1
Owner'sManual
ManualDel Propietario
Vacuum Cleaner
Aspiradora
Model, Modelo
116,24614
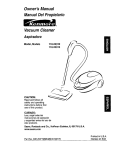
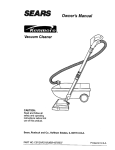
CAUTION:
Read and follow all
safety and operating
instructions before first
use of this product.
CUIDADO:
Lea y siga todas las
instrucciones de operaci6n
y seguridad antes del uso de
este producto.
Sears, Roebuck and Co., Hoffman Estates, IL 60179 U.S.A.
www.sears.com
Part No. CI211ZCN R_(_UQI3-KC_IZCNRZI3U_I
Printed in U.S.A.
lmpreso en EUA
Before Using Your New Vacuum .......
2
Kenmora Vacuum Cleaner Warranty ... 2
Important Safety Instructions .........
3
Parts and Features .................
4-5
Assembly Instructions
.............
Power-Mata Jr." Storage ..............
Use ................................
How to Start ........................
VacuumingTips .....................
Suggested Pile Height Settings ........
Attachments.......................
AttachmentUse Chart ...............
PerformanceFeatures .............
HowYour Vacuum Works ............
6-7
7
8
8
9
10
10
11
11-12
13
Please read this guide. It will help you assemble
the safest and most effective way.
Canister Care ......................
13
Bag Changing .....................
Cleaning Exteriorand Attachments .....
Motor Safety Filter Changing ..........
Exhaust Filter Changing ..............
13
14
14
15
Power-Mata • Care ..................
15
Belt Changingand Agitator Cleaning.. 16-17
LightBulb Changing .................
18
AgitatorServicing ...................
18
Troubleshooting
....................
Requesting Assistance
Or Service
..................
19
Back Cover
and operate your new Kenmore vacuum in
For more information about vacuum cleaner care and operation, call your nearest Sears store.
You will need the complete model and serial numbers when requesting information. Your vacuum's model and serial numbers are located on the Model and Serial Number Plate.
Use the space below to record the model number and serial number of your new Kenmore
vacuum.
Model No.
Serial No.
Date of Purchase
Keep this book and your sales check (receipt) in a safe place for future reference.
LIMITED ONE YEAR WARRANTY
ON KENMORE
VACUUM CLEANER
This warranty is for one year from the date of purchase, and includes only private household
vacuum cleaner use. During the warranty year, when this vacuum cleaner is operated and
maintained according to the owner's manual instructions, Sears will repair any defects in
material or workmanship free of charge.
This warranty excludes vacuum bags, belts, light bulbs, and filters, which are expendable
and become worn during normal use.
parts
For warranty service, return this vacuum cleaner to the nearest Sears Service Center in
the United States.
This warranty applies only while this product is in use in the United States. This warranty gives
you specific legal rights, and you may also have other rights which vary from state to state.
Sears, Roebuck and Co., D/817 WA, Hoffman Estates, IL 60179
Yn_Ur safety is important to us. To reduce the risk of fire, electrical shock,
uryto persons or damage when using your vacuum cleaner, follow basic
safely precautions
including the following:
Read all intstructionsin this manual before
assembling or using your vacuum cleaner.
Turn off all controls before unplugging.
Use extra care when cleaning on stairs. Do
not put on chairs, tables, etc. Keep on
floor.
Use your cleaner only as described in this
manual. Use only with Sears recommended
attachments.
Do not use cleaner to pick up flammable or
combustible liquids (gasoline, cleaning
fluids, perfumes, etc.), or use in areas
where they may be present. The fumes
from these substances can create a fire
hazard or explosion.
Disconnect electdcal supply before
servicing or cleaning out brush area.
Failure to do so could result in electrical
shock or brush suddenly starting,
Do not leave cleaner when plugged in.
Unplug from outlet when not in use and
before servicing,
To reduce the risk of electrical shock - Do
not use outdoors or on wet surfaces.
Do not pick up anything that is burning or
smoking, such as cigarettes, matches, or
hot ashes.
Do not use cleaner without dust bag and/or
filters in place.
Do not allow to be used as a toy. Close
attention is necessary when used by or
near children.
Always change the dust bag after
vacuuming carpet cleaners or freshener,
powders and fine dust. These products clog
the bag, reduce airflow and can cause the
bag to burst. Failure to change bag could
cause permanent damage to the cleaner.
Do not use with damaged cord or plug. If
cleaner is not working as it should, has
been dropped, damaged, left outdoors, or
dropped into water, return it to a Sears
Service Centre.
Do not use the cleaner to pick up sharp
hard objects, small toys, pins, paper clips,
etc. They may damage the cleaner or dust
bag.
Do not pull or carry by cord, use cord as a
handle, close door on cord, or pull cord
around sharp edges or comers. Do not run
cleaner over cord. Keep cord away from
heated surfaces.
Do not operate cleaner without the exhaust
filter or exhaust filter door in place (If
applicable).
Do not unplug by pulling on cord. To
unplug, grasp the plug, not the cord.
The hose contains electrical wires. Do not
use when damaged, cut, or punctured.
Replace if cut or worn. Do not pick up
sharp objects.
Do not handle plug or cleaner with wet
hands.
Do not put any objects into openings.
Always turn off and unplug the cleaner
before connecting or disconnecting either
hose, Handi-Mate Jr.® (if applicable), or
nozzle.
Do not use with any opening blocked; keep
free of dust, lint, hair and anything that may
reduce air flow.
Hold plug when rewinding onto cord reel.
Do not allow plug to whip when rewinding.
Keep hair, loose clothing, fingers, and all
parts of body away from openings and
moving parts.
SAVE THESE
You are responsible for making sure that
your vacuum cleaner is not used by anyone
unable to operate it properly.
INSTRUCTIONS
Proper assembly and safe use of your vacuum cleaner are,your responsibilit es
Your cleaner is intended for household
use. Read this Owner s Manual carefully for
important use and safety information. This guide contains safety statements under
warning and caution symbols.
Please pay special attention to these boxes and
follow any instructions given. WARNINGs[atements
alert you to such dangers as
fire, electrical shock burns and personal injury. CAUTION statements a erfyou to
such dangers as persona njury and/or propertydamage.
3
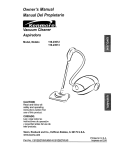
Itis importantto know your vacuum cleaner's parts and features to ensure its proper and safe
use. Review these before usingyour cleaner.
Item
Part No.
In U.S.
Part No.
In Canada
Headlight Bulb
20-5240
596181
Belt
20-5218
20-5218C
Power-Mate®
Handle
Quick
Release
Button
Telescoping
Wand
_---Wand
Length
Adjust
Button
Range
Belt
Wand Quick
Release Pedal
(Not Shown)
Pile
Height
Protector
ResetBu_on
Pedal
Handle
Power-Mate"
Model/Serial
(On Bottom)
Number
s Cleaner
(Not Shown)
HOSE
ATTACHMENTS
3-Way On/Off Switch
Off/Floor/Carpet
Crevice
_-q_--
TOOI "_"
Floor
_]_7
Brush _
_
H_,
andle
J
L
Power-Mate
Jr.°
It.................
Combination
_E _
Brush_
:
__)
I .................
<-'-
Dusting
Brush
d
H
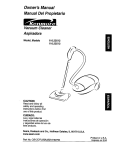
CANISTER
Item
Part No.
In U.S.
Part No.
In Canada
Dust Bag
20-50557
20-50557C
Exhaust Filter
20-86889
20-86889C
Motor Safety Filter
20-86883
20-86883C
Power.Mate Jr."
Storage cover
Cord
Rewind
Exhaust Filter Cover
Button _.
Tool Storage Cover
(Attachment Storage inside)
Cord
Canister
Hood
Bag Holder
Dust Bag
5
Motor Safety Filter
(Behind Dust Bag)
Electrical
Shock Hazard
DO NOT plug into electrical supply
until assembly Is complete. Failure
to do so could result in electrical
Handle
shock or injury.
Before assemblingvacuum, check the
PACKING LIST on the cover of the separate
Repair Parts List.Use this listto verifythat
you have received all the componentsof
your new Kenmorevacuum.
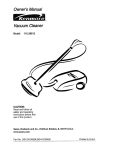
Handle
Quick
Release
Button
WAND -TELESCOPING
6,
="=.-
Wand
Length
Adjust
Button
Hand
Above
This
Tab
_lr
The swivel,
located on the
The wand length
is adjustable
and requires no
assembly. To
Telescoping
Wand
adjust, simply
push down on
the wand adjust
button and slide
the upper wand
-- Wand Length
Adjust Button
to the desired
height.
!
Power-Mate
®,
allows you to
turn the handle
to the left side to
reach farther
under low furniture.
: _--_
Wand
Button
When adjusting the wand length you may
have to hold the Power-Mate® with your hand
or foot.
Wand Quick
POWER-MATE ®
Insert wand into Power-Mate® until the wand
button snaps into place.
lease Pedal
6
CANISTER
1. Open the canister hood.
2. Check to see that the dust bag is properly installed. See BAG CHANGING for
instructions.
3. Check to see that the motor safety filter is
properly installed. See MOTOR SAFETY
FILTER CLEANING for instructions.
HOOD AND TOOL
STORAGE COVER
HOSE
1. Line up the hose
latch tab and notch
in canister hood
and insert hose
into canister until it
snaps in place.
To remove: Lift
hose latch tab
Notch
upward and pull up
on hose.
Pl
2. Insert han- H
die into wand
until lock but-
it is normal for the canister hood and tool
storage cover to come off when opened further than needed. Line up the hinge slots,
insert the hinges into the slots, and close
the hood and tool storage cover to reinstall.
Handl
ton snaps in
place. Be
sure hose is
not twisted.
I
Lock
CAUTION
Never open canister hood with the
tool storage cover open. This will
help to prevent damage from
occurring to the canister hood
and/or tool storage cover,
-Handle
Quick
Release_
To remove:
Press handle
quick release
buttonand
pull up on
I
handle.
To store: Disconnect hose from wands and
canister to prevent stress on hose during
storage. Store hose in a loosely coiled
position so the hose covering is not
stressed.
This canister is equipped with an on-board
storage area for a Power-MateJr. = attachment.
To Install:
Open the Power-Mate Jr.® storage cover.
Insert the Power-Mate Jr.", press down into
place, and close the lid securely.
To Remove:
Open the storage cover. Remove PowerMate Jr.® from the storage area and use as
needed (see AI-IACHMENTS
and ATTACHMENT USE).
Power-Mate
Storage
Jr. _
Cover
HOW TO START
Indicator
WARNING
Personal Injury and Product Damagi
Hazard
Release
Pedal -_
• DO NOT plug in if switch is in ON
position. Personal injury or
damage could result.
,
Pile Height
Pedal
• The cord moves rapidly when
rewinding. Keep children away
and provide a clear path when
rewinding the cord to prevent
personal injury.
3. Lower wand from uprightpositionby
pressing on the handle release pedal.
• DO NOT use outlets above
CAUTION
counters. Damage from cord to
items in surrounding area
could occur.
Cord
1. Pull cord out
_eu_nd ._
_
of canister to
_
DO NOT leave the Power-Mate •
Damage to carpet may occur.
The cord will
not rewind until
the cord rewind
button
esired islength.
4. Select a pile height setting by pressing
the small pedal on the rear of the PowerMate". The pile height setting shows on the
indicator. See SUGGESTED PILE HEIGHT
SEI-i'INGS.
pushed.
Attention:
Refer to your carpet manufacturers cleaning recommendations. Some
more delicate carpets may require that they
be vacuumed with the Power-Mate • agitator
turned off to prevent carpet damage.
NOTE: To reduce the risk of electric shock,
this vacuum cleaner has a polarized plug;
one blade is wider than the other. This plug
will fit in a polarized outlet only one way. If
the plug does not fit fully in the outlet,
reverse the plug. If it still does not fit, contact a qualified electrician to install the proper outlet. Do not change the plug in any
way.
_OFF
FLOOm
&RPET
5. Select a switch
position on the
handle.
2. Plug the polarized power cord into a 120
Volt outlet located near the floor.
OFF
To rewind: Unplug
the cleaner. Hold
the plug while
rewinding to prevent
damage or injury
from the moving
cord. Push cord
rewind button.
FLOOR - turns on the canister motor only.
CARPET - turns on both the canister and
the Power-Mate" motors.
NOTE - When this switch is in the FLOOR
position, the headlight DOES NOT function
since no electricity flows to the PowerMate e.
8
Suggested
sweeping
pattern.
Suction
ContrOl
For best cleaning action, the Power-Mate"
should be pushed straight away from you
and pulled straight back. At the end of each
pull stroke, the direction of the Power-Mate ®
should be changed to point into the next
section to be cleaned. This pattern should
be continued across the carpet with slow,
gliding motions.
Carpeted stairs
need to be
vacuumed
regularly.For
best cleaning
results, fully
close the suction
control.
WARNING
"_
NOTE: Fast,
jerky strokes do
not provide
complete cleaning.
Personal Injury Hazard
Use care if canister is placed on
stairs. If it falls, personal injury
or property damage could result.
!
The hose swivel
allows the hose to
_,._
turn canister.
without moving
the
This is
_I_I_
helpful for cleaning in
small areas. Check
_
_,_r
H
CAUTION
Product Damage Hazard
Do not pull on the hose to move the
canister from one stair to the next.
_,"
=When finished cleaning in one area
use the handle grip on the canister to
move the vacuum to a new location
for further cleaning.
hose for twisting
before pulling canister.
The stair grip located
on the caster will aid
in preventing the
canister from
Product Damage Hazard
Use care if the Power-Mate ®and
wand is left in the upright position as
it may tip over easily. Property
damage can occur if tipped.
slipping when used
on stairs (see
PERFORMANCE
FEATURES).
NOTE: Be sure the canister is resting
securely on the stairs and the caster is in a
locked position before using.
Personal Injury and Product Damage
Hazard
For best cleaning results, keep the airflow
passage open. Check each assembly area
in HOW YOUR VACUUM WORKS
• DO NOT run over power cord with
Power-Mate °. Personal injury or
damage could result.
occasionally for clogs. Unplug from outlet
before checking.
• DO NOT pull plug from wall by
the power cord. If there is damage
to the cord or plug, personal injury
or property damage could result.
9
w
For best deep down cleaning, use the XLO
setting. However, you may need to raise the
height to make some jobs easier, such as
scatter rugs and some deep pile carpets,
and to prevent the vacuum cleaner from
shutting off. Suggested settings are:
HI - Shag, deep pile, or scatter rugs.
MED - Medium to deep pile.
LO - Low to medium pile.
XLO - Most carpets and bare floors.
CAUTION
To remove,
press latch
and liftout.
Latch
ATTACHMENTS ON HANDLE
NOTE: If the
Power-Mate" is
attached, turn
cleaner off
before removing handle
from wand.
ATTACHMENTS ON WANDS
Lock
Handle
Quick
1. Press handle quick
release button
and pull up on
handle.
1.To
remove
wands from
PowerMate ®, lock
wand in
straight-up
position.
t
m
I
Upper
Wend
2. Press wand quick
Quick
release pedal with foot
Release and pull the wand
2. Slide attachments
firmly on handle as
needed. See ATI-ACHMENT USE CHART.
NOTE:
To assemble
dusting brush,
insert the fabric
brush into the
dusting brush
nozzle and press
into place
P,_det
Dusting
Brush
3. Put attachmeats on
wands as
needed. See
ATTACHMENT
USE CHART
FabHc
Brush
10
straight up and out of
Power-Mate ®.
CLEANING AREA
Between
ATTACHMENT
Furn_ure* Cushions*
.Dusting
CombtnaUon oruan
brash
Fabric
brush
!
_
Floor brush
x
X
x
Stair=
Floors
Carpeted
Floors/Rugs
X
x
x
X**
_ _;_
Walls
X
€;_
Power'Mate=
Hand!-:.',.;:_Jr."
(SomeUodet=)'*'
Power-Mate Jr.•
(SomeMod,s)--
X
X
Crevice tool
Bare
Drapes°
x
x
x
x
X
X
*Always clean attachments beforeusingon fabrics. "* 3-way OnJOflswitchshouldbe in FLOOR position,
*** Handi-MateJr.2 and Power-MateJr."attachmentinstructionsare includedwiththe products.
NOTE: When separating wands, depress lock button complete y before pullinqwands apart. If
wand lock button is difficult to depress, push the two wands more tightly together to line up
the lock button with the hole. Depress lock button and then pull wands apart.
EDGE CLEANER
SUCTION CONTROL
Active brush edge
cleaners are on both
sides of the PowerMate`=. Guide either
side of the Power-
The suction
control allows
you to change
the vacuum
suction for
different fabrics
Mate" along baseboards or next to
Suction
Suction
and carpet
weights. Opening the control decreases
suction for draperies and lightweight rugs,
while closing the control increases suction
for upholsteries and carpets.
furniture to help
remove dirt trapped at
carpet edges.
OVERLOAD PROTECTOR
The Power-Mate ° has
Overload Protector
built-in protection
against motor and
belt damage should
the agitator jam. If the
agitator slows down
or stops, the overload
protector shuts off the
Power-Mate ®. The
canister motor will continue to run.
Personal Injury Hazard
Always unplug the vacuum cleaner
before cleaning the agitator area as
brush may suddenly restart. Failure
to do so can result in personal
injury.
To correct problem: Turn off vacuum,
remove obstruction, then press reset button.
To reset: Press the overload protector
button. A ball point pen may be required.
11
ELECTRONIC BAG/HOSE
CHECK INDICATOR
POWER-MATE e STORAGE
The lower wand
has a "U" shaped
tlange in the area
where the power
cord attaches. The
base has a"U"
Ele_onlc
Bag/Hose
Check Indicator
4,
_!"
shaped slot near
the front.
The flange allows
the wands and Power-Mate®to be stored
The light comes
on whenever
the airflow
becomes
blocked, dust
bag needs
changing or
canister safety
filter needs
cleaning.
NOTE: The light may come on when using
certain attachments, due to reduced airflow
through attachment.
with the canister to conserve storage space.
The canister must be stored on end for this
feature to be used.
To attach the Power-Mate ®, it must be in the
flat position as shown in the illustration. Use
the handle release pedal to place it in this
position.
Refer to TROUBLESHOOTING.
STAIR GRIP
During normal operation while the vacuum is
in the horizontal position, the caster wheel
rotates freely 360 ° .
The wand will slip out of the slot as it is lifted
up for use and will slide into the slot as it is
lowered for storage.
The Stair Grip
feature allows
the caster
wheel to lock in
THERMALPROTECTOR
This vacuum has a thermal protector which
automatically trips to protect the vacuum
from overheating. The thermal protector
turns the motor off automatically to allow the
motor to cool in order to prevent possible
damage to the vacuum.
position when
the unit is
rotated 25 °
from horizontal
into a vertical
position in
order for the
vacuum to rest on stairs.
To reset: Turn off and unplug the vacuum
from the outlet to allow the vacuum to cool
Check for and remove any clogs. Also
check and replace any clogged filters.
Wait approximately 50 minutes and plug
the vacuum in and turn back on to see if
the thermal protector has reset. In some
cases, the unit may suddenly restart. DO
NOT leave unattended.
12
The vacuum cleaner creates suction that
picks up dirt. Rapidly movingair carries the
/'/"_'_
dirt to the dust bag throughthe airflowpas/)
sages. The dust bag lets the air pass
_/_
through, while it traps the dirt.
J/"f
For best cleaning results, keep the air- /_/
flow passage open. Check the starred _,,_/"
areas occasionallyfor clogs. Unplug L#Y
•
/
/_
Ii
Motor
Safety
Filter
from outlet before ch_
Exhaust
_,
BAG CHANGING
7. The red bag mount will flip forward after
removing bag. This will prevent the lid from
closing until a new bag is installed.
For best cleaning results, the dust bag
should be changed often. The electronic
bag/hose check indicator will come on when
the bag needs to be changed or the airflow
is blocked.
Note:
DO NOT bend or crease the middle
of the cardboard when installing the bag
into the bag mount slots.
8. Rotate red bag
mount down and
NOTE: See PARTS AND FEATURES for
Bag Number.
install bag into slots
per instructions
pushing down until
the cardboard tab
locks into position
and the holes align.
1. Unplugcord
from wall outlet.
2. Remove hose
from canister.
3. Pull hood
Tuck the bag
securely into the bag cavity so that none of it
is able to be pinched by the hood.
release out and up,
then lift canister
hood.
9. Close and latch canister hood.
4. Disengage
cardboard tab from
10. Reinstall hose.
red bag mount by
pulling away and
lifting up.
11. Plug cord into wall outlet.
5. Pull bag out of
the red bag mount.
NEVER REUSE A DUST BAG.Very
fine materials, such as carpet
freshener, face powder, fine dust,
plaster, soot, new carpet lint, etc. can
clog the bag and cause it to burst
before it is full and may cause
damage to vacuum motor. Change
bag more often when vacuuming
these materials.
6. Check the
motor safety
filter and
replace, if
necessary.
Mount
13
1. Unplug cord from wall outlet.DO NOT
drip water on cleaner.
2. Clean exterior using a clean, soft cloth
that has been dipped in a solution of mild
liquid detergent and water, then wrung dry.
Wipe dry after cleaning.
Do not use attachments if they
are wet. Attachments used in
dirty areas, such as under a
refrigerator,
should not be used
on other surfaces until they are
washed. They could leave marks.
3. To reduce static electricity and dust buildup, wipe outer surface of cleaner and
attachments.
Check motorsafety filter occasionallyand
change when dirty.
1. Lift the rubber
retainer and pull
out motor safety
filter as shown.
Electrical Shock Hazard
Unplug power cord from electrical
outlet. Do not operate the cleaner
without the motor safety filter. Be
sure the filter is dry and properly
installed to prevent motor failure
and/or electrical shock.
Rubber
Retainer
//#
2. Replace the filter, white side out,
facing the dust bag,
by sliding it back
into place under
the ribs in the bag
cavity. Tuck filter in
so that it fits com-
Remove the bag as outlined in the BAG
CHANGING section.
MOTOR SAFETY FILTER
ELECTROSTATIC
pletely under the
rubber retainer.
This white filter must be replaced when
dirty. It should be replaced regularly
depending on use conditions. The filter
CANNOT be washed as it will lose its
dust trapping ability.
3. Replace the bag as outlined in the BAG
CHANGING section.
NOTE: See PARTS AND FEATURES for
motor safety filter number.
14
WARNING
Filter
Do not operate with a clogged
2. Pullthe exhaust
tilter up and out
from the rear of
the vacuum.
3. Replace the
exhaust filter
EXHAUST FILTER
HEPA
cartridge.
Place the new
filter into the
vacuum with
the foam seal
The exhaust filter cartridgemust be
replacedwhen dirty. Replace the filter when
the entire surface area is covered evenly.
The filter CANNOT be washed as it will
lose its dust trapping ability.
facing
towards the
vacuum.
NOTE: See PARTS AND FEATURES for
exhaust filter number.
Filter
i
4. Replace the
exhaust filter
1. Pull out and
up on the
exhaust filter
cover to remove
from the vacu-
cover by placing
the two tabs on
the filter cover
into the slots on
the vacuum and
um and lay
aside.
Tabs
15
rotate into place
until it snaps
closed.
Alwaysfollow all safety precautionswhen
cleaning and servicingthe Power-Matee.
Electrical Shock Or Personal Injury
Hazard
Disconnect electrical supply before
servicing or cleaning the uniL
Failure to do so could result in electrical shock or personal Injury from
cleaner suddenly starting.
TO REMOVE BELT
4. TO remove cover,
grasp the sides and
pull out.
1. Turn PowerMate® upside
down.
2. Unscrew the
two (2) PowerMate® cover
screws.
3. Turn PowerMate ® right side
up. Press handle
release pedal
and lower the
swivel. Lift rear
_atches up.
5. Lilt agitator
assembly out
and remove
worn belt.
Side
Latch
Latches
End Cap
6. Check and clean end cap areas. See
AGITATOR ASSEMBLY for picture of
complete agitator assembly.
16
TO CLEAN AGITATOR:
TO REPLACE BELT
NOTE: In order to keep cleaning efficiency
high and to prevent damage to your vacuum, the aaitator must be cleaned every time
The agitator must also be cleaned according to the following schedule:
1. Install new
belt over
motor drive,
then over
brush
Vacuum Use
Clean Aoitator
sprocket.
HEAVY
every week
-
NOTE: See
PARTS AND
Agitator
FEATURES
for belt number.
(used daily)
MODERATE
-
Motor
Drive
every month
Sprocket
End Cap
(used 2-3 times/week)
LIGHT -
every 2 months
(used 1 time/week)
IMPORTANT
2. Place agitator/
assembly
back
into PowerMatee.
Disconnect cleaner from electrical outlet.
Check and remove hair, string and lint buildup frequently in the Power-Mate ® agitator
and end cap areas,
Remove any dirt or debris in the belt path
area or in the brush roller area.
Carefully remove any string or debris
located on the agitator, or end caps.
Cover
Agitator Assembly
Base
3. Line up
front of
cover and
base. Rest
cover on
front edge of
base as
shown.
4. Rotate cover
back. Press
Belt Pulley_
cover firmly until
side and rear
tabs snap into
place.
Brush
Unit
Make sure there
is no gap
Latch
between the cover and base.
Rear
Latches
5. Turn Power-Mate®upside down and
replace two (2) cover screws.
17
I I
1. Remove Power-Mate ® cover as shown in
BELT CHANGING AND AGITATOR CLEANING section.
--_Pushln
And Turn I
I
3. Push in and turn
bulbclockwise,to
replace. Bulb must
not be higherthan
15 Watts(130 Volts).
2. Push in and turn
bulb counterclock-
I
wise, then pull out
to remove.
4. Reinstall Power-Mate ® cover as shown in
BELT CHANGING AND AGITATOR CLEANING section.
NOTE: See PARTS AND FEATURES for
bulb number.
TO REPLACE AGITATOR
ASSEMBLY
1. Remove Power-Mate ®cover, belt and
agitator assembly. See "To Remove Belt"
in BELT CHANGING AND AGITATOR
CLEANING.
Electrical Shock Or Personal Injury
Hazard
Disconnect electrical supply before
servicing or cleaning the unit.
Failure to do so could result in elec-
2. Replace Agitator
trical shock or personal injury from
cleaner suddenly starting.
3. Replace belt, agitator assembly, PowerMate"cover, light bulb and light cover.
See "To replace belt" in BELT CHANGING
AND AGITATOR CLEANING.
TO CHECK AGITATOR
ASSEMBLY
When brushes
_---" ____
_}r[--__
Base Support
Bars
level of the base
support bars,
replace the
are worn to the
agitator
assembly.
18
Review this table to find do-it-yourself solutions for minor performance problems. Any service needed, other than those described in this owner's manual, should be performed by
an authorized Sears Service Center.
WARNING
Electrical
Shock Hazard
Disconnect electrical supply before servicing or cleaning the unit.
Failure to do so could result in electrical shock or personal injury.
Cleanerwon't storL
Poorjob of dirt
pick-up.
Cleanerstorte but
cuteoff.
I,
Unplugged
ut walloubet.
Trippedcimuitbreakar/bkw/n
fuse
at householdservisepaneL
3. Loosehoseelectricalconsections.
1.
2.
3,
4.
S.
6.
7.
g.
9,
10.
Fu_or cleggeddustbeg.
Cloggedaidlowpassages.
Dirtyfiiters.
Wrongpileheightsetting.
Suctioncontrolisopen.
HokzIn hose.
WornPower-Mate
° agitator.
Wornor brokenbelL
Dirtyagitatoror endcape.
Canletorhoodspan,
3. Recormecthose ends,(page 7).
I.
2.
3.
4.
S.
6.
7.
fi & 9.
Changebag,(page13).
Clearairflowpassages,(page13).
Changefilters,(page14-15).
Adjustsetting,(page10).
Adjustcontrol,(page11).
Replecehose,
Changeagitator,(page18).
See BELTCHANGINGAND AGITATOR
CLEANING,(pagest6-t7).
10. Closeandletchhood.
1, Hoseor hoodelectricalconnections.
2. Tr_opad
overloadprotectorin
Power-Mate
=,
3. TrippedthermaFprotactor
in canister.
Power-lVleto
= will not
run when attached,
1. Plugin firmly,pLP_h
OhPOFFswitchto ON.
2. Resetcircuitbreakero_replacefuse,
1. Power-Mate
e connections
unplugged.
2. WornorbrokenbelL
3, Dirtyugitatoror eed cap_
4. Trippedovedoadprotoctorin
Power-Mats
e
5, Switchnot i_CARPETposition.
Fullor cloggeddustbug.
Dirtyfilters.
Blockedairflowpassage.
Certainaltachmenttoohs.
1. Checkcozlnec_m,
recmnect
h_e eed_(page7).
2. Removeany itemsthatmaybe caught
orjammed,thenreseL If cleanerstarts
andstopsagain,dean agitatorandendcaps,
thenreset,(pages11.16-17).
3. Resetlhermalprotoclor,
(page12).
1. Plugin firmly.(page6).
2 & 3. See BELTCHANGINGANDAGITATOR
CLEANING,(pages16-17).
4. Chackagitotoraroalorexcessivelint
build-upor jamming.Cleanagitatorand
endcaps, thenreset,(pages11.16-17).
5. Moveswitchto CARPETposition,(page8).
ElectronicSeg/Hose
Check Indicatoractivates.
1.
2.
3.
4.
1.
2.
3,
4.
Cleanerpicks Upmoveable
rugs -or- Power-Mate=
pushestoo herd.
1. Wrongpile heightsetting.
2. Suctiontoostroug.
1. Adjustsetting,(page10).
2. Opensuctioncontrol,(page11).
Light won't work.
1. Burnedout lightbulb.
1. Changelight bulb,(page17).
Cordwon't rewind.
1. Dirtypowercord,
2. Cordjammed.
1. Cleanthe powercord.
2. Pulloutcordandrewind.
Cleanerleavesmarkson carpet
1. Wrongvacuumingpattern.
1, SeeVACUUMINGTIPS, (page9).
19
Changebag.(page13).
Changefilters,(page14-15).
Clearblockagefromairflowpassage,(page13).
Thisisnormal,Lightshouldgooff
whentoolisremoved
20
Antes de usar su asplmdora nueva ..... I
Gamntia de la asplradom de Kenmore .. I
Instrucclones importantes de
seguridad ............................
Piezas y camcteristicas
Instruccionee
de
ensamblamiento
...............
...............
2
3-4
5-6
Almacenaje del Power-Mate Jr.® .......
6
Uso ..............................
7
Pare coroenzar..........................
7
Sugerenciaspara aspirer ...............
8
Sugereociassobreel ajustede nivelde
pelode la alforobra ....................
9
Accesorios...........................
9
Usode los accesorios .................
10
Caracterfsticasde rendiroiento........
10-11
Funclonamlento de su asplradora ....
..12
..12
Cuidado del recep_culo
............
Cambiode la bolsa .................
..12
Liropiezadel exteriory de los accesorlos. ..13
Cambiodel filtrode segurideddel motor . ..13
..14
Cambiodel fiflrode escape ...........
Cuidado de la Power.Mate" ..........
..14
Carnblode la correay limpieza
del agitader .......................
Carnbiode fa bombilla.................
Cuidadodel agitador ..................
15-16
16
17
Reconocimiento de problemas
Informacl6n de
assistancia o serviclo
.....
.........
18
PosteriorCubierta
Por favorlea esta guiaque le ayudarea assemblary opersrsu aspiradorenuevade Kenmoreen una roanere
mas seguray effectiva.
Pare mas inforroaci6nacerca del cuidadoy operaci6nde esta aspirador,Ilamea su tJondaSears mascorcana.
Cuandoprequntepor informaci6nustednecisitardel nOroerecompletode serie y roodelo de la aspiradoraque
est_ Iocadoen la placade losn_merosde modeloy serio.
Use el espaciode abajopara registrarel n0roemde modelo y seriopara su nuevaaspiradorade Kenroore.
N6mero de Modelo
N0rnerode Serie
Fecha de Coropra
Matengaeste libroy su reciboen u lugarseguropara referenciasfuturas.
GARANTiA LIMITADADE UN ANO DE LA ASPIRADORA KENMORE
Estagarantia es por un aho desde la fecha de coropra,e incluye solamente el usode la aspiradora en hogares
privados.Duranteel aSode garantla,cuandola aspiradora es operaday mantenidade acuerdo al roanual de
instruccionos
doldueSo,Searsreparar&cualquierdefoctoan roatorialos o fabricaci6n librode cargo.
Estagarantiaexcluyelasbolsasde colocci6n,correas,lamparillas,y filtros, lascualesson partesgastablesque
se deteriorancon el usonormal.
Para el servicio de garanfia, retorne esta aspiradora al Centro de Servicio Sears m_s cercano en los
Estados Unidos.
Esta garantfase aplica solamente mientras este producto esta en usoen losEstados Unidos.Esta garantia le
da a usled derechos legales especificos,y usted puede tener tambi_n otros derechoslos cuales varian de
estado a estado.
Sears, Roebuck and Co., 13/817WA, Hoffman Estates,IL 60179
Susegurldadesmuy.Importanteparanosotros.Parsreduclrel rlesgodeIncendlo_
cnoquee,6ctrlcolesi6n corporal o daflos el utlllzar su asplradora, actGe de acueroo
con precauc ones b_s cas oe segur dad, entre • as:
Lea las instrucciones en este manual antes de
armar o user su aspiradora.
Apague todoslos controlesantes de
desenchufar.
Use su aspiradore _nicamente en la forma
descrita en este manual. Use 0nicamente con
accesorios recomendados per Sears.
Tenga cuidado especial al utilizar la
aspiradora en escalones. No la coloque sobre
sillas, mesas, etc. Mantdngala en el piso.
Desconecte el cord6n el6ctrico antes de
componer o limpiar el Area del cepillo. De Io
contrerio, el cepillo podria arrancar de form
imprevista o podria producirse un choque
el6ctdco.
No use la aspiradore para aspirer liquidos
inflamables o combustibles (gasolina, liquidos
para limpieza, perfumes, etc.) ni la use en
lugares donde dstos podrian estar presentes.
Los vapores de estas sustancias pueden crear
un peligro de insendio o explosibn.
No abandone la aspiradora cuando estd
conectada. Descon6ctela cuando no la estd
usendo y antes de dade servicio.
No levante ninguna cosa que se est_
quemando o emitiendo humo, como
cigarrillos, cerillos o cenizas calientes.
Para reducir el riesgo de choque eldctrico, no
use su aspiradora al aire libre ni sobre
superficies rnojadas.
No use la aspiradore sin tener instalada la
bolsa para polvo y/o los filtros.
No permita que sea utilizada como juguete.
Se requiere tener mayor cuidado cuando sea
utilizada en la proximidad de nil_os o por
ni_os,
Cambie siempre la bolsa para polvo despu_s
de aspirer limpiadores de alfombras o
desodorantes, talcos y polvos finos. Estos
productos atascan la balsa, reducen el flujo de
aire y pueden causar que dsta se rompa. Si
no carnbia la bolsa podrla ocasionar daSo
permanente a la aspiradora.
No use la aspiradora si el cord6n o el enchufe
esta daSado. Si la aspiradora no est_
funcionando adecuadamente o si se ha
dejado caer, estd da6ada, se ha dejado
expuesta a la intemperie o se ha dejado caer
en agua, devudlvala a un Centre de servicio
de Sears.
No use ta aspiradora para levantar objetos
agudos, juguetes pequeSos, alfileres,
sujetapapeles, etc. Podrian daSar la
aspiradora o la bolsa para polvo.
No hale ni transporte la aspiradore por el
cordbn; no use el cordbn como mango; no
cierre puertas sobre el cord6n; no hale el
cordbn sobre rebordes agudos ni esquinas.
No pase la aspiradora sobre el cord6n.
Mantenga el cordbn alejado de superficies
calientes.
No opere sin el filtro de escape ni la cubierta
del filtro de escape instalados.
No desconecte la aspiradora tirando del
cord6n el6ctrico. Para desconectarla, hale el
enchufe, no el cordbn.
Siempre apagu_ y desconecte la aspiradora
antes de conectar o desconectar la manguera,
Handi-Mate Jr.® (si aplicable), o la boquilla.
No toque la aspiradora ni el enchufe con las
manos mojadas.
Sujete el enchufe con la mano al enrollar el
cordbn eldctrico. Para desconectarla, hale en
enchufe, no el cord6n.
La manguera contiene cables electricos. No
la use cuando est_ daSada, cortada, o
perforada. Reemplace siesta cortada o
desgastada. No levante objetos afilados.
No coloque objetos en las aberturas.
Usted es responsable de asegurar que su
aspiradora no sea utilizada por ninguna
persona que no pueda manejarla
correctamente.
No atilice la aspiradora si alguna abertura
est_ bloqueada; mant6ngala libre de polvo,
GUARDE ESTAS INSTRUCCIONES
E] armado y uso seguro de su aspiradora
son su responsab
dad. Esta aspiradora
ha sido
diseSada exclusivamente
para uso domestico. La asp radora deberz_ almacenarse
en un lugar
seco yen
el interior. Lea este Manual del prop etario detenidamente
pues contiene
informaci6n
importante
sobre sequridad
y uso. Esta quia contiene in1'ormaci6n sobre
seguridad debaJo de simbolos de aavert enc a cuidado.
Pot favor ponga atencion especial a
estas instrucciones
dadas. Advertenc a Este nformaci6n le alertar& con el poligro de fuego,
choques electricos, quemadas yes ones
Cu dado: Este informaci6n le alertara a peligros
como lesiones y daSos de propiedad.
2
Esimportante
conocer
laspiezas
y caractedsticas
desuaspiradora
paraasegurar
suusoadecuado
yseguro.
Examfnelas
antesdeusarsuaspiradora.
Objeto
PlezaI_.
en EUA
PiezaNg.
en Canad=t
Bombillado farol
20-5240
596181
Correa
20-5218
20-5218C
flberaci6n
rdpldadel
mango
_
.t---- Bot6n de
Tubo
telesc6pico
Controlde
extensi6n
adjustable
del tubo
Power.Mate®
Rebord_
I_
Pedal de liberaci6n
rdpida
del tubo
N0=oro. ase.lo e,
_°drt_l°n;e°r/W°er_'_M_ e'
_
Correa
___
--
_
=" _!
_J
delmango
_._
f
L;:dicadorde
_Protectorcontra
_l
I, / /..*_'_v_
___!_
nivel
J de
.elo
de
,aa.om..a
__J_"_X
Pednailvde_;e_eClCol°n _r_/_
liberaci6n
D
_
_
_
restaurac#on"Reset"
Limpiadorde orinas
(Nosemuestra)
MANGUERA
ACCESORIOS
Interruptor de encendldo/
apagado de ires poslciones
(Apagado/Plso/Alfombra)
Herramienta
Cep.lo
___
_'_._
_raplsos-------_._
Cepillo pars
combinacl6n
p_7_Mt_.r._
_,
'
_
till|
r
--_
I
I
Cepillo
pars sacudir
"4--- Cepillo
_ra te_s
Dlspositlvo
giratorio de
la manguera
RECEPTACULO
Objeto
Pleza N,.
en EUA
Part N'.
en Canadd
Bolsa para polvo
20-50557
20-50557C
Filtro de escape
20-86889
20-86889C
FLItrode seguridad
del motor
20-86883
20-86883C
Cubierta de
almacenamiento
pars accesorlos
(Almacenamiento
pars accesorios
Bot6n de
cordon
Cubierta de slmacenamiento
para Power-Mate
Jr.*
_
/
el_ctrico
Cubierta del filtro de escape
(No es muestra)
eldctrico
Pestillo
de la tapa
de la bolsa
Bolsa pars polvo
4
Filtro de seguHdad
del motor (Detrds
de la bolsa pars polvo)
ADVERTENCIA
Pellgm de choque el_trlco
No conecte la asplradora hasta qua termlne
de armada. De Io contrarlo podrla causar
un choqueel6ctrico o lesi6n corporal.
Antesde armar la aspiradora,chequeela LISTA
DE EMBALAJEen la cubiertaseparadade la Usta
de Partespara Reparaci6n.Use esta listaparaverificar que ha recibidotodaslascomponentesde su
nuevaaspiradoraKenmore.
TUBO TELESC( PICO
Control de
exfensi6n
adjustable
del tubo
La parte giratoria,situadaen el
Power-Mate',le
permitemoverel
mangoa la
izquierdapara
pasar la aspiradoraa una
extensi6nm_,s
largadebajode
losmuebles
bajos.
La extensi6n
del tub, es
ajustabley no
Man_6ngas e
requeireel
montaje.Para
la man,
ajustar,empuarriba
je hacia abajo
esta
en el bot6ndel
lengOete
tub, y mueva
el tub, superior a la posici6n dedeada
del mango_
Bot6n
de#mango-_..
m
m
Bot6n de
Iiberacl6n
r_;plda
del mango
Tube
POWERMATE®
Control
de extensi6n
ajustable
del tube
Bot6n
del
tube
Cuando ajuste la Iongitud de la vara hay que tener
el Power-Mate°con la man, o el pie.
POWER-MATE®
Introduzca los tub,s en la Power-Mate" hasta que el
bot6n del tub, quede fijo en posici6n.
liberaci6n
r_pida del tub,
R
RECEPTACULO
MANNGUERA
1. Abra la tapadel receptdculo.
2. Examinela bolsapara polvoeste instaladocorrectamante.Consultolas instrucciones
de instalaci6nen
la CAMBIODE LA BOLSA.
3. Examineel filtm de seguridaddel motoreste instaladecorrectamante.Consultelas instrucciones
de
instalaci6nen LIMPIEZA DEL FILTRODE SEGURIDAD DEL MOTOR.
LA TAPAY LA CUBIERTA
Es normalque la tapadel mcept_culo se desprenda
al ser abiertamdsde Io necesado.Paracolocarnuevamentela tapa, alineelas ranurasde la bisagra,ins_rtelasy cierrela tapa.
!
1. Alinoela pestai_ade
sujec'_nde la manguem
la ranurade la cubierta del receptdculoe
introduzcala manguera
en el receptdculohasta
que quede fija en posici6n.
Para retlrar: Levanteel
)estJllo
de la manguera
y tirede la manguera.
sujecl6n
dela
manguera
Ra/lura
2. Introduzcael
mangoen el tubo
hasta que el bot6n
quede en posici6n.
Asegdrese de que la
manguerano estd
torclda.
CUIDADO
Nunca debe abrir la capucha del contenedor
estando la tapa ablerta. As| se evitar_ da_o=
a la capucha del contenedor y/o a la tape.
i
Bot6n
de
Botdn de
liberaci6n
r_pida del
m
Para retirar: Oprima
el bot6nde liberaci6n
rapidedel mango
paraliberarel mango
y tire del mangohacia
arriba.
Pare Guarder:Paraprevenirla precibnde la mangua
mientrasse guarda,desunala mangua del tubode la
aspiradora.Guardsla maguaen una posicibn
enmlladay flojamente de tal maneraque la tapade la
mangua no se estire.
Est._ aspiradora
esta equipada
con almacdn
a bordo para el accesorio POWER- MATE
JR.®.
Para instalar:
Abra la cubierta de almacenaje del PowerMate Jr. ®.Inserte el Power-Mate Jr.®, presi6nelo en su lugar hacia abajo, y cierre la
cubierta con seguridad.
Para quitar:
Abra la cubierta de almacenaje. Levante el
Power-Mate Jr. ®de su lugar utilicelo como
sea necesario (v_ase ACCESORIOS y
USO DE ACCESORIOS).
Almacenamiento
para Power-Mate
/
Jr.*
PARA COMENZAR
Indicedor de nlvel
de pelo de la alfombra
Pellgro do lesi6n personaly dafio al
producto
• NO enchufe la asplradora si el
interruptor est_ on la poslol6n ON.
Podrla causar lesi6n personal o dafio
al producto.
• El cord6n eldctricose rnueve
rdpldamentedurante el enrollamlento.
Mantenga alejado$ a los ni_oa y
asegure espaclo lime suficlente pare
evltar lesiones personaleaal enrollar
el cord6n.
liberacl6n
• NO use los enchufes Iocalizados sobre
los muebles. Los objetos cercanos
podrian resultar da5ados.
I.L1c,,o,
oo
Bo|6n
del cord6n
1.Tire del cordon
paresacarlodel
recept_culohasta
tear la longitud
deseada,El cord6n no se enroIlar._hastaque
oprimael bot6n
para enrollarlo.
NOTA:Pare reducirel riesgode chequeel6ctrico,
esta aspiradoracuentacon unaclavijapolarizada,
unode loscontactoses m_tsanchoqua el otto.La
clavijasSIopuedeintroducirse
de una maneraen el
enchufa.Si la clavijanocade bienenel enchufe,
invk_rtala.
Si at_nno cabe, Ilamea un electricista
para que instaleunenchufecorrect(].No alterela
clavijade ninguna manera.
Pedal de selecci6n
de nlvel de pelo
de la alfombra
3. Baje el tube desde la posici6nverticalpisande el
pedalde liberaci6n del mango.
NO dale la Power-Mate"funcionando en
poslcl6n vertical en un lugar durante ning_n
eepaclo de tlempo: ae puede daSar la
alfombra.
4. Seleccione una altura de pale de la allombra
usandoel pedalpequeSoubicadoen la parte posteriorde la Power-Mate'. El nivel de pelo la affombra
se muestra en el indicador.Consulle SUGERENClAS SOBRE EL AJUSTE DE NIVEL DE PELO DE
LA ALFOMBRA.
Atencidn: Refierasealas reeomendaciones
del fabficante para limpiar su alfombra.Algunas alfombras
m_,sdelicadas )uedenraquerirel usede la aspiradora con el a itador Power-Mate"desconectado
para prevenir Je la alfombrasea daSada.
o_F
FLOOR
_c#,Rpelr
5. Selecciona una
posici6n del interrupter en el mango.
2. Conecte el cord6n el6ctrico polarizadoen un
enchufade 120 voltios que se encuentre cerca del
piso.
Para enrollar: desconectela aspiradora. Sujeteel
enchufemientras
enrollae] cordon
para impedir daSoo
lesion corporalper el
movimiento del cord6n. Oprima el
control para botOnel
cord6n electrico con
la mane o con el pie.
R
OFF.
OFF
FLOOR - s61oenciende el me_ordel recept_.culo.
CARPET - enciende los motores del recept_,cu]oy
de la Power-Mate=,
NOTA- Cuando este controlestden la posJci6n
FLOOR, el farol no funciona porque no la electricidad no fluyeal Power-Mate'.
E-stllo
deIlmpleza
sugerldo,
Paraobtener
lamejoracci6n
delimpieza
sereco-
Controlde
mienda empujarla Power-Mate
sen direcci6ndirectamenteopuestaa ustady jalarla en Ifnea recta.AI
final de cada pasada de regreso,cambie la direcci6nde la Power-Mate
® hacia la siguientesecci6na
limpiar.ContinUeasia trav6sde toda la alfombrade
una manera lenta y deslizante.
NOTA:las pasadas rdpidasy jalonadas no Iogran
una limpiezacompleta.
Los e.=calone=alfombrsdos requierenlimpieza
peri6dica.Cierre porcornplatoel controlde aspira.
ci6n para Iograrlosmejo.
res resultadosde limpieza. Mantengael paso
de aire abiertopara
Iogrsr los mejorss resultados de limpiez.a.
ADVERTENClA
Pallgm de lesl6n personal
Tenga culdado sl coloca el recept_iculo
sobre escalones. Si se cae, podr|a causar
lesl6n personalo da_o a Is propledad.
El dispositivo
giratorio
de la manguera permite que dsta gire sin necesidadde moverel
recept_culo.Estoes
muy dtil para limpiaren
areaspequeSas.Aseg0resede que la manguerano est_ torcida
antesde jalar el mceptdculo.
Peligrode lesi6n personal y da_o al
producto
No jale de la manguera para mover la
aspiradora de un escal6n al
siguiente. Cuando termine de limpiar
una =trea use la manija en la
aspiradora para moverla a otto lugar
para conUnuar la limpieza.
SOSTI_N PARA LA
ESCALERA El sost_n
para la escalera esta
situadoen el cuerpo y
ayudara a evitar que la
aspiradorase deslice
cuando se esta
utilizadoen las
escaleras (v_ase CARACTERiSTICAS del
FUNCIONAMIENTO)
Peligro de lesi6n personal y dafio al
producto
Tenga cuidadosi el Power-Matee y la
manguera se dejan en posici6n vertical
pues peuden caerse f=ioilmente.Si ae
voltean peude haber da5o de propledad.
NOTA: Asegdrese que la aspiradora este
descansando con seguridad sobre las
escaleras y el echador estd en la
posici6n bloqueada antes de usarla.
Peligrode lesi6n personal y daSo al
producto
• No atropeneel cord6n eldctrico con la
Power-Mate°. Hay un peligro de
lesi6n corporal o unos da6os de
posesiones.
Examine de vez en cuando cada una de las areas
de uni6n en FUNCIONAMIENTODE SU
ASPIRADORApara asegurarse de que no esten
bloqueadas. Desconectela aspiradora antes de
revlsar,
• No tire del cordon el_ctrico de la pared
para desenchufario. Si hay danos en
el cord6n ek_ctricoo el enchufe, hay
un peligro de lesi6n corporal o unos
da_os de posesiones.
8
Useelajuste
XLO(bajo)paraobtener
lamejorlimpiezaa rondo.Porotra parte,quiz_ se requiemelevar el nivelparafacUitaralgunastareas, comopor
ejernplocuandose trata dotapetesy algunasalfombras de pelo largo,y para impedirque la aspiradora
se apague.Se sugierenlossiguientesajustes:
HI - Pelomuylargoy suelto,tapetes,alfombras
muyacojinadas.
MED - Pelomedlano a largo.
LO - Pelocortoa mediano.
XLO - La mayorfade lasalfombrasy pisos
descubiertos.
! 'I. 1 CUIDADO
Para quitar,
NO instale ni retire el mango nl los tubos
cuando la aspiredore est6 encendida.
Esto podrfa causar chlspas y da_lar los
contactos el6ctrlcos.
pestillo y
_
presionar el
_1_:_""
1. Optima el
bot6n de liberaci6nr_pida
del mango para
liberar el mango
y tire del mango
hacia arriba.
cierre--'_
Bot6n d
levantarse.
Pestillo
ACCESORIOS DEL MANGO
NOTA: Si tiene instaladala Power-Mate
=, apaguela
aspiradoraantesde quitarel mangode lostubos.
_
ACCESORIOS DELTUBO
1. Para retirarlos
tubosde la
POWER-MATE=,
col6quelosen la
posici6nvertical
de btoqueo.
t
Bot6n de
Ilberacl6n
rapide
Tubo
I
m
2. Desliceel accesoriodeseado con firmezasobreel
mango.Consultela USO DE
LOS ACCESORIOS
NOTA:
Para montar el
_==='=
-J',mw
cepillo para sacudir
_(,j_
inserte el cepillo para
telas dentro de la
boquilla del cepillo
para sacudir
presione en su lugar.
Cepfllo
telae
para
m
==
Cepillo
pare sacudir
__
3. Coloque el
accesorio deseado sobre el
tubo, Consulte
la USO DE LOS
ACCESORIOS,
Pedal de
liberaci6n
rdpida del
tubo
2. Piseel pedalde
liberaci6n rapida del
tubo y tire del tubo
haciaarriba para
desprendedode la
POWER-mATE
"e.
,
AREA A LIMPIAR
Entre
ACCESORIO
Meubbl*
Cepillo para =Cepillo
sacudlrpara D
comblnact6n Cepillo
)ara telas
Herramienta
para hendiduras
colin.*
COl'tim*
X
X
X
X
Pilos
Pisol
_llcublertoaalfombradold
Pamdel
Aifombm
E_$
X
X
X
Cepillo para pisos
X
X**
PowerJAate®
(Allunos
Handi-MateJr.•
modelo=)
"_'
(Algu.o=
Power.MateJr."
modelo=)'*" ,_
x
x
x
x
x
* Siempre
fimpie
losaccesodos
antesdeusarsobrebias, **Elinterruptor
de3 poslcioP,
esdebeestarenla posici_n
FLOOR(pisodescubierto).
**"LaHandi-Mate
Jr.*y laPower-Mate
Jr.*blcluyen
suspropias
i_strucciones
parausodeaccesofios.
NOTA: Cuando separe los tubos, optima completamente el bot6n de bloqueo antes de separaflos por completo. Si se le dificulta oprimir el bot6n, junte rods los tubos para alinear el bot6n con el orificio. Optima el bot6n y
despu6s separe los Tubos.
LIMPIADOR DE ORILLAS
CONTROL DE ASPIRACION
Elcontrolde
aspiraci6nle
permitecambiar la poten-
Activeloscepilloslimpiadoresde orillasa cada
ladode la Power-Mate
=.
Pase la Power-Mate
® junto
alas paredeso juntoa los
mueblespara ayudara eliminar la tierraacumulada
en las off,as de la alfombra.
cia de aspiraaspiraci6n
aspiracldn
ci6n de la as/
I
piradoradependiendodel
grosorde la tela o alfombra.La aspiraci6nse disminuye,para limpiarcortinasy tapetesligeros,abfiendo el control;paraaspirarmuebies y alfombras,el
controldebe cerrarsepara aumentarla aspiraci6n.
PROTECTOR CONTRA
SOBRECARGAS
La Power-Mate
®
Protectorcontra
cuentacon protec- sobrecargasBot6n de
ci6n incorporada
contrada_o del
motory la correa
en casode atascamientodel agitador.Si el agitador
funciona m;_s
despacioo para,
el protectorde sobrecargapara la Power-Male®.
El motor del recept_,culo
continuardfuncionando.
Peligrode lesiones personales
Desconectesiempre la aspiradora antes
de limpiar las _;reasde la agitador pues
dstos podrian arrancar de manera
Impreviata. El ho hacerlo, podria resultar en lesiones personales.
Para resolver el problema:Apague la aspiradera,
quiteel residuoy aprieteel bot6npara encenderde
nuevo.
Para restablecer:Optima el botondel protector
contrasobrecarga.
10
INDICADOR ELECTR( NICO
TAPAY ALMACENAMIENTO
PARA POWER-MATE®
Electronic
Bag/Hose
Chock Indicator
El tuboinferiortiene un
rebordean forrna de
=U"en la zona de fijaci6ndel cord6nel6ctrico. La base tiene una
ranuraen forma de "U"
cercade la parte frontal del recept_culo.
La ranuraperrnitealmacenarlostubosy la
Power-Mate
® conel
tubopara economizarel espaciorequeridopara su
almacenamiento.Parausar esta caractedsticaes
nocesarioalmacenar el receptdculoen formavertical.
La luzse enciendeen cualquiermomentoque se
bloqueeel flujode aim, cuandola bolsase nene o
cuandosea necesariocambiarel filtrode seguridad
del receptdculo.
El tubose sale de la ranuraal serlevantadopara
usadoy se deslizadentrode _sta al bajarlopara alrnacenarlo.
NOTA:Es posibleque la luz tambi6nse encienda
cuandoutiliceciertosaccesoriosdebidoa que el flujo de aire se reduceal pasarporel accesorio.
PARA LA BOLSA/MANGUERA
La Power-Mate
® debe estaren la posici6nliana
cornose ve en el diagrama. Use el mango del
pedalde liberaci6npara moverla a esta posici6n.
Consulte el solucionador de problemas.
SOSTI=N PARA LA ESCALERA
NOTA:Se puedeusarmenos espaciosi baja el
tubotelesc6picocomose rnuestraen la secci6n
MONTAJE.
Durante la operaci6nnormal de la aspiradora
mientras que estd en la posici6nhorizontal, las
ruedasdel cuerpo
giren libremente
360".
PROTECTOR TERMAL
Estaaspiradoratienounprotectortermalque se
ajusta automdticamente
paraprotegera la
aspiradoradel sobrecalentamiento.
El protector
termalapaga el motorautomdticarnente
para
permitirque el motorse enfrfea fin de evitar
posiblesdahosa laaspiradora.
La caracterfetica
del Sost_n para
la Escalera
permitsque las
ruedas del cuerpo se
trabenen posici6ncuando la unidad gira 25° de
una posici6nhorizontala verticalpara que la
aspiradoradescanse con seguridadsobrelas
escaleras.
Para restablecer: Apaguela aspiradora y desenchufeel cord6ndel tomacorrientepara permitir
que la aspiradorase enfr(e.Busque y saque lae
obstrucciones,ei as necesario. Examine tambidn
y reemplace cualquier flltro obetruido. Espere
aproximadamente50 minutos y enchufe la aspiradora y volt6ela para ver si el protectordel
motor so ha reajustado. En algunos oasos, la
unidad puede volver a arranoarst_bitamente,NO
LA DEJE desatendida.
11
Laaspiradora
creasuccibn
oaspiraci6n
quelevanta
latierra.
Latierraesimpulsada
atrav_sdelasvfas
deflujoairehastalabolsaporunardpida
corriente
de aire. La bolsapara polvopermiteel flujode aire,
peroatrapala tierra.
///
ParaIograrlos mejoresresultadosde limpieza,
,/_"
mantengeabiertaslasv[as de aire.Examineperi6-/_7
dicamentelas dreasindicadascon asteriscos ,/_y
para asegurarsede qua no est6nbloqueadas./_,_/
Desconectedel recept_culode reVmarlo. _/
|.....
/J
J//_
j
/
/!
Filtro de
II
seguridad
_
CAMBIO DE LA BOLSA
__
==_i,
7. Examiney limpieel filtro de seguridaddel motor.
El montaje rojode la bolsase inclinar_hacia
adelantedespuc_s
de que retirela bolsa. Esto
impedir&que la tapase cierreantes de instalaruna
boisenueva.
La bolsa debe cambiarseseguidopara Iograrlos
mejores resultadosde limpieza. El indicador
eleotr6nicedela bolsa o de manguera enciende
cuando se necesita cambiar.
NOTA: NO doble ni pliegue el centro del
cart6n al instalar la bolsa en lae ranuras del
montaje de la bolea.
NOTA:V6ase PIEZAS y CARACTERiSTICAS
para el nSmerode la bolsa.
8. Gire haciaabajo el
soporte para la bolsa
roja y para inserterla
bolsa en las ranuras
empujehaciaabajo
1. Desconecteel cord6n
el6ctricode la clavijade
la pared.
2. Quite la manguera de
la aspiradora.
3. Tire del pestillo de la
tapa haciafuera y hacia
arriba; luego levante la
tapa del receptaculo.
_.
hastaque las lengGetas
de cart6nencierren
seguramenteen las
posicionesapropiadascomoseve enel diagrama.
9. Baje lacubiertadel mcept&culoy cierreel pestillo.
4. Destrabe la pestaSa
de cart6ndel montaje
rojo de la bolsa empujando hacia afuera y
tirando hacia arriba.
f0. Reinstaiela manguera.
11. Conecteel cordbnel6ctdcoen la clevijade la
pared.
5. Saque la bolsa del
montaje rojo.
del motor.
/
I
NUNCA REUTIMCE UNA BOLSA PARA
POLVO.Los materlales muy finos, tales
como desodorantespara alfombras,taloo
facial, polvo fino, yeso, hollin, pelusa de
alfombras nuevas,etc., pueden atascar la
bolsa y causar que se rompa antes de que
estd lianay puede dafiar el motor de la
aspiradora. Cambie la bolea mds eeguido
ouandoaspire este Upo de materiales.
6. Revisey
cambie el fiftrode
seguridad del
motor, cuando
sea necesario.
12
1.Desconecte
elcordon
el6ctrico
delaclavija
dela
pared.
NOchoresagossobrelaasplradora.
2.Limpie
elexterior
conuntreposuave
y limpio,
que
ha sideexprimidedespudsde remojar en unasoluci6nde aguay detergentsI|quidoligem.Sequeel
exteriorcon un traposecodespu6sde limpiar.
CUIDADO
No use los accesorlos si est_n mojados.
Los accesodos qos se utillcen en =_reas
sucla=, debaJo del refrigerador,no deben
usame en otras superficies sin antes set
lavados.Podrfan dejar marcas.
3. Umpiela superficieexteriordel recept_cuioy de
losaccesoriospars reducirla electricidadestdticay
la acumulack_n
de polvo.
Examineel filtrode segurideddel motorde vez en
cuandoy cambiocuandoest6 sucio.
Pellgm de choque el6ctrlco
Dlspositivo de
retencl6n de goma
Desenchufe el cord6n de Is corrienteel6ctrica. No opere la asplradora sin el filtro de
seguridad del motor. Aseg6urese de que el
filtro est6 seco • instalado adecuadamente
para impodir que el motor falle y/o qua se
produzca un choqos eldctrlco.
2. Reemplaceel
filtre,con el lado
dspero haciaafuera,
endirecci6nde la
bolsadelpolvo,
deslizdndoloen su
lugar dentinde las
costillasde la
cavidadparala
bolsa.Metael filtm
paraque quepa por
completodebajodel
dispositivede
retenci6nde goma.
Para quitarla bolsa,siga las instruccionesen CAMBIO DE LA BOLSA.
FILTRO DE SEGURIDAD DEL
MOTOR
ELECTROSTATICO
Este filtmblancoso tieneque cambiarcuandoest6
sucio. Debe cambiarseperi6dicamentesegt_nlas
condiciones
de uso. El flltro no se puede lavar
pues perderfasu capacidad pars atrapar altrapar
polvo.
1. Levante el dispositivo de retenci6nde
gomay saqueel filtro
de seguridedcomose
ve en el diagrama.
Dispositivo de
rerencl6n de goma
3. Vdase CAMBIO DE LA BOLSA para cambiar
la bolsa.
NOTA:Vdase PIEZAS y CARACTER{STICAS
para el n_mero del filtro de seguridad del motor.
13
!
ADVERTENCIA
Pellgm de choque el(,ctrico
No opera con un flltm de escape bloqueado
o sin el flltro de escape o la cublerta del illtro de escape Instalados.
escape
FILTRO DE ESCAPE
HEPA
3. Reemplace el cartuchodel filtrodel
escape. Coloque el
filtronuevo en la
aspiradora con el
lado de esponja an
dirsccl6n a la scpiradora.
Este cartuchodel filtroescapetiene que cambiar
est_ sucio, Cambieel fiitmcuandoel drea superficial est6 cubiertapor completo.El flltro no se
puede laver pues perderia su capscidad para
atrapar altrapar polvo.
2. Jale el filtmde
escapehaciaarribay
haciafuerade la
park)posteriorde la
aspiradora.
escape
NOTA:V6ase PIEZAS y CARACTERJSTICAS
para el nOmerodel firm de escape.
1. Jale y suba la
cubiertadel filtro
de escapepara
quitadade la
aspiradoray
col6quelaa un
lado.
LengiJetas
4. Montela
cubiertadel filtro
de escape
colocandolasdos
lengSetasen la
cubiertadel filtro
en las ranurasde
la aspiradory gire
en su lugarhasta
que cierre
completamente..
Siempre deberan seguirse todas las precauclones de seguridad al limpiary dar servicio a
la Power-Mate .
Peligro de choque eldctricoo lesi6n corporal
Desconecte la unidad antes de limpiarla
o darle servicio. De Io contrario podr/a
producirse un cheque el_ctrico o causar lesi6n corporal si la aspiradora
arranca de manera imprevista,
14
PARA RETIRAR LA CORREA
LIMPIEZA DEL AGITADOR
NOTA: Para mantener una alta aficiencia de
limpieza y evitar el daSo a la aspiradora, hay
aue limoiar el aaitador cada vez aue se cambia
1. CoLoquela PowerMate`="con la parte
inferior hacia arriba.
la correa.
2. Quite losdos (2)
tornUlosen la cub.Lerta
de la Power-Mate_.
3. ColoqueI_
Power-Mate
"="en la
posici6nvertical.
Aprieteel pedaldel
mangode liberaci6ny baje la
articulaci6ngiratoria.Levantelos
pestillostraseros
Tambidn hay qua limpiar el agitador seg6n el
siguiente horario:
Frecuente (usada dirariamente)
Moderado (usada 2 o 3 veces
por semana)
Pestiflos
laterales
cada semana
cada mes
Ligero cada 2 meses
(usada 1 vez por semana)
Pestillos
traseros
IMPORTANTE
Deeconecte la aapiradora. Examinefrecuentemente el cepilloy las dreasde soportedel mismo
de la Power-Mate
® y elimine todocabello,hiloy
pelusaacumulada.
4. Paraquitar la cubierta, agarrelos ladosy
tire afuera.
Retire todo indicio de basura o suciedad de la
zona de la correa y del rodillo del cepillo.
Con cuidado quite las tapas y quite el hilo o
los restos ubicados en el agitador, o en los
soportes del cepillo.
Ensamble del
agitador
5. Levantela
unidaddel agitador
y quitela correa
gastada.
Polea para
Tapa del
corre = -_ ,_.
Tapa del extremo
6. Examine y limpie las &reasde tapa del extremo.
En la ENSEMBLE DEL AGITADORse proporciona
una ilustraci6nde todoel ensamble del agitador.
agitador
15
PARA RETIRAR LA CORREA
1. Instale
una correa
nueva
sobreel
impulsor
del motor
y luego
sobrela
ruedadentadadel
cepillo.
Impulsor
del motor
Agitador
Tapa del
extremo
Cu/derm
tueda
dentadada
del cepillo
Cerci6rese que no
hay espacio entre
la cubierta y la base.
2. Coloqueotravez
la unidaddel agitadoren ta PowerMete®.
h'acia
y gire
Pestlllos
laterales
Pestillos
traseros
5. Coloquefe Power-Mate
® con la parte inferior
hecie arribay insertelos dos (2) tornillosen la
cubierta.
EmpuJe hacla
1. Quite ia cubiertade la Power-Mate
® comese
describeen la secci6nCAMBIO DE LA CORREAY
LIMPIEZA DEL AGITADOR.
adentro
Base
5. Rote la cubierta
hacia atr'_s.Aprfete
con poca fuet-za
hasta que las
leng0etaslateralas
y traserasencierren
seguramente.
NOTA: V6ase PIEZAS y CARACTERfSTICAS
para el nt_merode la correa.
Empuje
3. Alineela parfe
frontalde la
cubiertacon la
base. Coloque
la cubiertasobre
el borde
delantemde fe
basecomo se
muastra.
adentro
2. Empuje hacia adentroy girela bombilla en
el sentidosontrarioal
de las agujasdel reloj,
luego tire haciaafuera
pare sacar.
y gire
3. Empujehacia
adentroy gireen el
sentidocontrarioal de
las agujasdel reloj
para reemplacer.La
bombillano debe ser
rods de 15 varies(130
voltios/).
4. Reinstale la cubiertade la Power-Mate
® come
se describe en la secoi6nCAMBIO DE LA CORREA Y LIMPIEZA DEL AGITADOR.
NOTA:Vdase PIEZAS y CARACTERiSTICAS
para el nSmero de la bombilla.
16
PARACAMBIAR MAZO DEL
AGITADOR
1. Retirela cubierta,correay ensambledel agitador
de la Power-Mate
° Consulte"Pararetirarla correa"
bajoCAMBIO DE LA CORREAY LIMPIEZA DEL
AGITADOR.
Peligm do choquoeldctrlco o lesi6n corporal
Desconecte la unldad antes de Ilmpiarla o
darle sarviclo. De Io contrarlo podia producirsa un choque ol6ctrico o causar
lesi6n corporal si la aspiradora arranca de
manera imprevista.
2. Reemplaceel agitador.
3. Cambiela correa,el ensambledel agitador,lacubierlade la Power-Mate
°, la bombillay la cubiertade
la bombilla,Consulte=Paracambiarla correa"bajo
CAMBIODE LA CORREAY LIMPIEZA DEL
AGITADOR.
PARA REVISAR LA UNIDAD DEL
AGITADOR
Cuandoestdngastados los cepillosal
nivelde las barras
de soporteen la
base, cambiela
unidaddel agitador.
Barrade soporte
de la base
17
"Consulte
estetablaparaencontrar
soluciones
queusted
mismo
puede
realizar
cuando
tenga
problemas
menores
demndimiento.
Cualquier
servicio
quenecesite
aparte
deotmsdescritos
enestemanual
tienen
queserhechos
porunCentro
deservicio
deSears.
f
La _plradma
no m'mncL
1. Est6 desconectade.
2. Cortadrcudesbotedeo kslole quemade
en =dteb_m de serviciode te msld_
3. Cone.toonesel6cl6casde te manguera
sue_.
NO ISpka
saUstactodamente.
I,= aspkadoca wmncz,
pen= se apaga.
Bolsapara poh_oIlena o atescade.
2. Vias de Itt_jode =;reatescades.
3" Rltros sucks.
4. Ajusteloconec_o
de nMd de pek_de
te alfombra_
5. Controlde _spiraci6n ablerto,
6. Manguera rota.
7. Agitaderde te Foyer-Mate" desgastedes,
& Conea desgastadao rote.
9, Agitator o tapasdel evtrernode _te su=dos.
10. Tapa del mcepRtculoabterta.
|.
1. Conexlones=d_ctric_ de la manguemo
de _atepa.
2- Protectorcontm sobrecargasde te
Pov_r-M=dee detade.
3, Protectortermal botado
en e_recept6culo.
La POWER-MATEe no fun¢lona
cuando estll Inltalm_a.
1.
2.
3.
4,
Conexionesde ta Power-Matee desconectadas.
Cotrea desgastadao rota.
Agitadoro lapas del extrernosde &slosucios.
Protectorcontrasobrecargasde ta
Power.Malee botado.
S- El intermptorno estA en fa posloi_nCARPET.
Bok;apara polvo Itenao alascada.
Filtros suoo.
Vias de ftu;ode aim =dascadas.
Ciertos a_.cesorios,
1. Corlecte blen,oprin_ s=dectorde encendide/
=degade a Iz posid6n ON.
2. Restabiezcael ¢ortacimuiteeo cambie=d
fraY=de.
3. Vue_a a conectarIo6 extmmosde te manguera,
(.o_na6).
1. Can_lo te I:olsz (p_
12).
2.
las via=de l_JjO
de aim, (p_na 12).
3. Cambte elflnr0s,
(p_gina
13-14).
4. Alume_r_i, (p_gm9).
5.
6.
7.
B.&9.
Ajuste el control,(p_gina 10).
Camblote mangue_
Camblote agdeder,(p6gm 17).
ConsodeCAMBIO DE LA CORREA Y UMPIEZA
DEL AGITADOR, (pztginas15.16).
10. Cterrebien te tapa.
1. Examinelos conexlonesek_l_as, vue_vaa conectar los extren_osde la manguer_ (pAgi_a6).
2, Retire cualquiero_letoatomde o at_
luego m=dabte_a. Si la aspiraderaarranc_pero
se vuelve a apag_r, limpieel a_tader y los
tapas derextmmo_ de _te, luego restabtezca,
(p_g_as 10, 15-16).
3. Restabtezcaprotec_0rterm=d,(p_ioina11).
1. Conecle bien.(p_tgina5).
2 & 3. ConsudeCAMBIO DE LA CORREAY LIMPIEZA
DEL AGITADOR,(p_inas 15-16).
4. Examineel Area d=dag_tadorpara determiner si
hay acum_aclonexcesivao bloqoeode pel_&
Limp=d=dagitader y lostapas del extremos,lueg<
resteblezca_(p_ginas10, 15-16).
5. Po_gae_lolerruptor a la posloi6nCARP_,
(p_ina 7).
El indlcador ele_nloo
de hi botea y de te
manguera hmclona
1.
23,
4,
I.= uplradora tevanta tapetu --o-.oIs diflcil
I,mpuJara
e=_z-B
la =-_
de nivel
de delodelaaffombra.
1. Ajusteinconecto
2. Aspirac_bndemasiado potente.
I, AjL_teel nivel, Ip_gina 9).
2. Abrael controlde aspiraclon,(pdgkla 10).
L.t luz no fun¢iona.
1. Bombiitefundida=
I. Can_k_ I_ bOrT_il_l.(p_gina 16).
El cord6n no n enmde,
1. CordOnel_ctrloosuclo.
2- Co_n atascade.
I. LJmpieel co_n ek_cltloo.
2. 13rede] co_d_ y despu_s enn_llelo.
La aa;plrldorl de|a marcas
en te a_fombra,
1. Estilo de limpiezaincorrecta.
1. Consulte SUGERENCIAS PARAASPIRAR,
(p_ina 8)
18
1.
2.
3,
4.
Cambie te bolsa, (p._gina12).
Cat, hie =dflltros,(p,_g_na13-14).
Desbloqueete_ Was de flujode =dre,(p_lgina12)
Esto e$ norm=d.Ellodloador debe set normal
cuando
la herramientaest_ qudeda.
19
Your Home
For repair - in your home - of all major brand appliances,
lawn and garden equipment, or heating and cooling systems,
no matter who made it, no matter who sold it!
For the replacement parts, accessories and
owner's manuals that you need to do-it-yourself.
For Sears professional installationof home appliances
and items like garage door openers and water heaters.
1-800-4-MY-HOME _
Anytime, day or night
(1-800-469-4663)
(U.S.A. and Canada)
www.sears.com
www.sears.ca
For repair of carry-in products like vacuums, lawn equipment,
and electronics, call or go on-line for the nearest
Sears Parts and Repair Center.
1-800-488-1222
Anytime, day or night (U.S.A. only)
www,sears.com
To purchase a protection agreement (U.S.A.)
or maintenance agreement (Canada on a product serviced by Sears:
1-800-827-6655
(U.S,A)
1-800-361-6665
Para pedir servicio de reparacibn
a domicilio, y para ordenar piezas:
1-,888-SU-HOGAR sM
(Canada)
Au Canada pour service en tran_ais:
1-800-LE-FOYER Mc
(1-800-533-6937)
www.sears.ca
(1-888-784-6427)
SIARS
_) Sears, Roebuck and Co.
® Registered
Trademark
/ TMTrademark
/ su Service
Mark of Sears, Roebuck and CO.
® Marca Registrada / TM Marca de Fdbrica / su Marca de Servicio de Sears, Roebuck
MCMarque de commerce / MDMarque d_pos&e de Sears, Roebuck and Co.
and Co.