1
®ÂØÒňÎ
®
APPLICATION GUIDE 2.0
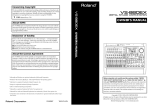
This Application Guide provides step-by-step procedures and important information about day-to-day use of the
VS-880 in actual applications. This second edition is based upon a VS-880 V-Xpanded Digital Studio Workstation
(or a VS-880 that has had its software enhanced with the VS-880-S1 System Expansion Kit to Version 2 software),
and the use of a VS8F-1 effects expansion board.
R
L
A
2
3
4
1
B
2
3
INPUT SENS
2
PEAK
10
FOOT
SWITCH
4
4
PEAK
10
IN
SCSI
OUT THRU
POWER
MIDI
MIXER MODE
3
PEAK
10
OUT
IN
DIGITAL(5,6)
INPUT B
INPUT A
1
PHONES
AUX SEND
MASTER OUT
1
PHONES
TIME VALUE
PEAK
10
SELECT
TRACK
INPUT
CONDITION MARKER#
TIME
INPUT MIX
dB
TRACK MIX
4
50 dBm
PAN
4
50 dBm
PAN
C
4
50 dBm
PAN
C
4
C
0
50 dBm
PAN
C
10
0
4
PAN
PAN
C
PAN
C
PAN
C
AUX SEND
12
C
24
48
0
INPUT TRACK
L
Input BUSS
V.Track
EQ
BUSS Send
AUX Send
Channel Link
EFFECT - 1
-2
SOURCE
R
L
R
L
R
L
R
L
R
L
R
L
R
L
R
6 dB
CH EDIT
CH EDIT
CH EDIT
CH EDIT
CH EDIT
CH EDIT
CH EDIT
CH EDIT
Input BUSS
V.Track
EQ Low
EQ Mid
EQ Hi
Aux Send
EFFECT - 1
EFFECT - 2
SOLO
Master Out
AUX SEND
EFFECT - 1
-2
SEL
SEL
SEL
SEL
SEL
SEL
SEL
SEL
STATUS
STATUS
STATUS
STATUS
STATUS
STATUS
STATUS
STATUS
AUX MASTER
EDIT CONDITION
EDIT
REC
SONG
Song Select
- New
- Name
- Copy
- Erase
- Optimize
DAT Backup
- Recover
LOCATOR
Marker
Locate
Loop
A.Punch I O
TRACK
Track Copy
- Move
- Xchg
- Insert
- Cut
- Erase
Time Comp Exp.
PLAY
EFFECT
EFFECT - 1
-2
SYSTEM
System
MIDI
DISK
Sync
Scene
Drive Select
- Initialize
PARAMETER
DISPLAY
Pre Level
Post Level
Play List
Fader Pan
SHIFT
Amp Profile
CURSOR
NO
YES
CANCEL
ENTER
UNDO
MIDI /
DISK
PLAY
MUTE
1
BUSS
a
2
3
AUX
BUSS
b
4
5
AUX
BUSS
c
6
7
AUX
BUSS
8
d
MARKER
(dB)
(dB)
6
6
4
0
4
PREVIOUS
NEXT
1
2
TAP
LOOP
AUTO PUNCH
3
4
5
NUMERICS
VARI PITCH
SCENE
SCRUB
4
0
PREVIEW
1/
LOC
5
2/
LOC
6
LOC
3/
7
4/
LOC
8
CLEAR
TO
FROM
4
8
8
12
12
18
LOCATOR
MASTER
AUX
6
1/
7
5
2/
8
3/
6
9
7
4/
0
8
CLEAR
18
24
24
36
36
STORE
SONG TOP
SONG END
SHUT EJECT
RESTART
ZERO
REW
FF
STOP
PLAY
REC
© 1996 Roland Corporation
All rights reserved. No part of this publication may be reproduced in any form without the written permission of ROLAND CORPORATION.
All trademarks are the property of their respective owners.
Contents
Purpose of this Guide ...................................................................................................................... 5
How to use this Guide ..................................................................................................................... 5
Refer to your VS-880 Owner’s Manual & Quick Start .................................................................... 5
Icons & Symbols ............................................................................................................................. 5
Conventions Used In This Manual ............................................................................................... 6
Chapter 1: Laying a Foundation
Introduction to Multitrack Recording .................................................................................................. 7
Multitrack Tape Recording (Linear) .............................................................................................. 7
Tracking Session ....................................................................................................................... 7
Overdub Session ...................................................................................................................... 7
Mixdown Session ...................................................................................................................... 8
Audio Post Production for Video ................................................................................................. 8
Random-Access Hard Disk Recording .......................................................................................... 8
Pointer Based Editing ................................................................................................................ 9
Summary of VS-880 Terminology ................................................................................................... 10
VS-880 Commonly Asked Questions ............................................................................................... 14
Chapter 2: Understanding Your VS-880
Understanding Your VS-880 .......................................................................................................... 17
Sections of the VS-880 ............................................................................................................ 17
Internal VS8F-1 Effect Expansion Board ..................................................................................... 18
Important Concepts to Understand .................................................................................................. 18
Understanding The Mixer ........................................................................................................ 18
A Mixer Analogy .................................................................................................................... 19
The VS-880 Mixer ................................................................................................................... 20
Selecting Mixer Modes ............................................................................................................ 21
INPUT>TRACK Mode .............................................................................................................. 21
INPUT MIX / TRACK MIX Mode ............................................................................................... 22
INPUT MIX ............................................................................................................................. 22
TRACK MIX ............................................................................................................................ 23
Mixer Effect Routing ................................................................................................................ 24
Mixer Summary ...................................................................................................................... 25
Now Time .............................................................................................................................. 26
Virtual Tracks ......................................................................................................................... 27
Finding Your Edit Points ........................................................................................................... 28
Editing Resolution ................................................................................................................... 29
Undo & Redo ......................................................................................................................... 30
Nulling - (Faders & Pan Controls) .............................................................................................. 30
Important Navigational Rules & Skills to Master ............................................................................... 32
[PLAY (DISPLAY)] Button ........................................................................................................... 32
Transport Buttons .................................................................................................................... 32
[SHIFT] Button ......................................................................................................................... 32
[CH EDIT] Buttons ................................................................................................................... 32
[STATUS] Buttons .................................................................................................................... 32
[PARAMETER] Buttons .............................................................................................................. 33
[CURSOR] Buttons ................................................................................................................... 33
[YES] / [NO] Buttons .............................................................................................................. 33
Table of Contents
1
TIME/VALUE Dial ................................................................................................................... 33
VS-880 Demo Song ...................................................................................................................... 34
VS-880 Connections ..................................................................................................................... 35
Comments On VS-880 Connections .......................................................................................... 37
Phantom Power ....................................................................................................................... 37
Creating A New Song .................................................................................................................. 37
Naming A Song ........................................................................................................................... 38
Defining Default Settings .......................................................................................................... 38
Save Your Song to Disk Often ........................................................................................................ 39
Sample Setup ......................................................................................................................... 40
Chapter 3: Recording Applications
Record A Single Piano Track From A Synthesizer ......................................................................................... 41
Play A Piano Track And Add Markers & Locators ......................................................................................... 42
Using Locator Banks ................................................................................................................................. 43
Record Vocal With Mic And External Compressor ........................................................................................ 44
Record 5 Guitar Tracks Using Virtual Tracks ................................................................................................ 45
Listening To A Guitar Using Internal Effects .................................................................................................. 47
Recording A Guitar ‘Dry’ While Listening With Effects .................................................................................. 48
Recording A Guitar ‘Wet’ With Internal Effects ............................................................................................ 49
Record A Guitar On Tr. 1, Record The Effects On Tr. 2 ................................................................................. 51
Punching In And Out - Manual (with Undo and Redo example) ..................................................................... 53
Use Auto-Punch For Punch In/Out .............................................................................................................. 55
Loop Recording ....................................................................................................................................... 56
Sync To A Midi Sequencer Using MTC (MIDI Time Code) ............................................................................. 58
Sync To A MIDI Sequencer Using MIDI Clock .............................................................................................. 60
Sync To An External Sequencer Using MMC ............................................................................................... 61
Recording From A Digital Source ............................................................................................................... 63
Recording Multiple Inputs To A Single Mono Track ....................................................................................... 64
Recording Multiple Inputs To 2 Tracks As A Stereo Mix ................................................................................. 65
Record 4 Mics, Using Internal Compressor, To 1 Track ................................................................................. 66
Using the Serial Insert Path ........................................................................................................................ 67
Using the COSM Microphone Simulator ..................................................................................................... 68
Using the Voice Transformer ...................................................................................................................... 69
Chapter 4: Overdub Applications
Add A Guitar Track To The Existing Piano Track........................................................................................... 71
Bouncing Tracks 1-6 To Tracks 7-8 ............................................................................................................. 72
Using The Internal VS8F-1 When Bouncing ................................................................................................. 74
Using The Aux Buss As A Headphone Monitor ............................................................................................ 76
Combining Lead Vocal Tracks Into One Using [Mute] ................................................................................... 77
Making A New Version of Your Song ......................................................................................................... 78
Chapter 5: Editing Applications
Use {Cut} To Shorten Your Song ................................................................................................................. 81
Use {Erase} To Eliminate Unwanted Material ............................................................................................... 82
Use {Insert} To Add Space Into An Existing Recording .................................................................................. 83
2
VS-880 Application Guide
Use {Move} To Place Guitar Part in New Location ........................................................................................ 84
Use {Move} & Sync Point - Align Music With Narration ................................................................................ 86
Use {Copy} To Create A Drum Loop ........................................................................................................... 88
Use {Copy} To Re-Use A Vocal In Multiple Verses ......................................................................................... 90
Chapter 6: Mixdown Applications
Mixing 8 Tracks To Stereo Analog Outputs .................................................................................................. 93
Mix 8 Tracks To Stereo DAT - Digitally ........................................................................................................ 94
Mixing 8 Tracks With Internal Effects To Stereo Output ................................................................................. 95
Using Mute During Mixdown .................................................................................................................... 96
Using Scenes To Help With Mixdown ......................................................................................................... 97
Mixing 8 Tracks and External Source To 2 Track DAT ................................................................................... 98
Using External Effects During Mixdown ...................................................................................................... 99
Use Virtual Tracks To Re-Use The Internal Effects ......................................................................................... 100
Listen To More Than One Virtual Track Simultaneously ................................................................................101
Process Entire Mix With Internal EQ And Compressor ................................................................................102
Backup Your Song to DAT ....................................................................................................................... 103
Recover Your Song from DAT ................................................................................................................... 104
Automated Mixing Using a MIDI Sequencer .............................................................................................. 105
Automated Mixing Withing the VS-880 (3 methods) ................................................................................... 106
Creating A Tempo Map ..........................................................................................................................108
Using the Sync Track (3 methods) ............................................................................................................109
Chapter 7: Tips and Advanced Applications
Tips & Features ........................................................................................................................... 113
Using The ‘Narration’ Effect (VS8F-1) ...................................................................................... 113
Using the [SHIFT] Button to Speed Up Operations ..................................................................... 113
[SHIFT] + [PLAY (DISPLAY)] Displays Waveforms in Edit Modes ................................................. 113
[SHIFT] + [SONG] Displays Song Information .......................................................................... 113
Use [SHIFT] + [PREVIEW] to Change The Preview Length ........................................................... 113
Use [SHIFT] + [SCRUB] to Change The Scrub Length ................................................................. 113
Use [SHIFT] + [SYSTEM] to Toggle Int / Ext Sync ...................................................................... 113
Use ‘Archive’ Copy Mode to copy to multiple ZIP disks ............................................................. 113
Vari-Speed Functions in Scrub Mode ....................................................................................... 114
Keep Original Tracks When Bouncing .................................................................................... 114
Use the Correct Scrub Direction .............................................................................................. 114
Use a Longer Scrub Preview Length. ........................................................................................ 114
Change Track Status Quickly ................................................................................................. 114
Use Locators For Editing Functions .......................................................................................... 114
Use [NUMERICS] for Precise Time Code or Measure Location ................................................... 114
Record First Using the Metronome .......................................................................................... 114
Display Shows Scrub or Preview Type ..................................................................................... 114
Additional Equalizers in VS8F-1 ............................................................................................. 115
Additional Recording Time ..................................................................................................... 115
Synchronizing Your VS-880 ................................................................................................... 115
Stereo Grouping / Channel Linking ........................................................................................ 115
Automation .......................................................................................................................... 115
SMPTE and the VS-880 ......................................................................................................... 115
Table of Contents
3
Sync multiple VS-880’s together ................................................................................................... 116
VS-880 with a Digital Sampler ..................................................................................................... 117
Sync VS-880 to Analog Tape Recorder ......................................................................................... 118
Sync VS-880 to ADAT ................................................................................................................. 119
Sync VS-880 to DA-88 ................................................................................................................ 120
Sync VS-880 with Computer Sequencer ........................................................................................ 121
Sync VS-880 to Drum Machine or MIDI Sequencer ......................................................................... 122
Sync VS-880 to Video ................................................................................................................. 123
Chapter 8: Appendix
Glossary of General Audio and Recording Terms ........................................................................... 125
More About SCSI ....................................................................................................................... 136
The SCSI “Chain” ................................................................................................................. 136
SCSI ID Numbers .................................................................................................................. 136
SCSI & IDE ........................................................................................................................... 136
SCSI Cables ......................................................................................................................... 137
SCSI Termination .................................................................................................................. 137
“ACTIVE” Terminators ........................................................................................................... 138
Terminator Power .................................................................................................................. 138
Test For Internal Termination................................................................................................... 138
Double Termination ............................................................................................................... 138
SCSI Summary ...................................................................................................................... 139
Blank Track Sheet ....................................................................................................................... 140
4
VS-880 Application Guide
Purpose of this Guide
This Application Guide details many of the common concepts and procedures associated with recording
and editing with the VS-880. It has been written for users new to the general world of recording and
specifically to digital hard disk recording.
After general information on recording, it concentrates on using the VS-880 in real world recording situations. Each situation or application is broken down into three simple sections:
Why?
Why someone might want to do the task that is being described.
What?
A general description & overview of the task to be accomplished.
How?
The actual step by step button pushes required to complete the task.
How to use this Guide
All references to Owners Manual in this guide refer to the VS-880 V-Xpanded Owners Manual.
Refer to your VS-880 Owner’s Manual & Quick Start
This guide does not replace your VS-880 Owner’s Manual or the VS-880 Quick Start. Keep them close at
hand for additional support.
Where applicable, this guide will direct you to specific pages in the owner’s manual or the quick start for
additional information or clarification. Page number references may differ slightly, depending on the date
your document was printed. If you do not see what you are looking for, you may have to look a few pages
before or after to find the correct page.
The LCD displays pictured in this manual may vary slightly from the actual display on your VS-880.
Icons & Symbols
Special icons are placed in the left margin throughout this guide to draw your attention to important
information about your VS-880.
This WARNING icon points to critical information about issues that may affect the
operation of your VS-880 or your recorded song data.
A NOTE adds clarification to a specific point or attempts to explain a concept in a
different manner.
This TECH INFO icon points to information that is specifically technical in nature.
Table of Contents
5
Conventions Used In This Manual
Buttons
• Actual front panel buttons are indicated in square brackets [ ].
• Some buttons have more than one button name. These indicate the function that the button
performs when [SHIFT] is pressed or when in a different mode. When giving only the
“secondary” function name would make it difficult to know which button is indicated, both
button names will be given, with the current function given first.
Example: [SOLO (EDIT)], [SEL (CH EDIT)]
• The VS-880 has two buttons marked PLAY. In this manual, these are distinguished as follows.
1.
[PLAY (DISPLAY)]: the button at the lower right of the LCD screen
2.
[PLAY]: the button to operate the recorder ‘transport’, located in the lower right corner.
Mixer Channel
• In the mixer section, a knob/button/indicator/fader of a specific channel is usually indicated by adding the channel number. Example: the PAN 1 knob, FADER 3.
Commands
• Capitalized text, surrounded by braces, { }, indicates a command that the VS-880 can execute.
Example: {MOVE}
Tracks
• The VS-880 has 8 virtual tracks for each actual primary recording track. When displayed, the
LCD indicates the primary recording track as the first number and the virtual track as the
second number. This guide will use the same convention. For example, Tr. 2-5 will always
indicate primary recording track # 2, virtual track # 5 (see Virtual Tracks - Application
Guide page 27).
6
VS-880 Application Guide
Chapter 1: Laying a Foundation
Introduction to Multitrack Recording
In order to maximize the usefulness of your VS-880, a basic understanding of the typical recording process
is very helpful. Since there are many books available covering the history of recording, we will not discuss
it here. We will, however, review a few modern recording techniques that you might find helpful when
planning your next recording session with the VS-880.
Multitrack Tape Recording (Linear)
Modern multitrack recording techniques allow the recording engineer an increased level of creative control
beyond the direct to mono or stereo recording of the past. In the early days of recording, every musician
and singer had to all assemble in a studio at the same time. Every part of the song was recorded
simultaneously, directly to a mono or stereo recording. One major problem of this technique was that if
any individual musician made a mistake, everyone had to do the recording over again from the beginning.
The entire recording process changed dramatically with the introduction of multitrack recorders. These
recorders provided ‘multiple tracks’ on a single piece of recording tape. For example, a 4 track recorder
was just like having 4 mono recorders stacked on top of each other. Each track was distinct from the others.
This allowed for recording different instruments on different tracks, even recorded at different times.
With this technique, a mistake in the piano part could be re-recorded on its individual track without
affecting the other instruments. Probably the most famous recording using the early 4 track analog
recorders was “Sergeant Pepper” by the Beatles in 1967. George Martin actually used two, 4 track analog
recorders. All the music was recorded on the four tracks of the first machine. These four tracks were
combined together into a final stereo music recording on the first two tracks of the second recorder. That
left two tracks open on the second recorder for the vocal parts. The vocals were recorded on the second 4
track machine, long after the orchestra musicians had left the studio. The stereo music tracks and the
vocals were then combined into the final stereo recording that is still popular today.
Modern digital tape recorders are available in configurations of up to 48 individual tracks on a single piece
of recording tape. Synchronization techniques provide the ability to lock multiple recorders together
providing for a relatively unlimited number of available tracks.
Tracking Session
Modern recording sessions are usually broken down into three basic components:
1. Tracking (original recording).
2. Overdubbing (adding of additional instruments and vocals).
3. Mixing (combining of all the recorded tracks into a final mono or stereo format).
The tracking session is first. In a music session, this usually means recording the basic rhythm instruments.
For example, bass, drums, piano, guitars, and maybe a scratch vocal track. The scratch vocal is recorded
along with the rhythm instruments to allow the musicians to hear something similar to the final vocal
track. This scratch track is usually erased when final vocals are recorded.
Overdub Session
Once original tracking has been completed, the overdub process begins. Additional instruments,
background singers, and vocals are added to the multitrack tape by overdubbing. The originally recorded
rhythm tracks are played back through a cue system (usually headphones) to the overdubbing musician.
Their musical part is recorded in sync with the original tracking instruments.
Chapter 1: Important Information
7
Overdubbing may consist of many musicians adding new tracks to the recording simultaneously or maybe
it will be a single vocalist. Overdubbing means to record new tracks of music in sync with music that has
been previously recorded. If you were to record music on the left channel of a cassette deck, rewind the
tape, and then record your voice on the right channel, you would be overdubbing the voice, using the
recorded music as a guide.
Mixdown Session
Once all the tracks of the music have been recorded, they must be mixed together into some type of release
format. For example, if the release format is CD, the tracks would be mixed into a final stereo recording. If
the release format is a movie, the tracks might be mixed into a final multichannel format such as left,
center, right, and surround. Whatever the final release format, the original recorded tracks must be mixed
(combined) together specifically for that format.
Audio Post Production for Video
The post production process for adding audio to moving pictures is similar to recording music. However,
the audio usually must be recorded synchronously to the picture requiring that the audio recorder and the
video recorder be ‘locked’ together electronically.
Random-Access Hard Disk Recording
Traditional multitrack tape recorders are ‘linear’ recording devices. You begin recording at a place on the
tape and record your song in a linear fashion along the length of the tape until the end. Just like with a
typewriter, you can go back and correct a mistake, however, you lose the original in the process. For
example, the piano player can go back and re-record over the top of his or her original recording, but the
original is lost forever. What if the original was the best performance? Of course, a new piano part could be
recorded on a blank track, keeping the original track untouched. However, you quickly run out of tracks
for recording the other instruments.
The VS-880 adds a new dimension to traditional multitrack recording. This is the concept described as
Random Access or Non-Linear. Instead of recording your song on a linear piece of recording tape, the
recording tracks of your music are turned into digital data and this data is stored on some type of storage
device such as a hard disk drive. The term random access means that you can access the data (music)
stored on the hard drive in a random manner. For example, let’s assume that you have recorded a song on
your VS-880 consisting of 2 Verses, 1 Chorus, 1 Verse, and the ending. If, for example, you wanted to start
the song with the chorus on a traditional tape recorder, you would have to physically cut the piece of tape
containing the chorus and splice it in front of the first verse. If you didn’t like it, you had to replace the
section of tape back to its original location.
However, the VS-880 provides random access to all parts of your song. For example, you just instruct the
VS-880 to play the chorus first, then the first verse, etc. If you didn’t like it, you just instruct the VS-880 to
change the order as many times as you wish. Since it is not physically moving your song or re-recording
anything, you can rearrange your song a thousand different ways without ever using any addition
memory from the hard disk. This ability to “randomly access” all the parts of your song, allows a new
level of creative editing capability not available with traditional tape recorders.
8
VS-880 Application Guide
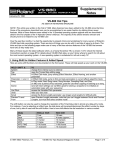
TAPE: Total time per each track = 30 minutes
TRUE RANDOM ACCESS DISK RECORDING: Total time per track is variable
Track 1: 60 minutes
Track 2: 10 minutes
Track 4: 12 Minutes
Total track minutes used here: 97 minutes
Track 3: 15 Minutes
No track minutes (disk space) used for:
Looping, Copying or using the same material more than once.
Pointer Based Editing
When you record sounds into the VS-880, they are stored on the hard drive. Once on the drive, the original
recording is never changed. All of the editing, copying and moving of the sound is actually just moving
and copying “pointers” to the original sound. These pointers indicate when to start and stop playing all or
part of the original recording. The advantage to this way of working is that copying or moving or erasing
part of a track is only changing these pointers. Pointers take up virtually no disk space, and the VS-880 can
write or change pointers instantly. That allows you to copy all 8 tracks of a song instantly to another
location without using additional disk space. The original audio is never changed.
Chapter 1: Important Information
9
Summary of VS-880
Terminology
You might want to review the following summary of
specific VS-880 terminology. Even though you will
not need to memorize all these items, it will be
extremely helpful to at least be exposed to the
terminology before you encounter it in context
throughout all VS-880 Manuals. A more extensive
glossary of terms is included at the end of the
Appendix section of this manual and will serve to
familiarize you with many of the general terms used
in audio recording.
Auto Punch
The ability for the VS-880 to Punch Into and Out of
Record automatically based on locations that you
specify.
Aux Send
An auxiliary signal path normally used to route the
signal from a recorded track to an internal or external
effects processor device. (Reverb, EQ, delay, etc.)
Cancel
To stop in the middle of a command. To instruct the
VS-880, “No, I don’t want to do that.”
CH Edit
The button used to select a channel or track for
editing.
Channel Link
To link two channels together so they respond as a
stereo pair.
Clear
To erase or remove. e.g. To clear a locator point.
Cursor
The line, blinking area, or highlighted box that
indicates your current location within a screen
display or menu. Also refers to actual buttons on the
VS-880 front panel.
DAT Backup
The ability to store your completed song on an audio
DAT tape as a ‘backup’ in case something goes
wrong with your hard disk.
Dat Recover
The ability to recall your completed song from an
audio DAT tape and load it into your VS-880 so it can
be played, re-edited, added to, etc.
Digital In
The VS-880 input that will accept a digital signal
such as a DAT or CD.
10 VS-880 Application Guide
Digital Out
The VS-880 output that will send a digital signal
from the VS-880 to some other external digital
device.
Display
The LCD screen located in the top of the right hand
section of the VS-880. Used to display important
information to the user such as information about the
present recording, edit commands, and song
position.
Pre Level
The audio signal level before it enters the front panel
fader control. Fader movement will not affect the
signal level.
Post Level
The audio signal level after it exits the front panel
fader. Fader movement will affect the signal level.
Play List
The play list is the complete set of instructions built
by you during editing to tell the VS-880 what tracks
and recordings to play and when to play them.
Fader/Pan
The fader is the linear volume control for each
channel on the front panel. The pan control is a
rotary knob used to position a mono audio signal
within a two channel stereo field.
Amp Profile
The amplitude profile is a visual representation of
the audio signal presented as vertical bars in the LCD
display.
Edit
Any change made to an original recording. For
Example, if a small section is erased from the original
recording, that is an edit. Copying one section of a
song to another part is an edit.
Effect 1 & 2
Effects are sound modifiers applied to an audio
signal to change the sound in some way. For
example, digital reverb is an effect. Changing the
relative balance of treble and bass with an equalizer
is an effect. Effect 1 & 2 may refer to internal effects
using the optional VS8F-1 or external effects.
Enter
The same as YES or OK.
EQ High
High frequency equalization boosts or lowers the
perceived loudness of treble (high) frequencies. The
VS-880 High EQ can affect frequencies from 500 Hz
to 18 kHz.
EQ Low
Low frequency equalization boosts or lowers the
perceived loudness of bass (low) frequencies. The
VS-880 Low EQ can affect frequencies from 40 Hz to
1.5 kHz.
EQ Mid
Mid frequency equalization boosts or lowers the
perceived loudness of frequencies in the middle part
of the hearing range. The VS-880 Mid EQ can affect
frequencies from 200 Hz to 8 kHz.
FF
Abbreviation for Fast Forward. The ability to move
forward quickly in your song.
Foot Switch
An optional foot switch can be used to select VS-880
functions by pressing the switch with your foot,
keeping your hands free for playing an instrument.
Input Sensitivity
Adjusts the gain (volume) of an incoming audio
signal.
Input/Buss
Selects the routing of the rear panel inputs to
different recording channels.
Input Mix
A mixer mode selection which allows you to mix
signals coming directly into the rear panel inputs
along with previously recorded tracks.
Input>Track
The normal mixer mode allowing the rear panel
inputs to be recorded to selected tracks.
Locator
A position marker placed in your song to help you
find sections quickly. Locator locations can be
accessed directly from the front panel buttons.
Marker
A marker is any temporary mark placed within an
song to indicate a particular location you wish to
return to. For example, just like a bookmark points to
a page in a book, a marker points to a song location
to make it easy to find later.
Previous
An instruction to the VS-880 to locate to the previous
marker position (backwards).
Next
An instruction to be VS-880 to locate to the next
marker position (forwards).
Tap
A button on the front panel used to enter marker
locations during recording or playback.
Loc 1-Loc 4
These buttons correspond to Locator position # 1-4.
Holding [SHIFT] plus these buttons select Locator
positions # 5-8.
Loop
A loop indicates a section of a song that has been
designated by the user to play over and over.
Loop Punch
The ability to instruct the VS-880 to play a particular
section of your song over and over while you
rehearse a punch-in. It then allows you to record the
punch-in section as many times as you want.
Auto Punch I/O
This is the command to set the location for punch
into record and to punch out of record mode.
Master
The two channel stereo section of the VS-880 which is
what you listen to in your headphones or speakers.
Master Out
The two channel stereo mix output from the VS-880.
Media
Media is the term used to indicate the actual surface
or device your song is recorded on. For example, a
cassette tape is a recording media. The VS-880 uses
digital recording media such as computer hard disk
drives, removable drives, magneto-optical drives,
etc.
MIDI In
The connector where an external MIDI signal can be
sent into the VS-880.
MIDI Out/Thru
The connector where the MIDI signal is sent from the
VS-880 to some external device.
Mute
Turn the signal off.
Numerics
This button allows you to use 10 front panel buttons
for quick entry of the numbers 0-9 into the LCD
display, location makers, etc.
Now Line
The vertical black line in the center of the LCD
display indicates the current VS-880 position in your
song. It is similar to the ‘playback’ head of a tape
recorder with the tape passing over it.
Chapter 1: Important Information
11
Pan
A control on the VS-880 that allows you to position a
mono recording somewhere in the stereo field.
Parameter
A Parameter refers to some setting within the VS-880
that you can modify. e.g. EQ frequency is a
Parameter. Aux Send level is a Parameter. etc.
Peak
The maximum recording level of the VS-880 when
digital clipping (distortion) occurs.
Phones
The volume control for headphones which can be
connected to the rear of the VS-880.
Play
The play button controls the playback of the VS-880
recorder section.
Preview - Scrub
The ability for the VS-880 to play a short continuous
loop of audio over and over. This loop can be moved
in real time through your song to aid in finding a
specific location for editing (see Owner’s Manual
page 77).
Preview To
The ability to play a short section of audio directly in
front of your edit point (see Owner’s Manual page
76).
Preview From
The ability to play a short section of audio directly
following your edit point (see Owner’s Manual page
76).
Scene
An automation function in the VS-880 providing an
“instantaneous” snapshot picture of every control.
This scene snapshot can be recalled to “reset” the VS880 to the same settings as when the scene snapshot
was stored.
SCSI
Small Computer System Interface - The connection
on the VS-880 to allow for addition of storage devices
(hard disks).
Shift
A button to allow for selection of the alternate
function of many front panel buttons.
Shut/Eject
The Shut/Eject command instructs the VS-880 that
you wish to finish recording or editing. This
command is important since it instructs the VS-880 to
close all the data files you have been working on (do
some housekeeping) and to eject any removable
media you might have attached . You should always
use the Shut/Eject command before turning off the
power.
Solo
This button function allows you to listen to a single
channel of the VS-880 by temporarily turning off the
audio from the other channels.
Song Select
This command selects which song you want to work
on from all those stored on your hard disk.
Song New
This command is used to begin a new song.
Preview Thru
The ability to play a short section of audio centered
on your edit point.
Song Name
A command to enter the name of your song using
alphanumeric characters.
REC
The master record button to instruct the VS-880 to
record on all tracks that have been selected to record
ready mode.
Song Copy
A command to provide the ability to copy a song
from one recording media to another.
Restart
After the VS-880 has been properly shut down, the
Restart command can be used to reload your song
into memory and make it available to play without
turning the power off and on.
REW
Short for rewind. The ability to move the current
“now time” backwards in your song (same as rewind
on your cassette recorder).
Song Erase
A command to erase a song and all its’ associated
recordings from your hard disk.
Song Optimize
A command to erase all unused recordings from a
song to recover the disk space for additional
recording.
Song End
The location of the end of your song.
Song Top
The beginning of your song.
12 VS-880 Application Guide
Source
A mode of each channel allowing you to listen
directly to the incoming source for your recording.
i.e. Microphone, guitar, synthesizer, etc.
Status
A mode selection to choose the monitoring and
recording condition of each VS-880 channel. e.g.
Record Ready, Source, Play, Mute.
Stop
Stop playback of the recorder section.
Store
This command instructs the VS-880 to permanently
store all the edits you have made to hard disk.
(Similar to the SAVE command of your word
processor). This command is important. If you lose
power to your VS-880 during your editing or
recording session, you will loose everything you
have done since the last time you executed the
STORE command.
System
A section of the VS-880 that refers to the overall
settings related to your song such as Sample Rate,
sync source, etc.
MIDI
A section of the System function where you can edit
and change the MIDI parameters in the VS-880.
DISK
This section of the System function provides the
settings required for the hard disk storage media.
Sync
This section of the System function provides the
control settings for synchronizing the VS-880 to other
devices.
Drive Select
This command allows you to chose which hard disk
you will be using for song selection and storage
(assuming you have more than one connected).
Drive Initialize
This command allows you to Initialize or Format a
hard disk. (erase it and prepare it for recording).
Time Compression/Expansion
The ability to compress or expand the playback time
of a section of your song with or without affecting
the pitch.
Time/Value Dial
A rotary dial used to move forward and backwards
in time as well as change the value of parameter
settings.
Track Copy
A command to copy all or part of a recorded track to
some other location in your song.
Track Move
A command to move all or part of a recorded track to
some other location in your song.
Track Xchg
A command to exchange the audio from one virtual
track with the audio on some other virtual track.
Track Insert
A command to insert blank time in your song at any
location and of any length.
Track Cut
The command to eliminate all or part of a recorded
track. The remaining audio past the cut portion, will
move backward in time to fill the gap left by the cut
command.
Track Erase
The command to erase or eliminate all or part of a
recorded track. The remaining audio past the erased
portion, will not be affected and will remain in its
original time location.
Track Mix
A mode of the mixer to provide mixing capability
directly from the playback of the recorded tracks in
the VS-880 along with input sources.
Undo
A command to eliminate a previous action,
command, or recording. e.g. Pressing the UNDO
button will return the VS-880 to the condition
immediately previous to your last action or last
many actions.
Vari Pitch
The ability to play back your song at a pitch different
from the original recording. The playback time will
also be affected by the change in pitch.
Virtual Tracks (VTrack)
8 layers of recording capability on each primary
recording track.
Vocoder
The primary use of a Vocoder is to analyze a spoken
or sung human voice, then use the information to
shape the harmonic content and envelope of a second
musical signal (usually an electronic instrument),
giving that instrument the ability to simulate singing.
Zero
A command to instruct the VS-880 to return to ZERO
time location.
Chapter 1: Important Information
13
VS-880 Commonly Asked Questions
•
“I just want to record - what do I do?” (see Application Guide page 41)
•
“How do I record with effects?” (see Application Guide page 44 for external
effects and page 49 for internal effects)
•
“I plugged my foot switch into the VS-880 and it won’t punch into record - what
do I do?” (see “Footswitch”, Application Guide page 35)
•
“How does the auto punch work?” (see Application Guide page 55)
•
“How do I record digitally into the VS-880 from my DAT?” (see Application
Guide page 63)
•
“What is the best way to have EVERYTHING as a default setting so I can always
walk up to the VS-880 and start a new song?” (see “Default Song”, Application
Guide page 38)
•
“How do I bounce tracks?” (see Application Guide page 72)
•
“How do I bounce tracks with effects?” (see Application Guide page 74)
•
“Can I plug a mic directly into the unit? What will I need?” (See Application
Guide pages 19 & 37)
•
“How can I use my existing outboard effects units with the VS-880 in record
mode and mix down mode?” (see Application Guide page 44 & 99)
•
“I move the faders but they don’t seem to work. What am I doing wrong?” (see
“Nulling”, Application Guide page 30)
•
“What are the differences/applications of the various mixer modes?” (see
Application Guide beginning on page 18)
•
“What are ‘virtual’ tracks and what are they used for?” (see Application Guide
page 27)
14 VS-880 Application Guide
•
“How do I sync my VS-880 to my sequencer, drum machine, etc.?” (see
Application Guide beginning on page 58)
•
“When I try to recover songs from DAT, I lose all the data on my Internal drive.
What am I doing wrong?” (see Application Guide page 104).
•
“How do I use the locate buttons to set loop and auto punch points?” (see
Application Guide page 55-57)
•
“How do I get the VS-880 to follow tempo changes in my sequencer?” (see
Application Guide page 109-111)
•
“What type of DAT machine is required for DAT backups?” (see Owner’s Manual
page 72)
•
“What types of hard drives/storage devices are compatible with the VS-880?”
(see Owner’s Manual page 130).
•
“What are ‘From’ and ‘To’ points used for?” (see Owner’s Manual page 76 and
Application Guide page 81)
•
“Is there a particular procedure to turning the VS-880 on or off?” (see Quick Start
Manual pages 4-7)
•
“How can I add more recording time to my VS-880?” (see Application Guide
page 115)
•
“How do I begin a new song in my VS-880?” (see Application Guide page 37,
Owner’s Manual page 42, or Quick Start Manual page 9)
•
“What are “default settings” in the VS-880 and why is it important how I set
them?” (see Owner’s Manual page 71 and Application Guide page 38 )
•
“Can I plug a guitar directly into the VS-880?” YES (see Application Guide page
45)
Chapter 1: Important Information
15
16 VS-880 Application Guide
Chapter 2: Understanding Your VS-880
Understanding Your VS-880
This chapter is extremely important. It will explain the necessary concepts you will need to know in order
to operate your VS-880 efficiently, effectively, and creatively.
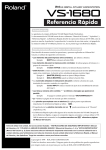
Sections of the VS-880
First, you should familiarize yourself with the VS-880 front panel.
There are three types of devices on the front panel of the VS-880.
CONTROLS – Controls make changes to the value of settings. For example, they change volume,
amount of EQ, panning position, etc. The only variable controls on the VS-880 are the
channel faders, pan pots, input sensitivity, headphone volume, aux send, and the Time/
Value dial.
COMMANDS – Commands instruct the VS-880 what to do next. For example, pressing the [PLAY]
button instructs the recorder to begin playback. Pressing the [UNDO] button tells the VS-880
to reverse the last action.
VISUAL INDICATORS – The LCD display provides information to the user about song position,
editing parameters, song information, etc. Panel mounted LED’s indicate command modes,
peak recording, etc.
Chapter 2: Understanding Your VS-880
17
Internal VS8F-1 Effect Expansion Board
The optional VS8F-1 Effect Expansion Board for the VS-880
provides two independent, stereo effects processors inside
the VS-880.
All other effects processors will be external
and must be connected to the VS-880 through
the rear panel connectors.
Important Concepts to Understand
Understanding The Mixer
In order to make best use of your VS-880, an understanding of the built-in digital mixer is required. This
will save you valuable hours later when you are trying to figure out why you can’t hear the reverb, why
there is EQ on the bass drum, and why you cannot hear anything in your headphones.
The term ‘MIXER’ is normally applied to any electronic device that ‘mixes’ one or more audio sources and
routes them to one or more destinations.
Signal Flow
What is signal flow and why do you need to know anything about it? Signal flow describes how your
music (the signal) flows through the VS-880.
There are six important signal flow concepts to understand:
DIRECTION – In order to understand the signal flow of your VS-880 or any audio device, you
should first understand that the audio signal (your music) is always traveling in one
direction. It might travel from point A to point B to point C to point B to Point D to Point A,
etc.; however, it is always travelling FROM one place TO a different place. It may even
travel to one or more destinations at the same time, but it is always travelling FROM > TO.
INPUT – Where your music travels ‘TO’ is called an INPUT. Every audio amplifying, processing, or
mixing device has one or more inputs. You “put a signal IN” to an INPUT. Many terms are
used to describe an audio signal going IN to an INPUT. e.g. You ‘feed’ the guitar into the
guitar amp. You ‘send’ the signal to a reverb device. You ‘buss’ the piano track to an
equalizer. Whatever term you use, you will notice that your music is always traveling
towards an INPUT. Even when the music is played through a speaker, it is traveling to your
ear - an INPUT. Some devices have multiple inputs, some have analog and digital inputs,
and some have different ‘level’ inputs (discussed later).
OUTPUT – Where your music travels ‘FROM’ is called an OUTPUT. You receive an audio signal
from an OUTPUT. For example, the speaker terminals on the back of your Hi-Fi amplifier
are the OUTPUTS of the amplifier, the phone jack on your guitar is the OUTPUT of your
guitar, etc.
18 VS-880 Application Guide
SIGNAL PATH – The signal path is the wire (conduit, pipe, conductor, etc.) that carries your audio
signal (the music) from an OUTPUT to the next INPUT. For example, the wire between your
Hi Fi amplifier and your speaker is a SIGNAL PATH. This wire carries the music from the
amplifier to the speaker. Your guitar cord is a signal path. It carries the OUTPUT of the
guitar to the INPUT of your guitar amp or VS-880.
BUSS – A BUSS is a special type of signal path to which a number of inputs may be connected for
feed to one or more outputs. In a mixing console a BUSS is usually a long piece of wire to
which any input channel may be connected by means of a switch or push button. The end of
the wire (buss) goes into a combining amplifier or summing amplifier to combine all the
INPUTS together. The combining amplifier then feeds one of the console outputs.
LEVEL – The last item to consider about signal flow is the level or volume of the signal.
Audio signals can be very low level (the output of a dynamic microphone if you whisper into it) or
extremely high level (the output of your 400 watt power amplifier).
There are two basic audio levels of interest when using your VS-880 – Microphone Level and Line Level.
The term of measurement for level is the decibel (dB). This is not the place for a complete description of the
decibel, however, a few numbers are handy to remember.
Dynamic Microphone Level
-50 dBm
Condenser Microphone Level
-30 dBm
HI FI Line Level
-10 dBV
Professional Line Level
+ 4 dBm
0 dBm = 0.775 Vrms, 0 dBV = 1 Vrms
These are nominal levels for reference only. In actual usage, microphones and other
audio equipment exhibit a very wide dynamic (level) range. The important thing to
remember is that all audio equipment operates at some internal “nominal” level. If,
for example, you feed a very high level signal into an input designed for a low level
signal, the input will distort (you “overdrive” the input). Conversely, if you feed an
extremely low level signal into an input designed for a high level signal, you will
add noise to the audio signal.
The VS-880 uses “variable” level inputs. This allows you to send a wide range of signal levels into the VS880 without distortion or noise. The INPUT SENS (input sensitivity) knobs in the upper left corner of the
front panel control the variable inputs.
When they are set to -50, it means that they are set to receive a nominal level of -50 dBm (dynamic
microphone). Conversely, when they are set to +4, they should receive an input level of approx. + 4 dBm.
The “nominal” operating level of the VS-880 is -10 dBV.
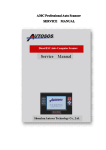
A Mixer Analogy
To best understand the concepts of signal flow, let’s think about the plumbing in your own home and use it
to illustrate the signal flow in the VS-880 mixer.
Chapter 2: Understanding Your VS-880
19
Your House
Kitchen Sink
INPUTS
Toilet
INPUT
OUTPUT
INPUTS
OUTPUT
OUTPUT
OUTPUT
INPUT
INPUT to house
from water line
Bathtub
OUTPUT
OUTPUT
to street
OUTPUT
INPUTS
Water Heater
Bath Sink
Cold Water (Bus)
Drain
(Bus)
Hot Water (Bus)
Think of your home as the VS-880 mixer. The cold water coming into your home from the main supply in
the street is just like the audio signal from your guitar entering an input of the VS-880. As shown in the
plumbing diagram, the cold water branches into two directions, the kitchen sink and your water heater.
The same thing can happen in the VS-880. The guitar signal can be sent to a reverb device (water heater)
and a recording track (kitchen sink) simultaneously.
The water (guitar) that has passed through the water heater (reverb) is now very hot (has lots of reverb).
The original cold water (dry guitar) travels to the kitchen sink (recording track) by one path and the hot
water (reverb guitar) travels to the kitchen sink (recording track) by a different path or pipe.
We have faucets (faders) at the kitchen sink that can control the mix of cold and hot water entering the
sink. Just like a fader or volume control in the VS-880 controls how much dry guitar and how much reverb
guitar are mixed together and sent on to the drain (output).
Once the cold and hot water are mixed in the kitchen sink, they become warm water which flows out the
drain to the street (output).
Whenever you want to visualize the signal flow in your VS-880, think about the water flow in your own
home. If you can always think about “where is the signal coming from” and “where is the signal going
next”, you should not have any difficulty navigating the mixer in your VS-880.
Sometimes it is also helpful to think about the audio signal as an actual wire (patch
cord) that you are holding in your hand. For example, plug a cable into your guitar.
Hold the other end in your hand. You are now holding an OUTPUT (the output of
the guitar). Every OUTPUT is always looking for the next INPUT. So I plug the
guitar cord into the INPUT of the VS-880. Now you visualize the guitar signal
flowing through the input amplifier, etc.
The VS-880 Mixer
As you can see from the front panel, the VS-880 provides 8 channel mixing faders. However, unlike a
conventional analog mixer where every fader is hard-wired to perform a specific function, the VS-880
digital mixer is virtual (assignable) – meaning that you can change the function of the buttons and faders
by selecting a different mixer mode. Each mode is designed for different configurations and exhibits
unique functions which provide the VS-880 digital mixer a high degree of flexibility.
20 VS-880 Application Guide
The two master Mixer Modes are Input>Track and Input Mix / Track Mix:
Selecting Mixer Modes
When you power-on the VS-880, INPUT>TRACK mode is selected automatically. The other two mixer
modes can be entered by holding the [SHIFT] button and pressing the [SELECT] button.
The orange LED next to INPUT MIX will illuminate indicating that it is selected. Switching between
INPUT MIX and TRACK MIX is accomplished by pressing only the [SELECT] button. These two modes
work in tandem with each other as described below.
Refer to the following mixer mode diagrams to familiarize yourself with the signal path in each mode. The
audio flows in the direction of the arrow.
INPUT>TRACK Mode
The [Input/Buss] function (CH EDIT button 1) is used to route the Input signal (rear panel of the VS-880)
to the desired recording Track (1 – 8). Any Input (1 - 6) can be assigned to record to any Track (1 - 8). In
other words, Input 2 could be assigned to record on Track 5. That Track is automatically routed to its
corresponding mixer channel (Track 1 > Mixer channel 1, Track 2 > Mixer channel 2, etc.) for playback.
Therefore, if we’re recording a signal that is coming in from Input 2 and we’re recording it onto Track 5, the
channel 5 fader will be the fader you use to adjust playback volume.
When the INPUT>TRACK mode is selected, you have the choice of recording with or without effects and
EQ. This is chosen for individual channels with the Channel Edit function “EQ/EffPreIns.”
Recording Without Effects in INPUT>TRACK Mode
INPUT>TRACK mode with the Channel Edit function “EQ/EffPreIns” set to OFF routs the rear panel
Inputs directly to a recording Track – bypassing the mixer (faders, pan knobs, EQ, etc.) entirely. Notice how
the signal goes directly from the Inputs to the Recorder Tracks. The Mixer, in this mode, is used mainly for
adjusting the EQ, level and pan position for playback of the recorded Tracks. Even though you will hear
the changes you make to the EQ, effects, panning, etc. while you are recording, these changes will not be
recorded to the disk tracks since they all occur after the tracks have been recorded.
Chapter 2: Understanding Your VS-880
21
Recording With Effects in INPUT>TRACK Mode
INPUT>TRACK mode with “EQ/EffPreIns” set to ON routs the rear panel Inputs through the EQ and
Effects sections of the Mixer before sending the signal to a recording track. Input signals can be recorded
with EQ and Effects with this option. Level and pan position are not recorded, and are set for playback of
the recorded Tracks.
The channel faders 1-8 correspond directly with recorded tracks 1-8 (not the input
connectors. When you are monitoring an actual recorded track, Fader # 1 will
always be Track # 1, Fader # 2 will always be Track # 2, etc.
INPUT MIX / TRACK MIX Mode
These two modes are basically two parts of the same recording and playback “Mix” mode. It is in this
mode that the VS-880 can be used as a 14 channel mixer: 6 Inputs from the rear panel (INPUT MIX) and 8
recorded Tracks (TRACK MIX).
INPUT MIX and TRACK MIX mode operate simultaneously. You can switch between INPUT MIX
and TRACK MIX modes without losing the settings made in the opposite mode. In other words, if
you make settings in the INPUT MIX mode, then switch to TRACK MIX mode to make more
settings, then switch back to INPUT MIX mode, the original settings of INPUT MIX are still there.
INPUT MIX
INPUT MIX mode allows you to have up to six audio sources mixed in with the eight recorded Tracks – all
going to one stereo output.
For example, let’s imagine that you are synchronizing your sequencer (computer or keyboard workstation)
with the VS-880. Maybe your sequencer tracks are piano, bass, and drums. You have recorded vocals, sax
and guitar on the VS-880. The sequencer tracks and the VS-880 tracks can all be mixed simultaneously to
DAT with EQ and effects.
In INPUT MIX mode, the faders and pan knobs control only the audio sources plugged into the Inputs on
the rear of the VS-880, not the recorded tracks. Each physical input (on the rear panel of the VS-880) is
automatically assigned to its corresponding mixer channel (Input 1>mixer channel 1, Input 2>mixer
channel 2, etc). The digital input Left and Right assign to channels 5 and 6 respectively. An external analog
to digital converter can be used to connect analog signals to the digital Inputs.
22 VS-880 Application Guide
Many DAT machines can be used as an analog to digital converter. Plug a microphone or line level
instrument into your DAT machine’s analog audio input and connect the digital output of the DAT
to the VS-880 digital input. You will probably have to put the DAT in Record/Pause mode to have
the audio pass through it without recording. Check your DAT manual.
After the audio signal passes through the EQ, Fader, and Pan can be routed to a stereo record buss (Track
1-2, 3-4, 5-6, 7-8) or the MIX buss (speakers or headphones). The audio level recorded to disk is controlled
by the fader.
If you are recording to both Tracks of the stereo pair (Track 1-2 for example), the channel PAN
control determines the amount of audio signal recorded on each track. For example, it the PAN
control is set full left, the audio will only be recorded on Track 1. Alternatively, a panning completely to the right will record only on Track 2. If you set the PAN control in the center, an equal
amount of signal will be recorded on both Tracks 1 and 2.
TRACK MIX
The other half of this mixer mode is TRACK MIX. To adjust playback levels of Tracks you have already
recorded, switch to TRACK MIX mode.
Use the [SELECT] button to switch back and forth (toggle) between INPUT MIX and TRACK MIX mode.
You are essentially accessing two different mixers with the same set of physical controls (sliders, knobs,
buttons, etc.)
Chapter 2: Understanding Your VS-880
23
The audio recorded on the Tracks, after the EQ, Fader, and Pan, can be routed to the MIX buss for
monitoring, or to any of the record busses. Routing the Track(s) to a record buss is a simple way to merge
Tracks or record the output of effects devices to a Track.
Remember, each mixer (INPUT Mix & TRACK Mix) retains its own settings when you switch to the
other. The fader level, pan position, and EQ settings that you set up in INPUT MIX mode are
memorized by the VS-880. So, when you switch to TRACK MIX mode and adjust the fader for
channel 1 (for example), the level of Input 1 in INPUT MIX mode is not affected.
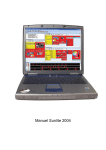
Mixer Effect Routing
The internal effects (if the optional VS8F-1 Effects Expansion Board is installed) can be placed in the audio
signal path at any one of three locations.
1.
PRE-FADER: The input to the effect is selected from the signal path before the fader. This
means that the fader will have no control over the volume of the audio entering the effect.
The stereo output from the effect is assignable to the MIX buss or the REC (recorder) busses.
2.
POST-FADER: The input to the effect is selected from the signal path after the fader. This
means that the fader will control the volume of the audio signal entering the effect. The
stereo output from the effect is assignable to the MIX buss or the REC (recorder) busses.
3.
INSERT:The audio signal is routed directly through the effect. i.e. You will only hear the
“effected” signal because the “dry” signal no longer exists. There are four Insert Effect
options: Insert (mono in/mono out), Insert L (processed through the left side of a stereo
effect), Insert R (processed through the right side of a stereo effect), and Insert S (mono in
through the left side of a stereo effect, then in through the right side of the same stereo effect
in series).
Insert
Insert L
Insert R
PRE-FADER
Effect
POST -FADER
Recorder Mixer
INPUT 1
INPUT 2
INPUT 3
INPUT 4
DIGITAL IN L
DIGITAL IN R
Input select
With "EQ/EffPreIns"
Set to ON
(EQ and effects
are recorded)
EQ and
INSERT
Effect
Track 1
Fader 1
Pan 1
Track 2
Fader 2
Pan 2
Track 3
Fader 3
Pan 3
Track 4
Fader 4
Pan 4
Track 5
Fader 5
Pan 5
Track 6
Fader 6
Pan 6
Track 7
Fader 7
Pan 7
Track 8
Fader 8
Pan 8
– OR –
EQ and
INSERT
Effect
Insert S
Output assignable to
MIX buss or AUX buss
MIX buss (MASTER OUT L)
MIX buss (MASTER OUT R)
With "EQ/EffPreIns"
Set to OFF
(EQ and effects for monitoring, are not recorded)
Effect Routing Options in Input>Track Mode
24 VS-880 Application Guide
Fader 7
Fader 8
EQ 7
EQ 8
Track 7
Track 8
INSERT
Effect
Fader 6
EQ 6
Track 6
Pan 8
Fader 5
EQ 5
Track 5
Pan 6
Pan 4
Fader 4
EQ 4
Track 4
Pan 5
Pan 3
Fader 3
EQ 3
Track 3
Pan 2
Fader 2
EQ 2
Track 2
Pan 7
Buss select
MIX buss (MASTER OUT L, R)
7-8 buss (Recorder)
5-6 buss (Recorder)
3-4 buss (Recorder)
1-2 buss (Recorder)
Pan 1
Fader 1
EQ 1
Track 1
Press 'Select' to
choose which mode
will be affected by
the control panel.
POST -FADER
PRE-FADER
INSERT
Effect
Pan 6
EQ 6
Fader 6
Pan 5
Fader 5
Pan 4
Fader 4
EQ 4
EQ 5
DIGITAL IN 6 (R)
DIGITAL IN 5 (L)
Pan 3
Fader 3
EQ 3
INPUT 4
Pan 2
Fader 2
EQ 2
INPUT 3
Pan 1
Fader 1
EQ 1
INPUT 2
INPUT 1
Effect
Buss select
Output assignable to
MIX buss or REC 1-8 buss
MIX buss (MASTER OUT L, R)
REC 7-8 buss (Recorder)
REC 5-6 buss (Recorder)
REC 3-4 buss (Recorder)
REC 1-2 buss (Recorder)
Output assignable to
MIX buss or REC 1-8 buss
Effect
POST -FADER
PRE-FADER
Input Mix Mode
Both modes are
active at once!
Track Mix Mode
VS-880 as a 14 Channel Mixer using Input Mix/Track Mix Mode
Effect Routing Options in Input Mix / Track Mix Mode
When working with the Preset Patch List that came with the VS8F-1 Effect Expansion Board,
Patches listed as ‘Loop’ type are best used as Pre Fader or Post Fader. They are intended to be used
as if they were on a mixer ‘effect loop’.
Mixer Summary
INPUT>TRACK Mode
The Input signal is recorded directly to disk – bypassing the mixer. Recording in this mode is quick and
easy. You have two choices for using effects in this mode. With the Channel Edit function “EQ/EffPreIns”
set to OFF, you can listen to effects while you’re recording from the VS8F-1 but they won’t be recorded to
disk. This is useful for recording vocals or guitar when you want to provide the musicians some ambiance
for expressive recording, but retain the option of changing the effects later during mixdown. Setting the
Channel Edit function “EQ/EffPreIns” to ON records EQ and Insert effects that are applied to the inputs.
This is useful for effects such as compressors and limiters.
For basic recording of any kind, INPUT>TRACK is the quickest and easiest method.
Chapter 2: Understanding Your VS-880
25
INPUT MIX / TRACK MIX Mode
INPUT MIX is used to mix live music from external sources with the tracks your have already recorded on
your VS-880. You will use INPUT MIX to mix the incoming sources and TRACK MIX to mix the prerecorded tracks – switching back and forth with the [SELECT] button.
TRACK MIX is useful for Track bouncing (recording two or more Tracks onto one Track or a stereo pair),
recording effects Pre and Post Fader, and recording multiple Inputs and/or Tracks to a stereo Track (1-2, 34, etc.).
You can also use Track Mix to record a dry signal to one Track and the effect for that instrument to a
different Track. In other words, if you are recording a vocal with a reverb effect, you can record the dry
vocal to Track 1 and the reverb to Track 2. This will allow you to control the balance of dry vocal and
reverb during mixdown.
In addition, Track Mix allows you to mix Tracks 1 - 6 and Inputs 1 - 6 with EQ, panning and effects to
Tracks 7 - 8. This allows you to bounce tracks digitally within the VS-880, or to master a song recorded and
mixed on the VS-880 – back to the VS-880. If you don’t have a DAT recorder, this method allows you to
make a digital mixdown of your song inside the VS-880.
Now Time
Now Time indicates the exact location in your song where the VS-880 is stopped or playing. It is indicated
by the vertical black line in the center of the LCD display. You might think of this “now line” as the
playback head of a traditional tape recorder. The audio passes under it as it plays. For a look at how Now
Time is used in editing, see the graphic for ‘Finding Your Edit Points’ on Application Guide page 28.
CONDITION MARKER#
***
5
INT
156
TIME
Play List
1+
--069
INPUT TRACK
26 VS-880 Application Guide
***
dB
0
4
12
24
48
AUX MASTER
Virtual Tracks
The VS-880 contains 8 primary recording tracks. In other words, the VS-880 is capable of playing back 8
independent audio signals simultaneously. Each primary recording track has 8 virtual tracks.
Example: Think of a primary recording track as a stack of 8 blank index cards. On the top card (V. Track 1)
we will write First Guitar Solo. On the next card in the stack (V. Track 2) you write Second Guitar Solo. The
card is V. Track 3 and you write the words Third Guitar Solo. etc. You can read the words on the first card
in the stack - First Guitar Solo. The other words are below it, but you cannot read them. However, if you
move the third card to the top of the stack, you read the words Third Guitar Solo, but all the others are
now hidden. The VS-880 Virtual Tracks operate the same way. Whatever Virtual Track you “bring to the
top of the stack” is the V. Track that you will hear. All the other 7 are still there, but they are hidden below
the top one.
You may find it useful to copy the blank virtual track sheet from the appendix of this Application Guide to
keep track of your virtual track recordings.
TRACKS
1
V
2
I
3
R
4
T
5
U
6
7
A
8
L
TRACKS
1
2
3
4
Final MixL Final MixR Gtr Rhy1 Gtr BG1
Gtr Rhy2 Gtr BG2
Gtr Fast Gtr BG3
Gtr Slo
BG Vox1L BG Vox1R BG Vox2L BG Vox2R
5
6
VoxMix1L
VoxMix2L
VoxMix3L
VoxMix4L
VoxMix1R
VoxMix2R
VoxMix3R
VoxMix4R
7
8
Lead 1
Lead 2
Lead 3
Lead 4
Lead 5
Lead 6
Comp 1
Comp 2
Lets assume that you just recorded your first guitar solo on primary recording Track # 2, Virtual track # 1.
To record another guitar solo, you do not have to record over the original recording (as you must do with
an analog tape recorder), you simply switch to the next Virtual Track and record another solo. Once you
have filled all eight virtual tracks, you can listen to them one at a time to choose the very best performance,
or you can mix and merge them as you see fit.
Chapter 2: Understanding Your VS-880
27
Think of each of the eight primary recording tracks in the VS-880 having eight
layers. Each Virtual Track (layer) is completely independent from the others. You
can record up to 64 tracks total, however, only eight can be played simultaneously.
Finding Your Edit Points
The VS-880 provides a number of tools
to assist you in finding the exact location
in your song to make a edit. The confident
use of these tools will make editing and
assembling your song quick and simple.
You may wish to review...
PREVIEW TO,
PREVIEW FROM,
PREVIEW THROUGH (TO + FROM),
and SCRUB.
(see the Owners Manual, page 76)
EXAMPLE: Find the beginning of the word “Cat”. During playback, press [STOP] as close to the beginning
of the word as possible. Press PREVIEW [FROM] and PREVIEW [TO] alternately. If you do not hear the
beginning of “cat” during PREVIEW [FROM], you are too far ahead. If you do not hear the beginning of
‘cat’ during PREVIEW [TO], you are too far behind. Adjust the now time by using the TIME/VALUE dial
until you just hear the beginning of the “C” from ‘cat’ using PREVIEW [TO], then backup slightly.
PREVIEW [FROM] should then begin playing exactly at the beginning of ‘cat’. Your Now Time is set
exactly on the beginning of the word ‘cat’.
An alternate way to edit the above example is the use of SCRUB. Refer to Owner’s Manual page 76-77.
28 VS-880 Application Guide
A quick way to assign the Now Time to an edit point is to hold the [TRACK] button (under EDIT
CONDITION) and press one of the four Locator buttons. Locator 1 assigns the Now Time to ‘Start’,
Locator 2 assigns it to ‘From’, Locator 3 assigns it to ‘End’, and Locator 4 assigns it to ‘To.’ When
you use a Track Edit function that uses these points, they will already be assigned.
Editing Resolution
The VS-880 has the ability to move the Now Line in different size steps. This is very important when you
want to edit your song. For example, if you set the VS-880 step size to one measure, you could only set the
Now Line on the beginning of each measure. That would not give you much resolution if you want to edit
to the beat. If you are editing to SMPTE time code numbers, maybe a resolution of 10 frames per click of
the TIME/VALUE dial would be fine for most applications. However, for tight dialogue editing you might
need to edit to a resolution of 1/10 frame per click of the dial.
• During editing, you can use the Right Cursor button [CURSOR>] to select the next lowest
editing resolution.
1.
Press the [PLAY (DISPLAY)] button.
2.
Press the < [CURSOR] arrow until the MEASURE value in the LCD display begins to blink.
The TIME/VALUE dial will now step through the recording, 1 measure for each click of the
dial.
3.
Press the > [CURSOR] arrow one time. The BEAT value will begin blinking and the TIME/
VALUE dial will step through your song one beat per click of the wheel.
4.
Press the > [CURSOR] arrow one more time. The MARKER value will begin blinking
indicating that the TIME/VALUE dial will step between marker positions with each click of
the dial.
5.
Press the > [CURSOR] arrow one more time. Now the TIME/VALUE dial will step through
the song 1 SMPTE frame per click.
6.
Press the > [CURSOR] arrow one more time. Now the TIME/VALUE dial will step through
the song approximately 1/10 of a SMPTE frame per click of the dial.
Resolution Selection
in LCD Screen
Time/Value Dial
Step Increments
Measure
Beat
Marker
SMPTE Frames
SMPTE Sub Frames
Single Measure
Single Beat
Single Marker
Single Frame
1/10 Frame
[SHIFT] + Time/Value Dial
Step Increments
10 Measures
10 Markers
10 Frames
1/100 Frame
When Sub Frame resolution is selected, use [SHIFT] + the TIME/VALUE Dial to
select the very lowest editing resolution. (1/3,000th of a second or 1/100 Frame).
This is the preferred setting for extremely detailed editing.
(see Owner’s Manual page 56 ‘Moving the current time’, and Applications Guide page 33 ‘Time/Value
Dial’)
Chapter 2: Understanding Your VS-880
29
Using Waveforms To Edit
The VS-880 Scrub feature makes it very easy to find your edit points because you can see a visual
representation of the sound and hear it at its original pitch while editing at a fine resolution of down to
1/3000th of a second. (See Owner’s Manual pages 76-77.)
Undo & Redo
The UNDO command will reverse your previous actions up to 999 times. Press the [UNDO] button and the
LCD will display - UNDO Level = 1. The TIME/VALUE dial will allow you to select how may previous
actions to reverse (undo). For example, if you make 5 recordings on the same track (see figure below) and
then execute the UNDO command with level 3, you will erase (undo) the past three actions (the past three
recordings). Recording # 2 will now be the one that plays back.
recording 5
recording 4
recording 3
recording 2
Undo level 3
recording 1
Time
After completing an UNDO command, the UNDO LED will be lit. You can play your song to see if you are
happy with the UNDO. If you are not, hold the [SHIFT] button and press the [UNDO] button to REDO the
functions. This will effectively cancel the UNDO function you have just completed.
The UNDO command operates for ALL functions of the VS-880. This includes
recording, editing, etc. (see Owner’s Manual pages 112-113 for more information)
Nulling - (Faders & Pan Controls)
Since the physical controls of the VS-880 provide multiple functions (depending on the mixer mode
setting), there must be some way to match the ‘physical’ control position to the ‘electronic’ control position
inside the mixer.
For example, let’s assume that you set Fader # 1 to a physical front panel position of -8 dB while using
INPUT MIX mode. Since you set this Fader in real time, the internal ‘electronic’ level is -8 (the same as the
physical control). Then you switch mixer modes to TRACK MIX. Now you set Fader # 1 to a physical
position of +4 dB to mix Track # 1. When you switch back to INPUT MIX mode, the ‘physical’ fader is set
to +4 (you just set it there), but the internal ‘electronic’ level is still set to -8 dB (which you set the last time
you were using INPUT MIX mode).
In order to realign the physical and electronic levels, the VS-880 provides a function in the System
Parameters called Fader Match. When Fader Match is set to Null, the VS-880 will ignore any movements of
the physical fader, until the physical fader position and the internal electronic position are equal (Nulled).
In other words when you begin to move the fader from the +4 position, no change will occur in the audio
until you lower the fader to -8. Once the internal and physical levels match, the fader will continue to
operate normally. The Pan controls operate in the same manner.
When Fader Match is set to Jump, the actual value will change to the current position of the fader or pan
knob at the instant they are moved.
30 VS-880 Application Guide
A flashing horizontal bar in the LCD display ([SHIFT] + [DISPLAY]) will indicate
the internal ‘electronic’ position of the control. The entire vertical bar indicates the
current ‘physical’ position.
If your faders or pan controls do not appear to operate, you can either: Move the physical control
from one end to the other to assure that you have crossed the NULL position – or – view the LCD
[DISPLAY] to carefully move the physical control into position to match the electronic position.
Channels vs Tracks
The 8 faders, status buttons, and pan controls on the left side of the VS-880 represent mixer channels. They
may or may not represent actual recorded tracks. However, when a fader is being used for a recorded
track, the channel # and the track # will be the same. Her e are the rules for Mixer channels:
• INPUT>TRACK MODE: Each channel fader represents the corresponding recording track.
i.e. Channel 1 = Track 1, Channel 2 = Track 2, etc.
• INPUT MIX MODE: Channel faders represent rear panel source inputs 1-4 and Digital Left
and Right, in that order.
• TRACK MIX MODE: Each channel fader represents the corresponding recording track. i.e.
Channel 1 = Track 1, Channel 2 = Track 2, etc.
Chapter 2: Understanding Your VS-880
31
Important Navigational Rules & Skills to Master
[PLAY (DISPLAY)] Button
Use the [PLAY (DISPLAY)] button (directly below the bottom right hand corner of the LCD display) to
escape from the current command. For example, if you are lost or confused about where you are, press the
[PLAY (DISPLAY)] button to return to a ‘safe’ position and start over.
When used with the [SHIFT] button, it toggles the LCD to different displays (see Owner’s Manual page
114).
Transport Buttons
The Transport buttons operate the internal recorder section of the VS-880. (Play, Stop, Record, Rewind, Fast
Forward, and Return to Zero)
[SHIFT] Button
Use the [SHIFT] button to access ‘white box’ commands.
Press and hold the [SHIFT] button whenever you want to access a VS-880 command which is indicated on
the front panel by a white outline box with internal white lettering (for example: SONG END). To locate to
the SONG END, hold down the [SHIFT] button and press the [SONG END] button.
[CH EDIT] Buttons
Use the [CH EDIT] button to select a specific channel to edit.
Press the [CH EDIT] button to instruct the VS-880 which track you want to work with. For example, if you
want to change the virtual track on channel 4, you would first press the [CH EDIT] button above fader # 4
to select channel # 4 for editing. Then press [SHIFT] + [VTrack] (CH EDIT button # 2) to select the Virtual
Track parameter to edit. Then use the Time/Value dial to select the VTrack of choice.
[STATUS] Buttons
The Channel Status buttons are used to toggle each channel between four operational modes:
SOURCE Listen to the incoming source plugged into the rear panel.
REC
Place track into record ready mode.
PLAY
Place track into playback mode.
MUTE
Turn channel off.
32 VS-880 Application Guide
[PARAMETER] Buttons
Use the [PARAMETER] buttons to change screens (pages) in the LCD display.
For example, you would use the [PARAMETER] buttons to move through the different screen displays
used during the editing process.
[CURSOR] Buttons
Use the [CURSOR] buttons to navigate around the inside of a single screen display.
For example, use the [CURSOR] buttons to move from one value setting to another inside the same screen.
The [CURSOR] buttons are also used as the [YES] / [NO] buttons.
[YES] / [NO] Buttons
The [YES] button is also used to answer YES whenever the VS-880 displays a question in the LCD.
Alternately, the [NO] button signals a NO response. For example, anytime the VS-880 display asks you a
question (i.e. when you see a ?), you must press the [YES] button to continue forward or press the [NO]
button to return to the previous command.
TIME/VALUE Dial
The [TIME/VALUE] dial is used for to two separate functions.
A:
To change the actual value of a selected (highlighted) setting in the LCD screen display.
B:
To move forward or backward in time, through the recording.
Use the cursor buttons to change the selected value of each click of the TIME/
VALUE dial (see editing resolution - Application Guide page 29).
Chapter 2: Understanding Your VS-880
33
VS-880 Demo Song
All VS-880’s are shipped with at least one demo song. Use it to experiment with your VS-880 to
familiarize yourself with the controls The demo song contains settings that allow you to switch scenes and
compare different versions of the song.
Each track of the song titled “VS-880 Demo” contains the following data (No data has been recorded in the
blank V-tracks).
V-Track 1
V-Track 2
V-Track 3
V-Track 4
V-Track 5
V-Track 6
V-Track 7
V-Track 8
Track 1
Track 2
Track 3
Track 4
Track 5
Track 6
Track 7
Track 8
Brush Drum L
Brush Drum R
Upright Bass
Blues Guitar
Ac. Guitar
Electric Guitar
Organ
Male Voice
Big Drum L
Big Drum R
Fretless Bass
Harmonica
Female Voice
Slide Guitar
Narration
About the scenes
The demo song contains four scenes. Each scene contains a different selection of Virtual tracks and the
appropriate mixer settings. Use the following procedure to switch scenes and compare the performances.
For details on scenes, refer to “Storing mixer settings (Scene)” (p.52) in your VS880 owner’s manual. Each scene also includes effect settings. If a VS8F-1 effect
expansion board is installed in your VS-880, the selected effects will be added to the
song.
1.
With the song stopped, press the [SCENE] button. (the LED will light)
2.
Press the [LOC] button for the desired scene number. (the LED’s above LOC button # 1, 2, &
3 will be lit, showing they have a stored scene in that location).
3.
Press the [PLAY] button to playback the demo song. When the demo song finishes playback,
select another scene and playback the demo song again.
4.
When you finish comparing scenes, press the [SCENE] button again to exit SCENE mode.
The V-tracks selected for each scene are as follows:
Track 1 Track 2 Track 3 Track 4 Track 5 Track 6 Track 7 Track 8
• Scene 1
V-Track 1
V-Track 2
• Scene 2
V-Track 1
V-Track 2
• Scene 3
V-Track 1
V-Track 2
• Scene 4
V-Track 1
V-Track 2
Track 1 Track 2 Track 3 Track 4 Track 5 Track 6 Track 7 Track 8
Track 1 Track 2 Track 3 Track 4 Track 5 Track 6 Track 7 Track 8
Track 1 Track 2 Track 3 Track 4 Track 5 Track 6 Track 7 Track 8
The VS-880 Demo Song - Copyright © 1996 Roland Corporation. Unauthorized public performance, broadcasting, sale, distribution,
or recording of this demo song on tape or any other medium for purposes other than your own personal enjoyment is prohibited by
law.
34 VS-880 Application Guide
VS-880 Connections
SCSI (Small Computer System Interface)
SCSI is a protocol for high-speed recording and data transfer between computer devices. For our purposes,
the VS-880 is a computer that has all the recording hardware and software built in. You will use this SCSI
connector to add external hard disks for additional recordings. (see Owner’s Manual page 130 for detailed
information).
MIDI IN and OUT/THRU
The MIDI connectors on the VS-880 are very versatile, adding more functionality to the VS-880 than can be
accessed from the front panel. For example, the MIDI ports allow you to connect to external sequencers
and MIDI sound modules (see Owner’s Manual page 86). MIDI also allows you to record and play back
VS-880 fader movements with your external sequencer and sync your VS-880 to other MIDI devices.
DIGITAL IN and OUT
The Digital In connector allows information from an external digital audio source (CD player, DAT
machine) to be digitally recorded into the VS-880. Likewise, the Digital Out allows the VS-880 to transmit
digital audio data to an external recording device (DAT machine, MiniDisc recorder, CD recorder). Besides
recording and playback, the Digital In and Out are also used to Backup and Restore song data to the VS880. You can backup the VS-880 data to digital audio tape (DAT).
The Digital IN/OUT conforms to the S/PDIF standard.
FOOTSWITCH
A momentary switch (i.e. Roland DP-2, DP-6, FS-5U) can be connected to the footswitch jack to activate
certain operations. For example, if you set the Footswitch to Record, you could use a DP-2 pedal to activate
Punch In/Out, keeping your hands free to play the guitar, keyboard, etc. Other footswitch functions
include: Play/Stop, Tap Marker, Previous, Next and GPI. (General Purpose Interface is basically an on/off
switch contact which can be supplied by an external device such as a video editor - see Owners Manual
page 110). Select the function to be controlled by your footswitch in the SYSTEM display. If this is not
selected correctly, the footswitch will appear to be non-operational.
Chapter 2: Understanding Your VS-880
35
PHONES
Plug a pair of headphones into the PHONE jack. Use the PHONES control on the front panel to adjust the
volume. The PHONES jack and the MASTER OUT jacks have exactly the same program material
INPUT B
These Inputs are analog audio RCA phono type jacks for any type instrument or device that uses an RCA
phono type jack (i.e. CD player, tape deck, etc.) Any of the four Inputs can be routed to any recording
track. The front panel knobs labeled INPUT SENS control the volume of Inputs 1-4.
INPUT A
These input jacks, are identical in audio function to the analog RCA phono type jacks labeled Input B.
However, there are two main differences:
1. 1/4” phone jacks are used for Input A.
2. Input A overrides Input B. i.e. If you have an input source plugged into an Input B (RCA
jack) and then plug a cable in the corresponding Input A (1/4” phone jack), the Input B
source will not be heard.
AUX SEND A & B
B
A
AUX SEND
These outputs allow recorded tracks to be sent to external devices in addition to the Maser Outs. There are
a number of reasons you might want to do this. For example, you might use the Aux Sends to route the
bass track to an external effects processor for compression and the vocal track to an external effects
processor for harmonizing. External effects can be used simultaneously with the VS8F-1 Effects Expansion
Board (if installed). Another application for the Aux Sends is to provide additional individual outputs. By
assigning two tracks to the Aux Send busses and panning them left and right, those tracks will have
discrete analog outputs. This method provides four discrete analog outputs from the VS-880.
MASTER OUT
R
L
MASTER OUT
These RCA phono type jacks provide the main stereo output from the VS-880. Normally you will connect
these jacks to the left and right inputs of your external amplifier or speaker system. If you are using the VS880 with an external mixing console, simply plug a cable from each master output connector to a separate
input of your mixing console.
The identical audio program material appears on the Digital Outputs, the Master
Outputs, and the Phones Output simultaneously.
36 VS-880 Application Guide
Comments On VS-880 Connections
The VS-880 uses 1/4” phone and RCA phono jacks as input connectors. Your microphone may already
come equipped with a 1/4” phone plug on the cable or you might need to adapt the XLR connector from
some microphones to the 1/4” phone jack on the VS-880. Adapters and cables are readily available from
your Roland dealer or music supply store.
1/4” balanced connectors (ring, tip, sleeve) and 1/4” unbalanced connectors (ring,
tip) will work equally well into the VS-880.
Phantom Power
All condenser microphones require some type of power source to operate correctly. They may have a built
in battery, connect to their own external power supply, or they might require “phantom powering”.
Phantom Power microphones are the most common today. Phantom power microphones obtain their
power directly through the mic cable, from the device they are connected to. The VS-880 does not provide
phantom power for this type of microphone. You might use an external analog mixer that does supply
phantom power as a mic preamp, or, you can use an external microphone preamp to power the
microphone and connect its output to the VS-880.
Creating A New Song
1.
Press [SONG] (under EDIT CONDITION) until “SNG Song New?” is displayed. Press [YES].
2.
“SNG SampleRate =” will be displayed. Use the TIME/VALUE dial to select the desired
sample rate (32kHz, 44.1kHz, or 48kHz).
3.
Press the [PARAMETER>>] button and “SNG Record Mode =” will be displayed. Use the
TIME/VALUE dial to select the desired record mode (MAS, MT1, MT2, or LIV).
4.
Press [YES].
5.
“SNG Create NewSong?” will be displayed. Press [YES].
6.
“SNG Create New-Sure?” will be displayed. Press [YES].
7.
“SNG STORE CURRENT?” will be displayed. Press [YES] to save any recent changes to the
current song or press [NO] to discard all changes made to the current song since the last
time it was saved to disk.
“Now Working” will be displayed. When the VS-880 is finished creating the new song, it will return to
Play condition.
You should name your song before you begin recording (see Application Guide page
38).
Chapter 2: Understanding Your VS-880
37
Naming A Song
When creating a new song it is a good idea to name that song. If you do not name the song, the VS-880
automatically assigns a name such as “Init Song 001, 002…”, depending on how many new songs have
been created during the current recording session. After multiple sessions you may end up with more than
one song with the same name at different song number locations, which can be confusing. Use the
following procedure to name each song before you begin recording.
1.
Press [SONG] until “Song Name/Prtct?” is displayed.
2.
Press [YES].
3.
Use the TIME/VALUE dial and the [<CURSOR>] buttons to select alphanumeric characters
for the name of the song.
4.
When the name is complete, press the [PLAY (DISPLAY)] button to return to the previous
screen.
5.
Press [SHIFT] + [STORE]. The display will indicate “STORE OK?”.
6.
Press [YES].
Defining Default Settings
The VS-880 has many global system settings that affect your recordings. For
example, selection of sampling rate, clock sync source, TIME/VALUE dial step
resolution, footswitch function, metronome settings, etc. becomes very important.
Once you become familiar with the operation of your VS-880, you will establish the
“normal default” settings for your particular style of recording. In order to return to
these default settings when you begin a New Song;
1.
Create a New Song.
2.
Name it “DEFAULT SONG”
3.
Set all the parameter settings to your chosen defaults.
4.
Do not record any audio tracks.
5.
Save the Song to disk.
6.
Each time you want to begin a new recording, select “Default Song”.
7.
COPY it to a New Song.
8.
Name the New Song.
9.
Select the New Song and begin recording with all your defaults already preset.
A complete list of the possible parameter settings for the VS-880 are listed in the
“Parameter List” section of the Owner’s Manual page #138.
38 VS-880 Application Guide
Save Your Song to Disk Often
Since the VS-880 creates editing information in RAM (Random Access Memory) before it is saved to disk, it
is a good idea to save (store) your song to hard disk often. If the AC power failed, you would loose all the
recordings and edits made since the last time your song was stored on the hard disk.
1.
Press [SHIFT] + [STORE (ZERO)]. The display will indicate “STORE OK?”.
2.
Press [YES].
Since hard disk drives are mechanical devices, they are more subject to failure than
any other part of your VS-880. If your hard disk develops a problem or fails for any
reason, you may lose all the songs stored on that disk. It is a good idea backup your
songs often by copying them to another disk or backing them up to DAT (see
Owner’s Manual page 94 - Copying Song Data, and page 97 - DAT Backup).
You may also refer to the section of this Application Guide - DAT Backup and DAT
Recover (see Application Guide pages 103-104).
Chapter 2: Understanding Your VS-880
39
Sample Setup
The VS-880 can be integrated into a large variety of studio environments. The diagram below depicts one
possible system idea.
XP-50/80 Music Workstation
Audio from
Keyboard,
Microphone,
Guitar, or
Mixer
MIDI
MIDI Interface
Computer with
Serial Cable
connection
MIDI Sync via
MMC, MTC
Digital Mix to DAT
DAT Recorder
40 VS-880 Application Guide
Chapter 3: Recording Applications
Record A Single Piano Track From A Synthesizer
Probably the most common recording you will do is a single instrument or microphone directly to a single
track of the VS-880. Our example records a synthesizer as a piano track on the VS-880.
You will need to connect your synthesizer to the VS-880 Input # 1, select Tr. 1-1 for recording, correctly
adjust the volume, then finally record the instrument to Tr. 1-1.
ACTION: Record A Single Piano Track From A Synthesizer
1.
Connect the output of your synthesizer to the VS-880 - Input #1
2.
Play the keyboard as loud as you will during the performance and turn the [INPUT SENS 1]
knob clockwise until the PEAK light turns red, then turn it slightly counterclockwise until
the red peak LED goes off. (The read peak LED should only come on occasionally during the
loudest point of your performance.)
3.
If mixer mode INPUT>TRACK is not selected (LED is off), hold the [SHIFT] button and
press the [SELECT] button under the MIXER MODE label repeatedly until the
INPUT>TRACK mode is selected (LED is on).
4.
Press the [CH EDIT] button 1 to select channel 1.
5.
Hold [SHIFT], then press the INPUT/BUSS (CH EDIT 1 button).
6.
Rotate the TIME/VALUE dial to select CH 1 Input = INPUT - 1. (this is the normal default
setting unless you have changed it).
7.
Press the [STATUS] button of channel 1 until it flashes red. This selects track one to record
ready mode.
8.
Raise the [FADER] on the channel 1 to listen to the keyboard.
The fader controls what you hear, it will not affect the recording level.
9.
Press the [ZERO] button to return the VS-880 to time location 00:00.
10.
Press the [REC] button. The red light will flash.
11.
Press the [PLAY] button to begin recording the keyboard track.
Chapter 3: Recording Applications
41
Play A Piano Track And Add Markers & Locators
Once a single musical track has been recorded, it is very helpful to place markers throughout the song to
make it easy to quickly find different sections. For example, you might want to put a marker at the
beginning of each verse, a marker before and after the solo sections, and maybe another marker before the
ending.
During playback of your song, you can place markers ‘on the fly’ at all the appropriate places in your
song. ‘On the fly’ means that you place the markers during the actual playback of the song, in real time.
You can always adjust the exact location of the marker later if it is not in precisely the correct place.
Marker Points
The VS-880 provides up to 1000 potential marker points that can be entered using the [TAP] button and
located by two methods outlined below.
Locator Points
The VS-880 also provides 32 Locator points. These are identical to Marker Points except that they can be
directly accessed from buttons on the front panel. These do not use a marker # position since they have
corresponding panel buttons.
ACTION: Play A Piano Track And Add Markers & Locators
Marker Points
Setting a Marker Point
1.
While playing the piano track you just recorded, press the [TAP] button (in the LOCATOR
section) at every location you want to place a mark.
Moving to a Marker Point
1.
To move to a marker point after the current location, press the [NEXT] button. Notice the
Marker number currently cued shows up in the LCD display under Marker #.
2.
To move to a marker point before the current location, press the [PREVIOUS] button.
Directly Specifying a Marker Point
1.
Use the [CURSOR] buttons to select the MARKER # field in the LCD display. (it will blink
when selected)
2.
Use the [TIME/VALUE] dial to select what marker # you would like to locate to. The VS-880
will automatically locate to the marker # you select in the Marker # window.
Alternate Method to Specify a Marker Point
You can directly specify the marker point by pressing the [NUMERICS] button (When the
NUMERICS button is lit, the ten LOCATOR buttons 0-9 act as numeric keys to specify
numbers).
1.
Use the [CURSOR] buttons to select the MARKER # field in the LCD display. (it will blink
when selected)
2.
Press the [NUMERICS] button so the LED above remains lit.
3.
Enter the number of the marker point.
4.
Press [YES] to locate to the chosen marker point.
Notice the [NUMERICS] LED goes off after each use. To locate using NUMERICS, you must press this
button each time.
(Continued)
42 VS-880 Application Guide
(Market Points, Continued)
Clearing a Marker Point
1.
Locate the VS-880 to the marker point you wish to clear, hold the [CLEAR] button (in the
LOCATOR section) and press the [TAP] button.
Clear All Markers
1.
Hold down the [SHIFT] and [CLEAR] buttons, then press the [TAP] button.
2.
The display will show “Clear ALLMarker?”
3.
Press the [YES] button.
Locator Points
Setting a Locator Point
1.
While playing the piano track you just recorded, press one of the [LOC] buttons (in the
LOCATOR section) at every location you want to place a Locator point. The LED will light
when a location is stored in that button.
Moving to a Locator Point
1.
To move to an active Locator point (LED is on), just press the appropriate [LOC] button..
Clearing a Locator Point
1.
Hold the [CLEAR] button (in the LOCATOR section) and press the [LOC] button you wish to
clear. The LED will turn off, indicating that this location is empty and can be used to store a
new location.
Holding the [SHIFT] button when pressing a [LOC] button will access the next set
of locator numbers. For Example, [SHIFT] + [LOC] 2 locates to location # 6.
Using Locator Banks
The VS-880 provides multiple banks of Locator positions. You have 8 locator positions available directly
from the front panel (buttons for [LOC] 1-4, plus [SHIFT] = 5-8). These eight positions can be switched
between four different locator banks. For example, Bank 1 has positions 1-8, Bank 2 has positions 1-8, Bank
3 has positions 1-8 and Bank 4 has positions 1-8. This bank switching provides a total of 32 locator
positions.
1.
Hold [LOCATOR] (under EDIT CONDITION) and press one of the four [LOC] buttons to
select a Locate Bank (LOC 1 will select Locate bank 1, LOC 2 will select bank 2, etc.).
Chapter 3: Recording Applications
43
Record Vocal With Mic And External Compressor
In order to control the volume of an audio signal being recorded into the VS-880, it is sometimes advisable
to use an external limiter or compressor to control the dynamic range of your microphone before
recording. (Limiter and compressor are defined in the Appendix).
You will need to connect your microphone to the VS-880 Input # 1, select Tr. 1-1 for recording, correctly
adjust the volume, then finally record the instrument to Tr. 1-1.
You record on the VS-880 as outlined on page 41 of this guide, however, you must first make the proper
settings on your external limiter.
ACTION: Record Vocal With Mic And External Compressor
1.
Connect the microphone to the input of the compressor/limiter according to the instructions
of the compressor device.
2.
Connect the output of the compressor/limiter to Input # 1 of the VS-880.
3.
Adjust the settings of the compressor/limiter (see the instructions for the device).
4.
Sing into the microphone as loud as you will during the performance and turn the [INPUT
SENS 1] knob clockwise until the PEAK light turns red, then turn it slightly
counterclockwise until the red peak LED goes off (the read peak LED should only come on
occasionally during the loudest point of your performance).
5.
If mixer mode INPUT>TRACK is not selected (LED is off), hold the [SHIFT] button and
press the [SELECT] button under the MIXER MODE label until the INPUT>TRACK mode is
selected (LED is on).
6.
Press the [CH EDIT 1] button to select channel 1.
7.
Hold the [SHIFT] button, then press [INPUT/BUSS] (CH EDIT 1 button).
8.
Rotate the TIME/VALUE dial to select CH 1 INPUT = INPUT - 1 (this is the normal default
setting unless you have changed it).
9.
Press the [STATUS] button of channel 1 until it flashes red. This selects track one to record
ready mode.
10.
Raise the [FADER] on the channel 1 to listen to the microphone.
The fader controls what you hear, it will not affect the recording level.
11.
Press the [ZERO] button to return the VS-880 to time location 00:00.
12.
Press the [REC] button. The red light will flash.
13.
Press the [PLAY] button to begin recording the microphone.
44 VS-880 Application Guide
Record 5 Guitar Tracks Using Virtual Tracks
If you are unfamiliar with virtual tracks in the VS-880, refer to page 27 of this guide for more details. It is
often desirable to record many takes or recordings of the same musical instrument or vocal so you can pick
the best performance to use in you final song. You could obviously record on separate tracks of the VS-880,
pick the one you like best, and then erase the other tracks. However, once you erase the other tracks, they
are gone forever. Virtual tracks allow you to pick between different performances and change your mind
right up until the final mixdown.
If you want to be able to record multiple performances of the same song in sync with each other on
separate virtual tracks, you will need some type of recorded track to use as a guide. For example, you
might first make a recording of your song using a piano on Tr. 1-1. Now the piano can be your guide for
adding a guitar part on multiple virtual tracks of track 2. Once the guide track is recorded, you will set the
VS-880 to playback Tr. 1-1 while recording your guitar on Tr. 2-1. You then record Tr. 2-2, then Tr. 2-3, etc.
Once all virtual tracks are recorded, you can go back and listen to the tracks one by one to choose the best
performance.
ACTION: Record 5 Guitar Tracks Using Virtual Tracks
1.
Connect your guitar to INPUT # 2 of the VS-880.
2.
Play the guitar as loud as you will during the performance and turn the [INPUT SENS 2]
knob clockwise until the PEAK light turns red, then turn it slightly counterclockwise until
the red peak LED goes off. (The read peak LED should only come on occasionally during the
loudest point of your performance.)
3.
If mixer mode INPUT>TRACK is not selected (LED is off), hold the [SHIFT] button and
press the [SELECT] button under the MIXER MODE label until the INPUT>TRACK mode is
selected (LED is on).
4.
Press the [CH EDIT 2] button to select channel 2.
5.
Hold the [SHIFT] button, then press [INPUT/BUSS] (CH EDIT 1 button).
6.
Rotate the TIME/VALUE dial to select CH 2 INPUT = INPUT - 2 (this is the normal default
setting unless you change it).
7.
Press the [STATUS] button of channel 2 until it flashes red. This selects track (channel) 2 to
record ready mode.
8.
Raise the [FADER] on channel 2 to listen to the guitar.
9.
Press the [ZERO] button to return the VS-880 to time location 00:00.
10.
Press the [REC] button. The red light will flash.
11.
Press the [PLAY] button to begin recording the guitar.
12.
After you complete your first guitar track, stop the VS-880 and press the [ZERO] button to
return to the beginning of the song.
13.
Press the [CH EDIT 2] button.
14.
Hold the [SHIFT] button and press [V TRACK] (CH EDIT 2 button).
CONDITION MARKER#
CH2
1
INT
229
TIME
V.Track=
1
--192
INPUT TRACK
2
dB
0
4
12
24
48
AUX MASTER
(Continued)
Chapter 3: Recording Applications
45
(Record 5 Guitar Tracks using Virtual Tracks, Continued)
15.
Use the [TIME/VALUE] dial to select Virtual Track 2. The top line of the LCD should read
CH2 V.Track= 2.
16.
Press the [PLAY/DISPLAY] button to return to the play screen.
17.
Press [REC], then [PLAY] to record your second guitar track on Tr. 2-2.
18.
Repeat steps 15-19 to record the other virtual tracks.
19.
To listen to each virtual track recording, press the [STATUS] button above fader 2 repeatedly
until the LED is green (play mode)
20.
Hold the [SHIFT] button and press [V TRACK] (CH EDIT 2 button).
21.
Use the [TIME/VALUE] dial to select between each of the virtual tracks you have recorded.
You can listen to one, then select another and listen, then select another and listen, etc. Note:
You cannot change Virtual tracks while the VS-880 is in PLAY. You must press [STOP]
before changing virtual tracks.
46 VS-880 Application Guide
Listening To A Guitar Using Internal Effects
There may be occasions where you want to just audition different effects on your instrument without
actually recording anything. Maybe you just want to experiment with different reverb effects or change an
EQ. This example uses the optional VS8F-1 Effect Expansion Board.
You will setup the VS-880 as though you are going to record the guitar with effects, however, you will not
actually press the record button to begin recording.
ACTION: Listening To A Guitar Using Internal Effects
1.
Hold the [SHIFT] button and press the [SELECT] button under MIXER MODE - choose the
INPUT>TRACK Mixer mode.
2.
Plug your Guitar into Input #2 on the rear of the VS-880 (1/4” phone jack).
3.
Press the [STATUS] button above fader 2 to select SOURCE (orange LED).
4.
Play the guitar as loud as you will during the performance and turn the [INPUT SENS 2]
knob clockwise until the PEAK light turns red, then turn it slightly counterclockwise until
the red peak LED goes off. (The read peak LED should only come on occasionally during the
loudest point of your performance.)
5.
Raise the FADER on channel 2 to listen to the guitar.
6.
Press the [CH EDIT] button to select Channel 2.
7.
Hold the [SHIFT] button and press the [EFFECT 1] (CH EDIT 7) button.
8.
Use the TIME/VALUE dial to select CH2 EFFECT 1 = Insert.
9.
Press the [EFFECT] button under EDIT CONDITION repeatedly until you see EFFECT-1
PRM ? in the LCD display.
10.
Press the [YES] button.
11.
Use the TIME/VALUE dial to select the effect you want to hear, then press the [YES] button.
See information about Pre-Fade, Post-Fade, and Insert on page 24 of this guide.
Chapter 3: Recording Applications
47
Recording A Guitar ‘Dry’ While Listening With Effects
There are many times that you may want to record a track ‘dry’, (without any effects), but you might want
to listen to effects during the recording. A typical example is listening to reverb on your guitar while you
are recording it, but not recording the reverb on the guitar track. By listening to the effects during
recording, you can begin to think about what you might use for effects during the mixdown. However,
since the track is ‘dry’ (no recorded effects), you will be able to wait until mixdown to make your final
effects decisions. The example uses the optional VS8F-1 Effect Expansion Board.
You will connect your guitar to the VS-880, select an effect to listen to, select a track to record to, and then
record the guitar ‘dry’ to the VS-880.
ACTION: Recording A Guitar ‘Dry’ While Listening With
Internal Effects
1.
Hold the [SHIFT] button and press the [SELECT] button under MIXER MODE - choose the
INPUT>TRACK Mixer mode.
2.
Plug your Guitar into Input #2 on the rear of the VS-880 (1/4” phone jack)
3.
Play the guitar as loud as you will during the performance and turn the [INPUT SENS 2]
knob clockwise until the PEAK light turns red, then turn it slightly counterclockwise until
the red peak LED goes off. (The read peak LED should only come on occasionally during the
loudest point of your performance.)
4.
Press the [CH EDIT 2] button to select channel 2.
5.
Hold the [SHIFT] button, then press [INPUT/BUSS] (CH EDIT 1 button).
6.
Rotate the TIME/VALUE dial to select CH 2 Input = INPUT - 2 (this is the normal default
setting unless you have changed it).
7.
Press the [STATUS] button of channel 2 until it flashes red. This selects track (channel) two
to record ready mode.
8.
Raise the [FADER] on channel 2 to monitor the guitar.
9.
Press the [CH EDIT 2] button to select Channel 2 for editing.
10.
Hold the [SHIFT] button and press [EFFECT - 2] button (CH EDIT 8). Dial effect routing to
OFF.
11.
Hold the [SHIFT] button and press the [EFFECT 1] button (CH EDIT 7).
12.
Select CH2 EFFECT 1 = INSERT using the TIME/VALUE dial.
13.
Press the right [ PARAMETER>>] button until “EQ/EffPreIns=” is displayed. Use the
TIME/VALUE dial to select OFF.
14.
Press the [EFFECT] button under EDIT CONDITION repeatedly until you see EFFECT-1
PRM?
15.
Press the [YES] button.
16.
Use the TIME/VALUE dial to select the effect you want to hear, then press the [YES] button.
17.
After you choose the effect you want to listen to during the recording, press the [PLAY
(DISPLAY)] button.
18.
Press the [ZERO] button to return to the beginning of your song.
19.
Press the [REC] and [PLAY] buttons to begin recording.
48 VS-880 Application Guide
Recording A Guitar ‘Wet’ With Internal Effects
Sometimes you want to make an original recording into the VS-880 with some type of effect added to the
track during the recording. You might want to change the EQ of the guitar before it is recorded and add
some type of interesting delay effect as you record it. The most common reason to record instruments with
effects is to save your effects devices for use on other channels during mixdown. For example, if you only
have the two internal effects devices in the VS-880 and you have 8 tracks of recording, you may need to
add some of the effects during recording, so the effects device can be used on a different track during
mixdown. One negative aspect of recording with effects is that you cannot remove the effect from the track
if you decide later that you don’t like it. You would need to re-record the track without the effect in order
to remove it. The example uses the optional VS8F-1 Effect Expansion Board.
You will set up the VS-880 to record your instrument on Tr. 1-1. You will then select that type and amount
of effect that you wish to use. The final step will be to actually record your instrument on Tr. 1-1 with the
effect. There are different methods for accomplishing this, depending on the mixer mode you are using.
ACTION: Recording A Guitar ‘Wet’ With Internal Effects
USING INPUT>TRACK MODE:
1.
Hold the [SHIFT] button and press the [SELECT] button under MIXER MODE - choose the
INPUT>TRACK Mixer mode.
2.
Plug your Guitar into Input #2 on the rear of the VS-880 (1/4” phone jack).
3.
Play the guitar as loud as you will during the performance and turn the [INPUT SENS 2]
knob clockwise until the PEAK light turns red, then turn it slightly counterclockwise until
the red peak LED goes off. (The read peak LED should only come on occasionally during the
loudest point of your performance.)
4.
Press the [CH EDIT 2] button to select channel 2.
5.
Hold the [SHIFT] button, then press [INPUT/BUSS] (CH EDIT 1 button).
6.
Rotate the TIME/VALUE dial to select CH 2 Input = INPUT - 2 (this is the normal default
setting unless you have changed it).
7.
Press the [STATUS] button of channel 2 until it flashes red. This selects track (channel) two
to record ready mode.
8.
Raise the [FADER] on channel 2 to monitor the guitar.
9.
Press the [CH EDIT 2] button to select Channel 2 for editing.
10.
Hold the [SHIFT] button and press [EFFECT - 2] button (CH EDIT 8). Dial effect routing to
OFF.
11.
Hold the [SHIFT] button and press the [EFFECT 1] button (CH EDIT 7).
12.
Select CH2 EFFECT 1 = INSERT using the TIME/VALUE dial.
13.
Press the right [ PARAMETER>>] button until “EQ/EffPreIns=” is displayed. Use the
TIME/VALUE dial to select ON.
14.
Press the [EFFECT] button under EDIT CONDITION repeatedly until you see EFFECT-1
PRM?
15.
Press the [YES] button.
16.
Use the TIME/VALUE dial to select the effect you want to hear, then press the [YES] button.
17.
After you choose the effect you want to listen to during the recording, press the [PLAY
(DISPLAY)] button.
(Continued)
Chapter 3: Recording Applications
49
(Recording with Effects in Input>Track Mode, Continued)
18.
Press the [ZERO] button to return to the beginning of your song.
19.
Press the [REC] and [PLAY] buttons to begin recording.
USING INPUT MIX / TRACK MIX MODE:
1.
Plug your Guitar into Input #2 on the rear of the VS-880 (1/4” phone jack).
2.
Hold the [SHIFT] button and press the [SELECT] button under MIXER MODE - choose the
INPUT MIX mode.
3.
Play the guitar as loud as you will during the performance and turn the [INPUT SENS 2]
knob clockwise until the PEAK light turns red, then turn it slightly counterclockwise until
the red peak LED goes off. (The read peak LED should only come on occasionally during the
loudest point of your performance.)
4.
Raise the [FADER] on channel 2 to about -4. (This level may vary depending on what type of
sound you are using). The Fader WILL affect the recording level!
5.
Press the [CH EDIT 2] button to select Channel 2 for editing.
6.
Hold the [SHIFT] button and press the [EFFECT 1] button (CH EDIT 7).
7.
Select CH2 EFFECT 1 = INSERT using the TIME/VALUE dial.
8.
Press the [EFFECT] button under EDIT CONDITION repeatedly until you see EFFECT-1
PRM?
9.
Press the [YES] button.
10.
Use the TIME/VALUE dial to select the effect you want to hear, then press the [YES] button.
11.
Press the [CH EDIT 2] button.
12.
Hold [SHIFT] and press the [INPUT/BUSS] button (CH EDIT 1). This is where you will
assign what output buss the input channel is routed to.
13.
Using the TIME/VALUE dial, select BUSS SELECT = 1-2.
14.
Turn the [PAN] knob, on channel 2, all the way to the left to send the signal to BUSS 1.
15.
Press the [SELECT] button (under the Mixer Mode section) to select TRACK MIX.
16.
Raise the [FADER] # 2 all the way up in order to cross the null point, then down to a
comfortable listening volume.
17.
Press the [STATUS] button of track 1 until the LED flashes red. This sets track # 1 to record
ready mode.
18.
Press [REC] and [PLAY] to begin recording.
50 VS-880 Application Guide
Record A Guitar On Tr. 1, Record The Effects On Tr. 2
There are occasions when you might want to record your guitar ‘dry’ on Tr. 1-1, but record guitar effects on
another track. A typical reason for this is when you have one or two effects devices. If you want to use
individual effects on individual tracks, you will only be able to add effects to two tracks during mixdown
with two effects devices. By adding effects during recording, you can reuse the effects device during
mixdown for a different track. When you are completely sure about the type of effect you want to use and
the amount or volume of it, you can record it onto the same track with the instrument. However, when you
are unsure about the amount or level of an effect, you might want to record the effect on a separate track so
that during mixdown you can control the level of the instrument and the effect independently.
You will plug your guitar into Input # 1, set the VS-880 to r ecord it on Tr. 1-1, determine what effect you
will use, then set the effect to record on Tr. 2-1, and finally make the actual recording.
ACTION: Record A Guitar On Track One, Record The Effects
On Track Two
1.
Connect your guitar to Input # 2 of the VS-880.
2.
Hold the [SHIFT] button and press the [SELECT] button under MIXER MODE to select
INPUT MIX (LED is on).
3.
Play the guitar as loud as you will during the performance and turn the [INPUT SENS 2]
knob clockwise until the PEAK light turns red, then turn it slightly counterclockwise until
the red peak LED goes off. (The read peak LED should only come on occasionally during the
loudest point of your performance.)
4.
Raise the [FADER] on channel 2 to about -4. (This level may vary depending on what type of
sound you are using.)
5.
Press the [CH EDIT 2] button to select Channel 2 for editing.
6.
Hold the [SHIFT] button and press the [EFFECT 1] button (CH EDIT 7).
7.
Select PRE-FADE using the TIME/VALUE dial.
8.
Press the [EFFECT] button under EDIT CONDITION repeatedly until you see EFFECT-1
PRM?
9.
Press the [YES] button.
10.
Use the TIME/VALUE dial to select the effect you want to hear, then press the [YES] button.
11.
Press the [CH EDIT 2] button.
12.
Hold [SHIFT] and press the [INPUT/BUSS] button (CH EDIT 1).
13.
Using the TIME/VALUE dial, select BUSS SELECT = 1-2.
14.
Turn the PAN knob, on channel 2, all the way to the left to send the signal to BUSS 1.
15.
Press the [EDIT] button, above the MASTER FADER, repeatedly until you see EFF 1 RTN to
= MIX.
16.
Use the TIME/VALUE dial to select EFF 1 RTN to = 1-2. This is where you will assign what
output buss the input channel is routed to.
17.
Press the right [PARAMETER>>] button twice. The display will read ‘EFF 1 RTN Bal = 0’.
18.
Using the TIME/VALUE dial, pan the EFF RTN Bal to the RIGHT. It should read ‘EFF RTN
Bal = R63’.
19.
Press the [PLAY (DISPLAY)] button to get back into the Play display.
(Continued)
Chapter 3: Recording Applications
51
(Record A Guitar On Tr. 1, Record The Effects On Tr. 2, Continued)
20.
Press the [SELECT] button under MIXER MODE to select TRACK MIX.
21.
Raise the FADERS on Channels 1 and 2 all the way up, then all the way down in order to
cross the null point.
22.
Raise the FADER on either Channel 1 or 2 to monitor what you play. Channel 1 will be the
‘dry’ guitar and channel 2 will be the ‘wet’ guitar.
Faders 1 and 2 WILL affect the Recording level.
23.
Press the [STATUS] button of channel 1 and channel 2 so both LEDs flash red (record ready
mode).
24.
Press [REC] and [PLAY] and begin recording.
52 VS-880 Application Guide
Punching In And Out - Manual (with Undo & Redo)
Sometimes you just want to record over a section of your song or vocal because you know that you don’t
want to keep the original. You might want the VS-880 to simulate a traditional analog tape recorder and
allow you to record over a part of a track that already exists.
The VS-880 allows you to manually ‘punch in and out’ on any track, in real time. You will set the punch-in
track to record, play the track, then place the VS-880 into record at the appropriate place. Once you have
finished recording over the section of interest, you can take the VS-880 out or record mode or press STOP.
Playback
Recording
Playback
Time
Start
[PLAY]
Punch-in
[REC]
Punch-out
[REC]
Stop
[STOP]
Even though punch in and punch out looks like it is recording over the existing
track, the VS-880 does not actually destroy the original recording. You can always
return to the original recording by pressing [UNDO].
ACTION: Punching In And Out - Manual
1.
Connect the output of your synthesizer to the VS-880 - Input #1.
2.
Play the keyboard as loud as you will during the performance and turn the [INPUT SENS 1]
knob clockwise until the PEAK light turns red, then turn it slightly counterclockwise until
the red peak LED goes off. (The read peak LED should only come on occasionally during the
loudest point of your performance.)
2.
If mixer mode INPUT>TRACK is not selected (LED is off), hold the [SHIFT] button and
press the [SELECT] button under the MIXER MODE label until the INPUT>TRACK mode is
selected (LED is on).
3.
Press the [CH EDIT] button 1 to select channel 1.
4.
Hold [SHIFT], then press the [INPUT/BUSS] (CH EDIT 1 button).
5.
Rotate the TIME/VALUE dial to select CH 1 INPUT = INPUT - 1 (this is the normal default
setting unless you have changed it).
6.
Press the [STATUS] button of channel 1 until it flashes red. This selects track one to recordready mode.
7.
Press [PLAY] to begin playback of your track.
8.
When you reach the section you want to re-record, press the [REC] button to begin
recording.
9.
When you reach the end of the section, press the [REC] button again to punch out (the
original track will continue to play).
UNDO
If you make a recording that you do not want to keep, the UNDO function will eliminate it.
1.
Press [UNDO]. The LCD will indicate ***UNDO Level= 1.
2.
Change the LEVEL value using the TIME/VALUE dial.
(Continued)
Chapter 3: Recording Applications
53
(Punching In And Out - Manual (with Undo & Redo), Continued)
UNDO LEVEL allows you to choose how many previous actions to “UNDO” For
example, if you made 7 punch in/out recordings and then selected an UNDO LEVEL
of 6, the VS-880 would UNDO the previous 6 recordings leaving only the first one.
This UNDO LEVEL also functions the same way during editing.
3.
Press [YES]. After performing the UNDO command, the LED above the UNDO button will
remain lit.
If you wish to REDO your last edit, hold [SHIFT] and press [UNDO].
54 VS-880 Application Guide
Use Auto-Punch For Punch In/Out
There are occasions when you want to punch in and out at very specific time locations. For example,
maybe you need to change a guitar solo that is exactly 8 measures long and you are playing the guitar.
First you will choose which track to punch into, then you can select the exact location for the punch in and
the punch out, then you will rewind to a location before the punch in point and begin playing the song.
The VS-880 will not actually enter the record mode until the specified location and it will exit the record
mode at the specified punch out location. You can then rewind the song, place the record ready track into
play mode, and play back the newly recorded solo.
Playback
Recording
Playback
Time
Start
[PLAY]
Punch-in
[REC]
Punch-out
[REC]
Stop
[STOP]
ACTION: Use Auto-Punch For Punch In/Out
1.
Find the punch in location in your song and store it in the LOC 1 locator point by pressing
[LOC] 1 (the LED will come on).
If LOC 1 position already contained a previous location (LED was on), you can erase
the old location by holding the [CLEAR] button and pressing the [LOC] 1 button.
2.
Find the punch out location and store it in LOC 2 by pressing [LOC 2].
3.
Press [LOCATOR] (under EDIT CONDITION-just under the LCD screen) repeatedly until
“LOC APin” is displayed.
Perform steps 4, 5, and 6 without releasing the [AUTOPUNCH] button.
4.
Press and HOLD the [AUTOPUNCH] button (the one with the led above it next to [LOOP]),
during the next two steps.
5.
Press the [LOC] 1 button where the punch in location is stored.
6.
Press the [LOC] 2 button where the punch out location is stored.
You can then check the punch out point by pressing the right [PARAMETER>>]
button (LOC APOt).
ALTERNATE METHOD:
1.
Alternatively, you can enter the AUTOPUNCH in and out locations manually while viewing
their respective screen displays by using the TIME/VALUE dial or NUMERICS buttons (for
more information on Numerics, see Owner’s Manual page 44).
Chapter 3: Recording Applications
55
Loop Recording
Loop record is very similar to Auto Punch (see Use Auto-Punch for Punch In/Out) in that you are able to
rehearse the part you are going to record many times before you actually record it. In addition, you are
able to record over and over in the same area until you are satisfied with the recording. This is a very
important feature if you are operating the VS-880 and playing the instrument you are recording.
First you will choose which track to punch into, then you can select the exact location for the punch in and
the punch out, the loop start and end, then you will rewind to a location before the loop start and begin
playing the song. As long as you do not press the [REC] button, the VS-880 will not actually enter the
record mode. The VS-880 will continue to play from the loop start to the loop end location, over and over
until you press [STOP]. Once you have completed your rehearsal, you can press the [REC] button anytime
before the designated punch in location and the VS-880 will automatically enter the record mode at the
correct punch in location and will exit the record mode at the punch out point. During the next playback of
the loop, you will automatically hear what you just recorded. If you wish to record it again, just press the
[REC] button before the punch in time and the VS-880 will record the section again. The loop will continue
to play over and over, allowing you to press [REC] when you wish to record. When you have completed a
recording you are satisfied with, press [STOP].
Repeat
Playback
Recording
Playback
Time
Loop start
Punch-in
Punch-out
Loop end
ACTION: Loop Recording
1.
Find the punch in location in your song and store it in the LOC 1 locator point by pressing
[LOC] 1 (the LED will come on).
If LOC 1 position already contained a previous location (LED was on), you can erase
the old location by holding the [CLEAR] button and pressing the [LOC] 1 button.
2.
Find the punch out location and store it in LOC 2 by pressing [LOC 2].
3.
Press [LOCATOR] (under EDIT CONDITION-just under the LCD screen) until “LOC APin”
is displayed.
Perform steps 4, 5, and 6 without releasing the [AUTOPUNCH] button.
4.
Press and HOLD the [AUTOPUNCH] button (the one with the led above it next to [LOOP]),
for the next two steps.
5.
Press the [LOC] 1 button where the punch in location is stored.
6.
Press the [LOC] 2 button where the punch out location is stored.
You can then check the punch out point by pressing the right [PARAMETER>>]
button (LOC APOt).
7.
Find the LOOP start point by rewinding to a point before the punch in location (beginning of
a Verse, Chorus etc.) and store this location in LOC 3 by pressing [LOC] 3 (the LED will
illuminate).
(Continued)
56 VS-880 Application Guide
(Loop Recording, Continued)
8.
Find the LOOP end point by using fast forward to locate a point after the punch out location
(end of a Verse, Chorus etc.) and store this location in LOC 4 by pressing [LOC] 4 (the LED
will illuminate).
9.
Press [LOCATOR] (under EDIT CONDITION-just under the LCD screen) repeatedly until
“LOC LpSt” is displayed.
Perform steps 10, 11, and 12 without releasing the [LOOP] button.
10.
Press and HOLD the [LOOP] button (the one with the LED above it next to AUTOPUNCH),
during the next two steps.
11.
Press the [LOC] 3 button where the LOOP start location is stored.
12.
Press the [LOC] 4 button where the LOOP end location is stored.
You can then check the LOOP end point by pressing the right [PARAMETER>>]
button (LOC LpOt).
Alternate Method:
1.
Alternately, you can enter the LOOP start and end locations manually while viewing their
respective screen displays by using the TIME/VALUE dial or [NUMERICS] buttons (for
more information on Numerics, see Owner’s Manual page 44).
Chapter 3: Recording Applications
57
Sync To A MIDI Sequencer Using MTC (MIDI Time Code)
If your external MIDI sequencer is playing your music tracks from a sound module or sampler, you may
want to record your vocals or saxophone solos on the VS-880. However, they must be recorded in sync
with the music tracks.
The VS-880 can easily be synced to your external MIDI sequencer using MTC (MIDI Time Code)
If you are not completely familiar with the terms MTC (MIDI Time Code), MMC
(MIDI Machine Control), SPP (Song Position Pointer), Tempo Map, and MIDI
Clock, please review their definitions in the Appendix glossary section.
You must first connect the VS-880 to your sequencer with a MIDI cable, then make the proper system
settings in the VS-880.
ACTION: Sync To An External MIDI Sequencer Using MTC
Slaving your sequencer (slave) to the VS-880 (master) using MTC:
MIDI TIME CODE (MTC) is a sync code based on real time (time on your watch: hours/minutes/seconds
etc.) as opposed to MIDI Clock which is based on tempo (musical divisions: measures/beats). If your
sequencer can slave to MTC, use the following steps to sync your sequencer as a slave to the VS-880:
1.
Connect a MIDI cable from the MIDI output of the VS-880 to the MIDI input of your external
sequencer.
2.
Press the [SYSTEM] button until “SYS Sync/Tempo?” is displayed in the LCD screen.
3.
Press [YES].
4.
Using the [<<PARAMETER>>] buttons, scroll through the various pages and set each
parameter to the following settings:
Syn:Source=
INT
Syn:Gen=
MTC
Syn:ErrLevel=
5
Syn:MTC Type= 30
`5.
Syn:Tmap
*
Syn:Ofs
*
Syn:Sync.Tr Rec?
*
Syn:Sync.Tr Cnv?
*
Press [SYSTEM] repeatedly until “MIDI PRM?” is displayed.
6.
Press [YES].
7.
Use the [<<PARAMETER>>] buttons to display “MIDIThr=” and use the Time/Value dial to
change it to “Out” (if it is not already set to “Out”).
8.
Press the [PLAY (DISPLAY)] button.
* These screens apply to MIDI Clock (not MTC) and are not used here.
9.
Set your sequencer to “Slave to External Sync”. Make sure that it is set to receive MTC and
that the MTC Type is 30 frame (if using a different frame rate, make sure that it matches
what was set in the VS-880).
10.
Press “PLAY” on the external sequencer.
11.
Press [PLAY] on the VS-880.
(Continued)
58 VS-880 Application Guide
(Sync To A MIDI Sequencer Using MTC (MIDI Time Code), Continued)
Slaving the VS-880 (slave) to your sequencer (master) using MTC:
1.
Connect a MIDI cable from the MIDI output of the external sequencer to the MIDI input of
the VS-880.
2.
Press the [SYSTEM] button repeatedly until “SYS Sync/Tempo?” is displayed.
3.
Press [YES].
4.
Using the [<<PARAMETER>>] buttons, scroll through the various screen pages and set each
parameter to the following settings:
Syn:Source=
Syn:Gen=
Syn:ErrLevel=
Syn:MTC Type=
Syn:Tmap
Syn:Ofs
Syn:Sync.Tr Rec?
Syn:Sync.Tr Cnv?
5.
EXT
Off
5
30
*
*
*
*
Press the [PLAY (DISPLAY)] button.
* These screens apply to MIDI Clock (not MTC) and are not used here.
6.
Set your sequencer to “Transmit MTC”. Make sure that the MTC Type is 30 frame (if you use
a different frame rate, make sure that it matches what was set in the VS-880).
7.
Press [PLAY] on the VS-880.
8.
Press “PLAY” on your sequencer.
Chapter 3: Recording Applications
59
Sync To A MIDI Sequencer Using MIDI Clock
MIDI Clock is a sync code that uses the tempo settings of your song to lock two devices together. In order
to use MIDI Clock with the VS-880, you first must make a “Tempo Map” (see page 108 of this guide). Some
of the reasons to use MIDI Clock instead of MTC are as follows:
1.
Older sequencers generally cannot sync to MTC.
2.
If you use the internal click (metronome) of the VS-880, you must make a Tempo Map in the
VS-880 that the metronome uses as a reference. You will want your sequencer to follow that
same Tempo Map.
The VS-880 does not slave to MIDI Clock, it can only generate MIDI Clock based on
its own internal Tempo Map.
Use the following steps to slave your sequencer to the VS-880’s Tempo Map (master) using MIDI Clock:
ACTION: Sync To An External Sequencer Using MIDI Clock
Setting System Parameters
1.
Press the [SYSTEM] button repeatedly until “SYS Sync/Tempo?” is displayed.
2.
Press [YES].
3.
Using the [<<PARAMETER>>] buttons, scroll through the various screen pages and set each
parameter to the following settings:
Syn:Source=
Syn:Gen=
Syn:ErrLevel
Syn:MTC Type
Syn:Tmap
Syn:Ofs
INT
MIDIclk
*
*
see Step # 4 below
***
Syn:Sync.Tr Rec?
Syn:Sync.Tr Cnv?
**
***
*These screens apply to MTC (not MIDI Clock), and are not used here. **This screen applies to
recording a tempo track into the VS-880 from an external MIDI sequencer, and is not used here.
***These screens apply to MIDI Clock, but their specific functions are not used here.
Creating A Tempo Map
4.
When you reach the Tempo Map page (step #3 above), use the [<CURSOR>] buttons to
navigate around the screen.
5.
Enter the tempo of the song in the tempo field.
6.
If there are tempo changes during the song, [<CURSOR>] back to the Tmap#, select Tmap 2,
and then enter the new tempo in the bpm field.
7.
[<CURSOR>] to the measure field and input the measure where the new tempo starts.
The VS-880 will generate a MIDI Clock signal from this Tempo Map and transmit this MIDI clock to the
MIDI out connector on the VS-880 rear panel. The MEASURE and BEAT display will also be based on this
tempo map information as will the tempo of the internal click (metronome).
60 VS-880 Application Guide
Sync To An External Sequencer Using MMC
MIDI Machine Control (MMC) is a set of commands that can be sent from your sequencer to control the
VS-880’s Transport Control buttons (ZERO, REW, FF, STOP, PLAY, and REC) and select tracks to Record
Ready mode. You must use MTC or MIDI Clock to provide location/timing information to synchronize the
two units. For example, you would use MMC if you are working on your sequencer and would like to start
and stop the VS-880 without ever having to press any transport buttons on the front panel of the VS-880,
especially if your sequencer does not transmit MTC (MIDI Time Code).
In this example, your sequencer is the MMC Master and the VS-880 is the MMC Slave. The VS-880 is also
the Time Code Master (MTC) and your sequencer is the Time Code Slave (MTC).
ACTION: Sync To An External Sequencer Using MMC
1.
Connect a MIDI cable from the MIDI output of the VS-880 to the MIDI input of your external
sequencer.
2.
Press the [SYSTEM] button repeatedly until “SYS Sync/Tempo?” is displayed in the LCD
screen.
3.
Press [YES].
4.
Using the [<<PARAMETER>>] buttons, scroll through the various pages and set each
parameter to the following settings:
Syn:Source=
Syn:Gen=
Syn:ErrLevel=
INT
MTC
5
Syn:MTC Type=
Syn:Tmap
Syn:Ofs
Syn:Sync.Tr Rec?
30
*
*
*
Syn:Sync.Tr Cnv?
*
* These settings apply to MIDI Clock (not MTC) and are not used here.
5.
Set your sequencer to “Slave to External Sync”. Make sure that it is set to receive MTC and
that the MTC Type is 30 frame (if using a different frame rate, make sure that it matches
what was set in the VS-880). Also set your sequencer to transmit MMC.
6.
Connect a MIDI cable from the MIDI output of the sequencer to the MIDI input of the VS880.
VS-880 SETUP
7.
Press [SYSTEM] repeatedly until “MIDI PRM?” is displayed.
8.
Press [YES].
(Continued)
Chapter 3: Recording Applications
61
(Sync To An External Sequencer Using MMC, Continued)
9.Using the [<<PARAMETER>>] buttons, scroll through the various screen pages and set each
parameter to the following:
MID:DeviceID=
MID:MIDIThr=
MID:SysEx.Rx=
MID:SysEx.Tx=
MID:MMC=
MID:CtrLocal=
*
OUT
On
Off
Slave
*
MID:CtrType=
MID:P.C.Scne
MID:P.C.Eff
MID:C.C.Eff
*
*
*
*
* These parameters do not apply to MMC Sync and are not used here.
THE EXTERNAL SEQUENCER SETUP
10.
Set the sequencer to “MMC Master” mode.
11.
Set it to slave to MTC (MTC slave mode).
12.
Press “PLAY” on the external sequencer – OR – press [PLAY] on the VS-880.
MIDI Clock can also be used as the sync source in this example. Follow the instructions detailed in “Using MIDI Clock” on page 60 of this guide, along with the
instructions above.
62 VS-880 Application Guide
Recording From A Digital Source
Recording from a digital source into the VS-880 is very similar to recording an analog source. The only
major difference is the need for the VS-880’s sample clock to be locked to the incoming digital signal.
Connect your digital source, probably a DAT machine, to the Digital input of the VS-880. You will then
need to select the track you wish to record, select the digital input as the source for recording, and finally
record the digital audio into the VS-880.
The sample rate of the VS-880 must match the sample rate of the connected digital
source. Remember, the proper sample rate must be set when a new VS-880 song is
created if you want to use the digital input.
ACTION: Recording From A Digital Source
1.
Connect the digital S/PDIF output of your digital source to the digital input of the VS-880.
2.
Turn on the power of the digital source (the power can be on while the digital connection is
made). It must be on in order for the VS-880 to “see” that there is a digital clock connected to
its digital input.
3.
Press the [SYSTEM] button repeatedly until SYSTEM PRM appears.
4.
Press [YES].
5.
Using the TIME/VALUE dial, set: “MasterClk = Digitl”.
6.
Select mixer INPUT>TRACK mode ([SHIFT] + [SELECT]).
7.
Hold [SHIFT] and press [INPUT BUSS] (CH EDIT 1).
8.
Press the [CH EDIT] button of the track you want to record to.
9.
Set the input to DIGITAL-L (if you are recording a stereo signal, select another track and set
it’s input to DIGITAL-R).
10.
Press the [STATUS] button for the track(s) that you selected until the LED’s flash red (record
mode).
11.
Press [REC] followed by [PLAY].
12.
Start sending audio from your digital source.
Chapter 3: Recording Applications
63
Recording Multiple Inputs To A Single Mono Track
What if you want to record multiple microphones to a single track of the VS-880 simultaneously? For
example, maybe you have three background vocalists that you wish to record on a single track using
individual microphones for each one.
You would first connect the three microphones to three inputs of the VS-880. We will use inputs 1-3. You
will select these inputs to faders 1-3 of the VS-880, select the correct Mixer mode, select each channel to
record onto Tr. 1-1, adjust their individual levels, and then record all three vocalists on Tr. 1-1.
ACTION: Recording Multiple Inputs To A Single Mono Track
1.
Set the Mixer to INPUT MIX mode ([SHIFT] + [SELECT]).
2.
Connect the three microphones to Inputs 1-3 on the VS-880.
3.
Hold [SHIFT] and press [INPUT/BUSS] (CH EDIT 1).
4.
Press [CH EDIT] 1 to select Input 1 and use the TIME/VALUE dial to set it to “1-2.”
5.
Press [CH EDIT] 2 to select Input 2 and use the TIME/VALUE dial to set it to “1-2.”
6.
Press [CH EDIT] 3 to select Input 3 and use the TIME/VALUE dial to set it to “1-2.”
7.
Turn the PAN knobs for Inputs 1-3 all the way right and then all the way left (this will send
all three microphones to track # 1).
8.
Use the INPUT SENS knobs to adjust the level of each microphone.
9.
Press the [STATUS] button for Track 1 until it is flashing red (record ready mode).
10.
Press [REC] followed by [PLAY]. All three microphones will now be recording on Track 1.
64 VS-880 Application Guide
Recording Multiple Inputs To 2 Tracks As A Stereo Mix
To add depth and dimension to your background vocal recordings, you might choose to record them as a
stereo mix onto two tracks of the VS-880. It is very similar to recording multiple inputs to a single track,
however, your will use the pan pots to position each microphone in the stereo mix before recording (see
the action page - Recording Multiple Inputs to a Single Mono Track).
You would first connect multiple microphones to inputs of the VS-880. For example, let’s use all four
inputs. You will select these inputs to faders 1 through 4 of the VS-880, select the correct Mixer mode, select
each channel to record to the stereo mix bus, select the Mix bus to record on Tr. 1-1 and Tr. 2-1, and then set
each channel pan pot to the correct position in the stereo mix. For example, maybe the bass singer would
be placed slightly right of center with the tenor vocal slightly left of center. Maybe two additional singers
would be placed hard left and hard right. Audition different pan pot settings until you are satisfied with
the positioning. You will then adjust the individual channel levels before recording the composite stereo
mix of all four microphones onto Tr. 1-1 and Tr. 2-1.
ACTION: Recording Multiple Inputs To Two Tracks As A Stereo
Mix
1.
Set the Mixer to INPUT MIX mode ([SHIFT] + [SELECT]).
2.
Connect the four microphones to Inputs 1 through 4 on the VS-880.
3.
Hold [SHIFT] and press [INPUT/BUSS] (CH EDIT 1).
4.
Press [CH EDIT] 1 to select Input 1 and set it to “1-2.” (use the TIME/VALUE dial).
5.
Press [CH EDIT] 2 to select Input 2 and set it to “1-2.”
6.
Press [CH EDIT] 3 to select Input 3 and set it to “1-2.”
7.
Press [CH EDIT] 4 to select Input 4 and set it to “1-2.”
8.
Use the PAN knobs for Inputs 1 through 4 to position each microphone location in the left/
right stereo field.
9.
Use the INPUT SENS knobs to adjust the level of each microphone.
10.
Press the [STATUS] buttons for Tracks 1 and 2 until they are flashing red (record ready
mode).
11.
Press [REC] followed by [PLAY]. The stereo mix of all four microphones will now be
recording to Tracks 1 and 2.
Chapter 3: Recording Applications
65
Record 4 Mics, Using Internal Compressor, To 1 Track
What if you want to record multiple microphones to a single track of the VS-880 simultaneously using one
of the internal compressors? For example, maybe you have four background vocalists that you wish to
record on a single track using individual microphones for each one. You may also want to use an internal
compressor to control the final dynamic range of the recorded signal.
You would first connect the four microphones to the four inputs of the VS-880. You will select these inputs
to faders 1 through 4 of the VS-880, select the correct Mixer mode, select the compressor, select each
channel to record onto Tr. 1-1, adjust their individual levels, and then record all four vocalists on Tr. 1-1.
ACTION: Record 4 Microphones, Using Internal Compressor,
To One Track
1.
Connect the output of the microphones to Inputs 1-4 on the VS-880.
2.
Select INPUT/MIX mode on the VS-880 (refer to p.21 of this guide if you are unsure how to
do this).
3.
Hold the [SHIFT] button and press [Input/Buss].
4.
Press [<<PARAMETER] until “IN1 BUSS Sw =” is displayed.
5.
Press [CH EDIT] button 1 and use the TIME/VALUE dial to select “BUSS Sw = Off.”
6.
Press [CH EDIT] buttons 2-4 and use the TIME/VALUE dial to select “Buss Sw = Off” for
each of the remaining inputs.
7.
Use the INPUT SENS knobs to adjust the levels of each of the microphones.
8.
Hold the [SHIFT] button and press [EFFECT-1] (CH EDIT button 7).
9.
Press [CH EDIT] button 1 and use the TIME/VALUE dial to select “IN 1 EFFECT=PstFade.”
10.
Press [CH EDIT] buttons 2-4 and use the TIME/VALUE dial to set each of them to
“PstFade”.
11.
Press [EFFECT] (under EDIT CONDITION) until “EFFECT-1 PRM?” is displayed.
12.
Press [YES].
13.
Use the TIME/VALUE dial to select “EF1 A66=CL:Comp.” Press [YES].
14.
Use the {<<PARAMETER>>] buttons and the TIME/VALUE dial to adjust the compressor
settings.
15.
Press [EDIT] (above the master fader) until “MST EFFI RTN to =” is displayed.
16.
Use the TIME/VALUE dial to select “1-2”.
17.
Press the [PARAMETER>>] button and use the TIME/VALUE dial to adjust the audio level
returned from the compressor.
18.
Press the [PARAMETER>>] button and use the TIME/VALUE dial to set the return balance
to L63. (panned all the way to the left).
19.
Press the [STATUS] button for channel 1 until it is flashing red (record mode).
20.
Start recording on the VS-880. The four microphone signals will now be recording on Track 1
after being processed by the compressor.
66 VS-880 Application Guide
Using the Serial Insert Path
The serial insert FX path routing allow you to send the same mono channel thru both the left and
right sides of a stereo effect. You can then use the parameters of both sides for more precise
effecting of the original mono signal.
ACTION: Use the Serial Insert Path to Create an 8 Band
Parametric EQ
1.
Hold SHIFT and press EFFECT-1 [CH EDIT button 7].
2.
Press the CH EDIT button that corresponds to the track/input that you want to EQ.
3.
Use the TIME/VALUE dial to select “InsertS.”
4.
Press EFFECT (under EDIT CONDITION) until “EFFECT-1 PRM?” is displayed.
5.
Use the TIME/VALUE dial to select “B93=ParametricEQ” and press YES/ENTER.
6.
Use the PARAMETER buttons and the TIME/VALUE dial to adjust the EQ settings
for Input A and B. The signal will be processed by the Input A settings before being
routed to Input B. This, in essence, creates an 8-band parametric EQ.
This procedure requires a mono signal. Make sure that Channel Link is set
to Off for the designated channel.
Chapter 3: Recording Applications
67
Using the COSM Microphone Simulator
You can record a vocal using an inexpensive dynamic mic such as the Roland DR-20 and then,
using the Microphone Simulator in the VS8F-1 effects section, emulate the warmth and tone of a
much more expensive microphone. This can be done during the recording process or at any later
time, even at mix down. This processing can also be applied to line level signals, such as the
output from an acoustic guitar pickup. You do this by just inserting the microphone simulator into
the path of the channel you want to affect.
ACTION: Use the COSM Microphone Simulator to
emulate the sound of a vintage microphone
1.
Press EFFECT (under EDIT CONDITION) until “EFFECT-1 PRM?” is displayed and
press YES/ENTER.
2.
Use the TIME/VALUE dial to select “B99=MicSimulator.”
3.
Press YES/ENTER.
4.
Press PARAMETER>> until “MCA:Input” is displayed and use the TIME/VALUE
dial to select the desired input/mic type.
5.
Press PARAMETER>> until “MCA:OUT” is displayed and use the TIME/VALUE
dial to select the desired microphone algorithm. For example, if you want to make a
dynamic mic sound like a vintage condenser mic, select “Sml.Dy” in step 4 and
“Vnt.Cn” in step 5.
6.
From INPUT MIX mode, hold SHIFT and press EFFECT-1 [CH EDIT button 7].
7.
Press the desired CH EDIT button (1-8) and use the TIME/VALUE dial to select
“Insert.”
8.
Set the corresponding STATUS button to SOURCE (orange) to hear the microphone
simulation.
68 VS-880 Application Guide
Using the Voice Transformer
The Voice Transformer algorithm can be used to change the sound of a recorded track. For
example, you can transform the pitch of a male vocal to a female, harmonize a track, or create a
wacky cartoon character from a voice over track. Using only the Formant parameter, it can be used
to fatten a vocal or bass track. The algorithm allows the user to edit the effect in real time using the
first 5 faders of the VS-880 mixer.
ACTION: Use the Voice Transformer to Affect a Vocal
Track
1.
Connect a microphone to Input 1.
2.
Hold SHIFT and press EFFECT-1 [CH EDIT button 7].
3.
Press CH EDIT button 1 and use the TIME/VALUE dial to select “Insert.”
4.
Press the channel 1 STATUS button until it is set to source (orange). You should be
able to hear the mic input.
5.
Press EFFECT (under EDIT CONDITION) until “EFFECT-1 PRM?” is displayed.
6.
Use the TIME/VALUE dial to select “B07=Voice Trans.”
7.
Press YES/ENTER.
8.
Press PARAMETER>> until “FE:FaderEdit” is displayed and use the TIME/VALUE
dial to select “On.”
9.
Speak into the microphone and use faders [1]-[5] to alter the sound of your voice.
The following shows the effect of the various faders:
Fader
Fader
Fader
Fader
Fader
1
2
3
4
5
Controls
Controls
Controls
Controls
Controls
the
the
the
the
the
‘Robot’ (monotone) effect.
pitch.
formant.
balance between effect and dry signal.
reverb level.
Chapter 3: Recording Applications
69
70 VS-880 Application Guide
Chapter 4: Overdub Applications
Add A Guitar Track To The Existing Piano Track
Probably the most common overdubbing situation is adding one new instrument at a time to a recording.
If you begin with a single recorded piano on Tr. 1-1, you might want to next add a guitar on Tr. 2-1.
You will need to configure the guitar input to record on Tr. 2-1, set Tr. 1-1 for playback, adjust the incoming
guitar level and mixer balance for monitoring, then record the guitar in sync with the piano.
ACTION: Add A Guitar Track To The Existing Piano Track
1.
Connect the guitar to INPUT 2 of the VS-880.
2.
Play the guitar as loud as you will during the performance and turn the [INPUT SENS 1]
knob clockwise until the PEAK light turns red, then turn it slightly counterclockwise until
the red peak LED goes off. (The read peak LED should only come on occasionally during the
loudest point of your performance.)
3.
If mixer mode INPUT>TRACK is not selected (LED is off), hold the [SHIFT] button and
press the [SELECT] button under the MIXER MODE label until the INPUT>TRACK mode is
selected (LED is on).
4.
Press the [CH EDIT 2] button to select channel 2.
5.
Hold [SHIFT], then press [INPUT/BUSS] (CH EDIT 1 button).
6.
Using the TIME/VALUE dial, select CH 2 INPUT = INPUT -2 (this is the normal default
setting unless you change it).
7.
Press the [STATUS] button for channel 2 repeatedly until the LED blinks red (record ready
mode).
8.
Raise the FADER on the channel 2 to monitor your guitar.
9.
Press the [STATUS] button for channel 1 repeatedly until the led is green (green = PLAY
mode). This will enable track 1 for playback.
10.
Raise the FADER on channel 1 to hear the piano previously recorded.
11.
Press the [REC] button. The red led will flash.
12.
Press the [PLAY] button to begin recording.
13.
After you complete your guitar track, [STOP] the VS-880 and press the [ZERO] button to
return to the beginning of the song.
Chapter 4: Overdub Applications
71
Bouncing Tracks 1-6 To Tracks 7-8
Sometimes you will want to make a submix of existing tracks to free up tracks for more recording or to use
one or two faders to control the instruments. For example, you might have 6 different background vocal
performances recorded on tracks 1-6. Once you are sure that these are the performances you want to keep,
it might be handy to pre-mix (bounce) them to two new tracks as a stereo mix. You can adjust the level and
panning position of each vocal track within the stereo mix. Once the bounce is complete, it will be much
easier to control the entire background vocal section using just two faders instead of the original six.
To accomplish this, you will need to first assign tracks 1 through 6 to the inputs of an internal mixing buss
(inside the VS-880). You will then assign the outputs of that mixing buss to Tr. 7-1 and Tr. 8-1. Once you
have made your level, EQ, panning, and other creative choices, you will record the six tracks down to two
tracks using the internal mixing buss.
ACTION: Bouncing Tracks 1-6 To Tracks 7-8
Using the INPUT>TRACK mode:
It is possible to bounce tracks quickly in INPUT>TRACK mode using the following procedure:
1.
Select INPUT>TRACK mode. Hold [SHIFT] and press [SELECT] (under MIXER MODE), to
choose INPUT>TRACK mode.
2.
Adjust the faders, pans and effects of tracks 1 through 6 as needed.
Route MIX buss to tracks 7 & 8. You will select the inputs for track 7 and 8 to be the Mix Buss. This means
that instead of recording an audio input, track 7 and 8 will record the composite Mix of tracks 1 through 6.
3.
Press [CH EDIT] button 7 to select track 7.
4.
Hold [SHIFT] and press [INPUT/BUSS] (CH EDIT button 1).
5.
Use the TIME/VALUE dial to select MIX-L as the Input for Track 7.
6.
Press the [CH EDIT] button 8 to select track 8.
7.
Use the TIME/VALUE dial to select MIX-R as the Input for Track 8.
8.
Press the [TRACK STATUS] buttons on Tracks 7-8 until they are flashing red. They are now
set to record ready mode.
9.
Press [REC] and then [PLAY] to record (bounce) tracks 1 through 6 to tracks 7 and 8. You
can use the faders of channels 1-6 to mix levels in real-time and those changes will be
recorded onto tracks 7 and 8.
(Continued)
72 VS-880 Application Guide
(Bouncing Tracks 1-6 To Tracks 7-8, Continued)
Using the INPUT MIX/TRACK MIX mode:
Use the following procedure to bounce tracks using the INPUT MIX/TRACK MIX mode:
A.
Select TRACK MIX mode
1.
Hold [SHIFT] and press [SELECT] (under MIXER MODE), to choose TRACK MIX mode.
B.
Route Tracks 1 through 6 to buss 7-8
2.
Press [CH EDIT] 1 to select Track 1.
3.
Hold [SHIFT] and press [Input/BUSS] (CH EDIT button 1)
4.
Use the TIME/VALUE dial to select “7-8” as the “BUSS SEL” for Track 1.
5.
Press [CH EDIT] 2, select “7-8” as the “BUSS SEL” for Track 2.
6.
Repeat steps 2-5 for Tracks 3, 4, 5, and 6.
C.
Route tracks 7 & 8 to the MIX buss
7.
Hold [SHIFT] and press [Input/BUSS] (CH EDIT button 1).
8.
Press [CH EDIT] 7 to select Channel 7.
9.
Use the TIME/VALUE dial to select “MIX” as the “BUSS SEL” for Track 7.
10.
Repeat steps 8 and 9 for Track 8.
D.
Record tracks 1 through 6 to tracks 7 & 8
11.
Press the [TRACK STATUS] buttons on Tracks 7-8 until they are flashing red (record ready
mode).
12.
Make sure that channels 1-6 are in “PLAY” mode (green LED).
13.
Adjust the faders, pans and effects of tracks 1-6 as needed.
14.
Press [REC] followed by [PLAY] to record the bounce.
Chapter 4: Overdub Applications
73
Using The Internal VS8F-1 Effects When Bouncing
When bouncing multiple recorded tracks down to a single mono or stereo track, you may often want to
add effects during the bouncing process. For example, you might want to take the six background vocal
tracks (see Bouncing Tracks 1 through 6 to 7 & 8), and add some reverb to each individual vocal track
during the bounce down.
To accomplish this, you will need to first assign tracks 1 through 6 to the inputs of an internal mixing buss
(inside the VS-880). You will then assign the outputs of that mixing buss to Tr. 7-1 and Tr. 8-1. You will also
need to select the tracks to add effects and assign them to the effect of choice. The effect device output
must then be added into the final mix. Once you have made your level, EQ, panning, effects, and other
creative choices, you will record the six tracks down to two tracks using his internal mixing buss.
ACTION: Effects Processing - Using The Internal VS8F-1 When
Bouncing
Using the INPUT MIX/TRACK MIX mode:
Use the following procedure to bounce tracks using the INPUT MIX/TRACK MIX mode:
A.
Select TRACK MIX mode
1.
Hold [SHIFT] and press [SELECT] (under MIXER MODE), to choose TRACK MIX mode.
B.
Route Tracks 1 through 6 to buss 7-8
2.
Press [CH EDIT] 1 to select Track 1.
3.
Hold [SHIFT] and press [Input/BUSS] (CH EDIT 1)
4.
Use the TIME/VALUE dial to select “7-8” as the “BUSS SEL” for Track 1.
5.
Press [CH EDIT] 2, select “7-8” as the “BUSS SEL” for Track 2.
6.
Repeat steps 2-5 for Tracks 3, 4, 5, and 6.
C.
Route the source tracks to the EFFECTS Processor
7.
Press [CH EDIT] button 1 to select Channel 1.
8.
Hold [SHIFT] and press [Effect 1] (CH EDIT button 7).
9.
Use the TIME/VALUE dial to select “PstFade.”
10.
Repeat steps 7-9 for all desired tracks by selecting the corresponding track number.
D.
Select the EFFECTS
11.
Press [EFFECT] button (under EDIT CONDITION) until “EFFECT 1?” (or 2 if you have
chosen to use EFFECT # 2) is displayed.
12.
Press [YES].
13.
Use the TIME/VALUE dial to select the desired effect.
14.
Press [YES] to confirm your selection.
D.
Route the outputs of the EFFECTS Processor
15.
Press the [EDIT] button (found over the MASTER FADER) until “EFFECT 1 RTN To = MIX”
is displayed.
16.
Use the TIME/VALUE dial to select “EFFECT 1 RTN = 7-8”, to route the effect to Buss 7-8.
17.
Press the right [PARAMETER>>] button and use the TIME/VALUE Dial to set the return
level. This is the Volume setting for the output of the effect.
74 VS-880 Application Guide
18.
Press the right [PARAMETER>>] button again and use the TIME/VALUE Dial to set the Pan
position.
The effects will now be routed to tracks 7-8 and will be recorded along with the source tracks 1-6.
E.
Route tracks 7 & 8 to the MIX buss
19.
Hold [SHIFT] and press [Input/BUSS] (CH EDIT button 1).
20.
Press [CH EDIT] 7 to select Track 7.
21.
Use the TIME/VALUE dial to select “MIX” as the “BUSS SEL” for Track 7.
22.
Repeat steps 8 and 9 for Track 8.
F.
Record tracks 1 through 6 to tracks 7 & 8
23.
Press the [TRACK STATUS] buttons on Tracks 7-8 until they are flashing red (record ready
mode).
24.
Make sure that channels 1-6 are in “PLAY” mode (green LED).
25.
Adjust the faders, pans and effects of tracks 1-6 as needed.
26.
Press [REC] followed by [PLAY] to record the bounce.
Chapter 4: Overdub Applications
75
Using The Aux Buss As A Headphone Monitor
Sometimes a musician overdubbing a solo part wants to hear a blend of instruments in his or her monitor
headphones that is different from the main stereo mix of the VS-880. For example, maybe they would like
their individual instrument and the piano part to be very loud, but all the other instruments to be very
soft, and they do not want to hear the acoustic guitar at all. The VS-880 allows you to use the internal AUX
bus as a cue (headphone) bus in order to provide a separate mix for the musician.
You will first need to configure the mixer correctly, set up the incoming microphone for recording, adjust
the track levels for the headphone mix and the main mix, then overdub the new instrument.
ACTION: Using The Aux Buss As A Separate Headphone
Monitor - Cue
You will need an external headphone amplifier.
Headphone Amp
L
R
INPUT
L
R
A
B
AUX SEND
MASTER OUT
1
2
3
INPUT A
4
1
2
3
4
INPUT B
1.
Connect the output of your microphone to Input # 1 of the VS-880.
2.
Sing into the microphone as loud as you will during the performance and turn the [INPUT
SENS 1] knob clockwise until the PEAK light turns red, then turn it slightly
counterclockwise until the red peak LED goes off. (The read peak LED should only come on
occasionally during the loudest point of your performance.)
3.
Connect the AUX SEND jacks (VS-880 rear panel) to the input of the external headphone
amp and connect a pair of headphones to the headphone amp output.
4.
Turn the AUX SEND knob, located above the EDIT SOLO button, clockwise to about the 2
o’clock position.
5.
Select TRACK MIX mixer mode by pressing the [SELECT] button or [SHIFT] + [SELECT].
6.
Hold [SHIFT] and press [AUX SEND] button (CH EDIT 6 button).
7.
Press the CH EDIT button on one of the playback channels. You will see ‘AUX Sw = off’.
8.
Using the TIME/VALUE dial, change the ‘OFF’ setting to ‘PRE-FADE’.
9.
Press the [PARAMETER] right button once. You will see ‘AUX Level = 100’.
10.
Using the TIME/VALUE dial, adjust the volume of the channel that will be going to the
headphones. (127 = Full level, 0 = Off)
11.
Repeat steps 6 thru 9 for the other playback tracks you want to hear in the headphone mix.
12.
Begin recording the microphone.
When you press play, you will hear the mix you just made in the headphones. If you
adjust the faders, the mix for the MASTER OUT will change but the headphone mix
will not be affected.
76 VS-880 Application Guide
Combining Lead Vocal Tracks Into One Using [Mute]
This function is known in recording studios as “vocal comps” or “comping vocals.” Let’s assume that you
have two lead vocal parts recorded on Tr. 1-1 and Tr. 2-1. You decide that the best performance of the first
verse, third verse, and ending are the recording on track one. However, the best performance of the second
and fourth verses is on track two. A simple way to make one final vocal performance track from the two
recorded tracks is to use the channel MUTE function to make a new recording on Tr. 3-1. As you will
remember, the channel [STATUS] button is used to select Source, REC, Play or Mute status for each
individual channel.
Select Tr. 1-1 and Tr. 2-1 to record to Tr. 3-1 using the internal mixing bus. Select Tr. 3-1 to REC mode. Since
the first verse of the vocal we wish to keep is on Tr. 1-1, we will use the [STATUS] button on channel 2 to
select MUTE (turn OFF channel 2, the LED will be OFF). The first verse will play from Tr. 1-1 and be
recorded onto Tr. 3-1. At the end of the first verse, while still recording, you will MUTE channel 1 and UNMUTE (turn on again) channel 2. The second verse will then record onto Tr. 3-1 from Tr. 2-1. You can follow
this process to the end of the song.
ACTION: Combining Two Lead Vocal Tracks Into One Using
[Mute]
1.
Hold [SHIFT] and press [SELECT] (under MIXER MODE), to choose TRACK MIX mode.
2.
Hold [SHIFT] and press [Input/BUSS] (CH EDIT button 1).
3.
Press [CH EDIT] 1 to select Track 1.
4.
Use the TIME/VALUE dial to select “3-4” as the BUSS SEL for Track 1.
5.
Press [CH EDIT] 2, use the TIME/VALUE dial to select “3-4” as the BUSS SEL for Track 2.
6.
Turn the PAN knob for channels 1 and 2 to the left (route to track 3).
7.
Raise the Faders for Channels 1, 2, and 3 to the desired level.
8.
Press [CH EDIT] 3 to select Track 3.
9.
Use the TIME/VALUE dial to select “MIX” as the BUSS SEL for Track 3.
10.
Press the [STATUS] button on channel 3 repeatedly until it blinks red (record ready mode).
11.
Press the [STATUS] button on channel 1 repeatedly until the led is green (play mode).
12.
Press the [STATUS] button on channel 2 repeatedly until the LED is off (track is muted).
13.
Press [REC] and [PLAY] to begin recording the first verse’s vocal part.
14.
When the first verse is over, press the [STATUS] button on channel 1 to mute it. The led will
turn off. You don’t need to stop the recording.
15.
Before the 2nd verse starts, turn channel 2 on (unmute) by pressing the [STATUS] button on
channel 2. The led is green (play mode).
16.
Switch between the two channels by pressing the [STATUS] buttons on either channel to
mute and unmute the tracks.
17.
When you are finished recording the vocal comp to track 3, press the [STATUS] button on
channel 3 to select play mode (led is green).
Be sure to MUTE tracks 1 & 2 or move fader # 1 or 2 to off.
Chapter 4: Overdub Applications
77
Making A New Version of Your Song
Once you have recorded some material into the VS-880, moving, erasing or copying is not really affecting
the original recordings, it is just changing the “pointers” to that original material. This makes it very fast
and easy to try different versions of your songs. You can experiment with doubling a chorus, rearranging
the order of your verses, shortening a bridge, or just about anything you want to try. And all of this can be
done without losing the original order of your first recording.
One approach is to copy your whole song to another location in the VS-880 time line. You would do this
using the Copy function and using the Song Top as the Copy Start and Copy From points, the Song End as
the Copy End and some marker that is after the song end as your Copy To location.
After making a copy of the whole song, you can then easily Cut out a section of the song or even Insert
some space and add more material or copy a chorus to double its length, etc. The following action steps
explain a method of using the Copy function to completely re-arrange your song, section by section.
You will need to do each step that follows for each section of the song that you want to copy to your new
version location.
ACTION: Making A New Version of Your Song
1.
First, set [LOC 4] Point #4 to the starting location of your new version, (somewhere after the
end of your original song). You can do this easily by pressing Song End and then holding
the FF button for a second or two.
2.
Then set [LOC 1] to the START of the section that you want to copy first, and set [LOC 3] to
the END of the end of that section.
3.
Press [TRACK] until the display indicated “COPY?”.
4.
Press [YES].
5.
Press the [<CURSOR] button until you see “?-?>?-?”.
6.
Press the [CH EDIT] button for the first track you want to copy.
7.
Press the [CURSOR>] button.
8.
Press the [CH EDIT] button for the destination for this track (it probably will be the same
track).
9.
Use the TIME/VALUE dial to select the destination virtual track (again, probably the same
one).
10.
If you want to copy more than one track: Press the [CURSOR>] button for the next selection
screen that displays “?-?>?-?”.
11.
Enter the Source track by pressing the [CH EDIT] button for that track.
12.
Press the [CURSOR>] button.
13.
Enter the Destination track by pressing the [CH EDIT] button for that track.
14.
Use the TIME/VALUE dial to enter the Virtual track for the destination.
15.
Continue using the [CURSOR>] button to access the Source Track and Destination track
selection screens until you have entered all of the tracks you want to copy
16.
Press the [PARAMETER>>] button to move the next parameter: “COPY START”.
17.
Press [LOC 1] for the copy start location.
18.
Press the [PARAMETER>>] button to display “TRK FROM”.
(Continued)
78 VS-880 Application Guide
(Making A New Version of Your Song, Continued)
19.
Press [LOC 1] again.
20.
Press [PARAMETER>>] to display “Copy End”.
21.
Press [LOC 3].
22.
Press [PARAMETER>>] to display “Copy To”.
23.
Press [LOC 4].
24.
Press [PARAMETER>>] to display “Copy time” and leave it set to 1.
25.
Press the [PARAMETER>>] button.
26.
Press [YES].
Now you need to find the destination for the next section you want to copy, which will be the end of the
section you just copied.
27.
Press the [Song End] Button.
28.
Use the Scrub Functions or Preview Functions to find the exact point you want the next
section to start.
29.
Hold [CLEAR] and press [LOC 4].
30.
Press [LOC 4] to reuse this location for the next Copy Destination.
Now find the Start of the next section that you want to Copy.
31.
Clear [LOC 1] and then re-enter it here.
Do the same for the end of the section that you want to copy next. etc., etc.
Chapter 4: Overdub Applications
79
80 VS-880 Application Guide
Chapter 5: Editing Applications
Use {Cut} To Shorten Your Song
Be sure you have read and understand the sections of the V-Xpanded Owner’s Manual describing:
scrub, using waveforms to edit, and preview to/from/thru (Chapter 4); editing resolution (page 56);
and undo & redo (pages 112 & 113.) These are important skills that will be used during editing.
One of the best parts of the VS-880 is the ability to cut and paste your audio material, just like you would
use a word processor on your computer to cut and paste a written document. One common editing
function is the cut command. It functions just the way it sounds. You specify a section of audio to be “cut”
from the music. For example, let’s assume you have recorded a song that is too long. You decide to cut the
second verse from the song in order to shorten it.
Instruct the VS-880 which track you intend to “cut”, then specify the start and end of the section to be
removed. The VS-880 will execute the CUT command and move all the material following the CUT
backwards in time to join with the first section of audio. e.g. If you CUT the second verse from your song,
the VS-880 will move the beginning of the third verse to directly follow the end of the first verse (For more
- see the V-Xpanded Owner’s Manual Page 83).
ACTION: Use {Cut} To Shorten Your Song
A
Start
End
Time
Clear Locate Points First: Hold the [CLEAR] button and press any [LOC] buttons with lit LED.
1.
Advance your song to the beginning of the section you want to cut and set a locate point.
Press [LOC] 1 (the LED will turn on).
2.
Advance your song to the end of the section you want to cut and set a locate point. Press
[LOC] 2 (the LED will turn on).
3.
Press [TRACK] repeatedly until “Track Cut ?” appears in the screen display.
4.
Press [YES].
5.
Press [NO] repeatedly until the display shows “?-?” (to clear previous track selections).
6.
Press the [CH EDIT] button for the Track that contains the material you want to cut.
7.
Use the TIME/VALUE dial to select the Virtual Track that contains the material you want to
cut. **
8.
Press [PARAMETER>>] until “TRK St =” is displayed.
9.
Press [LOC] 1.
10.
Press [PARAMETER>>] until “TRK End =” is displayed.
12.
Press [LOC] 2.
12.
Press [PARAMETER>>] and “Track Cut OK?” will be displayed.
13.
Press [YES] to complete the CUT command.
** If you turn the TIME/VALUE dial past V. Track 8 you will see the Virtual Track
number replaced by an asterisk. This indicates that the specified time on all Virtual
Tracks for that Primary Track will be cut. If you turn the dial further both numbers
will be replaced by asterisks. This indicates that the specified time on all Tracks
(Virtual and Primary) will be cut.
Chapter 5: Editing Applications
81
Use {Erase} To Eliminate Unwanted Material
Another common editing function for the VS-880 is the ERASE command. It is very similar to the CUT
command, however, it does not move the section of your song following the part to be erased. You specify
a section of audio to be ERASED from the music. For example, let’s assume you have recorded a song that
contains three guitar solos recorded at various places in the music on Tr. 2-1. You decide to erase the
second solo from the song because you don’t like it, but you wish for the other two solos to remain in
exactly the same place they were recorded.
Instruct the VS-880 which track you intend to ERASE, then specify the start and end of the section to be
erased, and finally instruct the VS-880 to execute the erase command. You may think of the ERASE
command exactly like your were erasing an analog tape or cassette. You could ERASE (i.e. record silence)
the middle part of a cassette tape and the remainder of the material would remain in the exact same
position as it was recorded. (For more - see the VS-880 V-Xpanded Owner’s Manual Chapter 4.)
ACTION: Use {Erase} To Eliminate Material
A
Start
End
Time
Clear Locate Points First: Hold the [CLEAR] button and press any [LOC] buttons with lit LED.
1.
Advance your song to the beginning of the section you want to erase and set a locate point.
Press [LOC] 1 (the led will turn on).
2.
Advance your song to the end of the section you want to erase and set a locate point. Press
[LOC] 2 (the LED will turn on).
3.
Press [TRACK] repeatedly until “Track Erase ?” appears in the display.
4.
Press [YES].
5.
Press [NO] repeatedly until the display shows “?-?” (to clear previous track selections).
6.
Press the [CH EDIT] button for the Track that contains the material you want to erase.
7.
Use the TIME/VALUE dial to select the Virtual Track that contains the material you want to
erase. *
8.
Press [PARAMETER>>] until “TRK St =” is displayed.
9.
Press [LOC] 1.
10.
Press [PARAMETER>>] until “TRK End =” is displayed.
10.
Press [LOC] 2.
12.
Press [PARAMETER>>] and “Track Erase OK?” will be displayed.
13.
Press [YES] to complete the procedure.
*If you turn the TIME/VALUE dial past V. Track 8 you will see the Virtual Track
number replaced by an asterisk. This indicates that the specified material on all
Virtual Tracks for that Primary Track will be erased. If you turn the dial further
both numbers will be replaced by asterisks. This indicates that the specified material
on all Tracks (Virtual and Primary) will be erased.
The CUT and ERASE commands function for a single track or across multiple
tracks. Be sure you specify if you intend to CUT or ERASE one specific track, or all
tracks. If you already have multiple tracks of your song recorded, you will probably
want to CUT all tracks at the same time to shorten each track by the same amount.
(For more - see the VS-880 V-Xpanded Owner’s Manual Chapter 4).
82 VS-880 Application Guide
Use {Insert} To Add Space Into An Existing Recording
Sometimes your song is too short and you would like to add 2 additional verses after verse # 2. The
INSERT command will allow you to insert blank space into your recording at the correct location.
First choose which track or tracks to insert blank time into. The VS-880 will let you specify the location to
insert the time and also the length of time to insert.(For more - see the VS-880 V-Xpanded Owner’s
Manual, Chapter 4).
Blank
To
Length
Time
ACTION: Use {Insert} To Add Space Into An Existing Recording
Clear Locate Points First: Hold the [CLEAR] button and press any [LOC] buttons with lit LED.
1.
Press [TRACK] repeatedly until “Track Insert?” appears in the LCD display.
2.
Press [YES].
3.
Press [NO] repeatedly until the display shows “?-?” (to clear previous track selections).
4.
Press the [CH EDIT] button for the Track # you wish to wish to add space to.
5.
Use the TIME/VALUE dial to select the Virtual Track you wish to add space to.
If you turn the TIME/VALUE dial past V. Track 8 you will see the Virtual Track
number replaced by an asterisk (*). This indicates that space will be inserted on all
Virtual Tracks for that Primary Track. If you turn the dial further both numbers
will be replaced by asterisks. This indicates that space will be inserted on all Tracks
(Virtual and Primary).
6.
Press the right [PARAMETER>>] button (“To = _____” will be displayed), then use the
TIME/VALUE dial to set the time location where the blank space will be inserted. You can
also use locator buttons to select the correct insert time if you have a marker preset to the
correct time.
7.
Press the right [PARAMETER>>] button (“Len = _____” will be displayed), then use the
TIME/VALUE dial to set the length (amount) of blank space to be inserted.
Blank space will be inserted from the point specified on the “TRK To” screen to the
point specified in the “TRK Len” screen.
8.
Press the right [PARAMETER>>] button again and “Track Insert OK?” will be displayed.
9.
Press [YES] to complete the procedure.
Chapter 5: Editing Applications
83
Use {Move} To Place Guitar Part in New Location
When you decide to make a new arrangement of your song, the MOVE command is very useful. Maybe
you decide that the second verse is musically stronger than the first, so you want to move the first verse to
the end of the song, leaving the second verse as the new beginning.
Select which track you want to move something from, you will designate the start and end of the section
you wish to move, then select the location and track where you want to move the section to, then compete
the move.
START of the EDIT.
Beginning of the
material to edit
END of the EDIT.
End point of the
material to edit
FROM of the EDIT.
Convenient reference
point for the edit
TO of the EDIT.
Final destination
for the FROM point
By setting the ‘START’ and ‘FROM’ maker to the same location, the start of the
section you are moving will be relocated to the designated ‘TO’ destination. (For
more - see the VS-880 V-Xpanded Owner’s Manual Chapter 4).
ACTION: Use {Move} To Place Guitar Part in New Location
Clear Locate Points First: Hold the [CLEAR] button and press any [LOC] buttons with lit LED.
1.
Set a Locate point with [LOC 1] at the start of the section you want to move.
2.
Set a Locate point with [LOC 2] at the end of the section you want to move.
3.
Set a Locate point with [LOC 3] at the time location you want to move this section to.
4.
Press [TRACK] until “Track Move?” is displayed.
5.
Press [YES].
6.
Press [NO] repeatedly until the display shows “?-?” (to clear previous track selections).
7.
Press the [CH EDIT] button that corresponds to the Track you want to move.
8.
Use the TIME/VALUE dial to select the Virtual Track that you want to move.
9.
Press [CURSOR>].
10.
Press the [CH EDIT] button that corresponds to the Track you want to move this part of
your song to (this can be the same as the source Track).
11.
Use the TIME/VALUE dial to select the Virtual Track that you want to move this section to.
12.
Press right [PARAMETER>>] button, “TRK St.=” should be displayed.
(Continued)
84 VS-880 Application Guide
(Use {Move} To Place Guitar Part in New Location, Continued)
13.
Press [LOC 1].
14.
Press the right [PARAMETER>>] button, “TRK Frm=” should be displayed.
15.
Press [LOC 1].
16.
Press the right [PARAMETER>>] button, “TRK End=” should be displayed.
17.
Press [LOC 2].
18.
Press the right [PARAMETER>>] button, “TRK To=” should be displayed.
19.
Press [LOC 3].
20.
Press the right [PARAMETER>>] button, “Track Move OK ?” should be displayed.
21.
Press [YES] to complete the move.
Moving within the same track.
A
A
Start
End
To
Time
Moving to a different track.
B
B
Start
End
To
Time
Moving using the “Frm” setting.
C
C
Start From
End
To
Time
Chapter 5: Editing Applications
85
Use {Move} & Sync Point - Align Music With Narration
If you have already used the MOVE command without designating a ‘FROM’ location, you noticed that
the beginning of the section to be moved was moved to the location you designate as ‘TO’. This is very
good if you are moving verses of a song and the beginning of a verse or section is also the beginning of the
section to be moved. It is easy to instruct the VS-880 to {MOVE} the beginning of a verse # 2 to the end of
verse # 4.
However, what do you do if you need to move a section of audio, but the point of synchronization is not at
the beginning. For example, you have a voice narration recorded on Tr. 1-1 and an instrumental music
recording on Tr. 2-1 and Tr. 3-1. You then decide that you want the solo piano section of the music to begin
at a particularly expressive point in the voice narration. The solo piano section begins somewhere in the
middle of the musical recording. The task is to move the entire musical recording in time so that the solo
piano section begins at the exact same moment as the important expressive point in the narration. You are
not interested when the music begins or ends, only that the particular section of the music begin at the
correct time. The VS-880 accomplishes this with great ease by adding the additional parameter ‘FROM’ to
the {MOVE} command.
Set the ‘START’ parameter at the beginning of the music and the ‘END’ parameter at the end of the music.
You will then mark the beginning of the solo piano as the ‘FROM’ parameter and set the expressive
narration point as the ‘TO’ parameter. When you execute the full {MOVE} command, the entire musical
recording will be moved to the new location, however, the solo piano will begin at the correct point in the
narration.
(For more - see the VS-880 V-Xpanded Owner’s Manual, Chapter 4).
START of the EDIT.
Beginning of the
material to edit
END of the EDIT.
End point of the
material to edit
FROM of the EDIT.
Convenient reference
point for the edit
TO of the EDIT.
Final destination
for the FROM point
ACTION: Use {Move} And Sync Point To Align Music With
Narration
Clear Locate Points First: Hold the [CLEAR] button and press any [LOC] buttons with lit LED.
1.
Set a Locate point with [LOC 1] at the start of the section you want to move.
2.
Set a Locate point with [LOC 2] at the start of the piano solo.
3.
Set a Locate point with [LOC 3] at the end of the section you want to move.
4.
Set a Locate point with [LOC 4] at the time location you want the piano solo to start
5.
Press [TRACK] until “Track Move?” is displayed.
6.
Press [YES].
7.
Press [NO] repeatedly until the display shows “?-?” (to clear previous track selections).
8.
Press the [CH EDIT] button that corresponds to the Track you want to move.
(Continued)
86 VS-880 Application Guide
(Use {Move} To Place Guitar Part in New Location, Continued)
9.
Use the TIME/VALUE dial to select the Virtual Track that you want to move.
10.
Press [CURSOR>].
11.
Press the [CH EDIT] button that corresponds to the Track you want to move this section of
the music to (this can be the same as the source Track).
12.
Use the TIME/VALUE dial to select the Virtual Track that you want to move the section to.
13.
Press the right [PARAMETER>>] button, “TRK St.=” should be displayed.
14.
Press [LOC 1].
15.
Press the right [PARAMETER>>] button, “TRK Frm=” should be displayed.
16.
Press [LOC 2].
17.
Press the right [PARAMETER>>] button, “TRK End=” should be displayed.
18.
Press [LOC 3].
19.
Press the right [PARAMETER>>] button, “TRK To=” should be displayed.
20.
Press [LOC 4].
21.
Press the right [PARAMETER>>] button, “Track Move OK ?” should be displayed.
22.
Press [YES] to complete the {Move} command.
Moving within the same track.
A
A
Start
End
To
Time
Moving to a different track.
B
B
Start
End
To
Time
Moving using the “Frm” setting.
C
C
Start From
End
To
Time
Chapter 5: Editing Applications
87
Use {Copy} To Create A Drum Loop
A very important feature of random access recording is the ability to play the same recording over and
over and over, without actually recording it that way. For example, let’s assume that you have recorded a
drum groove on Tr. 1-1 for 12 measures. Now you decide that you want to make a 10 minute dance mix
based on this 12 measure drum groove.
The beginning and ending of the drum part will define the section to be copied. Then instruct the VS-880
to copy the drum part, end to end, for a defined number of times up to 99. The drum part will now repeat
over and over again, end to end, creating a long dance track. (For more - see the VS-880 V-Xpanded
Owner’s Manual, Chapter 4).
ACTION: Use {Copy} To Create A Drum Loop
Clear Locate Points First: Hold the [CLEAR] button and press any [LOC] buttons with lit LED.
1.
Set a Locate point with [LOC 1] at the start of the drum groove.
2.
Set a Locate point with [LOC 2] the end of the drum groove.
3.
Press [TRACK] until “Track Copy?” is displayed.
4.
Press [YES].
5.
Press [NO] repeatedly until the display shows “?-?>?-?” (to clear previous track selections).
6.
Press the [CH EDIT] button that corresponds to the Track you want to copy.
7.
Press [CURSOR>].
8.
Press the [CH EDIT] button that corresponds to the Track you want to copy this drum
groove to (this can be the same as the original source Track).
9.
Use the TIME/VALUE dial to select the Virtual Track that you want to copy the drum
groove to.
10.
Press the right [PARAMETER>>] button, “TRK St.=” should be displayed.
11.
Press [LOC 1].
12.
Press the right [PARAMETER>>] button, “TRK Frm=” should be displayed.
13.
Press [ LOC 1].
14.
Press the right [PARAMETER>>] button, “TRK End=” should be displayed.
15.
Press [LOC 2].
16.
Press the right [PARAMETER>>] button, “TRK To=” should be displayed.
17.
Press [LOC 2].
18.
Press the right [PARAMETER>>] button, “Copy Time =” should be displayed.
19.
Use the TIME/VALUE dial to select the number of times you want the drum groove to be
copied end to end.
20.
Press the right [PARAMETER>>] button, “Track Copy OK?” should be displayed.
(Continued)
88 VS-880 Application Guide
(Use {Copy} To Create A Drum LoopContinued)
Copying twice to the same Track
A
A'
Start
End
A"
To
Time
Copying twice to a different Track
B
B'
Start
End
B"
To
Time
Copying using the “Frm” setting
C
C'
Start From
End
To
Time
Chapter 5: Editing Applications
89
Use {Copy} To Re-Use A Vocal In Multiple Verses
What if you have a song with 3 chorus sections but you have the perfect background vocals recorded on Tr.
6-1 for the first chorus only? It would be extremely helpful to be able to use the first chorus background
vocals for the other 2 chorus sections.
Again using the {COPY} command, you can select the first chorus recording on tracks Tr. 6-1 as the
‘START’ and ‘END’ of the section to be copied. You can then instruct the VS-880 to {COPY} this
background vocal section to the second and then to the third chorus. You will first specify the beginning of
the second chorus as your COPY TO location and then choose the third chorus as the COPY TO location.
(For more - see the VS-880 V-Xpanded Owner’s Manual, Chapter 4).
ACTION: Use {Copy} To Re-Use A Vocal Background In
Multiple Verses
Clear Locate Points First: Hold the [CLEAR] button and press any [LOC] buttons with lit LED.
1.
Set a Locate point with [LOC 1] at the beginning of the chorus # 1.
2.
Set a Locate point with [LOC 2] at the end of the chorus # 1.
3.
Set a Locate point with [LOC 3] at the beginning of chorus # 2
4.
Set a Locate point with [LOC 4] at the beginning of chorus # 3.
5.
Press [TRACK] until “Track Copy?” is displayed.
6.
Press [YES].
7.
Press [NO] repeatedly until the display shows “?-?>?-?” (to clear previous track selections).
8.
Press the [CH EDIT] button for the first track you want to copy from.
9.
Press the [CURSOR>] button.
10.
Press the [CH EDIT] button for the destination track.
11.
Use the TIME/VALUE dial to select the destination virtual track
If you want to copy more than one track:
12. Press the [CURSOR>] button again until the selection screen displays “?-?>?-?”.
13.
Enter the Source track by pressing the [CH EDIT] button for that track.
14.
Press the [CURSOR>].
15.
Enter the Destination track by pressing the [CH EDIT] button for that track.
16.
Use the TIME/VALUE dial to select the destination virtual track.
Continue using the [CURSOR>] button to access the Source Track and Destination
track selection screens until you have entered all of the tracks you want to copy.
You can only use those tracks and virtual tracks that are “on top” or ready to play
as source tracks for copying. If you want to copy a virtual track that is below a
currently playing track, you must first make that virtual track the current playable
track (see V-Xpanded Owner’s Manual page 63 - Switching V-tracks).
17.
Press the right [PARAMETER>>] button, “TRK St.=” should be displayed.
18.
Press [LOC 1].
(Continued)
90 VS-880 Application Guide
(Use {Copy} To Re-Use A Vocal In Multiple Verses, Continued)
19.
Press the right [PARAMETER>>] button, “TRK Frm=” should be displayed.
20.
Press [ LOC 1].
21.
Press the right [PARAMETER>>] button, “TRK End=” should be displayed.
22.
Press [LOC 2].
23.
Press the right [PARAMETER>>] button, “TRK To=” should be displayed.
24.
Press [LOC 3] (the beginning of chorus # 2).
25.
Press the right [PARAMETER>>] button, “Copy Time =” should be displayed.
26.
Use the TIME/VALUE dial to select 1 (number of times to copy the background vocal).
27.
Press the right [PARAMETER>>] button, “Track Copy OK?” should be displayed.
28.
Press [YES] to complete the copy command.
29.
Repeat Steps # 5 through # 28 to copy the selected section to the beginning of chorus # 3.
When you execute step # 24, Press [LOC 4] (the beginning of chorus # 3).
Copying twice to the same Track
A
A'
Start
End
A"
To
Time
Copying twice to a different Track
B
B'
Start
End
B"
To
Time
Copying using the “Frm” setting
C
C'
Start From
End
To
Time
Chapter 5: Editing Applications
91
92 VS-880 Application Guide
Chapter 6: Mixdown Applications
Mixing 8 Tracks To Stereo Analog Outputs
Once you have your final tracks recorded and have chosen which virtual tracks you wish to use, you are
ready to mix them all to a final stereo mix. Using the analog output, you might mix to a cassette deck or
other analog tape recorder.
You will need to select the correct mixer mode for your final mixdown. Then you will make your
appropriate pan pot settings, connect your mixdown device to the analog master output, adjust your fader
levels and record your final mix on the stereo analog device.
ACTION: Mixing 8 Tracks To Stereo Analog Outputs
1.
Hold [SHIFT] and press [SELECT] to select INPUT>TRACK mode (if it is not already set to
this mode).
2.
Connect the MASTER OUT L and R (VS-880 rear panel) to the left and right inputs of your
mastering tape recorder.
3.
Put your mastering deck in record pause mode and press [PLAY] on the VS-880.
4.
Use the MASTER fader on the VS-880 and the record input level knob on your tape deck (if
it has one) to set the optimum record level (around 0 dB).
5.
Use the PAN knobs and FADERS to adjust the desired level of each track.
6.
Press [STOP] on the VS-880.
7.
Start recording on your tape deck.
8.
Press [ZERO] on the VS-880 (to return to the beginning of the song).
9.
Press [PLAY] on the VS-880. Use the FADERS and PAN knobs to make any real time
adjustments to the music as it is recorded to your mixdown recorder.
10.
Press [STOP] on the VS-880 and your tape deck when the song is finished.
Chapter 6: Mixdown Applications
93
Mix 8 Tracks To Stereo DAT - Digitally
Mixing your 8 VS-880 tracks to stereo DAT digitally is exactly the same as recording to a stereo analog
recorder. Remember that the master analog outputs and the digital output from the VS-880 contain exactly
the same information.
ACTION: Mix 8 Tracks To Stereo DAT - Digitally
1.
Make sure that the VS-880 mixer is set to INPUT>TRACK mode (hold [SHIFT] and press
[SELECT] if it is not).
2.
Connect the DIGITAL OUT of the VS-880 to the digital input of your DAT recorder.
3.
Make sure that your DAT machine is set to record from it’s digital input (S/P DIF).
4.
Make sure that the sampling rate of your DAT recorder matches the sampling rate of the
current song in the VS-880 (some DAT recorders will do this automatically).
Press the [PLAY (DISPLAY)] button, then press [SHIFT] + [SONG] to display the
sampling rate of the current song.
94
5.
Set the panning and level to desired position for each track on the VS-880.
6.
Start recording on your DAT machine.
7.
Press [ZERO] on the VS-880.
8.
Press [PLAY] on the VS-880. Use the FADERS and PAN knobs to make any real time
adjustments.
9.
Press [STOP] on the VS-880 and your DAT machine when the song is finished.
VS-880 Application Guide
Mixing 8 Tracks With Internal Effects To Stereo Output
Using the 2 effects processors built into the VS8F-1 expansion board (if installed) you can add additional
creativity during the mixdown process. For example, maybe you have a ‘dry’ vocal on Tr. 1-1 (no effects
recorded on it). Tr. 2-1 has a piano that was originally recorded using reverb. Tr.3-1 is the BASS guitar with
no effects. Tr. 4-1 is an acoustic guitar that was also recorded with reverb. Tr. 5-1 is your dry (no effects)
solo saxophone recording. You decide that you want to add reverb to the vocal on Tr. 1-1 during the
mixdown. You might also want to add chorus to the saxophone.
You will select EFFECT # 1 to Tr. 1-1 and select the output of EFFECT # 1 to the final stereo mix. You will
then select EFFECT # 2 to Tr. 5-1 and select the output to the final stereo mix. Each EFFECTS device can be
selected to the appropriate effect you are looking for.
ACTION: Mixing 8 Tracks With Internal Effects To Stereo
Output
1.
Make sure that the VS-880 mixer is set to INPUT>TRACK mode (hold [SHIFT] and press
[SELECT] if it is not).
2.
Connect the MASTER OUT L and R to the left and right inputs of your mastering recorder.
3.
Hold [SHIFT] and press [EFFECT-1] (CH EDIT button 7).
4.
Press the [CH EDIT] button of every track (channel) you wish to assign to this effect.
5.
Use the TIME/VALUE dial to select “PstFade.”
6.
Press [EFFECT] (under EDIT CONDITION) until “EFFECT 1 PRM ?” is displayed. Press
[YES].
7.
Use the TIME/VALUE dial to select the effect that you want and press [YES] to confirm your
selection.
8.
Press [EDIT] (above MASTER fader) and press [PARAMETER>>] until “EFF 1 RTN =” is
displayed.
9.
Use the TIME/VALUE dial to select “MIX” (if it is not already selected).
10.
Hold [SHIFT] and press [EFFECT-2] (CH EDIT button 8).
11.
Press the [CH EDIT] button of every track (channel) you wish to assign to this effect.
12.
Use the TIME/VALUE dial to select “PstFade.”
13.
Press [EFFECT] (under EDIT CONDITION) until “EFFECT 2 PRM ?” is displayed. Press
[YES].
14.
Use the TIME/VALUE dial to select the effect that you want and press [YES] to confirm your
selection.
15.
Press [EDIT] (above MASTER fader) and pres [PARAMETER>>] until “EFF 2 RTN =” is
displayed.
16.
Use the TIME/VALUE dial to select “MIX” (if it is not already selected).
17.
Using the PAN knobs and FADERS, adjust your mix as desired.
18.
Start recording on your master recorder.
19.
Press [ZERO] on the VS-880.
20.
Press [PLAY] on the VS-880. Use the FADERS and PAN knobs to make any real time
adjustments.
21.
Press [STOP] on the VS-880 and your master recorder when the song is finished.
Chapter 6: Mixdown Applications
95
Using Mute During Mixdown
The channel [STATUS] buttons are very useful during mixdown.
MUTE
The normal playback mode during mixdown is that all channels are set to PLAY mode (STATUS LED is
green.) By pressing the status button of a channel during playback the LED goes off. This is the MUTE
function of the channel. Basically, you have turned the channel OFF and the audio will stop playing from
that channel. Let’s assume that you have two tracks of recorded lead vocals, Tr. 1-1 and Tr. 2-1. Maybe you
want to use the first verse from Tr. 1-1 and the second verse from Track 2-1. As you are recording your
mixdown, you can use the [STATUS] buttons to MUTE track 1 when you want the vocal part from track 2,
and alternatively MUTE track 2 and return track 1 to play mode when you want to hear track 1.
ACTION: Using Mute During Mixdown
1.
Press [PLAY].
2.
Press the [STATUS] button for the Track that you want to mute until the LED turns off
(mute).
3.
Press the [STATUS] button until the LED lights green to un-mute that track (return to Play
mode).
SOLO
The opposite of the MUTE function is the SOLO function. Pressing the [SHIFT] + [SOLO] buttons enters
the SOLO mode. The individual [STATUS] buttons become SOLO buttons. A SOLO button acts the way
you would expect. By pressing a channels [STATUS] button when the master SOLO mode is on, that
individual channel is the only one that will be heard. Essentially, all the other channels will MUTE.
This feature is very useful during a mixdown if you want to MUTE all the channels except for one or two
during a particular section of your music. For example, let’s assume that your piano track is recorded on
Tr. 6-1 in one of your songs. During the middle of the song, the piano plays a short passage that you want
to be the only instrument playing. However, all the other tracks are still playing back, even though the
musicians might have stopped playing during that passage. But maybe there is noise from the
microphones, or buzz from a synthesizer on some of those tracks during the solo piano passage. By using
the SOLO function on the piano track, you can MUTE (turn OFF) all the other tracks during the solo piano
passage and then press the [STATUS] button on the piano track again at the end of the passage to return all
the tracks to PLAY mode.
ACTION: Using Solo During Mixdown
1.
Hold [SHIFT] and press [SOLO] (EDIT).
2.
Press the [STATUS] button of the track or tracks that you want to hear.
3.
Press the [STATUS] button of that track or tracks again to return all tracks to play mode.
4.
Hold [SHIFT] and press [SOLO] again to exit SOLO mode.
The SOLO function can be used on more that one channel (track) at a time.
96
VS-880 Application Guide
Using Scenes To Help With Mixdown
The VS-880 contains ‘snapshot’ automation known as SCENES. Essentially, the VS-880 allows you to take a
‘snapshot’ or picture of all the settings in the VS-880 at a particular point in time. The ‘snapshot’ is stored
in one of the 8 available scenes. These scenes or snapshots can be recalled by pressing the correct [SCENE]
button. By using SCENES you can try or audition different mixes of your song. For example, you might try
one mix with the vocal very loud with reverb and the drums very soft. You could store that ‘snapshot’ into
SCENE # 1. You might then try a mix with no reverb on the vocal, the drums very loud, and the guitar solo
panned to the left speaker. That would be stored as SCENE # 2, etc. Once you have tried many dif ferent
mixes and stored them as SCENES, you can alternately listen to them to pick which one you think is best.
That would be the mixdown you would then record to your final cassette or DAT tape. (For more - see
V-Xpanded Owner’s Manual page 72-73.)
ACTION: Using Scenes To Help With Mixdown
1.
Adjust the panning, levels, effects levels, and EQ as desired for all the tracks you intend to
mix.
2.
Press [STOP].
3.
Press [SCENE] (the LED will light).
4.
Press [LOC] 1. The led should now be lit, indicating that you stored all the present mix
information in scene location # 1.
5.
Experiment with some different level and/or pan settings.
6.
Make sure that the [SCENE] led is still on and press [LOC] 2. You have now stored your new
mix settings into scene location # 2.
7.
Press [LOC] 1 followed by [PLAY]. Your song will play back with the mix information
stored in scene location # 1.
8.
Press [STOP] followed by [ZERO].
9.
Make sure that the [SCENE] LED is still on and press [LOC] 2.
10.
Press [PLAY]. Your song will now play back with the mix information from scene location 2.
Remember actual fader levels may not match the physical fader position. (See
Nulling - Application Guide page # 30.)
CLEARING A SCENE
To clear a scene, hold [CLEAR] and press the [LOC] (scene) button that corresponds to the
scene that you want to erase.
•
IMPORTANT: The VS-880 cannot recall scenes while it is playing back. You can
only select a new scene when the VS-880 is STOPPED.
Remember that SCENES are ‘SNAPSHOTS’ of all the settings in the VS-880 at a single point in
time. SCENES do not record any movement of controls. That function is available using an external
MIDI sequencer (page 105 of this guide) or realtime automated mixing (page 106 of this guide.)
Chapter 6: Mixdown Applications
97
Mixing 8 Tracks and External Source To 2 Track DAT
There are occasions when you have all 8 tracks recorded and you would like to add just one more
instrument or vocal to your song during mixdown. This is a simple process in the VS-880 using the INPUT
MIX and TRACK MIX modes of the mixer section.
You will first connect your external device to the VS-880, connect your DAT recorder, adjust the mix of
your pre-recorded tracks, adjust the level of your incoming source, and then record the final mix to DAT.
ACTION: Mixing 8 Tracks & External Sources To 2 Track DAT
1.
Make sure that the VS-880 has been set to INPUT MIX mode (hold [SHIFT] and press
[SELECT] if it is not).
2.
Connect the output of an external source into Input 1 of the VS-880.
3.
Connect the Digital Out of the VS-880 to the Digital In of your DAT recorder.
4.
Make sure that your DAT machine is set to record from its’ Digital Input (S/P DIF) and that
its sampling rate matches the sampling rate of the current song in the VS-880 (some DAT
machines do this automatically).
Press the [PLAY (DISPLAY)] button, then press [SHIFT] + [SONG] to display the
sampling rate of the current song.
5.
Hold the [SHIFT] button and press the [Input/Buss] (CH EDIT button 1).
6.
Press [CH EDIT] button 1 and use the TIME/VALUE dial to select MIX.
7.
Press [PLAY (DISPLAY)] and use the faders and INPUT SENS knobs to adjust the level of
your external source.
8.
Press [SELECT] to change the mixer to TRACK MIX mode.
9.
Hold the [SHIFT] button and press the [Input/Buss] (CH EDIT button 1).
10.
Press [CH EDIT] button 1 and use the TIME/VALUE dial to select MIX.
11.
Press [CH EDIT] buttons 2 through 8 and make sure that each of the remaining tracks are
also set to MIX.
12.
Press [PLAY] on the VS-880 and use the PAN knobs and faders to adjust the recorded Tracks
to their desired settings.
13.
Press [STOP].
14.
Start recording on your DAT recorder.
15.
Return the VS-880 to the beginning of the song (press [ZERO]) and then press [PLAY]. Use
the faders in INPUT MIX mode to adjust the signal from your external source. Use the faders
in TRACK MIX mode to adjust the level of the recorded Tracks.
You can switch back and forth between INPUT MIX and TRACK MIX mode during
the mixdown.
98
VS-880 Application Guide
Using External Effects During Mixdown
Let’s assume that you want to do your final mixdown of a song using your favorite external reverb device.
Sometimes both internal effects are already being used or maybe you just like the sound of a particular
external effects device. Let’s assume that you have a stereo background vocal recording on tracks 7 & 8.
You want to use your external reverb device to add reverb to these vocals during mixdown.
You would set up your VS-880 for normal mix mode, but select track 7 & 8 to use the Aux Send bus 1 and 2
to pass the audio out the AUX send jacks to the external reverb. You would bring the outputs from the
reverb back into the VS-880 through inputs # 1 and 2.
ACTION: Using External Effects During Mixdown
1.
Connect the AUX SEND outputs of the VS-880 to the Inputs of your external effects device.
Connect the Outputs of your effects device to Input # 1 and 2 on the VS-880.
FX Processor
INPUT
OUTPUT
L
R
L (mono)
R
A
B
STEREO AUDIO SOURCE
L
R
AUX SEND
MASTER OUT
1
2
3
4
1
INPUT A
2
3
4
INPUT B
2.
Enter TRACK MIX mode. Hold ([SHIFT] + [SELECT] then [SELECT]).
3.
Hold [SHIFT] and press [AUX SEND] (CH EDIT button 6).
4.
Press [CH EDIT] button 7 and use the TIME/VALUE dial to select “PstFade.”
5.
Press [CH EDIT] button 8 and use the TIME/VALUE dial to select “PstFade.”
6.
Turn the AUX SEND knob all the way left and right and then back to 0 dB.
7.
Use the faders to adjust the amount of signal that is sent to your external effects.
8.
Press [SELECT] to switch to INPUT MIX mode.
9.
Hold [SHIFT] and press [INPUT/BUSS] (CH EDIT 1).
10.
Press [CH EDIT] 1 and use the TIME/VALUE dial to select “MIX.”
11.
Press [CH EDIT] 2 and use the TIME/VALUE dial to select “MIX.”
12.
Use the INPUT SENS knobs and the faders for Inputs 1 and 2 to adjust the level of the signal
returned from your external effects.
13.
Press [PLAY]. Your dry tracks can be controlled in TRACK MIX mode by faders 7 and 8 and
your effected signal can be controlled in INPUT MIX mode by faders 1 and 2.
Chapter 6: Mixdown Applications
99
Use Virtual Tracks To Re-Use The Internal Effects
What do you do if you want to add a different reverb sound to each individual track of the VS-880 using
only the 2 internal effects devices (if installed)? You re-record two tracks at a time to new virtual tracks,
using the internal devices. Maybe you have a song recorded on all 8 tracks of your VS-880 and you want to
add different effects to the first 6 of the 8 tracks. You might begin by selecting Tr. 1-1 and Tr. 2-1 to use the
two internal effects and bounce (re-record) them to Tr. 7-2 and Tr. 8-2. Once that is completed, you can
listen to Tr. 7-2 and Tr. 8-2. You can then select Tr. 3-1 and Tr. 4-1 to use the internal effects devices and
record them to Tr. 1-2 and Tr. 2-2. You can continue this process of re-recording instruments with effects
onto unused virtual tracks, until all the instruments have been recorded with the effect of choice. You can
then select the correct virtual track of each channel for playback and complete your final mix.
ACTION: Use Virtual Tracks To Re-Use The Internal Effects
1.
Enter TRACK MIX mode. (Press [SHIFT] + [SELECT] if you are in Input>Track mode, press
[SELECT] if you are in Input Mix mode).
2.
Hold [SHIFT] and press [EFFECT 1] (CH EDIT 7).
3.
Press [CH EDIT] button 1 and use the TIME/VALUE dial to select “PstFade.”
4.
Press [CH EDIT] button 2 and use the TIME/VALUE dial to select “PstFade.”
5.
Press the right [PARAMETER>>] button and use the TIME/VALUE dial to set the EFFECT 1
send to 100.
6.
Press [CH EDIT] button 1 and use the TIME/VALUE dial to set the EFFECT 1 send to 100.
7.
Press the right [PARAMETER>>] button and use the TIME/VALUE dial to set the EFFECT 1
pan to L63.
8.
Press [CH EDIT] button 2 and use the TIME/VALUE dial to set the EFFECT 1 pan to R63.
9.
Press the [EFFECT] button (under EDIT CONDITION) repeatedly until “EFFECT 1?” is
displayed. Press [YES]
10.
Use the TIME/VALUE dial to select the desired effect and press [YES] to confirm that
selection.
11.
Hold [SHIFT] and press [V.Track] (CH EDIT 2).
12.
Press [CH EDIT] button 7 and use the TIME/VALUE dial to select Virtual Track 2.
13.
Press [CH EDIT] button 8 and use the TIME/VALUE dial to select Virtual Track 2.
14.
Press the [EDIT] button (above MASTER fader) repeatedly until “EFFECT 1 RTN To =” is
displayed.
15.
Use the TIME/VALUE dial to select “EFFECT 1 RTN To = 7-8.”
16.
Press the right [PARAMETER>>] button and use the TIME/VALUE dial to set the return
level to 100.
17.
Press the right [PARAMETER>>] button and use the TIME/VALUE dial to set the return
balance to 0.
18.
Press the [STATUS] buttons for Tracks 7 and 8 until they are flashing red (record mode).
19.
Press [REC] followed by [PLAY]. The signal from the effects processor will now be recorded
on Tracks 7-8.
Use {TRACK EXCHANGE} to swap track positions. (see next page >)
100 VS-880 Application Guide
Listen To More Than One Virtual Track Simultaneously
The {TRACK EXCHANGE} command allows you to move track data to another Track or V.Track (e.g. 1-2,
7-3, 5-6). This will allow you to listen to multiple virtual tracks (different recordings) at the same time. For
example, let’s assume that you have recorded 6 guitar solos on the first 6 virtual tracks of recording track #
8. After listening to each virtual track, you decide that you would like to listen to virtual track # 2, 5, and 6
all at the same time. Since the VS-880 will only play one virtual track at a time for a given recording track,
you must move some of your virtual guitar tracks to other recording tracks so that they can be selected for
playback. You might think that the MOVE command would perform this function, and it will. However,
remember that the MOVE command replaces the existing material with the material that is moved. For
example, if you {MOVEd} Tr. 8-2 to Tr. 1-2, whatever was already on Tr. 1-2 would be gone.
The VS-880 provides a command called {TRACK EXCHANGE} to accomplish this task. It will allow you to
exchange or swap the information from two different tracks. No material is lost during {TRACK
EXCHANGE}, it is just swapped with another track.
Using the example above of the three virtual tracks of guitars, you could use {TRACK EXCHANGE} to
exchange Tr. 8-5 with Tr. 1-1 and exchange Tr. 8-6 with Tr. 2-1. The audio that was originally on Tr. 1-1 will
now be on Tr. 8-5 and vice versa. The audio from Tr. 2-1 will be on Tr. 8-6 and vice versa. You can listen to
all three guitar solos simultaneously by selecting Tr. 1-1, Tr. 2-1 and Tr. 8-2 for playback. (For more - see
Owner’s Manual page 81.)
Exchanging Tracks 1 and 2
Track1
A
B
C
Track2
D
E
D
E
Track1
Track2
A
B
C
Time
ACTION: Listen To More Than One Virtual Track
Simultaneously
1.
Hold [SHIFT] and press [V.Track] (CH EDIT 2).
2.
Press [CH EDIT] button 8 and use the TIME/VALUE dial to select Virtual Track 5.
3.
Press [TRACK] (under EDIT CONDITION) repeatedly until “Track Exchange?” is displayed.
4.
Press [YES].
5.
Press [CH EDIT] button 8 followed by [YES].
6.
Press [CH EDIT] button 1 and use the TIME/VALUE dial to select Virtual Track 1.
“XchgTr.=8-5=>1-1” should be displayed.
7.
Press the right [PARAMETER>>] button. “Track Exchange OK?” should be displayed.
8.
Press [YES]. The information that was on Virtual Track 5 of primary Track 8 is now on
Virtual Track 1 of primary Track 1 and vice versa. You can repeat this procedure for
additional Tracks and Virtual Tracks.
It will cause much less confusion if you can exchange tracks with other blank tracks.
However, it is always good to keep your track sheet (see appendix) up to date with
the correct recordings listed on the correct virtual tracks.
Chapter 6: Mixdown Applications
101
Process Entire Mix With Internal EQ And Compressor
On some occasions you might already have a really good mix set up in your VS-880, but you find that you
would like to add a little more low frequency boost to the overall mix. In addition, you might want to
compress the dynamic range so your song will sound “louder” when played in your auto cassette player.
You will need to set up a normal mix situation, then assign the stereo mix to the effects device, choose the
EQ and Compressor, then record your final mix.
ACTION: Process Your Entire Mix With Internal EQ And
Compressor
1.
Select INPUT>TRACK mode on the VS-880.
2.
Press [EDIT] (above the Master Fader) until “MST EFF1 INS Sw=” is displayed.
3.
Use the TIME/VALUE dial to select On.
4.
Press [EFFECT] (under EDIT CONDITION section) until “EFF EFFECT-1 PRM?” is
displayed.
5.
Press [YES].
6.
Use the TIME/VALUE dial to select “EF1 A66=CL:Comp.”
7.
Use the left/right [<<PARAMETER>>] buttons and the TIME/VALUE dial to adjust the
compressor settings.
8.
Return the VS-880 to the beginning of the song and press [PLAY]. All tracks will be routed
to the compressor and then to the mix buss to be recorded on your mastering device. Any
level or EQ changes will be recorded as well.
102 VS-880 Application Guide
Backup Your Song to DAT
Since hard disk drives are mechanical devices, they are more subject to failure than any other part of your
VS-880. If your hard disk develops a problem or fails for any reason, you may loose all the songs stored on
that disk. It is a good idea backup your songs often by copying them to another disk or backing them up to
DAT (for more information see the V-Xpanded Owner’s Manual page 97. )
ACTION: Backup Your Song to DAT
1.
Connect the Digital output of the VS-880 to Digital input of your DAT recorder (the VS-880
uses S/P DIF coaxial (RCA phono) connectors).
2.
Set the sample rate of your DAT machine to 48kHz (some DAT machines do this
automatically).
3.
Press [SONG] (under EDIT CONDITION) until “SNG DAT Backup” is displayed. Press
[YES].
4.
Use the TIME/VALUE dial to select the song you wish to backup (select “ALL” if you would
like to backup all songs on the current drive).
5.
Press the right [PARAMETER>>] button until “SNG Tape Len =” is displayed.
6.
Use the TIME/VALUE dial to select a tape length that is slightly shorter than the length of
the tape that you are using. For example, if the shortest tape you are using is 60 minutes
long you would select a tape length of 55 minutes on the VS-880.
7.
Press [YES]. “Backup Ready?” will be displayed.
8.
Press [YES]. “Please Rec DAT” will be displayed.
9.
Start recording on your DAT machine and the press [YES] on the VS-880. If multiple tapes
are required to store your backup, the VS-880 will pause after the amount of time specified
in step 5 and allow you to change tapes. You may wish to make a note of where the
recording began on your DAT tape. This information will be useful when loading the song
back into the VS-880.
10.
“Please Stop DAT” will be displayed when the backup is complete. Stop your DAT machine
and the press [YES] on the VS-880. Press [PLAY (DISPLAY)] to return to Play mode.
The Backup to Dat function copies everything about your song from the hard disk
onto the DAT tape. This includes all the music, edits, mixer settings, effect settings,
etc. If you ever need to Recover from DAT (reload the song onto the hard disk from
the DAT tape), the song will be restored exactly as you had saved it.
Chapter 6: Mixdown Applications
103
Recover Your Song from DAT
If you ever need to recover your song from DAT (reload the song onto the hard disk from the DAT tape),
use the following procedure. (for more information see V-Xpanded Owner’s Manual page 98.)
ACTION: Recover Your Song from DAT
1.
Connect the Digital output of your DAT recorder to the Digital input of the VS-880. (the VS880 uses S/P DIF coaxial (RCA phono) connectors).
2.
Load the appropriate DAT tape containing the song you wish to recover.
3.
Press [SONG] (under EDIT CONDITION) until “SNG DAT Recover ?” is displayed.
4.
Press [YES].
5.
“STORE Current?” is displayed. Press [YES] to save any recent changes to the current song.
6.
“Recover Ready?” is displayed. Press the right [PARAMETER>>] button until “Name
Ready?” is displayed.
7.
Press [YES].
8.
“Please Play DAT” is displayed momentarily and then changes to “Waiting Start ID.” Play
your DAT machine from the beginning of the song you wish to recover, “Receiving DATA!!”
will be displayed.
9.
The name of your song will appear in the display followed by “Complete!!”. Stop your DAT
machine.
10.
“SNG Rcv = [Your Song Name]” will be displayed. If this is the song you wish to recover,
press [YES].
11.
“Select Song Recover” is displayed. Press [YES].
12.
“Init IDE:0 OK?” is displayed (Init SC:0 OK? If you have an internal SCSI drive).
Press [NO] (the VS-880 is prompting you to initialize the current drive, which
erases all data on that drive including all the songs. However, if you would prefer to
erase the entire hard disk drive before recovering your song, you can press the [YES]
button instead.
13.
“SNG Set To Tape No.[001]” is displayed. Press [YES].
14.
“Please Play DAT” is displayed momentarily and then changes to “Waiting Start ID.”
Rewind your DAT to the beginning of your song and press play on your DAT machine.
15.
When the recover procedure is done, “Complete-Please Stop DAT” will be displayed. Stop
your DAT machine and press [YES] on the VS-880.
16.
Press [PLAY (DISPLAY)] to return to Play mode.
104 VS-880 Application Guide
Automated Mixing Using a MIDI Sequencer
This guide described the use of scenes for mixdown in an earlier section. You can also add dynamic
automation for actual fader and other control movements by connecting an external MIDI sequencer to
your VS-880. This automation function can be very useful if you have a complicated mix requiring many
level changes during the song.
ACTION: Automated Mixing Using a MIDI Sequencer
1.
Connect the MIDI OUT of your sequencer/interface to MIDI IN of the VS-880 and connect
the MIDI OUT of the VS-880 to MIDI IN of your sequencer/interface.
Make sure that your sequencer is set to record MIDI Control Change messages.
2.
Press [SYSTEM] (under EDIT CONDITION) until “SYS MIDI PRM?” is displayed. Press
[YES].
3.
Press the right [PARAMETER>>] button until “SYS MID:MIDIThr=” is displayed. Use the
TIME/VALUE dial to select “Out” (if it is not already selected).
4.
Press the right [PARAMETER>>] button until “SYS MID:CtrLocal=” is displayed. Use the
TIME/VALUE dial to select “On” (if it is not already selected).
5.
Press the right [PARAMETER>>] button until “SYS MID:CtrType=” is displayed. Use the
TIME/VALUE dial to select “C.C.” (if it is not already selected).
6.
Make sure that the VS-880 and your sequencer are synced together (refer to p.116 if you are
unsure how to do this) and record enable one of your sequencer tracks to record MIDI
messages from the VS-880.
7.
Set your sequencer to record mode and start playback on the VS-880. Hold [SHIFT] and
press [SCENE] (this will send the initial mixer setting information to your sequencer where
it will be recorded).
8.
Adjust the track levels, panning, EQ, and effect settings on the VS-880 as desired. All the
settings and changes are sent as MIDI Control Change messages and recorded into your
sequencer.
9.
Set your sequencer to play mode, reset the song to the beginning, and start playback. The
VS-880 will now respond to the Control Change messages recorded into your sequencer to
create an automated mix.
Chapter 6: Mixdown Applications
105
Automated Mixing Within the VS-880 (3 methods)
It is also possible to add dynamic automation for actual fader and other control movements within
the VS-880 itself. There are three methods for accomplishing this, and separate auomated mixes
can be recorded in each mixer mode.
ACTION: Realtime Automated Mixing
Realtime automated mixing allows you to record your fader and knob adjustments for automatic
playback. This means you can perfect your ‘mix’ before you start recording on your master tape.
The VS-880 provides the option of automated mixing without any additional equipment.
1.
Hold [SCENE] and press [SELECT] (the select indicator will blink).
2.
Adjust the initial mixer settings as desired.
3.
Press [ZERO]. Hold [SCENE] and press [TAP].
4.
Hold [SCENE] and press [REC] (the display condition will alternate between [PLY]
and mix).
5.
Press [PLAY] and adjust the faders and knobs as desired.
6.
Press [STOP] when you are finished.
7.
Reset your song to the beginning and press [PLAY]. Marker points will be created
automatically and you will hear your fader/knob adjustments in realtime.
ACTION: Automated Mixing using Snapshots
Another type of automated mixing is referred to as ‘snapshot’ mixing. A ‘snapshot’ stores the
current mixer settings at a certain point in time. This is very convenient for turning effects on or
off, changing the track routing, etc. You can even have the effects that you are using change at any
point in the song.
1.
Hold [SCENE] and press [SELECT] (the select indicator will blink).
2.
Adjust the initial mixer settings as desired.
3.
Press [ZERO]. Hold [SCENE] and press [TAP].
4.
Advance the VS-880 to the point in your song where you want the mixer settings to
change.
5.
Adjust the mixer settings as desired.
6.
Hold [SCENE] and press [TAP]. A marker will created at that point.
7.
Play your song from the beginning. When your song reaches that marker point you
will hear the mixer settings change automatically.
(Continued)
106 VS-880 Application Guide
(Automated Mixing Within the VS-880 (3 methods), Continued)
ACTION: Automated Mixing using Gradation
The VS-880 provides yet another type of automated mixing that is referred to as gradation. In this
type of automation the VS-880 will interpolate the settings between two marker points
(snapshots). This is a very effective method for creating smooth fadeouts.
1.
Advance the VS-880 to the time location where you want the fadeout to begin.
2.
Hold SCENE and press SELECT (the select indicator will blink).
3.
Adjust fader levels as desired. Hold SCENE and press TAP (a marker will be created
at that point).
4.
Hold SHIFT and press SONG END [FF].
5.
Move faders [1]-[8] all the way down.
6.
Hold SCENE and press TAP (a second marker will be created at that point).
7.
Hold SCENE and press PREVIOUS. The mixer settings will automatically interpolate
between the two marker points.
Chapter 6: Mixdown Applications
107
Creating A Tempo Map
A tempo map provides location and timing information about the bars and beats of your song. It describes
the tempo of each song measure in BPM (beats per minute) and designates the location of each beat and
fraction of a beat within each measure. This allows other devices to synchronize to your song.
ACTION: Creating A Tempo Map
1.
Press [SYSTEM] (under EDIT CONDITION) until “SYS System PRM?” is displayed. Press
[YES].
2.
Press the right [PARAMETER>>] button until “SYS MetroOUT =” is displayed. Use the
TIME/VALUE dial to select “INT”
If you would prefer to use a MIDI sound module as the source for the metronome
sound, select “MIDI” instead of “INT”. The VS-880 defaults to sending MIDI note
C#2 on MIDI channel 10. These settings, as well as MIDI velocities can be changed
in the MIDI Parameter menu of the VS-880.
3.
Press the right [PARAMETER>>] button and use the TIME/VALUE dial to adjust the
metronome level.
4.
Press the right [PARAMETER>>] button and use the TIME/VALUE dial to set the
metronome mode. This determines whether the metronome will play only in Record mode
(Rec Only) or in Record and Play modes (Rec & Play).
5.
Press [SYSTEM] (under EDIT CONDITION) until “SYS Sync/Tempo?” is displayed. Press
[YES].
6.
Press the right [PARAMETER>>] button until “SYS Syn:Gen.=” is displayed. Use the TIME/
VALUE dial to select MIDIclk.
7.
Press the right [PARAMETER>>] button until “SYS Syn:Tmap 1=” is displayed.
8.
Press the right [CURSOR>] button so that the tempo (120.0) is flashing. Use the TIME/
VALUE dial to select the desired tempo for your song.
Tempo Map 1 determines the initial tempo of the song and the measure number is
fixed at measure 1.
9.
Press the right [CURSOR>] button so that the time signature (4/4) is flashing. Use the
TIME/VALUE dial to select the desired time signature.
10.
Press the right [CURSOR>] button until the Tmap “1” is flashing. Use the TIME/VALUE
dial to select 2.
11.
Use the right [<CURSOR>] buttons and the TIME/VALUE dial to set the new tempo, the
measure number where Tempo Map 2 will take effect, and a new time signature (if desired).
12.
Advance the VS-880 to the next tempo map change and continue this procedure if you
would like any additional changes. The VS-880 allows up to 50 tempo maps (changes) per
song.
13.
Press [PLAY] and the metronome will reflect any tempo/meter changes that were made. If
you play in time with the metronome while recording you will be in sync with the bar/beat
display of the VS-880. This will make it easier for you to edit your song.
108 VS-880 Application Guide
Using the Sync Track (3 methods)
The VS-880 provides a separate Sync track for recording the tempo map from an external sequencer. This
tempo map can then be used to synchronize the VS-880 and an external MIDI sequencer.
ACTION: Recording a Sync Track from a MIDI Sequencer
1.
Connect the MIDI OUT of your sequencer/interface to the MIDI IN of the VS-880 and
connect the MIDI OUT of the VS-880 to the MIDI IN of your sequencer/interface.
Make sure that your sequencer is set to transmit MIDI Clock messages.
2.
Press [SYSTEM] (under EDIT CONDITION) until “SYS Sync/Tempo?” is displayed. Press
[YES].
3.
Press the right [PARAMETER>>] button until “SYS Syn:Sync. Tr Rec?” is displayed. Press
[YES]. If you already have a sync track recorded “Overwrite Sync?” will be displayed. Press
[YES] if you want to replace the existing sync track with a new one.
4.
“=Wait for Start=” will be displayed. Reset your sequencer song to the beginning and press
play on the sequencer. Stop your sequencer when the song is finished. The VS-880 will
display “Complete!!” momentarily and then return to the play screen.
5.
Press [SYSTEM] (under EDIT CONDITION) until “SYS MIDI PRM?” is displayed. Press
[YES].
6.
Press the right [PARAMETER>>] button until “SYS MID:MIDI Thr=” is displayed. Use the
TIME/VALUE dial to select “Out” (if it is not already selected).
7.
Press [SYSTEM] (under EDIT CONDITION) until “SYS Sync/Tempo?” is displayed. Press
[YES].
8.
Use the TIME/VALUE dial to select “Syn:Source= INT” if it is not already selected.
9.
Press the right [PARAMETER>>] button and “Syn:Gen.=” will be displayed. Use the TIME/
VALUE dial to select “SyncTr”.
10.
Set your sequencer so that it is slaved to MIDI Clock. Press [ZERO] on the VS-880 followed
by [PLAY]. Your sequencer should start to play in sync with the VS-880 and the VS-880 will
now send out all of the tempo and meter changes that were contained in your original
sequence.
ACTION: Generating a Sync Track & Tempo Map from
Markers (Tap Tempo)
Markers can be used to generate the Sync Track. This is very useful for syncronizing a sequencer or drum
machine with a song that was recorded without using the metronome.
The first step in this process is to assign markers in time with your song.
Assigning markers according to tempo:
1.
Press [ZERO].
2.
Press [PLAY].
3.
While listening to your song, press [TAP] at the beginning of each measure or beat. Press
[[STOP] when you are finished.
(Continued)
Chapter 6: Mixdown Applications
109
(Generating a Sync Track & Tempo Map from Markers (Tap Tempo), Continued)
Creating a Sync Track from marker points:
1.
Press [SYSTEM] until “SYS Sync/Tempo” is displayed. Press [YES/ENTER].
2.
Press the right [PARAMETER>>] button until “Syn:Gen=“ is displayed.
3.
Use the TIME/VALUE dial to select “SyncTr.”
4.
Press the right [PARAMETER>>] button until “Sync.Tr Cnv?” is displayed. Press
[YES/ENTER].
5.
Use the TIME/VALUE dial to select “CV1=Tap ->S.Tr”
6.
Press the right [PARAMETER>>] button until “CV:Beat=“ is displayed and use the
TIME/VALUE dial to select the amount of beats in each measure.
7.
Press the right [PARAMETER>>] button until “CV:Tap Beat=“ is displayed and use
the TIME/VALUE dial to select the number of markers in each measure. For
example, if your song has 4 beats per measure and you created a marker for every
beat, you would select 4. If you created a marker at the beginning of each measure,
you would select 1.
8.
Press [YES/ENTER] (if a Sync Track or Tempo Map already exists, “Overwrite Sync”
and/or “Overwrite Tempo” will be displayed. Press [YES/ENTER]). “Now
Working” will be displayed and a new Sync Track will be created.
9.
Connect MIDI OUT of the VS-880 to MIDI IN of your sequencer/interface. Set your
sequencer to sync to MIDI Clock.
10.
Press PLAY on the VS-880 and your sequencer will play in sync with your song.
ACTION: Generating a Sync Track from Start & End
Times
Another way to create a Sync Track is by inputting the start time, end time, and total number of
measures for your song. If your song has a constant tempo you can use this method and let the
VS-880 do the math for you.
1.
Press SYSTEM until “SYS Sync/Tempo” is displayed. Press YES/ENTER.
2.
Press the right [PARAMETER>>] button until “Syn:Gen=“ is displayed.
3.
Use the TIME/VALUE dial to select “SyncTr.”
4.
Press the right [PARAMETER>>] button until “Sync.Tr Cnv?” is displayed. Press
[YES/ENTER].
5.
Use the TIME/VALUE dial to select “CV4=Time ->S.Tr”
6.
Press the right [PARAMETER>>] button until “SYS:St=“ is displayed and use the
TIME/VALUE dial to select the start time of your song (you can also use locate
points or [SHIFT & SONG TOP]).
7.
Press the right [PARAMETER>>] button> until “SYS:End=“ is displayed and use the
TIME/VALUE dial to select the end time of your song (you can also use locate
points or [SHIFT & SONG END]).
(Continued)
110 VS-880 Application Guide
(Generating a Sync Track from Start & End Times, Continued)
8.
Press the right [PARAMETER>>] button until “SYS CV4:Measure=“ is displayed and
use the TIME/VALUE dial to select the number of measures in your song.
9.
Press PARAMETER>> until “SYS CV4:Beat=“ is displayed and use the TIME/
VALUE dial to select the number of beats in each measure.
10.
Press [YES/ENTER]. “Overwrite Tempo?” will be displayed, press [YES/ENTER]
and a Sync Track will be created.
The Sync Track offset allows you to start your Sync Track at a time other
than 00h00m00s00f (since most recordings do not actually begin at this
time). Set the offset to match the time location where your recording
actually begins.
Offsetting the Sync Track
1.
Press SYSTEM until “SYS Sync/Tempo” is displayed. Press [YES/ENTER].
2.
Press PARAMETER>> until “SYS Ofs=“ is displayed and use the TIME/VALUE dial
to select the time location for the beginning of the Sync Track (you can also use
locate points or the numeric buttons to do this).
3.
Press [PLAY/DISPLAY] to return to Play condition.
Chapter 6: Mixdown Applications
111
112 VS-880 Application Guide
Chapter 7: Tips and Advanced Applications
Tips & Features
Using The ‘Narration’ Effect (VS8F-1)
If you have the optional VS8F-1 effects board installed, one particular effect is very useful when recording
narration or voice dialogue. If you use the NARRATION effect in the Insert mode of your incoming
microphone channel, it provides all the following features from a single effect setting:
• Noise suppression - This would help with a less than acceptable recording level or to help
eliminate background noise.
• Limiter/De-esser - Both are very valuable features for voice work of any kind.
• Enhancer - Works like a basic vocal exciter.
• EQ - A true 3 band parametric EQ with peak and shelving - this EQ is in addition to the
normal EQ section of the VS-880.
• Pitch Change - Very effective for changing the characteristics of a voice.
• Delay - Up to 1 sec., with feedback effect available.
• Chorus - For that special effect to make the voice sound “larger” or like more than one voice.
Using the [SHIFT] Button to Speed Up Operations
• When editing effects, use [SHIFT]+[PARAMETER] buttons to jump quickly between each
section or block of the effect you are editing.
• If you hold the [SHIFT] button when using the TIME/VALUE dial for selecting alphabetic
characters when entering names, it will speed up the operation.
• If you hold the [SHIFT] button when using the TIME/VALUE dial for selecting measures or
markers in the LCD display, it will speed up the operation.
[SHIFT] + [PLAY (DISPLAY)] Displays Waveforms in Edit Modes
• You don’t have to enter Scrub mode to see the waveforms during the middle of an edit.
Press [SHIFT] + [PLAY (DISPLAY)] during the edit to show the audio waveform in the LCD.
[SHIFT] + [SONG] Displays Song Information
• Press the [PLAY (DISPLAY)] button, then press [SHIFT] + [SONG] to display information
about the current song. (Name, Song #, Sample Rate, Recording Mode, Remaining Storage
Available on Disk)
Use [SHIFT] + [PREVIEW] to Change The Preview Length
Use [SHIFT] + [SCRUB] to Change The Scrub Length
Use [SHIFT] + [SYSTEM] to Toggle Int / Ext Sync
Use ‘Archive’ Copy Mode to copy to multiple ZIP disks
• If your song files are larger than 100 Mbytes, you can copy them to multiple Zip disks. The
VS-880 will prompt you to insert the next ZIP disk when it’s needed.
Chapter 7: Advanced Applications and Tips
113
Vari-Speed Functions in Scrub Mode
• You can use Vari-Speed while operating in the Scrub Preview mode to alter the pitch of the
preview playback.
Keep Original Tracks When Bouncing
• Use Virtual Tracks to keep your original vocals or guitars after bouncing them.
• Use a Scene to store the exact levels and effects for later remixing if necessary.
Use the Correct Scrub Direction
• Scrub up TO the beginning of a transient sound or phrase.
• Scrub FROM to find the End of a phrase.
Use a Longer Scrub Preview Length.
Use a longer length Scrub Preview for some sounds.
• Sometimes it is useful to use a longer Scrub Preview length. For example, a vocal note may
be easier to find using the maximum length of scrub preview - 100 ms.
Change Track Status Quickly
• Press [STOP] + [STATUS] buttons to select Play mode.
• Press [REC] + [STATUS] buttons to select Record Ready mode.
Use Locators For Editing Functions
Using the same numbers consistently will speed up your work.
• 1=Start
• 2=From
• 3=End
• 4=To
Use [NUMERICS] for Precise Time Code or Measure Location
Record First Using the Metronome
• Set up a tempo map first and then record with internal metronome click and/or external
MIDI gear. This provides you the easiest and fastest way to edit by bars and beats.
Display Shows Scrub or Preview Type
• When you are using SCRUB or PREVIEW, a blinking horizontal bar at the bottom of the LCD
screen on either side of the center “now” line indicates Preview From or Preview To.
114 VS-880 Application Guide
Additional Equalizers in VS8F-1
• The optional VS8F-1 effects board not only contains many useful effects, it also contains a
stereo 4 band fully parametric equalizer (configurable as 8 bands in mono), and a stereo 10
band graphic equalizer.
Additional Recording Time
An additional hard disk drive can be added to your VS-880 to increase the storage capacity for additional
recordings (see V-Xpanded Owners Manual pgs. 130-131 “About SCSI”.) Some removable media drives
may work with your VS-880. See your Roland dealer for information.
You cannot record continuously from the internal disk to the external disk. Your
entire song must fit on one disk or the other.
Synchronizing Your VS-880
The VS-880 has extensive synchronizing capabilities which are explained in the V-Xpanded Owner’s
Manual, Chapter 5. However, there are a few important items to remember.
Slave Mode - Master Mode
When the VS-880 is operated in Slave mode, some external device is controlling the VS-880. (The VS-880 is
“slaved” to an external “master). The VS-880 is capable of slaving to MTC (MIDI Time Code) or MMC
(MIDI Machine Control).
When the VS-880 is operated in Slave Mode, the sample clock will “resolve” to the
sync signal. This is very important to keep the VS-880 from drifting in time.
When the VS-880 is operated in Master mode, it becomes the controlling device for external “slave”
devices. The VS-880 will output MTC (MIDI Time Code), MMC (MIDI Machine Control), SPP (Song
Position Pointer) from the Tempo Map, or SPP (Song Position Pointer) from the alternate Sync Track.
Sync Track
The VS-880 provides a special Sync Track. A complete tempo map including MIDI clock and Song Position
Pointer can be recorded from an external sequencer, into the VS-880 Sync Track. The Sync Track can then
be used to synchronize the sequencer and the VS-880 (see page 109 of this manual).
Stereo Grouping / Channel Linking
When working with stereo signals, the Channel Link function allows you to link two channels together so
that they respond as a stereo pair. (see V-Xpanded Owner’s Manual - page 112)
Automation
• In addition to MIDI automation, there are three types of automation built into the VS-880:
Realtime, Snapshot and Gradation. (see pages 106-107 of this guide.)
SMPTE time code and the VS-880
The VS-880 sends and receives MTC (MIDI Time Code). MTC is traditional SMPTE time code embedded in
a MIDI signal. If you have an external device that will ONLY send or receive SMPTE Time Code, you can
obtain an external SMPTE - MIDI translator. For example, the MIDIMAN ‘Video Syncman’ device
translates MTC to SMPTE and SMPTE to MTC.
Chapter 7: Advanced Applications and Tips
115
Sync multiple VS-880’s together
If you need additional tracks, you can link several VS-880s together.
SYNC:
You can use Digital Word Clock to synchronize the timing of multiple VS-880s. Make sure that the
sampling rate for the current song is the same on all units and that all units, with the exception of the final
VS-880 in the chain, have their master clock set to Digital. Check that the master VS-880 is set to transmit
system exclusive messages as the MMC master and that all other VS-880s are set to receive system
exclusive messages as MMC slaves.
AUDIO:
You can connect the Digital Out port from the slave units to the Digital In port of the next VS-880 in the
chain. If you are in INPUT MIX /TRACK MIX mode, turn Channel Link on for input 5 on all units with the
exception of the final VS-880 in the chain. You can use the channel 5 faders (in INPUT MIX) on each of the
VS-880s to control the overall level of the unit connected to its Digital In port. The audio from all units will
be present in the mix output of the master VS-880.
If you are in INPUT>TRACK mode, set the master Stereo In to Digital, and the master Stereo In Balance to
zero for all units with the exception of the final VS-880 in the chain. You can use the master Stereo In Level
on each of the VS-880’s to control the overall level of the unit connected to its Digital In port. The audio
from all units will be present in the mix output of the master VS-880.
116 VS-880 Application Guide
VS-880 with a Digital Sampler
Because the VS-880 has digital inputs, it is a natural companion for a digital sampler.
SYNC:
You can use MIDI Time Code, MIDI Machine Control, or MIDI Clock to synchronize your sequencer with
the VS-880. If possible, set aside a port on your MIDI interface for the VS-880 and use a different port for
your sampler(s). If you are using the VS-880 as the master device sending MIDI Time Code, make sure that
you connect the MIDI OUT connector of the VS-880 to the MIDI IN connector of the sequencer. Make sure
that MIDI Thru is set to Out and that the sync source is set to internal. You will also have to set the VS-880
to generate MTC and make sure that the frame rate matches that of your sequencer (the VS-880 defaults to
a frame rate of 30). Also, remember to set your sequencer to sync to incoming MIDI Time Code.
AUDIO:
Connect the analog and/or digital output of your sampler to the corresponding input on the VS-880 to
record or monitor your sampler on the VS-880. If you are using digital connections make sure that
sampling rate of your sampler matches that of the current song on the VS-880. With this setup it is also
possible to create an automated mix by recording your fader movements into your sequencer as either
MIDI Control Change or System Exclusive messages.
Computer with
Serial Cable
connection
S-760 Digital Sampler
MIDI Interface
MIDI
Analog Audio
Digital Audio
MIDI Sync via
MMC, MTC
Digital Mix to DAT
DAT Recorder
Chapter 7: Advanced Applications and Tips
117
Sync VS-880 to Analog Tape Recorder
The VS-880 can work together with your analog recorder.
SYNC:
You can use SMPTE Time Code in conjunction with a SMPTE to MIDI Time Code converter (such as the
Video Syncman by MIDIMAN) to synchronize an analog tape deck with the VS-880. You will need to
record (stripe) SMPTE onto a track of your analog deck and connect the output of that track to the SMPTE
input of the SMPTE to MTC converter. Connect the MIDI OUT connector of the converter to the MIDI IN
connector of the VS-880 and set the VS-880 to external sync. Make sure that the SMPTE frame rate of the
converter matches that of the VS-880 (which defaults to 30).
AUDIO:
You can connect the audio outputs of the tape deck (with the exception of the track striped with SMPTE) to
your mixer and then route the mixer outputs to the analog inputs of the VS-880. This will allow you to
transfer tracks from your analog deck to the VS-880 (up to 4 at a time) for digital editing or mastering.
MIDIMAN
Video Syncman
SMPTE
Mixer
MIDI Sync Via MTC
Analog
Audio
Digital Mix to DAT
DAT Recorder
118 VS-880 Application Guide
Sync VS-880 to ADAT
SYNC:
You can synchronize the VS-880 with an ADAT system by using MIDI Time Code and/or MIDI Machine
Control messages generated from the Alesis BRC (the Alesis AI 2 can be used in place of a BRC). You will
need to connect the MIDI OUT connector of the BRC (or AI 2) to the MIDI IN connector on the VS-880 and,
if you are using MMC, connect the MIDI OUT connector of the VS-880 to the MIDI IN connector of the
BRC (or AI 2). Set the VS-880 to external sync and match the frame rate of the BRC (the VS-880 frame rate
defaults to 30). If you are using MIDI Machine Control messages set the VS-880 as the MMC slave and turn
Receive System Exclusive messages on.
AUDIO:
To transfer tracks back and forth between the ADAT and the VS-880 you can use the analog connections
(up to 4 tracks at a time) or the digital connections (up to 2 tracks at a time). When using the analog
connections you can connect the outputs of the ADAT to the inputs of the VS-880 to record ADAT tracks
onto the VS-880 (reverse the connections to record VS-880 tracks onto the ADAT). An analog mixer can be
used to increase the signal routing options. When using the digital connections you will need to use the
Alesis AI 1 to convert the Alesis digital signal to the coaxial S/P DIF signal used by the VS-880. Connect
the digital out connector of the AI 1 to the digital in connector of the VS-880 and connect the digital out
connector of the VS-880 to the digital in connector of the AI 1. You will need to make sure that the
sampling rate of the AI 1 matches that of the current song in the VS-880.
ADAT is a registered trademark of Alesis Corporation.
Alesis AI 1
ADAT
Alesis BRC
Mixer
Digital Audio
MIDI Sync Via
MMC, MTC
Analog Audio
Digital Mix to DAT
DAT Recorder
Chapter 7: Advanced Applications and Tips
119
Sync VS-880 to DA-88
SYNC:
You can synchronize the VS-880 with an DA-88 system by using MIDI Time Code and/or MIDI Machine
Control messages generated from the DA-88 (equipped with an SY-88 sync card). You will need to connect
the MIDI OUT connector of the DA-88 to the MIDI IN connector on the VS-880 and, if you are using MMC,
connect the MIDI OUT connector of the VS-880 to the MIDI IN connector of the DA-88. Set the VS-880 to
external sync and match the frame rate of the DA-88 (the VS-880 defaults to a frame rate of 30). If you are
using MIDI Machine Control messages set the VS-880 as the MMC slave and turn Receive System
Exclusive messages on.
AUDIO:
To transfer tracks back and forth between the DA-88 and the VS-880 you can use the analog connections
(up to 4 tracks at a time) or the digital connections (up to 2 tracks at a time). When using the analog
connections you can connect the outputs of the DA-88 to the inputs of the VS-880 to record DA-88 tracks
onto the VS-880 (reverse the connections to record VS-880 tracks onto the DA-88). An analog mixer can be
used to increase the signal routing options. When using the digital connections you will need to use the
Tascam IF-88AE to convert the Tascam digital signal to the coaxial S/P DIF signal used by the VS-880.
Connect the IF-88AE to the DA-88. Connect the digital out connector of the IF-88AE to the digital in port of
the VS-880 and connect the digital out connector of the VS-880 to the digital in connector of the IF-88AE.
You will need to make sure that the DA-88 tape is formatted for the same sampling rate as that of the
current song in the VS-880.
Tascam is a registered trademark of TEAC Corporation.
DA-88
Mixer
Tascam
IF-88AE
MIDI Sync Via MMC, MTC
Analog
Audio
Digital
Audio
Digital Mix
DAT Recorder
120 VS-880 Application Guide
Sync VS-880 with Computer Sequencer
The VS-880 is a natural partner for a sequencer. There are many ways that the two can work together.
SYNC:
You can use MIDI Time Code, MIDI Machine Control or MIDI Clock to synchronize your computer with
the VS-880. If possible, set aside a port on your MIDI interface for the VS-880 and use a different port for
your other MIDI devices. Connect the MIDI INs and OUTs of the VS-880 to the MIDI Interface as shown in
the diagram below. In this setup, the VS-880 can act as the master or the slave.
To use the VS-880 as the master device sending MIDI Time Code, make sure that MIDI Thru is set to Out
and that the sync source is set to internal. You will also have to set the VS-880 to generate MTC and make
sure that the frame rate matches that of your sequencer (the VS-880 defaults to a frame rate of 30). To
respond, the computer sequencer must be setup to sync to incoming MIDI Time Code.
AUDIO:
Connect the audio outputs of your keyboard to the audio inputs of the VS-880. You can use the INPUT
MIX/TRACK MIX mode to mix the signals of your keyboard with your playback tracks. You can record
fader movements of the VS-880 to the computer sequencer. For mixdown, connect the digital out of the VS880 to your DAT machine.
MIDI Interface
Chapter 7: Advanced Applications and Tips
121
Sync VS-880 to Drum Machine or MIDI Sequencer
The VS-880 can easily synchronize with your drum machine or sequencer using Song Position Pointer.
SYNC:
If your sequencer does not support MIDI Time Code or MIDI Machine Control you must use MIDI Clock
to synchronize it with the VS-880. Connect the MIDI IN and OUT ports of the VS-880 to your MIDI
sequencer (or drum machine) as shown in the diagram below. For this setup, the VS-880 must be the
master. Make sure that the VS-880’s sync source is set to internal. The VS-880 must be set to generate MIDI
Clock and the MIDI Thr must be set to Out. To respond, the MIDI sequencer (or drum machine) must be
set to MIDI Sync.
AUDIO:
Connect the audio outputs of your MIDI devices to the audio inputs of the VS-880. You can use the INPUT
MIX/TRACK MIX mode to mix the signals of your MIDI devices with your playback tracks. You can
record fader movements of the VS-880 to the MIDI sequencer. For mixdown, connect the digital out of the
VS-880 to your dat machine.
MIDI Sequencer
or Drum Machine
Analog Audio
MIDI Sync via Song Position Pointer
Digital Mix to DAT
DAT Recorder
122 VS-880 Application Guide
Sync VS-880 to Video
You can do video post production with the VS-880.
SYNC:
You can synchronize a video deck with a VS-880 by using a SMPTE generator/converter (such as the Video
Syncman by MIDIMAN) to generate SMPTE Time Code for the video deck and convert that to MIDI Time
Code for the VS-880. If your video tape is not already striped with SMPTE Time Code you will need to
record (stripe) SMPTE to one of the audio tracks on the tape. Connect the audio output of that track to the
SMPTE input on the converter. Connect the MIDI OUT connector of the converter to the MIDI IN
connector of the VS-880. Set the VS-880 to external sync and make sure that the SMPTE frame rate of the
converter matches that of the VS-880 (which defaults to 30).
AUDIO:
You can connect the audio output(s) of the video deck (with the exception of the SMPTE striped track) to
the VS-880 inputs for recording the audio from the video tape onto the VS-880 for editing purposes. You
can also connect the VS-880 outputs to the inputs on the video deck to record audio from the VS-880 (such
as sound effects and/or dialog) onto the video tape (be careful not to record over the SMPTE track).
SMPTE
MIDIMAN
Video Syncman
MIDI Sync via MTC
Digital Mix to DAT
DAT Recorder
Chapter 7: Advanced Applications and Tips
123
124 VS-880 Application Guide
Chapter 8: Appendix
Glossary of General
Audio and Recording
Terms
Ambience
The distinctive acoustical characteristic of a given
concert hall, recording studio, etc. It results from
reverberations (multiple sound reflections) from the
walls and ceiling. Rooms that are said to be “dead”
lack ambience.
Amplifier, balanced
An amplifier with high (+) and low (-) signal
connections and a separate shield (ground)
connection. This 3-wire approach can be achieved
with a transformer or with special electronics. An
amplifier can have a balanced input and output, or it
may have the input unbalanced and the output
balanced, or vice-versa. The term “balanced” does
not refer to frequency or level balance. (Also see
“balanced.”)
Amplifier, unbalanced
An amplifier with only two signal input or output
conductors; one being high (+), and the other being
low (-) and ground. An amplifier can have an
unbalanced input and output, or it may have the
input unbalanced and the output balanced, or viceversa.
Analog
An electrical signal whose frequency and level vary
continuously in direct relationship to the original
acoustical sound waves. “Analog” also may refer to a
control or circuit which continuously changes the
level of a signal in a direct relationship to the control
setting.
Attenuate
To reduce the level of an electrical signal, usually
with a volume or loudness control. Also, to reduce
sound levels acoustically through the use of
absorption materials.
Balanced
An audio circuit with 3 wires; two wires carry the
signal, high (+) and low (-), and the third is a shield
which is connected to a chassis or system ground.
The signal leads are both of equal potential difference
from the ground, and are hence “balanced” with
respect to ground. Sometimes improperly described
as “floating.” (See “amplifier, balanced” and also
“floating.”)
Bass
The low audio frequency range, normally considered
to be below 500 Hz.
Bridging
A method of deriving signal from an audio circuit
without loading or taking appreciable power from
that circuit. (The input impedance of the “bridging”
device is at least 10 times the output impedance of
the signal source.)
Also, a technique for using a stereo power amplifier
as a higher powered mono power amplifier whereby
the inputs are driven with the same signal, but
reversed in polarity, and the output is derived from
the high (+) side of each channel’s output: this may
cause damage to some amplifiers - consult
manufacturer.
Buss
A signal path to which a number of inputs may be
connected for feed to one or more outputs. In a
mixing console a Buss is usually a long piece of wire
to which any input channel may be connected by
means of a switch or control. The end of the wire
goes into a combining amplifier or summing
amplifier which then feeds one of the console
outputs.
Bypass
An alternate signal path that goes around a given
circuit. A “hard wire” bypass uses a switch and a
piece of wire to route the signal from the input to the
output of a device. A “bypass” switch is sometimes
called an “In-Out” switch.
Aux Send / Return
Normally refers to the output Buss of a mixer used to
“send” a signal to an external processing device. The
Aux Return is the return input to the mixer used for
the return signal from the effects device.
Click Track
In motion picture or television sound recording, an
electronic metronome is applied to the audio
recording so that musicians can synchronize the
musical tempo with the visual action or frame rate.
The channel carrying the metronome signal is known
as the click track.
Aux (Auxiliary) Input
A high level input on an amplifier, mixer, tape
recorder, etc. which will accept a variety of line level
signals from external devices or systems. Sometimes
a spare input.
Clipping
Occurs when the capabilities of an amplifier are
exceeded. The result is very audible distortion, also
visible on an oscilloscope.
Chapter 8: Appendix
125
Comping
The process of creating a single recording from
multiple takes. i.e.: In many cases a single vocal
recording on one track may not have the best version
of a singer’s performance. Engineers cut and paste
sections of multiple tracks together to get one
complete useful recording. This process in known as
“comping” and the final outcome is called a “comp.”
Compressor
A compressor is an amplifier that decreases its gain
as the level of the input signal increases to reduce the
dynamic range of the program (see “compression”).
A compressor may operate over the range of input
levels, or it may operate only on signals above or
below a given level (the threshold level.)
Condenser Microphone
A microphone utilizing a capacitor (condenser) as a
pickup element. Electronics are usually contained in
the microphone body and a polarizing voltage is
necessary, so external or battery power is required,
and output levels are usually higher than other types
of microphones. Condenser microphones are
commonly used for high quality audio applications.
COSM (Composite Object Sound Modeling)
COSM was first introduced with Roland’s VG-8 VGuitar System. COSM processing electronically
reproduces all of the stages of a guitar signal chain,
including the placement of the pickup, the type and
body of the guitar, the amp processor, the speakers
and cabinets, and the microphone and placement of
the microphone at the speaker.
These models are extremely accurate and allow great
control over the sound of any guitar. The VS8F-1
Effect Expansion Board for the VS-880 includes some
of the COSM preamplifier and speaker models, plus
new Microphone Simulators.
Cue Buss
In a mixing console, the Buss or channel which is
used to feed a program to performers’ headphones.
Also known as the foldback Buss. See “cue circuit,
performer headphone cue.”
Cue Circuit (Foldback Circuit)
Channel Cue
A circuit which enables one to monitor an input
position with the fader down (no program feed);
for program identification or troubleshooting.
Communications Cue
An intercom system made up of amplifiers,
headphones, microphones and signaling lights or
tones; for coordination of sound, lighting, stage
and other personnel. Not for the actual audio
program.
126 VS-880 Application Guide
Performer Headphones Cue
In recording studio work, a mono or stereo mix
which is fed to performers so they can hear other
performers and themselves, or can monitor a
previously recorded program (tracks) for
overdubbing.
D Connector
A common term for the interface connector used for
many computer signals, printers, monitors, etc.
Named because it has a shape similar to a capital D.
DAC
Digital-to-Analog Converter. An electronic device
used at the output of digital audio equipment to
convert digital numbers representing level and
frequency information back to a continuously
varying analog electrical signal.
DAT (Digital Audio Tape)
A recording medium that records audio signals to
tape digitally, via a hardware recording device called
a DAT Recorder.
dB
The “dB” (decibel) is a unit of measurement for ratios
of sound level, power, voltage, and other quantities.
The dB is only meaningful when referenced to some
actual value. See “dBm”, “dBV”, “dB SPL.”
dBm
dBm is an electrical measurement of power. 0 dBm is
equal to 1 milliwatt, which is the same as 0.775 volts
across a 600-ohm impedance. (+30 dBm is 1 watt, +50
dBm is 100 watts.)
dBV
dBV is an electrical measurement of voltage. 0 dBV is
equal to 1 volt. (+10 dBV is 20 volts.)
dB SPL
SPL is Sound Pressure Level (i.e., an acoustical
measurement). One dB SPL is the smallest audible
difference in sound level. 0 dB SPL is 0.0002 dynes/
square centimeter or 20 micro-Pascals. It is also the
threshold of human hearing at 1 kHz (the threshold
of pain is between 120 and 130 dB SPL).
Decoder
The second part of a 2-part system which also has a
complementary encoder. Generally, the decoder of a
given system is not compatible with the encoder of
another system.
De-esser
An audio signal processing device that is used to
remove excess sibilance (the lispy “sss” sound) from
certain vocal tracks. Generally, a de-esser is a
specialized form of compressor with an equalizer in
its level detection circuit that causes it to be more
sensitive to high frequencies, thus restricting highlevel high-frequency sounds. Unlike a simple filter or
equalizer, moderate level high frequency sounds are
not affected.
Dynamic Microphone
A type of microphone which converts acoustical to
electrical energy by means of a permanent magnet
and a moving coil. Dynamic microphones do not
require external power. Some dynamic microphones
have very high quality and are commonly used in
recording and sound reinforcement.
Delay Line
A device which delays an entire audio program
signal by a certain length of time, usually from 0 to
500 milliseconds. Commonly used in recording and
sound reinforcement (for echo or special effects).
Echo Return
A mixing console input that receives the signal from
a reverberation chamber or device. Many mixing
consoles have a level control to adjust the amount of
reverberation signal returned to the program mix;
this is called the echo return control
Analog Delay
Describes the electronic process by which the
signal is delayed; stores actual signal voltages
(analog signal).
Digital Delay
Describes the electronic process by which the
signal is delayed; stores binary numbers (digital
processing) that represent the analog signal
voltage levels.
Tape Delay
Uses magnetic recording and immediate
playback to delay the signal; delay comes from
time required for tape to move from record head
to playback head(s).
Digital
A numerical representation of the actual analog
frequency and level of and audio signal. “ Digital”
also may refer to a control or circuit which changes
the level or the assignment of a signal in discrete
mathematical steps rather than continuously variable
amounts.
DIN connector
Deutsche Industrie Normen. German Industrial
Standards. In audio, the German set of standards for
audio connectors, etc. Widely used throughout
Europe.
Distortion
Distortion is an unwanted change that occurs to and
audio signal, causing frequencies to appear at the
output that were not present at the input of the audio
device. There are several types of distortion.
Echo
One or more discretely discernible sound images.
Echo Send
A mixing console output that sends a signal to the
input of a reverberation chamber or device. Most
mixing consoles have an echo send level control for
each input position (channel) so the musical mix sent
to the reverb unit can be adjusted; many consoles
also have a master echo send control for the echo
send Buss.
Effects Buss
In a mixing console, the Buss or channel which is
used to feed a program to special signal processing
equipment or effects devices. Also known as the
effects send Buss. Typical effects devices include
delay lines, phasers, and flangers, as well as echo/
reverb units.
Effects Return
A mixing console input that receives the signal from
an effects device. Many mixing consoles have a level
control to adjust the amount of effects signal
returned to the program mix; this control is called the
effects return control.
Effects Send
A mixing console output that sends a signal to the
input of an effects device. Most mixing consoles have
an effects send level control for each input position
(channel) so the musical mix sent to the device can be
adjusted; many consoles also have a master effects
send control for the effects send Buss.
Encode
Refers to the act of processing a signal by adding or
subtracting signal components. Encoded audio
signals are usually intended to be Decoded before
listening to them.
Chapter 8: Appendix
127
Equalizer
An electronic device that will amplify (boost) and/or
attenuate (cut) certain portions of the audio
frequency spectrum. There are many different types
of equalizers.
Fixed Frequency
An equalizer which operates at one or more
specific frequencies which can be boosted or
attenuated.
Graphic
An equalizer which operates simultaneously at a
number of preset frequencies, any of which may
be boosted or cut independently of the others.
Often done at standard 1, 1/2, 1/3, or 1/6 octave
center frequencies. Graphic equalizers are
usually peaking-type equalizers.
Paragraphic
A graphic equalizer where the center frequency
of each band is adjustable. May also have
adjustable “Q.” A contraction of “parametric”
and “graphic.”
Parametric
An equalizer where the center frequency is
continuously variable over a given frequency
range, and where the “Q” (slope rate) is
adjustable. If “Q” is nonadjustable, the EQ is
“Quasi-parametric,” “Tunable” or “Sweepable.”
Peaking
A boost or cut characteristic which has a bellshaped response. (The shape of the “bell”
determines the “Q” of the equalizer.) Maximum
boost or cut occurs at the center frequency, and
there is less effect at frequencies farther away,
above or below the center frequency.
Shelving
A boost or cut characteristic which has a
response curve resembling a shelf. Maximum
boost or cut occurs at the indicated frequency
and remains constant at all points beyond that
frequency.
Sweepable
An equalizer where the center frequency is
continuously variable over a given frequency
range, but the “Q” is not variable.
Three Band
An equalizer where three separate frequency
ranges can be boosted or cut simultaneously;
usually divided into high, mid, and low
frequency ranges. Also called “3-knob EQ.”
128 VS-880 Application Guide
Two Band
An equalizer where two separate frequency
ranges can be boosted or cut simultaneously;
usually divided into high and low frequency
ranges. Also called “2-knob EQ.”
Fade In
An inverse fade where the signal is increased from
zero to the desired level.
Fade Out
A fade that starts with full signal level and goes to
inaudibility.
Fader
A potentiometer that controls the signal level for a
console input position or output channel. May be a
rotary or linear (straight line) control.
Filter
A device which attenuates certain portions of the
audio frequency spectrum.
Anti-Aliasing
A low pass (high-cut) filter used in digital audio
equipment to prevent aliasing. Usually has a
very steep cut-off rate such as 36 dB or 48 dB per
octave.
Band Pass
A filter which has high frequency and low
frequency cut-off points, and which only passes
signals between these two points.
High Pass
A filter which will only pass frequencies above a
certain cut-off frequency point. (Also known as
low-cut filter.)
Low Pass
A filter which will only pass frequencies below a
certain cut-off frequency point. (Also known as
high-cut filter.)
Notch
A filter which attenuates a very narrow portion
of the frequency spectrum, but will pass signals
on either side.
Flanger
A special effects device used to create “flanging.”
Flanging is an effect originally created by careful
manipulation of two tape machines that recorded
and played the same signal, relying on phase errors
to create a comb filter ( a series of harmonically
related notches in the response). Hence the term “reel
flanging.” Today flanging is commonly done with
electronic signal processing devices that do not
require tape and can operate in real time.
Foldback
A term, usually on European mixers, used
interchangeably with “cue” in recording work or
“monitor send” in sound reinforcement work.
Impedance
The total opposition to the flow of alternating current
in an electrical circuit. Impedance is measured in
ohms.
Gain
The amount an amplifier increases the power of a
signal, usually specified in dB.
Input Level
Refers to the level in dB, dBm or volts that is
acceptable for an input signal to a particular
connector in any given piece of electronic equipment.
Such input levels are rated either as maximum (i.e.,
the level above which overdrive distortion occurs) or
as nominal (i.e., the average level which would be
fed to the input under normal operating conditions).
Gain Control (fader)
A device which adjusts the gain of an amplifier,
commonly by changing the amount of negative
feedback. Not to be confused with an “attenuator” or
“volume” control.
Ground Loop
A condition when two or more paths to ground exist
and a voltage is induced unequally in these paths
causing hum, buzz, or noise.
Grouping
A mixing process where the signal level from two or
more inputs can be adjusted simultaneously using a
single control. A typical application would be the
grouping of several microphones inputs for related
instruments (i.e., a drum set), where individual mics
are balanced in relation to the others using the input
faders, and then an overall level adjustment is done
using a group fader. Grouping of this nature
simplifies mixing.
Headroom
“Headroom” refers to the difference between the
nominal operating level and the maximum level at
any point in an audio system or device, usually
expressed in dB.
Hertz
Abbreviated “Hz,” the unit of measurement for
frequency; 1 Hz is equal to one cycle per second
(cps).
Hum
A low frequency tone, usually a multiple of the 50 Hz
or 60 Hz power mains frequency (i.e., 120 Hz, 180
Hz, etc.)
ID Strip
An area, above or below the faders on a mixing
console, reserved so the engineer can identify the
signal being fed to the various faders. ID strips on
many mixers are white so they can be marked with
grease pencils and easily wiped clean, although
masking tape and permanent marking pens are a
common alternative.
Insert
When a track is routed to a Buss such as an effects
Buss using an INSERT path, the audio goes to the
effect Buss and then directly back to the channel in
the mixer. Therefore, there is no “dry” sound of the
original without the effect because the only audio
path is through the effect and then to the mixer.
INSERTS are used when you don’t want to hear the
original sound without the processing, i.e.: when you
use a compressor on a voice.
kHz
Abbreviation for kiloHertz, or one thousand cycles
per second. Formerly called kilocycles (kc).
LCD
Liquid Crystal Display. An electronically driven
display with black characters or graphic elements on
a light background. LCD displays depend on
ambient light rather than generating light of their
own, so they use very little power compared to LED
(Light Emitting Diode) displays. The principal is
based on a special crystal which changes its light
polarization axis when a voltage is applied, thereby
blocking the light and creating a black area.
LED
Light Emitting Diode. A solid state device that emits
infrared or visible light when a current flows through
it. Usually red, green or amber, LEDs are available in
other colors.
Level
A term loosely used to describe the amplitude of a
signal or a sound. More precisely, it is the value of
that signal or sound relative to a given reference,
expressed in dBm, dB SPL, etc.
Limiter
A type of compressor with approximately a 10:1 or
greater compression ratio. Used primarily to prevent
the signal level from exceeding a certain pre-set level.
(See also “compressor.”)
Chapter 8: Appendix
129
Linear
Having an output that varies in direct proportion to
the input. May refer to low distortion.
Line Input
An input designed to operate at line levels (see
below), as opposed to microphone or speaker levels.
Line Level
Line level refers to the nominal (average) operating
level of an audio system, and generally corresponds
to a “0 VU” meter reading. There are several widelyused standard line levels:
a) +8 dBm (1.95 volts RMS), for broadcast
b) +4 dBm (1.23 volts RMS), for professional
recording & sound reinforcement
c) -10 dBv (310 millivolts RMS), an alternate for
professional recording
Line Output
Any output which delivers a signal at the nominal
line level (see above), not microphone or speaker
level.
Loss
The opposite of gain in a circuit; describing signal
attenuation.
Mic Level
The signal level in dBv, dBV, dBm or voltage that
would approximate the nominal level of a
microphone. While the nominal levels of
microphones vary tremendously as a function of the
sound level present and the type of mic involved,
mic level is generally considered to be somewhere
around 0.001 to 0.003 volts (about -60 dBv to -50
dBv). It is not unusual, however, for a mic to
generate +4 dBv in the presence of a very loud
sound.
Mic Proximity
A change in the bass frequency response of a
microphone in relation to the distance from the
sound source.
Microphone
A device for converting sound waves into
corresponding electrical signals. Microphones can be
categorized in several ways: their sensitivity
patterns, the method by which they convert sound to
electrical energy, or other characteristics.
MIDI
Musical Instrument Digital Interface. A digital
communications language that allows musical
instruments and related equipment to ‘talk’ to each
other.
130 VS-880 Application Guide
MIDI Clock
MIDI Clock is a stream of digital timing pulses that
provides information about the current tempo of a
song or sequence. It is used commonly with
hardware sequencers and drum machines. While it is
commonly used by many devices today, it does not
provide enough informaiton to control a hard disk
recorder like the VS-880. However, MIDI clock can be
used to control other devices. MIDI Clock works in
conjunction with other MIDI messages including
Start, Stop, Continue, and Song Position Pointer.
Mix
The procedure whereby two or more signals from
live and/or recorded sources are combined to
achieve a desired balance. Mixing consoles provide
separate level controls for each source, as well as
overall controls for the mixed (combined) signal.
Consoles may also provide equalization and
auxiliary signal processing much as echo and
reverberation.
Mixdown
The process whereby signals from a multi-track tape
recorder are routed to a mixing console and
recombined to make a stereo or monaural master
tape. The 4, 8, 16 or 24 tracks of the multi-track
master are positioned anywhere from full left,
through center, to full right of the stereo perspective,
and the individual track levels and equalization are
adjusted to achieve the desired balance. Echo,
reverberation and other special effects may be added
during the mixdown.
Mixer
A device or system in which two or more signal
sources (mic or line level) can be combined and fed
to another device or part of the audio system. Larger
mixers are often called “mixing consoles,” especially
if they include a built-in mounting pedestal or are
designed for mixing many inputs or feeding many
outputs. The term “mixer” is generally reserved for
units with a smaller number of inputs and outputs,
and for rack-mounted mixing equipment.
Mono Buss
In a mixing console, the Buss or channel which is
used to feed a program to a monaural tape recorder,
broadcast transmission point, or other mono device.
Many mixing consoles have the ability to obtain the
mono mix utilizing the mono Buss at the same time a
stereo mix is being provided.
MMC (MIDI Machine Control)
MIDI controller messages sent from one device to
another via MIDI to start recording, playing, and
arming tracks for recording. This communication
data does not contain any timing or location
information.
MTC (MIDI Time Code)
MIDI Time Code is a synchronization signal that is
digitally sent through MIDI for synchronization of
absolute time between audio devices. Similar to
SMPTE, MTC can have different frame rates for
synchronization. See SMPTE for more details.
Outboard
Refers to electronic equipment or signal processors
that are not incorporated in the mixing console.
External equipment. Outboard equipment includes
special equalizers, delay lines, reverbs, compressors,
etc.
Mute
Reducing an audio signal to off (full attenuation).
Output Assign
The routing of a signal from a given input position
(channel) to a particular output Buss or Busses.
Noise Gate
An electronic device that turns off or greatly
attenuates an audio signal when the level falls below
a user-adjustable threshold. Thus, program will pass
through, but low-level hiss, noise or leakage will not
be heard when the program is below threshold.
When the program is above threshold, the noise gate
has no effect on the signal.
Omni-Directional
Equal sensitivity in all directions. Usually refers to
non-directional microphones.
Out of Phase
When two related signals (or a single signal which
has been split) are offset in time acoustically or
electronically, they may be said to be out of phase
(larger offsets that enable two signals to be audibly
differentiated from each other are considered to be
time delays). Depending on the actual phase
difference, the out of phase signals may cancel or
reinforce one another when combined.
Out of Polarity
When two circuits are reversed in polarity with
respect to one another, sometimes they are
mistakenly considered to be 180 degrees out of
phase. Even though there is no real offset in signal
arrival time here, the result is similar to a true 180
degree phase difference - the singles will cancel one
another if combined. An example would be reversing
the speaker wires of one stereo speaker but not the
other. The reversed speaker is said to be “out of
polarity”.
Out Take
A recording or segment of a recording that originally
was considered usable, but later was not used or was
discarded in favor of another recording of the same
program. Records are often made by recording a
given musical selection two or more times and then
selecting the best performance. The unused
recordings (takes) are considered to be out takes.
Output Buss
A signal path to which a number of inputs may be
connected for feed to one or more outputs. In a
mixing console a Buss is usually a long piece of wire
to which any input channel may be connected by
means of a switch. The end of the wire goes into a
combining amplifier or summing amplifier which
then feeds one of the console outputs via an output
or line amplifier.
Output Channel
The final output of any multi-channel audio device.
In a mixing console, individual inputs can be routed
to different output channels via the output Busses In
a multi-channel tape recorder, each track of the tape
feeds its own tape recorder output channel.
Overdubbing
A recording procedure utilized in multi-track tape
recording. A performer (or performers) listens to
previously recorded musical tracks, typically with
headphones, while recording one or more additional
tracks on the same tape.
Overload
What occurs when a device is “asked” to supply
more power than it is capable of delivering; usually
caused by connection of too low an impedance to the
device’s output. May cause distortion and/or
damage.
Pad
A passive resistor network which reduces the power
level of a signal. In some cases a pad is utilized to
match unequal input and output impedances for
proper interface.
Pan Pot
The control that places a signal in stereo perspective
to appear acoustically between the left and right
speakers.
PCM
Pulse Code Modulation. A process of digital
encoding of audio signals. PCM recordings are
synonymous with digital audio recordings (not to be
confused with PWM, pulse width modulation).
Chapter 8: Appendix
131
Phantom Power
A method of remotely powering the preamplifier or
impedance converter which is built into many
condenser microphones by sending voltage along the
audio cable. Phantom power is usually from 6 to 48
volts DC and is run along the same conductors that
carry the mic signal. The DC is separated from the
audio by using capacitors and special transformers.
Many professional recording mixing consoles supply
phantom power. In the cases where phantom power
is required, but not available from a mixer, you can
use an external power supply for the microphone.
Phone Plug (1/4”)
Describes any of several varieties of 2-conductor or 3conductor audio connectors having a 1/4” shaft
diameter. The term phone plug is derived from the
original use of these connectors in early telephone
switchboard equipment. The male connector is the
plug and the female is the jack.
Tip-Sleeve (TS) phone plug
A 2-conductor phone plug (or jack) commonly
used for unbalanced audio connections.
Tip-Ring-Sleeve (TRS) phone plug
A 3-conductor phone plug commonly used for
balanced audio connections. Also used in some
systems’ unbalanced patch points so that a single
cable assembly can handle the input and output
instead of separate cables; crosstalk can be a
problem in this application.
Phono Plug (RCA)
A 2-conductor connector commonly used for
unbalanced audio signal connections. Also known as
a “pin plug” or “RCA plug.”
Ping Pong
A multi-channel recording procedure whereby
several recorded tracks are played back in “sync”
mode, mixed into one track, and re-recorded on any
open (unrecorded) track. This procedure is done to
make additional tracks available, and may be
repeated.
Also refers to a recording technique utilized in the
early days of stereo recording whereby a sound
source appears to move from one speaker to the
other.
Pointer Based Editing
When you record sounds into the VS-880, they are
stored on the hard drive. Once on the drive, the
original recording is never changed. All of the
editing, copying and moving of the sound is actually
just moving and copying “pointers” to the original
sound. These pointers indicate when to start and
stop playing all or part of the original recording. The
advantage to this way of working is that copying or
moving or erasing part of a track is only changing
these pointers. Pointers take up virtually no disk
space, and the VS-880 can write or change pointers
instantly. That allows you to copy all 8 tracks of a
song instantly to another location without using
additional disk space. The fact that the VS-880’s
editing is Pointer Based is also why it can have 999
levels of UNDO. The original audio is never touched,
just the pointers that tell the VS-880 when to play
and stop playing the original audio.
Polarity
Refers to the relative position of the high (+) and low
(-) signal leads in an audio system. When two
channels are reversed in polarity relative to each
other, and are either mixed together or fed to a stereo
speaker system, signal cancellations will occur. This
is usually not desirable.
Also refers to the positive and negative (or ground)
terminals of a battery or power supply.
Pop Filter
A cloth, foam, or similar shield placed over a
microphone to avoid “popping” sounds from sudden
bursts of breath. Also, an electronic filter that
attenuates low frequencies where the “popping”
sounds exist (a high pass filter with its cutoff at
approximately 70 Hz to 100 Hz).
Post
Refers to a signal input, output or routing point that
comes after something. Usually used in conjunction
with another term, such as post fader, post EQ, etc.; if
unstated, one may assume the term means post
fader.
Pre
Refers to a signal output, input or routing point that
comes before (precedes) something. Usually used in
conjunction with another term, such as pre fader, pre
EQ, etc.; if unstated, one may assume the term means
pre fader.
Pre-Fader / Post-Fader
Audio signals from an external source or a recorded
track come into a mixer and are then routed to a Buss
such as the Mix Output. If the audio signal is routed
to the Mix Output Buss PRE-Fader, then the faders
won’t have any effect on the level of the sound in the
mix.
132 VS-880 Application Guide
(Continued)
If the source or track is routed POST-Fader, then the
fader will control the level to the Mix Output Buss.
Generally, tracks will be routed to the Mix Output
Buss or the Aux Buss POST-Fader. You might route a
track POST-Fader to the Mix Output and PRE-Fader
to the Effects Buss if you are adding reverb to a
sound and you want to fade out the “dry” original
sound and leave the reverb sound playing. This
technique could be used at the end of a song or
possibly for a sound effect like somebody yelling as
they fall off a cliff.
Punch In
A procedure in multi-track recording that is
essentially an overdub, but instead of recording the
new part on an adjacent track to already recorded
material, the new part is recorded by erasing a
previous part from a given track. The punch in is
initiated, while tape is playing, by entering record
mode at some precise instant, i.e., a punch in at bar
XX, or a punch in after a given word. (Punch out
refers to either stopping the recording or switching
from record back to play mode for the track or tracks
involved.)
Random Access
(See Pointer Based Editing.)
As the VS-880’s play structure is pointer based, it is
possible to instantly jump from one location in the
song to another. There is no “tape” or material to
move through, there are only pointers to reposition
(which happens very quickly). This is makes locating
and moving or copying material in the VS-880
instant.
Reverberation
Multiple, blended sound images caused by
reflections from walls, floor and ceiling. It also can be
created artificially by electronic or mechanical
devices.
RSS (Roland Sound Space)
Roland Sound Space is a 3-Dimensional processor
that allows you to move sound towards and around
the listener from playback on only two speakers. In a
mono system, sound comes from one source. The
only controls are volume and EQ. Stereo allows the
sound to be moved from left to right. Adding reverb
allows depth to be added to a mix by moving sounds
away from the listener. RSS is the next level of
processing. It allows sound to be moved towards the
listener, to the side of the listener or even above,
below and behind the listener. It is used for adding
great dimension to a mix, for special effects (a
percussion part or vocal hook) or for sound effects
for film and video.
Sample Rate
The rate at which samples are taken in the analog to
digital conversion process, usually specified in Hertz
(Hz).
Sampling
Refers to the first step in the process which converts
an analog waveform to a digital format.
Scrubbing
The VS-880’s Scrub mode will playback a very short
loop of audio selected from a track on the hard drive.
This is similar to the skip or cue mode on a DAT or
CD player. With this short loop of audio, you can
“scrub” across the audio using the Time/Value dial
to find where the initial attack of a sound begins,
allowing you to search for minute edit points on a
track.
The VS-880’s scrubbing feature makes it very easy to
find your edit points because you can always hear
them at their original pitch. The editing resolution
for finding edits on the VS-880 is 1/3000th of a
second, allowing you to do very precise edits.
SCSI (Small Computer System Interface)
SCSI is a protocol for high-speed recording and data
transfer between computer devices.
Shielding
There are two types of shielding, electrical and
magnetic. Electrical shielding may be copper screen,
a wire braid, or any conducting material which
surrounds a circuit or cable conductors to exclude
electrostatic or radio frequency noises. Magnetic
shielding may be iron, steel, nickel, mu-metal or
other magnetic material and is used to exclude
unwanted electromagnetic fields from circuitry,
transformers or conductors.
Slapback
An echo effect where the original signal re-appears as
distinct echoes that decay in level each time they
appear. A common technique for creating slapback is
to feed the output signal from the play head back
into the record head, at a slightly lover level. If the
sound “ta” is originally fed to the recorder, the sound
“ta-ta-ta-ta-...ta” will be heard, with each “ta”
somewhat lower in level as the signal fades away.
Slate
A voice or talkback signal which is applied to the
output Busses of a mixing console so the engineer
can identify each take of a tape (by “slating” an
announcement onto the tape) prior to actually
recording the program. The term may have been
derived from the motion picture industry practice of
identifying scenes with a slate board and chalk just
prior to the shooting.
Chapter 8: Appendix
133
Slider
Another term for a straight-line fader (see “fader”).
Also may refer to any straight-line control, as
opposed to a rotary control.
SMPTE
Society of Motion Picture and Television Engineers.
(Formerly, SMPTE, Society of Motion Picture
Engineers.) Also refers to a common standard for
measurement of intermodulation distortion (IM), and
for a standard reference code for identification of
frames of film or videotape; SMPTE code is also used
for synchronization of two or more audio tape
recorders.
SMPTE Time Code
A synchronization code developed for video
designed for frame edge lockup of multiple video
and audio devices. SMPTE is calculated in
Hours:Minutes:Second:Frames. There are several
different types of SMPTE frame rates, ie: 30 frames
per second, 29.97 fps non-drop, 29.97 fps drop, 25 fps
(European standard) and 24 fps (used for film). The
VS-880 supports all types of MTC which corresponds
to all types of SMPTE. You only need to use the
MIDIMAN ‘Video Syncman’ unit to interface
between a SMPTE source and the VS-880. The VS-880
also will resolve (exactly lock to) the frame edge of
the SMPTE or MTC. This means that the lock will not
drift or go out of sync even if the song or project is
very long.
Solo
A feature of many mixing consoles that allows one
input signal, one Buss, or a combination of “soloed”
signals to be monitored exclusive of all other signals
- without disturbing the main output mix. For
example, in the middle of a show with an 18 in x 2
out console, an engineer might listen to one
microphone (perhaps to check for a problem, to see
what it is picking up, or adjust the input position’s
EQ). He merely engages that input position’s solo
button - the sound reinforcement and/or tape
recorder feeds are not affected.
SPP (Song Position Pointer)
Song Position Pointer works in conjuction with MIDI
Clock to provide the current measure and beat
information of the song or sequence. This message
allows the user to rewind and fast forward the
‘master’ device and still synchronize with the ‘slave’.
134 VS-880 Application Guide
S/PDIF (Sony/Philips Digital Interface
Format)
A digital recording format that conforms to the AES/
EBU consumer standard for the high-speed transfer
of two channels of digital audio data. The VS-880 has
a coaxial S/PDIF connector that allows you to
connect digitally to a consumer or professional DAT
recorder or CD player.
Stereo Buss
In a mixing console, the Buss or channel which is
used to feed a program to a stereo tape recorder, 2channel sound system or other stereo equipment. (A
stereo Buss actually consists of two Busses, the left
and right Busses.)
Stereo Master
A 2-gang fader which simultaneously controls the
overall level of the left and right outputs (i.e., the
stereo Buss output).
Sub-Master
A level control or fader which adjusts the signal level
on a given output channel, prior to the master fader
(which is normally a multi-channel fader). For
example, there might be a Left Channel Submaster, a
Right Channel Submaster and a Stereo Master.
Sync
In multi-track tape recorders, a technique where
channels on the record head can be used for tape
play back while other channels are being recorded.
This permits performers to listen to previously
recorded tracks and to record additional tracks in
perfect Synchronization.
Sync Track
The VS-880 has a SYNC TRACK that is independent
from the 8 recording tracks. You can record a TEMPO
MAP from a drum machine or sequencer and then
use this map to synchronize the VS-880 to the
sequencer. In this case, the VS-880 would be the
Master and the sequencer would be the Slave.
Synchronizer
A device which “reads” a time code recorded on two
or more tape machines and synchronizes the units
(via servo control of their motors) to move in the
desired relationship to one another. Also known as
“time code synchronizers,” such devices are
available to sync any combination of audio tape
recorders, video tape recorders, or film recorders and
projectors.
Tempo Map
A TEMPO MAP includes bar and beat, tempo and
time signature information for part or all of a song.
This information can be used to make editing easier.
You can edit or locate to an exact bar and beat rather
than an absolute time reference. Tempo Maps can
also be used to synchronize external drum machines
or sequencers. The tempo map generates MIDI Clock
information and Song Position Pointer information
that will start and stop a sequencer at an exact
location and keep it playing in perfect sync.
In the VS-880, you can create a tempo map from
scratch before you start recording a song. There are
MIDI and Click metronome outputs to allow the
recording process to be in time with the tempo map.
You can also create a Tempo Map after you have
recorded part or all of a song. See SYNC TRACK for
another way to use MIDI sync information.
Time Compression
An operation that allows you to expand or compress
the playback time of recorded material to a specified
time length. Usually when playback time is
compressed or expanded, the playback pitch is
affected. On the VS-880, you can select whether the
playback pitch will change in correlation to the
compression / expression ratio, or whether the
original playback pitch will be preserved. The time
compression feature of the VS-880 can therefore be
used to change the tempo of a drum loop without
changing the pitch. It can also be used to correct the
pitch of a vocal note that is sung out of tune.
Vari-pitch
Vari-pitch allows you to speed up or slow down the
playback of the VS-880 in order to match the tuning
of instruments that are difficult or impossible to tune
to your existing recorded tracks. A typical instrument
that Vari-pitch would be useful for would be an
acoustic piano.
Virtual Tracks (VS-880)
Virtual tracks are additional areas to record you takes
and ideas. Each track on the VS-880 has 8 virtual
tracks. You can play one of these at a time per track,
using the others to hold earlier performances or
different edits. You can edit several virtual tracks
together for a composite edit. You can even bounce
several virtual tracks to another virtual track to make
a mix of these tracks.
For example: If you need to bounce some
background vocals together to make room for some
guitar parts, you can use the virtual tracks to store
the original vocal parts that you have bounced.
Unlike a tape based system, you can then add new
material on the tracks you have bounced from and
still keep the originals in case you want to re-mix the
bounce later.
Voltage Control
A method of adjusting a special type of circuit which
responds to an external control voltage. Almost all
musical synthesizer operations are done using
voltage control, and many automated mixing
functions utilize voltage controlled circuitry.
Track
The path on magnetic tape along which a single
channel of sound is recorded.
Volume
A loosely used term which describes the level of an
audio signal or the intensity of a sound.
Tracking
Refers to the original recording of live music when
the first tracks (usually rhythm instruments) are
recorded.
Waveform
The characteristic shape of a wave when graphed or
displayed by test equipment.
Treble
The high audio frequency range, normally
considered to be above 5000 Hz.
Unbalanced
An audio circuit with 2 wires; one wire carries the
signal, high (+) and the second carries the low (-) and
also is connected to chassis or system ground. Since
the signal leads are not of equal potential difference
from the ground, they are considered to be
“unbalanced” with respect to ground.
XLR
Describes any of several varieties of audio connectors
having 3 or more conductors plus an outer shell
which shields the connection and locks the mating
connectors. 3-pin XL-type connectors are commonly
used to make balanced mic and line level
connections in professional audio systems. The XLtype connector is sometimes called a “cannon”
connector, so named for the original manufacturer
although a number of companies now manufacture
compatible 3-pin connectors.
(Portions of this glossary are from the CAMEO Dictionary of
Creative Audio Terms; copyrighted and used by permission of
The WorkCenter Corp., dba Gary Davis & Associates.)
Chapter 8: Appendix
135
More About SCSI
SCSI is a high-speed data transmission buss that is often taken for granted thanks to its common use on
personal computers. However, insufficient attention to SCSI connections have turned out to be the major
cause of “mysterious” or intermittent performance problems users have experienced. Although SCSI has
received a reputation for being voodoo or black magic, most problems may be cured 100% by following
the suggestions outlined below.
The SCSI “Chain”
The SCSI specification allows for up to eight devices (computers, disk drives, etc.) to be “chained” together
on a single SCSI circuit. Cables are connected from one to the next and then the next, etc.; just like making
a chain.
VS-880
Disk drive 0
Disk drive 1
Disk drive 2
The two physical ends of a SCSI chain must be terminated correctly. This also helps reduce reflection on
the bus. Incorrect termination will result in extra “ghost reflections” appearing on the SCSI bus, which can
also corrupt SCSI communications. One end of the SCSI chain is the VS-880. It is internally terminated
already. You must provide proper termination on the other end of your SCSI chain.
Remember: You only add termination to the LAST drive of the external SCSI chain.
SCSI ID Numbers
Each disk or device in a single SCSI chain is identified by its SCSI ID number. This number from 0-7 (eight
devices total) is usually set by a switch on the rear panel of the device.
Each device must be set to a unique SCSI ID number. No two devices can have the
same number. The VS-880 internal computer is set to SCSI ID # 7. Use SCSI # 1-6
for your external devices. (If you have an internal SCSI hard disk drive installed
inside your VS-880, it will most likely be set to SCSI # 0.)
If you cannot find the SCSI ID selector switch, contact your device supplier for instructions to “set the SCSI
ID number”.
SCSI & IDE
The VS-880 actually contains two internal busses for communicating to disk devices - SCSI and IDE.
However, only the SCSI buss is available externally. If you purchased your VS-880 with an internal disk
drive installed, it is most likely an IDE device and is connected to the internal IDE communication buss. It
is simple to identify your internal device.
1.
Press the [SYSTEM] button repeatedly until the LCD displays “SYS Drive Select ? “.
2.
Press [YES].
3.
The LCD will display “SYS Select DRV=IDE:0” if your internal device is connected to the
IDE buss.
136 VS-880 Application Guide
The VS-880 allows you to copy songs from the Internal IDE drive to any of your external SCSI drives. The
communications between the IDE buss and the SCSI buss are all handled by the VS-880 internally.
There are two main causes of SCSI problems with any computer device including the
VS-880: Cables and Termination.
SCSI Cables
Don’t be fooled by disk drive suppliers that tell you, “our cables work just fine on a PC computer”. An
unstable SCSI buss may require the host computer (VS-880) to try over and over to communicate with the
drive. This is fine for a PC since the user doesn’t really notice that the PC has to make a number of
attempts at communication before actually writing the computer data to disk. However, the large amount
of data transfer for digital audio requires a very stable SCSI buss with solid communications at all times.
Since the SCSI buss is actually a form of transmission line, impedance matching is very important. If the
impedance is not properly matched, “ghost reflections” will occur within the cable which will alter or
corrupt the data on the line.
SCSI specifies a cable impedance of 100 Ω ±10%. Unfortunately, the vast majority of SCSI cables sold today
have an impedance closer to 50 Ω. This results in up to 50% of the signal being reflected back to the VS-880.
Another problem in cable construction is the amount of shielding used and the quality of the cables
themselves. Some users have assumed that “molded connectors” are automatically equal to “high quality”
- this is not the case.
The SCSI specification calls for the internal cable wiring to consist of 25 twisted pairs (each pair consists of
one signal and one ground). However, many cables only contain a total of 26 wires - 25 signals plus one
overall ground.
“Double shielding” - where each twisted pair has its own shield in addition to the overall cable’s shield - is
required by the SCSI specification to eliminate crosstalk and RFI.
At low data speeds and for short cable runs (less than 1 foot), the above shortcomings may not be too
much of a problem. With longer cable runs (3-6 feet) and higher data rates (such as those common in the
VS-880), cable reflections do become a factor, resulting in random data errors which in turn cause problems
ranging from noise in the audio to the VS-880 ceasing to operate. Because these errors are indeed random,
the resulting symptoms are also random and may not be completely repeatable (adding to confusion and
frustration when trying to debug them).
SCSI Termination
Since the VS-880 end of the SCSI chain is internally terminated, the other physical end of the external SCSI
chain must be terminated as well. i.e. If you add one 1 Gigabyte external drive to the SCSI connector of the
VS-880, it must also be terminated since it is the last device on the other end of the SCSI chain.
For Reference Only: Most disk drives can be terminated internally or externally.
Internal termination is usually provided by small in-line resistor packs called
“SIPs”. They plug directly into sockets on the main controller circuit board of the
physical drive unit. Internal termination is extremely rare. Most commercial disk
drives available today provide for external termination.
CAUTION: DO NOT INSTALL SIPs terminators backwards. Pin # 1 is designated
with a dot. Socket # 1 of the circuit board will be designated with a 1, a dot, a
square, or some other designation for Pin # 1. Match Pin # 1 to Socket # 1.
Chapter 8: Appendix
137
External terminators are usually rectangular boxes which can be attached to a separate 50 Pin Amphenol
connector on the rear of the drive. Other external terminators have a 50 pin connector on both sides so the
terminator can be plugged onto the drive and the cable from the VS-880 can be plugged into the
terminator.
Do not change terminators on any SCSI device with the power turned on.
“ACTIVE” Terminators
“Active” terminators are your best and first choice. These have a voltage regulator inside to make sure the
precise reference voltage is available to minimize cable reflections. Unless external terminators are marked
as “active”, they will be “passive” devices. Some new drives have active termination built into the drive
with a rear panel switch that can turn it on or off.
Roland recommends that you purchase drives from a supplier who has exhaustively tested their drives
specifically for hard disk recording or other digital audio and video applications.
Terminator Power
All external terminators (active or passive) require a power source to operate
correctly. This is known as ‘terminator power’ or ‘term power’. Since the VS-880
does not provide this power, your external hard disk drive must provide its own
terminator power. Check with your drive supplier.
If you have a volt meter, you can measure two pins on the 25 pin male end of the SCSI cable attached to the
last device in your SCSI chain. If you measure + 5 VDC between pins 14 and 25, the device is providing the
correct terminator power.
1
2
3
4
5
6
7
8
9 10 11 12 13
14 15 16 17 18 19 20 21 22 23 24 25
GND
25 Pin SCSI Cable End Connector (male)
+5VDC
Test For Internal Termination
If you are not sure if your external drive is internally terminated, you can measure this. With the drive
turned on and not connected to any other SCSI device, measure the voltage between one of the data lines
(such as pin 26 on a 50-pin connector, or pin 6 on a 25-pin connector) and the ground (GND) pin listed
above. If the drive is internally terminated, you should measure approximately 3 VDC. If the drive is not
internally terminated, this pin will be “floating” and you may measure something close to 0 or 5 VDC
(your meter may even fluctuate between these two extremes).
Double Termination
Be sure that the last drive in the SCSI chain is not double terminated. That means that it has internal
terminator resistors installed as well as an external 50 Pin terminator. You must remove either the internal
SIPs or the external terminator package. Remember, only the last drive in the chain is terminated.
138 VS-880 Application Guide
SCSI Summary
• Keep SCSI cables as short as possible.
• Do not allow the total length of the SCSI chain to exceed 6 meters.
• Use only high quality SCSI cables of correct impedance and shielding.
• Do not connect or disconnect SCSI cables or terminators with power on.
• Check your SCSI ID numbers.
• Be sure only the last external drive in the chain is correctly terminated. No other drives in
the chain should be terminated.
Chapter 8: Appendix
139
Blank Track Sheet
VS-880 APPLICATION GUIDE 2.0
2394US