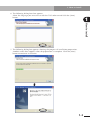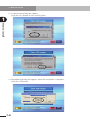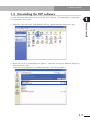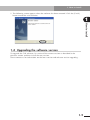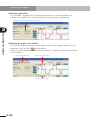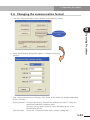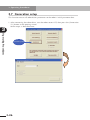
1
YAMAHA Tool for Optimizing Parameters
RD series
TOP
User’s Manual
ENGLISH
E
E98-Ver. 1.03
Note to the user
Keep this manual handy so that anyone using this software can easily refer to it when
needed.
Before installing and operating "TOP for Windows" (hereafter called "TOP software" or
"TOP"), read this manual carefully to understand RD series functions and comply with its
safety information, precautions, and operating and handling instructions.
Always use the TOP software while staying within the specification limits stated in this
manual.
About this manual
• The contents of this manual are subject to change without prior notice.
• Carefully keep this manual because it will not be reissued.
• This manual must not be reproduced or reprinted in part or in whole without our
permission.
• Every effort was made to ensure that this manual is accurate and complete.
However, please contact us if you notice any errors, omissions or dubious points.
• Please note that we accept no responsibility for any results that might occur from
use of this manual or the unit described in it.
• The TOP software runs on a PC (personal computer) that is connected to the
YAMAHA robot driver RD series, and does not operate independently. When
operating a robot, read the robot and robot driver user's manuals thoroughly as well
as this manual. Ensure safety and then start operating the robot.
• Windows, Windows NT, and Windows 2000 are either registered trademarks or
trademarks of Microsoft Corporation in the United States and/or other countries.
1
Safety precautions
Safety precautions
Safety precautions
To use this software correctly and safely, always read this manual and all other attached
documents carefully before use. Use this software only after you are thoroughly familiar
with its features and functions, safety information and precautions.
This manual classifies safety caution items into the following alert levels, using the signal
words "DANGER" and "CAUTION".
w
c
DANGER
INDICATES AN IMMINENTLY HAZARDOUS SITUATION WHICH, IF NOT AVOIDED,
WILL RESULT IN DEATH OR SERIOUS INJURY.
CAUTION
Indicates a potentially hazardous situation which, if not avoided, could result in
minor or moderate injury or damage to the equipment or software.
Note that some items described with "CAUTION" might lead to serious results depending
on the situation. In any case, always observe the above instructions and precautions
since they provide important safety information.
After reading this manual, always store it where the operator can easily refer to it any
time when needed.
Precautions when connecting/disconnecting the cable
c
CAUTION
1. When connecting or disconnecting the PC cable from the robot driver,
make sure that both the robot driver and PC are turned off.
Connecting or disconnecting the PC cable while power is still supplied may
cause the robot driver and/or PC to malfunction.
2. Never disconnect or connect the PC cable to the robot driver while the TOP
software is running.
If reconnecting the PC cable to the robot driver, always first quit the TOP
software. Then reconnect the cable and restart the TOP software.
Failure to follow this procedure might cause the TOP software and PC to
malfunction.
Precautions during use
c
2
CAUTION
1. When the robot driver control power is turned off, always quit the TOP
software and then restart it.
Unless you quit the TOP software, the TOP software and PC might malfunction
when the control power is turned back on.
2. Do not turn off the robot driver control power while initialization or parameter
rewriting is in progress.
The EEPROM data (stored data) in the robot driver might be destroyed if the
control power is turned off during write operation, causing the robot driver
to malfunction.
General Contents
Chapter 1
How to install
1. Installing the TOP software
1-1
1.1
Check before installation
1-1
1.2
Installing the TOP software
1-2
1.3
Uninstalling the TOP software
1-7
1.4
Upgrading the software version
1-9
Chapter 2
Connecting to the robot driver
2. Connecting to the robot driver
2-1
2.1
Connection cable
2-2
2.2
Connecting to the robot driver
2-2
Chapter 3
Operating Procedures
3. Operating Procedures
3-1
3.1
3-1
Starting and exiting
3.1.1 Starting the TOP software
3.1.2 Exiting the TOP software
3.2
Monitor function
3.2.1 Starting the monitor function
3.2.2 Monitor display window description
3-1
3-3
3-4
3-4
3-5
3.3
Parameter setup function
3-6
3.3.1
3.3.2
3.3.3
3.3.4
3.3.5
3.3.6
3.3.7
3.3.8
Starting the parameter setup function
Parameter setting window description
Changing the parameters
Saving the parameters
Loading the parameters
Retuning to the default setting
Printing the parameters
Robot driver replacement procedure
3-6
3-7
3-8
3-12
3-13
3-14
3-15
3-15
3.4
Operation trace function
3.4.1
3.4.2
3.4.3
3.4.4
3.4.5
Starting the operation trace function
Trace display window description
Operation trace sequence
Setting the operation trace conditions
Setting the graph display
3.5
Test run and adjustment functions
3.5.1
3.5.2
3.5.3
3.5.4
Jog
Offline tuning
Mechanical system diagnostic measurement procedure
Notch filter setup procedure
3-16
3-17
3-18
3-19
3-21
3-23
3-25
3-25
3-30
3-36
3-43
3.6
Changing the communication format
3-45
3.7
Generation setup
3-46
Chapter 4
Troubleshooting Guide
4. Troubleshooting guide
4-1
4.1
If failed to connect to the robot driver
4-1
4.2
If failed to write parameters
4-1
4.3
If failed to load parameters
4-2
4.4
If failed to initialize parameters
4-2
4.5
If operation trace does not run correctly
4-2
Chapter 5
Appendix
5. Appendix
5-1
5.1
Files copied to system
5-1
5.2
Connection to a PC with no serial port (RS-232C) 5-2
5.2.1 Connection procedures and precautions
5.3
Adding a generation model
Chapter 6
Index
Index
5-3
5-5
Chapter 1
How to install
This chapter explains what you need to check before installing the TOP software and how to install
it. This chapter also describes how to uninstall the TOP software and how to upgrade the software
version.
Contents
1. Installing the TOP software
1-1
1.1
Check before installation
1-1
1.2
Installing the TOP software
1-2
1.3
Uninstalling the TOP software
1-7
1.4
Upgrading the software version
1-9
1. How to install
1. Installing the TOP software
1
1.1 Check before installation
(1) Hard disk space
Before beginning installation, check that the hard disk where you will install the TOP
software has at least 30MB of free space.
(2) PC and OS
Check that the PC and OS meet the following requirements:
PC
: Computer with Pentium or 100% compatible processor
OS
: Microsoft Windows 95 or later, or Windows NT 4.0 or
later
Memory
: 32 MB or more (recommended)
CD-ROM drive
: 4x or higher speed (recommended)
Graphic display
: 800×600 pixels, 32000 or more colors (recommended)
Serial communication port : 1 or more port
Adobe Acrobat Reader 6.0 or later should be installed in the PC.
* Microsoft, Windows, and Windows NT are registered trademarks of Microsoft Corporation in
the United States and/or other countries.
* Adobe and Acrobat Reader are registered trademarks of Adobe Systems Incorporated in the
United States and/or other countries.
* Pentium is a registered trademark of Intel Corporation in the United States and/or other
countries.
1-1
How to install
Before installing the TOP software, make the following checks:
1. How to install
1.2 Installing the TOP software
1
1. Start Windows.
(The following steps are explained using Windows XP screens.)
How to install
2. Quit unnecessary resident programs.
(Software installation might become unstable or fail if a resident program is running.)
3. Insert the CD-ROM containing the TOP software into the CD-ROM drive.
The setup program will automatically start up. (If it does not start up, open the CDROM drive icon and double-click "ToPforWinLaunch" to start the setup program.)
4. The following screen appears when the setup program starts.
Click the [English] (or [Japanese]) button to select the menu language.
5. The following menu screen then appears.
Click the [Start TOP installer] button.
1-2
1. How to install
6. The following dialog box then appears.
Select the language you want to use with the TOP software and click the [Next]
button.
1
How to install
7. The following dialog box appears showing the progress of installation preparation.
Another screen then appears when the preparation is complete. Click the [Next]
button to continue installation.
1-3
1. How to install
1
8. When the following screen appears, select the folder where the TOP software will be
installed.
If you want to change the default destination folder, click the [Browse] button and
specify the folder to install the software.
After selecting the folder, click the [Next] button.
How to install
9. Click the [Next] button without entering anything.
10. The installer starts installing the software.
1-4
1. How to install
The following screen appears when the installation is complete. Click the [Finish]
button.
1
How to install
11. The following dialog box then appears.
Click the [Yes] button to install robot data.
12. The "Install data" dialog box then appears.
Select "Install all data" or "Install individual data", and click the [Start installation]
button.
1-5
1. How to install
13. A confirmation dialog box appears.
Click the [Yes] button to start installing data.
1
How to install
14. The following dialog box appears when the installation is complete.
Click the [OK] button.
1-6
1. How to install
1.3 Uninstalling the TOP software
Use the following procedure to uninstall the TOP software. (The procedure is explained
using Windows XP screens.)
1
1. Open the "Control Panel" and double-click the [Add or Remove Programs] icon.
How to install
2. When the list of installed programs appears, select the [Change or Remove Programs]
icon on the left side.
Scroll the list of programs as needed and select "TOP for Windows".
1-7
1. How to install
3. After selecting "TOP for Windows", click the [Remove] button.
1
How to install
4. The uninstall program starts and the following message then appears. Click the [OK]
button to start removing the TOP software.
1-8
1. How to install
5. The following screen appears when the software has been removed. Click the [Finish]
button to end the uninstallation.
1
How to install
1.4 Upgrading the software version
To upgrade the TOP software, first uninstall the current version as described in the
previous section and then install the new version.
Please contact us for information on the latest version and software version upgrading.
1-9
MEMO
1-10
Chapter 2
Connecting to the robot driver
This chapter describes the cable for connecting the PC to the robot driver and explains how to make
the connection.
Contents
2. Connecting to the robot driver
2-1
2.1
Connection cable
2-2
2.2
Connecting to the robot driver
2-2
2. Connecting to the robot driver
2. Connecting to the robot driver
Precautions when connecting/disconnecting the cable
c
Precautions during use
c
CAUTION
1. When reconnecting the PC cable to the robot driver, always first quit the
TOP software.
Then reconnect the cable and restart the TOP software.
Failure to follow this procedure may cause the TOP software and PC to
malfunction.
2. Do not turn off the robot driver control power while initialization or parameter
rewriting is in progress.
The EEPROM data (stored data) in the robot driver might be damaged if the
control power is turned off during write operation, causing the robot driver
to malfunction.
The following sections explain the PC connection cable and how to make the
connection.
2-1
2
Connecting to the robot driver
CAUTION
1. When connecting or disconnecting the PC cable from the robot driver,
make sure that both the robot driver and PC are turned off.
Connecting or disconnecting the PC cable while power is still supplied may
cause the robot driver and/or PC to malfunction.
2. Never disconnect or connect the PC cable to the robot driver while the TOP
software is running.
2. Connecting to the robot driver
2.1 Connection cable
Assemble the connection cable as shown in the wiring diagram below, or use the
assembled PC cable as shown below.
2
Wiring diagram
PC side
Robot driver side
Connecting to the robot driver
1
8
8-pin modular
connector
1
2
3
4
5
6
7
8
GND
–
–
ER2
SD
RD
DR
RS
1 DCD
2 RxD
3 TxD
4 DTR
5 GND
6 DSR
7 RTS
8 CTS
9 –
9-pin D-sub (female)
8 pins
PC cable
Robot driver side
PC side
8-pin modular connector
9-pin D-sub connector
2.2 Connecting to the robot driver
Using the above-mentioned cable, connect the PC to the robot driver.
Robot driver : Front panel connector marked "PC"
PC
2-2
: RS-232C port
Chapter 3
Operating Procedures
This chapter describes how to start and exit the TOP software, monitor operation, make parameter
setups, perform operation trace and test runs, and change the communication format.
Contents
3. Operating Procedures
3-1
3.1
Starting and exiting
3-1
3.1.1
3.1.2
Starting the TOP software
Exiting the TOP software
3.2
Monitor function
3.2.1
3.2.2
Starting the monitor function
Monitor display window description
3.3
Parameter setup function
3-6
3.3.1
3.3.2
3.3.3
3.3.4
3.3.5
3.3.6
3.3.7
3.3.8
Starting the parameter setup function
Parameter setting window description
Changing the parameters
Saving the parameters
Loading the parameters
Retuning to the default setting
Printing the parameters
Robot driver replacement procedure
3-6
3-7
3-8
3-12
3-13
3-14
3-15
3-15
3.4
Operation trace function
3.4.1
3.4.2
3.4.3
3.4.4
3.4.5
Starting the operation trace function
Trace display window description
Operation trace sequence
Setting the operation trace conditions
Setting the graph display
3.5
Test run and adjustment functions
3.5.1
3.5.2
3.5.3
3.5.4
Jog
Offline tuning
Mechanical system diagnostic measurement procedure
Notch filter setup procedure
3.6
Changing the communication format 3-45
3.7
Generation setup
3-1
3-3
3-4
3-4
3-5
3-16
3-17
3-18
3-19
3-21
3-23
3-25
3-25
3-30
3-36
3-43
3-46
3. Operating Procedures
3. Operating Procedures
3.1 Starting and exiting
3.1.1 Starting the TOP software
3
1. From the Start menu on the Windows taskbar, select "Programs" (or "All Programs"),
point to "TOP for Windows" and click "TopWin".
Operating Procedures
2. The software then starts and displays the opening screen.
[Connect] button
< If the wrong motor type was selected >
The following message appears if the robot driver is a rotary motor type.
The following message appears if the robot driver is a linear motor type.
Clicking the [Yes] button automatically changes to the correct type and connects to
the robot driver.
Clicking the [No] button cancels the connection.
3-1
3. Operating Procedures
Note 1: The PC will not connect to the robot driver if any screen other than the
opening screen is already displayed.
Note 2: Applicable robots for the RD series robot drivers are as follows:
(See the robot driver user's manual for detailed information.)
RDX-05, RDX-10, RDX-20 .... Robot drivers for rotary motor
RDP-05, RDP-10, RDP-20 .... Robot drivers for linear motor
3
Operating Procedures
3. Click the [Connect] button to connect to the robot driver.
When connected correctly, the screen changes as shown below after a few seconds to
make more buttons available on the opening screen. The [Connect] button also
changes to [Disconnect] button.
If failed to connect correctly, see section 4.1, "If failed to connect to the robot driver".
Selectable buttons
3-2
3. Operating Procedures
3.1.2 Exiting the TOP software
(1) To exit the TOP software
1. Close all open screens except the opening screen.
2. Click the [Disconnect] button if currently connected to the robot driver.
3. Click the [Exit] button on the opening screen.
3
Operating Procedures
[Exit] button
(2) To disconnect the communication
1. Close all open screens except the opening screen.
2. Click the [Disconnect] button on the opening screen.
[Disconnect] button
Note: The motor type cannot be changed as long as a screen (such as "Parameter
setting" screen) other than the opening screen is displayed. Close such that
screen if displayed.
3-3
3. Operating Procedures
3.2 Monitor function
The monitor function allows you to check operation information in real time.
3.2.1 Starting the monitor function
Click the [Monitor display] button on the opening screen.
The "Monitor display" window then appears as shown below.
3
Operating Procedures
Click this button
to start the monitor.
3-4
3. Operating Procedures
3.2.2 Monitor display window description
The "Monitor display" window is described below.
Shows input terminal
status in real time
(0: OFF; 1: ON).
Shows operation information
in real time.
Shows output terminal
status in real time
(0: OFF; 1: ON).
3
Operating Procedures
(Note)
(Note)
(Note)
(Note)
(Note)
Shows alarm log.
The larger the number,
the older the log.
(Note)
Shows current operation status
such as "Stop", "Operating",
"Forward overtravel" and "Reverse overtravel".
Note: Items shown here vary depending on which motor type is selected, as shown
in the table below.
When "Rotary Motor" is selected
Item name
Speed command
Unit
min -1
Speed detection value
When "Linear Motor" is selected
Item name
Unit
Speed command
mm/s
Speed detection value
Moment of inertia
kg·m × 10 -4
Phase Z position
pulses
Detected mass on slider
Magnetic pole position
counter
kg × 10
dig
3-5
3. Operating Procedures
3.3 Parameter setup function
The parameter setup function allows you to set and control the robot driver parameters.
3.3.1 Starting the parameter setup function
Click the [Parameter setting] button on the opening screen.
The "Parameter setting" window then appears as shown below.
3
Operating Procedures
Click this button to
start the parameter
setup function.
(Note)
(Note)
Note: Parameters and units shown here vary depending on whether "Rotary Motor"
or "Linear Motor" was selected. See the robot driver user's manual for
detailed parameter information.
3-6
3. Operating Procedures
3.3.2 Parameter setting window description
The "Parameter setting" window is displayed as shown below.
Open
Save As
Print
Read
3
Write
Default
Parameter group tabs:
Select the tab for the
parameter group you
want to set.
The current value
(parameter data in the robot
driver) can be changed by
changing the setting value
and writing the parameters.
Parameter names
Parameter data
in robot driver
Parameter data
in PC
3-7
Operating Procedures
You can type a title here.
(The title appears
when a print-out is made.)
3. Operating Procedures
3.3.3 Changing the parameters
This section explains how to change parameters, using the following two examples.
• Select from the drop-down list --- [Example 1] To change the pulse train input
mode (FA-11).
• Directly enter a value
3
--- [Example 2] To change the electronic gear
denominator (FA-13).
[Example 1] To change the pulse train input mode (FA-11).
Operating Procedures
1. Select the [FA] tab, click the down arrow button to the right of the "Setting value"
field for FA-11, and select a new setting from the drop-down list.
Note: Drop-down list numeric values which appear in parentheses are the
internal representation value of the robot driver.
2. Verify that the "Setting Value" changes to red, and that an asterisk displays to its
right.
3. Select "Write" from the "Parameter" menu or click the
3-8
button on the toolbar.
3. Operating Procedures
4. The following screen then displays. To proceed with the operation, click the [OK]
button.
3
6. When finished rewriting the parameter, the setting shown in red turns black and the
asterisk (*) placed on the right side disappears.
Note 1: An error is displayed on the screen if an attempt is made to rewrite a
parameter that is write-prohibited during servo-on.
Note 2: Some parameter settings will not be recognized unless the robot driver's
control power is restarted after the writing operation.
Note 3: Do not turn off the robot driver control power while a parameter is being
written. The EEPROM data (stored data) in the robot driver might be
destroyed if the control power is turned off during parameter write,
causing the robot driver to malfunction.
3-9
Operating Procedures
5. The following message then appears indicating the parameter is being written.
3. Operating Procedures
[Example 2] To change the electronic gear denominator (FA-13).
1. Select the [FA] tab, place the mouse pointer in the "Setting value" field for FA-13,
and enter a new setting.
Select the [FA] tab.
3
Operating Procedures
2. Verify that the "Setting Value" changes to red, and that an asterisk displays to its
right.
3. Select "Write" from the "Parameter" menu or click the
button on the toolbar.
4. The following screen then displays. To proceed with the operation, click the [OK]
button.
3-10
3. Operating Procedures
5. The following message then appears indicating the parameter is being written.
6. When the parameter has been rewritten, the setting shown in red turns black and
the asterisk (*) placed on the right side disappears.
3
Operating Procedures
Note 1: An error is displayed on the screen if an attempt is made to rewrite a
parameter that is write-prohibited during servo-on.
Note 2: An error is displayed on the screen if an attempt is made to write a
parameter value outside the allowable range.
Note 3: Some parameter settings will not be recognized unless the robot driver's
control power is restarted after the writing operation.
Note 4: Do not turn off the robot driver control power while a parameter is being
written. The EEPROM data (stored data) in the robot driver might be
destroyed if the control power is turned off during parameter write,
causing the robot driver to malfunction.
3-11
3. Operating Procedures
3.3.4 Saving the parameters
The parameters can be saved and managed as files.
1. In the "Parameter setting" window, select "Save As" from the "File" menu or click the
button on the toolbar.
3
Operating Procedures
2. Specify the file save location and the file name, then press the [Save (S)] button to
save the data.
The file can be saved in either of the following two different formats:
CSV: Saves a file in comma-separated value format.
TXT: Saves a file in tab-separated value format.
(Files saved in TXT format cannot be read by TOP software.)
Note: Data saved by the above procedure is not robot driver data but PC data (data
displayed in "Setting value" column on the "Parameter setting" window). If
you save data without completing the write procedure, the saved data differs
from the data in the robot driver.
3-12
3. Operating Procedures
3.3.5 Loading the parameters
Files saved as described in the preceding section can be loaded to set the parameters.
1. In the "Parameter setting" window, select "Open" from the "File" menu or click the
button on the toolbar.
3
Operating Procedures
2. Specify the location and name of the file to be load, then press the [OPEN (O)] button
to load the file.
Note: Only CSV files can be loaded.
3. After the parameters are loaded from the file, the parameter data appears in red if the
PC data does not match the robot driver data.
4. To change the robot driver parameter data, perform a parameter writing operation. For
this procedure, see section 3.3.3, "Changing the parameters".
3-13
3. Operating Procedures
3.3.6 Retuning to the default setting
All parameters can be returned to their default settings (factory settings) and the trip
history can be cleared using the pulldown menu or toolbar button.
3
Note: Initializing the data can not return the robot's default parameters. To return
the robot's default parameters, first initialize the data, then perform a
generation operation. For this procedure, see section 3.7, "Generation setup".
1. Turn the robot servos OFF and display the Parameter Settings screen.
Operating Procedures
From the pull-down menu, select [Parameter (P)] – [Initialization (I)], or press toolbar's
(file open) button.
2. When the following dialog box appears, select the initialization mode.
The following initialization modes are selectable:
Trip history clear:
Clears the alarm history only.
Data initialization:
Clears the parameter data only.
3. Click the [initialization start] button to start the initialization process.
While initialization is in progress, the robot driver LED indicator shows as follows:
Trip history clear → HC
Data initialization → JP
4. When initialization is complete, the robot driver LED indicator shows "d-00".
5. When the "Data initialization" mode has been selected, the PC automatically loads the
data from the robot driver after completing initialization.
6. Restart the system (turn power OFF and back ON again).
Note 1: Do not turn off the robot driver control power during initialization. The
EEPROM data (stored data) in the robot driver might be destroyed if the
control power is turned off during initialization, causing the robot driver to
malfunction.
Note 2: Before operating the robot after initialization, be sure to execute a generation
operation for the model being used. Operating the robot in an initialized
condition could result in robot malfunctions, and possible damage.
3-14
3. Operating Procedures
3.3.7 Printing the parameters
Parameter data can be printed out as a report.
1. In the "Parameter setting" window, select "Print" from the "File" menu or click the
button on the toolbar.
3
Operating Procedures
2. When the printer setup dialog box appears, enter the items needed to make the
printout and print out the data.
3.3.8 Robot driver replacement procedure
This section explains the robot driver replacement procedure.
1. Before beginning this procedure, connect the robot driver to be replaced to the TOP,
and save the parameter data. For the save procedure, see section 3.3.4, "Saving the
parameters".
2. End TOP operation, then shut off the power.
3. Replace the robot driver.
4. Turn the new robot driver power ON, and connect it to TOP.
5. Perform a generation operation. For this procedure, see section 3.7, "Generation
setup".
6. When generation is completed, load the parameter data that was saved at step 1
above. For this procedure, see section 3.3.5, "Loading the parameters".
7. Verify that parameter setting values to be changed display in red at the "Setting Value"
column, then write the parameter data from the personal computer to the robot driver.
For this procedure, see section 3.3.3, "Changing the parameters".
Note 1: Be sure to replace the robot driver with a driver type that is compatible with
the robot. If the driver is incompatible with the robot, the generation
operation will not occur properly.
Note 2: When performing the generation operation, be sure to select the model to be
used. Performing generation at the wrong model could result in robot
malfunctions, and possible damage.
3-15
3. Operating Procedures
3.4 Operation trace function
This function allows you to visually check the robot and robot driver operation. The table
below shows traceable items and control states.
Trace items
3
Trace type
Resolution
(number of points)
Time
axis
Vertical
axis
Operating Procedures
Analog
graph 1/graph 2
Digital
512
65535
Trace item (units)
Description
Data
update
intervals
Speed command
(min -1)
(mm/s) (Note 1)
Traces the speed command
from the position controller or
analog input, etc.
140 μs
Speed detection
value (min -1)
(mm/s) (Note 1)
Constantly traces the
detected speed value.
140 μs
Output current
(%)
Traces the current pulse
height supplied from the
robot driver to the robot.
4 ms
Torque command
(%)
Traces the torque current
command from the speed
controller or analog input,
etc.
140 μs
Output torque
(%)
Traces the torque current
value.
140 μs
Position command
high order
(pulses) (Note 2)
Traces the high-order portion
of the position controller's
position command.
140 μs
Position command
low order
(pulses) (Note 2)
Traces the low-order portion
of the position controller's
position command.
140 μs
Current position
high order (Note 2)
Traces the high-order portion
of the current position.
140 μs
Current position
low order
(pulses) (Note 2)
Traces the low-order portion
of the current position.
140 μs
Position error high
order
(pulses) (Note2)
Traces the high-order portion
of the position controller's
position error.
140 μs
Position error low
order
(pulses) (Note 2)
Traces the low-order portion
of the position controller's
position error.
(32768 dig = 1 rotation)
140 μs
Output voltage
(V)
Traces the RMS voltage
supplied from the robot driver
to the robot.
40 ms
All input terminals
Traces all input terminals.
Approx. 1 ms
All output terminals
Traces all output terminals.
Approx. 1 ms
2 points
Note 1: Units displayed when linear motor type is selected.
Note 2: The angle or distance per pulse differs depending on the encoder type when "rotary motor" is
selected or on the linear sensor resolution when in "linear motor" type. Refer to the robot driver
user's manual for more details
3-16
3. Operating Procedures
3.4.1 Starting the operation trace function
The "Trace display" window opens when you click the [Trace operation] button on the
opening screen.
3
Click this button
to start the
operation trace.
Operating Procedures
3-17
3. Operating Procedures
3.4.2 Trace display window description
The "Trace display" window is described below.
Open
Save As
Print
Start Operation Trace
3
Clear Graph
You can type a title here.
(The title appears when
a print-out is made.)
Trace Setup
Operating Procedures
Time at t1-axis
cursor line
Trigger point
Time axis scale
t1, t2-axis cursor lines
$t: Time difference
1/$t: Frequency
This cursor line
appears by dragging
the mouse on the
t1-axis graph while
holding down the left
mouse button.
Analog 1 display area
This cursor line
appears by
clicking the right
mouse button on
the t2-axis graph.
Analog 2 display area
Legend
Digital display area
Data value at
t1-axis cursor
line position
Clearing the check
mark hides the
drawn line.
3-18
Difference in data
values between
t1-axis and t2-axis
cursor line positions
Time-axis scroll bar
Change Y-axis scaling
Clear window
Zoom out one step
Zoom in one step
3. Operating Procedures
3.4.3 Operation trace sequence
1. Open the "Trace display" window.
3
Operating Procedures
2. Set the trace conditions. (For the setup procedure, see 3.4.4, "Setting the operation
trace conditions".)
on the toolbar.
Select "Trace setting" from the "Trace operation" menu or click
3. After setting the conditions, click the [OK] button.
3-19
3. Operating Procedures
4. Start operation trace.
Select "Trace Start" from the "Trace operation" menu or click
on the toolbar.
The following message appears when operation trace has started.
3
Operating Procedures
5. When the trigger conditions are met or when you click the [Manual trigger] button in
the above message box, the robot driver transfers data to the PC and the following
dialog box appears.
Note 1: It might be difficult to view the message "Trace operation was stopped!" if the
sampling cycle is short.
Note 2: No graph is drawn if you click the [Cancel] button in the "Trace data
uploading ...." message box.
6. When the data transfer is complete, the data is displayed as shown below.
3-20
3. Operating Procedures
3.4.4 Setting the operation trace conditions
To set the operation trace conditions, open the "Trace setting" window as explained
below.
on the toolbar.
Select "Trace setting" from the "Trace operation" menu or click
After setting the trace conditions by referring to the procedures below, click the [OK]
button to close the "Trace setting" window.
3
(1) To set the analog trace conditions:
2. Select the trace item from the "Trace object" drop-down list.
For details on the trace items, see the trace item table shown in 3.4, "Operation
trace function".
3. Select the display graph No. (1 or 2).
(No.1 is displayed in analog 1 display area, while No.2 is displayed in analog 2
display area.)
4. Set the display color as desired.
5. Change the label name as needed by entering it directly into the field.
6. Select the channel for triggering.
1
2
3
4
5
6
3-21
Operating Procedures
1. Select the check boxes for channels you want to enable.
Up to 4 channels of analog data can be traced.
3. Operating Procedures
(2) To set the digital trace conditions:
1. Select the check boxes for the channels you want to enable.
Up to 4 channels of digital contacts can be traced.
2. Select the trace item from the "Trace object" drop-down list.
(All input/output terminal data is selectable as trace items. For details on the trace
items, see the trace item table shown in 3.4, "Operation trace function".)
3
3. From the drop-down list, select the name of the terminal to be traced.
(All input/output terminal data is selectable as trace items. For details on trace
items, see the trace item table shown in 3.4, "Operation trace function".)
Operating Procedures
4. Set the display color as desired.
5. Change the label name as needed by directly entering it in the field.
6. Select the channel for triggering.
1
2
3
4
(a)
(b)
(d)
(c)
5
6
(e)
(3) Other settings
(a) Pre-trigger point: Displays data starting from a position prior to the trigger point.
Set that position here in the number of trace points.
(b) Trigger:
Enter the trigger level. (This is valid only for analog trace.)
(c) Trigger edge:
Set the trigger edge.
(d) Sampling period: Specify the sampling period or interval. Data will be sampled
and displayed at the interval specified here. The maximum
tracing time (time during which data can be traced) is displayed
to the right of the sampling interval setting.
(e) Automatic:
Select this check box when you want to optimize the Y-axis scale
according to the sampled data.
When all settings are complete, click [OK] to close the window.
3-22
3. Operating Procedures
3.4.5 Setting the graph display
(1) Setting the X-axis direction
The toolbar buttons above each graph allow you to extend the graph in the X-axis
direction or return it to standard size. Use the following toolbar buttons.
Click to zoom in the
X-axis in one step.
Click to zoom out the
X-axis in one step.
3
Click to change Y-axis scale.
The following window then opens. Enter the maximum and minimum scales and then
click the [OK] button. The graph will be redrawn to match the specified scales.
3-23
Operating Procedures
(2) Setting the Y-axis direction
The toolbar button above each graph allows you to change the Y-axis scale. Use the
following toolbar button.
3. Operating Procedures
(3) Hiding a graphed line
You can hide a graphed line by clearing the check box as described below. To
redisplay the graphed line, reselect the check box by placing a check mark.
Click this check box to show or hide the graphed line.
3
Operating Procedures
(4) Clearing the graphs in the window
To erase the graphs displayed in the window, select "Clear display" from the "Trace
operation" menu or click
on the toolbar.
You can use the following toolbar buttons to erase all graphs or each graph displayed
in the window.
Click to erase all graphs.
Click to erase each graph.
Click to erase each graph.
3-24
3. Operating Procedures
3.5 Test run and adjustment functions
This section describes the functions useful for a test run.
3.5.1 Jog
Jog can be run from a PC.
<Jog operation>
Jog operation allows you to make wiring checks for the robot driver, robot and power
supply. (No outside connections to the I/O connector are needed for jog operation.)
(1)-A Normal jog operation
The robot moves at a constant speed specified by the speed command until a stop
command is received.
Note 1: Do not input any signals through the I/O connector including the SON
terminal during this operation. Doing so runs the operation according to the
input terminal.
Note 2: In this jog operation, the robot moves at an acceleration/deceleration time of
0 seconds and the current control gain and speed limit settings.
3-25
Operating Procedures
(1) Jog operation types
There are two types of jog operation: one is normal jog performed in speed control
mode, and the other is pulse train jog that feeds according to the number of pulses set
in position control mode. Each of these is explained below.
3
3. Operating Procedures
To run normal jog:
1. Click the [Test run and Adjustment] button on the opening screen.
The "Test run and Adjustment" window appears as shown below.
Click the [Jogging] tab.
3
Click this button
to start test run and
adjustment mode.
Operating Procedures
Note: If the "Monitor display" window is open, close it before starting the test
run and adjustment mode.
3-26
3. Operating Procedures
2. Enter the speed command in the "Jogging speed" box (2).
Note: When "Linear Motor" is selected, the units are "mm/s".
3. Check safety and then click the [Forward] or [Reverse] button (3) that indicates the
direction to move the robot.
(The robot will start moving in the specified direction.)
3
Note1: The robot moves during this operation, so check safety before starting
operation.
(2)
Note 1
(3)
4. To stop operation (turn off the servo), click the [Stop] button (4).
(4)
3-27
Operating Procedures
Note2: When a PHASER series robot is used, magnetic pole position finding must
be performed before this operation. For information on magnetic pole
position finding, refer to the separate "YAMAHA Single-Axis Robot Driver
RD Series" user's manual.
3. Operating Procedures
(1)-B Pulse feed jog operation
In this jog operation, the robot moves in position control mode up to the position
specified by the position command.
Note 1: Do not input any signals through the I/O connector including the SON
terminal during this operation. Doing so runs the operation according to the
input terminal.
3
Note 2: In this jog operation, the robot moves at an acceleration/deceleration time of
0 seconds and the current control gain and speed limit settings.
Operating Procedures
To run pulse feed jog:
1. In the "Rest run and Adjustment" window, enter the number of feed pulses in the
"Feed pulse" box (A).
(A)
(B)
2. Set the speed limit values (Fb-20, Fb-21) to 300 min -1 or less.
Also set the position error detection value (FA-05) to more than the number of feed
pulses. (This is to prevent an alarm or out-of-control condition that might occur
during jog operation.)
3-28
3. Operating Procedures
3. Check safety and then click the [Forward] or [Reverse] button (B).
(The robot will start moving in the specified direction and stop at the position
specified by the command.)
Note1: The robot moves during this operation, so check safety before starting
operation.
Note2: When a PHASER series robot is used, magnetic pole position finding must
be performed before this operation. For information on magnetic pole
position finding, refer to the separate "YAMAHA Single-Axis Robot Driver
RD Series" user's manual.
(C)
To stop positioning (turn off the servo), click the [Stop] button (C).
4. After positioning is complete, the "Test and Adjustment" window returns to the state
in step 1. The servo is still turned on at this point so click the [Stop] button (C).
3-29
Operating Procedures
The buttons (except [Stop] button) in the "Rest run and Adjustment" window are
grayed out during positioning as shown below.
3
3. Operating Procedures
3.5.2 Offline tuning
The total inertia including motor inertia can be approximately calculated in offline mode.
Use the following procedures to run offline tuning.
3
Operating Procedures
Note 1: The robot driver parameters are factory set to ensure that the robot operates
normally. Use of this function is not required except in cases where robot
follow-up response is poor, where operation is abnormal, or when adjusting
the parameter data.
Note 2: When this function is executed, the moment of inertia (weight of moving
part) Fd-00 value is automatically changed.
Therefore, be sure to save the parameter data before performing this
function. For the data save procedure, see section 3.3.4, "Saving the
parameters".
Note 3: When a PHASER series robot is used, the correct inertia value cannot be
estimated unless the magnetic pole position is determined. For instructions
on how to determine the magnetic pole position, refer to section 5.4,
"Return-to-origin function", in the separate "YAMAHA Single-Axis Robot
Driver RD Series" user's manual.
(1) Procedure for fully automatic offline tuning
1. Click the [Test run and Adjustment] button on the opening screen.
The "Test run and Adjustment" window appears as shown below.
Click the [Offline tuning] tab.
Click this button to
start test run and
adjustment mode.
[Offline tuning] tab
3-30
3. Operating Procedures
2. Set the following parameters that are required for tuning.
(A)
Note 1
Operating Procedures
(C)
3
(B)
Note 2
(D)
(E)
Note 3
(A) Cut-off frequency (fc) setting
Set the cut-off frequency for controlling the speed during auto-tuning. Set a
value that will not cause hunting.
(B) Initial value of tuning moment of inertia
Set the moment of inertia at start of auto-tuning. Tuning will end quickly if
setting this to a value that you know will roughly match the moment of inertia.
If you do not know this value then leave the setting as is. The auto-tuning
function will estimate the moment of inertia.
Note 1: When "Linear Motor" is selected, the edit box label is "=m" and the
units are "kg×10".
(C) Tuning speed
Enter the speed to use for auto-tuning. If you are sure that the default value does
not damage the system including the robot, you can use the default setting.
Note 2: When "Linear Motor" is selected, the edit box label is "Tuning speed"
and the units are "mm/s".
(D) Acceleration/deceleration time
Set an acceleration/deceleration time for pattern operation during auto-tuning. If
you are sure that the default value does not damage the system including the
robot, you can use the default setting.
(E) Moving range
Displays a general guide for the rotation (distance) amount during auto-tuning.
Use the displayed value only for a general guide. Perform the operation at a
position where no interference or collision occurs during tuning.
Note 3: When "Linear Motor" is selected, the units are "mm".
3-31
3. Operating Procedures
3. Click the [Continuous pattern tuning start] button.
4. Check safety conditions and then turn on the FOT and ROT terminals, and turn on
the SON terminal. This starts continuous pattern operation and estimates the
moment of inertia.
Note: When a PHASER series robot is used, magnetic pole position finding must
be performed before this operation. For information on magnetic pole
position finding, refer to the separate "YAMAHA Single-Axis Robot Driver
RD Series" user's manual.
3
Operating Procedures
5. After estimating the moment of inertia, the last pattern operation waveforms are
downloaded from the robot driver and the estimated results displayed as shown
below.
6. After tuning ends, turn the SON terminal off, and turn the RS terminal on and then
off, to exit the auto-tuning mode.
Note 1: This function automatically rewrites the "Moment of inertia" (Fd-00)
parameter.
Read the parameters from the robot driver again if the "Parameter setting"
window is open.
Note 2: Even when tuning is interrupted before it is complete, turn the SON
terminal off, and turn the RS terminal on and then off, to exit the autotuning mode.
3-32
3. Operating Procedures
(2) Procedure for offline auto-tuning while checking the result each time
1. Click the [Test run and Adjustment] button on the opening screen.
The "Test run and Adjustment" window appears as shown below.
Click the [Offline tuning] tab.
2. Set the following parameters that are required for tuning:
(A) Cut-off frequency (fc) setting
Set the cut-off frequency for controlling the speed during auto-tuning. Set a
value that will not cause hunting.
3
Note 1: When "Linear Motor" is selected, the edit box label is "=m" and the
units are "kg×10".
(C) Tuning speed
Enter the speed to use for auto-tuning. If you are sure that the default value does
not damage the system including the robot, you can use the default setting.
Note 2: When "Linear Motor" is selected, the edit box label is "Tuning speed"
and the units are "mm/s".
(D) Acceleration/deceleration time
Set an acceleration/deceleration time for pattern operation during auto-tuning. If
you are sure that the default value does not damage the system including the
robot, you can use the default setting.
(E) Moving range
Displays a general guide for the rotation (distance) amount during auto-tuning.
Use the displayed value only for a general guide. Allow the operation at a
position where no interference or collision occurs during tuning.
Note 3: When "Linear Motor" is selected, the units are "mm".
3-33
Operating Procedures
(B) Initial value of tuning moment of inertia
Set the moment of inertia at start of auto-tuning. Tuning will end quickly if
setting this to a value that you know will roughly match the moment of inertia.
If you do not know this value then leave the setting as is. The auto-tuning
function will estimate the moment of inertia.
3. Operating Procedures
(A)
Note 1
3
Operating Procedures
(C)
(B)
Note 2
(D)
(E)
Note 3
3. Click the [1 pattern tuning start] button.
4. Check safety conditions and then turn on the FOT and ROT terminals, and turn on
the SON terminal. This starts 1-pattern operation and estimates the moment of
inertia.
Note: When a PHASER series robot is used, magnetic pole position finding must
be performed before this operation. For information on magnetic pole
position finding, refer to the separate "YAMAHA Single-Axis Robot Driver
RD Series" user's manual.
5. After estimating the moment of inertia, the last pattern operation waveforms are
downloaded from the robot driver and the estimated results displayed as shown
below.
3-34
3. Operating Procedures
6. Check if the waveform is satisfactory and click the [1-pattern tuning start] button
again if necessary. This runs the 1-pattern operation and estimates the moment of
inertia.
Repeat this to perform tuning while checking one waveform at a time.
7. After tuning ends, turn the SON terminal off, and turn the RS terminal on and then
off, to exit the auto-tuning mode.
Note 2: Even when tuning is interrupted before it is complete, turn the SON
terminal off, and turn the RS terminal on and then off, to exit the autotuning mode.
3-35
3
Operating Procedures
Note 1: This function automatically rewrites the "Moment of inertia" (Fd-00)
parameter.
Read the parameters from the robot driver again if the "Parameter setting"
window is open.
3. Operating Procedures
3.5.3 Mechanical system diagnostic measurement procedure
Use the following procedure when measuring the resonance point of a robot connected
to the robot driver.
3
Note: The robot driver parameters are factory set to ensure that the robot operates
normally. Use of this function is not required except in cases where robot
operation is abnormal, or when adjusting the parameter data.
Operating Procedures
1. Set up as described below.
Before starting measurement, open the "Parameter setting" window and set the
parameters as shown in the following table.
Parameter name
No.
Setting
Initial value
Fd-00
Enter an approximate
value.
Motor-specific
value
Speed control cut-off
frequency
Fd-01
5 to 10 Hz
30 Hz
Torque command filter
time constant
Fd-06
0 ms
2 ms
Notch filter bandwidth 1
Fd-13
0 dB
0 dB
Notch filter bandwidth 2
Fd-15
0 dB
0 dB
Moment of inertia
(Note 1)
Note 1: This parameter is named "Slider mass" when "Linear Motor" is selected.
2. Click the [Test run and Adjustment] button on the opening screen.
The "Test run and Adjustment" window then appears as shown below.
Click the [Machine diagnosis] tab.
3-36
3. Operating Procedures
3. Enter settings for mechanical system diagnosis.
Set each item in the "Machine diagnosis setting" group box as described below.
3
Operating Procedures
(A)
(B)
(C)
(D)
(Note 1)
(Note 2)
3-37
3. Operating Procedures
(1) Overall setup
Read the following instructions and check if your machine is in safe condition. If there
is no problem, use the default settings for making measurements.
(A) Frequency range
Set the machine resonance frequency measurement range as directed below.
• If the approximate resonance frequency is already known:
Set a frequency range that covers about 5 times the approximate resonance
frequency.
3
• If an approximate resonance frequency is not known:
Operating Procedures
Select a range of up to 900 Hz.
After measuring the resonance frequency, set a frequency range that covers
about 5 times the measured resonance frequency, and then measure the
resonance frequency again to obtain a more accurate result.
(B) Torque
Set the diagnostic signal amplitude during mechanical system diagnostic
measurements.
Setting a higher amplitude (100% or less) ensures more accurate measurements.
However, the higher the amplitude, the greater the torque applied to the machine,
so use caution.
(C) Speed
Operation proceeds at a constant speed during mechanical system diagnosis. Set a
speed command to specify the constant speed.
Enter a sufficiently high speed in a range from 100 min -1 on up to the rated speed.
This speed must remain constant and must cause no machine damage.
Note 1: When "Linear Motor" is selected, the units are "mm/s".
(D) Allowable (allowable operation range)
Displays the allowable distance (amount of rotation) the machine can move during
mechanical system diagnosis. The machine immediately stops after mechanical
system diagnosis ends, but moves slightly more than the displayed value due to the
inertia of the machine. Set a longer distance to allow the machine to move slightly
more than the displayed distance (amount of rotation). To do this, decrease the
speed command value or reduce the operation adjustment range (see (G) in the
detailed setting dialog box).
Note 2: When "Linear Motor" is selected, the units are "mm".
3-38
3. Operating Procedures
(2) Detailed setting
Clicking the [Options] button opens the following dialog box. Make settings as
needed. (You do not have to make these settings under normal conditions.)
3
(E)
(G)
(E) Number (number of data points)
Set the number of FFT computation points for mechanical system diagnosis.
The larger the number of points, the higher the measurement accuracy, but the
longer the time needed uploading data. Using a small number of points for initial
rough measurements and then increasing the number of points for final detailed
measurements will reduce the measurement time. Basically make measurements
using the maximum number of data points (4096).
(F) Window ( windowing function)
A windowing function is applied to the data. If it is difficult to see the measured
waveform, changing this setting may make it easier to see. You can select from
among "Hanning", "Hamming" or "Nothing". Basically make measurements using
"Hanning".
(G) Operation ( operation adjustment range)
Reducing this setting narrows the operation range during measurement. But this
makes it difficult to see the waveform in a low frequency region. If difficult to see
the waveform in a low frequency region in the default setting, then change it to a
larger value. Units for this parameter are as follows:
Rotary motor: rotations (number of revolutions)
Linear motor: magnetic pole pitch (mechanical length equal to 360° electrical
angle)
3-39
Operating Procedures
(F)
3. Operating Procedures
4. Click the [Start] button to start diagnosis.
3
Operating Procedures
Click
Note: When a PHASER series robot is used, magnetic pole position finding must
be performed before this operation. For information on magnetic pole
position finding, refer to the separate "YAMAHA Single-Axis Robot Driver
RD Series" user's manual.
5. Turn on the servo ON (SON) terminal.
The robot then starts moving.
If an emergency stop is required, turn off the SON terminal.
6. Data upload begins when this operation ends.
3-40
3. Operating Procedures
7. Results from mechanical system diagnosis appear as shown below.
3
Operating Procedures
8. Turn off the servo ON (SON) terminal, turn the RS terminal on and then back off.
3-41
3. Operating Procedures
9. Check the waveform to determine whether or not to make measurements again.
When the resonance point is easily seen:
Proceed to the next section 3.5.4, "Notch filter setup procedure".
The waveform shown in step 7 indicates that a relatively clear resonance point was
measured. If a clear resonance point like this was not obtained, then make the
measurement again as explained next. You might then be able to measure a clear
waveform.
3
If the resonance point is not easily seen:
Operating Procedures
Change the frequency range (A) explained earlier so that the measurement
frequency is 5 times the frequency at the currently estimated resonance point
(peak), and then repeat from step 4 until a clear resonance point is obtained. Also
change the settings for parameters (B) through (G). The example below shows the
waveform measured after changing the settings.
Note: No matter how many times you change the settings, you might still be unable
to obtain an easy-to-see waveform depending on your machine. Even in that
case, there is no real problem as long as the resonance point (peak) is
measured.
3-42
3. Operating Procedures
3.5.4 Notch filter setup procedure
Use the following procedure to set the notch filter parameters (Fd-12 to Fd15).
(You need to first measure the resonance point as described in the preceding section.)
1. Left-click the mouse at the resonance point (peak) of the waveform displayed on the
[Mechanical diagnosis] tab screen. Use the arrow buttons on the left side to fineadjust the cursor line so it lies along the peak point as shown.
3
Operating Procedures
Click the left
mouse button
at this point.
Click these
arrow buttons to
make fine-adjustment.
2 Right-click the mouse at the intersection of the cursor line aligned with the peak point
and the straight line sloping downward to the right along the waveform.
Line sloping downward to
the right along the waveform
(not shown in the graph)
(A black square N appears.)
Parallel
3-43
3. Operating Procedures
3. Click the [Filter 1] button. The recommended settings then appear in the boxes to the
right of the button you clicked.
3
Operating Procedures
4. You can set up to 2 resonance frequencies. If there is another resonance point, repeat
from step 1 and make the setting with the [Filter 2] button.
Note: If two resonance points are close to each other, then robot operation might
become unstable even when the filters are set correctly. In this case, set the
resonance point that is clearer.
5. Click the [Writing] button. The settings for Fd 12 to Fd-15 are then transferred to the
robot driver.
6. Return the gain and other settings to their previous values, and then start operation to
check whether vibration is reduced. If vibration is not significantly reduced, slightly
change the "Notch filter frequency" parameters (Fd-12, Fd-14) to locate a point where
vibration is reduced. The notch filter function might work more effectively if you
adjust the "Notch filter bandwidth" parameters (Fd-13, Fd-15).
Note: Mechanical diagnostic measurements are to be used only as a guide.
The measured resonance frequency might deviate slightly from the correct
frequency.
3-44
3. Operating Procedures
3.6 Changing the communication format
1. Click the [Communication format] button on the opening screen.
3
Operating Procedures
[Communication format]
button
2. When the following dialog box appears, make the necessary
changes.
3. After making the necessary changes, click either of the following buttons depending
on the situation:
[Setting] button: Changes the settings for both the robot driver and PC if they are
connected and then reconnect them.
Changes settings only for the PC when the robot driver is not
connected to the PC.
[Close] button:
Closes the "Communication format setting" dialog box.
3-45
3. Operating Procedures
3.7 Generation setup
This function returns all robot driver parameters to the robot's initial parameter data.
1. After connecting the robot driver, turn the robot servos OFF, then press the [Generation
(G)] button at the opening screen.
Make setups as described next.
3
Operating Procedures
[Generation ] button
3-46
3. Operating Procedures
2. Select the robot model number from the "Model" drop-down list. Generation data on
robots incompatible with the robot driver cannot be written.
The contents of this list differ
depending on whether
"Rotary Motor" or "Linear Motor"
is selected.
3
Note 2: Be sure to select the model to be used.
Performing generation at the wrong model could result in robot malfunctions,
and possible damage.
3. Click the [Write Generation parameters] button.
The generation parameters are written and then checked.
You can run one of those tasks by selecting the check box on the lower left.
Click this button
to start writing
the parameters.
3-47
Operating Procedures
Note 1: If the robot you are using is not in the list, you must add it to the generation
models. See Appendix 5.3, "Adding a generation model".
3. Operating Procedures
4. The following message appears when generation setup ended normally.
Before starting operation, you must turn the power off and then back on again. Click
the [OK] button to close this message.
3
Operating Procedures
Note: If an error occurs while the parameters are being written, the following error
message displays.
Error message example
As directed by the error message, verify the robot model number and the parameter
settings, then execute the writing operation again.
5. Click the [Close] button to end the generation setup.
Click this button
to end the generation
setup.
Note: Never shut off the robot driver's control power while the parameters are
being written. This could damage the robot driver's internal EEPROM data
(saved data), possibly resulting in malfunctions.
3-48
Chapter 4
Troubleshooting Guide
This chapter explains how to troubleshoot problems or errors that might occur during operation of
this product.
Contents
4. Troubleshooting guide
4-1
4.1
If failed to connect to the robot driver 4-1
4.2
If failed to write parameters
4-1
4.3
If failed to load parameters
4-2
4.4
If failed to initialize parameters
4-2
4.5
If operation trace does not run correctly 4-2
4. Troubleshooting Guide
4. Troubleshooting guide
4.1 If failed to connect to the robot driver
If the PC cannot connect to the robot driver, check the following possible causes and
correct the problem.
Possible cause
Action
Check the connector and use a correct
connector.
The connection cable is not securely
connected or in poor contact.
Check the cable connection and
securely connect the cable.
The robot driver and PC baud rates do
not match.
Check the baud rate, etc. Correct the
PC or robot driver settings as needed.
The RS-232C port (COM) setting
is incorrect. (Check the COM port
number by opening the "Control Panel"
– "Device Manager".)
Check the COM port setting on the
PC, and then set the correct COM
port number in the "Communication
format setting" dialog box on the TOP
software.
4
Troubleshooting Guide
A wrong connector is used for
connecting the robot driver to the PC.
4.2 If failed to write parameters
If the above message appears, click the [OK] button and then check the following
possible causes to correct the problem.
Possible cause
Action
An attempt was made to change a
write-prohibited parameter during
operation with the SON terminal turned
on.
Turn off the SON terminal and write
the parameter.
An attempt was made to write
parameter data that was outside the
allowable range.
Write parameter data that is within the
allowable range.
4-1
4. Troubleshooting Guide
4.3 If failed to load parameters
If parameters cannot be loaded, check the following cause and correct the problem.
Possible cause
The connection cable between the
PC and robot driver is not securely
connected or is broken.
4
Action
Check and correct the cable
connection or wire breakage and then
load the parameters again.
4.4 If failed to initialize parameters
Possible cause
Action
Troubleshooting Guide
Parameters could not be loaded after
initialization.
Check whether the digital operator
on the robot driver displays the
initialization progress. Load the
parameters again.
The connection cable between the
PC and robot driver is not securely
connected or is broken.
Check and correct the cable
connection or wire breakage and then
initialize the parameters again.
4.5 If operation trace does not run correctly
If operation trace does not run correctly, check the following possible cause and correct
the problem.
Possible cause
Operation was not triggered due to
improper trigger conditions.
4-2
Action
Correct the trigger conditions.
Chapter 5
Appendix
Contents
5. Appendix
5-1
5.1
Files copied to system
5-1
5.2
Connection to a PC with no serial port (RS-232C) 5-2
5.2.1
Connection procedures and precautions
5.3
Adding a generation model
5-3
5-5
5. Appendix
5. Appendix
5.1 Files copied to system
The table below lists the names of files that are copied to the c:\windows\system
directory when you install the TOP software (assuming that Windows is installed on drive
C).
COMDLG32.OCX
MSCOMCT2.OCX
MSCOMCTL.OCX
5
TABCTL32.OCX
OCX files
PDQCOM32.OCX
Appendix
MSFLXGRD.OCX
VSVIEW3.OCX
VSFLEX6D.OCX
ACSGRAPH.OCX
MSVBVM60.DLL
OLEAUT32.DLL
ASYCFILT.DLL
CMDLGJP.DLL
COMCAT.DLL
MSCC2JP.DLL
MSCMCJP.DLL
DLL files
OLEPRO32.DLL
TABCTJP.DLL
VB6JP.DLL
STRFMT.DLL
FLXGDJP.DLL
MSVCRT.DLL
VB6STKIT.DLL
MFC42.DLL
5-1
5. Appendix
5.2 Connection to a PC with no serial port (RS-232C)
When running the TOP software on a PC with no RS-232C port and connecting the PC to
the RD series robot driver, you may use the following PC card or USB-serial converter.
Use these devices at your own risk.
< PC card >
5
Product name
PC Card Standard Type II RS-232C PC Card
Manufacturer
RATOC Systems
Type No.
REX-5056V
Accessory
9-pin D-sub (male) cable (50 cm)
Appendix
< USB-serial converter >
Product name
USB Serial Converter
Manufacturer
RATOC Systems
Type No.
REX-USB60
Connector
USB (type A)
OS
Windows XP, Windows 2000, Windows 98 SE
For detailed information, you can access RATOC Systems website: http://www.rexpccard.
co.jp
Operation under different software usage conditions such as effects due to the installation
environment at the site or different PC types has not been confirmed. Usage under such
conditions is the responsibility of the customer.
5-2
5. Appendix
5.2.1 Connection procedures and precautions
(1) Installing the PC card
Install the PC card by following the instructions in the manual that came supplied with
it. At this time, be sure to note which COM port the PC card RS-232C is assigned to.
(2) Connecting the TOP software
When you first start the TOP software after installing it, the communication port is set
to COM 1, so change it to the above-noted COM port and make the connection as
explained below. (The following example assumes that the PC card RS-232C is
assigned to COM2.)
1. Start the TOP software.
5
2. Click the [Communication format] button.The "Communication format setting"
dialog box appears.
Appendix
3. Set the communication port to COM2.
4. Click the [Setting] button.
5-3
5. Appendix
5. When the following dialog box appears, click the [OK] button.
6. Click the [Close] button.
5
Appendix
7. Connect the PC card RS-232C cable to the robot driver connection cable and then
click the [Connect] button to make the connection.
If the connection is not properly made, check the COM port assigned to the PC card and
the communication baud rate, data bit, stop bit and parity settings for the robot driver.
Check that the PC settings match those on the robot driver, and then retry the
connection.
You do not have to repeat the above procedure unless you reinstalled the TOP software.
From the next time onward, just click the [Connect] button to make the connection after
starting the TOP software.
5-4
5. Appendix
5.3 Adding a generation model
If the robot you are using is not found in the generation setup list, then you must add it
as a generation model, In that case, please contact us in advance to obtain the correct
generation data file that matches the robot you want to add as a generation model.
To add a generation model, follow these steps.
1. Exit the TOP software if it is running.
2. Copy the generation data file onto the following folder by using the Windows
Explorer, etc.
When the robot driver is for a rotar y motor:
"Directory (where TOP is installed)"\R_Setting
5
Example: When the TOP software is installed in "C:\Program Files\TOP for
Windows (default directory)
Appendix
When the robot driver is for a linear motor:
"Directory (where TOP is installed)"\L_Setting
Example: When the TOP software is installed in "C:\Program Files\TOP for
Windows (default directory)
3. Start the TOP software, and you can then select the added robot model from the
generation setup list.
5-5
MEMO
5-6
Chapter 6
Index
6. Index
Index
Starting the operation trace function ............... 3-17
Trace display window description ..................... 3-18
Operation trace sequence ..........................3-19
A
P
Adding a generation model .............................. 5-5
Parameter entry ...............................................3-8
C
Direct entry ........................................................... 3-10
Check before installation ................................ 1-1
Selecting from the drop-down list ....................... 3-8
Communication format ................................3-45
Connecting to the robot driver ......................2-1
Parameter setting window description .........3-7
Parameter setup function ...............................3-6
Changing the parameters ................................... 3-8
Connection cable ...........................................2-2
Loading the parameters .................................... 3-13
Connection to a PC with no serial port (RS-232C) ....5-2
Printing the parameters ...................................... 3-15
E
Saving the parameters ....................................... 3-12
Exiting the TOP software ..................................3-3
Starting the parameter setup function ............... 3-6
PC and OS ........................................................1-1
Files copied to system......................................5-1
R
G
Retuning to the default setting.....................3-14
Generation setup ...........................................3-46
Robot driver replacement procedure.........3-15
H
S
Hard disk space................................................1-1
Safety precautions .............................................. 2
I
Starting the TOP software ................................3-1
Installing the TOP software ..............................1-2
T
J
Test run and adjustment functions ...............3-25
Jog ...................................................................3-25
Troubleshooting ................................................4-1
If failed to connect to the robot driver ............... 4-1
M
If failed to initialize parameters ............................ 4-2
Mechanical system diagnostic measurement ...3-36
If failed to load parameters ................................. 4-2
Operation adjustment range ............................. 3-39
If failed to write parameters ................................. 4-1
Windowing function ............................................ 3-39
Monitor display window description ..............3-5
Monitor function ...............................................3-4
Starting the monitor function ............................... 3-4
If operation trace does not run correctly ........... 4-2
U
Uninstalling the TOP software..........................1-7
Upgrading the software version .....................1-9
N
Notch filter setup ............................................3-43
O
W
Wiring diagram .................................................2-2
Offline tuning ..................................................3-30
Fully automatic offline tuning ............................. 3-30
Offline auto-tuning while checking the result each time .. 3-33
Operation trace function..............................3-16
Graph display ...................................................... 3-23
Setting the operation trace conditions ............ 3-21
6-1
6
Index
F
Revision record
Manual version
Issue date
Description
Ver. 1.00
Ver. 1.01
Ver. 1.02
Ver. 1.03
Feb. 2007
Oct. 2007
May 2008
Jul. 2008
English manual Ver. 1.00 is based on Japanese manual Ver. 1.02.
English manual Ver. 1.01 is based on Japanese manual Ver. 1.03.
English manual Ver. 1.02 is based on Japanese manual Ver. 1.04.
English manual Ver. 1.03 is based on Japanese manual Ver. 1.05.
User's Manual
Tool for Optimizing Parameters RD series
Robot Driver
Jul. 2008
Ver. 1.03
TOP
This manual is based on Ver. 1.05 of Japanese manual.
© YAMAHA MOTOR CO., LTD.
IM Company
All rights reserved. No part of this publication may be reproduced in
any form without the permission of YAMAHA MOTOR CO., LTD.
Information furnished by YAMAHA in this manual is believed to be
reliable. However, no responsibility is assumed for possible
inaccuracies or omissions. If you find any part unclear in this manual,
please contact YAMAHA or YAMAHA sales representatives.