1
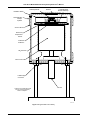
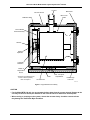
User's Manual
Model MTD-125/-126
Modular Test Dewar
Cryotest System
Obsolete Notice:
This manual describes an obsolete Lake Shore product. This manual is a copy from our archives
and may not exactly match your instrument. Lake Shore assumes no responsibility for this manual
matching your exact hardware revision or operational procedures. Lake Shore is not responsible
for any repairs made to the instrument based on information from this manual.
Lake Shore Cryotronics, Inc.
575 McCorkle Blvd.
Westerville, Ohio 43082-8888 USA
Internet Addresses:
[email protected]
[email protected]
Visit Our Website:
www.lakeshore.com
Fax: (614) 891-1392
Telephone: (614) 891-2243
Methods and apparatus disclosed and described herein have been developed solely on company funds of Lake Shore Cryotronics, Inc.
No government or other contractual support or relationship whatsoever has existed which in any way affects or mitigates proprietary
rights of Lake Shore Cryotronics, Inc. in these developments. Methods and apparatus disclosed herein may be subject to U.S. Patents
existing or applied for. Lake Shore Cryotronics, Inc. reserves the right to add, improve, modify, or withdraw functions, design
modifications, or products at any time without notice. Lake Shore shall not be liable for errors contained herein or for incidental or
consequential damages in connection with furnishing, performance, or use of this material.
Rev. 1.2
17 September 1998
Lake Shore Model MTD-125/126 Cryotest System User’s Manual
LIMITED WARRANTY
Lake Shore Cryotronics, Inc. (henceforth Lake Shore), the manufacturer, warrants this product to be free from
defects in material and workmanship for a period of 12 months from the date of shipment. During the warranty
period, under authorized return of instruments or component parts to Lake Shore freight prepaid, the company
will repair, or at its option replace, any part found to be defective in material or workmanship, without charge to
the Owner for parts, service labor or associated customary shipping cost. Replacement or repaired parts will
be warranted for only the unexpired portion of the original warranty.
All products are thoroughly tested and calibrated to published specifications prior to shipment. Calibration
Certifications are offered for 6 month periods only. Where such documentation must be updated, a recertification service is offered by Lake Shore at a reasonable cost.
LIMITATION OF WARRANTY
This warranty is limited to Lake Shore products purchased and installed in the United States, or Internationally
through our approved distribution agents. This same protection will extend to any subsequent owner during
the warranty period. It does not apply to damage caused by accident, misuse, fire, flood, or acts of God, from
failure to properly install, operate, or maintain the product in accordance with the printed instructions provided.
This warranty does not apply to defects resulting from improper or inadequate maintenance, unauthorized
modification or misuse, operation outside of the environmental specifications for any product or part or buyersupplied software interfacing.
This warranty is in lieu of any other warranties, expressed or implied, including merchantability or fitness for a
particular purpose, which are expressly excluded. The owner agrees that Lake Shore’s liability with respect to
this product shall be set forth in this warranty, and incidental or consequential damages are expressly
excluded.
CERTIFICATION
Lake Shore certifies that this product has been inspected and tested in accordance with its published
specifications and that this product met its published specifications at the time of shipment. The accuracy and
calibration of this product at the time of shipment are traceable to the United States National Institute of
Standards and Technology (NIST); formerly known as the National Bureau of Standards (NBS).
TRADEMARK ACKNOWLEDGMENT
Many of the designations used by manufacturers and sellers to distinguish their products are claimed as
trademarks. Where those designations appear in this manual and Lake Shore was aware of a trademark
®
claim, the designations have been printed in initial capital letters and the ™ or symbol used.
®
Apiezon is a trademark of Biddle Instruments
®
Cryo-Gloves is a trademark of TeMTD-125hield
®
Swagelok is a trademark of the Swagelok Company
®
Teflon is a trademark of DuPont De Nemours
CryoCable™, Duo-Twist™, SoftCal™, Quad-Lead™, and Quad-Twist™ are trademarks of Lake Shore
Cryotronics, Inc.
Copyright © 1994, 1995, and 1997 by Lake Shore Cryotronics, Inc. All rights reserved. No portion of this
manual may be reproduced, stored in a retrieval system, or transmitted, in any form or by any means,
electronic, mechanical, photocopying, recording, or otherwise, without the express written permission of Lake
Shore.
A
Lake Shore Model MTD-125/126 Cryotest System User’s Manual
TABLE OF CONTENTS
Chapter/Paragraph
Title
Page
List of Illustrations ...........................................................................................................................
List of Tables ..................................................................................................................................
Foreword ........................................................................................................................................
Purpose and Scope ........................................................................................................
Hardware Covered .........................................................................................................
Lake Shore Sensors .......................................................................................................
Warning, Cautions, and Notes .......................................................................................
General Installation Precautions.....................................................................................
Electrostatic Discharge...................................................................................................
Handling Electrostatic Discharge Sensitive Components ..............................................
Handling Cryogenic Storage Dewars .............................................................................
Liquid Helium and Nitrogen Safety Precautions .............................................................
Recommended First Aid.................................................................................................
Safety Summary .............................................................................................................
Safety Symbols...............................................................................................................
ii
ii
iii
iii
iii
iii
iii
iii
iv
iv
v
v
v
vi
vi
1
INTRODUCTION ............................................................................................................................
1.0
General...........................................................................................................................
1.1
MTD-125 Cryotest System General Description ............................................................
1.2
MTD-125 Cryotest System Features ..............................................................................
1.3
Hardware Descriptions and Functions ...........................................................................
1-1
1-1
1-1
1-3
1-6
2
INSTALLATION..............................................................................................................................
2.0
General...........................................................................................................................
2.1
Inspection and Unpacking ..............................................................................................
2.2
Repackaging For Shipment............................................................................................
2.3
Environmental Requirements .........................................................................................
2.4
System Power and Ground Requirements .....................................................................
2.5
Physical Support Requirements .....................................................................................
2.6
Liquid Cryogen................................................................................................................
2.7
Instrumentation Hookup Instructions..............................................................................
2.8
Miscellaneous Precautions.............................................................................................
2.9
Device Under Test (DUT) Insertion ................................................................................
2.10
Changing the Fanout Board ...........................................................................................
2.11
Changing the Test Set Assembly ...................................................................................
2-1
2-1
2-1
2-1
2-1
2-2
2-2
2-2
2-3
2-3
2-4
2-4
2-5
3
OPERATION...................................................................................................................................
3.0
General...........................................................................................................................
3.1
MTD System Operation ..................................................................................................
3.2
MTD System Shutdown..................................................................................................
3-1
3-1
3-1
3-2
4
TROUBLESHOOTING ...................................................................................................................
4.0
General...........................................................................................................................
4.1
Water Condenses On Outer Surface Of Vacuum Chamber ..........................................
4.2
Unable To Reach Cold Terminal Temperature ..............................................................
4.3
No Response To Control Heater ....................................................................................
4.4
Cable Assembly..............................................................................................................
4-1
4-1
4-1
4-1
4-1
4-1
5
OPTIONS, ACCESSORIES AND CABLES ...................................................................................
5.0
General...........................................................................................................................
5.1
MTD Cryotest System Options .......................................................................................
5.2
Accessories ....................................................................................................................
5-1
5-1
5-1
5-1
APPENDIX A – UNITS FOR MAGNETIC PROPERTIES...................................................................
A-1
Table of Contents
i
Lake Shore Model MTD-125/126 Cryotest System User’s Manual
LIST OF ILLUSTRATIONS
Figure No.
Title
Page
F-1
1-1
1-2
1-3
1-4
1-5
1-6
1-7
Typical Cryogenic Storage Dewar ............................................................................................
Typical MTD-125 and MTD-126 Cryotest System ....................................................................
Typical MTD-125 Cutaway........................................................................................................
Typical MTD-126 Cutaway........................................................................................................
Typical Fanout Board Wiring ....................................................................................................
10-Pin Instrumentation Feedthrough Connector.......................................................................
50-Pin Signal Feedthrough Connector .....................................................................................
Vacuum Valve Cutaway............................................................................................................
v
1-1
1-4
1-5
1-6
1-7
1-8
1-9
2-1
2-2
MTD-125 Hookup to the Model 330 Temperature Controller ...................................................
Retaining Ring and Fanout Board.............................................................................................
2-3
2-4
3-1
Typical MTD-125 Cryotest System Operational Setup .............................................................
3-1
4-1
Definition of Model 8271-30M-10 Cable Assembly...................................................................
4-2
LIST OF TABLES
Table No.
1-1
ii
Title
Page
Model MTD-125 Cryotest System Specifications .....................................................................
1-2
Table of Contents
Lake Shore Model MTD-125/126 Cryotest System User’s Manual
FOREWORD
PURPOSE AND SCOPE
This manual contains user instructions for the Modular Test Dewar Model MTD-125 Crytest System. Lake
Shore Cryotronics, Inc. designed, manufactures, and assembles the MTD-125 in the United States of
America.
We welcome your comments concerning this manual. Although every effort has been made to keep it free of
errors, some may occur. To report a specific problem, please describe it briefly and include the manual part
number, the paragraph/figure/table number, and the page number. Send comments to Lake Shore
Cryotronics, Inc. Attn: Technical Publications, 575 McCorkle Blvd., Westerville, Ohio 43082-8888.
HARDWARE COVERED
Modular Test Dewar Model MTD-125/126 Cryotest System.
LAKE SHORE SENSORS
The MTD-125 Cryotest System uses the Lake Shore Series DT-470 Silicon Diode Temperature Sensor.
Sensor installation is covered in detail in the Lake Shore Product Catalog, Application Notes, and Technical
Data. Contact Lake Shore for further information.
WARNINGS, CAUTIONS, AND NOTES
Warnings, cautions, and notes appear throughout this manual and always precede the step to which they
pertain. Multiple warnings, cautions, or notes are bulleted.
WARNING: An operation or maintenance procedure which, if not strictly observed, may result in
injury, death, or long-term health hazards to personnel.
CAUTION: An operation or maintenance procedure which, if not strictly observed, may result in
equipment damage, destruction, or loss of effectiveness.
NOTE: Emphasizes an operation or maintenance procedure.
GENERAL INSTALLATION PRECAUTIONS
These recommended general safety precautions are unrelated to any specific procedure and do not appear
elsewhere in this manual. Personnel should understand and apply these precautions during installation.
Installation personnel shall observe all safety regulations at all times. Keep away from live circuits. Turn off
system power before making or breaking electrical connections. Regard any exposed connector, terminal
board, or circuit board as a possible shock hazard. Discharge charged components only when such grounding
cannot damage equipment. If a test connection to energized equipment is required, make the test equipment
ground connection before probing the voltage or signal.
Do not install or service equipment alone. Do not under any circumstances reach into or enter any enclosure
to service or adjust equipment without the presence or assistance of another person able to render aid.
Forward
iii
Lake Shore Model MTD-125/126 Cryotest System User’s Manual
ELECTROSTATIC DISCHARGE
Electrostatic Discharge (ESD) may damage electronic parts, assemblies, and equipment. ESD is a transfer of
electrostatic charge between bodies at different electrostatic potentials caused by direct contact or induced by
an electrostatic field. The low-energy source that most commonly destroys Electrostatic Discharge Sensitive
(ESDS) devices is the human body, which generates and retains static electricity. Simply walking across a
carpet in low humidity may generate up to 35,000 volts of static electricity.
Current technology trends toward greater complexity, increased packaging density, and thinner dielectrics
between active elements, which results in electronic devices with even more ESD sensitivity. Some electronic
parts are more ESDS than others. ESD levels of only a few hundred volts may damage electronic components
such as semiconductors, thick and thin film resistors, and piezoelectric crystals during testing, handling, repair,
or assembly. Discharge voltages below 4000 volts cannot be seen, felt, or heard.
Identification of Electrostatic Discharge Sensitive Components
Below are various industry symbols used to label components as ESDS:
HANDLING ELECTROSTATIC DISCHARGE SENSITIVE COMPONENTS
Observe all precautions necessary to prevent damage to ESDS components before attempting installation.
Bring the device and everything that contacts it to ground potential by providing a conductive surface and
discharge paths. As a minimum, observe these precautions:
1. De-energize or disconnect all power and signal sources and loads used with unit.
2. Place unit on a grounded conductive work surface.
3. Ground technician through a conductive wrist strap (or other device) using 1 MΩ series resistor to protect
operator.
4. Ground any tools, such as soldering equipment, that will contact unit. Contact with operator's hands
provides a sufficient ground for tools that are otherwise electrically isolated.
5. Place ESDS devices and assemblies removed from a unit on a conductive work surface or in a conductive
container. An operator inserting or removing a device or assembly from a container must maintain contact
with a conductive portion of the container. Use only plastic bags approved for storage of ESD material.
6. Do not handle ESDS devices unnecessarily or remove them from their packages until actually used or
tested.
iv
Forward
Lake Shore Model MTD-125/126 Cryotest System User’s Manual
HANDLING CRYOGENIC STORAGE DEWARS
Operate all cryogenic containers (dewars) in accordance with manufacturer
instructions. Safety instructions are normally posted on the side of each dewar.
Keep cryogenic dewars in a well-ventilated place, protected from the weather, and
away from heat sources. Figure F-1 shows a typical cryogenic dewar.
LIQUID HELIUM AND NITROGEN SAFETY PRECAUTIONS
Transfer LHe and LN2 and operate storage dewar controls in accordance with
manufacturer/supplier instructions. During transfer, follow all safety precautions
written on the storage dewar and recommended by the manufacturer.
NONMAGNETIC
LIQUID
HELIUM
NONFLAMMABLE
KEEP
UPRIGHT
WARNING
• Liquid helium is a potential asphyxiant and can cause rapid suffocation
without warning. Store and use in an adequately ventilated area. DO NOT
vent the container in confined spaces. DO NOT enter confined spaces
where gas may be present unless area is well-ventilated. If inhaled,
remove to fresh air. If not breathing, give artificial respiration. If
breathing is difficult, give oxygen. Get medical attention.
Figure F-1 Cryogenic
Storage Dewar
• Liquid helium can cause severe frostbite to exposed body parts. DO NOT
touch frosted pipes or valves. For frostbite, consult a physician
immediately. If a physician is unavailable, warm the affected parts with water that is near body
temperature.
Two essential safety aspects of handling LHe are adequate ventilation and eye and skin protection. Although
helium and nitrogen gases are non-toxic, they are dangerous because they replace air in a normal breathing
atmosphere. Liquid helium is an even greater threat because a small amount of liquid evaporates to create a
large amount of gas. Store and operate cryogenic dewars in open, well-ventilated areas.
When transferring LHe and LN2, protect eyes and skin from accidental contact with liquid or the cold gas
issuing from it. Protect eyes with full face shield or chemical splash goggles; safety glasses (even with side
shields) are inadequate. Always wear special cryogenic gloves (TeMTD-125hield Cryo-Gloves® or equivalent)
when handling anything that is, or may have been, in contact with the liquid or cold gas, or with cold pipes or
equipment. Wear long sleeve shirts and cuffless trousers long enough to prevent liquid from entering shoes.
RECOMMENDED FIRST AID
Post an appropriate Material Safety Data Sheet (MSDS) obtained from the manufacturer/distributor at every
site that stores and uses LHe and LN2. The MSDS specifies symptoms of overexposure and first aid.
If a person exhibits symptoms of asphyxia such as headache, drowsiness, dizziness, excitation, excessive
salivation, vomiting, or unconsciousness, remove to fresh air. If breathing is difficult, give oxygen. If breathing
stops, give artificial respiration. Call a physician immediately.
If exposure to cryogenic liquids or cold gases occurs, restore tissue to normal body temperature (98.6°F) by
bathing it in warm water not exceeding 105 °F (40 °C). DO NOT rub the frozen part, either before or after
rewarming. Protect the injured tissue from further damage and infection and call a physician immediately.
Flush exposed eyes thoroughly with warm water for at least 15 minutes. In case of massive exposure, remove
clothing while showering with warm water. The patient should not drink alcohol or smoke. Keep warm and
rest. Call a physician immediately.
Forward
v
Lake Shore Model MTD-125/126 Cryotest System User’s Manual
SAFETY SUMMARY
Observe the following general safety precautions during all phases of operation, service, and repair of this
instrument. Failure to comply with these precautions or with specific warnings elsewhere in this manual
violates safety standards of design, manufacture, and intended use of the instrument. Lake Shore Cryotronics,
Inc. assumes no liability for the customer's failure to comply with these requirements.
Ground the Instrument
To minimize shock hazard, connect the instrument chassis and cabinet to an electrical ground. The instrument
is equipped with a three-conductor AC power cable. Plug this cable into either an approved three-contact
electrical outlet or a three-contact adapter with the grounding wire (green) firmly connected to an electrical
ground (safety ground) at the power outlet. The power jack and mating plug of the power cable meet
Underwriters Laboratories (UL) and International Electrotechnical Commission (IEC) safety standards.
Do Not Operate in an Explosive Atmosphere
Do not operate the instrument in the presence of flammable gases or fumes. Operating any electrical
instrument in such an environment constitutes a definite safety hazard.
Keep Away from Live Circuits
Operating personnel must not remove instrument covers. Refer component replacement and internal
adjustments to qualified maintenance personnel. Do not replace components with power cable connected. To
avoid injuries, always disconnect power and discharge circuits before touching them.
Do Not Substitute Parts or Modify Instrument
Do not install substitute parts or perform any unauthorized modification to the instrument. Return the
instrument to an authorized Lake Shore Cryotronics, Inc. representative for service and repair to ensure that
safety features are maintained.
Dangerous Procedure Warnings
A WARNING heading precedes potentially dangerous procedures throughout this manual. Instructions in the
warnings must be followed.
SAFETY SYMBOLS
vi
Forward
Lake Shore Model MTD-125/126 Cryotest System User’s Manual
CHAPTER 1
INTRODUCTION
1.0
GENERAL
The MTD-125 Cryotest System provides quality, economically high throughput testing of focal plane arrays
and integrated circuits at stable cryogenic test temperatures. The modular design of the MTD systems
reduces the time required for test device installation, cycle testing, and test device removal. The MTD systems
provide high signal quality as well as quick and easy access to the device test area. See Chapter 6 for options
and accessories.
1.1
MTD-125 CRYOTEST SYSTEM GENERAL DESCRIPTION
The MTD-125 System is a cost effective, single test position, 100-lead flexible cryogenic test dewar system
configured for rapid production testing of 40-pin dual in-line package (DIP) or 68- or 100-pin leadless chip
carrier (LCC) devices at liquid nitrogen temperature (T≤80 K). The standard system configuration includes a
blanked optical window port over the interior device under test (DUT) location. The MTD-125 features a high
efficiency, pour-fill, single-stage cryostat which operates with liquid nitrogen cryogen. The MTD-125 operates
vertically, while the MTD-126 operates horizontally. The factory can configure the system to test devices with
packages other than the standard 40-pin DIP or 68- or 100-pin LCC package. Consult the factory for details.
The Model MTD-125 is a flexible tool which provides high signal quality, precise temperature control, and rapid
test cycling. The unique design of the MTD optimizes test integrity by greatly minimizing the potential for
vacuum leaks and signal interference while providing fast, easy access to the test chamber.
Functionally, the Model MTD-125 and MTD-126 are identical. However, the MTD-125 has a down-looking
optical window and fills vertically through a fill port on the bottom. The MTD-126 has a side-looking optical
window and fills horizontally through a fill port on the side of the vacuum shroud, with tripod mounting
provisions on the side opposite the fill port. See Figure 1-1. In this manual, unless it is necessary to be
specific, references to the MTD-125 include both models.
Typical
MTD-125
Typical
MTD-126
Model 330
Temperature
Controllers
Drawing Not
To Scale
C-125-U-1-1
Figure 1-1 Typical MTD-125 and MTD-126 Cryotest System Setup
Introduction
1-1
Lake Shore Model MTD-125/126 Cryotest System User’s Manual
Table 1-1 Model MTD-125 Cryotest System Specifications
Cryotest Mainframe: Integrated single-stage, pour fill cryostat incorporating a high efficiency cold plate to
provide rapid cooling of the sample mounting structure. The radiation shield encloses the DUT area. The
cryostat is designed to use liquid nitrogen (LN2) cryogen. Approximately 0.75 liter capacity for LN2.
Hold Time: Greater than 14 hours with LN2, depending on device heat load.
Temperature Range: ≤ 80 K with liquid nitrogen; to 200 K with optional Model 1150K-XX Variable
Temperature Test Set.
Cool Down Time: About 15 minutes to 80 K.
Warmup Time: Approximately 20 minutes after removing cryogen from cryogenic test temperature to 300
K using a temperature controller with 50 watts of heater output power. The Lake Shore Model 330-11W50 Autotuning Temperature Controller is recommended.
Stability: ±0.1 K at the cryogenic test temperatures.
Accuracy: ±0.5 K from 77 K to 100 K; ±1.0% from 100 K to 350 K
Optical Configuration: The vacuum chamber cover includes an optical window port positioned over the
interior DUT location. This port accommodates a 5.1 cm (2 inches) diameter x 6 mm thick window. The
nominal focal plane distance to the outside of the window is 3.8 cm (1.5 inches). A 2.54 cm (1 inch)
diameter filter can be installed on the radiation shield. The clamp assembly for the DUT accommodates a
2.54 cm (1 inch) diameter filter and aperture. Background flux level is <109 photons/cm2/second.
Signal Quality: All signal lines are high quality semi-rigid, stainless steel coaxial cabling with solid
shielding, 50 Ω characteristic impedance and <15 pfd input capacitance per lead. The 50 Ω impedance is
maintained throughout the MTD-125 up to the DUT socket. The signal lines are suitable for bandwidths
up to 100 MHz. All interior electrical contacts are gold-plated to enhance contact and inhibit corrosion.
-15
Dewar equivalent input noise is approximately 8 x 10 aMTD-125/√Hz. Cross-talk is less than 0.1% at 1
MHz with the adjacent lead terminated.
-8
Vacuum Performance: System is leak tested at the factory to 10 cc/sec (standard gaseous helium).
Minimum vacuum level requirement before cool down is 10-20 microns. Vacuum pump is user-supplied.
Vacuum Pumpout Port: Standard configuration is a Cryolab 1/2-inch valve, Model S-V8, with 5/8 inch
port/removable valve operator. Other configurations are available.
Vacuum Feedthroughs:
• One each 10-pin instrumentation feedthrough for temperature sensor and heater connections.
• Four high density, 25-line/50-pin, 50 Ω impedance feedthroughs for up to 100 signal lines.
• All feedthroughs are located on the base plate of the vacuum chamber.
Cartridge Heaters: One 50 Ω cartridge heater is installed in the MTD-125. The heater is located on the
cryostat cold plate for system warmup. All heater lines connect to the 10-pin instrumentation feedthrough.
Size: 17.8 cm (7 inches) diameter by 25.4 cm (10 inches) long
Weight: 6.8 kilograms (15 pounds)
1-2
Introduction
Lake Shore Model MTD-125/126 Cryotest System User’s Manual
1.2
MTD-125 CRYOTEST SYSTEM FEATURES
Easy access to device test area. The vacuum shroud cover mates to the vacuum shroud body by two
spring-loaded, quick-release claMTD-125, with a captive o-ring seal. Beneath the vacuum shroud cover, the
radiation shield attaches to the cold stage with captive screws. Remove this radiation shield for quick and
simple access to the device test area.
Interchangeable fanout boards accommodate virtually any device package. Fanout boards are designed
for three basic purposes: to accept specific device packages and their individual contact arrangement; to
reroute contact connections of a device package under prototype test conditions; or to adapt custom-made
devices or complete modules.
Convenient, efficient, and economical. The small, easy to handle MTD-125 has a ring base, while the MTD126 has a tripod mount. The down-looking MTD-125 operates vertically with the DUT facing down. The sidelooking MTD-126 operates horizontally, with the DUT facing to the side. The small size of both models and the
highly efficient cryostat ensure the system uses a minimum amount of cryogen for cooldown and device
testing.
Rapid temperature cycling capability. All MTD systems are built for optimum thermal performance. The
MTD-125 is the best choice for small size and high efficiency. It has a single-stage cryostat that cools to
cryogenic test temperatures in as little as 15 minutes. For maximum device testing throughput, use a Lake
Shore temperature controller with 50 watts of heater output power to rapidly warm the system to room
temperature. The Lake Shore temperature controller uses temperature sensors and cartridge heaters installed
in all MTD systems. The Lake Shore Model 330-11-W50 Autotuning Temperature Controller is recommended
for use with the MTD-125 system.
Superior vacuum characteristics. Instead of penetrating the test chamber with individual feedthroughs, each
a potential source for a vacuum leak, the up to 100 coaxial signal lines terminate into four, high-density, 25line (50-pin) vacuum feedthrough connectors. (Mating connectors are user supplied.) This configuration
reduces discrete penetrations into the vacuum chamber—enhancing test environment integrity.
High signal quality. All MTD systems feature high quality, fully shielded coaxial signal lines with a 50 Ω
characteristic impedance and 15-20 picofarads of input capacitance (<15 pfd for the MTD-125 system). The
50 Ω impedance is maintained throughout the MTD system up to the DUT socket. All interior electrical contact
connections are gold-plated to enhance the contact and to inhibit corrosion.
Precise monitoring and control of temperature over a wide range. For temperature measurement and
control purposes, temperature sensors (Lake Shore DT-470 Series Silicon Diode Sensors) and cartridge
heaters are installed in the MTD system. Lake Shore also offers a complete line of temperature controllers
compatible with the MTD systems. The selected Lake Shore temperature controller provides precise
temperature measurement and control over the full cryotesting temperature range. The Lake Shore Model
330-11-W50 Autotuning Temperature Controller is recommended for use with the MTD-125. The temperature
controller and cable are purchased separately.
Introduction
1-3
Lake Shore Model MTD-125/126 Cryotest System User’s Manual
Filters/Apertures
Window
Radiation Shield
Fanout Board &
Socket Assembly *
Quick Release
Clamps,
2 places
Vacuum Shroud
Heater and
Temperature
Sensor
Cold Plate
Pedestal *
LN 2 Reservoir
Micro Coax Cable
Feedthrough
Connector
Fill Port
* Customer removable items that
must be ordered separately.
Refer to Chapter 5.
C-125-U-1-2
Figure 1-2 Typical MTD-125 Cutaway
1-4
Introduction
Lake Shore Model MTD-125/126 Cryotest System User’s Manual
Fill Port
Base Plate
Vacuum Shroud
Micro Coax
Cable
Radiation shield
Fanout Board/
Socket Assembly *
Window
Filters/
Apertures
Cold Plate
Pedestal *
Heater &
Temperature
Sensor
* Customer removable items that
must be ordered separately.
Refer to Chapter 5.
Base
#1/4 - 20 Tap for
Tripod Mount
LN 2 Reservoir
Feedthrough
Connector
C-125-U-1-3
Figure 1-3 Typical MTD-126 Cutaway
CAUTION
• For the Model MTD-126 only, do not separate the base plate from the vacuum shroud. Damage to the
unit may result since the fill port attaches to the reservoir which is attached to the baseplate.
• When venting or pumping out the system, release the vacuum slowly. A sudden vacuum release
may damage the aluminized Mylar insulation.
Introduction
1-5
Lake Shore Model MTD-125/126 Cryotest System User’s Manual
1.3
HARDWARE DESCRIPTIONS AND FUNCTIONS
CARTRIDGE HEATER: One 50 Ω cartridge heater is installed in the MTD-125. The heater is located on the
cryostat cold stage for system warmup. The heater lines connect to the 10-pin instrumentation feedthrough.
CHIP CARRIER CLAMP ASSEMBLY: Secures the chip carrier in the device socket and against the cold
pedestal. It may also be used to hold the fixed aperture disks and optical filters. Its spring load ensures good
thermal contact between the ceramic substrates on the device package and the cold pedestal.
COLD PLATE AND PEDESTAL: The cold plate provides a cooled mounting surface for the cold pedestal,
fanout board, and chip carrier clamp assembly. The cold pedestal, which provides thermal interface between
the DUT and the cold plate, mounts to the center of the cold plate and makes direct thermal contact with the
DUT.
CRYOSTAT: Integrated single-stage, pour fill cryostat incorporating a high efficiency heat exchanger to
provide rapid cooling of the sample mounting structure, the radiation shield which encloses the DUT area, and
the heat sinks. The cryostat is designed for LN2 cryogen.
FANOUT BOARD TEST SET ASSEMBLY:
Order the fanout board separately; it is not
Fanout
included with the standard MTD-125 System.
Board
The standard fanout board configurations
available include the removable 40-pin DIP or 68or 100-pin LCC device test set assemblies. Each
assembly includes all of the hardware necessary
to configure the MTD-125 to test the DIP or LCC
devices. The assembly includes a fanout board,
a chip carrier socket mounted on the fanout
board, a chip carrier clamp assembly, and a cold
50-Pin Feedthrough
etc.
27
26 1
pedestal. The fanout board with the LCC socket
Connector Pins
2
and the chip carrier against the cold pedestal can
Figure 1-4 Typical Fanout Board Wiring
be removed easily from the cold plate and
exchanged with another assembly. This clamp
housing holds 2.54 cm (1 inch) diameter apertures and/or filters.
NOTE: Because the MTD-125 test configuration is hard-wired, it cannot be reconfigured in the field to test
devices with packages other than 68-pin LCC. However, the MTD-125 can be built to test devices with other
packages. Contact Lake Shore for details on custom configurations.
INSTRUMENTATION FEEDTHROUGH CONNECTOR: The 10-pin Instrumentation Feedthrough Connector
is located on the main body of the cryostat. Temperature control and measurement electrical connections are
made through the o-ring sealed electrical feedthrough. Only 4 of the 6 pins are used in a standard Model
MTD-125 Installation. This allows for future installation of additional instrumentation leads. See Figure 1-5 for
connector definition.
PIN NO.
A
H
G
K
F
B
J
E
C
D
A
B
C
D
E
F
G
H
J
K
DESCRIPTION
Sensor A I– and V–
Sensor B I+ and V+ (Optional)
Sensor B I– and V– (Optional)
No Connection
No Connection
Heater High (Cold Plate)
Heater Low (Cold Plate)
Heater Low (DUT)
(Optional)
Sensor A I+ and V+
Heater High (DUT)
(Optional)
Figure 1-5 10-Pin Instrumentation Feedthrough Connector
1-6
Introduction
Lake Shore Model MTD-125/126 Cryotest System User’s Manual
MICROCOAX CABLING SIGNAL LINES: System configuration is 68 semi-rigid stainless steel microcoax
cables with solid shielding which interconnect the hard-wired fanout board and the four 50-pin (25-line)
vacuum feedthrough connectors. All 100 coax signal lines are thermally sunk to the cryostat cold plate to
reduce heat conduction along signal lines to the DUT area. Coax cable shields electrically float up to their
common ground plane interface connection. Ground plane terminations for the coax shields can be isolated
upon request.
RADIATION SHIELD: A gold plated radiation shield controls the thermal and optical radiation environment
around the device under test. The radiation shield completely encloses the DUT area and attaches to the cold
plate with captive screws. With an optional adapter, a 1-inch (2.54 cm) diameter filter/aperture can be
mounted on the radiation shield.
SIGNAL FEEDTHROUGH CONNECTOR: Four 50-pin connectors labeled A, B, C, and D pass through the
100 connections from the fanout board. The default setup for a Model MTD-125 is the outer row of 25 pins
being the signal lines and the inner row is the shield for that corresponding line (as shown in Figure 1-4). See
Figure 1-6 for signal feedthrough connector definition. Note: Order mating cables separately.
1
50
A
Figure 1-6 50-Pin Signal Feedthrough Connector
TEMPERATURE SENSOR: One Lake Shore Model DT-470-CU-12A Silicon Diode Cryogenic Temperature
Sensor is installed on the MTD-125 cold plate. The sensor measures and controls the DUT temperature and is
also utilized during system warmup. It wires to the 10-pin instrumentation feedthrough. For Variable
Temperature Test Set, a second sensor and heater are added to the cold pedestal.
VACUUM CHAMBER: Externally black anodized, machined aluminum cylinder which encloses the cryostat
cold plate, the signal lines, and the device test area. The complete vacuum chamber consists of a vacuum
shroud cover, body, and base plate.
VACUUM CHAMBER BASE PLATE: The vacuum shroud body and cryostat attach to the base plate. All
electrical feedthroughs pass through the base plate located on the bottom of the vacuum chamber. The signal
line and instrumentation vacuum feedthroughs also mount on the base plate.
VACUUM SHROUD BODY: Main section of the vacuum chamber, mounted to the base plate. Remove
vacuum shroud body from the base plate for access to system wiring and mechanical components.
VACUUM SHROUD COVER: Remove the vacuum shroud cover to expose the radiation shield, which
encloses the device testing area. The vacuum shroud cover mates to the vacuum shroud body by two (2)
spring-loaded, quick release claMTD-125; an o-ring is embedded in the shroud cover to assure a vacuum tight
fit between the vacuum shroud cover and body. The cover includes a 5.1 cm (2 inches) diameter x 6 mm
window blank over the DUT area.
VACUUM FEEDTHROUGHS: One each 10-pin instrumentation feedthrough for temperature sensor and
heater connections. Four high density, 25-line/50-pin, 50 Ω impedance feedthroughs for the 100 signal lines.
All feedthroughs are located on the base plate of the vacuum chamber.
CAUTION
• For the Model MTD-126 only, do not separate the base plate from the vacuum shroud. Damage to the
unit may result since the fill port attaches to the reservoir which is attached to the baseplate.
• When venting or pumping out the system, release the vacuum slowly. A sudden vacuum release
may damage the aluminized Mylar insulation.
Introduction
1-7
Lake Shore Model MTD-125/126 Cryotest System User’s Manual
VACUUM PUMPOUT PORT: Standard configuration is a Cryolab valve with 0.625 inch O.D. tube outlet.
Consult factory for other termination options. The vacuum pumpout port connects a vacuum pump to
evacuate/isolate vacuum chamber space. It also serves as a pressure relief in case of vacuum chamber
overpressure. See Figure 1-7. In normal operation, the handle threads into the valve. The vacuum space may
then be manually opened or closed.
C-125-U-1-7
Figure 1-7 Vacuum Valve Cutaway
1-8
Introduction
Lake Shore Model MTD-125/126 Cryotest System User’s Manual
CHAPTER 2
INSTALLATION
2.0
GENERAL
This chapter covers various aspects of MTD-125 installation: Inspection and Unpacking (Paragraph 2.1),
Repackaging for Shipment (Paragraph 2.2). Environmental Requirements (Paragraph 2.3), System Power and
Ground Requirements (Paragraph 2.4), Physical Support Requirements (Paragraph 2.5) Liquid cryogen
Requirements (Paragraph 2.6), Instrument Hookup Instructions (Paragraph 2.7), Miscellaneous Precautions
(Paragraph 2.8), and the Procedure for Device Under Test (DUT) Insertion (Paragraph 2.9).
2.1
INSPECTING AND UNPACKING
Inspect the shipping container for external damage. Make all claims for damage (apparent or concealed) or
partial loss of shipment in writing to Lake Shore within five (5) days from receipt of goods. If damage or loss is
apparent, notify the shipping agent immediately.
Open the shipping containers. Locate the MTD-125 packing list and use it to check for receipt of all
components, cables, accessories, and manuals. Inspect each item for damage. Retain internal packing
material and box for reshipment. Fill out and mail the warranty card.
If there is freight damage to any instruments, promptly file proper claims with the carrier and insurance
company and notify Lake Shore Cryotronics. Notify Lake Shore of any missing parts immediately. Lake Shore
cannot be responsible for any missing parts unless notified within 60 days of shipment. See the standard Lake
Shore Cryotronics, Inc. Warranty on the A Page (immediately behind the title page).
2.2
REPACKAGING FOR SHIPMENT
To return any part of the MTD-125 for repair or replacement, obtain a Return Goods Authorization (RGA)
number from a factory representative before returning the instrument to our service department. When
returning an instrument for service, Lake Shore requires the following information before attempting any
repair:
1.
2.
3.
4.
5.
Instrument model and serial number
User's name, company, address, and phone number
Malfunction symptoms
Description of system
Returned Goods Authorization number
Consult the factory for shipping instructions. Ship the MTD-125 in the original shipping box.
2.3
ENVIRONMENTAL REQUIREMENTS
Operate the MTD-125 in an area with an ambient temperature range of 18 to 28 °C (64.4 to 82.4 °F). The unit
may be operated within the range of 15 to 35 °C (59 to 95 °F) with reduced accuracy.
The MTD-125 is intended for laboratory use: no specific humidity or altitude specifications have been
determined. However, relative humidity of 20 to 80 percent (no condensation) and altitudes from sea level to
2.4 km (8,000 feet) are generally acceptable.
WARNING: To prevent electrical fire or shock hazards, do not expose this instrument to moisture.
Provide adequate ventilation. See Forward for cryogenic safety instructions. Filter dust and other particulate
matter at the site to a reasonable level. For salt air, corrosive gases, or other air pollutants, consult an airconditioning expert for special filtering arrangements.
Installation
2-1
Lake Shore Model MTD-125/126 Cryotest System User’s Manual
2.4
POWER AND GROUND REQUIREMENTS
The AC power source for the MTD-125 should be frequency and voltage regulated and isolated from sources
that may generate Electromagnetic Interference (EMI). The MTD-125 is designed for single-phase 3-wire
alternating current (AC) power; do not use two-wire (without ground) AC power. Lake Shore recommends
Ground Fault Interrupter (GFI) and Transient Surge Protection circuitry at the AC source.
In areas where AC voltage varies, consider using a constant voltage transformer. For power outages, consider
using an Uninterruptible Power Supply (UPS).
CAUTION: Do not attempt to apply electrical power until the MTD-125 is checked for proper line
voltage settings.
Factory-preset MTD-125 line voltage requirements allow proper operation at the shipping destination. The line
voltage setting is indicated on the rear panel. Before applying power to the main input power cable, check for
correct input power settings for the power source voltage.
Ground the instrument panels and cabinets. The safety ground provides a true ground path for electrical
circuitry and, in the event of internal electrical faults such as shorts, carries the entire fault current to ground to
protect users from electrical shock. The MTD-125 has a three-conductor power input connector which
grounds instrument console equipment when plugged into a 3-wire receptacle.
EMI is both a natural and man-made electromagnetic phenomena which, either directly or indirectly, may
degrade electronic system performance. Natural EMI includes thunderstorms, solar disturbances, cosmic
rays, etc. Man-made EMI includes fixed and mobile transmitters, high voltage power lines, power tools and
appliances, florescent lights, and other equipment containing motors, heaters, etc. Protect the AC source from
EMI. Consider transient surge protectors for lightning protection.
2.5
PHYSICAL SUPPORT REQUIREMENTS
Stabilize the MTD to prevent the system from tipping over or falling, especially during transfer of liquid
cryogen. The preferred method for the MTD-125 is to clamp the mounting base to the table surface. The
preferred method for the Model MTD-126 is to mount the system on a stable tripod.
2.6
LIQUID CRYOGEN
The standard Model MTD-125 Cryostat is designed for use with liquid nitrogen.
2-2
Installation
Lake Shore Model MTD-125/126 Cryotest System User’s Manual
2.7
INSTRUMENTATION HOOKUP INSTRUCTIONS
It is recommended the MTD-125 be used with the Model 330 Autotuning Temperature Controller. Figure 2-1
details the Model 8271-30M-10 Cable Assembly hookup to the Model 330. See Figure 4.1 for cable assembly
definition.
Model MTD-125 Cryotest System
CAUTION
DUT
(Sensor B)
DUT
Heater Gnd
DUT
Heater
DUT
(Sensor A)
The DUT Sensor
connected to Channel A
must be selected as the
input channel. Press and
hold the CHANNEL key
and press the UP arrow
to toggle between A and
B input channels. Refer to
the Model 330 User’s
Manual for additional
details.
NOTE
8271-30M10
The DUT (Sensor A)
connection is for the
standard sensor. The
DUT (Sensor B)
connection is only used if
the optional second
temperature sensor is
installed.
HEATER OUTPUT
HI
LO
GND
CHANNEL A
CHANNEL B
Model 330 Autotuning Temperature Controller
Figure 2-1 MTD-125 Hookup to the Model 330 Temperature Controller
2.8
MISCELLANEOUS PRECAUTIONS
• Heater power should not exceed 80 watts.
• Never heat the DUT mount or any part of the MTD-125 above 100 °C.
• Do not “break” vacuum in the chamber while the system is cold.
• Avoid contact with cold gas when depressurizing the storage dewar.
• Periodically clean routinely accessed o-ring seals and their mating surfaces with a paper wipe and re-grease
®
with Apiezon “N” grease.
Installation
2-3
Lake Shore Model MTD-125/126 Cryotest System User’s Manual
2.9
DEVICE UNDER TEST (DUT) INSERTION
1. Stabilize the MTD-125 System at room temperature and remove the transfer line.
2. Open the cryostat vacuum pumpout valve to vent system.
3. Release the 2 pull-down clamps and remove the vacuum chamber enclosure.
NOTE: Place vacuum chamber enclosure with the o-ring face up to prevent damage.
4. Remove radiation shield by unscrewing the six captive socket head screws.
5. Remove the chip carrier clamp assembly held in place by 4 captive socket head screws.
6. Place the DUT in the device socket on the fan out board and ensure that its contacts line up with the
socket contacts.
7. Carefully place the chip carrier clamp assembly over the DUT and check that it compresses the DUT into
the socket without binding.
8. Replace the chip carrier clamp assembly mounting screws in a 1–3–2–4 sequence to ensure uniform
clamping pressure.
CAUTION: Do not over tighten screws or completely tighten one at a time. Tighten each screw
one-half turn, continuously repeating the 1–3–2–4 sequence until all four screws are snug.
9. Replace the radiation shield.
10. Clamp down the vacuum chamber enclosure.
2.10 CHANGING THE FANOUT BOARD
NOTE: Stabilize the MTD-125 System
at room temperature and remove the
transfer line.
1. Perform steps 1 through 5 from
Paragraph 2.9.
2. Remove the fanout board
retaining ring held in place by 4
phillips flat head screws.
Square
Fanout
Board
Cold
Pedastel
Chip Carrier
Signal Line
Shield Jumpers
(4 x 25)
3. Remove fanout board. Take care;
Socket
protect the spring finger contacts
Fan-Out Board
Retaining Ring
exposed by fanout board removal.
Fanout
Board
NOTE: Some test set assemblies
Holddown Screw (4)
(such as the Model 1520-24D, 24pin DIP with Zero Insertion Force
Figure 2-2 Retaining Ring and Fanout Board
socket) have additional mounting
screws that hold the cold pedestal
adapter piece in the center of the device socket. Remove these screws also.
4. Install the fanout board so that the cold pedestal protrudes through the device socket.
CAUTION: Cold pedestal and fanout board must not bind. Do not force socket over cold pedestal.
5. Replace the fanout board retaining ring with the 4 flat head screws.
6. Place the DUT in the device socket on the fanout board and ensure that its contacts line up with the
socket contacts.
7. Carefully place the chip carrier clamp assembly over the DUT and check that it compresses the DUT into
the socket without binding.
8. Replace the chip carrier clamp assembly mounting screws in a 1–2–3–4 sequence to ensure uniform
clamping pressure.
CAUTION: Do not over tighten mounting screws or completely tighten one at a time. Tighten each
screw one-half turn, continuously repeating the 1–3–2–4 sequence until all four screws are snug.
9. Replace the cooled filter wheel assemblies, if used, and tighten the 3 captive screws and the drive shaft
collett lock hex nut. Verify proper alignment of filters/apertures.
2-4
Installation
Lake Shore Model MTD-125/126 Cryotest System User’s Manual
10. Replace the radiation shield.
11. Clamp down the vacuum chamber end closure.
2.11 CHANGING THE TEST SET ASSEMBLY
This procedure is necessary when switching a DIP (Dual In-Line Package), LCC (Leadless Chip Carrier), or
other device that requires a different fanout board and socket.
NOTE: Stabilize the MTD-125 System at room temperature and remove the transfer line.
1. Follow steps 1 through 3 in Paragraph 2.10.
2. Remove the 4 gold plated posts which hold the cold pedestal in place.
CAUTION: Handle the gold plated aluminum posts with care. The threads may be easily damaged.
3. Remove the cold pedestal.
NOTE: It may be necessary to gently pry the cold pedestal base from the cold plate. The indium foil at the
thermal interface tends to stick to the mated surfaces.
4. Clean with rubbing alcohol and a paper wipe the cold plate surface where the cold pedestal contacts the
cold plate. Verify the cold pedestal base plate is also clean.
5. Cut 0.07 – 0.127 mm (0.003 – 0.005 inch) thick indium foil to the shape of the cold pedestal base plate.
6. Fasten cold pedestal to cold plate (with the indium foil placed carefully between the surfaces) using the 4
gold plated posts supplied with the test set assembly kit. Also, be sure to use the Belleville spring washers.
CAUTION: Do not over tighten the posts and remember to handle with care.
7. Install the fanout board so that the cold pedestal protrudes through the device socket.
CAUTION: Cold pedestal and fanout board must not bind. Do not force socket over cold pedestal.
8. Replace the fanout board retaining ring with the 4 phillips flathead screws.
9. Place the DUT in the device socket on the fanout board and ensure that its contacts line up with the
socket contacts.
10. Carefully place the chip carrier clamp assembly over the DUT and check that it compresses the DUT into
the socket without binding.
11. Replace chip carrier clamp assembly mounting screws in a 1–2–3–4 sequence to ensure uniform
clamping pressure.
CAUTION: Do not over tighten mounting screws or completely tighten one at a time. Tighten each
screw one-half turn, continuously repeating the 1–2–3–4 sequence until all four screws are snug.
12. Replace the cooled filter wheel assemblies, if used, and tighten the 3 captive screws and the drive shaft
collett lock hex nut. Ensure that the filters/apertures are properly aligned.
13. Replace the radiation shield.
14. Clamp down the vacuum chamber end closure.
Installation
2-5
Lake Shore Model MTD-125/126 Cryotest System User’s Manual
This Page Intentionally Left Blank.
2-6
Installation
Lake Shore Model MTD-125/126 Cryotest System User’s Manual
CHAPTER 3
OPERATION
3.0
GENERAL
This chapter describes MTD-125 Cryotest System operation (Paragraph 3.1) and shutdown (Paragraph 3.2).
Read the entire manual before continuing, and verify all instruments work correctly prior to system operation.
3.1
MTD SYSTEM OPERATION
1. To evacuate vacuum chamber, attach suitable nitrogen-trapped vacuum pumping system capable of <20
millitorr to vacuum port. Turn on vacuum pump.
CAUTION: When venting or pumping out the system, release the vacuum slowly. A sudden
vacuum release may damage the aluminized Mylar insulation.
2. Slowly open cryostat vacuum pumpout valve. A clean system reaches 20 millitorr in 15 to 20 minutes.
CAUTION: Do not pump on MTD System when cold or contamination from pumping system may
“cryopump” onto cold surfaces. Do not vent and back fill system with gas during warm-up.
3. Fully close valve pumpout valve and disconnect vacuum line.
4. Connect Model 8271-30M-10 Instrumentation Cable to 10-pin instrumentation feedthrough connector
located on underside of the MTD-125 vacuum chamber.
LN2 Dewar
Funnel
Vacuum Port & Pumpout Valve
Cryostat
Instrumentation Cable
Model 330
Temperature Controller
MTD-125
Vacuum
Pump
Drawing Not
To Scale
C-125-U-3-1
Figure 3-1 Typical MTD-125 Cryotest System Operational Setup
5. Connect other end of Instrumentation Cable to Sensor A on the rear of the Temperature Controller. See
Figure 2-1 for hookup to the Model 330 Autotuning Temperature Controller. Consult the Model 330
Temperature Controller User's Manual for controller operation.
NOTE: If using the optional Model 1150K-XX Variable Temperature Test Set Assembly, use the B sensor
and heater for control and use the A sensor and heater for warm up only.
6. Position cryostat so the fill port points up.
CAUTION
• Start with small amounts of liquid nitrogen when initially pouring into a warm dewar. Too much
liquid too fast can cause a violent boil over.
• Read and observe all liquid nitrogen safety precautions detailed in the Forward.
Operation
3-1
Lake Shore Model MTD-125/126 Cryotest System User’s Manual
7. Using a funnel, slowly pour LN2 into the reservoir thru the fill port.
8. Stop filling when excess cryogen begins to overflow. Pour in more LN2 when the boil off gas slows.
9. Stop when the LN2 reaches the top of the fill port.
10. Wait for system cool down to desired temperature. Typical cool down time is about 15 minutes to 80 K.
11. To connect Customer instrumentation to the DUT signal lines, connect appropriate cables to four 50-pin
feedthrough connectors on vacuum chamber base plate. Connectors are labeled A, B, C, and D. A typical
50-pin connector is illustrated in Figure 1-5. The MTD-125 is now ready to perform tests.
NOTE
• Although the instrumentation connectors have 50 pins, there are only 25 signal lines per connector.
Twenty-five signal lines times four connectors equals the one hundred connections on the fanout board.
When viewing the instrumentation connector as shown in Figure 1-5, the outer row of 25 pins for signals
from the DUT. The inner row of 25 pins has connections for the shields. The shield pin corresponds to
the signal pin directly adjacent to it.
• Other wiring configurations are possible per Customer Order. Consult the factory with questions
concerning alternative wiring configurations.
3.2
MTD SYSTEM SHUTDOWN
At the completion of the test, the steps below ensure proper system shutdown and avoid contamination of
the DUT by water vapor or other contaminants.
1. Disconnect all cables.
2. Turn MTD over and empty LN2 from reservoir into a cryogenic storage dewar.
3. Place MTD back on the table. Cover the fill port to prevent internal condensation.
4. Reconnect cables to the Model 330 Temperature Controller. Wait for the system to warm up before
opening. Turn the internal heater on to speed warming (see the Model 330 User’s Manual).
NOTE
• In order to prevent condensation of moisture, do not open the MTD System until all internal parts are at
room temperature. Because the MTD is designed to be thermally efficient, this will take several hours
without assistance.
• Do not vent and back-fill system with gas for a rapid warm-up.
3-2
Operation
Lake Shore Model MTD-125/126 Cryotest System User’s Manual
CHAPTER 4
SERVICE
4.0
GENERAL
This chapter covers possible difficulties that may occur. Read the entire manual before attempting to service
the MTD-125 System. Please contact the factory with any questions or concerns.
4.1
WATER CONDENSES ON OUTER SURFACE OF VACUUM CHAMBER
If the vacuum chamber “sweats,” check the vacuum integrity of the chamber.
4.2
UNABLE TO REACH COLD TERMINAL TEMPERATURE
This may be caused by any of the following:
•
•
•
•
•
•
Experimental heat load too high.
Improper anchoring of instrumentation and DUT lines or poor wiring practices.
“Soft” vacuum in the vacuum chamber or transfer line.
Thermal short between DUT and radiation shield or radiation shield and vacuum chamber.
Poor interfacing between DUT and mount and/or between temperature sensor and cold finger.
Insufficient cryogen in reservoir.
4.3
NO RESPONSE TO CONTROL HEATER
Check the cables to the 10-pin instrumentation feedthrough located on the cryostat main body, the power
supply, and controller. Check the heater lines with an ohmmeter. If approximately 50 Ω are not measured,
verify correct wiring. Otherwise, replace the heater. Consult the factory for instructions.
4.4
CABLE ASSEMBLY
Details of the optional Cable Assembly P/N 8271-30M-10 that connects a MTD-125 with a Lake Shore Model
330 Autotuning Temperature Controller appear in Figure 4-1
Service
4-1
Lake Shore Model MTD-125/126 Cryotest System User’s Manual
1
DUT
Rear View
A
H
G
K
F E
6
2
5
4
3
B
C
J
D
1
Cold Plate
6
2
5
4
3
HI
DUT Heater
LO
8271-30M-10
HI
Cold Plate
Heater
LO
Cable Length = 10 Feet
SHIELD-A
A
J
-I A Input
BLK <GRN>
+I A Input
GRN
Not Used
BLK <WHT>
Not Used
5
WHT
+V A Input
RED
-V A Input
BLK <RED>
-I B Input
BLK <GRN>
+I B Input
GRN
Not Used
BLK <WHT>
Not Used
WHT
1
2
Cold Plate
(Sensor)
1
DUT Sensor
(Optional*)
6
4
3
SHIELD-B
C
B
+V B Input
RED
-V B Input
BLK <RED>
K
H
HI Heater
RED
LO Heater
BLK <RED>
G
F
HI Heater
RED
LO Heater
BLK <RED>
5
6
4
2
3
*Works with
optional isolation
sample stage.
DUT Heater
(Optional*)
Cold Plate
Heater
Figure 4-1 Definition of Model 8271-30M-10 Cable Assembly
4-2
Service
Lake Shore Model MTD-125/126 Cryotest System User’s Manual
CHAPTER 5
ERROR MESSAGES AND TROUBLESHOOTING
5.0
GENERAL
This chapter lists MTD-125 Cryotest System Options (Paragraph 5.1) and Accessories (Paragraph 5.2).
5.1
MTD CRYOTEST SYSTEM OPTIONS
The MTD-125 Cryotest System comes in the two standard configurations detailed below. Lake Shore tailors
the MTD Cryotest System to fit custom applications. Contact Lake Shore for details.
• MTD-125: Liquid Nitrogen (LN2), single-position, pour-fill, down-looking cryostat system.
• MTD-126: Liquid Nitrogen (LN2), single-position, pour-fill, side-looking cryostat system.
5.2
ACCESSORIES
Accessories are devices that perform a secondary duty as an aid or refinement to the primary unit. Other
accessories not listed (signal cable assemblies, breakout boxes, filters/apertures, etc.) are added on an as
required basis. Consult the factory for current availability of other accessories not listed below.
MODEL
NUMBER
DESCRIPTION OF ACCESSORY
1065
Breakout Module with 25 BNC Connectors. Breakout modules attach directly to the MTD System
and contain 25 coax BNC connectors, which correspond to one side (or quadrant) of the device
package. The 1065 mounts directly to the multiple line feedthroughs on the base palste of the
vacuum chamber. This configuration eliminates the need for an interconnecting cable, reducing
potential noise pickup and parasitic capacitance.
1150K-40D
Variable Temperature Test Set Assembly Kit – 40-pin DIP. Kit includes Cold Pedestal, Fanout
Board, Top Clamp, and fasteners.
1150K-68
Variable Temperature Test Set Assembly Kit – 68-pin LCC. Kit includes Cold Pedestal, Fanout
Board, Top Clamp, and fasteners.
1150K-100
Variable Temperature Test Set Assembly Kit – 100-pin LCC. Kit includes Cold Pedestal, Fanout
Board, Top Clamp, and fasteners.
1325
Filter Wheel Assembly – 5 position. Accepts 5 x 1 inch diameter up to 0.1 inch thick filters.
1550-40D
LCC Fanout Board – 40-pin DIP.
1550-68
LCC Fanout Board – 68-pin LCC.
1550-100
LCC Fanout Board – 100-pin LCC.
1550K-40D
Test Set Assembly Kit – 40-pin DIP. Kit includes Cold Pedestal, Fanout Board, Top Clamp, and
fasteners.
1550K-68
Test Set Assembly Kit – 68-pin LCC. Kit includes Cold Pedestal, Fanout Board, Top Clamp, and
fasteners.
1550K-100
Test Set Assembly Kit – 100-pin LCC. Kit includes Cold Pedestal, Fanout Board, Top Clamp, and
fasteners.
Options & Accessories
5-1
Lake Shore Model MTD-125/126 Cryotest System User’s Manual
MODEL
NUMBER
DESCRIPTION OF ACCESSORY
1550-X
DT-470 sensor and chip heater pre-mounted in a Customer-Supplied Leadless Chip Carrier
(LCC) Mounting Base. Lake Shore service for those who want an existing LCC mounting base
configured with a temperature sensor and heater. This accessory normally uses a Lake Shore
Model DT-470-SD-12 silicon diode temperature sensor. Contact Lake Shore for further information.
330
8271-30M-10
Model 330 Autotuning Temperature Controller. A full featured digital control unit featuring
Autotuning and SoftCal™. Consult the Lake Shore Product Catalog for details.
Instrumentation Interconnection Cable for Model 330 Autotuning Temperature Controller.
9001-00X
Lake Shore Cryogenic Wire. Lake Shore sells the following types of cryogenic wire:
DT = Duo-Twist™, MN = Single Strand, MW = Manganin, NC = Nichrome Heater,
ND = Heavy Duty, QL = Quad-Lead™, and QT = Quad-Twist™. See Lake Shore Catalog for details.
9002-432
CryoCable™ 4 x 32 AWG. A robust, 4-wire superconductive cable for use in applications ranging
from cryogenic to room temperature. Designed by Lake Shore for Customers with demanding
installations. Available in 25, 50, and 100 foot lengths.
9004-020
Apiezon “N” Grease, 25 gram Tube. General purpose grease well-suited for cryogenic use
because of its low viscosity. Often used as a means of thermally anchoring cryogenic sensors as
well as lubricating joints and o-rings. Contains high molecular weight polymeric hydrocarbon
additive which gives it a tenacious, rubbery consistency that cushions mating surfaces.
9007-002
Indium Foil (5 Pieces). Indium is a semi-precious non-ferrous metal, softer than lead, and
extremely malleable and ductile. It stays soft and workable down to cryogenic temperatures. May be
used as a sealing gasket for covers, flanges, and windows in cryogenic applications.
®
5-2
Options & Accessories