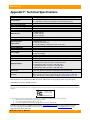
1
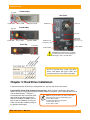
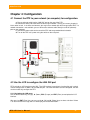
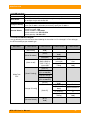
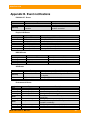
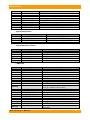
RTX-UR™
(RTX400-UR, RTX400H-UR, RTX600-UR, RTX600H-UR & RTX800-UR)
ULTRA-320 SCSI to SATA
Disk Subsystem
User’s Manual
Revised July 29, 2008
RTX-UR User’s Manual
-1-
WiebeTech LLC
WARRANTY
The information in this document is subject to change without notice. We make no warranty of any kind
regarding this material, including, but not limited to, the implied warranties or merchantability and fitness
for a particular purpose. Furthermore, we shall not be liable for errors contained herein or for incidental or
consequential damage in connection with the furnishing, performance, or use of this material.
Introduction
About this Manual
Thank you for choosing WiebeTech products. If you have any questions, please e-mail
[email protected] or call our tech support.
This manual is designed and written for users of the RTX-UR. Users should ideally be familiar and have
some experience with RAID planning and data storage operations. However, this manual will provide
instructions and education for those who have little or no experience in RAID to install and setup the RTXUR.
Notice
Product features and specifications described in this manual are subject to change without notice.
The manufacturer shall not be liable for any damage, or for the loss of information resulting from the
performance or use of the information contained herein.
Trademarks
All contents of this manual are copyrighted by WiebeTech LLC. The information contained herein is the
exclusive property of WiebeTech LLC and shall not be copied, transferred, photocopied, translated on
paper, film, electronic media, or computer-readable form, or otherwise reproduced in any way, without the
express written permission of WiebeTech LLC.
Copyright@2008, WiebeTech LLC
All rights reserved.
RTX-UR User’s Manual
-2-
WiebeTech LLC
Table of Contents
Chapter 1: Introduction to RAID
Chapter 2: Pre-Installation
2.1 RTX accessories
2.2 RTX parts
Chapter 3: Hard Drive Installation
Chapter 4: Configuration
4.1 Connect the RTX to your network (or computer) for configuration
4.2 Use the LCD to configure the LAN GUI port
4.2.1 Navigating the LCD menu
4.2.2 LCD functions
4.2.3 RTX-UR LCD Menu Diagram
4.2.4 If you are connected to a DHCP-enabled network
4.2.5 If you are connected to a static network
4.2.6 If you are connected directly to a computer
Chapter 5: Using the GUI
5.1 GUI indicators
5.2 Overview of GUI architecture
5.3 Quick Install
5.4 System Config
5.4.1 System name
5.4.2 IP address
5.4.3 Language
5.4.4 Login Config
5.4.5 Password
5.4.6 Date
5.4.7 Mail
5.4.8 Simple Network Management Protocol (SMNP)
5.4.9 System Log Server
5.4.10 Event Log
5.5 Volume Config
5.5.1 Physical Disk
5.5.2 Volume Group (VG)
5.5.3 User Data Volume (UDV)
5.5.4 Cache Volume
5.5.5 Logical Unit
5.6 Enclosure Management
5.6.1 SES Config
5.6.2 Hardware Monitor
5.6.3 S.M.A.R.T.
5.7 Maintenance
5.7.1 Upgrade
5.7.2 Info
RTX-UR User’s Manual
5
6
6
6
7
8
8
8
8
9
9
10
10
10
11
11
12
12
13
13
13
14
14
14
14
16
16
16
17
17
18
19
20
22
22
23
23
23
24
24
24
24
-3-
WiebeTech LLC
5.7.3 Reset to default
5.7.4 Config Import & Export
5.7.5 Shutdown
5.8 Quick Set-up of RAID
5.9 Connecting to your Computer
Chapter 6: Formatting new volume(s)
Appendix A. Certification list
Appendix B. Event notifications
Appendix C: Working with Volumes over 2TB in size
Appendix D: Warnings and Notices
Appendix E: Frequently Asked Questions (FAQ)
Appendix F: Technical Specifications
RTX-UR User’s Manual
25
25
25
25
25
26
27
28
30
31
31
32
-4-
WiebeTech LLC
Chapter 1: Introduction to RAID
A RAID (Redundant Array of Independent Disks) is an array of multiple hard drives that are combined in a
way that provides faster performance and/or data safety. Your RTX unit is capable of creating and
managing several different varieties of RAID. You may choose your preferred RAID level based on
factors such as disk capacity, desired data safety, and desired performance.
Summary of RAID Levels
The RTX supports RAID Levels 0, 1, (0+1), 3, 5 and 6. RAID level 5 is most commonly used by those
seeking an optimal balance of speed and data safety.
RAID Features and Performance
RAID
Level
0
1
0+1
3
5
6
Description
Also known as striping. Data distributed
across multiple drives in the array. There is
no data protection.
Also known as mirroring. All data replicated
on separated disks. RAID 1 is almost always
2 disks.
This is a high availability solution, but due to
the 100% duplication, it is also a costly
solution.
Also known as Block-Interleaved Parity.
Data and parity information is subdivided
and distributed across all disks. Parity must
be equal to the smallest disk capacity in the
array. Parity information normally stored on
a dedicated parity disk.
Also known as Bit-Interleaved Parity. Data
and parity information is subdivided and
distributed across all disks. Parity must be
equal to the smallest disk capacity in the
array. Parity information normally stored on
a dedicated parity disk.
Also known as Block-Interleaved Distributed
Parity. Data and parity information is
subdivided and distributed across all disks.
Can withstand the failure of one drive, and
80& of drive capacity is usable.
Two different parity bits are used, to create
double redundancy. Can withstand the
failure of two drives, but only 60% of drive
capacity is usable.
RTX-UR User’s Manual
Min.
Drives
Max.
Drives
Data Reliability
Data Transfer Rate
1
8
No data Protection
Very high
2
2
Lower than RAID 6;
Higher than RAID
3, 5
Reads are higher
than a single disk;
Writes are similar
to a single disk
3
8
Lower than RAID 6;
Higher than RAID
3, 5
Transfer rates are
more like RAID 1
than RAID 0
3
8
Lower than RAID 1,
10, 6;
Higher than a
single drive
Reads are similar
to RAID 0; Writes
are slower than a
single disk
3
8
Lower than RAID 1,
10, 6;
Higher than a
single drive
Reads are similar
to RAID 0; Writes
are slower than a
single disk
4
8
Higher than 1,10, 5
Slightly less than
RAID 5
-5-
WiebeTech LLC
Chapter 2: Pre-Installation
2.1 RTX accessories
Check the accessories with your RTX-UR. Please contact WiebeTech if any parts are missing or
damaged. The box should contain the following items:
RTX400-UR, RTX400H-UR & RTX600H-UR
Accessories
Quantity
RTX600-UR & RTX800-UR
Accessories
Quantity
SCSI Cable
1
SCSI Cable
1
RS-232 Configuration Cable
1
RS-232 Configuration Cable
1
Power Cable
1
Power Cable
1
Packet of Keys
1
Terminator
Terminator
1
Manual and Warranty Info
Manual and Warranty Info
1
(on CD)
(on CD)
2.2 RTX Parts
Take a moment to familiarize yourself with the parts of your new product. This will help you to better
understand the remaining instructions.
LCD Panel on front of RTX
LCD
Power LED
Up
ESC (Escape, Exit)
IP Address
Access LED
RTX-UR User’s Manual
Alarm LED
Down
ENT (Enter)
-6-
WiebeTech LLC
Key lock
Hardened Bay
Rear Panel
Power LED
Key lock
Access LED
Ejection handle
8cm Fan
SCSI Ports
Standard Bay
RS-232
Power LED
Access LED
Ejection handle
Infiniband
Expansion
Ethernet Port
(400 models only)
(configuration only)
Basic Bay
Power LED
Power Switch
Power Outlet
Ejection handle
Access LED
WARNING: Do not block the ventilation
fan during operation. Overheating may
damage the device or hard drives.
All RTX TrayFree Bays accept 1TB SATA
drives, have power and access LEDs, and
connect to the host via a SATA connection.
Chapter 3: Hard Drive Installation
If you purchased your RTX with pre-configured drives, you may skip to the next section.
Install a SATA (Serial-ATA) hard drive into each bay. With TrayFree™ technology, this process
couldn’t be easier! Simply pull the ejection handle to open the bay door, slide in your SATA drive, and
shut the door behind it. The drive is
inserted with the label up and the SATA
NOTE: If any of the drives are inaccessible after
connection on the drive inserted first.
powering on the unit, try the following steps:
With the RTX400 & RTX600H, you can
1. Turn off the power.
2. Remove the drive(s) in question.
lock the bay for additional security, but
3. Reinsert the drive(s).
make sure to unlock it before pulling on
4. Turn on the power.
the ejection handle again.
RTX-UR User’s Manual
-7-
WiebeTech LLC
Chapter 4: Configuration
4.1 Connect the RTX to your network (or computer) for configuration.
a. Plug an ethernet cable into the “LAN GUI” port on the rear of the RTX.
b. Connect the other end of the ethernet cable to your network. Usually, this means plugging it
into a router or hub. In an office environment, you may have a network jack built into your office wall. If a
network connection is not available, you can connect the ethernet cable directly to an RJ45 (ethernet)
port on your computer.
c. Connect the power cable to the rear of the RTX and to a grounded electrical outlet.
d. Turn on the RTX unit’s power using the switch on the rear panel.
4.2 Use the LCD to configure the LAN GUI port
RTX has both an LCD interface and a GUI. The LCD interface has only basic functionality and is mainly
used to configure the IP address of the LAN GUI port. Once the LAN GUI has been configured, the GUI
can be used to fully configure the RTX.
4.2.1 Navigating the LCD menu
Use the four function keys, ▲ (Up), ▼ (Down), ESC (Escape) and ENT (Enter) to manipulate the LCD
interface.
After pressing ENT (Enter) key, you can use the ▲ (Up) and ▼ (Down) keys to select a function. If there
is an alarm or error message, the LCD will display the related information.
RTX-UR User’s Manual
-8-
WiebeTech LLC
4.2.2 LCD functions:
Alarm Mute
To turn off the alarm sound when an error occurs
Reset/Shutdown
To reset or shutdown the controller
To use “Quick Install” to set up a volume by three steps. Please refer to section 4.3
Quick Install
for configure via the web-based GUI
View IP Setting
To view current IP address, subnet mask and gateway
To set up the IP address, subnet mask and gateway. You can choose to use DHCP
Change IP Config
server (for IP address allocation) or manually specify the IP address
To restore factory defaults:
Default Password: 1234
Reset to Default
Default IP address: 192.168.0.1
Default subnet mask: 255.255.255.0
Default gateway: 192.168.0.254
4.2.3 RTX-UR LCD Menu Diagram
Use the following chart for reference when following the instructions in 5.2.4 through 5.2.7 for setting up
the RTX according to your network type.
Main Menu
nd
rd
2 Menu Screen
3 Menu Screen
[Alarm Mute]
[▲Yes
No▼]
[Reset]
[Reset/Shutdown]
[Shutdown]
[Quick Install]
[View IP Setting]
WiebeTech
RTX
RAID 0
(RAID 1/RAID 3/
RAID 5/RAID 6)
xxxxxx MB
[IP Config]
[Static IP]
[IP Address]
[192.168.000.001]
[IP Subnet Mask]
[255.255.255.0]
[IP Gateway]
[192.168.000.254]
[DHCP]
[Change IP Config]
[Static IP]
th
5 Menu Screen
[▲Yes
No▼]
[▲Yes
No▼]
Volume Size
(xxxxxx M)
Apply The
Config
Adjust Volume
Size
[▲Yes
No▼]
[▲Yes
No▼]
[IP Address]
[IP Subnet
Mask]
[IP Gateway]
[Apply IP
Setting]
[Reset to Default]
RTX-UR User’s Manual
th
4 Menu Screen
Adjust IP address
Adjust Submask IP
Adjust Gateway
IP
[▲Yes
No▼]
[▲Yes
No▼]
-9-
WiebeTech LLC
4.2.4 If you are connected to a DHCP-enabled network
On DHCP networks, a new IP address is dynamically assigned to the RTX’s LAN GUI port as soon as the
network detects it. You can determine this address by checking the LCD interface on the front of the
RTX. It will appear in this format: xxx.xxx.xxx.xxx. Simply type this IP address into a web browser on
your computer. This will access the RTX’s GUI, which you will use to configure the unit.
4.2.5 If you are connected to a static network
a. Check your computer’s IP address. To do this in Windows, open Network Connections in the Control
Panel. Double-click on your network and then click on the Support tab. Your computer’s IP address will
be displayed. Mac users can find this information in System Preferences Network.
b. On the RTX’s LCD interface, press ENT and then scroll up or down to Change IP Setting. Press ENT.
c. Scroll up or down to find Static. Press ENT.
d. Change the IP address to closely match what your computer is using. For example, if your computer's
IP address is 192.168.000.009 you could change the RTX's IP to 192.168.000.007. Everything but the
last set of three digits must be the same! When changing the IP address you'll notice that a box flashes
over the digit to be changed. While the digit is selected,
press up or down to change it. Press ENT to move to
Not sure what type of network you
the next digit. After the IP is set, press ENT all the way
have? If the IP address displayed on the
to the end and confirm the settings change. To confirm,
LCD starts with 169.254 or 192.168, this
indicates that the network is probably not
press up for “yes” and then press ENT again.
DHCP-enabled. Use the instructions for
e. Type the RTX’s new IP address into a web browser
a static network.
on your computer. This will access the RTX’s GUI,
which you will use to configure the unit.
4.2.6 If you are connected directly to a computer
The instructions are similar to those for a static network (see 5.2.2), except that your computer will not
have the IP address assigned if it’s not a part of a network. Since the RTX and your computer must have
similar IP addresses, you will assign an IP address to your computer based on the default IP address of
the RTX.
a. Check the RTX’s LCD to find out the IP address of the LAN GUI configuration port. It will appear in this
format: xxx.xxx.xxx.xxx.
b. Next, change your computer’s IP address so that all but the last three digits match the RTX’s address.
For example, if the RTX’s IP is 169.254.12.62, you might assign your computer the number
169.254.12.63 (assuming no other computer on the network is already using that number). The process
of changing your computer’s IP address varies depending on its operating system. (For Windows XP,
open Network Connections in the Control Panel. Right-click on your network and select Properties. On
the new window that opens, select TCP/IP and click the Properties button. Mac users can go to System
Preferences Network.) By default, your computer is probably set to receive a new IP address
automatically. Change the setting to manual configuration and then type in the IP address.
c. Using the same process as the previous step, change the computer’s Mask setting to match the RTX’s
Mask setting.
d. Finally, use the LCD interface to change the RTX’s Gateway setting. It should match the IP address
you assigned to your computer.
e. Launch a web browser and type the RTX’s IP address into the URL bar, as if it were a website. This
will access the RTX’s GUI, which you will use to configure the unit.
The tables below show example settings. The table on the left shows the type of settings that will appear
by default. The table on the right shows how the settings might look after you’ve made changes.
IP Address
Mask
Gateway
RTX
Computer
169.254.12.62
255.255.000.000
000.000.000.000
(blank)
(blank)
(blank)
Before making changes
RTX-UR User’s Manual
IP Address
Mask
Gateway
RTX
Computer
169.254.12.62
255.255.000.000
169.254.12.63
169.254.12.63
255.255.000.000
(blank)
After making changes
- 10 -
WiebeTech LLC
Chapter 5: Using the GUI
You will use the web browser-based GUI to set up a RAID and create logical volumes on the RTX. After
accessing the GUI (see step 5.2), the GUI’s main page should load, displaying a picture of the RTX with
several options to the left. When you click on any option, you will be prompted for a user name and
password. The user name is "admin" and the default password is "1234."
5.1 GUI indicators
The top right hand corner of the GUI window displays several indicators.
RAID light: Green indicates the RAID is working properly. Red indicates a RAID error. If no RAID
is set up, the light will remain green.
Temperature light: Green indicates normal. Red indicates abnormal system temperature, such as
overheating.
Voltage light: Green indicates normal. Red indicates abnormal voltage status, such as a power
surge or a bad power supply.
RTX-UR User’s Manual
- 11 -
WiebeTech LLC
5.2 Overview of GUI architecture
Quick Install
→
Step 1 / Step 2 / Step 3 / Confirm
System Configuration
System Name →
IP Address →
SCSI →
Log Config →
Password →
Date →
Mail →
SNMP →
Event Log →
System name
DHCP / Static
SCSI bus setting
Auto Logout / Login Lock
Old password / Password / Confirm
Date / Time / Time zone / Daylight saving
Mail-from address / Mail-to address / SMTP relay / Authentication / Send test
mail
SNMP trap address / Community
Mute / Clear / Download
Volume Configuration
Physical Disk →
Volume Group →
User Data Volume →
Cache Volume →
Logical unit →
Free disc / Global spares / Dedicated spares / More information
Create / Delete / More information / Rename / Migrate
Create / Delete / Attach LUN / Snapshot / More information / Rename / Extend
/ Set read/ write mode / Set priority / Resize Snapshot space / Auto Snapshot
Create / Delete / More information / Resize
Attach / Detach
Enclosure Management
SAF-TE Config →
Hardware Monitor →
S.M.A.R.T. →
Enable / Disable
Item / Information / Confirm
S.M.A.R.T. for physical disks
Maintenance
Upgrade →
Info →
SCSI →
Reset to default →
Config Import & Export →
Shutdown →
Browse the firmware to upgrade
System information
SCSI SAF-TEsions and connections
Reset to factory default
Import / Export / Import File
Reboot / Shutdown
Logout
5.3 Quick Install
WiebeTech does not recommend using the Quick Install option to set up your RTX-UR. For quick set-up
of a RAID, refer to section 5.8 or the QuickStart Guide on your WiebeTech CD.
RTX-UR User’s Manual
- 12 -
WiebeTech LLC
5.4 System Config
The System Config menu gives access to a number of options used to configure the RTX-UR system
properties. Click on “System Config” to access the following menu options: System name, IP address,
Language, Login config, Password, Date, Mail, SNMP, System Log Server, and Event Log.
5.4.1 System name
Clicking on the “System name” option allows you to view and change the system name. The default
system name is “RTX-UR-<individual serial number>.” Note that this serial number is different from the
one on the outside of the product, and is not the one that should be used to contact technical support.
To change the system name, simply click in the box displaying the system name and highlight or delete
the part of the name you wish to change, then type the new name and click “Confirm.”
5.4.2 IP address
The IP address option allows you to view and modify the IP information of the LAN GUI port of the RTXUR. Note that this is not the option used to configure the IP address of the data ports.
An RTX-UR configured for DHCP. Some of the information has been obscured for security reasons.
RTX-UR User’s Manual
- 13 -
WiebeTech LLC
5.4.3 Language
The Language option allows you to change the language of the GUI menu. To change the language,
click the drop down menu, select your choice, and then click the “Confirm” button.
5.4.4 Login Config
The login configuration features are “Auto Logout” and “Login Lock.” Auto Logout allows you to set a time
of 5 minutes, 30 minutes, or 1 hour to automatically log the user out of the GUI. Login Lock prevents
multiple users from using the GUI simultaneously. Both features are disabled by default.
To enable a feature, click on the dropdown menu associated, select the new option, and then click the
confirm button.
5.4.5 Password
The Password option allows you to change the administrative password used to access the GUI. (Recall
that the default user name and password is admin/1234.) To change the password, enter the old
password in the first field, then type the new password in the second and third field and click the
“Confirm” button on the right side of the screen.
A dialog box will appear asking for verification. Click “OK.” After the password has been changed,
another dialog box will appear to inform you that the password has been changed.
5.4.6 Date
The Date option allows you to change the date and time settings of the RTX-UR. The default settings are
the Asia/Taipei time zone:
To change the date or time, click in the field that you wish to change and highlight or delete the
information, then type the new information and click confirm. To change the time zone, click the drop
down box and then scroll up or down until you reach the correct time zone, then choose that time zone
RTX-UR User’s Manual
- 14 -
WiebeTech LLC
and click confirm.
After confirming, a dialog box will appear verifying that changes have been made.
Alternatively, an NTP (network time provider) can be used to sync the RTX-UR’s time information with
that of a standardized server. To use an NTP, click the NTP check box, then input the server information
in the server field.
Click confirm to update the time settings. A dialog box will appear to inform you that the changes have
been made. The updated settings will reflect the time settings of the NTP:
RTX-UR User’s Manual
- 15 -
WiebeTech LLC
5.4.7 Mail
RTX-UR can be configured to send email to up to 3 addresses when events, warnings, and errors occur.
Contact your IT administrator to set up an email address for RTX-UR and to input the proper SMTP
settings.
5.4.8 Simple Network Management Protocol (SMNP)
SNMP can be configured to send trap messages to up to three different addresses on the network. To
add an address, simply enter the IP address of the receiving server or computer, then click confirm. Note:
The receiving server must be configured to receive SMNP messages.
For more information on SMNP, you may wish to consult the third party website: http://www.techfaq.com/snmp.shtml
5.4.9 System Log Server
The System Log Server option allows configuration for error, warning, and information reporting via a
certain port on the server. Enter the server IP in the first line and the port used in the second line (default
514). The facility can be changed between User and Local1 through Local7 using the dropdown box.
Select the check boxes for Info, Error, and Warning that pertain to the information that you want to be
reported.
RTX-UR User’s Manual
- 16 -
WiebeTech LLC
5.4.10 Event Log
The Event Log allows you to display and download event messages. To configure what type of
messages are displayed click the Filter button. By default, errors and warnings will be displayed on both
the LCD of the unit itself and in the GUI.
Use the checkboxes to configure how the information is displayed.
Click the Download button to download the entire event log as a text file. Click the Clear button to clear
the entire event log. Click the Mute button to stop system alerts.
5.5 Volume Config
The Volume Config menu provides the options you will use to set up a RAID on the RTX-UR. Click on
Volume Config to view the following menu options: Physical Disk, Volume Group, User Data Volume,
Cache Volume, and Logical Unit.
RTX-UR User’s Manual
- 17 -
WiebeTech LLC
The following diagram explains the architecture of RAID using RTX-UR and the relationship between
physical disks (PDs), volume groups (VGs), user data volumes (UDVs), and logical unit numbers (LUNs).
One VG (Volume Group) consists of a set of UDVs (User Data Volume) and owns one RAID level
attribute. Each VG can be divided into several UDVs. The UDVs from one VG share the same RAID
level, but may have different volume capacity. If multiple UDVs are created, they will mount on your
computer as separate partitions. Each UDV will be associated with one specific CV (Cache Volume) to
execute data transfers. Each CV could have different cache memory size as defined or configured by
user. LUN is a SCSI protocol that the computer uses to distinguish and access SCSI devices.
5.5.1 Physical Disk
Click the Physical Disk option to view and modify the status of the drives installed in the RTX-UR.
The following information is displayed:
• Checkboxes: Click the checkbox of any disk or disks, then click Free disks, Global spares, or
Dedicated spares to set the selected drive(s) to that status. Click the top checkbox to select all
drives.
• Slot: The slot number of the hard drive. 1 corresponds to the top bay of the RTX-UR. Click the
button below the slot number to display more information about that particular hard drive.
• WWN: The World Wide Name of the hard drive, an identification code unique to each hard drive.
• Size (GB): The logical capacity of the drive.
• VG (name): The Volume group the drive is assigned to, if any.
RTX-UR User’s Manual
- 18 -
WiebeTech LLC
Status: Displays general operational status of the disk. Possible states are Good, Defect, and
Fail.
• 1: Displays the RAID status of the disk. Possible states are:
o RD – RAID Disk. The drive is part of a RAID that is currently online.
o FR – Free disk. The drive is available for use in a volume group, or to be marked as a
spare.
o DS – Dedicated spare. The drive is a dedicated spare of a specific volume group. This
option cannot be selected until at least one volume group has been created.
o GS – Global spare. The drive is a global spare of all VGs.
o RS – Reserve. The drive contains VG information but cannot be used. This generally
indicates that the drive is part of a RAID set that is missing components.
• 2: Displays RAID rebuild status of the disk. Possible states are “R” – Rebuild, or “M” – migration.
• Speed: The maximum speed of the drive. 1.5 Gbps indicates a SATA1 drive, 3.0 Gbps indicates
a SATA2 drive, and unknown indicates that the drive does not support either of the two levels.
Auto spindown: If auto spindown is enabled, after a set amount of time (30 seconds, 1 minute, 5 minutes,
or 30 minutes) of inactivity, RTX-UR will spin down the hard drives to save power. The drives will be spun
up again when the RTX-UR is accessed. Auto spindown is disabled by default. To enable auto
spindown, click the hyperlink “disabled.” On the following screen, select the desired auto spindown time
from the dropdown box:
•
Click the Confirm button.
5.5.2 Volume Group (VG)
The Volume Group screen displays information about all existing volume groups. To create a usable
RAID set, you will first need to create a new Volume Group. Click the Create button.
This brings up the VG creation screen. Enter a name for the new VG in the first field then select your
desired RAID type from the dropdown box. WiebeTech recommends RAID5 for maximum performance,
capacity, and security. For more information on RAID, see Chapter 1: Introduction to RAID. Click Select
PD to select the drives that will be added to the VG. Note: Drives must be marked as Free Disks (FR)
before they can be added to a VG. To set drives to Free Disks, see section 5.5.1.
All available Free disks will be displayed. Check the drives that you wish to add to the VG, then click
Confirm.
RTX-UR User’s Manual
- 19 -
WiebeTech LLC
The selected PDs will now be displayed in the VG creation screen. Click next to proceed.
This brings you to a confirmation screen. Verify that the RAID level is correct and all of the disks you
selected are displayed under “RAID PD slot,” then click confirm to create the VG.
The VG will now display on the main VG screen.
The VG screen displays the following information:
• No: The VG number. Click the button underneath the number of a VG to view more information.
• Name: The name of the VG. Click the button below a VG’s name to rename the VG.
• Total (GB): The total capacity of the VG. Note: This will depend on both the number and capacity
of the drives that are part of the VG, and the RAID type of the VG.
• Free (GB): The free capacity of the VG (not yet assigned to a UDV).
• #PD: The number of drives in the VG.
• #UDV: The number of UDVs that have been created as part of the VG.
• Status: The status of the VG. Possible states are Online and Fail.
• 1: Displays “DG” if the VG is degraded. This generally means a hard drive is missing or has
failed.
• 2: Displays “R” if the VG is rebuilding.
• 3: Displays “M” if the VG is under migration.
• RAID: The RAID level of the volume group. The button underneath the RAID setting indicates
“migrate,” but it is recommended that if you wish to change RAID types or add disks, you simply
recreate the VG using the new RAID type as this is generally faster.
5.5.3 User Data Volume (UDV)
The User Data Volume main screen displays any UDVs and allows you to create and delete UDVs.
After a VG has been created, you can create associated UDVs. You must create at least one UDV to
access the drives of the RTX-UR with a computer. To begin this process, click Create. This brings up a
screen displaying the following:
RTX-UR User’s Manual
- 20 -
WiebeTech LLC
•
•
•
•
•
•
•
•
Name: Enter a name for the UDV
VG name: Choose the VG that you wish to add the UDV too.
CV no.: Cache Volume number – if you have created multiple caches, you can select between
them. Normally the default option is preferred.
Capacity: Enter the capacity of the UDV. The default uses the maximum capacity of the
associated VG. If you wish to create multiple UDVs on the selected VG, you will need to reduce
the capacity below the maximum so that there is space left on the VG for additional UDVs.
Stripe height (KB): Determines how the RTX-UR organizes the RAID. Normally the default option
is preferred.
Block size: Determines the minimum file size of the UDV. Higher block sizes can result in more
wasted space if many small files are saved to the drive, but are necessary to take advantage of
high capacity RAIDs. If you are creating a UDV over 2 TB in size, you must increase the
block size to 4096 to take advantage of the full capacity of the UDV. For more information,
see the Appendix, “Working with Volumes Greater than 2 TB”
Read/Write: Allows selection of cache type. Normally the default option is preferred.
Priority: Determines the priority that RTX-UR will give to RAIDing activities (rebuild, initialization)
versus priority given to file transfers. High priority will result in slower file transfers during
initialization, but provide for faster initialization.
After selecting your desired options, click Confirm. The new UDV will now display on the main UDV
screen:
The main UDV screen displays the following information:
• No.: The number of the UDV. Click the button below the number of a UDV to view more
information about that UDV.
• Name: The name of the UDV. Click the button below a UDV’s name to rename it.
• Size: The total capacity of the UDV. Click the button below the displayed size of a UDV to add
capacity to the UDV. Note: There must available space on the VG to extend the UDV.
• Status: The status of the UDV. Possible states are Online and Fail.
• 1: Displays the cache mode of the UDV. “WT” indicates that the cache is set to write through,
while “WB” indicates write back mode. Click the button below the cache mode to change the
cache mode.
• 2: Displays the priority of RAID functions for the UDV. Possible states are HI, MD (medium), and
LO. Click the button below a UDV’s priority to change the priority.
• 3: Displays the RAID activity of the UDV. “I” indicates that the UDV is initializing a RAID, “R”
indicates that the UDV is rebuilding a RAID, and “M” indicates that the UDV is under migration
between RAID types.
• R %: Displays progress of the activity indicated in column “3.” Note: Initializing a RAID5 may take
RTX-UR User’s Manual
- 21 -
WiebeTech LLC
•
•
•
•
several hours.
RAID: The RAID level of the UDV. This was chosen during the VG creation.
#LUN: Number of LUNs that the UDV is using. 1 LUN must be attached before use with a
computer. See section 6.6.5 for more information on attaching a LUN.
VG name: The name of the VG associated with the UDV.
CV (MB): The cache volume of the UDV.
5.5.4 Cache Volume
The Cache volume screen allows the creation and management of multiple caches. By default, a global
cache using all of the cache memory is created and automatically assigned to all UDVs created.
The cache volume screen displays the following information:
• No.: The number of the cache. Global cache is always first. Click the button below to view more
information.
• Size: The size of the cache. By default, the global cache uses all available cache space. If you
wish to create additional caches, you must click on the button below the size of the global cache
and enter a number lower than the maximum value, then click Confirm. This frees up space to
create a new cache. Now click Create, enter the desired size of the new cache, and click
Confirm. The new cache will now be an option under “CV No.” when creating a new UDV.
• UDV name: The name of the UDV associated with the cache. Global is default for all UDVs.
5.5.5 Logical Unit
The Logical Unit is what your computer will use to access and manage SCSI devices. In order to access
a UDV, you will need to attach a Logical Unit Number (LUN) to that UDV. To attach a LUN, click the
Attach button:
The following options are available:
• UDV: Choose the UDV to which you wish to attach a LUN.
• Host: The Host field is filled with an asterisk by default, meaning that any host can access the
UDV. You may change the field if you wish to limit access to specific hosts.
• LUN: The LUN field allows you to select which LUN to attach to the UDV. The default option is
normally acceptable.
• Permission: Choose Read-write or Read-only for accessing the UDV.
RTX-UR User’s Manual
- 22 -
WiebeTech LLC
Click Confirm after selecting your desired settings. The main Logical Unit Screen will now display the
LUN you have just created:
5.6 Enclosure Management
Enclosure management gives access to the following menu options: SES config, Hardware Monitor and
SMART.
5.6.1 SES Config
SCSI Enclosure Services, or SES, is a command set that is used to manage and sense the state of the
power supplies, cooling devices, displays, indicators, and individual drives of a SCSI device. The RTXUR is an SES compliant enclosure, however, in order to use manage RTX-UR using SES you must have
the appropriate software installed on your computer. An example is SMART Monitor, offered by Santools
at www.santools.com.
To enable SES on your RTX, you must have a UDV set up and a LUN attached. Once you have done
this, navigate to SES Config and simply click the Enable button, then click Confirm. The SES-enabled
LUN will show up on the main SES screen.
5.6.2 Hardware Monitor
The Hardware Monitor displays information about the voltages and temperatures of the RTX-UR.
Auto shutdown feature: When this checkbox is enabled, the RTX-UR will automatically shut down if any of
RTX-UR User’s Manual
- 23 -
WiebeTech LLC
the voltages or temperatures displayed stray outside of the minimum or maximum values. Auto shutdown
is enabled by default to protect the hardware of the RTX-UR.
5.6.3 S.M.A.R.T.
S.M.A.R.T. (Self-Monitoring Analysis and Reporting Technology) is a diagnostic tool for hard drives that
gives advanced warning in some cases of hard drive failure. S.M.A.R.T. measures various attributes of a
hard drive at all times to detect if certain values have moved outside of a certain range. The S.M.A.R.T.
option allows you to view the S.M.A.R.T. status of all of your hard drives.
5.7 Maintenance
The maintenance screen gives access to the firmware and configuration functions: Upgrade, Info, Reset
to default, Config import & export, and Shutdown.
5.7.1 Upgrade
The upgrade function allows you to upgrade the firmware of the RTX-UR. DO NOT USE THIS
FUNCTION WITHOUT SPECIFIC INSTRUCTION FROM WIEBETECH TECHNICAL SUPPORT. Doing
so could result in malfunction of your RTX-UR.
5.7.2 Info
Click on Info to display system information:
5.7.3 Reset to default
RTX-UR User’s Manual
- 24 -
WiebeTech LLC
The Reset to Default option allows you to restore settings to the factory defaults. After clicking Reset to
Default, you will need to click Confirm to verify.
5.7.4 Config Import & Export
The config import & export function allows you to import or export a firmware config file. DO NOT USE
THIS FUNCTION WITHOUT SPECIFIC INSTRUCTION FROM WIEBETECH TECHNICAL SUPPORT.
5.7.5 Shutdown
The Shutdown feature allows you to shutdown or reboot the RTX-UR’s RAID controller and LCD
controller. Note: Choosing Shutdown will not shut down the physical components of the RTX-UR (fans,
drives, power supply). However, it will flush data from the cache to the physical drives, which is
recommended before physically shutting down using the power switch on the unit to prevent data
corruption.
5.8 Quick Set-up of RAID
Follow these instructions to quickly create a RAID set using the GUI:
a. Click on Volume Config, then Volume Group.
b. Choose Create. Select the RAID level you would like to use (usually RAID 5). If there is an error
saying "Disk is not enough" you'll need to go to Physical Disk, select all of the disks you wish to include
in the Volume Group, and press the Free Disk button.
c. Click on Select PD. Select all the hard drives
you wish to put into the new RAID.* You’ll need
NOTE: If the total capacity of your volume exceeds
2TB, it is likely you will encounter problems using that
to confirm your choice.
volume on most current operating systems. If that is the
d. Next, go to User Data Volume (UDV) and
case, you will most likely wish to divide the capacity into
choose Create. Select the capacity you want
two or more volumes of less than 2TB each. Please
for this UDV. (See note at right.)
see the section labeled, "Working with volumes > 2TB."
e. The rest of the details can be left at the
default setting. You’ll need to confirm several times.
f. You should wind up back at the main UDV screen. The RAID will begin initializing, and progress
will be displayed in the R% column. Depending on the RAID type and size, the initialization could
take several hours. The R% number will disappear when the initialization has finished. Note: some
RAID types initialize almost instantaneously, so you may not see a progress meter.
g. Select the check box next to the UDV you just created and then click Attach. If you created more than
one volume, you’ll need to repeat this step for each one.
h. Use the default settings on the next screen. You’ll need to confirm your selections.
* With the RTX400-UR, the number of drives contained in the RAID group can be as high as eight using
the Infiniband expansion port on the rear of the unit. This port allows you to connect another 4-bay JBOD
eSATA enclosure (e.g. RTX400-SJ), or multiple 1-bay eSATA drive enclosures and add those additional
drives to the RTX400-UR’s RAID. Note: These additional drives must be added at the time the RAID is
first created.
5.9 Connecting to your computer
a. First, make sure your computer is turned off. Plugging a SCSI cable into a live host could cause
damage to the host. Besides, since SCSI is not hot-swappable your computer would not see the RTX
until it is restarted.
RTX-UR User’s Manual
- 25 -
WiebeTech LLC
b. Connect the SCSI cable to one of the channels on the
back of the RTX. Connect the other end to the host
computer. If your computer does not have an available
SCSI port, you will need to install a SCSI host bus adapter
(HBA). If the SCSI port on your computer is a different type
and the cable will not fit, you may need to use an adapter.
Install a terminator in the other port of that channel
NOTE: If you are using a SCSI host card
that would normally support RAID
functionality, you will need to disable any
and all RAID settings on the card for the
RTX to be detected. If you cannot disable
the RAID settings, select JBOD mode.
c. Connect the power cord to the RTX and a grounded electrical outlet.
d. Turn on the RTX. After it is started up and ready, turn on your computer. If you turn on the computer
first, it will not be able to see the RTX.
Chapter 6: Formatting new volume(s)
If you did not purchase the RTX with preconfigured drives,
before using them. This is typically done using
tools built in to your computer’s operating
system. (For example, Disk Utility for Mac OS
X or Disk Management for Windows.) Consult
your computer’s operating manual for details.
you will need to format the new volume(s)
NOTE: When formatting a volume larger than 2TB in
Windows Vista, you may be prompted to select either
MBR or GPT for initialization. MBR will truncate the
volumes to 2TB each, creating multiple partitions if
necessary. GPT will allow volumes over 2TB, but is not
compatible with all previous versions of Windows.
Usage with Macintosh computers
Mounting and Ejecting Volumes
When you connect the unit to the Mac for the first time and turn on the power,
you’ll probably see a message saying that the disk is unreadable. This is
because you must format the volume before using it. The easiest way to do
this is to use Mac OS X’s Disk Utility. If you plan to use the unit on both Macs
and PCs, select “MS DOS File System” as the format type. If you only plan to
use the unit on Macs, then select “Mac OS Extended”. After the volume is
formatted, an icon representing the drive volume will appear (“mount”) on the
desktop. You can now use the volume just like an internal hard drive.
Eject the volume before powering down the unit by dragging the volume’s icon
to the trash bin, or by selecting the volume then pressing Command-E. Shutting down the unit without
first ejecting the volume can result in data loss.
Usage with Windows computers
Formatting Volumes
Before you can use your RTX-UR, you must first format the drives into a volume. Use Disk Management,
which you can find by right-clicking on My Computer then selecting Manage. Select NTFS for the format
type.
After the volume is formatted, an icon representing the drive volume will appear in My Computer. You
can now use the volume just like an internal hard drive.
Ejecting Volumes
Unlike external storage devices that connect via FireWire or USB, SCSI devices cannot usually be
ejected. It is possible to disable the device using Device Manager. Whether or not you choose to disable
RTX-UR User’s Manual
- 26 -
WiebeTech LLC
the device in this way, always make sure the drives are not being accessed before shutting off the RTXUR. If the unit is turned off in the middle of a data input/output process, data loss may result.
Appendix A. Certification list
RAM
(RAM Spec: 184pins, DDR333(PC2700), Reg.(register) or UB(unbuffer), ECC or Non-ECC.)
Vendor
Model
UG732D6688KN-DH, 256MB DDR333 (UB)
UG732D7588KZ-DH, 256MB DDR333 (Reg, ECC)
UG764D7588KZ-DH, 512MB DDR333 (Reg, ECC)
UG7128D7588LZ-DH, 1GB DDR333 (Reg, ECC)
UG732D6688KS-DH, 256MB DDR333 (UB)
UG764D6688LS-DH, 512MB DDR333 (UB)
256MB DDR333 (Reg ECC)
512MB DDR333 (Reg ECC)
1GB DDR333 (Reg ECC)
Unigen
Unigen
Unigen
Unigen
Unigen
Unigen
Trenscend
Trenscend
Trenscend
iSCSI HBA Card
Vendor
Adaptec 7211C
QLogic QLA4010C
Model
(Gigabit, 1 port, TCP/IP offload, iSCSI offload)
(Gigabit, 1 port, TCP/IP offload, iSCSI offload)
NIC
Vendor
Intel PWLA8490MT
Intel PWLA8492MT
Intel PWLA8494MT
Model
(Gigabit, 1 port, TCP/IP offload)
(Gigabit, 2 port, TCP/IP offload)
(Gigabit, 4 port, TCP/IP offload)
SATA Hard Drive
Vendor
Hitachi Deskstar
Hitachi Deskstar
Hitachi Deskstar
Hitachi Deskstar
Maxtor
Maxtor
Samsung
Seagate
Seagate
Seagate
Seagate
Western Digital
Western Digital
Western Digital
Western Digital
Model
7K250, HDS722580VLSA80, 80GB, 7200RPM, SATA, 8M
7K80, HDS728080PLA380, 80GB, 7200RPM, SATA-II, 8M
7K500, HDS725050KLA360, 500G, 7200RPM, SATA-II, 16M
7K80, HDS728040PLA320, 40G, 7200RPM, SATA-II, 2M
DiamondMax Plus 9, 6Y080M0, 80G, 7200RPM, SATA, 8M
DiamondMax 11, 6H500F0, 500G, 7200RPM, SATA 3.0Gb/s, 16M
SpinPoint P80, HDSASP0812C, 80GB, 7200RPM, SATA, 8M
Barracuda 7200.7, ST380013AS, 80G, 7200RPM, SATA, 8M
Barracuda 7200.7, ST380817AS, 80G, 7200RPM, SATA, 8M, NCQ
Barracuda 7200.8, ST3400832AS, 400G, 7200RPM, SATA, 8M, NCQ
Barracuda 7200.9, ST3500641AS, 500G, 7200RPM, SATA-II, 16M
Caviar SE, WD800JD, 80GB, 7200RPM, SATA, 8M
Caviar SE, WD1600JD, 160GB, 7200RPM, SATA, 8M
Raptor, WD360GD, 36.7GB, 10000RPM, SATA, 8M
Caviar RE2, WD4000YR, 400GB, 7200RPM, SATA, 16M, NCQ
RTX-UR User’s Manual
- 27 -
WiebeTech LLC
Appendix B. Event notifications
PD/S.M.A.R.T. Events
Level
Type
Disk inserted
Disk removed
S.M.A.R.T. threshold exceed
condition
Info
Info
Warning
Description
Info: Disk <slot> is inserted.
Info: Disk <slot> is removed.
Warning: S.M.A.R.T. threshold
condition exceeded.
Physical HW Events
Level
Warning
Error
Info
Info
Error
Error
Warning
Type
ECC error
ECC error
ECC DIMM Installed
Non-ECC installed
Host chip failure
Drive chip failure
Ethernet port failure
Description
Warning: Single-bit ECC error is detected.
Error: Multi-bit ECC error is detected.
Info: ECC Memory is installed.
Info: Non-ECC Memory is installed.
Error: Host channel chip failed.
Error: Drive channel chip failed.
Warning: GUI Ethernet port failed.
HDD IO Events
Level
Warning
Warning
Warning
Warning
Type
Disk error
Disk error
HDD failure
Channel error
Description
Error: Disk <slot> read block error.
Error: Disk <slot> writes block error.
Error: Disk <slot> is failed.
Error: Disk <slot> IO incomplete.
SES Events
Level
Info
Warning
Info
Info
Type
SES load conf. OK
SES Load Conf. Failure
SES is disabled
SES is enabled
Description
Info: SES configuration has been loaded.
Error: Failed to load SES configuration. The SES device
is disabled.
Info: The SES device is disabled.
Info: The SES device is enabled
Environmental Events
Level
Info
Warning
Info
Warning
Error
Warning
Error
Warning
Info
Error
Type
Admin Login OK
Admin Login Fail
Admin Logout OK
Admin Logout Fail
Thermal critical
Thermal warning
Voltage critical
Voltage warning
PSU restore
PSU Fail
RTX-UR User’s Manual
Description
Info: Admin login successfully.
Warning: Admin failed to login.
Info: Admin logout successfully.
Warning: Admin failed to logout.
Error: System Overheated! The system will auto shutdown
immediately.
Warning: System temperature is high.
Error: System voltages failed! The system will auto
shutdown immediately.
Warning: System voltage is slightly high/low.
Info: Power <number> has been restored.
Error: Power <number> has failed.
- 28 -
WiebeTech LLC
Info
Error
Error
Error
Info
Warning
Info
Warning
Info
Info
Fan restore
Fan Fail
Fan non-exist
AC Loss
Mgmt Lan Port Active
Mgmt Lan Port Failed
RTC Device OK
RTC Access Failed
Reset Password
Reset IP
Info: Fan <number> has been restored.
Error: Fan <number> has failed.
Error: System cooling fan is not installed.
Error: AC loss for the system has been detected.
Info: Management LAN Port is active.
Warning: Failed to manage the system via the LAN Port.
Info: RTC device is active.
Warning: Fail to access RTC device
Info: Reset Admin Password to default.
Info: Reset network settings set to default.
System Config Events
Level
Info
Info
Error
Warning
Type
Sys Config. Defaults Restored
Sys NVRAM OK
Sys NVRAM IO Failed
Sys NVRAM is full
Description
Info: Default system configurations restored.
Info: The system NVRAM is active.
Error: Can’t access the system NVRAM.
Warning: The system NVRAM is full.
System Maintenance Events
Level
Info
Error
Info
Info
Info
Error
Type
Firmware Upgraded
Firmware Upgraded Failed
System reboot
System shutdown
System Init OK
System Init Failed
Description
Info: System firmware has been upgraded
Error: System firmware upgrade failed.
Info: System has been rebooted
Info: System has been shutdown.
Info: System has been initialized OK.
Error: System could be initialized in the last boot up.
LVM Events
Level
Info
Warning
Info
Info
Warning
Info
Info
Warning
Info
Warning
Info
Info
Warning
Info
Info
Warning
Warning
Warning
Info
Warning
Type
VG Created OK
VG Created Fail
VG Deleted
UDV Created OK
UDV Created Fail
UDV Deleted
UDV Attached OK
UDV Attached Fail
UDV Detached OK
UDV Detached Fail
UDV_OP Rebuild Started
UDV_OP Rebuild Finished
UDV_OP Rebuild Fail
UDV_OP Migrate Started
UDV_OP Migrate Finished
UDV_OP Migrate Failed
VG Degraded.
UDV Degraded
UDV Init OK
UDV_OP Stop Initialization
RTX-UR User’s Manual
Description
Info: VG <name> has been created.
Warning: Failed to create VG <name>.
Info: VG <name> has been deleted.
Info: UDV <name> has been created.
Warning: Failed to create UDV <name>.
Info: UDV <name> has been deleted.
Info: UDV <name> has been LUN-attached.
Warning: Failed to attach LUN to UDV <name>.
Info: UDV <name> has been detached.
Warning: Failed to detach LUN from Bus <number>
SCSI_ID <number> LUN <number>.
Info: UDV <name> has started rebuilding.
Info: UDV <name> has completed rebuilding.
Warning: Failed to complete UDV <name> rebuilding.
Info: UDV <name> has started migration.
Info: UDV <name> has completed migration.
Warning: Failed to complete UDV <name> migration.
Warning: VG <name> is under degraded mode
Warning: UDV <name> is under degraded mode.
Info: UDV <name> has completed the initialization.
Warning: Failed to complete UDV <name>
initialization.
- 29 -
WiebeTech LLC
Warning
Warning
Warning
Warning
Info
Error
Info
Info
Info
Info
Info
Info
Info
Info
Info
Info
UDV IO Fault
VG Failed
UDV Failed
Global CV Adjustment Failed
Global Cache
Global CV Creation Failed
UDV Rename
VG Rename
Set VG Dedicated Spare
Disks
Set Global Disks
UDV Read-Only
WRBK Cache Policy
WRTHRU Cache Policy
High priority UDV
Mid Priority UDV
Low Priority UDV
Error: IO failure for stripe number <number> in UDV
<name>.
Error: Failed to access VG <name>.
Error: Failed to access UDV <name>.
Error: Failed to adjust the size of the global cache.
Info: The global cache is OK.
Error: Failed to create the global cache.
Info: UDV <name> has been renamed as <name>.
Info: VG <name> has been renamed as <name>.
Info: Assigned Disk <slot> to be VG <name>
dedicated spare disk.
Info: Assigned Disk <slot> to the Global Spare Disks.
Info: UDV <name> is a read-only volume.
Info: Used the write-back cache policy for UDV
<name>.
Info: Used the write-through cache policy for UDV
<name>.
Info: UDV <name> is set to high priority.
Info: UDV <name> is set to mid priority.
Info: UDV <name> is set to low priority.
Appendix C: Working with Volumes over 2TB in size
Although the RTX can create data volumes larger than 2TB, operating systems cannot usually access
such volumes. This is because most systems support only 32-bit LBA (Logical Block Addressing).
Newer operating systems (Windows Server 2003, Vista, Mac OS 10.5.x) should be able to use 2TB+
volumes without difficulty. You will simply need to do one of the following two things while creating the
UDV (User Data Volume):
• Change the LBA to 64-bit
• Increase the block size to 4096
Windows
Neither of the options above will work for Windows versions before Server 2003. You will need to make
more than one UDV, each less than 2000GB in size. Each UDV also needs a different LUN.
Mac OS
Although Mac OS 10.4.x supports only 32-bit LBA, increasing the block size to 4096 will allow you to
create a 2TB+ volume that is usable by the OS.
Linux
Versions of Linux vary, but using one of the above methods may allow you to create a 2TB+ volume that
your distribution can use.
RTX-UR User’s Manual
- 30 -
WiebeTech LLC
Appendix D: Warnings and Notices
• Use only hard drives that are in perfect condition. Avoid using drives that have ever developed
bad sectors during previous usage. This could lead to possible device failure or loss of data.
• The RTX supports SATA hard drives of various specifications and different capacities. However,
we recommend using drives of the same brand and type for optimal performance. If drives of
different capacities are used in a RAID, the capacity of the smallest drive will determine how much
of each drive is used. The additional capacity on the larger drives will not be used by the RAID.
• RAID level 0 will allow you to use the full combined capacity of the drives, and offers the best data
transfer speeds. However, RAID 0 offers no protection for the data. If one drive fails in a RAID 0,
the data on all of the drives is irretrievably lost. Before creating a RAID, investigate the various
RAID types and choose the one that is best for your needs.
• Always back up data before switching RAID types. You must reformat your drives afterwards.
• Before starting any type of hardware installation, please ensure that all power switches have been
turned off and all power cords have been disconnected to prevent personal injury and damage to
the hardware.
• To avoid overheating, RTX should be operated in a well-ventilated area and in such a way that
sufficient airflow is maintained across the controller chips.
• Static electricity can damage electronic components such as the exposed circuitry on hard drives.
When swapping hard drives in the RTX, take precautions to guard against such damage:
o
o
o
o
Work in a static-free environment
Wear a grounded anti-static wrist strap
Store uninstalled components in anti-static protective bags
Handle the drives by their edges and avoid touching the exposed circuitry
Appendix E: Frequently Asked Questions (FAQ)
Q. I created one volume, but my computer sees two of them. Why?
A. There may be two LUNs assigned to that volume. To check this, use the GUI. Navigate to Volume
Config and then Logical Unit. If there are two LUNs for the same volume, click the checkbox for one of
them and click on “detach.” Note: You may still see two volumes until you restart your computer.
Q: I've hooked up the LAN GUI port to my DHCP-enabled network, but the LCD displays an IP address
that is not on my network and I cannot connect to the GUI control panel using that IP address in my web
browser.
A: This may occur if you plugged in the LAN GUI after the RTX has already started up and initialized, or if
you previously configured the RTX for a static network or direct connection. The solution is to use the
LCD interface to obtain a DHCP address. Press ENT, then use the up or down arrows to scroll to the
option Change IP config. Press ENT. The screen will say DHCP. Press ENT then press the up arrow
to select Yes. Press ENT. The RTX will now attempt to acquire a DHCP address. This new address will
be displayed on the main screen of the LCD.
Q. When I try to log on to the RTX-UR using the IP address under the iSCSI configuration menu nothing
happens.
A. Sometimes when you first set up the RTX-UR you'll need to reattach the LUN (Logical Unit Number) if
it doesn't work the first time.
Q: I’ve formatted the RTX’s drive, and my disk utility reports that a volume was successfully created, but I
can’t find the volume or access it.
A: Try restarting your computer. Sometimes this is a necessary step before a new volume will become
usable.
RTX-UR User’s Manual
- 31 -
WiebeTech LLC
Appendix F: Technical Specifications
Product name/code:
Raid Levels Supported:
Host Interfaces:
Data Interface Speeds:
Drive Types Supported:
TrayFree™ Technology:
Online Auto-Rebuild:
Shock Absorbing Bays:
LED Indicators:
Security:
Controller Display:
Operating System
Requirements:
Operating Temperature:
Operating Humidity:
Power Switch:
Power Supply:
Cooling Fan:
Safety Certification:
External Material:
Shipping Weights:
Dimensions:
Warranty:
RTX400-UR, RTX400H-UR, RTX600-UR, RTX600H-UR & RTX800-UR
RAID 0, 1, 0+1, 3, 5, 6 & JBOD
• Dual SCSI Ultra320
• 4 expandable eSATA ports (RTX400-UR and RTX400H-UR only)
Up to 320MB/s
SATA1 and SATA2 hard disk drives
Yes
Yes
Yes (RTX400-UR, RTX400H-UR & RTX600H-UR)
• Alarm Indicator
• Power Indicator
• Access Indicator
Separate key lock for each HDD (RTX400-UR, RTX400H-UR & RTX600H-UR)
LCD screen with yellow backlight/control panel
• Windows XP, Vista
• Mac OS X 10.2.6 or later
• Linux distributions using Kernel version 2.4 or above
50 – 85° Fahrenheit (10 – 30° Celsius)
5% to 95%, noncondensing
2 position: On / Off
• Input: 100-240VAC
• Output: 200 Watts
8cm Ball Bearing Fan (x2 for RTX600H-UR & RTX800-UR)
CE/FCC
Aluminum alloy case
• RTX400-UR: 16.3lbs sans drives, 20.3lbs with drives
• RTX400J-UR: 16.3lbs sans drives, 20.3lbs with drives
• RTX600-UR: 19lbs sans drives, 25lbs with drives
• RTX600H-UR: 22lbs sans drives, 30lbs with drives
• RTX800-UR: 23lbs sans drives, 33lbs with drives
177mm W x 270mm D x 274mm H (RTX400-UR, RTX400H-UR & RTX600-UR)
177mm W x 270mm D x 361mm H (RTX600H-UR and RTX800-UR)
3-year limited warranty. See warranty statement for details and limitations.
WiebeTech offers free phone support for 90 days after purchase (1-866-7448722). After 90 days, email support is available at [email protected].
RTX and TrayFree are trademarks of WiebeTech LLC. Other marks are the property of their respective owners.
© 2008 WiebeTech LLC. All rights reserved.
FCC Compliance Statement: “This device complies with Part 15 of the FCC rules. Operation is subject to the following two conditions: (1) This
device may not cause harmful interference, and (2) this device must accept any interference received, including interference that may cause undesired
operation.”
Tested to comply
with FCC standards
FOR HOME OR OFFICE USE
In the event that you experience Radio Frequency Interference, you should take the following steps to resolve the problem:
1)
Ensure that your unit is plugged into a grounded electrical outlet.
2)
Use a data cable with RFI reducing ferrites on each end.
3)
Use a power supply with an RFI reducing ferrite approximately 5 inches from the DC plug.
If you have any questions or problems, please contact [email protected] for technical support. If you are
interested in purchasing more WiebeTech products, check our website or contact [email protected]. We
appreciate being able to serve you!
RTX-UR User’s Manual
- 32 -