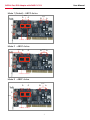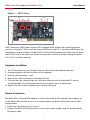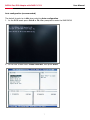
1
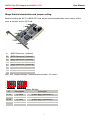
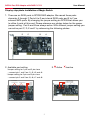
SATA 4 Port PCI Adaptor with RAID RC209
User Manual
SATA 4 Port PCI Adaptor with RAID RC209
Content
• Feature highlights .............................................................................. 01
• Package contents .............................................................................. 01
• System requirement .......................................................................... 01
• Magic Switch introduction and jumper setting ............................... 02
• Step by step photo installation of Magic Switch ............................ 03
• Hardware installation ......................................................................... 05
• Important message for user .............................................................. 06
• RAID introduction
• RAID 0 .................................................................................... 06
• RAID 1 .................................................................................... 09
• RAID 0+1 ................................................................................ 10
• RAID 5 (optional) ..................................................................... 11
• BIOS configuration .............................................................................14
• Driver installation
• Quick guide ............................................................................. 14
• Detail guide ............................................................................. 17
User Manual
User Manual
SATA 4 Port PCI Adaptor with RAID RC209
SiI 3114 SATA PCI Card
Feature Highlights
•
•
•
•
•
Silicon Image SiI3114 SATA controller chip
Compliant with PCI Specification, Rev. 2.3, 32bit, 33/66Mhz
Compliant with Serial ATA 1.0 specification
Provides four independent channels to support up to four Serial ATA drives
Supports RAID0(striping), RAID1(mirroring), RAID5(Parity RAID), RAID 0+1
(mirroring+striping) and Concatenation modes
• HDD functions normally when not in RAID sets (un-RAID mode)
• Supports SATA up to 150MB/Sec
• Supports Windows® 98SE, Me, 2000, XP/2003 32/64 bit
• Connectors : 4 x internal SATA connectors, 2 x external SATA connectors
Package Contents
•
•
•
•
•
1x Serial ATA 4-Channel RAID PCI HD controller
1x Driver CD
2x SATA Data Cables & 2 x SATA Power Cables
1x Manual
1x Low profile bracket
System Requirements
• Pentium-class computer with one available PCI slot
• Windows® 98SE, ME, 2000, XP/2003 32/64 bit
User Manual
SATA 4 Port PCI Adaptor with RAID RC209
Magic Switch introduction and jumper setting
Before installing the SiI 3114 SATA PCI Card, please see the photo below which shows all the
ports & jumpers on this PCI Card.
A
B
C
D
E
F
G
SATA Connector 1 (internal)
SATA Connector 2 (internal)
SATA Connector 3 (internal)
SATA Connector 4 (internal)
SATA Connector 5 (external)
SATA Connector 6 (external)
Jumpers
IDE/RAID: Jumper Settings ( Default mode as below : 2-3 close )
J J2 J3 J4
J5 J6 J7 J8
3
2
JP
J1-J4
J5-J8
Description
1-2 close
2-3 close
1-2 close
2-3 close
Jumper Settings
Active port
Enable SATA Connector 5
Enable SATA Connector 4
Enable SATA Connector 6
Enable SATA Connector 3
User Manual
SATA 4 Port PCI Adaptor with RAID RC209
Step by step photo installation of Magic Switch
1. There are six SATA ports in RC209 RAID adapter. We named these ports
character A through F. Ports A to D are internal SATA ports and E to F are
external SATA ports. By changing the jumper setting on RC209 that allows you
to utilize 4 ports of this card. Please reference our photos below for the proper
jumper setting. Port A and B are always active. With different jumper setting you
can active port C, D, E and F by referencing the following photos.
D
C
B
A
E
F
2. Available port setting
3.
Active
Inactive
*Jumper setting for 1 pin and 2 pin close
– connect pin 1 and 2 on J1, J2, J3 and J4.
*Jumper setting for 2 pin and 3 pin close
– connect pin 2 and 3 on J5, J6, J7 and J8.
for exsample:
& 2 PIN close
2 & 3 PIN close
A,B always active
Control D,E switch
Control C,F switch
3 PIN
2 PIN
PIN
D
E
F
C
B
A
User Manual
SATA 4 Port PCI Adaptor with RAID RC209
Mode 1 (Default) - ABCD Active
D
Active
C
B
Active
A
E
F
2.3 close 2.3 close
Mode 2 - ABDF Active
Active
D
C
B
Active
A
E
F
2.3 close .2 close
Mode 3 - ABEF Active
D
C
B
Active
E
Active
F
.2 close .2 close
A
User Manual
SATA 4 Port PCI Adaptor with RAID RC209
Mode 4 - ABCE Active
Active
D
C
B
Active
A
E
F
.2 close 2.3 close
Note: There are six SATA ports in Serial ATA 4-Channel RAID adapter. We named these ports
character A through F. Ports A to D are internal SATA ports and E & F are external SATA ports. By
changing the jumper setting on the Serial ATA 4-Channel RAID adapter that allows you to utilize 4
ports of this card at the same time. Please set which port to work by jumper setting. By default,
Port A, B, C and D are working.
Hardware Installation
1.
2.
3.
4.
5.
Turn Off the power to your computer and any other connected peripheral devices.
Unplug the power cord form the back of the computer.
Remove your computer’s cover.
Remove the slot bracket from an available PCI slot.
To install the card, carefully align the card’s bus connector with the selected PCI slot on
the motherboard. Push the board down firmly, but gently, until it is well seated.
6. Replace the slot bracket’s holding screw to secure the card.
Device Connection
The Serial ATA 4-Channel RAID adapter is a four channel Serial ATA controller that supports up
to four Serial ATA hard disk drives. It is recommended to use identical hard drives for all RAID
configurations.
1. Install your hard disk drive(s) in chassis.
2. Connect the Serial ATA hard disk drive to the system power supply using the included Serial
ATA power cable.
User Manual
SATA 4 Port PCI Adaptor with RAID RC209
3. Connect one end of the Serial ATA cable to the hard disk drive.
4. Attach the other end of the Serial ATA cable to the Serial ATA controller on the Serial ATA
4-Channel RAID adapter.
5. Follow the same instructions to connect up to four hard drives. Device connection is now
complete.
6. Replace the computer cover and reconnect the power cord.
Important message for user
1. Backup all your data in HD before setting any RAID.
2. New HD connecting to RC-209 is recommended to “initial” and “format” before setting
a RAID. Otherwise, PC might find nothing in the system.
3. Please read the PDF file of “SATARAID5-UserGuide_v1.40” for basic RAID knowledge.
4. If you want to boot from correct HD either from motherboard HD or RC-209 HD, please
change from BIOS “booting sequence”.
5. Although SATA HD is a “hot swap” design, it is strongly recommended that all users
turn off the power before you add any HD to PC.
6. If you want to use RC-212 as a un-RAID card, please do not enter the RAID BIOS and set
any RAID set at the beginning of booting. You can jump to P11 “Driver installation” directly to
complete the install. The only different is ignoring the step of RAID setting and the driver
setting is the same as a RAID card.
RAID Arrays
RAID Arrays are setup in the Serial ATA 4-Channel RAID adapter’s BIOS.
RAID 0 (Striping)
This RAID array to be used on New/Blank hard drives. Striping will destroy all existing data
on the original hard drive. Auto Configuration is recommended. For applications that require
custom chunk size, Manual Configuration is offered.
User Manual
SATA 4 Port PCI Adaptor with RAID RC209
Auto configuration (recommended)
The default chunk size is 64k when selecting Auto configuration.
1. As the BIOS boots press Ctrl+S or F4 when prompted to enter the RAID BIOS.
2. At the next screen select Create RAID Set, then press Enter.
User Manual
SATA 4 Port PCI Adaptor with RAID RC209
3. Select RAID0, then press Enter.
4. Select the number of drives then press Enter.
5. Select Auto configuration, then press Enter.
6. Input the RAID size, press Enter.
7. When asked Are You Sure (Y/N)?, press Y to accept.
8. Press Ctrl+E to exit the BIOS.
9. When asked Are you sure to exit (Y/N)?, press Y to exit and reboot.
10. Continue with FDISK and FORMAT steps as if you were installing a conventional hard drive.
Manual configuration
1. As the BIOS boots press Ctrl+S or F4 when prompted to enter the RAID BIOS.
2. At the next screen select Create RAID Set, then press Enter.
3. Select RAID0, then press Enter.
4. Select the number of drives then press Enter.
5. Select Manual configuration then press Enter
6. Select chunk size from 8k, 16k, 32k, 64k or 128k, then press Enter.
7. Select the first drive, press Enter.
8. Select the second drive, press Enter.
9. If applicable select the 3rd and 4th drives pressing enter after each selection.
10. Input the RAID size, press Enter.
11. When asked Are You Sure(Y/N)?, press Y to accept.
User Manual
SATA 4 Port PCI Adaptor with RAID RC209
12. Press Ctrl+E to exit the BIOS.
13. When asked Are you sure to exit(Y/N)?, press Y to exit and
reboot.
14. Continue with FDISK and FORMAT steps as if you were installing a conventional hard drive.
RAID 1 (Mirror)
For New/Blank Hard Drive
Recommended for all fresh HD without data.
1. As the BIOS boots press Ctrl+S or F4 when prompted to enter the RAID BIOS.
2. At the next screen select Create RAID Set, then press Enter.
3. At the next screen select RAID1 then press Enter.
4. Select Auto configuration, then press Enter.
5. Input the RAID size, press Enter.
6. When asked Are You Sure(Y/N)?, press Y to accept.
7. Press Ctrl+E to exit the BIOS.
8. When asked Are you sure to exit(Y/N)?, press Y to exit and reboot.
9. Continue with FDISK and FORMAT steps as if you were installing a conventional hard drive.
For Existing Hard Drives with Data
Recommended for one/two original HD with data to mirror with one/two fresh empty HD
1. As the BIOS boots press Ctrl+S or F4 when prompted to enter the RAID BIOS.
2. At the next screen select Create RAID Set, then press Enter.
3. At the next screen select RAID1 then press Enter.
4. Select Manual configuration, then press Enter.
5. Select the Source drive, press Enter.
6. Select the Target drive, press Enter.
7. Select Create with data copy, then press Enter.
8. Select online copy, then press Enter.
Note : Selcting Online Copy builds the mirror while in Windows. Selecting Offline Copy builds
the mirror before exiting the RAID BIOS.
9. Input the RAID size, press Enter.
10. Press Ctrl+E to exit the BIOS.
11. When asked Are you sure to exit(Y/N)?, press Y to exit and reboot.
Note : If during boot the RAID BIOS reports an RAID1 set is in Rebuild status, The rebuild will
continue after boot sequence is complete, disregard the message, continue booting, and let
the Mirror rebuild.
User Manual
SATA 4 Port PCI Adaptor with RAID RC209
Creating a SPARE Drive
This function is used when you want to backup your data by adding a new HD to RC-209. You
can transfer original data to the new adding HD by the following.
When a hard drive failure occurs in a mirror set, the auto-rebuild feature enables a drive
designated as SPARE to become the new member of the mirror set. After you process this
function, your mirror will be rebuilded.
1. During boot press Ctrl+S or F4 to enter the RAID BIOS.
2. Select Create RAID Set then press Enter.
3. Select SPARE DRIVE then press Enter.
4. Select the single hard drive then press Enter.
5. When asked Are You Sure(Y/N)?, press Y to accept.
6. Press Ctrl+E to exit.
7. When asked Are you sure to exit(Y/N), press Y to exit.
The SPARE drive will not been by Windows, however, it remains in the background waiting to
rebuild the mirror in the event of a hard drive failure.
Rebuilding a Failed Mirror Set
This function is used when any HD in mirror is failure. Your data is still safety. System will notice
and help you rebuild mirror by replacing new HD to the broken part.
When a failure to one member occurs, you will be notified either by the RAID BIOS during boot
or by the SATARAID5 GUI while in Windows. The steps below will guide you in rebuilding a failed
mirror set.
1. Replace the failed drive with one of equal or greater capacity, then start the computer.
2. During boot press Ctrl+S or F4 to enter the RAID BIOS.
3. Select Create RAID Set then press Enter.
4. Select SPARE DRIVE then press Enter.
5. Select the replacement drive then press Enter.
6. When asked Are You Sure(Y/N)?, press Y to confirm.
7. Press Ctrl+E to exit.
8. When asked Are you sure to exit(Y/N)?, press Y to exit.
RAID 0+1 (Mirroring+Striping)
This RAID array to be used on New/Blank hard drives, do not use existing hard drive(s) with data.
To create a RAID 0+1 set at least four hard drives are required.
10
User Manual
SATA 4 Port PCI Adaptor with RAID RC209
Auto configuration (recommended)
The default chunk size is 64k when selecting Auto configuration.
1. As the BIOS boots press Ctrl+S or F4 when prompted to enter the RAID BIOS.
2. At the next screen select Create RAID Set, then press Enter.
3. Select RAID10, then press Enter.
4. Select Auto configuration, then press Enter.
5. Input the RAID size, press Enter.
6. When asked Are You Sure(Y/N)?, press Y to accept.
7. Press Ctrl+E to exit the BIOS.
8. When asked Are you sure to exit(Y/N)?, press Y to exit and reboot.
9. Continue with FDISK and FORMAT steps as if you were installing a conventional hard drive.
Manual configuration
1. As the BIOS boots press Ctrl+S or F4 when prompted to enter the RAID BIOS.
2. At the next screen select Create RAID Set, then press Enter.
3. Select RAID10, then press Enter.
4. Select the number of drives then press Enter.
5. Select Manual configuration then press Enter.
6. Select chunk size from 8k, 16k, 32k, 64k or 128k, then press Enter.
7. Select the first drive, press Enter.
8. Select the second drive, press Enter.
9. Select the third drive, press Enter.
10. Select the fourth drive, press Enter.
11. Select Create without data copy then press Enter.
12. Input the RAID size, press Enter.
13. When asked Are You Sure(Y/N)?, press Y to accept.
14. Press Ctrl+E to exit the BIOS.
15. When asked Are you sure to exit(Y/N)?, press Y to exit and reboot.
16. Continue with FDISK and FORMAT steps as if you were installing a conventional hard drive.
RAID 5 (Parity)
This RAID array to be used on New/Blank hard drives. Striping will destroy existing data on the
hard drive. Auto Configuration is recommended. For applications that require custom chunk
size, Manual Configuration is offered.
Auto configuration (recommended)
The default chunk size is 64k when selecting Auto configuration.
1. As the BIOS boots press Ctrl+S or F4 when prompted to enter the RAID BIOS
2. At the next screen select Create RAID Set, then press Enter.
11
User Manual
SATA 4 Port PCI Adaptor with RAID RC209
3. Select RAID5, then press Enter.
4. Select the number of drives then press Enter.
5. Select Auto configuration, then press Enter.
6. Input the RAID size, press Enter.
7. When asked Are You Sure(Y/N)?, press Y to accept.
8. Press Ctrl+E to exit the BIOS.
9. When asked Are you sure to exit(Y/N)?, press Y to exit and reboot
10. Continue with FDISK and FORMAT steps as if you were installing a conventional hard drive.
Manual configuration
1. As the BIOS boots press Ctrl+S or F4 when prompted to enter the RAID BIOS.
2. At the next screen select Create RAID Set, then press Enter.
3. Select RAID5, then press Enter.
4. Select the number of drives then press Enter.
5. Select Manual configuration then press Enter.
6. Select chunk size from 8k, 16k, 32k, 64k or 128k, then press Enter.
7. Select the first drive, press Enter.
8. Select the second drive, press Enter.
9. Select the third drive, press Enter.
10. If applicable select the 4th drive pressing enter after each selection.
11. Input the RAID size, press Enter.
12. When asked Are You Sure(Y/N)?, press Y to accept.
13. Press Ctrl+E to exit the BIOS.
14. When asked Are you sure to exit(Y/N)?, press Y to exit and reboot.
15. Continue with FDISK and FORMAT steps as if you were installing a conventional hard drive.
CONCATENATION
This RAID array allows you to use one, two, three or four hard drives to a array. It does not
provide any data protection or performance improvement but can be useful for utilizing leftover
space on disks.
1. As the BIOS boots press Ctrl+S or F4 when prompted to enter the RAID BIOS.
2. At the next screen select Create RAID Set, then press Enter.
3. Select CONCATENATION, then press Enter.
4. Select the number of drives then press Enter.
5. Select the first drive, press Enter.
6. If applicable select the 2nd, 3rd, 4th drive pressing enter after each selection.
7. When asked Are You Sure(Y/N)?, press Y to accept.
8. Press Ctrl+E to exit the BIOS.
12
User Manual
SATA 4 Port PCI Adaptor with RAID RC209
9. When asked Are you sure to exit(Y/N)?, press Y to exit and reboot.
10. Continue with FDISK and FORMAT steps as if you were installing a conventional hard drive.
Deleting RAID Arrays
1.
2.
3.
4.
As the BIOS boots press Ctrl+S or F4 when prompted to enter the RAID BIOS.
Select Delete RAID Set, then press Enter.
Select the RAID set then press Enter.
When asked Are You Sure(Y/N)?, press Y to confirm.
Resolving Conflicts
When a RAID set is created, then metadata written to the disk includes drive connection
information. If, after a disk failure, the replacement disk was previously part of a RAID set (or used
in another system), it may have conflicting metadata. If so, this will prohibit the RAID set from
being either created or rebuilt, in order for the RAID set to function properly, this old metadata
must be first overwritten with the new metadata. To resolve this, from the main BIOS window
select Resolve Conflicts, then press Enter, the correct metadata, including the correct drive
connection information, will be written to the replacement disk.
Low Level Format
Low Level Format is build into the RAID BIOS to make it more convenient to erase the entire
contents of a hard disk drive, including data, drive and partition information. The Low Level
Format utility works on single hard drive only, before the RAID set is configured.
Logical Drive Info
This menu item allows the display of the assignment of physical drives within a logical set(RAID0,
RAID1, etc.). This is display only function.
BIOS Configuration
The Serial ATA 4-Channel RAID adapter BIOS will appear every time your system starts up. If the
BIOS doesn’t show, please try your controller in another PCI slot. During this (POST) process, the
13
User Manual
SATA 4 Port PCI Adaptor with RAID RC209
BIOS will show up and indicate the devices attached to it.
Driver Installation
Quick guide:
1. If you want to add RC-209 to an existing OS, set up RC-209 into a PCI slot. Enter the OS
and install RC-209 with driver disk. In this case, PC is booting up by an existing HD
connecting to motherboard. After RC-209 is installed complete, you can add HD and set the
RAID by RAID BIOS.
2. If you want to add RC-209 to a new PC without any OS, you need to boot the OS from HD
connecting to RC-209 instead of motherboard.
a. Put the driver (the driver must fit the OS you want to install to the HD) into a floppy disk
and keep it in the floppy drive.
b. Plug the HD. Turn on PC and press F4 to complete the RAID set. After you complete,
save and left the setting.
c. Inset Windows installation disk and start the windows installation.
d. Press F6 at the beginning as the blue screen scanning.
This will let PC boot from a HD controller instead of motherboard HD.
e. Keep the floppy in floppy drive and follow the installation. Press “S” when the screen
shows as the following picture.
14
User Manual
SATA 4 Port PCI Adaptor with RAID RC209
Choose the correct OS for your future system.
Then choose “Standard PC with C-Step i486”.
15
User Manual
SATA 4 Port PCI Adaptor with RAID RC209
Keep the floppy disk in floppy drive. PC will notice you as below if you take them off
from the drive.
The installation of RC-209 by floppy drive will be completed and the system will
detect the HD which now plug on the card.
16
User Manual
SATA 4 Port PCI Adaptor with RAID RC209
After you install RC-209 successfully by floppy disk, installation will lead you back to the
same screen as below and then press “enter” to left the setting.
f. Once the system can find the HD connecting to RC-209, you can follow the normal steps
to complete the Windows installation.
3. If you want to create a mirror with a HD with existing OS and a fresh HD, the data on existing
HD will copy to fresh HD and boot as RAID 1. In addition, based on the above situation, if
a bootable HD on the RC209 is desired. It means in this case you will boot our computer
from RC209 instead of motherboard. Please follow the following instructions.
a. Install RC-209 to an existing OS HD connecting to motherboard.
b. After RC-209 install complete, turn off PC. Take the original HD off from motherboard and
connect to RC-209. Take another fresh HD to connect to RC-209 for setting mirror.
c. Turn on PC and enter RAID BIOS to set mirror. Choose “Manual” and then select the
original HD as the data source to complete mirror. The copy will take a long time
depending on your HD capability. After data copy complete, save and left RAID BIOS.
Important message: If you choose the wrong HD source at the step of “manual”,
all your data will be lost.
d. Reboot your PC and now you can enter your OS with RAID 1.
Detail guide
For Windows® XP/Server 2003
17
User Manual
SATA 4 Port PCI Adaptor with RAID RC209
For New Installation
A new installation requires a floppy disk for the driver installation. To make this floppy disk, copy
the contents of the “RC-209\Driver\RAID” folder, found on the driver CD, onto a blank floppy disk
then follow the directions below.
1. Setup the RAID Array prior to Windows installation.
2. Follow Microsoft’s Windows installation procedure.
3. Restart the computer when prompted by Windows’ installation.
4. At the Windows Setup screen, press F6 to install the RAID driver.
5. When prompted, press S to specify the location of the driver.
6. Insert the floppy disk, then press Enter.
7. Select Silicon Image SiI 3114 SoftRAID 5 Controller for Windows XP/Server 2003,
then press Enter.
8. Press Enter to finish driver installation, then follow the on-screen instructions to complete
the Windows installation.
Note: If the Security Alert warning pops up, click Yes. Our driver has passed Microsoft
compatibility testing, this message appears during new installation.
For An Existing Installation
1. Setup the RAID Array prior to driver installation and boot up to Windows.
2. At the Found New Hardware Wizard:
XP(w/SP1 or earlier)/Server 2003: continue to step #3
XP(w/SP2 or later)/Server 2003(w/SP1 or later): select No, not this time, then click Next.
3. Insert the driver CD, select Install the software automatically (Recommended),
and click Next.
4. Click Finish.
5. Repeat steps 2-4.
For Windows® 2000
For A New Installation
A new installation requires a floppy disk for the driver installation. To make this floppy disk, copy
the contents of the “RC-209\Driver\RAID” folder, found on the driver CD, onto a blank floppy
disk then follow the directions below.
1. Setup the RAID Array prior to Windows installation.
2. Follow Windows® 2000 installation procedure.
3. Restart the computer when prompted by the installation.
4. At the Windows® 2000 Setup screen, press F6 to install the RAID driver.
5. When prompted, press S to specify the location of the driver.
18
User Manual
SATA 4 Port PCI Adaptor with RAID RC209
6. Insert the floppy disk, then press Enter.
7. Select Silicon Image SiI 3114 SoftRaid 5 Controller for Windows 2000, then press Enter.
8. Press Enter again to finish driver installation, then follow the on-screen instructions to
complete the Windows installation.
For An Existing Installation
1. Setup the RAID Array prior to driver installation and boot up to Windows.
2. At Found New Hardware Wizard, click Next.
3. Select Search for a suitable driver for my device(recommend) then click Next.
4. Insert the driver CD, check CD-ROM drives, uncheck the other boxes, click Next,
then click Next again.
5. If the Digital Signature Not Found message appears, click Yes. Our driver has been
thoroughly tested for stability and compatibility.
6. Click Finish.
7. Repeat steps 2-6.
To Verify Windows® 2000/XP/Server 2003 Installation
1. Right click My Computer and click Manage.
2. Select Device Manager.
3. Double click SCSI and RAID Controller, then double click Silicon Image SiI 3114
SoftRaid 5 Controller to display driver properties. A message this device is working
properly is displayed in the dialog box, the driver has been correctly installed.
For Windows® 98SE
For New Installation
1. Setup the RAID array prior to Windows installation.
2. Follow Microsoft procedures to install Windows® 98SE accordingly.
3. Once Windows has installed and booted, right click My Computer and click Properties.
Select Device Manager tab.
4. Double click PCI RAID controller listed under Other Devices.
5. Select Driver tab, then click Update Driver button.
6. Please insert the CD driver bound with Serial ATA 4-Channel RAID adapter into your
CD-ROM Drive, then click Next.
7. Select Search for the best driver for your device (Recommended) and click Next.
8. Select Specify a location and type D:\RC-209\Driver\RAID on the filed designating the
19
User Manual
SATA 4 Port PCI Adaptor with RAID RC209
file’s location. Press Next to continue to setup.
(Change D: to match your CD-ROM drive letter)
9. Click Next again, then Finish.
10. Remove the driver CD, close all open Windows, then restart Windows to complete the
installation.
For An Existing Installation
1. Setup the RAID Array prior to driver installation and boot up to Windows.
2. At he Found New Hardware Wizard window pop-up, click Next to continue.
3. Please insert the CD driver bound with Serial ATA 4-Channel RAID adapter into your
CD-ROM Drive, then click Next.
4. Select Search for the best driver for your device (Recommended) and click Next.
5. Select Specify a location and type D:\RC-209\Driver\RAID on the filed designating the
file’s location. Press Next to continue to setup.
(Change D: to match your CD-ROM drive letter)
6. Click Next again, then Finish.
7. Remove the driver CD, close all open Windows, then restart Windows to complete the
installation.
For Windows® Me
For New Installation
1. Setup the RAID array prior to Windows installation.
2. Follow Microsoft procedures to install Windows® Me accordingly.
3. Once Windows has installed and booted, right click My Computer and click Properties.
Select Device Manager tab.
4. Double click PCI RAID controller listed under Other Devices.
5. Select Driver tab, then click Update Driver button.
6. Please insert the CD driver bound with Serial ATA 4-Channel RAID adapter into your
CD-ROM Drive, then click Next.
7. Select Automatic search for a better driver (Recommended), then click Next.
8. Click Finish, remove the CD, close all open Windows, then restart Windows to complete the
installation.
For An Existing Installation
1. Setup the RAID Array prior to driver installation and boot up to Windows.
2. At the Add New Hardware Wizard, insert the CD driver bound with Serial ATA 4-hannel
RAID adapter into your CD-ROM Drive, select Automatic search for a better driver
(Recommended), then click Next.
20
User Manual
SATA 4 Port PCI Adaptor with RAID RC209
3. Click Finish.
4. Remove the driver CD, close all open Windows, then restart Windows to complete the
installation.
To Verify Windows® 98SE/Me Installation
1. Right click My Computer, click Properties, then click Device Manager.
2. Double click SCSI Controllers, Silicon Image SiI 3114 SoftRaid 5 Controller should be
displayed.
3. Highlight Silicon Image SiI 3114 SoftRaid 5 Controller and click Properties.
A message this device is working properly is displayed in the dialog box, the driver has
been correctly installed.
Thank you for purchasing a quality Rosewill Product.
Please register your product at : www.rosewill.com/
for complete warranty information and future support for your product.
If you have any question while using our products, please feel free to contact us at [email protected]
21