1
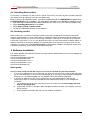
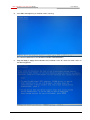
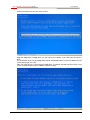
SATA150 RAID 2 Port PCI Host RC201 User Manual SATA 150 RAID 2 Port PCI Host RC201 User Manual Contents 1. Introduction .......................................................................................... 2 2. What Is RAID ........................................................................................3 3. BIOS Installation ( RAID Setting ) ......................................................... 3 4. Software Installation............................................................................. 5 Quick guide: ......................................................................................................... 5 Detail guide: ......................................................................................................... 8 1 SATA 150 RAID 2 Port PCI Host RC201 User Manual Important Message: 1. Before controller card installation, we recommend to study the PDF file of SATA Raid manual at enclosed CD folder \ SATA Raid_2Port \ SiI3x12 \ Win98_me_2000_xp_nt4.0 \ Gui first. This Raid manual has more information on Raid architecture, Raid features, Raid installation, Raid setting and Management software for Raid GUI (Graphical User Interface). 2. After driver installation, if you like, you can install SATARaid GUI for Raid management. Before SATARaid GUI installation, you must remove all the existing SATARaid GUI (or Java SATARaid GUI) to ensure your new SATARaid GUI can work properly. i.e. : (\ Start \ Control Panel \ Add or Remove Programs \ Select all SATARaid \ Remove) 3. For the creating and management of Raid sets, you can either use BIOS utility setting before Windows operation or use GUI setting under Windows. Backup all your data in HD before setting any RAID. 4. New HD connecting to RC-201 is recommended to “initial” and “format” before setting a RAID. Otherwise, PC might find nothing in the system. 5. Please read the PDF file of “SATARAID5-UserGuide_v1.40” for basic RAID knowledge. You can download this document from Rosewill website. 6. If you have trouble booting from correct HD either from motherboard HD or RC-201 HD, please change the selection from BIOS “booting sequence”. 7. Although SATA HD is a “hot swap” design, it is strongly recommended that all users turn off the power before you add any HD to PC. 1. Introduction This SATA RAID 2 Port PCI Host Adapter is a PCI to dual Serial ATA host controller board. It provides a 32bit, 33/66 MHz PCI interface on the host side and dual, fully compliant Serial ATA ports on the device side to access SATA storage devices. The board can be used to upgrade your desktop computer to have dual Serial ATA Channels and support RAID 0 and RAID 1 features. It accepts host commands through the PCI bus, processes them and transfers data between the host and Serial ATA devices. The board should be connected to SATA target device and will take the data, serialize it and output it for transmission over the SATA interface. The board can control two independent Serial ATA channels. Each channel has its own Serial ATA bus and will support one Serial ATA device. The board supports Serial ATA Generation 1 transfer rate of 1.5 Gb/s (150 MB/s). It comes completely with drivers for Windows 98, Windows Millennium, Windows NT 4.0, Windows 2000 and XP. RAID, Redundant Array of Independent Disks, greatly enhances two main areas of data storage: performance and data integrity. By using RAID 0, also known as Striping, performance of sustained data transfer rates is greatly enhanced by simultaneously writing data to 2, 3 or 4 drives. The second benefit of RAID is data redundancy. RAID 1, Mirroring, writes identical data on two drives or sets of drives, thus protecting the data from a disk failure. If, for any reason, one drive were to fail, your data is secure and available from the mirrored second drive. 1.1. Features 1.1.1. PCI Interface Compliant with PCI Specification, revision 2.2. Integrated PCI DMA engines. 32 bit, 33/66MHz fully compliant PCI host interface. Sufficient power current 1.5A5V and 2A12V to supply External Device 2 SATA 150 RAID 2 Port PCI Host RC201 User Manual 1.1.2. High Speed Serial ATA Interface Two special shielded and durable SATA1 connectors for plugging more than 1,000 times Dual high speed Serial ATA interface ports, each supporting 1st generation Serial ATA data rates (1.5Gb/s). Provides RAID 0 (Stripping) to greatly increase the performance of data transfer by simultaneously writing data to 2 drives. Provides RAID 1 (Mirroring) to protect the data from a disk failure by writing identical data on 2 drives. Fully compliant with Serial ATA 1.0 specifications. Supports Spread Spectrum in receiver. Independent 256-byte FIFOs (32 bit * 64 deep) per Serial ATA channel for host reads and writes. 1.2. Package Contents SATA RAID 2 Port PCI Host Adapter Users Manual Driver CD Low profile bracket 2. What Is RAID RAID or un-RAID function RC-201 is designed for two functions- a RAID card with RAID 0/1 or an extending card for two SATA devices with un-RAID. The un-RAID installation is the same as the RAID installation as below. The only different is that you won’t need to enter the RAID BIOS to set a RAID structure. If you want to use RC-201 as a un-RAID card, please do not enter the RAID BIOS and set any RAID set at the beginning of booting. You can jump to P5 directly to complete the driver installation. The only different is ignoring the step of RAID setting and the driver setting is the same as a RAID card. RAID - Redundant Array of Independent Disks RAID technology manages multiple disk drives to enhance I/O performance and provide redundancy in order to withstand the failure of any individual member, without loss of data. This card provides two RAID Set types, Striped (RAID 0) and Mirrored (RAID 1). Disk Striping (RAID 0) Striping is a performance-oriented, non-redundant data mapping technology. While Striping is discussed as a RAID Set type, it is actually does not provide fault tolerance. With modern SATA bus mastering technology, multiple I/O operations can be done in parallel, enhancing performance. Striping arrays use multiple disks to form a larger virtual disk. Disk Mirroring (RAID 1) Disk mirroring creates an identical twin for a selected disk by having the data simultaneously written to two disks. This redundancy provides instantaneous protection from a single disk failure. If a read failure occurs on one drive, the system reads the data from the other drive. 3. BIOS Installation (RAID Setting) Creating and deleting RAID sets is a function found in the BIOS. During boot up, the RAID setting message will appear and pause for a few moments to allow the user to choose what to do. This board will act as normal NON-RAID card when BIOS not configured for RAID. Just proceed to Software Installation section directly. If you use traditional parallel ATA HDD, make sure your hard drives be set up as master mode before the RAID setting. 3 SATA 150 RAID 2 Port PCI Host RC201 User Manual 3.1. Creating Striped Sets (RAID 0) This RAID array to be used on New/Blank hard drives. Striping will “destroy” all existing data on the original hard drive. Auto Configuration is recommended. For applications that require custom chunk size, Manual Configuration is offered. 1. As the BIOS boots, Press CTRL+S or F4 to enter the raid bios utility. 2. Select Create RAID set. Press Enter. 3. Select Stripe (RAID 0) then press Enter. 4. Select Auto configuration. Press Enter. 5. Press Y to save your settings. 6. Press CTRL+E and then press Y to exit the setup. 7. Continue with conventional Fdisk and Format steps as if you are installing a conventional hard drive. 8. Your RAID configuration is complete. Please proceed to software installation section. 3.2. Creating Mirrored Sets (RAID 1) For New/Blank Hard Drive (Recommended for all fresh HD without data) 1. As the BIOS boots, Press CTRL+S or F4 to enter the raid bios utility. 2. Select Create RAID set. Press Enter. 3. Select Mirrored (RAID 1) then press Enter. 4. Select Auto configuration. Press Enter. 5. Press Y to save your settings. 6. Press CTRL+E and then press Y to exit the setup. 7. Continue with conventional Fdisk and Format steps as if you are installing a conventional hard drive. 8. Your RAID configuration is complete. Please proceed to software installation section. For Existing Hard Drives with Data (Recommended for one/two original HD with data to mirror with one/two fresh empty HD) 1. As the BIOS boots, Press CTRL+S or F4 to enter the raid bios utility. 2. Select Create RAID set. Press Enter. 3. Select Mirrored (RAID1) then press Enter. 4. Select Manual configuration. Press Enter. 5. Select the Source drive, press Enter. 6. Select the Target drive, press Enter. 7. Select Create with data copy (disk copy), then press Enter. 8. Select online copy, then press Enter. Note: Selcting Online Copy builds the mirror while in Windows. Selecting Offline Copy builds the mirror before exiting the RAID BIOS. 9. Input the RAID size, press Enter. 10. Press Ctrl+E to exit the BIOS. 11. 11.When asked Are you sure to exit(Y/N)?, press Y to exit and reboot. 12. 12.Your RAID configuration is complete. Please proceed to software installation section. Note: If during boot the RAID BIOS reports an RAID1 set is in Rebuild status, The rebuild will continue after boot sequence is complete, disregard the message, continue booting, and let the Mirror rebuild. 3.3. Deleting RAID Sets 1. As the BIOS boots, Press CTRL+S or F4 to enter the raid bios utility. 2. Select Delete RAID set. Press Enter. 3. Answer Y to remove the RAID set. “If the RAID set being deleted is a Striped set, then all of the data will be lost. If the set being deleted is a Mirrored set, then the data will remain intact and accessible on both drives.” 4 SATA 150 RAID 2 Port PCI Host RC201 User Manual 3.4. Rebuilding Mirrored Sets This function is used when any HD in mirror is failure. Your data is still safety. System will notice and help you rebuild mirror by replacing new HD to the broken part. When a failure to one member occurs, you will be notified either by the RAID BIOS during boot or by the SATARaid GUI while in Windows. The steps below will guide you in rebuilding a failed mirror set. 1. After replacing the failed hard drives boot the BIOS, Press CTRL+S or F4 to enter the raid bios utility. 2. Select rebuilding Mirrored set. Press Enter. 3. Select Online rebuild or Offline rebuild. 4. Answer Y to rebuild the Mirrored set of hard drive. 3.5. Resolving Conflict When a RAID set is created, the metadata written to the disk includes drive connection information (Primary and Secondary). If, after a disk failure, the replacement disk was previously part of a RAID set (or used in another system), it may have conflicting metadata, specifically in reference to the drive connection information. If so, this will prohibit the RAID set from being either created or rebuilt, In order for the RAID set to function properly, this old metadata must be first overwritten with the new metadata. To resolve this, select Resolve Conflicts, and the correct metadata, including the correct drive connection information, will be written to the replacement disk. 4. Software Installation This section provides the information on how to install the drivers of SATA RAID 2 Port PCI Host Adapter for the operating systems: New & Existing Windows 98/98 SE New & Existing Windows ME New & Existing Windows NT 4.0 New & Existing Windows 2000 New & Existing Windows XP Quick guide: There are three modes for RC-201 and you can select one of them for your PC installation. 1. If you want to add RC-201 to an existing OS, set up RC-201 into a PCI slot. Enter the OS and install RC-201 with driver disk. In this case, PC is booting up by an existing HD connecting to motherboard. After RC-201 is installed complete, you can add HD and set the RAID by RAID BIOS. 2. If you want to add RC-201 to a new PC without any OS, you need to boot the OS from HD connecting to RC-201 instead of motherboard. Please follow below steps (a~f) to complete the installation. a. Put the driver (the driver must fit the OS you want to install to the HD) into a floppy disk and keep it in the floppy drive. b. Plug the HD. Turn on PC and press F4 to complete the RAID set. After you complete, save and left the setting. c. Insert Windows installation disk and start the windows installation. 5 SATA 150 RAID 2 Port PCI Host RC201 d. User Manual Press F6 at the beginning as the blue screen scanning. This will let PC boot from a HD controller instead of motherboard HD. e. Keep the floppy in floppy drive and follow the installation. Press “S” when the screen shows as the following picture. 6 SATA 150 RAID 2 Port PCI Host RC201 User Manual Choose the correct OS for your future system. Keep the floppy disk in floppy drive. PC will notice you as below if you take them off from the drive. The installation of RC-201 by floppy drive will be completed and the system will detect the HD which now plug on the card. After you install RC-201 successfully by floppy disk, installation will lead you back to the same screen as below and then press “enter” to left the setting. 7 SATA 150 RAID 2 Port PCI Host RC201 f. 3. User Manual Once the system can find the HD connecting to RC-201, you can follow the normal steps to complete the Windows installation. If you want to create a mirror with a HD with existing OS and a fresh HD, the data on existing HD will copy to fresh HD and boot as RAID 1. In addition, based on the above situation, if a bootable HD on the RC201 is desired. It means in this case you will boot our computer from RC201 instead of motherboard. Please follow the following instructions. a. Install RC-201 to an existing OS HD connecting to motherboard. b. After RC-201 install complete, turn off PC. Take the original HD off from motherboard and connect to RC-201. Take another fresh HD to connect to RC-201 for setting mirror. c. Turn on PC and enter RAID BIOS to set mirror. Choose “Manual” and then select the original HD as the data source to complete mirror. The copy will take a long time depending on your HD capability. After data copy complete, save and left RAID BIOS. Important message: If you choose the wrong HD source at the step of “manual”, all your data will be lost. d. Reboot your PC and now you can enter your OS with RAID 1. Detail guide: 4.1. Windows 98/98SE Driver Installation For New Windows 98/98 SE Systems 1. After the SATA RAID PCI Host Adapter and attached drives are configured, follow Microsoft procedures to install Windows accordingly. 2. Once Windows has been installed, double click My Computer/Control Panel/System, then click Device Manager. 3. Double click Other Devices then PCI RAID Controller. 4. Click Driver tab, then Update Driver. 5. Insert the Driver diskette and click Next. 6. Select Search for a better driver than the one ...option and click Next. 7. Check Specify a location, uncheck the other boxes, type in E:\ (If your CD-ROM/DVD is E:\) and click Browse. 8. Points specify a location, example E:\SATA Raid_2Port\ Sil3x12\ Win98_me _2000_xp_nt4.0 \ Driver, click OK and then Next. 9. Click Next and then Finish. 10. Remove the Driver CD and click Yes to restart Windows to complete driver installation. For Existing Windows 98/98 SE Systems 1. 2. 3. 4. 5. After the SATA RAID PCI Host Adapter and attached drives are configured, boot up Windows. At the Add New Hardware Wizard, click Next. Select Search for the best driver for your device option and then click Next. Insert the Driver CD, check Specify a location, uncheck the other boxes, and click Browse. Points specify a location, example E:\SATA Raid_2Port\ Sil3x12\ Win98_me _2000_xp_nt4.0 \ Driver, click OK and then Next.(If your CD-ROM/DVD is E:\) 6. Click Next and then Finish respectively. 4.2. Windows ME Driver Installation For New Windows ME Systems 1. After the SATA RAID PCI Host Adapter and attached drives are configured, follow Microsoft 8 SATA 150 RAID 2 Port PCI Host RC201 User Manual procedures to install Windows accordingly. 2. Once Windows has been installed, click My Computer, then click Properties. Click Device Manager tab. 3. Double click Other Devices then PCI RAID Controller. 4. Click Driver tab, then Update Driver. 5. Insert the Driver CD, check Specify the location of the driver (Advanced) and click Next. 6. Select Search for the better driver option, check Specify a location, uncheck Removable Media, type in E:\ (If your CD-ROM/DVD is E:\), and click Browse. 7. Points specify a location, example E:\SATA Raid_2Port\ Sil3x12\ Win98_me _2000_xp_nt4.0 \ Driver, click OK and then Next. 8. Click Next and then Finish. 9. Remove the Driver diskette and click Yes to restart Windows to complete driver installation. For Existing Windows ME Systems 1. After the SATA RAID PCI Host Adapter and attached drives are configured, boot up Windows. 2. At the Add New Hardware Wizard, check Specify the location of the driver (advanced), and click Next. 3. Insert the Driver CD, check Specify a location, uncheck the other boxes, and click Browse. 4. Points specify a location, example E:\SATA Raid_2Port\ Sil3x12\ Win98_me _2000_xp_nt4.0 \ Driver, click OK and then Next.(If your CD-ROM/DVD is E:\) 5. Click Next and then Finish. Verification of the Proper Installation for Windows 98/98SE/ME 1. Double click My Computer/Control Panel/System. Click Device Manager tab. 2. Double click SCSI Controllers, Silicon Image Sil-3x12 SATA Raid Controller should be listed. 3. Highlight Silicon Image Sil-3x12 SATA Raid Controller and click Properties. A message This device is working properly is displayed in the dialog box, the driver has been correctly installed. If any error message is displayed, remove Silicon Image Sil-3x12 SATA Raid Controller and restart your system. 4.3. Windows NT 4.0 Driver Installation For New Windows NT 4.0 System 1. Before installation, copy all the files under directory E:\SATA Raid_2Port\ Sil3x12\ Win98_me _2000_xp_nt4.0\ driver\ *.* to a blank floppy disk 2. After the SATA RAID PCI Host Adapter and attached drives are configured, follow Microsoft procedures to install Windows accordingly. 3. At the Windows Set-up screen, press F6 to specify and add the driver. 4. Press S, select Other, then press Enter. 5. Insert the Driver diskette and press Enter. 6. Select Silicon Image Sil-3x12 SATA Raid Controller Driver and press Enter. 7. Press Enter to continue and follow on-screen instructions to complete Windows NT 4.0 installation. Add Windows NT 4.0 Driver on Original Booting Device 1. After the SATA RAID PCI Host Adapter and attached drives are configured, boot up Windows. Double click My Computer/Control Panel/SCSI Adapters, then click the Drivers tab. 2. Click Add… then Have Disk.... 3. Insert the Driver CD in your CD-ROM/DVD drive and type in E:\ (If your CD-ROM/DVD is E:\), then click Browse. 4. Points specify a location, example E:\SATA Raid_2Port\ Sil3x12\ Win98_me _2000_xp_nt4.0 \ 9 SATA 150 RAID 2 Port PCI Host RC201 User Manual Driver, click Open then OK. 5. Highlight Silicon Image Sil-3x12 SATA Raid Controller and click OK. Verification of the Proper Installation for Windows NT 4.0 1. Double click My Computer/Control Panel/SCSI Adapters. 2. Highlight Silicon Image Sil-3x12 SATA Raid Controller and click Properties. This device is working properly is displayed in the dialog box, the driver has been correctly installed. 4.3. Windows 2000 Driver Installation For New Windows 2000 Systems 1. Before installation, copy all the files under directory E:\SATA Raid_2Port\ Sil3x12\ Win98_me _2000_xp_nt4.0\driver\ *.* to a blank floppy disk. 2. After the SATA RAID PCI Host Adapter and attached drives are configured, follow Microsoft procedures to install Windows accordingly. 3. At the Windows Set-up screen, press F6 to specify and add the driver. 4. Insert the Driver diskette. Press S, then press Enter. 5. Select Silicon Image Sil-3x12 SATA Raid Controller Driver and press Enter. 6. Press Enter to continue and follow on-screen instructions to complete installation. Add Windows 2000 Driver on Original Booting Device 1. 2. 3. 4. After the SATA RAID PCI Host Adapter and attached drives are configured, boot up Windows. At the Found New Hardware Wizard, click Next. Select Search for a suitable driver for my device (recommended) and click Next. Insert the Driver CD in your CD-ROM/DVD drive, check Specify a location, uncheck the other boxes, click Next, type in E:\ (If your CD-ROM/DVD is E:\). Click Browse. 5. Points specify a location, example E:\SATA Raid_2Port\ Sil3x12\ Win98_me _2000_xp_nt4.0 \ Driver, click Open then OK. 6. If the Digital Signature Not Found message appears, click Yes. (Note If prompted for Windows 2000 CD-ROM, insert the CD and click OK. Type in E:\I386, click OK and Finish. (assuming E: is your CD-ROM drive)) 7. Click Finish. 4.5. Windows XP Driver Installation For New Windows XP Systems 1. Before installation, copy all the files under directory E:\SATA Raid_2Port\ Sil3x12\ Win98_me _2000_xp_nt4.0\driver\ *.* to a blank floppy disk 2. After the SATA RAID PCI Host Adapter and attached drives are configured, follow Microsoft procedures to install Windows accordingly. 3. At the Windows Set-up screen, press F6 in order to specify and add the driver. 4. Insert the Driver diskette. Press S then press Enter. 5. Select Silicon Image Sil-3x12 SATA Raid Controller Driver and press Enter. 6. Press Enter to continue and follow on-screen instructions to complete Windows XP installation. Note: When the Software Installation warning pops up, click Yes. And when the Hardware Installation warning pops up, click Yes again. 10 SATA 150 RAID 2 Port PCI Host RC201 User Manual Add Windows XP Driver on Original Booting Device 1. After the SATA RAID PCI Host Adapter and attached drives are configured, boot up Windows. 2. At the Found New Hardware Wizard, check Install from a list or specific location (advanced), then click Next. 3. Insert the Driver CD. Check Include this location in the search, uncheck the other box, type in E:\, and click Browse. 4. Points specify a location, example E:\SATA Raid_2Port\ Sil3x12\ Win98_me _2000_xp_nt4.0 \ Driver, click OK then Next. 5. When a warning message pops up, click Continue Anyway, then click Finish. Verification of the Proper Installation for Windows 2000/XP 1. Double click My Computer/Control Panel/System. 2. Click Hardware then click Device Manager. 3. Double click SCSI and RAID Controllers, then double click Silicon Image Sil-3x12 SATA Raid Controller to display driver properties. 4. A message This device is working properly is displayed in the dialog box, the driver has been correctly installed. Thank you for purchasing a quality Rosewill Product. Please register your product at :http://www.rosewill.com for complete warranty information and future support for your product. 11