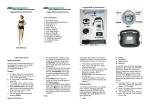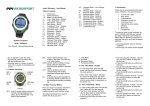
1
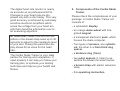
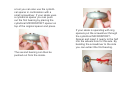
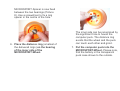
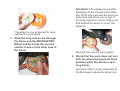
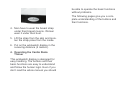
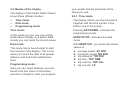
Cardio Skate Trainer 4.2.1. Time Mode 4.2.2. Data Mode 4.2.3. Programming Mode 4.3. Digital code Content 5. Programming the Display 1. Introduction 6. Changing of the batteries 1.1. Warning 1.2. Important Information 1.3. Function 6.1. Changing of the display battery 6.2. Changing of the battery in the elecronic puck 6.3. Changing of the battery in the breast strap 2. Components of the MICROSPORT-Cardio Skate Trainer 7. Trouble shooting 3. Installation 8. Remarks 3.1. Installation of the wheel 3.2. Display and wheel perimeter 3.3. Wearing the breast strap 4. Operating the MICROSPORT Cardio Skate Trainer 4.1. Buttons and their functions 4.2. Modes of the display 9. Warranty 1. Introduction Thank you very much for choosing the MICROSPORT Cardio Skate Trainer. This device is recommended because of the easy installation and handling as well as its outstanding accuracy. 1.1. Warning Before you start using the Cardio Skate Trainer please read this manual carefully. After that the installation procedure will not take longer than 10 minutes. Attention: - The breast strap of the cardio skate trainer should not be used by people wearing a pacemaker or similar devices without consulting a doctor. Interference of the strap with the pacemaker can never be ruled out totally! - The Cardio Skate Trainer includes small components which can be swallowed and can cause death by suffocation. Keep the Cardio Skate Trainer out of reach from small children. - Don’t let the Cardio Skate Trainer distract you from the traffic around you. - Always check the your equipment before skating. Check the bearings and the fitting of the axle to avoid blocking or loosening of a wheel. - Skating accidents can always happen, even to experienced skaters. To avoid serious damage always wear the complete protective gear. 1.2. Important Information - Please adjust the length of the breast strap that it fits tight but not too tight. Moisten the electric poles at the inner side of the strap to allow a correct measuring of your heart rate. - Don’t bend the transmitter, which is located in the breast strap further than the position in the original packaging. Doing so might decrease the conductivity of the poles. Please have that in mind when you store the breast strap. - Please clean the breast strap after usage. - Protect all components of the cardio skate trainer from hot and cold conditions. - Don’t expose the cardio skate trainer to direct sunlight for a longer period. 1.3. Function The Cardio Skate Trainer is a real high tech sports computer. Two independent sensor devises gather information about your speed/distance and your heart rate. This data is transmitted wirelessly to your wristwatch display where you can recall all data with the push of a button. The skate sensor (puck) is located in the wheel and is therefore protected against influences from outside. This let’s the Cardio Skate Trainer survive even severe accidents without damage. Special o-rings protect the electronic from water which might damage the electronic inside. The heart of the skate sensor is the special skating software which analyses the individual skating technique in real time. The software determines whether the skate is on the ground or not, whether you do skating moves or you are just rolling down a hill etc. From this information and the actual speed of the wheel the skate software calculates the speed of the body of the skater with an accuracy of +-3% and transmits the results to the wristwatch display. The digital heart rate monitor is nearly as accurate as an professional ECG. Changes is your heart rate are displayed only with a short delay. This very good accuracy is achieved by extremely sensitive electronic amplifiers which sense the voltage from your heart amplify them hand the information over to an evaluating algorithm. 2. Components of the Cardio Skate Trainer Please check the completeness of your package. A Cardio Skate Trainer set consists of: - a wristwatch display - an orange skate-wheel with integrated magnet ATTENTION! Please note that the amplifiers in the breast strap need up to 30 seconds to adjust to the resistance level of your skin. During this period the display shows 00 as value for the heart rate. - a transparent electronic puck, which houses the skate computer. The Cardio Skate Trainer is your ideal partner for training and competition. If used properly it can help you follow your training plan, to optimise your skating technique and improve your health and fitness. - a distance ring (1mm) - Two types of spacers, one cylindrical, the other is a 3mm thick ring spacer. - two outer spacers (1,5mm) to assemble the wheel into wider frames. - a breast strap with elastic extension strap. - this operating instruction. 3. Installation 3.1. Installation of the wheel First you have to replace one of your current wheels with the MICROSPORTWheel. In principal it does not matter which wheel of your skates you replace, but we recommend to chose the second or the third wheel. This guarantees the best protection of you speedometer by the frame of your skate. Attention: Please use adequate equipment to replace the wheel, i.e. a special Skate-Tool (not included in this package). 1. Disassemble the axle of the wheel to replace. The wheel is fixed to the frame of your skates by two screws to the left and the right of the frame. These screws form the axle. While you turn out one screw have an eye on the other screw as well. If the other screw begins to turn freely please fix it with you hand or another tool. Store the two screws carefully for reassembling. 2. Extract the spacer and the bearings of the wheel. In the wheel you have disassembled you find two bearings and one spacer in the middle. You now have to take these bearings and the spacer out of the wheel. This is most easy with a special skate tool. If you don’t have such a tool you can also use the cylindrical spacer in combination with a small screwdriver. If your skate uses a cylindrical spacer you can push out the first bearing by placing the cylindrical MICROSPORT spacer on top of the original spacer and press. If your skate is operating with ring spacers put the screwdriver through the cylindrical MICROSPORTSpacer and insert it nearly to the half into the wheels hole for the axle. By bending the screwdriver to the side you can extract the first bearing. The second bearing can then be pushed out from the inside. Again the second bearing can then be pushed out from the inside without problem. Store the bearings carefully. 3. Install the first of the extracted bearings into the MICROSPORTWheel. Push one bearing with your fingers into the central hole of the orange MICROSPORT-Wheel. 4. Place the correct spacer into the orange MICROSPORT-Wheel. Decide which of the MICROSPORTSpacers you need. Principally if your original spacer looks cylindrical you need the cylindrical MICROSPORT- Spacer. If your original spacer is a 1cm thick ring you need the 3mm MICROSPORT ring spacer. Now place the MICROSPORT Spacer into the MICROSPORT-Wheel. 5. Press the second bearing into the MICROSPORT Wheel. The MICROSPORT-Spacer is now fixed between the two bearings (Picture 8). Use a screwdriver to fix a ring spacer in the centre of the hole. 6. Place the distance ring (smallest of the delivered rings) on the bearing of the inner side of the MICROSPORT-Wheel. The inner side can be recognized by the significant hole to house the computer puck. The distance ring avoids that the wheel and the puck can touch each other and grind. 7. Put the computer puck into the MICROSPORT-Wheel. Please note, that the battery in the transparent puck case shows to the outside. Attention! If the wheel moves after tightening of the screws in the direction of the axle unscrew the axle one more time and place one or two of the outer spacers in front of the puck and behind the wheel to cover the distance. The wheel is now prepared for reassembly into your skate. 8. Stick the long axle screw through the frame and the MICROSPORTWheel and fix it with the second, smaller screw on the other side of the frame. Now the axle can be put in again. 9. Check that the puck does not turn with the wheel but keeps its fixed position while the wheel is spinning freely. Important: After correct assembly of the Microsport wheel the wheel can rotate without irritation. The puck is not moving at all. You have completed the installation of the wheel now. You do not need any technical skills for the further steps. In just five minutes you can start your first trip. 3.2. Display and wheel perimeter The bracelet of your Cardio Skate Trainer display is equipped with an elastic part underneath the watch case. This enables you to lengthen the bracelet in order to wear it over the recommended wrist pads. Handle the bracelet with care! The lower part contains the antenna and shall not be dismantled from the watch case. The display is waterproof (do not swim or dive with the display), in order to protect the electronic inside from rain and/or sweat. When changing the display battery please make sure that the o-ring fits in correctly. Perimeter of the Wheel 1. Determination of the wheel perimeter with new wheels. The following table help you to find the correct perimeter of your Microsport wheel. ∅72mm ∅76mm ∅78mm ∅80mm ∅84mm ∅100mm = PM 226 = PM 239 = PM 245 = PM 251 = PM 264 = PM 314 Attention! The perimeter of the wheel you bought has to be programmed into the display (see Chapter 5.). When you have bought your Cardio Skate Trainer i.e. with a ∅80mm wheel you have to program 251 for the perimeter PM. Generally the perimeter can be calculated from the diameter of the wheel like this: Perimeter = Diameter x 3.14 2. Determination of the actual wheel perimeter. For measuring the actual perimeter of your wheel please mark the Microsport wheel with a dot on the side. When you roll the wheel over a piece of paper please mark on the paper where the dot on the wheel is closest to the paper. Continue to roll the wheel over the paper one more full revolution and mark the position where the dot on the wheel is again closest to the paper. The distance between the two marks on the paper is the actual perimeter of the wheel in millimetres (mm). 3. The usage of the Cardio Skate Trainer with a used set of skate wheels You can also use the Microsport Skate wheel with a used set of skate wheels which have already worn out themselves. Some skates with plastic frames are designed for usage of wheels with different sizes. This so called “rockering” is enabled by a small “washer” with an eccentric hole for the axle. By rotating the washer the wheel will move up or down in the frame. This allows you to adjust the Microsport wheel to the other wheels in your skate. If rockering is not possible with your skates we recommend to use the next larger Microsport wheel. The measuring wheel will then stick out a little bit. But this effect is only short lasting because of the higher pressures it will wear out much faster until it has the same size as the other wheels of your skate. This will have only a very small effect on the accuracy of the measurements. 4. Adjusting the wear out function. The Cardio Skate Trainer has a built in wear out function which takes into account that the diameter of the wheels reduce over the distance skated. This guarantees a high level of accuracy over the whole lifespan of the wheel. The pre programmed wear out function is based on statistical data from many test skaters. However your personal wheel usage might differ from the statistical assumptions. The main factors for the wheel wear rate are the weight of the skater and the surface of the skate track. If you have the feeling that the displayed perimeter of the wheel is different from the real perimeter you should adjust the programming (see Chapter 5.) in order to guarantee the accuracy of the information provided. It makes sense to measure the actual perimeter from time to time like described in point 2. of this chapter. 3.3. Wearing the breast strap 1. Connect the breast strap to the elastic strap extension. 2. Adjust the length of the elastic extension to your breast. The strap has to sit tight, so it can not move while you are skating, but not too tight around your chest. 3. Attention! The strap has to be worn in a way that the MICROSPORT logo can be seen and that the orange arrow on the plastic cap of the breast strap points up. If you don’t wear the strap as described your heart rate cannot be measured correctly. be able to operate the basic functions without problems. The following pages give you a complete understanding of the buttons and their functions. 4. Men have to wear the breast strap under their breast muscle. Women wear it under their bust. 5. Lift the strap from the skin and moisten the strap poles from the inside. 6. Put on the wristwatch display in the receiving distance (2 meters). 4. Operating the Cardio Skate Trainer This wristwatch display is designed for easy handling. The buttons and their basic functions are easy to understand and follow the human logic. Even if you don’t read the whole manual you should 4.1. Buttons and their functions SET/DOWN: This button is used to activate the programming mode. In the programming mode you can decrease the values of interest. START/STOP: Activate/deactivate the data mode by pressing this button. Without pressing START/STOP before you use your Cardio Skate Trainer you cannot measure anything. MODE: The MODE button switches between different functions in the data mode. In the programming mode it is used to confirm the settings and switch to the next programmable value. HOTKEY: The HOTKEY lets you switch to the most important functions like actual speed, trip distance and heart rate in the data mode. When you have activated the lapcounter with MODE, the HOTKEY increases the number of laps by one. In the programing mode it brings you back to the time mode directly. RESET/UP: This button resets the trip related values like trip time, trip distance, average speed etc. to zero. In the programming mode you can increase the values by one with this button. 4.2. Modes of the display The display of the Cardio Skate Trainer knows three different modes: • • • Time mode Data mode Programming mode Time mode: In this mode you can use your cardio skate trainer display as a watch. Additionally you can recall the stored values. Data mode: This mode has to be activated to start the receiver in the display. This is necessary to record the date of all speed/ distance and heart rate related functions. Programming mode: Here you can select between your preferred units like miles or kilometres, pounds or kilograms. Also you program your weight and the perimeter of the wheel you use. 4.2.1. Time mode - The display shows you the actual time together with the time symbol in the bottom line of the screen. - Pressing SET/DOWN –activates the programming mode. - START/STOP –activates the data mode. - With RESET/UP –you erase the stored values of: a. b. c. d. e. f. average speed, AV SPD maximum speed, MX SPD trip distance, TRP DST trip time, TRP TIME trip calories, TRP CAL lap counter, LP - The MODE button lets you browse through the stores values of the following functions: a. b. c. d. e. f. g. real time, TIME actual speed, SPD average speed, AV SPD trip distance, TRP DST trip calories, TRP CAL trip time, TRP TIME lap counter, LP:00 - With the HOTKEY button you can view the stored values of: a. b. c. d. e. f. real time, TIME actual heart rate, ♥(heart symbol) distance, DST wheel wear rate, PM maximum speed, MX SPD total calories, CAL ATTENTION: the HOTKEY is only used to increase the laps in the data mode when you have activated the lap counter with the MODE button. 4.2.2. Data mode By pressing the START/STOP button in the time mode the data mode is activated. a. The screen of the display shows you two symbols HF and S (Heart Frequency and Skating) when the corresponding sensors are active and in receiving distance of the display. These symbols are replaced individually by a two digit code when the data from the sensor is received properly. The two digit number is a digital code which links your display to your sensor to avoid interference by other skaters. If it is necessary to change this code please replace the battery of the sensor for one minute. This lest the sensor automatically generate a new code when the battery is put back in. To allow the dis- play to accept the new sensor code please press MODE. Keep the MODE button pressed and push the HOTKEY button as well until the display switches of. When you press START the next time the display will link to the new sensor code automatically. b. When the signals of the breast strap and the skate puck are received correctly the display switches to the actual speed function SPD. c. When no sensor (neither skate puck nor breast strap) is received in the first 10 seconds after pressing START the display changes to nCon (no Connection). By pressing the HOTKEY you return to the time mode from which you can activate the data mode again by pressing START to try again. d. In the data mode the buttons of the display have the following functions: - START/STOP -> Deactivating the data mode. The display switches into the time mode and displays the actual function. - SET/DOWN -> This button is deactivated in the data mode to avoid entering the programming mode accidentally.. - RESET/UP -> erases the stored trip values (see chapter 4.2.1. Time mode for details). - MODE -> Displays the functions TIME, SPD, AV SPD, TRP DST, TRP CAL, TRP TIME, LP:00 in a loop. - HOTKEY -> displays: SPD, ♥=heart rate, DST, PM, MX SPD, CAL in a loop. When you have activated the lap counter with the MODE button the HOTKEY increases the number of laps by one. 4.2.3. Programming mode During the programming of the watch you can always return to the time mode by pressing the HOTKEY. This might be useful if you don’t want to program all features again. The different values to be programmed are explained in chapter 5. Programming to the display. 4.3. Digital Code The Cardio Skate Trainer is equipped with two independent coding techniques in order to avoid interference from other skaters. Besides the time coding which blocks all transmissions which are not in the correct time window of your Cardio Skate Trainer there is a digital identification code for both sensors (skate puck and chest belt). The digital code of each sensor is generated when the battery is entered into the battery compartment of the sensor cases. This means that whenever you change the battery of a sensor a new two digit code is generated. When you use your Cardio Skate Trainer for the first time, or when you have changes the batteries in one or both sensors you have to link the display to your sensor codes before you can use it again. Attention! To enable your display to link to new sensor codes press MODE. Keep the MODE button pressed and press the HOTKEY. The display turns blank for a short time and then reactivates. Put on the chest belt and have the skate with the built in MICROSPORT skate wheel available. Turn the measuring wheel in the skate for a few seconds and the press the START button of the display. Please make sure that there is no other MICOROSPORT transmitter in the range (20m, 60ft). The display displays “:” in the centre of the LCD window. When a sensor is received correctly the corresponding abbreviation -“HF” for the heart rate and “S” for skating – is displayed. When both sensors are detected correctly the display shows the corresponding sensor codes for one second (i.e. “57:38”). And then switches to the trip time function. The numbers represent the digital code of the sensors. In the example above the chest belt has the code 57 and the skate puck has the code 38. If you use your Cardio Skate Trainer with only one sensor, the display will show the abbreviation of the active sensor after detection. The display will then scan the surrounding for 10 more seconds in order to find the other sensor. If there is no other sensor active it will then display the digital code of the active sensor for one second. After that the display switches to the trip time. You can then use your Cardio Skate Trainer as a standalone heart rate monitor or as a skate speedometer. Attention! If your display can not receive the data of your sensors correctly please check: • Are the sensors activated? o Moisten the chest belt in order to guarantee activation. o Turn the measuring wheel of your skate while you are waiting for the display response. • Are the batteries still ok? o Bring the sensors very close to the display. If the sensors are detected the battery power is not sufficient any more. Refer to Chapter 6. Changing of the batteries. • Does the display expect another digital code? o When you have changed the batteries or got a new component for your Cardio Skate Trainer the sensor and the display have to be linked together again (see the beginning of this chapter). If you have the feeling that you get the information of another skater on your display please take out the sensor batteries for one minute. This will generate new codes for your sensors and the interference should be removed. Don’t forget to erase the links in the display before reusing your Cardio Skate Trainer. Attention! When your display does not react to any of your inputs, you are probably experiencing the unlikely event of a system failure. First try a software reset. Press the 4 side buttons of your display simultaneously. The display shows the actual software version of the display and returns to the time function. If the software reset is nor successful you have to perform a hardware reset. For doing so please dismantle the display battery for one minute. After that the display restarts with the factory settings. 5. Programming the Cardio Skate Trainer The calorie function of the Cardio Skate Trainer is based on a research by the University of Massachusetts (USA) about the calorie consumption in In-Line Skating. For improving the accuracy the software also takes into account the number of skating steps as well as the heart rate while skating! To activate the programming mode of the display press SET. The first variable to program is the wheels perimeter. 1. Setting the perimeter Have the actual wheel perimeter of your MICROSPORT wheel in mind. Refer to chapter 3.2. for determination. The icon PM (for perimeter) is activated in the lower left corner of the display. The first of the three digits is blinking. Press UP and/or DOWN until the correct value for this digit is reached. Confirm the value by pressing MODE. Now the second digit is blinking and can be set. Always confirm the values with MODE. consumption. Enter the weight in the unit selected before. Attention! If your weight is less than 100 KG or 100 LBS please program a leading 0, i.e. 075 for 75 KG. The programming of the three digits is equivalent to the procedure for the wheel perimeter (see point 1 of this chapter) 4. Select the speed/distance unit 2. Select the weight unit The next step is to select the unit for entering your weight. You can select between kilograms (KG) and pounds (LBS). Switch to the preferred unit with UP and/or DOWN. Confirm with MODE. 3. Enter your weight You now have to enter your weight for the correct calculation of the calorie Switch to the preferred unit with UP and/or DOWN. Confirm with MODE. 5. Program the actual time Finally you should program the actual time. First set the hours by pressing UP and/or DOWN until you have reached the correct value. Confirm with MODE and proceed in setting the minutes in the same way. After confirming the minutes with MODE the programming sequence has been finished successfully and the display returns to display the time in time mode. reason i.e. interference it’s time to change the battery. The lifespan of the batteries in the chest belt, in the computer puck and the display is nearly the same and allow approximately 150 hours of usage. If the receiving quality reduces and a change of the batteries becomes necessary please change all three batteries at the same time. 6. Changing the batteries ATTENTION! Batteries consist of dangerous, poisonous materials. They should never be swallowed or played with by children! Also batteries should never be thrown away carelessly because of the damage to the environment. Your community offers battery collections for proper disposal. For most easy changing of the batteries we offer a MICROSPORT Battery Service Kit for your Cardio Skate Trainer which consists of the necessary batteries as well as new screws and o-rings to maintain the water resistance, a screwdriver and a separate instruction manual. This makes the Battery Service Kit a complete maintenance tool for your Cardio Skate Trainer. The first indicator of a used up battery is the reading "nCon" during the data mode. If this happens without any other Of course you can also buy the batteries separately in a photo or department store. 6.1. Changing the display battery Open all four screws on the back of your display and dismantle the back plate. Unscrew one screw from the battery clip and remove the old battery. The new battery has to be a CR 1632 type. The + symbol on the top of the battery has to face up when reinstalling the battery into the clip. Carefully fasten the battery clip screw. Before you close the back plate again check the success of the reinstallation by pressing any display button. Attention! In some cases you can accidentally enter the LCD test mode of the display which means that all segments of the display are on after the new battery has been installed. Please take out the battery one more time and try again. Now you can fasten the screws of the back plate again. If you are using the MICROSPORT Battery service kit for changing the batteries we recommend to change the o-ring and the screws as well in order to keep your display waterproof. 6.2. Changing the skate puck battery Dismantle the MICORPSORT wheel from the skate (see chapter 3.1) and take out the electronic puck. Sometimes the puck is very dirty so you might want to clean it before changing the battery. Unscrew the four screws of the puck, open the case and take out the battery. The new battery has to be a CR 1632 type. The + symbol on the top of the battery has to face up when reinstalling the battery into the puck case. Close the puck case and fasten the screws again. If you are using the MICROSPORT Battery service kit for changing the batteries we recommend to change the o-ring and the screws as well in order to keep your electronic puck waterproof. code in the display by pressing MODE, keep the MODE button pressed and hit the HOTKEY until the display turns off. Reinstall the wheel according to the instructions in Chapter 3.1. 7. Troubleshooting 6.3. Changing the chest belt battery Open the battery compartment on the back of the chest belt with a small coin. Dismantle the old battery and replace it with a battery of the CR 2032 type. The + symbol on the top of the battery has to face up when reinstalling the battery into the battery compartment of the chest belt. Close the compartment with a coin. ATTENTION! After changing the chest belt battery and/or the electronic puck battery your sensor automatically generates a new digital code (see Chapter 4.3.). Before you use your Cardio Skate Trainer again you have to erase the This section deals with the most common problems reported so far. Problem: Nothing appears on the display. Solution: Press MODE, if the display remains blank replace battery of watch and press MODE again. Problem: Display readings fade out. Solution: Battery of the watch are running out and has to be replaced. Problem: Slow display response. Solution: The current temperature is higher or lower than the operating temperature of the speedometer (0 °C to 55 °C/ 32 °F to 131 °F). Problem: Black display. Solution: Temperature is too high, perhaps the display has been exposed to direct sunlight for too long. Problem: The puck is grinding against the core of the wheel. Solution: Your bearings are worn out and allow too much movement. Please replace your bearing. We recommend at least an ABEC-1 quality bearing. Problem: The displayed actual speed seems not to be realistic. Solution A. The transmission may have been interrupted for a short time. Such an interruption has no significance for the accuracy of the measurement of the distance, as long as the interruption is not for longer than 1 kilometre or 0.6 miles. Solution B. The programmed wear out function does not predict the real wear out of the wheel correctly. Check the actual perimeter of your MICROSPORT wheel and program the correct value if necessary. Solution C. The bearings you use are either extremely good or extremely bad! It the second case we recommend to get higher quality bearings for this wheel. If your bearings are extremely good the skate computer might not recognize the reduction of the wheels speed when the skate is in the air. This can lead to an error in the calculation. In this case we recommend to manually use the perimeter setting for an individual calibration. For doing so you need a known distance to skate. The best value for the perimeter to program is: real perimeter x real distance/ displayed distance (real perimeter multiplied by the real distance divided by the displayed distance) Problem: The communication between the sensors and display does not work. Solution A. The transmitter in the sensor is not activated jet. Make sure the sensors are working and check the transmission by pressing START. Solution B. The battery is weak so the distance between sensor and display is to long. You can check by bringing sensor and display close together and check again. If the signal is ok then you need to replace the batteries. 8. Remarks Microsport offers a wide range of spare parts and maintenance tools for your Cardio Skate Trainer. • A Battery Service Kit consisting of spare batteries, new screws and orings, a small screwdriver and an maintenance manual. • A Microbearing Adapter Set consisting of two inlays for the Microsport wheel and a special spacer, allows you to use lightweight microbearings of the 688 type with your Cardio Skate Trainer. • Five different Spare Wheels: 76mm/80A, 78mm/80A, 80mm/82A, 84mm/85A and 100mm/87A In case of any questions or problems not dealt with in this manual please contact our service number in Germany at: +49 (0)89 307 255 99 or leave a message on our US voicemailbox under (206) 203-1459. We will get in contact with you in 24 hours. If you have to send in the Speedometer for service and/or repair please use proper packaging in order not to damage your Speedometer during transport. Please send to the nearest of the Microsport Service Centres (Addresses below). It is always helpful if you send in a short explanation of the trouble or error that occurred. Maximum values: Trip distance 999.9 km or 999.9 mi Total distance 9999 km or 9999 mi Trip calories 9999 kcal Trip time 99 hr 59 min Laps 99 laps Limited Warranty Microsport offers the original buyer of this In-Line Skate Speedometer the warranty corresponding to the laws in the country of purchase beginning from the date of the purchase for material and/or manufacturing errors. This warranty does not cover manual damage, damage during commercial usage, usual wear and tear, accident and misguiding the warnings in this manual. Also the batteries are not covered by warranty. During the time of warranty Microsport can repair or exchange accepted claims by it's decision. Please store the receipt carefully for evidence of purchase. This limited warranty is in lieu of all other express or implied warranties, and excludes refund of the purchase price. In no event shall Microsport be liable for direct, indirect, incidental, or consequential damages arising out of the Cardio Skate Trainer, and any recovery is limits to the purchase price. No other person or company is authorized to change this limited warranty, and your dealer is solely responsible for any other warranties. The content of this operating instruction are for information only. The product can be changed during the continuous process of product development without warning. Your Microsport Team hopes you enjoy your Cardio Skate Trainer and that it helps you to achieve your personal goals better! If you have any questions, comments or critics please feel free to contact us. Microsport GmbH & Co. KG Gruental 10a 81925 Munich Germany Phone: +49 (0)89 307 255 99 Fax: +49 (0)89 307 255 98 E-mail: [email protected] website: www.microsport.de US Voicemail and Fax:(206) 203 1459 Please contact us for the Service Centre nearest to you. The MICORPSORT Cardio Skate Trainer meets the following standards for the European Union and the USA. The devices comply to the requirements of ETS 300 683 Electro Magnetic Compatibility (EMC) standard for Short Range Devices (SRD) operating on frequencies between 9 kHz and 25 GHz. The devices comply with the requirements of EEC directive 89/336/EEC with regard to Electro Magnetic Compatibility and fulfil the requirements of 99/5/EC with regard to Radio Equipment and Systems (RES); Electro Magnetic Compatibility (EMC) standard for Short Range Devices (SRD). FCC-ID: OWUOK622-7 The devices comply with Part 15 of the FCC rules. Operation is subject to the following two conditions: This device may not cause harmful interferences and this device must accept any interference received, including interference that may cause undesired operation.