1
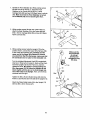
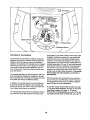
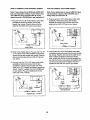
1. Identifythe Front Stabilizer (2). While another person
lifts the front of the Frame (1), attach the Front
Stabilizer to the Frame with two M10 x 112mm
Carriage Bolts (65) and two M10 Black Nylon Locknuts
(63). Make sure that the Front Stabilizer is turned
so the Wheels (30) are not touching the floor.
30
65
2
63
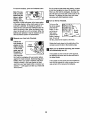
2. While another person lilts the rear of the Frame (1),
attach the Rear Stabilizer (3) to the Frame with two
M10 x 112mm Carriage Bolts (65) and two M10 Black
Nylon Locknuts (63).
63
3
65
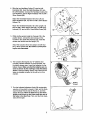
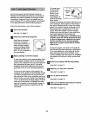
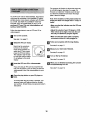
3. While another person holds the Upright (13) in the
position shown, connect the Upper Wire Harness (36)
to the Lower Wire Harness (35). Carefully pull the
upper end of the Upper Wire Harness to remove
any slack from the Wire Harnesses; make sure that
the connectors do not catch on the indicated rod.
Turn the indicatedAdjustment Knob (28) counterclockwise two or three turnsto loosen it. Next, pull the Knob,
insert the Upright (13) intothe Frame (1), and then
release the Knob. Be careful to avoid pinching the
Wire Harnesses (35, 36). Move the Upright up and
down slightly until the pin on the Knob snaps into
one of the holes in the Upright. Then, turn the Knob
clockwiseuntil it is tight.
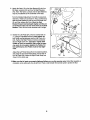
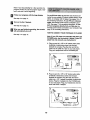
Tighten the M6 x 25.4mm Button Screw (33) intothe
Frame (1) and into the slot in the side of the Upright (13).
Attach the Water Bottle Holder (9) to the Upright (13)
with two M4 x 22mm Screws (21).
3
9
Make sure the
wire harnesses
do not get
pinched and
damaged during
this step.
21
Rod
1
28