1
TOOOBUF(_
04.4.7
1:44
PM
Page
1
9
I_ T/
/T
%
,.":<</i' " <
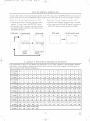
A(CESSORIFS
Remote
Control
Batteries
[ {NSTRUCC_ONES
EN ESPANOL
_
AsaoENERGY
STAR_
L_Y_
Partner,
our company
has
determined
that this product meets
the ENERGY STAR ® guidelines for
energy
is a U.S
efficiency.
registered
ENERGY STAR ®
mark
{NCLU{DAS.
1
Owner's
1
Unit
PART N().
/NE22_
_2 AA Batteries
Manual
[ 1EMN20025
T0005UF(pl-3B).QX3
04.4.7
WARNING:
1:44
TO REDUCE
PM
Page
THE RISK
2
OF FIRE OR ELE( TRI(
SHO(K,
DO NOT EXPOSE
THIS APPLIAN(
E
TO RAIN OR MOISTURE.
THIS SYMBOL INDICATES THAT DANGEROUS VOLTAGE ( ONSTITL TING A
RISK OF ELECTRI( SHOCK IS PRESENT
WITHIN THIS UNIT
CAUTION
THIS SYMBOL INDICATES THAT THERE
ARE IMPORTANT OPERATING AND
MAINTENANCE INSTRUCTIONS IN THE
LITERATURE AC( OMPANYING THE
APPLIAN( E.
CAUTION: TO REDU( E THE RISK OF ELECTRI(
SHO(K, DO NOT REMOVE (OVER (OR BACK).
NO LSER SERVICEABLE PARTS INSIDE REFER
SERVI(ING TO QL ALIFIED SERVICE PERSONNEL
The caution marking is located on the rear of the cabinet.
IMPORTANT
1oRead instructions-All
should be read before
the sal'cty and operating
the appliance is operated.
2oRetain Instructions-The
safety and operating
should be retained for tmure reference
3°Heed WarningsoAll
operating
warnings
insm+ctions
on the appliance
SAFEGUARDS
instructions
AMEUBLESCot appareil ne dolt
_tre placd que sur un meuble (axec
ou sans roulettes) recommand_
le titbricant. Si xous l'installez
instructions
operating
and use instructions
9. Ventilation-Slots
and openings in the cabinet and the back
or bottom are provided for ventilation and to ensure reliable
operation of the TV VCR DVD and to protect it from over°
heating, and these openings mast not be blocked or cow
ered. The openings should never be blocked by placing the
bility of the loss of an amhorization code tbr a CAT\: converter, is not intended to be m_ptugged by the user t:or clean=
ing or any other propose, may exclude the reference to
unplugging the appliance in the cleaning description otherwise required in item 5.
TV VCRDVD
on a bed, solit, rug, or other similar surtitce.
This TV VCRDVD should hexer be placed near or over a
radiator or heat register. This TV VCR DVD shonkt not be
placed in a built-in installation such as a bookcase or rack
unless proper ventilation is prox ided or the manutitcmrer's
instructions have been adhered to.
not use attachments not recommended by
umautitcturer as they may cause hazards
7oV_ater and Moisture-Do
not use this TViV(RiDVD
•
near
not place this TViV(_DVD
on an unstable
cart, stand, tripod, bracket, or table The ]A.7 VCR DVD may
fall, causing serious injury to someone, and serious damage
to the appliance. Use only with a cart, stand, tripod, bracket,
or table recommended
by the manutitcturer,
or sold with the
]_7 VCRiDVD. Any mourning of
the appliance should *:ollow the
manuiitcmrer's
instructions and
should use a mounting accessory
recommended by the manuthcturer.
An appliance and cart combination
should be moxed _ith care.Quick
7
10.Power Sources-This
T\
CRDVD should be operated
only from the type of power source indicated on the mark=
ing label. If you are not sure of the type of power suppl 3 to
?,our home, consult your appliance dealer or loca! po_er
company. For TV VCR DVDs intended to operate trom
battery power, or other sources, refer to the operating
water4br example, near a bath tub, wash bowl, kitchen sink,
or laun&y rob, in a wet basemem, or near a swimming pool,
and the like.
&Accessories-Do
par
sur
faces irrdgulbres risquem do ddsta=
biliser I ensemble et de b rem_erser
5°Cleaning-Unplug
TV VCRiDVD £'om the wall outlet before
cleaning. Do not use liquid charters or aerosol cleaners. Use
a damp cloth for cleaning.
EXCEPTION:
A product that is meant for uninterrupted
service and, that for some specific reason, such as the possio
6oAttaehments-Do
the TViV(RiDVD
POUR
LESCOMPOSANTES
A ROULETTES
APPARE]L ET MEUBE
un meuble 5_roulettes, d@lacez les
deax ensembles avec precautiom
Un arr_t brusque, Putilisation
d'une k)rce excessixe et des sur-
and in the
should be adhered to
4.Folbw Instructions-All
should be tbllowed.
SYMBOLE D'AVERTISSEMENT
Instructions.
PORTABLE_CART
WARNING
_'_IL
11oGrounding
or Polarization-This
TV V(R DVD is
equipped _;ith a polarized alternating-current
line plug(a
plug having one blade wider than the other). This plug will
fit into the power outlet only one way. This is a safety fentare If yon are ramble to insert the plug tglly into the outlet try reversing the plug. Itthe plug should still fail to fit,
contact >'our electrician to replace your obsolete outlet Do
not detent the satcty purpose ot the polarized plug.
12.Power-Cord
stops, excessive three, and unex en
su@aces may cause the appliance
and cart combination to overturn.
Protection-Power-supply
cords should be
routed so that they are not likely to be x_alked on or
pinched by items placed upon or against them, paying par°
ticular attention to cords at plugs, convenience receptacles,
and the point _here they exit t}om the appliance.
-2-
EN
IB15
4>
T0005UF(pl-35).QX3
04.4.7
1:44
PM
Page
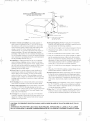
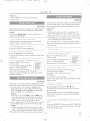
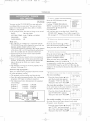
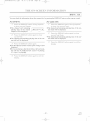
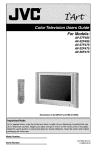
FIGURE
EXAMPLE
OF ANTENNA
NATIONAL
3
A
GROUNDING
ELECTRICAL
AS PER
CODE
LEAD IN
WIRE
DISCHARGE
UNIT
(NEC SECTION
810 20)
ELECTRIC
SERVICE
{NEC SECTION
CONDUCTORS
8/0 2/}
GROUNDCLAMPS
NEC
NATIONAL ELECTRICALCODE
GROUNDING
ELECTRODE
SYSTEM
(NEC ART 250 PART H/
S2898A
13.Outdoor
Antenna grounding-If
an outside antenna or
cable system is com_ected to the ]_J VCR DVD, be sure
the antenna or cable system is grounded so as to provide
some protection against voltage surges and built=up static
charges. Article 810 of the National Electrical (?ode,
AN SI NFPA No. 70, provides ini)rmation
with respect to
19.Damage Requiring
Service-Unplug
this TV VCRiDVD
from the wall outlet and refer servicing to qualified service
perso_me! under the tbllowing conditions:
a. When the power-supply
proper grounding of the mast and supporting structure,
grounding of the lead=in wire to an antepam discharge unit,
size of grounding conductors, location ot antemm=discharge
m_it, connection to grounding electrode,s, and requirements
tbr the grounding electrode (Fig A)
c If the TViVCRiDVD
omside antenna
has been exposed
to rain or water.
that are covered by the operating instructions, as improper
acljustment of other controls may resuh in damage and will
o,qen require extensive work by a qualified teclmician to
restore the TV VCR DVD to its normal operation.
tended and unused ibr long periods of time, unplug it from
the wall outlet and disco_mect the antenna or cable system.
This will prevent damage to the TV VCR DVD due to
lightning and powerqine surges.
Lines-An
or ti'ayed.
d. If the TViVC_DVD
does not operate nomm!ly by follow°
ing the operating instructions. Adjust only those controls
14.Lightning-For
added protection for this TV V( RiDVD
recei_ er during a lighming stom_, or when it is leti unat=
IS.Power
cord or plug is damaged
b. If liquid has been spilled, or object_ have tallen into the
TV VCR DVD
e. If the TViVCWDVD
has been &opped
or damaged
in any
way.
f
system should not be
located in the vicinity of overhead power lines or other
electric light or powcr circuits, or where it can P,dl into
such power lines or circuits. When installing an outside
antenna system, extreme care should be taken to keep from
touching such power lines or circuits as contact with them
When the TVVCR DVD exhibits a distinct
formance=this indicates a need for service.
change in per-
2&Replacement
Parts-When
replacement parts are required,
be sure the selwice technician has used replacement parts
specified by the manufacturer
that have the same characteristics as the original part. Unauthorized
sgbstitutions
may
result in fire, electric shock, injmw to persons or other haz=
ards.
might be i_ta!.
16.Overloading-Do
not ox erload wall outlets and extension
cords as this can result in a risk of fire or electric shock
21°Safety Check-Upon
completion of any service or repairs to
this TVVCR DVD, ask the service tedmician to perthrm
routine satcty checks to determine that the TV VCRiDVD
is in proper operating condition.
17.Object and Liquid Entry-Never
push objects of any kind
into this TViVCRiDVD
tl,a'ough openings as they may
touch dangerous voltage points or short out parts that could
22°Heat-This
result in a fire or electric shock. Never spill liquid of any
kind on the ]_7 VCR DVD
TViV(RiDVD
product
should be situated
away
from heat sources such as radiators, heat registers, stoves,
or other products (including amplificrs) that produce heat.
18.Servidng-Do
not attempt to service this ]N?VCRiDVD
yourself as opening or removing covers may cxpose you to
dangerous voltage or other hazards Refer all servicing to
qualified se_wice persom_el.
CAUTION: TO PREVENT ELECTRIC SHOCK, MATCH WIDF BLADE OF PLUG TO WIDF SLOT, FULLY
_NSlaRT.
ATTENTION: POUR EWTER LES CHOCS ELECTRIQUES, INTRODUIRE LA LANE LA PLUS LARGR
DR LA FICH l= DANS LA BORNE CORRESPONDANTE
DR LA PRISE laT POUSSER JUSQU'AU FOND.
=3=
EN
1BI5
4>
T0005UF(pl-35).QX3
04.4.7
1:44
PM
Page
4
IRI.{:¢I
IMPORTANT
( OPYRIGHT
I
INFORMATION
LASER SAFETY
Urmnthorized copying, broadcasting, public per%rnmnce and lending of discs are prohibited.
This product incorporates copyright protection technolog_ that is protected by method claims of certain
T_LS.patents and other intellectual property rights
owned by Macrovision Corporation and other rights
owners. Use of this copyright protection technolog3_
must be authorized by Macrovision Corporation,
and is intended for home and other limited viewing
uses only unless otherwise amhorized by
Macrovision Corporation. Reverse engineering or
disassembly is prohibited.
This unit employs a laser. Only a qualified service
person should remove the cover or attempt to se>
vice this device, due to possible eye injury.
( AUTION: USE OF CONTROLS OR AD,RISTMENTS OR PERFORMANCE OF PROCEDURES OTHER THAN THOSE SPECIFIED
HEREIN MAY RESULT IN HAZARDOUS
RADIATION EXPOSURE.
( AUTION: VISIBLE AND INVISIBLE LASER
RADIATION VV%IEN()PEN AND INTERLOCK
DEFEATED DO NOT STARE INTO BEAM.
F(( WARNING- This equipment may generate or use radio fl'equency energ3; ( hanges or
modifications to this equipment may cause
harmful interDrence unless the modifications
are expressly approved in the instruction manual The user could lose the authority to operate this equipment if an unauthorized change
or modification is made.
LO( ATION: INSIDE, NEAR THE DECK
MECHANISM
This (lass B digital apparatus
( anadian ICES-003.
coraplies with
(let appareil num@ique de la classe B est conihrn-te 'a la norme NMB-003 du ( anada.
RADIO-TV INTERFERENCE
(AUTION: TO PREVENT ELECTRIC SHOCK,
MATCH WIDE BLADE OF PLUG TO Vv]DE
SLOT. FULLY INSERT.
This equipment has been tested and %und to comply with the limits %r a Class B digital device, ptusuant to Part i5 olkhe FCC Rules. These limits are
designed to provide reasonable protection against
hannftt interlbrence in a residential insmllation.
This equipment generates, uses, and can radiate
radio fiequency energy and, if not installed and
used in accordance with the insmtctions, may cause
harmfi_d inter*Drence to radio communications.
ATTENTION:
POUR }_VITER LES CHOCS
_iLECTRIQUES, INTRODUIRE LA LAME LA
PLUS LARGE DE LA FICHE DANS LA
BORNE CORRESPONDANTE DE LA PRISE
ET POUSSER .R;SQU'AU FOND.
However, there is no guarantee that interference
will not occur in a particular installation. If this
equipment does cause harmfi_d interference to
radio or television reception, which can be determined by turning the equipment off and on, the
user is encouraged to try to correct the interl}rence by one or more of the %llowing measures:
1) Reorient or relocate the receiving antenna.
2) Increase the separation between the equipment
and receiver.
3) Connect the equipment into an outlet on a circuit different fiom that to which the receiver is
connected.
4) Consult the dealer or an experienced radio/TV
technician tDr help.
-4-
EN
IB15
+
T0005UF(pl-35).QX3
04.4.7
1:44
PM
Page
5
For sa[} operation and safis_itctoU per%rmance of
yottr TV/VCR/DVD, keep the following in mind
when selecting a place for its installation:
* Shield it from direct sunlight and keep it away from
sources of intense heat.
* Avoid dusty or humid places.
* Avoid places with insufficient ventilation thr proper
heat dissipation. Do not block the ventilation holes at
the top or bottom of the unit. Do not place the unit
on a ca<oct because this will block the ventilation
holes.
in a horizontal position.
* Avoid locations subject to strong vibration.
* Do not place tile TV/VCPJDVD nea' strong magnetic
fields.
® Install
1.u!it
Moisture condensation nmy occur inside the unit
when it is moved fiom a cold place m a wanr_ place
or after heating a cold room or under conditions of
high lmmidity, ff a DVD is played in a TV!VCPJ
DVD which has moisture, it may danmge the DVD
and TV/VCR/DVD Therefore when the condensation
occurs inside the unih tlal-nthe POWER on and allow
at least 2 hours for the unit to dW out.
The tbllowing symbols below appear in some headings and notes in this manual, with the following
meanings
ITv/vcRI
: Description re_rs to TV!VCR operation (m the
TV!VCR mode).
* Avoid moving TV/VCR/DVD to locations where
temperature differences are extreme.
: Description refers to playback of DVD video discs
(in the DVD mode).
: Description refers to playback of audio CDs
(in the DVD mode).
* Do not handle the power cord with wet hands.
* Do not pull on the power cord when disconnecting
it from an AC wall outlet. (}rasp it by the plug.
* If by accident, water is spilled on yot_r unit, unplug
the power cord immediately and rake the unit to an
Attthorized Sel_ice Center l\_r servicing.
® Do not put yottr fingers or objects into the
TV/VCR/DVD disc loading tray.
* Do not place anything directly on top of the unit.
: Description refers to the items to be set by the
QUICK mode (in the DVD mode).
A NOTE ABOUT RE( Y( LING
This product's packaging materials are recyclable and can be reuse& Please dispose of aw materials in
accordance with your local recycling regldations.
Batteries should never be thrown away or incinerated but disposed of in accordance with your local regula=
tions concerning chemical wastes.
The serial number of this product may be found on the back of the unit. No other TV!VCPJDVD has the same
serial number as yours. You should record the number and other vital in%rmation here and retain this book as
a pemmnent record of your purchase to aid identification in case of their Serial nurnbers are not kept on file.
Date of Purchase
Dealer Purchase fiom
Dealer Address
Dealer Phone No.
Model No.
Serial No.
o5o
EN
1(29
T0005UF(pI-35).QX3
04.4.7
m I]IPORTAAT
m PRECt
1:44
PM
SAFEGUARDS
UIZO:VS
LO( ATION
_'
. ...............
4
...................
5
AVOID THE HAZARDS OF
ELE( TRI< AL SHO(K AND FIRE
.5
WARNING
5
....................
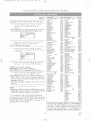
SYMBOLS USED IN THIS
MANUAL .....................
m _BLE
OF COATE:YIS
m EL4TURES.
5
. .........
6
...................
m OPEtL4TI:VG CONTROLS
F{ "IV('TIOA_S. ..................
m PRE_41t4TIOA"
7
A:'_
F()R {%'E .......
11
11
< ONNE< TFNG TO FRONT AiV
INPUT ]A<KS ................
12
THE BATTERIES
.. 12
< ONNE< TFKG TO A STEREO
AMPLIFIER EQUIPPED WITH DIGITAL INPUT .[A< KS RE< EIVER . .13
( ONNE( TI_G TO AN AMPLIFIER/RE( EIVER \VITH A DOLBY
DIGITAL DE( ODER (ibr DVD) . .14
TV/VCR SECTION
m SET UPFOR
SELECTING
(LO<K
(AUTO
USE
.............
15
THE LANG UAGE
SET UP
MANUAL)
6
VERTICAL
m SPE(Z4L
HOLD ( ONTROL
PLAYBA(X
. .15
15
27
27
REPEAT
AUTO REPEAT PLAYBA( K .....
27
PR(3GRAM
m SEARCH
.....................
ZERO RETURN
28
...............
19
DEGAUS SING ................
19
PI( TURE CONTROL ...........
19
< LOSED < APTION SYSTEM ....
20
X-(HIP
SET UP ...............
21
23
CHECKING THE SELE( TED
MTS MODE ..................
23
STEREO SOEIND MODE ........
4l
< AMERA ANGLE
41
m SPE(ZAL
F_ATURES;
. .........
29
. . .29
AUTO REWIND-E.fE< T ........
m RECORDkYG
29
.................
30
NORMAL RE< ORDING
........
30
SKIPPING UNWANTED S< ENES
DURING RECORDfNG .........
OTR (One Touch Recording)
......
......................
TIMER PROGRAM
AUTO RETURN.
m ABOUT
THE DISCS'.
PLAYABLE DIS(S
DIS( TYPES
m PLA]gA_A
DIS( MENU
...........
26
..............
49
.............
50
....................
5**
Back Cover
37
37
37
RESUME
38
....................
38
.....
..........
26
TRACK SEAR( H .............
SLOW MOTION
..............
26
TITLE / CHAPTER SEARCH
STILL PICTURE
..............
26
TIME SEARCH
...............
+
49
.............
37
.........
TITLE MENU .................
-6-
...46
37
............
.................
SE54RCH F{_VCTIOA'.
G{JDE
36
38
.....
45
36
38
TRA< KFNG AD/USTMENT
m SPE(ZFI(IIHONS
43
36
SLOW FOR\_ARD / SLOW
REVERSE ....................
NORMAL PLAYBA< K .........
43
45
...............
HANDLING
m 1_{4RIt4NTY ...........
FAST FOR\\ L%RDiREVERSE
SEAR( H ....................
26
m 3L4LYTEA_4N(_
35
.24
...................
m TROUBLESHOOTL\:G
m ESPAf/OL
SELE<TING
mPLAYBA(;¥
.........
..................
34
STEP BY STEP PLAYBACK
25
INITIALIZE
.........
35
PAUSE ......................
.............
SETTING
PARENTAL ( ONTROL
DIS(
34
.................
DISC
m (_4:VGLYG
THE D_D SETUP
FEEMS .................
44
34
............
BASIC PLAYBACK
m THE ON-S(_EF3" L\TOR]L4ITOA'...42
44
TIMER
.........
41
.........
............
.33
m OA" SCREEA: DISPLAY
41
VIRTUAL SURROUND
AUDIO SETTINGS
EXTENSION
................
BLA<K LEVEL SETTING .......
31
32
..............
.............
............
..........
HINTS FOR AUTOMATI<
RE< ORDING .................
4l
DISPLAY SETTING
32
AUTOMATI(
TIMER RE< ORDING
41
...........
LANGUAGE
< OPYING A VIDEO CASSETTE
(Requires a V<R or camcorder)
...31
m TIMER
........
30
23
m _TDEO 0tSSETTE
....41
29
MTS RECORDING MONITOR
MODE ......................
THE MTS SYSTEM
THESETTINGS
40
INDEX SEAR( H ..............
GENERAL FEATURES
m MTS(3fldti-(7*annel
Television
sound)S]STE3I
............
m (_4NGLYG
40
.........
AUDIO LANGUAGE
DVD SECTION
...19
RANDOM PLAYBACK
28
18
. ..............
4(I
...................
TIME SEAR< H ...............
m ('ABLE CHA:_]VEL
DESIG:_I4TIO]_9
..............
\\½T< HING A TV PROGRAM
. . .40
SUBTITLE LANGUAGE
18
DELETING (OR ADDING)
< HAZEL(S)
.................
FIiYCIION
.....................
28
< HAZEL
m T_ OPERATIO:Y
28
m STE(gAL PLAYBA(_
39
PI( TURE SEAR< H ............
17
............
SETUP S< REEN ......
..........
SLEEP TIMER
............
MARKER
RENTAL PLAYBA< K ..........
DAYLIGHT- SA\'fNG TIME ......
SET UP
. . .26
REAL TIME TAPE < OUNTER
9
ANTE NNAi( ABLE
< ONNE( TION ................
INSTALLING
Page
38
39
39
....
39
39
EN
IC29
T0005UF(pl-35).QX3
I TV/VCR
04.4.7
1:44
PM
Page
7
Mode I
* HbFisystem-The Hi-Fi stereo recoMing/playback
system offers you excellent sound quality.
* Rotary&head Record/PlaybackSystem-Fourheads
video ensure excellentpicrare quality aad special effects
playback
* hdex Search-Fastoforwards to start of next recording,
* Smow Notion=View recorded material at slower
titan nomml speed.
* infrared remote controm
® 2 Step picture search operation=You can view a
video material at a high speed or super high speed
in either a forward or reverse direction in LP and
SLP mode. For SP mode only high speed applies.
® Three different playback tape speeds : SP/LP/SLP
® Two different recording
tape speeds : SP/SLP
* Auto Head Cleaner=Automatically cleans video
heads when you insert or remove a cassette.
* Zero Return=The tape returns to the counter position of 0:00:00 by rewinding or *hst forwarding.
* StiH-"Freezes" the picml-e at a W time, %r close
viewing of a particular scene.
* Digital Auto Tracking (DTR}=Automafically
adjusts tracking t\_r each rope you play.
* Rental Nay mode-Improves playback picture
quality from worn ropes, such as rcntal tapes.
* Auto repeat-Allows you to repeat the playing of a
rope indefinitely without pressing tl_e PLAY button.
* Time search-Lets you set the TV/VCR/DVD to
advance tl_e rope by entering the desired playback
tirne you v_-a1111o
skip.
* OTR (One Touch Recording)-Instant
tirned
recording flora 30 to 480 minutes is possible at the
push of the REC/OTR button_
® i Year, 8 events (including
Dally and Weekly
Timer Recording}=The built-in timer allows you to
record up to 8 programs at different times on dif
fcrcnt channels up to i year in advance. The Daily
timer allows recordings 1o be made of daily broadcasts and the Weekly timer allows recording to be
made once a week up m the end of the rope.
* Auto return-After timer recording is finished, the
TViVCRiDVD can return to the begirming of the
recording.
® Smeep timer=Allows you m have the TV VCRiDVD
automatically turn off at a desired time.
* Timer Program Extension=A!lows you to shit_ the
time schedule %r automatic timer recording.
* VoCHP=Enables parents to prevent their children
from watching inappropriate nmterial on TV
® Trilingual on screen TV/VCR setup display in
English or Spanish or French
® Reamtime counter-This shows the elapsed recording
or playback time in hours, minutes and seconds_ The
.... indication will appear when the tape is rewound
fmther titan tl_e rope counter position "0:00:00"_
® i8i
tion
channel
access-(A
capabiHW
converter
TV tuner
with
direct
may be necessary
stao
to
view scrambled cable channels 0
* Auto Clock Setting=Allows you to set the clock
ftmction from a PBS (Public Broadcast Station)
broadcast station.
* Closed caption system-You nmy view specially
labeled (co) TV programs, movies, news, prerecorded ropes, etc. with either a dialogue caption or
text display added to the program.
* Auto power on and off system-Automatically
rams on the TV/VCPJDVD when you insert a cassette, turns off after auto-rewind and ejects when
tl_e beginning of the rope is reached.
® Auto
rewind
when
the
end
of a tape
is
reached=This Amction doesn't occur when using
timer recording.
* Smooth mode change-TV/VCR
mode and DVD
mode automatically changes.
-7-
4>
EN
1(29
T0005UF(pl-35).QX3
04.4.7
[ DVD Node
® Dolby
Digital
1:44
PM
Page
8
]
®On-screen display
In%nnation about the CUlTentoperation can be dis=
played on a TV screen, allowing you to confirm the
CUlTendy active functions (such as program playback), on the TV screen using the remote control.
®Search
Chapter search / Title search / Track search / Time
search
sound
This TV/VCWDVD
can output an audio signal from
the digital audio output jack Dolby Digital.
®Still/fast/Mow/step playback
Various playback modes are available including still
picture, fast %rward/reverse, slow motion and step
flames.
® Random playback for audio CD
This TV!VCP,!DVD can shu[_le the order of tracks
to play them in random order.
o Repeat
Chapter / Title / Track / All / A=B
o Marker
The location on a specific DVD disc designated by
the user to be accessed later.
playback
for audio CD
Yuu can prugram the order of tracks to play in any
desired order.
® Program
®Resume Play
User can return to the location at which play was
stoppe&
®VirtuaJ Surround
® DVD menus in a desired language
Yuu can display DVD menus in a desired langaage,
if available on a DVD.
®Screen saver/Auto power-off functions
The screen saver pru_am starts when there is no
input from the TV/VCR/DVD fur five minutes in the
stop mode_ When the screen has been in opperation
_br 15 mim_tes, the power will automatically turn off
® 8it
rate indication
o DRC {Dynamic range control)
Yuu can control the range of the diffcmce
the loudest and so*iest sounds.
between
®Subtitles in a desired language
Yuu can select a desired Iangmage _hr the display
s:ubtitles if that language is available on a DVD disc.
® Selecting
a camera angle
Yuu cap. select the desired camera angle, if a DVD
disc contains sequences recorded from different
angles.
® Choices for audio language and sound mode
You can select the desired audio langlmge and sound
mode, if different languages and modes are available
on a DVD disc.
o Parental Bock
You can set the control level to limit playback of
DVD discs which may not be suitable for childrem
o Automatic detection of discs
This TV!VCR/DVD
automatically detects if the
loaded disc is a DVD or audio CD.
NOTE:
* Wc do not recommend the use of universal remote controls. Not all of the ffmctions of this unit will be con=
trolled with the universal remote control
It"you decide to use a universal remote control with this TV/VCWDVD, please be aware that the code nun1=
bet given may not operate this TV!VCR/DVD. In this case, please call the nmnufacmrer of the universal
remote control
- 8-
EN
1(29
4>
T0005UF(pl-35).QX3
04.4.7
-TVfVCRIDVD
1:44
PM
Page
9
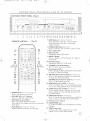
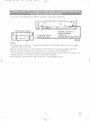
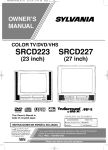
FRONT PANEL - [Fig.l]
435
6789
1011 12 13144
5. STOP
- REMOTE CONTROL -
PICTURE
[Fig. 2]
Stops
SLEEP
1
22
45
44
11
23
24
SPEED
25
26
(DVD)3
CRESET
VSURR
MUTE
<:b cO
43
42
3 (DVD)
(TV/VCR) '
5
41
13
DISpLAy
27
28
29
3O
.......
_//
4O
39
38
37
31
32
33
36
35
34
15 16 17 1819 20
Button
21
[TV \'CR R26 / DVD R37]
operation
of the disc,
(or fiont
panel)
Stops operation of the disc or video tape_
(remote control)
6. OPEN/CLOSE Button [DVD P37]
Press to open disc tray to insert or remove a disc.
7. Disc
loading
8. DVD
mndicator
tray
Illumilmtes during DVD mode,
9°SELECT Button
Press to change to TV!VCR mode, A/V input or
DVD mode.
10.TV/VCR
hdicator
Illuminates during TV/VCR mode_
11. CHANNEL (CH.) _,/V Buttons
Press to select memorized chalmeh
12. Recording
hdicator
Flashes during recording
Illuminates
by mode fur F'imer Recording
in the Stand=
13. REC/OTR Button {Front Pane[) [TVV(R P30, 31]
Press to start malmal recording
Press repeatedly
to begin One Tuuch Recording.
RECORD Button {Remote Contro{) [TV V(R P30]
Press to begin manual recording
14. REW Button (for TV/VCR) [TV VCR P26]
Press to rewind the tape, or to view the picture rapidly in reverse during playback mode. (Rewind Search)
18. F.FWD Button
(for TV/VCR} [TV \'CR R2(J
the rope, or tO VieW the
picture rapidly in tbrward during playback mode.
(Forward Search)
Press to rapidly advance
1. POWER
Button
[TV \'CR El5 / DVD 237]
Press to turn the power on and off.
2.VOLUNE (VOL) ZI..gVButtons
Press to control the volume level.
3.SKIP
Buttons
(for BVD)[R38]
Press once to skip chapters or tracks_
Press and hold to change tbrward or reverse playback speed.
4. PLAY Button
[TV I'(R
E26 / DVD
P37]
Begins playback of the disc or video tape.
16. STOP/EJECT Button [TV VCR R28]
Press to stop the tape movement. Press in the Stop
mode toremove tape _}om the TV/VCR/DVD.
17. Remote sensor window
18. HEADPHONE Jack
Tu connect headphone (not supplied) fur personal
listening
19. VmDEO input Jack
Connect tu the video output jack of a video
camera, VCR or video game system.
-9EN
1(:29
4>
T0005UF(pl-35).QX3
04.4.7
-TVlVCRtDVD
1:44
PM
Page
10
(_
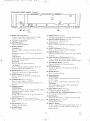
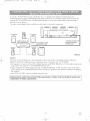
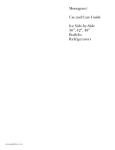
REAR PANEL - [Fig.3]
48
20. AUDIO
L/R input
31. MODE Button [DVD Rd0]
Activates program playback or random playback mode
32.SEARCH MODE Button[DVDR391
Press to locate a desired point.
33. AUDIO Button [DVD Rdl]
Press to select a desired audio language or sound
mode.
Jacks
Connect to the audio output jacks ufa video
camera, VCR or video game system.
21. Cassette compartment
22. PICTURE Button
Press to adjust the picture.
23. Number Buttons
TV Mode:[P lS]
Press two digits to directly access the desired
channel.
Remember to press a "0" before a single digit
channel.
+100
34.
35° REPEAT
[DVD Rdl]
Button
[DVD Rdl]
Repeats playback of the current disc, title, chapter
or track.
Button-
36.ANGLE Button(DVD mode) [DVDPdl]
Press to change the camera angle to see the
sequence being played back from a different angle.
37. AoB REPEAT Button[DVD Ed0]
Repeats playback of a selected section.
+10 Button-
38. RETURN
Press to enter the desired nmnbers which are
equal or greater than number 10.
24. PAUSE Button [TVVCR R26 DVD R38]
Pauses the current disc or tape operation.
28. SPEED Button [TVVCR R30]
Press to choose the desired recording speed:
SP/SLR
Button
Retmns to the previous operation in the DVD
setup mode.
39. ENTER
Button
Press to accept a setting.
40.Arrow Buttons
TV/VCR Mode:
Press to select a setting mode fi'om the menu on
the TV screen.
P,vss to select or adjust from a particular menu.
DVD Mode:
Use when making settings while watching the
display on a TV screen.
26. C.RESET Button [FVVC;RP28]
Press to reset counter to 0:00:00.
Press to cancel a setting of timer progqam. (See
page 33.)
27. DISPLAY Button
TV/VCR Mode:
Display the counter or the CU1Tentchalmel nm'nber
and current time on the TV screen.
DVD Mode:lEd2]
Displays the current slams on the TV screen fur
checking proposes.
41. DiSC MENU Button [DVD R37]
Displays the menus in the DVD.
42. M SURR {VIRTUALSURROUND) Button
Sets virtual surround on/off
43. MUTE
[DVD Rdl]
Button
Mutes the sotmd. Press it again to resmue sound.
44. SLEEP Button[TVVCRP34]
Sets the Sleep Timer.
Button [TVVCR R15] [DVD R43-45]
Press to enter or exit the TV mem_ or DVD setup
mode.
45. SELECT
29. TITLE Button [DVD P37]
Displays the title menu.
30. CLEAR
Button
Press m select a desired subtitle langstage.
Press to select cable channels which are equal or
greater than manber 100.
DVD Mode:
Press to enter the desired nmnber.
28. SETUP
SUBTITLE
Button
Press to switch TV/VCR and DVD mode. You can
see the mode (TV/VCR or DVD) on the fiont
panel indicator.
Button
Resets a setting
-10-
EN
1(29
4>
T0005UF(pl-35).QX3
04.4.7
1:44
PM
Page
11
(_
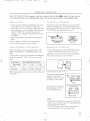
46.ANT. in Jack
Connect to an antenna, cable system, or satellite
system.
47. Power cord
Connect to a standard AC outlet (120V/60Hz).
NOTE: Remove the power cord from the hook to
avoid breaking a wire beibre you connect
to a standard AC outlet.
48. COAXIAL digRal audio out Jack {OVO, CO, MP3
Audio only)
Connect to the digital input of an external
amplifier or receiver
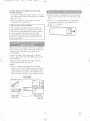
g,s
Satellite Box or
Cable Box (Not supplied)
E
__>_-_ VHF/UHF Antenna
<_
From Cable System or
Satellite Dish
(Not supplied)
.Lt VHF Antenna (Not supplied)
UHF Antenna
(Not supplied)
or
or
VHF/UHF
J
Flat twinqead cable
DL;?<;k",I J?' LLR Ji !z;v)R
In some areas it will be necessa W to use an outdoor
antenna.
[Fig. 41
7/iL ;/;!L
/f:(,yg
If yore cable set_ice snpplies you with a converter
box or if you use a satellite system, you can use the
basic connection shown in the illustration.
By using this connection you can also record scram=
bled channels. However, channel selection must be
made with the converter box or satellite box. This
means that channels cannot be changed using the
TV/VCPJDVD Remote Control. Unattended timer
recoNing is limited to one channel at a time.
Use this connection if your cable system connects
directly to your TV!VCR/DVD without a converter
box.
By using this connection you can:
1) Use the TV!VCR/DVD rcrnote to select channels.
2) Program one or more unscrambled channels _br
Automatic Timer Recording.
NOTE: This TV/VCR/DVD will ONLY record and
view the same channel.
Anten_ta/( able Connections
( ontinued on the Next Page.
-11-
EN
1(29
4>
T0005UF(pl-35).QX3
04.4.7
1:44
PM
Page
12
(_
TO RECORD
A S( RAMBLED/UNSCRAMBLED CHANNEL
1. Set the TV!VCWDVD
channel
selector
to the out-
l)Open the battery compartment cover by pressing
the cover on the remote unit in the direction of the
arrow.
2)Insert 2 "AA" penlight batteries into the butte17
compartment in the direction indicated by the
polarib_ (+/-) markings.
3)Replace the cover.
put channel of the Cable Convel_rer Box or Satellite
Box. (Ex. CH3)
2.Select fl_e channel to r_cord with yore Cable
Converter Box or Satellite Box.
Note to CATV system installer:
This reminder is provided to call the CATV system insmller's attention to Article 820°40 of flue
NEC that provides guidelines for proper grounding and in particulac specifies that the cable
ground shall be connected to the grounding system of the building as close to the point of cable
entry as practical.
When you watch a program recorded on an anofller
source (VCR, video camera, video game systcm), use
the audio/video input jacks on fl_e fiont of the
TV/VCR/DVD.
Connect fl_e audio/video output jacks of another
source to the AUDIO L/R and VIDE() jacks of this
TV!VCR/DVD.
Then press the CHANNEL button A or T until
"AUX" appears on the TV screen.
NOTE:
* When you connect a monaural VCR (another
somce) to this TV/VCR/DVD, connect the Audio
output jack of the monaural VCR (another source)
to the AUDIO L jack of this TV/VCR/DVD. The
audio will output in bofl_ L and R chalmeI equally.
To the audio
............................................................................................................................
output jacks
JAn
_ other source] !-
::-_-=__
aEAPao_a \lOEO
[
Audio/Video
cables
(not supplied)
_-_
[] aao
[]
@@@
etc.
output jack
TV/VCR/DVD]
[Fig. 51
-12-
EN
1(29
T0005UF(pl-35).QX3
04.4.7
1:44
PM
Page
13
Use an audio coaxial digital cable available at retail stores for the audio connections.
Amplifier receiver equipped
To DIGITAL
AUDIO
OUT
(PCM/BITSTREAM)
To COAXIAL
,O
AUDIO
iNPUT
DIGITAL
jack
COAXIAL jack
(only DVD, CD, MP3 AUDIO
OUT)
[Fig. 6]
NOTES:
* The audio source on a disc in a 5. i channel Dolby Digital surround format cannot be recorded as digital
sound by an MD or DAT deck.
* Be sure to turn off the power to all components in the system be/bre connecting another component.
* Ret_r m the Owner's Manuals _\)r the components to be connected to the TV!VCWDVD.
* Set Dolby Digital to OFF for audio output in the setup mode. Playing a TV!VCR/DVD using inconect settings may generate noise distortion and may also danmge the speakers.
* This will allow 2 channel DVD sound to be listened to on the amplifier/receiver.
- 13 -
EN
1(29
T0005UF(pl-35).QX3
04.4.7
1:44
PN
Page
14
(_
To use this TV/VCWDVD to play a DVD disc in a 5A channel Dolby Digital surround fom3at, the
TV/VCtL/DVD can output a DOLBY DIGITAL Data stream li'om its COAXIAL digital audio out jacL By
hooking the TV/VCtUDVD up to a Dolby Digital decoder, you can enjoy high-qualiv surrom3d sound as
enjoyed in movie theaters.
Use audio coaxial digital cables available at retail stores l\_r the audio connections.
[Fig. 7]
NOTES:
* Be sure to tLtrn Off the power to all components in the system before connecting another component.
* Rel_r to tile Owner's Manuals for the components to be connected to the TV/VCR/DVD
* If connected to a receiver with a Dolby Digital decoder, set DOLBY DIGITAL to ON tbr audio output in the
setup mode. (See page 44 to set DOLBY DIGITAL to ON.)
* Unless connected to a Dolby Digital decoder, set DOLBY DIGITAL to OFF for audio output in the setup
mode. Playing a TV!VCR/DVD using inconect settings may generate noise distortion and may also damage
the speakers.
* Only DVD, CD, MP3 sound is available using this jack.
Nanufactured
Under license from Oolby Laboratories.
trademarks of Dolby Laboratories.
- 14 -
"OoJby" and the douNe,O
symbol
are
EN
1(29
TOOOSUF(pI-3B).QX3
04.4.7
1:44
PM
Page
_
15
%" _.....
U b _.
ITV/VCR]
Plug the TVtVCWDVD po_aer cord into a
standard AC outlet.
NOTE:
x
* If any digits appear in the corner of the
screen, press the POWER button without unplug=
ging the po'_xer cord.
Make sltre °..
* Press the SELECT button to select TV/VCR mode or
make sure TVtVCR lights on.
* Press tM POD%R btltto11to ttlm on the T_/VCPwCDVD.
NOTE: This ti_mction effects only the language on
the screen menu and not the audio source.
2
Make slate ...
* The TV/VCRtDVD
See<2 'LANGUAGE"
Press the SETUP button
remote control.
on the
Press the Arroyo button .A or V to
point to '%ANGUAGE".
,
The TV/VCWDVD clock must be set correctly belbre
VCR timer recording is possible. It is suggested that
the clock be set manually when lirst setting up the
TVtVCR/DVD, then set to [ON] the auto clock sere
ring which will periodically coIrect the setting if nec=
essar>
NOTE: If you cannot receive a station with time
siglmlS, auto clock setting cannot be performed. Use
manual setting only.
s
:
/;:;,s_Aba< L <
DATE
SETTING TIME
T_P,_E
R pRO 6 RA_,4r._IN
CS
PlOTURE CONTROL
SETT_N6 CLOCk<
CHANNEL SET UP
USERS SET UP
V C;HIP SET U_ _
*
_Ab*6UAOa
EN6L_SH
CAPTIONMENU
IOF "_] [_
ZERO RETURN
T_ME SEAROH
,.
is mined on.
May 6th, 2004
5:40PM
MENU
Press the SETUP button on the
remote control.
Press the Arrow button _ or _ to
point to '_SETTING CLOCK"..,M_
Then press the ENTER button.
#...
Select ENGLISH , ESPANOL = Spamsh or
FRAN(iAIS
French usm_ the ENTER button.
2
Press the SETUP button on the remote control to
return to TV mode.
NOTE: If"for some reason the menu is in Spanish or
French, press the SETUP button on the remote control,
press the A_Towbumm _ or _ to point to "IDIOMA
[ESPAN-OL]" or "LANGAGE [FRAN(iAIS]", then
press the ENTER button, then press the SET[PP button
on the remote control.
_!:5{!e{7:{_<_
_x ,J/._,..
<,,
<,</.#
_,%
.......................
p GTURE
CONTR©L
SETTiN¢'
CHANNEL CLOCK
"ET
USERS
UP
SET UP
...........
..........
_o.
LAN®//AGE
CAPTION
[ENGL
Sbl]
IOFF]
;:_;::'"
;292
Press the Arro'_ button _ or _ to
point to "MANUAL CLOCK
SET .
..............
..........
pN_
,oToo_o°,o, [0,
AUTO
CLOCK
MANUAL
D S •
CH SEARCH
CLOCK
SET
[OFF]
Then press the ENTER button.
Press the Arrow button _ or _
until your desired month appears.
(Example: May -> 05)
Then press the Arrow button _.
(Or press the Arrow button _ to
go back one step.)
_{ Seec{
4>
HOUR
MINUTE
_he day
Pressthe Arrow button _ or _
until yore' desired day appears.
(Example:
6th-+ 06)
Then press the Arrow button _.
1151
....................
,.............
5
................
,,............
...........
EN
1(29
04.4.7
TOOOBUF(pl-35).QX3
1:44
PM
Page
16
* The TV;VCWDVD
qANUAL OLOCK SET
Press the AKow button A or _
until yotlr desired year appears.
(Example: 2004)
Then press the AKow button _.
8{(C
_%e
Press the AKo_
button
_
or _
e
;q
..............
.... ..........
"_ _."_
{<!
Press the Arrow button _ or _
until the desired minute appears,
(Example: 40)
h4ANUA[
{{
OOK _ET
...............
o............
.... ,_....
O5
40
is tamed on.
* Confim_ the TV!VCPJDVD is receiving ft RE
(Radio Frequency) signal from either an antenna or
cable system connection using the ANT. terminal
on the rear of the TV!VCR/DVD.
NOTE:
* Ifa cable converter box is being used, nmke sure it
is powered on.
* You must use the TV/VC_/DVD
remote control to
perform the clock setting procedure.
* If the TV/VCR/DVD is connected directly m a
cable converter box or satellite box, the local PBS
station must be selected on the cable box itself and
the TV/VCPJDVD must be set to the output channel of the cable convemer box or satellite box (usu=
ally channel 3 or 4), to be able to set up or correct
the clock automatically.
,_AnUAkOLOC_SE_
O_/
until your desired horn appears.
(Example: 5, PM)
Then press the Arrow button _1_
_,:>,
..............
0_, o.......
............
PM
t
©LOCK'"
Press the SETUP button on the
remote control,
Press the Arrow button A or _ to
select SETTING CLOCK .
Press the ENTER button to enter
'_SETTING CLOCK" menu.
{:? Start ecock
Press the SETUP button on the
remote control.
Although seconds are not displayed,
they begin counting from 00 when
you press the SETUP button on the
remote control. Use this t_ature to synchronize the
clock with the comect time.
NOTE:
_
•
MENU
....................
sEr,_o_oo_
USERS SET UP
........
_A_O_E
_,%_
,s_
•.........
p OT[/RE
,,
OONTRO[
CHANNEL
SET
OAPT
[OF]
TIME
ON
UP
SEARCH
2 Se ANO ?.OCt:;' s:; ON}
Press the AKow button _ until
'%UTO CLOCK [ON]" appears.
When unplugging the AC cord or if there is a power
£hilure for more than 3 seconds, you nmy have to
reset the clock.
70 l: /Lci '_,,(7/!<7;(?{K VL77/',_(7
P._.,#
If you want to change the clock,
1) Follow steps [1] and [2].
2) Select where you want to change using the Arrow
button _.
>a,
_/
%
,
{<g
g
s/'v_"{'
Press the Arrow button _ to select
_%UTO CLOCK CH SEARCH".
............
AUTO COOK
Press the ENTER button.
_............... /ON]
* The TV/VCR]DVD is nov ....
_o_
searching for the station which
contain the auto clock set signal.
The search %r a signal may take up to 20
seconds per channel.
*
" appears at the lower left of
...................
08
0
_3
the screen _xhen the search has
ended.
* Auto Clock station- write do-vxn
the number(s) that appear on the
screen. These are the auto clock
station(s) in your area. See step [4] on page i7.
* It"no number(s) appear on the TV screem there are
no stations in your area which contain the Auto
Clock signal. Auto Clock Setting is not possible.
Please use Manual Clock Setting on page 15.
Press the SETUP button to exit the screen.
AUTO
COCK
CH
/ 02
MANUAL
CLOCK
SET
3) Enter correct numbers using the Arrow button
or _.
4) Press the SETUP button on the remote control to
start the clock.
PLEASE NOTE:
If there is no local PBS (Public Broadcast station) in
your area or on your cable system, select "AUTO
CLOCK" and press the ENTER bumm to tuln [OFF]
this function. Then you can manually adjust the
clock.
1161
4>
]
EN
1(29
T000BUF(pl-3B).QX3
04.4.7
1:44
PM
Page
17
NOTE: During Auto Clock CH Search, the picture
may be distorted, this is normal.
A t_}<<i_
{ <,Oc!,<
S{:[ [_$9"_:;_
Press the SETUP button on the remote
Press the Arro'_x button & or V to
select "SETTING CLOCK".
Press the ENTER button to enter
"SETTING CLOCK" menu.
Press the Arrow button T to select
"AUTO CLOCK CH'.
Press the ENTER button or the
Arro-vxbutton _ or I_ until you
locate Auto Clock Set station nmn=
bet. See step [3] on page 16.
Press the SETUP button to exit the
screen.
ITV/VCR]
Select this feature and the TV/VCR/DVD's clock
automatically will advance one hour in April, then
reverse one hour in October.
controh
When Daylight-Saving Time is ON, the clock will
change autonmtically as follows:
* First Sunday of April : At 2 AM the clock irene=
diately changes to 3 AM. Any timer programming
you have set to occur between 2 AM and 3 AM
will not record.
MENU
.......................
SETTING CHOCK
.............
users
SeT UP
v..........
..........
p CTURE
CONTROL
LAN®//AGE
CAPTION
TIME
[ENGE
I©FF]
8H]
SEARCH
.............
.........
_o_
AUTO CLOCK CH
[ 45]
o_,
_o<
AUTO
CLOCK
MANUAL
COCK
* Last Sunday of October : At 2 AM the clock
immediately changes to i AM.
3/Iake sm_e ...
* Press the POWER bl._tlo11
to n__l._t_
ol! the TV/VCI_CDVD.
CH SEARCH
SET
J See<; !{;I;::
T"!' _,t_,CLOC/<'
mENU
TIMER
pRO®RAMMING
PICTURE
CONTROL
SaTTIN_ CLOC_
CHANNEL
USERS
SET
SET
UP
UP
v Clip SET UP
LANt, UAGE
{ENGLISH}
CAF'T ON
[OFF]
ZERO RETURN
Tl,_Z SEARCH
9
Set
Press
point
Then
[ON]
< 7
_} <
,-
_":,,,
the Arrow button & or T to
to "D.S.T.'.
press the ENTER button until
appears,
-
">1
..............
"
........
_o_
...........
,0_]
o_
,_°'_
AUTO
CLOCK
,_ANUAL
CH SEARCH
CL©CK
SE
/
Press the SETUP button on the remote control to
return to TV mode.
Repeat steps [1] to [2], select [OFF] using the
ENTER button.
1171
d>
EN
1(29
T0005UF(pl-35).QX3
04.4.7
1:44
PM
Page
18
You can program the tuner to memorize all the channels you receive in your area.
NOTE: Channel memo17 programming is NOT
needed when connected to a cable box or satellite
box. Just select the TV/VCWDVD
channel selector
to the output chalmeI of the cable box or satellite box
(Ex CH3), then select the channel to be viewed on
the Cable Box or Satellite Box.
Ma_sure...
* Press thePOW_Rbum)ntommonthe
'J Seec ©/4A/_b£i_}£L
SKT UP*
Press the SETUP button on the
remote control.
Press the Arrow button & or T to
point to _CHANNEL SET -UP'.
Then press the ENTER button.
The channels you no longer receive or seldom watch
can be deleted fiom the memory. (Of comse, yon
can add the deleted channel into the memory again.)
Press the SET-UP button on the
remote control,
Pressthe A_ow button _ or V to
point to "CHANNEL SET UP .......
Then press the ENTER button.
1
TV/VCR,©VT).
2
......
PICTURE
CONTROL
TMER
pRO{=RAMMING
SETT NG
CHANNEL
CL©CK
SET UP
USERSSETUP
v c_lp
SET UP
Seee
A©©/©E_LKT/i?
©_s,
Press the Arrow button _ or V to
point to "ADD/DELETE CH'.
Press the ENTER button.
pROGRAMMIN®
8K•TING
CHANN£L
COOK
SET UP
v Clip
SET
LANGUAGE
ZERO
UP
[ENGLISH}
RETDRN
c............
_ooo__•_,_<o_•,,)
.....................
,__,oN........
[o_
......
•............
ZERO
RETURN
_f Kite<
Be!_ auoc
:_roga*_s_, ,g
Press the Arrow button A or V to
point to "AUTO CH PROGRAMM1NG'.
_3
......
p,o_o_
oo_o
.... ......
_o<
•..........
TIqER
Press
c..,N__ o_
_.......... _,:_,_
...........................
t}e
the Arrow
dew, red
button
eha
ne
A or
until your desired channel number
appears. (You can also use the
0_
number buttons or the CHANNEL
button _ or V to enter it)
(Example: CHS)
* You must precede single-digit channel numbers
with a zero (Example: 02 ... 09).
* When selecting cable channels which are higher
than 99, press the _100 button first, then press the
last two digits. (Example: to select channel !25,
first press the +100 button then press "2" and "5').
Then press the ENTER button.
The tuner scans and memorizes all
the active channels in your area.
The tuner stops on the lowest memorized channel.
* When AUTO CH PROGRAMMING is activated
where there is no TV signal input, "NO TV SIGNALS" will appear on the display after the completion of the channel scanning.
* The TV!VCWDVD rnay recognize TV channels to
be CATV channels if reception conditions are poor.
If this happens, check the antenna connection and
t_7 the AUTO CH PROGRAMMING again, or
wait until reception conditions are better and then
W it again.
_
Oee!e(o_
add}
_om(
_o}
e_'_oy
Press the ENTER button. The channel ntlmber
changes to light red. The channel is deleted from
n]en]ory.
* To delete another channel, repeat steps [3] and [4].
* If you press the ENTER button again, the channel
is memorized again.
Added channel: Light Nue.
Deleted channel: Light red.
_
Ex
see€an
e se
p '_ode
Press the SETUP button on the remote control to
remm to TV mode.
NOTE: To confirm that channel(s) has been deleted
or added, press the CHANNEL button *_ or V.
IS
EN
1(29
4>
T0005UF(pl-35).QX3
04.4.7
1:44
PM
Page
19
The TV!VCR/DVD's picture controls
BRIGHT,
( ONTRAST, ( OLOR, TINT and SHARPNESS
are preset to _hctory specifications. Although they are
usually the best, you may need to make some further
adjustments for your individual preference.
NOTES:
* Procedures must be tbllowed within 5 seconds or
the Picture Control mode will be cancelled.
_'
o
7V VO_sU[V©
Press the POWER button to mm on the
TV!VCX/DVD.
2 Seecttcec}:{ e _'_<_e_
Press the CHANNEL button A or _" to select yol]r
desired channel number or press the number on the
rernote control.
* When setting the Picture Control, the Game mode
will be cancelled.
Note _r using the Number button on the remote
controh
• You must precede single=digit channel numbers
with a zero (For example: 02, 03, 04 and so on).
• When selecting cable channels which are higher
than 99, press +i00 first, then press the last two
digits. (Example: m select channel 125, first press
"+100" then press "2" and "5").
Remember: if the TV/VCPdDVD is connected to a
cable box or satellite box, the TV!VCR/DVD lrl_tst
be on CH3 or CH4, then the channel m be viewed
must be selected on the cable box or satellite box.
:gake sure ...
* TV/VCPJDVD
power xnust be turned on.
f S>_sa >C_" }x:!72
20_a'<<<>/'
Press the PICTURE button on the remote control.
PresstheArro'_x
buttonA or_ until
desired
control
is displayed.
BRIGHT
CONTRAST
COLOR
TINT
ooooooo_ooooooo÷
SHARPNESS
Press the VOLUME button £ or V
to adjust the volmne.
BRIGHT
VOLUME 2O
,,,_<
NOTES:
t
1!<; I { )
;Oil{
O!
Press the Al'ro'_ button _ or _ to adjust to yore'
desired level.
* If you press the CHANNEL button _ or _'in the
DVD mode, you can change the TV channels
Even if you turn off the TV/VC_/DVD in the
DVD mode, when you turn it on again, it will go
into the TV/VCR mode.
Arrow
_
A_+rmv Bu_rton
to decrease
brighmess
to increase
brighmess
(ONTRAST
to decrease
contiast
to increase
colrl-a st
(OLOR
to pale
to brilliam
TINT
to pmple
to g_ee_
SHAPNESS
to sof_
to clear
BRIGHT
This television has a degaussing circuit that will clear
up color errors on the TV screen thm are caused by
any excess magnetism which happens to get too
close to the TV This circuit is designed to operate
once when the set is first plugged in. It'minor color
errors are seen in some locations on the screen,
please unplug the TV for approximately i5 minutes.
When the TV is plugged back in, the degaussing air=
cult will operate once to clear them up. Repeat this
procedure any time the TV screen is accidentally
magnetized, or when the TV is moved or relocated.
Burton
® If there is a power failure of any kind, the
TV/VCR/DVD
will remember the setting.
19
+
EN
1(29
T0005UF(pl-3B).QX3
04.4.7
1:44
PM
Page
20
Press the SETUP button on the
remote control.
TIMER
pg{©ORAMM
............
CHANN£L SET UP
USERS SET tip
,,OHP
_E_
_P
t AN SL AG
CAPTIOr
NO
B (,LISF,]
OFF
You can view specially labeled (co) TV prograrns,
movies, news and pre=recorded tapes with either a
dialogue caption or text display.
CAPTION mode: By choosing the caption mode, you
can watch dramas, rnovies and news while captioning
the dialogues and the contents of news.
TEXT mode: By choosing the text mode, you can
watch half screen text information Jr'you want
1-2: You may get these captions or text in*\_rrnation
by selecting either "i" or "2". Caption "2" is used,
usually for a second language if available.
Press the Arro'_ button A or T to
point to "CAPTIONZ
NOTE:
PresstheSETUP buttonon theremotecontrol
to
return to TV mode.
.......
v
£<;
{.g:} ?{ O } @
Press the ENTER button until your
desired caption menu appears.
([CAPTION1], [CAPTION2] ..........
[TEXT1] or [TEXT2])
<? _::X<""e
Not all programs are broadcast with closed captions.
Your TV!VCR/DVD is designed to provide error flee
closed captions from high quality antenna, cable and
VCR signals. Conversely. poor quality signals are
likely to result in caption errors or no captions at all.
Common signal conditions which nmy cause captions
elTors are listed below:
Ca:
©"
f;_: <' "
..........
...........
CHANNEL SET UP
TIMER
PROGRAMM
N®
USERS SET UP
V Clip SET UP
*E_,,_,
_
...................
=_o_
TIME SEARCI _
NDEX SEARCH
"<O
7) <; _{_<;<iL
77H! (Z<V;L)
5 <? 7_'M
4;_/77{?_
Repeat steps [1] and [2], select [OFF] using the
ENTER button. Press the SETUP button on the
remote control to return to TV mode.
* Automobile ignition noise
* Electric motor brush noise
* Weak snowy reception on TV screen
* Multiplex signa! reception displaying picture
ghosts or ailplane flutter.
* Playback of poorly recorded or worn VCR tapes.
NOTE:
If the TV!VCR/DVD displays a
black box on the TV screen, this
;/_
....... 0
...........
TItlE SEARCH
L%<0,_,
The On-ScreenDisplay
willdisappear
a£_er
5 seconds.
* It wil! also disappear when the MUTE button is
pressed or when the PAUSE button is pressed
while recording.
* If there is a power *Silure of any kind, the
/ .............................................................
TV!VCR/DVD will retain its memory for this fca=
[
/
means that the TV/VC1UDVD is
set to the TEXT mode. To clear
screen,
select
[C APTI()N!
TION2] or [OFF].
].
[C AP-i
/
/
tklr e.
kIake sure ...
* TV/VCR/DVD's
power must be turned on.
-20-
4>
EN
1(29
T000BUF(pl-35).QX3
04.4.7
1:44
PM
Page
21
When you select the ratings of TVoY7,TVoPG,TVo 14
or TVoMA you will have the option of selecting sub
rating categories.
I ,-£
i;'
I
_! {
Make sure ...
* TV/VCR!DVD is mrned on.
'J Select
%/O/tiP
S{M " UP
T%VCR
Press the SETUP button on the
remote control.
Press
the Arro'_
V C_qip SET
LANGUAGE
& oi' T to
button
SETUp
.....................
SETTINCSCl OOK
CHANNE SET UP
°seas
seto_
/ENGL
(
[
[
[
"
_!_ S>/;
[
"g'
_
,=..
e<)<_e
OODE
1 TV
_7
RA'[/,/IIi
,,........
Press the Arro'_xbutton & oi V to
select "TV RATING".
[
_:
.........
..........
MPAA
RATING
Then press the ENTER button.
g/! S_/e:> 'g 'Sub-Raft g_
Press the Arro'_xbutton V or & to select the sub-rating you wish to block. Then, press the ENTER button twice.
............
CHAN_,E
CODE
Then press the ENTER button.
•
_\e<e')51;
remote control to enter the access
code. (Default code is 0000.)
Press the Arro'_ button & or V to
select "TV RATING'.
i ;,
,
ACOEIS
2 t_Me_/,'<<e_>_ <;t<le
¢>.,
s,, I
Use the number buttons on the
Then press the ENTER button.
,_
?
SH]
...........
INOEXSEA_CH
Use the numbc_"buttons on the/'emote
control to enter the access code.
* For the first time set-up or in the
event the TV/VCR/DVD has lost
power, enter the default code of
the manbers: 0000.
SETTING OLO_><
CHANNEL SET UP
USERS SET LIp
V CfqP SET UP
LAb*OUAGE _E_GI ISH]
OAPTION [OFF]
ZERO
TIMERRETURN
PROGR_,MMING
TIME SEAROH
J_qDEXSEARO_
UP
.......
Eo<
ZERO RETURN
select "VoCHIP SET UP'.
Press the SETUP button on the
remote control.
Press the Arrow button & or V to
select "V-CHIP SET LIP". Then
press the ENTER button.
* Whe_ you select [TYLYT]:
(
..........
<> ,<,
19
I_1-I
:al >
select "FV" (Fantasy Violence).
_"
r_LOCn
Press the Arrow button & or '_ to
,,,_
I,',EW_
Press press
the Anow
button button
V or &toto t .....
_LOO_
Then
the ENTER
select TV ratm_ that you _xish to
,,,,,
*,,,EW_
yv PG(
)
p,*lEW]
select [BLOCK] or [VIEW].
block.
_ _4_ ) _,,,E,_
* When you select [TV-PG], [TV- (
Press the ENTER button to turn it
[BLOCK].
Press the A1TOV_ button _ or & to
_
r_LOO_
[BLOCK]
*When you select the rating category and mrn it
14]
or "D"(Suggestive
[TV-MA]:
/7 .....
/_LOO_I
select
Dialog),
_
_LOO_r=L°°_
[BLOCK], the higher rating will mrn [BLOCK]
"L'(Coarse Language),
automatically. Also, the lo_er rating _ill mm
"S'(Sexual Situation), or "V'(Violence). Then
[VIEW] automatically.
press the ENTER button to select [BLOCK] or
* When you turn "TVoY" to [VIEW], all ratings _ill
[VIEW].
turn to [VIEW] autonmtically.
Note: W'hen you .'elect [TVoMA], D does not
TV
MA{
)
IVIE_N
appear
Selection
TVoY
TVoY7
TVoG
Rating Category Explanations
Appropriate %r all children
Appropriate IDrchildren seven and older
General Audience
TVoPG
TV-14
Parental Gnidance suggested.
Unsuitable for children under i4
TV-MA
Mature audience only
"=+ =
........
"
"
i :I
]Q
o2! the TV screen.
* The sub-ratings which set to
[BLOCK] appears next to the rating catego W in the TV rating
....
_,=,,,q
[VIEW]
_,,_"
_,,< ' v,=,,_
_,
.....",'_<_°_V_L_V,
r_LOCnr_L°°n
FV
pG
(DLSV}
[ILOCK]
menu.
g,., _
,
<,
+,,{
{a
vv.>*_
{}
Press the SETUP button on the remote control to
enter the setting and exit the screen.
!!l©<fI!
Press the SETUP button o2!the remote control to
exit the screen.
-21 -
+
EN
1(29
T0005UF(pl-35).QX3
04.4.7
1:44
PM
Page
22
(_
;</¢fPf;]"
(}<:%7{PFi;O,
<,xl
Note: To change the rating, the TV must be mined to
a station that is not protected. If the (PROTECTED)
appears on the screen, please change the channel to a
station that is not protected•
1)Follow steps [1] and [2]•
2)Press the Arrow button A or T to select "TV RATING". Then press the ENTER button• Select a TV
rating to be unblocked by pressing the Arrow button & or T.
Fhen press the ENTER breton to unblock the rating.
3)Press the SETUP button on the remote control to
exit the screen.
se_t{
g
Press the SETUP button on the remote control to
exit the screen.
_" i
{%
6L, {{ ,{6
F', {OIL
To change access code, %llow the steps.
?
Press the SETUP button on the remote control•
Press the AKow button _ or T to select "VoCHIP
SET "LIP".
Then press the ENTER button.
<
control to enter the access code•
The default code is 0000.
/
Press the Arrow button _ or T to
select "CHANGE CODE"• Then
press the ENTER button.
k
Use the nl.lnibul" bottons
<_:
%
,,
_
.......
TVn,/CR SETUP
TIMER PROGRAMMIN®
SETTING
CLOCK
Press the SET,LIPbutton on the
remote control•
Press the Arro'a button A or V to
select "V=CHIP SET UP". Then
press the ENTER button.
2
@ _/_:{
.............
USERS SET UP
LAN_,O_Oe
_,_ ,s_}
CAPT ON rOF_]
...........
V CHP
SET
ZERO
RETURN
_HDEX
SEARCH
ACCESS
coda
;ode
Use the number buttons on the
remote control to enter the access
code.
Press the
Arrow
button
UP
A
o1' T
1o
point to "MPAA RATING".
Then press the ENTER button.
Press the Arro'a button _ or V to
point to your desired item.
Then press the ENTER button to
select [BLOCK] or [VIEW].
Oll the rcirtote
_,
.........
I_ MpAA
RATING
CHANL, E CODE
,,
_ ':_
PG
NO W
_,_,,_
_'_"_
[BLOON
[BLOON
_Loo,,_
...........
Tg
RATING
( HANGE
CODE
#_ Ete
Newco<e
NEW CODE
Use the number buttons to enter
your desired access code in the
OONF_Rm CODE
NEW CODE space• Then enter the
same code in the CONFIRM
CODE space• V=CHIP SET UP
screen appear on the screen•
* If you enter wrong code, repeat step 4, making
sure you enter the same new code exactly in the
confima code space•
_'IE','_}
Selection
G
Rating ( ategory Explanations
General Audience
PG
PG=13
R
NCo17
Parental Guidance suggested•
Unsuitable for children under 13
Restricted; under i7 requires accompa=
nying parent or adult goardian
No one under 17 admitted
X
Mature audience only
_
Kxt
theV,©hp
settng
_ode
Press the SETUP button on the remote control to
exit
the screen.
Note: If yon unplug the power cord or power £itilure
occurs,
the access code will be lost and will remm to
defauh (0000). You will then have to your access
code again as necessary.
* When you select the rating category and mm it
[BLOCK], the higher rating will turn [BLOCK]
automatically. Also, the lower rating will mm
[VIEW] automatically.
® When you ttIIT1"G" to[VIEW], all ratings will tmn
to [VIEW] automatically.
-22 o
EN
1(29
4>
T0005UF(pl-35).QX3
04.4.7
1:44
PM
Page
23
Q_
You can record or listen to a program in MTS stereo.
When you play a VHS tape, or receive a broadcast
on the TViVCRiDVD tuner channel you arc watching,
the stares shown below will appear when you press
the DISPLiVY button on the remote control.
PLAY _
4) E
12:00AM
,HIFt
CH 123
• SP
SAP
COUNT
4) While the TV!VCPJDVD is set in HIFI stereo
mode and playback mode. HIFI appears on the
TV screen. While the TV!VCR/DVD is set in
0:00:00
Second Audio Program, which means your
program, can also be received in a second
language
HIFI
1) When a prograrn is broadcast in stereo, STERE()
appears on the TV screen.
2) When a program is broadcast in second audio,
SAP appears on the TV screen.
3) When a program broadcast both in stereo and sec=
ond audio, STEREO and SAP appear on the TV
screen.
NOTE: Although a program may be broadcast in
both stereo and second audio, you cannot
record in both stereo and second audio at
the same time.
or sometimes
High Fidelity
sonnd.
Type of broadcast
Regular
(monaura! audio)
Stereo broadcast
Bilingual broadcast
a radio
which produces
Display on
the TV screen
°None=
monaural(MONO)
the TV screen.
station
NOTE: If you play nonoHIFI tapes while the
TV/VCR/DVD is set in HIFI, HIFI will
disappear flom the TV screen and the
TV!VCR/DVD wi!! play automatically in
monaural.
high quality
STEREO/SAP
Hi-Fi audio track(2-chamlel)
L-channel
R-chamM
SELE( TION
qnvalido
STERE()
-invalid=
SAP
STEREO*
SAP*
Stereo & Bilingual
broadcast
STERE()
SAP
mode, HIFI disappears flom
STEREO*
SAP*
Normal audio
Mono
Mono
track
Mono
L
Main audio
R
Main audio
L _R
Main audio
prog_um
Sub audio
progqam
L
sub audio
program
program
Sub audio
program
R
sub audio
program
prog_um
Sub audio
prog_am
L+R
s:ub audio
program
*You must select the recording mode in TV AUDIO [STERE()] or [SAP] uhen you record a broadcast
-23 -
+
EN
1(29
T000BUF(pl-3B).QX3
04.4.7
Ma_sut_
1:44
Page
mrned on.
?
S'
VCfh
You can change the selection to "MONO" if you
want to listen to HIFI tapes in normal audio playo
back.
'/'H/i:?
(?D£
Press the SETUP button on the
remote control.
Press the Arrow button A or V to
point to "USER'S SET UP". Then
press tile ENTER button.
_,
24
...
o TV/VCR/DVDpowermustbe
;_??£Yti
PM
5
Press the A_Tou button _ or V to
point to"VCR AUDIO".
1) Press the SETUP button on the remote control.
Press tile Arrow button _ or T to point to
"USER'S SET UP". Then press the ENTER button.
2) Press the Arrow button _ or V to point to
"VCR AUDIO".
3) Press the ENTER button until [MONO] appears.
4) Press the SETUP button on the remote control to
return to TV mode.
.............
USERS SETUP
......
...........
_o_
_°_
vc_ AUDIO
TVAUD 0
_lg
ISlER_01
AUT©
NETURN
{OIF /
'_ Seec
*UStI_':_ S SZ{7 UP
_v........
Press the SETUP button on the
TIMER
3 Seec_/IP_ F:/]
Press the ENTER button until
[HIFI] appears.
remote
control.
PF_QGIRAMM
UseRs
RE_TAL
REPEAT
PLAY
fOFF]
[OFF]
AUTO RETURN
VCR AUDIO
IOFF]
[HIFI]
T_ AUDI©
[gTE_
Press the Arrow button _ or _ to
point to "USER'S SET -LIP .
.....
O]
/
NOTES:
For everyday operation, "HIFP' should be selected
for playback/recording.
* When you play non-HIFI tapes, the TV/VCR/DVD
will play automatically in the monaural mode.
* The TV/VCPdDVD records automatically MTS
broadcasts in HIFI stereo sound unless you select
SAP mode recording before you begin recording.
SET Up
_A_UA_
Y2_,,_,_
_,_
.........
_A_o_,
CAPTION
[OFF]
_NDEXSEARC_
2
,#_To e/_
_oqV _ode
Press the SETUP button on the remote control to
remm to TV mode.
N®
_eTTING
CSETOOK
CHANNSL
UP
Seec_
?VAU©O
Press the AKow button _ or _ to
point to"TV AUDIO".
3 Seec/STZi:([_iO]/SAP]
o_ ilF;/_ONO]
Press the ENTER button until [STERE()], [SAP], or
[MONO] appears.
Press the SETUP button on the remote control to
return to TV mode.
NOTES:
You must select the recording mode,either TV
AUDIO [STEREO] or [SAP] when you record a
broadcast.
Reibr to "MTS RECORDING/MONITOR
MODE".
* If you select second audio when second audio is
not available, the TV/VCR/DVD will record norma! audio.
* The TV/VCR/DVD records automatically MTS
broadcasts in HIFI stereo sound unless you select
SAP mode recording beibre you begin recording.
- 24 -
EN
1(29
T0005UF(pl-3S).QX3
04.4.7
1:44
PM
Page
25
This TV/VCR/DVD
will operate with any cassette that has the _
mark. For best results,
we recommend the use of high-quality tapes. Do not use poor quality or damaged tapes.
k??E<;4
_'77o,<_
* Avoid moisture. Moisttue condensation may oeel]r
on the tape if it is moved _iorn a cold place to a
warrn place or visa versa. Betbrc using a tape with
these conditions, to avoid damage of the tape and
your TV/VCWDVD
wait until the tape has
warmed to room temperature and the moisture has
evaporated.
* Avoid extreme heat, high humidity and nmgnetie
fields.
Insert the cassette in the direction as shown. Push in
gently, but continuously, on the cente>back of the
cassette until it is drawn into the TV!VCR/DVD. The
TV!VCWDVD will automatically turn on.
* Do not tamper with the cassette mechanism.
* Do not touch the tape with your ringers.
7>'0
CORRECT
<; *'>:?E7
77!'
7;4PE_iP/i'L
){:<
Betbre recording, select the rope speed from : SP
mode (Standard Play) or SLP mode (Super Long
Play).
The ruble below shows the nmximum recording/playback time using T60, T120 or T160 ropes in each
WRONG
1)IntheStopmode, presstheSTOP/EJECT button
on theTV;VCR/DVD_ The cassette
willejecL
2)Pu!l
thecassette
outofthecassette
compartment
3)Store the cassette in its case as shown.
mode.
Tape Speed
Recording/Playback
Time
T)pe of tape
SP mode
T60
1 hottr
TI20
2 hours
TI60
2o2/3 hours
SLP mode
3 hottrs
6 hours
8 hours
Note: You can play back a rope recorded in LP mode
(Long Play).
You can prevent accidental
erasing of recording by
breaking off the mb on the
back edge of the cassette.
If you decide 1o record on
the rope again, cover the
hole with plastic tape.
Plastic
Tape
NOTE:
° In DVD mode, Whether the cassette is with mb or
without tab you insert, it doesn't start playing until
you press the PLA-Ybutton.
In TV,WCR mode, if the cassette without tfff_is
inserted, playback will autonmtieally start.
- 25 -
4>
EN
1(29
T0005UF(pl-3B).QX3
04.4.7
1:44
PM
Page
25
(_
1_/Iakesure ...
* TV/VCR/DVD
Press the PAUSE button, then press the F.FWD _
po'_xer must be turned on.
button to start the playback in slow motiom The
TViVCRiDVD mutes the sound during slow motion.
Press the PLAY button to return to nomla] playback.
NOTE: If it is left in the Slow mode lbr more than
five minutes, the TV/VCR/DVD will automatically
go into the Stop mode.
'J _:_<:_ _ }>_:,e;:_<_:le__,::_l)e
If the erase-protection tab has been removed, the
TV/VCR/DVD will start playback atuomafically,
Press the PLAY button.
You can view a still picture on the TV screen during
playback (the Still rhode). Press the PAUSE button
during playback. Only tapes recorded in the SLP
mode will show the least amount of lines. Press the
PLAY button to return to playback.
NOTES:
* You can advance the pictul-e one flame at a time by
pressing the PAUSE button during the Still mode.
* If it is left in the Pause mode for more than five
minutes, the TV!VCR/DVD will automatically
switch to the Stop mode.
Press the STOP button when playback is completed.
NOTES:
* If you press the PLAY button (of the TV!VCR side)
in the DVD mode, you can start the VCR playback.
* If you press the SELECT button dm'ing the VCR
playback, it will stop and the mode will change to
the DVD mode. In addition, the same fl_mction
operates with the DVD side PLAY button or the
OPEN/CLOSE button.
In the Pause/Still mode only, when the picture begins
to vibrate verticall> stabilize the picture by pressing
the CHANNEL button i or _.
NOTE:
If there are video noise lines on the screem see Tracking
Adiusm_ent section.
* Tracking adjustment will be set automatically
(Digital Tracking function) when you start play=
back.
* However when playing pre-recorded tapes or tapes
recorded on other VCR, noise lines (black and
white streaks) may appear on the playback picture.
If this occurs, you can adjust the tracking control
manually by pressing the CHANNEL button _ or
until the streaks disappear. To remm to the DTR
fi_mction,stop the tape once and start playback
again.
* You can reduce the noise lines by pressing the
CHANNEL button _ or _" in slow mode too.
Tracking adjusm_ent in Slow mode will not be set
automatically.
1261
4>
EN
1(29
T0005UF(pl-35).QX3
04.4.7
1:44
PM
Page
27
I>I]LI' I !s £
7I 1I,_=,
, '_: 2! &_;" ;/"
kJake sm"e ...
* TV/VCR/DVD's po'_xer must be turned on.
* Insert a prerecorded tape.
The TV/VCR/DVD has the auto repeat function that
allows you to repeat a tape indefinitely without
touching the PLAY button.
ALL REPEAT: Repeat playback from the beginning
to the end of the tape.
BLANK REPEAT: Repeat playback fiom tl_ebeginning to a blank par< which is blank tbr more than
10 seconds.
This ffmction enables you to improve the picture
quality _ahen playing back _om cassettes such as
rented tapes.
_
Start
return to the TV mode.
playback
Press the PLA-Ybutton to start playback. "RENTAL
PLAY _" appears.
* Once you select tl_e Renta! mode, it stays in e_l}ct
even a*ker you tttrn off the TV!VC_JDVD.
7Y?
#;_Start playback
Press the PLAY button to start the Repeat Play.
"REPEAT PLAY _" appears.
* Once you select the Repeat Play mode, it stays in
effect even after you turn off the TV/VCR/DVD.
* If"the Rental mode is set [ON], the "RENTAL
PLAY _" display has priority.
7'}M:{_ £/} _"_
}!; £ "U_O)E
Repeatsteps[1]and [2],
select
[OFF]usingthe
ENTER button on the remote control. Press the
SETUP button on the remote control to return to TV
mode.
7Y?<;
If there is a power Nilure of any kind, the
tv/vcr/dvd will retain its memory %r this feature.
",<7i£TM£EE/*£,;II
< P£,
} IODE
Repeat steps 11] and [2], select [()IF] using the
ENTER button on the rernote control. PrEss the
SETUP button on the remote control to return to TV
mode.
If there is a power failure of any Mnd, the
TV/VCR/DVD will retain its memory %r this feature.
-27-
4>
EN
1(29
T0005UF(pl-35).QX3
MaDe sure ...
, TV/VCR/DVD
* Insert a tape.
04.4.7
1:44
PM
Page
28
power must be turned on.
The Time Search ftmc_ion nmkes it possible to quick=
ly advance the tape to your desired position sirnply
by entering the exact amount of playback time you
want to skip.
NOTES:
This fhnction allows you to search easily a beginning point
dmt you want to review by rewinding or fhst fbm arding.
NOTE:
Zero Return WILL NOT work on a blank tape or a
blank portion of a tape.
*Tirne Search can be set up to a maximum of 9
hours 50 minutes (9:50) by i0 minutes at a time.
* This fl_mction will not operate in recording mode.
* This Rmction is not operative when a cassette rope
is not inserted in the TV/VCPUDVD.
'_' 9 <@a apes3 yo_ _ d<<: r_::: po_;
Rewind or [hst %rwm'd the tape to the beginning
point at which you want to review.
h, tDe e.va,_n/c, Delow. To watch a program be%re/
after 2 hour 50 minutes fiom the present position, in
either direction.
Press the C.RESET buuon repeatedly.
'S se_t
s
Press the RECORD or PLAY button.
Press the STOP button when recording or playback is
completed.
£
a tape
8
8
Seeet
7 _iS/;!I;
SEARCH
88
s
_ode
Press the SETUP button on the
.........
remote control.
TIMERPROGRAqMINGsKTTINI3
CI OOX
CHANNK
Press the SETUP button on the
relTlote
control,
(-
.............
TIMER pROO_MmlNG
s_m_, c_ocx
SET tip
SET
UP
USERS SET UP
Press the Arrow button & or _ to
point to "TIME SEARCH".
Then press the ENTER button.
..........
=_o......
_._°_
TIME S£AROH
NDE× SEARC_t
CHANNEL
USEmS SET UP
Press the Arrow button _ or _ to
..........
LANOUAOE (ENOL SH]
point to "ZERO RETURN".
_o........
_o_°_
TImE SEARCH
Then press the ENTER button.
,..........
The counter wil! appear on the TV screen.
The tape wi!l automatically stop when the counter
returns to 0:00:00.
Press the Arrow button & or _" until( _,,.:>-A
....
your desired time appears.
iExample: "2:50' stands for 2
/ _
hours/
50 minutes)
[
If you _aish to cancel the Tirne
Search at this point, press the SETUP button on the
remote control.
This feature is veWusefifl in finding or skipping over a particular scene on a tape.In this mode, the soundwill be muted.
1)You nmy view a video tape at a high speed in
either a forward or reverse direction by pressing
the RFWD _
or REW _l-_ button during playo
back. (in the SP / LP / SLP modes)
NOTE:
*If you press the F.FWD _
or REW _
button
on the front panel in the DVD mode, the VCR forward or reverse will start. Please press the STOP /
EJECT button once to stop it, twice to eject it.
2)Press it again and the TViVCRiDVD wil! now search
in super high speed. (in the LP / SLP modes only)
NOTE:
* Tapes recorded in the SP or LP mode will dis=
play a noise bm on the TV screen and the picture
may revert to Black and White. This is normal.
3)Press the PLAY button to return to nomml speed.
°28
Be9
;'[_eSea_e
By pressing
TV/VCR/DVD
the Arrow
button _ or _, the
will rewind or fast forward
to the
specified point.
The time counts down as the searching progresses.
When 0:00 is reached, the tape will start playback
automatically.
Press the STOP/EJECT bumm on the TV;VCR/DVD
or the STOP button on the remote control. This will
delete the selected time.
o
EN
IC29
4>
T0005UF(pl-3B).QX3
04.4.7
1:44
PM
Page
29
[% ,,,,
,;>,
@
,
¢ **
TVVCR
Press the SETUP button on the
remote control,
Press the AKow button A or _' to
point to "iNDEX SEARCH". Then
press the ENTER button.
This feature provides a method of indexing the star>
ing point so that it can be easily returned to in ei@er
fast forward or rewind mode.
* The index mark will be made automatically when
@e RECORD button is pressed. It wil! also be
marked at @e starting point of Timer recording and
OTR.
* The index nmrk will not be recorded if the PAUSE
button is pressed and released during recording.
* The time gap beP,veen making the index marks on
@e tape should be greater than i minute for SP
recording, 2 minutes £)r LP recording and 3 mira
utes £_r SLP recording.
* In some cases, the index mark at the beginning of
video tape cannot be detected.
Example: You are watching program number 4 and
want to fast lbrward to program number 7. You
must skip three programs.
CURRENT
PLAYBACK
PROGRAM
9
R_£ !el
yo_l!
d!);ii-e
SETUP
.....................
SETTINLv
CLOCK
o_=_useRs
sErSETupUP
v c;HIP sET up
........ _......
............
CAPTION
[OFF]
ZERO RETURN
INDEX
SEARCH
J 11@I_ ){!_
Press the Arrow button A o1'_" matil[ '=°=i2
.....
the number of programs that you
[
want to skip appears.
/
(Example: _'03 ' for 3 prom'ams)
/
* The Index Search mode will be
(
canceled if the procedures are not activated in 30
seconds.
3 _i!;egi /alex Seach
Press the AiTow button _ or _. The TV!VCR/DVD
begins rewinding or fast lbrwarding to the beginning
of desired program.
NOTE: Eveu time an index signal is skipped, the
nmnber in the progqaln indicator decreases by one.
m
Beginning of tape
.4
INDEX
3
2
!
1
End of tape
1
2
When the preset program is reached, the
TV/VCPJDVD will start playback automatically.
* A video cassette must be inserted in the
TV!VCR!DVD £_r this hmction to work.
3
MARK
* The number of Index Searches can be set up to 20.
* This function will not operate in the recording mode.
* When you want to cancel @e Index Search while
in progress, press the STOP button.
<g}l]W I !_ I
I:? "i_,
This shows the elapsed recording or playback time in
hours, minutes, and seconds. (The displayed time will
not change on a blank rope or blank portions on the
tape.)The .... indication will appear when the rope has
rewound further than "0:00:00" on the tape counter.
I I>}129;<
* When the end of a tape is reached daring record=
ing, playback, or fas>lbrward, the rope will auto=
matically rewind to the beginning. After rewinding
finishes, the TV/VCR/DVD will eject the rope and
mm itself to off
* This ftmction is operative when Repeat Play is set
to the [OFF] position.
* The tape will not aura-rewind during timer record=
ing or One Touch Recording.
- 29 -
EN
1(29
4>
T0005UF(pl-35).QX3
04.4.7
1:44
PM
Page
30
Make sure ...
* TV/VCWDVD
power must be turned on.
* Insert a cassette tape with its erase prevention tab in place. (If necessary, rewind or fast forward the rope to
the point at which you want to begin recording0
NOTES:
* This TV/VCR/DVD will ONLY record and view the same channel
* This TV/VCR/DVD calmot record the contents fi'om the bull>in DVD.
You can ONLY _xatch the same TV progqam that is
being recorde&
'_ Seect
t e c a
/
Press the PAUSE button to tern=
( .....
porarily stop recording.
Press the PAUSE or RECORD button to resume recording.
NOTES:
_
* After rive minutes, the
TV/VCPJDVD will automatically switch to the
Recording mode to prevent tape damage.
* If"CLOSED CAPTION (ON)" is selected, the Ono
Screen Display will appear for 5 seconds, then dis=
appear.
e to be*eeo<e(_
Press the mm_ber buttons on _he
cH_0
remote control or the CHANNEL
button A or V.
Remember: If the TV/VCR/DVD
is connected to a cable box or satel=
lite box, the TV/VCtUDVD must be
on CH3 or CH4, then the channel to be recorded
must be selected on the cable box or satellite box.
_,3 _
;
sb@<x
Press the SPEED
the desired
button
....
to select
tape speed (SP! SLP).
sp
,£
REC
Press the RECORD button.
sp
,g S_< ecod q
Press the STOP button when recording is completed.
1301
4>
EN
1(29
T000BUF(pl-3S).QX3
04.4.7
1:44
PM
Page
31
This h_mction enables you to set a recording length
simply by pressing the REC!()TR button on tile
TV/VCWDVD.
kIake sure ...
* TV/VCWDVD power must be turned on.
* insert a cassette tape with its erase prevention tab in
place, (If necessary, rewind or fast forward the tape
to the point at which you want to begin recording.)
NOTES:
* You cannot start OTR with the remote control.
* Recording starts immediately when the REC/OTR
button is pressed.
* When the RECiOTR button is pressed 18 times, the
TV VCR DVD retmns to the Normal Recording mode.
* To stop the OTR operation, press the STOP button
on the TV!VCWDVD or on the remote control.
* To show the remaining time, press tile DISPLAY
button on the remote control so that "OTR"
appears on tile TV screen. (It will show up
momentarily then disappear0
* Recording stops when 0:00 is reached.
Push@s)
1 push
2 pushes
3 pushes
Display
17 pushes
8:00
0:30
1:00
Recording length
nomml recording)
30 minutes
60 minutes
480 minutes
You can make copies of video tapes made by friends
or relatives for your el_joymenL
You can not copy a DVD to a videotape.
WARN_NG: Unauthorized recordings of
copyrighted v{deo tapes may be an
infringement of copyright laws.
Connect yore TV/VCWDVD and a Sol.trce (Playing)
VCR using the following diagraln.
[Fig.8]
* Please note that in the SLP lnode maxinmm recording time, assuming the tape is started at the beginning, is 8 hmlrs using T-160 (or 6 hours using T-120).
* If the rope rims out be['ore the end time, the
TV/VCWDVD
will switch to tile Stop mode
immediatel> qiects tile rope and mills itself off
* It'you press the POWER button during OTR, the
TV/VCWDVD
continues recording until tile selected length is reached.
_
[Ex: Source (playing)
IT _1.(]VCR or camcorder]
Audio/Video \\ "__
adapter cable _
_<_m_
_
I
(not supphed)
S {:<t e
o ;;,e ....... ,_ <_
Press the number buttons on the remote control or
the CHANNEL button A or T.
Remember: If the TV/VCWDVD is connected m a
cable box or satellite box, the TV/VCWDVD
must
be on CH3 or CH4, then the channel to be recorded
is selected on the cable box or satellite box.
2
7><
:
[ /? <,.
<_l _:! < ) ....
,,
Press the SPEED button to select tile desilvd tape
speed (SP/SLP).
Press the RECiOTR button on the
I o,_<,_0,
TViVCRiDVD as many times as
nee&& The recording length ;_ill be
determined by the number of times
yot_ press the RECiOTR button. Each _
additional push wi!l increase the
recording time by 30 minutes. It is set up to 8 hours.
1)Insert a prc=recorded video cassette into the Source
(Playing) VCR or camcorden
2)Insert a blank video cassette, or one you want to
record over, into the TV!VCR/DVD's cassette
compartment.
3)Press the SPEED button on remote control _br the
TV!VCR/DVD to select tile desired recording
speed (SP/SLP).
4)Press the CHANNEL button A or _ on the
TV!VCR/DVD until "AUX" appears on the screen.
5)Dess the RECORD button on the TV!VCR/DVD.
6)Begin playback of the rope in the source (Playing)
VCR or camcorder.
NOTE: For best results during copying, use the
TV!VCR/DVD's
_hmt panel controls whenever possible. The _vrnote control might afi}ct the somce
(Playing) VCR's playback operation.
7)To stop copying, press the STOP/EJECT button on
the TV/VCWDVD, then stop the rope on the
source VCR or camcorder.
-31 -
EN
1(29
4>
T0005UF(pl-3B).QX3
04.4.7
1:44
PM
Page
32
(_
'_ Seect
You may set the TV/VCWDVD to start and end a
recording while you are away. You can set 8 pro=
grams to record on specific days, daily or weeldy
within a 1 year period.
In the example/Seh)w, fl_etinter is/Sein£ set to record.
DATE:
July 4th, 2004
SETTING TIME: liom 7:30PM to 8:50PM
CHANNEL:
CH6I
TAPE SPEED:
SP
//_ Sett
Recording
10:OOAM-I'I:OOAM
Program
9:O0AM-I
2
0:0OAM
Program
g:30AM-I
3
2:00PM
PROGRA
CHANNE
USERS
qMING
SET Up
SET Up
LANL, UAGE
e _: _a_'s e
_ !
{ENOL]SH]
be
Press the A1Tow button & or T until(
the desired
channel
number
Then
press
the Arrow
btttton
......................"]
/
/°_'_ '_
appears. (Example: CH6I)
Iji[ [iiiiii iii
_.
iii ii I
iii iii iii
:
_ecod
9
iiJ
Remember: If the TVFVCR/DVD
is connected to a cable box or satellite box, the
TV/VCR/DVD must be on CH3 or CH4, then the
channel to be recoNed is selected on the cable box or
satellite box.
Avoid over lop of programs ...
There is a chance that a program will not be record=
ed, when programs overlap;
* The program with an earlier smia has priority.
* Once the earliest program finishes, the overlapping
programs will begin recording in sequence.
* The illustration below demonstrates the sequence
of recordings.
Program i
10:00AM - II:00AM
Program 2
9:00AM - 10:00AM
Program 3
9:30AM - 12:00PM
I
_v........
_e_,N_
o,oc_
v.........
CAPT ON [OF 1
_,M_..........
_o_
...........
TIMER
* If you have not yet set the clock, "MANUAL
CLOCK SET" appears. If so, lhllow steps [3] to
[8] on pages 15_ 17. Then set the timer recording.
1_ake sure ...
, if a cable box or sate!lite box is connected with the
TViVCRiDVD you will be limited to record only one
channel, and the channel selector on the
TViVCRiDVD must be selected to the output channel
of the boxes CH 3 or CH 4 and then the actual channel to be recorded must be selected on the boxes
* Clock must be set to the correct time and date
before setting the timer.
* TViVCRiDVD power must be turn on to program it.
* Insert a cassette tape with its erase prevention tab
in place. (If necessary, rewind or fast l\_rward the
tape to the point at which you want to begin
recording.)
* The channel you want m record is properly set in
advance. (See page i8J
Program
"_ _4ER F_ROGRA/_/_i! _",iG'
Press the SETUP button on the
remote control.
Confil_r_ "TIMER PROGRAMMING" is pointed by pressing the
Arro'_xbutton A then press the
ENTER button.
,_}i Se ec:t o_sce
@veiy day o_" weeky
For once recording :
TI_,IER PROGRAIqM_NG
Press the Arrow button & (t_p)
until the desired date appears.
(Example: "7/04" %r July 4th).
Then press the Arrow button _.
O_! DA_
BEGIN END
ii ii iiii!ii
'i'ii ii
For eveo_ &O' recording : To record a TVprogram
at the same time on the same channel eve O' dco'.
(]_3:amp{e.
_//onda
3' tkron£k
_qltnffa)')
Press
theA rowbuttonv (do,,n)
Saquonce
{
until "EVRY DAY" appears.
Then press the Arrov_ button _-.
{
i
........................
"
t
.; E;a_;ii:x: x: x
ii i[!ii ill
{
9:00AM
10:00AM
_Recording
11:00AM
period
For weekly recording : _ record a TVprogram at
the same time on the same ehatme/ eve O' week.
(Fxamp/e. eve O' Mond<v)
12:00PM
is SHADED
Press the Arrow button V (down)
nmil "EVRY" and your desired
day of the week appear together.
Then press the Alrow button _.
-32-
EN
1(29
+
T0005UF(pl-35).QX3
04.4.7
1:44
PM
Page
33
(_
_5 Setbe{_ _s _9 _ou_
To shift the time schedule of an automatic timer
recording.
1)Press the POWER button.
2)Repeat step [1] on page 32.
3)Press the RECORD button and select the desired
program using the A_Tow button & or T.
4)Press the RECORD button again.
Each additional push will shift fOlward the
begin!end time for recording by 10 minutes. When
the recording is already in progress, each additional
push wil! shift tbrward the end time only. If you
want to cancel while setting, press the PAUSE but=
ton on the rernote control. The recording time
rcmms to the origina! time.
NOTE: When you shi[i forward the time schedule
during recording, the recording speed will automati=
cally be set to the SLP mode.
5)Press the ENTER or RETURN button to exit the
setting menu. Then press the SETUP button on the
remote control to return to original mode.
_F'Se e_d hour'
f} Set e_d ';_nu{e
Press the Arrow button & or
until the desired minute appears.
(Example: "50" %r 8:50PM)
Then press the A1Towbutton _.
70 {?£££41';f,
_ Sett etapespeed
Press the Arrow button & or V
until the desired tape speed
appears. (Example: SP)
'SO ¢::> s_, sett f_g the ptog_s r,
Press the ENTER or RETURN button. The program
is now completed.
* To set another program, repeat steps [2] to [10].
* Press the SETUP button on the remole conlrol to
return to original mode.
'f'J Sett etme
Press the POWER button to set aulomatic timer
recording. The RECORDING indicator lights up.
® You nlt._st turn off the TV/VCPJDVD to activate
automatic timer recording.
If power is not turned off and you continue watch°
ing TM "TIMER REC STANDBY" starts flashing
on the TV screen 2 minutes before the programmed
start time.
B/? 76 £,,_ 57
* While setting a program; press the Arrow btttton
to go back one step and enter the con'ect hum=
hers using the A1Tow button & or _.
* At}er setting a p_grarn;
1)Press the POWER button.
2)Repea steps [1] o [2] on page 32.
3)Press the A1Towbutton _ (or press the A1Tow
button _ to go back one step) until the part you
want to correct begins flashing, then make the
changes pressing the A1Tow button & or _.
4)Press the POWER button to set automatic timer
recording.
7© _f_Nd££ ,,t,o,,, 7<?}2}
££< X,_££>f%6
77(' }!? W/!A
® AJ_:er setting a program;
1)Press the POWER button.
2)Repeat steps [1] - [2] on page 32 and select a
program you want to cancel.
3)Press the CRESET button.
4)Press the SETUP button on the remote control to
return to TV mode.
* WMJe recording is in progress;
l)Dess the POWER button.
2)Dess the STOP!EJECT button on the
TV/VCPJDVD.
133 o
EN
1(29
4>
T0005UF(pl-BB).QX3
04.4.7
1:44
PM
Page
7_? (77/£<¸¸% 77ZF _E_7_<iL_/')
34
(_
77DS_
3 A_i/oReur
w7 ieg _
When all the timer recordings are completed, the
TV/VCR/DVD will rewind to the beginning of the
recorded progqam(s).
NOTE:
l)Press the POWER button so that the Recording
indicator goes off
2)Press the SETUP button on the remote control.
3)Confim3 "TIMER PROGRAMM]NG" is pointed.
4)Press the ENTER button. The demils of programs
appear on the TV screen.
5)Less the SETUP button on the remote control to
remm to TV mode.
* If you press the POWER button while tape is
rewinding, the Auto Remm will stop.
,4 W_ch _÷ ecodedpoga_
Press the PLAY button.
70 U; "+_<
7'/{; 7/1£ ,_7_?
* Make sure the channel you want to record is prop°
erly set in advance.
* It is not necessary to press the RECORD button lbr
timer recording.
* Recording begins automatically at the Start time.
* The display will not be turned on when the pro=
gqammed recording begins. To watch the currently
recorded TV program or to play a DVD disc, press
the POWER button to mm on the display and use
the SELECT button to choose the TV/VCR mode
or the DVD mode.
* The erase=prevention tab on the cassette must be in
place (or you nntst put tape over the hole).
* Kthe eraseoprevemion tab is removed, the cassette wil!
be ejected when the POWER button is pressed to off.
* If the tape runs out before the end time, the
TV!VCR/DVD will switch to the Stop mode
immediately and the rope wil! be ejected.
Repeat steps [1] and [2], select [OFF] using the
ENTER buuon.
If there is a pm_er failure of ally kind, the
TV/V( R/DVD will retain its memolw t_r this Dature.
The Sleep Timer fi_mction turns off the
TV/VCPUDVD without using the POWER button
after a desired period of time.
NOTE:
* This function does not operate during Recording
mode.
'_ Se cot SLKEf:,'l°/VGiR
Press the SLEEP button on the remote control until
"SLEEP TIMER" appears.
2
•...........
......................
_,_, o_oo_
up
vo_e_s.*er
c_lp SET UP
Press the Arro'a button _ or _ to
point to "USER'S SET UP".
Then press the ENTER button.
_3_,
/,+Ls,,
_
+,,,,
,,
Press the A1Tox5 button
¢
t
o1" I
CHANNE
SET
LANGUAGE
CAPTION
{ENGL
[OFF]
..........
...........
TIME
%,
Set
seept
>e
Press the SLEEP button until your
desired sleep time appears.
Each additiona! push wil! increase
the time by 30 minutes up to 120
minutes.
With this [}ature, after timer recording is finished,
the beginning of the recorded program(s) can be
searched for automatically.
'_ S_::<_c b:iiti_i::?9 _;Ki t;P
Press the SETUP button on the
remote control,
£/! 72?? _
SEEK
_ 120 MIN[3TKS
A_ier 5 seconds, exit the Sleep Timer setting.
LIp
SH]
Press the SLEEP button on the renlote control until
"SLEEP TIMER" appears. Press the SLEEP button
until "SLEEP 0 MINUTES" appears.
SEARCH
USER S _IETUP
to
point to "AUTO RETURN".
Press the ENTER button until [ON]
appears.
......
AUDIO
........
REPEAT
,_ U•O
vc_
PLAY
RETLJRN
_o_
fHF
i......
[O
ON
....
=34=
4>
EN
IC29
T0005UF(pl-35).QX3
04.4.7
1:44
PM
Page
35
(_
To check the Counter, Clock and Channel number on the TV screen, press the DISPLAY button on the remote
control. Each time you press the DISPLAY button on the remote control, the IV screen _ill change as folloa s:
* Counter mode: After 5 seconds, only the counter
remains. To clear it, press the DISPLAY button.
* Clock mode: After 5 seconds, only the clock and
the channel number remain. To clear them, press
the DISPL/VY
button.
OFF
Counter
mode
mode
* The On Screen Display disappear after 5 seconds.
* This is true even if the MUTE button is pressed or
tl3e PAUSE button is pressed while recording
OFF mode
Clock mode
Clock/Counter
STOP
mode
54O
PM
OH2
i
i s_
COUNT 0_12_34
...................................
i!ii=e,5
secon,s
i+ =er.coods
!
.........................................................
Jli
i
i
i
;
\
!i
_i
COUIT 1_234
i
Counter
remains
012:$4
i
iii
i
r
_
COUNT
k
j
ii
_i
;
Clock S Channel
remains
...............
g<'<]!_1'>
l& "°_I
.I
& _%ri%rI;<I
I',>
":
(
IS''F,_<I
'"
( "',_r(,,.....
If you subscribe to cable TV, the channels are displayed as 1-125. Cable companies often designate channels
with letters or letteronumber combinations. Please check with your local cable colnpany. The IDllowing is a
chart of common cable channel designations.
CATVchannel
5A
2
3
4
5
6
7
8
9
10
1!
12
13
A
B
TV Display
1
2
3
4
5
6
7
8
9
10
1!
12
13
14
15
CATVchannel
C
D
E
F
G
H
I
J
K
L
M
N
O
P
Q
TV Display
16
17
18
19
20
21
22
23
24
25
26
27
28
29
30
CATVchannel
R
S
T
U
V
W
W+I
W+2
W+3
W+4
W+5
W+6
W+7
W+8
W+9
TV Display
31
40
41
CATVchannel W+10
TV Display
46
CATVchannel W+25
TV Display
61
CATVchannel W+40
TV Display
76
CATVchannel W+55
TV Disptay
91
CATVchannel W+65
TV Display
32
33
34
35
36
37
38
39
W+11
W+12
W+13
W+14
W+15
W+16
W+17
W+18
47
48
49
50
51
53
54
55
43
44
45
W+22
W+23
W+24
57
58
59
60
W+27
W+28
W+29
W+30
W+31
W+32
W+33
W+34
W+35
W+36
W+37
W+38
W+39
62
63
64
65
66
67
68
69
70
71
72
73
74
75
W+41
W+42
W+43
W+44
W+45
W+46
W+47
W+48
W+51
W+52
W+53
W+54
W+49 W+50
77
78
79
80
81
82
83
84
85
86
87
88
89
90
W+56
W+57
W+58
A-5
A-4
A-3
A-2
A-1
W+59
W+60
W+61
W+62
W+63
W+64
100
101
92
93
94
95
96
97
98
99
W+66
W+67
W+68
W+69
W+70
W+71
W+72
W+73
111
112
113
114
106
107
108
109
110
W+81
W+82
W+83
W+84
122
123
124
125
121
56
42
W+21
W+26
CATVchannel W+80
TV Display
52
W+19 W+20
- 35 -
W+74 W+75
115
1!6
102
103
104
105
W+76
W+77
W+78
W+79
1!7
1!8
1!9
120
EN
1(29
+
T0005UF(P36-51).QX3
04.4.7
The %!lmxing
TV/VCR/DVD_
discs
1:25
can be played
PM
Page
back
36
[DVD]
on this
® DVD video
® DVD-R/RW*
o DVD+R/RW*
o Audio
Data on a DVD is divided into sections called "titles" and
then into subsections called "chapters", each of which is
given a title or chapter number. Playback conditions are
preset on some DVD video discs and these playback con_
ditions take priority
over user operations
on this
TV/VCR/DVD
lfa function you selected does not run as
desired, refer to the manual accompanying the disc.
CD
® CD-R/RW*
* Depending
medium
on
some
the types
discs
or the writing
method
of the
can not be played_
Example
o Some DVD-R/RW, DVD+RiRW, or CD-R/RW discs
made on personal computers or on DVD recorders may
not be played back properly due to the fi_ctors such as
scratches, dirt or special properties of the disc.
* Discs made on personal computers may not be played
back properly due to the different enviromnent or the
settings of the application you use. We recommend
always to use the standardized, rightly formatted discs.
(Please contact the sales agency for more detai!).
Title 1
_1.
Title 2
[AUDIO (D]
Data on an audio CD is divided into sections
"tracks", each of which is given a track number_
This TV/VCR/DVD con%rms to the NTSC color system.
You cannot play discs recorded in other color systems
such as PAL or SECAM
called
o Some discs include region codes as shown belmv.
o The number inside the symbol refbrs to a region of the
world, and a disc encoded in a specific region format
can only be played back on TV/VCR/DVD
with the
same region code.
The follow,lug
TV/VCR/DVD.
discs
cannot
be played
back
on this
® DVD with region codes other than i or ALL.
® DVDoROM
®DVDoRAM {Never play back, otherwise
tion may resumt)
ma[funco
® CDoROM
®VSD
® CDV (Only Nays back the audio part.)
® CD-G {Only plays back the sound.)
o CDq {Never Nay
may result.)
® SACD
back,
otherwise
maffunction
®Photo
CD {Never play back, otherwise
tion may result}
maffunco
oVideo
CD {Never play back, otherwise
tion may result.)
maffunco
oMP3
AtO' ofl:_e_"
c/isc._ u,iK_oHtcompatibi/iO _indications.
36
EN
01All
T0005UF(P36-51).QX3
04.4.7
1:25
PM
Page
37
DVD may contain menus to navigate the disc and
access special features. Dess the appropriate number
bumms or use the Arrow button (A/_/_ll!_)
to highlight your selection in the DVD main menu and press
the ENTER button to confim_.
NOTES
Select DVD mode by pressing the SELECT bumm on
the remote control. Then operate the DVD functions.
Unless stated, all operations described are based on
remote conm)l use. Some operations can be carried
out using the rnenu bar on the TV screen.
• Tt.t111on the power of amplifier and any other coin=
ponents, if necessary.
P'es:;<t ePOW{£A b<t_o>
• The power will mm on.
2
o toope!
Pes_!t_eOPENcgosEb
< s<
o_:_5 _gtay
3
P:_cetbecbose_dsc
t
et}} 9
wt_t_e
[/:_tess rise DS©
f'?/£NU b_ tto _
The DVD main nlenu will appear.
2
4 P'ess the PLAY but{o_
The tray wil! close automatically and playback will
then start t_on] the first chapter or track of the disc.
If the playback does not start antomaticall> press
the PL/gY buttom
When you playback a DVD which features a title
menu, it may appear on the screen. In this case, refer
to _TITLE MENU".
/>! fea>_e s /<£_va
u_sy _ppea
s
8
3
s
s
sara
{_sa_d< su{_t
®optoss,
8
8
ab<_on
sedst
appet_
S
a
eA_iow
audo
ti'ap%,s%,
w_dothe_oplo_ssw
as ter_sa/dt
@ symBo
s:
fdst/_'ettu
6tiess
_be
oh th:_ TV <;c_ee/_
butos
_;_t
ft
S
e
se÷oton
S
{aP@i</_*"
eENTER
to see¢_
b_ _os ocoff
_s
seSec os
_s
_}
st,/
S4SF
;_
'
NOTES
When the DVD rnode has been switched to the
7W/VCR mode, the DVD mode shuts down first and
then TV picture and sound appears in about 4 seconds.
Similarly, when the POWER button is pressed to mm
offin the DVD mode, this mode shuts down first a_d
then the TV/VCP,!DVD's power" is turned of£
Press theSTLE butt<n
The title menu will appear
<
2
/ _e feahs/e _ _<>av,:_:{abe, @ sy!>_o
may appea
s
A "prohibited icon" may appear at (
the top-right on the TV screen dur=
ing operation, warning that a pro=[
hibited operation has been encoun=
tered by the DVD or the disc.
k
With DVDs that use titles for playback program sig=
nals, playback may start from the second title, or it
may skip these titles.
During the playback of a two layered disc, pictures
may stop for a moment. This happens when the 1st
layer switches to the 2nd layer This is not a real=
function.
s
{}
een,
s
[;hesst_eA
ah
_o_" the 'YV sc
{era a_sd/:_eKk}TKR
9eeet
<
owbut{:os(A/_'/q/>},
b_:_ostoco
oseeet
_m
os
<}£LkZ>_<, <LP4Mi:}£_
_ Y(£EEN
®Press the DISC MENU button to call up 6e DVD menu.
®Press the TITLE button to call up the title menu.
NOTE
®Contents of rnenus and corresponding menu opera=
tions may vary between discs. Refer to the manual
accompanying the disc for details.
37
EN
01All
T0005UF(P36-51).QX3
04.4.7
1:25
PM
Page
38
©<_
_
" _1_
_,
£
p_essas<
gpayback
o
'_4<
REV
1_ or "_1_1
s
_od_heFFW©
fo_' s f_::W SeCO/'_dS
1_ appears
s
on @e scrcen_
888
7oseee
you_
btto
asotse
s_ee({/epea
sepS
equ_edspeedasDes_so
u t
tLese_eel
For DVDs, fast 5rward/reverse search speed is dis
fcrem depending on @e disc. Approximate speed is
1(x2), 2(x8), 3(x50) and 4(x100).
For audio CDs, approximate speed is x16.
When you use buttons on the TV/VC_/DVD liont
panel, use the SKIP _l/
SEARCH m_ or
SKIP _/SEARCH
_-_ button.
<
/,}<i
[
a
• Playback sill
2
u, ....
0
<0
©u_
'
p
_{
>f_,,s,m
pause and sound sill
F_<
_i_ is,
}a}/
a
_S B. };,gef:s
[)t
%}
Re mute&
s@
PLAY
{_s
_ s,,,,n£ >@k"
< _'e< _ ;LePAUS};I_[
b< io_ _,
,
ic
........
Playback will pause and sound will Re muted.
P,a{,S(i
............................................................................................................................
2
}'O<
{t),g;;,
g;,_
b{>o
"J_
i" o1' ;;
3
'R_ se_:_c
you
<;, F
I':%]Sq.')N*">'
fo<afewseco
S<\/,... _:#4,-4..
i" appears on the screen.
_
_eqs
)"
ds
";:p_:ed eisea{ s{ep2
edspeed_@:_es_so_
_ ese_ee
Slow forward or reverse speed varies with tile disc.
Approximate speed is i(1/i6), 2(i/8) and 3(!/2).
When you use bumms on the TV/VCR/DVD liont
panel, use the SKIP _1/
SEARCH _
or
SKIP _/SEARCH
_
button.
T}
PL/W
38
O { > _X}} .....
}
.......
b<to_
EN
01All
T000BUF(P36-51).QX3
04.4.7
1:25
PM
Page
39
There are three ways to begin playback on an Audio
CD at a specific track
Using the ?@mber bltttons on the remoW eomrol
_ ne <s g'!heNu{sbe
b<_{_:o_ssosIDe
ie_soeco_
/o
Playback will start at the specil]ed time,
Press the CLEAR button to erase the incorrect input
_]_.en there is !o need to enter a lumber> _'0>_
@pears amomatically.
For example, " 0 : 0
"
appears in the Time Search display if the total time
of the disc is less lmn i0 minutes.
• Playback will start a_ tl_e selected track.
• For single digit tracks (1-9), press a single number
(eg. track 3, press 3).
oTo play track 26, press dO, 2, 6.
U_ing the SEARCH I_IODE button
P_:'ss _u, !i;_:A£¢}, {,'4ODE
• The track search display @pears.
2
W/_}s SO<;_co_;ds ":e_c: a d_:_sr_:__aek
I<s_be_us _9R e
_,_otso} "e
[eIYo_ie
col [o
For single digits press 0 first.
Playback will start at tl_e selected track.
Use nmrkers to memorise your favorite places on a
disc.
I;
("+=71
<_I.,
Using the SKIP b_,_ _'1 buttons
During playback, press the SKIP _'I_I button to move
the next track. Press it repeatedly to skip subsequent
tracks. Press the SKIP Nt_ button to go back to begin=
ning of the cmrent track. Press it repeatedly to go to
the previous tracks.
If the SKIP button is pressed while the playback is
paused, the playback will be paused again alier skip=
ping to the next track.
NOTE
The SKIP _
_j
buttons are not available when
playback is stopped.
Ill...../D:
;_'+ I ?i
11
"
4 5 C 7 ,g 9
iiiiiiiiiiiiiiiiiiiiiiiiiiiiiiiiiiii iii i {iii{iiiiiii iiiii
,iI
1/i_1=
.....
iiiiii[ is iiiiiiii iiiiiiiiiiiiiii[ i11iiii 1ii{iiiiilliiiiii(
_1"1
I .............b,=a
l=h w=¢.
_, ISl{
<;
_;,,1
_/
(,; a
i11iiiii
i i ]iiiiiiiii
I "1
IIueO
ai:Ie<sesc_
ses_cD
d<_
IRe©I-i!} b</o
wicefo
o_ce
II_
fo
Opening
sg p!aybaek
IT_L e[
is iiiiilliiiiiiii i i
_,_
i iiiilliiiiiiiiiiiiiiiiiiiii
<l(_iiIe<l
iiiiiiiiii{iiii
iiiiiiiii
{}(Dill
iiiiiiiiiiii[ iiiiiiiiiiiiiiiiiiiiiiiiiiiiiiiiiiii iiiiiii
I.) '=='
........_; Ill(
"
# "
:;_ }_/'_'
In
"1")_=
e
is
.
#
1_'
;q
;. >>
} 9
. iiI=l]!? :, ¢",,I)
;>I:;"" ;;f.(
= = _:
,<I,<..
.....
4<'=
I,...>.>y
":" :' t,,,=:=IblT°£II19<;11<.
NOTES
T/:e
g
the
disc
tray
or tmning
off
the
power
or
selecting AC at step 2 and pressing the ENTER button will erase al! Markers.
To clear a rnarker, using the Arrow button (_l!l_),
position the cursor on to the nmrker number to be
cleared and press the CLEAR button.
You can mark up to !0 points.
2
................
is ii{iii
? <f_5
The Title or Track and el@sed playing time _111
appear in the TV screen.
1131"I ,61/1-.}
SI3AI;(Ch
filliP!;
<)II
S/,}_IAf;?O _;1_,,_,,12
1, e'er.,=- o1[
te
IOU[
The display screen and Markers will @pear on the
TV screen.
(>
P;ess
_,*<I
I
,*;
,
>
->
>
{I{_IIIl.{
L_III_{{3I;,CI=
:
lh<,
I;,k_l>be_
b_ aloe's, o It÷: _:_]oi_:_
cosl'ol,
Playback will start at tl_e selected Ch@ter or Track.
Press lie CLEAR button to erase the incorrect input.
For single digits press 0 first.
<g_
_;> /2 g 17,
........
_)
39
+
:_,>c_,_,,
ro
<'/%g.......
}<¢C_{
b "> /,
};g
EN
01All
T0005UF(P36-BI).QX3
04.4.7
1:25
PM
Page
40
................
.........
< I
REPEAT is available only during playback
F?U_)2_:I7 7W7](,U / C IY/_ B+I2!_R
You may detemaine the order in v, hich tracks xxill play.
I
stop
_rode
piess
the
Si,_OD££5_tto_
®The PROGRAM screen will appear.
®The repeat mode changes as described below every
time you press the button•
2> P_'e<s/eA_,;,>
b_ o>,/s.o
tuck, _en Ire'/; _h<.
K_'/TEB bc_tto
s
Press the CLEAR buttonto
erase the most recently entered
prog_am.
NOTES
• Repea Title/Chapter is not available with some
scenes•
• The REPEAT setting will be cleared when moving
to other title or chapter.
F?Zi):
f:_)2_;_
T "TF_'
A 0¢4
7o activa/e
the
epeat
[@{{PB/AF burro
The repeat
fu_ctio
_ du<i_:g
mode
h p<ess
/7
as described
d
every
NOTES
Repeat setting will be cleared when moving to other
track
Repeat playback does not ihnc_km dmi_g repeat A-B
playback.
I:?E B EX Y A d7
se
[]
i:?{71Pff£7 A-Bb
s_st
_oa_
y<ut¢
chose
/:_!KP}I{,/_i}A,B
e_sd po
b
tea
aga
sePLAi'<
b_/to
M{ t_+,
top£ayt
ep_o-
o,,
This shuffles the playing order of tracks instead of
playback in the sequence.
9}':_o_st
A- appears briefly on the TV screen•
_J_ Peast;e
Peas
see<_;ed
t_epogs
NOTES
While the program is being played back, the STOP
works as _hllows.
Press the STOP buUon once and l_en the PLAY button again, playback will restart from the point where
the STOP bumm was pressed. (Program continued)
Press the STOP button twice and then tlaePLAY butlon
again, playback will restart _i'omthe track in the usual
way (Program cleared)
Up m 99 programs can be entered.
To erase all programs at once, select ALL CLEAR at
tlae bouom of the list at Step2.
If you like to repeat tl_ecurrent track in the program,
press the REPEAT button repeatedly until []
TRACK appears during playback• If you like to
repeat the entire E£ogram press the REPEAT button
repeatedly until [_J ALL appears during playback.
time you press the button.
Press
y_,_ _we
J_ack<.
the
below
':_¢ep 2 _/
,_sc<syou,lv;_ I.
opay
pIayb;isek
changes
£epea
_ io<;e<,<; ;_
_atyaa_
.
+ .......
......
; <..,_.;;
)_;'H"" JW<
.
RANDOM screen appears.
f
[] A-B appears briefly on the TV screen and the
repeat sequence begins.
_J7 To exi{ e
se<7_ e! ce
p_e{<s _De <EIEi_,,'_
A,
NOTES
The repeaA-B section can only be set wilain tlae Ctll'rent title (for DVDs) or cmrent track (_hr audio CDs).
RepeatA-B is not available with some scenes in DVD.
To cancel the A point which was set, press tl_e
CLEAR button.
Repeat A-B playback does not ffmction during title,
chapter, track or all repeat playback.
2
P _::ssthe PLAt'
to s_a_ andom
_:Aq/baek
NOTE
If you like to repeat the current track in the raadonl
selection, press the REPEAT button repeatedly until
[] TRACK appears during playback. If you like to
repeat the entire random selection press the
REPEAT button repeatedly until [] ALL appears
during playback.
EN
4O
01All
TOOOBUF(P36-51).QX3
04.4.7
1:25
PM
Page
41
(
#'_t
S{_
_ _/_%i _
<
PegUBT'F{,Eb{
_o/_ {£
_v<,_.-._._-__
_ _ _ _{_
.........
Some DVD discs contain scenes which have been shot
simuhaneously fi-om various angles. You canchange
tlae camera angle when the (_)
icon appears on the
screen.
The TV/VCR/DVD allows you to select a language %r
subtitles during DVD disc (if available) playback.
Pens
..................
q_X_
_{/P_uYb_!<{'_
8
see:i
?c,_
des
ed sub_
e s2sg_sge
The selected
anglewillbe displayed
on thedisplay
bar at the top of the screen.
• The subtitle language will appear on tlae display bar
at the top of the TV screen.
2
$
To{,
/" of
s>bi_bs
pte<s
Pe_;>o he
},eSUBTTLE
se(:c
bu_o _epe_:_tedys_ OFF a::_pe_:_'s
NOTES
®Some discs allow audio language setting/subtitle language
setting on the disc menu. (Operation varies between discs,
so refer to the marmal accompawing the disc)
• If the desired language is not shown after pressing
the SUBTITLE button several time< the disc does
not have subtitles in that language.
• If you choose a Language tl_at has a 3 letter language
cod< the code will be displayed eve U time you
change the Subtitle langtmge setting. If you choose
any other lanMmges, 'ooo' will be displayed instead.
(Refer to page 43.)
ANG_}}I
you{
_eDeae_yio
b,t_o<
desied
ssge_
Adjust the Black Level Settings to make the black
parts of the picture brighter.
a
Fhess _be f401/,)_!il/:n_t
m_
p ,:_yb,_c/,,,
;:;:....................
....
/)}
2
Pr<:ss h<,/£HT[£A
b_
<_? oswt_?O_:F;
ON: Makes the dark parts brighter.
OFF: Shows the original picture as recorded.
<
3
The TV/VCR/DVD allows you to select a language
during DVD disc (if multi languages are available)
playback.
P_ess!_eAUOO}m{ohdu_0_,k_ybm_t;
{
{<
yo{
des_ed
{
_'>'
{
({
:, :_},
:{
<
NOTE
The setting will be saved even if the TV!VCR!DVD
is turned off
<
_{ }:_
.....
e:,s
{e AOOO
<
!:hess_h< _400K}> o_ wceo_"
_<{EK'UPA;
b;/o
_oex/
x]see<s[
a 9/;ege
NOTE
Pressing the AUD][O bumm may not work on some
DVDs with rnuhiple audio languages (e.g. DVDs
which allow audio language setting on tl_edisc menu).
You can enjoy surroun&sound
era on this TV/VCtUDVD.
b
Psess!}eAU©Obuto} _elseaedyd_< sg
_o;_yb:¢ei<
toseen be,/_ee ST[]}i£_{O
[,,,0/,4
ot R,C}4
STEREO - both right and left channels are antise (stereo)
L=CH o only left channel is active
R=CH o only right cbmnel is active
NOTE
If the Virtual Surround setting is ON, the sound mode
will be fixed to STERE() and can not be changed.
[toB!_ce{©©;o/_ee}
_f_'')
> 2
_"........
as
ef_bct over two speak=
<u_
g}sayb_}ck
e _<,
.....,o
(FF
NOTE (for(D playonly)
Virtual
SmTound willnotbe effective
ifthesound
mode is set to something other than STEREO.
EN
41
01All
4>
T0005UF(P36-51).QX3
04.4.7
1:25
PM
Page
42
(_
T }IE J_¸_:¸
_'_"
_>_-'
_ v __ _J,___4¸_'r'
_¢__
You can check the in£)rmation about the current disc by pressing the DISPLAY button on the remote control.
For DVD-Vs
_,,',_,,
For audio
[} P AY
to s ow c_J_ e t O
<_</_<!.<
P
_':OSP!..AY
<_;_
.....
;<,:
The elapsed and remaining playing time of the current track will be displaye&
l
Press_
:; d_,.:
i3Sf.l.,.iW
_It_:m
• The elapsed and remaining
(
)
playing time of the current / _2__ ............... ,-I
chapter _aill be displayed.
_'"......
2
CDs
b_ _o_ag_
<
io>how
co_e stT e
The elapsed
and remaining
playingdineof thecurrent title will be displayed.
<:_[re<
Tr<<I,;
The elapsed and remaining playing time of the current track will be displayed.
2
Pesst}_eDSPgA?'b<tto
g_!:}:!_i_toextt_÷
<$sp sy
The BIT RATE and the current repeat setting will be
displayed.
If you are playing a dua! layered disc, the layer ram>
bet will also be displayed (LO: Layer 0 is playing.
LI: Layer i is playing).
4
Press tb,.;_D S>L/<¢
:_g_:_,/o ex/h÷
42
+
EN
01All
T0005UF(P36-SI).QX3
04.4.7
1:25
PM
Page
43
Language
Code
Language
Code
AdB
Langlmge options arc not available with some discs.
P e_<,:_ e f!;_':._?'I,)p
, to_ w<:e
r
%70P
s_od8soi e_ he DVDS_iT'UPsI_:_
:_ppea{5
• Ifthemenu doesnotappear,
pressthePLAY buttom
the STOP buttcm, then the SETUP
button twice.
.....'
il
4748
4747
4752
6563
4759
4764
5471
4765
Aymara
Azerbaijani
Bashkir
4771
4772
4847
Basque
BengaH;Bangta
Bhutani
Bihari
Bislama
Breton
5167
4860
5072
4854
4855
4864
Bulgarian
Burmese
4853
5971
Byetorussian
2
Pesst
TO/_i
CUSTOM
3
eA_/owbutot_'{g
tse_
press
t'e
toseectOUS_,
Cambodian
Catalan
_::_NT_}iRbu_tot_
/o_{_J'_'}
press he
4851
C-E
5759
4947
Chinese
Corsican
Croatian
Czech
nrode will appear.
Pr_<.::
Ar<)wb
LAIeG.!AG_;£' te
_o
L-N
Abkhazian
Afar
Afrikaans
Albanian
Arnharic
Arabic
Armenian
Assamese
ose_c
ElsS'S_'}'[R
b tos
[CHI]
7254
4961
5464
4965
Danish
[DAN]
Dutch
[DUT]
English
[ENG]
Esperanto
Estonian
5047
6058
5160
5161
5166
F-H
Faroese
.....
Fiji
Finnish
French
Frisian
GaHcian
_
AUDIO
,#
P/_sstheA/ow
nex/ tB_SS e!
bu o/_ _
press tse
o se_!_c _e
BN'117£[_hutch
AUDIO: Sets the audio language.
SUBTILE: Sets the subtitle language.
DISC MENU: Sets the lan_tage *Br DVD menu.
?
5261
[FIN]
[FRE]
Georgian
German
[GER]
Greek
[GRE]
Greenlandic
Guarani
5747
5051
5158
5758
5360
Gujarati
Hausa
Hebrew
Hindi
5367
5447
5569
5455
Hungarian
,
s <}?:/ S
.... ,, ,
<,
If OTHER is selected on the AUDIO, SUBTITLE
DISC MENU screem press fouPdigit number
enter the code for the desired language. (Refer to
language code list.)
Only the langmages supported by the disc can
selected.
[HUN]
icelandic
indonesian
x,h{
or
to
the
be
NOTE
Language Setting lbr Audio and Subtitle is not avail=
able _aith some discs. Then use the AUDIO and the
SUBTITLE buttons. Details are on page 41.
5256
5255
5264
5271
5358
lICE]
5467
5565
5560
lnteriingua
lnterlingue
lnupiak
Irish
[IRt]
Italian
[FA]
Japanese
[JPN]
Javanese
Kannada
Kashmiri
Kazakh
5547
5551
5557
5347
5566
5647
5669
5760
5765
5757
KJnyarwanda
Kirghiz
Kirundi
6469
5771
6460
Korean
Kurdish
5761
5767
[KOR]
Laothian
Latin
5861
5847
Latvian;Lettish
Lingala
Lithuanian
Macedonian
5868
5860
5886
5957
Malagasy
Malay
Malayalam
Maltese
Maori
Marathi
Moldavian
5953
5965
5958
5966
5955
5964
5961
Mongolian
Nauru
5960
6047
Nepali
Norwegian
[NOR]
O-R
6051
6061
Occitan
6149
OMya
Oromo(Afan)
Panjabi
Pashto;Pushto
Persian
Polish
6164
6159
6247
6265
5247
6258
Portuguese
[POP.]
Quechua
Rhaeto-Romance
6266
6367
6459
Romanian
Russian
6461
6467
[RUM]
[RUS]
Samoan
6559
Sangho
Sanskrit
Scots
Gaelic
Serbian
Serbo-Croatian
Sesotho
Setswana
Shona
Sindhi
6553
6547
5350
6564
6554
6566
6660
6560
6550
Singhalese
Siswat
Stovak
Stovenian
Somali
6555
6565
6557
6558
6561
Spanish
Sundanese
Swahili
[SPA]
5165
6567
6569
Swedish
[svgE]
6568
T
Tagalog
Tajik
Tamil
Tatar
6658
6653
6647
6666
Telugu
Thai
Tibetan
6651
6654
4861
Tigrinya
Tonga
Tsonga
Turkish
Turkmen
Twi
6655
6661
6665
6664
6657
6669
[TUR]
U-£
Ukrainian
Urdu
Uzbek
Vietnamese
6757
6764
6772
6855
Volapuk
6861
TO CMT;NGE}" 7#{}7'
OM,@Cf:?_i!}'_TA/_2_'}}#dUS
VVelsh
4971
VVotof
6961
You can access the TV/VCR SETUP rrlenu by pressing
Xhosa
7054
the SETUP button fiom the DVD mode. Refer to
Yiddish
5655
Yoruba
7161
'_SELECTING THE LANGUAGE"
on page 15 to
Zutu
7267
changing the on-screen menus.
If you choose a Language that has a 3 letter langtmge
code, the code wi!l be displayed every time you change
the Audio or Sttbtide langttage setting on page 41 If
you choose any other langgages, <-' wil! be displayed
_nstead. (3 letter language code is written in bracket)
43
EN
01All
T0005UF(P36-BI).QX3
04.4.7
1:25
PM
Page
44
You can change certain aspects of the DVD display
screens and on=screen messages on the TV screen.
P<,¢,
};_::
_<, ,/ ......
<
v
=g},, 4<,
_,
[):_/
# ,>;:if;,
,,P
:,<} < ;¢ ,
Choose the appropriate Audio settings for your equip=
ment as it only affects during the playback of DVD
discs.
> £)b _><{<
P<ess tse
g{? < _}7}1}@?;{;
• It'the menu does not appear, press the PLAY button,
the STOP button, then the SETUP button Paice.
SETUP
I
so_sa
SKTU_:: burros
seDVG
SETJP
,
::1:,:_
/5,
W
'_g
, _,g
v,{
.....
,{,
ap/>eas
]
]
(,LS,
_.
,
• CUSTOM mode will appear.
{
se _': SLOP/_;o{e
If the menu does not appear, press the PLAY button,
the STOP button then the SETUP button twice.
.....
,(
tw
<'e_>
2
{{
':_ .......
e9 ;, e '
' /%iv"
' ........
{ , 71<> _ '_F <
S:
_:C; /°<_,<o"<:
{
,
PL.:'_Y : e )<:ssib;_12N'/7:R :_ tt)
:oco
_
sf: f"
EIN'Kfq
bu:f:
• CUSTOM mode _xill appear.
.
9
SETUP
i:)
....
¢'<_egs
t'
A
,,, .......
]
I
co"
ow
{'e"
;*,,_
"" {:< t
{,&11_ } to se _,,:;t
e [£f,"g/£R [ It)
o
>
tANGUAGE
'
/:
,
:)w :::
}
s,t/<
! }I
>esst
_
<gg
DISPLAY
< _7_'"[_:R >;to
__l
TV MODE:
Press the Arrow button (&/_) l[)r an item selection,
then press the ENTER button.
Select 4:3 LETTER BOX for black bars to appear on
top and bottom of the screen.
Select 4:3 PAN & SCAN %r a full height picture
with both sides trimmed.
The dethuh setting is 4:3 LETTER BOX.
:!_
L_
,!:>
i
......
AUDIO
A7
<
, :,,
I
'<%;
AI<{ i/
7
r
"
7>
"
+t_ f'_: fZ_/Tf::i:¢ :)_¢P,: ':,
DRC (Dynamic
Range Control):
To compress the range of soft to loud sound.
The defimlt setting is ON.
DOWN SAMPLING:
Set to ON when outputfing in 48 klBz.
The default setting is ON.
When pla3ing disc with cop3 right Protection
If you select OFK copyright protection will be acti=
rated and sound will be down sampled at 481_Iz.
STILL MODE:
Press the A1Tow button (A/_')Ibr an item selection,
then press the ENTER button.
Select "AUTO" usually.
It"you select <'FIELD", the picture in the still mode
will be stabilized.
If you select "FRAME", the picture in the still mode
will be highly delined.
DOLBY DIGITAL:
Set to On when the unit is connected to a Dolby Digital
Decoder
(ON: Output a Dolby Digital signal)
(OFF: Convert the Dolby Digital to PCM (2 channel
stereo))
The defauh setting is ON.
ANGLE ICON:
Press the ENTER button repeatedly to turn Angle
icon ON or OFF.
The dethuh setting is ON.
AUTO POWER OFF:
Press the ENTER button repeatedly to turn Auto
Power off ON or OFF.
The default setting is ()IX"and it will turn the
-[ViVCRiDVD off automatically after 20 mimttes of no
'¢>
b<< JP _<_tl<>}t<>ex7%
use.
44
EN
01All
T0005UF(P36-SI).QX3
04.4.7
1:25
PM
Page
45
CONhsTOL
LEWSi_LS
cALL
All parental lock is cancelled.
• Level 8
DVD sotiware of any
can be played back.
• Levels
grade
(aduh/general/children)
7 to 2
Only DVD sotiware intended tDr general use and
children can be played back.
£4 R EN 7"XL L E _I:iL
Parental Level allows you to set the rating level of
your DVD discs. Playback will stop if the disc's ratings exceed the level you set.
Pes_
so t
h<:{SET
at te
)Pb>/:/:<_r
QOOK
wc<_
S/[Yl'bP
_em_
st<eRr
• Level 1
Only DVD sotware intended _\_rchildren can be
played back, with those intended for adult and
general use is prohibited.
od4_
appe<::us,
F YOU FORGET
• If the menu does not appear,press the PLAY button,
the STOP button, then the SETUP button twice.
P_!_ss t'e
T/'e_e!,te
p_'ess _e /Ti£NY'EA
/:_t_o _
70_,k
2
,
SETUP
ICUSTOM
h_ m _e_"
b/,:tto_s
your
4 7 3 7 ;;:_tstep
4
_ew}>asswod.
• Password will be cleared and parental level will be
set to ALL.
NI_IALIZE
...........
77-{E PASSWORD
P<y<_<d_"
<, S
>s 5,,7 a<B_ _
:>
I
This allo'_xs you to return all selections of SETUP
(except for PARENTAL) to their default settings.
LANGUAGE
DISPLAY
AUDIO
t
:e
iT< } .....
N7
AL, ZE
ap:>e_;,
NOTES
• When doing this for the first time, enter any 4 digits.
(except tbr 4737) That number wil! be used as the
password.(in the event you tDrget the password, see
below)
• To change the password, press the Anow button
(_/W) to select CHANGE at step 5, then press the
ENTER bumm. Enter the tDu>digit password, then
press the ENTER button.
• With some DVDs, it nmy be difficuh to rind it they
are compatible with parental lock. Be sure to check
if the parental lock ftmction operates in the way that
you have set.
• Record the password in case you tbrget it.
45
EN
01All
T0005UF(P36-51).QX3
04.4.7
1:25
PM
Page
46
If the TV!VCPJDVD does not perlbrm properly when operated as instructed in this Owner's Manual, check
the TV/VCR/DVD, consulting the tbllowing checklist.
PROBLEM
No power
The TV/VCWDVD does not
respond to the remote control
ITV/VCR
( ORRE(
TIVE A( TION
* Make sure the power plug is connected to an AC outlet.
* Make sme the power is turned on.
* Check if the power plug is connected to an AC outlet.
* Check the batteries in the remote control.
* Aim the rernote control dircctly at the rernote sensor. If necessary,
remove a!l the obstacles between the sensor and the remote.
* You have to be within 23 lbet of the TV/VCR/DVD
* Check if the correct mode is selected. If not switch the mode by
pressing the SELECT button on the remote conm)l,whichever you need
Mode I
Sometimes a perfi)rrnance problem can be easily solved by checking seemingly apparent but often overlooked
)ossibilifies. Belbre alTanging l\_r service, check these items. It could save yore' time and money.
PROBLEM
( ORRE( TIVE A( TION
No picture and sound
No picture or poor picture on
TV/VCWDVD
No sound or poor sound
* Make sure the AC cord is connected to an AC outlet.
• Check antenna connectiom
• Press the SELECT button on the renrote control to select TV nrode.
Then try oflaer TV feature.
* Let the TV/VCR/DVD piv}gram its tuner memoi 7.
* Adjust direction or replace antemm.
* Adjust picture controls.
* Adjust volume control on remote control or nrain unit.
* Press the MUTE button to restore sound.
Bars On Screen
* If outside antenna is being used, check fbr broken wire.
* Check lbr local interference.
Pictm"e Distorted or Blurred
* Try a new channel, if OK, then possible station trouble.
* If"outside antenna is being used, check liar broken wire.
Picture Rolls Vertically
Lines or Streaks in Picture
* TU a new channel, if OK, then possible station trouble.
* If outside antelma is being used, check liar broken wire.
* Check fbr local interference.
No Color
* Try a new channel, if OK, then possible station trouble.
* Is antenna connected to terminal on the back of the set'?
Poor Reception on Some Channels
Ghosts m Picture
* If outside antenna is being used, check liar broken wire.
* Adjust COLOR control.
* T<Va new channel, if OK, then possible station trouble.
* Is antenna connected to temrinal on the back of the set?
* If"outside antemm is being used, check liar broken wire.
* Check for local interference.
Weak Picture
Sound OK, Picture Poor
* T<i a new channel, if OK, then possible station trouble.
* Is antemm connected to tel_rtinal on the back of the set'?
* If outside antenna is being used, check l\_r broken wire.
* Adjust CONTRAST & BRIGHT control
* TI37a new channel, if OK, then possible station trouble.
* Is antemm connected to tenrdnal on the back of the set'?
* If outside antenna is being used, check fbr broken wire.
* Check lbr local interference.
* Adjust CONTRAST & BRIGHT control
46
EN
01All
TOOO5UF(P36-51).QX3
04.4.7
1:25
PM
Page
47
PROBLEM
( ORRE(
Picture OK, Sound Poor
TIVE A( TION
* Try a new channel, if OK, then possible station trouble.
* Check for loca! interference.
* Make sure the timer recording is set correctly.
* Make sure the power is off
* Make sure the TV/VCR/DVD clock is set conectly.
* Make sure the tape has an erase=prevention tab. If need, cover the
hole with plastic rope.
7imer recording is not possible
Cannot go into Record mode
Playback picture is partially noisy
* Adjust tracking control for a better picture using the CHANNEL
button _, or _ on the TV/VCR/DVD.
No picture but the audio is OK in
playback
* Head cleaning nmy be necessa W. Refer to "AUTO HEAD
CLEANFNG" on page 49.
No operation by in_ared Remote
Control
Video or color titdes in and out
* Make sure the AC cord is connected to an AC outlet.
when making a copy of a video tape
Different color realks on screen
( LOSED
CAPTION
* Check batteries in remote control.
.
* You can not copy a copyrighted video tape. You are experiencing
copy guard protection.
* Magnetism fl-om nearby appliances and speaker systems might aft_ci
the color of the TV picml-e. Move the TV/VCR/DVD away flom the
object. Refer to "DEGAUSSING" on page 19.
PROBLEM
My TV/VCR/DVD is showing
captions that are misspelled.
My TV/VCR/DVD will not show
the text dialogue in its entirety or
there is a delay of what is being
said.
My captions are scrambled with
white boxes on the TV screem
My program guide listed a TV show
as being closed captioned but none
of the captions were displayed.
My prerecorded video rope does not
show any captions. The tape box
mentions it being closed captioned.
My TV screen shows a black box
on certain channels.
POSSIBLE
REMEDY
*You are watching a live broadcast and spelling errors made by the
closed captioning production company nmy pass through uncolTected.
A prerecorded program will not show any rnisspelled words because
of the norma! time available %r editing the captions.
* Captions that are delayed a few seconds behind the actual
are common for live broadcast. Most captioning production
companies can display a dialogue to a nmximnrn of 220 words
per minute. If a dial%me exceeds tlmt rate, selective editing is used
to insure that the captions remain upoto-date with the current
TV screen dialogue.
* Intert_rence caused by building, power lines, thunderstorms, etc.
nmy cause scrambled or incomplete captions to appear.
* Broadcasters nmy at times use a time compression process to speed
up the actual program so that additiona! advertising time can be
given. Since the decoder cannot read the compressed in_brmatiom
captions will be lost.
* The video tape was either an illegal copy or the tape duplicating
compa W accidentally leti out the captioning signals during the
copying process.
*You are in the TEXT mode. Select CAPTION mode m CAPTION
[OFF].
47
4>
EN
01All
T0005UF(P36-51).QX3
04.4.7
[ DVD Node
1:25
PM
Page
48
]
PROBLEM
No picture
Disc cannot be played
No sound
No DTS audio is output
Distorted picture
Audio or subtitle language
does not match the set up
The camera angle cannot be
changed
Audio or subtitle language cannot
be changed
_{Prohibited ico_f' appears on the
screen, prohibiting an operation
CD sound dropout
No CD reproduction
DVD picture dropout
DVD picture freeze
DVD picture in mosaic
No DVD r_rodLtcfion
( ORRE( TIVE ACTION
° Insert a correct video disc tlmt plays on this TV/VCR/DVD.
° Press the SELECT button on the remote control to select DVD mode
Then, try other DVD feature.
° Insert the disc.
° Clean the disc.
° Place the disc correctly, with the label side up.
* Cancel the parental lock or change the control level.
° Connect the audio cables fimaly.
° Turn the power of the audio component on.
* Coirect the audio output settings.
° Correct theinput settings on the audio cornponent
° This TV/VCPUDVD does not support DTS audio. This is not a real=
fLtnction.
° There are some cases where pictures may be slightly distorted, which
are not a sign of a ma![:tmctiom
° Although pictures may stop for a moment, this is not a malfunction.
° The selected language is not available *br audio or subtitles on the
DVD.
This is not a malfunction
° The DVD does not contain sequences recorded fiom dif*}rent calnerg
angles. This is not a mal_imction
° The DVD does not contain audio source or subtitles in the selected
language. This is not a mal*imctiom
° That operation is prohibited by this TV/VCR/DVD or the disc.
This is not a rnalftmction.
° Scratched disc. Replace the disc with an unscratched one.
NOTES:
*Sorne ftmctions arc not available in specific modes, but this is not a malfm_ctiom Read the description in
this Owner's Manual for details on coirect operations.
* Playback *iom a desired track and random playback are not available during progqam playback.
48
4>
EN
01All
T0005UF(P36-51).QX3
04.4.7
1:25
PM
Page
49
1.Please visit yotlr local Audio/Video store and purchase a good quality VHS Video Head Cleaner.
2. If a Video Head Cleaner does not solve the problem, please call our help line at 1-800-968-3429, to
locate an Authorized Service Center.
NOTES:
* Remember to read the instructions included with
the video head cleaner before use.
* Wipe the front panel and other exterior sur_hces of
the TV!VCWDVD with a so_}cloth immersed in
lukewarm water and wrung do<
* Never use a solvent or alcohol. Do not spray insecticide liquid near the TV,WCR/DVD. Such chemicals may cause damage and discoloration to the
exposed sur_hces.
* Clean video heads only when problems occur.
,?70
HgL4}
CL/!L4 '_?"_'_
{;
* Automatically cleans video heads as you insert or
remove a cassette, so you can see a clear picture.
* Playback picture may become blurred or interrupted while the TV program reception is clear. Dirt
accumulated on the video heads after long periods
of use or the usage of rental or worn tapes can
cause this problem.
If a streaky or snowy picture appears during playback, the video heads in yom TV/VCP, JDVD may
need to be cleaned.
I/TRVTL,
_}!;_()PT?4;:_L
PI<'k
* Should your TV/VCR/DVD become inoperative,
do not try to correct the problem by yoursel[ There
are no user-sel_iceable parts inside_ Turn off
unplug the power cord and please call our help line
at 1-800=968-3429, to locate an Authorized Service
Center
} L ;_/T L%'D?/?7}
* If the TV!VCWDVD still does not perform properly when it is operated while refclTing to the relevant sec=
tions and m "TROUBLESHOOTING GUIDE" in this Owner% Manual, the laser optical pickup unit nmy be
dirty. Consuh your dealer or an Authorized Service Center for inspection and cleaning of the laser optical
pickup unit.
® To clean-off use a soft cloth.
® Do not use a hard cloth since this wil! mar the disc.
* Use discs which have the %llo'_xing logos on them.
(Optical audio digital discs.)
.....
DVD+R
o.o._.o.o
* Wipe the disc in a straight line from center to edge.
* Never wipe with a circular motiom
* Do not use detergent or abrasive cleaning agents.
_
DVD+ReWritable
* Handle the discs so that fingerprints and dust do
not adhere to the snr[hces of the discs.
* Always store the disc m its protective case when it
is not used.
49
EN
01All
T0005UF(P36-51).QX3
04.4.7
GL!)_
]<!,/?,d
L _PI}i
1:25
PM
Page
50
770<{<
t},ZL{<TtiU']
Z %PE(7174)I _76_>,,7<
Sound output:
[ TVIVC R ]
19 inch in-line gxm,
90" deflection robe
Television system :
NTSC-M
Closed caption system :§15.119/FCC
Video Heads :
Rotary %ur-head
Tape width :
1/2 inch
Tape speed
SP:
33.40ram/see.
LP :
16.67mm/sec.
SLP :
11.12mm/sec.
Tm_er channel
TV VHF Low :
#2- 96
TV VHF High :
#7 # 13
TV UHF :
#14- #69
CATV
VHF :
5A
MID band :
A5 AI, A I
SUPER band :
J- W
HYPER band :
W+I W+84
2 speakers, IW. 8 ohm
CRT
Terminals
Antenna input:
Video inpuL
Audio L/R input:
Headphone:
Coaxial digital
audio output:
Remote control:
Operating
temperature:
Power requirements:
Power consumption
(Maxmmm):
Picture robe:
Dimensions:
Weight:
Product type:
Discs:
Output signal fommt:
VHF!UHF/CATV
75 ohm unbalanced (F-type)
RCA connector × 1
RCA connector ?< 2
1/8" stereo (3.5 ram)
One pin jack,
500m Vpp (75 ohm)
Digital encoded
infiared light system
5°C to 40°C
AC 120V. 60Hz
90W
19"
H: i9- i 1/i6" (500ram)
W:2!-7/8" (556mm)
D: 18-7/8" (480ram)
46.3 lbs (21kg)
DVD Player
DVD video, Audio CD
NTSC color
* Designs and specifications are subject to chmtge without notice.
* If there is a discrepancy bem'een languages, the default language will be English.
50
EN
01All
T000BUF(ES).QX3
04.4.7
11:03
AM
Page
Bl
[] (.DNTROLES
DE OPERA(.ION
Y FLTVLIONES
.....
PANEL FRONTAL DEL TELEVISOR DVD ..........
MANDO A DISTANCIA .........................
VISTA POSTERIOR
............................
[] PREPARA(70N
PARA LA UTILIZACION
..........
CONEXIONES
DE ANTENAiCABLE
..............
CONEXION A TOMAS DE ENTRADA EXTERNA ....
PARA INSERTAR LAS PILAS ....................
MODO DE ENTRAI)A EXTERNA
................
CONEXION A UN SISTEMA ESTt_REO ............
CONEXION A U2N AMPLIFICADOR
ESTt_REO
12. hdicador
de grabacidn
Parpadea durante la grabacidn.
Se ilumina durante el
modo de espera de grabacidn controlada pot temporizador,
S1
51
51
51
$2
52
52
53
53
53
13. Botdn
REC/OTR
(Panel
frontal)
Presione para empezar ta grabacidn manual, Presione
repetidamente
para empezar ta grabacidn instantSnea
(()TR),
gotdn
RECORD
(Mando
a distancia)
Presione para empezar ta grabacidn manual.
14. Botdn
REW (para TV/VCR)
Presione este botdn para rebobinar la cinta o para vet
ta imagen r@idamente
en direccidn de retroceso
durante el modo de reprodnccidm
(B0squeda
en direccidn de retroceso)
EQUIPADO CON TOMAS DE ENTRADA DIGITAL,
PLATINA MD O PLATINA DAT (Para DVD) .........
53
CONEXION A tiN DECODIFICADOR
DOLBY DIGITAL
(para DVD) ...................................
SECCION DE TV/VCR
[] PREPARA(70N
PARA LA UTILIZACION
SELECCI<)N DE IDIOMA .......................
AJUSTE DE CANALES .........................
AJUSTE DEL RELOJ ...........................
15. Botdn
F.FWD (para TV/VCR)
Presione este botdn para adelantar r@idamente
la cinta
o para vet ta imagen rhpidamente
en direccidn de
avance durante el modo de reprodnccidn,
(Bi_squeda en
direccidn de avarice)
16. Botdn STOP/EJEOT
53
..........
SECCION DE OVO
REPRODUCCION
BA.SICA ......................
53
53
54
54
Presione este botdn para detener la cinta, Presidnelo
el modo de parada para retirar ta cinta del
televisor videograbadoraiDVD
17. Ventanii[a
de[ sensor
de mando
a distancia
54
18. Toma
HEADPHONE
Para conectar auriculares
(no suministrados)
en privado,
19. Toma de entrada VIDEO
#!'_% h}'%[ <'< )_"
[
I
[
Consulte la figura 1 de la paigina 9
Consulte la figura 2 de la paigina 9
(ensuRe
la figura
3 de la pJgina
10
1° gotdn POWER
Presione este botdn para conectar y desconectar la alimentacidn,
2. gotones
VOLUME A/V
Presione estos botches para controlar el nivet de volurnen
del DVD y el televisor.
3. gotones
SKiP (para DVD)
Presione el botdn correspondiente una vez para omitir
capitulos o pistas y desplazarse ann punto especifico.
Mantenga el botdn presionado para cambiar la velocJdad de reproduccidn en avance o retroceso.
4. Botdn PLAY
Inicia ta reprodnccidn del contenido del disco o cinta.
5. gotdn STOP
Detiene la reprodnccidn del disco.
6. gotdn OPEN/CLOSE
Presione este botdn para insertar discos en ta bandeja o
retirarlos de ella.
7. Bandeja de carga de[ disco
8. Indicador
DVD
Se ilumina durante el modo DVD
9. gotdn SELECT
Presione este botdn para cambiar al modo TViV( R,
modo de entrada extema o modo de DVD
10. Indicador TVIVCR
Se ilumina durante el modo TViVCR,
11. gotones
CHANNEL A/V
Utillce estos botches pare seleccionar canales memorizados.
[
j
en
y escuchar
(onecte
aqu{ la tonm de salida de video de mm
videocfimara
o de mm videograbadora
2{). Tomas
de entrada
AUDIO L/R
< onecte aqu{ las tomas de salida de audio de una
videocfimara
o de una videograbadora
21. Compartimiento
de[ cassette
22. Botdn
PmCTURE
PresJone este botdn para ajustar
23. Botones
num4ricos
Modo TV:
la imagen
Presione dos botches para acceder directamente
al
canal deseado,
No olvide presionar "0" antes de elegir un canal de un
solo digito,
gotdn +100
Presione este botdn para seleccionar
canales de tele°
visidn pot cable cuyo n0mero sea igual o superior a 100,
Modo DVD:
[
Presione este botdn
Botdn +10
Presione este botdn
mayores qne 10,
24. Botdn
PAUSE
para introducir
el ndmero
para introducir
nOmeros iguales
HaLe una pausa en ta reprodnccidn
25. Botdn SPEED
Presione este botdn para seleccionar
grabacidn
deseada: SPiSLR
26. Botdn C.RESET
del disco
deseado,
o
o cinta,
la velocidad
de
Presione este botdn para ponm el contador en 0:00:00,
Presidnelo
tarnbi@* para cancelar un ajuste de programa de temporizador
27. Botdn
DBSPLAY
Modo TV/VCR:
Para visualizar el contador o el n£ur_eio del canal y ta
fccha actual en la pantalla del televisor,
Modo DVD:
Indica el estado actual en la pantalla del televisor para
tines de comprobacidm
28. Botdn SETUP
Presione este botdn para activar o salir det modo de
menf_s de televisor o confJguracidn
de DVD.
29. Botdn TITLE
Para visualizar el meng de timlos.
ES
51
0C28
+
T0005UF(ES).QX3
30. Bot6n
04.4.7
11:03
AM
Page
52
%<;/!1]<4]},:!?
t}E I<HFH'7I,<
En aigtmas zonas ser/t necesario utilizar una antena
exterior.
CLEAR
Para cancelar ajustes.
31. Botdn
MODE
Acfiva el modo de reproduccidn
rcpro&ccidn aleatoria.
32. Botdn
SEARCH
MODE
Presione este botdn
33. got6n AUDIO
Fogramada
para localizar
o el modo de
un punto
deseado.
Presione este botdn para seleccionar
audio o el modo de sonido deseado
34. Botdn
SUBTITLE
nn idioma
Presione este botdn
mlos deseado.
35. Botdn
REPEAT
el idionm
para seleccionar
<'_)'\.
_"i.b_
}'
])()]?
Utilice esm conexidn si su sistema de televisidn por
cable se conecm direcmmente a su televisor/
videograbadora/DVD, sin una caja de convertidor.
Con esta conexidn podr{t:
1) Utilizar el mando a distancia del televisor/
videograbadora/DVD pare seleccionar canales.
2) Do_amar uno om{ts canales decodificados para
grabacidn aummStica controlada pot temporizador.
NOTA: Este televisol/videograbadora/DVD
SOL()
puede grabar e! canal que se est{t viendo.
7 k / f3 15,</O'_.P()/,#C41/L E _ 5""_,+
<1454
LU:;
,<717_7/!){7,&_<Ui<77D fT<; tT(?;_f
O(Tgl; Z) 7 %, T]!, ;.7'71<'i
Si su compafia de televisidn por cable le SLmfinistra
una caja de convertidor o si utiliza un sistema de
satdlitc, pod% utilizar la conexidn bdsica que se
muestra en la ilustracidn.
A1utilizar esta conexidn, tambi_n podfft grabar canales
codJficados. Sin embargo, la seleccidn de los, canales
deberd hacerse con la caja de convertidor o con la caja
de sat_lite. Esto significa qt_e no es posible cambiar de
canal utilizando el mando a distancia del televisor/'
videograbadoraiDVD. La grabacidn en ausencia (controlada por temporizador) estd limitada aun canal a la vez.
PARA GRABAR UN CANAL
CODIFICADO/DE(
ODIFI( ADO
l.Ajuste el selector de canales del
televisorNideogmbadora/DVD
al canal de salida de
la caia de convertidor de televisidn por cable o caja
de sa_lite. (Ej., CH3)
2. Seleccione el canal que &sea grabar en la caja de
convertidor de televisi(m pot cable o caja de sat_lite.
de
de subtio
Repite la repioducci&_ del disco, t{mlo, c3p{mlo o pista actual.
36o Botdn ANGLE
{modo
DVD)
Presione este botdn para cambiar el fingulo de la cdmara
y vet ta secuencia que se estfi reproduciendo
desde un
fin_llo dif_rente.
37. gotdn A-g REPEAT
Repite ta reprodttccidn
de una seccidn
38. 8otdn
RETURN
Permite volver a la operacidn anterior
configuracidn
de DVD,
39. Botdn
ENTER
seleccionada
en el modo
de
Presione este botdn para establecer un ajuste.
40° Botones
de flechas
Modo TV/VCR:
Presione estos botones par3 sebccionar
un modo de
3juste en el menfi qne 3parece en 13 pant3!13 del televisor.
Presidnelos
tambidn para seleccionar
opciones 0
establecer
ajustes en un mend en particuta>
Modo DVD:
Use estos botones para haler ajustes mientras observa
ta inmgen en la pantalla del televiso>
41. Botdn
DISC MENU
Moestra los mends contenidos
en el DVD.
42. Botdn V.SURR
Activaridesactivar
el envolvente
virtal
43. Botdn
MUTE
Suprime la salida de sonido Presidnelo
de nuevo para
restablecer
el sonido
44. Botdn
SLEEP
Utilice este botdn p3r3 ajustar el temporizador
45. Botdn
SELECT
Nota para el instalador de sistemas CATV
Esta nora tiene la finalidad de llamar la atencidn
del instalador de sistemas CATV para que tenga
en cuenm el Articulo 820=40 de la NEC, que pro=
porciona rccomendaciones para haler una cortex=
idn a tierra apropiada > en particular, especifica
qne la tierra del cable debe conecmrse al sistema
de puesm a tierra deI edificio, tan cerca del punto
de entrada del cable como sea posible.
de dormir.
Presione este botdn p3ra cambiar entre los modos
TV_CR
y DVD, El nrodo seleccionado
(TV VCR o
DVD) se visualiza en el indicador
del panel delantero,
46. Toma de entrada
ANT,
Condctela
auna antena, sistem3
o sistema de satdlite.
47. CaMe de a[imentacidn
de televisidn
por cable
Con6ctelo auna toma de CA estfindar (120 V./60 Hz).
NOTA: Antes de conectar el cable de alimentacidn
a
una toma de CA estdndar, retfi'elo del gaucho
para evitar dafiarlo.
48. Toma de sa[ida de audio digital
COAXIAL
( on&rein solamente 3 t3 entrad3 digital de un amplificador extemo o decodificador
de audio de DVD
Cumldo yea un program3
s_
( onsulte Ia figm'a 4 de Ia paigina 11
grabado cn otr3 fuente (videograbado-
r3 o videocdmar3),utilice las tomas de entmdade 3udiowideo
de la parle delanter3det televisorividcograbadoraiDVD_
(onecte las tonms de salida de audio video de otra fhente a
las tonms AUDIO _R v VIDE() de este televisor/
xideograbadora DVD Lue_o, presione los botones CHANNEL A_ hasta que 3parezca "AUX" en ta pantalta
NOTA:
* Cuando conecte una videograbadora
monofdnica
(otra
fuente) a este televisor videograbadoraiDVD, conecte la
toma de salida de audio de ta videograbadora
monofiSnica
(otra f_aente)a la toma AUDIO L de este
televisor videograbadoraiDVD.
El audio sal&fi igualmente pot los canales izquierdo y derecho.
]
[
[
52
+
Consulte Ia figm'a S de Ia paigina 12
l
1
ES
0C28
T0005UF(ES).QX3
04.4.7
11:03
AM
Page
53
( onsuRe la figura 7 de la pfigina 14
I
NOTAS:
* Asegfircse de desconecmr la alimentacidn de todos
los componentes del sistcma antes de conectar otto
componentc.
* Consuhc los manuales de instrucciones de los
componentcs que va a conecmr al televisor/
videograbadora!DVD.
* Si conecm un decodificador Dolby Digital, aiustc
la ftmcidn DOLBY DIGITAL a ON para salida de
audio en el modo de configuracidm
* A menos que se haga la conexidn a un decodificador Dolby Digital, ajustc Ia ftmcidn Dolby
Digital a OFF para salida de audio en el modo de
configuracidn. La reproduccidn en un
televisol/videograbadora/DVD
utilizando ajustes
incorrectos puede generar ruido y distorsidm y
tambidn puede causar dafios a los almvoces.
1) Abra la cubierta del compartinfiento de las pilas
empujando la cubierta del mando a __
distancia en el sentido de la flecha.
2) Inserte 2 pilas "AA" en el
comparrimiento de las pilas, en el
sentido indicado por las marcas de polaridad (+/-).
3) Vuelva a poner la cubierta.
A1 usar una serial de entrada externa (o_ra videograbadora o una videocfimara), conecte !os cables de salida de
audio/video del equipo externo a las tomas AUDIO MR
IN/VIDE() IN de su televisor/videogqabadoraiDVD.
Luego, presione los botdn CHANNEL A o V hasta que
aparezca "AUX" en la pantalla.
Fabricado bNo lcencia de Dolby
Laboratories: '!Dolby!' y el Mmbolo de la D
done son mamas d e f_brica 6 e Do!by
Laboratories.
I
I
I
j
Utilice un cable digital coaxial de audio de vema en e!
comercio especializado para hacer las conexiones de audio.
Conexidn a un amplificador equipado con tomas de
entrada digital, platina MD o platina DAT
[
( onsulte la fgura 6 de la p/_gina 13
]
!
[
NOTAS:
* La ft_ente de audio de un disco grabado en %rmato de
sonido envolvente Dolby Digital de 5,1 canales no se
puede grabar como sonido digital mediante una platina MD o DAT.
* Asegfirese de desconectar la alimentacidn de todos
los componentes de! sistema antes de conectar otro
componente.
* Consulte los manuales de instmcciones de los componentes que va a conectar al televisor!videograbadorai
DVD.
* Ajuste la f,_mcidnDolby Digital a OFF para salida de
audio en el modo de configuracidn. La reproduccidn
en un televisor/videograbadoraiDVD utilizando
ajustes incorrectos puede generar ruido y distorsidn, y
tambidn puede causar dafios a los altavoces
[TV/VCR]
Enclaffc el corddn de alimentacidn del
televisorivideograbadoraiDVD en tma toma de CA
estfndar
NOTA:
* Si aparecen algunas ciffas en la esquina de la pantalla, pulse el botdn POWER sin desenchufar e!
corddn de alimentacidm
Aseg{lrese de we ...
* Pulse el botdn POWER para encender e!
televisorivideograbadoraiDVD.
NOTA: Esta funcidn afccta sdlo el idioma en el menfi
de la panta!la y no la fuente de audio.
Si utiliza este televisor/videograbadora/DVD
para
repro&._cir un disco DVD grabado en _\_rmato de
sonido envolvente Dolby Digital de 5, ! canales, el
televisor/videograbadora/DVD
emitirit un l'lL_jode
datos DOLBY DIGITAL des& su toma de salida de
audio digital COAXIAL
Si conecta el reproductor a
un decodificador Dolby Digital, podrit disfi°Ltmrde
una tonalidad m{ts convincente y real, con un sonido
envolventc potente y de aka calidad similar al de los
cines.
Pulse el botdn SETUP en el mando a distancia.
Pulse e! botdn _, o V para sefialar "LANGUAGE".
"r'<_-,N{vA >
Seleccione "ENGLISH", "ESPAlqOL"o "FRAN('AIS"
con el botdn ENTER.
Pulse el botdn SETLTPen el mando a distancia para
voh'er al modo de! televisor.
Utilice cables digimles coaxiales de audio
disponibles en el cornercio especializado para hacer
las conexiones de attdio.
53
4>
ES
0(28
T000BUF(ES).QX3
04.4.7
11:03
AM
Page
B4
NOTA: Si, pot alglma razdn, el mcnil est{ten inolds o
liancds, pulse el botdn SETUP en el maMo a dismncia,
pulse el botdn A o T para sefialar el "LANGUAGE
[ENGLISH]" o "LANGAGE [FRAN_AIS]', a contim
uacidn, pulse el botdn ENTER y pulse el botdn SETUP
en el mando a distancia
1)Pulse el botdn SETUP en el mando a distancia.
Pulse el botdn A o T para indicar "AJ-USTE
RELOJ'.
Luego, pulse el botdn ENTER.
2) Pulse el botdn A o _" para indicar "AA;STE
MANUAL RELOJ'L
Luego, pulse el botdn ENTER.
3)Pulse el botdn A o T basra que aparezca el rues
deseado. (Ejemplo: Mayo o 05)
Luego, pulse el botdn _.
4) Pulse el bot(m A o _" basra que aparezca el dia
del rues deseado. (Ejemplo: 6 o 06)
Luego, pulse el botdn _.
5)Pulse el botdn A o V basra que aparezca el al_o
deseado. (Ejemplo: 2004)
Luego, pulse el botdn li_.
6)Pulse el botdn A o T basra que aparezca la hora
deseada. (Ejemplo: 5, PM)
Luego, pulse el botdn ti_.
7)Pulse el bot(m & o _' hasta que aparezca el minu=
m deseado. (Ejemplo: 40)
8)Pulse el bot(m SETUP en el mando a distancia.
Aunque los seglmdos no se visualizan, dstos
empiezan a contar des& 00 cuando se pulsa
SETUP en el mando a distancia. Utilice esta ftmo
ci(m para sincronizar el reloj con la hora correcta.
[ TV/VCR ]
Puede programar el sintonizador para buscar todos
los canales que recibe en su localida&
NOTA: E1 canal preparado NO es necesario cnando
estd conectado a una caja de cable o caja de sa_61itc.
Sdlo tiene que seleccionar con el selector de canal
del tclevisor/videograbadora/DVD
al canal de salida
de la caja de cabe o caja de sa_61ite (por ejemplo el
cana! CH3). Seleccione el canal a vet en la caja de
cable o caja de sat_lite.
Aseg4rese de que ...
* Pulse el botdn POW%R para encender el televisor/videograbadora/DVD.
Pulse el botdn SETUP en el mando a distancia.
Pulse el botdn A o T para sei_alar "AJ-USTE DE
CANAL".
A continuacidm pulse el botdn ENTER.
Pulse el botdn & o _' para se6alar "AUTOPROGRAMACION DE CA".
A continuacidm pulse el botdn ENTER.
E1 sintcmizador busca y memoriza todos los canales
activos en su localida&
E1 sintonizador se dedene en el calml memorizado
m{tsbajo.
* Cuando se activa AUTOPROGRAMACION
DE
CA, donde no hay entl-ada de serial del televisor,
aparecer_t "NO HAY SEN-AL DE TV" en la pan=
talla despu6s de terminar la N__tsquedade canales.
* El tclevisor/videograbadora/DVD
puede rcconocer
los canales de TV para que sean canales de TV de
antena de cable con las condiciones de recepcidm
En este caso, pruebe nuevamente con el prel_jado
autongttico en las condiciones de recepcidn l_na.
Conecte la alimentacidn del amplificador
componentes, si es necesafio.
{
{
.....
{,
y otros
{
_><' k/<<>
La alimen[aci6n
seconectar{t.
{
{
, >:_o
{
{{
{
{
{{{
,
{
{
{
{ {
,,.........<,){:>[_]_>l<;h<)$[):
:>a's"
{
{
{ {
{
{
;_g [_:}<>}
< {k{}{< S<:> < ;:{_@S<
9 e
]
{{
{
<
" "_
{
_} ba _de]a {;{9}
a < <_1::<a}a< s _} b[
4 P<eso ,.:e [:/:6{ _.m.._.Y
La bandeja se celTar{_autom{tticamente y la reproduccidn comenzarit des& el primer capitu!o o pista
del disco. Si la reproduccidn no comienza autom_tti=
camente, presione el botdn PLAY
Cuando reproduzca un DVD que tenga gqabado un
men-(t de titu!os, el men{t podr_t aparecer en la pan=
talla.
[ TV/VCR ]
Cercidrese.°.
° La alimentacidn del televisor/videograbadora/DVD
deberfi esmr conectada.
En el _,emplo & abqio, el mloj va a q/_tsmrse aM
FECHA: 6 de mayo de 2004
HORA: 5:40 PM
54
4>
ES
0(28
T0005UF(ES).QX3
04.4.7
11:03
AM
Page
55
55
ES
0(28
T0005UF(P36-51).QX3
04.4.7
1:25
PM
Page
51
....
Your Home
For repair- in your home-of all major brand appliances,
lawn and garden equipment, or heating and cooling systems,
nomatterwhomadeit,
nomatterwhosoldit7
For the replacement parts, accessories and
owner'smanualsthatyouneedtodo-it-yourself.
For Sears professional installation of home appliances
anditemslikegaragedooropenersandwaterheaters.
1-800-4-MY-HOME
CaIlanytime,
®
(1-soo-,sg-.ss3)
dayornight(U.S.A,
www,sears.com
andCanada)
www,sears,ca
OurHome
Forrepairofcarry-in
items,kevacuums,
lawnequipment,
and electronics, call orgoon-lineforthe
location ofyournearest
SearsParts&RepairCenter.
1-8o0-488-1=2
Call anytime, day or night (U.S.A. only)
www.sears.com
TopurchaseaprotectionagreementonaproductservicedbySears:
1-800-827-6655
(U.S.A.)
1-800-361-6665
(Canada)
..............................................................................................................................................................................................
aPara
domiciIio,lPedir
"888"SU'HOGARSM
(I -888-784-6427)servici°
Y para ordenar
de reparaciOn
piezas:
Au Canada
1-800-LE-FOYER
Mc(1
www.sears.ca-800-533-6937)pour
service en fran_ais:
SEARS
Registered Trademark
/ TM Trademark
/ SM Service Mark of Sears, Roebuck and Co
¢ Marca Registrada / TM Marca de Fabrica / SM' Marca de Servicio de Sears, Roebuck and Co
MC Marque de commerce
/ MD Marque deposce de Sears, Roebuck and Co
© Sears,
Roebuck
and Co
90 Day Full Warranty
If this (product)
experiences
any failure due to a defect in material or workmanship
within 90 days from the date
of purchase,
return it to your nearest Sears Parts & Repair Center, and Sears will repair it free of charge.
After 90 days and until one (1) year from
You pay for labor.
After 90 days and until two (2) years from
tive. You pay for labor.
This warranty
applies
This warranty
gives you specific
and Co., Dept
For the location
of a Sears Service
Sears
is used for private
household
legal rights,
817WA,
Hoffman
Center
Sears will replace
the date of purchase,
only if this (product)
Sears, Roebuck
Primed i_ Chilm
the date of purchase,
and you may also
Estates,
in your
will replace
have other
defective
parts free of charge.
the Picture
Tube if it is defec-
purposes.
rights which
vary from state to state.
mL60179
area : 1o800o488o1222
IEMN20025
T0005UF _-k_r
_r