1
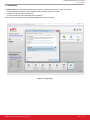
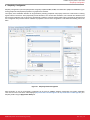
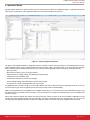
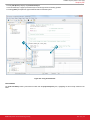
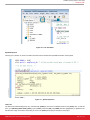
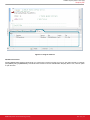
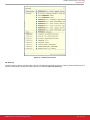
AN0822: Simplicity Studio™ User Guide
Simplicity Studio greatly reduces development time and complexity with Silicon Labs' EFM32, EFM8, and 8051 MCUs, wireless
MCUs, and ZigBee SoCs.
Simplicity Studio can create wireless applications and provides hardware configuration,
network analysis, real-time energy debugging, a high-powered IDE, and links to helpful
resources, all in one place.
Download and install Simplicity Studio from: http://www.silabs.com/simplicity-studio.
KEY POINTS
• Simplicity Studio makes the development
process easier, faster, and more efficient.
• The IDE and integrated tools help optimize
designs.
• Getting started with development is quick
and easy with Demos and Software
Examples.
• Quickly find help and design resources.
silabs.com | Smart. Connected. Energy-friendly.
Rev. 0.2
AN0822: Simplicity Studio™ User Guide
Relevant Resources
1. Relevant Resources
• Simplicity IDE Guide—In the Simplicity Studio IDE, select [Help]>[Help Contents] to display this guide as well as any installed documentation.
• AN0821: Simplicity Studio C8051F85x Walkthrough—This document provides a step-by-step walkthrough for using the Simplicity
Configurator and Simplicity IDE tools with the C8051F85x family.
• AN0823: Simplicity Configurator User’s Guide—In addition to the documentation within the tool itself, this document provides a discussion of the Simplicity Configurator tool.
• Ember UG102: "Ember Application Framework Developer's Guide"—This document describes how to use the Application Builder
tool in detail and more information on the Application Framework.
• Ember UG104: "Testing and Debugging Ember Applications"—This document provides guidance for how to debug wireless networks.
• Silicon Labs Videos—See the Simplicity Studio tools in action! Access these videos from the Silicon Labs website (http://
www.silabs.com/simplicity-studio) or using the [Silicon Labs Videos] tile in Simplicity Studio.
• Lizard Labs—More information on specific tools included in Simplicity Studio and their usage can be found at http://www.silabs.com/
support/training/pages/online-training.aspx.
silabs.com | Smart. Connected. Energy-friendly.
Rev. 0.2 | 1
AN0822: Simplicity Studio™ User Guide
Overview
2. Overview
Simplicity Studio is a launching pad for everything needed to evaluate, configure, and develop with EFM32, EFM8, and 8051 MCUs,
wireless MCUs, and ZigBee SoCs. The software gathers all of these tools as tiles representing each activity. These tiles are separated
into four categories: Tools, Software and Kits, Part Documentation, and Resources.
The contents of these sections are contextualized for the selected device or kit so that only the relevant information and tools are
shown.
silabs.com | Smart. Connected. Energy-friendly.
Rev. 0.2 | 2
AN0822: Simplicity Studio™ User Guide
Overview
2.1 Part Selection
Selecting the device in the Product area of the launcher will change the available tiles and the behavior of each tile in the launcher. The
part can be selected by searching for a part, using the Parametric Search button to the left of the search box, or the [Refresh detected
hardware] option after connecting a kit or board.
Figure 2.1. Selecting a Device
The parametric search is useful for determining the best device for a particular application and can be narrowed to a smaller list of
devices using the selection criteria or the [Filter] text box in the lower right. To select a device, highlight it in the list and click [Select].
silabs.com | Smart. Connected. Energy-friendly.
Rev. 0.2 | 3
AN0822: Simplicity Studio™ User Guide
Overview
Figure 2.2. Using the Parametric Search
To automatically detect the appropriate device, connect the board to the PC. The board will automatically detect, or click the [Refresh
detected hardware] option. Simplicity Studio will scan for any connected devices and present a list. Select the device from the list.
2.2 Tools
The [Tools] section of Simplicity Studio provides software to develop code, configure or download code to a device, and debug the
code on hardware. There are also tools to measure energy consumption in real-time, estimate a battery life, download demo code to a
device, analyze a network of wireless devices, and configure wireless applications.
The default IDE selection is the Simplicity IDE, which is an Eclipse-based IDE provided with Simplicity Studio. To change the IDE preferences and use another IDE, click the [Settings] button on the main Simplicity Studio page and select [Simplicity Studio]>[Preferred
IDE]. All IDEs detected on the system will be available as options.
2.3 Software and Kits
The [Software and Kits] section provides links to software and kit documentation. In addition, this section links to the available application notes and software examples for the selected device.
2.4 Part Documentation
The [Part Documentation] section provides access to the selected device's documentation, including the data sheet, reference manual, or errata.
silabs.com | Smart. Connected. Energy-friendly.
Rev. 0.2 | 4
AN0822: Simplicity Studio™ User Guide
Overview
2.5 Resources
The [Resources] section provides links to useful resources, like the Silicon Labs Community or Technical Support.
silabs.com | Smart. Connected. Energy-friendly.
Rev. 0.2 | 5
AN0822: Simplicity Studio™ User Guide
Kit Manager
3. Kit Manager
The [Kit Manager] is a tool used to control the supported starter and development kits. When connected to a kit, the tool displays information about the kit and the MCU present on the kit.
Figure 3.1. Kit Manager
The [Update Kit] section is used to update the kit firmware. Whenever a new firmware version is released, enter the location of the new
firmware image here and install the new firmware on the kit.
The [Debug Mode] drop-down menu controls the routing of the debug signals from the built-in J-Link debug adapter. The options are
as follows:
• MCU
• In
• Out
• Off
silabs.com | Smart. Connected. Energy-friendly.
Rev. 0.2 | 6
AN0822: Simplicity Studio™ User Guide
Kit Manager
The default setting, [MCU], will debug the device on the kit. To use the on-board debug adapter to debug custom hardware, select the
[Out] option in this drop-down menu, and the debug signals will be routed to the debug header on the kit. The [In] option will enable an
external debug adapter on the debug header to debug the MCU on the board.
Note: The MCU on the board must be powered using the USB debug connector, a battery, or an external power supply when using the
[In] option.
Finally, the [MCU Information] section contains information about the MCU that is connected to the on-board debug adapter. Normally,
you will get information on the MCU on the kit, but when if debug mode is set to out, you will get information about the MCU on the
external board, instead.
More information on this tool can be found at http://www.silabs.com/simplicity-studio.
silabs.com | Smart. Connected. Energy-friendly.
Rev. 0.2 | 7
AN0822: Simplicity Studio™ User Guide
Setup Tasks
4. Setup Tasks
The [Setup Tasks] tile consolidates all optional setup items after installing Simplicity Studio. These items include:
• Configuring Simplicity Studio to use an installation of IAR Embedded Workbench for ARM.
• Installing CP210x VCP drivers for C8051 kits.
• Licensing the Keil tools for the EFM8 and C8051 8-bit MCUs.
Select an item from the list and click the [Launch setup] button to start a setup task.
Figure 4.1. Setup Tasks
silabs.com | Smart. Connected. Energy-friendly.
Rev. 0.2 | 8
AN0822: Simplicity Studio™ User Guide
Energy Profiler
5. Energy Profiler
The [Energy Profiler] is a tile available from the Simplicity Studio Tools area and enables Advanced Energy Monitoring. This tool enables power profiling of code in real-time by measuring the power consumption. Some devices also support linking the power consumed
with the associated line of code.
Figure 5.1. Energy Profiler
More information on this tool can be found at .http://www.silabs.com/support/training/pages/online-training.aspx
silabs.com | Smart. Connected. Energy-friendly.
Rev. 0.2 | 9
AN0822: Simplicity Studio™ User Guide
Simplicity Configurator
6. Simplicity Configurator
Simplicity Configurator is part of Simplicity Studio and greatly simplifies EFM32, EFM8, and C8051 MCU peripheral initialization by presenting peripherals and peripheral properties in a graphical user interface.
The majority of the initialization firmware can be generated by selecting peripherals and property values from combo boxes or entering
register values in text boxes. Some peripherals provide calculators, such as baud rate calculators, timer overflow rate calculators, and
SPI clock rate calculators, that can be used to automatically confirm the necessary reload register value to generate the specified clock
rate. Configurator also provides real-time validation of properties to ensure that a configuration is valid before downloading code to the
MCU.
Figure 6.1. Simplicity Studio Configurator
More information on how to use Simplicity Configurator can be found in "AN0823: Simplicity Configurator User Guide." Application
notes can be found on the Silicon Labs webpage (http://www.silabs.com/32bit-appnotes or http://www.silabs.com/8bit-appnotes) or in
Simplicity Studio using the [Application Notes] tile.
silabs.com | Smart. Connected. Energy-friendly.
Rev. 0.2 | 10
AN0822: Simplicity Studio™ User Guide
Network Analyzer
7. Network Analyzer
The Simplicity Network Analyzer enables debugging of complex wireless systems. This tool captures a trace of wireless network activity
that can be examined in detail live or at a later time.
Figure 7.1. Simplicity Network Analyzer
The Simplicity Network Analyzer incorporates all the features of Silicon Labs’ Ember Desktop software. More than simply a packet sniffer, the Network Analyzer works with the data sniffer interface on the Silicon Labs wireless chips to provide direct feedback from the
baseband radio of each device, allowing any supported radio to report detailed packet transmission and reception data, such as timestamps, link quality (or LQI), receive sensitivity (or RSSI), and CRC pass/fail results, all without any software overhead.
With Simplicity Studio, any PTI-enabled Silicon Labs platform can record the radio activity regardless of the application firmware that is
being used, so there’s no need to have a dedicated sniffer device installed to catch the traffic. The Network Analyzer also enables capture from multiple sources simultaneously into the same log file without falsely duplicating packets. This enables the developer to compare how well different radios in the network heard the same transmission.
In cases when detail is not desired, Network Analyzer makes it easier to understand the workings of a complex wireless protocol. Related packet events are automatically grouped into a [Transactions] pane within the capture view, allowing for quicker parsing of what’s
happening during that portion of the traffic log. Quickly access statistics like total duration, number of related packets, number of pointto-point and end-to-end retries, and unexpected conditions like requests with missing responses or deliveries where expected acknowledgments are missing.
7.1 Filtering Events and Data
Filters can be applied to live or pre-captured traffic and can be entered via the [Expression Builder] by selecting one of the suggested
filters in the context menu of the [Transactions] or [Events] pane or by manually entering or editing text in the [Filter Bar].
Filters can be chained together using regular expressions to produce more specific results. Filters can also double as search criteria
with the rest of the surrounding events for context.
When the developer finds an item of interest, add a bookmark for future reference. This is great for annotating captures during debugging or collaborating with other users.
silabs.com | Smart. Connected. Energy-friendly.
Rev. 0.2 | 11
AN0822: Simplicity Studio™ User Guide
Network Analyzer
7.2 Logging Results
Simplicity Network Analyzer can record software-based debug activity from the firmware on the embedded networking devices, allowing
application developers a glimpse into which firmware events correlate closely in time with certain network-related events and transactions.
Stepping through a time-sensitive embedded networking application with a traditional debugger can disrupt the networking stack’s realtime behavior, but with Network Analyzer, a firmware engineer can get a transcript of all networking stack API calls and stack callback
functions as they happen, which can be a big help in shedding light on why a certain network activity occurred or why it had a particular
outcome. Silicon Labs even provides a Virtual UART interface to allow for traditional printf output through Serial Wire debug lines to
enable application printf statements the stack API and callback activity.
Other critical software activities, such as resets, assert() violations, and stack startup, are also captured in this [Events] listing, so developers have the maximum amount of information about what happened at runtime. This recorded information can also be sent to
Silicon Labs technical support to quickly resolve problems or answer questions.
7.3 More Information
More information on the Simplicity Network Analyzer tool can be found in "UG104: Testing and Debugging Ember Applications" in
Chapter 3. This document can be found on the Silicon Labs website: http://www.silabs.com/Support%20Documents/TechnicalDocs/
UG104.pdf.
silabs.com | Smart. Connected. Energy-friendly.
Rev. 0.2 | 12
AN0822: Simplicity Studio™ User Guide
Application Builder
8. Application Builder
Simplicity Studio shortens the software design cycle and reduces time-to-market with Application Builder, a graphical interface that
works in harmony with Silicon Labs’ application framework to make critical design choices up-front.
Figure 8.1. Simplicity Application Builder
The Silicon Labs Application Builder, or AppBuilder, allows a developer to start a new project based on an existing framework of bestpractice application state machine code developed and tested by Silicon Labs. This framework sits on top of the wireless networking
stack to interface with the Hardware Abstraction Layer (or HAL) and provide application layer functionality, including the following:
• Start-up routines.
• Mechanisms for finding, joining, or forming networks.
• High-level APIs for creating, parsing, and handling message payloads.
• Configuration of the networking stack.
• Command-line interfaces for control of the program.
• Human-readable debug output tailored to the needs of the developer.
• Incorporation of customer-provided libraries and code modules.
The AppBuilder tool is modular enough to accommodate different data sets for different versions of application protocols, so you can
choose exactly the right version of application-level specs when it really matters for interoperability.
Within a given application layer, like ZigBee’s ZCL or ZigBee Cluster Library, you can pick from any of the defined device types to get
the desired mixture of client and server functionality, or you can build your own custom device definition from any of the available client
and server clusters.
Device-wide, stack-level settings like network node type and security method can easily be set via the picklists in AppBuilder, and all
relevant code is automatically included, with all unnecessary code being automatically removed in the final output. You can even use
the Simplicity Studio Application Builder to configure two different networks on the same chip, such as ZigBee PRO and RF4CE.
silabs.com | Smart. Connected. Energy-friendly.
Rev. 0.2 | 13
AN0822: Simplicity Studio™ User Guide
Application Builder
8.1 Callback Interface
AppBuilder is very versatile, with one example being the callback interface, which allows user applications to be notified about important
events or make decisions based on runtime state. Software designers can choose which callbacks are needed for their application and
can leave the rest disabled so that only the chosen callbacks appear in the user’s Callbacks C file. The rest are safely defined as
empty stubs within the framework until they are enabled.
Callbacks are the places where custom application code can be added on top of Silicon Labs’ existing framework to give that application unique behaviors and decide how it will react. Within the callback implementations, developers can utilize the entire HAL and stack
APIs as well as a complete set of Application Framework-specific APIs that often provide high-level wrappers around complex HAL or
stack functionality. These APIs are documented in an Application Framework API Guide and be found in use in existing sample code.
Like all of the Silicon Labs Application Framework, full source code in C is provided to help understand the implementation of these
APIs.
Overall, there are over 200 callbacks to choose from. In addition, Application Builder automatically provides a unique callback for every
incoming message type supported by the device’s application protocol, enabling the application to handle each incoming command
frame exactly as desired.
8.2 Customization
To add proprietary extensions to a standard application protocol like ZCL, just describe the custom clusters, commands, attributes, and
device types in an XML file that follows the Silicon Labs schema, and point AppBuilder to the XML file. The next time a configuration
based on that stack is created or edited, those manufacturer-specific enhancements will appear as clusters and attributes that can be
enabled, and callbacks will automatically be provided to handle any proprietary incoming commands declared in the XML data. AppBuilder will even create macros that firmware can use to quickly craft an outgoing message in the proprietary format, enabling the assembly of a command frame and the passing of arguments from the API to populate parameters of that command.
8.3 Plugins
The [Plugins] tab in AppBuilder also enables application acceleration. This tab has over 100 plugins that each implement one or more
callbacks on top of the Application Framework to provide a sophisticated state machine for complex features like message fragmentation, RF4CE device profiles, or external dataflash storage for downloading firmware updates. Source code for all plugins is available, so
the code is there as a point of reference for customized implementations.
Many plugins implement functionality for a specific ZigBee ZCL cluster, such as Level Control, Groups, or Key Establishment, so the
plugin can be enabled and, in many cases, provide all the needed messaging required to pass ZigBee application layer compliance
tests. Other plugins implement a software state machine and expect developers to integrate the hardware behavior into that state machine to get the device to physically react to the change in software state. Still other plugins are provided as sample code that can be
used like a test harness to exercise functionality otherwise not available in the system.
8.4 Generating a Project
After making selections for any portions of the application the developer wishes to customize, AppBuilder will generate a software
project with customized header files and array definitions in C code to represent the desired application behavior. The resulting project
can be built from within Simplicity IDE to produce a binary that can be loaded onto the target wireless SoC.
This project generation is specific to the stack version and target chip where the configuration is done, but the Silicon Labs Application
Framework abstracts many of these differences within its APIs and state machines, so AppBuilder configurations can be reused across
different stack versions or chip platforms. This makes it much easier to transition from one version of a stack release to the next.
8.5 More Information
More information on the Simplicity AppBuilder tool can be found in "UG102: Ember Application Framework Developer's Guide." This
document can be found on the Silicon Labs website: http://www.silabs.com/Support%20Documents/TechnicalDocs/UG102.pdf..
silabs.com | Smart. Connected. Energy-friendly.
Rev. 0.2 | 14
AN0822: Simplicity Studio™ User Guide
Simplicity IDE
9. Simplicity IDE
The Simplicity IDE is an Eclipse-based Integrated Development Environment (IDE) enabling code editing, downloading, and debugging
for Wireless (including EM35xx), EFM32, EFM8, and 8051 devices.
Figure 9.1. Simplicity IDE
Launch the Simplicity IDE from the Simplicity Studio launcher by clicking on the [Simplicity IDE] tile, clicking the [Software Examples]
tile, or using the [Import Project] button in the [Application Notes] tile.
silabs.com | Smart. Connected. Energy-friendly.
Rev. 0.2 | 15
AN0822: Simplicity Studio™ User Guide
Simplicity IDE
Figure 9.2. Launching Simplicity IDE
9.1 Workspaces
A workspace in the Simplicity IDE is a grouping of active projects shown in the [Project Explorer] view and is tied to a physical location
on disk. The workspace contains the top-level IDE settings, including the global defaults, view window positions, and the projects in the
workspace. The workspace information is contained in the metadata (.metadata) subdirectory in the workspace directory. Any projects
added to the workspace will be copied to this location. The default workspace location can be seen and modified by going to
[File]>[Switch Workspace]>[Other].
9.2 Projects
A Simplicity IDE project contains files, build options, and project settings. Projects generally exist as a directory containing sub-directories and files. The project structure seen in the IDE in the [Project Explorer] view is replicated physically on the disk. However, a
project may also contain linked files or directories which are just pointers to files or folders outside of the project directory.
silabs.com | Smart. Connected. Energy-friendly.
Rev. 0.2 | 16
AN0822: Simplicity Studio™ User Guide
Simplicity IDE
9.3 Importing a Project
To import a project from Keil µVision4, IAR Embedded Workbench, or the 8-bit Silicon Labs IDE into Simplicity IDE:
1. Go to [File]>[Import].
2. Select [Simplicity Studio]>[MCU Project].
3. Follow the steps in the wizard to finish importing the project.
The SDK is a collection of header files and examples for the device families. The header files define registers and enumerations for
each bitfield within registers.
9.4 Exporting a Project
To share a Simplicity IDE project:
1. Go to [File]>[Export].
2. Select [Simplicity Studio]>[MCU Projects to Files].
3. Follow the steps in the wizard to finish exporting the project.
This will enable Simplicity Studio to re-import the project at another time.
silabs.com | Smart. Connected. Energy-friendly.
Rev. 0.2 | 17
AN0822: Simplicity Studio™ User Guide
Simplicity IDE
9.5 Creating a New Project
There are four project types in Simplicity Studio:
• Empty C Program
• Example—This type of project is based on a pre-existing example.
• Library—A Library project enables the creation of a library, which can then be used as part of another project.
• Simplicity Configurator Program—This type of project enables pin, clock, and peripheral configuration of supported devices. This option may not be present if it has not been installed.
To create a new project in Simplicity IDE:
1. Click the [Create new project] link from the welcome screen or go to [File]>[New]>[Silicon Labs MCU Project].
2. Select the desired [Kit], [Part], and [SDK] from the drop-down menus and click [Next].
3. Select the project type and click [Next]. For [Example] projects, select the example and click [Next].
4. Name the project and click [Next] or [Finish].
5. After clicking [Next], the [Build Configurations] dialog enables setup of the project build options. The default is [Debug] and
[Release] configurations, which differ by debug symbol and optimization settings.
Alternatively, create a project directly from the Simplicity Studio main page by clicking the [Software Examples] tile and following the
wizard.
Creating a new project will cause Simplicity Studio IDE to check if the build environment is configured. If it is not, then the IDE will
automatically launch the [Setup Environment] wizard. In the [Part Selection] step of the wizard, select from the list of installed parts
only the parts to use during development. Choosing parts and families in this step affects the displayed or filtered parts in the later
device selection menus. Install additional parts using the [Help]>[Install New Software] menu item. Modify the part selection at any
time by accessing the [Part Management] dialog from the [Window]>[Preferences]>[Simplicity Studio]>[Part Management] menu
item.
Simplicity IDE can detect if the Keil C51 toolchain is not activated. If the [Licensing Helper] is displayed after completing the [Setup
Environment] wizard, perform the following steps to activate the toolchain:
1. Click the [this form] link to open the activation form in a web browser.
2. Complete and submit the form.
3. Once a registration key is received, copy the key into the text box in the [Licensing Helper] dialog.
4. Click [OK].
1
3
4
The Licensing Helper can also be accessed using the [Help]>[Licensing] menu option.
silabs.com | Smart. Connected. Energy-friendly.
Rev. 0.2 | 18
AN0822: Simplicity Studio™ User Guide
Simplicity IDE
9.6 Views and Perspectives
Perspectives are a saved set and configuration of views. Each view within a perspective provides information specific to the active perspective’s task. For example, while debugging a project, the [Debug] perspective shows the [Debug] view with stack trace information,
[Registers] view, [Breakpoints] view, [Expressions] view, and [Disassembly] view.
Swap between perspectives using the buttons in the upper-right corner of the IDE. The perspectives available by default are as follows:
• Simplicity—Clicking the [Simplicity] perspective will reopen the main Simplicity Studio launcher. Click the Simplicity IDE tile to return
to the Development perspective.
• Development—The [Development] perspective is the default perspective when in the Simplicity IDE. This perspective is designed
for code editing and development.
• Configurator—The [Configurator] perspective is used by the Simplicity Configurator tool, which enables peripheral and pin configuration for devices.
• Debug—Starting a debug session will automatically switch the IDE to the [Debug] perspective, which includes useful debugging
tools like the [Registers] and [Disassembly] views.
Figure 9.3. Perspectives Within the Simplicity IDE
silabs.com | Smart. Connected. Energy-friendly.
Rev. 0.2 | 19
AN0822: Simplicity Studio™ User Guide
Simplicity IDE
9.7 Code Editing and Debugging Features
Simplicity IDE is a code editing and development environment. The editor includes context highlighting, reference searching, and standard features found in any modern editor.
Open Declaration
In addition to the basic features, Simplicity IDE supports many advanced code-editing features. For example, the IDE automatically indexes all code within the project to support symbol lookup. The code does not have to build completely for the indexer to work, though
certain features may not be available if, for example, the main() routine is not declared.
In this example, the [Open Declaration] (F3 shortcut) feature quickly finds symbol declarations.
1. Open the file of interest by double-clicking it in the [Project Explorer].
2. Right-click on the desired symbol to display the context menu.
3. Click [Open Declaration] to quickly navigate to the definition of the symbol (e.g., [TMR2CN_TF2H]).
4. Studio will automatically open the file and highlight the line containing the declaration of the symbol.
silabs.com | Smart. Connected. Energy-friendly.
Rev. 0.2 | 20
AN0822: Simplicity Studio™ User Guide
Simplicity IDE
1
2
3
4
Figure 9.4. Finding Symbol Declarations
Content Assist
Simplicity Studio also supports code completion, a feature called [Content Assist]. Content Assist requires that the appropriate header
files be included in the file so that the symbols are available. To use [Content Assist], type the first few letters of a symbol or include
file and press [Ctrl+Space] to display a list of symbols that match. For example, to use [Content Assist] to display a list of symbols
starting with the characters [P1]:
1. Open a file and type the desired characters in the file (e.g., [P1]).
silabs.com | Smart. Connected. Energy-friendly.
Rev. 0.2 | 21
AN0822: Simplicity Studio™ User Guide
Simplicity IDE
2. Press [Ctrl+Space] to display the [Content Assist] list.
3. Use the arrow keys or page up and down keys to look through the list of matching symbols.
4. Pressing [Enter] will replace the typed characters with the selected symbol.
1
2
Figure 9.5. Using Content Assist
Link with Editor
The [Link with Editor] button synchronizes the editor with the [Project Explorer] view, highlighting the file currently selected in the
editor.
silabs.com | Smart. Connected. Energy-friendly.
Rev. 0.2 | 22
AN0822: Simplicity Studio™ User Guide
Simplicity IDE
Figure 9.6. Link with Editor
Symbol Expansion
Hovering over a function or macro in the editor will create a hover window with expanded information on that symbol.
Figure 9.7. Symbol Expansion
Task Lists
The task list will automatically pick up any comments with [TODO] in the line and consolidate them into the [Tasks] view. To add this
view, go to [Window]>[Show View]>[Other], type in [Tasks], and press [OK]. The [TODO] lines are highlighted by a clipboard in the
left-hand blue margin in the editor, and clicking on a line in the [Tasks] list will jump to that place in the project.
silabs.com | Smart. Connected. Energy-friendly.
Rev. 0.2 | 23
AN0822: Simplicity Studio™ User Guide
Simplicity IDE
Figure 9.8. Using the Task List
Quick-Access Console
Pressing [Ctrl+3] within Simplicity Studio brings up a quick-access console for locating any menu or view within the IDE. For example,
press [Ctrl+3] and type [Preferences]. This lists all of the Preferences menus available within Simplicity Studio. Then, select an option
to open the menu.
silabs.com | Smart. Connected. Energy-friendly.
Rev. 0.2 | 24
AN0822: Simplicity Studio™ User Guide
Simplicity IDE
Figure 9.9. Quick-Access Console
Call Hierarchy
The IDE includes a call stack and call hierarchy that can help debug and find where functions are called. To find the call hierarchy for a
function in either debug or development mode, right-click on it and select [Open Call Hierarchy].
silabs.com | Smart. Connected. Energy-friendly.
Rev. 0.2 | 25
AN0822: Simplicity Studio™ User Guide
Simplicity IDE
Figure 9.10. Using the Call Stack and Call Hierarchy
Snapshots
The [Snapshot] feature is available while debugging saves the values of the registers on a device at a particular point in time. Take a
[Snapshot] when the core is halted and the register values are constant and accessible by the debug hardware. Each [Snapshot] is
listed in the [Snapshot Albums] view. This feature is useful when comparing the states of two systems next to each other or looking at
the state of the hardware at separate points in time.
To view a snapshot, switch to the [Development] perspective and go to [Window]>[Show View]>[Other] and select [Snapshot Albums]. In the list, right click on a [Snapshot] and select [Launch Snapshot]. This will open the [Debug] perspective as it was at the
time of the [Snapshot], but it is not an active debug session on hardware. To switch back to a debug session on hardware, go to
[Run]>[Debug].
silabs.com | Smart. Connected. Energy-friendly.
Rev. 0.2 | 26
AN0822: Simplicity Studio™ User Guide
Simplicity IDE
Figure 9.11. Using the Snapshot Feature
silabs.com | Smart. Connected. Energy-friendly.
Rev. 0.2 | 27
AN0822: Simplicity Studio™ User Guide
Simplicity IDE
9.8 Common Actions
The common actions while developing are described in Table 9.1 Simplicity IDE Development Toolbar on page 28.
Table 9.1. Simplicity IDE Development Toolbar
Icon
Command
Description
Debug
The [Debug] button starts a new debug session. An active debug session must be disconnected before starting a new session using the same debug adapter.
Build
The [Build] button builds the selected project.
In a debug session, the IDE switches to the [Debug] perspective with the common actions shown in Table 9.2 Simplicity IDE Debug
Toolbar on page 28. If a single debug adapter is available, the IDE will automatically download the code to the MCU. If more than one
debug adapter is available, the IDE will prompt to select a debugger.
Table 9.2. Simplicity IDE Debug Toolbar
Icon
Command
Description
Debug
The [Debug] button starts a new debug session. An active debug session must be disconnected before starting a new session using the same debug adapter.
Resume
The [Resume] button runs the MCU after reset or after hitting a breakpoint.
Suspend
The [Suspend] button halts the MCU.
Disconnect
The [Disconnect] button terminates the current debug session and disconnects the debug
adapter. The IDE will automatically switch back to the Development perspective.
Reset the Device The [Reset the Device] button performs a hardware reset on the MCU.
Step Into
The [Step Into] button single steps into the first line of a function.
Step Over
The [Step Over] button single steps over a function, executing the entire function.
Step Return
The [Step Return] button steps out of a function, executing the rest of the function.
Instruction Stepping Mode
The [Instruction Stepping Mode] button toggles assembly single stepping. When enabled,
single steps will execute a single assembly instruction at a time. See the [Disassembly] view
for the assembly code corresponding to the source code at the current line of execution.
The [Debug] view in the top-left corner displays any active debug sessions. A debug adapter can only support a single debug session
at a time. An active debug session must be disconnected before code can be recompiled and a new debug session started.
To set a breakpoint, double-click in the blue bar to the left of the code editor or right-click on a line of code and select [Add Breakpoint]. Breakpoints can be managed using the [Breakpoints] view in the [Debug] perspective. Register contents are viewable and editable using the [Registers] view. Memory can be accessed using the [Memory] view.
silabs.com | Smart. Connected. Energy-friendly.
Rev. 0.2 | 28
AN0822: Simplicity Studio™ User Guide
Simplicity IDE
Figure 9.12. Navigating the IDE while Debugging
9.9 Running Blinky with an EFM32 Device
To create a project based on the Blinky example using the Zero Gecko starter kit:
1. From the main Simplicity Studio window, click the [Software Examples] tile.
2. In the first [Project setup] page of the project creation wizard:
a. Select [Zero Gecko 3200 Starter Kit] in the [Kit] drop-down menu.
b. The wizard automatically selects the [EFM32ZG222F32] device in the [Part] drop-down menu.
c. Select the SDK in the [SDK] drop-down menu.
d. Click [Next].
3. Select the [STK3200_blinky] example from the list and click [Finish].
4. Click the project in the [Project Explorer] view and click the [Debug] button to build and download the code to the hardware.
5. Click the [Resume] button to start running the example. The LED should blink.
6. Press the [Disconnect] button to return to the [Development] perspective.
silabs.com | Smart. Connected. Energy-friendly.
Rev. 0.2 | 29
AN0822: Simplicity Studio™ User Guide
Simplicity IDE
9.10 Running Blinky with an EFM8 or 8-bit Device
To create a project based on the Blinky example using the EFM8BB1 starter kit:
1. From the main Simplicity Studio window, click the [Software Examples] tile.
2. In the first [Project setup] page of the project creation wizard:
a. Select [EFM8BB1 Starter Kit] in the [Kit] drop-down menu.
b. The wizard automatically selects the [EFM8BB10F8G] device in the [Part] drop-down menu.
c. Select the SDK in the [SDK] drop-down menu.
d. Click [Next].
3. Select the [EFM8BB1 Blinky] example from the list and click [Finish].
4. Click the project in the [Project Explorer] view and click the [Debug] button to build and download the code to the hardware.
5. Click the [Resume] button to start running the example. The LED should blink.
6. Press the [Disconnect] button to return to the [Development] perspective.
9.11 More Information
Simplicity Studio includes detailed help information and device documentation within the tool. The help contains descriptions for each
dialog window. To view the documentation for a dialog, click the question mark icon in the window:
This will open a pane specific to the dialog with additional details.
The documentation within the tool can also be viewed by going to [Help]>[Help Contents] or [Help]>[Search]. Simplicity Studio also
contains several interactive walkthroughs called [Cheat Sheets]. These tutorials provide guidance through basic usage scenarios within
the IDE. Access these tutorials by going to [Help]>[Cheat Sheets].
silabs.com | Smart. Connected. Energy-friendly.
Rev. 0.2 | 30
AN0822: Simplicity Studio™ User Guide
Other Tools
10. Other Tools
More information on the other tools available in Simplicity Studio can be found at http://www.silabs.com/support/%20training/pages/
online-training.aspx and http://www.silabs.com/simplicity-studio.
silabs.com | Smart. Connected. Energy-friendly.
Rev. 0.2 | 31
Simpilcity Studio
One-click access to MCU tools,
documentation, software, source
code libraries & more. Available
for Windows, Mac and Linux!
www.silabs.com/simplicity
MCU Portfolio
www.silabs.com/mcu
SW/HW
Quality
Support and Community
www.silabs.com/simplicity
www.silabs.com/quality
community.silabs.com
Disclaimer
Silicon Laboratories intends to provide customers with the latest, accurate, and in-depth documentation of all peripherals and modules available for system and software implementers
using or intending to use the Silicon Laboratories products. Characterization data, available modules and peripherals, memory sizes and memory addresses refer to each specific
device, and "Typical" parameters provided can and do vary in different applications. Application examples described herein are for illustrative purposes only. Silicon Laboratories
reserves the right to make changes without further notice and limitation to product information, specifications, and descriptions herein, and does not give warranties as to the accuracy
or completeness of the included information. Silicon Laboratories shall have no liability for the consequences of use of the information supplied herein. This document does not imply
or express copyright licenses granted hereunder to design or fabricate any integrated circuits. The products must not be used within any Life Support System without the specific
written consent of Silicon Laboratories. A "Life Support System" is any product or system intended to support or sustain life and/or health, which, if it fails, can be reasonably expected
to result in significant personal injury or death. Silicon Laboratories products are generally not intended for military applications. Silicon Laboratories products shall under no
circumstances be used in weapons of mass destruction including (but not limited to) nuclear, biological or chemical weapons, or missiles capable of delivering such weapons.
Trademark Information
Silicon Laboratories Inc., Silicon Laboratories, Silicon Labs, SiLabs and the Silicon Labs logo, CMEMS®, EFM, EFM32, EFR, Energy Micro, Energy Micro logo and combinations
thereof, "the world’s most energy friendly microcontrollers", Ember®, EZLink®, EZMac®, EZRadio®, EZRadioPRO®, DSPLL®, ISOmodem ®, Precision32®, ProSLIC®, SiPHY®,
USBXpress® and others are trademarks or registered trademarks of Silicon Laboratories Inc. ARM, CORTEX, Cortex-M3 and THUMB are trademarks or registered trademarks of
ARM Holdings. Keil is a registered trademark of ARM Limited. All other products or brand names mentioned herein are trademarks of their respective holders.
Silicon Laboratories Inc.
400 West Cesar Chavez
Austin, TX 78701
USA
http://www.silabs.com