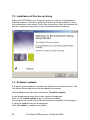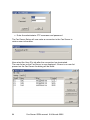
1
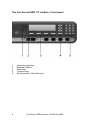
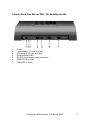
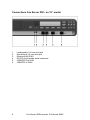
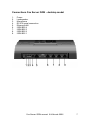
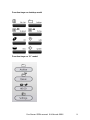
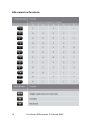
Fax Server ISDN
Manual
Version 3.0 ©-Vidicode 2006
2
Fax Server ISDN manual ©-Vidicode 2006
The Fax Server ISDN – desktop models
1.
2.
3.
4.
5.
6.
7.
8.
9.
10.
Menu keys
Backlight Display
Function keys
Speaker
Alfa-Numerical keys
CryptoCard reader
CD Recorder
Recorder keys
Speakerphone key
Volume adjustment
Fax Server ISDN manual ©-Vidicode 2006
3
The Fax Server ISDN 19" models - Front panel
1.
2.
3.
4.
5.
4
Internal loudspeaker
Backlight Display
Menu keys
Function keys
Alfa-Numerical / Recorder keys
Fax Server ISDN manual ©-Vidicode 2006
Connections Fax Server PRI - On desktop model
1.
2.
3.
4.
5.
6.
7.
Power
Loudspeaker 3.5 mm mini jack
Microphone 3.5 mm mini jack
Ethernet/LAN RJ45
RS 232 9 pin female serial connector
ISDN/PRI Out RJ45
ISDN/PRI In RJ45
Fax Server ISDN manual ©-Vidicode 2006
5
Connections Fax Server PRI - on 19” model
1.
2.
3.
4.
5.
6.
6
Loudspeaker 3.5 mm mini jack
Microphone 3.5 mm mini jack
Ethernet/LAN RJ45
RS 232 9 pin female serial connector
ISDN/PRI Out RJ45
ISDN/PRI In RJ45
Fax Server ISDN manual ©-Vidicode 2006
Connections Fax Server ISDN - desktop model
1.
2.
3.
4.
5.
6.
7.
8.
9.
Power
Loudspeaker
Microphone
RS 232 serial connection
Ethernet/LAN
ISDN BRI 4
ISDN BRI 3
ISDN BRI 2
ISDN BRI 1
Fax Server ISDN manual ©-Vidicode 2006
7
Connections Fax Server ISDN – 19” model
1.
2.
3.
4.
5.
6.
7.
8.
8
Loudspeaker
Microphone
RS 232 serial connection
Ethernet/LAN
ISDN BRI 4
ISDN BRI 3
ISDN BRI 2
ISDN BRI 1
Fax Server ISDN manual ©-Vidicode 2006
Function-keys on desktop model
Function-keys on 19” model
Fax Server ISDN manual ©-Vidicode 2006
9
Alfa-numerical functions
10
Fax Server ISDN manual ©-Vidicode 2006
Care and Maintenance
Keep the Fax Server dry. If it gets wet, wipe it
dry immediately Liquids might contain
minerals that can corrode the electronic
circuits.
Use and store the Fax Server only in normal
temperature environments. Temperature
extremes can shorten the life of electronic
devices and distort or melt plastic parts.
Keep the Fax Server away from excessive
dust and dirt that can cause premature wear
of parts.
Do not use harsh chemicals, cleaning
solvents or strong detergents to clean the
Fax Server.
Fax Server ISDN manual ©-Vidicode 2006
11
12
Fax Server ISDN manual ©-Vidicode 2006
Contents
1
Introduction.....................................................................17
2
Unpacking and installation..............................................19
2.1
2.2
2.3
2.4
What is in the box ......................................................................... 19
Connecting to power ..................................................................... 21
Connecting to E1 primary rate ISDN............................................. 22
Connecting to S0 Basic Rate ISDN............................................... 24
2.4.1Without other equipment on S0..................................................................26
2.4.2With other equipment without Fax Recording.............................................27
2.4.3With other equipment and with Fax Recording...........................................28
3
Configuration and operation............................................29
3.1
3.2
3.3
3.4
4
System settings ..............................................................33
4.1
4.2
4.3
4.4
4.5
4.6
4.7
4.8
4.9
4.10
4.11
4.12
4.13
4.14
4.15
4.16
4.17
4.18
4.19
4.20
4.21
5
Operation basics ........................................................................... 29
Frequently used key indicators ..................................................... 30
Save Changes .............................................................................. 30
Initializing CD ................................................................................ 31
Fax ID ........................................................................................... 33
Top text ......................................................................................... 34
Dial prefix...................................................................................... 34
Stand Alone Mode ........................................................................ 35
Connection (BRI only)................................................................... 36
Total Lines (BRI only) ................................................................... 36
Max. Fax Lines.............................................................................. 36
Max. Rx Fax Lines ........................................................................ 37
Max. Tx Fax Lines......................................................................... 37
Tx Retries ..................................................................................... 37
Tx Retry Time ............................................................................... 38
Tx Answer Timeout ....................................................................... 38
Tx Start Time ................................................................................ 38
Tx Stop Time................................................................................. 39
Fax to printer................................................................................. 39
Copy Fax to CD ............................................................................ 39
CD Copy Time .............................................................................. 40
Protect the Fax Server with a Password ....................................... 40
Remove Password protection ....................................................... 41
Set the Clock................................................................................. 41
Set the Language.......................................................................... 42
LAN settings ...................................................................43
5.1
5.2
FTP user ....................................................................................... 43
FTP password............................................................................... 44
Fax Server ISDN manual ©-Vidicode 2006
13
5.3
5.4
5.5
5.6
5.7
5.8
5.9
5.10
5.11
5.12
5.13
5.14
5.15
5.16
5.17
5.18
5.19
5.20
5.21
5.22
5.23
6
FTP port........................................................................................ 44
DHCP server................................................................................. 45
IP address..................................................................................... 45
IP subnet mask ............................................................................. 46
Gateway........................................................................................ 47
IP name ........................................................................................ 47
Email address ............................................................................... 48
Reply address ............................................................................... 49
SMTP server IP address............................................................... 49
SMTP server port.......................................................................... 50
SMTP Login .................................................................................. 50
Domain name................................................................................ 51
DNS server ................................................................................... 52
Printer address.............................................................................. 52
Printer port .................................................................................... 53
Printer queue ................................................................................ 53
NTP Server ................................................................................... 54
NTP Server Port............................................................................ 54
GMT correction ............................................................................. 55
Telnet............................................................................................ 55
Service timer................................................................................. 56
The Internal Number List and how faxes are answered ..57
6.1.1Add a new number to the internal number list ............................................58
6.1.2Delete a number from the fax number list ..................................................59
7
Managing Users .............................................................61
7.1
7.2
7.3
7.4
7.5
7.6
7.7
8
Introduction ................................................................................... 61
Installation of Fax Server Setup .................................................... 62
Software updates .......................................................................... 62
Setting up a Fax Server ................................................................ 63
The user list .................................................................................. 65
Create a new user......................................................................... 65
Edit a user profile .......................................................................... 66
In service operation ........................................................69
8.1
Fax Archive ................................................................................... 70
8.2
Email queue.................................................................................. 73
8.3
Fax Queue .................................................................................... 73
8.4
The CD menu................................................................................ 74
8.1.1Received faxes ..........................................................................................70
8.1.2Sent faxes .................................................................................................71
8.2.1Send an Email again..................................................................................73
8.3.1Send a fax again........................................................................................74
8.4.1Free on CD................................................................................................75
8.4.2Create CD directory...................................................................................75
14
Fax Server ISDN manual ©-Vidicode 2006
8.4.3Erase CD Re-writable ................................................................................76
8.4.4Software update ........................................................................................77
8.5
9
Disk info ........................................................................................ 78
Fax Recording ................................................................79
9.1
9.2
Introduction ................................................................................... 79
Configuration of fax recording....................................................... 79
10 Acknowledgements ........................................................81
10.1
10.2
Guarantee..................................................................................... 81
Liability.......................................................................................... 81
11 INDEX ............................................................................83
Fax Server ISDN manual ©-Vidicode 2006
15
16
Fax Server ISDN manual ©-Vidicode 2006
1 Introduction
The Fax Server is a system with ISDN and Ethernet interfaces. It offers
services that can be compared with what the PBX does for voice calls. On
top of that it will record and archive all fax communication. The Fax Server
has the following functions:
Receiving faxes
Incoming calls on the fax numbers are answered by the Fax Server.
Received faxes are stored on the hard disk of the Fax Server. PC’s have
access to the Fax Server via the LAN and can view and print all faxes on the
hard disk of the Fax Server.
Distribution of faxes via Email
The preferred method to receive faxes for most people is as internal email.
Dependant on the fax Number that the Fax Server has answered to it will
forward the fax to the email address that belongs to this number.
Receiving faxes on paper
If required all received faxes can be printed out on a network printer.
Sending faxes
Faxes can be sent from any computer on the network that has SendFax
software installed. On the PC the SendFax software behaves as a printer.
SendFax software transfers the file over the network to the Fax Server which
in turn takes care of the actual fax transmission. All sent faxes remain stored
on the Fax Server and can be accessed via the LAN at any time.
Archiving faxes
The most important function of the Fax Server is to give access to all fax
correspondence that took place since it was installed. The Fax Server
Access System software supplied is the best tool to access the faxes
because they are presented as a database.
Fax recording
Because hand written documents and forms usually will be sent with a
traditional fax machine, the Fax Server can make recordings of these fax
transmissions. Once configured this is automated. The idea is that your fax
archive is only complete when it contains all faxes, also the handwritten
letters and forms that you have sent using the traditional fax machine.
Fax Server ISDN manual ©-Vidicode 2006
17
Several models
There are two models of ISDN Fax Servers. This has to do with the different
ISDN line types that exist. The types are primary rate (PRI) and basic rate
(BRI).
The interface to the network is called E1 for primary rate and S0 for basic
rate.
Basic rate lines carry 2 telephone channels. Primary rate lines can carry a
variable number of channels that the user has subscribed to with a maximum
of 30.
The models for basic rate and for primary rate are different because of the
interface to the telephone network.
The model for primary rate can send and receive on up to 16 channels
simultaneously. It has only one line port.
The model for basic rate is available for 2 lines and 4 lines and can work on
4 or 8 channels simultaneously.
Identical operation
The differences between the Fax Servers for basic rate and for primary rate
are only small. In this manual they are treated as one product and
differences, if they exist, are mentioned only when needed.
18
Fax Server ISDN manual ©-Vidicode 2006
2 Unpacking and installation
The various models of the Fax Servers for ISDN are:
• Fax Server ISDN PRI
• Fax Server ISDN BRI – 2 lines
• Fax Server ISDN BRI – 4 lines
There are several options available:
Fax channels
- from 1 to 16 channels on a ISDN PRI
- from 1 to 4 channels on a ISDN BRI – 2 lines
- from 1 to 8 channels on a ISDN BRI – 4 lines
• CD recorder
• Fax Recording (firmware & PC software)
• 19” frame
•
The minimal configuration is a Fax Server with at least 1 channel.
2.1 What is in the box
The Fax Server ISDN PRI desktop model comes with the following parts:
• Mains power supply adapter and cable.
•
•
•
•
two 8-wire cables with RJ45 connectors
CD with software
CD recordable (only with CD option)
This manual
The Fax Server ISDN PRI 19” model comes with the following parts:
• Mains cable.
•
•
•
•
two 8-wire cables with RJ45 connectors
CD with software
CD recordable (only with CD option)
This manual
The Fax Server ISDN (BRI) desktop model comes with the following parts:
• Mains power supply adapter and cable.
• Per line a cable kit that contains a short and a long 8-wire cable with
RJ45 connectors (4 cables or 8 cables in total)
• Per line a T-adapter (2 or 4)
Fax Server ISDN manual ©-Vidicode 2006
19
• CD with software
• CD recordable (only with CD option)
• This manual
The Fax Server ISDN (BRI) 19” model comes with the following parts:
• Mains cable.
• Per line a cable kit that contains a short and a long 8-wire cable with
RJ45 connectors (4 cables or 8 cables in total)
• Per line a T-adapter (2 or 4)
• CD with software
• CD recordable (only with CD option)
• This manual
Please note: For some countries we do not supply a mains cable with our
product (Australia, Switzerland). The reason for this is that the cable with the
correct mains plug is not available in the country of manufacture.
20
Fax Server ISDN manual ©-Vidicode 2006
2.2 Connecting to power
On the desktop model
The Fax Server is powered through an external power adapter. It does not
have an On/Off switch; the Fax Server is turned on by connecting the power
supply.
On the 19” model
The Fax Server is powered through a line cord. The power supply is internal.
The unit does not have an On/Off switch; the Fax Server is turned on by
connecting the mains cable.
Fax Server ISDN manual ©-Vidicode 2006
21
2.3 Connecting to E1 primary rate ISDN
This only applies to the model for ISDN primary rate.
The Fax Server PRI is connected in series with the PBX. With the Fax
Server PRI you have received a cable with two RJ45 connectors. This cable
is used to connect the Fax Server PRI to the wall socket. The existing cable
can be used to connect the Fax Server PRI to the PBX as is shown in the
figure below.
It is possible that you do not want to connect the PBX together with the Fax
Server on one line because you want to use the line for faxing only. In this
case the PBX and the connection to it are not there.
It is also possible that you want to use all 30 channels of the E1 line for
faxing. In this case a second Fax Server PRI can be connected in place of
the PBX.
22
Fax Server ISDN manual ©-Vidicode 2006
The figures below are examples of a possible setup of the Fax Server PRI.
Fax Server ISDN manual ©-Vidicode 2006
23
2.4 Connecting to S0 Basic Rate ISDN
There are three ways to use a Fax Server ISDN Basic Rate:
• Stand alone on one or more lines that are used for the Fax Server
only.
• Together with other equipment such as the PBX
• Together with other equipment such as the PBX and Fax Recording
You must always use the supplied T-splitters to connect to the ISDN S0 line.
The T-splitter is marked that it is made for a ”Call Recorder”. The reason is
that the T-splitter was indeed originally made for the Call Recorder, another
product that has the same interface to the network.
24
Fax Server ISDN manual ©-Vidicode 2006
The figures below are examples of a possible setup of the Fax Server ISDN
Basic Rate.
Fax Server ISDN manual ©-Vidicode 2006
25
2.4.1
Without other equipment on S0
This is how to connect to the line if you use the line only for the Fax Server.
Use the long cable supplied in the box to connect to the TE port of the Tadapter and use the short cable to connect the port ISDN of the T-adapter to
Port 1 to 4 of the Fax Server.
26
Fax Server ISDN manual ©-Vidicode 2006
2.4.2
With other equipment without Fax Recording
This only applies to point to multi point ISDN lines. If you doubt whether the
line that you have is point to multi point select the next option.
This way of connecting has a small advantage over the next option. You do
not disconnect other equipment while connecting the Fax Server.
The connection is the same as above: Use the long cable supplied in the box
to connect to the TE port of the T-splitter and use the short cable to connect
the port ISDN of the T-adapter to Port 1 to 4 of the Fax Server.
This is the classic way to connect ISDN equipment to point to multi point
lines.
Fax Server ISDN manual ©-Vidicode 2006
27
2.4.3
With other equipment and with Fax Recording
This is the most often used method to connect the Fax Server on ISDN basic
rate. We call this “pass through mode”. The difference is that the Fax Server
can see and record all communication of connected terminal equipment.
This is used for recording fax transmissions of other fax machines.
In this case the connection again is the same as above, but all terminal
equipment (TE) that must be recorded is connected to the TE port of the
adapter. Usually this will be the PABX with one or more fax machines
connected to it.
28
Fax Server ISDN manual ©-Vidicode 2006
3
Configuration and operation
After you have connected the hardware it is time to configure and use the
Fax Server. This chapter explains you how the user interface works. In the
following chapters we guide you with the configuration. You must:
o
On the keyboard of the Fax Server, go through the system settings
and make changes if required and
o
On the keyboard of the Fax Server, go through the network settings
so the Fax Server will fit in with your network and
o
On the keyboard of the Fax Server, edit the number list to enable
the fax numbers and attach email addresses to them or
o
On the PC of the systems manager, arrange the user profiles and
user access to the Fax Server
3.1 Operation basics
The Fax Server has a common menu driven user interface. Most functions
and operations are initiated by pressing a function key followed by a
sequence of menu keys of which the function is determined by the text in the
display. The use of function keys and menu keys is as follows:
Function keys
The most frequently used functions of the Fax Server have been grouped in
the function keys. Throughout the entire manual, symbols representing the
function keys are used to indicate the function key corresponding to the
described function.
Menu keys
After pressing a function key the available functions are assigned to the four
menu keys. The operation of the menu keys is determined by the text in the
display right above the corresponding key. Throughout the entire manual
figures representing the display with or without the menu keys are used to
show the required action corresponding to the described feature.
Example:
Monday
16-11-04 15:51
System settings
NEXT
MENU
STOP
█████ ▓▓▓▓▓ █████ █████
Fax Server ISDN manual ©-Vidicode 2006
29
When you are instructed to press the MENU key in the text it means you are
instructed to press the grey key below the text MENU in order to open the
System setting menu.
3.2 Frequently used key indicators
The following menu key functions are consistently used throughout the
manual.
MENU in the display indicates the presence of an underlying menu
Press MENU to open the underlying menu
NEXT in the display indicates the presence of more menu items
Press NEXT to jump to the following menu item
BACK in the display indicates the presence of an embracing menu
Press BACK to return to the embracing menu
STOP in the display indicates the absence of an embracing menu
Press STOP to return to operating mode of the Fax Server
CHANGE will toggle the item in the display between "On" and "Off"
In some cases CHANGE is used to increase or decrease a value.
3.3 Save Changes
After making settings the user is forced to press YES or NO before returning
to operating mode. Press STOP in the menu and the display will show:
YES
Save Changes?
NO
CANCEL
YES returns the Fax Server to normal use with changed settings
NO returns the Fax Server to normal use without changed settings
CANCEL returns to the settings
30
Fax Server ISDN manual ©-Vidicode 2006
3.4 Initializing CD
A CD recorder is available as an option for the Fax Server ISDN.
There are various moments where the CD drive has to be initialized before it
can read and write.
During initialization the display will show:
Initialising CD
At this point the Fax Server cannot be used for any other functions. The
initialization of the CD may take up to 30 seconds.
Fax Server ISDN manual ©-Vidicode 2006
31
32
Fax Server ISDN manual ©-Vidicode 2006
4 System settings
When you have connected the Fax Server you can configure it. This chapter
is about the system settings. Enter the system settings as follows.
On the desktop model:
• Press the
System key.
On the 19” model:
• Press the
key.
• Press System to move to the menu.
From here on desktop model and 19” are the same. A sequence of system
settings will need to be passed. Every item will have at least three options:
• Press NEXT to move on to the next menu item.
• Press CHANGE to enter the value or property of the menu item.
• Press STOP to exit the menu.
Press NEXT repeatedly to scroll through the menu items. The following
sequence of menu items will appear:
4.1 Fax ID
The Fax ID is the identification of the fax machine. When a fax is transmitted
between two fax machines, they both negotiate their Fax ID's. The Fax ID is
also displayed in the top line of the fax. The Fax ID that you must enter here
is just the default Fax ID that applies when there are no matching user
configurations. When the Fax Server is sending or receiving on behalf of one
of the users, it will use the Fax ID for that user.
Fax-Id:
NEXT
CHANGE
STOP
Set the Fax ID.
• Press CHANGE to enter the Fax ID.
Fax Server ISDN manual ©-Vidicode 2006
33
Fax-Id: ▓
STORE
CANCEL
Enter the Fax ID.
• Press STORE to save the Fax ID.
• Press NEXT to move on to the next menu item.
It is a good practice that a Fax ID is the number that the fax can be reached
on. However text can also be entered here.
4.2 Top text
The top text is the text that is printed as the top line of the fax. Usually this
will be the name of the person or company.
Top Text:
NEXT
CHANGE
STOP
Set the Top text.
• Press CHANGE to enter the Top text.
Top Text:
▓
STORE
CANCEL
Enter the Top text.
• Press STORE to save the Top text.
• Press NEXT to move on to the next menu item.
4.3 Dial prefix
The dial prefix is a standard number sequence that must be dialed before an
external number can be reached. When a Fax Server is connected to an
internal extension of a digital PBX a common prefix would be “0”.
It can also be used to route faxes to the most economical network provider,
that sometimes is not the same provider as for telephony because fax
transmissions tend to be shorter then telephone calls.
34
Fax Server ISDN manual ©-Vidicode 2006
Dial Prefix:
Off
NEXT
CHANGE
STOP
Set the dial prefix.
• Press CHANGE to enter the Prefix.
Dial Prefix:
▓
STORE
CANCEL
Enter the dial prefix.
• Press STORE to save the dial prefix.
• Press NEXT to move on to the next menu item.
4.4 Stand Alone Mode
Usually the Fax Server is connected to the line in series with a PBX (Pass
Through Mode). If this is not the case (Fax Server is the only device on the
line) the Stand Alone Mode setting has to be turned On.
Stand Alone Mode:
NEXT
Off
CHANGE
STOP
Set the Stand Alone Mode.
• Press CHANGE to enable Stand Alone Mode.
Please Note: If the Fax Server is in series with a PBX Stand Alone Mode
must be turned Off.
Stand Alone Mode:
NEXT
On
CHANGE
STOP
Set the Stand Alone Mode.
• Press STORE to save the Stand Alone Mode.
• Press NEXT to move on to the next menu item.
Fax Server ISDN manual ©-Vidicode 2006
35
4.5 Connection (BRI only)
This option only applies to ISDN Basic Rate. There are two configurations of
Euro ISDN basic rate lines, called Point-to-Point and Point-to-Multipoint.
Because the protocol is different the Fax Server must know. In case of doubt
you must call your telephony provider.
Connection:
Multipoint
NEXT
CHANGE
STOP
Set the Connection type.
• Press CHANGE to alter the setting.
Connection: Point-to-Point
NEXT
CHANGE
STOP
Set the Connection type.
• Press STORE to save the connection type.
• Press NEXT to move on to the next menu item.
4.6 Total Lines (BRI only)
The Total Lines property determines the number of lines that can be
occupied by the Fax Server BRI counted from port 1 to 8 for sending. Lines
are counted from port ISDN 1 to ISDN 4. This property is used to keep ISDN
BRI lines completely free of outgoing faxes.
Total Lines: 8
NEXT
-
CHANGE
+
STOP
Set the Maximum number of Fax lines.
• Press + or - to change the number of lines.
• Press NEXT to move on to the next menu item.
4.7 Max. Fax Lines
The Maximum Fax Lines property determines the number of lines that can
be occupied by the Fax Server. This property is used to prevent the Fax
36
Fax Server ISDN manual ©-Vidicode 2006
Server to seize too many lines and to guarantee that a fixed number of lines
is available for the PBX.
Maximum Fax Lines: 16
NEXT
-
CHANGE
+
STOP
Set the Maximum number of Fax lines.
• Press + or - to change the number of lines.
• Press NEXT to move on to the next menu item.
4.8 Max. Rx Fax Lines
The maximum Rx Fax Lines fixes the maximum number of lines that can be
used by the Fax Server for Fax reception.
Max Rx Fax Lines: 6
NEXT
-
CHANGE
+
STOP
Set the Maximum Rx Fax Lines number.
• Press + or - to change the number of lines.
• Press NEXT to move on to the next menu item.
4.9 Max. Tx Fax Lines
The maximum Tx Fax Lines fixes the maximum number of lines that can be
used by the Fax Server for Fax transmission.
Max Tx Fax Lines: 6
NEXT
-
CHANGE
+
STOP
Set the Maximum Tx Fax Lines number.
• Press + or - to change the number of lines.
• Press NEXT to move on to the next menu item.
4.10 Tx Retries
Tx Retries determines the number of attempts to send a fax.
Fax Server ISDN manual ©-Vidicode 2006
37
Tx Retries: 5
NEXT
-
CHANGE
+
STOP
Set the number of attempts.
• Press + or - to change the number of attempts.
• Press NEXT to move on to the next menu item.
4.11 Tx Retry Time
The TX Send Retry Time determines the interval between the fax
transmission attempts.
Tx Retry Time: 120s
NEXT
-
CHANGE
+
STOP
Set the Retry Time.
• Press + or - to change the Retry Time.
• Press NEXT to move on to the next menu item.
4.12 Tx Answer Timeout
The Tx Answer Timeout time determines the time the Fax Server will wait for
the remote fax machine to answer the call.
Tx Answer Timeout: 60s
NEXT
-
CHANGE
+
STOP
Set the Tx Answer Timeout.
• Press + or - to change the Tx Answer Timeout.
• Press NEXT to move on to the next menu item.
4.13 Tx Start Time
With Tx Start Time a time of the day can be set for the Fax Server to start
sending the faxes in the Fax queue. Please note: Priority will always be sent
at once and not wait for the start time.
38
Fax Server ISDN manual ©-Vidicode 2006
Tx Start Time:
NEXT
-
00:00
CHANGE
+
STOP
Set the Tx Start Time.
• Press + or - to change the Tx Start Time or turn Off.
• Press NEXT to move on to the next menu item.
4.14 Tx Stop Time
In conjunction with the Tx Start Time the Tx Stop Time sets a limit to the
time the Fax Server is given to handle the Fax queue. If Tx Start Time is set
to Off the Tx Stop Time will not appear.
Tx Stop Time:
NEXT
-
00:00
CHANGE
+
STOP
Set the Tx Stop Time.
• Press + or - to change the Tx Stop Time.
• Press NEXT to move on to the next menu item.
4.15 Fax to printer
Fax to Printer allows for automatic printing of faxes. Network setting of the
printer are described in § 5.16.
Fax to Printer:
NEXT
CHANGE
All
STOP
Set Fax to Printer.
• Press CHANGE to select All, Rx Only, Tx Only or Off.
• Press NEXT to move on to the next menu item.
4.16 Copy Fax to CD
Copy Fax to CD allows for automatic copy of faxes to the CD. If the Fax
Server does not have a CD recorder this property will not appear.
Fax Server ISDN manual ©-Vidicode 2006
39
Copy Fax to CD:
NEXT
All
CHANGE
STOP
Set Copy Fax to CD.
• Press CHANGE to select All, Rx Only, Tx Only or Off.
• Press NEXT to move on to the next menu item.
4.17 CD Copy Time
CD Copy Time determines the time of day for the Fax Server to copy faxes
to CD. If the Fax Server does not have a CD recorder or if Copy Fax to CD
is turned Off this item will not appear.
CD Copy Time:
NEXT
00:00
CHANGE
STOP
Set CD Copy Time.
• Press CHANGE to select the CD Copy Time.
• Press NEXT to move on to the next menu item.
4.18 Protect the Fax Server with a Password
The Fax Server can be protected with a password against unauthorized use.
When password protection has been enabled all operations are blocked
before the correct password has been entered.
Password:
NEXT
Off
CHANGE
STOP
Setting the Password.
• Press CHANGE enable password protection
• The display will then prompt for a password.
40
Fax Server ISDN manual ©-Vidicode 2006
Password:
▓000
STORE
CANCEL
Enter a password.
• Press STORE to enable the entered password.
• Press STOP to exit the menu.
From this point on you will be prompted for the password before entering the
menus.
4.19 Remove Password protection
• On the desktop model press the
already in the menu).
System button (if you are not
key and then press
• On the 19” model press the
SYSTEM.
• Enter the password and press CONTINUE.
• Press NEXT 11 x.
Password active:
NEXT
CHANGE
Yes
STOP
Disable the Password.
• Press CHANGE to disable the password.
• Press STOP to save and exit the menu.
The password protection has now been disabled.
4.20 Set the Clock
The clock can be set manually, or if available on the network, NTP can be
enabled to retrieve the time from a network server.
Fax Server ISDN manual ©-Vidicode 2006
41
Clock: Mo
04-12-06
NEXT
11:03
CHANGE
Clock: ▓o
22-04-02
STORE
STOP
11:03
CANCEL
Setting the clock.
• Press CHANGE to change the setting of the clock.
• Press key's 1-7 to change the day of the week.
The default date and time format is DD-MM-YY and HH:MM (when American
has been set as language the format is changed to MM-DD-YY). Use the
arrowed keys to move the blinking character left and right.
• Press softkey STORE to store the changes or press softkey CANCEL
to return to previous values.
4.21 Set the Language
You can select the language of your choice. Several languages are available
in the Fax Server. Selecting “American” will also influence the date and time
format used.
Language:
English
CHANGE
STOP
Setting the Language.
• Press CHANGE to select the preferred language.
• Press STOP to save and exit the menu.
42
Fax Server ISDN manual ©-Vidicode 2006
5 LAN settings
Enter the LAN settings as follows.
On the desktop model:
• Press the
LAN key.
On the 19” model:
• Press the
key.
• Press LAN to move to the LAN settings menu’s
A sequence of LAN settings will appear. Every item will have at least three
options:
• Press NEXT to move on to the next menu item.
• Press CHANGE to enter or change the value or property of the menu
item.
• Press STOP to exit the menu.
Press NEXT repeatedly to scroll through the menu items. The following
sequence of menu items will appear:
5.1 FTP user
The FTP user is the administrator user name of the Fax Server. It can be
used in the Fax Server Access System and Send Fax to log on to the Fax
Server. The administrator with this username and password has all the
available authorities.
FTP user: 0000
NEXT
CHANGE
STOP
Set the FTP user name.
• Press CHANGE to change the FTP user name.
Fax Server ISDN manual ©-Vidicode 2006
43
FTP user:
▓
STORE
CANCEL
Enter the FTP user name.
Use the numerical keys to enter the FTP user name.
• Press STORE to save the FTP user name.
• Press NEXT to move on to the next menu item.
5.2 FTP password
The FTP password of the Fax Server is the password that goes with the FTP
administrator user name of the Fax Server.
FTP pwd: 0000
NEXT
CHANGE
STOP
Set the FTP password.
• Press CHANGE to change the FTP password.
FTP pwd:
STORE
▓
CANCEL
Enter the FTP password.
Use the numerical keys to enter the FTP password.
• Press STORE to save the FTP password.
• Press NEXT to move on to the next menu item.
5.3 FTP port
FTP port is the port number through which the Fax Server Access System
and Send Fax log on to the Fax Server. The FTP server port is default set to
21, as is the setting of the port number in the Fax Server Access System and
Send Fax. If there is no direct reason to change the FTP server port it is best
left unchanged.
44
Fax Server ISDN manual ©-Vidicode 2006
FTP port:
21
NEXT
CHANGE
STOP
Set the FTP -server port number.
• Press CHANGE to change the FTP server port number.
FTP-server port:
▓
STORE
CANCEL
Enter the FTP server port number.
Use the numerical keys to enter the FTP server port number.
• Press STORE to save the FTP server port number.
• Press NEXT to move on to the next menu item.
5.4 DHCP server
In case a DHCP server is used on the network the use of the DHCP server
must be enabled. In case it is not used it must be disabled.
Use DHCP server:
NEXT
CHANGE
No
STOP
Use of the DHCP server
• Press CHANGE to enable DHCP server.
Use DHCP server:
NEXT
CHANGE
Yes
STOP
Use of the DHCP server enabled
• Press NEXT to save and move on to the next menu item.
5.5 IP address
As part of the network the Fax Server requires an IP address. In case a
DHCP server is used (see previous item) the DHCP server will assign the
Fax Server ISDN manual ©-Vidicode 2006
45
Fax Server an IP address. In case a DHCP server is not used a static IP
address must be given to the Fax Server.
IP addr: 0.0.0.0
NEXT
CHANGE
STOP
Set the IP address of the Fax Server.
• Press CHANGE to enter the IP address of the Fax Server.
IP addr: ▓00.000.000.000
STORE
CANCEL
Enter the IP address of the Fax Server.
Use the numerical keys to enter the IP address of the Fax Server.
• Press STORE to save the IP address of the Fax Server.
• Press NEXT to move on to the next menu item.
5.6 IP subnet mask
The IP subnet mask is used by the Fax Server if access outside the network
is required. In this case the gateway will need to be entered as well. In case
the used SMTP server is not on the local network the IP mask and gateway
must be entered.
IP mask: 255.255.255.000
NEXT
CHANGE
STOP
Set the IP subnet mask of the Fax Server.
• Press CHANGE to change the IP subnet mask of the Fax Server.
IP mask: ▓55.255.255.000
STORE
CANCEL
Enter the IP subnet mask of the Fax Server.
Use the numerical keys to enter the IP subnet mask of the Fax Server.
46
Fax Server ISDN manual ©-Vidicode 2006
• Press STORE to save the IP subnet mask of the Fax Server.
• Press NEXT to move on to the next menu item.
5.7 Gateway
The Gateway is used by the Fax Server if access from outside the network is
required. If so the Gateway and the IP subnet mask will need to be entered.
For instance, if the used SMTP server is not on the local network the IP
mask and gateway are required.
Gateway: 0.0.0.0
NEXT
CHANGE
STOP
Set the Gateway of the Fax Server.
• Press CHANGE to enter the Gateway of the Fax Server.
Gateway: ▓00.000.000.000
STORE
CANCEL
Enter the Gateway of the Fax Server.
Use the numerical keys to enter the Gateway of the Fax Server.
• Press STORE to save the Gateway of the Fax Server.
• Press NEXT to move on to the next menu item.
5.8 IP name
Aside from the IP address the Fax Server can also be addressed by an IP
name if this function is supported by your DNS server.
IP name: IPFax0001
NEXT
CHANGE
STOP
Set an IP name for the Fax Server.
• Press CHANGE to enter an IP name for the Fax Server.
Fax Server ISDN manual ©-Vidicode 2006
47
IP name: ▓
STORE
CANCEL
Enter an IP name for the Fax Server.
Use the numerical keys to enter an IP name for the Fax Server.
• Press STORE to save the IP name of the Fax Server.
• Press NEXT to move on to the next menu item.
5.9 Email address
The Fax Server has extensive Email capabilities. Received faxes will be sent
to the email address of the owner of the fax number. Sent faxes will be
confirmed by email to the sender. See § 9
There is however, a default email address that will be used when no other
Email address is known. This might be the email address of the person who
is responsible for the Fax Server. The email address to be filled in here is
this default email address.
Email:
NEXT
CHANGE
STOP
Set the Email address.
• Press CHANGE to enter an Email address.
Email:
▓
STORE
CANCEL
Enter the Email address.
Use the numerical keys to enter the Email address.
• Press STORE to save the Email address.
• Press NEXT to move on to the next menu item.
Selection of faxes for distribution via Email can also take place according to
remote Fax ID. See § 9
48
Fax Server ISDN manual ©-Vidicode 2006
5.10 Reply address
Because the Fax Server cannot receive Email the Emails sent by the Fax
Server require another reply address.
Reply:
NEXT
CHANGE
STOP
Set the Email reply address.
• Press CHANGE to enter the Email reply address.
Reply:
▓
STORE
CANCEL
Enter the Email reply address.
Use the numerical keys to enter the Email reply address.
• Press STORE to save the Email reply address.
• Press NEXT to move on to the next menu item.
5.11 SMTP server IP address
The Fax Server uses the IP address of the SMTP server to send Email. In
case a local SMTP server is used the IP number can be entered directly. In
case of an SMTP server outside the network both the Gateway and the
Subnet Mask must be set as well.
SMTP srv: 0.0.0.0
NEXT
CHANGE
STOP
Set the IP address of the SMTP server.
• Press CHANGE to enter the IP address of the SMTP server.
Fax Server ISDN manual ©-Vidicode 2006
49
SMTP-srv: ▓00.000.000.000
STORE
CANCEL
Enter the IP address of the SMTP server.
Use the numerical keys to enter the IP address of the SMTP server. Both an
IP number or IP name are allowed. In case an IP name is used the DNS
server needs to be configured.
• Press STORE to save the IP address of the SMTP server.
• Press NEXT to move on to the next menu item.
5.12 SMTP server port
SMTP server port is the port number through which the Fax Server
connection is to be made with the SMTP server. The SMTP-server port of
the Fax Server is default set to 25. Do not change the SMTP-server port
number when this value is not explicitly changed in the SMTP-server.
SMTP-server port:
NEXT
25
CHANGE
STOP
Set the SMTP-server port number.
• Press CHANGE to change the SMTP-server port number.
SMTP-server port:
STORE
▓
CANCEL
Enter the SMTP-server port number.
Use the numerical keys to enter the SMTP-server port number.
• Press STORE to save the SMTP-server port number.
• Press NEXT to move on to the next menu item.
5.13 SMTP Login
Sometimes SMTP-servers are set up to require a login. In this case SMTP
Login should be enabled. Note: When SMTP Login is enabled the next
questions in the menu will ask for SMTP User name and Password.
50
Fax Server ISDN manual ©-Vidicode 2006
SMTP Login:
No
NEXT
CHANGE STOP
Enable SMTP Login.
• Press CHANGE to enable SMTP Login.
SMTP Login:
Yes
NEXT
CHANGE STOP
SMTP Login enabled.
• Press NEXT to save and move on to the next menu item.
5.14 Domain name
This is the domain name of the SMTP-server. In case the SMTP-server is on
the network the network domain is required. In case the SMTP-server is
outside the network the domain name of the SMTP-server is required.
Contact your provider for more information. Usually the IP-address of the
SMTP-server is enough and the domain name is left empty.
Domain:
NEXT
CHANGE
STOP
Set the domain of the SMTP-server.
• Press CHANGE to enter the domain of the SMTP-server.
Domain: ▓
STORE
CANCEL
Enter the domain of the SMTP-server.
Use the numerical keys to enter the domain of the SMTP-server.
• Press STORE to save the domain of the SMTP-server.
• Press NEXT to move on to the next menu item.
Fax Server ISDN manual ©-Vidicode 2006
51
5.15 DNS server
In case an IP name has been configured for your SMTP-server you must
also give the IP number of the Domain Name Server.
DNS srv: 0.0.0.0
NEXT
CHANGE
STOP
Set the DNS server
• Press CHANGE to enter the DNS server.
DNS srv: ▓00.000.000.000
STORE
CANCEL
Enter the DNS server
Use the numerical keys to enter the DNS server.
• Press STORE to save the DNS server.
• Press NEXT to save and move on to the next menu item.
5.16 Printer address
In case automatic printing has been enabled a printer address has to be
specified.
Printer addr.: ▓
NEXT
CHANGE
STOP
Set the Printer address.
• Press CHANGE to enter the Printer address.
Printer address:▓
STORE
CANCEL
Enter the Printer address
Use the numerical keys to enter the Printer address.
52
Fax Server ISDN manual ©-Vidicode 2006
• Press STORE to save the Printer address.
• Press NEXT to save and move on to the next menu item.
5.17 Printer port
The Printer port is the port number through which the Fax Server connection
is to be made with the printer.
Printer port:
NEXT
CHANGE
STOP
Set the Printer port
• Press CHANGE to enter the Printer port.
Printer port:
STORE
CANCEL
Enter the the Printer port
Use the numerical keys to enter the Printer port.
• Press STORE to save the Printer port.
• Press NEXT to save and move on to the next menu item.
5.18 Printer queue
In case automatic printing has been enabled a network printer queue name
has to be specified.
Printer queue: Fax_ISDN
NEXT
CHANGE
STOP
Set the Printer queue
• Press CHANGE to enter the Printer queue.
Fax Server ISDN manual ©-Vidicode 2006
53
Printer queue: ▓
STORE
CANCEL
Enter the Printer queue
Use the numerical keys to enter the Printer queue.
• Press STORE to save the Printer queue.
• Press NEXT to save and move on to the next menu item.
5.19 NTP Server
Network Time Server refers to the IP address of the Network Time Server.
Network Time Server is used to synchronize the time of the Fax Server with
the time on the Network Time Server.
NTP srv:
NEXT
0.0.0.0
CHANGE STOP
Set the IP address of the NTP server.
• Press CHANGE to enter the IP address of the NTP server.
NTP svr: ▓00.000.000.000
STORE
CANCEL
Enter the IP address of the NTP server.
Use the numerical keys to enter the IP address of the NTP server.
• Press STORE to save the IP address of the NTP server.
• Press NEXT to save and to move on to the next menu item.
5.20 NTP Server Port
NTP server port is the port number through which the Fax Server connects
to the Network Time Server. The NTP server port is default set to 123, as is
the setting of the port number in most NTP servers. If there is no direct
reason to change the NTP server port it is best left unchanged.
54
Fax Server ISDN manual ©-Vidicode 2006
NTP server port:
NEXT
123
CHANGE STOP
Set the NTP server port number.
• Press CHANGE to change the NTP server port number.
NTP server port:
STORE
▓
CANCEL
Enter the NTP server port number.
Use the numerical keys to enter the NTP server port number.
• Press STORE to save the NTP server port number.
• Press NEXT to save and to move on to the next menu item.
5.21 GMT correction
GMT correction property is used to identify the time zone. NTP server
normally issues GMT. GMT correction can be set in half hours from -15:00 to
+ 15:00.
GMT correction:
NEXT
00:00
CHANGE STOP
Send Start Time.
• Press CHANGE to set GMT correction. Keep pressing CHANGE to
increase the correction. It will start with + 1:00, keep pressing
CHANGE to increase. After + 15:00 there will appear - 15:00.
• Press NEXT to save and move on to the next menu item.
GMT correction refers to Winter time. Summer time and Winter time are
corrected automatically.
5.22 Telnet
Telnet can be used to log on to the Fax Server and configure the Fax Server
from your PC. If required contact your supplier for more details.
Fax Server ISDN manual ©-Vidicode 2006
55
TelNet active:
NEXT
No
CHANGE
STOP
Enable TelNet.
• Press CHANGE to enable TelNet.
TelNet active:
NEXT
Yes
CHANGE
STOP
TelNet enabled.
• Press NEXT to save and move on to the next menu item.
5.23 Service timer
The Service timer determines the performance of the network connection.
Default the Service timer is set to Automatic. Changing the setting should
only be done when advised by a service engineer to solve problems.
Service timer:
Auto
CHANGE
STOP
Set the Service timer
• Press CHANGE to change the Service timer.
The following settings are available:
S1-S5, F1-F3 and U1-U3. Where S stands for Slow, F for Fast and U for
Ultra fast.
The Service Timer is the last item in the LAN settings menu.
• Press STOP to exit the LAN menu.
56
Fax Server ISDN manual ©-Vidicode 2006
6 The Internal Number List and how faxes
are answered
The next step in the configuration is to fill in the Internal (Fax) Number List.
Normally you will have to tell a Fax Server what numbers it should answer.
On an ISDN line bundle, PRI or BRI, there are several or many numbers
available. The internal fax number list is the list of numbers that the Fax
Server will answer to.
However, there is an exception to this rule: if the Fax Server is configured to
be the only machine on the line(s), then it will answer all incoming calls. This
will when:
• A Fax Sever for ISDN BRI is stand alone on a point to point line.
• A Fax Server for ISDN PRI is in stand alone mode (a PRI line is always
“point to point”)
In the above two situations the Fax Server will receive faxes and handle
them as in the default settings given by you as LAN settings or system
settings.
In all other cases the Internal Number List will be applied.
The Internal Number list is nothing more then a list of numbers that the Fax
Server will answer to. These numbers must be supplied to you by the
telephony provider. In some instances you get many of numbers for one line
or bundle of lines already when you subscribe. In other cases you will have
to order more numbers from your provider. In any case the idea is that
everyone in your office who needs a direct fax number will get that, just like
he has his direct phone number.
To every number in the list an email address should be added. Faxes
received on the fax number are forwarded by email to the associated email
address. In this way everyone in your office will immediately receive the
faxes that are sent to his own direct fax number.
Important: The internal number list can also be managed on the PC. See
the next chapter about managing users.
There is also an external number list. The external number list is used to
define fax recording numbers. We will explain this later.
Fax Server ISDN manual ©-Vidicode 2006
57
6.1.1
Add a new number to the internal number list
To access the number list on a desktop model:
• Press
No.List function key to open the number list menu.
To access the number list on a 19” model:
• Press the
function key
• Press LIST softkey to open the number list menu.
Fax Number Lists
INTERN EXTERN
STOP
The Fax number lists.
• Press INTERN
[email protected]
123456
NEXT
NEW
DELETE STOP
The Fax number lists.
• Press NEW to add a new fax number to the list.
Number: ▓
STORE
CLEAR
CANCEL
Enter the fax number
• Press STORE to add a new fax number to the list and continue with
the email address.
Important: When entering fax numbers you can decide to include or exclude
the area code. Do not use leading zeros. Keep it the same for all users
(include or exclude area code). This will make it easier for the Fax Server to
58
Fax Server ISDN manual ©-Vidicode 2006
match the numbers with the numbers that are used on the telephone
network.
Email: ▓
STORE
CLEAR
CANCEL
Enter the Email address.
Use the numerical keys to enter the Email address.
• Press STORE to save the number and Email address.
• Press STOP to leave the number list.
If any changes to the list have been made you will be prompted to save the
changes. If you choose NO the list will remain unaltered.
6.1.2
Delete a number from the fax number list
• Select the Fax Number List menu.
Fax Number Lists
INTERN ERTERN
STOP
The Fax number lists.
• Press INTERN or EXTERN
[email protected]
123456
NEW
DELETE STOP
The Fax number lists.
•
•
•
•
•
Use the << and >> keys to scroll through the fax number list.
Select the entry you want to delete.
Press DELETE to remove the number
Press YES to acknowledge.
Press STOP to leave the number list.
If any changes to the list have been made you will be prompted to save the
changes. If you choose NO the list will remain unaltered.
Fax Server ISDN manual ©-Vidicode 2006
59
60
Fax Server ISDN manual ©-Vidicode 2006
7 Managing Users
7.1 Introduction
User access to the Fax Server is for the users on the network who can have
access in three ways:
• To receive faxes via email. A fax number must be created and a link
must be made between the fax number and an email address.
• To send faxes. The users must be identified, to maintain the database
and to prevent unwanted use.
• To access the database. Users must only be able to see those faxes
that they are allowed to see.
The access is controlled in the Fax Server as a list of FTP accounts and as
the internal number list.
The FTP user accounts are not only used to control the access, but also to
maintain and personalize the Fax Servers archive.
• The Fax Server will keep track of who has sent or received a specific
fax.
• The Fax Server will allow a user to view faxes that have been sent by
specific users and to view faxes received on specific telephone
extension numbers only.
The Fax Server Setup application for MS Windows is the tool for the network
manager to create the internal number list via the LAN and to manage the
FTP accounts.
There is no tool on the keyboard of the Fax Server to manage user access.
The reason is that it would not be very practical.
The Fax Server Setup program on the PC does not keep any records by
itself. Every time the application is started a connection to the Fax Server is
required to retrieve the user information. This information can then be edited
and uploaded to the Fax Server.
Important: It is possible to create user accounts without an FTP account.
This is the same as the INTERNAL NUMBER LIST. When there is just an
Internal Number list and when no user accounts are managed, you get a
somewhat simplified installation of the Fax Server. Everyone would use the
same access code to send faxes or access the database. This might be
perfectly acceptable for smaller organizations.
Fax Server ISDN manual ©-Vidicode 2006
61
7.2 Installation of Fax Server Setup
Placing the CD-ROM in your computer gives you a choice of installation of
Vidicode software. Choose to install the Fax Server Setup software. Follow
the instructions on the screen. Part of the instructions is that the software will
ask for a registration key that you will find packed with the software.
7.3 Software updates
It is always recommended to update your software to the latest revision. The
Fax Server Setup application can be updated via internet.
Choose Help in the main menu and select “Check for update”
A new dialog opens where the current version is displayed.
Click on the “Check update” button to check for updates.
The program will check on the Vidicode website for updates of the program.
If there are updates they will be displayed.
Click “do update” to execute the update.
62
Fax Server ISDN manual ©-Vidicode 2006
Note: The file that is downloaded is a zipped file that is unpacked by the
application itself. Update files are approximately 1 Mb in size.
Updates can not be executed while the program is performing other tasks.
An open internet connection is required for this operation
7.4 Setting up a Fax Server
When the program is started the following dialog appears:
• Enter the Fax Server IP address.
The port setting on the Fax Server is default set to 21.
• Select the UserID’s tab.
The Fax Server Setup will now come up with the following dialog for FTP
username and password:
Fax Server ISDN manual ©-Vidicode 2006
63
• Enter the administrator FTP username and password.
The Fax Server Setup will now make a connection to the Fax Server to
retrieve user information.
Now select the User ID’s tab after the connection has terminated.
The user list as on the Fax Server is now displayed. If there is no user list
present on the Fax Server the dialog will be blank.
64
Fax Server ISDN manual ©-Vidicode 2006
7.5 The user list
The user list displays the User ID, The username the email address and fax
number.
The User ID consists of two characters; the user ID is used throughout the
Fax Server applications to identify a user.
The username is the text that identifies the user for you.
The email address is the email address where faxes received for the user
and confirmations of sending faxes are sent.
The Fax Number is the telephone number which is used as a fax number of
the user.
Important: When entering fax numbers you can decide to include or exclude
the area code. Do not use leading zero’s. Keep it the same for all users
(include or exclude area code). This will make it easier for the Fax Server to
match the numbers with the numbers that are used on the telephone
network.
7.6 Create a new user
Click NEW to create a new user.
The following dialog appears:
Fax Server ISDN manual ©-Vidicode 2006
65
Enter the user properties of the new user.
For every user there is an option to create an FTP account for the user.
With the FTP account a user can setup a connection to the Fax Server with
the Fax Server Access System software to view his or her faxes on the Fax
Server. For every user access to existing user accounts can be set. Check
the checkboxes of existing users in the list to enable access to the faxes of
said users.
Click OK to finish.
7.7 Edit a user profile
A user profile is edited much the same way as creating a new user.
• Select a user in the list of users and click “Edit”
A new dialog appears with the selected user properties. Now you can edit
the user properties.
• Click OK to save the changes.
66
Fax Server ISDN manual ©-Vidicode 2006
At this point the user profile has changed in the user list as displayed on your
screen. To save the list on the Fax Server the list needs to be transferred to
the Fax Server.
Press “Update Fax Server” to transfer the user profiles to the Fax Server.
Fax Server ISDN manual ©-Vidicode 2006
67
68
Fax Server ISDN manual ©-Vidicode 2006
8 In service operation
Under normal circumstances the Fax Server does not need much attention.
Operation is through the Fax Server Access System and Send Fax
applications. Once the settings have been made the sending and receiving
of faxes is automatic.
On the keyboard of the desktop model there are 5 function keys, which give
access to functions of a Fax Server in operation. The 19” model has three of
such function keys. The function keys are described in the following
paragraphs.
To access the Archives on the desktop model and on the 19” model:
Archive
or
is the fax archive of sent and received faxes.
It contains fax information and can be used to
copy faxes to CD.
To access the queues on a desktop model:
To Email
To Fax
function key to check the email queue and test
email.
Fax queue function key to check the outgoing fax
queue.
To access the queues on a 19” model:
To go to the Queue menu
Then choose with softkeys between the EMAIL,
FAX and PRINT queues
To Access the CD on a desktop model:
CD
function key opens the CD menu.
To Access the CD on a 19” model:
Fax Server ISDN manual ©-Vidicode 2006
69
function key opens the CD menu.
To view the free disk space on a desktop model:
Disc
displays the free disk space.
To view the free disk space on a 19” model:
Leftmost softkey
displays the free disk space.
8.1 Fax Archive
Press
Archive or
to open the Fax Archive.
There are two separate archives for Received and Sent faxes. Both archives
are operated in the same manner. They are described in the following
paragraphs; § 8.1.1 and § 8.1.2 Faxes in the archive can be sent again as
fax (see § 8.3) or through email (see § 8.2).
8.1.1
Received faxes
Open the Fax Archive and press RECEIVED to open the received faxes
archive.
• Press the Received key to enter the received faxes menu.
Received Faxes
CD
DISK
STOP
The Received faxes menu.
• Press CD or DISK to open the respective item.
Received faxes archive can be searched on time, date and/or Fax ID.
70
Fax Server ISDN manual ©-Vidicode 2006
Received on ▓4-08-04
SEARCH TIME
STOP
Search the received faxes.
In the search the date time and Fax ID is always incorporated. You are first
prompted to enter the date.
• Enter the date you want to search and press SEARCH to perform the
search.
If you want to search on date only the Fax Server uses wildcards in the
search strings for the time and Fax ID.
If you want to search according to date only you can enter wildcards for the
date, e.g. ::.
It is possible to further refine your search according to Time.
• Press the TIME key
• Enter a time to search for. Use wildcards (star key) to expand your
search criteria, e.g. enter 13: to search for faxes received between
13:00 and 13:59 hours for the specified date or date range.
• Press SEARCH to search for the entered search string.
It is possible to further refine your search according to Fax ID.
• Enter a time or wildcards for in the Time search string and press Fax
ID
• Enter a Fax ID to search for.
• Press SEARCH to search for the entered search string.
Use the double arrowed keys to scroll through the found faxes and select a
fax. Use the single arrowed keys to scroll through the fax properties of the
selected fax.
8.1.2
Sent faxes
Open the Fax Archive and press SENT to open the received faxes archive.
• Press the Received key to enter the received faxes menu.
Fax Server ISDN manual ©-Vidicode 2006
71
Sent Faxes
CD
DISK
STOP
The Sent faxes menu.
• Press CD or DISK to open the respective item.
The Sent faxes archive can be searched on time, date and/or Fax ID.
Received on ▓4-08-04
SEARCH TIME
STOP
Search the Sent faxes.
In the search the date time and Fax ID is always incorporated. You are first
prompted to enter the date.
• Enter the date you want to search and press SEARCH to perform the
search.
If you want to search on date only the Fax Server uses wildcards in the
search strings for the time and Fax ID.
If you want to search according to date only you can enter wildcards for the
date, e.g. ::.
It is possible to further refine your search according to Time.
• Press the TIME key
• Enter a time to search for. Use wildcards (star key) to expand your
search criteria, e.g. enter 13: to search for faxes sent between
13:00 and 13:59 hours for the specified date or date range.
• Press SEARCH to search for the entered search string.
It is possible to further refine your search according to Fax ID.
• Enter a time or wildcards for in the Time search string and press Fax
ID
• Enter a Fax ID to search for.
• Press SEARCH to search for the entered search string.
72
Fax Server ISDN manual ©-Vidicode 2006
Use the double arrowed keys to scroll through the found faxes and select a
fax. Use the single arrowed keys to scroll through the fax properties of the
selected fax.
8.2 Email queue
The email queue is the queue of emails that have not (yet) been sent out.
(This may be caused by an error in the mail server)
• Press EMPTY to empty the email queue, all emails in the queue are
lost.
• Press TEST to place a test email in the queue. Normally a test email is
sent in a matter of seconds.
8.2.1
Send an Email again
Faxes that are present in the archive can be sent again as Email. The fax
can be sent to any Email address.
• Select a fax in the Received or Sent archive.
• Press the
function key (on a desktop model)
• Press the
function key (on a 19” model)
Email:
STORE
CLEAR
BACK
Email a fax from the archive.
• Enter the Email address or fax number.
• Press STORE to place the email in the queue.
The email queue is automatically processed every 5 minutes.
8.3 Fax Queue
The fax queue is the queue of faxes that have not(yet) been sent out. (This
may be caused by an error from your service provider) Normally the Fax
queue is empty.
• Press EMPTY to empty the fax queue, all faxes in the queue are lost.
Fax Server ISDN manual ©-Vidicode 2006
73
• Press BROWSE to browse through the faxes in the queue. The
browse menu is the same as the Archive menu as in in § 8.1.1 and §
8.1.2.
8.3.1
Send a fax again
Faxes that are present in the archive can be faxed again. The fax can be
sent to any fax number.
• Select a fax in the Received or Sent archive.
• Press the
function key (on a desktop model)
• Press the
function key (on a 19” model)
Number:
STORE
CLEAR
BACK
Fax a fax from the archive.
• Enter the fax number.
• Press STORE to place the fax in the queue.
The fax queue is automatically processed every 5 minutes.
8.4 The CD menu
The following paragraphs describe the operation of the CD functions that are
grouped in the disk menu.
On the desktop model:
• Press
CD function key to open the CD menu.
On the 19” model:
• Press the
function key to open the CD menu.
The first menu item in the menu is free time left on CD as described below.
74
Fax Server ISDN manual ©-Vidicode 2006
8.4.1
Free on CD
Enter the disk menu. The display will show:
Free on CD = <CD empty>
NEXT
EJECT
STOP
Or for example:
Free on CD =
NEXT
700 MB
EJECT
STOP
The amount of free space on the CD is displayed. Effectively the available
recording space is slightly smaller due to space reserved for directory
purposes.
8.4.2
Create CD directory
Creating a directory on the CD is done to make the CD usable for the PC.
• Enter the disk menu and press NEXT once.
The display will show:
Create CD Directory
NEXT
EJECT
START
STOP
• Press START to start creating a directory.
The display will show:
Create CD Directory
OPEN
CLOSE
CANCEL
• Press OPEN or CLOSED to create an open or closed directory.
Fax Server ISDN manual ©-Vidicode 2006
75
An "open directory" leaves the remaining space on the CD open for
recording.
A "closed directory" disables the CD for further recording.
Note: A CD Directory will include only the faxes that are on the CD
when making the directory!
8.4.3
Erase CD Re-writable
If a CD-rewritable is used the faxes on the CD can be erased.
• Enter the disk menu and press NEXT three times.
The display will show:
Erase CD Re-Writable?
NEXT
EJECT
START
STOP
Press START to proceed erasing the CD
The display will show:
Erase CD Re-Writable?
QUICK
FULL
BACK
Press QUICK or FULL to proceed
Choose QUICK to erase the CD directories only.
Choose FULL to erase the entire CD.
The display will show:
CD Quick Erase
YES
Start?
NO
Press YES to start erasing.
When the Fax Server is finished erasing the display will show:
76
Fax Server ISDN manual ©-Vidicode 2006
CD Erase
completed
EJECT
STOP
Press STOP to finish.
8.4.4
Software update
The Fax Server has the ability to update its own internal operating software
from CD.
• Enter the disk menu and press NEXT four times.
The display will show:
Software update
EJECT
START
STOP
Place the CD with the software update in the CD drive and press START
It may take a few seconds for the Fax Server to recognize the CD.
The display will show:
Software update
YES
Start?
NO
• Press YES to start the software update.
While searching for the update the display will show:
Software update
Busy......
The various software parts will be updated automatically when newer
versions have been found. During the updating the display will show:
Fax Server ISDN manual ©-Vidicode 2006
77
One moment please!
WARNING! Do not interrupt the Fax Server in any way at this point!
Interrupting the software update may cause un-restorable failure in the
Fax Server
When the Fax Server is finished the display will show:
Update finished
STOP
• Press STOP to finish.
The faxes on the hard disk and your settings will remain intact after the
software update.
8.5 Disk info
To show the free disk space of the Fax Servers hard disk on the bottom line
of the display.
• Press the
Disc function key (on the desktop model)
• Press the rightmost softkey (on the 19” model)
Monday
24-04-02 10:26
Busy 0
Fax Rx/Tx 0/0
Free on disk: 9960 MB
The free disk space
78
Fax Server ISDN manual ©-Vidicode 2006
9 Fax Recording
9.1 Introduction
One of the important functions of a Fax Server is to create a complete
archive of all faxes that are sent or received by your organisation. This would
work if the organisation would only use the Fax Server and no other
equipment to send and receive faxes. This however can not always be
maintained because a traditional fax machine is very convenient to send
paper documents such as a handwritten letters or forms that have been filled
in by hand.
The solution to include those fax transmissions in the fax archive is that the
Fax Server is recording them. The Fax Server Access System software for
MS Windows can convert these recordings back to the original document.
They are then included in the archive as if they were sent from the Fax
Server.
Incoming faxes can be recorded also, although this is less common because
most users prefer the Fax Server to receive faxes on.
Important: The conversion of recorded faxes is an option to the Fax Server
Access system, so it may not be available on your system. Check with your
dealer for more information or pricing.
9.2 Configuration of fax recording
There are three modest requirements to get fax recording working:
• The Fax Server must be configured in pass through mode (stand alone
mode Off).
• The fax machine must be connected behind the Fax Server on the
extension of the PBX
• The external number list must be filled in with the numbers of the
extensions that are used by your fax machines.
When the extension number of your fax machine is in the external number
list, all connections of the fax machine (incoming as well as outgoing) will be
recorded. External numbers can also be used. This would be in the rare
case that you would only want to record connections with some fax
machines.
The steps to follow to configure fax recording are:
Fax Server ISDN manual ©-Vidicode 2006
79
To access the number list on a desktop model:
No.List function key to open the number list menu.
• Press
To access the number list on a 19” model:
• Press the
function key
• Press LIST softkey to open the number list menu.
Fax Number Lists
INTERN EXTERN
STOP
The Fax number lists.
• Press EXTERN
External – fax 1/4
3471088
NEXT
NEW
DELETE STOP
The Fax number lists.
• Press NEW to add a new fax number to the list.
Number: ▓
STORE
CLEAR
CANCEL
Enter the fax number
• Press STORE to add a new fax number to the list and continue with
the email address.
Note: It is possible to use wildcards as part of an external fax number. It is
not practical however. Suppose (in The Netherlands) you would use 20* as
an external fax number, all connections on the PBX behind the Fax Server
would be recorded. That would include telephone calls.
80
Fax Server ISDN manual ©-Vidicode 2006
10 Acknowledgements
10.1 Guarantee
Your Fax Server has a 12-month factory guarantee. The guarantee is
effective for normal use only. We would like to emphasize that the guarantee
is not valid under exceptional environmental conditions, such as extreme
temperatures or humidity levels, nor in the unlikely event of a lightning strike.
The guarantee is not valid if the machine has not been handled properly, for
example when it has been dropped, or bumped into. In order to qualify for
guarantee, you should contact your supplier, and show the receipt. If your
supplier cannot help you, you should contact the manufacturer. The
manufacturer reserves the right to determine the final date of the guarantee
period on the basis of the date of production. Costs of transport to and from
the supplier or the manufacturer are for the buyer’s account. Guarantee is for
parts only and does not cover any costs resulting from the breakdown of the
Fax Server.
The Fax Server has various extra features that have not been described in
this manual. Additional information about this is given in a technical
information bulletin. Subjects discussed in this technical documentation are
further configuration options, remote configuring, and how to update the
firmware in the Fax Server. The further configuration options concern all
aspects of operation. In our experience most people are interested in
configurations related to user’s access.
10.2 Liability
Correct functioning of the Fax Server cannot be guaranteed under all
conditions and thus we do not accept any liability for loss of information or
other damages due to the use of the Fax Server.
Vidicode is not a source of official interpretation of laws of any country or
state and shall not be construed as a source for making decisions.
Fax Server ISDN manual ©-Vidicode 2006
81
82
Fax Server ISDN manual ©-Vidicode 2006
11 INDEX
A
Acknowledgements, 79
Alfa-numerical functions, 9
C
Care and Maintenance, 10
CD menu, 72
clock, 40
Connect
power supply, 19
telephone lines, 20
Create CD directory, 73
D
day, 40
DHCP server, 43
Disk info, 76
Domain name, 49
E
E-mail address
Fax Server, 46
Erase CD Re-Writable, 74
F
Fax ID, 31
FTP password
Fax Server, 42
FTP server port
Fax Server, 42
FTP user
Fax Server, 41
Function keys, 27
Function-keys, 8
G
Gateway, 45
guarantee, 79
I
Index, 80
Initialize CD, 29
Introduction, 15
IP address
Fax Server, 43
L
Language
Fax Server, 40
liability, 79
M
Menu keys, 27
Menu-key indicators, 28
N
Network
Service timer, 54
Network settings
Fax Server, 41
P
password protection
Fax Server, 38
Power supply, 19
R
received faxes, 68, 69
Reply address, 47
Fax Server ISDN manual ©-Vidicode 2006
83
S
sent again, 71, 72
Service timer, 54
SMTP server, 47
SMTP-server port, 48
Software update, 75
subnet mask, 44
T
TelNet, 53
top line, 32
84
U
User interface, 27
V
volume, 37
W
wildcards, 69, 70
Fax Server ISDN manual ©-Vidicode 2006