1
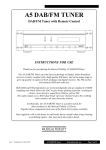
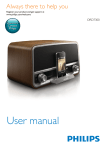
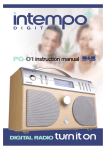
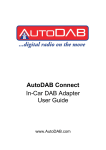
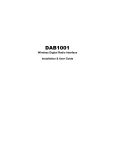
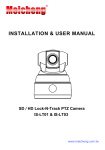
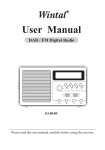
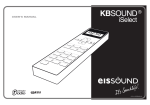
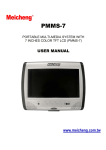
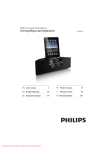
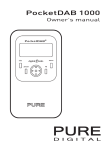
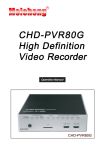
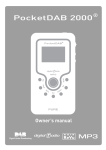
Meicheng ® ADR-605R Digital Audio System DAB + FM + CD Player / CD Recorder USER MANUAL www.meicheng.com.tw Table of Contents 1. Foreword 2. Package Contents 3. Functions 4. Controls & Features 5. Remote 6. Installation 7. Basic Operation 8. Cautions & Maintenance 9. Troubleshooting Guide Line 10. Specifications !Laser Warnings:Digital Audio System-- DAS is equipped with a laser device .Under any conditions , DO NOT watch the Laser pick-up head , the laser beam is totally enclosed at all time. ! Precaution for the first time power on the audio recording For the first time Power On, please press the “Autotune” key and hold about 2 seconds then ADR – 605R can auto-searching all DAB broadcasting stations. To finish the recording, you MUST press remote the “Finalize” key to format this CD-R/RW disc. Then this disc can be played with other CD/VCD/DVD Players. CAUTION: ◎ DO NOT twist the optical cable to avoid damage. ◎ Both the optical and coaxial will be outputted in the same time when you use the digital audio output. You can select the optical or coaxial output by ADR-605R. 1 ◎ Please “Power Off “ADR-605R before connection or removing any audio devices. ◎ Please refer to ADR-605R User’s Manual for others information. 1. Foreword We are highly appreciated you to purchase Digital Audio System – ADR – 650R. This machine is contented DAB + FM Receiver & CD Player + CD Recorder Hi- Fi Audio System. You can store the Perfect Audio through ADR – 605R. Please reference this User’s Manual first before you operating ADR – 605R. 2. Package Contents When you open the package, please check the accessories as follows “Accessory List“. ADR-605R or ADR-605C Audio Cable*1 AC Power Cable*1 Digital Audio System DAB + FM + CD Player / CD Recorder ADR-605R User’s Manual Antenna*1 User’s Manual 2 Remote *1 AAA battery*2 Optical Cable*1 3. Functions DAB + FM Receiver DAB – Digital Audio Broadcasting is broadcasted the audio via digital technique to lessen the analog signal interference and distortion during the transporting. It is offered the audience the CD quality audio. CD - Player ADR – 605R can be played the CD discs. CD - Recorder DAS can record Audio into CD-R, CD-RW either from DAB /FM or External Audio source. S/PDIP Optical & Digital Audio Output It is equipped the S/PDIF Optical Digital Output. You can enjoy the 5.1 channel, Home Theater Hi-Fi Audio effect through the Optical Cable or Coaxial Cable to connect the D / A converter / Amplifier. Others ◎ Real time OSD (On Screen Display), it can be showed the broadcast channel / CD /Operation information. ◎ CD Next / FF / Prev /FR scanning. ! Caution of the CD can not be playing The CD disc would be auto ejected if it can not be correctly identified after 15 ~ 20 seconds, or you can manual eject the disc. Please remove the disc and double check the CD specific is matched the machine or any abnormal on the disc. For the detail information, please refer to Chapter 9 “Troubleshooting Guide Line”. Remark: ADR-605R don’t support CD-ROM / DVD-ROM / VCD / DVD / SVCD / 3 DVD-R/RW / DVD+R/RW disc. 4. Controls & Features H J A I B C D E F G (A).Power On / Standby (B).CD Eject / Insert (C).Switch to CD Mode (D).Stop CD Player or Record (E).Start CD Play or Pause (F).CD Record (ADR-605R only) (G).Switch to DAB/FM Mode (H). LCD Screen (I). CD Tray (J).Program Channel Selection (Up /Down /Enter) N K P (K). (L). (M). (N). (O). (P). O M L AC Power Socket External Audio INPUT Terminal, R / L Analog Audio OUTPUT Terminal, R / L Digital Audio Coaxial OUTPUT Terminal Digital Audio Optical OUTPUT Terminal Antenna Terminal 4 5. Remote CAUTION: ◎ Please use two “AAA” type batteries. DO NOT use two different types battery or mixing new and old battery in the same time. ◎ Remote should be kept out of the High Temperature / Humidity environment. ◎ DO NOT disassemble, take parts of the Remote. ◎ Follow the arrow direction to open the battery cover to replace new 2 * AAA (1.5V) batteries. ◎ Misuses the battery may cause the liquid leaking or explosion. You should clean the battery case set before install the new battery if you found the battery liquid leaking. ◎ Please remove the battery if you will not use the remote for a long period of time to avoid the battery leaking and corrosive the battery case. ◎ Please DO NOT mix alkalinity and carbon-hydrogen battery using in the same time to avoid the explosion accident. Note: Remote function area within 9.0 meters , operation angle area is 45o side by side (Left /Right either direction is 22.5o ). 9 22.5 M 5 o 「 「 「 , 」 5.2 」 5.1 「Enter」 5.3 」5.5 「 「+」 「-」5.6 , 」 5.4 5.1「Power」 ADR – 605R – Power On / Standby 5.2「Band」 Switch DAB or FM band 5.3「Enter」 Press “Enter” to play the selected program after chosen the DAB / FM channel. 5.4「Next/FF」 Play CD, press this button then it will be jumped to the next track. Press this key and hold about 2 seconds, it will become the fast forward play. 5.5「Prev /FR」 Play CD, press this button then it will be jumped to the previous track. Press this key and hold about 2 seconds, it will become the fast rewind play. 5.6「+」、「-」 Up , Down In DAB/FM mode, Up/Down is used to switch the channels. 6 5.7「REC」 CD Record Recording CD-R/RW, you have two modes to option as follows: (1) Record DAB/FM channels: Receiving the DAB/FM programs press “REC” to record the program at real time. Press “STOP” or “BAND” to stop recording. (2) External Audio Source: You should press “CD” key to switch to CD mode, connecting the external audio source via cable then press “REC” to function. 「Erase」5.8 「 」5.7 「 」5.10 「Finalize」5.9 「 」 5.12 「 」 5.11 「Mute」5.14 「Vo1+ / Vo1-」5.16 「 」5.13 5.8「Erase」 Erase CD-RW Disc only Press “Erase“, it can erase CD-RW (Re - Writable) disc all materials. (1) Switch to CD mode first, then the “Erase” function can be work. (2) Press “Erase” to erase the last track. (3) Press “Erase” and hold it about 2 seconds to erase full disk. 5.9「Finalize」CD-R / RW Disc Press “Finalize“ to format the CD-R / RW disc and playable in others CD/VCD/DVD players. Not finalized disc, it just can play in this player. The Finalized CD-R /RW disc can not be recorded again. You should erase the entire finalized CD – RW disc first then you can record the disc again. 5.10「Stop」 Press “STOP“, the CD will be stopped the play or record. 5.11「Play/Pause」 Press this button to play CD. Press 2nd time, the CD Player will be pause. 7 5.12「Eject」CD Tray In / Out Press “Eject”, the CD Tray will be Opened / Closed. 5.13「CD」 Switch to CD Mode Switch the system to CD Mode. 5.14「Mute」 Press Mute one time, all of the Audio output mute. Press it again to release mute function. 「Repeat」 5.15 「Manual」5.20 「M1~M4」5.17 「Auto Select」5.21 「AutoTune」5.22 「Display」5.18 「Sleep」5.19 5.15「Repeat」 It has 5 Repeat modes to play CD: Normal, Single, Single Repeat, Disc Repeat, and Random. 5.16「Vol+ / Vol-」 Volume control (The Digital output can not be controlled), it is controlled the analog output volume. 5.17「M1 ~ M4」Memory If you want to store the radio stations / channels, please select the program / channel which you want to store and then press one of the preset (M1~M4) key and hold about 2 seconds to store it. The LCD screen will show “preset # stored”. If you want to listen the preset channels, you just need to press the corresponding memory key (M1~M4). The LCD screen will show “preset # empty” if there was no preset any channels / programs. 5.18「Display」 LCD Information Display Displays the various statuses of modes as DAB, FM, CD play, and recording, please see the details in Chapter 7. 8 5.19「Sleep」 Sleep & Alarm Setup There are two functions of the 「Sleep」 key. One is “auto turn off” and another is “Alarm”. You can set the “Alarm” time if you press this key and hold about 2 seconds. Please see the details in Chapter 7. 5.20「Manual」 Manual Channel Selection You can use this function to find the channel after the antenna adjusted, or have the newly additional radio stations which are not found by auto tune search. Please see the details in Chapter 7. 5.21「Autoselect」 Auto Channel Selection LCD screen will be showed the “Autoselect On” when you press this key, after this, you can use 「+」、「-」Up/Down button to select a program and listen it without pressing “Enter”. 5.22「Autotune」 There are two modes to scan channels. Please see the details in Chapter 7. 9 6. Installation The CD – RW disc which you recorded the audio from DAB programs or external audio is equivalent to the original one. 6.1 Installation with analog audio amplifier system Analog Audio System Audio Cable Left Analog 2CH Right 10 10 Note: ◎ You can connect ADR – 605R to AUX、CD or LINE IN terminals on the audio system. Also you can set your audio system on AUX、CD mode to enjoy ADR – 605R. 6.2 Installation with Digital Amplifier system You can connect this unit to a digital amplifier simply with built-in AC-3 decoder for 5.1 audio tracks and you will enjoy the theater-like surrounding audio effect. Dolby Digital (AC-3) is a theater-like 5.1-track digital surrounding audio system. The Digital amplifier who is supported (AC-3) has the Dolby mark on the machine. There are two front speakers, one central speaker, two rear speakers and a double bass speaker to set as an AC-3 5.1 sound track surrounding audio system. Digital Audio System Coaxial Cable (Optional) Digital Optical Cable Digital Audio O/P: Digital Coaxial 11 Digital Audio O/P : Optical 7. Basic Operation DAB Mode First Time Power On Connect the AC power to ADR – 605R. AC Power: 90~240V Connect the Antenna and put it on the best signal receiving place. When power on please press 「Autotune」 and hold it about 2 seconds. It will be scanned the all DAB channels. During the scanning, the LCD screen will be showed the black blocks and increasing the blocks one by one to indicate the scanning status and the scanned channels. DAB (Digital Audio Broadcasting) – is total different to the general broadcast – is grouped several channels and launched / broadcasted it by one frequency. These Groups are named “multiplexes” and “ensembles”. When you searched the group then the group name will be showed on the LCD screen. E.g.: BBC National DAB. 12 When the “autoscan” was finished, ADR – 605R will be showed the first searched group / channel by alphabet sequence. Display Channel / Program (DAB or FM) ADR – 605R Modes Dynamic Letter Show (DLS) If you can not receive any signal, please adjust the volume tuner according to clock direction until the expected volume. If you want to select more new channels, press 「+」, 「-」 Up/Down buttons to select the channels one by one. When you selected the channel, press「Enter」, then it will be jumped to the selected channel. If you did not press “Enter”, the LCD screen will be returned to the original channel after 4 seconds later. Autoselect When you selected the channel, you can press「Enter」 or set ADR – 605R to play the searched radio channels by order. Autoselect can be scanned channels fast. After you selected the channel, press “Autoselect“ to start this function, then the “Autoselect ON” will be showed on the LCD screen. Next time, when you press「+」 ,「-」 Up/Down keys, it will be searched the next radio channel automatically and no need to press “ Enter “. Press「Autoselect」and hold 2 seconds until the LCD screen is showed the “Autoselect OFF” to off the Autoselect function. Radio Channels / Stations Saving / Recall You can save 4 favorite channels when you press one of the memory keys (M1, M2, M3, M4) in DAB / FM mode. Press “Band “ switch to FM model , can memory M1,M2,M3,M4, too. When you selected a channel then press M1 and hold it about 2 seconds, the LCD screen will be showed the “Preset M1 stored” on the screen and this channel is saved in M1. Next time, you can press M1 to jump to M1 channel directly. (M2~4 setup procedure is same as above.) Play / Recall the Preset Radio Channels / Stations 13 If you already preset one channel in one of the preset keys (M1 ~ M4), then you can press the correspond preset to listen the channel. E.g.: if you have saved Radio 1 in preset 2 (M2), you just need to press “M2” key to function it. The screen will be showed the “preset # empty”. Display modes Press「Display」button then the screen will be showed the display modes as follows: DLS (SCROLLING TEXT) PROGRAMME TYPE ENSEMBLE (GROUP NAME) (ENSEMBLE) SIGNAL STRENGTH (訊號強度) TIME AND DATE (時間與日期) DLS (Dynamic Letter Show) DLS is a scrolling text including the information transmission with the channel / program. The information normally is included the relative data of the program. Programme type Display the music “style” as ”Rock” or ”Classical”. Ensemble / Multiplex (Group Name) Multiplex / Ensemble is an integral broadcasting radio station and transmitted via one frequency. It has national and local radio station. The local radio station is included the local specified station as MXR West Midlands. Signal strength 14 The moving blocks are indicated the strength of the receiving signal. The square blocks are closer to the right side that the signal is more strength. MINIMUM SIGNAL LEVEL The receiving quality will be not so good if the signal strength is less than 5 blocks (minimum signal level). Date & Time The radio stations are normally provided the information of the date and time automatically, so you do not need to set the date and time by manual. Under the rare situation, the stations are transmitted without any information of the date and time, then the screen will be showed <Time/date >. CLOCK DATE Auto tune modes There are two autotune modes. One is fast scan, another is fully Scan. Fast scan is only search the digital radio band III in UK, and fully scan search for all of the digital radio stations in frequency band III. Fast scan, please press「Autotune」button. If you want to do the fully scan, then press the 「Autotune」button and hold about 2 seconds. Secondary service In some case, you can see a symbol “>” behind the radio station name. That mean is the secondary service with this station, including other services related to the main station. E.g., 15 the sports station might add the extra live report. Secondary service is attached to the main station directly. Manual tune You can search the station in manual except the autotune. It is used to add the channel that can not be searched after the antenna adjusted or new radio stations additional by autotune. Press 「Manual」, then the LCD will be showed the ”Manual tune” on the screen. Use「+」 or「-」Up/Down button to switch the frequency from 5A to 13F channels by terms in DAB band. DAB CHANNELS When ADR – 605R is found someone ensemble / multiplex in DAB band, then it will be showed on the LCD screen underline. Please press「Enter」button to enter the present ensemble / multiplex. On the LCD screen, the upper line is showed the first radio station / channel in this ensemble / multiplex. If you want to know about the ensemble / multiplex station, press「+」or「-」 up/down button to find out the station which you want to listen and press「Enter」. When you searched to the last radio station / channel for this ensemble / multiplex, it will be gone back to the fist one. Press 「Enter」 button to leave the ”Manual tune” mode if you want. FM Mode Switch DAB to FM If you want to switch the mode from DAB to FM, just press 「Band」 button once. On the 16 screen will be showed the “wait……”, “Switching to FM “, the ADR – 605R will be auto selected the nearest radio station. Wait………. The screen upper line is showed the name of the present station or the frequency when RDS disable. 97.40MHz FM Autotune For searching for the FM stations, press 「Autotune」 to search the near frequency band. When you press 「Autotune」 and hold about 2 seconds, it will be searched the frequency band slowly. The searching will be stopped after the station was found. If you can not find any station, the searching will be stopped after scan the all FM band from 87.5 – 108MHz. Presets When you find out a station that you want to save as a preset station, just press one of the preset buttons M1 ~ M4 and hold it about 2 seconds. You can see the “Preset # stored” on the LCD screen. Then press one of the preset buttons, you can enjoy the station which has been preset. The “preset # empty” is showed on the screen if the preset button has not saved any station. Display modes 17 Press「Display」button then you can see the information as follows: RADIOTEXT PROGRAMME TYPE SIGNAL STRENGTH TIME AND DATE FREQUENCY AUDIO MODE Frequency It will be showed the frequency of the present station as 89.30 MHZ. Audio mode Under FM mode, you can see the sound effect is (mono) or (stereo) on the screen. The radio can be switched automatically about the sound effect “mono” or “stereo”. You can ignore this function. It would be very helpful for raising the sound quality with bad signal strength by switching “mono” or “stereo” manually. Just press 「Enter」 button can achieve that function. CD Mode CD Play 18 If you want to play the music CD disc, please press the “CD mode” button as follows picture. Or press the button on the remote as follows picture. You can see the ”Switching to CD” on the LCD screen. Then you can start operate the CD function after switched to the CD mode. Press 「Eject」 key to open the tray and put a CD disc on it before playing the music CD. Press 「Eject」 again to insert the disc into this device. When the LCD is showed out ”Ready”, press 「Play」 to start the disc playing. The CD operation other buttons as follows beside the 「Play」. 「Stop 」 -- It is used to stop play. 「Vol+ / Vol-」 Volume controller -- to control the analog audio output level. 「Next/FF」 When the CD playing, press this key that you can jump to the next track. If you press and hold this button over 2 seconds, then it will do the fast forward. 「Prev/FR」 When the CD playing, press this key that you can jump to the previous track. If you press and hold this button over 2 seconds, then it will do the fast rewind. 「Mute」 -- to stop the audio output. 「Repeat」 The repeat key has 5 playing modes. It will be switched the playing modes as follows sequence when press it time by time. “NORMAL”, “SINGLE”, “REPEAT ONE”, “REPEAT ALL”, and “RANDOM”. CD Recording ADR – 605R has two kinds of the recording mode. One is recording from DAB / FM radio; another is recording from the external audio source. The detail description of operation is 19 following: Recording from DAB/FM Radio 1. Press「Band」 to switch the system to DAB or FM mode. 2. Choose your favorite, good receive / listen effect radio station that you want to listen. 3. Press 「Eject」 key and put a blank disc or a CD-R/RW disc which has not been fully recorded and not finalized into this device. 4. Press 「REC」 , then you can record the present radio station output audio into the CD disc. 5. Press 「Stop」 to stop the recording and edit the just recorded disc to be an audio track. At the same time, you can enjoy the radio continuously without interruption. 6. If you want to listen the recorded audio, press 「CD」 key to switch the system mode to CD and wait the ”Ready” on the LDC screen. Now you can press 「Play」 to play the CD, and you also can press 「Next / FF」 or 「Prev / FR」 to listen other audio tracks which has recorded in the previous times. 7. In process of recording, the recording will not be stopped if you choose other stations. But the recording will be stopped if you switch the system to other modes as DAB, FM or CD. 8. The recording will be stopped automatically when the CD-R/RW disc is full. 9. You must press the 「Finalize」 to close the disc when you finish the recording or disc is full. The Finalize will be take about 1~1.5 minutes. After the 「Finalize」, this disc can be played in any devices as CD, VCD or DVD player. 10. After the 「Finalize」, the CD-R disc can not be recorded any more. 11. Without function the 「Finalize」, the recorded disc just can be played in this device. 12. After 「Finalize」, the recorded CD-RW disc should be totally erased by pressing 「Erase」button and then it can do the recording again. Recording from External Audio Source 1. Confirm the external audio source has well connected with this device first as follows: Cassette Player CD Player DVD Player TV 20 2. Press 「CD」 button to switch the system mode to CD. Now you can enjoy the audio from the external audio source. 3. Press 「Eject」 key and put a blank disc or a CD-R/RW disc which has not been fully recorded and not finalized into this device. 4. Press 「REC」 , then you can record the external audio into the CD disc. 5. Press 「Stop」 to stop the recording and edit the just recorded disc to be an audio track. At the same time, you can enjoy the radio continuously without interruption. 6. By pressing 「Play」 and 「Stop」 keys time by time, you can make an personal favorite effect of multi tracks audio CD. 7. If you want to listen the recorded audio, press 「CD」 key to switch the system mode to CD and wait the ”Ready” on the LDC screen. Now you can press 「Play」 to play the CD, and you also can press 「Next / FF」 or 「Prev / FR」 to listen other audio tracks which has recorded in the previous times. 8. In process of recording, the recording will be stopped if you switch the system to other modes as DAB, FM or CD. 9. The recording will be stopped automatically when the CD-R/RW disc is full. 10. You must press the 「Finalize」 to close the disc when you finish the recording or disc is full. The Finalize will be take about 1~1.5 minutes. After the 「Finalize」, this disc can be played in any devices as CD, VCD or DVD player. 11. After the 「Finalize」, the CD-R disc can not be recorded any more. 12. Without function the 「Finalize」, the recorded disc just can be played in this device. 13. After「Finalize」, the recorded CD-RW disc should be totally erased by pressing「Erase」 button and then it can do the recording again. Erase Disc Press 「Erase」 key to erase the recorded disc for new recording purpose. There are two kinds of the erase as follows. (1) If you press the 「Erase」 key then you erase the last track only. This is available when the CD-RW disc has not been finalized. (2) If you press and hold the 「Erase」 key over 2 seconds, then you can erase the entire disc material. (3) You should switch the system to the CD mode before pressing / function 「Erase」. (4) Make sure that the CD-RW disc was inserted into the device. Recheck the disc’s material before you do the erase because the erasing can not be stopped / pause. (5) The 「Erase」 timing is depended on the size of the recorded material. Generally it will be took about 1 ~ 1.5 minutes. Check Lists of the Recording not function 21 1. 2. 3. 4. 5. 6. Check the disc was put into the device correctly. Check the disc is CD-R, CD-RW. Check the disc still has the space to record or full. Check the disc has been finalized or not. Please put the disc in the central of tray and try it again if the above issues are none. Do not use the CD-R / RW disc that is scratch seriously, dirty, or poor quality. 22 Others setting Alarm Setting You can set the alarm both in standby or power on mode. Press「Sleep」and hold it about 2 seconds to setup the alarm while the power on. You can see the messages on the LCD screen as follows about 5 – 6 seconds. The <OFF> / <ON> is flashing, you should press 「+」 、 「-」Up / Down keys to switch ON / OFF and press 「Enter」 key in 5 – 6 seconds. After you setup the alarm ON / OFF and ENTER, the flashing sign will be jumped to hour position. Also you should press 「+」、「-」Up / Down keys to setup the hour and then ENTER. The flashing sign will be jumped to the next minute and you can setup the number of minute too as above the hour setting. Press 「Enter」 button time by time, the process will be took term to next one. ALARM <OFF> 12:00 ALARM <ON> 12:00 ALARM <ON> 00:00 Press「Sleep」 to setup the alarm while the power standby. You can see the USER CLOCK / ALARM switching on the LCD screen when you press 「Sleep」 time by time. When the ALARM on the screen and the <OFF> / <ON> is flashing, you should press 「+」、「-」 Up / Down keys to switch ON / OFF and press 「Enter」 key in 5 – 6 seconds. After you setup the alarm ON / OFF and ENTER, the flashing sign will be jumped to hour position. Also you should press 「+」 、 「-」Up / Down keys to setup the hour and then ENTER. The flashing sign will be jumped to the next minute and you can setup the number of minute too as above the hour setting. ALARM <ON> 00:01 Every time you press the 「+」 、 「-」buttons, the time only change one number. If you want to change it faster, then keep pressing「+」 、 「-」buttons. Every time you complete the time 23 setting, press「Enter」button to confirm it. If you want to leave the time setting, keep free the buttons on the remote about 5 – 6 seconds later then it will be back to the original mode. When you completed the alarm setting, make sure the volume is enough or not. If you want to active alarm, press the “Standby ” button to switch the radio to standby mode. If you want to set off the alarm, press 「Sleep」 and hold it over 2 seconds then set it off and see the “alarm status off” on the LCD screen. If you want to leave the time setting, keep free the buttons on the remote about 5 – 6 seconds later then it will be back to the original mode. Sleep mode This function can be used to set this device power off (standby) automatically in the certain time. Press「Sleep」button then you can see message in below. Every time press「Sleep」 button, the timing to sleep is from 90 minutes gradually down to 10 minutes. If you set it to be 0 minutes means setting off the sleep mode. Sleep <90> <80> .. <0> User Clock Setting You can setup the user clock at the standby mode. Press「Sleep」, you can see the USER CLOCK / ALARM switching on the LCD screen when you press「Sleep」time by time. You can see the messages on the LCD screen as follows about 5 – 6 seconds. USER CLOCK 0:00:01 The Time <0:00:01> is flashing, you should press ENTER to switch the flashing to hour location and press 「+」 、 「-」 Up / Down keys to setup the hour and press 「Enter」 key in 5 – 6 seconds. After you setup the hour and ENTER, the flashing sign will be jumped to the minute position. Also you should press 「+」 、 「-」 Up / Down keys to setup the minute and then ENTER. The flashing sign will be jumped to the next second and you can setup the number of minute too as above setting. Press 「Enter」, to finish the setting. 24 8. Cautions and Maintenance This ADR – 605R is extremely precision audio equipment, so please according to the following instructions to ensure the best preservation and avoid the unnecessary safety issues. ◎ Please avoid the device exposing under the sunlight directly, high temperatures, high humidity environment and heat. Also, please keep out of reach of children. ◎ Please keep the metal terminals cleaning and please use the cotton bars with electronic detergent to clean it if it is dirty. Make sure that no cotton fibers are left inside the terminals. ◎ Prevent put this device with other hard-cover objects to avoid scratching. You can use the soft clothes with little neutral detergent or Isopropyl alcohol to wipe the dirty cover gently. Avoid using alcohol for cleaning to prevent damaging surface. ◎ Unplug the device’s power cable during the lightning. Release the static electric charge when it is stored under the dry environment. ◎ DO NOT try to fix this device by yourself. Please seek the help from the dealer always the device is out of order. ◎ DO NOT pull the power or signal cable hardly. Always unplug and pull to hold the plug head not cable. Avoid curling the cable too much when storage them. 9. Troubleshooting Guide Line When ADR – 605R is out of order, please check the following table first before sending it back for repairing. Problems Causes 25 Troubleshooting No power, LCD no light on Bad AC power connect Check power cable & power source On DAB model, press “ Autoscan” no signal Bad signal Move antenna to other location then “Autoscan“ again. Moved antenna , but still No DAB service. No DAB signal Please visit http://www.digitalradionow.com/ to check the DAB broadcast information in your area. When received DAB signal, audio signal not continue with noise. Check the LCD screen display the signal strength (over 5 blocks is better), if lower than 4 blocks then change the antenna location or close the house window. Bad signal If FM signal weak then switch to “Mono” model (Check FM Audio model). On FM model “Stereo” need stronger signal than “Mono”. On FM mode has noise. Bad signal No sound output when the alarm is on Too low level of volume output No audio signal output, as NTL station only provide data without music Some stations provide data only. In the future they might start providing The station provide data only the services as information of stock market, news, and music. CD Tray can not open / close Disc put on the wrong position Put / adjust the CD disc position again. Forward / Rewind CD Press “Play” back to normal speed. Audio output poor connect Check the Audio connect & cable Amplifier / TV volume is controlled too small Please tune the volume bigger Setup too small the audio output Please check the audio output setting “Mute” on “Mute“ off No batteries / batteries power poor / liquid leaking. Put in batteries /replace new batteries. Batteries wrong position Put the batteries in correct position / direction. Poor disc quality Replace new CD-R/RW disc Disc put up-side-down Turn to right side of CD Disc Disc dirty Clean the CD Disc No Sound Remote Control fail No disc 26 Make sure the volume output is enough before power off to standby. Not supported Format Disc (DVD / CD-ROM / VCD…) Put the supported Audio CD disc only. None of above problems Put the disc correctly and insert again Record CD-R/RW noise / CD-R / RW Finalized, Not Can not be recorded blank CD-R/RW disc, bad quality. Change new CD-R / RW disc Audio cable just connect one Make sure the Audio cable connect Record only one channel channel or audio source only well. one channel The recorded sound effect is bad Audio source is unstable Use amplifier to increase the signal level Unstable in CD playing and recording process The best operation environment is 25℃ Put the device in good environment 10. Specification This unit is a multi functional audio system. It can receive DAB, FM radio, play music CD and recording audio CD from DAB / FM or external audio source (ADR-605R). This device has excellent readability. It can playback various discs, also records music CD by using CD-R, CD-RW discs. 27 Key Features Fully Integrated DAB / FM + CD Player / CD Recorder CD Sound quality without background noise for both DAB and CD system CD Playback and CD Recording from either DAB / FM or external Audio source DAB band III / L Band with FM band II (include Canada L Band) Keyboard / LCD direct connection Single DAB / FM antenna connector Superior RF Receiver Sensitivity Frequency range: DAB VHF Band III 174 MHz – 240 MHz L-Band 1452 MHZ – 1492 MHZ FM 87.5MHz – 108MHz DAB Service Selection DAB Ensemble Automatic tune & Memory FM frequency tune & Auto tune 4-Presets Memory (DAB / FM) S / PDIF optical output IR Remote Control Accessories Supplied: Remote control, Audio Cable, AC Cable, Optical Cable, Antenna, User Manual Specification Parameter Condition Min Typical Max Unit DAB RF frequency range Sensitivity Band III L-Band VHF Measurement to EN50248 [3] 28 174 1452 -96 240 1492 -98 MHz MHZ dBm Maximum Input Signal for a BER of 10-4 Adjacent Channel Selectivity: (EN50248) Far-off selectivity. (EN50248) Acquisition Sensitivity VHF -10dBm 0 dBm 32 35 dB 45 55 dB -102 dBm FM RF Frequency Range RF Sensitivity RF Limiting Sensitivity Large Signal Handling capacity (S+N)/N THD Environment & Physical Operating Temperature Range Storage Temperature Range Storage Humidity Playable Discs Recordable Discs Frequency Response S/N Ratio D/A Converter Digital Output Audio O/P Audio I/P Input Power Consumption Dimensions Weight 87.5 108 (S+N)/N = 26 dB 2 0.5 500 MHz uV uV mV Ultimate signal to noise ratio @200mV 38 dB 0.5 % 45 ∘C 70 ∘C % 20 44.1 16 KHz dB KHz bit 1 1 1 Unit Unit Set 1 Set 5 -20 Relative Humidity CD Player / Recorder CD / CD-R / CD-RW CD-R / CD-RW 20 90 80 Digital Coaxial Digital Optical Analog 2CH Other Analog 2CH AC 110V~240V, 50~60Hz 35W L332*W430*H60m m 4.8kg ※Products specifications and design subject to change without notice.※ 29 Meicheng® MEI CHENG AUDIO VIDEO CO., LTD Address: 5F., NO.111, SEC. 2, HUAN HO N. RD., TAIPEI, 10376 Tel: +886(2) 2585 3869, Website: www.meicheng.com.tw TAIWAN Fax: +886(2) 2593 6672 Email: [email protected]