1
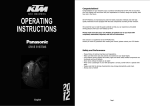
Milestone 212
Manual
www.bones.ch
3.46
!
Congratulations on purchasing Milestone 212.
We would like to welcome you in the Milestone family.
With Milestone 212 you have purchased a smart book reader which opens you the world
of digital talking books. Milestone 212 focuses on simplicity so that everyone who loves
books is able to handle this book reader. Its uncomplicated handling guarantees you fun
from the very beginning.
The eye-catching Milestone 212 is covered in a trendy ruby red coloring. As all products
from the Milestone line it has the size of a credit card. This guarantees an excellent
portability. Also very portable is the memory medium which Milestone 212 uses. Your
books are stored on exchangeable SD memory cards. The huge capacity of such cards
enables you to store all your favorite books on one tiny card. So with its featherweight of
only 49 grams you have a whole library with you, wherever you go.
We wish you a good start with Milestone 212 and a lot of fun!
!
!
!
!
!
!
!
!
!
www.bones.ch
!
Content
1. Milestone 212 layout description!
1.1. Visual layout!
1.2. Written layout description!
1.2.1.
1.2.2.
1.2.3.
1.2.4.
Get to know the operator surface!
Get to know the front end!
Get to know the bottom side!
Get to know the right long side!
1.3. Using the interfaces!
1.3.1.
1.3.2.
1.3.3.
1.3.4.
1.3.5.
Battery charging!
Headphone using!
USB connection to the computer!
External microphones!
SD memory card!
2. General handling!
2.1. On / Off (sleep mode)!
2.2. Keyboard lock!
2.3. Sound volume control!
2.4. Reading rate control!
2.5. Change application!
2.6. Information Service!
2.6.1. Book information!
2.6.2. Voice recorder information!
2.6.3. Audio information!
2.7. Shortcut overview of general handling!
2.8. Connect Milestone 212 with your computer!
2.8.1. Copy a book to the SD memory card!
2.8.2. Copy Audio content to the SD memory card!
2.8.3. Erasing via computer!
3. Books!
3.1. Start and pause a book!
3.2. Navigate in a book!
3.3. Select a book!
3.4. Create and erase a bookmark!
3.5. Shortcut overview of Books!
4. Voice recorder!
4.1. Record a short voice message!
4.2. Record a continuous voice message!
4.3. Listen to a recorded voice message!
4.4. Erase a voice message!
4.5. The 5 recording folders!
4.5.1. Change between the folders!
1
1
1
1
2
2
2
2
2
2
2
3
3
4
4
4
4
4
4
5
5
5
5
5
6
6
6
6
7
7
7
8
9
9
9
9
10
10
10
10
10
!
4.5.2. Voice labeling of folders!
4.6. External microphones!
4.7. Copy your voice recordings to the SD card!
4.8. Shortcut overview of Voice recorder!
5. Audio!
5.1. Navigation in Audio!
5.1.1. Navigation without folders!
5.1.2. Navigation with folders!
5.2. Play a music file!
5.3. Play a text file!
5.4. Shortcut overview of Audio!
6. Further information!
6.1. Technical data!
6.2. Protect your Milestone!
6.3. Troubleshooting - nothing works anymore!
6.4. Service and support!
6.4.1. General information!
6.4.2. Update software!
10
11
11
11
12
12
12
12
13
13
13
14
14
14
14
15
15
15
1. Milestone 212 layout description
This chapter explains Milestoneʼs push buttons, connectors and other tactile parts.
1.1. Visual layout
1.2. Written layout description
1.2.1. Get to know the operator surface
On the operator surface you can discover 5 push buttons. There is a big button in the
center and 4 buttons around it arranged in the shape of a cross. The one in the middle can
not only be identified by its size and central positioning, furthermore it is the only one
which has a clean surface, so it has no integrated sign. The name of this central button is
“Play”. Now we go to the other buttons around the “Play” button. Therefore glide down with
your fingers. The next push button is as big as “Play” but has an integrated X-sign you can
feel. This one is the “Mode” button. It is the lowest one. If you slide down again with your
fingers, you reach the round vents of the speaker. But let us stay with the buttons. The
remaining three are smaller. If you go from the central “Play” button to the left, you reach
the “Left arrow” button. You recognize it by its arrowhead, which faces to the left. The “Left
arrow” has an opponent, which is located across from it. So when you go to the right,
starting from the “Play” button, you reach the “Right arrow” button. This one has also an
arrow but it is directed to the right. Finally there is only one push button left on the operator
surface. When you slide up from the “Play” button, you will reach the “Rec” button. This is
the highest of these 5 buttons and it has a round indentation in the centre. The four
buttons around “Play” you often use like a directional pad. So with the “Right arrow” you
navigate to the right. With the top “Rec” button you go up. “Right arrow” is used to go to
the right and accordingly the lowest “Mode” button is used to go down.
1/15
Now you know all buttons on the operator surface. Besides the buttons and the mentioned
speaker you find as well a small red light in the top left corner of the operator surface.
1.2.2. Get to know the front end
On the left side is the sixth and last push button. This one is smaller and juts out of the
case. It is the “Selector” button. In the middle there is a longish opening, the mini-USB
connector. You can build a connection with the provided USB cable and consequently
interact with your computer and also charge Milestoneʻs battery from this access. On the
right side is a jack for external microphones.
1.2.3. Get to know the bottom side
On the bottom side there is only one connector. Therewith you can connect headphones.
1.2.4. Get to know the right long side
The right long side contains one longish port. There you insert SD memory cards.
1.3. Using the interfaces
The following descriptions focus on physical connection possibilities with Milestone 212.
1.3.1. Battery charging
Connect the provided recharger to a power outlet. Connect the other end of the recharger
with Milestoneʻs mini-USB connector, located in the middle of the front end. A correct
connection is signalized with a deep beep and the LED on the operator surface blinks in a
3 seconds cycle. Maximum charging is 3 hours. You can check the level of the battery by
using the „Information Service“. Milestone 212 will tell you the battery level besides other
information. You can find more about this under “Information Service”. Please be aware
that a connection to a computer via a USB cable recharges the battery as well.
Milestone 212 is equipped with a powerful rechargeable lithium polymer battery. Maximal
playback duration is over 15 hours. You reach this value if you listen to music or a books
over headphones with standard reading speed and a medium volume level. Please be
aware that listening over the integrated speaker, reading of text files, high reading rates
and high volume levels need more energy and accordingly result in less playback time.
1.3.2. Headphone using
If you do not want to listen to Milestone 212 over the speaker you can plug in any
headphones with a standard 3.5 mm jack on the right bottom side of the device. The
sound will then switch from the speaker to the headphones.
1.3.3. USB connection to the computer
You can connect your Milestone 212 to your computer to upload and download files. The
fast USB 2.0 Hi-Speed port allows you quick transfer times, also for big data volumes.
Just grab the provided USB cable and connect Milestone 212 to a computer with it. Plug
the smaller USB end into the USB interface, which is located in the center of Milestoneʻs
front end. The bigger end you connect with a USB interface on your computer. Set-up of
the connection is signalized with the message “Connection activated”.
2/15
1.3.4. External microphones
The jack on the right side of the front end you can use to connect an external microphone
with a 3.5 mm jack. The microphone is powered by Milestone 212 and does not need an
own amplifier.
1.3.5. SD memory card
You can insert SD memory cards into the longish slot on the right long side of Milestone
212. To insert the card press until it locks in. Please do not use force therefore. To remove
the card, just give a short push on the card and it will disconnect from the socket.
Milestone 212 uses SD memory cards to store books and other files. SD stands for
“Secure Digital”, which denotes a world-wide standard for memory cards. These memory
cards are available in different memory capacities in your electronic shop. We recommend
SD cards from SanDisk, Kingston, Transcend and Toshiba for untroubled usage.
Attention: In case you have problems with inserting the SD memory card make sure the
card is adjusted correctly. The card has a ribbed side. This is where the contacts are. In
addition one corner is notched. When inserting the card make sure the ribbed side is in
front and the notched corner is facing down.
3/15
2. General handling
This chapter informs about the general handling of Milestone 212. The following shortcuts
and therewith activated functions do work in all applications, “Books”, “Voice Recorder”
and “Audio”.
2.1. On / Off (sleep mode)
Milestone 212 has no physical on / off switch. Press “Play” to start Milestone 212. After ten
minutes of inactivity, the device will automatically go into sleep mode to conserve battery
life (as long as it is not connected to a power outlet or a powered USB cable). The device
will reactivate upon pressing the middle “Play” button. After reactivation the device returns
to the same application and position, as it was before going to sleep.
Hint: If Milestone does not wake up by pressing the “Play” button, there are three
possibilities to check. Either, the keyboard is locked, the sound volume is on the lowest
level or quite simply, the battery is discharged.
2.2. Keyboard lock
To avoid unintended inputs, keep the “Mode” button pressed and then in addition press the
“Rec” button. By doing this, all buttons of the device disable. This is indicated by the
message “Keyboard locked”. To unlock the keyboard, press the same combination of
buttons again. The device will acknowledge this with the message “Keyboard active”.
Attention: In case you have problems to activate the keyboard lock, please pay attention to
the sequence of pushing the buttons. It is important to start with the “Mode” button. Push
and hold “Mode” and then in addition quickly push “Rec”. Afterwards release “Mode” again.
2.3. Sound volume control
To increase the volume, keep the “Mode” button pressed and then additionally press the
“Right arrow” button. To decrease the volume push the “Left arrow” instead of the “Right
arrow”. With each press on the right or left arrow button the volume changes by one level.
There are 16 volume levels. If you press the mentioned button combination during
playback you just hear the volume increasing or decreasing. If the volume is changed
during paused mode, Milestone 212 announces “Volume up” or “Volume down”. Reaching
the maximum and minimum is indicated by a beep.
2.4. Reading rate control
During playback use “Selector” and an arrow button combination to increase or decrease
the speed of reading. So when you push and hold “Selector” and then in addition press on
“Right arrow”, you increase the reading rate by one level. To slow down the speed, press
the “Selector” combination with “Left arrow”. Each press on “Left arrow” or “Right arrow”
changes the reading rate by 10%. The range of speed change extends from 50% (half
speed) to 200% (double speed). A deep, short beep signalizes the original speed level.
2.5. Change application
Pressing the “Selector” button rotates Milestone 212 between the applications “Books”,
“Voice Recorder” and “Audio”.
4/15
2.6. Information Service
Keep the “Mode” button pressed for 1.5 seconds to start the Information Service. To stop it
press “Selector” once or wait until all information have been announced.
2.6.1. Book information
If you are located in Books you receive the following information:
•
•
•
•
•
•
Position in the current book
Name of the book
Battery status
Memory status
Software version
Serial number of your Milestone 212.
2.6.2. Voice recorder information
If you are located in Voice recorder you receive the following information:
•
•
•
•
•
•
Name and storage position of the current voice record
Battery Status
Memory Status
Announcement of backup option
Software version
Serial number of your Milestone 212.
2.6.3. Audio information
If you are located in Audio you receive the following information:
•
•
•
•
•
Name and storage position of the current file
Battery Status
Memory Status
Software version
Serial number of your Milestone 212.
2.7. Shortcut overview of general handling
Function
Operation
Acoustic feedback
Activate Milestone
“Play”
Starting sound and application
Select application
“Selector”
Application
Increase volume
“Mode” + “Right arrow”
“Volume up” (in paused mode)
Decrease volume
“Mode” + “Left arrow”
“Volume down” (in paused mode)
Change reading rate
(during playback)
“Selector” + “Right” or
“Left arrow”
-
Lock or unlock the
keyboard
“Mode” + “Rec”
“Keyboard locked” or “Keyboard
active”
Start Information Service
“Mode” for 1.5 seconds
Information Service starts
Stop Information Service
“Selector”
Information Service stops
5/15
2.8. Connect Milestone 212 with your computer
Before you can listen to a book or music you have to load it on Milestoneʻs SD memory
card. Therefore, connect Milestone 212 physically to your PC, via the provided USB cable,
as described under “USB connection to the computer” in this manual. If an SD memory
card is plugged into Milestone it appears as drive on your PC in the same way as an USB
memory stick. On this drive you can store your books, music et cetera. When you have
finished the transfer, disconnect the SD card drive properly from your computer, as you
would also do with an USB stick.
2.8.1. Copy a book to the SD memory card
To make a book available in the application “Books” you have to copy it to the SD memory
card plugged into your Milestone 212. Please store each book in a separate folder on the
SD memory card. This helps you to organize your books properly because a book often
contains up to hundreds or even thousands of files. You can store the folder with your
book wherever you want on the SD memory card. Of course you can use sub-folders.
2.8.2. Copy Audio content to the SD memory card
In the application “Audio” you can listen to your music or even read text files. Therefore
you have to copy music or text files to the SD memory card in your Milestone 212. You can
copy the files to the root directory of the SD memory card or if required, store the files in a
folder or even in a subfolder.
Audio plays music files in the format MP3, AAC, WMA or WAV and text files in TXT. These
files you can copy directly to the SD memory card.
However, a commercial music album on CD you have to convert first into one of the
mentioned formats before you can play it with Milestone 212. When you insert the CD into
your computer it creates its own format which is not directly usable with Milestone. That is
why you have to download the CD first with a program such as Windows Media Player,
CDex et cetera. This is the usual process to save music CDs on the computer. The
mentioned programs convert music tracks into a selectable reduced size format.
Hint: A folder you can compare with a drawer and subfolders are like drawers in a drawer.
You can use the folders to store and organize your data. With your computer you can
create and name folders on your SD memory card. Milestone 212 reads the name of
folders. That helps you navigating through your folder structure.
Attention: Please be aware that protected content, for example music purchased over
internet, cannot be played on Milestone 212.
2.8.3. Erasing via computer
Besides simple delete functions directly on Milestone 212, you can also delete files via
your computer. Operate as usual when you delete a file or several files on your computer.
Attention: If you delete files on your M212 via a Mac computer, you have to empty the
trash bin afterwards. Otherwise the files are not really removed, but only the link to the files
is erased.
6/15
3. Books
The application “Books” reads intelligent talking books, for example in DAISY format. The
outstanding difference to conventional audio books is the possibility of extensive
navigation. This allows you to move around inside a book in a variety of different
navigation options. The following formats are possible to use with Books:
Format
Description
DAISY 2.02
DAISY stands for Digital Accessible Information System. It is a format for
digital talking books with extensive navigation. More information about
DAISY you can find on www.daisy.org.
Audible AA
& AAX
Audible.com is a popular internet provider of spoken audio entertainment,
information, and educational programming.
NLS
(for the US)
NLS stands for National Library Service and is a big provider of talking
books in the USA.
3.1. Start and pause a book
Press the “Selector” button on the front end until you hear the announcement “Books”.
Now you are in the right application. To start the reading, press the “Play” button in the
middle of the keyboard. Milestone 212 starts the first book it can find. To pause the
playback of the book press “Play” again.
3.2. Navigate in a book
Instead of listening the whole book from start till end you have the opportunity to navigate
in a book. Depending on which kind of book you are listening there are different options to
navigate. A list of all possibilities you find listed below.
You can use “Rec” and “Mode” to check what kind of navigation options are available.
Press “Rec” to go up in the list and “Mode” to go down in the list. Let us assume you go to
the option “Phrase jump”. Now you can use the arrow buttons to navigate phrase by
phrase. So if you press the “Left arrow” you jump back to the start of the current phrase. If
you press it twice you jump at the start of the previous sentence et cetera. If you use the
“Right arrow” you jump to the next sentence. If you press it twice you jump 2 sentences
forward. So in every option you can use the arrow buttons to navigate or make a selection.
Please be aware that most books do not provide all navigation options. The number of
available navigation options depends on the type of book and how it is edited.
All possible navigation options you find in the following list:
Navigation option
Description
Phrase jump
Jump to next or previous phrase by using the arrow buttons. A
phrase is the smallest navigation possibility and for example may
correspond to a sentence. The exact definition depends how the
book was published.
Time jump
Jump 2 minutes of reading in the desired direction by using the
arrow buttons.
7/15
Navigation option
Description
Beginning of book / Jump to the beginning or respectively to the end of the book by
end of book
using the arrow buttons.
Bookmarks
Select previously inserted bookmarks by using the arrow buttons.
Bookshelf
Scroll between all available books by pressing the right or the left
arrow button. Press “Play” to start a book.
Activate sleep
timer
Activate sleep timer by pressing the “Right arrow” button. By
pressing the “Left arrow” button sleep timer is deactivated. With
sleep timer Milestone 212 will pause playback at the desired time.
Afterwards it will wait for 10 minutes. If there is no further input it
will turn off itself. The reading position is saved automatically.
Set time for sleep
timer
Select how long Milestone 212 remains active before sleep timer
switches it off. Use the arrow buttons to adjust the duration.
Pages jump
Jump to next or previous page by pressing the arrow buttons.
To enter a desired page directly, pause the book, push and hold
“Selector” and then in addition enter the page number with the
“Left arrow”, “Play” and “Right arrow”. With each push on “Left
arrow” you select between the three-digit figures: 100, 200, 300 et
cetera., with “Play” you reach the two-digit figures 10 to 90 and
with “Right arrow” you select between the single-digit figures from
1 to 9. Afterwards release “Selector” to reach the desired page.
First level
(Chapter)
Jump to the next or previous main chapter by pressing the arrow
buttons. For example from chapter 1 to chapter 2.
Second level
Jump to the next or previous sub-chapter by pressing the arrow
buttons. For example from chapter 1.2 to chapter 1.3.
Third level
Jump to the next or previous third level sub-chapter with the arrow
buttons. For example from chapter 1.2.1 to chapter 1.2.2.
Fourth level
Jump to the next or previous fourth level sub-chapter by pressing
the arrow buttons. For example from chapter 1.2.1.1 to chapter
1.2.1.2.
Footnotes jump
Jump to the next or previous footnote with the arrow buttons.
Marginals jump
Jump to the next or previous marginal note by using the arrow
buttons. Marginalia are text parts in frames or separate columns.
3.3. Select a book
In case you have several books saved on your SD memory card you can rotate between
these books with the navigation option “Bookshelf”.
Press “Rec” or “Mode” until you hear “Bookshelf”. With the arrow buttons you can select a
book now. All books of DAISY 2.02 and Audible are listed. Press “Play” to start the desired
book. Please be aware that after this selection the device changes automatically to the
option “Phrase jump”.
8/15
3.4. Create and erase a bookmark
To set a bookmark press “Rec” for 2 seconds. Milestone 212 announces “Bookmark set”
and the number of the bookmark. You can create a bookmark during a book is played back
or as well in paused mode.
Bookmarks are saved directly into the book. They are therefore saved on the SD memory
card. The advantages are that you are able to exchange bookmarks with friends and that
bookmarks are always clearly assigned to a book when working with several books on
several memory cards. You may insert up to 120 bookmarks per book.
To navigate from one bookmark to another go to the navigation option “Bookmark“.
Therefore press “Rec” or “Mode” until you hear “Bookmark”. With the arrow buttons you
can now jump between the bookmark numbers you have created.
Bookmarks are activated in the order of appearance in the book and not in the
chronological order they were inserted. This has the advantage that when selecting
bookmarks you move through the book in the reading direction until you find the desired
bookmark. You find your bookmark intuitively and quickly.
To delete a bookmark keep pressed “Mode” and in addition press “Play”.
3.5. Shortcut overview of Books
Function
Operation
Acoustic feedback
Playback or Pause
“Play”
-
Go to next part
“Right arrow”
-
Go to previous part
“Left arrow”
-
Insert bookmark
“Rec” for 2 seconds
“Bookmark set”
Erase bookmark
“Mode” + “Play”
“Bookmark erased”
Erase all bookmarks
“Mode” + “Play” + “Rec”
“All bookmarks erased”
Go to the next higher
navigation option
“Rec”
Name of the navigation
option
Go to the next deeper
navigation option
“Mode”
Name of the navigation
option
4. Voice recorder
The application “Voice recorder” allows you to record voice messages and sounds over the
integrated microphone. Shopping or to-do lists, interviews, schedule information, memos,
meeting agendas, recording of presentations or school seminars and addresses are some
possibilities which can be recorded. The integrated microphone is optimized for voice
recording and filters bothering background noises. So you can even record in a bus, car or
plane. Records are saved as MP3 file with a quality of 64 kbps.
4.1. Record a short voice message
To record a short voice message, push “Rec” and hold it while recording. A short “click”
signalizes that the recording starts. For best results, speak at normal volume and hold the
device at a distance of approximately 10 cm (4 inches) from your mouth. The integrated
microphone is located in the upper left corner near the small red light.
9/15
4.2. Record a continuous voice message
As an alternative of keeping a button pressed during a record, you may start a continuous
recording. Push and hold the “Rec” button and then additionally press “Play” after a short
“click”. The device will acknowledge the start of the continuous recording with the sound
sequence “low pitched-high pitched”. To terminate the continuous recording, press the
“Rec” button again. The device will acknowledge the end of the continuous recording with
the opposite sound sequence “high pitched-low pitched”. Furthermore continuous
recordings can be paused with “Play” and with a further push on “Play” again continued.
4.3. Listen to a recorded voice message
To listen to a voice message press “Play” after recording. If you have several messages
use the arrow button to select a voice message.
Hint: You have the possibility to jump to the last or the first file within a folder. Therefore
push and hold “Right arrow” and in addition press “Play” to reach the last file or push an
hold “Left arrow” and in addition “Play” to jump to the first file.
4.4. Erase a voice message
Milestone 212 enables you to delete voice messages directly without a connection to the
computer. Therefore play back the file you would like to erase. While the message is
playing, press and hold down the “Mode” button and briefly press “Play” button in addition.
The file will be erased as you let go off the buttons. An erasing signal will appear as an
acknowledgment. A message may be erased while it is being replayed or up to 10 seconds
after playback has stopped.
4.5. The 5 recording folders
Milestone 212 has 5 folders on the internal memory wherein you can record your voice
messages. By default Milestone 212 stores the recordings in folder “M1”.
4.5.1. Change between the folders
To change the folder push an hold “Selector”, then in addition press one of the 5 front
buttons. When releasing the buttons you jump inside the dedicated folder. So each front
button is directly linked to one folder. For example the button combination “Selector” and
“Mode” leads to folder M5 and “Selector” and “Right arrow” leads to folder M4.
4.5.2. Voice labeling of folders
Push and hold “Rec” to start recording a name for the current folder and after a click in
addition press “Mode” continuously. Milestone announces “folder” and then you start
recording your desired folder name. To stop recording release both buttons and you will
hear the sound sequence “high pitched-low pitched”. The new folder name is announced
the next time you choose this folder. A recorded folder name can be re-recorded anytime.
Hint: Be aware that you can delete recorded folder names with Milestone 212. Erasing of a
file is usually done by selecting a file and using the combination “Mode” and “Play”. A
record for a folder can not be selected the usual way. Therefore please re-record a folder
name to activate the file and afterwards press the erase combination “Mode” and “Play”.
10/15
4.6. External microphones
The jack on the right side of the front end you can use to connect an external microphone
with a 3.5 mm jack. The microphone is powered by Milestone 212 and does not need an
own amplifier. With a connected microphone Milestone 212 switches automatically from
the integrated to the external microphone. Recordings are saved as MP3 files with a
quality of 128 kbps. The handling stays the same as with the integrated microphone.
4.7. Copy your voice recordings to the SD card
To copy all your voice recordings from the internal memory of Milestone 212 to the inserted
SD memory card please open the Information Service. Therefore push and hold “Mode” for
1.5 seconds until Milestone starts speaking. Press the “Right arrow” when you hear the
announcement “For a backup copy of your internal memory on the SD card please press
right arrow now”.
4.8. Shortcut overview of Voice recorder
Function
Operation
Acoustic feedback
Short recording
“Rec” (push and hold)
“Click”
Start continuous recording
“Rec” + “Play”
Sound sequence “low
pitched-high pitched”
Pause or continue a
continuous recording
“Play” (during continuos
recording)
Short beep
End continuous recording
“Rec”
Sound sequence “high
pitched-low pitched”
Playback or pause a record
“Play”
-
Playback next record
“Right arrow”
-
Playback previous record
“Left arrow”
-
Jump to last record
“Right arrow” + “Play”
-
Jump to first record
“Left arrow” + “Play”
-
Erase current record
“Mode” + “Play”
Erasing signal
Choose between folder 1 to 5
“Selector” + a front button
Folder name
Voice labeling of current folder “Rec” + “Mode” (push and hold) Start of record with
“Folder”.
End of record with “high
pitched-low pitched”
11/15
5. Audio
If you want to use your Milestone 212 also for listening to music or text files you can do
that in the application “Audio”. Press the “Selector” button on the front end until you hear
the announcement “Audio”. Now you are in the Audio application.
The following formats you can play back in the application “Audio”:
Format
Description
MP3
Most popular compressed digital audio file
AAC
Compressed digital audio file format used by iTunes
WAV
Digital audio file format, quite large in size.
WMA
Windows Media Audio: Compressed digital audio file format used in
Windows Media Player.
TXT
Simple text files containing very little formatting.
Attention: Please be aware that Daisy books do not appear in the Audio application.
5.1. Navigation in Audio
5.1.1. Navigation without folders
In case you have stored your files in the root directory of the SD memory card without
using folders navigation is very simple. Just press “Left arrow” to go to the previous file
and “Right arrow” to go to the next file. The files are alphabetically ordered.
5.1.2. Navigation with folders
In case you have stored your files in folders you need as well “Rec” and “Mode” to
navigate in the vertical axis. You have to imagine the 4 press-buttons around “Play” as a
directional pad.
With the arrow button you jump from one folder or file to the other. If you want to enter a
folder you use “Mode” to go down, into the folder. Use “Rec” to go up, out of the folder.
Example: Let us assume you created a folder “Music” and a folder “Text” on the SD
memory card with your computer. In the folder “Music” you have created two subfolders,
“Oldies” and “Country”. In the folder “Oldies” you stored, besides some other music tracks,
your favorite song of Elvis Presley. You would like to listen to this Elvis track.
Therefore you use the arrow buttons to select between the folders “Music” and “Text”. You
stop on “Music” and press “Mode” to go down one level. So you go inside the folder
“Music”. Therein Milestone 212 jumps to the first file or subfolder. In our case it finds and
announces “Folder Country”. Press “Right arrow” to jump to the folder “Oldies”. Enter it
with the “Mode” button. Milestone 212 opens the first music track. The files are
alphabetically ordered. Press now “Right arrow” until you reach the track of Elvis Presley. If
you want to go up again into the highest folder level , the root directory of the SD memory
card, press “Rec” twice.
12/15
Hint: When you have a folder with a large amount of files, you have the possibility to jump
to the last or the first file within this folder. Therefore push and hold “Right arrow” and in
addition press “Play” to reach the last file or push an hold “Left arrow” and in addition
“Play” to jump to the first file.
5.1.2.1. Voice labeling of folders
Besides reading the name of a folder by the synthetic speech you can also voice label
folders directly on Milestone 212. Enter the appropriate folder with “Mode”. Push and hold
“Rec” and after a click in addition press “Mode” continuously. Milestone announces “folder”
and then you start recording your desired folder name. To stop recording release both
buttons and you will hear the sound sequence “high pitched-low pitched”. The new folder
name is announced the next time you reach this folder. A recorded folder name can be rerecorded at any time.
Hint: Please be aware that you can delete recorded folder names with Milestone 212.
Erasing of a file is usually done by selecting a file and using the combination “Mode” and
“Play”. A record for a folder can not be selected the usual way. Therefore please re-record
a folder name to activate the file and afterwards press the erase combination “Mode” and
“Play”. In addition you can remove the folder names on the SD memory card via computer.
Therefore delete the file “FOLDER.NAM” within the desired folder.
5.2. Play a music file
Select a music file. Therefore navigate to a file as described under “Navigate in Audio”.
Music files automatically start playing if you select them. Press “Play” in the middle of the
keyboard to pause the music file. If you press “Play” again playback will continue. With the
arrow buttons you can jump from one file to the other. If you keep the arrow buttons
pressed you can also use them to fast forward and rewind. So if you keep the “Right
arrow” pressed, it will fast-forward after about one second. The speed of scrolling
increases the longer you are pressing the button. When you keep pressing “Left arrow” it
will rewind with the same characteristics. As soon as you stop holding the arrow buttons
normal playback continues.
5.3. Play a text file
Be aware that when you select a text file, you hear the name of the file first. By pushing
“Play” you start the reading of the file. Besides this difference you can handle a text file
similar to a music file. Accordingly you can jump to the next and previous file with the
arrow buttons and use pause function with “Play“. If you push and hold an arrow button
during playback of a file then you can also kind of fast forward or rewind the text file. You
can hear a click in periodic time intervals. With each click you jump one step in the file.
How big such a step is, you can select by pressing “Rec” or “Mode” during playback. You
can choose between “Screen“ (which is around 25 lines), “Paragraph” or “Sentence“.
5.4. Shortcut overview of Audio
Function
Operation
Acoustic feedback
Playback or Pause
“Play”
-
Go to next file or folder
“Right arrow”
-
Go to previous file or folder
“Left arrow”
-
13/15
Fast forward
“Right arrow” (push and hold) -
Rewind
“Left arrow” (push and hold)
-
Jump to last file
“Right arrow” + “Play”
-
Jump to first file
“Left arrow” + “Play”
-
Erase current file
“Mode” + “Play”
Erasing signal
Voice labeling of current folder
“Rec” + “Mode” (push and
hold)
Start of record with
“Folder”.
End of record with “high
pitched-low pitched”
6. Further information
6.1. Technical data
•
•
•
•
•
•
•
•
•
•
•
•
•
•
•
•
•
External memory: Depends on the SD card, maximum is 32 GB (at the moment). Internal memory for voice records: 1 GB (0.74 GB / 25 hours available for recording).
Bit rate during recording over built-in microphone: 64 kbps.
Bit rate during recording over external microphone: 128 kbps.
Sampling rate during recordings: 44.1 kHz.
Sample resolution during recording: 16 bit.
Bit rate for playback: 8 kbps to 320 kbps, or VBR (Virtual Bit Rate).
USB 2.0 Hi-Speed connection.
Memory card slot MMC, SD and SDHC, maximum card size 32 GB.
Headphone jack: Standard 3.5 mm.
External Microphone jack: 3.5 mm .
Body made of impact-resistant plastic.
Measurements: 85 x 54 x 14 mm (3.35” x 2.13” x 0.55”).
Weight: 49 grams (1.7 ounces).
Built-in rechargeable lithium polymer battery.
Maximum run time: Over 15 hours (depends strongly on type of usage).
Maximum charging: 3 hours.
6.2. Protect your Milestone
Please protect Milestone 212 from mechanical overload, humidity and from contact with
water. All parts of the guarantee are voided by inappropriate use or opening of the device.
6.3. Troubleshooting - nothing works anymore
First of all relax and please do not beat poor Milestone 212. Not before you have tested
the following steps:
Step 1:
Is the device charged? Connect your Milestone 212 to a power outlet and ensure that the
charger is powered. Recharge the built-in battery for at least half an hour. Afterwards press
“Play” at least half a second. If Milestone 212 does not speak go to step 2.
14/15
Step 2:
Is the keyboard locked? While keeping the “Mode” button pressed, press the “Rec” button
briefly and listen for the response of the device:
• You hear the message “Keyboard active”: Keyboard was locked and is now unlocked.
• You hear the message “Keyboard locked”: Keyboard has now just been locked. Press
the same combination of buttons once more to unlock the keyboard. The device will play
the message “Keyboard active”.
• If you hear nothing go to step 3.
Step 3:
If you do not hear anything, the device is not functioning properly. Please press and hold
all front buttons except “Play”. This restarts the device. If it is still not working you can try to
reinstall the software as described in the following chapter or you contact your dealer.
6.4. Service and support
6.4.1. General information
Service and support you get from your dealer, where you bought your Milestone 212. This
includes answering questions about handling of Milestone and assistance in case of a
necessary repairing. Suggestions for improvements are very welcome and can be
forwarded as well to the dealer.
Please be aware that there is also a support area for Milestone on the website
www.bones.ch. There you get the newest manuals, software and answers to frequently
asked questions.
6.4.2. Update software
Bones Inc. aims to improve Milestone 212 constantly. New firmwares allow to update the
software on Milestone 212 and solve problems or add new functions.
If you would like to do such an update with the newest firmware, you have two options.
Either you go to your dealer, where you bought the device. He will update your Milestone
212 if the software is out-of-date. Or you can do it by your own over the internet. Therefore
please follow the few steps below.
• Check which firmware is on your M212: Keep pressed the “Mode” button for 1.5 seconds
and Information Service starts. Besides other information you get the number of the
current software.
• Check which is the newest available firmware: Open your internet and go to
“www.bones.ch”. Go to “Support” and select your product “Milestone 212”. There you find
the newest firmware, for example 2.2. If this is higher than the one on M212, please
download the file on your desktop.
• Copy the newest firmware on the SD memory card: Connect Milestone 212 with your
computer. If you do not know how, please go to “Connect Milestone 212 with your
computer” in this manual. Copy the firmware into the root directory of the plugged in SD
card and log off your M212 properly from the computer as you would do with a memory
stick. Now you will hear the announcement “Software update in progress. Please wait”.
Afterwards the update is complete. In case the update does not start automatically take
the SD memory card out of Milestone and insert it again.
15/15