1
ATTACHMENT
Model No. 316.792460
o SAFETY
ASSEMBLY
OPERATION
MAINTENANCE
PARTS LIST
o ESPANOL, R 9
CAUTION: Before using this
product, read this manual and
follow all safety rules and
operating
instructions.
Sears Brands Management
Corporation,
Visit our website:
769-07377 P00
Hoffman
Estates, IL 60179 U.S.A.
www.craftsman.com
11/11
TABLE OF CONTENTS
Rules for Safe Operation .................................
Warranty .............................................
Know Your Unit ........................................
Assembly instructions ...................................
Operating instructions ...................................
Maintenance & Repair instructions .........................
Replacing Saw Chain ...................................
Chain Lubrication ......................................
Cleaning and Storage ...................................
Specifications
.........................................
Parts List ............................................
Service Numbers ..............................
2
4
5
5
6
7
7
8
8
8
23
Back Cover
All information, illustrations and specifications in this manual are based
on the latest product information available at the time of printing. We
reserve the right to make changes at any time without notice.
The purpose of safety symbols is to attract your attention to possible I
dangers. The safety symbols, and their explanations, deserve your I
careful attention and understanding. The safety warnings do not by I
themselves eliminate any danger. The instructions or warnings they I
give are not substitutes for proper accident prevention measures.
J
SYMBOL
MEANING
Attention is required
SAFETY
ALERT: in order
indicates
to avoid
danger,
serious
warning
personal
or caution.
injury.
May be used in conjunction with other symbols or pictographs.
NOTE:
Advises you of information or instructions vital to the
operation or maintenance of the equipment.
DANGER:
Failureto
obeyAlways
a safetyfollow
warning
result
in serious
injury
to yourself
or to others.
the will
safety
precautions
to reduce the risk of fire, electric shock and personal injury.
WARNING:
in injury to yourself
Failure
andto others.
obey aAlways
safety warning
follow the
cansafety
result
precautions to reduce the risk of fire, electric shock and
personal injury.
property damage
CAUTION:
Failure
or personal
to obey ainjury
safetyto warning
yourself may
or to result
others.in
i Always follow the safety precautions to reduce the risk of
fire, electric shock and personal injury.
Read the Operator's Manual and follow all warnings and safety instructions.FaUureto do so can resultin serious injuryto the operator and/or bystanders.
,, iMPORTANT
READ ALL INSTRUCTIONS
SAFETY iNSTRUCTiONS
BEFORE OPERATING
WARNING:
When using the unit, you must follow the
safety rules. Please read these instructions before operating
the unit in order to ensure the safety of the operator and any
bystanders. Please keep these instructions for later use.
• Carefully read and understand the operator's manual of the unit
that powers this attachment.
Read this operating instruction manual carefully. Be thoroughly
familiar with the controls and the proper use of the equipment.
Know how to stop the unit and disengage the controls quickly.
Do not operate this unit when tired, ill, or under the influence of
alcohol, drugs, or medication.
Never allow children to operate the equipment. Never allow adults
unfamiliar with the instructions to use the unit. Never allow adults
to operate the equipment without proper instruction.
All guards and safety attachments must be installed properly
before operating the unit.
POLE SAW OPERATING PROCEDURES
Keep bystanders, especially children and pets, at least 50 ft (15 m) away.
Wear safety glasses or goggles that are marked as meeting ANSI
Z87.1-1989 standards, and ear/hearing protection when operating
this unit. Wear a face or dust mask if the operation is dusty.
Wear heavy, long pants, boots, gloves and a long sleeve shirt. Do
not wear loose clothing, jewelry, short pants, sandals or go
barefoot. Secure hair above shoulder level.
Use the unit only in daylight or good artificial light.
Use the right tool. Only use this tool for the purpose intended.
Always stop the engine when operation is delayed or when
walking from one location to another.
Use only OEM replacement parts and accessories for this unit.
These are available from your authorized service dealer. Use of any
unauthorized parts or accessories could lead to serious injury to the
user or damage to the unit, and void your warranty.
,,
KICKBACK SAFETY PRECAUTIONS
WARNING:
Kickback may occur when the nose or tip of the
guide bar touches an object, or when the wood closes in and
pinches the saw chain in the cut. Tip contact insome cases may
cause a lightning-fast reverseaction, kicking the guide bar rapidly
back towards the operator. Pinching the saw chain along the top of
the guide bar may push the guide bar rapidly back towards the
operator. Either of these reactions may cause you to lose control of
the saw, which could result in serious injury to the user.
Do not rely exclusively upon the safety devices built into your
saw. As a pole saw user, you should take several steps to
keep your cutting jobs free from accident or injury.
With a basic understanding of kickback, you can reduce or eliminate
the element of surprise. Sudden surprise contributes to accidents.
Grip trimmer firmly. Hold the pole saw/trimmer unit firmly with
both hands when the motor is running. Keep one hand on the grip
and the other hand on the handle.
Do not let the nose of the guide bar contact a log, branch, ground
or other obstruction.
Always cut with the engine running at full speed. Fully squeeze
the throttle trigger and maintain a steady cutting speed.
• Do not over reach.
Follow the manufacturer's sharpening and maintenance
instructions for the saw chain.
Use only replacement bars and chains specified by the
manufacturer or the equivalent.
OTHER SAFETY PRECAUTIONS
= DO NOT operate a pole saw with one hand! Serious injury to the
operator, helpers, or bystanders may result from one-handed
operation. A pole saw is intended for two-handed use.
Do not operate a pole saw if you are fatigued.
Do not wear loose clothing or jewelry, as they can get caught in
moving parts. Non-skid footwear is recommended when working
outdoors. Wear protective hair covering to contain long hair.
• Usesafetyglasses,
safetyfootwear,
snugfittingclothing,
• Never
remove,
modifyormakeinoperative
anysafetydevice
protective
gloves,
andprotective
hearing
andheadgear.
furnished
withyourunit.
Keeptheworkareaclean.
Cluttered
areas
inviteinjuries.
Donot
Thissawisintended
forinfrequent
usebyhomeowner's,
cottagers
startcuttinguntilyouhaveaclearworkarea,secure
footing,
and
andcampers,
andforsuchgeneral
applications
suchasclearing
and
a planned
retreatpathfromthefallingbranches.
pruning.
Itisnotintended
forprolonged
use.Iftheintended
use
involves
prolonged
periods
ofoperation,
thismaycause
circulatory
StayAlert.
Watch
whatyouaredoing.
Usecommon
sense.
Donot
problems
intheuser's
hands
duetovibration.
Itmaybeappropriate
operate
thepolesawwhenyouaretired.Keep
allpartsofyourbody
touseasawhaving
ananti-vibration
feature.
away
fromthesawchainwhenthemotorisoperating.
Before
you
startthesaw,make
surethesawchainisnotcontacting
anything.
Safety
clothing
required
byyoursafety
organizations,
government
regulations,
oryouremployer
should
beused;
otherwise,
snug
fitting
Disconnect
thepolesawwhennotinuse,before
servicing,
andwhen
safety
footwear,
andhandandearprotection
should
beworn.
changing
accessories
andattachments
suchassawchainandguard. clothing,
Low-kickback
sawchainischainthathasmetthekickback
Check
damaged
parts.
Before
further
useofthepolesaw,aguard
or
requirements
ofANSIB175.1-1991
andisin
otherpartthatisdamaged
should
becarefully
checked
todetermine performance
accordance
withCSAZ62.3.
Donotuseotherreplacement
chain
thatitwilloperate
properly
andperform
itsintended
function.
Check
unlessithasmettheserequirements
foryourspecific
model.
foralignment
ofmoving
parts,
binding
ofmoving
parts,
breakage
of
parts,
mounting,
andanyotherconditions
thatmayaffectits
Donotuseanyothercutting
attachment
oraccessories.
Useonly
operation.
Aguard
orotherpartthatisdamaged
should
beproperly
original
equipment
manufacturer
replacement
partsandaccessories,
repaired
orreplaced
byanauthorized
service
center,
unless
otherwise whicharedesigned
specifically
toenhance
theperformance
and
indicated
inthisinstruction
manual.
maximize
thesafeoperation
ofourproducts.
Failure
todosomay
cause
poorperformance
andpossible
injury.
Useonlythechainand
Useextreme
caution
whencuttingsmallsizedbrushandsapling,
barsupplied
withthisproduct.
Donotuseanyothercutting
asslender
material
maycatchthesawchainandbewhipped
attachment.
Useofsuchattachments
willvoidyourfactory
warranty
toward
youorpullyouoffbalance.
andcouldresult
inserious
bodilyinjury.
Donotoperate
apolesawinatreeunless
youarespecifically
Never
touchthechainorattempt
toservice
thesawwhilethe
trained
todoso.Whencuttinga limbthatisundertension,
be
engine
isrunning.
Makesureallmoving
partshavestopped.
alertforspringbacksothatyouwillnotbestruckwhenthe
Allowthechaintocool,asthechaincanbehot.
tension
inthewoodfibersisreleased.
Checkthebarandchainatfrequent
intervals
forproper
Donotexpose
thepolesawtorain.Donotusethepolesawin
adjustment.
Makesurethebarandchainareproperly
tightened
damporwetlocations.
andsharpened.
Visually
inspect
fordamage.
Repair
anydamage
Donotusethepolesawinthepresence
offlammable
liquids
orgases.
before
restarting
oroperating
thepolesaw.
Allpolesawservice,
otherthantheitemslistedintheoperator's
Donotcutnearelectrical
cables
orpowerlines.
manual
safety
andmaintenance
instructions,
shouldbe
Donotusethepolesawtofellatree.Useastandard
chainsaw
performed
bycompetent
polesawpersonnel.
Donotattempt
to
forthisapplication.
repairityourself;
therearenouserserviceable
partsinside.
MAINTENANCE AND STORAGE
Thepolesawwilldoa betterandsaferjobwhenusedattherate
forwhichitwasintended.
= Allow the unit to cool before storing or transporting. Be sure to
secure the unit while transporting.
Usetherighttool.Cutwoodonly.Donotusethepolesawfor
purposes
forwhichitwasnotintended.
Forexample,
donotusethe
Always use the transport guard on the bar and chain during
polesawforcutting
plastic,
masonry,
ornon-building
materials.
transportation and storage.
Usedevices,
such
aslow-kickback
chain,
guide
barnose
guards,
chain
Store the unit in a locked up and dry or high and dry place to
brakes
andspecial
guide
bars,which
reduce
therisksassociated
with
prevent unauthorized use or damage, out of the reach of children.
kickback.
Never douse or squirt the unit with water or any other liquid. Keep
Therearenootherreplacement
components
forachieving
handles dry, clean and free from debris. Clean after each use.
kickback
protection
inaccordance
withCSAZ62.3.
Keep these instructions. Refer to them often and use them to
Donotoperate
apolesawthatisdamaged,
improperly
adjusted,
instruct other users. If you loan someone this unit, also loan them
these instructions.
ornotcompletely
andsecurely
assembled.
Besurethatthesaw
chainstopsmoving
whenthetriggerisreleased.
Only qualified personnel should perform any repairs or
Donotattempt
operations
beyond
yourcapacity
orexperience.
maintenance procedures that are not described in this manual.
SAVE THESE
iNSTRUCTiONS
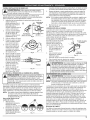
This operator's manualdescribes safety and international
symbols and pictographs that may appear on this product. Read the operator's manualfor complete
safety,assembly, operatingand maintenance and repairinformation.
SYMBOL
MEANING
SYMBOL
MEANING
= SAFETY ALERT SYMBOL
I Indicates danger, warning or caution. May be used in
conjunction with other symbols or pictographs.
©
• READ OPERATOR'S
MANUAL
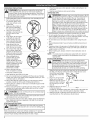
WARNING:
Contact of the guide bar tip with any object I
should be avoided. Tip contact may cause the guide barto I
,GUIDE BAR
I
_:_i!
WARNING:
_
m°ve suddenly uPWardand backward' which may cause
se[ious injury,
Read the operator's manual(s) and
follow all warmngs and safety instructions. Failure to
do so can result in serious injury to the operator
and/or bystanders.
• USEBOTH
HANDS
Always use both hands while operating the chain saw, I
WEAR HEAD, EYE AND HEARING PROTECTION
Never Use 0n!Y 0n e hand to operate the saw:
,L
WARNING:
Thrown objects and loud noise can cause
severe eye injury and hearing loss. Wear eye protection
meeting ANSI Z87.1-1989 standards and ear protection
when operating this unit. Falling objects can cause
severe head injury. Wear head protection when operating
this unit.Use afull face shield when needed.
WARNING:
D0n0t touch a h0t surface: You may
_get
HOTburned.
SURFACE
These parts get extremely hot from
operationl They remain hot for a short time after the
un t s turned off.
CHAIN OiL ADJUSTMENT
WARNING:
Keep all bystanders, especially children
and pets, at least 50 feet (15 m) from the operating area.
POWER LINES CAN CAUSE SEVERE INJURY
Do not operate unit near power lines.
Contact with a power line may cause serious injury or
damage to the unit. Maintain a clearance of at least 50 ft
(15 m) between the pole saw (including any branches
it is contacting) and any electrical line.
CRAFTSMAN
•
I
J
KEEP BYSTAND ERS AWAY
WARNING:
I
INDICATOR
The
funct!on
Chainproperly,
must beMake
c0nt!noUsiy
sure to €0ated
set the With
Oil Adjustment
oil to
Screw to a!low a sufficient amount of oil to flow
ContinuoUsly onto the chaini
uSe a 3/32' nch Alien wrench to adjust the Qi!
Adjustment Screw,
TWO YEAR FULL WARRANTY
FOR TWO YEARS from the date of purchase, this product is warranted against any defects in material or workmanship. A defective product
will be replaced free of charge.
For warranty details to obtain free replacement, visit the web site: www.craftsman.com
This warranty does not cover the bar or chain, which are expendable parts that can wear out from normal use within the warranty period.
This warranty is void if this product is ever used while providing commercial services or if rented to another person.
This warranty gives you specific legal rights, and you may also have other rights which vary from state to state.
Sears Brands Management Corporation, Hoffman Estates, IL 60179
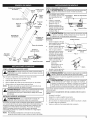
Chain
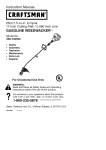
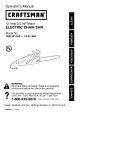
Transport Guard
Removing
Guide Bar
Nose
1. Turn the knob
counterclockwise to
loosen (Fig. 3).
2. Press and hold the release
button (Fig. 1).
3. While firmly holding the
upper shaft housing, pull
the attachment or
extension boom out of the
coupler (Fig. 2).
Installing the Attachment or
Extension Boom
Bar Retainin
Chain
Saw
!
Oil Tank Cap
:
Convertible
1. Remove the hanger or
shipping cap from the top
of the shaft housing.
2. Turn knob
counterclockwise to
loosen (Fig. 3).
Boom
ShipF
Oil Reservoir
FiLLiNG THE OiL RESERVOIR
-_J
i
damage
ANGER"
to theFailure
unit. Make
to fill sure
the oil
thereservoir
oil reservoir
will cause
is always
irreparable
filled.
Follow the following steps to fill the oil reservoir:
1. Place the unit on a flat surface.
2. Remove the Oil Tank Cap.
3. Open the bar & chain oil bottle provided with your unit.
4. Pour oil into the reservoir until filled.
NOTE: The oil reservoir may be filled to the lip of the fill opening
without damaging the unit.
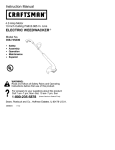
_[_[
Primary Hole
While firmly holding the
attachment, push it
straight into the
Housing
Housing
Convertible TM coupler
Fig.2
until the release button
snaps firmly into the
primary hole (Fig. 6).
NOTE: Aligning the release
button with the guide
recess will help
installation (Fig. 1).
4. Turn the knob clockwise to
tighten (Fig. 3).
Knob
5. Repeat steps 1-4 for the
attachment or extension
Fig. 3
boom.
The attachment should be installed with the release button in the
primary hole.
_L_
I_
1
the chain. Check the oil level constantly so that the oil level does
Oil constantly
flows from the oil reservoir to oil i
notARNING:
drop below half
full.
INSTALLING/REMOVING
Guide Recess
Fig. 1
3.
Oil Adjustment
Screw
Screw
_Z_
TM
Coupler
_)
Release Button
TM
_[____J power
ARNING:
tool.
Craftsman
Hanger_
Convertible
to the unit, NEVER install more than one extension boom to a
To avoid serious personal injury and damage
Drive Shaft
Extension
or Extension Boom
damage to the unit, shut the unit off before removing or
ARNING:
To avoid serious personal injury and
installing
add-ons.
_
Guide
,
__
f
the Attachment
ATTACHMENT
WARNING:
Priorfor
to unit
operation,
read with
and this
understand
the I
operator's manual
to be used
attachment.|
The attachment may be mounted to different power tools. The
instruction manuals for the basic power tool and the attachment
contain the information necessary for operation of the power tool
combination. Therefore, sways read BOTH instruction manuals
before using the power tool for the first time. Keep the manuals in a
safe place for future reference.
NOTE: To make installing or removing the attachment easier, place
the unit on the ground or on a work bench.
and
AUTION:
securely tighten
Lock the
therelease
knob before
button operating
in the primary
this unit.
hole
only. Using the wrong hole could lead to personal injury or
I CAUTION:
are to be used in the primary hole
damage to theAdd-ons
unit.
Check Flex Shaft Engagement
1. Start the unit.
2.
3.
4.
5.
Prior to Using
Briefly engage and release the trigger.
Check that attachment is operating.
If the attachment is not operating, remove attachment
repeat steps for installing the attachment.
Recheck operation of the attachment.
and
OPERATING
PRECAUTIONS
_{
1. Placethepolesawonfirmground
orothersolidsurface
inan
open area.
2. Maintain good balance and secure footing.
OPERATING TIPS
WARNING:
Dress properly to reduce the risk of injury
I when operating this unit. Do not wear loose clothing or
I jewelry. Wear eye and ear/hearing protection. Wear heavy
{ long pants, boots and gloves. Wear a hard hat. Use a full
L==_=_ face she d when needed.
1. Keep bystanders 50 feet (15 meters) away when operating the saw.
2. Do not use the pole saw
to cut down trees. Use a
chain saw without a pole
attachment.
3. Make sure the oil tank is
full and oil is lubricating
the chain prior to starting.
4. Grip pole saw/trimmer
securely--one hand on the
grip, the other on the
handle.
Fig. 4
5. Keep finger off the trigger
until ready to make cut.
6. Before starting the pole
saw, make sure the chain
is not touching anything.
7. Keep all parts of your
body away from the chain
when the saw is running.
8. Do not force the chain saw
while cutting. Apply light
Fig. 5
pressure. It will do the job
better and safer at the rate
for which it was intended.
9. When cutting limbs or
branches that are under
tension, use extreme
caution. Be alert for wood
springing back. When wood
tension is released, the limb
could spring back and
strike operator causing
severe injury or death.
Fig. 6
10. When carrying pole saw
from one place to another:
• hold pole at balance point
• keep guide bar and chain to the rear
11. Do not cut small brush and saplings with the pole saw. Slender
matter may catch in the chain and be whipped toward you. This
could also pull you off balance.
12. Never stand directly under the limb you are trimming. Always
position yourself out of the path of falling debris (Fig. 4).
13. Never stand on a ladder or other type of unstable support while
using the pole saw.
14. Always use both hands to operate pole saw. Keep a firm, steady
pressure on the pole saw while cutting, but do not try to force
the saw through the wood.
WARNING:
Kickback may occur when the nose or tip of
the guide bar touches an object, or when the wood closes
in and pinches the saw chain in the cut. Tip contact in
some cases may cause a lightning-fast reverse action,
kicking the guide bar rapidly back towards the operator.
Pinching the saw chain along the top of the guide bar may
push the guide bar rapidly back towards the operator.
Either of these reactions may cause you to lose control of
the saw, which could result in serious injury to the user.
DO not rely exclusively upon the safety devices built into
your saw. As a chain saw user, you should take several
steps to keep your cutting jobs free from accident or injury.
Avoid kickback. Kickback can result in severe injury or death.
Do not operate the pole saw while in a tree, on a ladder or any
other unstable work surface, or in any awkward position. You may
lose control of the pole saw causing severe injury.
Do not extend your arms above shoulders when using the pole
<
-L_
than
ARNING:
4" (10 cm)Do
in diameter.
not use the pole saw to cut limbs larger
saw.
Seek professional help if you are facing conditions beyond your
ability.
Trimming a tree is the process of cutting limbs from a living tree.
Make sure your footing is firm. Keep your feet apart. Divide your
weight evenly on both feet.
Before starting unit, always check the chain lubrication and oil
tank level.
NOTE: The chain must be continously coated with oil to function
properly. Make sure that the oil adjustment screw is set
appropriately.
To trim a limb (pruning):
,A
WARNING:
If the oil tank runs out, the oil adjustment
{ screw hole becomes clogged, or the chain fails to get proper
lubrication in any fashion, the chain will overheat and cause
irreversible damage to the unit and may result in severe injury.
{
{ Excessive heat from friction can lead the chain to
catastrophically fail and come off the bar while operating.
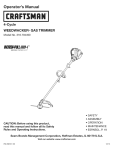
1. Make the first cut six inches from tree trunk on the underside of
the limb. Use the top of the guide bar to make this cut. Cut a
third of the way through
Cut4
6in
Cut 2
the diameter of the limb
Fi\_, (152cm)_/_.
(Fig. 7).
2.
Move two to four inches
farther out on the limb.
Make the second cut from
above the limb. Continue
the cut until you cut the
Cut 3
{_
,L,' cj
3.
i
15. Keep other persons away from cutting end of pole saw and at a
safe distance from work area. (Fig. 5).
16. Do not use the pole saw near cable, electric power or telephone
lines. Maintain a minimum clearance of 50 feet (15 m) from all
power lines (Fig. 6).
STARTING INSTRUCTIONS
_
start the engine at least 30 ft. (9.1 m) from the fueling spot,
WARNING:
l
outdoors only. To reduce the risk of fire and burn injuries,
Start and operate your pole saw without assistance. For specific
starting instructions, see the appropriate section of your powerhead
manual. Proper starting methods reduce the risk of injury.
4.
,5,_,o
2ore,
limb
Makeoff.
the third cut as close .\ _1
to the tree trunk as
Fig. 7
possible on underside of limb stub. Use the top of the guide bar
to make this cut. Cut a third through the diameter of stub.
Make the fourth cut directly above the third cut. Cut down to
meet the third cut. This will remove the limb stub.
SAWCHAINREPLACEMENT/INSTALLATION
m
_L_
WARNING:
wear work gloves
Whenever
for protection
handling
against
the saw
sharp
chain,
cutting
always
edges.
i
The pole saw chain and bar are expendable items, not covered by
the product warranty. Replacement chain or bar is available for
purchase through Sears parts and repair.
Chain Guard
1. Remove the bar retaining
nuts and screw. Then take off []
Using a flat-head
turn(Fig.
tension
2. screwdriver
the chain guard
8, B).
J
adjustment screw
counterclockwise (Fig. 8,
A) 4 turns.
Tension
3,
Take off the chain and bar.
Adjustment Screw Bar Retaining Nuts
4. Prepare new chain and/or
Fig. 8
bar, and fit the chain into
the groove in the bar.
5,
Loop the saw chain over
the drive sprocket with the
cutting edges of the chain
pointing in the direction of
rotation (Fig. 9).
6,
Adjust the tension
adjustment screw (Fig. 8,
A) to allow insertion of the
bar (Fig. 10). Make sure
Fig. 9
the chain follows the slot
in the guide bar and adjust
the tension adjustment
screw to make the chain
__
__ _
fit snugly on the underside
of the bar.
7,
Install the chain guard and
tighten bar retaining nuts
and screw (Fig. 8, B).
SAW CHAIN TENSION
ADJUSTMENT
Fig. 10
_
and saw bearings will wear more rapidly. Refer to Figure 11 for
information
cold tension
(A), correct
AUTION:concerning
If a chaincorrect
is too loose
or too tight,
the barwarm
chain
tension (B), and a chain in need of adjustment (C).
Proper tension of the saw chain is extremely important and must be
checked before starting, as well as during, any cutting operation.
Taking the time to make needed adjustments to the saw chain will
result in improved cutting performance and prolonged chain life.
NOTE: A new chain and bar
will need readjustment after as
few as 5 cuts. This is
normal during the
break-in period, and
the interval between
future adjustments
will lengthen quickly
(Fig. 11).
To adjust the saw chain tension:
Fig. 11
1. Loosen the bar retaining nuts so they are hand tight (Fig. 8, B).
2. Holding the nose of the bar up, use the screwdriver to turn the
guide bar adjustment screw clockwise to tighten the chain (Fig. 8,
A). Turning the screw counterclockwise loosens the chain on the
guide bar.
3. While wearing heavy duty work gloves (after you've made the
adjustment), move the saw chain back and forth on the guide
bar to be sure the chain moves freely and is in proper mesh with
the sprocket. Never move the chain with your bare hands.
NOTE: If the chain is difficult to rotate or if it binds on the guide bar,
there is too much tension applied and it must be adjusted. To
decrease tension, turn the adjustment screw counterclockwise,
slowly. Move the chain back and forth until it moves freely.
4. Holding
thenoseinupperposition,
securely
tighten
thebar
retaining nuts.
CHAIN LUBRICATION
The pole saw chain is self-lubricating. Oil is dispersed onto the
chain as the unit is used. Keep an adequate amount of oil in the oil
tank. Use the bar-chain oil provided in the hardware pack. Always
use bar-chain and sprocket oil
or similar chain saw oil.
Oil Adjustment Screw
Setting the Oil Adjustment
Screw
The Oil Adjustment Screw is
located on top of the gearbox
assembly (Fig. 12).
1. insert a 3/32-inch Allen
wrench into the oil
Assembly
adjustment screw.
Fig. 12
2. Turn the screw
counterclockwise to increase oil flow to the chain.
3. Turn the screw clockwise to restrict the oil flow to the chain.
_
hole becomes clogged, or the chain fails to get proper
lubrication in any fashion, the chain will overheat and cause I
irreversible damage to the unit and may result in severe injury. I
WARNING:heat from
If the friction
oil tank can
runslead
out, the
the chain
oil adjustment
screw I
Excessive
to
catastrophically fail and come off the bar while operating.
GUIDE BAR MAINTENANCE
_
I
is disconnected (gas powerheads) before perform ng any
ARNING: onEnsure
that the unit is off and the spark plug I
maintenance
your saw.
NOTE:
Proper maintenance of the guide bar is essential to the
performance of your pole saw. Proper guide bar
maintenance will keep your saw in good working order.
Most guide bar problems can be prevented merely by keeping the
chain saw well maintained, incorrect filing and non-uniform cutter
and depth gauge settings cause most guide bar problems, primarily
resulting in uneven bar wear. As the bar wears unevenly, the rails
widen, which may cause chain clatter and difficulty in making
straight cuts. insufficient guide bar lubrication and operating the
saw with a chain that is too tight will contribute to rapid bar wear.
Refer to Saw Chain Tension Adjustment and Oiling the Chain. To
help minimize bar wear, the following guide bar maintenance is
recommended:
Bar Wear
Turn guide bar frequently at regular intervals (for example, after 5
hours of use), to ensure even
wear on top and bottom of
bar.
Bar Grooves
Bar grooves (or rails which
support and carry the chain)
should be cleaned if the saw
has been heavily used or if the
saw chain appears dirty. Rails
should always be cleaned
every time the saw chain is
removed.
Fig. 13
To clean guide bar rails:
1. Remove chain guard, bar, and chain. Refer to Saw Chain
Replacement / installation.
2,
Using a screwdriver, putty knife, wire brush or other similar
instrument, clear residue from the rails on the guide bar (Fig. 13).
This will keep the oil passages open to provide proper
lubrication to the bar and chain.
3.
Ensure the sprocket in the bar turns freely during cleaning.
NOTE: Oil passages at the bar pad should be cleaned to ensure
proper lubrication of the bar and chain during operation.
This should be done while the bar is removed for cleaning.
4. Onthebarpaduseasoft
wiresmallenough
to
insertintotheoil
discharge
hole,scrape
anysawdustordebri
away.
(Fig.14)
5. Reinstall
thebar,chain,
chainguard,
screw,
and
barretaining
nuts.Refer
toSawChain
Replacement
/
Breaking in a New Saw Chain
A new chain and bar will need readjustment after as few as 5 cuts. This
is normal during the break-in period, and the interval between future
adjustments will begin to lengthen quickly. Over a period of time,
however, the moving parts of the saw chain will become worn, resulting
in what is called chain stretch. This is normal. When it is no longer
possible to obtain correct chain tension adjustment, it is recommended
to purchase a replacement chain at Sears or other qualified service
dealer have this repair performed.
CLEANING
Fig. 14
m
Installation.
CHAIN MAINTENANCE
A
WARNING:
Unless you have experience and specialized
training for dealing with kickback (see Important Safety
Instructions), always use a low-kickback saw chain, which
significantly reduces the danger of kickback. Low-kickback saw
chain does not completely eliminate kickback. A low-kickback or
"safety chain," should never be regarded as total protection
against injury.
Always use a replacement saw chain designed as "low-kickback" or a
saw chain which meets the low-kickback performance. A standard saw
chain (a chain which does not have the kickback reducing guard links)
should only be used by an experienced professional chain saw operator.
Low-Kickback Saw Chain
WARNING:
_:_
I WARNING:
_3
Never remove, modify or make inoperativeany
safety device furnished with your unit. The low-kickback saw
chain is a major safety feature provided for your protection.
Never use a loop of chain that has more than
nks removed from t. Thscouddamagethesprocket.
• Slacken the chain if you have retensioned it at operating
temperature during cutting work.
• The chain contracts as it cools down. If it is not slackened, it may
damage the gearbox and bearings.
STO RAG E
Wait for the engine to cool down. Drain the oil tank and store the
machine in a dry place well away from sources of ignition until you
need it again.
• Attach the transport guard to the bar/chain before storing the unit.
• Store the unit in a dry, high and/or locked location, out of the
reach of children and other unauthorized persons.
LONG-TERM STORAGE
• Remove the saw chain and guide bar, clean them, and spray them
with corrosion inhibiting oil.
• Attach the transport guard to the bar/chain before storing.
WARNING:
Ensure that the unit is off and the spark plug
is disconnected (for gas powerheads) when working on the
saw chain. Wear heavy duty gloves too.
A low-kickback saw chain is a chain which has met the kickback
performance requirements of ANSI B175.1. Do not use other replacement
chain unless it has met these requirements for your specific model. By
keeping the saw chain in good working condition and correctly serviced
as recommended in this manual, you will be able to maintain the safety
system of your pole saw over the life of the product.
Chain Tension
Check the chain tension frequently and adjust as often as necessary
to keep the chain snug on the bar, but loose enough to be pulled
around by hand. Refer to Saw Chain Tension Adjustment.
Approximate Operating Weight of Attachment .....
3.3 Ibs. (1.5 kg)
Drive Shaft Length ........................
26 inches (66 cm)
Cutting Length ...........................
8 inches (20.3 cm)
*
All specifications are based on the latest product information
available at the time of printing. We reserve the right to make
changes at any time without notice.
on ma_agemy_i£eocom
° Find this and a[[ your other product manuals
° Get answers from our team of home experts.
online.
° Get a personalized maintenance plan for your home.
° Find information and tools to help with home projects.
.
. !{.
;°
brou_ht to you by Sears
8
J
- for f_ee[
Manual del Operador
MAN
Accesorio
de
CORTADORA
DE POSTE
Modelo No. 316.792460
,, SEGURIDAD
o MONTAJE
FUNCIONAMIENTO
MANTENIMIENTO
LISTADO DE PIEZAS
PRECAUCION: Lea el manual del
operador y siga todas las
advertencias
e instrucciones de
seguridad.
Sears Brands Management
Corporation,
Visite nuestro
769-07377 P00
Hoffman
Estates, IL 60179 U.S.A.
sitio web: www.craftsman.com
11/11
TINDICE DE CONTENIDOS
Normas para una operaci6n segura .......................
Garantia .............................................
Conozca su unidad ....................................
Instrucciones de montaje ...............................
Instrucciones de operaci6n ..............................
Instrucciones de mantenimiento ..........................
Cadena instalaci6n de remplazo ..........................
Lubricaci6n de la cadena ...............................
Limpieza y almacenamiento
.............................
Especificaciones
......................................
Lista de piezas .......................................
Servicio Numera ............................
10
12
13
13
14
15
15
16
16
16
23
Contraportada
Los simbolos de seguridad se utilizan para Ilamar su atenci6n sobre
posibles peligros. Los sfmbolos de seguridad y sus explicaciones merecen
toda su atenci6n y comprensi6n. Los sfmbolos de seguridad no elJminan
ningun peligro pot si mJsmos.Las instrucciones o advertencias que ofrecen
no substituyen las medidas adecuadas de prevenci6n de accidentes.
SIMBOLO
SIGNIFICADO
precauci6n.
atenci6n paraIndicapeligro,
evitar sufrir graves
lesiones
ALERTA Debe
DE prestar
SEGURIDAD:
advertenciao
personales. Puede ser utilizadojunto con otros dmbolos o flguras.
NOTA:
Todala informaci6n, las ilustracionesy las especificaciones contenidas en este
manual se basan en la informaci6nmb,sreciente dJsponibleen el momento de
impresi6n del manual. Nos reservamos el derecho de hacer cambios en
cualquier momento sin aviso previo.
Le ofrece informaci6n o instrucciones que son esenciales
para la operaci6n o mantenimiento del equipo.
PELIGRO: El no obedecer una advertencia de segurJdad
puede conducir a que usted u otras personas sultan graves
lesiones. Siga siempre las precauciones de seguridad para reducir
el riesgo de incendio, descarga electrica y lesJonespersonales.
ADVERTENOIA-"
El no seguir una advertencia de seguridad
puede conducir a que usted u otras personas sufran lesiones.
Siga siempre las precauciones de seguridad para reducir el
riesgo de incendio, descarga electrica y lesiones personales.
PRECAUCI()N:
El no seguir una advertencJade seguridad
puede conducir a da_o patrimonial o a que usted u otras
personas sufran lesionespersonales. Siga siempre las
precauciones de seguridad para reducJrel riesgo de incendio,
descarga electrica y lesJonespersonales.
Lea el manual del operador y siga todas las advertencias e instrucciones de seguridad. De no hacerlo, el operador y/o los espectadores
pueden sufrir graves lesiones.
• IMPORTANTE
LEA TODAS LAS INSTRUCCIONES
INFORMACION
ANTES DE LA OPERACION
ADVERTENCIA:
Se debe seguir lassiguientes reglas de
seguridad cuando use la unidad. Pot favor lea estas instrucciones
para su propia segurJdady las de los espectadores, antes de hacer
funcionar la unidad. Pot favor mantenga estas instrucciones en un
lugar seguro para uso futuro.
• Lea cuidadosamente y entienda el manual del operador de la
unidad que impulsa a este acople.
Lea este manualde instrucciones de funcionamientodetenidamente.
Familiar{cesecompletamente con los controlesy el uso apropiado del
equJpo.Sepa c6mo apagar la unidad y desactJvarlos controles con rapidez.
No opere esta unidad si estb, cansado, enfermo, o bajo los
efectos del alcohol, drogas o medicamentos.
Nunca permita que los ni_os manejen el equipo. Nunca permita que
los adultos usen la unidad cuando no esten familiarizados con las
instrucciones. Nunca permita que las personas adultas manejen el
equipo si no cuentan con las instrucciones apropiadas.
Se debe instalar adecuadamente todos los protectores y
dispositivos de seguridad antes de hacer funcionar la unidad.
PROCEDIMIENTOS PARA LA OPERACION DE SIERRAS DE CADENA
Mantenga retirados a los espectadores, especialmente a los nitros y
animales domesticos por Io menos a 15 m (50 ft) de distancia.
Use lentes o gafas de protecci6n que cumplan con las normas
ANSI Z87.1-1989, y protecci6n para sus oidos/audici6n mientras
opere esta unidad. Use siempre una mb,scara facial o para
protegerse contra el polvo si la operaci6n levanta polvo.
Use pantalones largos y gruesos, botas, guantes y camisa de manga
larga. No use ropa holgada, alhajas, pantalones cortos, sandalias ni
este descalzo. Sostenga el cabello sobre el nivel de los hombros.
Use la unidad s61o con luz diurna o con buena luz artificial.
Use la herramienta correcta. Use esta herramienta s61o para el
trabajo para el que fue diser_ada.
Pare siempre la unidad cuando posponga el trabajo o mientras
camine entre diferentes zonas de corte.
Use s61opiezas y accesorJos de repuesto genuinos de fb,brJca para esta
unidad. Puede obtenerlos en su proveedor de servicio autorizado. El
uso de piezas o accesorios no autorizados puede causar lesiones
graves al usuario o dano a la unidad, y la cancelaci6n de su garant{a.
10
DE SEGURIDAD
•
PROTEJASE CONTRA EL CONTRAGOLPE
i
i
i
i
i
i
i
i
i
i
i
i
i
i
i
i
i
i
i
i
i
[
o
ADVERTENCIA:
El contragolpe puede ocurrir cuando la
narizo la punta de la barra guia toca un objeto, o cuando la madera
se cierra y pellizca la sierra de cadena cuando esta cortando. Si la
punta de la barra hace contacto, puede causar un a reacci6n
reversivarelb,mpago,pateando la barragu{a hacia arriba y atrb,sen
direcci6n del operado. Pellizcando la sierrade cadena a Io largo de
labarra guia pude empujar la barra rb,pidamentehacia atrb,sen
direcci6n el operador. Cualquierade estas reacciones puede causar
que usted pierdael control de lasierra,Io cual puede resultar en
serias lesionespersonales. No dependa exclusivamente de los
dispositivos de seguridad Jntegrados
en su sierra.Como usuario de
sierra de cadena, usted debe dar varios pasos para queen sus
trabajos de corte no ocurran accidentes ni lesiones.
Con una comprensi6n bb,sica del contragolpe, usted puede
reducir o eliminar el elemento de sorpresa, la sorpresa repentina
contribuye a los accidentes.
Agarre el recortador firmemente. Sujete firmemente con ambas
manos la sierra de pertiga/recortador cuando el motor este
funcionando. Mantenga una mano en el agarre y la otra en la manija.
No permita que la nariz de la barra guia tenga contacto con un
tronco, rama, el suelo u otra obstrucci6n.
Corte a altas velocidades del motor.
No sobrepase su alcance.
Utilice solamente barras y cadenas espcificadas pot su fabricante
o el equivalente.
OTRAS PRECAUCIONES DE SEGURIDAD
iNO opere la sierra de cadena con una mano! Serias lesiones al
operador, ayudantes, espectadores, o cualquier combinaci6n de
estas personas puede resultar por la operaci6n con una mano. La
sierra esta destinada para el uso con dos manos.
No opere la sierra de cadena cuando este cansado.
No se vista con ropa suelta o joyeria ya que pueden ser atrapadas
pot las partes en movimiento. Ligas o calzado contra el resbalo son
recomendados cuando trabaje al aire libre. Utilice cubiertas
protectivas para cabello para sostener el cabello largo.
Utilice lentes de precauci6n, ropa entallada, calzado de precauci6n,
guantes de protecci6n, y equipo de protecci6n para oidos y cabeza.
• Areas
detrabajo
sucias
inducen
lesiones.
Noempiece
acortar
hasta • Esta
sierra
decadena
conmotor
fueclasificada
porlaCSA
como
una
quenotenga
unArea
detrabajo
limpia,
seencuentre
seguramente
sierra
declase
2C.Yfuedestinada
para
elusoinfrecuente
pordue_os
parado
yhayaplaneado
elsendero
deretirada
delarbolquecaer&
caseros,
excursionistas,
jounaleros.
Para
aplicaciones
generales
tales
Estealerta.
Fijese
Ioqueestehaciendo.
Utilice
elsentido
comOn.
No
como
elIJmpiado,
podado,
cortado
delenapara
chimenea,
etc.Nofue
opere
lasierra
cuando
seencuentre
fatigado.
Mantenga
todaslas
dise_ada
para
unusoprolongado.
Sielusodestinado
envuelve
eluso
partes
desucuerpo
alejadas
delasierra
decadena
cuando
elmotor
prolongado
delosperiodos
deoperaci6n,
estopuede
causar
problemas
circulatorios
enlasmanos
delusuario
debido
alavibraci6n.
Puede
ser
seencuentra
enoperaci6n.
Antesdearrancar
lasierra,
asegurese
de
quelacadena
delasierranoestehaciendo
contacto
connada.
apropJado
elutilizar
lasierra
teniendo
unmecanJsmo
deanti-vibrado.
• Desconecte
lasierradecadena
cuando
noseencuentre
enuso,
NUNCA
REMUEVA,
modifique
ohagainoperativo
cualquiera
de
antesdecadaservicio,
ycuando
cambie
accesorios
y
losmecanismos
deseguridad
construidos
ensuunidad.
aditamentos
talescomolacadena
delasierrayelresguardo.
Ropas
deseguridad
sonrequeridas
porsusorganizaciones
de
Antesdecualquier
usodelasierra
decadena,
elresguardo
uotra
seguridad,
regulaciones
guber-namentales,
osuempleador
partequeseencuentre
da_ada
debera
setcuidadosamente
revisado deberan
serutilizadas;
deotramanera,
ropaentallada,
calzado
de
paradeterminar
sioperara
propiamente
yrealizara
lafuncion
parala
seguridad
y protecci6n
paramanos
y oidosdebera
serutilizada.
cualfuedise_ada.
Revise
etalineamiento
delaspartes
movibles,
y
Unacadena
para
sierra
decontragolpe
bajoesunacadena
queha
cualquier
otracondici6n
quepueda
afectar
laoperaci6n
correcta
de
cumplido
conlosrequerimientos
derendimiento
delcontragolpe
dela
launidad.
Unresguardo
ocualquier
otraparteda_ada
debera
ser
ANSI
B175.1-1991
yestadeacuerdo
conCSAZ62.3.
Noutilice
una
propiamente
reparada
oreemplazada
potuncentro
deservicio
cadena
derepuesto
diferente
amenos
queIlene
estosrequisitos
para
autorizado,
amenos
dequeelmanual
indique
otracosa.
sumodelo
particular.
Considere
elemedio
ambiente
delareadetrabajo.
Utiliceextrema
NousenJngOn
ottoadJtamento
oaccesorio
decorte.
Uses61o
repuestos
precauci6n
cuando
cortearbustos
pequedos,
aboles
jovenes,
yaccesorios
fabricante
delequipo
original,
loscuales
estb_n
dise_ados
dadoa quematerial
delgado
puede
setatrapado
potlasierray
especJalmente
para
mejorar
eldesempe_o
ymaximizar
laoperaci6n
azotado
endirecci6n
deusted,osacarlo
debalance.
segura
denuestros
productos.
Nohacerlo
asi,puede
producir
unpobre
Noopere
lasierra
enunarbolamenos
dequeusted
seencuentre
desempe_o
yposiblemente
alguna
lesi6n.
Uses61o
lacadena
ylabarra
especificamente
entrenado
parahacerlo.
Cuando
corteramas
que
quesesuministran
conesteproducto.
Nouseningun
otroaditamento
contengan
tensi6n,
estealerta
delresorteopara
queustednosea
decorte.
Elusodetales
aditamentos
anular_,
sugarant{a
defeabrica
y
golpeado
cuando
latensi6n
delafibras
delamadera
sealiberada.
puede
producir
alguna
lesi6n
seria
asucuerpo.
Nouselaunidad
bajolaIluvia.
Nolausedentrodelaguani
Nunca
toque
lacadena
nitratededarservJcio
alasierra
conelmotor
alrededor
deella.
encendido.
Cerci6rese
dequetodas
laspartes
m6viles
sehayan
Noexponga
lasierradecadena
enpresencia
deliquidos
ogases
detenido.
Dejeenfriar
lasierra,
yaquelacadena
pudiera
estar
caliente.
flamables.
Inspeccione
labarray lacadena
aintervalos
frecuentes
parael
Todoelservicio
delasierradecadena,
ottoquelosarticulos
listados
ajustedebido.
Cerci6rese
dequelabarray lacadena
esten
enlasinstrucciones
deseguridad
ymantenimiento
enelmanual
del
debidamente
apretadas
y afiladas.
Verifique
visualmente
queno
usuario,
deberan
serejecutadas
porunpersonal
deservicio
de
estenaveriadas.
Repare
cualquier
averiaantesdearrancar
ode
sierras
decadena
competente.
Nointente
reparla
ustedmismo;
nose
operardenuevolasierradecadena.
Nocortecableselectricos
nieltendidoelectrico.
encuentran
piezas
deservicio
paraelusuario
adentro
delasierra.
Cuando
noseencuentre
enuso,lasierradecadena
debera
ser
Nouselasierradepostesparatumbar
unarbol.Useunasierra
almacenada
fueradelalcance
delosni_os,enunlugarseco,
decadena
estandar
paraestatarea.
MANTENIMIENTO
YALMAOENAMIENTO
elevado,
y asegurado.
Noforcelasierra
decadena.
Lasierra
decadena
realizara
untrabajo
mejor
Espere
queelmotorseenfrieantesdeguardar
o transportar
la
ymasseguro
cuando
seutilice
aelpromedio
para
elcual
ruedise_ada.
unidad.
AsegOrese
dequelaunidad
estesegura
altransportarla.
Utilice
laherramienta
adecuada.
Cortesolamente
madera.
Noutilice
Usesiempre
elprotector
paratransporte
enlabarray lacadena
lasierra
decadena
parapropositos
paraloscuales
nofuedise_ada. durante
eltransporte
y elalmacenamiento.
Proejemplo,
noutilicelasierra
decadena
paracortarplasticos,
Guarde
launidad
bajoIlave
enunlugar
adecuado
ysecopara
evitar
el
mamposteria,
omateriales
quenoseanparalaconstrucci6n.
usoporpersonas
noautorizadas
yda_os,
lejosdelalcance
delosnHos.
Utilice
mecanismos
tales
como
cadenas
decontragolpe
bajo,
protectores Nunca
moje
nirocie
launidad
conagua
niconningOn
otroliquido.
para
lanariz
delabarra
guia,
chain
brakes
ybarras
guias
especiales,
los
Mantenga
lasmanijas
secas,
limpias
ysinresiduos.
Limpie
launidad
cuales
reducen
lospelJgros
relacionados
conelcontragolpe.
luego
decada
uso,lealasinstrucciones
deLimpieza
yAlmacenamiento.
Noexisten
otroscomponents
derepuesto
paraIograrprotecci6n
Guarde
estasinstrucciones.
ConsOltelas
confrecuencia
y
delcontragolpe
deacuerdo
conCSAZ62.3.
utilicelas
paraense_ar
aotrosusuarios.
Silepresta
estaunidad
a
NOoperelasierradecadena
cuando
esteda_ada,
alguien,
prestele
tambien
estasinstrucciones.
impropiamente
ajustada,
o nosegura
y completamente
Cualquier
reparaci6n
o procedimientos
demantenimiento
queno
ensamblada.
AsegOrese
deuelacadena
delasierradejede
estendescritos
enestemanual
debenserhechos
Onicamente
pot
moverse
cuando
elgatillodeestrangulaci6n
sealiberado.
personal
calificado.
NOintente
hacer
operaciones
mb_s
allb_
desucapacidad
oexperiencia.
GUARDEESTASINSTRUOOIONES
11
• SIMBOLOSDE SEGURIDAD E INTERNACIONALES
•
Este manual del operador describe los simbolos y figuras de seguridad e internacionales que pueden aparecer en este producto. Lea el
manual del operador para obtener informaci6n completa acerca de la seguridad, ensamble, operaci6n y mantenimiento y reparaci6n.
SIMBOLO
SIGNIFICADO
SIMBOLO
hd Oa
pe gr01
advertencia
_
ADVERTENCJA:
Debe evitarse el contacto de la punta
de
la
barra
de
gu[a
con
cualquier
objeto.
• AVISO SOBRE LA BARRA DE
GUiAEl contacto con la
'* SIMBOLO DEALERTADE SEGURIDAD
I uti!izad0 Junto con otros s!mb0!0s o figuras,
• LEA EL MANUAL DEL OPERADOR
_f}_ ,, ,
ADVERTENCIA:
Lea el manual del 0perad0r y Siga
todas !as advertencias e instrucciones de seguddad. De
no hacerlo, el operador y/o los espectadores pueden
sufrir graves lesiones.
repentinamente hacia arriba y hacia atrbs, Io cual pudiera
punta pudiera hacer qua la barra de guia se mueva
provocar es ones graves.
' USE
AMBAS ambas
MANOSmanos al operar la sierra de
Use siempre
,_
CABEZA
ADVERTENCIA:
, USE PROTECCION
SIGNIFICADO
cadena. Nunca opere la sierra con una sola mano.
Losobjetos arrojadoSP0r la unidad y
OCULAR, AUDITIVA Y EN SU
p6rdida auditiva. Utilice protecci6n ocular que curnpla con las
el
ruido fuerte
pueden causar
graves lesiones
Ocularesy
normas
ANSI Z87.1-!989
y protecci6n
auditiva
cuando
opere esta unidad.Los objetos que caen pueden causar
graves !esiones en su cabeza. Use protecci6n en su cabeza
mientras opere esta unidad, Use una careta completa
cuando la necesite.
_d
,
' SUPERFICIEADVERTENCIA:CALIENTNo
E
est6
toque una superficie que
caliente. Puede quemarse. Estas partes se calientan mucho
con el uso. Luego de apagarse permanecen calientes
durante un corto tiempo.
,, MANTENGA ALEJADOS
A LOS ESPECTADORES
ADVERTENCIA:
•
La cadena debe estar cubierta continuamente con aceite
,Dpara
NDICADOR
DE AJUSTE
DEL ACEITE
DE de
LA ajustar
CADENA
que funcione
correctamente
AsegOrese
el
tomillo de ajuste de aceite para permitir que fluya
continuamente una cantidad de aceite suficiente hacia la
Caden&
Utilice una ilaveAllen de 3/32 de puigada para ajustar ei
tornillo de ajuste de aceite.
GARANTiA
Mantenga retirados a los
espectadores, especialmente a los niSos y animales
dom_sticos por Io menos a 15 m (50 ft) de distancia.
• LAS LJNEAS DE CORRIENTE ELC:CTRICA PUEDEN
OCASIONAR LESION ES GRAVES
ADVERTENCIA:
No opere la unidad cerca de lineas de
corriente el@trica. El contacto con una I[neade corriente
el@trica puede ocasionar lesionesgraves o daSarla unidad.
Mantenga una separaci6n de al menos 50 pies (15 metros)
entre la sierra de p6rtiga (incluyendo cualquier rama con la
que este en contacto) y cualquier I[neade corriente electrica.
TOTAL POR DOS AltOS CRAFTSMAN
Este producto se garantiza P©R DOS ANOS a partir de la fecha de compra, contra cualquier defecto de materiales o mano de obra. Un
producto defectuoso sera sustituido sin cargo alguno.
Para conocer los detalles de la cobertura a fin de obtener el reemplazo gratuito, visite el sitio web: www.craftsman.com
Esta garantia no cubre la barra o cadena, que son piezas consumibles que se desgastan debido al uso normal dentro del periodo de garantia.
Esta garantia se anula si el producto en algOn memento se utiliza para prestar servicios comerciales o se alquila a otra persona.
Esta garantia le confiere a usted derechos legales especificos y usted puede tener, ademas, otros derechos que difieren de un estado a otto.
Sears Brands Management Corporation, Hoffman Estates, IL 60179
12
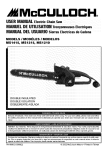
Quitar el Accesorio
Protector de transporte
del cadena
Punta de guia
Guia de
de barra
barra_
Tuerca sujeta dora de barra
//
1.
Ensamble
ooo,o
2.
Protector
Cubierta del
engrane
de
_
Acoplador de
Craftsman
Convertible TM
2.
Tanque del aceite
COMO LLENAR EL TANQUE DE ACEITE
1.
2.
3.
_
]
_
5.
Coloque la unidad en una superficie plana.
Quite la tapa del tanque de aceite.
Abra la botella de aceite que se proporciona con la unidad.
de aceite para lubricar la cadena. Revise el nivel de aceite
constantemente para que no descienda por debajo de la mitad
DVERTENCIA:
El aceite fluye constantemente del tanque
del tanque.
INSTALAR/QUITAR
[_
4.
irreparables a la unidad. AsegQrese de que el tanque de aceite
ELIGRO:
No Ilenarel tanquede aceite ocasionar& danos |
est6
siempre Ileno
4. Vierta aceite en el tanque hasta que este Ileno
NOTA: El tanque de aceite se puede Ilenar hasta el borde de la
abertura de Ilenado sin da_ar la unidad.
EL AOOESORIO
operador
DVERTENCIA:
de los accesorios
Lea y comprenda
antes de sueloperaci6n.
manual del
El accesorio se puede montar en diferentes herramientas motorizadas.
Los manuales de instruccbn para la herramienta motorizada bb,sica y los
accesorios contienen la informaci6n necesaria para la operacbn de la
combinacbn de herramientas motorizadas. Pot Io tanto, lea siempre
AMBOS manuales de instruccbn antes de usar la herramienta
motorizada pot primera vez. Guarde los manuales en un lugar seguro
para consultas futuras.
NOTA: Para facilitar la instalaci6n o remoci6n de los accesorios,
ponga la unidad sobre el suelo o sobre un banco de trabajo.
Hueco de Guia
Fig. 1
y dados a la unidad, NUNCA instale mas de un brazo de
DVERTENClA:
Para evitarmotorizada.
lesiones personales graves
extensi6n
en una herramienta
o la
Orificio primario
Quite el colgador o el tapa
para transporte de encima -I=-,.._.
\
\
de la cubierta del eje.
_
Apriete el bot6n girandolo
"--4LI
-==_[::__
"'t I _'4.,, ""
3.
Tapa para
transporte
Siga los pasos siguientes para Ilenar el tanque de aceite:
__
hacia la derecha (Fig. 3). v__"___,
A la vez que sostiene
Cubierta superior
Cubierta inferior
firmemente el accesorio,
del eje
del eje
empOjelo derecho hacia
el interior del acoplador
Fig. 2
Convertible TM hasta que
el bot6n de desconexi6n
encaje s61idamente en el
orificio principal (Fig. 2).
NOTA: La alineaci6n del
bot6n de
desconexi6n con la
guia ayuda en la
instalaci6n (Fig. 1).
Bot6n
de
ajuste de aceite
_
Acoplador_,
\
Brazo de extension
Tornillo
Bot6n de desconexi6n
TM
Oprima y sostenga
oprimido el bot6n de
liberaci6n (Fig. 1).
(Fig.
3). sostiene con
Mientras
firmeza el bastidor del eje
superior, tire del accesorio
de jardin hacia afuera del
acoplador (Fig. 2).
InstaJar el Accesorio
Extensi6n
1.
tension
Para aflojarlo, gire el bot6n
en el sentido opuesto al de Convertible
las manecillas del reloj
3.
_/_
_'
apague
la unidad antesPara
de sacar
o instalar
accesorios.
DVERTENClA:
evitar graves
lesiones
personales,
,._C;'a:a"°
_,_
Tapon de
tanque
aceite
_L_
o la Extensi6n
_
Apriete el bot6n girandolo
hacia la derecha (Fig. 3).
Fig. 3
RECAUCl6N:
Trabe
el bot6nde
deoperar
desconexi6n
en el orificio
primario
y ajuste bien la
perillaantes
esta unidad.
Repita los pasos 1-4 para los siguientes accesorios o de la
extensi6n.
con el sistema EZ-Link TM deben set usados en el orificio
primario a menos que se indique Io contrario en el manual
delRECAUCION:
operador del accesorio.
El usar
orificio
incorrecto
El accesorio
de el
corte
y los
accesorios
puede conducir a lesiones personales o da5o de la unidad.
El accesorio debera instalarse con el bot6n de desconexi6n en el
orificio primario.
Inspeccione el acoplamiento
del eje acodado antes de usar la
unidad
1.
2.
3.
Arranque la unidad.
Enganche y suelte el gatillo brevemente.
Verifique que el accesorio este funcionando.
4.
Si el accesorio no estb, funcionando, retire el accesorio y repita
los pasos para su instalaci6n.
Vuelva a verificar el funcionamiento del accesorio.
5.
13
PRECAUCIONES
INSTRUCCIONES
DE CORTE
el riesgo de lesiones cuando opere esta unidad. No use
ropa holgada ni alhajas. Use protecci6n ocular y auditiva.
Use pantalones largosVista
y gruesos,
y guantes.
use
ADVERTENCIA:
en formabotas
adecuada
para No
reducir
pantalones cortos, sandalias ni trabaje descalzo.
lesiones pot quemaduras, arranque al motor al menos a 30
pies
(9.1 metros) del sitio
aprovisionamiento
DVERTENCIA:
Para de
disminuir
el riesgo de de
inoendio y
combustible, en exteriores solamente.
_
1.
Mantenga a espectadores 15 metros (50 pies) lejos cuando este
operando la herramienta.
2.
No use la motosierra
telescopica para
derrumbar arboles. Use
para esto la motosierra sin
el aditamento telescopico.
3. AsegOrese de que el
tanque de aceite este
Ileno y de que el aceite
este lubricando la cadena
antes de arrancar.
Fig. 4
4. Agarre firmemente la sierra
de pertiga / recortador -una mano en el agarre, la
otra en la manija.
5.
Mantenga su dedo lejos
del gatillo interruptor
hasta estar listo para
hacer el corte.
6. Antes de encender su
motosierra telescopica,
Fig. 5
aseg-urese que la cadena
de corte no esta tocando
nada.
7. Mantenga todas las
partes del cuerpo alejadas
de la cadena de corte
cuando su motosierra
este en funcionamiento.
8. No force la motosierra
cuando este cortando.
Aplique una presion lijera.
Fig. 6
Hara el trabajo mejor y
mas seguro.
9.
Cuando este cortando ramas que se encuentren bajo tension, use
extrema precaucion. Este a(erta a el resorteo de (as ramas. Cuando
(a rama se (ibere, esta pudiera regresarse intempestJvamente y
golpear al operador causandole severas lesiones o hasta (a muerte.
10. Cuando transporte la motosierra telescopica de un lugar aotro:
• mantenga el tubo en posicion balanceada cerca de (a unidad de poder
mantenga la barra guia y la cadena hacia atras
11. No corte maleza o arbustos con la motosierra telescopic& Las
ramas de(gadas de (a maleza o arbustos pudieran enrredarse en (a
unJdadde corte y pudieran regresarse intempestivamente hacia
usted causando(e (esiones o (a posiNidad de que pierda el balance.
12. Nunca se pare directamente pot debajo de la rama que esta
podando. Siempre posicionese fuera de la trayectoria de caida
de dichas ramas (Fig. 4).
13. Nunca se pare en una escalera o otto tipo de soporte inestable
cuando utilice la motosierra telescopica.
14. Siempre use ambas manos al operar su motosierra
telescopica. Mantenga una presion firme y constante en la
motosierra telescopica mientras este cortando pero no trate de
forzar la sierra a traves de la madera.
Arranque y opere su sierra de pertiga sin ayuda. Para conocer instrucciones
precisas para el arranque, vea la secci6n adecuada de su manual del motor.
Los metodos de arranque adecuados reducen el riesgo de lesiones.
1. Coloque la sierra de pertiga en tierra firme u otra superficie
s61ida en un area abierta.
2. Mantenga buen equilibrio y los pies firmes en el suelo.
SUGERENCIAS DE OPERACION
ADVERTENCIA:
El contragolpe puede ocurrir cuando la
nariz o la punta de la barra gu(a toca un objeto, o cuando la
madera se cierra y pellizca la sierra de cadena cuando esta
cortando. Si la punta de la barra hace contacto, puede causar un
a reacci6n reversiva reiampago, pateando la barra gu(a hacia
arriba y atras en direcci6n del operado. Pellizcando la sierra de
cadena a Io largo de la barra gu[a pude empujar la barra
rapidamente hacia atras en direcci6n el operador. Cualquiera de
estas reacciones puede causar que usted pierda el control de la
sierra, Io cual puede resultar en serias lesiones personales.
No dependa exclusivamente de los dispositJvos de seguridad
integrados en su sierra. Como usuario de sierra de cadena, usted
debe dar varios pasos para queen sus trabajos de corte no
ocurran accidentes ni lesiones.
\
-_L_
ADVERTENCiA:
ramas de mas de 10 cm
No (4
usepulg.)
la sierra
de diametro.
de poste para cortar
15. Mantenga a las otras personas alejadas de la zona de corte y
de la motosierra telescopica (Fig. 5).
16. No utilice su motosierra telescopica cerca de cables, cables
electricos, o lineas telefonicas. Mantenga una minima distancia
de 3 metros (10 pies) de cualquier cable electrico (Fig. 6).
14
DE ARRANQUE
Evite el efecto de reculado. Este efecto de reculado pudiera
causar graves lesiones o la muerte.
No opere la unidad mientras este sobre un arbol, en una escalera
o cualquier otra superficie inestable, o en una posicion incomoda.
Pudiera perder el control de la unidad causando graves lesiones.
No extienda sus brazos mas alia de sus hombros cuando use la unidad.
Solicite ayuda profesional si ve que el trabajo que necesita hacer
esta fuera de sus posibilidades.
Podar un arbol es el proceso de cortar las ramas de un arbol vivo.
Asegurese que esta bien parado. Mantenga sus pies separados,
Divida su peso en los dos pies.
Antes de arrancar la unidad, revise siempre la lubricaci6n de la
cadena y el nivel del tanque de aceite.
NOTA: La cadena debe estar cubierta continuamente con aceite
para que funcione correctamente. AsegQrese de que el
tornillo de ajuste de aceite este ajustado correctamente.
Para cortar una rama (podar}:
ADVERTENClA:
,mL
1.
2.
3.
j
4.
si se acaba el aceite en el tanque, el orificio
del tornillo de ajuste de aceite queda obstruido, o lacadena no
recibe lubricaci6n adecuada por algun motivo, la cadena se
recalentaray ocasionara daSos irreversibles a la unidad y pudiera
ocasionar lesiones graves. El calor excesivo debido a la fricci6n
puede ocasionar unafalla catastr6fica de la cadenay hacer que se
salga de la barra mientras esta funcionando.
Hacer el primer corte a unas 6 pulgadas de el tronco pot
debajo de la rama. Use la parte superior de la barra para hacer
este corte. Corte 1/3 de diametro de la rama (Fig 7).
Mueva dos o cuatro pulgadas fuera de la rama. Hacer un
segundo corte desde ariiba de la rama. Continue el corte hasta
terminar de cortar la rama.
Corte 15.2crn
Corte 2
Hacer el tercer corte Io
4\
(6 in) ,_
mas cercano al tronco, y
lateralmente a a la
rama.Use la parte
superior para hacer este
corte. Corte 1/3 dentro
del diametro de la rama.
Hacer el cuarto corte
3
directament sobre tercer
\-_
corte. Corte hacia abajo
Fig. 7
para Ilegar al tercer corte.
Esto removera la rama.
CADENA
INSTALAClON
DE REMPLAZO
I_
para protegerse contra los eslabones de cortado filosos
Asta vio cadena y barra son articulos gastables, no cubrieron pot la
garantfa del producto. Cadena del reemplazo o la barra estan disponibles
para la compra por partes de Quemaduras y reparan.
1. Valiendose de un destornillador de ranura recta, gire el tornillo de
ajuste de tensi6n en
Cubierta del
sentido antihorario (Fig. 8,
[]
_engrane
B) tan lejos como Ilegue o
hasta el final de su
recorrido, despues saque la
cadena y retire la barra.
2.
Usando un destornillador
de cabeza plana, gire el
tornillo de ajuste de
To
de barra
tensi6n 4 vueltas hacia la ajuste de tension
izquierda (Fig. 8, A).
Fig. 8
3.
Quite la cadenay la barra.
4.
Prepare la cadena y/o barra
nueva, e instale la cadena
en la ranura de la barra.
5.
Enlace la cadena de la
sierra sobre el pi56n de
mando con los bordes
cortantes de la cadena
apuntando en la direcci6n
de rotaci6n (Fig. 9).
Fig. 9
Ajuste el tornillo de ajuste
de tensi6n (Fig. 8, A) para
permitir la inserci6n de la
barra (Fig. 10). Cerci6rese
._._
_
de que la cadena sigue la
ranura en la barra de guia
y ajuste el tornillo de
ajuste de tensi6n para
apretar la cadena.
7. Instale la cubierta del
pi_6n y apriete las
Fig. 10
tuercas y el tornillo para
fijar la barra (Fig. 8, B).
AJUSTE DE LA TENSION DE LA CADENA DE LA SIERRA
6.
l_1
muy APRETADA,la barra, cadena y los rodamientos del cigueSal
se desgastaran mb,s rb_pidamente.Estudie la Figura 11 para
informaci6n respecto a latensi6n frfa correcta (A),tensi6n caliente
correcta
(B),y como una
gu{a
para cuando
la cadena
la sierra
RECAUCION:
Si la
cadena
se encuentra
muy de
SUELTAo
requieraalgun ajuste (C).
Una tensi6n propia de la cadena de la sierra es extremadamente
importante y debe de ser revisada antes de arrancar la sierra, al igual
que durante cualquier operaci6n de cortado. El tomar tiempo para
hacer los ajustes necesarios para la sierra de cadena resultara en un
mejor rendimiento y una vida prolongada para su sierra de cadena.
NOTA: Una cadena y barra nueva requeriran un reajuste despues de por
Io menos 5 cortes. Esto es normal dentro del periodo de
acondicionamiento, y el intervalo dentro de los proxim6s ajustes
se alagara pronto (Fig. 11).
Para ajustar tension de la
cadena de corte:
1.
2.
3.
_ADVERTENClA:
Utilice
guantes de trabajo pesado
cuando maneje la sierra
de cadena.
Afloje lastuercas
retenedoras de la barra de
tal forma que esten
apretadas a mano (Fig. 8, I3).
Manteniendo la nariz de la
brra hacia arriba, utilice el
desarmador para girar el
tornillo de ajuste de la barra
guia a favor de las
manecillas del reloj para apretar la cadena (Fig. 8, A). Girando eltornillo
en contra de las manecillas del reloj afloja la cadena de la barra guia.
Despues del ajuste y usando guantes gruesos, mueva la cadena de
corte hacia atras y hacia adelante para asegurarse que lacadena se
mueve libremente y esta colocada correctamente en el engrane. No
mueva cadena con manos descubiertas.
NOTA:
Si la cadena muestra dificultad de movimiento, significa que
demasiada tension se le ha dado a la cadena y debera de
ser reajustada. Para reducir tension, gire el tornillo de ajuste
contra las manecillas el reloj lentamente. Mueva la cadena
hacia atras y hacia adelante hasta que se mueva libremente.
4. Manteniendo la nariz en posicion hacia arriba, apriete bienl a
tuerca de la barra.
LUBRICACION DE LA CADENA
La cadena de la sierra de poste se lubrica automaticamente. El
aceite se riega pot la cadena a medida que se usa la unidad.
Mantenga una cantidad adecuada de aceite en el tanque de aceite.
Use el aceite de cadena-barra que se proporciona en el paquete de
ferreteria. Use siempre el aceite de cadena-barra y pir_6n o un
aceite similar de sierra de cadena.
C6mo ajustar el tornillo
de ajuste de aceite
El tornillo de ajuste de aceite
Tornillo de ajuste
esta ubicado en la parte
aceite
superior del conjunto de la
caja de engranajes (Fig. 12).
1. Inserte una Ilave Allen de
3/32 de pulgada en el
tornillo de ajuste de
aceite.
Caja de
2. Gire el tornillo hacia la
engranajes
izquierda (en sentido
Fig. 12
antihorario) para
aumentar el flujo de aceite hacia la cadena.
3.
Gire el tornillo hacia la derecha (en sentido horario) para
restringir el flujo de aceite hacia la cadena.
ADVERTENClA:
,mL
si se acaba el aceite en eltanque, el orificio
del tornillo de ajuste de aceite queda obstruido, o la cadena no
recibe lubricaci6n adecuada por algun motivo, la cadena se
recalentar&y ocasionar& da_os irreversiblesa la unidad y pudiera
ocasionar lesionesgraves. El calor excesivo debido a lafricci6n
puede ocasionar una falla catastr6fica de la cadena y hacer que se
salga de la barra mientras esta funcionando.
MANTENIMIENTO
I_
NOTA:
DE LA BARRA GUIA
apagada y que la bujia este desconectada
(de gasolina)
_ADVERTENCIA:
Cerci6rese de
que de
la unidad
este
antes de realizar mantenimiento
alguno
su sierra.
Un propio mantenimiento de la barra guia, como se explica
en esta secci6n, es esencial para mantener su sierra en
buenas condiciones de servicio.
La mayoria de los problemas de la barra guia puede ser prevenidos
simplemente conservando la sierra de cadena bien mantenida. Un
Ilenado incorrecto y unos eslabones de cortado y ajuste en la
medida de profundidad no uniformes son la causa de la mayoria de
los problemas de la barra guia, resultando primeramente en un
desgaste desproporcionado de la barra. AI tiempo que le barra se
desgasta desproporcionalmente,
los rieles se agrandan, Io cual
puede causar estruendo en la cadena y difficultad al hacer cortes
derechos. Una insuficiente lubricaci6n de la barra guia y operaci6n
de la sierra con la cadena demasiado apretada contribuirb, a un
desgaste r_,pido de la barra. Vea la secci6n Ajuste de la Tension de
la Cadena de la Sierra. Para ayudar a minimizar el desgaste de la
barra, los siguientes procedimientos de mantenimiento para la barra
guia son recomendados.
Desgaste de la Barra
De vuelta a la barra guia frecuentemente a intervalos regulares (por
ejemplo, despues de cada 5 horas de uso), para aseguararse de un
desgaste parejo en la parte superior e inferior de la barra.
Fig. 11
15
Ranuras
delaBarra
Lasranuras
delabarra(o
rielesquesoportan
y
conducen
lacadena)
deber_.n
serlimpiados
si lasierraha
sidoutilizado
paraservicio
pesado
osi lasierra
manifiesta
suciedad.
Los
rielesdebendeserlimpiados
cadavezquelacadena
dela
sierraesremovida.
TENSION
Fig. 13
Para limpiar los rieles de la barra:
1. Remueva la cubierta del pir_6n, la barra y cadena. Vea la
Secci6n Ajuste de la Tension de la Cadena de la Sierra.
2.
Utilizando un desarmador, navaja, cepillo de alambre o
cualquier otto instrumento similar, limpie residous de los rieles
de la barra guia. Esto mantendra los pasajes abiertos para
proveer una lubricaci6n adecuada a la barra y cadena (Fig. 13).
3.
AsegOrese de que la rueda dentada en la barra gire libremente
durante la limpieza.
NOTA: Se deben limpiar los conductos de aceite en la almohadilla
de la barra para
garantizar que la
barra y la cadena se
lubriquen de manera
adecuada durante el
funcionamiento. Esto
debe hacerse
mientras se saca la
barra para limpiarse.
4.
En la almohadilla de la
Fig. 14
barra, utilice un alambre
blando Io suficientemente pequer_o para insertarlo en el orificio de
descarga de aceite y limpiar el aserrin y la suciedad. (Fig. 14)
5.
Reinstale la barra, cadena y las tuercas retenedoras de la barra.
Vea la secci6n Ajuste de la Tension de la Cadena de la Sierra.
MANTENIMIENTO DE LA CADENA
DE LA SIERRA
Revise la tensi6n frecuentemente y ajustela tan pronto como se
necesite para mantener la cadena ajustada a la barra, pero Io
suficientemente suelta para ser jalada con la mano. Vea la secci6n
Ajuste de la Tension de la Cadena de la Sierra
Acondicionarniento
en una Cadena para Sierra Nueva
Una barra y cadena nueva requeriran un reajuste despues de tan
pocos como 5 cortes. Esto es normal dentro del periodo de
acondicionamiento,
y los intervalos dentro de los pr6ximos ajustes
se alagaran r_.pidamente. Sobre un periodo de tiempo, de cualquier
manera, las partes movibles de la sierra se gastara.n, dando como
resultado Io que es Ilamado alargmiento de la cadena. Esto es
normal. Cuando es ya no posible obtener el ajuste correcto de la
tensi6n de cadena, es recomendado para comprar una cadena del
reemplazo en Sears u otto comerciante calificado del servicio tiene
esta reparaci6n realizada.
LIMPIEZA Y ALMACENAMIENTO
__
_
,_
_
I ADVERTENCIA:
Nunca tenga mas de 3 eslabones
remov dos de haro de la sierra. Esto puede causar daSo al pi56n.
• Afloje la cadena si la ha tensionado a la temperatura de operaci6n
durante el trabajo de corte.
• La cadena se contrae a medida que se enfria. Si no se afloja,
pudiera dar_ar la caja de engranajes y los cojinetes.
C6mo almacenar la rn_quina durante un periodo corto
Espere que el motor se enfrie. Drene el tanque de combustible y
almacene la maquina en un lugar seco alejada de fuentes de
ignici6n hasta que la necesite de nuevo.
• Coloque el protector para transporte en la barra/cadena antes de
almacenar la unidad.
Almacene la unidad en un lugar seco, alto y/o cerrado, lejos del
alcance de ni_os y otras personas no autorizadas.
AImacenamiento
a largo plazo
• Quite la cadena y la barra de guia de la sierra, limpielas y rocielas
con aceite para evitar la corrosi6n.
Coloque el protector para transporte en la barra/cadena antes de
almacenar la unidad.
ADVERTENCIA:
A menos de que usted tenga experiencia
y entrenamiento especializado para tratar con el contragolpe
(vea las Precaucions de Seguridad), siempre utlice una cadena
para sierra de contragolpe bajo, la cual reduce
significativamente el peligro de un contragolpe. Una cadena de
contragolpe bajo o "cadena de precaucion" nunca deber_, ser
referida como protecci6n total contra una lesi6n.
Utilice siempre una cadena de sierra de repuesto diser_ada con la
caracteristica de "bajo contragolpe" o una cadena de sierra que
cumpla con los requisitos de rendimiento de bajo conttragolpe Una
cadena de sierra est_,ndar (una cadena que no tenga los eslabones
del protector contragolpes) solamente debera ser usada por un
operador profesional experimentado en sierras de cadenas.
Cadena de Contragolpe
Bajo
Una cadena de contragolpe bajo es una cadena la cual ha cumplido
los requerimientos de rendimiento del contragolpe de la ANSI
B175.1. No utilice una cadena de repuesto diferente a menos que
Ilene estos requisitos para su modelo particular. Mediante el
mantenimiento della cadena de la sierra en buenas condicions de
trabajo y dandole servicio correctamente como se recomienda en
este manual, usted podra mantener el sistema de precauci6n de su
sierra mas alia. de la vida del producto.
ADVERTENClA:
Nunca desmonte, modifique ni desactive
ningun dispositivo de seguridad que se incluya junto con su
unidad. La sierra de cadena de "bajo contragolpe" es un
indispensable dispositivo de seguridad destinado a su proteccbn.
ADVERTENCIA:
Cerci6rese de que la unidad este
apagada y que la bujia este desconectada (de gasolina)
antes de realizar mantenimiento alguno de su sierra. Use
tambien guantes de trabajo.
16
Peso de la unidad (S61o el accesorio) ...........
Longitud del Eje Conductor ...................
Anchura de Corte .........................
1,5 kg (3,3 Ibs.)
66 cm (26 pulg)
20.3 cm (8 pulg)
* Toda las especificaciones contenidas en este manual se basan en
la informaci6n mas reciente disponible en el momento de impresi6n
del manual. Nos reservamos el derecho de hacer cambios en
cualquier momento sin aviso previo.
1
17
18
19
20
21
22
REPLACEMENT
PARTS - MODEL 316.792460
POLE SAW ATTACH M ENT
item
1
Part No.
753-04352
Description
Extension Boom
2
3
4
753-1190
791-182057
791-181617
Split Boom Coupler (includes 3-6)
Screw
Bolt
5
6
7
8
9
791-181981
753-04386
753-05724
791-181166
791-180288
Adjustment Knob
Knob Retaining Nut
Drive Shaft Housing (includes 8)
Flexible Drive Shaft
Screw
10
11
12
13
14
15
16
17
18
753-05586
753-05587
753-05274
753-05588
753-05589
753-05591
753-05765
753-05592
753-05594
Oil Tank Assembly
Oil Cap Assembly
Screw
Oil Line
Screw
Nut
Chain Guard
Chain
Bar
19
20
753-05595
753-05596
Sprocket Assembly
Bolt
21
22
753-05597
753-05598
Chain Tension Hardware Assembly
Chain Cover
23
753-05599
Gearbox Assembly (includes 14 & 19)
*
*
Not Shown
791-612605 Hanger
23
Your Home
product manuals and expert advice:
For troubleshooting,
managemylife
www.managernylife.com
For repair - in your home - of all major brand appliances,
lawn and garden equipment, or heating and cooling systems,
no matter who made it, no matter who sold it!
For the replacement parts, accessories and
owner's manuals that you need to do-it-yourself.
For Sears professional installation of home appliances
and items like garage door openers and water heaters.
1-800-4-MY-HOME
Call anytime,
®
day or night (U.S.A. and Canada)
www.sears.oorn
www.sears.ca
Our
For repair of carry-in
items
and electronics,
call anytime
Sears
Parts
1-800-488-1222
Home
like vacuums,
lawn equipment,
for the location
of your nearest
& Repair
(U.S.A.)
www.sears.corn
To purchase
a protection
1-800-827-6655
agreement
(U.S.A.)
Para pedir servicio de reparaci6n
a domicilio, y para ordenar piezas:
1-888-SU-HOGAR
(1-888-784-6427)
www.sears.com
®
(1-8oo-469-460s)
Service
Center
1-800-469-4663
(Canada)
www.sears.ca
on a product serviced
by Sears:
1-800-361-6665
(Canada)
Au Canada pour service
en fran(_ais:
I=800=LE=FOYER
(1-800-533-6937
www.sears.ca
S@SFS
® Registered Trademark / TMTrademark of KCD IP, LLC in the United States, or Sears Brands, LLC in other countries
® Marca Registrada / TMMarca de F&brica de KCD IP, LLC en Estados Unidos, o Sears Brands, LLC in otros paises
MCMarque de commerce / MDMarque d6pos6e de Sears Brands, LLC
No