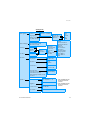
1
DT412/DT422/DT432
Cordless Telephones for Ericsson MX-ONE™ Telephony System and Ericsson MD110
User Guide
Cover Page Graphic
Place the graphic directly on the page, do not care about
putting it in the text flow. Select Graphics > Properties
and make the following settings:
•
Width: 15,4 cm (Important!)
•
Height: 11,2 cm (May be smaller)
•
Top: 5,3 cm (Important!)
•
Left: -0,3 cm (Important!)
This text should then be hidden.
?
EN/LZT 103 67 R5A
© Ericsson Enterprise AB 2006
Table of Contents
Table of Contents
Welcome .......................................................... 4
Important User Information ............................... 6
Description ..................................................... 11
Switching On/Off ............................................ 29
Free Seating ................................................... 31
Incoming Calls ............................................... 32
Outgoing Calls ............................................... 37
Phonebook .................................................... 50
During Calls .................................................... 57
Call Forwarding .............................................. 63
Absence Information ...................................... 72
Messages ...................................................... 75
Group Features .............................................. 85
Other Useful Features ..................................... 87
Alarm ............................................................. 91
Modes ........................................................... 94
Services ......................................................... 96
Settings .......................................................... 99
Audible Adjustments .................................... 112
Installation .................................................... 116
Reference .................................................... 123
Troubleshooting ............................................ 127
Glossary ....................................................... 129
Index ............................................................ 130
DT412/DT422/DT432
3
Welcome
Welcome
Welcome to the User Guide for the DT412, DT422 and DT432
cordless phones. This guide describes the available features of the
telephones when they are connected to Ericsson MD110 or
Ericsson MX-ONE™ Telephony System.
The functions and features available with these telephones are
designed for easy use in all different telephone handling situations.
Depending on the version and configuration of the exchange that
your telephone is connected to, some of the functions and features
that are described in this user guide may not be available. There
may also be some differences in the way your telephone is
programmed. Please consult your system administrator if you need
further information.
Some markets use differing codes for some features. In this guide
they are described using the most common code.
The latest version of the user guide can be downloaded from:
http://www.ericsson.com/enterprise/library/manuals.shtml
4
DT412/DT422/DT432
Welcome
Copyright
All rights reserved. No parts of this publication may be reproduced,
stored in retrieval systems, or transmitted in any form or by any
means, electronic, mechanical, photocopying, recording or
otherwise, without prior written permission of the publisher except
in accordance with the following terms.
If this publication is made available on Ericsson´s homepage, Ericsson
gives its consent to downloading and printing copies of the content
provided in this file only for private use and not for redistribution. No
parts of this publication may be subject to alteration, modification or
commercial use. Ericsson will not be liable for any damages arising
from use of an illegal modified or altered publication.
Warranty
ERICSSON MAKES NO WARRANTY OF ANY KIND WITH
REGARD TO THIS MATERIAL, INCLUDING, BUT NOT LIMITED
TO, THE IMPLIED WARRANTIES OF MERCHANTABILITY AND
FITNESS FOR A PARTICULAR PURPOSE. Ericsson shall not be
liable for errors contained herein nor for incidental or consequential
damages in connection with the furnishing, performance or use of
this material.
Declaration of Conformity
Hereby, Ericsson Enterprise AB, S-131 89 Stockholm,
declares that this telephone is in conformity with the essential
requirements and other relevant provisions of the R&TTE
directive 1999/5/EC.
Details to be found at: http://www.ericsson.com/sdoc
DT412/DT422/DT432
5
Important User Information
Important User Information
Safety instructions
Save these instructions.
Read these safety instructions before use!
Recommendations
•
•
•
•
•
•
•
6
Always keep and handle your products with care
and keep them in a clean and dust-free place.
Proper use and care will prolong the products life.
Use a soft absorbent tissue or cloth to remove
dust, dirt or moisture.
Always ensure that the phone, battery and
charger are used and operated in the
environment for which they are designed.
Operate the phone in temperatures between 0°C
to +40°C (32°F to 104°F).
Do not expose your products to liquid,
moisture, humidity, solvents, strong
sunlight, harsh environments or
extreme temperatures, never above
+60°C (+140°F), unless the product
has been specifically designed and
officially approved for such environments.
Exposure to heat may cause batteries
to leak, overheat or explode, resulting
in fire, burns or other injuries.
Do not put the product in the
microwave oven: This may cause
damage to either the oven or the product.
Do not attempt to disassemble or alter
any part of the phone, the charger(s)
or the battery-pack. Disassembly or
alteration may result in electrical
shock or irreversible damage to the
equipment. Only a qualified service
personnel or an authorized Ericsson partner
should conduct internal inspections, alterations
and repairs.
•
•
•
•
•
Do not expose your product to open flames or lit
tobacco products.
Do not drop, throw or bend your products. This
may cause malfunction or electric shock.
Do not paint your product.
Do not use your product in an area where a
potentially explosive atmosphere exists, unless
the product has been specifically designed and
officially approved for such environments.
To avoid hearing impairment, accept the call
before holding your product (or portable
handsfree device) to your ear.
Disposal of the product
•
Your product should not be placed in
municipal waste. Please check local
regulations for disposal of electronic
products.
DT412/DT422/DT432
Important User Information
Power supply
•
•
•
•
•
•
•
•
•
Connect the AC power adapter of the charging
unit only to the designated power sources as
marked on the charger.
Make sure the cord is positioned so that it will not
be subjected to damage or stress.
To reduce risk of electrical shock, unplug the
chargers from any power source before
attempting to clean or move it.
The AC power adapters must not be used
outdoors or in damp areas.
Never modify the cord or plug. If the plug will not
fit into the outlet, have a proper outlet installed by
a qualified electrician.
Limit the distance between the mains socket and
the cordless phone when charging for easy
accessibility.
As an energy saving measure, disconnect the
charger from the main socket after charging.
When unplugging the mains adapter from the
power outlet, make sure that your hands are dry
and ensure that you hold the solid portion of the
mains adapter.
Do not pull on cables.
•
•
•
•
•
•
•
•
•
•
•
Charging and batteries
•
Please read carefully the following
important precautions before the
first time use of the batteries. Make
sure to understand and observe all
cautionary instructions stated, so as
to avoid any possible safety hazards
that are caused by any misuse, misapplication
or damage to batteries.
•
Only use batteries, mains adapters or desk and
rack chargers which have been specifically
designed for use with your product.
•
Use of power sources not explicitly
recommended may lead to overheating, reduced
battery performance, distortion of the equipment
and fire or other damages.
•
Cordless phones are equipped with Nickel Metal
Hydride (NiMH) batteries or Lithium Ion Lion
batteries. In a complex infrastructure, the talkand standby time may differ, due to the
consequence of the increase in signaling.
•
The battery must always be completely charged
(minimal 4 hours) before first time use.
•
The battery in your product is designed to
withstand many charge cycles.
•
Use only the recommended charging equipment.
•
Improper charging can cause heat damage or
even high pressure rupture.
•
Observe proper charging polarity.
•
DT412/DT422/DT432
•
•
•
•
Do not solder lead wires directly onto the battery.
Do not allow water to come into contact with the
battery.
The initial charging of a NiMH battery will cause
the battery to become warm. This is a normal
effect of charging NiMH batteries.
The batteries are replaceable, however it is not the
intention to do this frequently.
Only charge the batteries when placed in the
phone.
Use only the specified battery-packs for your
product.
Never heat or dispose of the battery into a fire,
which, or else, may cause leakage, burst or fire.
Remove the carrying case from the product while
in charger.
Do not cover the product while being charged. Do
not charge the phone in a closed cabinet or
drawer. The charging of the battery is a chemical
process and causes the battery to become warm
during charging. Make sure the environment in
which the phone is charged, is well vented.
The cordless phone can be charged either when
switched on or off.
Do not connect the battery's positive and
negative leads altogether in any circumstances.
Do not strike or drop the battery. It may cause
damage to the battery.
Do not charge the battery below +5°C
(+41°F). Be sure to charge the battery
between +5°C and +45°C (+41°F and
113°F). Charging beyond these
conditions may impair the battery
performance and shorten the life
cycle.
Do not use battery packs from different types,
brands or of different capacities.
The battery is to be stored in a dry cool place, with
the ambient temperature of approx. +25°C
(+77°F) for best performance.
The battery continues to discharge a minimal
portion of its power, even if the product is
switched off or the battery is removed.
Dispose the battery in accordance with all local
regulations, applicable in your country.
7
Important User Information
Warnings
Preventing malfunction
Smoke or fumes
•
Stop operating the products and turn
off immediately in case of smoke or
fumes. Unplug the mains adapter
and remove the batteries from the phone
immediately. Continued operation may result in
fire or electrical shock.
LCD
•
If the liquid crystal display breaks, avoid injury by
not allowing the liquid crystal to come into contact
with eyes, skin or mouth. Prevent the liquid crystal
from leaking out of the broken glass.
•
•
•
•
8
Never place the equipment in close proximity of
electric motors, welding equipment or other
devices generating strong (electro) magnetic
fields. Exposure to strong (electro) magnetic fields
may cause malfunction and corrupt the
communication.
Moving the equipment rapidly between warm and
cold temperatures may cause condensation
(water droplets) to form on its internal and external
surfaces. Water droplets may cause malfunction
of the equipment and corrupt or end
communication or damage the equipment. When
condensation is noticed, stop using the
equipment. Switch off the phone, remove the
battery and unplug the mains adapter from the
power outlet. Wait until the moisture evaporates
from the equipment before putting it in operation
again.
Avoid accidental drop of the phone. Use the clip,
security clip or carrying case specified for carrying
purposes of the phone.
Avoid squeezing the phone between furniture and
your body when carrying the phone in your
pocket or attached to clothing.
DT412/DT422/DT432
Important User Information
SIM card
Your phone has a removable SIM card (Subscriber Identity Module)
to store your settings. This means that you can move your SIM
card from one phone to another and keep all your settings.
Safety information
The DT412, DT422 and DT432 phones are IP64 classified, which
means that they are robust, dust- and waterproof, designed for
people working in tough environments.
Intrinsic safety (DT432)
The DT432 phone is approved according to the ATEX directive to
be used in potentially explosive gas and dust environments.
Compliance with the Essential Health and Safety Requirements,
with the exception of those listed in the schedule to this certificate,
has been assured by compliance with the following documents:
EN 50014:1997 plus amendments A1 and A2
EN 50020:2002
IEC 61241-0:2004 plus Corrigendum 1
IEC 61241-11:2005
IEC 60529:1989
The classification and marking on the product is “II 2G EEx ib IIC
T4” for gas and “II 3D Ex ibD 22 IP64 T50°C” for dust.
DT412/DT422/DT432
9
Important User Information
Preparing for use
Before using your phone for the first time you have to charge and
connect the battery, see section “Installation” on page 116.
Note: Place the phone in the charger and charge it for at
least one hour before using it the first time.
Cleaning
Clean the phone only with a soft, water dampened cloth. Using
soap or any other cleaning materials may discolor or damage the
phone. Clean the battery contacts using ethanol or isopropyl
alcohol.
10
DT412/DT422/DT432
Description
Description
1
12
14
11
12
2
10
3
4
5
7
6
8
9
13
1
DT412/DT422/DT432
Lamp
A flashing lamp indicates an incoming call or a message waiting.
11
Description
2
Volume Up/Down
Off-hook: raise/lower speaker volume, see section “Audible
Adjustments” on page 112. The Volume Up key can also be used
to answer calls, see section “Answer calls” on page 32.
3
Display
The display can for example show the battery status, time, system,
owner ID/name, extension number and the Soft key information.
See sections “Display information” on page 14 and “Menu
structure” on page 22. It is possible to change the text size in the
display, see section “Settings” on page 99.
4
Soft keys
The functions depend on the traffic state and will be shown on the
last line of the display. When you are requested to (see display),
press the required key to access the function. Used for different
choices in the menu structure (menu mode). In idle mode the
functions of the Soft keys can be changed by you. The middle Soft
key is also used to turn Loudspeaking on or off. See sections
“Settings” on page 99, “Display information” on page 14 and
“Menu structure” on page 22.
5
Call key
Switch on. Make call, answer call, end call.
6
Navigation key
Controls the movement of the cursor in the display. In idle mode,
the Navigation key (down) is used for entering the Call list and the
Navigation key (up) is used for entering the message list. Pressing
Navigation key (left) will show the current date in the display
window. When navigating the menu structure, the key is used for
moving up, down, back (left), or next (right).
7
Menu key
Enter/exit the menu mode, see sections “Display information” on
page 14 and “Menu structure” on page 22. Also used to manually
lock/unlock the keypad, see section “Lock the keypad” on
page 108.
8
Keypad
Enter numbers and writing texts, see section “Enter names and
numbers” on page 51. Keys 0-9 can be programmed as Hot keys,
see section “Hot keys and Soft keys” on page 100.
9
Microphone
10
12
Mute key
Turn off/on audible signals in idle mode, silencing the ring signal at
an incoming call, and also to turn the microphone on/off during a
call.
DT412/DT422/DT432
Description
11
Alarm key (DT422 and DT432 only)
Sending alarms and testing the Alarm function. See section “Alarm”
on page 91.
12
Loudspeakers
One loudspeaker for ring signal and one for Loudspeaking. See
section “Handsfree” on page 57.
Please note: The phone may retain small magnetic
articles around the earpiece region.
DT412/DT422/DT432
13
Charging connector
See section “Installation” on page 116.
14
Headset connector
See section “Headset” on page 125.
13
Description
Display information
The display gives you visual feedback on all actions that you
perform, and also textual warnings. In idle mode the upper row is
used for icons and the clock. The next three rows are information
rows (20 possible characters in each row), showing system
information, names and numbers that you edit or dial, your owner
ID etc. The third information row is used for showing the status of
the phone (current mode). Examples of status information are;
Muted, In charger etc. When there is no status to show, the row is
empty.
Note: It is possible to change the owner ID and the text size
in the display, see section “Settings” on page 99.
The lower row displays the Soft key field. In idle mode it shows the
user defined names of the three Soft keys beneath the display. In
menu mode where the Soft keys are used for different choices, it
gives you the function of each Soft key. Examples of functions are;
Back, Option, Save etc. How to define the Soft keys in idle mode,
see section “Hot keys and Soft keys” on page 100.
The display:
3
5
System A
S Evans 2174
Info
14
Doctor
13:05
Jobs
DT412/DT422/DT432
Description
The following display examples show the different states of your
phone:
Note: If a name is available it is displayed instead of or
together with the number.
Idle phone
Depending on the state and setting of your phone, different
information can be shown.
Normal:
System A
Smith 4321
13:05
“System A” is the default name of your network. On the second
row is your name (if available) and extension number.
Note: If the name is long, the number is not displayed.
Follow-me activated:
4321 >
4444
13:05
The display shows your own extension number 4321 diverted to
extension number 4444.
DT412/DT422/DT432
15
Description
Outgoing call
Normal outgoing call:
When you make an outgoing call both the traffic state and the
dialed number or name are displayed:
13:05
Calling
3333
R
When the outgoing call is answered:
13:05
3333
R
Diverted call:
If the dialed number is diverted, the diversion information is shown.
For example, the display shows the dialed number 3333 (Smith)
diverted to 4444 (Brown):
13:05
4444
>3333
R
When the diverted call is answered, only the number of the
answering position is displayed:
13:05
4444
16
R
DT412/DT422/DT432
Description
Incoming call
Normal incoming call:
If available, the number or the name of the caller is displayed.
13:05
3333
Diverted call:
A diversion indicator before the number or name informs that the
call is diverted to your phone. For example, the display shows that
number 3333 (Smith) was dialed, but the call was diverted to you:
4321
>3333
13:05
When you have answered the call, the display shows only the
caller's number.
DT412/DT422/DT432
17
Description
System connection messages
System A
No system
System indication
The phone is in contact with System A. It is also possible for the
system to be named something else, e.g. MD110.
Out of coverage
The phone is not in contact with any system. Please ask your
system administrator to log on the phone.
Note: When re-entering the coverage area it can take a
couple of minutes before the phone automatically has
registered into the system.
It is also possible to get an out of coverage warning signal,
contact your system administrator if you require this.
No access
Access indication
Your phone has contact with a system, calling is not allowed.
Display icons
Call / Off-hook
Appears when your phone is off-hook and flashes during ringing.
Audio signal off
Shown when all alert signals, including ring signal, message tone,
key beep etc. are turned off. High priority messages will however
override this setting. See section “Audible Adjustments” on
page 112.
Battery
Always shown in the display in idle mode. When the level is low it is
time to charge the battery. See section “Installation” on page 116.
Loudspeaking (handsfree)
Shown when the loudspeaker is activated and the phone is in
Loudspeaking operation (handsfree). See section “During Calls” on
page 57.
3
New message
Appears when a new message is received. The number on the
right side of the icon shows the total number of unread messages.
The symbol will remain until the message is marked as read. See
section “Messages” on page 75.
Note: For voice messages the New message icon is only
an indication of received voice messages, the number does
not reflect the actual number of unread messages.
18
DT412/DT422/DT432
Description
5
Not answered call
Added to not answered calls in the Call list. The number on the
right side of the icon shows the total number of missed calls.
Key
Indicates that your keypad is locked. See section “Automatic key
lock” on page 108.
Padlock
Indicates that the phone has been locked, and has to be unlocked
with a code before it can be used. See section “Phone lock” on
page 105.
Headset
Indicates that a headset is connected to the phone. See section
“Headset” on page 125.
No-movement Alarm on (DT422 and DT432 only)
Indicates that the No-movement Alarm is activated. See section
“Alarm” on page 91.
Man-down Alarm on (DT422 and DT432 only)
Indicates that the Man-down Alarm is activated. See section
“Alarm” on page 91.
ABC
Upper case text input
Indicates that you can type upper case letters and numbers in text
input mode. See section “Enter names and numbers” on page 51.
abc
Lower case text input
Indicates that you can type lower case letters and numbers in text
input mode. See section “Enter names and numbers” on page 51.
123
Number input
Indicates that you can type numbers in text input mode. See
section “Enter names and numbers” on page 51.
Incoming call
Added in front of incoming calls in the Call list.
Outgoing call
Added in front of outgoing calls in the Call list.
Unread message
Added in front of not read messages in the message list. See
section “Messages” on page 75.
Read message
Added in front of read messages in the message list. See section
“Messages” on page 75.
DT412/DT422/DT432
19
Description
Interactive message
Added in front of an incoming interactive message in the message
list. See section “Messages” on page 75.
Read interactive message
Added in front of read interactive messages in the message list.
See section “Messages” on page 75.
Add contact
Appears on a Soft key when a phone number is marked in the Call
list. It indicates that it is possible to add the phone number to the
local Phonebook. See section “Phonebook” on page 50.
Contacts
Displayed when it is possible to get a phone number from the local
Phonebook, for example to add it to a function. See section
“Phonebook” on page 50.
>
20
Diversion indicator
When displayed before a name or number it indicates that the
phone is diverted to another extension.
DT412/DT422/DT432
Description
Menu tabs
The following tabs are displayed when you press the Menu key:
Messages
Here you can find the message list. See section “Messages” on
page 75.
Contacts
Here you can find the local Phonebook, the central Phonebook and
the Call list. See sections “Phonebook” on page 50 and “Dial
number from the Call list” on page 40.
Modes
Here you can select between modes, and change or edit modes.
See section “Modes” on page 94.
Services
Here you can select, add, delete, or change a Service function. See
section “Services” on page 96.
Settings
Here you can handle your phone settings. See section “Settings”
on page 99.
To navigate the menus, see section “Menu structure” on page 22.
Additional display features
Depending on which network you are connected to, additional
display features are available. Ask your system administrator if you
require additional display features.
DT412/DT422/DT432
21
Description
Menu structure
ç
The available phone and network functions can be accessed via
the menus.
Press the Menu key to enter or exit the menus.
The last used tab is marked, or if the phone has been restarted, the
menu tab Contacts.
Use the Navigation key (left/right) to choose tab and press the
Navigation key (down) to open it; a heading is shown and the first
alternative is marked. Use the Navigation key (up/down) to step in
the alternatives and select one by pressing Navigation key (right).
Notes:
Since the phone can be used in several networks, some
functions might not be supported in your network.
A parameter setting in the SIM card determines if changes
that are made from the menu is saved on the SIM card. If
changes are not saved on the SIM card, they will be
discarded when the phone is restarted.
22
DT412/DT422/DT432
Description
Messages tab
Messages list >
Message 1 >
Message 2 >
.
.
Message 20 >
Message 1 (time/date)
SMS tab
Send SMS >
SMS Address >
SMS
Contacts tab
Local phonebook >
Central phonebook
Call list >
DT412/DT422/DT432
Entry 1 >
Entry 2 >
.
.
Entry 100 >
Name: .....
Number: .....
Call number 1
Call number 2
.
.
.
.
.
Call number 20
23
Description
Modes tab
Normal >
In charger >
Mode 2 >
Mode 3 >
Mode 4 >
Mode 5 >
Mode 6 >
Mode 7 >
Mode 8 >
Mode 9 >
Volume >
(Level 1,2..5, Silent)
Ring signals >
Vibrator (on/off)
Key beep (on/off)
Internal call: >
External call: >
Callback: >
Alarm settings* >
No-movement (on/off)
Man down (on/off)
Beep,
Low,
Medium,
High,
Mixed
Absent (on/off)
Switch off
Ordinary
Auto
Loud
Auto loud
Answer >
Soft key**
Name: ...
* Only available for the DT422 and DT432 phones.
** See section “Settings tab” on page 25 for more information.
Services tab
Service 1 >
Service 2 >
.
.
Service 10 >
24
Name: ....
Function:
Data send
Data with prefix
Phone call
SMS
DT412/DT422/DT432
Description
Settings tab
Alert signals >
Volume: >
(Level 1,2..5, Silent)
Internal call: >
External call: >
Callback: >
Ring signals >
Vibrator (on/off)
Key beep (on/off)
Alarm settings*>
No-movement (on/off)
Man down (on/off)
Soft key >
Left: >
Middle: >
Right: >
Hot key >
0, 1, 2.....9 >
Data send
Data with prefix
Phone call
Short-cut >
SMS
Change mode
Not used
General >
Language >
(English, etc)
Text size** >
Small
Medium
Phone lock >
Lock phone
Set lock code
Clock (on/off) >
Auto key lock (on/off)
Quick answer (on/off)
New message rotated (on/off)
Owner ID
Auto setting
Manual setting
System >
Name: ....
Function: >
Absent
Local phonebook
Central phonebook
Services
Switch off
No-movement*
Man-down*
Edit alarm data*
Change system
Demo Mess 1
Demo Mess 2
RSSI
* Only available for the
DT422 and DT432
phones.
** Only available for the
DT412 and DT422
phones.
Select system >
Auto, System A.....D
Register >
System A.....D
Location test* >
Activate test
Information >
IPDI / IPEI / SW version / AP SW version
DT412/DT422/DT432
Beep,
Low,
Medium,
High,
Mixed
25
Description
Customizing the menus
Your system administrator can customize the menus by hiding
some of the functions that are available. Which functions that
should be hidden are decided with settings in the SIM card. The
following functions can be hidden:
26
•
Deletion of messages - The options Delete and Delete all are
hidden.
•
Administration of local Phonebook - It is not possible to add
new entries, or edit and delete existing entries.
•
Editing modes - The settings for the modes cannot be altered.
•
Changing modes - The option Select is hidden, i.e. it is not
possible to change modes from the menu.
•
Switch off handset - It is not possible to switch off the phone
from the Modes menu.
•
Administration of services - It is not possible to add new
services, or edit and delete existing services.
•
Changing alert signals - The Alert signals alternative in the
menu is hidden.
•
Changing alarm settings - The Alarm settings alternative in
the menu is hidden.
•
Administration of Soft keys - The Soft key alternative in the
menu is hidden.
•
Administration of Hot keys - The Hot key alternative in the
menu is hidden.
•
Edit of Hot keys - The option Edit is hidden. It is possible to
see the settings for the Hot keys.
•
Changing general settings - The General settings alternative
in the menu is hidden.
•
Handling Phone Lock - The Phone lock alternative in the
menu is hidden.
DT412/DT422/DT432
Description
•
Changing system* - The Select system alternative in the
menu is hidden.
•
Register system* - The Register alternative in the menu is
hidden.
•
Delete system - The option Delete is hidden.
•
View information* - The Information alternative in the menu is
hidden.
•
Location test* - The Location Test alternative in the menu is
hidden.
•
Central Phonebook address - When an address to the
central Phonebook is specified, the alternative Central
Phonebook will appear in the Contacts menu and the shortcuts list. At delivery the address is set to 999999.
* If all these alternatives are hidden, the System alternative in the
menu will be hidden.
Each mode in the menu can be hidden individually. This makes it
possible to remove modes that are not used from the menu. Note
that it is still possible to change to the hidden modes with help of
Soft and Hot keys.
DT412/DT422/DT432
27
Description
Tones
The following different tones are sent from the exchange to your
phone.
Tone characteristics
The tones shown in this section are the most used tones
worldwide. Many markets use a differing tone for one or more
situations.
Dial tone
Special dial tone
Ringing tone or queue tone
Busy tone
Congestion tone
Number unobtainable tone
Call waiting tone
Intrusion tone
Conference tone
every 15 seconds (to all parties)
Verification tone
Warning tone, expensive route
Ring signals
You can change the ring signals, see section “Ring signals” on
page 114.
28
DT412/DT422/DT432
Switching On/Off
Switching On/Off
æ
Switch on
Press and hold until the display lights up.
If the phone does not switch on or the Battery icon is displayed,
the battery is low. Charge the battery.
The display shows:
Switch on?
No
Yes
Yes
Press within two seconds to confirm (see display).
Now you can use your phone.
Notes:
If the message No System is displayed you cannot make or
answer calls.
Depending on system programming, your phone can be
locked. To unlock the phone, see section “Phone lock” on
page 105.
DT412/DT422/DT432
29
Switching On/Off
Switch off
Notes:
During calls, you cannot switch off your phone.
It is recommended that you program the Switch off function
as a Hot key, see section “Hot keys and Soft keys” on
page 100. If you do not program a Hot key, you can use the
menus, see section “Modes” on page 94.
å
ã Yes Ok
30
If you have programmed a Hot key:
Press and hold the Hot key.
Press to confirm (see display).
Now your phone is switched off.
DT412/DT422/DT432
Free Seating
Free Seating
The Free Seating function is used for persons who have an office
extension number but no telephone set of their own. For example,
flexible office workers, persons mostly outside the office, etc. As a
free seating user and working from the office, you logon to any free
telephone set that temporarily will be assigned with your extension
number and your system authorities.
*11*
å*
å#æ
æ
#11# æ
æ
DT412/DT422/DT432
To log on
Dial.
Enter the Authorization Code and press.
Enter your phone number and press.
Wait for the call icon to stop flashing.
Press to finish the procedure.
The display shows your phone number.
To log off
Dial and press.
Wait for the call icon to stop flashing.
Press to finish the procedure.
31
Incoming Calls
Incoming Calls
A ring signal and the flashing red lamp indicate an incoming call.
The ring type can tell you whether the call is an internal, external or
callback call and the display indicates an incoming call.
The twenty last received/dialed phone numbers are stored in the
Call list, see section “Dial number from the Call list” on page 40.
Answer calls
The caller’s number and the Call icon is displayed:
13:05
4736
æ
Press to answer.
Note: Calls can be answered at any time, no matter if you
are programming, or keying in a number etc.
The Volume Up key can also be used to answer calls
(handsfree speaking mode activated).
When a headset is connected to the phone, the button on
the headset can be used to answer the call.
32
DT412/DT422/DT432
Incoming Calls
Mute ring signal
If the phone rings at an inconvenient moment:
æ
ä
Press the Mute key on the right side of the phone to suppress
the ringing.
All alert signals, including the vibrator, will silence for this specific
call. See section “Description” on page 11 for the location of the
Mute key.
Press to answer the call.
Handsfree
Press the middle Soft key to answer the call in handsfree
speaking mode.
You are connected to the caller via the loudspeaker and
microphone.
Note: Which key to press depends on the answering
method used, to change the answering method see section
“Change answering method” on page 34.
æ
End the call
Press.
The duration time of the call is shown.
Note: When a headset is connected to the phone, the
button on the headset can be used to end the call.
On another extension
åæ
8
DT412/DT422/DT432
You can answer a call to a phone in another room:
Call the ringing extension and press.
Busy tone.
Press
4
Note: France press ; Sweden press
6
33
Incoming Calls
Change answering method
You can choose; Ordinary, Auto, Loud, or Auto loud.
ç
à á
ã
á
ãá
ã
or
Select
34
•
Ordinary; press the middle Soft key and the call is connected
with Loudspeaking function turned on.
•
Auto; the call is automatically connected (call is not connected
with Loudspeaking function).
•
Loud; press the Call key and the call is connected with
Loudspeaking function turned on.
•
Auto loud; the call is automatically connected with
Loudspeaking function turned on after 2 signals (Calls can be
answered as usual before that).
Press.
The last used tab is marked.
Select Modes.
Press to enter Modes.
Select Normal.
Select Answer.
Select the required answering method.
Press (see display).
The name of the selected method is shown. The new answering
method is selected.
DT412/DT422/DT432
Incoming Calls
Parallel Ringing
The Parallel Ringing function makes it possible for an incoming call
to ring several phones simultaneously and for the call to be
answered on any of the phones. The main advantage of this
function is that you do not risk losing any calls.
The function requires all the phones involved to be defined in a
Parallel Ringing list, which must be configured and initiated by
your system administrator. Because only calls to a main extension
will be distributed among the phones in the list, this main extension
also needs to be defined.
A call to a specific extension will not be distributed to other phones
in the list, and will only ring that specific extension's phone.
Parallell Ringing can be temporarily disabled by the phone user
using the function “Internal Follow-me”. See also section “Internal
Follow-me” on page 63.
*21* å #
æ
æ
To disable Parallel Ringing temporarily
Dial, enter the extension number and press.
Note: U.K., dial
* 2 * Number #.
Press.
Wait for the call icon to stop flashing.
Press to finish the procedure.
If you want to disable Parallel Ringing for all phones defined in the
list, follow the procedure for disabling the function from the phone
with the main extension number and enter the number of the
answering position.
If you want to disable Parallel Ringing for one specific phone in the
list only, follow the procedure for disabling the function from this
phone and enter its extension number.
DT412/DT422/DT432
35
Incoming Calls
#21#
æ
æ
To restore Parallel Ringing
Dial.
Press.
Wait for the call icon to stop flashing.
Press to finish the procedure.
Notes:
U.K., dial
# 2 #.
If you want to restore Parallel Ringing for all phones defined
in the list, follow the procedure for restoring the function
from the phone with the main extension number and enter
the number of the answering position.
If you want to restore Parallel Ringing for one specific phone
in the list only, follow the procedure for restoring the function
from this phone and enter its extension number.
36
DT412/DT422/DT432
Outgoing Calls
Outgoing Calls
Make calls
You can also make a call via the Phonebook, see section
“Phonebook” on page 50.
åæ
On-hook
Enter the phone number and press.
The number is shown in the display. Your phone will go off-hook
and establish the connection. The number is stored in the Call list.
The number may be any of the following:
•
an extension number,
•
an external number, where 0 is the digit for external call access.
Notes:
Correct a wrong entry by pressing C (see display). If you
decide not to make the call while keying in the number,
press C (see display) to stop.
It is possible to turn on/off the tone sender in a predialed
number by making a long press on the * key (e.g. when
calling telephone banks). Tone sender on will be indicated
with a T in the number, and off with -. If a pause is required
in the number, it is added by making a long press on the #
key. The pause is indicated with a P in the number.
You can make your calls faster by programming Soft/Hot
keys with frequently used numbers. See section “Program
a Hot key or a Soft key with a phone number” on page 102.
If you receive a queue tone when the digit or digits to get an
external line are dialed (if the feature Least Cost Routing is
used in the system), keep waiting. Once a line becomes free
you will receive a dial tone. If a warning tone is heard, the
selected line is marked “Expensive”.
DT412/DT422/DT432
37
Outgoing Calls
Off-hook dialing
æ
å
If you prefer to dial a number off-hook:
Press.
Dial tone.
Key your number on-line.
Notes:
When dialing this way, you cannot press C (see display) to
erase digits.
The number is not stored in the Call list.
Handsfree
ä
While you are waiting for a connection, dial tone or during the call:
Press the middle Soft key.
You are connected to the caller via the loudspeaker and
microphone.
Note: Which key to press depends on the answering
method used, to change the answering method see section
“Change answering method” on page 34.
æ
38
End the call
Press.
The duration of the call is displayed.
DT412/DT422/DT432
Outgoing Calls
Number Presentation Restriction
If you do not want your name and number to be displayed to the
person you are calling, use the following procedure.
Notes:
This function might be blocked for use on your extension
(programmed by your system administrator).
*42# æ
å
The Number Presentation Restriction is only valid for the
ongoing call, i.e. the procedure has to be repeated the next
time you want to use it.
Dial and wait for a new dial tone.
Dial the number.
Instead of your name and number, the display on the called phone
shows Anonymous.
Individual External Line
*0*
å#
åæ
DT412/DT422/DT432
To make a call on a specific external line:
Dial.
Dial the Individual External Line number and press.
Dial the digit or digits to get an external line and the external
number and press.
39
Outgoing Calls
Last External Number Redial
*** æ
When you initiate an external call the system automatically stores all
the dialed digits, irrespective of whether the call was successful or
not.
Press to redial the last dialed external number.
The display will show the dialed number.
Note: Finland and Sweden, dial
**0
Dial number from the Call list
The twenty last received/dialed phone numbers are stored in the
Call list. You can dial one of these numbers by selecting the
number from the Call list.
ã
If the Clock and Date function is set, you can on the same day the
call was received/dialed, see the time for the call. The time stamp is
changed to a date stamp the following day. See section “Clock
settings” on page 106.
Press until the desired number is displayed.
You can store numbers permanently by adding them to your
Phonebook, see section “Save a number from the Call list to the
Phonebook” on page 54.
If you want to edit the number:
Edit
å
æ
Press (see display).
Make the required changes.
Press to dial.
The display will show the dialed number.
Note: The Call list is cleared when your phone is switched
off or the power of your phone is lost.
40
DT412/DT422/DT432
Outgoing Calls
Delete a number from the Call list
ã
Options
Select
When your phone is in idle mode:
Press until the desired number is displayed.
Press (see display).
Delete is marked.
Press (see display).
Number deleted is displayed and the number is deleted.
Delete all numbers from the Call list
ã
Options
ã
Select
When your phone is in idle mode:
Press to enter the Call list.
The first number in the Call list is marked.
Press (see display).
Delete is marked.
Select Delete all.
Press (see display).
The display shows:
Delete all numbers?
No
Yes
DT412/DT422/DT432
Yes
Press (see display).
All numbers are deleted.
41
Outgoing Calls
When you receive a busy tone
If you call an extension and receive a busy tone, or get no answer,
or all external lines are busy, you can use any of the following
methods:
Callback
6
æ
æ
If a called extension is busy or there is no answer:
Press.
Note: France, Finland and Sweden, press
5
Press to finish the procedure.
You are called back (recall ring signal) when the ongoing call is
finished or the next time a new call is finished. You have to answer
within eight seconds, otherwise the Callback service is cancelled.
While waiting for the Callback, you can make and receive calls as
usual.
Press when you are called back.
The system calls the extension.
Note: Callbacks can be activated on several extensions at
the same time.
42
DT412/DT422/DT432
Outgoing Calls
6#
æ
æ
If all external lines are busy when the Hook key is pressed after
dialing the external number (on-hook dialing):
Press.
Notes:
If you were dialing off-hook (the Hook key was pressed
before the number), you are required to add the external
number now.
France, Finland and Sweden, press
5#
Press to finish the procedure.
When an external line becomes free you will be called back (recall
ring signal). You have to answer within eight seconds, otherwise the
Callback service is cancelled. While waiting for the Callback, you
can make and receive calls as usual.
Press when you are called back.
The system calls the external number.
Note: Only one Callback can be activated on a busy
external line.
#37* å
#æ
æ
DT412/DT422/DT432
Cancel any single Callback
Dial and enter the extension number.
Note: To cancel a single Callback on a specific external line,
dial the digit or digits to get a line instead of the extension
number.
Press.
Wait for the call icon to stop flashing.
Press to finish the procedure.
43
Outgoing Calls
#37#
æ
æ
Cancel all Callbacks
Dial.
Press.
Wait for the call icon to stop flashing.
Press to finish the procedure.
Activate Call Waiting
5
If you urgently wish to contact a busy extension or external line, you
can notify by a Call Waiting signal.
Press
6
4
Note: France and Finland, press ; Sweden, press .
Keep your phone off-hook
When the called extension or the external line becomes free, it will
be called automatically.
Note: The Call Waiting function might be blocked for use on
your extension (programmed by your system administrator).
If Call Waiting is not allowed, you will continue to receive a
busy tone.
Intrusion on a busy extension
4
You can intrude on an ongoing call on a busy extension.
Press
8
Note: France and Sweden, press .
Before the Intrusion is executed a warning tone is sent to the
parties in the ongoing call. A three party call is established and a
warning tone is heard.
Note: The warning tone might be disabled for your system.
The Intrusion function might be blocked for use on your
extension (programmed by your system administrator). If
Intrusion is not allowed, you will continue to receive a busy
tone.
44
DT412/DT422/DT432
Outgoing Calls
Bypass
æ
*60* å
#
DT412/DT422/DT432
If this function is allowed from your extension, you can bypass an;
activated Diversion, activated Follow-me or activated Absence
Information on a specific extension.
Press.
Dial and enter the extension number.
Press and wait for answer.
45
Outgoing Calls
Speed Dialing
Note: You can also make Speed Dialing calls via the
Phonebook and Call list, see sections “Phonebook” on
page 50 and “Dial number from the Call list” on page 40.
Common Speed Dialing numbers
å
æ
By using common Speed Dialing numbers, you can make calls
simply by pressing a few keys. The common Speed Dialing
numbers consist of 1–5 digits and are stored in the exchange (by your
system administrator).
Dial the common Speed Dialing number.
Please refer to your telephone directory.
Press to make the call.
Dial a number via Hot key or Soft key
The Hot key or Soft key has to be preprogrammed with a number,
see section “Hot keys and Soft keys” on page 100.
å
ä
46
Via Hot key:
Press and hold the preprogrammed Hot key.
A number between 0 and 9. The display shows the
preprogrammed number. The number is dialed and the connection
will be established automatically.
Via Soft key:
Press the preprogrammed Soft key (see display).
The display shows the preprogrammed number. The number is
dialed and the connection will be established automatically.
DT412/DT422/DT432
Outgoing Calls
Authority
Authorization Code, common
If you are assigned to use a common Authorization Code (1 to 7
digits) you can temporarily change any used phone within the
exchange to the authority level connected to this code. You can
use the code for one call only or you can open the phone for some
calls and lock it when leaving the phone.
*72*
å#æ
å
To use for a single call:
#73*
å#æ
æ
To open an extension for some calls:
*73*
å#æ
æ
To lock an extension
DT412/DT422/DT432
Dial.
Enter Authorization Code and press.
Verification tone.
Dial the digit or digits to get an external line and the external
number.
Dial.
Enter Authorization Code and press.
Verification tone.
Press to finish the procedure.
Dial.
Enter Authorization Code and press.
Verification tone.
Press to finish the procedure.
47
Outgoing Calls
Authorization Code, individual
If you are assigned to an individual Authorization Code (1 to 7
digits, assigned to your own extension) you can lock your own
extension to a common authority level, e.g. when out of the office.
You can also temporarily change any other used phone within the
exchange to the same authority level as you have on your own
phone. The individual code can be changed from your own
extension.
48
*76*
å#æ
æ
To lock your phone:
*75*
å#æ
å
To make calls with your authority level when your phone is locked:
#76*
å#æ
æ
To open your phone:
Dial.
Enter Authorization Code and press.
Verification tone.
Press to finish the procedure.
Dial.
Enter Authorization Code and press.
Verification tone.
Dial the digit or digits to get an external line and the external
number.
Dial.
Enter Authorization Code and press.
Verification tone.
Press to finish the procedure.
DT412/DT422/DT432
Outgoing Calls
*75*
å*
å#æ
å
To assign your own authority level to another phone:
*74*
å*
å#æ
æ
To change your individual Authorization Code:
DT412/DT422/DT432
Dial.
Enter Authorization Code and press.
Dial your own extension number and press.
Verification tone.
Dial the digit or digits to get an external line and the external
number.
Dial.
Enter old Authorization Code and press.
Dial new Authorization Code and press.
Verification tone.
Press to finish the procedure.
49
Phonebook
Phonebook
Your phone is equipped with a local Phonebook (personal) and a
central Phonebook.
In the local Phonebook you can make up to 100 entries (names
and numbers). The Phonebook entries are stored on the SIM card
in your phone.
Notes:
Phonebook numbers have a maximum of 22 digits and
phone book names have a maximum of 16 characters.
An indication that the Phonebook is full (indicated with a
beep), means that you have to delete an entry before you
can add a new one.
You can also open the Phonebook by programming a Soft/
Hot key. See section “Hot keys and Soft keys” on page 100.
50
DT412/DT422/DT432
Phonebook
Enter names and numbers
The characters that you can enter, are written above each key.
Use the keypad to write text. The following explains how to write
text when you add a new name in the Phonebook menu.
Example (to write SMITH):
7777
6
444
8
44
ã
The marked character is selected after a time out or when another
key is pressed.
Press for S
Press for M
Press for I
Press for T
Press for H
Press when the name is complete.
Control keys
à
á
*
0
C
While entering a name or a number you can use the following keys
for control and navigation:
Press to move left.
Press to move right.
Press to switch between upper and lower case.
Note: It is possible to turn on/off the tone sender in a
predialed number by making a long press on the * key (e.g.
when calling telephone banks). Tone sender on will be
indicated with a T in the number, and off with -.
Press to enter a space.
Press to correct a wrong entry (see display).
Note: Deletes the entire entry if held longer.
DT412/DT422/DT432
51
Phonebook
Special characters
Use the keypad to enter letters and characters. Press a key once
for the first letter or character, twice for the second, three times for
the third, etc. The most common letters are printed above each key
on the phone. All the available letters and characters are shown in
the following table:
Number of times to press the key
Phone
key
1
2
3
4
5
6
7
8
9
10
11
1
-
?
!
,
.
:
"
’
(
)
1
2
A
B
C
Å
Ä
Æ
À
Á
Â
Ã
Ç
3
D
E
F
È
É
Ê
Ë
3
4
G
H
I
ï
Ì
Î
Í
4
5
J
K
L
5
6
M
N
O
Ñ
Ö
Ø
Ò
Ó
Ô
Õ
6
7
P
Q
R
S
ß
7
8
T
U
V
Ü
Ù
Ú
Û
8
9
W
X
Y
Z
Ý
9
0
Space
+
&
<
@
=
/
>
$
^
%
_
£
°
μ
\
¿
±
¦
#
12
13
2
½
0
§
Note: Depending on the selected menu language, other
characters might be available, which means that the
character order differs from the table above.
2
52
Example special characters:
To enter Ä press 2 (five times).
1 time
result A
2 times result B
3 times result C
4 times result Å
5 times result Ä
DT412/DT422/DT432
Phonebook
Enter the Phonebook
ç
à á
ã
á
or
Access the names and numbers of the Phonebook.
Press.
The last used tab is marked.
Select Contacts.
Press to enter Contacts.
Select Local phonebook.
The name list is shown.
Local phonebook
Adam
Bob
Charlie
Add
Delete
>
Find
Make a call via the Phonebook
When you have accessed the central or local Phonebook:
Find
å
Ok
â ã
æ
or
DT412/DT422/DT432
Press (see display).
Find:_ is displayed.
Press the key which has the first letter of the name you are
looking for.
How to write text, see section “Enter names and numbers” on
page 51.
Press to confirm (see display).
The first name beginning with that letter is displayed.
Scroll up or down until you find the name.
Press.
The number is dialed.
53
Phonebook
Add a name and a number to the
Phonebook
When you have accessed the Phonebook:
Add
Press (see display).
Name: _
Number:
å
C
ã
å Save
ç
à á
ã
á
â ã
or
or
å Save
54
Back
C
ABC
Save
Enter the name.
How to write text, see section “Enter names and numbers” on
page 51.
Press to correct a wrong entry (see display).
Press.
Enter the phone number and press (see display).
The name and number are stored in the Phonebook.
Save a number from the Call list to the
Phonebook
Press.
The last used tab is marked.
Select Contacts.
Press to enter Contacts.
Select Call list.
Scroll up or down the Call list until you find the number.
Press.
The number is automatically added to the Phonebook.
Enter the name and press (see display).
How to write text, see section “Enter names and numbers” on
page 51. The name and number are stored in the Phonebook.
DT412/DT422/DT432
Phonebook
Change a name and a number in the
Phonebook
â ã
á
or
When you have accessed the Phonebook:
Scroll up or down until you find the name.
Select the name.
Name: Adam
Number: 001811005555
Back
Edit
å
C
ã
å Save
DT412/DT422/DT432
Delete
Edit
Press (see display).
Edit the name.
How to write text, see section “Enter names and numbers” on
page 51.
Press to correct a wrong entry (see display).
Press.
Edit the phone number and press (see display).
The name and number are changed.
55
Phonebook
Delete a name and a number from the
Phonebook
â ã
á
or
Delete
When you have accessed the Phonebook:
Scroll up or down until you find the name.
Select the name.
The name and number is displayed.
Press (see display).
Delete entry?
No
Yes
56
Yes
Press to delete the name and number (see display).
The name and number are deleted.
DT412/DT422/DT432
During Calls
During Calls
Handsfree
This function is useful in situations when you need to have a
conversation over the phone while having your hands free for other
tasks (handsfree). You can switch to handsfree speaking (and back
to standard speaking procedure) at any time during a call.
ä
ä
DT412/DT422/DT432
To activate handsfree during a call:
Press the middle Soft key to activate handsfree speaking
mode.
You are connected to the caller via the loudspeaker and
microphone.
Note: You can adjust the volume, see section “Audible
Adjustments” on page 112.
Press again to deactivate handsfree speaking mode.
57
During Calls
Mute microphone
To mute the microphone during an ongoing conversation:
Press the Mute key at the right side of the phone to turn the
microphone off.
The microphone is disconnected and the caller will not hear an
ongoing conversation or environmental noises. The text Muted is
shown in the display when the microphone is off during a call.
Press the Mute key again to turn the microphone on.
Note: It is advised to use this feature instead of putting a
call on hold. A call on hold may be diverted to your operator,
directly or after some time.
Inquiry
You have an ongoing conversation and you would like to make an
Inquiry to an internal or external party.
R
å
R
ææ
2
Press (see display).
Dial tone. The first call is put on hold.
Call the third party.
When the third party answers, you can switch between the calls
(Refer Back), transfer the call, create a Conference and end one of
the calls.
Press to end the Inquiry call (see display).
The third party is disconnected.
Press to return to the first party.
Refer Back
Press to Refer Back to the other party.
The party you talked to is put on hold, the other party is connected.
Note: Sweden press R (see display).
58
DT412/DT422/DT432
During Calls
Transfer
You have an ongoing call and you want to transfer the call to
another extension.
R
å
æ
Press (see display).
Dial tone.
Call the third party.
Press before or after answer
The ongoing call is transferred.
Note: If you have put more than one call on hold the last call
that was put on hold will be transferred. If the dialed
extension is busy or Transfer is not allowed, your phone will
ring again.
Call Waiting
If you hear the Call Waiting tone during an ongoing conversation,
another person is trying to contact you.
æ
æ
DT412/DT422/DT432
To terminate the ongoing call and answer the waiting call:
Press to finish the ongoing call.
The waiting call is signalled on your phone.
Press to answer the new call.
Note: The Call Waiting function might be blocked for use on
your extension (programmed by your system
administrator).
59
During Calls
Conference
With this procedure you can include up to seven parties in a
conference. Only the conference leader (i.e. the person initiating the
conference) can admit participants. During the conference a tone
will be heard every 15 seconds.
Note: The conference tone might be disabled for your
system.
You have an ongoing conversation and want to establish a
telephone conference. You will become the conference leader.
R
å
3
æ
Press (see display).
Dial tone.
Call the third party.
Wait for answer.
Press to establish a conference.
Repeat the procedure to add more conference members.
End the call to leave the conference.
Note: A tone burst is heard each time a participant enters
or leaves the conference. When the conference leader
leaves the conference, the conference will continue with the
other included parties. The conversation is changed back to
a normal two party connection when there is only two
parties left.
Answer a conference call
æ
60
A conference call is indicated by a different signal compared to
normal calls and a text message. The conference call must be
answered within a pre-set time (default 30 seconds). A normal call
in progress has higher priority, but if the normal call is ended before
the pre-set time, the conference call indication starts and the call
can be answered.
Press to answer the conference call.
You are connected to the conference.
DT412/DT422/DT432
During Calls
On hold
You can temporarily put the ongoing call on hold. Calls put on hold
can be resumed on your own or on another phone.
R
æ
æ
åæ
8
Press (see display).
Dial tone.
Press.
To resume the call on your extension
Press within 30 seconds.
If not resumed within 30 seconds you will be called back. An
unanswered external call will be re-routed to the operator after
another 30 seconds.
To resume on another extension
Call the extension where the call was put on hold and press.
Busy tone.
Press.
4
6
Note: France, press ; Sweden, press .
Dialing during a connected call
When calling interactive teleservices, e.g. telephone banks, you
need to use Dual Tone Multi Frequency (DTMF) signals. If your
exchange is not already programmed to automatically convert your
entered digits into DTMF signals, you need to activate the function
during the call.
9å
During an ongoing call:
Press and dial the required digits.
Entered digits are transferred as DTMF signals.
Note: Finland press
DT412/DT422/DT432
1 and dial the required digits.
61
During Calls
Push-to-talk button
There are two different types of push-to-talk functions that are set
by SIM card parameters in the phone. For both variants the Mute
key has to be pressed during conversation.
The first push-to-talk function can be described as a group call/
conference call. To enter the group call the members must press a
Soft/Hot key with a pre-programmed dial-code. If one of the group
members wants to get in contact with the others, he/she simply
presses and holds the Mute key to open the microphone. The
microphone is muted again when the Mute key is released. The
dial-code is set in the Soft/Hot key as a phone number, see section
“Hot keys and Soft keys” on page 100.
Note: When this function is enabled all calls started with a
Soft/Hot key will be using the push-to-talk function.
The second push-to-talk function is used in systems where only
one person is allowed to speak (not two persons at the same time).
The phone sends DTMF tones to the connected system when the
Mute key is pressed/released to open/close the speech channel.
62
DT412/DT422/DT432
Call Forwarding
Call Forwarding
Internal Follow-me
All calls to your extension are diverted to an extension of your
choice (within the private network). During Follow-me the display
shows a > after your number. On the next row the answering
position number is shown. A special dial tone will be heard. During
Follow-me, your phone can still be used for outgoing calls.
*21* å
#æ
æ
Order
Dial and enter the answering position number.
Note: U.K., dial
* 2 * and number.
Press.
Wait for the call icon to stop flashing.
Press to finish the procedure.
Display example:
4736 >
4321
DT412/DT422/DT432
13:05
63
Call Forwarding
#21# æ
æ
Cancel
Dial and press.
Note: U.K., dial
#2#
Wait for the call icon to stop flashing.
Press to finish the procedure.
External Follow-me
If external Follow-me is allowed, you can have all calls to your
extension diverted to an external number of your choice. During
Follow-me the display shows a > after your number. A special dial
tone will be heard. During Follow-me, your phone can still be used
for outgoing calls.
*22#
å
#æ
æ
Order
Dial.
Dial the digit or digits to get a line and enter the external
number.
Press.
Wait for the call icon to stop flashing.
Press to finish the procedure.
Display example:
4736 >
64
13:05
DT412/DT422/DT432
Call Forwarding
#22#
æ
æ
Cancel
Dial.
Press.
Wait for the call icon to stop flashing.
Press to finish the procedure.
Personal Number
With this feature you can be reached on your normal office phone
number even if you are out of the office, at home, etc.
Depending on the functionality of your office exchange, you can
have either one individual single search profile (standard) or you can
choose between five individual search profiles (optional).
A search profile can be designed to fit the situation, i.e. in the office,
traveling, at home, etc. Both internal or external phone numbers
can be used in a profile.
Your search profile is programmed or modified by your system
administrator. See section “To design and order your search
profiles” on page 68.
When the feature is activated, incoming calls are transferred to your
selected phones or back-up services in the order that you choose.
If an answering position in the profile is busy, the call can be
transferred to another predefined position in the profile, i.e. Voice
Mail or a colleague.
You can handle the profiles from your own office phone. How to do
this is described in this section (an operator can also assist you).
You can also use any of the Personal Assistant applications, if
available. Contact your system administrator for more information.
When out of the office, the feature Direct Inward System Access
(DISA) can be used, if available in your system. How to use DISA is
described in this section.
DT412/DT422/DT432
65
Call Forwarding
*10*
(1–5)
#æ
æ
#10#
æ
æ
66
To activate or change to another profile from your office
phone
Dial.
Press the search profile digit.
Press.
Wait for the call icon to stop flashing.
Press to finish the procedure.
Note: When another party is included in the activated
profile, a colleague or an operator, etc., always remember
to inform about your absence. If Voice Mail is included in the
activated profile, always update your greeting with Absence
Information.
To cancel from your office phone
Dial.
Press.
Wait for the call icon to stop flashing.
Press to finish the procedure.
DT412/DT422/DT432
Call Forwarding
To activate or change to another profile from an external
phone
z
*75*
z*
z#
*10*
z*
(1–5)
#d
DT412/DT422/DT432
#
*
The external phone must be of push button type provided with
pound key ( ) and star key ( ) or a mobile phone adapted for dial
tone pulses (DTMF).
Call the DISA function at your office.
Dial tone.
Dial.
Enter the Authorization Code and press.
Dial your own extension number and press.
Dial tone.
Dial.
Dial your own extension number and press.
Press the search profile digit.
Press and replace the handset.
Note: When another party is included in the activated
profile, a colleague or an operator, etc., always remember
to inform about your absence. If Voice Mail is included in the
activated profile, always update your greeting with Absence
Information.
67
Call Forwarding
To cancel from an external phone
z
*75*
z*
z#
#10*
z#
d
#
*
The external phone must be of push button type provided with
pound key ( ) and star key ( ) or a mobile phone adapted for dial
tone pulses (DTMF).
Call the DISA function at your office.
Dial tone.
Dial.
Dial the Authorization Code and press.
Dial your own extension number and press.
Dial tone.
Dial.
Dial your own extension number and press.
Replace the handset.
To design and order your search profiles
The search profiles are installed or changed by your system
administrator. In order to set up your profiles, copy the setting form,
fill in your new or changed profiles and give it to your system
administrator.
Note: If a profile handling application is connected to your
system, you can edit profiles via your Intranet. See separate
instructions for the application.
68
DT412/DT422/DT432
Call Forwarding
Important notes when designing your search profiles:
•
Avoid ring times longer than 45 seconds for your profiles.
Usually the caller hangs up after 3-6 ring signals. If you need a
longer ring time, the maximum time is 60 sec.
•
Consider the time you need to react and answer on each
answering position in your profile.
You might need up to 15 seconds to react and answer a call on
a desk or cordless phone and 20–25 seconds for a mobile
phone.
•
There must be an answering position at the end of every profile
(Voice Mail or operator/secretary).
If not, calls might end up unanswered.
•
Consider what should happen while you are busy on a phone.
The available options are:
•
–
Follow-me to Voice Mail
–
Follow-me to the operator
If an answering machine, a fax or other answering device is
used as an early answering position, it might interrupt the
searching.
Disconnect the answering device, or design the ring times so
they do not affect the searching.
•
If your system admits just one single personal profile, design the
profile only with your 2–3 most frequently used positions.
If you add more numbers, there is a risk that the caller hangs up
before a latter position is called.
•
If your system admits 1–5 personal profiles, design the different
profiles to fit your most frequently used positions.
Make sure you use as few answering positions as possible for
each profile. Profile examples:
DT412/DT422/DT432
–
In office
–
At home
–
Traveling
–
Absent/not reachable
69
Call Forwarding
Example:
How to fill in your setting form for search profiles:
Profile 1
In office
Search
order
Type of telephone or
Answering position*
1
Desk
1234
10
2
Cordless
5234
15
3
Voice Mail
Telephone number
Ring time
(seconds)
* Examples: Desk, Cordless, Mobile, External, Voice Mail, Operator, etc.
Profile 2
70
At home
Search
order
Type of telephone or
Answering position*
1
External
222222
20
2
Mobile
0706666666
25
3
Voice Mail
Telephone number
Ring time
(seconds)
DT412/DT422/DT432
Call Forwarding
Setting form for search profiles
Name:
Department:
Telephone No:
Account:
Profile 1
..........................
Search
order
Type of telephone or
Answering position*
Telephone number
Ring time
(seconds)
1
2
3
4
* Examples: Desk, Cordless, Mobile, External, Voice Mail, Operator, etc.
Profile 2
..........................
Search
order
Type of telephone or
Answering position*
Telephone number
Ring time
(seconds)
Telephone number
Ring time
(seconds)
Telephone number
Ring time
(seconds)
Telephone number
Ring time
(seconds)
1
2
3
4
Profile 3
..........................
Search
order
Type of telephone or
Answering position*
1
2
3
4
Profile 4
..........................
Search
order
Type of telephone or
Answering position*
1
2
3
4
Profile 5
..........................
Search
order
Type of telephone or
Answering position*
1
2
3
4
DT412/DT422/DT432
71
Absence Information
Absence Information
The Absence Information is used to inform callers why you are
absent and when you return. If you are authorized, you can also
enter Absence Information for another extension from your own
extension. A special dial tone will be heard. During Absence
Information, your phone can still be used for outgoing calls.
Order
*23* ( 0 – 9 )
*0915
#æ
æ
Example: Back on September 15 (=0915).
Dial and enter the absence code.
Note: The absence code is system dependent. Contact
your system administrator regarding the available absence
codes.
Press and enter date (MMDD) or time (HHMM) of your return.
Note: If no return time or date is needed, this step can be
skipped.
Press.
Wait for the call icon to stop flashing.
Press to finish the procedure.
Display example:
4736 TRIP
15 Sep
72
13:05
DT412/DT422/DT432
Absence Information
#23#
æ
æ
*230*
å*
(0–9)
*0915
#æ
Cancel
Dial.
Press.
Wait for the call icon to stop flashing.
Press to finish the procedure.
The programmed information is erased.
Order for another extension
Dial.
Dial the extension number and press.
Enter the absence code.
Press and enter the date (MMDD) or time (HHMM) of the
other person's return.
Note: If no return time or date is needed, this step can be
skipped.
Press.
Wait for the call icon to stop flashing.
æ
DT412/DT422/DT432
When the display on the other person's extension shows the
reason, and if entered, time or date of return:
Press to finish the procedure.
73
Absence Information
#230*
å#æ
Cancel for another extension
Dial.
Dial the extension number and press.
Wait for the call icon to stop flashing.
æ
74
Note: If the special dial tone is received, the Authorization
Code for the other extension is required. Add the code and
press before pressing the Hook key.
#
Press to finish the procedure.
DT412/DT422/DT432
Messages
Messages
When you receive a new message, the flashing lamp, accompanied
by a message tone and/or a vibrating phone, give you notice of a
message (a special dial tone can also be used to indicate a waiting
message, if programmed).
The New message icon is also used to indicate a new message. In
addition you can see the number of queued messages in the
display.
The message tone can be silenced by a press on the Mute key.
Notes:
The message tone will break through silent mode if the
message is urgent.
The message list is cleared when your phone is switched off
or the power of your phone is lost.
DT412/DT422/DT432
75
Messages
Manual Message Waiting (MMW)
If the called extension does not answer you can initiate a message
waiting indication on that extension (if this function is allowed).
Answer
An indication of a waiting message appears in the display, e.g.
Voice mail: 1.
Listen
Press (see display).
A call is initiated to the extension that requested Message Waiting.
Note: If the message is not answered within a certain time
(pre-defined by the system administrator), the Message
icon appears in the display, e.g. 3 . The message is
answered via the message list, see section “Text
messages” on page 77.
*31* å
#æ
æ
#31# å
#æ
æ
76
Order MMW to another extension
Dial and enter the extension number.
Press.
Wait for the call icon to stop flashing.
Press to finish the procedure.
The message is sent to the called extension.
Cancel MMW to another extension
Dial and enter the extension number.
Press.
Wait for the call icon to stop flashing.
Press to finish the procedure.
DT412/DT422/DT432
Messages
Text messages
The twenty last received text messages are stored in the message
list. To send text messages see section “SMS (Short Message
Service)” on page 80.
Notes:
If there is not enough free memory to store an incoming
message the oldest message will be deleted. This means
that it is not always possible to store twenty messages, it
depends on how big the messages are.
â
â ã
á
or
By pressing any key (not Alarm, Mute, and Volume keys) the
received message is marked as read.
Press to enter the message list.
Scroll up or down until you find the message.
The selected message is highlighted.
Press to read the message.
Lunch today?
From: Phil Collins
11:00 15/12
Delete
13:05
Exit
If the Clock and Date function is set, you can on the same day the
message was received, see the time for the message. The time
stamp is changed to a date stamp the following day. See section
“Clock settings” on page 106.
The size of the text can be changed or be displayed upside down,
see section “Settings” on page 99.
DT412/DT422/DT432
77
Messages
To delete a message:
Delete
Yes
Press (see display).
Delete message? is shown in the display.
Press to delete the message (see display).
If you get a text message with a request for answer, the text
Acknowledge is added to the message. Use the Soft keys to do a
positive or negative acknowledgement.
Note: The option Delete is not available for a message with
request for answer. An unacknowledged message can only
be deleted from the message list.
To reply to an incoming text message:
Reply
å Send
78
Press (see display).
Enter the message text and press (see display).
Sending is displayed as a confirmation of the transfer.
DT412/DT422/DT432
Messages
Absent
Activate Absent if you cannot receive any SMS messages. The
system will then receive an absent notice, and keeps track of if you
can be reached or not.
This function can be programmed as a Hot key or a Soft key. How
to program a Soft/Hot key, see section “Hot keys and Soft keys” on
page 100. It is also possible to activate/deactivate this function via
the menu, see section “Modes” on page 94.
Notes:
This feature may be restricted or not available. Ask the
system administrator for the availability and for more
information.
If you program a Hot key, you have to press and hold the
key when you activate/deactivate this feature.
Activate
Absent
Press the preprogrammed Soft/Hot key (see display).
The display shows:
Absent
Smith 4321
13:05
Deactivate
Absent
Press preprogrammed Soft/Hot key (see display).
The display shows:
System A
Smith 4321
DT412/DT422/DT432
13:05
79
Messages
SMS (Short Message Service)
SMS messages from one phone to another is enabled by
programming a Soft/Hot key to SMS, see section “Hot keys and
Soft keys” on page 100. If you program the Soft/Hot key without a
destination address you will be able to use it for sending an SMS to
any phone within the system, but you can also choose to send to a
predefined destination address.
An incoming SMS is immediately displayed and the number of the
sending phone is shown on a separate row. The time and date the
SMS was received, and the number of the sending phone, is
shown when you read the message. To view and reply incoming
SMS messages, see section “Text messages” on page 77. All SMS
messages are saved along with other messages in the message
list.
Notes:
This feature may be restricted or not available. Ask the
system administrator for the availability and for more
information.
If you program a Hot key, you have to press and hold the
key when you activate/deactivate this feature.
Send an SMS
SMS
å
Press the preprogrammed Soft/Hot key (see display).
Enter the destination number,
If you are sending an SMS to a predefined destination address, this
step is excluded.
or
press to fetch it from the local Phonebook (see display).
If you are sending an SMS to a predefined destination address, this
step is excluded.
Ok
å Send
80
Press (see display).
If you are sending an SMS to a predefined destination address, this
step is excluded.
Enter the message text and press (see display).
Sending is displayed as a confirmation of the transfer.
DT412/DT422/DT432
Messages
Interactive Messaging
Interactive Messaging (IM) is a function that extends basic
messaging. It makes it possible to access information from a client
application in the system. An example can be a centralized
Phonebook (a central phone number directory) that can be
accessed from your phone, or that a list of actions is included in the
message sent from the application to the phone.
Mobile data from the phone can initiate the application to send the
Interactive Message. The user can then select one action from the
list. The action can be sending a message back to the application,
and/or dialing a specific number etc.
Note: This feature may be restricted or not available.
Ask the system administrator for the availability and for
more information.
Incoming Interactive Message
An Interactive Message is indicated and viewed the same way as
an ordinary message, but the Interactive message icon is added in
front of the message. It is saved along with other messages in the
message list.
If the message gives you several options:
Select
å Ok
Mark the one you want and press (see display).
If the selected option requests input:
Enter the information needed and press (see display).
A press on the middle Soft key will change to digit input mode to
facilitate entering numbers.
Send mobile data
It is possible to send user entered data from the phone by pressing
a preprogrammed Hot key or Soft key, or selecting a service.
Mobile data can be used for opening a door, starting/stopping a
machine etc. The data can either be predefined, or entered after
the Soft/Hot key is pressed or service is selected. Mobile data with
prefix can be used to send information to an application in the
system (can also be predefined when you program the Soft/Hot
key or service). See sections “Hot keys and Soft keys” on page 100
and “Services” on page 96.
DT412/DT422/DT432
81
Messages
Voice Mail (optional)
The Voice Mail application allows you to leave a voice message to
the caller when you are unable to answer calls, e.g. when out of
office, in a meeting, etc. The caller can then leave a message in
your mailbox. When back in your office you can enter your mailbox
and listen to the messages received.
You can choose to divert all incoming calls to your mailbox, or calls
when there is no answer, or calls when your phone is busy.
If you use the Personal Number feature, it is recommended to
program Voice Mail as the last answering position for all search
profiles.
When you enter your mailbox, you will hear recorded instructions
on how to handle listening, recording, storing and deleting
messages, and how to change your security code.
Note: How to handle your mailbox, depends on the type of
Voice Mail system. The following describes the, in MD110,
integrated type. For other types, please refer to separate
user instructions. Contact your system administrator if you
do not know which type of Voice Mail system you have.
To activate and deactivate your mailbox
See section “Internal Follow-me” on page 63 (function code 21).
Use the number to the Voice Mail system as the “answering
position number”.
To access your mailbox when there is a new message
Listen
å
82
Press (see display).
If you are asked to enter your security code:
Enter your security code.
Code at delivery = your extension number.
DT412/DT422/DT432
Messages
To access your mailbox in general
åæ
å
åæ
#
å
å
åæ
#
å
å
DT412/DT422/DT432
When you want to listen to saved messages, change your security
code or change your greeting.
Dial the number to the Voice Mail system and press.
If you are asked to enter your security code (if the phone you are
using has a mailbox of its own):
Enter your security code.
Code at delivery = your extension number.
To access your mailbox from another phone
Dial the number to the Voice Mail system and press.
If you are asked to enter your security code (if the phone you are
using has a mailbox of its own):
Press.
Dial your mailbox number.
(normally your office extension number)
Enter your security code (if required).
To access someone else’s mailbox
Dial the number to the Voice Mail system and press.
If you are asked to enter your security code (if the phone you are
using has a mailbox of its own):
Press
Dial the mailbox number
(normally the office extension number of the other person).
Enter the security code of the other person (if required).
83
Messages
To handle the mailbox
Recorded information on the line informs about the number of new
and stored messages. If you have too many messages stored, you
will first be asked to delete saved messages.
Recorded instructions ask you to press different digits in order to
listen to caller's messages, record your own greetings, change
your password or exit your mailbox, etc.
The following diagram gives an overview of the mailbox system and
the digits to be used.
t level
84
DT412/DT422/DT432
Group Features
Group Features
Group Call-pick-up
People working in a team can have their phones programmed by
the system administrator to form Call-pick-up groups.
*8# æ
In a Call-pick-up group, any member can answer any individual call
to group members.
Dial and press to answer.
Notes:
One Call-pick-up group can serve as an alternative to
another group. Calls to the alternative group can only be
answered when there are no calls to your own group.
Finland and Sweden, press
*0#
Common Bell Group
*8# æ
DT412/DT422/DT432
Calls are signalled on a common bell.
Dial and press to answer.
Note: Finland and Sweden, press
*0#
85
Group Features
Group Hunting
An internal Group Hunting number is a common directory number
for a group of extensions. Calls to the group will be indicated at a
free extension in the group.
When you leave the group temporarily, you make your phone
unavailable for incoming calls.
*21* å
#æ
æ
#21# æ
æ
86
To leave the group temporarily
Dial and enter your own extension number.
Note: U.K., dial
* 2 * and number.
Press.
Wait for the call icon to stop flashing.
Press to finish the procedure.
To re-enter the group
Dial and press.
Note: U.K., dial
#2#
Wait for the call icon to stop flashing.
Press to finish the procedure.
DT412/DT422/DT432
Other Useful Features
Other Useful Features
Account Code
*61*
å#æ
å
This function is used to charge a call to an account number or to
prevent unauthorised calls from your phone. The Account Code
can have 1 to 15 digits.
Dial.
Note: Norway and Finland, dial
* 7 1 *.
Dial the Account Code and press.
Dial tone.
Dial the digit or digits to get an external line and the external
number.
Ongoing external call
When the Account Code function is used to charge a call it is also
possible to connect an ongoing external call to an Account Code.
During the call:
R
*61*
å#
R
ææ
DT412/DT422/DT432
Press to put the ongoing call on hold (see display).
Dial tone.
Dial.
Note: Norway and Finland press
* 7 1 *.
Enter Account Code and press.
Dial tone.
Press (see display).
Press to resume the call that was put on hold.
87
Other Useful Features
General Deactivation
The following features can be simultaneously cancelled:
#001# æ
æ
•
Callback (all Callbacks are cancelled).
•
Internal and External Follow-me.
•
Manual Message Waiting/Message Diversion.
Order
Dial and press.
Wait for the call icon to stop flashing.
Press to finish the procedure.
Night Service
When the exchange is in Night Service mode, all your incoming
calls to the operator are transferred to a selected extension or
group of extensions. The exchange is equipped with three different
Night Service modes:
Common Night Service
All incoming calls to the operator are transferred to one specific
extension. Answer the call in the normal way.
Individual Night Service
Selected external calls to the operator are transferred to one
specific extension. Answer the call in the normal way.
Universal Night Service
All incoming calls to the operator are transferred to a universal
signalling device, e.g. the common bell. Answer the call as
descibed in section “Common Bell Group” on page 85.
88
DT412/DT422/DT432
Other Useful Features
Emergency mode
In the event of an emergency, the operator can set the exchange
into Emergency mode, during which only preprogrammed
extensions are permitted to make calls. If your extension is not
assigned with this category and you try to make a call, you will not
receive a dial tone.
Malicious Call Tracing
If you are disturbed by bothersome or malicious external incoming
calls, you can request number tracing from the network provider.
You can invoke tracing during or after an ongoing conversation.
The external line can be held for a limited period of time.
Order
During an ongoing conversation:
R
*39#
DT412/DT422/DT432
Press (see display).
Dial tone.
Dial.
The system acknowledges with different tones whether the tracing
request was accepted or rejected.
89
Other Useful Features
DISA = Direct Inward System Access
If you are assigned to use this function and you are working
externally, you can call your office and get access to an external line
in order to make business calls. The business call will be charged
your office extension number or an account number. You will just
be charged for the call to the office.
#
*
The external phone must be of push button type provided with
pound key ( ) and star key ( ) or a mobile phone adapted for dial
tone pulses (DTMF).
After a completed DISA call you must hang up before a new DISA
call can be made.
There are different procedures depending on the type of
Authorization Code, or when an Account Code is used.
90
z
*72*
z#
z
With common Authorization Code
z
*75*
z*
z#
z
With individual Authorization Code
Call the DISA function at your office.
Dial tone.
Dial.
Dial the Authorization Code and press.
Dial tone.
Dial the external number.
Call the DISA function at your office.
Dial tone.
Dial.
Dial the Authorization Code and press.
Dial your own extension number and press.
Dial tone.
Dial the external number.
DT412/DT422/DT432
Alarm
Alarm
Note: The Alarm features are only available for the DT422
and DT432 phone.
When you work alone and at risk, your personal safety is important.
For situations like this, the DT422 and DT432 phones are equipped
with a red Alarm key on top. When you are in trouble, just press the
Alarm key to summon help by sending a preset message to the
alarm central, which distributes it (requires an external alarmserver).
Note: The Alarm features may be restricted or not
available. Ask the system administrator for the availability
and for more information.
Alarm with data
Additional data for example a location code, can be sent along with
an alarm. The data must manually be programmed by you. To use
the function, one Soft/Hot key must be defined as a short cut to the
menu Edit alarm data, see section “Hot keys and Soft keys” on
page 100. The stored data is added to all types of alarm at
transmission.
Automatic call after an alarm
The phone can be programmed to call a predefined phone number
directly after an alarm. One Hot key must be programmed with the
specific phone number, see section “Hot keys and Soft keys” on
page 100. It can be any external or internal phone number but also
a pre-defined group of phones. The phone can be configured to
call the same number for all types of alarms or to call different
numbers depending on the alarm type.
The automatic call can be programmed with speech monitoring,
i.e. the microphone on the phone that sends the alarm is discreetly
activated and will give the answering party opportunity to listen and
to take an appropriate decision on how to act.
DT412/DT422/DT432
91
Alarm
Personal Alarm
Activate
Press the red Alarm key twice within 2 seconds.
The display shows Personal Alarm and an alarm is sent to the
alarm central. After that, the phone returns to idle mode.
Note: You can always trigger the alarm, even when you are
speaking, editing your settings or while the phone is locked.
Cancel
C
Press to cancel the Personal Alarm (see display).
Test Alarm
Press and hold the red Alarm key until the information text is
displayed.
The default information text is Test Alarm.
C
92
Press to cancel (see display).
DT412/DT422/DT432
Alarm
No-movement Alarm and Man-down
Alarm
Notes:
This function requires an installed optional alarm module.
The stand-by time will decrease by approximately 25%
when the phone is equipped with the alarm module.
•
The No-movement Alarm will go off when you have not moved
within a preset time (default 30 seconds).
•
The Man-down Alarm will go off when the phone is tilted more
than 45º for a preset time (default 30 seconds), for example if
you fall.
Before an alarm is activated a warning signal sounds and the
No-movement alarm on or Man-down alarm on icon starts to
flash. If you do not cancel the alarm by pressing a key, it is sent and
a sensor inside the phone will alert the preprogrammed number.
To use any of these features, you have to activate them first. You
can do this via the Settings menu, see section “Settings” on
page 99 or by programming the function as a Hot key or Soft key,
see section “Hot keys and Soft keys” on page 100.
Press and hold the preprogrammed Soft/Hot key, to put the
alarm in operation respectively out of operation.
No-movement/Man-down Alarm is shown in the display when the
alarm is activated.
The No-movement and Man-down Alarms can be deactivated for
ten minutes (programmed by your system administrator). When the
warning signal sounds, press the Mute key to deactivate an alarm
for ten minutes.
A parameter in the phone determines whether or not an Acoustic
Localization Signal (ALS) should sound after a No-movement and
Man-down Alarm. The ALS is silenced by pressing the Mute key.
Make the alarm active again
When the No-movement Alarm has been sent, it is made active
again by moving the phone or pressing a key. When the Man-down
Alarm has been sent, it is made active again by moving the phone
to upright position or pressing a key.
DT412/DT422/DT432
93
Modes
Modes
The phone is equipped with ten modes. Two modes are preset at
delivery and the remaining eight modes are defined by you. The
preset modes are; Normal, and In charger.
The option Switch off is also located in the Modes menu.
Normal mode
The Normal mode is the default mode.
In charger mode
The In charger mode is activated when the phone is placed in the
charger and deactivated when removed, it cannot be manually
selected. Your last selected mode is automatically chosen when
the phone is removed from the charger.
User defined modes
Eight modes can be defined and saved by you. The modes can, for
example, be used to create a special headset mode with different
ring signal volume and automatic answer of incoming calls.
Another example is when several users are sharing the same
phone. Each user can then define his own settings, for example;
type of ring signal, volume, answering method, Soft key settings
etc. Note that one has to change to the user defined modes
manually.
94
DT412/DT422/DT432
Modes
ç
à á
ã
â ã
or
Change modes
Press.
The last used tab is marked.
Select Modes.
Press to enter Modes.
A list with all modes is shown. See also section “Menu structure”
on page 22.
or
Scroll up or down until you find the required mode.
Select
Press (see display).
The name of the selected mode is shown.
ç
ç
à á
ã
â ã
á
or
or
ç
DT412/DT422/DT432
Note: A Soft/Hot key can also be programmed to change
modes, see section “Hot keys and Soft keys” on page 100.
Press to leave the Modes menu.
Change mode settings
Press.
The last used tab is marked.
Select Modes.
Press to enter Modes.
A list with all modes is shown. See also section “Menu structure”
on page 22.
Scroll up or down until you find the required mode.
Press to view the settings.
The settings are basically the same as in the Settings menu, but
you also have the possibility to set Absent on/off, choose
answering method, and give the mode a new name. See sections
“Absent” on page 79, “Change answering method” on page 34
and “Settings” on page 99.
Note: It is possible to set that a mode should not be shown
in the list. This is an easy way to hide modes that are not
used. See section “Customizing the menus” on page 26.
Press to leave the Modes menu.
95
Services
Services
ç
à á
ã
or
ç
To enter the Services menu
Press.
The last used tab is marked.
Select Services.
Press to enter Services.
A list with all created services is shown. See also section “Menu
structure” on page 22.
Press to leave the Services menu.
Change service
â ã
or
When you have entered Services:
Scroll up or down until you find the required service.
Services
Open door
Get lab results
Require wheelchair
Add
Select
Delete
>
Select
Press (see display).
The service is activated. If data is sent, the text Sending is shown.
Note: You can also open a service by programming a Soft/
Hot key. See section “Hot keys and Soft keys” on page 100.
96
DT412/DT422/DT432
Services
Create a new service
When you have entered Services:
Add
å
Save
ã
Change
â ã
Select
å
or
Save
DT412/DT422/DT432
Press (see display).
Name:_ is displayed.
Enter a name that describes the service you want to add.
For example, if you want this service to open a door, then name it
Open door.
Press (see display).
The new name is marked and added to the list.
Press.
Function: Not used is marked.
Press to enter functions (see display).
The available functions are; Data send, Data with prefix, Phone
call, and SMS.
Choose the function you want the service to have.
Press (see display).
Enter data, prefix, phone number, or SMS address and text.
Press to save the setting (see display).
The new service is saved.
97
Services
Edit a service
â ã
á
Edit
å Save
ã
Change
â ã
Select
å
or
or
Save
When you have entered Services:
Scroll up or down until you find the service you want to edit.
Press.
Press to change the name (see display).
Change the name and press (see display).
Press.
Press (see display).
Choose the function you want the service to have.
Press (see display).
Enter data, prefix, phone number, or SMS address and text.
Press to save the setting (see display).
The service is changed.
Delete a service
â ã
or
Delete
When you have entered Services:
Scroll up or down until you find the service you want to
delete.
Press (see display).
Delete service?
No
Yes
98
Yes
Press (see display).
Entry deleted is shown for one second and the service is deleted.
DT412/DT422/DT432
Settings
Settings
Notes:
Some settings can also be controlled via the Modes menu,
see section “Modes” on page 94.
The alert signals are described in section “Audible
Adjustments” on page 112.
ç
à á
ã
â ã
ç
or
or
DT412/DT422/DT432
To enter the Settings menu
Press.
The last used tab is marked.
Select Settings.
Press to enter Settings.
A list with all available settings is shown.
Scroll up or down until you find the required setting.
Press to leave the Settings menu.
99
Settings
Alarm settings
Note: The Alarm settings are only available for the DT422
and DT432 phones.
Deactivate/Activate No-movement/Man-down Alarm
ãá
â ã
or
Change
When you have entered Settings:
Select Alarm settings.
Select No-movement or Man-down.
Press (see display).
The checkbox for the selected alarm is marked/unmarked.
Hot keys and Soft keys
By programming Soft/Hot keys, you can make calls or activate a
function by simply pressing one key. The programmed numbers
and functions are stored on the SIM card of your phone.
In idle mode the Soft keys can be used for specific functions
defined by you. The function can be to dial a specific phone
number, sending mobile data, a short cut to the menu, or sending
SMS. It can also be a link, for example to a central Phonebook.
When navigating the menu structure the Soft keys are used for
different choices in the menu.
A Hot key is one of the ordinary number keys 0 to 9. A Hot key can
have the same function as a Soft key, see above.
Note: The possibility to define a Hot key can be locked by
your system administrator.
To make a call with a Soft/Hot key, see section “Dial a number via
Hot key or Soft key” on page 46.
100
DT412/DT422/DT432
Settings
Activate a function or number with a preprogrammed
Soft key or a preprogrammed Hot key
Absent
å
Press the preprogrammed Soft key (see display),
The pre-set function will be activated, in this example Absent.
or
press and hold the preprogrammed Hot key.
A number between 0 and 9. The pre-set function will be activated.
Available functions
Data send - See section “Send mobile data” on page 81.
Data with prefix - See section “Send mobile data” on page 81.
Phone call - You program a key with a name and a number.
Short-cut - A short cut to any of the following functions:
•
Absent - See section “Absent” on page 79.
•
Local phonebook - See section “Phonebook” on page 50.
•
Central phonebook - See section “Phonebook” on page 50.
•
Services - See section “Services” on page 96.
•
Switch off - See section “Switching On/Off” on page 29.
•
No-movement Alarm *
•
Man-down Alarm *
•
Edit alarm data *
•
Change system - See section “Change system” on page 110.
•
Demo Mess 1
•
Demo Mess 2
•
RSSI
* Only available for the DT422 and DT432 phones. See section
“Alarm” on page 91.
SMS - See section “SMS (Short Message Service)” on page 80.
Change mode - See section “Change modes” on page 95.
Not used - If you do not need a function or a phone number any
longer, you can set the key to Not used.
DT412/DT422/DT432
101
Settings
Program a Hot key or a Soft key with a phone number
ãá
â ã
á
or
Edit
å Save
ã
Change
ã
Select
å
When you have entered Settings:
Select Soft key or Hot key.
Select key.
For the Soft keys you can select keys Left, Middle or Right and for
the Hot keys you can select keys 0 to 9.
Press.
Press (see display).
Name: is displayed.
Enter the name and press (see display).
Changes saved is displayed. How to write text, see section “Enter
names and numbers” on page 51.
Press.
Function: is marked.
Press (see display).
Select Phone call.
Press (see display).
Enter the phone number.
Notes:
If you program an external number, you have to enter the
prefix digit for external call access (e.g. ).
0
You can also store codes that contain * or #. You can for
example turn on/off the tone sender in the entered number
by making a long press on the * key (e.g. when calling
telephone banks). Tone sender on will be indicated with a T
in the number, and off with -.
Save
Press to save the setting (see display).
The key is programmed and the name of the selected function is
shown.
Repeat the procedure to program a new key or edit a
programmed key.
102
DT412/DT422/DT432
Settings
Program a Hot key or a Soft key with a function
ãá
â ã
á
or
Edit
å Save
ã
Change
â ã
When you have entered Settings:
Select Soft key or Hot key.
Select key.
For the Soft keys you can select keys Left, Middle or Right and for
the Hot keys you can select keys 0 to 9.
Press.
Press (see display).
Name: is displayed.
Enter the name and press (see display).
Changes saved is displayed. How to write text, see section “Enter
names and numbers” on page 51.
Press.
Function: is marked.
Press (see display).
or
Select the required function.
See section “Available functions” on page 101.
Select
Press (see display).
The following prerequisites apply:
Data send - Enter data if you want to predefine it, or leave it out if
you want to enter data after pressing the Soft key.
Data with prefix - Enter prefix.
Short-cut - Assign the short cut.
SMS - When SMS address is shown you can leave it blank, or you
can predefine a destination address. You can also predefine the
SMS text.
Change mode - Mark the mode that should be changed to.
Not used - Not used will be indicated in the Soft key list.
Save
or
Select
Press to save the setting (see display).
The key is programmed and the name of the selected function is
shown.
Repeat the procedure to program a new key or edit a
programmed key.
DT412/DT422/DT432
103
Settings
Language
The display messages are available in eleven languages: Danish,
Dutch, English, Finnish, French, German, Italian, Norwegian,
Portuguese, Spanish, and Swedish.
ãá
á
â ã
When you have entered Settings:
Select General.
Select Language.
or
Select the required language.
Select
Press (see display).
The selected language is shown.
Change text size
Note: This function is only available for the Cordless DT412
and DT422 phone.
You can change the text size in the display.
ãá
ã
á
â ã
104
When you have entered Settings:
Select General.
Select Text size.
Press.
or
Select the text size.
You can choose between Small and Medium.
Select
Press (see display).
Selected size is shown.
DT412/DT422/DT432
Settings
Phone lock
You can protect your phone from being used by others by locking
it. You can lock the phone manually or automatically. The Padlock
icon indicates when your phone is locked.
Note: When the phone is locked, it is still possible to send
all types of alarms.
Lock the phone manually
ãá
ãá
á
Select
When you have entered Settings:
Select General.
Select Phone lock.
Select Lock phone.
Press to lock your phone (see display).
Lock the phone automatically
With this function your phone is locked automatically when placed
in a charger or switched off.
Note: This function requires a SIM card parameter setting.
The function can only be enabled/disabled in the SIM card,
not from the phone.
Unlock the phone
The phone can only be unlocked with the lock code. The lock code
is preprogrammed on the SIM card and can be changed from the
phone, see section “Set lock code” on page 106.
å
DT412/DT422/DT432
With the phone switched on:
Dial your lock code.
105
Settings
Set lock code
The lock code consist of one to four digits and you can change it
from your phone.
ãá
ãá
ã
á
Select
å
Save
When you have entered Settings:
Select General.
Select Phone lock.
Select Set lock code.
Press.
Press (see display).
Dial your lock code (one to four digits).
Press to save the lock code (see display).
Clock settings
If the clock and date is set, you can on the same day a message or
call is received, see the time for it.
Set the clock to get the time automatically from the
system
ãá
ã
á
â ã
106
When you have entered Settings:
Select General.
Select Clock.
Press.
or
Select Auto setting.
Select
Press (see display).
Auto setting is shown.
DT412/DT422/DT432
Settings
Set the clock manually
ãá
ã
á
â ã
Select
å
or
Save
When you have entered Settings:
Select General.
Select Clock.
Press.
Select Manual setting.
Press (see display).
Enter time, year, month, and day according to the example
below.
Example: Time:0815, Year:2002, Month:03, Day:30.
Press (see display).
The setting is saved.
Set the clock to be visible/invisible in idle mode
ãá
ã
Change
DT412/DT422/DT432
When you have entered Settings:
Select General.
Select Clock.
Press (see display).
The clock checkbox is marked/unmarked.
107
Settings
Automatic key lock
You can set the keypad to lock after 20 seconds after the last
usage. In idle mode a locked keypad is indicated by the Key icon.
ãá
ã
Change
When you have entered Settings:
Select General.
Select Auto key lock.
Press (see display).
The Auto key lock checkbox is marked/unmarked.
Lock the keypad
ç*
The following procedure describes how to manually lock/unlock the
keypad, but it is recommended to always have the automatic lock
on.
Press to lock/unlock the keypad.
The Key icon indicates when your keypad is locked.
Quick answer
When this function is activated, you can answer incoming calls by
simply taking the phone out of the desktop charger. There is no
need to press the Call key.
ãá
ã
Change
108
When you have entered Settings:
Select General.
Select Quick answer.
Press (see display).
The Quick answer checkbox is marked/unmarked.
DT412/DT422/DT432
Settings
Set new messages to be displayed upside
down
Your incoming messages can be displayed upside down.
ãá
ã
Change
When you have entered Settings:
Select General.
Select New message rotated.
Press (see display).
The New message rotated checkbox is marked/unmarked.
Note: When this is set, the call information for incoming
calls is also displayed upside down.
Owner ID
With this function, you can program your personal owner ID.
ãá
ã
Edit
å
Save
DT412/DT422/DT432
When you have entered Settings:
Select General.
Select Owner ID.
Press (see display).
Enter your Owner ID.
The phone is changing to text entry mode automatically. How to
write text, see section “Enter names and numbers” on page 51.
Press (see display).
The new ID is shown.
109
Settings
System
Use this menu to select a system and view all phone related
information. If you are often moving between systems, it might be
convenient to change system quickly, therefore you can set this
function as a Soft key, or Hot key. See also section “Installation” on
page 116.
Note: The Register option may only be performed by the
system administrator and is described in a separate
documentation.
Change system
When you have registered to more than one system, you can
manually select which system to connect to. You can connect to
up to four different exchange systems with your phone, normally
named A, B, C and D.
ãá
á
â ã
or
Select
110
When you have entered Settings:
Select System.
Select Select system.
Select the required system.
Note: The normal setting is Auto. This setting makes the
phone automatically look and connect to a system.
Press (see display).
System selected is shown.
DT412/DT422/DT432
Settings
System information
The Information menu shows general information about your
phone and your network connection.
ãá
ã
á
When you have entered Settings:
Select System.
Select Information.
Press.
You can view the following information:
IPDI
IPEI
SW version
AP SW
version
The unique global GAP registration number for
the SIM card.
The unique global GAP registration number for
the phone.
Here you can see which version of the phone
software you have.
The alarm module software. If the alarm module
is not connected, it will be indicated with NC
(Not Connected).
Notes:
You cannot alter these settings.
*#46#
You can also view the system information via the quick
access code. The code is
.
DT412/DT422/DT432
111
Audible Adjustments
Audible Adjustments
In order to satisfy your personal needs, your phone is equipped
with many options to set and adjust a personal volume and ring
signal. In addition to this there is a vibrator option.
Your phone is delivered with a set of standard audio settings for
best audio quality. In some environments, for example one with a
high noise level, these standard values might have to be adjusted
to get good audio quality. There are different SIM card settings for
normal conversation, and when loudspeaking function or headset
is used. Ask your system administrator if you require a different
setting.
Volume control
Use the volume keys to adjust the volume in the earpiece.
See section “Description” on page 11 for the location of volume
controls.
To turn the microphone on or off during a call, see section “Mute
microphone” on page 58.
Loudspeaker volume
When you are making a call, the volume keys affect the
loudspeaker volume. This is useful when e.g. you enter a
machinery room.
Press the volume controls to adjust the loudspeaker volume
during a call.
The volume level is set and maintained until you adjust the volume
again.
112
DT412/DT422/DT432
Audible Adjustments
Ringer volume
ç
à á
ã
á
á
â ã
or
or
There are 5 audible ringer levels and one silent level. You can set
the ringer volume via the Alert signals menu.
Press.
The last used tab is marked.
Select Settings.
Press to enter Settings.
A list with all available settings is shown.
Select Alert signals.
Select Volume.
Select the required volume level.
You have six available alternatives; Level 1 to 5, or Silent.
If you want to hear the volume level during the changing:
Play
Select
Press (see display).
The marked volume is played until you press Stop or Select.
Press to select the volume (see display).
The selected volume is shown.
Mute audible signals
To mute the ring signal before answering a call, see section “Mute
ring signal” on page 33. See section “Description” on page 11 for
the location of the Mute key.
You can also turn the ringer off permanently. When the phone is onhook (idle mode):
Press and hold the Mute key on the right side of the phone.
The Ringer off icon is shown. Now only the vibrator and the red
lamp will indicate an incoming call.
Note: High priority messages will override this setting.
This action will also mute message signals.
Press and hold the Mute key to turn the ringer on again.
The Ringer off icon disappears.
DT412/DT422/DT432
113
Audible Adjustments
ç
à á
ã
á
ã
á
â ã
á
â ã
or
or
or
Ring signals
Press.
The last used tab is marked.
Select Settings.
Press to enter Settings.
A list with all available settings is shown.
Select Alert signals.
Select Ring signals.
Press.
Select the required call type.
You can change the ring signal for Internal calls, External calls, or
Callback calls.
Press.
Select the required signal.
Available alternatives are; Beep, Low, Medium, High, and Mixed.
If you want to hear the new signal during the changing:
Play
Select
114
Press (see display).
The marked ring signal is played until you press Stop or Select.
Press to select the ring signal (see display).
The selected ring signal is shown.
DT412/DT422/DT432
Audible Adjustments
Key beep
ç
à á
ã
á
ã
or
Change
Use this feature to set if you want every keystroke to be confirmed
with a short tone or not.
Press.
The last used tab is marked.
Select Settings.
Press to enter Settings.
A list with all available settings is shown.
Select Alert signals.
Select Key beep.
Press (see display).
The Key beep checkbox is marked/unmarked.
Vibrator
ç
à á
ã
á
ã
or
Change
You can set the vibration alarm instead of the ring signal to indicate
incoming calls and messages.
Press.
The last used tab is marked.
Select Settings.
Press to enter Settings.
A list with all available settings is shown.
Select Alert signals.
Select Vibrator.
Press (see display).
The Vibrator checkbox is marked/unmarked. A call will now be
indicated by both the vibrator and the ring signal. If you want only
the vibrator to indicate calls, you have to mute the ring signal first.
Note for DT432: Loudspeaking disables the vibrator. The
vibrator is active after the beep and never during a beep.
DT412/DT422/DT432
115
Installation
Installation
This chapter describes how to connect and charge the battery of
your phone. You will also find procedures for installation and
maintenance of your phone.
Note: If you have a DT412 or a DT422 phone, you need to
know what version of the phone you are using, as only
certain battery packs are compatible with each version.
Check the phone label to see the phone version. If the label
starts with “RAID2-” your phone is a version two phone.
ATEX battery and charging information (DT432)
116
•
It is only allowed to use the special ATEX battery pack together
with the DT432 ATEX phone. Using a standard battery pack will
void the ATEX approval.
•
The DT432 ATEX phone may only be charged in the ATEX desk
top charger II and in rack charger II.
DT412/DT422/DT432
Installation
Battery
All batteries are rechargeable.
Charging the battery
The battery requires charging when the Battery icon in the display
is empty.
Place the phone in the charger. A beep indicates connection with
the charger. The charging status is shown by the Battery icon in the
display. A fully charged phone is indicated by a filled Battery icon. If
the phone is switched off when placed in the charger, it will start up
automatically within 2 minutes.
Note: If a call is connected when the phone is placed in the
charger, the call will be disconnected.
Removing the battery
The battery is fastened by a screw and two hooks. To remove the
DT412 and DT422 battery, use a small coin and turn the screw to
horizontal position. To remove the DT432 battery, use the key
which is delivered with the phone and turn the screw to horizontal
position. Remove the battery by pulling the screw. When fastening
the battery again the screw has to be in horizontal position.
Note: Avoid using a screwdriver as it may damage the
screw.
Battery handling
The battery contains environmental polluting material. If damaged,
return it to a collecting point.
Note: Only use the charger that is delivered with your
phone to charge the battery.
DT412/DT422/DT432
117
Installation
Chargers
Desktop charger
The desktop charger is used for charging your phone, but also for
storing it when you are placed at one location, for example at your
desk. The tilted design facilitates the use of handsfree operation,
i.e. in loudspeaking mode. The charger is delivered with a plug-in
power supply and is connected into an ordinary wall socket.
Important!
Only use the equipment designed for the DT412/DT422/DT432
phones, see below.
Battery
type
Battery pack
article number
Charger article
number
Programmer article
number
Rack charger article
number
Battery pack adapter
for rack charger
NTM/DPYNB 220 21/1,
NTM/DPYNB 220 21/2,
NTM/DPYNB 220 21/3
or DPY 901 624/1
NTM/DPYNB 220 28/1,
NTM/DPYNB 220 28/2,
NTM/DPYNB 220 28/3
or LTT 999 07/1
DPYNB 101 54/1
(*BMLNB 101 54/1)
or DPY 901 642/1
DPYNB 220 29/1
or DPY 901 495/1
Only
BKBNB 902 44/1
NTM/DPYNB 220 21/1,
NTM/DPYNB 220 21/2,
NTM/DPYNB 220 21/3
or DPY 901 624/1
NTM/DPYNB 220 28/1,
NTM/DPYNB 220 28/2,
NTM/DPYNB 220 28/3
or LTT 999 07/1
DPYNB 101 54/1
(*BMLNB 101 54/1)
or DPY 901 642/1
Only
DPY 901 495/1
Only
DPY 901 639/1
Only
DPY 901 624/1
Only
LTT 999 07/1
Only
DPY 901 642/1
Only
DPY 901 495/1
DT412 and DT422
NiMH
Only
BKBNB 220 21/1
DT412 v2 and DT422 v2
Li-Ion
DT432
Li-Ion
* power supply.
118
DT412/DT422/DT432
Installation
Charging rack
Note: See also separate installation guide, supplied
together with your phone.
022
The charging rack is used for charging your phone and/or spare
batteries. When charging spare batteries an adapter is needed. The
wall mounted charging rack and its power supply are modular
systems which enables a number of installation configurations.
Each power supply can support three charging racks with four
positions for phones and/or batteries in each rack (see technical
specifications for the charging rack).
As the phone cannot distinguish between a desktop charger and
the charging rack, it is recommended that the alert signal is
silenced when placed in a rack, see section “Audible Adjustments”
on page 112. There is also a SIM parameter that can be set in the
SIM card programmer by your system administrator.
DT412/DT422/DT432
119
Installation
Belt clip
The clip on the back of the phone helps you fasten it to a belt or
similar. It is also possible to change the clip to a swivel-type or if no
clip is needed, to replace it with a covering plate.
Change the hinge-type clip
A hinge-type belt clip is mounted on the phone at delivery. The clip
can be replaced with a cover plate that is in the delivery or a swiveltype belt clip that can be ordered separately.
The required tool is a Pozidriv Point size 1.
Unscrew and replace the clip.
120
DT412/DT422/DT432
Installation
SIM card
All your personal phone settings are programmed and stored in the
Subscriber Identity Module (SIM) card.
The SIM card provides you with personal mobility as you can easily
move it to another cordless phone, enabling you to receive calls,
make calls and keep all your personal settings such as Phonebook,
identity, alert signal, and your defined functions of the Soft keys and
Hot keys
Changing the SIM card
Remove the battery as described.
See section “Battery” on page 117.
Slide the SIM card out of position.
Insert the new SIM card and slide it into position.
Changing SIM parameters
The SIM card parameters can be altered from the phone but also
by using a SIM card programmer. The parameters can be saved to
file from the SIM card programmer software to be able to give the
same parameter settings to several phones.
The file can also be used to reset the parameters to default values.
The SIM card programmer is delivered with a CD containing
required software.
DT412/422/432 functionality using a DT400/410/420/
430 SIM card
The phone can be used with a SIM card for the DT400/410/420/
430 phones but the functionality will be limited as described below:
DT412/DT422/DT432
•
Man-down alarm does not work.
•
Central phonebook from Contacts menu is not available.
•
Modes are not available.
•
Switch off from Modes menu is not possible.
•
Services are not available.
•
Internal/External and Callback call has same ring signal setting.
•
Soft keys cannot be used.
•
Some Hot key short-cuts cannot be used
121
Installation
DT412/422/432 functions that are working:
• Phone calls to and from the phone
• Messages
• SMS from the phone
• Interactive Messaging
• Push-button alarms
• No-movement alarm
Hot keys
The DT400/410/420/430 and DT412/422/432 do not have the
same set of Hot key functions. When the Hot keys on a DT400/
410/420/430 SIM card are programmed with functions, the
following applies:
DT400/410/420/430 function DT412/422/432 short-cut
Manual absent on
Manual absent off
Switch off
Change system
No-movement alarm on
No-movement alarm off
Edit alarm data
RSSI
Demo message 1
Demo message 2
Absent on/off
Switch off
Change system
No-movement alarm on/off
Man-down alarm on/off
Edit alarm data
RSSI
Demo message 1
Demo message 2
It is not possible to program the DT400/410/420/430 SIM card
with the short-cuts Local phonebook and Services.
Note: If a Hot key indicates Man-down alarm when a
DT400/410/420/430 SIM card is used, the phone will
indicate Wrong SIM when the Hot key is pressed.
122
DT412/DT422/DT432
Reference
Reference
This section describes the terminology used on the display, the
phone communication signals, technical specifications, spare parts
and accessories.
Terminology
The list below explains the terms which may appear on the display.
Terminology used in display
Term
Meaning
IPDI
International Portable part Equipment Identity, unique
identity assigned to your SIM card.
International Portable part Equipment Identity, unique
identity assigned to your phone by the manufacturer.
Portable Access Rights Key, unique identity assigned to
your network.
Here you can see which version of the phone software
you have.
Here you can see which version of the Alarm software
you have.
IPEI
Park
SW
AP SW
DT412/DT422/DT432
123
Reference
Phone signals
The phone is signalling certain events audibly and visually as
described below.
Signal
Meaning
Red warning light
Incoming call.
Message waiting.
The phone also generates audible ring signals and alarm signals.
Sound
Meaning
Ring signal
Alarm signal
Incoming call.
1 short beep: phone is out of range of base
system.
Message beep: Incoming message.
No-movement alarm or Man-down alarm
about to be sent (DT422 and DT432 only)
You hear this each time you press a key (when
selected).
Key beep
124
DT412/DT422/DT432
Reference
Optional accessories
All of the following accessories are optional and can be purchased
at your local Ericsson contact.
Belt clip, swivel-type
The ordinary belt clip can be replaced with a special swivel-type
belt clip adapted to firmly place your phone onto your belt.
Leather casing
The leather casing is especially designed for the phone. The casing
comes with the swivel-type belt clip and the phone is fully
operational while placed in the casing.
Note: The leather case may not be used in potentially
explosive areas.
Headset
A headset is recommended if you frequently use the phone, and/or
want to have both hands free. The phone has a special headset
connector that is waterproof. The headset comes in three versions;
with microphone integrated in the cable (with or without adapter),
with microphone on a boom, and with hearing protection (Peltor).
An adapter, that makes it possible to connect other standard types
of Peltor headsets, is also available.
Notes:
The phone must be equipped with the factory mounted
headset connector.
The headset answering button is only active during a call or
when the phone is ringing and cannot be used to get a line
when making a call.
Microphone integrated in the cable, microphone on a boom
and headset adapter may not be used with DT432.
ATEX headset information (DT432)
•
DT412/DT422/DT432
It is not allowed to use any other headsets than the Peltor ATEX
headsets connected via the ATEX headset adapter. Using any
other headset or headset adapter will void the ATEX approval.
125
Reference
Security chain
The security chain is 800 mm long. Fasten one end to the hingetype belt clip and the other end to, for example, your pocket.
Additional accessories
126
•
Standard clip, hinge-type
•
Desktop charger
•
Spare battery
DT412/DT422/DT432
Troubleshooting
Troubleshooting
This section contains information on how to solve common
operational problems, and warnings you may receive.
Go through the following lists if you encounter any problems. If this
checklist does not solve the problem, contact your system
administrator. If others have similar problems, there may be a
system error.
Fault / Display
Probable cause
The phone does
not switch on
No display
The battery level is
low.
The battery level is
low or the phone is
defective.
The Ringer off icon
is on or the phone
is defective.
The battery level is
low or the phone is
defective.
The battery level is
low or the phone is
defective.
The phone is
defective.
No ringing
Battery icon flashes
Call icon is
switched off after
2 seconds
Lamp shows
steady light
When adding
names to the
Phonebook, an
error beep sounds
DT412/DT422/DT432
Action or
comment
Charge the battery.
Charge the battery
or contact system
administrator.
Off icon on =
Turn on the ringing
signal.
Charge the battery.
Charge the battery
or contact system
administrator.
Contact system
administrator.
The memory is full,
you cannot add
new names.
Delete a name.
Wrong sim
The SIM card is not
compatible with the
software version of
the phone.
Contact system
administrator.
Check SIM card
The SIM card is
missing or inserted
the wrong way.
Insert or adjust the
SIM card or
contact system
administrator.
127
Troubleshooting
128
Fault / Display
Probable cause
Action or
comment
Keys locked
Unlock
The key pad is
locked.
Press Menu key
followed by .
No System
Cannot connect to
the network, the
phone is not
registered or out of
range.
Contact system
administrator.
*
DT412/DT422/DT432
Glossary
Glossary
DECT
Digital Enhanced Cordless Telephony.
Exchange
Switch. Your telephone switching system.
Idle mode
The state your phone is in when nothing is activated; not
calling, not ringing, not diverted etc.
Least Cost Routing
A function that automatically selects the cheapest way to
connect your external call (not necessarily the shortest
distance).
Speed Dialing number
Abbreviated number or short number, used for making
frequently used numbers faster to dial.
Third party
A third connection (person), which can be included in an
ongoing two person conversation. The connection can be
internal or external.
DT412/DT422/DT432
129
Index
Index
A
Absence Information 72
Absent 79
Account Code 87
Add a name and a number to the
PhoneBook 54
Alarm 91
Automatic call after 91
No-movement Alarm and Man-down
Alarm 93
Personal Alarm 92
Test 92
With data 91
Alarm settings 100
Alarm with data 91
Answer calls 32
Audible adjustments 112
Key beep 115
Ring signals 114
Vibrator 115
Volume control 112
Authority 47
Authorization Code, common 47
Authorization Code, individual 48
Automatic call after an alarm 91
Automatic key lock 108
130
B
Battery 117
Belt clip 120
Bypass 45
C
Call Forwarding 63
External Follow-me 64
Internal Follow-me 63
Personal Number 65
Setting form for search profiles 71
Call Waiting 44, 59
Callback 42
Change a name and a number in the
PhoneBook 55
Change answering method 34
Change modes 95
Change services 96
Change system 110
Change text size 104
Chargers 118
Charging the battery 117
Cleaning 10
Clock settings 106
Common Bell Group 85
Conference 60
Copyright 5
Create a new service 97
DT412/DT422/DT432
Index
D
Declaration of Conformity 5
Delete a name and a number from the Phone
book 56
Delete a service 98
Description 11
Display information 14
Menu structure 22
Switching on/off the Cordless 29
Tones 28
Dial number from the Call list 40
Dialing during a connected call 61
DISA = Direct Inward System Access 90
Display information 14
Idle telephone 15
Incoming call 17
Outgoing call 16
During calls 57
Call Waiting 59
Conference 60
Dialing during a connected call 61
Handsfree 57
Inquiry 58
Mute microphone 58
Push-to-talk button 62
Put a call on hold 61
Transfer 59
Group features 85
Common Bell Group 85
Group Call-pick-up 85
Group Hunting 86
Group Hunting 86
H
Handsfree 57
Hot Keys and Soft keys 100
E
Edit a service 98
Emergency mode 89
Enter names and numbers 51
Enter the PhoneBook 53
External Follow-me 64
I
Important user information 6
Cleaning 10
Intrinsic safety 9
Preparing for use 10
Safety information 9
SIM card 9
Incoming calls 32
Answer calls 32
Change answering method 34
Handsfree 33
Parallel Ringing 35
Individual External Line 39
Information 72
Inquiry 58
Installation 116
Battery 117
Belt clip 120
Chargers 118
SIM card 121
Interactive Messaging 81
Internal Follow-me 63
Intrinsic safety 9
Intrusion 44
F
Free Seating 31
K
Key beep 115
G
General Deactivation 88
Glossary 129
Group Call-pick-up 85
L
Language 104
Last External Number Redial 40
DT412/DT422/DT432
131
Index
M
Mailbox 84
Make a call via the PhoneBook 53
Make calls 37
Malicious Call Tracing 89
Man-down Alarm 93
Manual Message Waiting (MMW) 76
Menu structure 22
Messages 75
Absent 79
Interactive Messaging 81
Manual Message Waiting (MMW) 76
SMS 80
Text messages 77
Voice Mail 82
Modes 94
Change 95
Mute microphone 58
N
Night Service 88
No-movement Alarm 93
Number Presentation Restriction 39
O
Optional accessories 125
Other useful features 87
Outgoing calls 37
Authority 47
Bypass 45
Call Waiting 44
Callback 42
Dial number from the Call list 40
Handsfree 38
Individual External Line 39
132
Intrusion 44
Last External Number Redial 40
Make calls 37
Number Presentation Restriction 39
Speed Dialing 46
When you receive a busy tone 42
Owner ID 109
P
Parallel Ringing 35
Personal Alarm 92
Personal Number 65
Phone book
Delete a name and a number 56
Phone lock 105
Phone signals 124
PhoneBook 50
Add a name and a number 54
Change a name and a number 55
Enter 53
Enter names and numbers 51
Make a call 53
Save a number from the Call list to the
PhoneBook 54
Preparing for use 10
Push-to-talk button 62
Put a call on hold 61
Q
Quick answer 108
R
Reference 123
Ring signals 114
DT412/DT422/DT432
Index
S
Safety information 9
Safety instructions 6
Save a number from the Call list to the
PhoneBook 54
Services 96
Change 96
Create 97
Delete 98
Edit 98
Set new messages to be displayed upside
down 109
Setting form for search profiles 71
Settings 99
Alarm 100
Automatic key lock 108
Change text size 104
Clock 106
Hot Keys and Soft keys 100
Language 104
Owner ID 109
Phone lock 105
Quick answer 108
Set new messages to be displayed upside
down 109
System 110
SIM card 9, 121
DT412/DT422/DT432
SMS 80
Speed Dialing 46
Switch on/off 29
System 110
T
Terminology on display 123
Test Alarm 92
Text messages 77
Tones 28
Transfer 59
Troubleshooting 127
U
Unlock the phone 105
V
Vibrator 115
Voice Mail 82
Volume control 112
W
Warranty 5
Welcome 4
When you receive a busy tone 42
133
Ericsson Enterprise AB
All rights reserved.
For questions regarding the product,
please contact your Ericsson Enterprise Certified Sales Partner.
Also visit us on http://www.ericsson.com/enterprise
© Ericsson Enterprise AB 2006
EN/LZT 103 67 R5A
Subject to alteration without prior notice.
Ericsson is shaping the future of Mobile and Broadband Internet communications through its
continuous technology leadership. Providing innovative solutions in more than 140 countries,
Ericsson is helping to create the most powerful communication companies in the world.