1
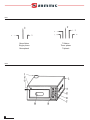
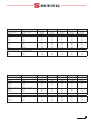
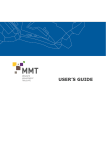
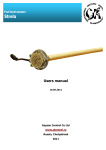
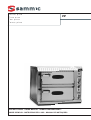
Hornos pizza
Pizza oven
FP
Four pizza
Fornos pizza
INSTRUCCIONES - USERS MANUAL - GEBRAUCHSANWEISUNG MODE D’EMPLOI - INSTRUZIONI PER L’USO - MANUAL DE INSTRUÇÕES
1. OVEN INSTALLATION
Carry the oven, complete with its support,
if any, to the place of installation. Make
sure there is enough clearance around the
appliance for proper ventilation and
cleaning. The oven base and frame legs
must rest on a firm, uniform and flat
surface. No anchoring of the frame into
the ground is required. After installing the
appliance, adjust its horizontality, if
necessary, by turning the M12 screws:
first, place the air level longitudinally and
then crosswise. The oven being level, lock
the adjusting screws.
close to the appliance as possible, so that
the fitted cord can be plugged into an
outlet. To this end, do not use extension
cables.
Depending on its configuration, this
appliance may be supplied with either a
three-pole or a four-pole power cord of
appropriate length and with a yellowgreen earthing line. The free end of this
cord must be connected to a EEC-unified
plug, consistent with the IEC 309-2 'Plugs
and Sockets for Industrial Use' standard
and properly sized for the supply voltage
and rated input power of the appliance as
shown on the wiring diagram and in the
section 'Technical Data'.
2. ELECTRIC EQUIPMENT DATA
The oven electrics comprises the following
devices:
- One ON/OFF lever switch protected
against unintentional use on the oven
front.
- Power relays in order to integrate the
heating resistors into the circuit.
- A safety transformer for supplying the
auxiliary circuit with low voltage power.
- RC cells fitted on the feeder of the
contactor / relay and thermostat trigger
circuit in order to limit surges caused by
the breaking of induction and/or
resistance circuits, in conformity with the
Electromagnetic Compatibility (EMC)
regulations for the suppression of EMI
effects.
- One thermostat for controlling and
regulating the temperature in the
cooking chamber.
- One safety thermostat intended to
disconnect the main power supply
circuit, if necessary.
- Enclosed-type heating resistors, featuring
AISI 321 stainless steel external tube and
a 100-mm neutral area, to reduce heat
transfer to the supports. Heating resistor
element made of 80-20 nichrome, with
MgO ceramic insulation.
- Branch and connecting terminals located
inside the controls housing.
- Control thermostat pilot lamps.
- Wiring of the different electric devices of
the appliance, with cables suitable for its
intended duty and line surge limits.
3. MAINS CONNECTION
Connecting the appliance to the mains
and its initial start-up shall be done by an
expert and qualified installer according to
the technical and legal regulations in force
in the user's country. Lay on a line as
The specialist installer shall install the
following components as may be required
to comply with the applicable norms in
the user's country:
- One appropriate pin plug
- One line breaker
- One hot-wire in addition to a differential
switch of adequate sensitivity for the
leakage current of the resistors.
The appliance must be earthed.
Make the connection, as technically
prescribed, bearing in mind both the
cyclical phase connecting sequence and
the colour code of the leads (Fig. 1):
- L1 = phase - L2 = phase - L3 = phase
- N/MP = Neutral - blue-coloured
- PE/Earth = GREEN/YELLOW stripe
sheathed wire
After connecting the oven power supply
protection systems, test for the
differential switch efficiency with the
instrument intended for this purpose.
Verify that there are no combustible or
other objects whatsoever inside the oven
and that the oven is ready for testing.
Check that the ON/OFF switch of the
appliance is in the 0/OFF position.
Turn the knob of the thermostat to set the
temperature at an average value of about
150ºC.
Put the ON/OFF switch lever in the I/ON
position.
Check for current consumption and
correct operation of all the lamps
installed.
Wait for the rupture of the thermostat
circuit and turn the ON/OFF switch to
0/OFF.
The oven is now ready to work normally.
Figura 1.
4. DESCRIPTION OF THE APPLIANCE
The oven's external structure is of
STAINLESS material.
The front of the oven is wholly made of
stainless steel.
- Cooking chamber of stainless steel plate.
- Oven's cooking sole made of movable
and repairable refractory tiles allowing
thorough cleaning of the cooking
chamber.
- 80-mm diameter round smoke and
steam exhaust spout to be connected by
means of an adequate pipe (not
supplied) to the room's fume exhaust
duct. This spout is special for the
exhaust of hot smoke and steam
developing during the cooking process.
- Complete insulation of the cooking
chamber by means of long-fibred rock
wool quilted mat, a non-toxic and nonpolluting material.
- Enclosed-type heating resistors,
manufactured according to the IEC
technical standards, from fine and longlasting materials.
- ON/OFF switch on the front of the oven.
- Thermostat for inside temperature
control and regulation in a range up to
500ºC programmable with the graduated
knob on the front of the oven.
- One special safety thermostat protects
the appliance against overheating for any
reason whatsoever during its operation.
- Internal lighting ON/OFF switch.
- Depending on the power demand and
size of the oven, the same will be
prepared for either single-phase 230V or
three-phase 400V, alternating current,
50 or 60Hz supply, with tolerances as
per IEC 8-6 of 3/1990.
- The front door includes an optimally
efficient, heat-insulator Pyrex pane,
except on the MINI model.
- Internal lighting permits the cooking
process to be supervised.
- The oven door swings on hard-wearing
hinges with gravity closing for easier
operation.
The handle of the oven door is made of
heatproof material. Control of the heating
resistors is by means of an integrated-type
electromechanical system that includes
the complete and reliable circuitry of the
heating resistors with power relays as well
as the auxiliary circuit controlling the
thermostats, relays and lamps.
Electric safeties consist in the following
circuit elements, built according to the
referenced standards:
- Mains galvanic isolation by means of the
ON/OFF switch on the front control
ENGLISH 5
panel.
- Fuse protection of the power relay
feeding circuit.
- Use of H05 RN-F type rubber covered
cables and wires of sections and types
suitable for the supply voltage and
specific working conditions.
NOTE: Protection against overcurrent
and differential protection must be
installed by the user upstream of the
appliance power intake.
minutes in order to accelerate the
renewal of air inside the oven and then,
close the door. During this process, do
not leave the oven unattended.
- At the end of the preheating phase, all
the metallic and refractory components
of the oven will have reached the
stabilization temperature and it will be
possible to use the oven in the normal
way.
- On subsequent uses of the oven, the
above described preheating procedure is
no longer required.
5. INSTRUCTIONS FOR USE OF THIS
APPLIANCE
7. PERIODICAL USE OF THE OVEN
With reference to Figure 2, the appliance
includes the following controls:
Before use, check for the following points
and settings:
A- Graduated knob of the oven
temperature control thermostat (two
thermostats per cooking chamber).
B- Backlit indicators of the operation of
the heating resistors in each cooking
chamber (one indicator per thermostat)
C- Internal lighting ON/OFF switch.
D- Pyrometer for measuring the
temperature in the cooking chamber.
E- ON/OFF switch: in the 0/OFF position, it
isolates the electric circuit of the oven
from the mains; in the I/ON position, it
makes the circuit.
F- Cooking steam exhaust control knob.
G- Oven door handle.
H- Pyrex pane window for supervising
food during their cooking.
I- 80-mm round exhaust spout to be
connected to the outside with an
adequate pipe.
L- Safety thermostat at the back of the
oven, with built-in red-coloured reset.
- Introduce the plug into the socket
situated in the junction box.
- Check that the oven ON/OFF switch is in
the 0/OFF position.
- Verify if the magnetothermal and
differential switches are connected.
- Put the line breaker at the current outlet
in the I/ON position.
- Turn the knob of the thermostat to the
temperature required.
- Put the oven ON/OFF switch in the I/ON
position.
- Wait until the selected oven temperature
is reached (the light indicator turns off).
- When the temperature is reached, open
the door and introduce the pizzas, even
directly onto the refractory sole, without
any container or pan.
Figura 2.
The opening of the oven door results in
hot air escape and the consequent quick
fall of the cooking chamber temperature.
It is therefore advisable to open the door
only the time strictly necessary to
introduce or remove the pizzas or other
food products. This will save energy and
prevent thermal shocks inside the cooking
chamber.
6. OVEN START-UP
Before cooking food in the oven, it is
necessary to preheat the cooking chamber
adequately.
- Turn the knob of the control thermostat
to set the temperature at approx. 250ºC
and keep the oven working at this
temperature for about one hour.
- During the preheating of the oven, water
steam will develop, with an unpleasant
smell due to surface oxidation of the
enclosed resistors.
- On completion of the first cycle, all metal
will have stabilised and thereafter no
unpleasant smell will develop. Once the
preheating time has passed by, open the
front door and keep it open for a few
6 ENGLISH
These ovens feature a cooking sole made
of special, non-toxic food-grade
refractories.
Doors with inspection windows enable a
visual control of the cooking of pizzas or
food products, without need for opening
the door.
On finishing a production cycle, turn the
oven off, by putting first the ON/OFF
switch and then the line breaker in their
0/OFF position.
8. MAINTENANCE OF THE OVEN
Operate the oven controls only in the
specified sequence, to prevent damages to
the devices due to misuse.
For cleaning the cooking chamber, wait
until the oven has completely cooled
down. Remove the plug from the socket
and place a 'Maintenance On' placard. The
refractory tiles may be cleaned with either
a water-moistened strong cloth or a steel
wire brush, but detergents, solvents and
chemicals whatsoever are prohibited.
The very high temperature reached will
automatically cause the sterilization of
anything inside the oven.
Hard-to-remove stains and charred
remains may be scraped off with a
suitable utensil, like a steel-blade spatula
with insulated handle, wearing protective
gloves too.
The external surfaces of the oven may be
cleaned with a soft sponge wetted in
water and pH-neutral, chlorophosphatefree detergent with a 90% content of
biodegradable surfactants.
Do not use creamy detergents containing
abrasives that will damage any surface
irremediably.
9. INFORMATION ON INCORRECT USERELATED HAZARDS
Although they are equipped with control
and safety thermostats, these ovens must
be attended by the user during the whole
process cycle.
- Keep the power cord and plug of the
oven in good condition, and all the
safety and circuit-breaking devices in the
power supply junction box and on the
oven as well.
- Protect the power cord against any
damage adequately and have it replaced
immediately if any failure or damage,
however superficial it may be, is
observed.
- At least once in a fortnight, check the
efficiency of the 'life-saving' differential
switch situated in the oven service line,
by pressing the test push-button.
- Neither install the oven in the open air
nor under any canopy or provisional
roof.
- The oven should be used inside civil or
industrial buildings.
- Do not spray water or any combustible
liquid in the interior of the oven.
- Do not wash the internal or external
surfaces of the appliance with water.
- The oven may be operated only by
people trained in the use of electrical
appliances and informed of the hazards
resulting from an incorrect use or, in any
case, of any use that is not consistent
with normal operation and the
instructions contained in this handbook.
- Users must be familiar with the appliance
and comply with the local legal age
requirements to perform their job.
- Neither clean nor service the oven while
it is functioning or cooling down.
- A user who is suffering from any
discomfort whatsoever or any
unfavourable physical condition, however
benign, leading to a reduction in
alertness MUST NOT use these ovens and
other appliances.
- People under the influence of alcohol,
psychotropic drugs or narcotics should
not use the oven.
- Before cleaning the oven, put the
ON/OFF switch and the line breaker in
the 0/OFF position, remove the plug
from the socket and put a 'Maintenance
On' placard, wait for the oven to be
completely cold - this takes many
hours!!!
- These ovens have been designed and
built, bearing in mind only their intended
specific and single purpose, i.e. basically
the cooking of pizza or other flour-based
foods similar in nature, form and
consistency such as, for instance, pies,
cakes, bread and oven-baked sweets,
leavened and unleavened products.
- Additionally, this oven will warm up nonloose food placed in a high-rimmed
container to prevent overflowing and
spilling on the refractory plate, as well as
the subsequent risk of a fire and
contamination.
- These ovens shall not be used for any
purpose other than those expressly
stated in this handbook.
- Charred remains sticking to the walls of
the oven may be removed with a noncutting utensil or a steel wire brush; in
this event, wear safety gloves.
- If stains on the refractory tiles are
consistent and hard-to-remove with usual
means, use other more specific means.
- Users shall neither repair or dismantle
any part of the oven nor work on the
electric circuit or effect any change to
the appliance. Only specialist technical
staff is allowed to work on the appliance.
- Do not climb or get on the oven frame
and the oven itself.
- Keep children away from the oven, even
if it is not in operation.
- Do not introduce your hands, arms or
any part of your body inside the oven.
- Do not move any of the refractory tiles
situated in the cooking chamber; replace
promptly any tile found cracked or
broken.
- Use the oven only for cooking pizzas and
similar foods.
- Keep the oven and its surrounding area
clean and free from any objects.
- Do not put your bare hands on any hot
part of the oven, including the cooking
chamber access door.
- To open the door, use the heatproof
handle.
- In order to carry foods or trays into and
out of the oven, the operator must use a
baker's shovel with heatproof handle and
wear safety gloves.
- Do not introduce closed food containers,
such as metal and non-metal cans, into
the oven, since they might burst open,
due to the high temperature, causing
severe damage both to the oven and to
the operator.
ENGLISH 7
FIG. 1
Monofásica
Single phase
Monophasé
FIG. 2
14
Trifásica
Three phase
Triphasé
CARACTERISTICAS
SPECIFICATIONS
TERMOSTATO REGULABLE
ADJUSTABLE THERMOSTAT
Nº PIZZAS
Nº PIZZAS
POTENCIA
LOADING
DIMENSIONES CÁMARA (MM)
DIMENSIONS CHAMBER (MM)
- Ancho
- Fondo
MINI
FP-4
FP-6
FP-4+4
FP-6+6
60-500ºC
60-500ºC
60-500ºC
60-500ºC
60-500ºC
4 de/of Ø25mm
4 de/of Ø30mm
6 de/of Ø30mm
8 de/of Ø30mm
12 de/of Ø30mm
2 x 3.000 W
4.400 W
6.600 W
2 x 4.400 W
2 x 6.600 W
2 cámaras/chambers
1 cámara/chamber
1 cámara/chamber
2 cámaras/chambers
2 cámaras/chambers
- Width
505
610
610
610
610
- Depth
530
610
910
610
910
- Alto
- Height
115
160
160
160
160
DIMENSIONES EXTERIORES (MM)
EXTERNAL DIMENSIONS (MM)
- Ancho
- Width
785
900
900
900
900
- Fondo
- Depth
720
880
1.180
880
1.180
520
460
460
770
770
80 kg
80 kg
100 kg
140 kg
190 kg
- Width
770
890
890
900
900
- Depth
650
780
1.100
810
1.140
- Height
1.000
1.000
1.000
850
850
MINI
FP-4
FP-6
FP-4+4
FP-6+6
- Alto
- Height
PESO NETO
NET WEIGHT
DIMENSIONES DEL SOPORTE (MM)
SUPPORT DIMENSIONS (MM)
- Ancho
- Fondo
- Alto
CARACTERISTIQUES
CARACTERÍSTICAS
THERMOSTAT VARIABLE
TERMOSTATO REGULÁVEL
NBRE PIZZAS
Nº PIZZAS
PUISSANCE
POTÊNCIA
DIMENSIONS CHAMBRE (MM)
DIMENSÕES CÁMARA (MM)
- Largeur
- Profondeur
60-500ºC
60-500ºC
60-500ºC
60-500ºC
60-500ºC
4 de Ø25mm
4 de Ø30mm
6 de Ø30mm
8 de Ø30mm
12 de Ø30mm
2 x 3.000 W
4.400 W
6.600 W
2 x 4.400 W
2 x 6.600 W
2 chambres/cámaras
1 chambre/cámara
1 chambre/cámara
2 chambres/cámaras
2 chambres/cámaras
- Largura
505
610
610
610
610
- Fundo
530
610
910
610
910
- Hauteur
- Altura
115
160
160
160
160
DIMENSIONS EXTÉRIEURES (MM)
DIMENSÕES EXTERIORES (MM)
- Largeur
- Largura
785
900
900
900
900
- Profondeur
- Fundo
720
880
1.180
880
1.180
520
460
460
770
770
80 kg
80 kg
100 kg
140 kg
190 kg
- Largura
770
890
890
900
900
- Fundo
650
780
1.100
810
1.140
- Altura
1.000
1.000
1.000
850
850
- Hauteur
- Altura
POIDS NET
PESO LÍQUIDO
SUPPORT DIMENSIONS (MM)
DIMENSÕES SUPORTE (MM)
- Largeur
- Profondeur
- Hauteur
15
UNE-EN
ISO 9001
09-01/0
ER-437/1/96
SAMMIC, S.A. (Sociedad Unipersonal) C/ Atxubiaga, 14 - 20730 AZPEITIA - www.sammic.com