1
OPERATING MANUAL
Label print dispenser
A103131
ALX
734/735
736
Edition 4 - 3/2012 - Translation of original version
ALX
73x
GB
CONTENTS
Please note
Entire unit ............................................................12
Dimensions .....................................................12
Connection, unit data ......................................13
Label material .................................................13
Ambient conditions ..........................................14
Certificates ......................................................14
Print module ........................................................15
Performance data ...........................................15
Thermal transfer ribbon ...................................18
Interfaces ........................................................18
Electronic equipment ......................................19
Dispensing module ..............................................20
Variables .........................................................20
Label sensor ...................................................20
Interfaces ........................................................20
Electronic equipment ......................................21
Cable kit for internal roll diameter monitoring . 34
Additional material guiding disc ...................... 35
Capacitive label sensor .................................. 35
Applicator interface ........................................ 35
Blow-on applicator LA-BO .............................. 36
Tamp-on applicator LA-TO ............................. 36
Double deflection roller .................................. 36
Operating modes of the dispenser ..................... 37
Overview ........................................................ 37
Online mode ................................................... 38
Offline mode ................................................... 41
Printer operating modes ..................................... 43
Overview ........................................................ 43
Online mode ................................................... 44
Offline mode ................................................... 46
Standalone mode ........................................... 49
Dispenser parameter menu ................................ 50
Overview of parameter menu ......................... 50
Information about the parameter description . 52
Tips for data entry in the parameter menu ..... 52
LABEL SETUP menu ..................................... 52
MACHINE SETUP menu ................................ 54
Printer parameter menu ..................................... 56
Overview of parameter menu ......................... 56
Information about the parameter description . 56
PRINT PARAMETERS menu ......................... 57
SYSTEM PARAMETER menu ....................... 58
SPECIAL FUNCTION menu .......................... 59
SERVICE FUNCTIONS menu ....................... 61
Product description
Startup and operation
Overview .............................................................22
Designs of the ALX 73x ...................................22
Configurations of the ALX 73x .........................23
Functionality ....................................................23
Operating components ....................................25
Control panels .................................................28
Connections ....................................................30
Options ................................................................32
External control panels ...................................32
Fixed dispensing edge ....................................32
Swivelling dispensing edge .............................32
Spring-loaded dispensing edge ......................32
Pneumatic dispensing edge ............................33
V-shape dispensing edge ...............................33
Adjustable dispensing edge holders ...............33
Adjustable head joint .......................................34
Roll diameter sensor .......................................34
Electrical connections ........................................ 62
Connecting to the mains power supply .......... 62
Connecting sensors ....................................... 63
Inserting label material ....................................... 64
Inserting the label roll ..................................... 64
Threading in the label web ............................. 65
Replacing a label roll ...................................... 71
Inserting/replacing ribbon ................................... 72
Inserting ribbon .............................................. 72
Changing ribbon ............................................. 73
Mechanical settings ............................................ 75
Adjusting the core diameter of the unwinder .. 75
Positioning the pressure roller ........................ 75
Position the label sensor on the dispensing
edge ............................................................... 76
Position the label sensor in the printer ........... 76
Setting the ribbon tension .............................. 77
General notes ........................................................3
Validity of this manual and required
compliance ........................................................3
How information is represented ........................5
For your safety ......................................................6
Intended use .....................................................6
Information and qualification .............................6
Operating safety of the machine .......................8
Every time before starting production .............10
Warning notes on the machine .......................11
Technical Data
Operating Manual ALX 73x | 03/2012
1
ALX
73x
CONTENTS
Setting the printhead pressure ........................78
Setting the return force of the unwinder
dancer lever ....................................................79
Setting the return force of the linear
dancer lever ....................................................80
Switching the unit on and off ...............................81
Switching the machine on/off ..........................81
Setting and monitoring the dispenser ..................82
Settings in parameter menu ............................82
Monitoring functions ........................................85
Setting and monitoring the printer .......................87
Settings in parameter menu ............................87
Monitoring functions ........................................88
Printing ................................................................90
Creating print jobs ...........................................90
Installing the printer driver ...............................90
Transferring a print job ....................................90
Using product profiles (dispenser) ......................92
What are product profiles? ..............................92
Loading a product profile ................................92
Saving a product profile ..................................93
Deleting a product profile ................................94
Cleaning
Operating faults
EC Declarations ............................................... 121
EC Declaration of Incorporation ................... 121
EC Declaration of Conformity ....................... 122
Material tear ........................................................95
Status messages in case of material tear .......95
Repairing material tear ....................................95
Material tear on the linear dancer lever ..........95
Status messages on the dispenser .....................96
Error messages ...............................................96
Warnings .........................................................96
Reference status messages - dispenser .............98
List of warnings ...............................................98
List of error messages ....................................99
Status messages on the printer ........................104
Error messages .............................................104
Reference status messages - printer ................105
List of error messages ..................................105
2
Cleaning instructions ........................................ 107
Safety ........................................................... 107
Cleaning agents ........................................... 107
Cleaning interval .......................................... 107
General cleaning .............................................. 108
Printhead .......................................................... 109
General notes ............................................... 109
Cleaning the printhead ................................. 110
Replacing printheads ................................... 112
Testing the printhead ................................... 113
Rubber rollers ................................................... 114
Feed rollers/print roller ................................. 114
Pressure roller .............................................. 115
Deviator rollers ................................................. 116
Sensors ............................................................ 117
Cleaning the punch sensor .......................... 117
Cleaning the material end sensor ................ 118
Cleaning the ribbon path .................................. 119
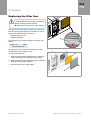
Replacing the filter liner .................................... 120
Appendix
Operating Manual ALX 73x | 03/2012
ALX
73x
GB
PLEASE NOTE
General notes
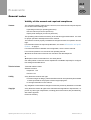
Validity of this manual and required compliance
Contents
The complete operating manual for the ALX 734, ALX 735 and ALX 736 print dispensers consists of the following parts:
• Operating manual (for operating personnel)
• Service manual (for service personnel)
• Spare parts catalogue (for service personnel)
This operating manual refers exclusively to the machine types listed above. It is used
for proper operation and adjustment of the machine.
The machine must be properly installed and configured to allow for operation and settings.
For information about the required qualification, see section Information and quali-
fication on page 6.
For information about installation and configuration, see the service manual.
For technical questions not covered in this operating manual:
Follow the instructions of the service manual for the label dispenser
or
Request a service technician from our sales partner.
Our sales partner's customer service department is available especially for configuration settings and malfunctions.
Technical release
Technical release: 6/2011
Software versions:
• Dispenser: 1.39
• Printer: 6.39
Liability
Avery Dennison reserves the right:
• to make changes in design, parts and software and to use equivalent parts instead
of those specified for the purpose of technological progress.
• to change information in this manual.
Any obligation to extend these changes to machines previously delivered is excluded.
Copyright
Avery Dennison retains all rights to this manual and its appendices. Reproduction, reprint or any other type of duplication, including parts of the manual, are permitted only
with written approval.
Printed in Germany
Operating manual ALX 73x | file version 02 | 03/12
General notes | 3
ALX
73x
PLEASE NOTE
Manufacturer
Avery Dennison Deutschland GmbH
Ohmstrasse 3
D-85386 Eching, Germany
Tel.: +49-8165-925-0
Fax: +49-8165-925-231
www.monarch.averydennison.com
4 | General notes
Operating manual ALX 73x | file version 02 | 03/12
ALX
73x
GB
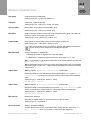
PLEASE NOTE
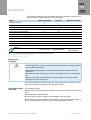
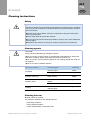
How information is represented
Explanation of
symbols
To enhance readability and make information easier to find, different types of information are identified:
Instruction with no order of tasks assigned
1. Numbered instructions introduced by preceding text
2. The specified order must be followed!
Special note for action that must be performed.
Explanation of an error cause in the reference of error messages.
• Enumeration of features
• Other feature
The Experts symbol identifies activities that are reserved exclusively for qualified and specially trained personnel.
The information symbol identifies notes and recommendations as well as
additional information.
Notes about hazards
and risks
Important instructions that must absolutely be followed are specially highlighted:
WARNING!
A warning symbol refers to risks that can result in severe or fatal injuries! The note
contains safety measures to protect affected persons.
Instructions must be followed without exception.
CAUTION!
A caution symbol refers to risks that can result in property damage or personal injury
(minor injuries). The note contains instructions for preventing damage.
Instructions must be followed without exception.
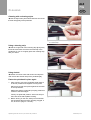
Illustrations
Illustrations appear in the text where required. References to these illustrations are
shown in [square brackets] containing the number of the illustrations. Uppercase letters after an illustration number, for example [12A], refer to the corresponding item
within the illustration.
Normally the machine is shown as the right version. The left version is only shown if
there is a need to make a distinction.
Key symbols
Keys in the dispenser control panel are represented as symbols.
If multiple keys must be pressed simultaneously, the symbols are joined in the text by
"+":
+
Keys in the printer control panel are represented as text, for example "Press the Cut
key".
Parameters
Parameters in the parameter menu are represented in the format MENU NAME >
Parameter name in grey type.
Operating manual ALX 73x | file version 02 | 03/12
General notes | 5
ALX
73x
PLEASE NOTE
For your safety
Intended use
Label print dispensers of series ALX 73x are designed for printing, dispensing and applying self-adhesive labels using the direct thermal or thermal transfer procedure. The
individual versions (ALX 734, ALX 735, ALX 736) differ in the maximum print width.
Different combinations of thermal transfer ribbons and label materials are used and
must be available in the form of rolls.
The label material that is used must be punched, i.e. the self-adhesive labels adhere
individually, separately by punchings, on a carrier material. The labels must only adhere strongly enough so that they will come loose when the material is deflected over
a sharp edge.
Any other type of or more extensive application will be considered non-intended use.
Avery Dennison shall assume no liability for damage resulting from non-intended use
of the machine.
Information and qualification
Ensuring the necessary qualification
Only fully trained and authorised personnel are permitted to operate, adjust and
maintain the machine.
Service work must only be performed by qualified and appropriately trained technical specialists (service technicians) or the customer service department.
Areas of responsibilities for operating and servicing the machine must be clearly
defined and consistently observed.
Personnel must also be regularly instructed in on-the-job safety and environmental
protection.
Qualification for
operation
The instruction provided for the operating personnel must ensure:
• that the operating personnel can use the machine independently and without
danger.
• that the operating personnel can rectify minor operating faults (for example a paper jam) independently.
At least 2 persons should be instructed in operation.
Have a sufficient quantity of label materials available for tests and instruction.
Qualification for
system integrators and
service technicians
Knowledge required to install the print dispenser and perform service work
must be demonstrated through appropriate qualification. Only service personnel with technical training are able to assess the tasks to be performed and
recognise potential dangers.
• Knowledge acquired through technical training in mechanics and electronics (for
example in Germany the training to become a mechatronics engineer).
• Participation in a technical training course for the corresponding label dispenser
offered by the manufacturer.
• The service personnel must be acquainted with the functionality of the label dispenser.
6 | For your safety
Operating manual ALX 73x | file version 02 | 03/2012
ALX
73x
GB
PLEASE NOTE
• The system integrator must be acquainted with the functionality of the of the system into which the label dispenser is being integrated.
Tasks
System integrator
Install the machine
Operator
Service technician
X
Connect
X
Make settings
X
Switch on/off
X
X
X
X
X
X
X
X
X
X
X
X
X
X
Insert/change material/ribbon
Application-related settings
Rectify minor operating faults
a
Clean the machine
Rectify major operating
faults b
X
Settings to the electronics/ mechanics
X
Repairs
X
Manual:
[tab. 1]
a)
b)
Service manual
Operating Manual
Service manual, spare
parts catalogue
An example of the distribution of tasks among different qualified personnel.
For example faults when detecting labels
For example incorrect labelling
Making note of
information
WARNING!
The label dispenser can only be operated safely and efficiently by complying with all
of the requisite information!
Before beginning operation, read this operating manual and follow all of the
instructions.
Observe all additional safety and warning information given on the label dispenser.
Only technically knowledgeable persons are permitted to operate the label
dispenser and make settings on it.
Any product liability and warranty claims will not be valid unless the machine is operated according to the instructions in the operating manual.
Keep product information at hand
This operating manual
must remain readily available for operating personnel at a location near to the machine
must be kept in legible condition.
If the machine is sold, it must be made available to the new owner.
The safety and warning symbols and messages on the machine must be kept in a
clean and legible state. Replace any signs that are damaged or missing.
Operating manual ALX 73x | file version 02 | 03/2012
For your safety | 7
ALX
73x
PLEASE NOTE
Operating safety of the machine
Intended use
The machine must only be used in accordance with the specifications in section
Intended use on page 6.
Warning of injuries due
to electrical shock
WARNING!
This unit operates at mains voltage! Contacting electrically live components can
cause lethal electrical shocks and burns.
Only operate the machine when the enclosure is properly installed.
The machine must only be connected by an authorised technician who is
acquainted with the associated dangers.
Before cleaning and maintenance, switch off the machine and pull out the main
plug.
Keep the machine dry.
If a liquid gets into the machine, switch off the machine immediately and unplug
the mains contactor. Notify a service technician.
The machine must only be connected with other machines if they meet the requirements of a SELV circuit (Safety Extra-Low Voltage circuit) in accordance with
EN 60950.
Keep the machine's On/Off switch accessible.
In case of emergency switch off the machine.
CAUTION!
If the supply voltage is too high or too low, the machine may be damaged.
Only operate the unit at the mains voltage given on the type plate.
Ensure that the mains voltage set on the machine corresponds to the local mains
voltage.
8 | For your safety
Operating manual ALX 73x | file version 02 | 03/2012
ALX
73x
GB
PLEASE NOTE
Warning of injury hazards from mechanical
components
WARNING!
Danger of injury due to moving and rapidly rotating parts!
Maintain a safety clearance from the machine when it is in operation.
Never reach into a machine that is running.
Switch off the machine before making any mechanical adjustments.
Keep clear of the area around moving parts even when the machine is stopped if
there is any possibility of the machine starting up.
Dancer levers work by spring tension and may snap back if the track tension of the
label material suddenly decreases.
Always keep clear of the range of motion of the dancer levers.
Entanglement hazard!
When working in the vicinity of machines in operation, do not wear ties, loose clothing items, jewellery, wrist watches or similar objects on your body.
Long hair must be kept in a hair net and must not be worn loose.
Crushing hazard on the dispensing edge due to products on the conveyor equipment!
If the machine is running or ready for operation, never reach between the product
and the dispensing edge.
Never remove or bypass the protective equipment to prevent reaching in while the
machine is in operation.
Tripping hazard!
Lay the connection cable and pneumatic hoses (if fitted) so that no one can trip
over them.
Danger of injury caused by falling label roll!
Wear safety shoes.
In applicator mode:
Danger of crushing between dispenser edge and applicator pressure plate due to
applicator movement!
The applicator must only be operated with higher-level protective equipment a.
If the machine is running or ready for operation, never reach between the applica-
tor and the dispensing edge.
Never remove or bypass the protective equipment to prevent reaching in while the
machine is in operation.
a)
Movable, locked, separating protective equipment (EN ISO 12100-1, 3.25.4)
Operating manual ALX 73x | file version 02 | 03/2012
For your safety | 9
ALX
73x
PLEASE NOTE
Every time before starting production
Due diligence of the
operator and service
personnel
Ensure that the following requirements are met in accordance with details specified
in the service manual:
•
•
•
•
The machine must be set up and configured to meet applicable requirements.
All necessary safety equipment must be installed.
The machine must have successfully completed at least one test run.
The machine must be connected to the energy supply.
Make the requisite personal protective equipment available to the operating personnel, for example hair nets. Ensure that the protective equipment is used properly.
Due diligence of the
operating personnel
Check the safety equipment to ensure it is working correctly.
Check the machine for visible damage. Report defects that are discovered immediately.
Use personal protective equipment properly, for example wearing a hair net.
Remove material and objects that are not required from the working area of the machine.
Ensure that only authorised persons remain in the working area of the machine.
Ensure that no one can be endangered by the machine starting up.
10 | For your safety
Operating manual ALX 73x | file version 02 | 03/2012
ALX
73x
GB
PLEASE NOTE
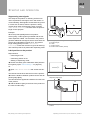
Warning notes on the machine
CAUTION!
Warning notes on the machine provide important information for the operating personnel.
Do not remove warning notes.
Replace missing or illegible warning notes.
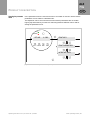
[1]
Warning notes on the ALX 73x
Warning note
[tab. 2]
Meaning
Article no.
The ´Pinch point´ warning note warns you of
the danger posed by the machine´s rotating
parts; they can trap items and draw them in.
A5346
The blue label ´Read manual´ demands that
operators read the user manual.
A5331
Meaning of the warning notes.
Operating manual ALX 73x | file version 02 | 03/2012
For your safety | 11
ALX
73x
TECHNICAL DATA
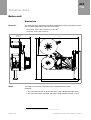
Entire unit
Dimensions
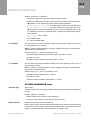
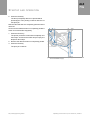
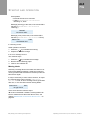
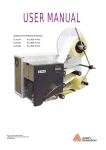
Dimensions
The amount of space required by the machine depends on which configuration is used
(see installation instructions in the Service manual).
• ALX 734/5: 1054 x 905 x 470 mm (H x W x D) 1
• ALX 736: 1054 x 905 x 513 mm
470 (ALX 734/5)
513 (ALX 736)
740
1054
420
905
860
[2]
Weight
Dimensions of a ALX 73x with top-mounted 400 mm unwinder without dispensing edge.
The weight of the machine depends on the configuration that is used.
Examples:
• ALX 734/5 with 300 mm unwinder and fixed L-shape dispensing edge: 65 kg
• ALX 736: with 400 mm unwinder and fixed L-shape dispensing edge: 71,4 kg
1)
12 | Entire unit
With top-mounted 400 mm unwinder without dispensing edge
Operating manual ALX 73x | file version 03 | 03/2012
ALX
73x
GB
TECHNICAL DATA
Connection, unit data
Protection rating
"I"
Mains voltage
100-240 V (AC)
Mains frequency
60/50 Hz
Power consumption
Max. 750 W
Power input
7.5 -3.0 A
Label material
Material types
Self-adhesive, punched labels on carrier material.
Thermal direct material, thermal transfer material, plastic ribbon: PE, PP, PVC, PA in
rolls.
Material width
• ALX 734/5: 30 -136 mm
• ALX 736: 50-190 mm
Recommendation: For applications at variable apply speed, the label width should be
at least 45 mm, to enable the defined label stop accuracy.
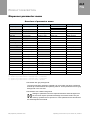
Label length
Min.
Max.
Condition
220
Standard dispensing edge holder and fixed L-shape dispensing
edge
• Elongated dispensing edge holder
440
or
• Adjustable dispensing edge holder
• Elongated dispensing edge holder
25
750
or
• Adjustable dispensing edge holder and
Double deflection roller at the linear dancer lever
[tab. 3]
Label lengths in milimeters that can be processed with the ALX 73x
See service manual, topic section Installation ,
• Chapter „Unpacking and assembling the machine“ > „Configuring the dispensing
edge holder“
• Chapter „Mounting of options“ > „Dancer lever unit with double roller“
Label pitch
Distance between labels on the carrier material:
• min. 1.0 mm
• max. label length -15 mm
Label roll
•
•
•
•
Winding direction: Labels facing inward or outward
Unwinder outside Ø: max. 300/400 mm (depending on the unwinder size)
Rewinder outside Ø: max. 300 mm
Core inside Ø: 38.1 / 76.2 / 101.6 mm (1.5 / 3 / 4")
Operating manual ALX 73x | file version 03 | 04/2012
Entire unit | 13
ALX
73x
TECHNICAL DATA
Ambient conditions
Operating temperature 5 to 40°C
Storage temperature
-4 to 60°C
Air humidity
45 to 75% (non-condensing)
Protection class
IP 21
Noise emissions
< 70dB(A)
Certificates
CE, TÜV-Mark, CTÜVUS -Mark, FCC, GOST
The regulation DIN EN 55022 demands for class A devices the following text to be
printed in the manual:
„WARNING: This is a class A product. In a domestic environment this product may
cause radio interference in which case the user may be required to take adequate
measures.“
The FCC regulation demands the following information text for class A devices:
„NOTE: This equipment has been tested and found to comply with the limits for a
Class A digital device, pursuant to Part 15 of the FCC Rules. These limits are designed
to provide reasonable protection against harmful interference when the equipment is
operated in a commercial environment. This equipment generates, uses and can radiate radio frequency energy and, if not installed and used in accordance with the instruction manual, may cause harmful interference to radio communications. Operation
of this equipment in a residential area is likely to cause harmful interference in which
case the user will be required to correct the interference at his own expense“
14 | Entire unit
Operating manual ALX 73x | file version 03 | 04/2012
ALX
73x
GB
TECHNICAL DATA
Print module
Performance data
Printing technology
Thermal direct or thermal transfer printing
Printhead type
"Corner Edge" type
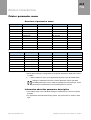
Printhead variables
Printer
Resolution
(dots/mm)
Resolution
(dpi)
Print speed
(mm/s)
Print
speed
(inch/s)
Max. print
width
(mm)
ALX 734
12.0
300
50-400
2 -16
104
ALX 735
12.0
300
50-400
2 -16
127
ALX 736
12.0
300
50-300
2 -12
160
[tab. 4]
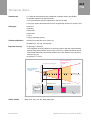
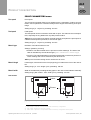
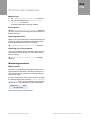
Label sensor
Printhead variables.
Light transmission/reflex sensor (combination sensor; detects both punches/gaps and
reflex markings on the bottom of the material).
• ALX 734/5: 2-80 mm
• ALX 736: 2-100 mm
Recommended punch dimensions.
• Punch length [3b]: 0.8-14 mm
• Punch width [3a]: min. 4 mm
Label sensor
Punch / reflex marking
Label material
a
c
Z0211.cdr
b
[3]
Max. print length
The maximum print length depends on the following factors:
•
•
•
•
Zero line
Dimensions and adjustment range of the punch / reflex marking.
Printer type
Printer resolution
Firmware version
Parameter settings for memory configuration
(for example SYSTEM PARAMETER > Free Store Size)
Offset of the material zero line from the print zero line: 1 mm (i.e. one strip 1 mm in
width on the inside label edge cannot be printed).
Operating manual ALX 73x | file version 03 | 03/2012
Print module | 15
ALX
73x
TECHNICAL DATA
Character sets
Code pages
•
•
•
•
17 character sets with fixed size (fixedfonts) including OCR-A and OCR-B
•
•
•
•
•
•
DOS 437
3 Scalable character set (speedo fonts)
TrueType character sets are supported (in Unicode as well)
TrueType, speedo and fixed size fonts can be optionally stored on a memory card
DOS 850
ANSI 1250
ANSI 1252
UTF 8
Legacy code page (7 bits)
Character modification
• Scaling in x/y direction up to a factor 16
• Rotation by 0, 90, 180, 270 degrees
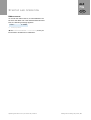
Impression accuracy
• In printing (y-) direction:
The impression accuracy depends on the print position. With the printout starting
directly at the punch position, the accuracy is ±0.5 mm. A distance between punch
(that is label start) and print position will add ±1% of this distance to the accuracy
fault (see fig. [4]).
• X-direction: ± 0.5 mm.
Max. misalignment of the printing position
Max. misalignment at
printing position 2
= 2,5 mm
+1%
+3,0
mm
Max. misalignment at
printing position 1
= 1,0 mm
+2,0
+1,5
+1,0
+0,5
0
- 0,5
50
100
150
200
mm
300
Distance
punch - printing position
-1,0
-1,5
-2,0
-2,5
-3,0
-1%
Punch position
Printing position 1
Printing position 2
Z00521E.cdr
Punch
Printing
direction
Label
[4]
Graphic formats
16 | Print module
Impression accuracy in printing direction, depending on the printing position.
BMP, PCX, JPG, TIF, GIF, Easy-Plug logos
Operating manual ALX 73x | file version 03 | 03/2012
ALX
73x
GB
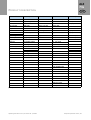
TECHNICAL DATA
Barcodes
Codabar
Code 128 A, B, C
Code 128
Code 128 UPS
Code 128 Pharmacy
ITF
Code 2/5 matrix
MSI
Code 2/5 Interleaved
EAN 8
Code 2/5 5 lines
EAN 13 Appendix 2
Code 2/5 Interleaved Ratio 1:3
EAN 13 Appendix 5
Code 2/5 Matrix Ratio 1:2.5
EAN 128
Code 2/5 Matrix Ratio 1:3
Postal code (guide and ID code)
Code 39
UPC A
Code 39 Extended
UPC E
Code 39 Ratio 2.5:1
Code 93
Code 39 Ratio 3:1
All barcodes are scalable in 30 widths with freely scalable height
Two-dim. barcodes
Data Matrix Code (coded based on ECC200)
Maxi code
PDF 417
Codablock F
Code 49
QR Matrix Code
GS1 Databar &
CC Barcodes
Printer emulation
Reduced Space Symbology (GS1 Databar) and Composite Component (CC) Barcodes:
GS1 Databar-14
UPC-A + CC-A/CC-B
GS1 Databar-14 truncated
UPC-E + CC-A/CC-B
GS1 Databar-14 stacked
EAN 13 + CC-A/CC-B
GS1 Databar-14 stacked omnidirectional
EAN 8 + CC-A/CC-B
GS1 Databar limited
UCC/EAN 128 + CC-A/CC-B
GS1 Databar expanded
UCC/EAN 128 + CC-C
Easy-Plug
Operating manual ALX 73x | file version 03 | 03/2012
Print module | 17
ALX
73x
TECHNICAL DATA
Thermal transfer ribbon
Winding direction
Roll
Coloured side wound inward or outward
Variable
Dimension
Outer Ø
max. 110 mm 1
25,4 mm (1")
Core inside Ø
40,2 mm (1.6") 2
Width 3
[tab. 5]
1)
2)
3)
20 -140 mm
Dimensions of usable ribbon rolls.
Corresponds to 1000 m standard ribbon type Avery 2240 with a
ribbon core of 40.2 mm.
With ribbon core adapter (accessory)
As a general rule, the thermal transfer ribbon must overlap the label
being printed on both sides by 2 mm.
Interfaces
Interface
RS-232
Opt.
X
Details
Baud rate: 1200-115200, 8 bits; suitable connection
cable: 1:1 Sub-D9 extension cable (plug/socket)
RS-232 (additional)
X
Optional (I/O board 1): Baud rate: 1200-115200, 8 bit;
Sub-D 9
RS-422/485
X
Optional (I/O board1): Sub-D15, baud rate: 1200115200, 8 bits
Ethernet
X
10/100 Base T with TCP/IP, LPD, RawIP printing,
DHCP, HTTPD, FTPD, SNMP
USB (V1.1)
X
2x USB-A host port, 1x USB-B device port, transfer
rate 12 Mb/s.
Centronics
[tab. 6]
1)
18 | Print module
Std.
X
Optional (Centronics board 1): Bidirectional mode
(nibble mode) corresponding to IEEE 1284 B
Data interfaces on the ALX 73x print module.
I/O board and Centronics board are mutually exclusive. Only one of the two additional boards can be
installed.
Operating manual ALX 73x | file version 03 | 03/2012
ALX
73x
GB
TECHNICAL DATA
Electronic equipment
Feature
Details
CPU
32 Bit MIPS
RAM
64 MB
ROM
4 MB
Memory cards
SD (1 slot)
CF I/II (1 slot)
Real-time clock
Fitted
Control panel
5 keys; LCD graphical display with 128x32 pixels; typically two
lines are displayed with 16 characters each
[tab. 7]
Electronic equipment for print module ALX 73x.
Operating manual ALX 73x | file version 03 | 03/2012
Print module | 19
ALX
73x
TECHNICAL DATA
Dispensing module
Variables
Dispensing speed
Up to 50 m/min
Label stop accuracy on At a constant dispensing speed: ± 0.5 mm
the dispensing plate
At a variable dispensing speed (range of 5-50 m/min): ±1.0 mm
Speed control
Fixed setting or automatic speed adaptation via encoder.
Label sensor
Distance from the
dispensing plate
L-shape dispensing edge: 19 mm
Sensor type
Transparent sensor, type Wenglor "OPT242-P800 optical", NPN
Interfaces
Data interfaces
Interface
Details
Serial
RS 232C (Sub-D9), 300 -115200 baud
Ethernet
10/100 Base T (RJ45)
USB
Device V1.1 (USB-B), operating mode "Full speed", 12 MBit/s
CF card
Slot for CompactFlash card
Control panel
interface
RS 485 (Mini DIN 6-plug) for remote control panel
[tab. 8]
Signal interfaces
Data interfaces on the ALX 73x dispensing module.
Interface
Details
Applicator
interface
Optional (AI board): control signals for applicators
Sub-D15, optically insulated, optionally 1 via two 8-pin M12s (inputs/
outputs separated)
PLC interface
Outputs: 4x PNP (high side drive), 24 V, max. 500 mA/channel, total
permissible output current: 1500 mA
Inputs: 3x PNP/NPN, 24 V
[tab. 9]
1)
20 | Dispensing module
Signal interfaces on the ALX 73x dispensing module.
Configuration option „full“
Operating manual ALX 73x | file version 03 | 03/2012
ALX
73x
GB
TECHNICAL DATA
External sensors
Interface
Details
Label sensor
Wenglor OPT242-P800 optical, NPN, 24 V, controllable
sensitivity
Product sensor
PNP/NPN, 24 V
Loop sensor
APSF sensor (rotary
encoder)
One/two-phase , PNP/P-P, 24 V, max. 20 kHz
Material reserve sensor
PNP, 24 V
[tab. 10] Interfaces for external sensors on the ALX 73x dispensing module (plugs are 4-pin M12).
Electronic equipment
Feature
Details
CPU
32 bit MIPS
RAM
16 MB
ROM
4 MB
Memory cards
CF I/II (1 slot)
Control panel
5 keys; LCD graphical display with 128x32 pixels; typically two
lines are displayed with 16 characters each
[tab. 11] Electronic equipment for print module ALX 73x.
Operating manual ALX 73x | file version 03 | 03/2012
Dispensing module | 21
ALX
73x
PRODUCT DESCRIPTION
Overview
Designs of the ALX 73x
ALX 734/735
The ALX 73x is available in versions ALX 734, ALX 735 and ALX 736. These two versions differ in the width of the printhead:
• ALX 734: 4" print width (106 mm)
• ALX 735: 5" print width (127 mm)
• ALX 736: 6“ print width (160 mm)
ALX 73x RH/LH
Each machine of series ALX 73x is available as a right-hand (RH) or left-hand (LH)
version [5]:
• ALX 73x RH: The label exits the machine on the right 1.
• ALX 73x LH: The label exits the machine on the left.
RH
22 | Overview
[5]
ALX 73x RH and LH.
1)
As seen by the operator
LH
Operating manual ALX 73x | file version 03 | 03/2012
ALX
73x
GB
PRODUCT DESCRIPTION
Configurations of the ALX 73x
The ALX 73x can be adjusted in many ways to meet customer requirements:
Feature
Adjustment
Direction in which products move
Selection of design: LH / RH
Assembly position of the machine
Horizontal / vertical (for labelling from above or
from the side)
Machine fastening
Below / in the rear
Number of unwinders
1/2
Fastening of unwinders
Above (to the right / left)
On the side (right / left)
[tab. 12] Options for configuring the ALX 73x.
Operation of the ALX 73x is described in this manual based on a machine with the following configuration:
• RH
• Horizontal installation position for labelling from above
• 1 Unwinder top left
For additional configuration illustrations see section Threading diagrams on
page 65.
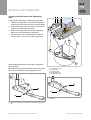
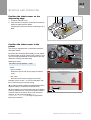
Functionality
The main function of the ALX 73x is printing and dispensing self-adhesive labels. This
function is performed by a printing [6C] and a dispensing [6B] module that will be referred to below by the shortened form printer and dispenser.
The printer and dispenser work largely independently of each other. The only information exchanged between the units relates to ready for operation status and error states
that occur. These units have their own control unit, firmware and control panel. To be
able to operate the machine, the two units must be set up separately from each other.
In some cases the same settings will have to be made twice (for example entering the
label length).
The labels are not dispensed immediately after printing. Instead they are buffered in
a loop where they are kept under tension by the dancer unit [6D].
Operating manual ALX 73x | file version 03 | 03/2012
Overview | 23
ALX
73x
PRODUCT DESCRIPTION
A
D
B
C
E
F
[6]
Left: Functional elements of the ALX 73x. Right: Flow of material.
A Unwinder
B Dispenser (LMA)
C Printer (PMA)
D Dancer unit (DU)
E Dispensing edge holder
F Dispensing edge (optional)
Sequence of print dispensing:
• A print job is transferred to the printer (via database interface or memory card).
• The printer starts. When it does the dancer lever of the dancer unit moves up. The
printer stops as soon as the dancer lever has reached approximately the position
shown here [6 right].
• The dispenser dispenses a label as soon as there are enough printed labels in the
buffer loop and a start signal is received. This draws the dancer lever down, which
in turn causes the printer to print as long as there are still more labels to print until
the dancer lever has reached the upper end position.
24 | Overview
Operating manual ALX 73x | file version 03 | 03/2012
ALX
73x
GB
PRODUCT DESCRIPTION
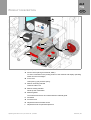
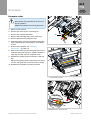
Operating components
A
B
C
D
E
P
F
O
G
H
I
Q
J
N
K
M
L
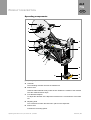
[7]
Operating components of the ALX 73x RH.
A Unwinder
The unwinding mandrel receives the material roll.
B Dancer lever
Holds the label material evenly under tension. Brakes the rotation of the material
roll if the material tension drops.
C Core diameter adapter
To adjust the diameter of the dispenser mandrel to the core diameter of the label
roll.
D Adjusting knob
Turn clockwise to fasten the label roll in place on the dispenser.
E
Dancer lever
Controls the rewinding speed.
Operating manual ALX 73x | file version 03 | 03/2012
Overview | 25
ALX
73x
PRODUCT DESCRIPTION
F
Rewinder
Winds up the empty carrier material.
G Unlocking button
Pressing the button reduces the diameter of the rewinding core. This makes it possible to remove wound carrier material easily.
H Dispenser control panel (dispensing module "LMA")
To enter commands on the dispensing section of the machine and display operating states and error messages.
I
Pressure mechanism
Presses the pressure roller against the drive roller. Prevents the carrier material
from slipping. Is automatically unlocked if the carrier material is drawn around the
drive roller.
J
Printer control panel (print module "PMA")
To enter commands on the printing section of the machine and display operating
states and error messages.
K Dispensing edge
Shown here: fixed L-shape dispensing edge. The following options are available:
swivelling L-shape dispensing edge, spring-loaded L-shape dispensing edge,
pneumatic L-shape dispensing edge
L
Label sensor
Stops the label feed after dispensing a label.
M Pressure roller
Presses the label after dispensing onto the product.
N Dispensing edge holder
Holds L-shape dispensing edges in position. Not required for V-shape dispensing
edge.
O Dancer lever
Holds the buffer loop under tension.
P
Adjusting knob
For setting the spring tension of the dancer lever.
Q Feed roller
26 | Overview
Operating manual ALX 73x | file version 03 | 03/2012
ALX
73x
GB
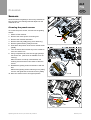
PRODUCT DESCRIPTION
B
A
D
C
E
I
E
F
G
H
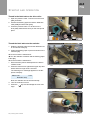
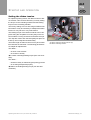
[8]
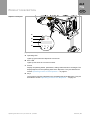
Operating components of the printer in a ALX 73x RH.
A Printer control panel (print module „PMA“)
To enter commands on the printing section of the machine and display operating
states and error messages.
B Front cover
Held open by gas pressure spring.
C Ribbon unwinding mandrel
Holds the ribbon roll.
D Ribbon winding mandrel
Winds up the used ribbon.
E
Material guides
The material end sensor is located inside the material guide.
F
Printhead
G Pressure lever
H Adjustment wheel for label sensor
I
Adjustment knob for printhead pressure
Operating manual ALX 73x | file version 03 | 03/2012
Overview | 27
ALX
73x
PRODUCT DESCRIPTION
Control panels
Control panel language Different languages are available for texts that appear on screen. Instructions for selecting the language:
• Dispenser: see Setting parameters on page 42.
• Printer: see Setting parameters on page 48.
Printer control panel
A
B
C
ON
ERROR
D
E
APPLY ONLINE FEED
[9]
PROG
Printer control panel.
A On/Off switch
Switches the printer on and off. To do this, press this button for longer than 2 seconds. Requirement: The mains power switch is turned on (position “I”, see ).
B Operating LED
Lights up green when the printer is turned on.
C Error LED
Lights up red when an error has occurred.
D Screen
Display of operating states, parameters, setting values and error messages. The
displays depend on the operating state of the printer. They are described in section Printer operating modes on page 43.
E
Keys
The functions of the keys depend on the operating state of the printer. They are
described in section Printer operating modes on page 43.
28 | Overview
Operating manual ALX 73x | file version 03 | 03/2012
PRODUCT DESCRIPTION
ALX
73x
GB
Dispenser control panel
A
B
C
D
[10] Dispenser control panel.
A Operating LED
Lights up green when the dispenser is turned on.
B Error LED
Lights up red when an error has occurred.
C Screen
Display of operating states, parameters, setting values and error messages. The
displays depend on the operating state of the dispenser. They are described in
section Operating modes of the dispenser on page 37.
D Keys
The functions of the keys depend on the operating state of the dispenser. They are
described in section Operating modes of the dispenser on page 37.
Operating manual ALX 73x | file version 03 | 03/2012
Overview | 29
ALX
73x
PRODUCT DESCRIPTION
Connections
WARNING!
Danger of electrocution.
Only connect the printer to devices that fulfil the SELV (safety extra-low voltage)
circuit requirements in accordance with EN 60950.
CAUTION!
Danger of damage to the machine due to faulty accessories.
Only connect original accessories.
H
U
A
V
B
W
C
D
I
J K
X
E
F
G
Y
N
L
M
O
Q
M
P
T
Z
RS
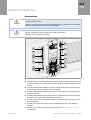
[11] Connections on an ALX 73x RH. Left: printer connections, right: dispenser connections.
A (Printer) network connection (Ethernet 10/100); used to transfer print jobs from a
host (for example a PC); read service data; transfer firmware; operation via web
server
B (Printer) Serial interface (RS232); used to transfer print jobs from a host (for example a PC); read service data; transfer firmware
C (Printer) USB device interfaces (2x); used to connect devices, for example keyboard or scanner
D (Printer) USB interface type A (host); used to transfer print jobs from a host (for
example a PC); read service data; transfer firmware
E
(Printer) card slot for CompactFlash cards; used to store/load print jobs, service
data or firmware
F
(Printer) card slot for SD cards; used to store/load print jobs, service data or
firmware
G (Printer) connection for a remote control panel (see External control panels
on page 32)
30 | Overview
Operating manual ALX 73x | file version 03 | 03/2012
ALX
73x
GB
PRODUCT DESCRIPTION
H Connection to the mains power supply
I
Label sensor
J
Product (start) sensor (available as accessory)
K Rotary encoder (available as accessory); used for operation with automatic speed
adaptation
L
Alternative label sensor (see Capacitive label sensor on page 35)
M Position sensor of the linear dancer lever
N OD 1 sensor for external OD monitoring (see Roll diameter sensor on page 34)
O (Dispenser) signal inputs (connection only to ALX 73x in the "complete") design;
used to exchange signals with other machines or control an applicator
P
(Dispenser) signal outputs (connection only to ALX 73x in the "complete") design
Q OD sensor 1 (for internal OD monitoring on dispenser 1, see Cable kit for internal
roll diameter monitoring on page 34)
R OD sensor 1
S
OD1 sensor 2 (for internal OD monitoring on dispenser 2)
T
OD sensor 2
U (Dispenser) PLC signal interface/applicator interface (switchable); used to exchange signals with other machines or control an applicator
V
(Dispenser) USB interface type A (host); used to transfer print jobs from a host (for
example a PC); read service data; transfer firmware
W (Dispenser) card slot for CompactFlash cards; used to store/load service data or
firmware
X
(Dispenser) connection for remote control panel
(see External control panels on page 32)
Y
(Dispenser) Serial interface (RS 232); used to read service data; transfer firmware
Z
(Dispenser) network connection (Ethernet 10/100); used to read service data;
transfer firmware; operate via web server
1)
OD = outer roll diameter
Operating manual ALX 73x | file version 03 | 03/2012
Overview | 31
ALX
73x
PRODUCT DESCRIPTION
Options
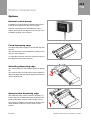
External control panels
In addition to the permanently installed control panel,
external control panels can also be connected.
External control panels are advantageous if the installed control panels are difficult to access due to the
installation position of the machine.
[12] External dispenser control panel
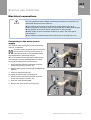
Fixed dispensing edge
The dispensing edge is rigidly connected with the holding bars.
The vertical position can be adjusted by raising or lowering the entire machine.
To adjust the inclination, rotate the holding bars (for further details see the Service manual).
[13] Standard dispensing edge
Swivelling dispensing edge
The vertical position of the dispensing edge is adjustable.
The machine does not need to be moved to adjust the
dispensing edge and the machine suspension does not
need to be loosened.
[14] Swivelling dispensing edge
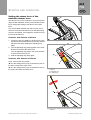
Spring-loaded dispensing edge
The dispensing edge can be rotated in its bearing. A
torsion spring in the dispensing head presses the dispensing edge down onto the surface of the product.
This makes it possible to compensate for differences in
height between products or on the surface of the
product.
[15] Spring-loaded dispensing edge
32 | Options
Operating manual ALX 73x | file version 01 | 03/2012
ALX
73x
GB
PRODUCT DESCRIPTION
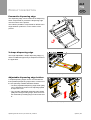
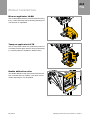
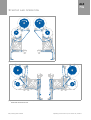
Pneumatic dispensing edge
The dispensing edge can be rotated in the dispensing
head. Compressed air presses the dispensing edge
onto the surface of the product.
This makes it possible to compensate for differences in
height between products or on the surface of the
product.
[16] Pneumatic dispensing edge
V-shape dispensing edge
The length-adjustable V-shape dispensing edge [17]
offers an additional opportunity to adapt the machine to
the application.
[17] V-shape dispensing edge.
Adjustable dispensing edge holders
L-shape dispensing edges can be mounted with the
fixed (standard) dispensing edge holder, or with one of
the two optionally available adustable holders.
• The finely adjustable dispensing edge holder [18A]
can be adjusted by means of an adjusting spindle
in steps of 0.2 mm.
A
B
• The „normally“ adjustable dispensing edge holder
[18B] offers a larger setting range, which can be further extended by installing longer rods into the holder.
[18] Adjustable dispensing edge holder.
Operating manual ALX 73x | file version 01 | 03/2012
Options | 33
ALX
73x
PRODUCT DESCRIPTION
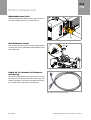
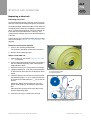
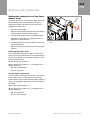
Adjustable head joint
Using the adjustable head joint [19A], just one person
can tilt the label dispenser ±4° for fine dosing.
A
[19] Adjustable head joint (A)
Roll diameter sensor
A
The roll diameter sensor (OD sensor) [20A] generates
a warning if a specific, adjustable Outer Diameter of the
roll is exceeded.
[20] Roll diameter sensor (A)
Cable kit for internal roll diameter
monitoring
The sensors integrated into the dispenser are connected to the ALX 73x controller with these cables [21]. This
makes it possible to use internal roll diameter monitoring. 2 cable kits are required for 2 dispensers.
[21] Cable kit for internal OD monitoring
34 | Options
Operating manual ALX 73x | file version 01 | 03/2012
ALX
73x
GB
PRODUCT DESCRIPTION
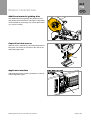
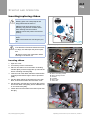
Additional material guiding disc
The additional material guiding disc [22A] improves
side guiding of the material roll. This option is especially
recommended for processing very narrow label material (< 30 mm in width).
A
[22] Additional material guiding disc (A)
Capacitive label sensor
Optional sensor, required for processing transparent labels [23A]. The sensor is mounted on the rods of the
dispensing edge holder.
A
[23] Capacitive label sensor (A).
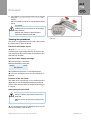
Applicator interface
Additional board [24A]; makes it possible to control almost all applicator types.
A
[24] Installed applicator interface (A) on an ALX 73x RH.
Operating manual ALX 73x | file version 01 | 03/2012
Options | 35
ALX
73x
PRODUCT DESCRIPTION
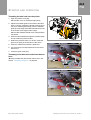
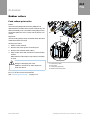
Blow-on applicator LA-BO
The LA-BO applies labels to products without touching
them. It suits especially well for labelling delicate products like fruits or vegetables.
[25] Applicator LA-BO.
Tamp-on applicator LA-TO
The LA-TO presses labels onto products by means of
a movable pressure plate, which is driven pneumatically. Pressure plates are available in different sizes.
[26] Applicator LA-TO.
Double deflection roller
The double deflection roller [27A] at the linear dancer
lever increases the loop capacity. This option recommends especially for very long labels.
A
[27] Double deflection roller (A) at the linear dancer lever.
36 | Options
Operating manual ALX 73x | file version 01 | 03/2012
ALX
73x
GB
PRODUCT DESCRIPTION
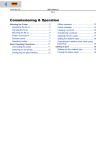
Operating modes of the dispenser
Overview
Operating modes of the dispenser:
• Online mode
– dispensing mode
– Active operating mode after switching on 1
– Label counter screen or
– Display/setting of dispensing speed and start delay
• Offline mode
Settings in parameter menu
[28] Dispenser control panel on the ALX 73x.
1)
Requirement: Factory setting or MACHINE SETUP > Turn-on mode = "Online"
Operating manual ALX 73x | file version 00 | 03/2012
Operating modes of the dispenser | 37
ALX
73x
PRODUCT DESCRIPTION
Online mode
ON
STATUS
Online
292
Labels
– + – +
A
[29] Dispenser control panel in online mode (292 labels dispensed)
A Meaning of keys in online mode
Activate online mode
Normally 1 activated automatically after switching on.
Activate from offline mode:
Press the
key 2x.
Screen:
ONLINE
Label
0
Or:
Prof 5 xxxxxxx
Label
292
(Product profile "xxxxxxxx" (memory slot 5) is activated).
For more detailed information see chapter Using product profiles (dispenser) on
page 92.
Stop /continue label
output
Stop label output:
Press the
key.
The dispenser stops.
Screen:
ONLINE
Stopped. - Press key. a
a)
Second = running text
or (in applicator mode)
ONLINE
Stopped. Remove label. - Press key. a
1)
Requirement: Factory setting or MACHINE SETUP > Turn-on mode = "Online"
38 | Operating modes of the dispenser
Operating manual ALX 73x | file version 00 | 03/2012
ALX
73x
GB
PRODUCT DESCRIPTION
Continue label output:
1. (applicator mode) remove label from applicator.
2. Press the
Online settings
key.
A
B
C
ON
STATUS
Offset
0.0
Speed
12.2 fix
– + – +
E
F
G
D
H
[30] Dispenser control panel in the online settings mode.
A Dispensing speed display (here: 12,2 m/min constant)
B Dispense label key
C Start delay display (here: 0 mm)
D Meaning of keys for online settings
E Reduce dispensing speed key
F Increase dispensing speed key
G Reduce start delay key
H Increase start delay key
The machine is in dispensing mode.
Switch to online settings:
Press the
key.
Screen shows dispensing speed [30A] and start delay [30C].
The key assignments as they are represented on the keys apply.
Both settings can be increased or reduced during dispensing mode ("+" key)
("-" key) [30D].
Dispensing speed:
• Setting range: [5.0…50.0] m/min
• "Fixed" display: The dispensing speed is constant
• "Var" display: The dispensing speed automatically follows the speed of the conveyor mechanism (automatic speed adaptation)
Start delay:
• Setting range: [0.0…999.9] mm
• The start delay is the distance between the product sensor and the dispensing
edge.
Changing back to online mode:
Press the
+
Operating manual ALX 73x | file version 00 | 03/2012
keys.
Operating modes of the dispenser | 39
ALX
73x
PRODUCT DESCRIPTION
Changing the counter
state
Set the counter state with MACHINE SETUP > Dispense counter.
Count labels backwards
To count dispensed labels backwards from a starting value to zero:
1. Set LABEL SETUP > Stop counter mode to "Enabled“.
2. Define the starting value with LABEL SETUP > Label stop quan..
Start dispensing cycle
To start dispensing of a single label manually:
Press the
To start the dispenser
in offline mode
key.
To start the dispenser in offline mode the next time it is turned on:
Set MACHINE SETUP > Turn-on mode to "Offline".
40 | Operating modes of the dispenser
Operating manual ALX 73x | file version 00 | 03/2012
ALX
73x
GB
PRODUCT DESCRIPTION
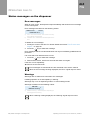
Offline mode
Activate offline mode
Activate from online mode:
Press the
key 2x.
OFFLINE
Press the
key.
LABEL SETUP
LABEL SETUP is the first menu in the parameter menu.
In offline mode the key assignments as they are represented under the keys apply.
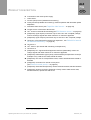
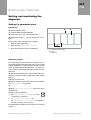
Opening the parameter In the parameter menu the user has access to a number of menus in which various
menu
parameters can be called in a defined order.
The dispenser can be set so that some menus and/or parameters are not visible.
Figure [31] shows the key functions for switching between different menus and for exiting the parameter menu.
ON
STATUS
OFFLINE
A
LABEL SETUP
– + – +
MACHINE SETUP
INTERFACE PARA
B
[31] Menu selection and key functions in the parameter menu.
A Meaning of keys in offline mode
B Menus
Operating manual ALX 73x | file version 00 | 03/2012
Operating modes of the dispenser | 41
ALX
73x
PRODUCT DESCRIPTION
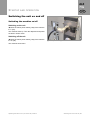
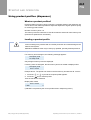
Setting parameters
MACHINE SETUP
MACHINE SETUP
Dispenser type
5x
Language
English
MACHINE SETUP
Language
B
MASCHINEN SETUP
Sprache
Language
German
A
[32] Key function when setting the parameter MACHINE SETUP > Language.
A Key for "Accept change"
B Key for "Reject change"
Each menu contains parameters that can be used to make settings on the machine
control unit.
Fig. [32] shows the MACHINE SETUP > Language parameter as an example of the key
functions for changing settings.
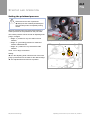
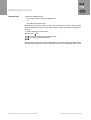
Start dispensing cycle
Press the
key.
A single label is dispensed.
Measure label length
Press and hold the
key for longer than 2 seconds.
The label material is fed 2 label lengths forward. At the same time the label length is
measured and appears in the display.
42 | Operating modes of the dispenser
Operating manual ALX 73x | file version 00 | 03/2012
ALX
73x
GB
PRODUCT DESCRIPTION
Printer operating modes
Overview
Operating modes of the printer:
• Online mode
– Print jobs are received and processed immediately
– Active operating mode after switching on
– Print contrast setting
• Offline mode
– Print jobs are received but are not processed
– Access to the parameter menu
• Standalone mode
– Print mode without data line
– Print job on memory card
ON
ERROR
APPLY ONLINE FEED
PROG
[33] Dispenser control panel on the ALX 73x.
Operating manual ALX 73x | file version 00 | 03/2012
Printer operating modes | 43
ALX
73x
PRODUCT DESCRIPTION
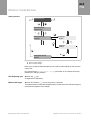
Online mode
ON
ERROR
ONLINE
A
0: JOBS
APPLY ONLINE FEED
B
PROG
[34] Printer control panel of the ALX 73x in online mode.
A Interpreter activity
B Data transfer
Activate online mode
Activate from offline mode:
Press the Enter key.
Screen:
ONLINE 0 JOBS
(There are no pending print jobs for processing).
Data transfer and
interpreter activity
ONLINE
0: JOBS
Screen showing data transfer:
A data transfer to the printer that is currently in progress is indicated in the display by
a dot on the right below the number of jobs loaded [34B].
Screen showing interpreter activity:
An additional dot above the first one at the vertical midpoint of the line [34A] indicates
activity of the interpreter:
• No dot: No data to interpret.
• Dot: The interpreter is working (data still present in the spooler)
• Flashing dot: The interpreter is waiting for additional data to be able to complete
the command (no data in the spooler).
44 | Printer operating modes
Operating manual ALX 73x | file version 00 | 03/2012
ALX
73x
GB
PRODUCT DESCRIPTION
Screen showing the
progress of printing
Screen during printing:
• Number of print jobs interpreted (13)
• Number of remaining labels to be printed in the current job (25)
ONLINE 13 JOBS
Restcount: 25
ONLINE 13 JOBS
Restcount: endless
If a printer job has been specified as endless, i.e., there is no limit to the number
of labels to be printed, the remainder for this job will also be endless.
Stop/continue print
process
Screen during printing:
ONLINE xx JOBS
Restcount: yy
To stop the print process:
Press the online key.
The label currently being printed is completed. Screen:
ONLINE xx JOBS
Stopped: yy a
a)
"Stopped: yy" alternates with "Press Feed".
To continue the print process:
Press the feed key.
ONLINE xx JOBS
Restcount: yy
Adjust the print
contrast
CAUTION!
The print contrast parameter directly affects the service life of the printhead. The higher the setting of the print contrast, the shorter the service life of the printhead. This
applies especially to settings over 100%.
Always select the lowest setting that will still produce acceptable printing results.
ONLINE xx JOBS
Restcount: yy
Press the prog key.
Print contrast
xxx%
Set the print contrast with the feed/apply keys.
Accept the setting with the online key.
Operating manual ALX 73x | file version 00 | 03/2012
Printer operating modes | 45
ALX
73x
PRODUCT DESCRIPTION
Offline mode
Activate offline mode
Normally 1 activated automatically after switching on.
To activate from online mode (when the print job is stopped):
Press the Enter key.
OFFLINE
0 JOBS
(There are no pending print jobs for processing).
OFFLINE xx JOBS
Stopped: yy
(The operator has switched from stopped online mode to offline mode)
Material feed forwards/ Material feed up to the start of the next label:
backwards
Press the feed key.
OFFLINE xx JOBS
feeding...
Slow material and ribbon feed:
Press and hold Online+Feed keys.
OFFLINE xx JOBS
feeding...
Slow material transport backwards:
Press and hold Online+Apply keys.
OFFLINE xx JOBS
feeding...
1)
46 | Printer operating modes
Requirement: factory setting or SYSTEM PARAMETERS > Turn-on mode = "Offline"
Operating manual ALX 73x | file version 00 | 03/2012
ALX
73x
GB
PRODUCT DESCRIPTION
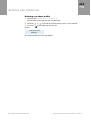
Opening the parameter In the parameter menu the user has access to a number of menus in which various
menu
parameters can be called in a defined order.
The dispenser can be set so that some menus and/or parameters are not visible.
Figure [35] shows the key functions for switching between different menus and for
exiting the parameter menu.
ON
ERROR
OFFLINE
0 JOBS
APPLY ONLINE FEED
PROG
PRINT INFO
PRINT PARAMETERS
INTERFACE PARA
[35] Menu selection and key functions in the printer parameter menu.
Operating manual ALX 73x | file version 00 | 03/2012
Printer operating modes | 47
ALX
73x
PRODUCT DESCRIPTION
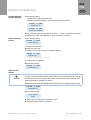
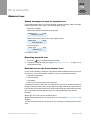
Setting parameters
SYSTEM PARAMETER
SYSTEM PARAMETER
Speed unit
Language
English
SYSTEM PARAMETER
Language
B
Language
German
A
SYSTEM PARAMETER
Sprache
[36] Key function when setting the SYSTEM PARAMETER > Language parameter.
A Key for "Accept change"
B Key for "Reject change"
Each menu contains parameters that can be used to make settings on the machine
control unit.
Fig. [36] shows the SYSTEM PARAMETER > Language parameter as an example of the key
functions for changing settings.
Dot check for
printhead
The printhead dot check is used to detect faulty dots on the printhead.
CAUTION!
Danger of damaging the printhead.
Do not switch off the machine under any circumstances during the dot check!
Press the Apply+Feed keys.
OFFLINE xx JOBS
Head dot test
48 | Printer operating modes
Operating manual ALX 73x | file version 00 | 03/2012
ALX
73x
GB
PRODUCT DESCRIPTION
Standalone mode
In standalone mode, print jobs are not transferred via data cable but are instead stored
on a memory card. You can access them there from the printer control panel or using
a connected keyboard.
Activate standalone
mode
1. Switch off the machine.
2. Save relevant print jobs in the \Formats directory on the memory card.
Files with print jobs must have the ending *.for.
3. Insert the memory card in the printer's card slot.
4. Switch on the machine.
Initial operating mode: online or offline.
5. Press Online+Esc keys.
Screen:
Select file
Avery.for a
a)
Filename of the print job. If there are several print jobs:
filename of the first print job in alphabetical order.
Screen if no file was found:
Standalone
No files!
Starting a print job
1. Activate standalone mode as described above.
2. If there are several print jobs: Press the feed/apply keys keys until the required
print job appears.
3. Press the online key to confirm the selection.
Screen:
Enter quantity
xa
a)
Assignment for quantity (in this case x) is included in the
print job.
Depending on the print job, the user may be prompted for additional entries.
4. Press the online key to confirm the number or the Esc key to delete the number.
5. Proceed in the following manner for each required digit:
– Press the feed/apply key to select a number from 0 to 9.
– Press the online key to move to the next digit.
6. Press the online key twice to confirm the selection.
The print job is now processed.
7. You can also optionally press the online+Esc to switch to online mode.
Operating manual ALX 73x | file version 00 | 03/2012
Printer operating modes | 49
ALX
73x
PRODUCT DESCRIPTION
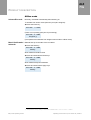
Dispenser parameter menu
Overview of parameter menu
LABEL SETUP
MACHINE SETUP
(continued)
INTERFACE PARA
(continued)
Load prod.profil
Dispenser type
Slave IP address
>EASYPLUGINTERPR
Port address
Gap detect. mode
Store prod.prof.
Tandem Distance
Interface
Ethernet speed
Dispense speed
Del. prod.profil
Label sens. type
Spooler mode
MAC Address
Slew speed
Dispense counter
Labelsen. InType
Dispenser ID no.
SNMP Agent
Label pitch
Turn-on mode
Startsen. In.Type
Spooler size
SNMP password
Lab. stop offset
Language
Start disp. mode
Offline mode
FTP server
Start offset
Access authoriz.
Start error stop
Interface delay
FTP Password
Product length
Default values
On inhibit enter
Multi label mode
Factory settings
On inhibit leave
>COM1 PORT
WEB admin passw.
Label 2 offset
a
WEB server
Store Parameters
Apply key
Baud rate
WEB supervisor p.
Label 3 offset b
Loop dancer adj.
Materialend err
No. of data bits
WEB operator p.
Miss. label tol.
Auto Sensor Adj.
Materialend warn
Parity
Time client
Miss. label mode
Sensor Adjust
Rewinder full
Stop bits
Time server IP
Speed Adaption
Ext. OD sensor
Data synch.
Sync. interval
Encoder Type
OD Sens.polarity
Frame error
DHCP host name
Encoder Resol.
Loop supply mode
Encoder Diameter
Loop setup
Stop count. mode
Label stop quan.
c
>NETWORK PARAM.
Rewinder Operat.
IP Addressassign
Rewinder gear
IP address
Tandem Operation
Net mask
Tandem synchron.
Gateway address
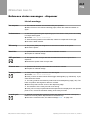
[tab. 13] Menu overview - part 1.
a)
b)
c)
Appears only if LABEL SETUP > Multi label mode = „x labels/start“.
Appears only if LABEL SETUP > Multi label mode = „3 labels/start“.
Appears only if LABEL SETUP > Stop count. mode = "Enabled".
• Parameter with grey background:
Only the parameters required to operate a ALX 73x which has been configured
and set up are described in this operating manual. These parameters have a grey
background in the overview.
• Parameters with a white background:
Settings to parameters that are represented with a white background in
the overview require specialist knowledge and must therefore only be
made by qualified service personnel. These parameters are described in
the Assembly/Service manual.
50 | Dispenser parameter menu
Operating manual ALX 73x | file version 02 | 03/2012
ALX
73x
GB
PRODUCT DESCRIPTION
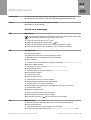
SIGNAL INTERFACE
(continued)
SERVICE/DIAGNOS.
SE