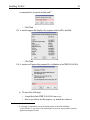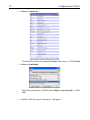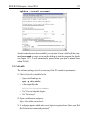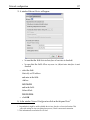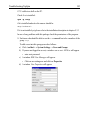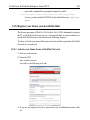
1
Installation Guide
TopSpin 2.1
Red Hat Enterprise Linux WS 4
Version 2.1.0
Copyright (C) 2007 by Bruker BioSpin GmbH
INDEX
Part-No: H9556SL2/10
DONE
INDEX
revision state: 19/10/2007 (Version 2.1.0)
The information in this manual may be altered without notice.
BRUKER accepts no liability for any mistakes contained in the manual, leading to
coincidental damage, whether during installation or operation of the instrument.
Unauthorized reproduction of manual contents, in any form, or by any means
without written permission of the publishers, or translation into another language,
either in full or in part, is forbidden.
Product names used are trademarks or registered trademarks of their respective
holders.
Bruker software support is available via phone, fax, e-mail or Internet. Please contact your local office, or directly:
Address:
Phone:
Fax:
E-mail:
FTP:
WWW:
Bruker BioSpin GmbH
Service & Support Department
Silberstreifen
76287 Rheinstetten
Germany
+49 (721) 5161 455
+49 (721) 5161 943
[email protected]
ftp.bruker.de / ftp.bruker.com
www.bruker-biospin.de / www.bruker-biospin.com
Contents
Chapter 1
1.1
1.2
1.3
1.4
Introduction . . . . . . . . . . . . . . . . . . . . . . . . . . . . . . . . . . . . . . . . . . . . . . . . . . . . . . 9
About this manual . . . . . . . . . . . . . . . . . . . . . . . . . . . . . . . . . . . . . . . . . . . . . . . . . . . . . . . . . . 9
Conventions . . . . . . . . . . . . . . . . . . . . . . . . . . . . . . . . . . . . . . . . . . . . . . . . . . . . . . . . . . . . . 10
Safety Regulations . . . . . . . . . . . . . . . . . . . . . . . . . . . . . . . . . . . . . . . . . . . . . . . . . . . . . . . . .11
Hardware and software requirements for TopSpin . . . . . . . . . . . . . . . . . . . . . . . . . . . . . . . . .11
1.4.1
1.4.2
1.4.3
Supported operating systems . . . . . . . . . . . . . . . . . . . . . . . . . . . . . . . . . . . . . . . . . . . . . . . . . . . 11
Special PC Hardware requirements . . . . . . . . . . . . . . . . . . . . . . . . . . . . . . . . . . . . . . . . . . . . . . 12
Spectrometer requirements . . . . . . . . . . . . . . . . . . . . . . . . . . . . . . . . . . . . . . . . . . . . . . . . . . . . . 12
1.4.3.1 AVANCE-spectrometers and AVANCE II-spectrometers . . . . . . . . . . . . . . . . . . . . . . . . . . . . . . . . . . . 13
1.4.3.2 AVANCE III-spectrometers . . . . . . . . . . . . . . . . . . . . . . . . . . . . . . . . . . . . . . . . . . . . . . . . . . . . . . . . . . 15
1.4.4
Software requirements . . . . . . . . . . . . . . . . . . . . . . . . . . . . . . . . . . . . . . . . . . . . . . . . . . . . . . . . 16
1.5 Important Red Hat Linux Enterprise WS 4 configurations . . . . . . . . . . . . . . . . . . . . . . . . . 17
1.5.1
Chapter 2
KDE - desktop manager: recommended by Bruker BioSpin . . . . . . . . . . . . . . . . . . . . . . . . . . . 17
Express Installation and Configuration of TOPSPIN . . . . . . . . . . . . . . . . . . . . . 19
2.1 About this chapter . . . . . . . . . . . . . . . . . . . . . . . . . . . . . . . . . . . . . . . . . . . . . . . . . . . . . . . . . 19
2.2 Installing TOPSPIN . . . . . . . . . . . . . . . . . . . . . . . . . . . . . . . . . . . . . . . . . . . . . . . . . . . . . . . . . 20
2.2.1
2.2.2
Installation in parallel . . . . . . . . . . . . . . . . . . . . . . . . . . . . . . . . . . . . . . . . . . . . . . . . . . . . . . . . . 20
What do you want to do with TOPSPIN? . . . . . . . . . . . . . . . . . . . . . . . . . . . . . . . . . . . . . . . . . . . 24
2.3 Configuring TOPSPIN . . . . . . . . . . . . . . . . . . . . . . . . . . . . . . . . . . . . . . . . . . . . . . . . . . . . . . 24
2.3.1
2.3.2
2.3.3
If you want to use a default configuration on a datastation . . . . . . . . . . . . . . . . . . . . . . . . . . . . 25
If your PC controls a spectrometer: . . . . . . . . . . . . . . . . . . . . . . . . . . . . . . . . . . . . . . . . . . . . . . 26
If you want to configure a processing-PC like your spectrometer-PC: . . . . . . . . . . . . . . . . . . . 29
Part 31
TopSpin Installation and Configuration 31
Chapter 3
General Installation Information . . . . . . . . . . . . . . . . . . . . . . . . . . . . . . . . . . . . 33
3.1 Installation order . . . . . . . . . . . . . . . . . . . . . . . . . . . . . . . . . . . . . . . . . . . . . . . . . . . . . . . . . . 33
Chapter 4
Installing TOPSPIN . . . . . . . . . . . . . . . . . . . . . . . . . . . . . . . . . . . . . . . . . . . . . . . . 35
4.1 NMR SUPERUSER and NMR ADMINISTRATION PASSWORD . . . . . . . . . . . . . . . . . . . . . . . . 35
4.1.1
4.1.2
How to change the NMR ADMINSTRATION PASSWORD . . . . . . . . . . . . . . . . . . . . . . . . . . 36
How to define a new NMR ADMINSTRATION PASSWORD. . . . . . . . . . . . . . . . . . . . . . . . . 37
4.2 Packages on the TOPSPIN DVD . . . . . . . . . . . . . . . . . . . . . . . . . . . . . . . . . . . . . . . . . . . . . . 37
3
4
4.3 Installing TOPSPIN . . . . . . . . . . . . . . . . . . . . . . . . . . . . . . . . . . . . . . . . . . . . . . . . . . . . . . . . . 38
4.3.1
4.3.2
Installation in parallel . . . . . . . . . . . . . . . . . . . . . . . . . . . . . . . . . . . . . . . . . . . . . . . . . . . . . . . . . 38
What do you want to do with TOPSPIN? . . . . . . . . . . . . . . . . . . . . . . . . . . . . . . . . . . . . . . . . . . . 46
4.6.1
4.6.2
4.6.3
Requirements for NMR Guide 4.0 . . . . . . . . . . . . . . . . . . . . . . . . . . . . . . . . . . . . . . . . . . . . . . . 48
Java Requirements for NMR-GUIDE 4.0. . . . . . . . . . . . . . . . . . . . . . . . . . . . . . . . . . . . . . . . . . 49
Working with the NMR-GUIDE. . . . . . . . . . . . . . . . . . . . . . . . . . . . . . . . . . . . . . . . . . . . . . . . . . . 49
INDEX
4.4 Perl and GCC
. . . . . . . . . . . . . . . . . . . . . . . . . . . . . . . . . . . . . . . . . . . . . . . . . . . . . . . . . . . . 47
4.5 Installing TopSpin patches . . . . . . . . . . . . . . . . . . . . . . . . . . . . . . . . . . . . . . . . . . . . . . . . . . 47
INDEX
. . . . . . . . . . . . . . . . . . . . . . . . . . . . . . . . . . . . . . . . . . . . . . . 48
4.6 The usage of
the NMR-GUIDE .DONE
Chapter 5
4.6.3.1 Start up of the NMR-GUIDE . . . . . . . . . . . . . . . . . . . . . . . . . . . . . . . . . . . . . . . . . . . . . . . . . . . . . . . . . . . 49
4.6.3.2 Using the NMR-GUIDE search engine . . . . . . . . . . . . . . . . . . . . . . . . . . . . . . . . . . . . . . . . . . . . . . . . . . . 50
The TOPSPIN license . . . . . . . . . . . . . . . . . . . . . . . . . . . . . . . . . . . . . . . . . . . . . . . 51
5.1 Questions and answers about the TOPSPIN license . . . . . . . . . . . . . . . . . . . . . . . . . . . . . . . . 51
5.2 Ordering and installing the TOPSPIN license. . . . . . . . . . . . . . . . . . . . . . . . . . . . . . . . . . . . . 55
5.2.1
5.2.2
5.2.3
5.2.4
5.2.5
5.2.6
Chapter 6
Ordering a license . . . . . . . . . . . . . . . . . . . . . . . . . . . . . . . . . . . . . . . . . . . . . . . . . . . . . . . . . . . . 55
How do I determine the correct hostid . . . . . . . . . . . . . . . . . . . . . . . . . . . . . . . . . . . . . . . . . . . . 56
Installing a Demo license . . . . . . . . . . . . . . . . . . . . . . . . . . . . . . . . . . . . . . . . . . . . . . . . . . . . . . 56
Installing a full license on a license server . . . . . . . . . . . . . . . . . . . . . . . . . . . . . . . . . . . . . . . . . 56
Installing a full license on a license client . . . . . . . . . . . . . . . . . . . . . . . . . . . . . . . . . . . . . . . . . 57
Modifying the license file . . . . . . . . . . . . . . . . . . . . . . . . . . . . . . . . . . . . . . . . . . . . . . . . . . . . . . 57
Configuration of TOPSPIN . . . . . . . . . . . . . . . . . . . . . . . . . . . . . . . . . . . . . . . . . . 59
6.1 Take over the configuration of XWIN-NMR/TOPSPIN into TOPSPIN 2.1 . . . . . . . . . . . . . . . . 59
6.1.1
6.1.2
You have a TopSpin/XWIN-NMR configuration that you like to use for TopSpin (on the same
PC)60
You have a TopSpin/XWIN-NMR configuration that you like to use for TOPSPIN (on another PC)
61
6.2 Configuring TOPSPIN . . . . . . . . . . . . . . . . . . . . . . . . . . . . . . . . . . . . . . . . . . . . . . . . . . . . . . 61
6.2.1
6.2.2
6.2.3
6.2.4
If your PC controls a spectrometer . . . . . . . . . . . . . . . . . . . . . . . . . . . . . . . . . . . . . . . . . . . . . . .
If you want to configure a processing-PC like your spectrometer-PC: . . . . . . . . . . . . . . . . . . .
If you want to use a default configuration on a datastation . . . . . . . . . . . . . . . . . . . . . . . . . . . .
If you do not know the configuration of your spectrometer . . . . . . . . . . . . . . . . . . . . . . . . . . .
62
73
78
78
6.3 Firmware update of the spectrometer hardware . . . . . . . . . . . . . . . . . . . . . . . . . . . . . . . . . . 78
6.3.1
6.3.2
Firmware Update for boards without ethernet connection . . . . . . . . . . . . . . . . . . . . . . . . . . . . . 79
Firmware Update for boards with ethernet connection. . . . . . . . . . . . . . . . . . . . . . . . . . . . . . . . 81
6.3.2.1 ELCB board: Save user configuration . . . . . . . . . . . . . . . . . . . . . . . . . . . . . . . . . . . . . . . . . . . . . . . . . . 83
6.3.2.2 ELCB board: Restore user configuration . . . . . . . . . . . . . . . . . . . . . . . . . . . . . . . . . . . . . . . . . . . . . . . . 85
6.4 A log of the entire system configuration . . . . . . . . . . . . . . . . . . . . . . . . . . . . . . . . . . . . . . . 87
6.5 Backup of VIFs (=Very Important Files) with
nmr_save and user_save (nmr_restore and user_restore)87
6.5.1
6.5.2
6.5.3
6.5.4
6.5.5
6.5.6
6.5.7
6.5.8
Chapter 7
Introduction. . . . . . . . . . . . . . . . . . . . . . . . . . . . . . . . . . . . . . . . . . . . . . . . . . . . . . . . . . . . . . . . .
How to use nmr_save . . . . . . . . . . . . . . . . . . . . . . . . . . . . . . . . . . . . . . . . . . . . . . . . . . . . . . . . .
How to save information with nmr_save . . . . . . . . . . . . . . . . . . . . . . . . . . . . . . . . . . . . . . . . . .
Which information is stored with nmr_save? . . . . . . . . . . . . . . . . . . . . . . . . . . . . . . . . . . . . . . .
How to restore informations saved with nmr_save. . . . . . . . . . . . . . . . . . . . . . . . . . . . . . . . . . .
How to use user_save and user_restore . . . . . . . . . . . . . . . . . . . . . . . . . . . . . . . . . . . . . . . . . . .
How to read the archive file . . . . . . . . . . . . . . . . . . . . . . . . . . . . . . . . . . . . . . . . . . . . . . . . . . . .
Is all information restored in their original places? . . . . . . . . . . . . . . . . . . . . . . . . . . . . . . . . . .
87
88
89
92
95
96
96
96
Plotting and Printing with TopSpin . . . . . . . . . . . . . . . . . . . . . . . . . . . . . . . . . . 99
7.1 Printing / plotting data . . . . . . . . . . . . . . . . . . . . . . . . . . . . . . . . . . . . . . . . . . . . . . . . . . . . . 99
5
7.1.1
7.1.2
7.1.3
7.1.4
7.1.5
7.1.6
Chapter 8
Plotting and printing . . . . . . . . . . . . . . . . . . . . . . . . . . . . . . . . . . . . . . . . . . . . . . . . . . . . . . . . . . 99
Print/Plot from the Menu . . . . . . . . . . . . . . . . . . . . . . . . . . . . . . . . . . . . . . . . . . . . . . . . . . . . . . 99
Plot data from the Processing guide . . . . . . . . . . . . . . . . . . . . . . . . . . . . . . . . . . . . . . . . . . . . . 101
Plot INDEX
data with the TOPSPIN PLOT EDITOR . . . . . . . . . . . . . . . . . . . . . . . . . . . . . . . . . . . . . . . . . 101
Store (Export) a Data Window as Graphics File. . . . . . . . . . . . . . . . . . . . . . . . . . . . . . . . . . . . 102
TOPSINDEX
PIN PLOT EDITOR . . .DONE
. . . . . . . . . . . . . . . . . . . . . . . . . . . . . . . . . . . . . . . . . . . . . . . . . . . . 102
User Management . . . . . . . . . . . . . . . . . . . . . . . . . . . . . . . . . . . . . . . . . . . . . . . 103
8.1 Adding a new user account . . . . . . . . . . . . . . . . . . . . . . . . . . . . . . . . . . . . . . . . . . . . . . . . . 103
8.1.1
Change group membership of an existing user. . . . . . . . . . . . . . . . . . . . . . . . . . . . . . . . . . . . . 105
Part 107
RED-HAT Enterprise Linux WS 4 Installation-Tips and Configuration 107
Chapter 9
RED HAT Enterprise Linux WS 4 . . . . . . . . . . . . . . . . . . . . . . . . . . . . . . . . . 109
9.1 Hints for installation of Red Hat. . . . . . . . . . . . . . . . . . . . . . . . . . . . . . . . . . . . . . . . . . . . . 109
9.2 Scratch installation of Desktop computer . . . . . . . . . . . . . . . . . . . . . . . . . . . . . . . . . . . . . . 109
9.3 Installation of additional Red Hat packages on already installed systems . . . . . . . . . . . . . .112
9.3.1
9.3.2
9.3.3
9.3.4
Additional packages for documentation view - Acrobat Reader . . . . . . . . . . . . . . . . . . . . . . .
nfs-utils . . . . . . . . . . . . . . . . . . . . . . . . . . . . . . . . . . . . . . . . . . . . . . . . . . . . . . . . . . . . . . . . . . .
Additional packages for compilation of AU programs. . . . . . . . . . . . . . . . . . . . . . . . . . . . . . .
uucp. . . . . . . . . . . . . . . . . . . . . . . . . . . . . . . . . . . . . . . . . . . . . . . . . . . . . . . . . . . . . . . . . . . . . .
113
117
118
120
9.4 Check if all necessary components are installed and active . . . . . . . . . . . . . . . . . . . . . . . . 121
9.5 Dual Boot computer . . . . . . . . . . . . . . . . . . . . . . . . . . . . . . . . . . . . . . . . . . . . . . . . . . . . . . 122
Chapter 10 Network configuration . . . . . . . . . . . . . . . . . . . . . . . . . . . . . . . . . . . . . . . . . . . 123
10.1
10.2
10.3
10.4
10.5
10.6
10.7
Configuring the laboratory network . . . . . . . . . . . . . . . . . . . . . . . . . . . . . . . . . . . . . . . . . .
Changing the hostname of the PC. . . . . . . . . . . . . . . . . . . . . . . . . . . . . . . . . . . . . . . . . . . .
Some useful commands . . . . . . . . . . . . . . . . . . . . . . . . . . . . . . . . . . . . . . . . . . . . . . . . . . .
Configuring the laboratory network by DHCP. . . . . . . . . . . . . . . . . . . . . . . . . . . . . . . . . .
Configuring the laboratory network by using a fixed TCP/IP address. . . . . . . . . . . . . . . .
Spectrometer PC that should not be connected to the laboratory network . . . . . . . . . . . . .
Configuring the spectrometer network . . . . . . . . . . . . . . . . . . . . . . . . . . . . . . . . . . . . . . . .
123
124
124
125
128
132
135
10.7.1 Configuration of the spectrometer network . . . . . . . . . . . . . . . . . . . . . . . . . . . . . . . . . . . . . . . 136
10.8 Nameserver configuration. . . . . . . . . . . . . . . . . . . . . . . . . . . . . . . . . . . . . . . . . . . . . . . . . . 138
10.9 Network diagnostic commands. . . . . . . . . . . . . . . . . . . . . . . . . . . . . . . . . . . . . . . . . . . . . . 139
10.10Accessing remote files and directories . . . . . . . . . . . . . . . . . . . . . . . . . . . . . . . . . . . . . . . . 140
10.10.1 Necessary Samba packages and configurations . . . . . . . . . . . . . . . . . . . . . . . . . . . . . . . . . . . .
10.10.2 Sharing directories from a Linux host using Samba. . . . . . . . . . . . . . . . . . . . . . . . . . . . . . . . .
10.10.3 Mounting Windows 2000/XP partitions on a Linux host using Samba . . . . . . . . . . . . . . . . . .
10.10.4 Mounting Windows 2000/XP partitions from a Linux host using NFS . . . . . . . . . . . . . . . . . .
10.10.5 FTP and Telnet . . . . . . . . . . . . . . . . . . . . . . . . . . . . . . . . . . . . . . . . . . . . . . . . . . . . . . . . . . . . .
140
140
141
143
143
Chapter 11 Installing a Printer . . . . . . . . . . . . . . . . . . . . . . . . . . . . . . . . . . . . . . . . . . . . . . . 145
11.1 Introduction. . . . . . . . . . . . . . . . . . . . . . . . . . . . . . . . . . . . . . . . . . . . . . . . . . . . . . . . . . . . . 145
11.2 Print system ‚CUPS‘ . . . . . . . . . . . . . . . . . . . . . . . . . . . . . . . . . . . . . . . . . . . . . . . . . . . . . 145
11.2.1 Installation of a Local printer . . . . . . . . . . . . . . . . . . . . . . . . . . . . . . . . . . . . . . . . . . . . . . . . . . 145
6
11.2.2 Installation of a Unix network printer. . . . . . . . . . . . . . . . . . . . . . . . . . . . . . . . . . . . . . . . . . . . 151
11.2.3 Installation of a Windows network printer . . . . . . . . . . . . . . . . . . . . . . . . . . . . . . . . . . . . . . . . 156
11.2.4 Installation of a Jet Direct printer . . . . . . . . . . . . . . . . . . . . . . . . . . . . . . . . . . . . . . . . . . . . . . . 161
INDEX
INDEX
DONE
Part
167
Tips, Tricks and Troubleshooting 167
Chapter 12 Troubleshooting TopSpin . . . . . . . . . . . . . . . . . . . . . . . . . . . . . . . . . . . . . . . . . 169
12.1 TopSpin does not start. . . . . . . . . . . . . . . . . . . . . . . . . . . . . . . . . . . . . . . . . . . . . . . . . . . . . 169
12.2 TopSpin troubleshooting. . . . . . . . . . . . . . . . . . . . . . . . . . . . . . . . . . . . . . . . . . . . . . . . . . . 170
12.2.1 Send debug information to Bruker BioSpin . . . . . . . . . . . . . . . . . . . . . . . . . . . . . . . . . . . . . . . 171
12.3 Communication problems between PC and Spectrometer . . . . . . . . . . . . . . . . . . . . . . . . . 172
12.3.1 Troubleshooting for AV and AV-II type of spectrometer . . . . . . . . . . . . . . . . . . . . . . . . . . . . . 175
12.3.1.1 Communication problems but telnet spect works . . . . . . . . . . . . . . . . . . . . . . . . . . . . . . . . . . . . . . . . 175
12.3.1.2 Communication problems and telnet spect does not work . . . . . . . . . . . . . . . . . . . . . . . . . . . . . . . . . 176
12.3.1.3 File entries made for the spectrometer network . . . . . . . . . . . . . . . . . . . . . . . . . . . . . . . . . . . . . . . . . 182
12.3.1.4 Files created for the spectrometer network . . . . . . . . . . . . . . . . . . . . . . . . . . . . . . . . . . . . . . . . . . . . . 184
12.3.1.5 View the output of the CCU console . . . . . . . . . . . . . . . . . . . . . . . . . . . . . . . . . . . . . . . . . . . . . . . . . 184
12.3.1.6 View/change the prom parameters . . . . . . . . . . . . . . . . . . . . . . . . . . . . . . . . . . . . . . . . . . . . . . . . . . . 187
12.3.1.7 Viewing the boot process . . . . . . . . . . . . . . . . . . . . . . . . . . . . . . . . . . . . . . . . . . . . . . . . . . . . . . . . . . 187
12.3.1.8 Running CCU diagnostic tests . . . . . . . . . . . . . . . . . . . . . . . . . . . . . . . . . . . . . . . . . . . . . . . . . . . . . . 191
12.3.2 Troubleshooting for AV-III type of spectrometer . . . . . . . . . . . . . . . . . . . . . . . . . . . . . . . . . . . 191
12.3.2.1 Communication problems with an AV-III spectrometer. . . . . . . . . . . . . . . . . . . . . . . . . . . . . . . . . . . 192
12.4 General steps that you can try to locate or solve problems . . . . . . . . . . . . . . . . . . . . . . . . 198
12.4.1
12.4.2
12.4.3
12.4.4
12.4.5
The Bruker BioSpin web server . . . . . . . . . . . . . . . . . . . . . . . . . . . . . . . . . . . . . . . . . . . . . . . . 198
RED HAT help . . . . . . . . . . . . . . . . . . . . . . . . . . . . . . . . . . . . . . . . . . . . . . . . . . . . . . . . . . . . . 199
Checking the history of TOPSPIN . . . . . . . . . . . . . . 199
Rebooting the PC . . . . . . . . . . . . . . . . . . . . . . . . . . . . . . . . . . . . . . . . . . . . . . . . . . . . . . . . . . . 199
Rebooting the PC and the CCU with ‘reviveccu’. . . . . . . . . . . . . . . . . . . . . . . . . . . . . . . . . . . 199
12.5 Various problems in Linux . . . . . . . . . . . . . . . . . . . . . . . . . . . . . . . . . . . . . . . . . . . . . . . . . 200
12.5.1
12.5.2
12.5.3
12.5.4
The entire screen is frozen . . . . . . . . . . . . . . . . . . . . . . . . . . . . . . . . . . . . . . . . . . . . . . . . . . . .
Programs like killtopspin, reviveccu and touser are not found. . . . . . . . . . . . . . . . . . . . . . . . .
Xserver does not start after reboot / not enough disk space available . . . . . . . . . . . . . . . . . . .
You cannot log in as normal user . . . . . . . . . . . . . . . . . . . . . . . . . . . . . . . . . . . . . . . . . . . . . . .
200
201
201
201
12.6 Useful configuration hints . . . . . . . . . . . . . . . . . . . . . . . . . . . . . . . . . . . . . . . . . . . . . . . . . 202
12.6.1 Definition of the font path. . . . . . . . . . . . . . . . . . . . . . . . . . . . . . . . . . . . . . . . . . . . . . . . . . . . . 202
12.6.2 Increase the swap space . . . . . . . . . . . . . . . . . . . . . . . . . . . . . . . . . . . . . . . . . . . . . . . . . . . . . . 202
12.7 Spectrometer hardware tests . . . . . . . . . . . . . . . . . . . . . . . . . . . . . . . . . . . . . . . . . . . . . . . . 203
12.7.1 Spectrometer internal boards . . . . . . . . . . . . . . . . . . . . . . . . . . . . . . . . . . . . . . . . . . . . . . . . . . 203
Chapter 13 Important Linux features . . . . . . . . . . . . . . . . . . . . . . . . . . . . . . . . . . . . . . . . . 205
13.1 Important Commands . . . . . . . . . . . . . . . . . . . . . . . . . . . . . . . . . . . . . . . . . . . . . . . . . . . . . 205
13.1.1
13.1.2
13.1.3
13.1.4
13.1.5
13.1.6
rpm . . . . . . . . . . . . . . . . . . . . . . . . . . . . . . . . . . . . . . . . . . . . . . . . . . . . . . . . . . . . . . . . . . . . . .
cd. . . . . . . . . . . . . . . . . . . . . . . . . . . . . . . . . . . . . . . . . . . . . . . . . . . . . . . . . . . . . . . . . . . . . . . .
ls . . . . . . . . . . . . . . . . . . . . . . . . . . . . . . . . . . . . . . . . . . . . . . . . . . . . . . . . . . . . . . . . . . . . . . . .
chmod . . . . . . . . . . . . . . . . . . . . . . . . . . . . . . . . . . . . . . . . . . . . . . . . . . . . . . . . . . . . . . . . . . . .
chown / chgrp . . . . . . . . . . . . . . . . . . . . . . . . . . . . . . . . . . . . . . . . . . . . . . . . . . . . . . . . . . . . . .
grep . . . . . . . . . . . . . . . . . . . . . . . . . . . . . . . . . . . . . . . . . . . . . . . . . . . . . . . . . . . . . . . . . . . . . .
205
206
206
206
208
209
7
13.1.7 find . . . . . . . . . . . . . . . . . . . . . . . . . . . . . . . . . . . . . . . . . . . . . . . . . . . . . . . . . . . . . . . . . . . . . .
13.1.8 ps . . . . . . . . . . . . . . . . . . . . . . . . . . . . . . . . . . . . . . . . . . . . . . . . . . . . . . . . . . . . . . . . . . . . . . . .
13.1.9 kill . . . . . . . . . . . . . . . . . . . . . . . . . . . . . . . . . . . . . . . . . . . . . . . . . . . . . . . . . . . . . . . . . . . . . . .
13.1.10 compress,
gzip. . . . . . . . . . . . . . . . . . . . . . . . . . . . . . . . . . . . . . . . . . . . . . . . . . . . . . . . . . . . . .
INDEX
13.1.11 tar . . . . . . . . . . . . . . . . . . . . . . . . . . . . . . . . . . . . . . . . . . . . . . . . . . . . . . . . . . . . . . . . . . . . . . .
210
211
211
212
213
13.2.1
13.2.2
13.2.3
13.2.4
13.2.5
214
215
217
218
219
13.2 Important Files
. . . . . . . . . . . .DONE
. . . . . . . . . . . . . . . . . . . . . . . . . . . . . . . . . . . . . . . . . . . . . . 214
INDEX
/etc/shadow . . . . . . . . . . . . . . . . . . . . . . . . . . . . . . . . . . . . . . . . . . . . . . . . . . . . . . . . . . . . . . . .
/etc/passwd . . . . . . . . . . . . . . . . . . . . . . . . . . . . . . . . . . . . . . . . . . . . . . . . . . . . . . . . . . . . . . . .
/etc/group . . . . . . . . . . . . . . . . . . . . . . . . . . . . . . . . . . . . . . . . . . . . . . . . . . . . . . . . . . . . . . . . .
.bashrc . . . . . . . . . . . . . . . . . . . . . . . . . . . . . . . . . . . . . . . . . . . . . . . . . . . . . . . . . . . . . . . . . . . .
umask . . . . . . . . . . . . . . . . . . . . . . . . . . . . . . . . . . . . . . . . . . . . . . . . . . . . . . . . . . . . . . . . . . . .
13.3 Linux shells. . . . . . . . . . . . . . . . . . . . . . . . . . . . . . . . . . . . . . . . . . . . . . . . . . . . . . . . . . . . . 220
13.3.1 How to use the bash . . . . . . . . . . . . . . . . . . . . . . . . . . . . . . . . . . . . . . . . . . . . . . . . . . . . . . . . . 221
13.4 How to avoid much typing in Linux . . . . . . . . . . . . . . . . . . . . . . . . . . . . . . . . . . . . . . . . . . 223
13.4.1 General . . . . . . . . . . . . . . . . . . . . . . . . . . . . . . . . . . . . . . . . . . . . . . . . . . . . . . . . . . . . . . . . . . . 223
13.4.2 Linux shell scripts . . . . . . . . . . . . . . . . . . . . . . . . . . . . . . . . . . . . . . . . . . . . . . . . . . . . . . . . . . . 224
13.4.3 cron - crontab . . . . . . . . . . . . . . . . . . . . . . . . . . . . . . . . . . . . . . . . . . . . . . . . . . . . . . . . . . . . . . 226
Chapter 14 File and directory handling . . . . . . . . . . . . . . . . . . . . . . . . . . . . . . . . . . . . . . . . 227
14.1 Permissions and Type of Access. . . . . . . . . . . . . . . . . . . . . . . . . . . . . . . . . . . . . . . . . . . . . 227
14.1.1
14.1.2
14.1.3
14.1.4
Permissions of a file . . . . . . . . . . . . . . . . . . . . . . . . . . . . . . . . . . . . . . . . . . . . . . . . . . . . . . . . .
Permissions of a directory. . . . . . . . . . . . . . . . . . . . . . . . . . . . . . . . . . . . . . . . . . . . . . . . . . . . .
Types of Access . . . . . . . . . . . . . . . . . . . . . . . . . . . . . . . . . . . . . . . . . . . . . . . . . . . . . . . . . . . .
Example . . . . . . . . . . . . . . . . . . . . . . . . . . . . . . . . . . . . . . . . . . . . . . . . . . . . . . . . . . . . . . . . . .
227
228
228
228
Chapter 15 Useful tools for Red Hat Enterprise Linux WS 4 . . . . . . . . . . . . . . . . . . . . . . 231
15.1 How to use a memory stick under Linux . . . . . . . . . . . . . . . . . . . . . . . . . . . . . . . . . . . . . . 231
15.1.1 Add an additional Panel . . . . . . . . . . . . . . . . . . . . . . . . . . . . . . . . . . . . . . . . . . . . . . . . . . . . . . 231
15.2 Firewall configuration. . . . . . . . . . . . . . . . . . . . . . . . . . . . . . . . . . . . . . . . . . . . . . . . . . . . . 234
15.2.1 Firewall configuration. . . . . . . . . . . . . . . . . . . . . . . . . . . . . . . . . . . . . . . . . . . . . . . . . . . . . . . . 234
15.3 Tools for internal communication. . . . . . . . . . . . . . . . . . . . . . . . . . . . . . . . . . . . . . . . . . . . 236
15.3.1 Installation description of an additional package: xinetd . . . . . . . . . . . . . . . . . . . . . . . . . . . . . 237
15.3.2 Check if all necessary components are installed. . . . . . . . . . . . . . . . . . . . . . . . . . . . . . . . . . . . 237
15.4
15.5
15.6
15.7
Configure a second monitor . . . . . . . . . . . . . . . . . . . . . . . . . . . . . . . . . . . . . . . . . . . . . . . .
Setting up permissions for rsh, rlogin and rcp . . . . . . . . . . . . . . . . . . . . . . . . . . . . . . . . . .
Creating a screenshot of the desktop . . . . . . . . . . . . . . . . . . . . . . . . . . . . . . . . . . . . . . . . .
Creating an icon on the desktop . . . . . . . . . . . . . . . . . . . . . . . . . . . . . . . . . . . . . . . . . . . . .
238
239
240
240
15.7.1 Create an icon for opening a pdf file with Acrobat Reader . . . . . . . . . . . . . . . . . . . . . . . . . . . 240
15.8 Register your Linux system with Red Hat . . . . . . . . . . . . . . . . . . . . . . . . . . . . . . . . . . . . . 241
15.8.1 Activate your Linux license at Red Hat Network. . . . . . . . . . . . . . . . . . . . . . . . . . . . . . . . . . . 241
15.8.2 Register the PC to the Red Hat Network . . . . . . . . . . . . . . . . . . . . . . . . . . . . . . . . . . . . . . . . . 243
15.8.3 Activate the Red Hat Alert Notification Tool . . . . . . . . . . . . . . . . . . . . . . . . . . . . . . . . . . . . . . 248
15.9 The Emergency Recovery DVD . . . . . . . . . . . . . . . . . . . . . . . . . . . . . . . . . . . . . . . . . . . . . 250
15.9.1 Using the Emergency Recovery CD . . . . . . . . . . . . . . . . . . . . . . . . . . . . . . . . . . . . . . . . . . . . . 251
15.10An image of the PC. . . . . . . . . . . . . . . . . . . . . . . . . . . . . . . . . . . . . . . . . . . . . . . . . . . . . . . 252
15.10.1 Creating an image . . . . . . . . . . . . . . . . . . . . . . . . . . . . . . . . . . . . . . . . . . . . . . . . . . . . . . . . . . . 253
15.11Using the DVD/CD-Writer . . . . . . . . . . . . . . . . . . . . . . . . . . . . . . . . . . . . . . . . . . . . . . . . . 254
15.12 Add a new harddisk . . . . . . . . . . . . . . . . . . . . . . . . . . . . . . . . . . . . . . . . . . . . . . . . . . . . . . 255
Chapter 16 Appendix . . . . . . . . . . . . . . . . . . . . . . . . . . . . . . . . . . . . . . . . . . . . . . . . . . . . . . . 257
16.1 Some notes for the helium handling . . . . . . . . . . . . . . . . . . . . . . . . . . . . . . . . . . . . . . . . . . 257
8
16.1.1 Automatic notification for helium refill . . . . . . . . . . . . . . . . . . . . . . . . . . . . . . . . . . . . . . . . . . 257
16.1.1.1 Set minimum limit of helium level . . . . . . . . . . . . . . . . . . . . . . . . . . . . . . . . . . . . . . . . . . . . . . . . . . . 257
16.1.1.2 Create shell script ’heliumwarn’ for email notification . . . . . . . . . . . . . . . . . . . . . . . . . . . . . . . . . . . 258
16.2 Script for saving
important files . . . . . . . . . . . . . . . . . . . . . . . . . . . . . . . . . . . . . . . . . . . . . 260
INDEX
16.3 Where Do I Find What? . . . . . . . . . . . . . . . . . . . . . . . . . . . . . . . . . . . . . . . . . . . . . . . . . . . 261
Chapter 17 Bruker BioSpin
addressesDONE
. . . . . . . . . . . . . . . . . . . . . . . . . . . . . . . . . . . . . . . . . 263
INDEX
Chapter 1
Introduction
1.1 About this manual
This manual describes the installation of the TOPSPIN 2.1 under RED HAT ENTERPRISE LINUX WS 4.
It is available:
• as a hard copy ’Installation Guide for TOPSPIN RED HAT ENTERPRISE LINUX
WS 4’. The print-version of the Installation Guide is actualized in planned
intervals.
• as pdf file on the toplevel of the TOPSPIN 2.1 DVD
• as TOPSPIN 2.1 online Help: click Help → manuals → Installation Guide
• as the up to date version on the Bruker BioSpin web-server:
http://www.bruker-biospin.com/documentation_nmr.html
• Note that this manual does not contain the TOPSPIN Release letter. That is a
separate document which is not available as a hard copy but delivered as
pdf and rtf files on the TOPSPIN DVD and also on the Bruker BioSpin
web-server (you can find it at the same URL as the Installation Guide)
This manual is subdivided into an introduction and three main parts. It depends on
your local demands which of these are necessary for you at the moment.
9
10
Introduction
The first part shows how to install and configure TOPSPIN and some essential additional software packages. It is recommended to follow the instructions step by
step.
INDEX
Part two describes the scratch installation of RED HAT ENTERPRISE LINUX WS 4
INDEX
and some configuration steps likeDONE
setup for network
and printers. If you want to
install Bruker BioSpin TOPSPIN on a PC which is already in use, you can skip this
part.
In the last part, you can find some additional information for working with RED
HAT ENTERPRISE LINUX WS 4 and TOPSPIN and also some tips for troubleshooting.
Note that all text-messages and graphics shown in this book are taken from the
current version of the respective software products. Small differences to other versions are possible but generally speaking they should be very similar.
If you have any comments or suggestions, or if you find any errors in this manual,
please do not hesitate to contact us at:
[email protected]
1.2 Conventions
The following conventions will be used throughout this manual:
Bold-Courier: Linux commands to be entered from the keyboard
Bold-Times: Linux commands/applications to be clicked with the mouse
Bold-Courier-Italics: NMR Suite commands to be entered from the keyboard
Bold-Times-Italic: NMR Suite commands to be clicked with the mouse
Courier: a file name or directory name
Courier Small Italics: responds of the system
Courier Small: the contents of a file
Times italics: any name which is not a file name e.g. host names, user names
etc.
< >: place holder
Introduction
11
1.3 Safety Regulations
INDEX
In order to work
safety in laboratories with NMR-spectrometers all users have to
follow the safety regulations for magnetic, electrical, cryogenic and chemical
INDEX
DONE
safety. For detailed information please refer to the safety instructions in the Beginners Guide Manual provided on the TOPSPIN DVD.
1.4 Hardware and software requirements for TopSpin
1.4.1 Supported operating systems
TOPSPIN 2.1 on spectrometer computers is supported for:
• Windows XP Professional
• Windows Vista
• Linux Red Hat Enterprise WS 3
• Linux Red Hat Enterprise WS 4
All operating system updates (hot fixes and service packs) at the time TOPSPIN 2.1
was released have been tested and are supported.
TOPSPIN 2.1 on Datastations is supported for:
• Windows 2000
• Windows XP Professional
• Windows Vista
• Linux Red Hat Enterprise WS 3
• Linux Red Hat Enterprise WS 4
• Linux Red Hat Enterprise WS 5
Although not officially supported by Bruker, users reported that TOPSPIN is also
running and is used for data processing, respective as storage unit:
• on other Linux systems
and
• on Windows XP Home Edition
Bruker does not recommend these systems for the use of TOPSPIN. Please note
12
Introduction
that Bruker cannot support the use of above-named systems. For detailed information please look up the software support matrix, provided in pdf-format, on the
Bruker Web server under following address:
INDEX
http://www.bruker-biospin.com/documentation_general.html
DONE
INDEX
1.4.2 Special PC Hardware requirements
To run TOPSPIN 2.1 with Linux Bruker recommend the following computer hardware:
• PC1 with CPU Clock ≥ 1 GHz
• Memory ≥ 512 MB
• Video (graphics)-card memory: 64 MB 2
• 2 Ethernet cards (the second card is only required if your PC controls a spectrometer)
• DVD device3
• 3 button mouse or wheel mouse
If your hardware does not meet these requirements, TOPSPIN might still run but
with a much lower performance.
Furthermore, display resolution must be set to 1280*1024 or higher.
The Installation was tested on a ’HP workstation xw4400’ PC with a ’NVIDIA
Quadro FX560’ graphics card (128 MB) and two ’Broadcom 5751 NetXtreme
Gigabit PCI4 Ethernet’ cards.
1.4.3 Spectrometer requirements
TOPSPIN 2.1 is released for datastations, AVANCE, AVANCE II and AVANCE III
spectrometers. If you are in doubt which kind of spectrometer do you have please
refer to chapter 12.3 on page 172.
For upgrade possibilities of your spectrometer with TOPSPIN 2.1, please check with
your local Bruker BioSpin office.
1. TOPSPIN only runs on x86-based PC’s. It does not support 64bit architecture.
2. It is recommend not to use shared memory graphics, because in some cases memory problems
have been observed.
3. TOPSPIN is delivered on DVD’s with “-R” format.
Introduction
13
Hardware components that are TOPSPIN version or operating system dependent are
listed below. Components that are not listed here do not need an upgrade for TOPSPIN 2.1.
INDEX
If your Avance INDEX
spectrometer does
not meet the above specifications, please get in
DONE
touch with your local Bruker BioSpin representative for your upgrade options.
1.4.3.1 AVANCE-spectrometers and AVANCE II-spectrometers
• CCU:
LINUX, independent of your TOPSPIN version
CCU
CCU 10
(part # H9503, EC level 00 to 19)
CCU 10
(part # H9503, EC level > 19)
CCU 11 a
(part # H9503V1)
required minimum EC level
06
22
00 (recommended 01)
Windows, independent of your TOPSPIN version
CCU
CCU 10
(part # H9503)
CCU 11 a
(part # H9503V1)
required minimum EC level
any
00 (recommended 01)
a. Note that a different CCU 11 also exists for AQX/AQR spectrometers.
• FCU 3:
FCU 3
required minimum EC Level
part # H5822
(64k memory)
04 (recommended 07)
part # H9598
(256k memory)
02 (recommended 05)
14
Introduction
• FCU 4:
FCU 4
required minimum EC Level
part # H9727
any
part # H9773
INDEX
DONE
INDEX any
• RCU:
RCUa
EC level
RCU 1/2 (part # Z003678)
any
RCU 1/3 (part # Z022488)
any
a. AVANCE-spectrometers only
• Multiple Receiver RCU:
Multiple Receiver RCUa
EC Level
RCU 1/4 (part # Z052488)
any
RCU 2/4 (part # Z062488)
any
RCU 3/4 (part # Z072488)
any
RCU 4/4 (part # Z082488)
any
RCU 1/5 (part # Z003206)
any
RCU 2/5 (part # Z003207)
any
RCU 3/5 (part # Z003208)
any
RCU 4/5 (part # Z003209)
any
a. AVANCE-spectrometers only
• TCU 3:
TCU 3
required minimum EC Level
part # H5813, EC level 00 to 19
09 (recommended 12)
part # H5813, EC level > 20
28 (recommended 31)
part # H5813V1
any (recommended 01)
part # H5813F2
any (recommended 01)
part # H5813F3
any (recommended 01)
RX22
EC Level
part # HZ002810
any (recommended 08)
part # Z012810
any (recommended 02)
part # Z032810
any (recommended 01)
• RX22:
1.4.3.2 AVANCE III-spectrometers
• IPSO 19’’ H9987
IPSO 19’’ H9987
Baseboard
part # H12519
TX-board (F-/T-/G-Ctrl)
part # H12538F1
TX-board (F-/T-/G-Ctrl)
part # H12538F2
RX-board (R-Ctrl)
part # H12532
PCI-board
part # H 12524
required minimum EC Level
03
01
any
any
01
15
16
Introduction
• IPSO-AQSS H9984
IPSO-AQSS H9984
required minimum EC Level
INDEX
Ipso-ACQ host
part # H12547
Ipso-ACQ acq
part # H12549
PCI adapter board
part # H12557
Hr-board
part # H12553
FTMS-board
part # H 12555
DONE
INDEX any
any
any
any
any
• DPP1:
DPP1
required minimum EC Level
part # H12513f1
any
1.4.4 Software requirements
!
Because of the variety of Linux systems and their possible problems with some
PC-hardware components, Bruker BioSpin can not support all of them. The supported Linux systems are RED HAT ENTERPRISE LINUX WS 4 and RED HAT
ENTERPRISE LINUX WS 3 and the hardware components described in section 1.4.2.
RED HAT ENTERPRISE is supported only for datastations, respective as storageunit. This software/hardware combination was successfully tested with TOPSPIN
2.1. Any other Linux systems and PC hardware components might work, but are
not tested and supported by Bruker BioSpin.
Please note that no additional hardware is required to run TOPSPIN 2.1 on a spectrometer or as datastation for processing data.
1.5 Important Red Hat Linux Enterprise WS 4 configurations
1.5.1 KDE - desktop manager: recommended by Bruker BioSpin
!
All information described in this manual is based on the desktop manager KDE. If
you use GNOME, there will be some differences in handling. In the login window,
type in:
• your login name
• your password
• choose as Session KDE1 and press Enter
1. You can define your default login session with the command switchdesk when you are
logged in.
18
Introduction
INDEX
DONE
INDEX
Express Installation and Configuration of TOPSPIN
19
Chapter 2
INDEX
INDEX
DONE
Express
Installation
and
Configuration of TOPSPIN
2.1 About this chapter
This chapter gives a brief description of how to install Bruker BioSpin’s TOPSPIN.
In order to provide installation impressively and short, this chapter only handles
with the main aspects of installation.
The following is dressed to users who would like to install TOPSPIN 2.1 on a PC,
on which XWIN-NMR or a version of TOPSPIN is already installed and configured
correctly. The Express Installation of TOPSPIN therefore provides a concise overview of the main installation aspects for TOPSPIN on Linux systems. Further
details can be found in the following chapters.
For more details on the installation see chapter chapter 4 on page 35.
Extensive details about the TOPSPIN commands like cf, expinstall etc. are
provided in the Acquisition Reference manual. Please refer to this document for
detailed information.
20
Express Installation and Configuration of TOPSPIN
2.2 Installing TOPSPIN
INDEX is where do you want to
The main decision you have to make during installation
install the new TOPSPIN version. If you a have previous NMR SUITE or TOPSPIN
DONE
INDEX
installation on this PC available, you can either:
• install the new version in parallel to the previous one
(e.g. old version in /opt/topspin2.0, new in /opt/topspin2.1)
or
• install the new version in the same directory as the previous one
(e.g. old version in /opt/topspin, new in /opt/topspin)
The installation in parallel has the advantage, that the previous version remains
unchanged. After a parallel installation you can start working with the new version
and if you want to go back to the previous version for whatever reasons you can
just start and reuse it.
The installation of TOPSPIN 2.1 offers an automatic import of your individual configuration of a previous version, so that there is no advantage to install the new
version in the same directory as the old one.
2.2.1 Installation in parallel
1. Close ALL WINDOWS on the desktop.
2. Insert the DVD TOPSPIN 2.1.
3. Start of the installation:
• If the automatic start of the DVD is enabled, the shell described in the next
step appears automatically, go to step 4.
• If the shell of the next step does not appear automatically you have click on
the DVD icon on your desktop and click on the file install 1.
4. If you are not logged in as root, a Linux shell will appear that asks you for the
root password:
Please enter root password if prompted for it:
Password:
• Enter root password and press enter
1. Please note that there is also a file called ‘install.cmd’ on the DVD. This file is the installation
script for windows, under Linux you have to click on the file ‘install’.
Express Installation and Configuration of TOPSPIN
21
5. The window TOPSPIN Installation Manager appears.
6. The window Welcome! appear.
INDEX
• Click Next
DONE
7. The windowINDEX
TOPSPIN Release
Letter will appear:
Please read the NMR Release letter! You can find therein all information about
new features and bug fixes of the current version .
• When you have finished reading the Release Letter please click Next.
8. The window Please select a target directory for TOPSPIN will appear:
Enter an installation path which does not exist so far, e.g. /opt/topspin2.1
• Click Next
9. If the installation directory does not exist so far, you will be asked if the installation process should create it.
• Click Yes
10. A window Please select the setup type will appear:
a) Select the setup type. Do one of the following:
• Select Data Processing only if you want to use TOPSPIN for data processing.
• Select Data processing, acquisition and automation if you want to use
TOPSPIN for spectrometer control. This will e.g. install Diskless automatically.
• Customized setup (allows components selection) if you want to install
selected programs only.
b) Click Next
10.1.
If Customized was selected please refer to step 10.
a) ... a window Please select products to install will appear:
• Select the packages which you want to install (note that DISKLESS is
only required if your PC controls a spectrometer or you want to configure it like this (see chapter 6.2.2 on page 73).
• Click Next
11. The window Select a spectrometer configuration to import will appear. You can
either import no spectrometer configuration, or browse for a spectrometer configuration or select one of the configurations you get offered within this win-
22
Express Installation and Configuration of TOPSPIN
dow.1
12. If a previous TOPSPIN installation is available in the global environment variaINDEX
ble Path, you will be asked if you want to define
the current installation path
instead. It is recommended to DONE
set the current INDEX
installation into the PATH variable, so enable:2
Yes, add the new TOPSPIN installation directory to the global PATH
• Click Next
13. A window appear that asks for the installation path of FlexLM. It is strongly
recommended to accept the default path3!
• Click Next
14. A window appear that displays the program selection of step 10a.
• Click Next
15. A window Set NMR Super User will appear:
a) Do one of the following:
• Accept the default NMR SUPERUSER (nmrsu) or
• Enter a special user for this purpose, e.g. named nmr-admin or
• Enter any other user
If the user does not exists, the installation will create it. For further details see
chapter 4.1 or the TOPSPIN Users Guide.
b) Click Next
16. A window Password Input will appear and asks for the NMR ADMINISTRATION
PASSWORD4 (for more details about this feature see chapter chapter 4.1 on page
35).
1. The installation process will offer all configurations which are available in the TOPSPIN /
XWIN-NMR installation that are defined in the /etc/profile.d/xwinnmr(.csh/.sh) resp. topspin(.csh/.sh) directory.
2. In case more than one TOPSPINTOPSPIN version is installed in parallel it is your decision
which one should be defined here
3. It is strongly recommended to accept the default path for the FlexLM installation:
/usr/local/flexlm ! If you choose a user defined path, it may cause some problems with other
applications using the FlexLM
4. Certain commands like cf and expinstall ask for the NMR ADMINISTRATION PASSWORD.
Express Installation and Configuration of TOPSPIN
23
a) Type in the NMR ADMINISTRATION PASSWORD
b) Re-enter the NMR ADMINISTRATION PASSWORD
INDEX
c) Click Next
17. If Data Processing,
and automation or Customized with the DiskINDEXacquisition
DONE
less package was selected in step 8 a window will appear to inform that the
spectrometer has to be shut down.
a) If the PC is not yet connected to a spectrometer or if the CCU is not booted1
you can promptly.
• Click Next
b) If your PC is currently connected to a spectrometer and the CCU is booted:
a) Open a Linux shell
b) enter the command:
telnet spect
c) login as root
d) enter the command:
init 5
→ this will shut down the CCU
e) Close the Linux shell
f) Click Next in the window that asked you about shutdown the CCU
Note: The CCU is now either down or switched off and should be turned on again
at the end of this procedure.
→ The installation of TOPSPIN will start now.
18. After installation is finished a window appears that informs about all installed
programs
• Click Seen
19. Depending if you have installed DISKLESS one of the following windows will
appear:
• If you have installed DISKLESS a window will appear that asks you to reboot
the PC. Make sure that you can reboot the PC now (check for any unsaved
1. Note that during a first time installation of the TOPSPIN the CCU can not be booted.
24
Express Installation and Configuration of TOPSPIN
windows (e.g. an editor window) and check if no other users are logged in
into this PC) then click Yes.
INDEX
• If you have not installed DISKLESS a window
will appear that informs you to
log out and log back in before you start TOPSPIN, click Seen.
DONE
INDEX
20. The window wherein you entered the root password informs you that you have
to press Enter to close this window.
• Press Enter
21. If you have started the installation manually by clicking the file install in
the Konqueror window, you have to close this Konqueror window.
22. To eject the DVD click right on the DVD icon on the desktop and choose eject.
2.2.2 What do you want to do with TOPSPIN?
• it should control a spectrometer or you want to use a special spectrometer
configuration
→ you have to execute cf and expinstall
• it should be used for data processing only?
→ you have to execute expinstall
For more details please refer to the next chapter.
2.3 Configuring TOPSPIN
The following chapter offers the basic guidelines to configure TOPSPIN for using
it as a datastation, respective as a storage unit, for data processing only or to control and operate a spectrometer.
In order to provide a short overview of the main actions, details about the commands are not discussed in here. Extensive details about the TOPSPIN commands
like cf, expinstall etc. are provided in the Acquisition Reference manual.
Please refer to this document for detailed information.
Start TOPSPIN:
• Click the icon TOPSPIN on the desktop1, or
• Click <redhat> → Other → TOPSPIN<vers.>
1. How to create a icon? See chapter 15.7.1
Express Installation and Configuration of TOPSPIN
25
When a user starts a new TOPSPIN version for the first time, a window LICENSE
will appear:
INDEX
a) Please read
the license agreement for Bruker TOPSPIN !
b) If you agree,
please clickDONE
I Accept.
INDEX
Now the window Configuration check will appear, that allows you to configure the
software. If you have to click on Cf or Expinstall depends on what you want to do
with TOPSPIN. You are mainly in one of the following situations:
1. You want to configure a processing-only-PC with a default configuration on a
datastation → go to chapter 2.3.1 (for details see chapter 6.2.3)
2. You have installed the new software on the same PC as a previous XWINNMR/TOPSPIN installation, so the old spectrometer configuration is available on
the same PC → go to chapter 2.3.2 (for details see chapter 6.2.1)
3. You want to configure a processing-only-PC like your spectrometer-PC and
you have the spectrometer configuration on another computer → go to chapter
2.3.3 (for details see chapter 6.2.2)
4. You have to configure the software for controlling a spectrometer on a new
hard disk without a backup of the spectrometer configuration, so you have no
configuration files → go to chapter 6.2.4
2.3.1 If you want to use a default configuration on a datastation
A default configuration of TOPSPIN can be used for a datastation, respective a
storage unit, meaning a PC that is used for processing only. During the installation
of TOPSPIN ...
• in a new TOPSPIN installation directory
• if no TOPSPIN/XWIN-NMR was installed on this computer so far
the configuration process performs automatically (no cf is required).
There are two default configuration available Bruker_default_av500 and
Bruker_default_avi300 which correspond to two different Avance spectrometer.
For data processing only you have to execute expinstall and select Installation for Datastation (Default).
For further details please refer to the respective chapters (see chapter 6.2.3).
2.3.2 If your PC controls a spectrometer:
1. Be sure that the spectrometer is booted (see chapter 9.3.2 and 12.3.1.7)
2. Open a dataset
• Type new and create a new dataset.
• You can also select a dataset (e.g. exam1d_1H) acquired with another TOPSPIN or XWIN-NMR version
3. Enter cf (The command cf now configures the software according to the
hardware of your spectrometer.)
a) A window will appear:
Password request. Please enter the NMR ADMINISTRATION
PASSWORD
Type in the NMR ADMINISTRATION PASSWORD. Click OK.
b) A window will appear:
Spectrometer configuration: ...
Select your previous configuration and press Edit to confirm this configuration.
c) A window will appear:
Edit configuration. ...
The selected configuration is displayed. Choose whether to configure it as a
spectrometer or datastation. Choose the type of your spectrometer e.g.
AVANCE → ENTER. Check or type in the 1H frequency of the magnet e.g.
500.13 → ENTER. Use the debug mode only in case of troubleshooting.
d) In case the information window mod hconfserver appears:
• your spectrometer has not a BSMS rack with ECLB board: you may
ignore this warning → ENTER. Nevertheless please check the configuration summary (uxnmr.info file) if all units are listed.
• your spectrometer has a BSMS rack with ECLB board and the DHCP
server might not work correctly. For troubleshooting information see
chapter 12.3.2
e) A window will appear:
Specify the channel to which external devices are connected. The RS232/485 channel for external devices-Table
appears.
Check if the tty-numbers of the hardware components are set correctly.
f) A window will appear:
Additional configuration. Security check. Enable peak
power check (POWCHK). Enable puls power check (PULCHK).
Choose the options if you want to use this security options. Powchk and Pulchk require special probes and cortab. If in doubt contact your local Bruker
BioSpin representative, please.
g) Only if you have a sample changer!
Should the Sample Changer control the Lift? (yes/no)
The answer depends on how the air flow is connected, normally you will answer: yes → ENTER
If you have a sample changer, this question appears:
Delay between SX and next command [sec]?
Type in the length of the delay e.g. 10 → ENTER
h) The nuclei-table appear
Check if the frequency of the nuclei are set correctly. If in doubt click Restore then click Save
!
i) The results of cf appears in a text window. Check this list carefully and
compare the result with an list from an earlier configuration (if available)
click Print and store the paper output with your other spectrometer documentation, then click OK. These data are saved in:
<TOPSPIN_HOME>/conf/instr/<spect>/uxnmr.info
If during ’cf’ an error message occurs that invites you to do a firmware
update see chapter 6.3
After finishing cf the window config will appear showing a list of configuration
steps. You will be asked for the NMR ADMINISTRATION PASSWORD several times:
• Continue with expinstall
a) Type in the NMR ADMINISTRATION PASSWORD and ENTER
b) Click Next if you either have not modified Bruker BioSpin Parameter files,
AU-programs and Pulse-programs or if you have archived them in a different directory. Your individual Parameter files, AU-programs and Pulse-programs etc. that are named different to the original Bruker BioSpin files will
not be destroyed during the installation.
c) A window appears: Check Installation for Spectrometer → Click Next
27
d) In the appearing window: Check the required system → Click Next
e) In the appearing dialog box: Select the spectrometer configuration name →
Click Next
f) In the appearing dialog box: Check the items you want to install or, accept
the default selection → Click Next
g) In the appearing dialog box: Select the default printer and plotter and the
desired paper format → Click Next
h) In the appearing window: Enter the desired spectrometer frequency, acquisition mode and pre-scan-delay or, accept the default values → Click Next
i) In the appearing information box: Check the configuration selection and, if
it is correct → Click Finish
and wait ...
• Continue with edsolv
Check the list of lock solvents → click Save if it is correct → Click Close
• Continue with edhead
Select the current probe → click Define as current probe → Click Exit
A window Edit Spectrometer Parameter will appear:
Check if the connections between preamplifier and probe are set correctly →
click Save if it is correct → Click Close
• Continue with edprosol
Check the parameters for your observed nuclei, and if necessary change
and/or recalculate them → Click Save to store to disk → Click Exit
• Continue with edlock
Check the lock table values (field, lock phase, ...), change them and click
Save if necessary, otherwise click Abort
• Continue with edscon
Check the spectrometer constants, change them and click Save if necessary,
otherwise click Cancel
• After finishing the configuration a window cron check appears. Click on
Automatic backup to set up an periodically backup of your TOPSPIN
spectrometer configuration.
If you click OK in the following window an automatic backup every 4 weeks
will be initiated.
After cf, expinstall,... have finished insert a sample and make sure that you
can lock on the lock solvent. Type ii and read with rpar a standard Bruker
BioSpin parameter file (e.g. 'rpar PROTON all'), type getprosol, rga,
wobb and zg and collect a normal 1H NMR spectrum.
2.3.3 If you want to configure a processing-PC like your spectrometer-PC:
If the PC does not control a spectrometer but is used in connection with a particular spectrometer, e.g. for setting up experiments, processing and or plotting, you
should configure it as that spectrometer (see chapter 6.2.2).
29
30
Express Installation and Configuration of TOPSPIN
INDEX
DONE
INDEX
Express Installation and Configuration of TOPSPIN
Part I
INDEX
INDEX
DONE
TopSpin
Installation
and
Configuration
31
32
Express Installation and Configuration of TOPSPIN
INDEX
DONE
INDEX
General Installation Information
33
Chapter 3
INDEX
INDEX
DONE
General
Installation
Information
3.1 Installation order
A complete new installation on a PC connected to a spectrometer involves the following steps:
1. Installing RED HAT ENTERPRISE LINUX WS 4 (see chapter 9.1)
2. Installing additional packages (see chapter 9.2)
Step 1 to 2 are normally already done by the manufacturer.
3. Configuring the network (see chapter Chapter 10)
4. Installing TOPSPIN (see chapter 4.3)
5. Installing TOPSPIN license (see chapter Chapter 5)
6. Configuring of TOPSPIN (see chapter 6.1)
7. Installing a printer (see chapter Chapter 11)
If your PC has already been used for TOPSPIN/XWIN-NMR, steps 1 and 2 are probably already done. In that case, you can start with step 3.
34
General Installation Information
INDEX
DONE
INDEX
Installing TOPSPIN
35
Chapter 4
INDEX
INDEX
DONE
Installing
TOP
SPIN
4.1 NMR SUPERUSER and NMR ADMINISTRATION PASSWORD
TOPSPIN offers a complete new password check for the configuration tools of TOPSPIN. During the TOPSPIN installation, you are prompted to define:
1. The username for the so called NMR SUPERUSER. The NMR SUPERUSER can
be nmrsu (this is the default) or any other user (if the user does not exists so far,
it will automatically be created during installation process).
• After the installation, the NMR SUPERUSER is the owner of the TOPSPIN
files, which are modified during configuration of the program. Log in as this
user allows you to remove these files, change file permissions etc. The name
of the NMR SUPERUSER will be stored in the readable text file:
<TOPSPIN_HOME>/conf/nmrsuperuser
2. the NMR ADMINISTRATION PASSWORD to be used for TOPSPIN configuration
commands. This password can be freely chosen and is not connected to any
user. TOPSPIN asks for this password by commands like cf, expinstall etc.
The encrypted NMR ADMINISTRATION PASSWORD is stored in the file:
!
<TOPSPIN_HOME>/conf/nmradminpassword
Note: The NMR SUPERUSER login password and the NMR ADMINISTRATION
PASSWORD have different purposes and are totally independent. Changing one of
36
Installing TOPSPIN
them does not affect the other.
With the information about the NMR ADMINISTRATION PASSWORD and NMR
INDEX
NMR ADMINISTRATION PASSSUPERUSER TOPSPIN is ready to be configured. The
WORD will be asked for every time a configuration type command is entered. If this
DONE
INDEX
password is typed in correctly, the command will be executed regardless of which
user is logged in the operating system. As a result all newly created configuration
files will be owned by the user that was logged in at the time the configuration
command was executed. Any other user can modify the configuration during his
login session, just by knowing the correct NMR ADMINISTRATION PASSWORD.
This is possible because all configuration files are read- and writeable for everybody, but TOPSPIN will not write them without the correct NMR ADMINISTRATION
PASSWORD!
TOPSPIN also offers a so-called Security Mode. With this feature all configuration
files are read- and writeable only for the NMR SUPERUSER.
4.1.1 How to change the NMR ADMINSTRATION PASSWORD
The installnmr script can be used to change the NMR ADMINISTRATION PASSWORD and the NMR SUPERUSER. If it is called with the option ’-secure’, it changes
the permissions in a way, that only the NMR SUPERUSER can execute the configuration commands and the resulting files are readable and writable only for him, all
other users have read-only permissions.
To change the NMR ADMINISTRATION PASSWORD, you have to:
1. Login as root
2. Open a Linux shell.
3. Go to the TOPSPIN installation directory, in a default installation this is
/opt/topspin
4. Enter the command:
prog/bin/installnmr <TOPSPIN_HOME> <NMRSUPERUSER>
If you installed TOPSPIN in the default directory and you want to use the user
’nmrsu’ as NMR SUPERUSER, you have to type in
prog/bin/installnmr /opt/topspin nmrsu
5. Enter the old password and new password as requested.
Installing TOPSPIN
37
4.1.2 How to define a new NMR ADMINSTRATION PASSWORD
To define a new NMR ADMINISTRATION PASSWORD, for example because you
INDEX
have forgotten it,
you have to:
INDEX
1. Open a Linux
shell
DONE
2. Login as root with the command
su 3. Delete the file
<TOPSPIN_HOME>/conf/nmradminpassword
4. Enter the command
prog/bin/installnmr <TOPSPIN_HOME> <NMRSUPERUSER>
5. Enter new password as requested.
If you want to make sure that no meddler can do this, you have to modify the permissions, owner and group membership of this file accordingly.
4.2 Packages on the TOPSPIN DVD1
The TOPSPIN 2.1 DVD contains the following programs:
1. TOPSPIN: Acquisition, Processing and Plotting software
• TOPSPIN PLOT EDITOR: Object oriented WYSIWYG plot editor
(automatically installed as part of TOPSPIN package)
2. ICON-NMR: Icon-driven interface for Routine Spectroscopy and Automation
3. NMR-GUIDE: Web-browser based teaching and training program
4. DISKLESS: Spectrometer CCU operating system
5. NMR-SIM: Program for numerical simulation of NMR experiments
6. AUTOLINK
The following programs are part of the TOPSPIN 2.1 DVD-content, but please
note that they must be licensed separately in each case:
1. AMIX-Viewer: new multiple object viewer
2. SBASE: Spectra database (requires AMIX license)
1. Installation under Windows offers additionally the two programs AUREMOL and PERCH
38
Installing TOPSPIN
3. NMR-GLP: Program for ’Good Laboratory Practice’ tests
4. FLEXLM: License manager required for starting TOPSPIN programs.
5. AUREMOL
INDEX
DONEabout theINDEX
Please note that all version information
different programs can be found
on the TOPSPIN DVD and in the latest version of the Release Letter.
4.3 Installing TOPSPIN
This chapter describes the installation of the TOPSPIN.
The main decision you have to make during installation is where do you want to
install the new TOPSPIN version. If you have a previous NMR SUITE or TOPSPIN
installation on this PC available, you can either:
!
• install the new version in parallel to the previous one
(e.g. old version in /opt/topspin2.0, new in /opt/topspin2.1)
or
• install the new version in the same directory as the previous one
(e.g. old version in /opt/topspin, new in /opt/topspin)
The installation in parallel has the advantage, that the previous version remains
unchanged. After a parallel installation you can start working with the new version
and if you want to go back to the previous version for whatever reasons you can
just start and reuse it.
The installation of TOPSPIN offers an automatic import of your individual configuration of a previous version, so that there is no advantage to install the new version
in the same directory as the old one.
4.3.1 Installation in parallel
1. Close ALL WINDOWS on the desktop
2. Insert the DVD TOPSPIN 2.1
3. Start of the installation
• If the automatic start of the DVD is enabled, the shell described in the next
step appears automatically, go to step 4
Installing TOPSPIN
39
• If the shell of the next step does not appear automatically you have click on
the DVD icon on your desktop and click on the file install 1
INDEX
4. If you are not
logged in as root, a Linux shell will appear that asks you for the
root password:
INDEX
DONE
Please enter root password if prompted for it:
Password:
• Enter root password and press enter
5. The windows TOPSPIN Installation Manager and Welcome to the Bruker Software Installation Manager will appear:
• Click Next
6. A window Release Letter TOPSPIN will appear:
a) Please read the NMR Release letter! You can find therein all information
about news and bug fixes of the current version.
b) When you have finished reading the Release Letter click Next
1. Please note that there is also a file called ‘install.cmd’ on the DVD. This file is the installation
script for windows, under Linux you have to click on the file install
40
Installing TOPSPIN
7. A window Please select a target directory for TOPSPIN will appear:
INDEX
DONE
Enter an installation
/opt/topspin2.1
path
which
INDEX
does
not
exists
so
far,
e.g.
• Click Next
8. If the installation directory does not exist you will be asked if the installation
process should create it automatically
• Click Yes
9. A window Please select the setup type will appear:
a) Select the setup type. Do one of the following:
• Select Data Processing only if you want to use TOPSPIN for data processing.
• Select Data processing, acquisition and automation if you want to use
TOPSPIN for spectrometer control. This will e.g. install Diskless automatically.
• Customized setup (allows components selection) if you want to install
selected programs only.
b) Click Next
Installing TOPSPIN
9.1.
41
If Customized was selected in step 9 ...
INDEX
INDEX
DONE
... a window Please select products to install will appear:
• Select the packages which you want to install (note that DISKLESS is
only required if your PC controls a spectrometer or you want to configure it like this (see chapter 6.2.2).
• TOPSPIN: Acquisition, Processing and Plotting software
• ICON-NMR: Icon-driven interface for Routine Spectroscopy and
Automation
• DISKLESS: Spectrometer CCU operating system
• NMR-SIM: Program for numerical simulation of NMR experiments
• NMR-GUIDE: web-browser based teaching and training program
• NMR-Data: spectroscopic example data
• AURELIA-AMIX-Viewer: Viewer of 2D/3D/4D NMR data (requires
separate license)
• SBASE: Spectra database (requires AMIX license)
42
Installing TOPSPIN
• FLEXlm: License manager required for starting TOPSPIN programs.
• NMR-GLP: Program for’Good Laboratory
INDEX Practice’ tests (requires
separate license)
• Click Next
DONE
INDEX
10. The window Select a spectrometer configuration to import will appear. You can
either import no spectrometer configuration, or browse for a spectrometer configuration or select one of the configurations you get offered within this window.1
The configurations that are shown in this picture are just an example. On your
PC this list could look different.
11. If a previous TOPSPIN installation is available in the global environment variable Path, you will be asked if you want to define the current installation path
instead. It is recommended2 to set the current installation into the PATH variable, so enable:
Yes, add the new TOPSPIN installation directory to the global PATH
• Click Next
12. A window appear that asks for the installation path of the FlexLM. It is strongly
1. The installation process will offer all configurations which are available in the TOPSPIN /
XWIN-NMR installation that are defined in the /etc/profile.d/xwinnmr(.csh/.sh) resp. topspin(.csh/.sh) directory.
2. In case more than one TOPSPIN version is installed in parallel it is your decision which one
should be defined here
Installing TOPSPIN
43
recommended to accept the default path! 1
INDEX
INDEX
DONE
• Click Next
13. A window appear that displays the programs which will be installed
• Click Next
14. A window will appear that prompted for a definition of an NMR SUPERUSER
a) Do one of the following:
• Accept the default NMR SUPERUSER (nmrsu) or
• Enter a special user for this purpose, e.g. named nmr-admin or
1. It is strongly recommended to accept the default path for the FlexLM installation:
/usr/local/flexlm ! If you choose a user defined path, it may cause some problems with other
applications using the FlexLM
44
Installing TOPSPIN
• Enter any other user
If the user does not exists, installation will create it. For further details see
chapter 4.1 or the TOPSPIN Users Guide. INDEX
b) Click Next
DONE
INDEX
15. A window Password Input will appear and asks for the NMR ADMINISTRATION
PASSWORD1 (for more details about this feature see chapter 4.1)
• Type in the NMR ADMINISTRATION PASSWORD
• Re-enter in the NMR ADMINISTRATION PASSWORD
c) Click Next → The installation of TOPSPIN will start now.
16. If Data Processing, acquisition and automation or Customized with the Diskless package was selected in step 8 a window will appear to inform that the
spectrometer has to be shut down
a) If the PC is not yet connected to a spectrometer or if the CCU is not booted2
you can promptly
• Click Next
1. Certain commands like cf and expinstall ask for the NMR ADMINISTRATION
PASSWORD.
2. Note that during a first time installation of the TOPSPIN the CCU can not be booted.
b) If your PC is currently connected to a spectrometer and the CCU is booted
(see chapter 9.3.2 and 12.3.1.7)
a) Open a Linux shell
b) enter the command:
telnet spect
c) login as root
d) enter the command:
init 5
→ this will shut down the CCU
e) Close the Linux shell
f) Click Next in the window that asked you about shutdown the CCU
Note: The CCU is now either down or switched off and should be turned on again
at the end of this procedure.
→ The installation of TOPSPIN will start now.
17. After installation is finished the window Setup is complete will appear:
• Click Seen
18. Depending if you have installed DISKLESS one of the following windows will
appear:
• If you have installed DISKLESS a window will appear that asks you to reboot
the PC. Make sure that you can reboot the PC now (check for any unsaved
45
46
Installing TOPSPIN
windows (e.g. an editor window) and check if no other users are logged in
into this PC) then click on Yes
INDEX
DONE
INDEX
• If you have not installed DISKLESS a window will appear that informs you to
log out and log back in before you start TOPSPIN, click Seen
19. The window wherein you entered the root password informs you that you have
to press Enter to close this window
• Press Enter
20. If you have started the installation manually by clicking the file install in
the Konqueror window, you have to close this Konqueror window.
21. To eject the DVD click right on the DVD icon on the desktop and choose eject
22. To start TOPSPIN log out and log back in
4.3.2 What do you want to do with TOPSPIN?
• it should control a spectrometer or you want to use a special spectrometer
configuration
→ you have to execute cf and expinstall
• it should be used for data processing only?
→ you have to execute expinstall
For more details please refer to the next chapter
Installing TOPSPIN
47
4.4 Perl and GCC
The packages INDEX
Perl and GCC are automatically installed in the directory
<TOPSPIN_HOME>/gnu
and
<TOPSPIN_HOME>/perl
where
INDEX
DONE
<TOPSPIN_HOME> is the directory where TOPSPIN is installed (default
/opt/topspin). Perl and GCC are needed for compiling TOPSPIN AU programs.
4.5 Installing TopSpin patches
TOPSPIN patches are parts of TOPSPIN which contain bug fixes. They are available
on the Bruker BioSpin WWW server. We recommend to install new patches whenever the patchlevel on your system is older than the one on the WWW server.
Perform the following steps:
1. Start TOPSPIN
2. Enter the command about
The upcoming window will show information about your TOPSPIN installation
and configuration. Version, Server patchlevel and GUI build number of your TOPSPIN installation can be used for an update check.
Download from WWW server
1. Log in on a computer which is connected to the internet
2. Open your web browser
3. Go to http://www.bruker-biospin.de
4. Click on NMR → tech support → Software → Downloads → Linux PC and
select the package you want to download
Note, that in the past it was also possible to download patches from the German
Bruker BioSpin FTP server. Bruker BioSpin Germany has now moved some parts
of the information from the German Bruker BioSpin FTP server to the German
Bruker BioSpin Web server. We did this because we want to offer relevant information about patches and documentation, for instance, in only one area. Should we
have forgotten or omitted to put relevant information onto the web, please notify
us at:
[email protected]
48
Installing TOPSPIN
We will then send you the information by email.
4.6 The usage of the NMR-GUIDE
DONE
INDEX
INDEX
NMR-GUIDE 4.0 that comes with TOPSPIN 2.1 uses an own web server and the TOPSPIN internal java package. Therefore it is not necessary anymore to have these
packages installed/configured separately!
4.6.1 Requirements for NMR Guide 4.0
The using of NMR-GUIDE 4.0 requires the installation of TOPSPIN 2.1. Also be
sure that the following components are installed:
1. Web browser
2. PDF viewer
NMR-GUIDE offers among other things a lot of PDF documents. To display
these documents it is necessary to install the acrobat reader. For an installation
description see chapter 9.3.1
3. NMR-GUIDE license (contact [email protected] for a three month demo license
or order a official license from your local Bruker BioSpin representative). Note
that the NMR-GUIDE license is already part of a full or demo TOPSPIN 2.1
license.
The WWW browser gets documents from the locally installed WWW server. The
client - server communication is established over a network socket connection, but
the communication partners only use the localhost TCP/IP host identifier. These
pages are shown in the right-hand side window of the browser.
The WWW browser also gets dynamically created pages from the localhost. These
workstation specific pages are coming from a gserver. This is a platform independent Java web server written by Bruker BioSpin and acts as a daemon running on
the locally installed JAVA virtual machine. The gserver is included in the NMR
Guide&Encyclopedia package. The table of contents is generated dynamically and
displayed in the left-hand side window of the browser.
TOPSPIN commands can be invoked from the WWW browser. This process is also
managed by the gserver. The gserver is an essential component of the NMR
Guide&Encyclopedia and requires an NMR-GUIDE license.
Installing TOPSPIN
49
4.6.2 Java Requirements for NMR-GUIDE 4.0
For using NMR-GUIDE 4.0 that comes with the TOPSPIN 2.1 version it is not necesINDEX a special Java package. NMR-GUIDE uses the TOPSPIN
sary to install/configure
internal Java package
that is automatically
INDEX
DONE installed and configured during installation of TOPSPIN.
4.6.3 Working with the NMR-GUIDE
In order to work with the NMR-GUIDE, the following procedure must be followed.
4.6.3.1 Start up of the NMR-GUIDE
1. Start TOPSPIN and enter the command:
ghelp
or enter the command (this allows to start a search also within NMR-GUIDE):
help
or select from the Help pull-down menu of TOPSPIN the entry:
NMR-GUIDE
2. Your standard web browser will automatically starts and shows the page
50
Installing TOPSPIN
http://localhost:6600/guide/index.html
INDEX
DONE
INDEX
You can now use the functionality of NMR-GUIDE
4.6.3.2 Using the NMR-GUIDE search engine
One of the very important and useful tools of NMR-GUIDE is its search engine. It
offers the possibility to search within thousands of html pages that contain a huge
amount of information about NMR spectroscopy.
For using this search engine you can start NMR-GUIDE and enter the keyword
therein (or select an entry of the list of commonly used keywords). With NMRGUIDE 4.0 you have also the possibility to search directly from within TOPSPIN,
just enter the command:
help <keyword>
The TOPSPIN license
51
Chapter 5
INDEX
INDEX
The TOP
SPINDONE
license
5.1 Questions and answers about the TOPSPIN license
1. Which programs need a license?
TOPSPIN, NMR-SIM and NMR-GUIDE need a license.
If you do not have a license for TOPSPIN, it will start up in an emergency mode
if your PC is connected to a spectrometer. However, NMR-SIM and NMR-GUIDE
will not run without a valid license.
ICON-NMR is always used in connection with TOPSPIN and does not need an individual license.
TOPSPIN PLOT EDITOR has an individual license but it comes in a bundle with
every kind of TOPSPIN license, so if you have a TOPSPIN license you have also
a TOPSPIN PLOT EDITOR license. If TOPSPIN is running with the spectrometer license TOPSPIN PLOT EDITOR offers limited functionality only.
AURELIA, AMIX, MAXENT, GLP and PARAVISION do need a license which
must be ordered for each program separately.
2. Which license types are available and what programs may be run with each?
There are six different license types, details of each are given in the following
table. For more information please refer to the Bruker BioSpin license order
page on the web server:
https://www.bruker-biospin.de/NMR/nmrsoftw/licenses
or contact your local Bruker BioSpin representative.
License type
Full
Demo
Processing-Only
Presenter
Teaching
Developer
Contents
Acquisition, Processing, Automation (ICON-NMR),
Plotting, Experiment Simulation and NMR-GUIDE
license period: 15 years
Floating
Acquisition, Processing, Automation (ICON-NMR),
Plotting, Simulation and NMR-GUIDE
license period: 3 months
Node locked, uncounted, free of charge
Processing and Plotting
license period: 15 years
no Acquisition, no NMR-SIM, no NMR-GUIDE
Viewing and Plotting
license period: 15 years
no Acquisition, no Processing, no NMR-SIM, no NMR-GUIDE
NMR-SIM and restricted Processing and Plotting
license period: 15 years
TOPSPIN can only process datasets created with XWIN-NMR > 3.1 that
are older than 4 weeks or datasets created by NMR-SIM. One TOPSPINplot session (without portfolio editor) can be started, Node locked,
count 1.
Special license for extending TOPSPIN with own functionalities.
Allows viewing of data.
license period: unlimited
no Acquisition/Processing/Plotting/NMR-SIM/NMR-GUIDE, free of
charge
3. What kind of licenses do I need?
If you want to use TOPSPIN 2.x you need a FEATURE line ’TOPSPIN2’ in your
license.dat file. If you have ’TOPSPIN 1.x’ you can only start TOPSPIN 1.x.
If more than one license is available, as many copies of the program as are covered by the license can be started simultaneously.
4. Which licensing program is used for TOPSPIN?
The Flexlm license manager is used and is delivered on the TOPSPIN DVD. It
contains the ’bruker_lmgr’ license manager, the ’lmutil’ program, Help files and
example license.dat file.
5. What are the requirements for the Flexlm to function:
Your PC must have an Ethernet card
6. What is a Floating license?
Floating licenses are licenses that are available for more than one computer in a
network. Floating licenses are issued based on the Host-ID of one particular
computer. This computer becomes the ‚license server‘. All computers that can
communicate with this ‚license server‘ computer can use the licenses managed
by this computer. For this to work, the same license file must be installed on all
participating computers, including the ‚license server‘. The Flexlm license manager software must only run on the ‚license server‘ computer.
A Floating license can have just one license for a program like TOPSPIN. In such
a case, the respective program can be started once on one computer in the network. If more than one license is available, as many copies of the program as are
covered by the license can be started simultaneously. For example, if you have
a license file with 5 licenses for TOPSPIN, TOPSPIN can be started 5 times from
any 5 computers in the network.
The number of licenses is stated in the FEATURE for the respective program.
7. What is the difference between 1-Server / 3-Server Licenses?
Floating licenses can be ordered as 1-server or 3-server licenses. In a 1-server
license you have only one license server, and in a 3-server license there are three
license servers defined in the license file.
• The advantage of a 1-server license is that it is only necessary to have one
computer active at a time to make the license available.
• The advantage of a 3-server license is that any of the three license servers
can be inactive and the license management is then done by the remaining
two servers.
• One requirement for the three license servers is that all of them have TCP/IP
active.
53
54
The TOPSPIN license
• The operating system on the three computers can be the same or can be different (Linux, Windows).
8. What is a Node Locked license?
INDEX
A node-locked license allows DONE
you to start theINDEX
respective program only on the
computer with the Host-ID for which that license was generated. Typically, this
license form is used for Demo and Teaching licenses. No other computer can use
the license in the way described above for floating licenses.
9. How do I know if my license is Floating or Node Locked?
You can recognize this from the syntax of the license FEATURES in the license.dat file:
/usr/local/flexlm/Bruker/licenses/license.dat
If the entry ’HOSTID=’ appears after the encrypted password, the license is
Node locked and can only be used on the local PC
FEATURE TOPSPIN1 bruker_ls 0.0 6-aug-2018 3 9B1EA0113CD53A883974 HOSTID=006008d244fe vendor_info=....
→ Node locked license for three parallel sessions of TOPSPIN that can be
started on the local PC
FEATURE TOPSPIN1 bruker_ls 0.0 6-aug-2018 3 9B1EA0113CD53A883974 vendor_info=....
→ Floating license for three parallel sessions of TOPSPIN that can be started on every PC in the local network
10. If I have a Floating license and I have a dual-boot PC (e.g Windows XP and
Linux), can I use the license on both operating systems?
Yes, the license is based on the physical address of the Ethernet card and not on
the operating system. Copy the license file license.dat to:
Windows:
c:\flexlm\Bruker\licenses\license.dat
Linux:
/usr/local/flexlm/Bruker/licenses/license.dat
11. How can I determine the hostid of my PC?
See chapter 5.2.2.
12. How do I install a license (full or demo) on my PC?
See chapter 5.2.
13. Does a Demo license require SERVER/DAEMON lines in license.dat?
The TOPSPIN license
55
No, a Demo license is Node Locked uncounted and therefore only requires FEATURE lines. If SERVER and/or DAEMON lines exist, they are ignored.
INDEX
14. I have a Floating
license. Must the file license.dat be identical on all
hosts, server and clients?
INDEX
DONE
Yes, you have to install the license.dat on the server and copy it to all clients.
15. Must the Flexlm license manager run on all hosts in the network?
No, it only needs to run on the license server. If the license manager also runs on
a license client, this is simply ignored.
16. Must the Flexlm license manager run on a host with a Demo license?
No, it only needs to run on the server for counted licenses, a demo license is uncounted.
17. What can I do if TOPSPIN does not start after I installed the license?
See chapter 12.1
18. How is it possible that TOPSPIN starts even though I do not have a license?
If you do not have a license for TOPSPIN, it will start up in an emergency mode
if your PC is connected to a spectrometer. Also one TOPSPIN PLOT EDITOR session (without portfolio editor) can be started from within TOPSPIN. However,
NMR-SIM and NMR-GUIDE will not run without a valid license.
19. What can I do if TOPSPIN cannot find the license server?
Try to restart the license server:
service bruker_lmgr start
5.2 Ordering and installing the TOPSPIN license
5.2.1 Ordering a license
You can order a license from Bruker BioSpin Germany. Demo licenses are free of
charge. For all licenses you must specify:
• the hostid of your PC
• the program for which you want to get a license, e.g. TOPSPIN
• the type of license (full, demo, processing-only, presentation or teaching)
56
The TOPSPIN license
• the number of licenses and your order number (not necessary for demo
license)
Licenses can be ordered from the German BrukerINDEX
BioSpin web server:
https://www.bruker-biospin.de/NMR/nmrsoftw/licenses
DONE
INDEX
5.2.2 How do I determine the correct hostid
The hostid is a 12-digit hexadecimal number. It is the physical address (also called
Mac address or Node address) of the Ethernet card. After installing TOPSPIN,
including the Flexlm license manager, you can determine the hostid in two ways:
• Start TOPSPIN; a command prompt will pop up, which will list the hostid, if
no licence.dat file is available.
• Open a Linux shell and enter:
/sbin/ifconfig eth0
take the numbers of the HWaddr.
5.2.3 Installing a Demo license
A Demo license can be installed as follows:
1. Log in as Administrator
2. Install the Flexlm license manager as described in chapter 4.3
3. Open a Linux shell and enter:
nedit /usr/local/flexlm/Bruker/licenses/license.dat
enter the FEATURE lines, save and exit the file
5.2.4 Installing a full license on a license server
The Flexlm license manager must always be installed and run as a service on the
license server. It is delivered on the TOPSPIN DVD and can be installed as
described in chapter 4.3. In case the license file identifies the PC as license server,
Flexlm is automatically installed as a service which is then automatically started
during boot time
On the license server, the file license.dat must contain a SERVER line, a
DAEMON line and FEATURE lines. An example would be:
SERVER tulip 0060080e830d 1700
The TOPSPIN license
57
DAEMON bruker_ls /usr/local/flexlm/Bruker/bruker_ls
FEATURE TOPSPIN1 bruker_ls 0.0 6-aug-2018 3 0B0E4011FF0CD32FBFF1 \
vendor_info=" INDEX
for hostid(s) : 0060080e830d" ISSUER=00047573d35e
FEATURE TOPSPIN_1D bruker_ls 0.0 6-aug-2018 3 9B3EA021818829E2716A \
INDEX
DONE
vendor_info=" for hostid(s) : 0060080e830d" ISSUER=00047573d35e
FEATURE TOPSPIN_2D bruker_ls 0.0 6-aug-2018 3 AB3E80014D54F0FB3887 \
vendor_info=" for hostid(s) : 0060080e830d" ISSUER=00047573d35e
FEATURE XWINPLOT bruker_ls 0.0 6-aug-2018 3 DB4E50F1618A2B2383D3 \
vendor_info=" for hostid(s) : 0060080e830d" ISSUER=00047573d35e
FEATURE TOPSPIN_ACQU bruker_ls 0.0 6-aug-2018 3 9BDE3051D4CB63255DCC \
vendor_info=" for hostid(s) : 0060080e830d" ISSUER=00047573d35e
FEATURE NMRSIM bruker_ls 0.0 6-aug-2018 3 2B4EC041E98523510FCB \
vendor_info=" for hostid(s) : 0060080e830d" ISSUER=00047573d35e
where tulip is the hostname and 0060080e830d the hostid of the computer. Note
that the second part of the FEATURE lines, the vendor_info, does not necessarily
exist. In that case a FEATURE line would look like:
FEATURE TOPSPIN1 bruker_ls 0.0 6-aug-2018 3 0B0E4011FF0CD32FBFF1""
To inform Flexlm about the new license enter in a Linux shell:
/usr/local/flexlm/Bruker/lmreread -c /usr/local/flexlm/Bruker/licenses/license.dat
5.2.5 Installing a full license on a license client
On a license client, license can be installed in two different ways, as described for
a Demo license chapter 5.2.3. The only difference is that you do not have to setup
a new file license.dat. You can just copy it from the license server which can
be another PC (see question 10 in chapter 5.1).
5.2.6 Modifying the license file
If you have modified a license file, you have to inform Flexlm about the modified
license with the command:
/usr/local/flexlm/Bruker/lmreread -c /usr/local/flexlm/Bruker/licenses/license.dat
58
The TOPSPIN license
INDEX
DONE
INDEX
Configuration of TOPSPIN
59
Chapter 6
INDEX
INDEX
DONE
Configuration
of TOPSPIN
The idea of this chapter is to give you some guidelines to full spectrometer or
workstation configuration. We do not discuss the commands in detail here. For a
full description refer to the TOPSPIN manual.
6.1 Take over the configuration of XWIN-NMR/TOPSPIN into
TOPSPIN 2.1
The decision how to install TOPSPIN is very important in case you have already
XWIN-NMR or TOPSPIN installed on the same or another PC. If so, you might want
to take over the configuration of a previous XWIN-NMR/TOPSPIN into TOPSPIN 2.1
because of:
• in case the XWIN-NMR installation was used for controlling a spectrometer
there are very important configuration files like the spectrometer configuration, shim files, your own pulse programs, parameter sets, etc.
!
• if XWIN-NMR was used for processing only there can be also very important
configuration files like AU programs, macros, plot layouts etc.
Note: Transferring files could cause permission problems especially if they are
transferred from one PC to another.
60
Configuration of TOPSPIN
6.1.1 You have a TopSpin/XWIN-NMR configuration that you like to use for
TopSpin (on the same PC)
INDEX
You can take over the configuration during the Installation of TOPSPIN 2.1 (see
chapter 4.3) or after the installation
with the TOPSINDEX
PIN command nmr_save.
DONE
During the installation you will be asked if you want to import a spectrometer configuration. If you want to take over the configuration after installation is finished,
start TOPSPIN
• and type in the command:
nmr_save
• or click
Options → Manage Configuration → Save installation specific files
A window NMR_Save appears.
• Accept or modify the ’Location of Backup file’
(default: <TOPSPIN_HOME>\nmr_backup).
• Enter the location of the installation to be saved (e.g. /opt/xwinnmr).
• Click on Save.
This will create a tar file of all necessary information from the TOPSPIN/XWINNMR installation. The tar-file is called nmr_backup.tar and will be stored in
the directory you selected.
To take over this information into TOPSPIN, start nmr_backup and ...
• Make sure that Location of Backup file contains the correct path to your
backup file
• Make sure that the restore destination is correct (previous settings might be
overwritten in the restore destination!)
• Click on Restore.
A window Password request will appear. Please enter the NMR administration
password and click OK.
After this process is finished, execute cf.
If you like to get more information about the command nmr_save refer to chapter 6.5.
Configuration of TOPSPIN
61
6.1.2 You have a TopSpin/XWIN-NMR configuration that you like to use for
TOPSPIN (on another PC)
INDEX
Before you start installation of TOPSPIN on PC-A you have to copy the two directories:
INDEX
DONE
conf , plot and exp
from the TOPSPIN/XWIN-NMR installation on the PC-B into the directory where
TOPSPIN will be installed. The default installation directory of TOPSPIN for Linux
is:
/opt/topspin
In case you will use the default installation path you have to create these directories and as a second step copy the two directories conf and exp into them. After
these two directories are available on PC-A you can start the TOPSPIN installation.
6.2 Configuring TOPSPIN
Start TOPSPIN:
• Click the icon TOPSPIN on the desktop1, or
• Click <redhat> → Other → TOPSPIN<vers.>
When a user starts a new TOPSPIN version for the first time, a window ’LICENSE’
will appear:
a) Please read the license agreement for Bruker TOPSPIN !
b) If you agree, please click I Accept.
Now the window Configuration check will appear, that allows you to configure the
1. How to create a icon? See chapter 15.7.1
62
Configuration of TOPSPIN
software. If you have to click on Cf or Expinstall depends on what you want to do
INDEX
DONE
INDEX
with TOPSPIN. You are mainly in one of the following situations:
1. You want to configure a processing-only-PC with a default configuration on a
datastation → go to chapter 2.3.1 (for details see chapter 6.2.3)
2. You have installed the new software on the same PC as a previous XWINNMR/TOPSPIN installation, so the old spectrometer configuration is available on
the same PC → go to chapter 2.3.2 (for details see chapter 6.2.1)
3. You want to configure a processing-only-PC like your spectrometer-PC and
you have the spectrometer configuration on another computer → go to chapter
2.3.3 (for details see chapter 6.2.2)
4. You have to configure the software for controlling a spectrometer on a new
hard disk without a backup of the spectrometer configuration, so you have no
configuration files → go to chapter 6.2.4
6.2.1 If your PC controls a spectrometer
1. Be sure that the spectrometer is booted (see chapter 9.3.2 and 12.3.1.7)
2. Open a dataset
• Type new and create a new dataset.
• You can also select a dataset (e.g. exam1d_1H’) acquired with another
TOPSPIN or XWIN-NMR version.
3. Enter cf (The command cf now configures the software according to the
hardware of your spectrometer):
a) A window will appear:
Password request. Please enter the NMR ADMINISTRATION
PASSWORD
Type in the NMR ADMINISTRATION PASSWORD. Click OK.
Configuration of TOPSPIN
63
b) A window Cf will appear:
INDEX
INDEX
DONE
Most likely you will select an existing configuration and press Edit to
confirm this configuration.
c) A window will appear:
The selected configuration is displayed. Choose the type of your spectrometer e.g. AVANCE → ENTER. Check or type in the 1H frequency of
the magnet e.g. 500.13 → ENTER. Use the debug mode only in a case
64
Configuration of TOPSPIN
of trouble-shooting.
INDEX
DONE
INDEX
d) In case the information window mod hconfserver appears:
• your spectrometer has not a BSMS rack with ECLB board: you may
ignore this warning → ENTER. Nevertheless please check the configuration summary (uxnmr.info file) if all units are listed.
• your spectrometer has a BSMS rack with ECLB board and the DHCP
server might not work correctly. For troubleshooting information see
chapter 12.3.2
e) A window will appear:
Specify the channel to which external devices are con-
Configuration of TOPSPIN
65
nected. The RS232/485 channel for external devicesTable appears.
CheckINDEX
if the tty-numbers of the hardware components are set correctly.
f) A window
will appear:DONE
INDEX
Additional configuration. Security check. Enable peak
power check (POWCHK). Enable puls power check (PULCHK).
Choose the options if you need this security options.
g) Only if you have a sample changer! A window will appear:
Should the Sample Changer control the Lift? (yes/no)
The answer depends on how the air flow is connected, normally you will
answer: yes → ENTER
In this cases the question appear:
Delay between SX and next command [sec]?
Type in the length of the delay e.g. 10 → ENTER
h) The nuclei-table appear.
Check if the frequency of the nuclei are set correctly. If in doubt you can
use default values by clicking on Restore then click Save
!
i) The results of cf appears in a text window. Check this list carefully and
compare the result with an list from an earlier configuration (if available)
click Print and store the paper output with your other spectrometer
documentation, then click OK. These data are saved in
<TS_HOME>/conf/instr/<spect>/uxnmr.info.
If during ’cf’ an error message occurs that invites you to do a firmware
update see chapter 6.3
After finishing cf the window configure will appear showing a list of configuration steps. Accept the default selection and click Start (You will be asked for
66
Configuration of TOPSPIN
the NMR ADMINISTRATION PASSWORD a couple of times):
INDEX
DONE
INDEX
• Continue with expinstall
a) Type in the NMR ADMINISTRATION PASSWORD and ENTER
b) Click Next if you either have no modified Bruker BioSpin-Parameterfiles,
Configuration of TOPSPIN
67
AU-programs and Pulse-programs (If you have some, you have to archive
them in a different directory before executing expinstall). Your individual Parameterfiles,
INDEX AU-programs and Pulse-programs that have different
names to the original Bruker BioSpin files will not be destroyed during the
INDEX
DONE
installation
c) In the window that appears → Check Installation for Spectrometer → Click
Next
d) In the window that appears → Check the boxes of the NMR categories you
are interested in1 → Click Next
e) In the dialog box that appears → Select your spectrometer configuration
name → Click Next
1. This selection defines which parametersets and pulse programs are available for usage after
configuration is finished. It is possible to rerun expinstall later to add another selection
afterwards
68
Configuration of TOPSPIN
In the dialog box that appears → Check the items you want to install or,
accept the default selection → Click Next
INDEX
DONE
INDEX
f) In the dialog box that appears → Select the default printer and plotter and
the desired paper format → Click Next
g) In the window that appears → Enter the desired spectrometer frequency,
acquisition mode and pre-scan-delay or accept the default values
Configuration of TOPSPIN
69
→ Click Next
INDEX
INDEX
DONE
h) In the information box that appears → Check the configuration selection
and, if it is correct → Click Finish
When expinstall is finished you can go ahead with the other configuration commands.
70
Configuration of TOPSPIN
• Continue with edsolv
INDEX
DONE
INDEX
Check the list of lock solvents and click Save if it is correct → Click Close
• Continue with edhead
Select the current probe, click the button Define as current probe → Click
Exit
• A window ’Edit Spectrometer Parameter’ will appear:
Configuration of TOPSPIN
71
INDEX
INDEX
DONE
Check if the connections between preamplifier and probe are set correctly →
click Save if it is correct → Click Close
• Continue with edprosol
Check the parameters for your favorite nuclei, change them and calculate them,
if necessary → Click Save to store to disk → Click Exit
72
Configuration of TOPSPIN
• Continue with edlock
INDEX
DONE
INDEX
Check the lock table values (field, lock phase, ...), change them and click
Save if necessary, otherwise click Abort
• Continue with edscon
Check the spectrometer constants, change it and click Save if necessary, otherwise click Cancel
After cf, expinstall,... have finished, insert a sample and make sure that you
can lock on the lock solvent. Type ii and read with rpar a standard proton
parameter file, type getprosol and rga and collect a normal 1H NMR spectrum.
Configuration of TOPSPIN
73
6.2.2 If you want to configure a processing-PC like your spectrometer-PC:
If the PC does not control a spectrometer but is used in connection with a particuINDEX
lar spectrometer,
e.g. for setting up experiments, processing and or plotting, you
should configure
it
as that spectrometer.
INDEX
DONE For example the spectrometer is a AV300
configured with the name 'av300'. Do the following.
a) Copy the configuration directory ’<TOPSPIN_HOME>/conf/instr
/av300’ from the spectrometer AV300 to the workstation.
b) On
the
workstation
paste
this
'av300'
directory
to
’<TOPSPIN_HOME>/conf/instr’.
(in a default installation this is the path: /opt/topspin/conf/instr)
c) Start TOPSPIN as normal user.
d) Perform expinstall as follows:
Type in the command line expinstall or
Click Open → Setup → Experiment Installation [expinstall]
e) Type in the NMR ADMINISTRATION PASSWORD and ENTER
f) In the appearing information box → Click Next if you either have no modified Bruker BioSpin-Parameterfiles, AU-programs and Pulse-programs (If
you have some, you have to archive them in a different directory before executing expinstall). Your individual Parameterfiles, AU-programs and
74
Configuration of TOPSPIN
Pulse-programs that have different names to the original Bruker BioSpin
files will not be destroyed during the installation
INDEX
DONE
INDEX
g) In the appearing window → Edit Spectrometer Parameter, check if the connections between preamplifier and probe are set correctly → click Save if it
is correct → Click Close
h) In the appearing window → Check Installation for Datastation (Customize)
→ Click Next
Configuration of TOPSPIN
75
INDEX
INDEX
DONE
i) In the window that appears → Check the boxes of the NMR categories you
are interested in1 → Click Next
j) In the appearing dialog box → Select the spectrometer configuration name
→ Click Next
1. This selection defines which parametersets and pulse programs are available for usage after
configuration is finished. It is possible to rerun expinstall later to add another selection
afterwards
76
Configuration of TOPSPIN
k) In the appearing dialog box → Check the items you want to install or, accept
the default selection → Click Next
INDEX
DONE
INDEX
l) In the appearing dialog box → Select the default printer and plotter and the
desired paper format → Click Next
Configuration of TOPSPIN
77
m) In the appearing window → Enter the desired spectrometer frequency,
acquisition mode and pre-scan-delay or, accept the default values → Click
Next
INDEX
INDEX
DONE
n) In the appearing information box → Check the configuration selection and,
if it is correct → Click Finish
The installation of the selected items, will start now. Wait until this process has finished.
For more details on expinstall, please refer to the description of this com-
78
Configuration of TOPSPIN
mand in the Acquisition Reference manual.
6.2.3 If you want to use a default configuration on
a datastation
INDEX
A default configuration can be used
on a datastation.
It is automatically performed
DONE
INDEX
(no cf required) during the installation of TOPSPIN on a new computer, a new disk
or in a new TOPSPIN installation directory. There are two default configuration
available Bruker_default_av500 and Bruker_default_avi300 which correspond to
two different Avance spectrometer.
It is required for a convenient usage of TOPSPIN to execute expinstall also in
case of a datastation. In this case select Installation for Datastation (Default).
6.2.4 If you do not know the configuration of your spectrometer
If you do not have any spectrometer configuration information, e.g. after a headcrash, then you have to recreate the configuration information.
For this you have to do cf and give the correct information for the ’Type of Spectrometer’. You will get the correct list of your hardware in the ’RS232 table’. You
only have to type in the correct tty’s of the interfaces.
6.3 Firmware update of the spectrometer hardware
This chapter describes how to update the firmware of certain spectrometer components. This is only necessary if the cf command has popped up a message window
which informs that you have to do a firmware update of a component.
!
It is strongly recommended to do the firmware update only in this case,
because the hardware component could get unusable if the update would
be done incorrectly.
If you have further questions according firmware updates, please get in contact
with your local Bruker BioSpin office. Addresses of several offices can be found in
chapter 17, for contact information about all Bruker BioSpin office please go to
our web server:
http://www.bruker-biospin.de/NMR/about/offices
Configuration of TOPSPIN
79
6.3.1 Firmware Update for boards without ethernet connection
This chapter describes how to update the firmware for boards without ethernet
INDEX
connection on the
example LCB board.
INDEX
DONE
If you answer the
question about
the setting of the default path during the installation of the NMR Suite with yes, you can start the following service tools in a shell
by typing their names:
acb
bsms
grad
hpcu
hppr
rx22
If you answer no you have to type in the name with the entire path:
<TOPSPIN_HOME>/prog/bin/scripts/<service-tool-name>
The following example shows the check of the bsms service tool with the entire
pathname
1. Open a shell
2. Type <TOPSPIN_HOME>/prog/bin/scripts/bsms
• An automatic interactive procedure starts in this shell
3. Type y → ENTER
80
Configuration of TOPSPIN
• A dialog comes up in the shell
INDEX
DONE
INDEX
4. To check and eventually download a new firmware (from TOPSPIN)
• type 2→ ENTER
The check starts and ends for example as shown in the following picture
A
if there is a problem with a component you get an information to contact your
service office
if you need a firmware update you will get a message (A) with the length of time
for the download (B). It is recommended to do the download as soon as possible.
5. Press y → ENTER to start the download
!
During the download it is absolutely necessary that spectrometer and
workstation are not disturbed! Make sure that no one pulls a cable out of
the spectrometer or will crash the Linux system while using it in parallel!
(Yes we know this seems very improbable, but if the download would
crash, your board might be unusable afterwards)
• A ’normal’ error during downloading the new firmware (you will see a comment in the shell) requires to do the download once again!
Configuration of TOPSPIN
81
• If you have done a download of newer firmware, you have to do cf again!
• If you do not need any downloads, you can follow the instructions in the
commandINDEX
prompt to exit this tool.
INDEX
DONE
6.3.2 Firmware Update for boards with ethernet connection
This chapter describes how to update the firmware for boards with ethernet connection on the example ELCB board. Please note, that the following procedure is
only available if you have a spectrometer with boards with ethernet connection.
To check which ethernet connected hardware
units are available you can use the TopSpin command ha:
• Open TOPSPIN and enter the command ha.
A window appears that shows available
hardware modules connected via ethernet.
or the shell command:
ethernet-service-tools
• Open a shell and enter the commands:
cd <TopSpin_HOME>/prog/bin
./ethernet-service-tools
A window appears that shows available
hardware modules connected via ethernet.
In the following a description is given how to update the firmware for boards with
ethernet connection on the example ELCB board (BSMS with ELCB board)
1. In either the ha or ethernet-service-tools window click on the name
of the hardware device. A browser window will appear with a connection to
this device.
82
Configuration of TOPSPIN
2. A window BSMS Service Web - Main appears. Click on Device Setup.
INDEX
DONE
INDEX
3. The BSMS Service Web - Setup page appears.
Click on the button Browse to select the BsmsCheckDownload.txt file. In
a default installation this file is stored in the directory:
C:\Bruker\TOPSPIN\conf\instr\servtool\bsmscnf\
Note: Selecting Get File BsmsCheckDownload.txt from Bruker ftp server is
only necessary if a Bruker Service Engineer recommends to do this.
4. After the selection click on the button Load BsmsCheckDownload.txt.
5. If a difference is displayed between Required Firmware and Loaded Firmware
please click on Load new ELCB firmware.
Configuration of TOPSPIN
83
6. The BSMS Service Web - ELCB Firmware Download page appears.
INDEX
INDEX
DONE
Click on the button Browse to select the firmware version which is mentioned in
the line Select the file.... In a default installation the file is stored in the directory:
C:\Bruker\TOPSPIN\conf\instr\servtool\bsmscnf\
7. Click on the button install firmware.
Note: Selecting Get File elcb_firmware_XXXXXX.gz from Bruker ftp server is
only necessary if a Bruker Service Engineer recommends to do this.
The ELCB firmware releases 06xxxx and up are distributed as *.gz files.
To be able to load this file format to the ELCB the firmware:
elcb_firmware_051116.hex
or newer has to be running on the ELCB. If an older firmware is running first
download the elcb_firmware_051116.hex distribution.
The *.gz file has to be loaded as is, do not unzip it!
6.3.2.1 ELCB board: Save user configuration
You can save the user specific configuration of the ELCB board in a Text file.
84
Configuration of TOPSPIN
1. Please open the BSMS Service Web page. Click on Service.
INDEX
DONE
INDEX
2. The ELCB Service Web page appears. Click under Active User Configuration /
Parameters on Save to Disc.
3. The BsmsSaveUsrNvm.txt page appears. Click in the browser window on File
→ Save as... and choose the directory where the file BsmsSaveUsrNvm.txt
Configuration of TOPSPIN
85
should be stored.
INDEX
INDEX
DONE
6.3.2.2 ELCB board: Restore user configuration
1. Please open the BSMS Service Web page. Click on Service.
2. The ELCB Service Web page appears. Click under Active User Configuration /
86
Configuration of TOPSPIN
Parameters on Save to Disc.
INDEX
DONE
INDEX
3. The ELCB Service Web page appears. Under User Level you have to enter the
User and Password and click on Login.
Note: To get these two information please get in contact with your local Bruker
BioSpin office. Addresses of several offices can be found in chapter 17, for contact
information about all Bruker BioSpin office please go to our web server:
http://www.bruker-biospin.de/NMR/about/offices
4. The ELCB Service Web page will be changed. Under Active User Configuration
/ Parameters click on Load From Disk.
5. The BSMS Service Web - Load User Configuration File appears. Click on
Browse to select the user configuration file (BsmsSaveUsrNvm.txt) to
Configuration of TOPSPIN
87
download. Click on Submit Query.
INDEX
INDEX
DONE
6. The BSMS Service Web - Load User Configuration Status appears. Please check
if the Status of User Configuration File Load is New User Settings successfully
loaded.
6.4 A log of the entire system configuration
The showconf command provides you with various information about your hardware and software, both of the PC and of the spectrometer. Here is how showconf
works: You type showconf in a shell - and wait the about 2 minutes until it has finished. After that showconf has produced a file called confout that contains all
you need. Confout is located in your home directory. The size of this report is
usually less then 100 kbytes.
DO KEEP A COPY OF THIS FILE IN A SAFE PLACE!
6.5 Backup of VIFs (=Very Important Files) with
nmr_save and user_save (nmr_restore and user_restore)
6.5.1 Introduction
It is not only necessary to create some backups for the operating system like Boot
Disks and to store the acquired datasets.
!
It is strictly recommended to create a frequently backup of the ’VIFs’ - the ’Very
Important Files’ - of the configuration of TOPSPIN, in order to make sure to get the
information saved and to restore in special cases.
There are many reasons like e.g. head crash or theft of the hard disk that makes it
important that a weekly or monthly backup is made of important data, so that you
would be able to restore the spectrometer configuration in a very short time.
TOPSPIN offers the command1 nmr_save for saving those important files that are
not delivered by Bruker BioSpin. With nmr_save all global files (installation specific files), like spectrometer information, licenses etc. are saved. Even the default
directories, listed in the Source Directories, like e.g. ’pp’ and ’pp/user’ are saved.
All these global files will be put together into one archive file.
With nmr_save installation specific files can now be saved periodically at a specific time and date.
Same functions like for nmr_save are even available for user specific files with the
command user_save. Only user-specific configuration files will be saved with this
command. The additional directories, added by user which are listed in the Source
Directories, and the user-specific directory <USER_HOME>/.topspin<PC_NAME>/prop are saved.
All these user-specific files will be put together into one archive file.
The periodic saving function, described below for nmr_save is also available for
user_save.
The commands nmr_restore and user_restore respectively restore installation and
user-specific files to the same or to a different installation.
6.5.2 How to use nmr_save
!
nmr_save can be used for saving and restoring configuration information of the
TOPSPIN installation where the command is executed. Furthermore, it is possible
to use nmr_save in one TOPSPIN installation to backup data from another TOPSPIN
or XWIN-NMR installation.
In fact, if you have several versions of Bruker software installed in parallel, you
1. Bruker BioSpin also offers a script (xwinnmr.save) which can be used for saving the ’VIF’s
from within a shell or a cronjob (see chapter 16.2).
should always use the nmr_save command from the highest software version.
If your previous TOPSPIN/XWIN-NMR installation is not located on the same PC,
you can even mount the respective network path on your local PC and tell
nmr_save to take over the necessary information over the network.
6.5.3 How to save information with nmr_save
nmr_save can be easily started as follows:
• Start TOPSPIN and type in the command:
nmr_save
• or start TOPSPIN and click
Options → Manage Configuration → Save installation Specific files
A window NMR_Save will appear.
1. Accept or modify the Location of Backup file
(default is: <TOPSPIN_HOME>\nmr_backup).
89
90
Configuration of TOPSPIN
2. Enter the location of the Installation to be saved
(default is: <TOPSPIN_HOME>).
INDEX
3. nmr_save will then offer a list of all available spectrometer configurations
which are located in this respective
installation.
Select the correct configuration
DONE
INDEX
in the field Spectrometer connfiguration (e.g. spect). In a typical setup your
spectrometer configuration is called spect.
In a typical installation three configuration names will be listed here, your current instrument name and the two Bruker default configurations,
Bruker_default_avanceII300 and Bruker_default_av500.
If you are in doubt about the name of your current spectrometer configuration
exit the nmr_save window and enter the TOPSPIN command about. You can
find the name of your current configuration in the upcoming window under Configuration → Current Instrument.
Start nmr_save again. Now you can select the correct Spectrometer name.
TOPSPIN even saves your installation specific files automatically. If you want to
execute „Save installation specific files“ periodically please click on the Button
Automatic Backup. This action will open a new window for a command schedul-
Configuration of TOPSPIN
91
ing. Clicking OK will accept the default values an execute nmr_save once in a
month.
INDEX
INDEX
DONE
This Automatic Backup functionality is offered by the TopSpin command cron
described below.
4. Now you can click on Save.
This will create an archive file of all necessary information from the selected
installation/spectrometer configuration. This file is called
nmr_backup_<data>-<time>.tar
(e.g. nmr_backup_20071910-2348.tar
and is stored in the directory you selected above, typically:
<TOPSPIN_HOME>\nmr_backup
Shortly defined the command cron allows TOPSPIN executing a command periodically at a specific time/date.
• It is possible to define „User“ or „TOPSPIN“ commands. Latter one will
be executed independent of the user who currently works with TOPSPIN.
• The functionality „off-schedule“ offers that the last one of a series which
cannot be executed because TopSpin did not run, would be performed when
TopSpin is started next time.
The command cron performs command scheduling. It allows to execute commands periodically at predefined date/time in planned intervals. These intervals
92
Configuration of TOPSPIN
can be defined user-specifically or by default. It offers full flexibility in time definition, off-schedule execution and user control. Here you can specify the command
to be scheduled, some scheduling options and the
starting time and date. The folINDEX
lowing fields are available:
DONE
1. Command: The command to be executed.
INDEX
2. Description: A description of the command.
3. Execution scope: The scope of the command execution, User of TOPSPIN. For
scope User, the scheduled command will only be executed if TOPSPIN is running by the same user that is active during cron definition. If the scope is TOPSPIN, the scheduled command will be executed for any user. Scheduled
command with TOPSPIN execution scope can only be defined, cancelled or
modified after entering the Administration password.
4. Off-schedule execution: this flag allows you to execute commands that were
scheduled to run at the time when TOPSPIN was off. These commands are executed after the next TOPSPIN startup.
Please note that commands that were scheduled to run multiple times during
TOPSPIN downtime are only executed once.
The following time scheduling rules exist:
• Minute of the hour: betwenn 00 and 59
• Hour of the date: between 00 and 23
• Month of the year: January to december
• Day of the week: Sunday to saturday
For each of these fields, you can define an interval by selecting a value in the From
and a value in the To field. Setting the To field to Ignore schedules the command
for execution only at the time/date selected in the From field. An asterix (*) in the
From field indicates all possible times. Clicking the „+“ button to the right of a
filed, adds an extra field of the same type, allowing multiple interval definition.
Clicking the „-“ button removes the extra field.
6.5.4 Which information is stored with nmr_save?
nmr_save archives some directories completely, in some other directories only
specific files. Files that start with an "." are ignored. The internal TOPSPIN database for pulse and cpd programs, macros and python scripts is saved completely.
Which information is stored with nmr_save can be found below.
The following directories are saved completely (hidden files are ignored!):
<TOPSPIN_HOME>/conf/instr/autoshim/refmaps/
<TOPSPIN_HOME>/conf/instr/probeheads/
<TOPSPIN_HOME>/conf/instr/<spect>/prosol/
<TOPSPIN_HOME>/conf/instr/<spect>/cortab/
<TOPSPIN_HOME>/conf/instr/<spect>/inmrusers/
<TOPSPIN_HOME>/conf/instr/topshim/parameters/user
<TOPSPIN_HOME>/conf/instr/topshim/solvents/user
<TOPSPIN_HOME>/data/final/nmr/protocolfiles/
<TOPSPIN_HOME>/exp/stan/nmr/lists/best-nmr/user/subset/fi
<TOPSPIN_HOME>/exp/stan/nmr/lists/best-nmr/user/subset/lc
<TOPSPIN_HOME>/exp/stan/nmr/lists/bsms/
<TOPSPIN_HOME>/exp/stan/nmr/lists/ds/
<TOPSPIN_HOME>/exp/stan/nmr/lists/eurotherm/corr
<TOPSPIN_HOME>/exp/stan/nmr/lists/eurotherm/tcf
<TOPSPIN_HOME>/exp/stan/nmr/lists/f1/
<TOPSPIN_HOME>/exp/stan/nmr/lists/group/
<TOPSPIN_HOME>/exp/stan/nmr/lists/scm/
<TOPSPIN_HOME>/exp/stan/nmr/lists/vc/
<TOPSPIN_HOME>/QTP/
<spect> represents the current spectrometer name or the user-specified name
that was explicitly chosen when nmr_save is started.
From the following directories every file is saved that does not belong to the genuine Bruker BioSpin distribution:
<TOPSPIN_HOME>/conf/instr/servtool/bsmstool/boss
<TOPSPIN_HOME>/conf/instr/topshim/spect
<TOPSPIN_HOME>/conf/instr/topshim/probeheads
<TOPSPIN_HOME>/exp/stan/nmr/lists/gp/
<TOPSPIN_HOME>/exp/stan/nmr/lists/wave/
<TOPSPIN_HOME>/exp/stan/nmr/au/scl/
<TOPSPIN_HOME>/exp/stan/nmr/au/src/
<TOPSPIN_HOME>/exp/stan/nmr/par/
<TOPSPIN_HOME>/exp/stan/nmr/parx/preemp
93
94
Configuration of TOPSPIN
<TOPSPIN_HOME>/plot/layouts/
<TOPSPIN_HOME>/prog/tcl/xwish3_scripts/
Additionally, the following files are also saved: INDEX
<TOPSPIN_HOME>/conf/instr/selpulse.*
DONE
INDEX
<TOPSPIN_HOME>/conf/instr/probehead
<TOPSPIN_HOME>/conf/instr/<spect>/2Hlock
<TOPSPIN_HOME>/conf/instr/<spect>/19Flock
<TOPSPIN_HOME>/conf/instr/<spect>/best-nmr/CurrPushSolvent
<TOPSPIN_HOME>/conf/instr/<spect>/best-nmr/hardware.par
<TOPSPIN_HOME>/conf/instr/<spect>/best-nmr/hardware.src
<TOPSPIN_HOME>/conf/instr/<spect>/best-nmr/racks.use
<TOPSPIN_HOME>/conf/instr/<spect>/best-nmr/scanner.src
<TOPSPIN_HOME>/conf/instr/<spect>/best-nmr/solvents.add
<TOPSPIN_HOME>/conf/instr/<spect>/best-nmr/solvents.par
<TOPSPIN_HOME>/conf/instr/<spect>/best-nmr/solvents.use
<TOPSPIN_HOME>/conf/instr/<spect>/hardware_list
<TOPSPIN_HOME>/conf/instr/<spect>/nuclei
<TOPSPIN_HOME>/conf/instr/<spect>/rs232_device/best
<TOPSPIN_HOME>/conf/instr/<spect>/rs232_device/bestscan
<TOPSPIN_HOME>/conf/instr/<spect>/specpar
<TOPSPIN_HOME>/conf/instr/<spect>/uxnmr.par
<TOPSPIN_HOME>/conf/instr/<spect>/uxnmr.info
<TOPSPIN_HOME>/conf/global/layoutsearchpath
<TOPSPIN_HOME>/exp/stan/nmr/lists/probeheads
<TOPSPIN_HOME>/exp/stan/nmr/lists/solvents
<TOPSPIN_HOME>/prog/logfiles/heliumlog
<TOPSPIN_HOME>/prog/logfiles/heliumlog.err
<TOPSPIN_HOME>/prog/server/export.conf
<LM_LICENSE_FILE>1
For safety reasons the tar-file will be saved in a directory nmr_backup_<date>1. This is the environment variable for the license file, in a default installation this is:
/usr/local/flexlm/Bruker/licenses/license.dat
Configuration of TOPSPIN
95
time.tar. This file contains date and time of saving, so that overwriting the tar-file
is not possible easily and the data are always available. Please note that Overwriting existing backup
file is only possible by saving data twice in the same minute.
INDEX
It is recommended that all data are backuped on a different Server or CD to prevent
INDEX
DONE
for a motherboard-crash.
6.5.5 How to restore informations saved with nmr_save
Note that this will overwrite your complete TOPSPIN configuration plus spectrometer configuration. Restore from a backup file only if you are absolutely sure that
this is necessary. If in doubt do not restore or at least create a backup of the current
state before.
Start TOPSPIN and type in the command:
nmr_restore
or click
Options → Manage Configuration → Restore installation specific file
A window NMR_Save will appear.
1. Enter the path where you archive file is stored in the field Location of Backup
file
(default is: <TOPSPIN_HOME>\nmr_backup).
2. Enter the location of the restore destination
(default is: <TOPSPIN_HOME>)
3. Click on Restore
A window Password request will appear:
96
Configuration of TOPSPIN
Please enter the NMR administration password and click OK.
4. Execute the TOPSPIN command cf
INDEX
DONE
6.5.6 How to use user_save and user_restore
INDEX
Similar to the function nmr_save and nmr_restore that saves and restores installation specific files, the commands user_save and user_restore save and restore
user-specific data in a TAR-file. These commands save and restore all user-specific data listed in the directory
Options → Preferences → Manage source directories for edpul, edau etc.
and
<USER_HOME>/.topspin-<PC_NAME>/prop
The periodic-saving-function avilable with the command cron is also available for
user_saved- and user_restored data. The TAR-file will be written in the following
directory:
nmr_backup_<username>-<date>->time>.tar
For saving and restoring data with user_save and user_restore the same steps like
for nmr_save and nmr_restore have to be executed.
Please note that for restoring data with user_restore the NMR administration password is not recommended. Furthermore all data that are restored with user_restore
are archived in one central directory user_backup, not in the individual directories where they have been read from with user_save. So user-specific configuration files can be taken from one PC to another.
6.5.7 How to read the archive file
Although the archive file created by nmr_save is a tar file, it should not be opened
or read with the tar command. It is packed in a special procedure and the only correct way of extracting the file is the TopSpin command nmr_save!
If you like to have a look at the content of an archive file or copy just some files
from it, you should extract the archive into a temporary directory, e.g.
/tmp/backup-test. Then you can check and copy the extracted files from there.
6.5.8 Is all information restored in their original places?
No, the license file, the heliumlogfile and the heliumlog.err file are restored in a
different directory, because the current ones should not be overwritten. If you want
to reuse the restored files you can find them in the restore destination you have
chosen, in the subdirectory conf/instr with the extension .backup
All other files are restored in their original places.
97
Chapter 7
Plotting and Printing with
TopSpin
7.1 Printing / plotting data
7.1.1 Plotting and printing
Under RED HAT ENTERPRISE LINUX WS 4, all common printer drivers can be used
for plotting and printing. When a printer is installed under RED HAT ENTERPRISE
LINUX WS 4, it can be used for plotting from TOPSPIN and TOPSPIN PLOT EDITOR.
7.1.2 Print/Plot from the Menu
The current data window can be printed as follows:
1. From the TOPSPIN menu:
• Click the print button in the upper toolbar
• or Click File → Print
• or Enter print or Crtl-p
99
100
Plotting and Printing with TopSpin
All these actions are equivalent; they open the Print dialog box.
INDEX
DONE
INDEX
2. In the Print dialog box:
• Select Print active window [prnt]
• Click OK
Before printing starts, the operating system print dialog box will appear to select e.g. the printer and printer properties.
The Print dialog box contains two further options:
• Print with layout - start Plot Editor [plot]
If you select this option and click OK, the Plot Editor will be started. This
option is equivalent to entering plot on the TOPSPIN command line.
• Print with layout - plot directly [autoplot]
Selecting this option activates the Plot Editor layout list box. Select the
desired layout and click OK to print. Standard layouts are delivered with
TOPSPIN. They use the Windows default printer. User defined layouts use
the printer defined in the TOPSPIN PLOT EDITOR. On a 1D dataset, only 1D
layouts are listed, on a 2D dataset only 2D layouts are listed etc.
For each of the last two options one of the following parameters is required.
Use plot limits:
• from screen/ CY
The processing parameter CY and the x-axis limits as they are displayed
Plotting and Printing with TopSpin
101
in TOPSPIN are used
• from Plot Editor Reset Actions
INDEX
The plot limits and maximum intensity are set according to the TOPSPIN
PLOT INDEX
EDITOR Reset Actions
DONE(right-click inside the TOPSPIN PLOT EDITOR
data field and choose Automation to set the Reset Actions).
• as saved in Plot Editor
The plot limits and maximum intensity are set in the specified layout
Fill dataset list:
• from your default portfolio
The portfolio contains the current TOPSPIN dataset plus the data from the
default Plot Editor portfolio
• from port folio saved in dataset
The portfolio contains the current TOPSPIN dataset plus the data from the
portfolio stored in this dataset
Override plotter saved in Plot Editor:
Allows choosing a different plotter than defined in the Plot Editor layout.
This is a temporary setting only, the plotter definition in the layout will
stay unchanged.
7.1.3 Plot data from the Processing guide
Printing/plotting data can be done from the Processing guide by clicking the
Plot/Print button. If Automatic mode is checked, the active data window will be
printed as it appears in the screen. If Automatic mode is unchecked, you will get
the dialog box.
7.1.4 Plot data with the TOPSPIN PLOT EDITOR
Although the print command allows you to use or start the TOPSPIN PLOT EDITOR, you can also start it from the command line (enter plot). This will open the
TOPSPIN PLOT EDITOR from which you can create layouts and plot data. The complete TOPSPIN PLOT EDITOR functionality is described in its online manual that can
be opened from the TOPSPIN PLOT EDITOR Help menu.
102
Plotting and Printing with TopSpin
7.1.5 Store (Export) a Data Window as Graphics File
The clipboard and metafile formats are resizable vector formats. In addition to this,
INDEX
window in a graphics file of
TOPSPIN allows you to save the contents of a data
selectable type, e.g. .png, .tif, .wmf
etc.
To
do
that:
DONE
INDEX
1. Click Edit → Export
2. Navigate to the storage folder
3. Enter the destination filename and extension
4. Click Export
The resolution of such a screen dump equals the resolution of your screen. When
you import a graphics file into an other program, you may loose information when
resizing the graphics.
7.1.6 TOPSPIN PLOT EDITOR
1. TOPSPIN PLOT EDITOR uses the printer driver system of the operating system
for any printer output. This means that any printer for which a system driver is
correctly installed can be selected as print device. Note that the printer name in
a layout file written by the Windows XP version is probably not known by the
Linux version of TOPSPIN PLOT EDITOR because of the different printer handling. Apart from that, layout files can be freely interchanged between the two
platforms.
2. Another way of exporting graphics is the menu option File/Print which allows
you to print the complete layout into a file. The format can be choosen from a
list (e.g. PostScript, Epsi, PDF, JPEG, PCX, PNG or TIFF). Most current graphical-oriented windows applications can import this format. This provides a convenient way of importing TOPSPIN PLOT EDITOR graphics into programs like
Word or Powerpoint.
3. With the TOPSPIN PLOT EDITOR you can directly send your current plot as
Email. Just click File → Send and TOPSPIN PLOT EDITOR will pop-up your
default mail client and add the current plot as an EMF attachment.
User Management
103
Chapter 8
INDEX
INDEX
DONE
User Management
8.1 Adding a new user account
If you want to add a new user1 and this new user already exists on other hosts in
the network, make sure that you use the same User ID and User Name on all hosts
in the network. It is also useful to use the same Group ID and Group Name, especially, if you want to mount directories via NFS between IRIX and Linux systems.
Perform the following steps:
1. Click <red hat> → System Settings → User and Groups
2. If you are not logged in as root, a window run as root - KDE su will appear
• enter root password
1. The default configurations of a new user are copied from /etc/skel/into the home directory of the new user. If you want to change the default informations, e.g. by adding an icon
that starts TOPSPIN copy the respective file into /etc/skel/
104
User Management
3. A window KDE User Manager will appear:
INDEX
DONE
INDEX
• Click Add User
4. A window Create New User will appear
• Enter the new User Name
• Enter Full Name of the new user
• Enter and confirm the password
• Make sure that Create home directory is enabled and that a legal path is
entered in the field Home directory. The default /home/ will create the
home directory:
User Management
105
/home/<USER_NAME>
• The field Create a private group of this user:
INDEX
a) enabled (default):
INDEX
This configuration
in DONE
conjunction with the default umask (002) will lead
to the situation, that only the user is able to write in those files he created
with the TOPSPIN. That means no other user could work with his spectroscopic data.
b) disabled:
New user will be assigned to the group users
This configuration in conjunction with the default umask (002) will lead
to the situation, that the user and all members of the group users are able
to write in those files he created with the TOPSPIN. That means all other
users of his/her group can work with his spectroscopic data.
• Enable the field Specify user ID manually if necessary (see introduction of
this chapter) and type in the desired ID of the new user
• click OK
8.1.1 Change group membership of an existing user
1. Click <red hat> → System Settings → Users and Groups
2. If you are not logged in as root, a window run as root - KDE su will appear
• enter root password
3. A window KDE User Manager will appear:
• Click on an existing user and click on Properties
106
User Management
4. A window User Properties will appear:
INDEX
DONE
INDEX
• Click on Groups
You will see in the appearing window the field Primary Group that shows the
original group of the user.
• In the field Select the groups that the user will be a member of you can now
add the user to other groups simply by selecting the respective field of the
list of group(s)
• Click OK
User Management
107
Part II
INDEX
INDEX
DONE
RED-HAT
Enterprise Linux
WS 4
Installation-Tips
and
Configuration
108
User Management
INDEX
DONE
INDEX
RED HAT Enterprise Linux WS 4
109
Chapter 9
INDEX
INDEX
DONE
RED HAT
Enterprise Linux WS 4
9.1 Hints for installation of Red Hat
A Linux NMR workstation purchased from Bruker BioSpin comes with a preinstalled Linux distribution, currently RED HAT ENTERPRISE LINUX WS 4.
If you want to install Red Hat by yourself, Bruker BioSpin recommends to use the
installation guide of the Red Hat Documentation CD. This offers, in different languages, a very easy and detailed description of all necessary steps. Those steps
which are recommended by Bruker BioSpin are listed below, for all other configuration steps you can choose your personnel settings.
9.2 Scratch installation of Desktop computer
1. Start the installation of RED HAT ENTERPRISE LINUX WS 4 as described on the
Red Hat Documentation CD
2. In the window Mouse Configuration:
select your mouse (the default generic mouse might not support all features) (e.g
110
RED HAT Enterprise Linux WS 4
select Microsoft Intellimouse if you have a wheel mouse, otherwise the middle
button will not work correctly)
INDEX
3. In the window Disk Partitioning Setup choose
Manually partition with Disk
Druid
4. In the window Partitioning:
DONE
INDEX
Bruker BioSpin recommends to create the following partitions on a 80GB harddisk. For all these partitions you should select the button: Force to be a primary
partition and as File System Type ‚ext31‘:
a) a partition /boot with 125MB size
b) a partition / with 16GB size
c) define the swap partition /swap with 4GB size by selecting swap as File
System Type
d) a partition /opt should use the remaining space (enable Fill to maximum
allowable size)
5. In the window Boot Loader Configuration accept the default Use GRUB as the
boot loader
6. In the window Network Configuration disable Active on Boot for eth1 if your
PC does not control a spectrometer (e.g. notebook or workstation).
!
If the PC is controlling a spectrometer you should select Active on Boot for eth1.
Additionally you can click on Edit of eth1 and configure it for spectrometer control. For this you can type in the IP address and subnet mask:
IP-address (eth1): 149.236.99.1
Subnet mask (eth1): 255.255.255.0
The hostname should be created by DHCP (if available). Changing the hostname
to another name can be done in the installed system, see chapter 10.2
7. In the window Firewall, select the firewall configuration you prefer.
If you select other than No Firewall and the installation is for spectrometer control, you have to enable your spectrometer communication for full access. Click
on eth1 in the section:
If you would like to allow traffic from a device, select it below
1. ext3 file system is a journaling filesystem. The advantage of a journaling filesystem is, that an
accidental power off would not end in most cases to a file system check and missing data.
RED HAT Enterprise Linux WS 4
!
111
Note: Bruker BioSpin does not support SElinux at the moment. Therefor it is
required to choose Disable in the section Enable SELinux!
INDEX
8. In the window
Timezone Selection:
it is necessary
to configure DONE
the Location, but do not enable System clock uses
INDEX
UTC
9. In the window Package Defaults:
we recommend to select: Customize the set of packages to be installed
and in the following window Package Group selection
scroll down to the end of the list and select Everything1
10. During the installation process, you will be asked to insert all four installation
CDs one after the other. After finishing with the fourth CD you will be asked to
insert the first CD once again.
11. The window Congratulations appears and informs you about a successful
installation. You have to remove the CD and press Exit, this will reboot the PC.
12. When the system is coming up again, a window Welcome appears
13. You have to accept the license agreement, to adjust date and time and you will
be asked for creating a non-administrative user account.
14. In the window Red Hat Network you can select to register at the Red Hat Network right now (Yes, ...) or you can choose No... in case you have currently no
network connection etc.
15. A window Additional CDs appear
On HP computers it is necessary to install the drivers/update CD that can be
downloaded from the HP web side
http://welcome.hp.com/country/us/en/support.html
Enter there the type of your PC (e.g. xw4300 for the currently delivered HP xw
4300) and follow the instructions of the following pages.
If you have the correct CD for your PC available or any other CD that should be
installed now (e.g. a Red Hat Extras CD), you have to insert the respective CD
then click on the Install... button right to the text Additional CDs
16. You will be guided trough the installation process
17. After finishing the installation process of the HP driver/update CD you will be
1. This installation requires about 4GB space on the harddisk
112
RED HAT Enterprise Linux WS 4
asked to reboot now or later. In case you want to install further CDs it is recommended to click on reboot later, because otherwise this process is stopped.
INDEX
18. After finishing this installation you can start T
OPSPIN installation (see chapter
2.2 for a brief description or chapter 4.3 for a detailed description)
DONE
INDEX
9.3 Installation of additional Red Hat packages on already
installed systems
If you have done the full installation of RED HAT ENTERPRISE LINUX WS 4 as it is
described in chapter 9.2, the packages described in this chapter are already
installed and you can skip this chapter.
If you want to prepare an already installed RED HAT ENTERPRISE LINUX WS 4 system for TOPSPIN, you have to make sure that the following packages are available:
Package
acrobat reader
https://rhn.redhat.com/network and
RHEL WS 4 Extras CD
https://rhn.redhat.com/network and
nfs-utils
Operating System CD 2 of 4
glibc-kernheaders
glibc-devel
uucp
available on ...
https://rhn.redhat.com/network and
Operating System CD 3 of 4
https://rhn.redhat.com/network and
Operating System CD 3 of 4
https://rhn.redhat.com/network and
Operating System CD 4 of 4
Necessary for
documentation viewer
acquisition
compiling AU programs
compiling AU programs
acquisition
For an installation description see the following chapters. For more information
about useful packages, please refer to chapter 15.3.1.
Please note that with RED HAT ENTERPRISE LINUX WS 4 there is no easy to use
graphical tool for installation of individual programs (rpm-files) which are available e.g. on the operating system CD. Several different possibilities for installation
of individual programs are available, in the following chapter a description of the
most easy and safe procedure is given. It requires that your Linux system is connected to the internet and you have a your system already subscribed at Red Hat.
For more details about this please see chapter 15.8.
If you are not connected to the internet you can install the respective rpms with the
browser nautilus. To do this open a shell, enter the command nautilus, click on
Places → Computer → CD drive → RedHat → RPMS and double click the
respective filename. You have to enter the root password and then the installation
process starts.
The installation of each of the packages listed above is described in an individual
chapter. Of course you can also install all packages in one step just by selecting all
of them in step 11.
9.3.1 Additional packages for documentation view - Acrobat Reader
The software packages acroread is necessary if you wants to open manuals from
the Help menu of TOPSPIN.
1. Check if acroread is installed so far
• Open a shell and type in: rpm -q acroread
• is the output like this: acroread-<version-number>
• Yes? You can skip this chapter
• No? Go to step 2.
2. Open a web browser and go to:
https://rhn.redhat.com/network
3. A web page appears which asks you to login as registered user. Enter your Red
113
114
RED HAT Enterprise Linux WS 4
Hat Network user name and password.1
INDEX
DONE
INDEX
You will now enter your individual Red Hat network area
1. For details about the registration at Red Hat Network see chapter 15.8.1
RED HAT Enterprise Linux WS 4
115
4. Click on Systems
INDEX
INDEX
DONE
The list of systems which are registered for your individual Red Hat network account appears
5. Click on the name of the system you want to install the acroread package
The summary of this system appears
6. Click on Alter Channel Subscriptions
The page switches to the defined Base Software Channel and possible Software
Channel Subscriptions.
7. Make sure that Red Hat Enterprise Linux WS (v. 4 for x86) Extra is checked.
8. If you have checked this field for the first time you have to click on:
Change Subscription
116
RED HAT Enterprise Linux WS 4
9. Click on Packages
INDEX
DONE
INDEX
10. Click on Install New Packages
11. Select all packages which starts with acroread. In case you do not want to
install any plugins select the main program acroread-<version_number> only.
12. Scroll down to the end of the page and click on Install Selected packages
13. You get a summary of all selected packages, click Confirm to start installation.
Installation will need a few seconds. After it is finished you can see the word
Done in the lower left corner of the window.
14. Go to a shell and login as root with the command
su enter your root password
15. Enter the command
RED HAT Enterprise Linux WS 4
117
up2date --install acroread
INDEX
INDEX
DONE
Acrobat reader has now been installed, you can start it from a shell with the command acroread or create a icon on the desktop to start the program (for details
see chapter 15.7). It will automatically opened when you open a manual from
within TOPSPIN.
9.3.2 nfs-utils
The software package nfs-utils is necessary if the PC controls a spectrometer.
1. Check if nfs-utils is installed so far
• Open a shell and type in:
rpm -q nfs-utils
• is the output like this
nfs-utils-<version-number>
• Yes? You can skip this chapter
• No? Go to step 2.
2. Open a web browser and go to:
https://rhn.redhat.com/network
3. A web page appears which asks you to login as registered user. Enter your Red
Hat Network user name and password.1
118
RED HAT Enterprise Linux WS 4
You will now enter your individual Red Hat network area
4. Click on Systems
INDEX
The list of systems which are registered for your individual Red Hat network account appears
DONE
INDEX
5. Click on the name of the system you want to install the acroread package
The summary of this system appears
6. Click on Alter Channel Subscriptions
The page switches to the defined Base Software Channel and possible Software
Channel Subscriptions.
7. Make sure that Red Hat Enterprise Linux WS (v. 4 for x86) Extra is checked.
8. If you have checked this field for the first time you have to click on:
Change Subscription
9. Click on Packages
10. Click on Install New Packages
11. Select nfs-utils-<version_number>
12. Scroll down to the end of the page and click on Install Selected packages
13. You get a summary of all selected packages, click Confirm to start installation.
Installation will need a few seconds. After it is finished you can see the word
Done in the lower left corner of the window.
14. Go to a shell and login as root with the command
su enter your root password
15. Enter the command
up2date --install nfs-utils
The package nfs-utils has now been installed.
9.3.3 Additional packages for compilation of AU programs
The packages glibc-kernheaders and glibc-devel are necessary for compilation of
AU programs.
1. For details about the registration at Red Hat Network see chapter 15.8.1
RED HAT Enterprise Linux WS 4
119
1. Check if glibc-kernheaders and glibc-devel are installed so far
• rpm -q glibc-kernheaders
INDEX
• rpm -q glibc-devel
INDEX
• is the output
like this
DONE
glibc-kernheaders-<version-number>
glibc-devel-<version-number>
• Yes? You can skip this chapter
• No? Go to step 2.
2. Open a web browser and go to:
https://rhn.redhat.com/network
3. A web page appears which asks you to login as registered user. Enter your Red
Hat Network user name and password.1
You will now enter your individual Red Hat network area
4. Click on Systems
The list of systems which are registered for your individual Red Hat network account appears
5. Click on the name of the system you want to install the acroread package
The summary of this system appears
6. Click on Alter Channel Subscriptions
The page switches to the defined Base Software Channel and possible Software
Channel Subscriptions.
7. Make sure that Red Hat Enterprise Linux WS (v. 4 for x86) Extra is checked.
8. If you have checked this field for the first time you have to click on:
Change Subscription
9. Click on Packages
10. Click on Install New Packages
11. Select glibc-kernheaders-<version_number>
12. Select glibc-devel-<version_number>
13. Scroll down to the end of the page and click on Install Selected packages
1. For details about the registration at Red Hat Network see chapter 15.8.1
120
RED HAT Enterprise Linux WS 4
14. You get a summary of all selected packages, click Confirm to start installation.
Installation will need a few seconds. After it is finished you can see the word
Done in the lower left corner of the window. INDEX
15. Go to a shell and login as root DONE
with the command
INDEX
su enter your root password
16. Enter the commands
up2date --install glibc-kernheaders
up2date --install glibc-devel
The packages glibc-kernheaders and glibc-devel have now been installed.
9.3.4 uucp
The software package uucp is necessary if the PC controls a spectrometer.
1. Check if uucp is installed so far
• Open a shell and type in:
rpm -q uucp
• is the output like this
uucp-<version-number>
• Yes? You can skip this chapter
• No? Go to step 2.
2. Open a web browser and go to:
https://rhn.redhat.com/network
3. A web page appears which asks you to login as registered user. Enter your Red
Hat Network user name and password.1
You will now enter your individual Red Hat network area
4. Click on Systems
The list of systems which are registered for your individual Red Hat network account appears
1. For details about the registration at Red Hat Network see chapter 15.8.1
RED HAT Enterprise Linux WS 4
121
5. Click on the name of the system you want to install the acroread package
The summary of this system appears
INDEX
6. Click on Alter Channel Subscriptions
INDEX
DONE
The page switches
to the defined
Base Software Channel and possible Software
Channel Subscriptions.
7. Make sure that Red Hat Enterprise Linux WS (v. 4 for x86) Extra is checked.
8. If you have checked this field for the first time you have to click on:
Change Subscription
9. Click on Packages
10. Click on Install New Packages
11. Select uucp-<version_number>
12. Scroll down to the end of the page and click on Install Selected packages
13. You get a summary of all selected packages, click Confirm to start installation.
Installation will need a few seconds. After it is finished you can see the word
Done in the lower left corner of the window.
14. Go to a shell and login as root with the command
su enter your root password
15. Enter the command
up2date --install uucp
16. The package uucp has now been installed.
9.4 Check if all necessary components are installed and active
To check if all necessary components are installed and active, please type
/sbin/chkconfig --list
in a shell and compare the output with this example
nfs
nfslock
bootparamd
0:off 1:off 2:on 3:on
0:off 1:off 2:off 3:on
0:off 1:off 2:on 3:on
4:on
4:on
4:on
5:on
5:on
5:on
6:off
6:off
6:off
122
RED HAT Enterprise Linux WS 4
If an entry is off, you can activate it in general:
/sbin/chkconfig <service> on
DONE
INDEX
INDEX
If an entry is off, you can activate it for a specific runlevel:
/sbin/chkconfig --level <runlevel> <service> on
for example to start bootparamd at runlevel 5:
/sbin/chkconfig --level 5 bootparamd on
With chkconfig command you define (permanently) which service will be
started/not started on which runlevel after the next reboot. It does NOT activate/deactivate the respective service, instantly.
For a temporary activation/deactivation of a process you have to use the command:
service <service> start/stop
There are mostly more possibilities for the different services like reload, restart ... .
To get a list which possibilities are available just type in
service <service>
A service which is listed below xinet.d can be started with the chkconfig command
immediately. e.g. the command
chkconfig smb-swat on
will turn on samba swat immediately, it is neither necessary to reboot nor to use the
service command.
9.5 Dual Boot computer
It is possible to configure a PC in a dual boot mode, so that you can decide during
boot time if you like to start Windows or Linux. This is not a necessary feature for
spectrometer PC’s and Bruker BioSpin does not recommend to configure the PC in
dual boot mode.
Network configuration
123
Chapter 10
INDEX
INDEX
DONE
Network
configuration
10.1 Configuring the laboratory network
The easiest way to add a Linux PC to a laboratory network is using DHCP
(Dynamic Host Configuration Protocol). It allows you to go online just by defining the hostname. The IP address, name- and mailserver will be created dynamically. Please contact your network administrator to find out whether DHCP is the
right choice for you, or whether a fixed TCP/IP address is to be assigned to your
PC. Because the licensing of TOPSPIN and many other programs and operating
system features needs a correct network configuration there are three ways to do
this:
1. Those PC’s which are configured by Bruker BioSpin Germany are set to DHCP.
If this configuration can be used the PC should be connected to the network
before the boot process starts. After the PC is coming up the network works
correctly and TOPSPIN can be started.
2. If the PC should connected to the network by using a fix IP address you have to
ask your system administrator for it. After the correct configuration the network
works correctly and TOPSPIN can be started
3. If the PC should not get a network connection it is necessary to work with a
neutral IP address e.g. 192.168.1.1. This address is not routed to any network
computer by world-wide-agreement. If you configure this number you will not
have a connection to any other computer (internet) but TOPSPIN can be started.
124
Network configuration
10.2 Changing the hostname of the PC
The hostname of the PC is defined within the INDEX
network configuration. Because
there are different possibilities how to set up a network correctly (DHCP, fix IP
DONE
INDEX
address or no network connection) there is no general description on how to
change the hostname.
If you want to change the hostname just follow the instructions given in the chapters 10.4 - 10.6.
Changing the hostname may has an effect on programs. For the Bruker BioSpin
software you might have to check these two places:
1. In case the PC is a license server the name of the PC is stored in the license.dat
file that is stored in the flexlm installation directory. In a default installation this
is:
/usr/local/flexlm/Bruker/licenses/license.dat
If this PC acts as a license server and you changed the license file, you have to
be sure that the respective file is changed in the same way on all license clients.
2. The user specific configuration is stored in the directory:
<USER_HOME>/.topspin-<PC_NAME>
To keep the individual TOPSPIN configuration in case the computer name was
changed, rename these directories.
10.3 Some useful commands
There are two commands that allows to easily check if network is set up correctly:
hostname and hostname -f
hostname has to show the short name of the PC, e.g. nmrpc and
hostname -f has to show the full qualified name e.g. nmrpc.chemistry.university.com. If the answers are not as described, something is wrong with your
network configuration. Because the Linux system reacts very sensitive on wrong
network configuration, you might get several problems, e.g. TOPSPIN does not
start, spectrometer will not boot, the TOPSPIN license can not checked out etc..
A convenient command for checking the functionality of the ethernet cards is
/sbin/mii-tool
Network configuration
125
The output of this command shows a list of all ethernet cards and gives the information if the connection is working properly or not.
INDEX
If a ethernet card
is not able to be activated in the graphical tool, you can use the
following commands
(in this example
INDEX
DONEfor ‚eth0‘):
service network restart
ifdown eth0
ifup eth0
10.4 Configuring the laboratory network by DHCP
1. Click <red hat> → System Settings → Network 1
a window Query will appear and asks for the root password
• enter root password
2. A window Network Configuration will appear
• On the tab pane Devices click on eth0 and click Edit . Note that it is necessary to use eth0 for your internet connection, because eth1 is required for
your spectrometer network connection.
1. The shell command for starting the network configuration is:
system-config-network or simply neat
126
Network configuration
3. A window Ethernet Device will appear
INDEX
DONE
INDEX
• select the field:
Activate device when computer starts
• select the field:
Automatically obtain IP address settings with:
and click the little arrow to the right of this field and select:
dhcp
!
• enter the hostname of the PC in the field Hostname (optional)
• Contact your network administrator to get the information if you can check
the field Automatically obtain DNS information from provider
• click OK
Network configuration
127
e) In the window Network Configuration click on the tab pane Hosts1
INDEX
INDEX
DONE
• Either this entry is correct and was visible in previous Linux versions, you
will not see here an entry 127.0.0.1 / Name: localhost.localdomain / Nickname: localhost The operating system controls this entry and does not show
it here in this interface. Nevertheless you can check the file /etc/hosts
to get the information if this entry is there or not.
• Be sure that there is NO entry with the name of this PC. If there is one highlight it and click on Delete
• The two entries that can be seen in the picture are necessary for the spectrometer connection. If this PC does not control a spectrometer they are not
necessary.
1. This information is stored in the file /etc/hosts
This file contains also the line: 127.0.0.1 localhost.localdomain localhost
This is required information and must not be deleted / modified!
128
Network configuration
f) Click on the tab pane DNS 1
INDEX
DONE
INDEX
• enter the hostname without the domainname into the field Hostname 2
• click File → Save
• click File → Quit
Note that the information given here are very important. In case wrong
names/addresses are entered here network calls might end in long time-outs which
can cause e.g. acquisition problems.
10.5 Configuring the laboratory network by using a fixed TCP/IP
address
1. Click <red hat> → System Settings → Network 3
a window Query will appear and asks for the root password
• enter root password
1. The information given in this tab is stored in the file /etc/resolv.conf
2. In this field you have to enter the hostname only, without domainnames, i. e. only nmrpc and
not nmrpc.chemistry.university.com
3. The shell command for starting the network configuration is:
redhat-config-network or simply neat
Network configuration
129
2. A window Network Configuration will appear
INDEX
INDEX
DONE
• On the tab pane Devices click on eth0 and click Edit . Note that it is necessary to use eth0 for your internet connection, because eth1 is required for
your spectrometer network connection.
3. A window Ethernet Device will appear
• select the field:
130
Network configuration
Activate device when computer starts
• select the field:
INDEX
Statically set IP addresses
and type in the
DONE
INDEX
IP address,
Subnet mask and
Default Gateway Address
that should be used from this PC (if you do not know them, contact your network administrator)
• click OK
g) In the window Network Configuration click on the tab pane Hosts1
• click Add and create an entry for the IP address of this PC. The Name has to
be the full qualified domain name like this:
nmrpc.chemistry.university.com
and the Nickname:
nmrpc
1. This information is stored in the file /etc/hosts
This file contains also the line: 127.0.0.1 localhost.localdomain localhost
This is required information and must not be deleted / modified!
Network configuration
131
• The two entries ASP_ST2 and spect that can be seen in the picture are necessary for the spectrometer connection. If this PC does not control a spectrometer they INDEX
are not necessary.
h) Click on the tab pane DNS 1
INDEX
DONE
• enter the hostname without the domainname into the field Hostname 2
• enter the domain name in the field DNS Search Path
• click File → Save
• click File → Quit
Note that the information given here are very important. In case wrong
names/addresses are entered here network calls might end in long time-outs which
can cause e.g. acquisition problems.
Remember, that the network administrator must enter your new host on the nameserver.
1. The information given in this tab is stored in the file /etc/resolv.conf
2. In this field you have to enter the hostname only, without domainnames, i. e. only nmrpc and
not nmrpc.chemistry.university.com
132
Network configuration
10.6 Spectrometer PC that should not be connected to the
laboratory network
INDEX
In case the spectrometer PC should
not be connected
to the laboratory network, it
DONE
INDEX
is nevertheless necessary to configure a kind of ’virtual network’.
1. Click <red hat> → System Settings → Network 1
a window Query will appear and asks for the root password
• enter root password
2. A window Network Configuration will appear
• On the tab pane Devices click on eth0 and click Edit . Note that it is necessary to use eth0 for your internet connection, because eth1 is required for
your spectrometer network connection.
1. The shell command for starting the network configuration is:
redhat-config-network or simply neat
Network configuration
133
3. A window Ethernet Device will appear
INDEX
INDEX
DONE
• select the field:
Activate device when computer starts
• select the field:
Statically set IP addresses
and enter in the field:
Address:
192.168.1.1
and in the field:
Subnet Mask:
255.255.255.0
• click OK
i) In the window Network Configuration click on the tab pane Hosts1
• Either this entry is correct and was visible in previous Linux versions, you
will not see here an entry 127.0.0.1 / Name: localhost.localdomain / Nickname: localhost The operating system controls this entry and does not show
it here in this interface. Nevertheless you can check the file /etc/hosts
to get the information if this entry is there or not.
• click Add and create an entry for the IP address of this PC. The Name has to
be the full qualified domain name like this:
nmrpc.chemistry.university.com
and the Nickname:
nmrpc
• The two entries that can be seen in the picture are necessary for the spectrometer connection. If this PC does not control a spectrometer they are not
necessary.
1. This information is stored in the file /etc/hosts
This file contains also the line: 127.0.0.1 localhost.localdomain localhost
This is required information and must not be deleted / modified!
j) Click on the tab pane DNS 1
• enter the hostname without the domainname into the field Hostname 2
• enter the domain name in the field DNS Search Path
• leave the DNS fields empty
• click File → Save
• click File → Quit
Note that the information given here are very important. In case wrong
names/addresses are entered here network calls might end in long time-outs which
can cause e.g. acquisition problems.
10.7 Configuring the spectrometer network
!
The network configuration for spectrometer control will be done automatically in
case the ethernet card is not yet configured. This configuration will be done by the
Diskless package that is part of a TOPSPIN installation. The description of the fol1. The information given in this tab is stored in the file /etc/resolv.conf
2. In this field you have to enter the hostname only, without domainnames, i. e. only nmrpc and
not nmrpc.chemistry.university.com
135
136
Network configuration
lowing chapter can be used for checking the configuration.
10.7.1 Configuration of the spectrometer networkINDEX
1
1. Click <red hat> → System Settings
DONE→ Network
INDEX
a window Query will appear and asks for the root password
• enter root password
2. A window Network Configuration will appear
• click on eth1 which is the ethernet card you have to use for the spectrometer
network connection and click Edit
1. The shell command for starting the network configuration is:
redhat-config-network or simply neat
Network configuration
137
3. A window Ethernet Device will appear
INDEX
INDEX
DONE
• be sure that the field Activate Interface at boot time is checked1
• be sure that the field Allow any user to (de)activate interface is not
checked
• select the field:
Statically set IP address
and enter in the field:
Address:
149.236.99.1
and in the field:
Subnet Mask:
255.255.255.0
• click OK
k) In the window Network Configuration click on the tab pane Hosts2
1. On notebooks it might be useful to disable the Activate Interface at boot time function. This
will avoid waiting for time outs during boot process, if there is no network connection.
2. This information is stored in the file /etc/hosts
138
Network configuration
• be sure that there are the following entries:
IP
Name
149.236.99.1
DONE
ASP_ST2
149.236.99.99
spect
INDEX
Nickname
INDEX <whatever>
<whatever>
If one of them is missing click New → Add and create it
• click File → Save
• click File → Quit
10.8 Nameserver configuration
In case there are some problems with the network, e.g. the name server is not available, everything on the desktop seems not to react anymore. In fact any activity
takes a very long time.
The reason for this could be that DNS resolver does not work anymore due to network problems. To check this press the buttons Ctrl-Alt-F1, login as root and enter
the command host <ENTER_NAME_OF_YOUR_PC>. If the answer is something like:
;;connection timed out no servers could be reached
the PC has lost the name server connection.
To make sure that the PC will not as easily run again into such trouble enable caching name services. ‚nscd‘ is the necessary package is which is typically installed.
To enable nscd do the following:
1. Open a Linux shell
2. Type in su - to become superuser
3. Enter the command: chkconfig nscd on
If this does not work you have to install the nscd package, this can be done either
with the command up2date nscd or by installing it from the Red Hat CD. For more
details about installing packages see chapter 9.3.
After installing the package you should configure the caching delay. For this edit
Network configuration
139
the file /etc/nscd.conf and search for the line:
positive-time-to-life hosts 3600
INDEX
Change the value to:
INDEX
DONE
positive-time-to-life hosts 260000
This will remember the name for about three days (~a weekend).
This information is also available form the Bruker Knowledge Base item 5762:
http://www.bruker-biospin.de/shell/bkb/show_bug.cgi?id=5762
10.9 Network diagnostic commands
Here is a list of the most important network diagnostic commands as they can be
entered from the shell:
• arp - displays or modifies the IP to physical address translation tables
• hostname - displays the short name of the current host
• hostname -f - displays the full qualified name of the current host
• host IP - displays the name that is connected with this IP
• ifconfig - displays information about the current TCP/IP configuration
• netstat - displays protocol statistics and current TCP/IP connections
• ping - checks if a destination host is receiving TCP/IP packets
• route - maintains and displays routing tables
• traceroute - displays the route, packets take to a destination host
• mii-tool - list all ethernet cards and show if they work or not
For more details about commands you can enter either:
man <command>
or
<command> --help
140
Network configuration
10.10 Accessing remote files and directories
INDEX
10.10.1 Necessary Samba packages and configurations
DONE
INDEX
To use samba it is necessary to install at the package smb and for the graphical configuration the package smb-swat. To allow access and configuration both packages
must be enabled. To check this open a shell, login as root with the command
‚su -‘ and enter:
chkconfig --list smb
Typically the service is off and the answer is something like this:
smb
0:off 1:off 2:off 3:off 4:off 5:off 6:off
chkconfig --list swat
Typically the service is off and the answer is something like this:
swat
off
To turn on these services enter
chkconfig smb on
and
service smb start
and
chkconfig swat on
For more details about the commands chkconfig and service see chapter 9.4
10.10.2 Sharing directories from a Linux host using Samba
If you are logged in on a Windows 2000/XP host, you can access data which reside
on a Linux host, using the sharing mechanism. This, however, only works if the
Samba package is installed on the Linux host (see chapter 15.3).
After installation of Samba is done, you can configure it with SWAT (Samba Web
Administration). This tool can be started from your Web Browser, e.g.:
<red hat> → Internet → Firefox Web Browser
by entering the address: http://localhost:901/
Network configuration
141
You will be asked for username and password. For configuration of SWAT it is
necessary to login as root. Other users are neither able to see the whole information
nor can change INDEX
it!
INDEX
DONE
There you have to define:
• the password and the user for configuration in the Password section
• the workgroup in the GLOBALS section
• the directories you want to share in the SHARES section
After configuration reboot the PC
10.10.3 Mounting Windows 2000/XP partitions on a Linux host using Samba
This is more convenient than mounting via NFS because you do not need to have a
NFS package installed on the Windows PC. The only thing that you need is the
Samba package for the Linux PC, which is available on the Red Hat CDs.
To define a mounted directory you have to gather the following information:
1. Check a valid user and the name of the Windows PC and get the information
which directories are available (=shared), enter the command:
smbclient -L <WIN_PVC_NAME> -U <WIN_PC_USER>
for example for the Windows PC nmrpc.chemistry.university.com and the user
142
Network configuration
Administrator the command looks like this:
smbclient -L nmrpc.chemistry.university.com -U Administrator
You will be asked to enter the users password.INDEX
The answer of the command is a
list of all shared directories on DONE
the Windows PC,
e.g.:
INDEX
Sharename
Type
Coment
----------
-----
-------
E$
Disk
Default share
tmp
Disk
now you have four information available
a) <WIN_PC_NAME>
b) <WIN_PC_USER_NAME>
c) <WIN_PC_USER_NAME_PASSWORD>
d) <WIN_PC_SHARE>
2. Create a group called nmruser and add those user who should get access into
the shared directory. To get information how to create a group please refer to
chapter 8.1
3. As a second step you have to define the directory wherein the contents of the
shared Windows directory should appear. It is recommended to create therefor a
new directory:
mkdir <WIN_PC_DATA_DIR>
4. To allow an automatic mount of the directory of the Windows PC during boot
of the Linux PC you have to create a text file (= <FILEX>) with the information of the user name and corresponding password. The syntax of the file has to
be:
username = <WIN_PC_USER_NAME>
password = <WIN_PC_USER_NAME_PASSWORD>
Because the file contains a plain password, you have to make sure that it is only
readable by root. You can do this as root on a LINUX shell with the two commands:
chown root.root <FILEX>
chmod 600 <FILEX>
Now you can put together the information and add a new line in the file
/etc/fstab:
Network configuration
143
//<WIN_PC_NAME>/<WIN_PC_SHARE>
/<WIN_PC_DATA_DIR>
smbfs
rw,gid=nmruser,dmask=775,credentials=<FILEX>,user 1 2
This is one INDEX
line between smbfs and rw is a space. The option gid=nmruser,dmask=775 gives full control to the user and the group, others get read and
INDEX
DONE
execute.
10.10.4 Mounting Windows 2000/XP partitions from a Linux host using NFS
This requires that the NFS server is installed on the Windows PC. If this PC is controlling a spectrometer, the Hummingbird NFS Server is already installed. The partition C:\Bruker\Diskless\clients\spect is mounted via NFS by the
spectrometer CCU (which is a UNIX host). In the same way, you can mount any
Windows 2000/XP partition or directory on any UNIX or Linux host. Proceed as
follows:
1. Export the Windows 2000/XP partition as described in Installation Guide for
Windows XP.
2. On the Linux host:
a)
b)
c)
d)
Open a shell
Type su to become superuser
Create a mount directory, e.g. mkdir /ntdata
mount the partition, e.g.:
mount nthost:/c/data /ntdata
Note that if the pathname on the Windows 2000/XP host contains upper case
letters, these must also be specified with the mount command.
10.10.5 FTP and Telnet
The security level of ftp and telnet are not very high. Because of this, these services are not installed on a typical RED HAT ENTERPRISE LINUX WS 4 installation.
The modern and secure alternative is SSH.
If you want to install ftp and telnet services see chapter 15.3
144
Network configuration
INDEX
DONE
INDEX
Installing a Printer
145
Chapter 11
INDEX
INDEX
DONE
Installing
a Printer
11.1 Introduction
In the following you can found the description of the print system ‚CUPS‘. In RED
HAT ENTERPRISE LINUX WS 4 CUPS is the only print system, the older ‚LPRng‘ is
not available anymore.
11.2 Print system ‚CUPS‘ 1
11.2.1 Installation of a Local printer
In order to install a Local printer on a Linux PC, you have to take the following
steps:
1. Click <red hat> → System Settings → Printing
A window Query will appear and asks for the root password
1. To define the default printer of the system root can also execute the command:
lpadmin -d <printer_name>
To define a user specific default printer the user has to execute the command:
lpoptions -d <printer_name>
146
Installing a Printer
• enter root password
2. The window Printer configuration will appear
INDEX
DONE
INDEX
• Click New
3. A window Add a new Print Queue will appear
• Click Forward
Installing a Printer
147
4. The window changes to Queue name
INDEX
INDEX
DONE
Enter name and short description of the printer (in this example printer-nmr3
and HP printer on NMR-3)
• Click Forward
5. The window changes to Queue type
Select Locally-connected and the port where the printer is connected (in this example /dev/lp0)
• Click Forward
148
Installing a Printer
6. The window changes to Printer model
INDEX
DONE
INDEX
Select the manufacturer and the model of the printer in this example HP Laser
Jet 1220)
• Click Forward
7. The window changes to Finish, and create the new print queue
• Click Apply
Installing a Printer
149
8. The new window Question appears
INDEX
INDEX
DONE
In case the printer is already connected it is recommended to print a test page
• Click Yes
If it is not connected so far, click on No and back in the window Printer configuration on Apply
9. To configure the printer click on its name and on Edit
150
Installing a Printer
10. The new window Edit a print queue appears
INDEX
DONE
INDEX
11. To change the driver click on the tab pane Printer driver
If there are several printer drivers, ‚Postscript‘ is always a good choice, and the
old ‚ljet4‘ works also in most cases very well)
12. Click OK and back in the window Printer configuration on Apply
13. The printer is ready to use
Installing a Printer
151
11.2.2 Installation of a Unix network printer
In order to install a Unix network printer on a Linux PC, you have to take the following steps: INDEX
INDEX
1. Click <red hat>
→ System DONE
Settings → Printing
A window Query will appear and asks for the root password
• enter root password
2. The window Printer configuration will appear
• Click New
3. A window Add a new Print Queue will appear
• Click Forward
152
Installing a Printer
4. The window changes to Queue name
INDEX
DONE
INDEX
Enter name and short description of the printer (in this example printer-nmr3
and HP printer on NMR-3)
• Click Forward
5. The window changes to Queue type
Select Networked UNIX (LPD) and enter the hostname/IP address1 and the
queue of the printer (in this example viola.software.bruker.de and laserjet1200)
• Click Forward
1. You can enter either a name or a IP address of the printer. Everything will work what can be
used for a successfully ping to the respective PC
Installing a Printer
153
6. The window changes to Printer model
INDEX
INDEX
DONE
Select the manufacturer and the model of the printer in this example HP Laser
Jet 1220)
• Click Forward
7. The window changes to Finish, and create the new print queue
• Click Apply
154
Installing a Printer
8. The new window Question appears
INDEX
DONE
INDEX
In case the printer is already connected it is recommended to print a test page
• Click Yes
If it is not connected so far, click on No and back in the window Printer configuration on Apply
9. To configure the printer click on its name and on Edit
Installing a Printer
155
10. The new window Edit a print queue appears
INDEX
INDEX
DONE
11. To change the driver click on the tab pane Printer driver
If there are several printer drivers, ‚Postscript‘ is always a good choice, and the
old ‚ljet4‘ works also in most cases very well)
12. Click OK and back in the window Printer configuration on Apply
13. The printer is ready to use
156
Installing a Printer
11.2.3 Installation of a Windows network printer
In order to install a Windows network printer on a Linux PC, you have to take the
INDEX
following steps:
DONE→ Printing
INDEX
1. Click <red hat> → System Settings
A window Query will appear and asks for the root password
• enter root password
2. The window Printer configuration will appear
• Click New
3. A window Add a new Print Queue will appear
• Click Forward
4. The window changes to Queue name
Enter name and short description of the printer (in this example printer-nmr3
and HP printer on NMR-3)
• Click Forward
5. The window changes to Queue type
Select Networked Windows (SMB) and the required shared printer from the list.
You will see all printers that are reachable without username and password. If
the required printer is not in the list, ...
• Click Specify
157
The window Authentication appears, enter all entries manually
.. if it is on the list, click on the entry and the window Authentication will appear
with those information that are available. Fill in the missing information about
the user name and password.
• Click Forward
6. The window changes to Printer model
Select the manufacturer and the model of the printer
• Click Forward
7. The window changes to Finish, and create the new print queue
• Click Apply
8. The new window Question appears
In case the printer is already connected it is recommended to print a test page
• Click Yes
If it is not connected so far, click on No and back in the window Printer configuration on Apply
9. To configure the printer click on its name and on Edit
159
160
Installing a Printer
10. The new window Edit a print queue appears
INDEX
DONE
INDEX
11. To change the driver click on the tab pane Printer driver
If there are several printer drivers, ‚Postscript‘ is always a good choice, and the
old ‚ljet4‘ works also in most cases very well)
12. Click OK and back in the window Printer configuration on Apply
13. The printer is ready to use
Installing a Printer
161
11.2.4 Installation of a Jet Direct printer
In order to install a Jet Direct printer on a Linux PC, you have to take the following
INDEX
steps:
INDEX
1. Click <red hat>
→ System DONE
Settings → Printing
A window Query will appear and asks for the root password
• enter root password
2. The window Printer configuration will appear
• Click New
3. A window Add a new Print Queue will appear
• Click Forward
162
Installing a Printer
4. The window changes to Queue name
INDEX
DONE
INDEX
Enter name and short description of the printer (in this example printer-nmr3
and HP printer on NMR-3)
• Click Forward
5. The window changes to Queue type
Select Networked JetDirect and enter name and port of the printer (in this example printersw and 9100
• Click Forward
Installing a Printer
163
6. The window changes to Printer model
Select the manufacturer and the model of the printer in this example HP Laser
Jet 1220) INDEX
INDEX
DONE
• Click Forward
7. The window changes to Finish, and create the new print queue
• Click Apply
164
Installing a Printer
8. The new window Question appears
INDEX
DONE
INDEX
In case the printer is already connected it is recommended to print a test page
• Click Yes
If it is not connected so far, click on No and back in the window Printer configuration on Apply
9. To configure the printer click on its name and on Edit
Installing a Printer
165
10. The new window Edit a print queue appears
INDEX
INDEX
DONE
11. To change the driver click on the tab pane Printer driver
If there are several printer drivers, ‚Postscript‘ is always a good choice, and the
old ‚ljet4‘ works also in most cases very well)
12. Click OK and back in the window Printer configuration on Apply
13. The printer is ready to use
166
Installing a Printer
INDEX
DONE
INDEX
Installing a Printer
167
Part III
INDEX
INDEX
DONE
Tips,
Tricks
and
Troubleshooting
168
Installing a Printer
INDEX
DONE
INDEX
Troubleshooting TopSpin
169
Chapter 12
INDEX
INDEX
DONE
Troubleshooting
TopSpin
12.1 TopSpin does not start
If TOPSPIN does not start, you should first look for an error message in the window
where the TOPSPIN startup messages appear. Then check if you have one of the
following problems:
• A window Choose Server or File appears:
The file license.dat was not found. You might have one of the following
problems:
license.dat has been deleted or renamed
→ Setup the file license.dat as described in chapter 5.2.
• Invalid license key (inconsistent license key)
The file license.dat might contain one of the following errors:
• The FEATURE line contains the wrong license key, the wrong date
and/or the wrong number of licenses
• The hostid is appended at the end of the FEATURE line
• Invalid host
170
Troubleshooting TopSpin
• The file license.dat contains additional characters at the end of the
FEATURE line (after ““)
INDEX see chapter 5.2.
• For some more information about license problems
• If you do not get the licenseDONE
to run:
INDEX
Open a shell and execute:
/bin/sh flexlm_diagnostic /tmp/flexlm_diagnostic-out.txt
The scripts may require 1 minute to execute.
Please send the whole output of the TOPSPIN start window using
copy&paste and the file /tmp/flexlm_diagnostic-out.txt to:
[email protected]
12.2 TopSpin troubleshooting
If your current TOPSPIN session has a problem, you can find in this chapter some
instructions how to get rid of this situation.
In order to stop TOPSPIN in case of any problems, the first thing to know is, that it
is using a client / server structure. It is possible to start more than one client. This
feature is used for the remote control but can also be very useful for troubleshooting!
• The client can be stopped without touching a running acquisition.
To get rid of a TOPSPIN problems follow the description below. These steps are
increasingly drastic. Please note that this procedure is only necessary in case of
any problems as TopSpin does not react anymore.
1. Create debug information and send it to Bruker. For this follow the instructions
in chapter 12.2.1
2. Open a Linux shell and start a second TOPSPIN graphical user interface with the
command:
<TOPSPIN_HOME>/topspin -client
<TOPSPIN_HOME> is the TOPSPIN installation directory, in a default installa-
tion this is /opt/topspin
Does the second TOPSPIN graphical user interface works fine?
• Yes? The problem is solved you can go ahead with TOPSPIN.
Troubleshooting TopSpin
171
Although you can now work with TopSpin you should restart the program as soon as possible. Typically wait until the current acquisition is
finished,
then exit and restart TopSpin.
INDEX
• No? go ahead with next step
INDEX
DONE
3. To kill the current TOPSPIN session completely, execute the shell command:
killtopspin
Note, that this will stop your TOPSPIN session and therefore also a running acquisition.
4. Start TOPSPIN and go on working.
12.2.1 Send debug information to Bruker BioSpin
If you are in a situation, that TOPSPIN problems appear periodically please send
information about this to Bruker BioSpin. For a successful and fast processing of
incoming emails please make sure that the following information is given:
1. Use TOPSPIN command about to get the information about:
• version number
• Server patchlevel
• GUI build number
2. Operating system information
• kernel version (shell command uname -r)
• operating system version
(shell command more /etc/redhat-release)
3. If the PC is sued for acquisition control add the Bruker BioSpin order number
of the spectrometer.
4. A detailed description how to reproduce the problem
5. TOPSPIN internal debug files. To get these files do the following:
Go into the Linux shell where TOPSPIN was started, maximize the window and
then press the keys Ctrl and Backslash (‚\‘) simultaneously. This will create a
debug output within the shell. To mark the whole text, click with the left mouse
button at the end of the text, keep the mouse pressed and move it up until you
reached the beginning of the text. Click on Edit - Copy. Now enter the command:
nedit <TOPSPIN_HOME>/prog/curdir/<USER_NAME>/stack.txt
<TOPSPIN_HOME> is the TOPSPIN installation directory, in a default installation
172
Troubleshooting TopSpin
this is /opt/topspin
The nedit window will appear and you will be asked if you want to create a new
INDEX
file. Select New File and in the main nedit window:
• click on File → Paste
DONE
INDEX
• click on File → Save
• click on File → Exit
Now it is necessary to pack all available information which Bruker needs to analyze your problem. For this open a shell and execute the following two commands:
cd <TOPSPIN_HOME>/prog/curdir/<USER_NAME>
tar cvzf /tmp/bug.tar.gz * ~/.topspin-<NAME_of_PC>/prop/protocol*
Please attach the file /tmp/bug.tar.gz into an email and send it to this address:
[email protected]
If the filesize is too big you can also put it on the german Bruker BioSpin ftp
server:
ftp://ftp.bruker.de
You have to login with the user name ftp and your email address as password. Now
you are authorized to put files into the directory ‚incoming‘ (or to get files from the
directory ‚outgoing‘). When you have uploaded files into ‚incoming‘ send an email
to
[email protected]
with the information described above and a list of files you have uploaded onto the
ftp server.
12.3 Communication problems between PC and Spectrometer
If the acquisition (zg, gs, wobb) and/or configuration (cf) fails, you might have
a communication problem between the Linux PC and the spectrometer.
Different spectrometer hardware requires different troubleshooting procedures. To
find out which spectrometer do you have, check which combination of the follow-
Troubleshooting TopSpin
173
ing boards are present in your spectrometer.
name
specific boards
Troubleshooting information
AVANCE (AV)
CCU-RCU
chapter 12.3.1
INDEX
INDEX
AVANVCE-II
DONE
CCU-DRU
AVANCE-III
IPSO-DRU
chapter 12.3.1
chapter 12.3.2
For a convenient classification the respective boards are shown below. Note, the
pictures are just an example, e.g. the EC level can be different.
?
For troubleshooting
information go to
chapter 12.3.1
Do I have an AV type spectrometer?
Yes, if you have the two boards:
CCU
and
RCU
174
Troubleshooting TopSpin
?
Do I have an AV-II type spectrometer?
Yes, if you have the two boards:
CCU
DONE
INDEX
andINDEX
DRU
For troubleshooting
information go to
chapter 12.3.1
?
Do I have an AV-III type spectrometer?
Yes, if you have the two boards:
IPSO
and
For troubleshooting information go to chapter 12.3.2
DRU
Troubleshooting TopSpin
175
Note that CCU, RCU and DRU have an upright orientation while the Ipso board is
typically horizontally orientated.
In all cases the INDEX
first step of troubleshooting should be to check if the spectrometer
is on power andINDEX
there is a physical
network connection between the Linux PC and
DONE
the spectrometer.
12.3.1 Troubleshooting for AV and AV-II type of spectrometer
First of all it is necessary to check the communication between the PC and the
CCU. This can be done in the following way:
a) Open a shell
b) Type telnet spect
Depending on whether telnet spect works (you get a login prompt) or
not, continue with paragraph 12.3.1.1 or 12.3.1.2.
12.3.1.1 Communication problems but telnet spect works
If telnet spect works, the CCU has booted. This means that the spectrometer
network software is installed and running. The communication problems obviously have other causes. Two of the most common causes are mentioned below.
In each of the following steps you must be logged in on the PC as root and type the
indicated commands in a shell.
1. Check if the process startd is running on the CCU:
a) Type telnet spect and log in on the CCU as root
b) Type ps -efw| grep startd
Does this command show you 2 processes /etc/startd?
YES? Then startd is running, type exit, go to step 2
NO? Then you found the problem, go to step 1c.
c) Type /etc/startd
Trying to start startd in this way might show you the reason why startd was
not started automatically. You might have a hardware problem and starting
the startd manually indicates which board has a failure. Run the corresponding hardware test (see chapter 12.7.1).
2. Check the list of PC names in the file /etc/resolv.conf.
176
Troubleshooting TopSpin
Every entry in this file must be correct, otherwise there will be time-outs in network traffic which interfere with the connection to the spectrometer.
INDEX
3. Check if the spectrometer has an alias name
which is not specified in
/etc/hosts:
DONE
INDEX
a) Type cd /<TOPSPIN_HOME>/conf/instr
<TOPSPIN_HOME> is the directory where TOPSPIN is installed (default is
/opt/topspin)
b) Type more curinst
What is the output of this command?
• spect? Then the spectrometer does not have an alias name
• different from spect, e.g. av600? Then do the following:
type grep spect /etc/hosts
What is the output of this command?
149.236.99.99 spect av600? Then the alias name is specified
149.236.99.99 spect? Then you found the problem, go to c)
c) Edit the file /etc/hosts:
append the alias name, e.g. av600 after spect
If these two steps did not solve your problem, copy the contents of the two history
files into an email to your local Bruker BioSpin office. Where do you can find the
files, can be seen by entering the command hist in TOPSPIN. These files contain
the necessary information:
<TOPSPIN_HOME>/prog/curdir/<USER_NAME>/history
<TOPSPIN_HOME>/prog/curdir/<USER_NAME>/history_j.txt
12.3.1.2 Communication problems and telnet spect does not work
If telnet spect does not work, the CCU has probably not booted up completely. This can have several causes, either software or hardware related. The following information describe software related problems.
In each of the following steps you must be logged in on the PC as root and type the
indicated commands in a shell. After each step, type telnet spect and see if
you get a login prompt.
Troubleshooting TopSpin
177
1. Open a Linux shell and become superuser; type su 2. Check if there are firewall rules that prohibit to contact the spectrometer
INDEX
a) go to the directory /etc/sysconfig
INDEX
DONE
• cd /etc/sysconfig
b) what is the configuration of iptables1
• iptables -L
Did you get a information that contains three times (policy ACCEPT)?
• Yes ? No problem, go to step 3
• No, the answer is at great length? go to step c
c) to check if this is the problem it is the best to stop the firewall temporarily.
Note that this can cause security problems. If in doubt please contact your
system administrator. To stop the firewall type in (for more details about the
firewall see chapter 15.2):
• service iptables stop
Check the spectrometer connection once again. Does it work now?
• No ? No problem, go to step 3
• Yes ? You might have found the problem. The system administrator
has to make sure that the ethernet card for spectometer control gets full
access or he has to disable firewall package in general. This can be
done by the command:
chkconfig iptables off
Note: You have to reboot the PC.
3. Reboot the PC and CCU using reviveccu2:
type reviveccu
→ follow the instructions:
a) You will be asked to switch off the acquisition rack
b) reviveccu will automatically reboot the PC
1. If you use the firewall package iptables, you have to make sure that it allows the ethernet card
for spectrometer control full access (see chapter 15.2.1)
2. The command reviveccu executes a shell script which will first remove the two files:
/usr/diskless/clients/spect/root/etc/mtab and .../utmp and then
reboot spectrometer-CCU and Linux-PC.
178
Troubleshooting TopSpin
c) Switch on the acquisition rack after the PC has rebooted
4. Check the nameserver configuration:
INDEX
a) Type grep hosts /etc/nsswitch.conf
What is the output of thisDONE
command? INDEX
Nothing? No problem, go to step 5.
• Cannot open nsswitch.conf ? No problem, no nameserver; go to step 5.
• hosts: files dns nisplus? No problem, this entry is correct; go to step 5
• hosts dns.... or hosts nisplus....? You found the problem: go to step b.
b) Edit the file /etc/nsswitch.conf and check if the line hosts looks
like this: hosts: files dns nisplus
where files refers to the local /etc/hosts file and dns to the DNS
(bind) and nisplus refer to nameservers.
This specifies that network commands like telnet should first check
the local file /etc/hosts then, if the host was not found, contact the
Domain Name System (dns) and finally the Network Information System
(nisplus). The entries dns and nisplus are only useful if you have the corresponding network systems. Make sure the entry files comes first, the existence and the order of entries nisplus and dns depends on your network.
5. Check the list of PC names in the file /etc/resolv.conf.
Every entry in this file must be correct, otherwise there will be time-outs in network traffic which interfere with the connection to the spectrometer.
6. Check if NFS is running:
a) Type ps -efw| grep nfsd
Does the output of this command show you 8 processes /usr/etc/nfsd ?
YES? Then NFS is running, continue with step 8
NO? Then you found the problem, continue with step c
b) Check the file
• /etc/sysconfig/network
Does the file contain the entry
NETWORKING=yes
YES? Then NFS can be started, continue with step 8
NO? Then you found the problem, change the entry to yes and restart NFS
manually. Open a shell and type in:
Troubleshooting TopSpin
179
service nfs restart
c) Type /sbin/chkconfig nfs on
INDEX
d) Type reviveccu
DONE
e) Run step INDEX
5a again and if NFS
is still not running continue with step 7
7. Check if NFS is installed:
a) Type rpm -q nfs-utils
Does the output of this command show you the package nfs-utils?
YES? Then NFS is installed, go to step 8
NO? Then you found the problem, install the package nfs-utils. For a
installation description please refer to chapter 9.3.2
8. Check if the process bfsd is running:
a) Type ps -fC bfsd.linux
Does the output of this command show you the process
/usr/diskless/bfsd.linux
YES? Then bfsd is running, continue with step 9
NO? Then you found the problem, continue with step 8b
b) Check the configuration of bfsd. Correct it if it is wrong.
• type in /sbin/chkconfig --list bfsd and check if the output
show on in runlevel 5, e.g.1:
bfsd
0:off 1:off 2:on
3:on
4:on
5:on
6:off
c) Start the bfsd manually.
• type in service bfsd start
and check if the output of step 8a is correct now. If it is not, go ahead.
d) Check the output of the command hostname
Is the output of this command:
a plain hostname? No problem, continue with step 9.
a hostname.domainname? You found the problem. Change the hostname as described in chapter 10.2. Then continue with step 7h.
1. If a process like this is not started, start it on a shell by typing service <process>
start
180
Troubleshooting TopSpin
e) Check the output of the command hostname -f
Is the output of this command:
INDEX
a hostname.domainname? No problem, continue with step 9.
a plain hostname? You DONE
found the problem.
Change the hostname as deINDEX
scribed in chapter 10.3. Then continue with step 7h.
f) Check the file /etc/hosts1 - at least the following entries have to exist
for spectrometer control:
127.0.0.1
localhost.localdomain
149.236.99.1
ASP_ST2
localhost
149.236.99.99 spect
If the ethernet card for the laboratory network is not configured as DHCP,
also the name of the own PC has to be listed
xyz.xyz.xyz.xyz name_of_own_pc.domain
name_of_own_pc
Does this entry exists?
Yes? No problem, continue with step 9.
No? You found the problem. Add the name of the PC as described in chapter 10.5. Then continue with step 8h.
g) Check if the ethernet card for the laboratory network is configured as DHCP
(see chapter 10.4). If so check if the DHCP server is still active:
• open a Linux shell
• type in su - to become superuser
• type in ifconfig
you will get a description of the configurations of the ethernet cards.
Check the IP address of the PC, this is the number behind inet addr: , typically of eth0
• take the IP address and type in host <IP-address>
is the answer like this:
<IP-address>.in.addr.arpa. domain name pointer <PC-Name.domainname>
Yes? No problem, continue with step 9.
No? You found the problem. Contact your network administrator to check
1. It is also possible to use the graphical tool for checking / configuring the entry, see chapter10.5
Troubleshooting TopSpin
181
the nameserver and DHCP server.
h) Type reviveccu
INDEX
9. Check if the /usr/diskless partitions are exported:
INDEX
DONE -v
a) Type /usr/sbin/exportfs
Does the output of this command show you both partitions with correct options :
/usr/diskless/dl_usr
spect (ro,async,wdelay,root_squash)
and
/usr/diskless/clients/spect
spect (rw,async,wdelay,no_root_squash)
YES? Then the partitions are exported, continue with step 10
NO? Then you found the problem, continue with step 9b
b) Check the file /etc/exports and correct it if it is wrong (see chapter
12.3.1.3)
c) Type reviveccu
10. Check if the spectrometer network is correctly configured:
Please refer to chapter 10.7.1
11. Reconfigure the spectrometer network:
• You can use the automatic procedure which will be started by typing:
/<TOPSPIN_HOME>/prog/bin/install.net/install.net
where <TOPSPIN_HOME> is the directory where TOPSPIN is installed (default /opt/topspin). This command reconfigures the entire spectrometer network.
• You can check it manually, see chapter 10.7
12. Reconfigure the spectrometer network by re-installing the DISKLESS package:
Insert the TOPSPIN DVD into the DVD drive, select the Diskless package and
deselect all other packages. For more details see installation description in chapter 10.7.1
To check if hardware related problems causes the CCU not to boot do the following:
182
Troubleshooting TopSpin
1. Check if the ethernet cable between PC and CCU is properly connected.
→ Remove and re-connect the ethernet cable and the transceiver or minihub.
2. Check if the ethernet interface is broken.
INDEX
INDEX
a) Physically connect the CCUDONE
to the first ethernet
interface (eth0) 1
b) Become superuser; type su c) Change the configurations between eth0 and eth1 as described in chapter
10.5 and 10.7.1.
!
Note: Write down all configuration parameters like IP addresses, nameserver etc.
3. Replace the ethernet cable, transceiver or minihub between the PC and CCU to
find out if either of these components is broken.
4. If a new CCU was installed:
a) login as root
b) Type arp -d spect
c) Type reviveccu
12.3.1.3 File entries made for the spectrometer network
• /etc/hosts
149.236.99.1
149.236.99.99
ASP_ST2
spect
• /etc/bootparams
spect root=ASP_ST2:/usr/diskless/clients/spect/root
swap =ASP_ST2:/usr/diskless/clients/spect/swapfile
dump= ASP_ST2:/usr/diskless/clients/spect/dump
Note that this is one line with a blank between the three entries.
• /etc/exports
/usr/diskless/dl_usr spect(ro)
/usr/diskless/clients/spect spect(rw,no_root_squash)
• /etc/sysconfig/network
NETWORKING=yes
HOSTNAME=hosttest
1. assuming that the CCU is currently connected to the second ethernet interface.
Troubleshooting TopSpin
183
GATEWAYDEV=
GATEWAY=
INDEX
• /etc/sysconfig/network-scripts/ifcfg-lo
DEVICE=loINDEX
DONE
IPADDR=127.0.0.1
NETMASK=255.0.0.0
NETWORK=127.0.0.0
# If you're having problems with gated making 127.0.0.0/8
# a martian, you can change this to something else
# (255.255.255.255, for example)
BROADCAST=127.255.255.255
ONBOOT=yes
NAME=loopback
BOOTPROTO=none
• /etc/sysconfig/network-scripts/ifcfg-eth1
BROADCAST=149.236.99.255
NETWORK=149.236.99.0
NETMASK=255.255.255.0
IPADDR=149.236.99.1
DEVICE=eth1
ONBOOT=yes
BOOTPROTO=none
USERCTL=no
• /usr/diskless/clients/spect/root/etc/fstab
•
ASP_ST2:/usr/diskless/clients/spect/root / nfs rw,bg,hard,retry=3,timeo=20 0 0
ASP_ST2:/usr/diskless/dl_usr /usr nfs ro,bg,hard,retry=3,timeo=20 0 0
ASP_ST2:/usr/diskless/clients/spect/var /var nfs rw,bg,hard,retry=3,timeo=20 0 0
/etc/xinetd.d/bootparamd1
service bootparamd
{
type= RPC
1. If the file is modified you can reload it with the shell command: service xinetd reload
184
Troubleshooting TopSpin
socket_type= dgram
user= root
server= /usr/sbin/rpc.bootparamd
INDEX
wait= yes
INDEX
protocol= udp
DONE
rpc_version= 1
disable= no
instances= 1
log_type= FILE /usr/diskless/bootparamd.log
}
12.3.1.4 Files created for the spectrometer network
• /usr/diskless/clients/spect/swapfile
This file can also be created manually with the command:
dd if=/dev/zero of=/usr/diskless/clients/spect/swapfile bs=8000000 count=1
• /etc/rc2.d/S95bfsd
This file is a symbolic link to the file /etc/init.d/bfsd. From this file the
bfsd daemon /usr/diskless/bfsd is started.
• /usr/diskless/clients/spect/root/dev
This directory contains a large number of special files such as tty00, tty01,
tty02, etc. These files are created during the installation of the DISKLESS
package from the TOPSPIN DVD. They can also be created manually:
a) Become superuser: type su b)cd /usr/diskless/clients/spect/root/dev
c)./MKDEV -m RS3330
12.3.1.5 View the output of the CCU console
In order to view the output of the CCU you must connect serial port 21 of the PC
with tty00 of the CCU, you need a cable with a round rs232 plug on the CCU side
(order number HZ04161/A). The program cu can be used to make the output of the
1. If you connect the cable with serial port 1, you have to use ttyS0 instead of ttyS1
Troubleshooting TopSpin
185
CCU visible in a shell on the PC.
Check if cu is installed:
INDEX
rpm -q uucp
INDEX
DONE
if it is installed and active the answer should be:
uucp-<versions-no>
If it is not installed yet, please refer to the installation description in chapter 9.3.2
In case of any problems with this package check the permissions of the program.
1. Each user who should be able to use the cu command has to be a member of the
group uucp
To add a user into this group proceed as follows:
a) Click <red hat> → System Settings → Users and Groups
b) If you are not logged in as root, a window run as root - KDE su will appear
• enter root password
c) A window KDE User Manager will appear:
• Click on an existing user and click on Properties
d) A window User Properties will appear:
186
Troubleshooting TopSpin
• Click on Groups
INDEX
DONE
INDEX
You will see in the appearing window the field Primary Group that shows the
original group of the user. Leave this entry unchanged, it is not necessary to
modify the primary group, it is enough to define the uucp-group membership
additionally.
• In the field Select the groups that the user will be a member of you can
now scroll to the group uucp and selecting the respective field
• Click OK
2. Type ls -l /dev/ttyS1
The permissions, owner, and group of this file must be: crw-rw-rw-, root and
uucp respectively. If they are different, change them as follows:
chmod a+rw /dev/ttyS1
chown root.uucp /dev/ttyS1
3. Type ls -l /var
The group of the directory lock must be uucp and has to have write permissions. If they are different, change them as follows:
• login as root
• type in:
chgrp uucp /var/lock
• type in:
chmod g+rwx /var/lock
Type /sbin/reboot
Troubleshooting TopSpin
187
12.3.1.6 View/change the prom parameters
1. Open a shell and become root
INDEX
2. Type cu -lttyS1
DONE
→ You will INDEX
get the prompt connected
and you can see the CCU output
messages:
a) Push the reset button of the CCU
b) Press Control-C to interrupt the boot process
The CCU will be in Monitor Mode now, the prompt will change to >>, type:
>> printenv
You will get a list of environment variables, the most important are:
netaddr=149.236.99.99
netmask=0xffffff00
bootfile=bfs()/usr/diskless/clients/spect/root/unix.r4600_std1
bootmode=c
These values must be shown as specified above2. You can set the environment
variables as follows:
>> setenv netaddr 149.236.99.99
>> setenv netmask 0xffffff00
To boot the CCU again, type:
>> u
c) To exit the cu program type:
>> ~.Enter (press the keys: tilde, dot, Enter)
12.3.1.7 Viewing the boot process
When all environment parameters are correct, you can view the boot process and
see where it hangs. This might give you an indication as to what the problem is.
1. For CCU 4-7 the bootfile entry is:
bootfile=bfs()/usr/diskless/clients/spect/root/unix.r3004_std
2. If the netaddr is different, the spectrometer network files must be adjusted. However,
when you install the DISKLESS package the entries are set back to 149.236.99.99 and your
CCU will not boot anymore. Therefore we strongly recommend not to change the netaddr.
188
Troubleshooting TopSpin
1. Open a shell and become root
2. Type cu -lttyS1
INDEX
→ you will get the prompt connected and after typing Enter you can see the
CCU output
DONE
INDEX
3. Push the reset button of the CCU
The CCU will try to boot now. The output of the boot process is listed below.
The marks ‘---?---’ indicate positions where the boot process possibly hangs or
goes into an endless loop:
Autoboot: Waiting to load
bfs()/usr/diskless/clients/spect/root/unix.r4600_std
(CTRL-C to abort)
loading
---1--Obtaining /usr/diskless/clients/spect/root/unix.r4600_std from server c85
851056+115728+824448 entry: 0x80021000
CPU: MIPS R4700 Processor Chip Revision: 1.0
FPU: MIPS R4700 Floating Point Unit [CP1] Revision: 1.0
RISC/os Release 4_52 mips Version UMIPS
Total real memory = 16777216
Available memory = 14356480
---2--Root on nfs file : Swap on nfs file :
---3--hostname: spect
domainname: dummy
---4--Root fstype nfs
Available memory = 12705792
---5--Root on nfs file : Swap on nfs file :
---6--The system is coming up. Please wait.
ASP_ST2:/usr/diskless/clients/spect/var mounted on /var
ASP_ST2:/usr/diskless/dl_usr mounted on /usr
Troubleshooting TopSpin
189
Internet daemons: portmap inetd.
NFS daemons: nfsd biod lockd statd.
The systemINDEX
is ready.
Booting might hang, stop (and print an error message) or go into an endless loop
DONE
at one of theINDEX
positions 1 through
5. This might be caused by one of the problems
mentioned below. Check the indicated files and correct them if necessary or perform the indicated steps.
a) If booting stops at position ---1--- you might have one of the following problems:
• the bfsd is not running; go to 12.3.1.2, step 8
• the DISKLESS packages is not installed; see chapter 12.3.1.2, step 12
• the network is not set up correctly; check the configuration (see chapter
10.7.1)
If the problems above do not exist, please enter the following command in a
shell:
/sbin/arp -a
The output should contain a line like:
spect (149.236.99.99) at a.b.c.d.e.f [ether] on eth1
where a.b.c.d.e.f is a hexadecimal hardware ethernet address of the CCU. The
command arp -a displays all active connections, if there is no spect entry
available, check the network configuration and the ethernet cable.
b) If booting stops at position ---2--- please try the following:
• push the CCU reset button
• type Ctrl-C to interrupt the boot process and enter:
>> setenv bootmode m
>> setenv bootmode c
• push the CCU reset button
c) If booting stops at position ---3--- one of the following problems exist:
• the CCU (hostname spect) is searched for on a nameserver first:
The search order is determined by hosts:
/etc/nsswitch.conf: hosts: files dns nisplus
Make sure the first location to be searched is the local /etc/hosts file
190
Troubleshooting TopSpin
as specified by the entry files as specified above.
• the network is not set up correctly; check /etc/hosts, /etc/bootINDEX
params
• the swapfile does not exist;
check the file
DONE
INDEX
/usr/diskless/clients/spect/swapfile
If the file does not exist please refer to chapter 12.3.1.4
• start of bootparam fails; check if bootparamd is active right now1:
ps -ef | grep bootparamd
Does the answer show the two processes rpc.bootparamd and grep bootparamd?:
Yes? Continue with the troubleshooting list
No? Do the following:
start bootparamd right now:
service bootparamd start
and check what is the general configuration for bootparamd:
/sbin/chkconfig --list bootparamd
If the entry for 5 is off, activate it in general:
/sbin/chkconfig --level 5 bootparamd on
• edit the file /etc/hosts.allow and add the line
ALL: spect
d) If booting stops at position ---4--- one of the following problems exist:
• NFS is not running; see chapter 12.3.1.2, step 5
• diskless partitions are not exported; see chapter 12.3.1.2, step 9
• the network is not set up correctly; check the file /etc/hosts
e) If booting stops at position ---5--- or ---6--- with the following error message please do like described:
mount root ASP_ST2:/usr/diskless/clients/spect/root
1. Note that in case the laboratory network is not active, starting of the bootparamd might fail.
For checking the network you can use the command /sbin/mii-tool. The output shows if the
ethernet cards are connected and working properly
Troubleshooting TopSpin
191
failed, rpc status 15
PANIC: vfs_mountroot: cannot mount root’
INDEX
you had to
check the file (see chapter 12.3.1.3)
/etc/xinetd.d/bootparamd
INDEX
DONE
f) If booting is very slow or hangs at an arbitrary point you might have a hardware problem (see chapter ).
4. To exit the cu program type:
>> ~.Enter (press the keys: tilde, dot, Enter)
12.3.1.8 Running CCU diagnostic tests
1. Open a shell and become root
2. Type cu -lttyS1
→ you will get the prompt connected and you can see the CCU output:
a) Push the reset button of the CCU
b) Press Control-C to interrupt the boot process
The CCU will be in monitor mode now, the prompt will change to >>
>> setenv bootmode m
c) Push the CCU reset button
The CCU diagnostic tests will start automatically. If one or more diagnostic
tests fail, the CCU could be broken. If they are all passed successfully, your
CCU seems to be okay. The bootmode is automatically set back to its normal
value c.
d) To exit the cu program press:
>> ~.Enter (press the keys: tilde, dot, Enter)
12.3.2 Troubleshooting for AV-III type of spectrometer
There are some differences in troubleshooting AV/AV-II and AV-III type of spectrometers. An important difference is, that on AV-III spectrometer is neither telnet spect available nor a nfs server necessary. Several hardware units are
connected via ethernet devices and controlled via a DHCP Server. This server
comes with the Diskless installation of the TOPSPIN DVD. The process is called
dhcpd.
192
Troubleshooting TopSpin
To find out what are the IP addresses of the different (via ethernet connected) hardware units there are two different possibilities:
INDEX
• the TOPSPIN command ha (for hardware addresses)
• the shell command ethernet-service-tools
DONE
INDEX
Both commands offer a list of available (via ethernet connected) hardware units
and their IP addresses. A mouse click on the name of a module opens the start page
of the respective module in a web browser. From there it is easy possible to reset,
test and configure the hardware unit. The firmware download can also be started
from there.
Note that the web pages of the hardware units are optimised for the web browser
Mozilla. Usage of Konqueror might cause problems, especially with firmware
downloads!
12.3.2.1 Communication problems with an AV-III spectrometer
To check if an AV-III is booted correctly you can use the following tests:
1. To check which ethernet connected hardware is available you can use either the
TOPSPIN command ha or the shell command ethernet-service-tools
• TOPSPIN command ha
A window appears that shows several hardware modules. Does the window
offers an entry ‚IPSO‘?
Yes? The AV-III is booted correctly, go on with the TOPSPIN command cf
No? Go to step 2
• Open a shell and enter the command:
ethernet-service-tools
Troubleshooting TopSpin
193
A window appears that shows several hardware modules. Does the window
offers an entry ‚IPSO‘?
INDEX
INDEX
DONE
Yes? The AV-III is booted correctly, go on with the TOPSPIN command cf
No? Go to step 2
2. Check the network configuration with the following commands:
a) Check the output of the command hostname
• open a Linux shell
• type in su - to become superuser
• enter hostname
Is the output of this command:
• a plain hostname like ‚nmrpc‘? No problem, continue with the next step.
• anything else, e.g. ‚nmrpc.chemistry.university.com‘? You found the
problem. Change the hostname as described in chapter 10, reboot the PC
and check if the spectrometer now boots correctly.
b) Check the output of the command hostname -f
• open a Linux shell
• type in su - to become superuser
• enter hostname -f
Is the output of this command:
• a hostname.domainname like ‚nmrpc.chemistry.university.com‘?
No problem, continue with the next step.
• anything else, e.g. ‚nmrpc‘? You found the problem. Change the hostname as described in chapter 10, reboot the PC and check if the spectrometer now boots correctly.
c) Check the file /etc/hosts1 - at least the following entries have to exist
for spectrometer control:
127.0.0.1
localhost.localdomain
149.236.99.1
ASP_ST2
localhost
149.236.99.99 spect
If the ethernet card for the laboratory network is not configured as DHCP,
also the name of the own PC has to be listed
xyz.xyz.xyz.xyz name_of_own_pc.domain
name_of_own_pc
Does this entry exists?
Yes? No problem, continue with the next step.
No? You found the problem. Add the name of the PC as described in chapter 10.5. Then reboot the PC and check if the spectrometer now boots correctly.
d) Check if the hostname and IP address of the PC is correctly available in the
nameserver.
• open a Linux shell
• type in su - to become superuser
• type in hostname -fv
You will get an answer like this:
gethostname()=‘name_of_own_pc‘
Resolving ‘name_of_own_pc‘ ...
Result: h_name=‘name_of_own_pc.domain‘
Result: h_addr_list=149.236.13.65
‘name_of_own_pc.domain‘
• take the IP address listed at h_addr_list and type in the command:
host <IP-address>
is the answer like this:
<IP-address>.in.addr.arpa. domain name pointer <name_of_own_pc.domain>
The answer contains only one line and this line shows the same name
1. It is also possible to use the graphical tool for checking / configuring the entry, see chapter
10.5
which is the answer of the above command hostname -fv
Yes? No problem, continue with the next step.
No? You found the problem. Contact your network administrator to correct the nameserver settings.
3. The firewall may prevent the spectrometer booting. To check this:
• open a Linux shell
• type in su - to become superuser and check what is the configuration of
iptables1 with the command
service iptables status
Did you get a information that contains three times (policy ACCEPT)?
Yes ? No problem, go to next step
No, the answer is at great length? You may have found the problem. To
check this it is the best to stop the firewall temporarily. Note that this
can cause security problems. If in doubt please contact your system
administrator. To stop the firewall type in (for more details about the
firewall see chapter 15.2):
service iptables stop
Check the spectrometer connection once again. Does it work now?
• No ? No problem, go to next step
• Yes ? You might have found the problem. The system administrator
has to make sure that the ethernet card for spectometer control gets full
access or the firewall has to disable in general. This can be done by the
command:
chkconfig iptables off
Note: You have to reboot the PC.
4. The DISKLESS package is not installed. Insert the TOPSPIN DVD into the
DVD drive, select the Diskless package and deselect all other packages. For
more details see installation description in chapter 10.7.1. After installation of
Diskless reboot the spectrometer.
5. Check if the DHCP service is running2. Open a shell and enter the command
1. If you use the firewall package iptables, you have to make sure that it allows the ethernet card
for spectrometer control full access (see chapter 15.2.1)
195
196
Troubleshooting TopSpin
/sbin/service dhcpd status
Is the answer like this:
dhcpd (pid <xxxx>) is running
INDEX
Yes? The DHCP service is running,
go to the next
step
DONE
INDEX
No? You may have found the problem, the DHCP is not running, start it with the
command
service dhcpd start
To make sure that it will automatically started with the next boot, enter the
command
chkconfig --level 2345 dhcpd on
Now you have to reboot the spectrometer.
6. Did the spectrometer booted successfully?
Yes? You have fixed the problem, the DHCP service is now working correctly.
No? Check the status of the DHCP service once again
/sbin/service dhcpd status
Is the answer like this:
dhcpd (pid <xxxx>) is running
Yes? The DHCP service is running, go to the next step
No? You may have found the problem, the DHCP cannot be started.
Check the files /var/log/messages* for any messages like this:
AUG 16 11:34:50 <name_of_PC> dhcpd:
No subnet declaration for eth1 (150.205.205.72).
AUG 16 11:34:50 <name_of_PC> dhcpd:
You must write a subnet declaration for this
AUG 16 11:34:50 <name_of_PC> dhcpd:
subnet. You cannot prevent the DHCP server
AUG 16 11:34:50 <name_of_PC> dhcpd:
from listening on this subnet because your
AUG 16 11:34:50 <name_of_PC> dhcpd:
operating system does not support this capability.
This information shows, that the DHCP server listened to the wrong network
card, because the listed IP address is not the spectrometer IP address
(149.236.99.1). To change this do the following:
2. The DHCP service is a standard Linux package. Configuration and if necessary installation is
automatically done with installation of DISKLESS. Only DHCP requests from eth1, the
spectrometer network card are managed by the DHCP process. This configuration is defined
in the file /etc/sysconfig/dhcpd
Troubleshooting TopSpin
197
• execute /sbin/ifconfig -a
• check what is the name of the network adapter which has the IP address
INDEX
149.236.99.1
• Edit the
file /etc/sysconfig/dhcpd
and replace the line:
INDEX
DONE
DHCPDARGS=eth1
with
DHCPDARGS=<NAME_OF_THE_ADAPTER>
• Save and exit the file
• Start the DHCP server
/sbin/service dhcpd start
Does the spectrometer is able to boot now?
Yes? You have fixed the problem, the DHCP service is now working correctly.
Please note that this fix has to be redone after every DISKLESS installation
No? No problem, go to next step.
7. Check if the tftpd service is running. Open a shell and enter the command
• open a Linux shell
• type in su - to become superuser
• type in chkconfig --list tftp
Is the answer like this:
tftp
on
No? You may have found the problem, the tftpd is not running, start it with the
command
chkconfig tftp on
Now you have to reboot the spectrometer.
Yes? The tftpd service is configured to run, go to the next step
8. Check if the xinetd service is running. Open a shell and enter the command
• open a Linux shell
• type in su - to become superuser
• type in service xinetd status
Is the answer like this:
198
Troubleshooting TopSpin
xinetd (pid <xxxx>) is running ...
No? You may have found the problem, the xinetd is not running, start it with the
INDEX
command
service xinetd start
DONE
INDEX
To make sure that it will automatically started with the next boot, enter the
command
chkconfig --level 345 xinetd on
Now you have to reboot the spectrometer.
Yes? The xinetd service is running, go to the next step
If for whatever reasons the xinetd service can not be started or you are not allowed to start it then start the tftpd manually. This can be done with the command:
/usr/sbin/in.tftpd -l -s /tftpboot
To check if this process is active use the command:
ps -fC in.tftpd
The way you have started this process will keep it running until the next reboot,
then it must be started manually once again.
If these troubleshooting steps do not give any hint on an existing problem, you
might have a hardware problem. Please get in contact with your local Bruker BioSpin office. Addresses of several offices can be found in chapter 17, for contact
information about all Bruker BioSpin office please go to our web server:
http://www.bruker-biospin.de/NMR/about/offices
12.4 General steps that you can try to locate or solve problems
12.4.1 The Bruker BioSpin web server
The Bruker BioSpin web pages contain a large amount of information about
known errors and problems. An easy and powerful tool for everybody is the
Bruker BioSpin Knowledge Base:
http://www.bruker-biospin.de/shell/bkb/index.cgi
Troubleshooting TopSpin
199
For some pages you need an account to enter them. If you do not have one, go to
www.bruker.de and click on Register Now. Fill out the form to get a free account.
INDEX
12.4.2 RED HAT help
INDEX
DONE
• Click <red hat> → Documentation
• Type man <command>, e.g. man find
12.4.3 Checking the history of TOPSPIN
The history function keeps track of all the commands you have entered in TOPSPIN
and of all error messages. This can be very useful if you discuss a problem with
your Bruker BioSpin service or support person.
• Enter hist in TOPSPIN
you will get a window with the information about the two history files and the contents of these files. You can use this window to copy-and-paste error messages into
your email to Bruker BioSpin.
The history files are automatically re-initialized (overwritten) when TOPSPIN is
started and the previous one is store with the extension .old
12.4.4 Rebooting the PC
Rebooting the PC workstation is a quick and efficient way to kill and restart any
hanging processes. Perform the following steps:
1. Check who is logged in; type who
→ warn all users who are logged in that you are going to shutdown the system
2. Shutdown the computer; type /sbin/shutdown1
3. When the computer is down, switch it off; push the power button
4. Switch the computer on, it will boot automatically
12.4.5 Rebooting the PC and the CCU with ‘reviveccu’
If you have any kind of communication problem between the PC and the spectrometer CCU, it is always a good idea to reboot both.
1. To force a file system check after the reboot you can use the command shutdown -r -F now
200
Troubleshooting TopSpin
1. Check who is logged in; type who
→ warn all users who are logged in that you are going to shutdown the system
INDEX
2. Become superuser: type su 3. Type reviveccu
DONE
INDEX
→ follow the instructions:
a) You will be asked to switch off the acquisition rack
b) reviveccu will automatically reboot the PC
c) Switch on the acquisition rack after the PC has rebooted
12.5 Various problems in Linux
12.5.1 The entire screen is frozen
If you have lost mouse control on the entire screen, there are several things you can
do. The following steps are increasingly drastic; perform the next higher step only
if the previous one didn’t help.
1. Press the Escape key: Esc
2. Press the three keys: Ctrl-Alt-F1 simultaneously
• this will open a text console, you may login as root and enter init 3 and
then init 5, if this does not work ...
• ... press the three keys: Ctrl-Alt-Delete simultaneously
→ this will reboot the system
3. If the system is connected to the network, log in as root via ssh from a different
host and type /sbin/reboot
→ this will reboot the PC
4. Push the power button, this is not dangerous in case the Linux system uses an
ext3 file system
Important: before you reboot or shutdown the system, first check who is logged in
if this is still possible: type who.Warn all users who are logged in that you are
going to shutdown the system.
Troubleshooting TopSpin
201
12.5.2 Programs like killtopspin, reviveccu and touser are not found
These programs are delivered with TOPSPIN and are executed by the superuser
INDEX if you become superuser with the command su, the profrom a shell. However,
grams may not be
found. You can
solve this problem in two different ways:
INDEX
DONE
1. Become superuser with the command ‘su -’ or
2. Log out and log in as root
Now the programs shmrm, reviveccu, touser etc. can be typed in from
any directory and will always be found.
12.5.3 Xserver does not start after reboot / not enough disk space available
In case the Xserver does not start after a reboot of the Linux PC, the cause could be
that the harddisk is 100% full. In every user’s home directory there is a file called
.xsession-errors
that could contain a lot of error messages and become very big (xGB!). It is possible to delete this file with the shell command:
rm -rf .xsession-errors
Note: After deleting this file you have to log out to free the reserved disk space.
It is helpful to check these files and of course the core file which are named as
core.<pid> under Linux. To find them, you can use the command:
find / -name core.* -print
12.5.4 You cannot log in as normal user
There are several possible reasons why you cannot login as normal user. First find
out if other normal users can log in. If they can, the problem is user specific:
1. Your password is wrong
2. The hard disk is full. Login in single user mode and remove unwanted files
3. One of your personal setup files is corrupt. Check the files:
• /home/<user>/.desktop-<hostname>/log
• /var/log/messages
202
Troubleshooting TopSpin
12.6 Useful configuration hints
INDEX
In this chapter you can find some useful configurations
of the xorg.conf file.
12.6.1 Definition of the font path
DONE
INDEX
In the file /etc/X11/xorg.conf you can add an information about the location of the fontpath, which make it easier for programs to find the necessary fonts.
E.g. if you have fonts available in /usr/X11R6/lib/X11/rgb
...
Section "Files"
RgbPath"/usr/X11R6/lib/X11/rgb"
FontPath "unix/:7100"
EndSection
...
12.6.2 Increase the swap space
With the description below you can create a second swap file in case you want to
increase the swap size of your system:
1. Open a linux shell
2. Login as root with the command su 3. Enter the command:
dd if=/dev/zero of=/swapfile bs=2097445888 count=1
4. Enter the command:
mkswap /swapfile
5. Enter the command:
swapon /swapfile
6. Check if the creation of the swapfile was successful:
cat /proc/swaps
You should get a three-line answer, e.g.:
Filename
Type
Size
Used
Priority
/dev/hda5
partition
2048720
<xxx>
-1
Troubleshooting TopSpin
/swapfile
203
file
2048726
0
-2
7. To activate the swap file during boot time enter the command:
INDEX
nedit /etc/fstab
and duplicateINDEX
the line that describes
DONE the original swap entry. Change the second
column from swap into /swapfile. Save and close this file.
8. Enter the command:
reboot
12.7 Spectrometer hardware tests
The TOPSPIN DVD contains various programs to test the spectrometer hardware
components.
12.7.1 Spectrometer internal boards
Test programs for spectrometer internal boards like RCU, TCU, FCU etc. are
started on the CCU.
1. Type telnet spect and log in as root
2. Type /u/systest/rcu/rcutest (to test the rcu)
After starting a test, type h to get help or type auto to run a complete test. The
tests for the other boards are started in the same way, just replace the names
accordingly.
204
Troubleshooting TopSpin
INDEX
DONE
INDEX
Important Linux features
205
Chapter 13
INDEX
INDEX
DONE
Important
Linux
features
13.1 Important Commands
13.1.1 rpm
calls the Red Hat package manager which manage the installation of software
packages.
• rpm -q ABC → list version of installed package ABC
• rpm --help → list options and their description for the rpm command
• rpm -qa → list all installed programs
• rpm -Uvh abc → install or upgrade the rpm package abc. This action is
silent and shows #-marks as display of progress
• rpm -Fvh abc → upgrade the rpm package abc. Does not install any new
packages. This action is silent and shows #-marks as display of progress
• rpm -Va → list all files of the default installation which are modified since
the installation
• rpm -qi ABC → list informations of version and installation of package
ABC
• rpm -ql ABC → list informations of installed files of package ABC
206
Important Linux features
13.1.2 cd
INDEX
cd: "change directory"
DONE
INDEX
• cd → change to your home directory
• cd dira → change to directory dira
• cd /u/data/guest/nmr → change to directory /u/data/guest/nmr
• cd dataseta → change to directory /u/data/guest/nmr/dataseta
• cd .. → change to directory /u/data/guest/nmr
• cd ../../usera/nmr → change to directory /u/data/usera/nmr
13.1.3 ls
ls: list the contents of a directory
• ls → list files and subdirectories in current directory
• ls -l → list complete file information
• ls -al → also list files starting with ’.’
• ls -Rl → also list the contents of all subdirectories
• ls -lt or ls -lrt → sort by time of last modification
13.1.4 chmod
chmod: change the permissions of a file or directory
(To understand the permissions and type of access please refer to chapter 14.1)
1. using the character representation: chmod [ugo][+-][rwx] filename
• chmod a+r fila
make fila readable for all users
-r--r--r-- user group 102 Apr 10 12.20 fila
• chmod a+w fila
Important Linux features
207
make fila writable for all users
-rw-rw-rw- user group 102 Apr 10 12.20 fila
INDEX
INDEXfila
• chmod ug+x
DONE
make fila executable for the owner and the group
-rwxrwxrw- user group 102 Apr 10 12.20 fila
• chmod o-w fila
make fila not writable for others
-rwxrwxr-- user group 102 Apr 10 12.20 fila
• chmod -R +w dira
make the directory tree dira, including all files and sub directories, writable
for all users
2. using the numerical representation: chmod xxx filename
• chmod 444 fila
make fila readable for all users
-r--r--r-- user group 102 Apr 10 12.20 fila
• chmod 222 fila
make fila writable for all users
--w--w--w- user group 102 Apr 10 12.20 fila
• chmod 640 fila
make fila read/write for the owner, read for the group
-rw-r----- user group 102 Apr 10 12.20 fila
• chmod 751 fila
208
Important Linux features
make fila read/write/execute for the owner, read/execute for the group and
execute for others
-rwxr-x--x user group 102 AprINDEX
10 12.20 fila
DONE
INDEX
• chmod -R 222 dira
make the directory tree dira, including all files and sub directories, writable
for all users
13.1.5 chown / chgrp
chown /chgrp: change the owner/group of a file or directory. The output of:
ls -l filea or
ls -ld dira shows the result.
• change the owner of the file fila to usera
chown usera fila
-r--r--r-- usera system 102 Apr 10 12.20 fila
• change the group of the file fila to grpa
chgrp grpa fila
-r--r--r-- usera grpa 102 Apr 10 12.20 fila
• change the owner of directory dira to usera
chown usera dira
• change the owner of directory tree dira to usera, including all files and subdirectories
chown -R usera dira
• change the group of directory tree dira to grpa
chgrp -R grpa dira
Important Linux features
209
• set the owner and group of the directory tree dira to usera and grpa
INDEX
chown usera.grpa dira
INDEX
DONE
-rwxr-xr-x
usera grpa
102 Apr 10 12.20 dira
13.1.6 grep
grep: search for a string in a text file and show the lines containing this string
• search for string stringa in the file fila
grep stringa fila
• search for stringa in all files in the current directory
grep stringa *
• search for stringa in all files AND directories in the current directory
grep -r stringa *
• search for stringa in all files which starts with a, b,c or d
grep stringa [a-d] *
• print the lines in fila not containing stringa
grep -v stringa fila
• ignore upper/lower case in stringa
grep -i stringa fila
• search for stringa or stringb in the file filea
grep -i "stringa|stringa" fila
210
Important Linux features
• search for stringa in the output of a command, e.g. ps -ef
ps -efw| grep stringa
13.1.7 find
DONE
INDEX
INDEX
find: search for files and directories in a directory tree
• search for entries (files and directories) called fila in the directory tree dira
find dira -name fila -print
• search for fila on all local partitions, not on NFS mounted partitions
find / -local -name fila -print
• search for entries that start with a
find dira -name "a*" -print
• search for entries not called fila
find dira ! -name fila -print
• search for entries newer than the file fila
find dira -newer fila -print
• search for files bigger than 1000 blocks
find dira -size +1000 -print
• run a Linux command (e.g. rm, lp) on all entries fila
find dira -name fila -exec lp {} \;
for example to delete 2D processed data: 2rr, 2ri, 2ir and 2ii in /opt/topspin:
find /opt/topspin -name "2[ir][ri]" -exec rm {} \;
Important Linux features
13.1.8 ps
211
INDEX
ps: show the Linux
process tableDONE
INDEX
• show all processes
ps -efw
UID PID PPID C STIME TTY TIME COMD
root 0 0 0 14:01:12 ? 0:01 sched
root 1 0 0 14:01:12 ? 0:00 /etc/init
root 164 1 0 14:01:48 ? 0:00 /usr/etc/nfsd 4
root 270 1 0 14:01:56 ? 0:00 /sbin/cron
lp 254 1 0 14:01:54 ? 0:00 /usr/lib/lpsched
root 308 1 0 14:01:58 ? 0:00 /opt/topspin/prog/topspin/bfsd
guest 312 309 0 14:01:59 pts/2 0:00 /opt/topspin/prog/topspin/cpr/cpr
• show all TOPSPIN processes
ps -efw | grep prog
UID
PID
PPID
C STIME TTY TIME COMD
guest 1143 686 0 17:07:14pts/1 0:00 /opt/topspin/prog/cpr/cpr
guest 1151 1143 0 17:07:24 pts/1 0:00 /opt/topspin/prog/mod/go
guest 1149 1143 0 17:07:15 pts/1 0:01 /opt/topspin/prog/cpr/xcpu
guest 1170 1168 0 17:09:42 pts/0 0:00 grep prog
13.1.9 kill
kill: terminate a Linux process
(for a graphic tool use <red hat> → System → KDE System Guard)
• kill processes with PID 1149, 1151 and 1143
kill 1149 1151 1143
212
Important Linux features
• kill directly processes with PID 1149, 1151 and 1143
kill -9 1149 1151 1143
DONE
INDEX
INDEX
Use kill -9 PID only if kill PID does not kill the process!
13.1.10 compress, gzip
compress, gzip, bzip: compression to reduce the size of a file
File compression can be used to:
• save disk space on rarely used files
• reduce network traffic (e.g. rcp, ftp, E-mail)
• compress a file, fila is replaced by fila.Z
compress fila
• uncompress a file, fila.Z is replaced by fila
uncompress fila
• compress a file, fila is replaced by fila.gz
gzip fila
• uncompress a file, fila.gz is replaced by fila
gunzip fila
• compress a file, fila is replaced by fila.gz
bzip2 fila
• uncompress a file, fila.gz is replaced by fila
Important Linux features
213
bunzip2 fila
Some remarks:
INDEX
INDEXdoes not DONE
• Uncompression
require the suffix .Z or .gz
• compression factor depends on the file type (20-70%)
• gzip gives a better reduction in size than compress
13.1.11 tar
tar: This command allows to convert a directory (tree) into a file. This is a convenient tool for attaching many files to an email or transferring them via ftp
• copy the directory-tree dira into the file dira.tar
tar cvf dira.tar dira
• extract fila from dira.tar
tar xvf dira.tar fila
• copy the directory-tree dira into the file dira.tar and compresses (gzip) the file
tar cvzf dira.tar.gz dira
• copy the directory-tree dira into the file dira.tar and compresses (bzip2) the file
tar cvjf dira.tar.bz2 dira
• extract fila from compressed file dira.tar.gz
tar xvzf dira.tar fila
• list the occurrences of fila in dira.tar
tar tvf dira.tar fila
214
Important Linux features
• append filb to the end of the archive
tar rvf dira.tar filb
INDEX
INDEX
• append if fila does not exist in DONE
fila.tar or if it exists
but has been modified
tar uvf dira.tar fila
• you can copy with relative pathnames e.g.
cd /u/data/guest/nmr
tar cvf dataseta
• or with absolute pathnames e.g.
tar cvf /u/data/guest/nmr/dataseta
13.2 Important Files
13.2.1 /etc/shadow
the file /etc/shadow:
• contains the complete password information
• has one line for each user (account) on the system, each line contains 9 fields
separated by colons
• example
root:$1$Oz.sVA5j$yMP3jpXgNTIjLTo6CZ7QK1:11432:0:99999:7:::
bin:*:11432:0:99999:7:::
daemon:*:11432:0:99999:7:::
adm:*:11432:0:99999:7:::
lp:*:11432:0:99999:7:::
sync:*:11432:0:99999:7:::
shutdown:*:11432:0:99999:7:::
halt:*:11432:0:99999:7:::
Important Linux features
215
mail:*:11432:0:99999:7:::
news:*:11432:0:99999:7:::
INDEX
uucp:*:11432:0:99999:7:::
operator:*:11432:0:99999:7:::
INDEX
DONE
games:*:11432:0:99999:7:::
gopher:*:11432:0:99999:7:::
ftp:*:11432:0:99999:7:::
nobody:*:11432:0:99999:7:::
nscd:!!:11432:0:99999:7:::
mailnull:!!:11432:0:99999:7:::
ident:!!:11432:0:99999:7:::
rpc:!!:11432:0:99999:7:::
rpcuser:!!:11432:0:99999:7:::
xfs:!!:11432:0:99999:7:::
gdm:!!:11432:0:99999:7:::
apache:!!:11535:0:99999:7:::
testuser:oaHKvUemEH3TE:11561:0::7:::0
meaning of the fields:
1. Login name
2. Encrypted password
3. Days since Jan 1, 1970 that password was last changed
4. Days before password may be changed
5. Days after password must be changed
6. Days before password is to expire that user is warned
7. Days after password expires that account is disabled
8. Days since Jan 1, 1970 that accoumt is disabled
9. A reserved field
13.2.2 /etc/passwd
the file /etc/passwd:
216
Important Linux features
- contains the complete login account information
- has one line for each user (account) on the system, each line contains 7 fields sepINDEX
arated by colons
DONE
INDEX
example
root:x:0:0:root:/root:/bin/bash
bin:x:1:1:bin:/bin:
daemon:x:2:2:daemon:/sbin:
adm:x:3:4:adm:/var/adm:
lp:x:4:7:lp:/var/spool/lpd:
sync:x:5:0:sync:/sbin:/bin/sync
shutdown:x:6:0:shutdown:/sbin:/sbin/shutdown
halt:x:7:0:halt:/sbin:/sbin/halt
mail:x:8:12:mail:/var/spool/mail:
news:x:9:13:news:/var/spool/news:
uucp:x:10:14:uucp:/var/spool/uucp:
operator:x:11:0:operator:/root:
games:x:12:100:games:/usr/games:
gopher:x:13:30:gopher:/usr/lib/gopher-data:
ftp:x:14:50:FTP User:/home/ftp:
nobody:x:99:99:Nobody:/:
nscd:x:28:28:NSCD Daemon:/:/bin/false
mailnull:x:47:47::/var/spool/mqueue:/dev/null
ident:x:98:98:pident user:/:/bin/false
rpc:x:32:32:Portmapper RPC user:/:/bin/false
rpcuser:x:29:29:RPC Service User:/var/lib/nfs:/bin/false
xfs:x:43:43:X Font Server:/etc/X11/fs:/bin/false
gdm:x:42:42::/home/gdm:/bin/bash
apache:x:48:48:Apache:/var/www:/bin/false
testuser:x:1001:1003:testuser:/home/testuser:/bin/bash
meaning of the fields:
1: Login name
2: password
3: User Id; must be a unique number for each user
4: Group Id; must be a unique number for each group
5: Full Name; the users full name, may contain blanks
6: home directory; usually /home/"user", but can be different
7: shell; must contain full pathname e.g. /bin/sh or /bin/bash
In the field password there are several entries possible:
• the field is empty
Security leak: the user has no password, everybody is able to login on this account
• the field contains an encrypted password
Security leak: the user has a password, everybody is able to read and probably able to decrypt this password
• the field contains: *
There is no password which translates to the encrypted password: *
Nobody is able to login on this account
• the field contains: x (default configuration)
The account has a shadow password. The encrypted password is written in
the file /etc/shadow that is only readable for root (see chapter 13.2.1).
This is the default setting on Red Hat Enterprise Linux WS 3
13.2.3 /etc/group
The file /etc/group
• contains the complete information for groups of login accounts
217
218
Important Linux features
• has one line for each group on the system
Each line contains 4 fields separated by colons:
DONE
INDEX
INDEX
example
root::0:root
users::100:guest,jim
meaning of the fields:
1. the Group Name
2. encrypted group password; usually empty
3. group Id; must be unique for a group and the same on each host
4. the list of users who belong to this group, separated by commas
Why are users divided into groups?
You can share your files with users within your group and protect them from all
other users.
The file /etc/group can only be changed by root.
13.2.4 .bashrc
The file .bashrc:
• sets your personal Linux environment
• is executed every time you log in
• resides in your home directory
• is used in connection with the shells sh and bash
You can edit the file .bashrc and add your personal preferences, e.g.:
• umask 002
Important Linux features
219
• PATH=$PATH:/home/guest
• NMR=/opt/topspin/data/guest/nmr
INDEX
• export PATH NMR
DONE
• 1r() { findINDEX
$@ -name 1r -ls
}
• alias ts=topspin
Now open a new shell:
• umask will be set to 002
• guests home directory is part of the Linux search path
• you can type cd $NMR instead of
cd /opt/topspin/data/guest/nmr
• you can type 1r <dirA> <dirB> for searching all files called 1r in the
in the directory trees dirA and dirB
• you can type ts instead of topspin
Note the difference between NMR, an environment variable and xw, a Linux function.
For csh and tcsh the file .cshrc is used. Note that the setting of environment variables is handled differently.
13.2.5 umask
umask: set the initial permissions for file creation
The initial permissions of a file are set according to:
permission = creation permission - umask
• the creation permissions are:
666 for files created by an editor (e.g. vi, emacs)
777 for an executable program, created by a compiler
• each user can set his own umask, e.g in his .profile or .bashrc 1. For this
it is necessary to add a line like this:
umask 0002
The 4-digit number must start with zero. The following three digits describe the
permissions for the user, group and others.
examples
1. create a file fila, e.g. with vi, for different values of umask
2. show the output of ls -l fila
• umask 000 → permissions 666
-rw-rw-rw- 1 owner group 10 Jun 7 12:20 fila
• umask 002 → permissions 664
-rw-rw-r-- 1 owner group 10 Jun 7 12:20 fila
• umask 024 → permissions 642
-rw-r---w- 1 owner group 10 Jun 7 12:20 fila
• umask 666 → permissions 000
-----------
1 owner group 10 Jun 7 12:20 fila
13.3 Linux shells
A Linux shell:
• is a layer between the operating system and the user.
1. umask can be set for all users in the file /etc/profile and /etc/csh.login (sh and
bash) or /etc/csh.cshrc (csh and tcsh)
• offers the user a way to communicate with the OS.
• is selected upon installation of a new user
Type echo $SHELL to find out which shell you use!
different Linux shells and the files executed during login:
• .profile
sh and bash (also executes .bashrc if it exists)
• .cshrc
csh and tcsh
Important differences between shells 1:
• How do you set environment variables
sh and bash:
1. export variable=value
csh and tcsh:
1.setenv variable value
• tcsh and bash offer history substitution
you can use the arrow keys to repeat and modify previously entered commands.
13.3.1 How to use the bash
• Open a shell and type in commands
• How to repeat a previously entered command
1. use the arrow keys to get a command back
2. hit the Enter key to execute the command again
1. type man sh or man csh for more information on these shells
221
222
Important Linux features
• How to repeat and change a previously entered command
1. use the arrow keys to get a command back
INDEX
2. use the arrow keys to move around in the line
use Control-a to move DONE
to the beginningINDEX
of the line
use Control-e to move to the end of the line
3. change the command according to your needs
4. hit the Enter key to execute the command
• How to search for previously entered commands:
type Control-r and enter a string or keyword to search for the last command
containing that string by typing Control-r again, you can search for earlier
commands containing the same string
• Use <TAB> key for filename/command completition:
Not sure how File or command is written? Just enter the first characters and press
<TAB> key, e.g. :
vi /etc/X11/xo<TAB> -> vi /etc/X11/xorg.conf
• How to set the prompt in the bash
The prompt can be changed by defining the environment variable PS1.
1. type cd to change to your home directory
2. edit (e.g. with vi) the file .profile and set PS1; you can include several
items into the prompt, e.g.:
a) the hostname of the computer:
PS1=’\h’
b) the logname of the user:
PS1=’\u’
c) the current directory:
PS1=’\w’
d) the last part of the current directory:
Important Linux features
223
PS1=’\W’
e) certain characters, e.g.:
INDEX
PS1=hello or PS1=% or PS1=’>’
1
INDEX of the DONE
f) a combinations
items above, e.g.:
PS1=’\h:\w>’
in case of the last example the prompt will look like:
<hostname> : /u/data/guest >
3. save the file and leave the editor
4. log out and log in again to see the effect of the change
The second prompt can be set be defining the variable PS2.
If you want to read the manual pages for the bash, type: man bash
13.4 How to avoid much typing in Linux
13.4.1 General
1. use environment variables, e.g.:
NMR=/opt/topspin/data/usera/nmr
export NMR
these 2 lines can be entered in your file .bashrc
Open a new shell and type cd $NMR to go to the corresponding directory.
2. use Linux functions, e.g.:
data()
{
cd /opt/topspin/data/usera/nmr
}
1. characters which have a special meaning in Linux, e.g. < , >, \ , and ; must be quoted
224
Important Linux features
this line can be defined in your file .bashrc
Open a new shell and type data to execute the function.
INDEX
3. use copy and paste
DONE
INDEX
mark text by holding the left mouse button down
paste this text somewhere by clicking the middle mouse button
4. use the Linux shells bash or tcsh
• use the arrow keys up/down to repeat and/or modify previously entered
commands
• use the Tab key to complete commands and paths
5. use a Linux shell script
They are described in the next chapter 13.4.2.
13.4.2 Linux shell scripts
A shell script executes (a series of) Linux commands:
• is an executable text file
• can contain a series of Linux commands
• can contain control loops and variables
example
1. scripta displays the date, current directory and contents:
edit a file scripta and enter:
date
pwd
ls
make scripta executable: chmod a+x scripta
execute the script by typing ./scripta 1
Important Linux features
225
When executing scripta a possible output is:
Wed Jan 3 03:51:07 PST 1996
/home/guest
scripta
INDEX
INDEX
DONE
fila
Note: the first line of the script should be:
#! /bin/sh
2. scriptb displays the contents of a pulse program:
• edit the file scriptb and enter:
dir=/opt/topspin/exp/stan/nmr/lists/pp
cd $dir
cat $1
$dir = the value of a parameter which is set in the script
$1 = an argument given to the script when it is executed
• make the file executable: chmod +x scriptb
• execute the script by typing its name and argument: ./scriptb zg30
3. Example of a control and loop structure in a shell script: 1
for i in ‘ls *.c‘
(for all files with the extension .c)
do
if grep strn $i
(if the file contains the string strn)
then
rm $i
(remove the file)
fi
done
1. "./" means: the command resides in the current directory. You can skip the "./" if the current
directory is part of the Linux search path. Type echo $PATH to see the Linux search path.
1. For more information on control and loop structures type man sh or man test.
226
Important Linux features
13.4.3 cron - crontab
Any Linux command or program can be executed automatically on a regular basis.
INDEX
check if crond is running: ps -efw| grep crond
DONE
INDEX
if crond is not running: service crond start
create a crontab file using the following syntax:
min hour daymo month daywk command
min: minute (0-59)
hour: hour (0-23)
daymo: day of the month (1-31)
month: month of the year (1-12)
daywk: day of the week (0-6 with 0=Sunday)
command: the command or program to be executed
Suppose you want to:
• backup your data at 4.30 am on Tuesday to Friday
• delete all core files at 2 am on Sunday
Note that the second task needs root permissions.
a) type cd to go to your home directory
b) type su to become root
c) edit the file fila and enter the following lines:
30 04 * * 2-5 tar cv /u/data/<user>/nmr
00 02 * * 0 find / -name core -exec rm {} \;
d) type crontab fila
You can skip step b) if all tasks in your crontab file can be done as normal user.
Type man crontab for more information.
File and directory handling
227
Chapter 14
INDEX
INDEX
DONE
File and
directory
handling
14.1 Permissions and Type of Access
14.1.1 Permissions of a file
The permissions of a file:
• determine what each user can do with the file
• are represented :
• by a set of characters -, r, w and x
or
• by a set of numbers between 0 and 7
1 = x = file is executable
2 = w= file is writable
4 = r = file is readable
The numbers 3, 5, 6 and 7 are combinations of 1,2 and 4:
e.g. 7 = 4 + 2 + 1= rwx
228
File and directory handling
14.1.2 Permissions of a directory
The permissions of a directory are represented as follows:
1 = x = search
2 = w= write
INDEX
DONE
INDEX
4 = r = read
14.1.3 Types of Access
Each file has 3 sets of permissions for 3 categories of users:
• the actual owner (shortened ’u’ like user)
• users who have the same group ID as the owner 1 (shortened ’g’ like group)
• users who have a different group ID than the owner (shortened ’o’ like other)
14.1.4 Example
• Type ls -l filename to see the 3 sets of file permission
e.g. ls -l fila
-rwxrw-r-- 1 jim sys 987 Sep 15 15:08 fila
The permissions of the file fila are 764:
7 = rwx for the user jim
6 = rw- for all users of the group sys
4 = r- - for other users
• Use the command ls -ld to see the directory permissions.
e.g. ls -dl dira
drwxr-xr-- 1 jim sys 987 Sep 15 15:08 dira
1. the group attribute of a file can be changed with chgrp, the permissions of a file always
refer to the group ID which is shown with ls -l filename
File and directory handling
229
The permissions of the directory dira are 754:
INDEX
• everybody can read (= see) the directory dira, e.g. use ls on dira
DONE of the group sys can read and search e.g.
• only the INDEX
owner jim and members
use cd, pwd, ls, cat, more, du, file on or in dira
• only the owner jim can also write or remove files in dira, e.g. use rm, cp,
mv, touch on files in dira
• In the following example the directories dira, dirb and dirc are assumed to be
readable and searchable.
• creating files
If the user guest wants to create the file fila, e.g. :
touch /dira/dirb/dirc/fila
the directory dirc must be writable for guest, the parent directories dirb and
dira do not have to be writable for guest
• removing files
If the user guest wants to remove the file fila, e.g. :
rm /dira/dirb/dirc/fila
the directory dirc must be writeable for guest, the parent directories dirb and
dira do not have to be writable for guest. The file fila can have any permissions, even 000, and any owner or group, you can always remove it if its directory is writable !
230
File and directory handling
INDEX
DONE
INDEX
Useful tools for Red Hat Enterprise Linux WS 4
231
Chapter 15
INDEX
UsefulINDEX
tools DONE
for Red Hat
Enterprise Linux WS 4
This chapter contains a description of some tools we found useful. We realize that
many other tools are available for various purposes and we are very interested in
your experiences. Just send your comments to:
[email protected]
15.1 How to use a memory stick under Linux
In previous Red Hat versions it was not easy to use a USB-memory stick. Under
RED HAT ENTERPRISE LINUX WS 4 this became much more convenient. In this
chapter you can find a description how to add a functionality which identifies one
and also more than one USB stick and pops up a short-cut icon on the desktop for
each device when it is plugged in.
Each Linux PC delivered by Bruker BioSpin Germany is already configured in this
way.
15.1.1 Add an additional Panel
1. Click right on an empty place on the panel (task bar) and select
232
Useful tools for Red Hat Enterprise Linux WS 4
Add → Panel → Child Panel
2. Click right on the main panel and select
Configure Panel
INDEX
DONE
INDEX
3. In the window Configure Panel
go to the tab
Arrangement and select Child
Panel in the field Settings For
4. Define as Position the lower rectangle on the right side, set Length to 5% and
Size to 37 pixels (see picture)
5. Select Main Panel in the field Settings For
6. Define as Position the left rectangle on the bottom, set Length to 97% and Size
to Large and deselect Expand as required to fit content
7. Go to the tab Hiding and select Main Panel in the field Settings For
Useful tools for Red Hat Enterprise Linux WS 4
233
8. Enable:
Allow other windows to cover the panel and
INDEX
Raise when the pointers touches the screen‘s: Bottom Edge
DONE
9. Select ChildINDEX
Panel in the field
Settings For
10. Enable:
Allow other windows to cover the panel and
Raise when the pointers touches the screen‘s: Bottom Right Corner
11. Click OK
12. Click right on the top of the new panel and select:
Add → Applet → Devices
13. Click right on the top of the new panel and select:
Configure Devices
(Note that the respective entry in the context menu only appears if you click on
the top side of the new panel)
14. A window Devices Applet Preferences - Devices will appear
15. In the tab Device Types uncheck all entries and select only:
Mounted Hard Disk Partition
and
Unmounted Hard Disk Partition
16. In the tab Devices deselect all entries
(Note that no memory stick should be connected at this time)
17. Now connect your memory stick
→ a hard disk icon appears in the new panel
18. Click left on the icon and select Open
→ a konqueror window will appear and shows the content of the memory stick
Any sticks which will be connected to the system will appear as seperate icon.
To free a memory stick click left on its icon and select Unmount
234
Useful tools for Red Hat Enterprise Linux WS 4
15.2 Firewall configuration
!
RED HAT ENTERPRISE LINUX WS 4 has a firewallINDEX
package inside. You can activate
and configure it during installation (see chapter 9.1) or in the running system.
DONE
INDEX
Note that for acquisition the ethernet card for spectrometer control has not to be
restricted by the firewall! For this it is strongly recommended to free the ethernet
card after activating the firewall (see below)!
The rules for the firewall, checked and executed during boot time, are stored in the
file1: /etc/sysconfig/iptables-config
The rules in this file are:
• defined during installation (see chapter 9.1)
• added manually (see troubleshooting, chapter 12.3.1.2)
• added manually by using a graphical user interface (see the next chapter)
15.2.1 Firewall configuration
RED HAT ENTERPRISE LINUX WS 4 offers a graphical user interface that allows
you to define some firewall configurations. The following example describes a
firewall configuration that allows SSH traffic on eth0 and frees eth1 completely.
1. Open a Linux shell
2. Become superuser
• su • enter superuser password
3. Type in
• redhat-config-securitylevel
or click on
• SystemSettings → Security level
1. In RED HAT ENTERPRISE LINUX WS 4 there is also another possibility for the firewall
settings: /etc/sysconfig/iptables
Useful tools for Red Hat Enterprise Linux WS 4
a window Security Level Configuration will appear
INDEX
INDEX
DONE
4. Select under Security level the entry Enable firewall
5. Select under Trusted Services the entry SSH
6. Select under Trusted devices the entry eth1
7. The window now looks like this, click on OK
8. The window Warning will appear
Click on Yes
235
236
Useful tools for Red Hat Enterprise Linux WS 4
Now the configuration of the Firewall is finished and your system is protected
right now.
INDEX
Note that this tool described here allows not a very
specific configuration, but it is
useful for a quick and secure setting.
In case youINDEX
like to free another service like
DONE
smb you can use the start command
redhat-config-securitylevel-tui
(note that the securitylevel-tui is one word and contains no space)
A window appears wherein you can define the same rules as above described but
you get an additional field called ‚Other ports‘.
Another useful tool is the freeware guarddog that can be downloaded from:
http://www.simonzone.com/software/guarddog/
All these three ways that were described in this chapter uses the firewall tool of
RED HAT ENTERPRISE LINUX WS 4 iptables. With iptables it is possible to define a
very complex firewall installation.
15.3 Tools for internal communication
If the Linux NMR workstation should be used as server, the following packages
should be installed:
Package
xinetd
telnet-server
vsftpd
rsh-server
samba
samba-swat
on CD
Necessary for
RED HAT ENTERPRISE LINUX WS 4 Operat-
"superserver" for several servers
ing System CD 2 of 4
RED HAT ENTERPRISE LINUX WS 4 Operating System CD 3 of 4
on TopSpin 2.1 Linux CD in /linux/rpm
RED HAT ENTERPRISE LINUX WS 4 Operating System CD 3 of 4
RED HAT ENTERPRISE LINUX WS 4 Operating System CD 2 of 4
RED HAT ENTERPRISE LINUX WS 4 Operating System CD 2 of 4
for telnet logins
for ftp sessions
for rlogin and rsh
to export directories to
Windows
graphical configuration
toll for samba
Useful tools for Red Hat Enterprise Linux WS 4
237
15.3.1 Installation description of an additional package: xinetd1
Other packages are installed similarly
INDEX
1. Check if xinetd is installed so far
INDEX
• rpm -q xinetd
DONE
• is the output like this
xinetd-<version-number>
• Yes? You can skip this chapter
• No? Go to step 2.
2. Insert RED HAT ENTERPRISE LINUX WS 4 Operating System CD 2 of 4
3. Click <red hat> → System Tools → More System Tools → File Manager Super User Mode
4. A window run as root - KDE su will appear
• enter root password
5. A window file:/root - Konqueror will appear
• go to file:/mnt/cdrom/RedHat/RPMS
6. Search for the entry xinetd-<version-number>.i386.rpm
7. Double click xinetd<version-number>.i386.rpm
8. A window Completed System Preparation will appear
• click Continue
9. Close the Konqueror window file:/mnt/cdrom/RedHat/RPMS
10. To eject the CD click right on the CD icon on the desktop and choose eject
15.3.2 Check if all necessary components are installed
To check if all necessary components are installed, please type
/sbin/chkconfig --list
on a shell and if these lines are exists2
1. A detailed description of a software installation is described in chapter 9.3.2
2. If a process like this is not started, start it on a shell by typing /sbin/chkconfig <process> on
238
Useful tools for Red Hat Enterprise Linux WS 4
xinetd
smb
xinetd
0:off 1:off 2:off 3:on 4:on 5:on 6:off
INDEX
0:off 1:off 2:off 3:on 4:on 5:on
6:off
based services: DONE
INDEX
rexec:
on
rlogin:
on
rsh:
on
telnet:
on
vsftpd:
on
swat:
on
15.4 Configure a second monitor
The NVidia graphics cards which are part of the PC equipment delivered by
Bruker BioSpin Germany have two ports (DVI and VGA). Because of this it is
possible to add a second monitor to the system.
The default nvidia config file /etc/X11/xorg.conf contains already the necessary configuration settings as part of the section ‘Screen’. You have just to
remove the ‘#’ at the beginning of the respective lines:
### TWINVIEW SETUP ###
# Option "TwinView"
# Option "TwinViewOrientation" "LeftOf"
# Option "MetaModes" "1280x1024, 1280x1024"
# Option "SecondMonitorHorizSync" "31.0 - 82.0"
# Option "SecondMonitorVertRefresh" "56.0 - 76.0"
# Option "ConnectedMonitor" "CRT, CRT"
If you want to add the same monitor as you have it already, you can just remove
the ‘#’ on the first two lines:
Option "TwinView"
Option "TwinViewOrientation" "LeftOf"
In case of different monitors you have to configure the second one with the available configuration lines.
After you have add the second monitor you can work with the two monitors as it
Useful tools for Red Hat Enterprise Linux WS 4
239
would be only one with a double width. You can either
• stretch the TOPSPIN window over the two monitors simply by clicking on the
border of theINDEX
TOPSPIN window and move the mouse until the window has the
desired size
or
INDEX
DONE
• work with e.g. TOPSPIN on one Monitor and e.g. ICON-NMR on the second
one. Just open the respective windows and move them with mouse to the
desired position.
15.5 Setting up permissions for rsh, rlogin and rcp
The commands rcp, rlogin and rsh1 require special access permissions. There
are two ways to set up these permission.
1. The system administrator can setup up these permission for all users:
a)
b)
c)
d)
Open a shell
Type su to become superuser
cd /etc
Edit the file hosts.allow
Make two entries for every remote host from which access is allowed, e.g.:
sunflower
sunflower.netx.lab.com
2. As a normal user, you can allow remote access from a remote host for yourself:
a) Open a shell
b) Go to your home directory; type cd
c) Edit the file .rhosts
Make two entries for every remote host from which access is allowed, e.g.:
sunflower
sunflower.netx.lab.com
d) chmod 644 .rhosts
1. For installation please see chapter 15.3
240
Useful tools for Red Hat Enterprise Linux WS 4
In both examples sunflower is the hostname and netx.lab.com is the domainname
of the remote host.
To allow rcp, rsh and rlogin network wideINDEX
in all directions, you must setup
the file /etc/hosts.allow orDONE
.rhosts onINDEX
each host.
15.6 Creating a screenshot of the desktop
There are several programs that offer the possibility for creating a screenshot of the
desktop or of individual windows.
• Click on <red hat> → Graphics → KSnapshot
or the program Gimp:
• Open a Linux shell and type in gimp
Inside gimp you has to go to File → Acquire → Screen Shot ...
15.7 Creating an icon on the desktop
For a more convenient using of Red Hat, it is recommended to create icons of frequently used commands on the desktop
15.7.1 Create an icon for opening a pdf file with Acrobat Reader1
1. Click right mouse button on the desktop
• a popup window appears
• choose Create New → File → Link To Application
• a window Properties for Program.desktop will appear
• in section General:
• choose a name for the new icon, e.g. Installation Guide
• click on the icon symbol, in the upcoming window you can choose one
that you enjoy
• in section Application:
1. Note that Acrobat reader might not installed by default on your system. For installation see
chapter 9.3.1
Useful tools for Red Hat Enterprise Linux WS 4
241
• type in the command for opening the manual in a shell:
acroread /opt/topspin/prog/docu/english/xwinproc/pdf/install_guide_linux.pdf
INDEX
(if case
you have installed TOPSPIN in the default directory /opt/topspin)
INDEX
DONE
15.8 Register your Linux system with Red Hat
The license agreement of RED HAT ENTERPRISE LINUX WS 4 demanded to register
the PC to the Red Hat Network service. A description how to register and how to
use the Red Hat Network can be found in the following chapters.
You have to do the activation of the license key first and the registration at Red Hat
Network as a second step!
15.8.1 Activate your Linux license at Red Hat Network
1. Start you web browser
2. Enter the URL
http://redhat.com/now
you will see the following web side
3. If you are not registered so far or you want to use an additional account, click
on
242
Useful tools for Red Hat Enterprise Linux WS 4
• New Log In
4. The window changes to
INDEX
DONE
INDEX
Enter all required information (fields marked with a small red asterisk). At the
bottom of the window click on
• Create Login
5. The window changes to
Useful tools for Red Hat Enterprise Linux WS 4
243
6. In the field Product ID Number enter your license key for RED HAT ENTERPRISE LINUX WS 4
7. The windowINDEX
changes to
INDEX
DONE
8. you have successfully activated your license code, you can now go to next
chapter and register the PC to the Red Hat Network
15.8.2 Register the PC to the Red Hat Network
1. Log in as root
2. Open a Linux shell and enter up2date
3. If you are not registered to Red Hat Network so far, the window Red Hat Network Registration will appear
• Click Register with RHN
244
Useful tools for Red Hat Enterprise Linux WS 4
4. The window Red Hat Network Configuration will appear
INDEX
DONE
INDEX
• Click on the tab pane Retrieval / Installation
5. The window changes to Retrieval / Installation
• Disable the entry
Do not upgrade packages when local configuration file has been modified
• Click on the tab pane Package Exceptions
6. The window changes to Package Exceptions
Useful tools for Red Hat Enterprise Linux WS 4
• Click on the entry kernel and click on Remove
INDEX
INDEX
DONE
• Click OK
7. The window Question will appear
• Click Yes
8. The window Welcome to Red Hat Update Agent will appear
• Click Forward
245
246
Useful tools for Red Hat Enterprise Linux WS 4
9. The window will change to Review the Red Hat Privacy Statement
INDEX
DONE
INDEX
• Click Forward
10. The window will change to Login
Enable Use Existing Account and enter the username and password that you
have specified in chapter 15.8.1
• Click Forward
11. The window will change to Register a System Profile - Hardware
• Click Forward
12. The window will change to Register a System Profile - Packages
• Click Forward
13. The window will change to Send Profile Information to Red Hat Network
• Click Forward
247
248
Useful tools for Red Hat Enterprise Linux WS 4
If you have already activeted your license code as it is described in chapter 15.8.1,
the process will go on with updating your system. Just follow the instructions
given. If you have not done the activation so far,INDEX
the following information window would appear.
DONE
INDEX
15.8.3 Activate the Red Hat Alert Notification Tool
RED HAT ENTERPRISE LINUX WS 4 offers a convenient tool that checks automatically the available security fixes that can be downloaded. If there are any of those
packages available or if the connection to Red Hat Network not working, he shows
a blinking, red exclamation mark at the lower right side of the desktop.
If the system is up-to-date and the connection to the Red Hat Network is fine, it
shows a friendly white hook in a green circle
To activate this tool proceed as follows:
Useful tools for Red Hat Enterprise Linux WS 4
1. Log in as root
2. Click on the Icon at the lower right side of the desktop
INDEX
INDEX
DONE
3. The window Red Hat Network Alert Notification Tool will appear
• Click Forward
4. The window Terms of Service will appear
• Click Forward
249
250
Useful tools for Red Hat Enterprise Linux WS 4
5. The window Proxy Configuration will appear
INDEX
DONE
INDEX
If you use a proxy server enter the required information, if not just leave the
fields empty
• Click Forward
6. The window Configuration Complete will appear
• Click Apply
15.9 The Emergency Recovery DVD
Each PC which is delivered from Bruker BioSpin Germany comes with a Emergency Recovery DVD. This DVD contains an image of the PC and can be used for
restoring the PC. The image contains the installed and preconfigured operating
system and all necessary programs like TOPSPIN. It does not contain any user specific data, like spectrometer configuration, NMR datasets or network configuration.
In case of a harddisk crash, a hacked system, or even a stolen PC it is possible to
get back on a new PC hardware a well working system within 20 minutes. After
restoring the image the last nmr_backup file must be restored and the TOPSPIN
command cf must be executed.
Useful tools for Red Hat Enterprise Linux WS 4
251
More information about nmr_backup and the TOPSPIN command nmr_save
file are available in chapter 6.5
INDEX
15.9.1 Using the Emergency Recovery CD
INDEX
DONE
!
Note:
This should be done by experienced people only! All data currently on the
disk will be destroyed!
If in doubt please contact your system administrator, maybe it is still possible to
get data from the old disk. New harddisk are not expensive therefore using a new
harddisk for restoring an image might be the best solution!
1. Insert the Bruker Emergency Recovery DVD and boot the PC. The window
Image Boot DVD Bruker Biospin will appear.
→ Press F1
2. The Acronis True Image selection window appears
Select Acronis True Image (full version)
Acronis True Image will be started. This will take about 2 minutes.
3. The window Acronis True Image appears.
→ Click on Recovery
4. The window Welcome to the Restore Image Wizard appears.
→ Click on Next
5. In the window Image Archive Selection click on the plus sign left to CD Drive.
Typically this is (D:) or (E:). You will see some directory and disk icons.
→ Click on the first disk icon below the directory icons.
On the right side a short description of the image DVD will appear. Please read
this carefully and make sure that this is the image you like to install on this PC.
6. Click Next in the window Restored Hard Disk Drive Location
7. Select the hard disk on which you want to restore the image. In general you will
have only one hard disk available, so click on this line and then click Next.
8. In the window Verify Archive Before Restoring you can verify the image before
it is used. This would need the same time which is necessary for restoring the
image.
9. In the window Partition or Disk to Restore check the box left to Disk 1 to
restore the complete image.
10. In the window Restore Partitions Resize you now have the possibility to change
the size of individual partitions. This is only necessary e.g. if you use a smaller
hard disk that on which the image was created. So if you use the same disk size
you can check No, I do not want to resize partitions.
→ Click on Next
11. In case the hard disk which you have selected contains already partitions you
must select Yes, I want to delete all the partitions on the destination hard disk
drive before restoring.
→ Click on Next
12. In the window Next Selection select No, I do not because you only want to
restore the image on one hard disk.
→ Click on Next
13. In the last window you will get a summary of the choosen operations. Check if
everything is defined correctly.
→ Click on Proceed
14. Restoring image will then be started. This process will take about 20 minutes.
When it is finished a window will appear with information Image was successfully created.
15.10 An image of the PC
Each PC which is delivered from Bruker BioSpin Germany has a license for the
backup tool Acronis True Image. With this software it is possible to create a oneto-one backup of the harddisk of the system.
It is recommended to periodically create a backup of the harddisk. In case of any
problems (harddisk crash, virus, hacker attack ...) you are able to rebuild the situation of your last backup within a few minutes.
In chapter 15.9 it is described how to use the Bruker Emergency Recovery DVD.
This DVD contains the first image of the PC. If you create periodically a new
image of your PC you will be able to restore a system which is much more up-todate and contain all your individual settings like network configuration, user management, spectrometer configuration etc.
15.10.1 Creating an image
You need a boot-CD to start Acronis True Image, if there is no such CD, you can
install Acronis True Image on a Windows system and create the Bootable Rescue
Media from there. The original Acronis True Image installation CD is usually
bootable.
1. Insert a bootable Acronis True Image CD and boot the PC. The window Acronis True Image appears.
→ Click on Create Image
2. The window Create Image Wizard - Welcome to the Create Image Wizard
appears.
→ Click on Next
3. In the window Create Image Wizard - Selecting Partitions to Image select the
partitions you want to image.
→ Click on Next
4. A window Information appears that informs about the possibility of an incremental image
→ Click on OK
5. The window Create Image Wizard - Image Archive Creation appears. Select the
partition, drive or network drive where you want to store the image. The following steps describe archiving on a network drive
→ Click on Next
Please note that Acronis True Image is able to burn images to DVD with version
9.0 3.633 and higher. Previous versions can only store on CD, harddisks and network drives.
6. The window Create Image Wizard - Creating Image Mode appears. Select
either a full backup or an incremental one. The following steps describe the creation of a full backup.
→ Click on Next
7. The window Create Image Wizard - Image Archive Splitting appears. It is recommended to choose Fixed Size and specify 650 MB. With this size you can
afterwards burn the image files on CD if necessary.
→ Click on Next
253
254
Useful tools for Red Hat Enterprise Linux WS 4
8. The window Create Image Wizard - Compression Level appears, select Maximum.
→ Click on Next
INDEX
9. The window Create Image Wizard
- Image Archive
Protection appears. You can
DONE
INDEX
enter a password to protect your image. If in doubt do not choose a password,
this makes it more save for the restoring of the image.
→ Click on Next
10. The window Create Image Wizard - Image Archive Comments appears. Enter
important information about the current image. This makes it easy in the future
to identify this image.
→ Click on Next
11. The window Create Image Wizard - Imaging operation summary appears.
Check if everything is correct.
→ Click on Proceed
12. Creation of the image will start. This process will take about 20 minutes. When
it is finished a window will appear with information Image was successfully
created.
15.11 Using the DVD/CD-Writer
On the desktop of the Linux PCs delivered by Bruker BioSpin
Germany is an icon called Burn CD/DVD. This icon starts
internally the program /usr/bin/K3b
1. Double click the icon starts K3b. You can open one of the
projects New Audio CD, New Data CD, New Data DVD
and Copy CD in the lower part of the window.
2. When you have choosen a project you can define the files which
should be burned on CD/DVD just by drag&drop from the upper
part of the K3b window to the lower part.
3. When finished click on Burn... button at the lower right corner of
the window.
4. A window will open where you can define several settings like
verify, speed, multisession, permissions, name of the disk etc. Make
sure that everything is correct configured then click on Burn
Useful tools for Red Hat Enterprise Linux WS 4
255
5. When the burning process is finished an information window will appear.
15.12 Add a new INDEX
harddisk
!
INDEX
DONE
NOTE: Using the command fdisk is recommended only for seasoned persons,
because formatting the old harddisk will destroy all data on this disk!
To buy a new harddisk on the Linux PC is quite easy because you can buy a usual
harddisk in a PC store. After installing the new disk you have to do the following:
1. Start the PC
2. Open a shell and become root
3. If the new harddisk is a scsi-disk, type in the command
cat /proc/scsi/scsi
If it is a ide-disk use the command
cat /proc/ide/hdX/model (the X in hdX have to be replaced with the
correct number of the disk, which is a, b, c or d)
4. Does the command show the harddisk which was built in?
• Yes? Go to step 5
• No? There was something wrong during build in, or the harddisk is damaged.
5. Type in the command fdisk -l
the output looks like this :
Device Boot
/dev/sda1*
...
Start
1
End
3
Blocks
24066
Id
4
System
FAT16 <32M
A second harddisk would show upas device ’sdbx’, where x is a number. All Devices sdax are part of harddisk number 1, sdbx of number two and so on.
6. Does the output show the new disk?
• Yes and the partitioning is OK? Go to step 9
• Yes but the partitioning was not done so far? Go to step 7
• No? Go to step 7
7. To partition the new disk, type in the command fdisk /dev/sdb
256
Useful tools for Red Hat Enterprise Linux WS 4
In case you need help just type m and choose the possibility you want
8. After partitioning is done you have to create the filesystem on the new partitions. This can be done with the command INDEX
mkfs /dev/sdbx
DONE
INDEX
where x is the partition you want to configure
9. Now you can add the new harddisk to the file /etc/fstab, open this file
with a text editor and add a line like this
/dev/sdb1
/X
ext2
defaults
12
where /X is an example for the mount point of the new harddisk. Be sure that the
mount point you have choosen exists. If you want to use one that does not exists
so far, you have to create this directory with the command
mkdir X
in case you want to use /X.
10. After reboot of the PC you can mount the new disk with the graphical tool
<red hat> → System → Disk Management
Appendix
257
Chapter 16
INDEX
INDEX
Appendix
DONE
16.1 Some notes for the helium handling
In the TOPSPIN home directory (default is /opt/topspin) in the directory
prog/logfiles are two files named heliumlog and heliumlog.err.
The heliumlog saves the current helium level in a new line every night at 3.00
am. The heliumlog.err documents possible errors during detection of the
helium level.
16.1.1 Automatic notification for helium refill
TOPSPIN is able to send an email notification to a list of defined users if the helium
level is equal or less than a predefined limit.
16.1.1.1 Set minimum limit of helium level
You can define the value of the helium level which should trigger the automatic
notification (see next chapter)
1. Click <red hat> → Editors → Text Editor
2. A window New Document - Text Editor will appear
3. type in the percentage (without ’%’) of the helium level, that should activate the
notification, e.g. 25
258
Appendix
4. Click File → Save as
5. Save the file as heliumlimit in the installation directory of TOPSPIN
INDEX
(default is /opt/topspin) in the subdirectory
conf/instr/<SPECT>
DONE
INDEX
16.1.1.2 Create shell script ’heliumwarn’ for email notification
In this chapter you find an example for the shell script that will be execute the
email notification in case the helium level is less than the entry (in %) in the file
heliumlimit
1. Click <red hat> → Editors → Text Editor
2. A window New Document - Text Editor will appear
3. Copy the following example in the file
#!/bin/sh
# send an email when the helium level is too low
################################################################
#-----------------------# user defined variables:
#-----------------------ADDRESSES="person1@domain person2@domain person3@domain"
INSTRUMENT="spectrometer identification"
MAIL="/usr/bin/mutt"
###############################################################
# no more changes are needed below this point. You may tailor #
# the variable MSG for specific needs though. Be careful!
#
###############################################################
#-----------------------------# catch command line arguments:
#-----------------------------MYSELF=$0
LEVEL=$1
LIMIT=$2
#--------------------------------------# get the name of the spectrometer host:
#--------------------------------------HOST=`hostname -f`
Appendix
259
user=`whoami`
#--------------------------# prepare the
email message:
INDEX
#--------------------------MSG="\n\
INDEX
DONE
Caution:\n\
The magnet of the spectrometer $INSTRUMENT \n\
has an helium level of $LEVEL % \n\
which is less than the limit of $LIMIT %: \n\
Please order liquid helium and refill this magnet.\n\
\n\
This email is automatically send from $MYSELF (user $USER) \n\
on $HOST to:\n\
- $ADDRESSES\n\
"
#----------------# mail the message:
#----------------echo -e $MSG|$MAIL -s "$INSTRUMENT : Helium refill" $ADDRESSES
exit 0
4. Modify the settings of "ADDRESSES" and "INSTRUMENT" and the text in
the example as you like
5. Click File → Save as
6. Go in the installation directory of TOPSPIN (default is /opt/topspin) into
the subdirectory prog/bin and save the file as heliumwarn
Now the defined email addresses will get a notification if the actual helium level
is the same or below the entry (in %) in the file
<TOPSPIN_HOME>/conf/instr/<spect>/heliumlimit
The notifications are sent only once but the procedure will be activated again if
the helium level is again higher than the limit.
Note that this script is only an example, if you would like to add more recipients
to the notification list you had to add the respective addresses, if you like to have
less addresses you have to delete the respective entries.
260
Appendix
16.2 Script for saving important files
TOPSPIN offers a script (xwinnmr.save) for savingINDEX
important files that are not delivered by Bruker BioSpin. This script can save and extract user specific data from
DONE
INDEX
the TOPSPIN_HOME directory and puts them into a tar-file. Files that start with
an "." are ignored. The script can be started as follows:
• Open a Linux shell and enter
<TOPSPIN_HOME>/prog/bin/scripts/ xwinnmr.save
Files and directories will be saved into the special tar-file xwin_backup.tar
which is, by default, in the directory <TOPSPIN_HOME>/xwin_backup.
The xwinnmr.save script saves the same files and directories as the command
nmr_save (see chapter 6.16.5). Nevertheless there are differences between xwinnmr.save and nmr_save. This is because of compatibility reasons with previous
XWIN-NMR installations and corresponding individual scripts that calling the xwinnmr.save script. The differences between these two ways to create a backup are
opposed in the following:
Script name
default directory
name of tar-file
xwinnmr.save
xwin_backup
xwin_backup.tar
nmr_save
nmr_backup
nmr_backup.tar
The options for xwinnmr.save starting from a command prompt are:
xwinnmr.save [-options]
• -help
additional information
• -path <x>
absolute
path
where
backup
xwin_backup.tar will be created
• -restore <x> <y>
absolute
path
where
backup
tar-file
xwin_backup.tar can be found (<x>) and
absolute path where the restoring should take
place (<y>) (installation directory of TOPSPIN)
• -replace
overwrite the old backup.tar file
• -silent
do not display any messages
• -source
absolute path of TOPSPIN/XWIN-NMR installation that should be saved
tar-file
Appendix
261
• -spect <x>
spectrometer name (e.g. spect; default is the current name)
INDEX
• -verbose
print more information while backing up
For safety reasons
the tar-fileDONE
will not be replaced by executing the xwinINDEX
nmr.save script once again. So if you like to use the script several times, you
have to move the xwin_backup.tar file from the directory
<TOPSPIN_HOME>/xwin_backup on a backup medium (floppy, CD, DVD ...)
and then start the script once again or you have to use the ’replace’ option.
16.3 Where Do I Find What?
If you cannot find the required information in this manual, please check the manuals listed below.
Further useful information you can also find in the Release Letter for the respective TOPSPIN version.
• TOPSPIN Users Guide
Window handling, displaying data, interactive data manipulation, user
interface related items
• Acquisition Reference
Description of all acquisition commands, parameters and files.
• Processing Reference
Description of all processing commands, parameters and files.
• AU Reference
How to write AU programs. Description of all AU macros, functions and variables. List of Bruker BioSpin AU programs.
For further manuals please refer to:
• TOPSPIN → Help
• http://www.bruker-biospin.de/NMR/nmrsoftw/passwd/docu
• NMR-GUIDE
262
Appendix
INDEX
DONE
INDEX
Bruker BioSpin addresses
Chapter 17
INDEX
DONE
BrukerINDEX
BioSpin
addresses
Germany
Bruker BioSpin GmbH
Silberstreifen
D-76287 Rheinstetten
Tel: (++49) (721) 51 61 0
Fax: (++49) (721) 51 71 01
Bruker BioSpin Software Department
Silberstreifen
D-76287 Rheinstetten
Tel: (++49) (721) 5161 455
Fax: (++49) (721) 5161 943
http://www.bruker-biospin.de
ftp server: ftp.bruker.de
Email: [email protected] (sales)
[email protected] (service)
[email protected] (application)
[email protected] (software)
[email protected] (licenses)
263
264
Bruker BioSpin addresses
USA
Bruker BioSpin Corporation
15 Fortune Drive
Manning Road
Billerica, MA. 01821-3991DONE
Tel: (++1)(978)
(++1)(978)
Fax: (++1)(978)
(++1)(978)
667
667
667
667
9580
9580
6168
2955
INDEX
INDEX
5195 (center)
5444 (application)
(center)
(application)
http://www.bruker-biospin.com
ftp server: ftp.bruker.com
Email: [email protected]
[email protected]
[email protected]
Switzerland
Bruker BioSpin AG
Industriestraße 26
CH-8117 Fällanden
Tel: (++41)(1) 8 25 91 11
Fax: (++41)(1) 8 25 96 96
web server: www.bruker.ch
E-Mail: [email protected]
[email protected]
France
Bruker BioSpin S.A.
34, rue de l’industrie
F-67166 Wissembourg/Cedex
Tel: (++33)(3) 88 73 68 00
Fax: (++33)(3) 88 73 68 79
web server: www.bruker.fr
E-Mail: [email protected] (customer support)
England
Bruker BioSpin LTD.
Bruker BioSpin addresses
Banner lane
Coventry CV4 9GH
Tel: (++44)(2476)
INDEX 855200
Fax: (++44)(2476) 465317
DONE
web server: INDEX
www.bruker.co.uk
Email:[email protected]
[email protected]
Our webpage
http://www.bruker-biospin.de/NMR/about/offices
provides contact addresses of our facilities and offices worldwide
265
266
Bruker BioSpin addresses
INDEX
DONE
INDEX
Index
Symbols
.bashrc 218
.cshrc 219
.profile 220, 223, 224
.rhosts 239, 240
/etc/bootparams 182, 190
/etc/exports 181, 182
/etc/hosts 176, 178, 182, 189, 190
/etc/hosts.allow 240
/etc/init.d/bfsd 184
/etc/nsswitch.conf 178
/etc/rc2.d/S95bfsd 184
/etc/shadow 214
/etc/startd 175
/etc/sysconfig/network 178, 182
/etc/sysconfig/network-scripts/ifcfgeth1 183
/etc/xinetd.conf/bootparamd 183
/sbin/arp 189, 195, 197
/sbin/chkconfig 190, 237
/sbin/reboot 186
/usr/diskless/bfsd 179
/usr/etc/nfsd 178
/var/log/messages 201
A
about 91, 171
acquisition
mode 28, 68, 77
Acquisition Reference Manual 19, 24, 78
Acrobat Reader 112
Acronis True Image 253
Amix 51
Amix-Viewer 37
arp 139, 182, 189, 195, 197
ASP_ST2 182, 183
AURELIA 41
auto command 203
automatic
configuration of a datastation 78
Automatic backup 28
AV 12, 173
AV-II 12, 173
AV-II+ 12, 173
B
bash 217, 218, 221, 224
bfsd 179, 189
bfsd daemon 179, 184
bind nameserver 178
bootfile 187
bootmode 187, 191
bootparams file 182, 190
Bruker addresses 263
C
CCU 23, 37, 41, 44, 45, 143, 172, 184, 188, 189
cd 206
cf 22, 26, 44, 62, 172
chgrp 208
chkconfig 179, 190
chmod 206, 224, 225, 239
chown 208
I-267
I-268
command
cf 35, 78
configuration 35
expinstall 35
compress 212
configuration 59
datastation 25, 78
default 25, 78
directory 73
name 28, 67, 75
confout 87
conventions 10
copy and paste 224
CPU 12
cron 226
cron check 28
crontab 226
csh 219, 221
cu 187
CUPS 145
curinst 176
INDEX
INDEX
D
DAEMON line 54, 55
datastation
configuration 78
dd 184
debug information 171
default
printer 28, 68, 76
selection in expinstall 28, 68, 76
Demo license 52, 54, 55, 56, 57
desktop manager 17
Developer license 52
DHCP 123, 125, 195
Diskless 37, 135, 181
diskless directory 181, 182, 183
display resolution 12
dns 178
domainname 188, 240
DONE
dump file 182
E
echo 225
edhead 28, 70
edlock 28, 72
edprosol 28, 71
edscon 28, 72
edsolv 28, 70
emacs 219
Emergency Recovery DVD 250
environment variable 219, 221, 223
Esc 200
eth0 125, 129, 132, 182
eth1 183
ethernet cable 182
Ethernet card 12, 53, 54, 56
ethernet interface 182
ethernet-service-tools 192
exam1d_1H 26, 62
executable 224, 225
expinstall 22, 25, 27, 44, 66, 73, 78
export 102, 219, 223
export variable 221
exportfs 181
exports file 181, 182
F
FCU 13
FEATURE line 54, 55, 56, 169, 170
find command 199
Firewall 110, 234
firmware 27, 65, 78
I-269
FLEXLM 38, 42
Flexlm license manager 53, 55, 56, 57
Floating license 53, 54, 55INDEX
fstab file 183
INDEX
ftp 212, 236
ftp server 172
Full license 52, 56, 57
full name 217
G
Ghost 252
Gimp 240
glibc-devel 112
glibc-kernheaders 112
GLP 38, 42, 51
Good Laboratory Practice 38, 42
graphics card 12
graphics file
export 102
import 102
png 102
tif 102
wmf 102
grep 209, 226
group 206, 217, 218, 220, 228
group id 228
gs 172
gzip 212
H
ha 192
Hardware requirements 12
hardware tests 203
headcrash 78
helium 257
helium refill 257
heliumlimit 258
heliumlog 257
heliumwarn 259
help 199, 203
history 221
DONE
history function 199
home directory 217
host 218
hostid 54, 55, 56, 169
hostname 124, 139, 179, 188, 189, 193, 240
hostname -f 124, 180, 193
hosts file 176, 178, 182, 189, 190
hosts.allow 239
hp workstation xw4300 12
I
ICON-NMR 37, 41, 51
ifconfig 139
Image 250, 252
install.net 181
installation directory 25, 78
Installation Guide 9
installnmr 36
iptables 177, 195, 236
J
Java 49
K
KDE 17
kill 211
killtopspin 171, 201
L
license 51
license agreement 25, 61
license.dat 53, 54, 55, 57, 169, 170
licensing program 53
LINUX 112
I-270
LINUX function 223
LINUX shell 224
lists 225
lmgr 53
lmreread 57
lmutil 53
loop structure 225
LPRng 145
ls 206, 220, 225, 228
INDEX
INDEX
NMR-SIM 37, 41, 51, 55
nmr-software-support 231
nmrsu 22, 35
Node address 56
DONE
Node Locked license 54
Notification Tool 248
nsswitch.conf file 178, 189
NVIDIA Quadro FX540 12
O
owner 207, 208, 220, 228
M
Mac address 56
MAXENT 51
memory stick 231
minihub 182
mkdev 184
Monitor Mode 187, 191
mount 143
mouse control 200
N
nameserver 131
netaddr 187
netmask 187
netstat 139
network 10, 33, 55, 125, 139
NFS 143, 178
NFS Server 143
nfsd daemon 178, 189
nfs-utils 112, 117
nis 178
NMR Administration Password
44, 62
NMR SuperUser 35, 43
nmr_save 60, 87, 88
Automatic backup 28
NMR-GUIDE 37, 41, 48, 49, 51
P
paper format 28, 68, 76
PARAVISION 51
passwd 215
password 215, 217, 218
pdf 9
performance 12
permissions 219, 220, 227, 228, 229
physical address 54, 56
ping 139
png 102
Powerpoint 102
pp 225
pre-scan-delay 28, 68, 77
Presenter license 52
Processing-Only license 52
ps 211, 226
pulse program 225
pwd 224
26, 35,
R
rcp 212, 239, 240
RCU 13, 14, 15
rcu 203
rcutest 203
I-271
RED HAT 199
spectrometer 135
Red Hat Documentation 109
spectrometer-PC 25, 62
INDEX
Red Hat Enterprise Linux WS 4.0 109
startd process 175
Register 243
su - 184
INDEX
DONE
Release Letter 9, 21, 39
swapfile 182, 184, 190
remote files 140
swat 140
requirements, software 11
systest 203
reset button 187, 188, 191
T
reviveccu 177, 179, 181, 182, 199, 200, 201
tar 213, 214
rlogin 239, 240
TCP/IP 123, 128
rm 225
tcsh 219, 221, 224
route 139
TCU 14
rs232 184
Teaching license 52
rsh 239
telnet spect 175, 176, 203
rsh-server 236
telnet-server 236
S
tftpd 197
tif 102
Samba 140, 236
samba-swat 236
TOPSPIN
scratch installation 10
CDROM 9, 53, 56
screenshot 240
configuration 24, 33
second monitor 238
Express Installation 19
select
installation 23, 33, 38, 44, 45
default printer 68, 76
installation directory 25, 78
spectrometer configuration name 28,
license 33, 55
67, 75
Online Help 9
the default printer 28
owner of the program files 35
server line 55
programs 37, 38, 42
service command 179, 190
Release letter 9
setenv 187, 191, 221
start 24, 61
sh 221, 225
TopSpin 19
shadow 214
topspin -client 170
shell script 224, 225
TOPSPIN Plot Editor 37, 51, 55, 102
shmrm 201
touser 201
showconf 87
traceroute 139
spect 176, 182
transceiver 182
I-272
U
umask 219
INDEX
UNIX host 143
up2date 243
INDEX
User Manager 103, 105, 185
uucp 112, 120, 121, 185
V
Very Important Files 87
VIF 87
W
who 199, 200
Windows 2000 141, 143
Windows XP 11
wmf 102
wobb 172
Word 102
X
xinetd 197
xinetd.d 183
Z
zg 172
DONE