1
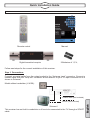
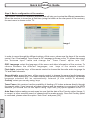
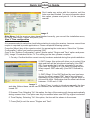
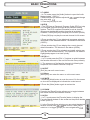
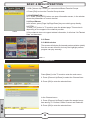
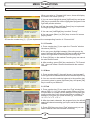
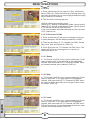
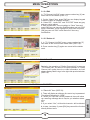
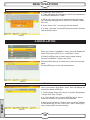
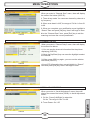
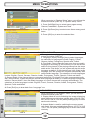
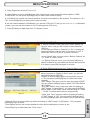
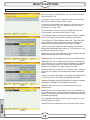
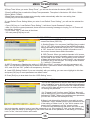
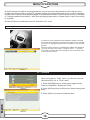
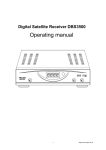
U4150 Digital terrestrial receiver ENGLISH DEUTSCH ESPAÑOL ITALIANO FRANÇAIS Manual de instrucciones Manuel d'installation Manuale prima delluso Bedienung sanleitung Instruccions manual ENGLISH DEUTSCH ESPAÑOL ITALIANO FRANÇAIS Quick Installation Guide. Include U4150 Terrestrial digital receiver ENGLISH DEUTSCH ESPAÑOL ITALIANO FRANÇAIS Manual de instrucciones Manuale prima delluso Remote control Manual Digital terrestrial receptor 2 Batteries of 1,5 V, Follow next steps for the correct installation of this receiver. Step 1: Connections Connect a coaxial cable from the output socket to the Antenna Input connector. Connect a coaxial cable from the Loop out connector at the receiver to your TV input connector as it is shown in Scheme1. Model without modulator (U 4150): Coaxial cable (Not included) Scheme1 This receiver has not built in modulator so it has to be connected to the TV through a SCART cable. English SCART (Not included) Quick Installation Guide. Step 2: Basic configuration of the receiver The receiver includes an installation assistant that will help you to setup the different parameters. When the receiver is turned on at first time (using the button at the rear panel of the receiver), the next menu is shown on the TV: Image 1 In order to move through the different options of this menu, please use the keys of the remote control. If an Overloading! Tuner Power is Off message is shown on the TV, please disconnect the Antenna Input cable and change the Tuner Power option into Off OSD Language: select the language of the menu and other information of the receiver. To choose between the different languages, use keys of the remote control. First Audio: press the keys of the remote control to choose the favourite audio language for TV and Radio channels. Second Audio: press the keys of the remote control to choose the second audio language. In case of, when selecting a TV or Radio channel that has not the favourite language, the second language selected will be automatically listened (if this action is allowed). Country: select your country using keys. Tuner Power: this receiver has the possibility of feeding a 5V indoor antenna directly through the coaxial cable. If you have not an indoor antenna and the receiver is connected to a MATV antenna, you should turn off this option using keys until [Off] option appears on the TV. English Auto Scan: before making an auto scan be sure that the data of the Country option (Image 1) is correct, in other case the search of channels will be made wrongly. Once the Country option is confirmed, please select the option Auto Scan and press [OK]. Quick Installation Guide. Dont make any action with the receiver until the Auto scan has finished. For more information about this option, please read point 4.1 of the complete manual. Image 2 Main Menu: if all the previous steps have finished correctly, you can exit the installation menu, by using Main Menu option and press [OK]. Step 3: Time configuration It is recommended to setup the clock before starting to enjoy the receiver, because correct time maybe is required by some applications. Please complete following options: Press the [Menu] key of the remote control for appearing the main menu. Select the System Configuration option and confirm pressing [OK]. Once in the System Configuration option, please select Region and Time option and press [OK]. Image 3 is watched on the TV. For setting up the time, please complete: 1. Country: Confirm that the correct country has been selected during the quick installation. 2. GMT Usage: this option will allow you to select if the date and time will be introduced manually (Use GMT: Off), if you prefer that it will be automatic by country (Use GMT: By Region) or if you wish to introduce the . manually (Use GMT: Defined by offset respect GMT user). 3. GMT Offset: If Use GMT defined by user has been chose, the offset respect GMT has to be configured depending on your region or country. Use the keys to choose the offset. Remember that the offset values are between -12:00 and +12:00 Image 3 4. Date / Time: In order to introduce manually the time and date. Before these values can be modified, the automatic control of GMT has to be turned Off. 5. Summer Time: Selecting On this option, the time of the receiver will change automatically during summer time. This option can only be modified when use GMT by region is selected. 6. Time Display: Selecting On this option, the time will be shown in the screen. English 7. Press [Exit] to exit the menu "Region and Time". Quick Installation Guide. TV Channel List: This option shows the list of TV stored channels. Radio Channel List: This option shows the list of Radio stored channels. Delete All Favourites: This option deletes all the favourite lists created. Delete All Channels: This option deletes all TV and Radio stored channels. Auto Scan: This option make a full scan of all TV and Radio channels received. Channel Scan: This option make a compete scan of only one Multiplex. Channel Setup: This option shows the information of stored channels. It is possible to change the video and audio PID. Aerial Adjustment: This option allows turns on or off 5V feeding throughcoaxial cable. It allows watch, by means of indicators, the level of the received signal of each channel OSD Language: This option allows selecting different menu and options languages. TV System: This option allows choosing the video Standard and other parameters of the screen. Start up Service: This option allows setting the receiver to start in a predefined channel. Region and Time: In this option, the time of the receiver and user region or country can be configured. Timer Setting: Timer setting menu. English OSD Setting: In this option, the subtitles of the channel information can be configured. Parental Lock: In this option, user can lock the access to the menu and change the password of the receiver. RCU Position: To choose the RCU Position of the remote control. Information: This option shows all the technical information for the selected channel. Game: In this option user can find some games like TETRIS, SNAKE Load Factory Default: If this option is selected, a reset of the receiver will be done and it will load the factory default values. Software Upgrade: To update the receiver with other receiver. WELCOME PAGE: If this option is selected, the welcome page or quick installation menu will be loaded. INDICE 1. Remote control & panel description 1.1.Front panel description........................................................................................................3 1.2.Rear panel description..........................................................................................................3 1.3.Remote control description................................................................................................4 2. Hotkey 2.1.Standby..................................................................................................................4 2.2.CH+/CH-.....................................................................................................................4 2.3.Vol+/Vol-....................................................................................................................4 2.4.Number...................................................................................................................4 2.5.TV/Radio..................................................................................................................5 2.6.OK................................................................................................................5 2.7.Audio.................................................................................................................5 2.8.EPG.................................................................................................................5 2.9.FAV+/-.................................................................................................................5 2.10.Exit.................................................................................................................5 2.11.Menu................................................................................................................5 2.12.Mute................................................................................................................5 2.13.BAC.............................................................................................................5 2.14.FAV......................................................................................................................5 2.15.Information..............................................................................................................6 2.16.Pup+/Pdown-...........................................................................................6 2.17.TTX...........................................................................................................6 2.18.Zoom......................................................................................................................6 2.19.Multi-window...........................................................................................................................6 3. Channel 3.TV Channel List.....................................................................................................................7 3.1.1.Favorite...........................................................................................................7 3.1.2.Move.................................................................................................................7 3.1.3.Find.................................................................................................................7 3.1.4.Sort.................................................................................................................8 3.1.5.TV Channel list edit........................................................................................8 3.1.5.1.Delete.............................................................................................8 3.1.5.2.Skip.................................................................................................8 3.1.5.3.Lock...............................................................................................8 3.1.5.4.Edit..........................................................................................9 3.1.5.5.Delete all..................................................................................9 3.2.Radio Channel list............................................................................................................9 3.3.Delete all favorites............................................................................................................9 3.4.Delete all...........................................................................................................................10 4. Installation 4.1.Auto scan..........................................................................................................................10 4.2.Channel scan.........................................................................................................11 4.3.Channel setup.......................................................................................................................11 4.4.Aerial adjustment...................................................................................................... 11 5. SYstem setup 5.1.OSD language..........................................................................................................12 5.2.TV system.............................................................................................................12 5.3.Start up service...............................................................................................................13 5.4.Region and time...................................................................................................................13 5.5.Timer setting..........................................................................................................................14 5.6.OSD setting........................................................................................................15 5.7.Parental lock..............................................................................................................15 5.8.RCU position..............................................................................................................16 6. Tools 6.Tools...........................................................................................................................16 6.1.Information............................................................................................................17 6.2.Game..................................................................................................................17 6.3.Load factory default.........................................................................................................17 6.4.Software upgrade.........................................................................................................18 7.Technical Specification 7.Technical specification...........................................................................................................18 1 English Safety precaution Caution..........................................................................................................................2 CAUTION SAFETY PRECAUTION CAUTION CAUTION RISK OF ELECTRIC SHOCK DO NOT OPEN English The lightning flash with arrowhead symbol, within an equilateral triangle, is intended to alert the user to "dangerous voltage" and to prevent from a risk of electric shock Warning: To reduce the risk of electric shock, don't open the cabinet. Refer servicing to qualified personnel only. The exclamation point within an equilateral triangle is intended to alert the user to important operating and maintenance (servicing). WARNING: Do not use this STB where contact with or immersion in water is a possibility. Do not use near flower vase, washbowls, kitchen sinks, laundry tubs, swimming pools, etc. WARNING: Do not put the candle or lamp stand on the cabinet; otherwise, there is the danger of fire. WARNING: The unit should be connected to a power supply only of the type described in the operating instructions or as marked on the unit. If you are not sure of the type of power supply (for example, 120 or 230 V) to your home, consult your local dealer or local power company. WARNING: This product install diodes. Do not open the cabinet or touch any parts in the inner mechanism. Consult your local dealer for technical service if the opening is required. Note: To ensure proper use of this product, please read this User manual carefully and retain for further reference. Unit Cleaning: After the unit power is turned off, you can clean the cabinet, panel and remote control with a soft cloth lightly moistened with a mild detergent solution. Attachments: Never add any attachments and/or equipment without the manufacturer consent; as such additions may result in the risk of fire, electric shock, or other personal injury. Locating: Slots and openings in the cabinet are provided for ventilation to protect it from overheating. Do not block these openings or allow them to be blocked by placing the STB on a bed, sofa, or other similar surface, nor should it be placed over a radiator or heat register. Power-Cord Protection: Place the power-supply cord out of the way, where it will not be walked on. Please take special attentions to cords at plugs, convenience receptacles, and the point where they exit from the unit. Object and Liquid Entry: Never put objects of any kind into this STB through openings, as they may touch dangerous voltage points or short-out parts that could result in a fire or electric shock. Never spill any liquid on the STB. Note: Moisture may be formed on the lens In the following conditions: when the unit is suddenly moved from a cold environment or an air-condition room to a warm place. immediately after a heater has been turned on. in a steamy or very humid room. If the moisture forms inside the unit, it may not operate properly. To correct this problem, turn ok the power and wait about two hours for the moisture to evaporate. Parts Replacement: When the unit parts need to be replaced, user should make sure the service technician use the replacement parts specified by the manufacturer or having the same characteristics as the original part. Unauthorized replacement may put the unit In the risk of fire, electric shock or other hazards. Safety Check: After all the maintenances and repairs are done, user is required to request the service technician to conduct the overall safety check to ensure the machine is in the proper condition. 2 REMOTE CONTROL & PANEL DESCRIPTION 1. REMOTE CONTROL & PANEL DESCRIPTION 2 1 3 4 1. POWER: Is used to switch between the working mode and the standby mode. 2. DISPLAY (4-Digit/7-Segment): Displays the received channel number while operating and time while in standby mode. 3. Remote Sensor: Detects the infrared signals from the remote control unit. 4. CH+/-: To change channels or for navigating and changing values in menus. 1.2 REAR PANEL DESCRIPTION U4150 3 6 7 4 5 2 8 9 1. ANTENNA INPUT:Terr. input of the digital tuner. 2. RS-232: Serial Port allowing software upgrades 3. LOOP OUT: Terr. ouput for cascading to others devices. Note:The operation of another receiver at the same time is only possible with limited channel selection 4. TV SCART: Output SCART for the connection to a TV set 5. VCR SCART: Output SCART for the connection to a VCR 6. S/PDIF: Coaxial output for digital audio (AC3) 7. Optical S/DIF:Optical output for digital audio (AC3) 8. AC IN: Mains input cable 9. POWER ON/OFF: Allows to completely switch off the receiver 3 English 1 REMOTE CONTROL & PANEL DESCRIPTION 1.3 REMOTE CONTROL DESCRIPTION 1 17 12 1- Standby 2- CH+/CH3- Vol+/Vol4- Number 5- TV/Radio 6- OK / Channel list 7- Audio 8- EPG 9- FAV+/10- Exit 11- Menú 12- Mute 13- Recall/Back 14- FAV 15- Información 16- Pup / Pdw 17- TTX 18- Zoom 19- Multi- window 4 19 3 13 5 2 10 11 6 8 7 15 14 9 18 16 2. HOTKEY 2.1 Standby 1.Press [Power] button to switch from TV mode to Standby mode 2.In Standby mode press [Power] button again to switch back to TV mode. The last active channel be showed. 3.To switch off the STB complete press the main power button. will 2.2 CH+/CHIn TV mode press [Channel Up/Channel Down] to change channel. 2.3 Vol+/VolIn TV mode, press [Volume Up/Volume Down] to adjust volume. 2.4 NUMBER In TV mode you can enter the channel number directly with your remote control unit and confirm the number with the OK button to change to the desired channel. English 2.5 TV/Radio In TV mode, press [TV/RADIO] to switch to Radio mode. In Radio mode press [TV/RADIO] again to switch back to TV mode. 2.6 OK 1. In full screen, press [OK] key can enter Channel List, please refer to TV Channel List for detail information. 2. In Channel List menu, press [OK] key to play the highlighted channel. 4 BASIC OPERATIONS OSD 1 2.7 AUDIO 1.In TV mode, press the [Audio] button to open the Audio Mode window. ( OSD 1). and change 2.Select the item you want to adjust with the value with . 3. Pres the [Exit] key to exit. 2.8 EPG 1.The STB has an Electronic Program Guide (EPG) to help you navigate channels through all the possible viewing options. The EPG supplies information such as channel listings and starting and ending times for all available channels. Press [EPG] key to display EPG screen.(OSD2) 2.Press [OK] key can play the current channel in full screen. 3.Press number key [1] can display all programs schedule information of the selected channel. The window is like below (OSD 3): 4.Press number key [2] can display the current channel detail information. The window is like below (OSD4): OSD 2 5.Press number key [2] in schedule and detail window can open the timer window directly. This operation can add the highlighted program to a timer quickly. 2.9 FAV +/1. In TV mode press the [FAV +/-] buttons to switch between the favorite channels in the current Favorite Group directly. 2. The sequence of the favorite channels is following the sequence in the related Favorite Group list. 2.10 EXIT [Exit] key can exit current menu. 2.11 Menu [Menu] key can enter the menu or exit current menu. OSD 3 2.12 MUTE 1.Press the [Mute] button to mute the sound. On the screen an icon will be displayed to indicate the muted sound. 2.Press the [Mute] button again to restore the 2.13 BACK Pressing the [Recall] button allows you to toggle between the actual and the last selected channel. OSD 4 2. In the Favorite Group window you can select the desired and confirm it with [OK] to favorite channel with switch to it. In bigger groups you can navigate with . 5 English 2.14 FAV 1. In TV mode press the [Favorite] button to display the Favorite Group window on the screen as the picture beside shows (OSD 5). BASIC & MENU OPERATIONS 3. With [Volume Up / Down] you can select different Favorite Groups. 4. Press [Exit] to close the Favorite Group window. 2. Funciones basicas 2.15 INFORMATION In TV mode, press [INFO] button can open information screen, in the window shows the parameters of current channel. 2.16 Pup+/PdownIn full screen, press [Page Up/Page Down] key can switch group directly. 2.17 TTX 1.Press [TXT] button in TV mode to open the teletext page. This service is depending on the support of the channel provider. OSD 5 2.If the channel does not support teletext information, it will show No Teletext Data on the screen. 2.18 Zoom 2.19 Multi-window The screem will display 9 channels preview window (static) from the current channel. And only the highlight preview program can play normally. OSD 5.1 3.CHANNEL Press [Menu] in the TV mode to enter the main menu. 1. Press [Channel Up/Down] to select the Channel item. 2. Press [OK] to enter the selected item. OSD 6 In the Channel menu: English 1. Press [Channel Up/Down] to select the wanted menu item among TV Channel, Radio Channel and Delete All. 2. Press [OK] to enter the selected item. OSD 7 6 MENU OPERATIONS 3.1 TV CHANNEL LIST When you enter to Channel List menu, there will display the screen like below (OSD 8). 1.You can move highlight by press [Up/Down] key and press [OK] key to preview the current highlighted program in the right side preview window. 2.You can press [Page Up/Page Down] key to implement the Page Up/Page Down function. 3.You can use [Left/Right] key to switch Group. OSD 8 4.You can press [Menu] or [Exit] keys to enter full screen playing mode. 5.Press the number key [1] ~ [5] can implement the corresponding function in Channel List. 3.1.1 Favorite 1. Press number key [1] can open the Favorite window like above (OSD 9) 2.You can move highlight between 8 favorite groups by press [Up/Down] key and press [OK] key to make a favorite mark in the right side of the selected Favorite group. 3. Press [OK] key on the marked Favorite group can cancel the exist favorite mark. OSD 9 4. After marking, press [Exit] key can back to TV Channel List , there will show a favorite mark beside the marked channel. 3.1.2 Move 1. Press number key[2] ,there will show a moving mark in the right side of the selected channel like above (OSD10) 2. You can move the selected channel to the position that you want to place by press [Up/Down] key. And press [OK] key to confirm your decision. 3.1.3 Find 1. Press number key [3] can open the Find window like above (OSD 11). You can press number [0] key to [9] key to input letter or number into the dialogue. Every time you press number key it will change the letter or number. For example, every time you press number [2], it will show a->b->c->2 ->a-> 2. After input each character, the program list on the left will search the channel according your input, and list the matched channel. 3. Press [Exit] key can close Find window and you can select channel from the channels list directly. OSD 11 7 English OSD 10 MENU OPERATIONS 3.1.4 Sort 1. Press number key [4] can open the Sort window like above (OSD 12). There are five kinds of sorting ways. You can press [Up/Down] key to move highlight and press [OK] key to confirm you selection 2. The five kinds of sorting way are: OSD 12 Default: Sorting by scanning result. Name (A-Z): Sorting in Alphabetical Order, ignore symbol. Name (Z-A): Sorting in Alphabetical Order, ignore symbol. FTA: Sieved out all free fare channels. Lock: Accumulated all locked channels and list in the last of TV Channel List. 3.1.5 TV Channel List Edit 1. Press number key [5] will open a message box for you to enter password, and the default password is 0000 2. There are five items of TV Channel List Edits: Delete, Skip, Lock, Edit, and Delete all. (OSD 13) OSD 13 3. Press [Exit] can exit TV Channel List Edit menu. The system will show up a message box to inquire you whethersaving or not. 3.1.5.1 Delete In TV Channel List Edit menu, press number key [1] can make a delete mark in the right side of the highlighted channel. After save and exit TV Channel List Edit menu, the marked channel will be deleted. (OSD 14) OSD 14 3.1.5.2 Skip In TV Channel List Edit menu, press number key [2] can make a skip mark in the right side of the highlighted channel. After save and exit TV Channel List Edit menu, the channel will be skip while user change channel in the full screen. (OSD 15) OSD 15 English 3.1.5.3 Lock In TV Channel List Edit menu, press number key [3] can make a lock mark in the right side of the highlighted channel. After save and exit TV Channel List Edit menu, STB will request you to input the password while you want to watch the locked channel. (OSD 16) OSD 16 8 MENU OPERATIONS 3.1.5.4 Edit In TV Channel List Edit menu, press number key [4] can enter edit box like below (OSD 17): OSD 17 1 .On the Name item, press [OK] key can display keypad to edit the name of selected channel. 2. Video PID, Audio PID and PCR PID items are grey and can not be edited. 3. After modification, move highlight to Save item and press [OK] key can save the modified value and exit Edit mode. Otherwise, move highlight to [Exit] item and press [OK] key can exit Edit mode and wont save any modification. 3.1.5.5 Delete all 1. In TV Channel List Edit menu, press number key [5] can mark all the channel with delete mark (OSD 18). 2. Press number key [5] again can cancel all the delete mark. OSD 18 3.2 RADIO CHANNEL LIST Basically, the operation of Radio Channel List is same as TV Channel List, but there is one point different: In Radio Channel List mode, there is no video information, so it will always display Radios logo in the right side preview window. (OSD 19) OSD 19 3.3 DELETE ALL FAVORITES 1. There will display an dialogue for user to key in password. The default Password is 0000. 2. When you input the correct password, there will show up a warning message box to inquire you whether delete all or not. 3. If you select Yes, all favorite channels will be deleted. 4. In step 1 and step 2, press [Exit] key can exit the function directly without save OSD 20 9 English In Delete All item (OSD 20): MENU OPERATIONS 3.4.DELETE ALL In Delete All item (OSD 21): 1. There will display an dialogue for user to key in password. The default Password is 0000. 2. When you input the correct password,there will show up a warning message box to inquire you whether delete all or not. 3. If you select Yes, all channels will be deleted. 4. In step 1 and step 2, press [Exit] key can exit the function directly without save. OSD 21 4.INSTALLATIÓN When you enter to Installation menu, there will display the screen like below (OSD 23): In Installation menu; OSD 22 1.Press [Left/Right] key to select menu pages among Channel, Installation, System and Tools. 2.Press [Up/Down] key to select menu items among each items. 3.Press [OK] key to enter the selected item. OSD 23 4.1.AUTO SCAN When you enter to Auto Scan menu, there will display the screen like below (OSD 24): 1. Firstly please select the country in System Setup Menu / Region and Time / Region English 2 .In Scan Mode item, press [Left/Right] key to select scans all channels or just scans free channels. 3 Moving the highlight to Search item and press [OK] key to start scanning. 4 In the Auto Scan menu, press [Exit] key to draw back from the scanning. OSD 24 10 MENU OPERATIONS 4.2 CHANNEL SCAN When you enter to Channel Scan menu, there will display the screen like below (OSD 25): 1. There is two mode. You can scan channel by channel or by frequency . 2. When scan band is UHF, the range of Ch No. is from 21 to 69. 3. When you complete your modification,move highlight to Search item and press [OK] key, then it will begin to scan. OSD 25 4.In the Channel Scan item, press [Exit] key to exit the scanning and save the current parameters. 4.3 CHANNEL SETUP When you enter to Channel Setup menu, there will display the screen like below: 1. You can see the channel information like the picture displaying (OSD 26). 2. Move the [Up/Down] key can move the highlight to select the channel. 3. When press [OK] key again, you can see the window like below (OSD 27): OSD 26 4. Input PID information,then move highlight to Search item and press [OK] key, then it will begin to scan. OSD 27 4.4 AERIAL ADJUSTAMENT When you enter to Aerial Adjustment menu, there will display the screen like below (OS28): In Aerial Adjustment mode: 1. Ch No.: Press [Left/Right] to select the Ch No. The range is from 2 to 69. OSD 28 11 English 2. Tuner Power: On / Off MENU OPERATIONS 5. SYSTEM SETUP When you enter to System Setup menu, you will see the screen like below (OSD 30): In System Setup menu: OSD 29 1. Press [Left/Right] key to select menu pages among Channel, Installation, System and Tools. 2. Press [Up/Down] key to select menu items among each items. 3. Press [OK] key to enter the selected item. OSD 30 5.1 OSD LANGUAGE When you enter to Language menu, you will see the screen like below (OSD 31): 1. Language: press [Left/Right] key to select languages, the selections of languages include: English, French, German, Italian, Portuguese, Spanish and Turkish. 2. First Audio: Some channels have more than one audio language for choosing; by this function you can set the first audio for this channel. If the playing channel has the same audio as the First Audio you set, system will play this audio language as default. If the channel hasnt the suited audio language, then the system will compare automatically with OSD 31 second audio language. The selections of audio languages include: English, French, German, Russian, Arabic, Portuguese, Turkish, Spanish, Polish and Italian. 3. Second Audio: If the channel has no correspond audio with First Audio but have corresponded audio with Second Audio, system will play the second audio language as default. If no audio language corresponds with the Second Audio, then the default language of current channel will be played automatically. The selections of audio languages include: English, French, German, Russian, Arabic, Portuguese, Turkish, Spanish, Polish and Italian. 4 .Press [Exit] key to draw back from Language me 5.2 TV SYSTEM English When you enter to TV System menu, you will see the screen like below (OSD 32): 1. Display Mode is use for switching the screen-displaying mode. Now we provide below options: Auto / PAL-M / PALBG / NTSC/ PAL-N. You can press [Left/Right] key to select each mode circularly. 2. Aspect Mode is used for switching the screen aspect ratio mode. Now we provide below options: 4:3 PS / 4:3 LB / 16:9. You can press [Left/Right] key to select each mode circularly. OSD 32 12 MENU OPERATIONS 3. Dolby Digital can select AC3 on or off. 4. Video Output is use for switching the video output mode. Now we provide below options: CVBS, CVBS+RGB. You can press [Left/Right] key to select each mode circularly. 5. LCN Mode can control the channel whether sort by the information in the streams. The options is: On / Off. You [Left/Right] key to select each mode circularly. 6.You can choose between VCR Master ( You see the VCR in the TV although the receiver is on ) or Receptor master ( you can see the receiver in the TV although the VCR is on). 7. Press [Exit] key to draw back from TV System menu. 5.3 START UP SERVICE 1. Startup Channel: Press [OK] key to enter Startup up Service menu, and you will see the screen like below (OSD33): If the setting of Boot on Channel is On, it means the following two items can be work. If the setting is Off, it means the Boot on Channel function cant work. In the Mode item, you can set the Startup Channel as TV mode or Radio mode. OSD 34 2. Press [Exit] to draw back from Channel Setup menu. 5.4 REGION AND TIME When you enter to Region & Time menu, you will see window like below (OSD 34): Region is used for selecting the country which you are in. You can press [Left/Right] key to select each mode circularly. GMT Usage: This item is use for open the usage of GMT. You can press [Left/Right] keys to switch Off / User Define / By Region. The GMT Offset item is valid only when the setting of GMT Usage is Uesr Define. You can press [Left/Right] keys to switch GMT Offset value, and the range is -12:00 ~ +12:00, increase each half hour progressively. Date and Time items are valid only when the setting of GMT Usage is Off. You can press [Left/Right] keys to moving highlight and use number keys to input directly. Summer Time items are valid only when the setting of GMT Usage is By Region. You can press [Left/Right] keys to switch. Time display function can control whether the time will be displayed on screen or not. Press [Exit] key to draw back from Time menu. 13 English OSD 33 In Startup Channel menu, you can press [OK] key to open the channel list, and select the channel that you want it to startup, press [OK] key again to confirm. MENU OPERATIONS 5.5 TIMER SETTING When you enter Timer Setting, you will see the window like below(OSD 35): 1. Program Timer: Select Program Timer item and pres [OK] key to enter Program Timer menu. Current time information will display on the first column; if the current time is incorrect, please modify the time information in Time item. Timer Number: You can press [Left/Right] keys to set Timer number, and there are 8 timers in total. OSD 35 Timer Mode: There are several modes for Timer to setting, include Off, Once, Daily, Weekly, Monthly and Yearly. Timer Service: There are two options for Timer Service, include Channel (timer setting for channel change and wakeup/Sleep) and Message (reminding message). When you select Channel (timer setting for channel change and Wakeup/Sleep) option in Timer Service, the screen will display like below: Wakeup Channel: press [OK] key to enter channel list and select channel that you want to setting. OSD 36 Wakeup Date: use number keys to input your wakeup date. Wakeup Time: use number keys to input your wakeup time. Once the times up, no matter what the system is in standby mode or in playing mode, the system will automatically switch to the channel you want and start to play. Duration: After you set a time for Duration item, once the times up, the system will automatically switch to standby mode. When you select Message (reminding message) option in Timer Service, the screen will display like below: Wakeup Message: press [Left/Right] key to select reminding message as Birthday, Anniversary and General. OSD 37 Wakeup Date, you can use number key to input your wakeup date. Wakeup Time: use number keys to input your wakeup time. Once the times up, no matter what the system is in standby mode or in playing mode, the system will automatically pop a reminding message. English The message will always display on the screen, you can press [Exit] key to close it. Press [Exit] key to draw back from Program Timer menu. OSD 38 14 MENU OPERATIONS 2.Sleep Timer When you enter Sleep Timer, you will see the window like below (OSD 38): *Press [Left/Right] key to switch the Sleep Time parameter. The option is like below: Off /10min /30min /60min /90min /120min *Sleep Timer can set the system enter standby mode automatically after the user setting time. *Press [Exit] can exit the current menu. 3. Load Default Timer Setting When you enter Load Default Timer Setting, you will see the window like below: Press [OK] key on Load Default Timer Setting, it will show Inpute Password dialogue. After you input the correct password, there will show a warning message to inquiry you All Timers will be cleared, continue? If you select Yes, it will clear all the timer. You can press [Exit] key to exit. 5.6 OSD SETTING When you input to OSD Setting menu, you will see a screen like below (OSD 39): 1. Subtitle Display: You can press [Left/Right] key to select On or Off. If the current channel has subtitle information, it will be showed up while this function is On. If this function is Off, there wont show up subtitle information even if the current channel has subtitle information. 2. OSD Timeout: When you switch channels in full screen, there will show up some information about current channel on the lower of the screen. And regarding to the duration of these information show up on the screen, you can press [Left/Right] key to set the time. The range of the duration OSD 39 is 1 second ~ 10seconds. 3. OSD Transparency: Besides the setting of OSD Menu Style, you also can set the transparency of OSD. You can press [Left/Right] key to select the values. There are 5 levels of transparency, 10%, 20%, 30%, and 40% and NO (means no transparency function). 4. Load OSD Setting Default: If you are not satisfy with your setting, you can move highlight to this item and press [OK] key to reset parameters as default value. 5. Press [Exit] key to draw back from the OSD Setting menu. 5.7 PARENTAL LOCK You can set a password for anyone who wishes to operate in the Installation menu. And you can also set the password for the lock channels. (How to set the lock channel please refer to LOCK) Here will show you how to setting and how to revising the password. 2.Menu Lock determining that when user wish to enter Installation menu, whether have to input Password or not. If the setting of Menu Lock is Yes which means user OSD 40 have to key in password, set No means unlock. 3. Channel Lock determining that when user wish to play the lock channels, whether have to input the password or not. If the setting is Yes, play the channels with lock mark will show up a dialogue on the screen and ask for the password. If the setting of Channel Lock is No, the Lock function will invalid. 15 English 1.In Parental Lock function, press [OK] key, there will pop an dialogue for you to input the password. The default password is 0000. When you input the correct password, you will see a screen like below(OSD 40): MENU OPERATIONS 4. New Password is used for revising password; you can input the new password in this item by using number keys directly. After you filled in 4 digital numbers, the highlight will auto skip to Confirm Password and ask you to input the new password again. If the password is correct, the screen will show up a message of Change password successfully. After finish saving and draw back to System Setup menu, the revising is complete. 5.Press [Exit] key to draw back from the Parental Lock menu. 5.8. RCU POSITION IMG 4 In order to avoid interferences between remote controls, you have the possibility to change the code of it, to do that you have to change the position of a switch in the remote control. But first of all you have to change this code in the receiver. You can do this in the menu Position RCU. ( OSD41) You have to select the same position in the receiver and in the remote control. OSD 41 6. TOOLS When you switch to Tools menu, you will see a screen like below(OSD 43): In Tools menu: 1. Press [Left/Right] key to select menu pages among Channel, Installation, System and Tools. OSD 42 2. Press [Up/Down] key to select menu items among each items. English 3. Press [OK] key to enter the selected item. OSD 43 16 MENU OPERATIONS 6.1 INFORMATION 1. When you enter to Information menu, you will see a screen like above (OSD 44). The screen displays some parameters of information of current channel, and this function same as the function [Information] in the full screen play mode. 2. Press [Exit] key to draw back from Tools menu. OSD 44 6.2 GAME When you enter Game menu, you will see three Games include Tetris, Snake and Othello. Basic operation statement: 1. Tetris 2. Snake 3. Othello Moving highlight to Setup and press [Left/Right] key to select the game level (speed). Moving highlight to Start and press [OK] key to start the game. Moving highlight to [Cancel] keys and press [OK] key to draw back from the game. Start on the game: [Left/Right] Move shape left or right Channel Up Rotate clockwise Channel Down Faster drop [OK] Pause/Play the game [Exit] Quit game and draw back to Game menu. Moving highlight to Setup and press [Left/Right] key to select the game level (speed). Moving highlight to Start and press [OK] key to start the game. Moving highlight to [Cancel] keys and press [OK] key to draw back from the game. Start on the game: [Volume Up/Volume Down/Channel UP/Channel Down] use these arrow keys to guide the snake. [OK] Pause/Play game [Exit] Quit game and draw back to Game menu. Moving highlight to Setup and press [Left/Right] keys to select the game level (degree of difficulty). Moving highlight to Start and press [OK] key to start the game. Moving highlight to [Cancel] keys and press [OK] key to draw back from the game. Start on the game: [Volume Up/Volume Down/Channel UP/Channel Down] use these arrow keys to guide chessman. [OK] set chessman. [Exit] Quit game and draw back to Game menu. 6.3 LOAD FACTORY DEFAULT When you press [OK] key In the Load Factory Default item: 1. There will pop a dialogue for you to enter the password, and the default password is 0000. 3. If you select Yes option, the all revised parameters of the receiver will reset to default value. Please carefully to using this function. 4. In step 1 and step 2, press [Exit] key can draw back from this item and without saving. 17 English 2. After you input the correct password, there will show a warning message to inquiry you The operation will load default and erase all the channels that user added, continue?. MENU OPERATIONS 6.4 SOFTWARE UPGRADE 1. We offer the functions for user to connecting receiver (Master) to the other receiver (Slave) via serial interface to upgrade software code and program list. 2. Connect master receiver to slave receiver via serial interface. Enter Software Upgrade menu in master receiver and press [Left/Right] keys to switch upgrade mode. Upgrade modes include: allcode / maincode / videoback / radioback / defaultdb1 / userdb 3. Turn on slave receiver and it neednt operate any setting. 4. Moving highlight to Start on master reeciver and press [OK] key to start upgrade. 5. Press [Exit] key to save the parameters and draw back. 7.TECHNICAL SPECIFICATIONS We , FTE Maximal, declare that the products U 4150 is in conformity with following Directives LVD 73/23/EEC EMC 89/336/EEC as last amended by 93/68/EEC If it wishes a copy of the declaration you can ask for it to the company. Video Decoding Bit rate Output Aspect ratio Active pixel Output connector MPEG-2 & MEPG-1 Max 15Mbps NTSC/PAL 4:3 / 16:9 / Auto "720 x 480 @ 30 fps; 720 x 576 @ 25 fps" Euroconector, RCA Audio Decoding Sampling rate Output connector MPEG-2/MEPG -1 Layer I & II 32 /44,1/ 48 Khz Euroconector , RCA, SPDIF coaxial Demodulator Demodulation Guard COFDM 2k, 8k 1/4, 1/8 , 1/16, 1/32 Imput Signal Frequency Imput Level VHF-UHF - 78 dBm - 20 dBm English Varios Supply voltage Power consumption Operation temperature Storage temperature Dimension (W x D x H) Weight 100 - 240 Vac 50-60hz Max. 30 W +5º a +40º -20º a +70º 280x 190 x 55 mm 1,3Kq 18