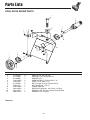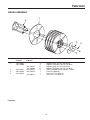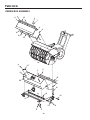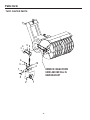
1
OPERATOR’S
MANUAL
Model MCD-WB Walk
Behind Power Broom
Serial No. 10-1638 and up
11/2004
Table of Contents
CONTENTS:
Regular Maintenance
Maintenance Schedule ..................................15
Checking Tire Pressure .................................15
Lubrication .....................................................16
Troubleshooting, Adjustments, & Service
Troubleshooting .............................................17
Speed Selector Adjustment ...........................19
Broom Drive Tension .....................................19
Traction Drive Tension ...................................19
Easy Turn™ Cable Adjustment......................20
Belt Replacement ..........................................21
Brush Segment Replacement........................23
Optional Equipment
Turf Caster Kit................................................24
Debris Box Kit................................................24
Parts Lists
Final Drive Repair Parts ................................26
Brush Assembly.............................................27
Broom Head Assembly................................. 28
Debris Box Assembly.....................................30
Turf Caster Parts............................................32
Handles and Controls Group .........................34
Engline and Frame ........................................36
Traction Drive Group......................................38
Wheel Group .................................................42
Safety Rules & Information
General Operation ...........................................2
Slope Operation...............................................2
Children ...........................................................3
Emissions ........................................................3
Service & Maintenance ...................................3
ANSI B71.3-1995 Warnings ............................4
Decals..............................................................5
Safety Icons .....................................................7
Identification Numbers........................................8
Features, Controls, & Operation
Control Locations.............................................9
Safety Icons .....................................................9
General Operation
Checks Before Each Start-Up .......................10
Starting the Engine........................................10
Operating the Power broom...........................11
Ground Speed Selector .................................11
Brush Angle Adjustment ................................12
Brush Height Adjustment...............................12
Easy Turn™ Traction .....................................13
Easy Turn™ Freewheeling and
Traction Drive Lock .......................................13
Temporary storage (30 Days Or Less) ..........14
Long term storage (Longer Than 30 Days) ...14
Starting after long term storage.....................14
WARNING
WARNING
You must read, understand and comply with all
safety and operating instructions in this manual
before attempting to set-up and operate your
power broom.
Engine exhaust from this product contains
chemicals known, in certain quantities, to cause
cancer, birth defects, or other reproductive harm.
Failure to comply with all safety and operating
instructions can result in loss of machine control,
serious personal injury to you and /or
bystanders, and risk of equipment and property
damage. The triangle in the text signifies
important cautions or warnings which must be
followed.
1
Safety Rules & Information
Read these safety rules and follow them closely. Failure to obey these rules could result in loss of control
of unit, severe personal injury or death to you, or bystanders, or damage to property or equipment.
The triangle
in text signifies important cautions or warnings which must be followed.
GENERAL OPERATION
• Read, understand, and follow all instructions in the
manual and on the unit before starting.
• Only allow responsible adults, who are familiar with
the instructions, to operate the unit (local regulations
can restrict operator age).
• Clear the area of objects such as rocks, toys, wire,
etc., which could be picked up and thrown.
• Be sure the area is clear of other people. Stop unit if
anyone enters the area.
• Always look down and behind before and while travelling in reverse.
• Be aware of the discharge direction and do not point
it at anyone. Do not point the discharge at glass
enclosures, automobiles, or windows.
• Disengage all clutches (release drive and broom control levers) before starting the engine.
• Never leave a running unit unattended. Always disengage the broom and traction controls and stop
engine.
• Operate only in daylight or good artificial light.
• Do not operate the unit while under the influence of
alcohol or drugs.
• Watch for traffic when operating near or crossing
roadways.
• Use extra care when loading or unloading the unit
into a trailer or truck.
• Keep in mind the operator is responsible for accidents occurring to other people or property.
• Data indicates that operators, age 60 years and
above, are involved in a large percentage of power
equipment-related injuries. These operators should
evaluate their ability to operate the unit safely enough
to protect themselves and others from injury.
• All operators should seek and obtain professional
and practical instruction.
• Always wear substantial footwear and appropriate
clothing. Wear footwear that improves traction on
slippery slopes. DO NOT wear long scarves or loose
clothing that could become entangled in moving
parts.
• Before using, always visually check that all hardware
is present, in-tact, and secure. Replace worn or
damaged parts.
• Never operate the machine with defective guards, or
without safety protective devises in place.
• Stop engine before: refuelling, removing the broom
assembly, or making adjustments.
• Follow the manufacturer’s recommendation for wheel
weights or counterweights.
• Adjust support roller height to set proper ground contact pattern.
• Do not touch power broom parts which may be hot
from operation. Allow such parts to cool before
attempting to service the unit.
SLOPE OPERATION
Do
• See your authorized dealer for recommendations
counterweights to improve stability.
• Travel up and down slopes, not across.
• Remove obstacles such as large rocks, tree limbs,
etc.
• Watch for holes, ruts, or bumps. Uneven terrain could
overturn the unit. Snow can hide obstacles.
• Use slow speed. Tires may lose traction on slopes.
Choose a low gear so that you will not have to stop or
shift while on the slope.
• Keep all movement on the slopes slow and gradual.
Do not make sudden changes in speed or direction.
• Always keep unit in gear especially when traveling
downhill.
Do Not
• Do not start or stop on a slope. If tires lose traction,
disengage the broom and proceed slowly straight
down the slope.
• Do not turn on slopes unless necessary, and then,
turn slowly and gradually downhill, if possible.
• Do not operate near drop-offs, ditches, or embankments. The unit could suddenly turn over if a wheel is
over the edge of a cliff or ditch, or if an edge caves in.
• Do not operate power broom on roof tops.
• Do not operate on wet surfaces. Reduced traction
could cause sliding.
• Do not shift to neutral and coast down hills.
WARNING
Never operate on slopes greater than 17.6 percent (10°) which
is a rise of 3-1/2 feet (106 cm) vertically in 20 feet (607 cm)
horizontally.
When operating on slopes use additional wheel weights or
counterweights. See your dealer to determine which weights
are available and appropriate for your unit.
Select slow ground speed before driving onto slope. Travel UP
and DOWN the slope, never across the face, use caution when
changing directions and DO NOT START OR STOP ON
SLOPE.
Slopes are a major factor related to loss-of-control and tipover accidents, which can result in severe injury or death.
All slopes require extra caution. If you cannot back up the
slope or if you feel uneasy on it, do not operate on it.
2
Safety Rules
EMISSIONS
CHILDREN
• Engine exhaust from this product contains chemicals
known, in certain quantities, to cause cancer, birth
defects, or other reproductive harm.
• Look for the relevant Emissions Durability Period and
Air Index information on the engine emissions label.
Tragic accidents can occur if the operator is not alert to the
presence of children. Children are often attracted to the
unit and the operating activity. Never assume that children
will remain where you last saw them.
• Keep children out of the area and under the watchful
care of another responsible adult.
• Be alert and turn unit off if children enter the area.
• Before and during reverse operation, look behind and
down for small children.
• Never allow children to operate the unit.
• Use extra care when approaching blind corners,
shrubs, trees, or other objects that may obscure
vision.
SERVICE AND MAINTENANCE
• Use extra care in handling gasoline and other fuels.
They are flammable and vapors are explosive.
a) Use only an approved container.
b) Never remove gas cap or add fuel with the
engine running. Allow engine to cool before
refueling. Do not smoke.
c) Never refuel the unit indoors.
• If fuel is spilled, do not attempt to start the engine but
move the machine away from the area of spillage and
avoid creating any source of ignition until fuel vapors
have dissipated.
• Replace all fuel tank caps and fuel container caps
securely.
• Never fill containers inside a vehicle or on a truck bed
with a plastic bed liner. Always place containers on
the ground away from your vehicle before filling.
• Remove gas-powered equipment from the truck or
trailer and refuel it on the ground. If this is not possible, then refuel such equipment on a trailer with a
portable container, rather than from a gasoline dispenser nozzle.
• Keep nozzle in contact with the rim of the fuel tank or
container opening at all times until fueling is complete. Do not use a nozzle lock-open device.
• If fuel is spilled on clothing, change clothing immediately.
• Maintain or replace safety and instruction labels as
necessary.
• Never run a unit in an enclosed area.
• Keep nuts and bolts tight and keep equipment in
good condition.
• Never tamper with safety devices. Check their proper
operation regularly and make necessary repairs if
they are not functioning properly.
• Keep unit free of debris build-up. Clean up oil or fuel
spillage.
• Stop and inspect the equipment if you strike an
object. Repair, if necessary, before restarting.
• Never make adjustments or repairs with the engine
running unless specified otherwise in the engine
manufacturer’s manual.
• Components are subject to wear, damage, and deterioration. Frequently check components and replace
with manufacturer’s recommended parts, when necessary.
• Check control operation frequently. Adjust and service as required.
• Use only factory authorized replacement parts when
making repairs.
• Always comply with factory specifications on all settings and adjustments.
• Only authorized service locations should be utilized
for major service and repair requirements.
• Never attempt to make major repairs on this unit
unless you have been properly trained. Improper service procedures can result in hazardous operation,
equipment damage and voiding of manufacturer’s
warranty.
• Do not change engine governor settings or overspeed the engine. Operating the engine at excessive
speed can increase the hazard of personal injury.
• Disengage broom and traction, stop the engine, and
disconnect the spark plug wire(s) before: performing
service work or if the unit vibrates abnormally. After
striking an object, inspect the machine for damage
and make repairs before restarting and operating the
equipment.
3
Safety Rules
ANSI B71.3-1995 WARNINGS
Training
1. Read the operating and service instruction manual
carefully. Be thoroughly familiar with the controls and
the proper use of the equipment. Know how to stop
the unit and disengage the controls quickly.
2. Never allow children to operate the equipment.
Never allow adults to operate the equipment without
proper instruction.
3. Keep the area of operation clear of all persons, particularly small children and pets.
4. Exercise caution to avoid slipping or falling especially
when operating in reverse.
Preparation
1. Thoroughly inspect the area where the equipment is
to be used and remove all doormats, sleds, boards,
wires, and other foreign objects.
2. Disengage all clutches and shift into neutral before
starting engine (motor).
3. Do not operate the equipment without wearing adequate outer garments. Wear footwear that will
improve footing on slippery surfaces.
4. Handle fuel with care; it is highly flammable.
(a) Use an approved fuel container.
(b) Never add fuel to a running engine or hot engine.
(c) Fill fuel tank outdoors with extreme care. Never
fill fuel tank indoors.
(d) Replace fuel cap securely and wipe up spilled
fuel.
5. Never attempt to make any adjustments while the
engine (motor) is running (except when specifically
recommended by the manufacturer).
6. Let engine (motor) and machine adjust to outdoor
temperatures before starting to clear snow.
7. Always wear safety glasses or eye shields during
operation or while performing an adjustment or repair
to protect eye from foreign objects that may be
thrown from the machine.
6. When cleaning, repairing, or inspecting make certain
the broom and all moving parts have stopped.
Disconnect the spark plug wire and keep the wire
away from the plug to prevent accidental starting.
7. Do not run the engine indoors except for starting the
engine or for transporting the power broom in or out
of the building. Open the outside doors; exhaust
fumes are dangerous.
8. Do not clear snow across the face of slopes.
Exercise extreme caution when changing direction on
slopes. Do not attempt to clear steep slopes.
9. Never operate the power broom without proper
guards plates, or other safety protective devises in
place.
10. Never operate the power broom near glass enclosures, automobiles, window wells, drop-offs, and the
like without proper adjustment of the discharge angle.
Keep children and pets away.
11. Do not overload the machine capacity by attempting
to clear snow, sand or dirt at too fast a rate.
12. Never operate the machine at high transport speeds
on slippery surfaces. Look behind and use care
when backing.
13. Never direct discharge at bystanders or allow anyone
in front of the unit.
14. Disengage power to the broom when power broom is
transported or not in use.
15. Use only attachments and accessories approved by
the manufacturer of the power broom (such as wheel
weights, counterweights, cabs, and the like).
16. Never operate the power broom without good visibility or light. Always be sure of your footing, and keep
a firm hold on the handles. Walk, never run.
Maintenance and Storage
1. Check shear bolts and other bolts at frequent intervals for proper tightness to be sure the equipment is
in safe working condition.
2. Never store the machine with fuel in the fuel tank
inside a building where ignition sources are present
such as hot water and spacer heaters, clothes dryers,
and the like. Allow the engine to cool before storing
in any enclosure.
3. Always refer to the operator’s guide instructions for
important details if the power broom is to be stored
for an extended period.
4. Maintain or replace safety and instruction labels as
necessary.
5. Run the machine a few minutes after moving snow to
prevent freeze-up of the broom assembly.
• Always observe safe refueling and fuel handling practices when refueling the unit after transportation or
storage.
• Always follow the engine manual instructions for storage preparations before storing the unit for both short
and long term periods.
• Always follow the engine manual instructions for
proper start-up procedures when returning the unit to
service.
Operation
1. Do not put hands or feet near or under rotating parts.
Keep clear of the discharge opening at all times.
2. Exercise extreme caution when operating on or
crossing gravel drives, walks, or roads. Stay alert for
hidden hazards or traffic.
3. After striking a foreign object, stop the engine
(motor), remove the wire from the spark plug, disconnect the cord on electric motors, thoroughly inspect
the power broom for any damage, and repair the
damage before restarting and operating the power
broom.
4. If the unit should start to vibrate abnormally, stop the
engine (motor) and check immediately for the cause.
Vibration is generally a warning of trouble.
5. Stop the engine (motor) whenever you leave the
operating position, before making any repairs, adjustments, or inspections.
4
Decals
DECALS
This unit has been designed and manufactured to provide you with the safety and reliability you would expect
from an industry leader in outdoor power equipment.
The safety decals below are on your unit.
Although reading this manual and safety instructions it
contains will provide you with the necessary basic knowledge to operate this equipment safely and effectively, we
have placed several safety labels on the unit to remind
you of this important information while you are operating
your unit.
These labels are easily applied and will act as a constant
visual reminder to you, and others who may use the
equipment, to follow the safety instructions necessary for
safe, effective, operation.
If any of these decals are lost or damaged, replace them
at once. See your local dealer for replacements.
NOTE: Engine operation and safety decals are supplied
by the engine manufacturer.
All WARNING, CAUTION, and instructional messages
on your unit should be carefully read and obeyed.
Personal bodily injury can result when these instructions
are not followed. The information is for your safety and it
is important.
DECALS
1724620
M-B COMPANIES INC
CHILTON & NEW HOLSTEIN
WISCONSIN USA
SERIAL NUMBER
390-114599
5
Decals
Decal Kit 390-117958
6
Safety Icons
SAFETY ICONS
WARNING: READ OPERATOR’S
MANUAL.
WARNING: DISMEMBERMENT.
Read and understand the Operator’s
Manual before using this machine.
This machine can amputate limbs.
Keep bystanders and children away
when engine is running.
DANGER: THROWN OBJECTS.
DANGER: DISMEMBERMENT.
This machine is capable of throwing
objects and debris. Keep bystanders
away.
The broom can amputate limbs. Keep
hands and feet away from rotating
parts.
7
Identification Numbers
Identification Numbers
When contacting your authorized dealer for replacement parts, service, or information you MUST have
these numbers.
Record your model name/number, manufacturer’s identification numbers, and engine serial numbers in the
space provided for easy access. These numbers can be
found in the location shown.
NOTE: For location of engine identification numbers,
refer to the engine owner’s manual.
Broom S/N___________________________________
Engine S/N __________________________________
M
CH
-B
ILT
CO
ON
M
WI &
SC NE PA
NI
ON W
SE
ES
RIA SIN HO
L NU USLSTE IN
C
IN
MB A
ER
M-B COMPANIES INC
CHILTON & NEW HOLSTEIN
WISCONSIN USA
SERIAL NUMBER
8
Features, Controls, & Operation
1,2..
Speed Selector
Selects forward speeds 1-5 and reverse speeds 1-2. No
neutral position or gate is required, since the traction
drive design automatically provides "neutral" (no forward
or reverse movement), whenever the Drive Control is
released.
Traction Control / Free Hand™ Lock
Engages traction drive to wheels when depressed. Also
locks broom control when depressed simultaneously.
Releasing the traction control lever releases the Free
Hand™ broom control lock and stops the drive wheels.
Broom Control
Engages the broom when depressed. Releasing the
control stops the broom.
Easy Turn™ Control
Easy Turn Control: Engaging the Easy Turn™ lever
releases the right wheel to allow easy turning in tight
areas. Releasing the control automatically engages both
drive wheels for full traction.
Traction Lock Pins: The right traction wheel can be
completely released using the locking pin (see Figure 7).
This allows the unit to be easily moved with the engine
off.
Fuel
Fuel tank filler cap. Note: The fuel shut off valve is located under the fuel tank. Close the valve when the power
broom is not in use. Open the valve before starting.
1,2..
Throttle Lever
Controls engine speed. Move toward the hare icon for
faster engine speed, move toward the turtle icon for
slower engine speed. Set throttle to FULL/FAST (hare
icon) for operation. Move throttle past FAST to engage
choke. Once engine is running smoothly, move throttle to
FAST run position.
Engine Power Switch
The Engine Power Switch prevents the engine from
being started. Rotate switch to ON position to start
engine, OFF on shut engine off.
9
Operation
GENERAL OPERATION
B
CHECKS BEFORE EACH START-UP
1. Make sure all safety guards are in place and all nuts,
bolts and clips are secure.
2. Check the engine oil level. See your engine Owner’s
Manual for procedure and specifications.
D
3. Check to make sure spark plug wire is attached and
spark plug is tightened securely. If necessary, torque
spark plug to 15 ft. lbs.
4. Check the fuel supply. Fill the tank no closer than 1/4
to 1/2 inch of top of tank to provide space for expansion. See your engine Owner’s Manual for fuel recommendations.
A
5. Check the casters to make sure they are set at the
desired height.
6. Check the Drive Control (B, Figure 2), and Broom
Control (C) for proper operation. If adjustment is
required, see the Service section for procedures.
7. Make sure that the broom is angled in the proper
direction. See the Service section for adjustment procedures and troubleshooting.
8. Check the Speed Selector (A, Figure 2) for smooth
operation. The control must move freely into each
speed position gate and remain in position when
released. If the Speed Selector does not move freely
into all forward and reverse speed positions, contact
your local authorized dealer for assistance.
C
STARTING THE ENGINE
1. Turn the fuel valve (D, Fig. 1) to the ON position.
2. Set Engine Power switch (C) to the ON position.
Figure 1. Engine Controls
A. Starter Handle
B. Throttle Lever and Choke Control
C. Engine Power Switch
D. Fuel Valve
WARNING
For your safety, operation on slopes should be in
an up and down direction only. If it becomes
necessary to move across the face of a slope, use
caution and do not engage the broom. Be very
careful when changing direction on a slope.
WARNING
Gasoline is highly flammable and must be
handled with care. Never fill the tank when the
engine is hot or running. Always move outdoors
to fill the tank. Keep power broom and gasoline
away from open flame or spark.
Proper footwear is recommended for the operator
to help prevent slipping. Never attempt to operate
on excessively steep slopes. The maximum slope
for any operation is 17.7% (10º).
10
Operation
3. Move the Throttle Lever (E) fully up to the FAST position and to the Choke position. (Do not choke a warm
engine.)
4. Pull Starter Handle (A) rapidly to start the engine. Do
not allow the Starter Handle to snap back—let the
starter rope rewind slowly—while keeping a firm grip
on the Starter Handle.
7. As the engine starts slide throttle lever towards the
idle position for a few minutes until engine runs
smoothly
NOTE: Allow the engine to warm up at SLOW throttle for
a few minutes before operating the power broom at full
speed. The engine will not develop full power until it
reaches operating temperature. After warming up,
always operate at full throttle.
WARNING
When BOTH levers are depressed, the FreeHand™ Control is activated. This allows Brush
Engage Control to be released — THE BRUSH
ROTATION WILL CONTINUE — until the FreeHand™ Control is released.
A
B
C
OPERATING THE POWER BROOM
WARNING
ALWAYS ENGAGE GROUND DRIVE BEFORE
ENGAGING BROOM DRIVE.
ALWAYS REMOVE YOUR HAND COMPLETELY
FROM THE BROOM DRIVE LEVER BEFORE
DISENGAGING GROUND DRIVE.
1. Set the Speed Selector to the desired forward speed.
Figure 2. Controls (from operator’s position)
A. Speed Selector
B. Traction & Free-Hand™ Control
C. Broom Engage Control
2. Fully press and hold the Traction & Free-Hand™
Control lever (B, Figure 2) on the left-hand grip to
engage the traction drive and begin moving the
power broom. To disengage the traction drive, completely release the lever.
3. Fully press and hold the Broom Engage Control (C,
Figure 2) on the right-hand grip to begin broom rotation. Releasing the Broom Engage Control will disengage the broom —unless the Free-Hand™ Control
has been activated (See step 4 below).
GROUND SPEED SELECTOR
Use the Speed Selector (A, Figure 2) to control the drive
speed of the broom. There are five forward speeds and
two reverse speeds.
To change speeds, release both control levers (B, Figure
2), then move the Speed Selector to the desired setting.
Fully depress the control levers to resume.
4. When BOTH levers are depressed, the Free-Hand™
Control is activated. This allows Broom Engage
Control to be released — BROOM ROTATION WILL
CONTINUE — until the Free-Hand™ Control is
released.
ENGINE SPEED
5. Select forward or reverse speeds as needed using
the Speed Selector (A, Figure 2). Release both control levers before changing drive speeds.
Broom speed is adjusted by engine rpm. Adjust broom
speed as needed.
11
Operation
BRUSH ANGLE ADJUSTMENT
A
To change the angle of the brush:
1. Release the attachment clutch and then the traction
clutch.
2. Loosen the T-nut on top of the adapter frame and
turn the brush as needed. (See A, Figure 3)
3. Retighten the T-nut.
BRUSH HEIGHT ADJUSTMENT
CAUTION
Figure 3. Brush Angle Adjustment
A. T-nut
If brush height is set too low, brush can drive
machine rearward when attachment clutch is
engaged. Engage brush slowly with brush set at
proper height.
For hard surfaces, adjust the caster wheels so that brush
just touches surface. The brush works best with the
brush properly leveled. To adjust the brush height:
1. Move the brush to a dusty, flat surface. Leave the
engine running.
2. Start the brush at a slow speed. Run the brush in a
stationary position for 30 seconds.
3. Lift the brush head assembly off the ground and
reverse the unit to move it away from the swept area.
4. Stop engine and allow all moving parts to stop.
5. Check the width of the swept area. The brush pattern
should be 2-3 inches wide, running the length of the
brush. (See Figure 4)
6. To adjust
a) Loosen the caster wheel lock lever.
(See A, Figure 5)
b) Raise or lower the caster wheel as needed.
c) Tighten the caster wheel lock lever.
NOTE: If using the power broom for turf applications,
less ground contract is required.
Figure 4. Brush Sweeping Pattern
A
Figure 5. Caster Adjustment
A. Caster wheel lock lever
12
Operation
EASY TURN™ TRACTION
Easy Turn™
Lever Engaged
Easy Turn™
Lever
Released
Right Wheel Freewheels,
Left Wheel Drives
Both Wheels Drive
Figure 6. Easy Turn Control
A
B
EASY TURN™ FREEWHEELING AND
TRACTION DRIVE LOCK
Normal Operation
For easy turning when using the power broom, squeeze
the Easy Turn™ lever (Figure 6). Engaging the Easy
Turn™ lever releases the right traction wheel but allows
the left wheel to continue driving. Releasing the Easy
Turn™ lever automatically engages both drive wheels for
full traction.
Figure 7. Traction Drive Lock
A. Pin in Outer Hole (Freewheel)
B. Pin in Inner Hole (Drive)
NOTE: The Easy Turn™ lever will be more difficult to
activate under a heavy load. Activate the lever before
beginning a turn.
1. Turn the unit off, remove the Engine Key, and disconnect the spark plug wire.
When Pushing the Power Broom:
For easy turning when pushing the power broom, disengage the right wheel using the Traction Lock Pin. (See
Figure 7)
13
Storage
TEMPORARY STORAGE
(30 DAYS OR LESS)
WARNING
Never store the unit, with gasoline in engine or
fuel tank, in a heated shelter or in enclosed,
poorly ventilated enclosures. Gasoline fumes may
reach an open flame, spark or pilot light (such as
a furnace, water heater, clothes dryer, etc.) and
cause an explosion.
Remember, the fuel tank will still contain some gasoline, so
never store the unit indoors or in any other area where fuel
vapor could travel to any ignition source. Fuel vapor is also
toxic if inhaled, so never store the unit in any structure used
for human or animal habitation.
Here is a checklist of things to do when storing your unit
temporarily or in between uses:
Handle gasoline carefully. It is highly flammable
and careless use could result in serious fire
damage to your person or property.
• Keep in an area away from where children may come
into contact with it. If there’s any chance of unauthorized
use, remove the spark plug wire.
Drain fuel into an approved container outdoors
away from open flame or sparks.
• If the unit can’t be stored on a reasonable level surface,
chock the wheels.
• Clean all debris and snow from the unit.
8. Drain fuel system completely or add a gasoline stabilizer
to the fuel system. If you have chosen to use a fuel stabilizer and have not drained the fuel system, follow all
safety instructions and storage precautions in this manual to prevent the possibility of fire from the ignition of
gasoline fumes. Remember, gasoline fumes can travel
to distant sources of ignition and ignite, causing risk of
explosion and fire.
NOTE: If storing your unit between winter snow removal
jobs in a cold area, we suggest that you fill the fuel tank at
the completion of each job to prevent water condensation in
the fuel tank. Wait for engine to cool before filling tank.
LONG TERM STORAGE
(LONGER THAN 30 DAYS)
NOTE: Gasoline, if permitted to stand unused for extended
periods (30 days or more), may develop gummy deposits
which can adversely affect the engine carburetor and cause
engine malfunction. To avoid this condition, add a gasoline
stabilizer to the fuel tank or drain all fuel from the system
before placing unit in storage.
Before you store your unit for the off-season, read the
Maintenance and Storage instructions in the Safety Rules
section, then perform the following steps:
1. Drain crankcase oil and refill with a grade of oil that will
be required when unit is used again.
2. Coat all bare metal surfaces with paint or light coat of oil
to prevent rusting.
3. Clean external surfaces and engine.
STARTING AFTER
LONG TERM STORAGE
4. Prepare engine for storage. See engine owner’s
manual.
Before starting the unit after it has been stored for a long
period of time, perform the following steps.
5. Clean any dirt from the engine housing.
1. Remove any blocks from under the unit.
2. Unplug the exhaust outlet and air cleaner.
6. Cover air intake and exhaust outlet tightly with plastic or
other waterproof material to keep out moisture, dirt and
insects.
3. Fill the fuel tank with fresh gasoline. See engine
manual for recommendations.
4. See engine owner’s manual and follow all instructions
for preparing engine after storage.
7. Completely grease and oil as outlined in the Normal
Care section.
5. Check crankcase oil level and add proper oil if
necessary.
6. Inflate tires to proper pressure.
7. Start the engine and let it run slowly. DO NOT run at
high speed immediately after starting. Be sure to run
engine only outdoors or in well ventilated area.
14
Regular Maintenance
MAINTENANCE SCHEDULE
Maintenance Required
Notes
Service Interval
Lubricate power broom
10 Hours
Use 10W Oil and Automotive
Lithium Grease
Check tire pressure
Monthly
Inflate to 20 psi (1.37 bar)
Check/Change engine oil**
Check oil before each
use **
None
Replace spark plug**
Yearly**
None
Check drive linkage & belt tension
4-6 Hours
None
** See your engine owner’s manual for engine-related information.
CHECKING TIRE PRESSURE
The air pressure in each tire (Figure 8) should be 20 psi
(136 kPa) and should be equal for both tires for best performance. Be sure to keep caps on valves to prevent
entry of debris into the valve stem when tires are filled.
Figure 8. Checking Tire Pressure
15
Regular Maintenance
LUBRICATION
IMPORTANT NOTE
It is very important that grease fittings on the
broom shaft are lubricated regularly. If broom
rusts to shaft, damage to worm gear may occur
if shear pins do not break.
To prevent wheels rusting to axles, it is also
necessary to remove the wheels and grease the
axles regularly.
1. Apply medium weight (10W) oil to points shown (See
Figures 9-12).
Figure 10. Drive Lubrication
2. Remove wheels and grease axles once each year
(See Figure 11).
3. Apply 5W-50 synthetic motor oil to the friction disk
drive hex shaft.
4. Grease broom drive universal joint (See Figure 12).
NOTE: Access is best gained from underneath
machine.
Generally, all moving metal parts should be oiled where
contact is made with other parts. Keep oil and grease off
belts, pulley grooves, drive disc, and friction disc.
LUBRICATION NOTES:
Grease locations indicated by grease gun symbol. Use grease fittings when present.
Disassemble parts to apply grease to moving
parts when grease fittings are not installed.
Figure 11. Grease Axles and Control Levers
Oil locations indicated by oil can symbol. Do
not allow oil to drip onto traction drive or friction
disc.
Figure 12. Grease Universal Joint
Figure 9. Lubricate Free Hand Control Linkage
16
Troubleshooting, Adjustments and Service
TROUBLESHOOTING
WARNING
This section provides troubleshooting and service
instructions. Locate the problem and check the possible
cause/remedy in the order listed.
Before performing any adjustment or service to
power broom, stop the engine and wait for
moving parts to stop. Remove the key. To prevent
accidental starting, disconnect the spark plug
wire and fasten away from the plug.
Also, refer to the engine manufacturer’s Owner’s Manual
for additional information.
For problems not covered here, contact your local dealer.
PROBLEM
Engine fails to start
POSSIBLE CAUSE
1. Engine switch is OFF.
1. Set switch to ON position.
2. Fuel valve is in CLOSED position.
2. Turn valve to OPEN position.
3. Out of fuel.
3. Fill fuel tank.
4. Choke OFF - cold engine.
4. Turn choke to ON, set throttle to
FAST.
5. Turn choke to OFF; try starting.
5. Engine flooded.
6. No spark.
1. Fuel mixture too rich.
6. Check gap. Gap plug, clean electrode, or replace plug as necessary.
7. Drain tank (Dispose of fuel at an
authorized hazardous waste facility).
Fill with fresh fuel.
1. Move choke to OFF position.
2. Carburetor adjusted incorrectly.
2. See your dealer for adjustments.
7. Water in fuel, or old fuel.
Engine starts hard or runs poorly
REMEDY
3. Spark plug faulty, fouled, or gapped 3. Clean and gap, or replace.
improperly.
4. Fuel Cap Vent is blocked.
4.Clear vent.
Brush does not clean hard surface 1. Casters improperly adjusted.
Broom does not rotate
1. Broom Control not engaged.
2. Broom drive clutch rod slack.
Poor traction
1. RAISE casters (this lowers the
broom).
1. Engage Broom Control.
3. Broom drive belt slipping.
2. Tighten to remove slack. See
broom clutch rod adjustment.
3. Check broom drive belt adjustment.
4. Broken belt.
4. Replace belt.
5. Shear pin broken.
5. Replace shear pin.
1. Tires slipping.
1. Check tire pressure and tread.
17
Troubleshooting
PROBLEM
Broom does not stop when broom
lever is released
POSSIBLE CAUSE
1. Free-Hand™ Control is ACTIVE.
2. Broom clutch rod too tight or bent.
REMEDY
1. Release BOTH broom Engage
Control AND Free-Hand™ Control
to stop broom.
2. Loosen or straighten clutch rod.
3. Broom drive belt out of adjustment. 3. Adjust broom belt.
Power broom does not stop when
drive lever is released
4. Broom belt guide out of adjustment. 4. Adjust broom belt guide.
1. Traction drive clutch rod bent or too 1. Loosen rod to remove slack or
tight.
replace. See adjustment procedure.
1. Traction drive clutch rod loose.
1. Tighten to remove slack. See
adjustment procedure.
2. Drive belt loose, broken, or
2. Replace drive belt.
stretched.
3. Drive roller chain damaged.
3. Replace chain.
4. Traction Lock Pins in FreeWheeling position (OUTER hole).
5. Friction Disc worn.
4. Change Traction Lock Pins to
INNER hole to engage traction
drive.
5. Replace Disc (see your dealer).
Power broom veers to one side
1. Tires pressure not equal.
1. Check tire pressure.
Excessive vibration
2. One wheel is set in Free-Wheeling 2. Make certain the left Traction Lock
mode. (Traction Lock Pin is in the
Pin is in the INNER holes (to
OUTER hole).
engage traction drive).
1. Loose parts or damaged broom
1. STOP engine and REMOVE the
assembly.
key. DISCONNECT the spark plug
wire. Tighten all hardware. Replace
broom assembly if necessary. If
vibration continues, see your dealer.
Drive fails to move power broom at 1. Traction Drive out of adjustment.
slow speeds
Speed selector difficult to move or 1. Hex shaft needs lubrication.
frozen in place
18
1. Readjust drive, or shift Speed
Selector setting up one speed
faster.
1. Lubricate hex shaft with 5W-50 synthetic motor oil (see Maintenance).
Adjustments
SPEED SELECTOR ADJUSTMENT
1. Loosen the two nuts (F, Figure 13).
F
2. Place the shift lever in 5th gear.
3. Push the lower rod into the housing and tighten the
two nuts. Do not lift up or down on rods while tightening. Make sure the shoulders of the carriage bolts (D)
are in the slots.
F
D
E
A
G
4. Always check traction drive tension and broom drive
tension after adjusting speed selector.
C
BROOM DRIVE TENSION
B
1. With the drive lever released, the hook (B, Figure 13)
should barely touch the lever (C) without raising it.
There can be a maximum 1/32” clearance as shown.
Figure 13. Speed Selector and Broom Drive Linkages
A. Turnbuckle
B. Spring Hook
C. Lever
D. Carriage Bolts
E. Lower Rod
F. Nuts
G. Nuts
2. To adjust, loosen the two nuts (G) and hold the lower
rod to keep from rotating. Turn the turnbuckle toward
the right to lower the spring, or toward the left to raise
the spring.
3. Tighten the two nuts against the turnbuckle. Hold the
turnbuckle with pliers while tightening the nuts.
TRACTION DRIVE TENSION
1. With the drive lever engaged, bottom end of lower
rod (D, Figure 14) should be flush with bottom of
spring (E).
A
B
2. To adjust, loosen the two nuts, (B) and hold the
lower rod to keep from rotating. Turn the turnbuckle
(C) toward the right to lower rod or toward the left to
raise rod.
C
B
D
3. Engage the drive lever to check the adjustment.
When correct, tighten the two nuts against the turnbuckle. Hold the turnbuckle with pliers while tightening the nuts.
E
Figure 14. Drive Tension Adjustment
A. Upper Rod
B. Nuts
C. Turnbuckle
D. Lower Rod
E. Spring
19
Adjustments & Service
EASY TURN™ CABLE ADJUSTMENT
If the Easy Turn™ cable has stretched, the gears will not
disengage when the control lever is activated. Adjust the
cable using the following procedure.
1. Turn the engine off and disconnect the spark plug
wire.
2. Loosen the jam nut (B, Figure 15).
3. Turn the adjustment nut (A) to lengthen or shorten
the cable. The cable should be tightened just until all
slack is removed from the lever, however it must not
engage the Easy Turn™ release without depressing
the control lever.
B
4. Tighten the jam nut.
A
Figure 15. Cable Adjustment
A. Adjustment Nut
B. Jam Nut
20
Adjustments & Service
BELT REPLACEMENT
A
1. Turn off the engine, remove the spark plug wire, and
wait for all moving parts to stop. Loosen the two
screws (B, Figure 16) securing the belt cover.
2. Tilt the cover forward and work it off the power broom.
3. Move the belt guides (B, Figure 17) by loosening the
two capscrews (A).
4. Remove the broom drive belt as follows:
a. Slip the broom drive belt (D, Figure 17) from the
idler pulley by pushing it away from the pulley and
then toward the rear.
b. Remove the belt from the engine pulley.
c. Remove six capscrews from bottom cover to
power broom frame. Loosen nuts (A, Figure 18) on
each side to release broom pulley belt stops (B).
Move belt stops and remove belt from pulley (C).
d. Remove the four bolts that hold the broom head
on and remove broom head assembly. NOTE:
Make sure to firmly support the broom assembly.
e. Remove broom drive belt.
f. For more clearance to remove the belt, engage
the traction drive lever.
5. Remove the traction drive belt as follows:
a. Pull the idler pulley (I, Figure 17) away from the
belt and slip the belt from the pulley.
b. Slip the belt off the traction pulley and then the
engine pulley. The arm for the front idler pulley (G,
Figure 17 may have to be pivoted to provide clearance for removing the belt from the traction pulley.
c. Pull the belt out between the broom pulley (F,
Figure 17) and traction pulley.
B
Figure 16. Belt Cover
A. Belt Cover
B. Screws
A
C
B
D
E
A
B
F
I
H
Figure 17. Belts and Pulleys
A. Capscrews
B. Belt Guides
C. Traction Drive Belt
D. Broom Drive Belt
E. Engine Pulley
F. Broom Pulley
G. Idler Pulley, Broom
H. Traction Pulley
I. Idler Pulley, Traction
21
G
Service
6. Reverse the procedure to install the belts. Be sure
there are no twists and the belts are properly seated
in the grooves. Adjust the belt stops so there is 1/8”
(3mm) clearance between belt and stop. The pattern
for both belts is shown in Figure 19. Slide the right
axle left fully before tightening the set collar (E,
Figure 18).
7. Check the traction drive tension and broom drive tension. Follow the procedures under BROOM/TRACTION DRIVE TENSION.
8. Make sure the broom stops when the broom drive
lever is released. Make sure traction drive stops
when the traction drive lever is released. If not, check
the drive tension. If a problem exists, see your dealer.
E
D
C
B
B
A
A
Figure 18. Broom Pulley Belt Stops
(shown with bottom cover removed)
A. Nuts
B. Belt Stops
C. Broom Pulley
D. Gear Assy. Bolts
E. Set Collar
E
E
A
C
B
D
F
F
Figure 19. Belt Pattern (viewed from front)
A. Engine Pulley
B. Drive Belt
C. Idler Pulley
D. Driven Pulley
E. Engine Belt Stops
F. Broom Pulley Belt Stops
22
Service
BRUSH SEGMENT REPLACEMENT
1. Remove bolts from broom bearings at both ends of
the support shaft (A, Figure 20).
2. Loosen bearing setscrews and slide bearings inwards
toward the center of broom.
3. Manually move power unit backwards away from the
brush assembly. IMPORTANT – Support splined
drive shaft to prevent damage.
4. Stand broom assembly on one end. (See Figure 21)
5. Remove the three bolts from the end plate (See A,
Figure 21).
6. Remove used broom segments.
7. Install new broom segments.
NOTE – Align segment engagement fingers (C,
Figure 21) on alternating support shafts. This will
evenly spread rotating force through the drive system.
A
Figure 20. Brush Removal
A. Attachment bolts
Note: Brush segments must align properly
B
Metal Rings
Alternate
Metal
Rings
A
Bristles
C
8. Reinstall broom assembly.
IMPORTANT – Fully tighten the bearing setscrews
before operating the power broom.
Figure 21. Brush Assembly
A. End plate
B. Brush segment
C. Engagement fingers
23
Optional Equipment
TURF CASTER KIT
The optional turf casters replace the standard broom
caster wheels. These casters provide greater floatation
when using the broom in turf grooming applications.
Install the turf casters as follows:
1. Raise and support the broom head assembly about
2"off the ground.
11
2. Loosen the standard caster assembly by loosening
and removing the locking lever. See Figure 22.
NOTE: Save both levers for use with the turf caster
assemblies.
3
3. Remove the original caster wheel and caster mounting tube.
9 8
4
6
10
2
5
4. Install the new caster mounting bracket (9) onto the
broom side frame and secure with the furnished nuts
and bolts (3, 4 and 8).
REMOVE CRANK FROM
HERE AND INSTALL
NEW BRACKET
7
NOTE:
2
a. The caster mounting brackets are designed for
right hand and left hand installation.
1
2
b. Remove the two bolts (11) holding hood in place.
Reinstall these bolts through the upper holes in
the new caster mounting bracket (9), securing the
caster mounting bracket and hood assembly.
5. Attach caster wheel (1) to the caster fork swivel plate
(2) using bolt, bushing and nut. NOTE: Make sure to
install the bushing into caster wheel before attaching
caster wheel to the caster fork swivel plate.
Assembled
Turf Caster
6. Attach the caster forks (2) onto the caster mounting
bracket (10) using the carriage bolts (7), washer (5)
and nuts (6).
7. Slide the turf caster wheel assembly into the mounting bracket from underneath and secure in place with
the locking lever removed from the original caster
wheels.
Figure 22. Turf Caster Assembly
8
9
7
8. Repeat Steps 2 - 6 for the other side of the broom.
10
5
DEBRIS BOX INSTALLATION
3
3
The optional debris box requires only a few assembly
steps to enable full use. Install the debris box as follows:
5
6
2
1. Install Deflector Kit onto Broom Hood.
1
a. Position deflector straps (2, Figure 23) over
broom hood (1) and secure each strap with one
bolt (3) washer (4) and nut (5) in the top hole of
the strap and broom hood.
b. Attach strap support (6) to each deflector strap.
Position the support strap at the lower edge of the
deflector strap and secure with one bolt (3) and
nut (5) in each support strap.
4
5
Figure 23. Deflector Kit Installation
24
Optional Equipment
c. Position the deflector (7) and upper support strap
(8) over the broom hood and deflector strap
assembly. Secure the deflector through the second hole at the top of the deflector strap and
broom hood using one bolt (9), washer (10)
washer (4) and nut (5).
2. Raise and support the broom head assembly about
2"off the ground. Loosen the standard caster assembly by loosening the locking lever (2, Figure 24) and
remove the caster assemblies. NOTE: Save the
standard casters for future use.
1
3. Position the debris box assembly (6) in-front of the
power broom.
2
4. Remove hitch pin (5), releasing debris box mounting
tubes (3).
3
5. Raise the power broom upwards and insert the
mounting tubes (3) through the mounting brackets
(1) on the broom frame.
4
5
6. Position the debris box under the broom assembly
and lower the broom assembly onto the debris box
mounting brackets.
6
Figure 24. Debris Box Installation
7. Insert hitch pin (5) to secure the broom assembly to
the debris box. Install hairpin cotter pin (4) to secure
the hitch pin.
8. The final assembly is shown in Figure 25.
9. Adjust the broom height to according to the Broom
Height Adjustment instructions earlier in this manual.
Figure 25. Debris Box/Power Broom Final Assembly
25
Parts Lists
FINAL DRIVE REPAIR PARTS
5
9
7
3
1
2
4
8
11
10
6
REF NO.
1
2
3
4
5
6
7
8
9
10
11
PART NO.
311-20750
341-20000
341-80000
370-126976
370-97446
371-92059
386-91174
410-140493
502-129543
505-129571
600-132224
QTY.
4
4
1
4
1
8
1
1
1
1
2
DESCRIPTION
HHCS, .31-18, Unc X 0.750
WASHER, Flat, 5/16, Std Zinc PL
WASHER, Flat
CARRIAGE BOLT, 5/16-18, UNC x .75
HHCS, .75-10, UNC X .75
NUT, Flanged, 5/16-18, Platted Locking
KEY, Round End, .1875 x 1
FRAME, Mounting
DRIVELINE, Series 07, 3/4, Keyd x 1-15 Spin
SHEAVE, 6 OD, 3/4 ID A, Section Stamped Steel
BEARING, 3/4”, Flangette
Footnotes:
26
Parts Lists
BRUSH ASSEMBLY
1
4
3
REF NO.
PART NO.
3' Brush
1
2
3
4
101-129541
101-132808
370-126977
401-129523
410-132213
QTY.
DESCRIPTION
4' Brush
101-129541
101-132808
370-126977
401-129523
410-140473
9
9
12
12
3
1
1
1
Segment, Poly, 10 x 25, Conv Black
Segment, Poly/Wire, 10 x 25, Cov Black
Segment, Poly, 10 x 25, Conv Black
Segment, Poly/Wire, 10 x 25, Cov Black
HHCS, Serrated Flange, 3/8-16 x 1 Plated
Plate, End, Retainer
Core, W.U., Thru Shaft Tri
Core, W.U., Thru Shaft Tri
Footnotes:
27
2
Parts Lists
BROOM HEAD ASSEMBLY
17
14
19
18
6
12
23
5 2
9
8
7
22
21
16
10
3
1
20
4
11
15
13
Key installs in
slot on shaft (15)
28
Parts Lists
REF NO.
PART NO.
3' Brush
4' Brush
1
2
3
4
5
6
7
8
9
10
11
12
13
14
15
100-140487
311-10750
311-11500
311-22000
341-10000
361-30000
343-30000
370-92047
371-81297
371-81299
371-81620
371-92058
386-120689
387-129559
401-140151
100-140487
311-10750
311-11500
311-22000
341-10000
361-30000
343-30000
370-92047
371-81297
371-81299
371-81620
371-92058
386-120689
387-129559
16
17
401-140486
410-129522
18
410-132203
19
20
21
22
23
410-140292
510-140152
600-132225
711-132229
711-132230
401-140471
401-140486
410-140003
410-140001
410-140292
510-140152
600-132225
711-132229
711-132230
QTY.
2
4
2
2
4
1
4
4
4
2
2
4
1
2
1
1
2
1
1
1
1
1
1
2
2
2
DESCRIPTION
Stem Caster, 5"
HHCS, .25-20 UNC x 0.75
HHCS, .25-20 UNC x 1.50
HHCS, .31-18 UNC x 2.00
Washer, Flat - 1/4", Std Zink Plate
Washer, Flat, 3/8" Std Zink Plate
Washer, SAE 3/8
Carriage Bolt, 3/8-16 UNC x 1
Nut, Hex, ESNA, 3/8-16 UNC
Nut, Hex, ESNA, 1/4-20 NC
Nut, Hex, ESNA, 5/16-18 UNC
Nut, Flanged, 1/4-20 Plated Locking
Key, Square, 2 Rnd Ends .25 x .25 x 2 Lg
Lever, Adjustable
Shaft, Thru, 1-1/8, 3' MCD
Shaft, Thru, 1-1/8, 4' MCD
Tube, Square, Caster Mounting
Hood, W.U. 3' MCD
Hood, W.U. 4' MCD
Frame, Brush, W.U. 3' Brush
Frame, Brush, W.U. 4' Brush
Handle, T-bar
Gearbox, worm, Aluminum, 8.25:1
Bearing, 1 1/8" Flanged
Plug, Square, 1" Plastic
Plug, Square, 2" x 2" Tube
Footnotes:
29
Parts Lists
DEBRIS BOX ASSEMBLY
15
2
5
7
9
4
4
9
15
14
7
9
4
21
5
3
18
15
22
20
19
9
16
10
11
12
17
13
6
1
30
8
Parts Lists
REF NO.
PART NO.
3' Brush
QTY.
430-96354
430-96472
430-96435
1
2
100-90281
101-132985
3
101-140412
4
5
6
7
8
9
10
11
12
13
14
15
311-10750
311-11000
370-126976
341-10000
370-91955
371-81299
371-81379
371-81620
383-140400
384-140384
401-132986
401-132987
16
410-140376
17
410-140378
18
19
20
21
22
410-140414
711-132229
371-92058
384-92034
390-117897
DESCRIPTION
4' Brush
430-96473
100-90281
101-140505
101-140506
311-10750
311-11000
370-126976
341-10000
370-91955
371-81299
371-81379
371-81620
383-140400
384-140384
401-132986
401-140504
410-140502
410-140503
410-140414
711-132229
371-92058
384-92034
390-117897
4
1
1
1
1
10
6
16
9
8
12
4
16
2
2
3
3
3
2
2
1
1
1
2
4
2
1
3' MCD Deflector Kit
4' MCD Deflector Kit
3' MCD Debris Box, includes Deflector Kit
4' MCD Debris Box, includes Deflector Kit
Caster Wheel
Deflector, 3' MCD
Deflector, 4' MCD
Deflector, Rubber, 3' Debris Box
Deflector, Rubber, 4' Debris Box
HHCS, .25-20 UNC X 0.750
HHCS, .25-20 UNC X 1.0
Carriage Bolt, 5/16-18 UNC X 0.750
Washer, Flat, 1/4"
Machine Screw, Plated, 10-32 x 1/2
Nut, Hex, ESNA, 14-20 NC
ESNA Nut, #10-32
Nut, Hex, ESNA, 5/16-18 UNC
Pin, Modified
Latch, Rubber, Pull
Strap, Deflector Support
Strap, Support, 3' Debris Box
Strap, Support, 4' Debris Box
Bracket, Mtg, W.U., 3' Debris Box
Bracket, Mtg, W.U., 4' Debris Box
Frame, MCD FOD
Frame, MCD FOD
Debris Box, W.U
Plug, Square, Plastic
Nut, flanged, 1/4-20 Plated Locking
Handle, Grab, Rubber Coated
Decal, MB Logo, Medium black on Clear
31
Parts Lists
TURF CASTER PARTS
3
9 8
4
6
10
2
5
REMOVE CRANK FROM
HERE AND INSTALL IN
NEW BRACKET
7
2
2
1
32
Parts Lists
REF NO.
1
2
3
4
5
6
7
8
9
10
PART NO.
430-96237
100-92126
100-92156
311-10750
341-10000
341-30000
361-30000
370-92047
371-92058
410-132595
410-132593
410-95245
QTY.
2
2
4
4
8
8
8
4
1
1
2
DESCRIPTION
Caster Wheel Kit
6.25 x 3 Caster Wheel, .75 I.D. Brg Rub. St,
Caster Fork, Swivel Plate, includes attachment bolt, nut and sleeve bearing
HHCS, .25-20 UNC x 0.750
Washer, Flat - 1/4", Std Zink Plate
Washer, Lock - 3/8", Std Zink Plate
Nut, Hex, UNC 3/8-16
Carriage Bolt, 3/8-16 UNC x 1"
Nut, Flanged, ¼-20 Plated, Locking
Bracket, Caster Mounting, RH
Bracket, Caster Mounting, LH
Caster Mount
33
Parts Lists
HANDLES AND CONTROLS GROUP
11
10
2
1
Linkage adjustment for traction and
broom control with drive levers engaged,
the bottom end of lower rods (Ref. 33 and 44)
should be flush with bottom of springs
(Ref. 32 and 46).
8
4
9
5
6
79
50
80
51
81
52
82
53
12
13
7
14
15
3
16 17
4
18
76
47
74
45
78
49
19
4
20
77
48
12
22
4
4
69
40
59
37
12
21
71
42
46
75
45
74
44
73
25
26
29
30
43
72
31
41
70
39
68
38
67
Shift rod assembly
(Ref. 42) must pivot
freely on pivot blocks
(Ref. 45)
28
27
36
29
37
30
59
54
31
38
43
36
65
37
66
Mount clutch cable
to cable support, see
Engine and Frame Grp.
36
65
32
39
Torque to
19 - 29 ft. lbs.
54
59
33
40
64
35
34
63
34
5 4
23
6
9
24
Parts Lists
REF NO.
1
2
3
4
5
6
7
8
9
10
11
12
13
14
15
16
17
18
19
20
21
22
23
24
25
26
27
28
29
30
31
32
33
34
35
36
37
38
39
40
41
42
43
44
45
46
47
48
49
50
51
52
53
54
PART NO.
QTY.
1727128
1668608
1928732
1668185
1725205
1960471
1705899
1726422
1726317
1667800
1724489
1925592
1930641
1935450
1933689
1678579
1705898
1701342
1960686
1726672
1723935
1718791
1677453
1727127
1725702
1664022
934683
1668121
928704
108775
1916621
1707452
1668526
1722460
1666255
1931317
1702004
1726304
1701996
1702485
1713844
1714120
1960705
1668681
1668524
1924361
1703043
1960074
1702663
1933689
1919326
1702662
1702552
1960685
1
2
1
5
2
4
1
2
2
1
1
6
4
4
1
1
1
1
1
1
1
1
1
1
1
1
1
1
2
2
2
1
1
1
1
2
1
1
1
1
1
1
1
1
2
1
1
1
1
1
1
1
1
2
DESCRIPTION
HANDLE, Clutch R.H.
GRIP, Handle Clutch, Black
CAPSCREW, Hex Washer Head Taptite #10-24 x 1
BUSHING, 1/2 ID x 3/4 OD x 1/4, Nylon
LEVER & TUBE ASSEMBLY, Clutch
CAPSCREW, Hex Washer Head Taptite #12-24 x 1
GUIDE, Control
RIVET, Pop
GRIP, Black Soft 1"
DASHBOARD
PLUG, Button
CAPSCREW, Hex Washer Head Taptite 1/4-20 x 3/4
NUT, Hex Flange Whiz Lock 1/4-20
CAPSCREW, Hex Washer Head, 1/4-20 x 3/4 G5
CAPSCREW, Hex Flange Whiz Lock, 5/16-18 x 1-1/2
SPACER, 21/64 ID x 13/16 OD x 15/16
LATCH, Control
SPRING, Compression
NUT, Hex Flange 5/16-18 ESNA
HANDLE ASSEMBLY, Channel
BRACKET, Shift Control
CABLE & HANDLE ASSEMBLY, Clutch L.H.
ROD, Control 2" Flat
HANDLE, Clutch L.H.
SCREW, Pan Head Torx #10 x 1/2 Thick Cut
GROMMET, 1/2
CLIP, Wire
ROD, Clutch, 17-5/16
NUT, Hex Machine Screw 10-24 NC-2B LH YEL
TURNBUCKLE, 2-1/4 Long #10-24NC (L.H. & R.H.)
NUT, Hex Machine Screw 10-24 NC-2B
SPRING, Extension 3-11/32 Long
ROD, Clutch, 6-5/16 Long
PIN, Quick
ROD, Lower Shift 15-21/64 Long
CARRIAGE BOLT, 1/4-20 x 3/4 G5
ROD, Lower Clutch
ROD, Upper Shift 11-3/8 Long
SPRING, Extension 4-3/4 Long
ROD, Upper Clutch
KNOB, Hole
ROD & CLEVIS ASSEMBLY, Shift
CAPSCREW, Hex Flange Whiz Lock 1/4-20 x 2-1/4
WASHER, Curved
BLOCK, Pivot, Powdered Metal
WASHER, 1/2
ROD & ARM ASSEMBLY, Pivot
CLIP, Hair Pin
ROD, Clutch 5-11/32 Long
CAPSCREW, Hex Flange Whiz Lock 5/16-18 x 1-1/2
WASHER, 5/16
LEVER, Clutch
SPACER, 21/64 ID x 3/4 OD x 53/64, Powdered Metal
NUT, Hex KEPS, 1/4-20 Conical Washer
35
Parts Lists
ENGINE AND FRAME
17
14
Position idler pulley (Ref. 11)
at center of slot in clutch arm
(Ref. 9)
98
14
11
19
16
15
12
20
17
15
18
13
10
Hook one end of spring (Ref. 13)
over clutch rod assembly (Ref. 9)
between tabs and other end into
slot in frame.
22
18
23
19
13
16
24
20
7
8
109
21
25
Long hub of idler
pulley (Ref. 2) to
be toward idler
arm (Ref. 5).
43
32
22
27
78
29
23
67
21
45
56
36
31
25
38
26
Hook one end of spring (Ref. 6)
into top hole of roller arm (Ref. 5)
and other end into top hole of
the idler arm assembly in the
Traction Drive Group.
30
24
35
Torque to
10-14 ft.lbs.o r
14-20 Nm
34
33
27
29
44
Torque to
10-14 ft. lbs. or
14-20 N m
32
51
35
31
35
50
35
49
30
20
45
48
28
47
Position belt stops 1/16 - 1/8
from belt when auger clutch is engaged.
36
Torque (4) Engine
Bolts to 17 - 21 ft. lbs.
or 23 - 29 N m
Parts Lists
REF NO.
1
2
3
4
5
6
7
8
9
10
11
12
13
14
15
16
17
18
19
20
21
22
23
24
25
26
27
28
29
30
31
32
33
34
35
36
PART NO.
1928731
1668477
1960647
1665994
1703046
1727149
1722460
1721257
1727058
1928352
1726348
960709
1727059
1724612
1935255
920426
1918249
1726568
1931317
1960685
1720404
1664847
1726870
1925003
1727004
*
931277
960551
1668174
1919326
1917356
1921515
1676493
1930540
500-132927
QTY.
1
1
1
1
2
1
1
1
1
1
1
1
1
1
1
2
2
4
1
2
4
1
4
1
2
1
3
4
1
2
2
1
1
1
1
1
DESCRIPTION
NUT, Hex, Toplock, Jam, 3/8-16
PULLEY, Idler
SCREW, Hex Head, 3/8-16 x 1-1/2
PIN, Flat Head Drilled
ARM, Idler, 5-3/4 LG
SPRING, Extension
PIN, Quick
V-BELT, HA (Used Only on 1390 Models)
ROD AND ARM ASSEMBLY, Clutch, Brake w/Pad
NUT, Hex Flange, 3/8-16 Whiz Lock Large
PULLEY, Idler
SCREW, Hex Whiz Lock Flange, 3/8-16 x 1-3/4
SPRING, Extension
COVER, Belt
NUT, Speed, 5/16-18, Lug Type
LOCKWASHER, External Tooth, 5/16
SCREW, Truss head Slotted, 5/16-18 x 3/4
FRAME ASSEMBLY, Chain/Tube Handles
CARRIAGE BOLT, 1/4-20 x 3/4 G5
NUT, Hex KEPS, 1/4-20, Conical Washer
SUPPORT, Clutch Cable, 16GA
SCREW, Hex Washer Head Taptite, 5/16-18 x 3/4
COVER, Bottom Frame, 20GA
SCREW, Hex Washer Head Taptite, 1/4-20 x 1/2
SUPPORT, Tie Bar
ENGINE, 8.5 HP Kohler
NUT, Hex Flange, 5/16-18, Whiz Lock Small
CAPSCREW, Hex Washer Head Taptite, 5/16-18 x 2-1/2
STOP, Belt
WASHER, 5/16
LOCKWASHER, Spring, 5/16
CAPSCREW, Hex Head, 5/16-24 x 3/4 G5
PULLEY, Engine
SET SCREW
KEY, furnished with engine
CAP, Gas Tank
Footnotes:
* See your local Kohler distributor for Parts and Service.
37
Parts Lists
TRACTION DRIVE GROUP
2
Pack groove
with grease.
3
4
1
5
2
3
13
Lubricate with
5W 50 Synthetic oil.
12
Mount to bracket in
frame weldment.
6
14
7
Apply loctite
(2 places).
8
20
1
Hook end to
top left corner
slot of frame.
11
10
Apply Loctite and
Torque to 55 - 60
in-lbs. when all parts
are against hub.
9
21
18
23
19
Mounted outside
of frame.
15
24
16
25
15
27
17
1
8
30
22
3
26
2
31
32
3
1
28
29
20
48
2
40
41
49
43
44
33
42
34
45
46
35
39
50
38
37
55
38
52
50
Torque to
10 - 14 ft-lbs.
Assemble Ref. 40, 44 & 51
with no end play. Parts
must rotate freely.
51
36
56
47
Apply anti-seize
compound to wheel hub
area of Ref. 49 & 57.
46
53
58
33
28
54
57
38
Grease bearing
area of Ref. 57.
59
Parts Lists
REF NO.
1
2
3
4
5
6
7
8
9
10
11
12
13
14
15
16
17
18
19
20
21
22
23
24
25
26
27
28
29
30
31
32
33
34
35
36
37
38
39
40
41
42
43
44
45
46
47
48
49
PART NO.
1930601
1667341
1722703
1726856
1921332
1725428
1665995
1960684
1960687
1669256
1666114
1924940
1923701
1668255
1678956
1666207
1667335
1724333
1726931
960164
1718752
1720298
1718689
1720078
927732
1960114
1718688
1679556
1667330
1666980
1718687
1921333
1960686
1700473
1666106
1922127
1726467
1722460
1725666
1719879
918312
1960114
1924366
1670849
1665521
1666425
1666855
1666001
1720299
QTY.
8
4
4
1
3
1
1
6
1
1
1
1
1
1
2
1
1
2
1
4
1
1
1
1
1
3
1
1
1
1
1
3
2
1
1
1
1
1
1
1
1
1
1
1
1
2
1
1
1
DESCRIPTION
SCREW, Hex Washer Head Taptite, 5/16-18 x 5/8
RETAINER, Bearing
BEARING, Ball
SHAFT, Hex
CAPSCREW, Hex Head, 5/16-18 x 3/4 G5
DISC, Friction with Insert
HUB, Friction Disc
NUT, Hex Keps, 5/16-18, Conical Washer
NUT, Hex Flange, 3/8-16 ESNA
ARM ASSEMBLY, Shift w/Bushing
BUSHING, 19/50 ID x 3/4 OD x 1-3/100 LG
WASHER, 3/8
CAPSCREW, Hex Head, 3/8-16 x 2 G5
SPRING, Extension
COLLAR, Thrust
PIN, Loop
COLLAR, Set
SCREW, Set Square Head Cup Point, 1/4-20 x 1/2
SPROCKET, 10 Tooth
WASHER, 5/8
JACKSHAFT, Double D
SPRING, Complete
CLUTCH, Sliding, 1/5LG, Powdered Metal
ARM, Clutch
RING, Retaining Extension
WASHER, 3/4
GEAR, Stationary Clutch
SPACER, Heat Treated, 31/100 LG
SPROCKET
CHAIN, Roller
GEAR, Double D
CAPSCREW, Hex Head, 5/16-18 x 1 G5
NUT, Hex Flange, 5/16-18 ESNA
BELLCRANK
BUSHING, 11/32 ID x 3/4 OD x 1-3/50 LG
CAPSCREW, Hex Head, 5/16-18 x 1-3/4 G5
ROD, Pivot, 9-15/100 LG
PIN, Quick
SPRING, Extension
DRIVE DISC with SPINDLE
KEY, Woodruff, 47/250 x 5/8
WASHER, 3/4
WASHER, 5/8
ARM, Pivot with Bushings & Bearings
BEARING, Ball
BUSHING, 3/4 ID x 1 OD x 3/4 LG, Powder Metal
BUSHING, 5/8 ID x 13/16 OD x 3/4 LG, Powder Metal
BUSHING, 377/100 ID x 1-13/100 OD x 1 LG, Powdered Metal
AXLE, Round
Footnotes:
39
Parts Lists
TRACTION DRIVE GROUP
2
Pack groove
with grease.
3
4
1
5
2
3
13
Lubricate with
5W 50 Synthetic oil.
12
Mount to bracket in
frame weldment.
6
14
7
Apply loctite
(2 places).
8
20
1
Hook end to
top left corner
slot of frame.
11
10
Apply Loctite and
Torque to 55 - 60
in-lbs. when all parts
are against hub.
9
21
18
23
19
Mounted outside
of frame.
15
24
16
25
15
27
17
1
8
30
22
3
26
2
31
32
3
1
28
29
20
48
2
40
41
49
43
44
33
42
34
45
46
35
39
50
38
37
55
38
52
50
Torque to
10 - 14 ft-lbs.
Assemble Ref. 40, 44 & 51
with no end play. Parts
must rotate freely.
51
36
56
47
Apply anti-seize
compound to wheel hub
area of Ref. 49 & 57.
46
53
58
33
28
54
57
40
Grease bearing
area of Ref. 57.
59
Parts Lists
REF NO.
50
51
52
53
54
55
56
57
58
59
PART NO.
1928721
1672595
1919394
8021010
1720300
1930570
921133
1720716
960169
1720305
QTY.
2
1
1
1
1
1
1
1
1
1
DESCRIPTION
SCREW, Set Square Head Cup Point, 5/16-18 x 1/2 G8
PULLEY AND HUB ASSEMBLY
WASHER, 1
COLLAR, Set
GEAR AND HUB ASSEMBLY- RH
CAPSCREW, Hex Head, 5/16-18 x 1-1/2 G8
FITTING, Lube 1/4 Drive, No Check Ball
GEAR AND HUB ASSEMBLY, with Bushings
WASHER, 1-47/250
BUSHING, 1-27/200 ID x 1-157/250 OD x 3/4 LG
Footnotes:
41
Parts Lists
WHEEL GROUP
1
2
6
3
5
4
6
5
4
3
8
REF NO.
PART NO.
QTY.
1
2
3
4
5
6
7
8
1921978
1919438
172353
1714242
1612000
1714235
153038
1666969
1
1
2
1
2
2
2
1
DESCRIPTION
CAPSCREW, Hex Head, 5/16-18 x 2
NUT, Hex Lock ESNA Light, 5/16-18
VALVE STEM & CAP
HUB, Wheel, RH
TIRE, 4.80-4.00-8
WHEEL & TIRE ASSEMBLY (Includes Ref. Nos. 3, 4 & 5)
TUBE, Tire
KLIK-PIN
42
7
S
M-B COMPANIES, INC.
Sales, Administration, Brush Mfg:
1615 Wisconsin Avenue, P.O. Box 200, New Holstein, WI 53061
Telephone: (920) 898-4203
FAX: (920) 898-4588
BETTER LIFE
G
OU
HR
H SERVICE W
E
EA
AR
H
FGC
T
M-B Companies, Inc.
Engineering, Manufacturing:
1200 Park Street, Chilton, WI 53014
Telephone: (920) 898-4203
FAX: (920) 849-2629
WARRANTY POLICY
The M-B Companies, Inc. of Wisconsin warrants all of its products to be free from manufacturing defects in normal
service for a period six months, to begin with the delivery of said product to its original owner.
A twelve month warranty applies to the following products: Truck Mounted Paint Stripers, and Airport Runway
Sweepers- (Tow Behind Sweepers/ Chassis Mounted Sweepers). All other products are covered by our six month
warranty.
M-B will, at its own expense and without expense to the owner, replace all failed parts for and make all repairs that
may be required by reason of defective design, workmanship, or material in any part of the assembly of the product
and associated components.
Upon notice in writing, M-B will promptly repair or replace all defective or damaged items delivered under the contract. The batteries, tires, rubber materials, brushes and material normally consumed in operation, and major components such as engines, air compressors, and hydraulic pumps and motors are excluded from this guarantee but
shall, in any event, be guaranteed by M-B to the extent of any guarntee received from its supplier.
If requested by M-B, products or parts for which a warranty claim is made are to be returned, transportation prepaid,
to M-B's factory. Any improper use, operation beyond capacity, or substitution of parts not approved by M-B, or alteration or repair by others in such a manner as in M-B's judgement materially and/or adversely affects the product shall
void this warranty.
This warranty does not apply to defects caused by damage or unreasonable use while in the possession of the
owner, including but not limited to: failure to provide reasonable and necessary maintenance, normal wear, routine
tune-ups or adjustments, improper handling or accidents, operation at speed or load conditions contrary to published
specifications, improper or insufficient lubrication, or improper storage.
The M-B Companies shall not be liable for consequential damages of any kind, including, but not limited to, consequential labor costs or transportation charges in connection with the replacement or repair of defective parts, or lost
time or expense which may have accrued because of said defect. M-B's total liability hereunder in no event shall
exceed the purchase price of this product.
The M-B Companies do not make any warranty of merchantability or fitness for a particular purpose. The only warranty made by M-B Companies is as set forth herein. This warranty cannot be extended, broadened or changed
except in writing by an authorized officer of M-B companies Inc. of Wisconsin.
09/01/04
43
NOTES:
_____________________________________________________________________________
_____________________________________________________________________________
_____________________________________________________________________________
_____________________________________________________________________________
_____________________________________________________________________________
_____________________________________________________________________________
_____________________________________________________________________________
_____________________________________________________________________________
_____________________________________________________________________________
_____________________________________________________________________________
_____________________________________________________________________________
_____________________________________________________________________________
_____________________________________________________________________________
_____________________________________________________________________________
_____________________________________________________________________________
_____________________________________________________________________________
_____________________________________________________________________________
_____________________________________________________________________________
_____________________________________________________________________________
_____________________________________________________________________________
_____________________________________________________________________________
_____________________________________________________________________________
_____________________________________________________________________________
44
NOTES:
_____________________________________________________________________________
_____________________________________________________________________________
_____________________________________________________________________________
_____________________________________________________________________________
_____________________________________________________________________________
_____________________________________________________________________________
_____________________________________________________________________________
_____________________________________________________________________________
_____________________________________________________________________________
_____________________________________________________________________________
_____________________________________________________________________________
_____________________________________________________________________________
_____________________________________________________________________________
_____________________________________________________________________________
_____________________________________________________________________________
_____________________________________________________________________________
_____________________________________________________________________________
_____________________________________________________________________________
_____________________________________________________________________________
_____________________________________________________________________________
_____________________________________________________________________________
_____________________________________________________________________________
_____________________________________________________________________________
45
M-B Companies
1615 Wisconsin Ave.
New Holstein, WI 53061
888-558-5801
All rights reserved. Copyright 2004
Printed in USA
Part Number 904-140496