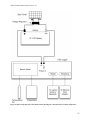
1
Tropical Ecology, Assessment, and Monitoring Network
Climate Monitoring Protocol
Version 3.0
Cite as: TEAM Network. 2010. Climate Monitoring Protocol, v. 3.0. Tropical Ecology,
Assessment and Monitoring Network, Science and Knowledge Division, Conservation
International, Arlington, VA, USA.
TEAM Climate Monitoring Protocol 3.0
Acknowledgments
This protocol and all other TEAM protocols are collective works. They were developed and reviewed
by numerous scientists. We thank specially Yadvinder Malhi, Helene Muller-Landau, Bill Munger, Karl
Kauffman and Steve Wofsy. Previous versions of this protocol were reviewed by Hilêndia Brandão,
Idemê Gomes Amaral, Lee Hannah, James Heath, Antonio Carlos Lôla da Costa, Yadvinder Malhi,
Marcelo Matsumura, Patrick Meir, Terry Root, Steve Schneider, Rebecca Shaw, Ansmarie Soetosenoj,
Marc Steinenger and Rudi van Kanten.
Jorge A. Ahumada and Eric H. Fegraus, Tropical Ecology, Assessment and Monitoring Network,
Science and Knowledge Division, Conservation International, compiled and wrote the TEAM
Implementation Manual.
Series Editor, TEAM Protocol Implementation Manuals is Sandy J. Andelman, Vice President, Tropical
Ecology, Assessment and Monitoring Network, Science and Knowledge Division, Conservation
International.
The TEAM Monitoring Protocols are published by:
The Tropical Ecology, Assessment and Monitoring (TEAM) Network
Conservation International
2011 Crystal Drive, Suite 500
Arlington, VA 22202
703.341.2400
TEAM Network online: www.teamnetwork.org
Conservation International online: www.conservation.org
Conservation International is a private, nonprofit organization exempt from federal income tax under
section 501(c)(3) of the Internal Revenue Code.
2
TEAM Climate Monitoring Protocol 3.0
Table of Contents
1! INTRODUCTION AND SCOPE.............................................................................................. 4!
2! GOALS AND IMPLEMENTATION ....................................................................................... 6!
3! BASIC EQUIPMENT DESCRIPTION .................................................................................... 7!
3.1! Base -UT10 tower............................................................................................................... 7!
3.2! Data logger -CR1000 .......................................................................................................... 7!
3.3! Sensors ............................................................................................................................... 7!
3.4! Power supply ...................................................................................................................... 8!
4! CLIMATE STATION SITING PROTOCOL ........................................................................... 9!
4.1! Basic Siting Requirements ................................................................................................. 9!
4.2! Level 1 Siting ................................................................................................................... 11!
4.3! Level 2 Siting ................................................................................................................... 13!
4.4! Level 3 Siting ................................................................................................................... 18!
4.5! Level 4 Siting ................................................................................................................... 18!
4.6! Ordering the Equipment ................................................................................................... 18!
4.7! Climate Station Pre-installation Preparations .................................................................. 19!
5! ASSEMBLY OF THE CLIMATE STATION ........................................................................ 20!
5.1! Testing all the instrumentation upon receipt .................................................................... 21!
5.2! Installing the base tower ................................................................................................... 26!
5.3! Installing the Data Logger and Battery ............................................................................ 27!
5.4! Installing the Solar Panel.................................................................................................. 27!
5.5! Installing the sensors ........................................................................................................ 28!
5.6! Finishing steps .................................................................................................................. 33!
5.7! Test run the station ........................................................................................................... 33!
6! RUNNING THE CLIMATE STATION ................................................................................. 34!
6.1! Data Retrieval ................................................................................................................... 34!
6.2! Checking rainfall measurements against the manual rain gauge ..................................... 35!
6.3! Regular Maintenance........................................................................................................ 36!
6.4! Sensor Calibration ............................................................................................................ 39!
7! REFERENCES CITED ........................................................................................................... 43!
8! Glossary ................................................................................................................................... 44!
9! Appendix A.1. Main Equipment List ...................................................................................... 48!
10! Appendix A.2. Site Metadata Field Form ............................................................................. 50!
11! Appendix A.3. Climate Protocol Maintenance Log .............................................................. 53!
12! Appendix A.4. Sensor Calibration Form ............................................................................... 56!
13! Appendix A.5. Sensor Calibration Metadata Form ............................................................... 58!
14! Appendix A.6. Wiring diagrams ........................................................................................... 60!
3
TEAM Climate Monitoring Protocol 3.0
1
INTRODUCTION AND SCOPE
Climate change has been identified as one of the main threats to humanity and to the long-term
persistence of the living world in general (IPCC 2007, Wright 2005, Malhi et al. 2008,
Rockström et al. 2009). Only 15 out of 50,000 long-term time series of biological and bioclimate
variables come out of tropical areas (less than 0.03%) (IPCC 2007). The lack of a long-term,
continuous, reliable climate data stream coming from tropical areas (Clark and Clark 1994; Root
and Schneider 1995; IPCC 2007; Enquist 2002) is compounded by the fact that most surface
climate measurements are collected in populated areas (e.g. airports, cities, towns), which
experience local climates that may not be representative of natural forested areas (Malhi and
Wright 2004). Additionally, many of these measurements although useful for meteorological
services (e.g. local weather forecasts), are not adequate to estimate long-term trends in climatic
variables over long periods of time, because of a lack of consistency between most surface
weather stations in instrumentation, sensor calibration protocols and data quality control (among
others).
The expected effects of climate change on tropical forest ecosystems are still unknown. For
example, Phillips et al. (1998) describe how forests could be carbon sinks, increasing forest
biomass accumulation as CO2 levels increase. However, during unusually dry spells, which are
more frequent due to climate change, increased temperature could cause tropical forests to
become sources of CO2, thus further aggravating the problem (Clark 2002, Kenneth et al. 2007,
Phillips et al. 2009).
A global network collecting continuous and reliable climate data throughout tropical forests is
badly needed. The foundation of this network should be the application of a single consistent
climate protocol for setup, instrumentation, data collection, calibration, maintenance, and data
quality control. Since changes in climate are so gradual and small (e.g. increase in temperature ~
0.6 ºC in the last two decades), it is imperative to remove the confounding effects of differences
in methods to measure climate across sites to detect these changes with an adequate level of
precision. The World Meteorological Organization and the National Research Council at the
National Academy of Sciences (NRC 1999, WMO 2003) propose a minimum set of guidelines
for climate observing networks to ensure adequate scientific rigor and maximize the use of data
and its applications (summarized):
1. Management of Network Change: Assess the effects of change in the observing
network on current and future climatological observations, particularly with respect to
climate change and variability.
2. Parallel Testing: Simultaneous operation of old systems with new systems over a
sufficiently long period that captures the full range of variation in the data.
3. Metadata: Full documentation of climate observing systems and procedures. This
includes, among others, instrumentation, instrument sampling time, calibration,
validation, climate station location, local environmental conditions, detailed algorithm
descriptions.
4. Data Quality and Continuity: Assessment of data quality and continuity as part of the
routine data collection process.
4
TEAM Climate Monitoring Protocol 3.0
5. Integrated Environmental Assessment: Anticipate the use of the data in the
development of environmental assessments such as climate change and its effects on
other systems.
6. Historical Significance: Strive to maintain climate observing systems that have been
operating for long time frames (decades, century) and maintain high quality data.
7. Complementary Data: Give higher priority to the deployment of climate observing
systems in data-poor, unrepresented areas.
8. Climate Requirements: Provide adequate monitoring technical requirements at the
outset of network implementation. This includes stated high accuracy of instrumentation
requirements and small bias to detect trends and other phenomena depending on the
nature of the network.
9. Continuity of Purpose: Maintain stable and long-term commitment to these observing
systems to maximize data utility.
10. Data and Metadata Access: Develop data management systems that facilitate access,
use, and interpretation of data and data products by users. Freedom of access, low cost
mechanisms that facilitate use and quality control should be an integral part of data
management.
Consistent with these guiding principles, The Tropical Ecology Assessment and Monitoring
Network (TEAM) has compiled a Climate Monitoring Protocol to address the lack of highquality, long-term climatological data coming from tropical forests. TEAM’s mission is to
understand the effects of global drivers of change (climate, land use change) on biodiversity and
ecosystem services by collecting standardized data throughout a network of tropical forest sites
at several spatial and temporal scales (Andelman & Willig 2004, Andelman, et al. in prep). Thus,
the implementation of a high quality climate monitoring protocol across a large number of
tropical sites is necessary to answer the global questions underlying the design of the network.
By unifying the equipment used, siting requirements for the climate station, and sensor
calibration and maintenance schedules across sites, it is possible to detect climate trends within a
site, compare data between sites, and make the data a truly global resource for the scientific and
conservation communities. Some the questions that could be answered with a long-term multisite tropical forest climate station network are:
1. Are dry seasons getting longer or more intense in tropical forests? Is this due to lower
rainfall, higher incoming solar radiation, or a combination of both?
2. How is the temporal pattern of rainfall changing with climate change? Is rainfall
becoming more variable and at what scale (e.g. day, month, year)?
3. How is temperature changing in tropical forests? Are these changes more evident in
periods of low rainfall and higher solar radiation?
This protocol has gone through the highest standards of scientific review to produce a
standardized, detailed and affordable protocol that can be implemented by anyone throughout the
tropics.
5
TEAM Climate Monitoring Protocol 3.0
This document describes in detail all the necessary steps to setup and implement the TEAM
Climate Monitoring Protocol. It has been written with non-experts in mind, so that anyone with
basic technical skills can understand the process of assembling a climate station and collecting
consistent and reliable climate measurements in tropical forests.
2 GOALS AND IMPLEMENTATION
The goal of the TEAM Climate Monitoring Protocol is to provide a standardized methodology to
generate high-quality reliable measurements of climatic variables in tropical forests. There is a
trade-off between the financial investment for the infrastructure (i.e. physical foundation,
sensors, equipment, etc) of the climate station and the level of high quality scientific data
captured. With this trade-off in mind, TEAM has designed two separate climate protocols that
differ in their initial investment in infrastructure and equipment but maximize the reliability and
quality of the data generated (a ground-based protocol and a canopy-tower based protocol).
This document describes a ground-based protocol where all the instrumentation is installed in a 3
m tower located in an adequate-size clearing. This ground-based version of the TEAM Climate
Monitoring Protocol implements measurements for four climatic variables: air temperature,
relative humidity, precipitation and global solar radiation. The sensors used, are mid-priced
ranged, but sensitive and reliable enough to handle the rough conditions encountered in tropical
environments. The climate station operates automatically; the sensor data feeds into a data
logger, powered by a solar panel and a rechargeable battery (for night operation). The data
logger collects information from the sensors every 5 seconds and produces summaries every 5
minutes (see Box 1 for a quick description of the protocol).
Box1. TEAM Climate protocol in a nutshell
•
•
•
•
•
•
•
•
Climate station is ground-based (most equipment mounted on a 3 m tower)
Climate station is autonomous and self powered (solar panel, battery)
Four variables measured: Air Temperature, Relative Humidity, Global Solar Radiation,
and Precipitation
Sensors for temperature/relative humidity and solar radiation are run in duplicate
Temperature/RH sensors housed inside an aspirated radiation shield
Measurements are logged every 5 seconds and reported every 5 minutes in a data logger
Automated standardized computer program for data collection
Detailed maintenance and sensor calibration schedules that are incorporated into the
metadata
6
TEAM Climate Monitoring Protocol 3.0
3 BASIC EQUIPMENT DESCRIPTION
In order to be an adequate tool for monitoring climate, the sensors and equipment used in the
Climate Protocol must comply with minimum standards of quality and accuracy required by
other standard climate monitoring efforts (e.g. United States Climate Reference Network at the
National Oceanic Atmospheric Administration). The following section describes briefly each of
the components required to implement the TEAM Climate Protocol. A list of the equipment
with providers and model numbers can be found on Appendix A.1. The range, resolution,
required uncertainty and other technical specifications for the variables measured in the TEAM
Climate Protocol are summarized in Table 1.
3.1 Base -UT10 tower
The base of the climate station where the data logger, power sources and sensors (except
rainfall), are located, consists of a 3 m aluminum tower. We recommend the use of Campbell’s
Scientific UT10 tower, which is light (18 kg), requires a small footprint for installation (61 x 61
x 61 cm) and has a high wind load (177 km/h). The tower comes with a grounding kit to protect
the integrity of the equipment and data during lighting storms.
3.2 Data logger -CR1000
The data logger receives all the information from the sensors and organizes the data that can be
exported later to a computer, memory card or broadcasted through a radio signal or network. The
protocol requires a data logger that can accommodate a wide array of sensors, is expandable, is
fully programmable, has network communication capabilities, and is rugged for the conditions
encountered at tropical forest sites. An adequate data logger that fits these specifications is the
CR1000 (Campbell Scientific). More detailed information on how to setup, program, maintain
and retrieve data from the CR1000 is found in later sections of this document (sections 5.1, 6.1,
6.3)
3.3 Sensors
The sensors are the instruments that make the actual measurements of given climatic variables.
Suitable sensors accurately translate environmental change into measurable electrical properties
by outputting a voltage, changing resistance, outputting pulses, or changing states. The data
logger receives this information and transforms it into the measurement of the variable in a
suitable unit (e.g. ºC, mm). The protocol uses sensors to measure four climatic variables: Air
Temperature (in duplicate), Relative Humidity (in duplicate), Precipitation and Global Solar
Radiation (in duplicate). The location of the climate station near the ground does not allow for
reliable measurements of wind speed and velocity (see section 4, for detailed climate station
siting requirements for different sensors). The sensors used in the TEAM Climate Protocol are
described below in more detail.
7
TEAM Climate Monitoring Protocol 3.0
3.3.1 Temperature – Relative Humidity Sensor Vaisala HMP45C
The TEAM Climate Protocol uses the Vaisala HMP45C which measures both relative humidity
(%) and air temperature (ºC). The sensor is housed in a radiation shield to avoid the
measurements being affected by solar loading. The shield type used for this sensor is an aspirated
radiation shield (MetOne 076B-5), which stabilizes the readings by allowing air to move past the
sensor. Two temperature/RH sensors are housed in the aspirated radiation shield.
3.3.2 Precipitation Gage – TB4
The use of an automatic but sensitive precipitation gage with low error in recording intense
rainfall events (very common in tropical areas) is essential. The TB4 rain gage (Hydrological
Services Pty. Ltd) funnels rain into a tipping bucket mechanism that tips when 0.25 mm of rain
has been collected. Each tip is marked by a dual reed switch closure that is recorded by the data
logger. After measurement, the water drains through two orifices in the base, allowing the
measured water to be collected in a separate container if desired.
The rain gage includes a siphoning mechanism that allows the rain to flow at a steady rate to the
tipping bucket mechanism regardless of rainfall intensity which reduces typical rain bucket
errors, enabling the gage to record intense rainfall events. As a backup, we recommend installing
a regular precipitation gage (US) to double check heavy precipitation events (>50 mm/hour).
Both precipitation gages should be mounted at least 6 m from the main climate station tower and
at least 30 cm above the ground (see section5.5.3).
3.3.3 Solar radiation – Licor Pyranometer LI200X
This is a silicon-photovoltaic pyranometer that measures global solar radiation (both direct and
diffuse radiation). Although less sensitive than the most sophisticated termophile pyranometers,
the Licor LI200X has medium stability (± 2% per year) and acceptable accuracy (3%-5%) for
baseline measurements. The LI200X should be mounted in an area with near complete view of
the sky (no obstacles 5 degrees above the horizon), which in many cases might require it to be
installed in a separate location from the rest of the sensors (see section 4 below). Sensors are
mounted in duplicate (one facing north and one facing south) to account for seasonal movements
in the solar path (and as backup)(see section 5.5.2 for more details)
3.4 Power supply
The sensors and the data logger are powered by a combination of an energy source (a solar
panel), which charges a 12 V rechargeable battery through a charger regulator. The
recommended solar panel (85 W, 2.24 A, Yinglu) can be mounted to the side of the UT10 (see
section 5.4 for details). The solar panel provides power to a 12V DC-100 Ah rechargeable
battery (UB-121000, Universal Power Group) to ensure proper functioning of the system at night
and during cloudy days. The battery is connected to the solar panel through a charge regulator
(Morningstar Sun Saver – 10 A). The regulator controls the current flowing to the battery and
prevents the battery current from flowing to the solar panel at night.
8
TEAM Climate Monitoring Protocol 3.0
Variable
Range
Resolution
Mode of
measurement
/observation
Instantaneous
Required measurement
uncertainty
Output
averaging
time
1 min
Air
0.1 K
-80 – +60°C
0.1 K (> -40°C and ! +40°C)
temperature
Relative
0 – 100%
1%
Instantaneous
1%
1 min
Humidity
Precipitation
0 – 500 mm
0.1 mm
Totals
0.1 mm (! 5 mm)
n/a
(daily)
2%
(> 5 mm)
Solar net
Totals
0.4 MJ m-2 (! 8 MJ m-2)
n/a
Not specified
1 J m-2
radiation
5% (> 8 MJ m-2)
(daily)
Table 1. Range, resolution, mode of observation, required uncertainty and typical output averaging time for
air temperature, relative humidity, precipitation and solar net radiation. Table is modified from Annex 1.B
Operational Measurement Uncertainty Requirements and Instrument Performance (WMO 2008).
4 CLIMATE STATION SITING PROTOCOL
4.1 Basic Siting Requirements
It is crucial to carefully choose the location where the climate station will be installed to ensure
the highest reliability and quality of the data. Listed below are the basic minimum siting
requirements for a ground-based climate station. We follow here the general guidelines from the
World Meteorological Organization (WMO 2008) and the Environmental Protection Agency
(EPA 1995):
•
•
•
•
The climate station (3 m base tower with the instrumentation and the precipitation gage)
should be located within a cleared and level piece of ground, no smaller than 65-70 m2.
The station should NOT be located in the following areas:
o Sloping ground
o Hollows or valleys
o Rooftops
o Permanently shaded areas
o Swamps
o Low places that hold water after rain
A fence to exclude unauthorized personnel should enclose this area.
The ground should be covered with short grass or a surface representative of the site (not
asphalt or cement).
9
TEAM Climate Monitoring Protocol 3.0
•
•
Ideally, the climate station should be located in a clearing with an unobstructed view of
the sky (no obstacles above 5 degrees from the horizon) to fulfill the siting requirements
of the solar radiation sensor (Level 1)(see Table 2). If it is impossible to find a location
with these characteristics that fulfills also the requirements outlined above, then the
station should be located based on the siting requirements for temperature and
precipitation (Level 2)(see section 4.3). If a suitable location for the solar radiation
sensor cannot be found within the vicinity of the climate station (~100 m), then a separate
site for the solar radiation sensor may be required (Level 3).
If no suitable locations can be found that fulfill Level 2 siting requirements, then find the
site that most closely approximates the siting requirements for precipitation and
temperature measurements and document site conditions carefully (see section
4.7.1)(Level 4). A workflow describing this process and each of the levels is shown in
Figure 1.
Table 2 summarizes the basic principles for locating several sensors under the guidelines
described above (it includes additional sensors not required in the TEAM Climate
Protocol).
Sensor
Height above the
ground
Temperature 2.0 m
Relative
2.0 m
Humidity
Precipitation 0.3 m
Wind
10 m
(more reliable in a
canopy tower)
Solar
3 m but not critical (as
Radiation
high as possible)
Minimum distance from
obstacle
4 times the height of obstacle
At least 30 m away from road
4 times the height of obstacle
2 times the height of obstacle
10 times the height of obstacle
Unobstructed view of the sky;
obstructions should be at an
angle < 5 degrees above the
horizontal plane
Source
WMO 2008,
EPA 1995
WMO 2008,
EPA 1995
WMO 2008,
WMO 2008,
EPA 1995
WMO 2008
Table 2. Height requirements and minimum distance requirements for several climatic sensors.
The following sections describe in more detail the process of siting the climate station based on
the availability of clearings that fulfill the requirements for different sensors. See Figure 1 for a
workflow summarizing this process.
10
TEAM Climate Monitoring Protocol 3.0
4.2 Level 1 Siting
Ideally, and to fulfill the requirements of the global solar radiation sensor, the climate station
should be located in a clearing that is large enough to allow for a nearly complete view of the sky
dome; no obstacles above 5 degrees from the horizon should obstruct the view of the sky, since
incident and diffuse radiation above 5 degrees are not negligible. To fulfill this requirement, the
distance to an obstacle of height H should be H/tan(5*2! / 360). For example, if the climate
station is in a clearing and the forest at the edge of the clearing is 25 m high, then the station
should be at least 285 m away from the forest edge which would require a clearing at least of 570
m in diameter (assuming the forest around it is more less uniform in height and there is no local
topography).
This requirement is unattainable in most tropical forest areas, not only because clearings of this
size are not often available, but also because of topographic features. Local mountains and hills
will usually preclude the view of the sky no matter how big the size of the clearing. Unless the
site is located in a flat area and a large clearing is available, the climate station should be sited
using the process described in Level 2 Siting (see next section).
11
TEAM Climate Monitoring Protocol 3.0
Figure 1. Workflow that illustrates the steps for siting the climate station. In Level 1, all sensors
(precipitation, temperature, relative humidity and solar radiation) are together at the same location. In Level
2, the station is sited using the requirements of the temperature/RH and precipitation sensors and the
radiation sensor is located at an alternate point within 100 m of the climate station and connected to the same
data logger. In Level 3 the radiation sensor is located at a separate location (> 100 m away from the other
sensors) and has a dedicated data logger and power source, separate from the rest of the sensors. If no
clearings are available that fulfill Level 2 siting then locate the station in the site that most closely resembles
Level 2 requirements and document site conditions carefully (Level 4).
12
TEAM Climate Monitoring Protocol 3.0
4.3 Level 2 Siting
Since the requirements of the solar radiation sensor are difficult to meet in many tropical forest
sites, an alternate strategy is proposed here to locate the station based on the siting requirements
of the temperature/RH and precipitation sensors (Table 2). In order to minimize the effects of
wind turbulence and eddies produced by the obstacles located in the vicinity of the sensor, the
temperature/RH sensor should be located at least a distance of 4 H units away from an obstacle
of height H (Figure 1A). Similarly, the precipitation gauge should be located at least 2 H units
away from an obstacle of height H (Figure 2B). A process to locate the radiation sensor is
described below in section 4.3.2.)
Figure 2. Siting requirements for a climatic base tower with a temperature/RH sensor (A) and a precipitation
gage (B). Distances are not shown to scale. In this example, the base tower with the temperature/RH sensor
needs to be at a distance from the trees at least four times their height (4H1). It also needs to be at a distance
from the house at least four times its height (4H2). The precipitation gauge needs to be 1) at least 30 cm from
the ground, 2) at least 6 m away from the 3 m base tower, and 3) at a distance from the house twice its height
(2H2) away from it. Guidelines from WMO (2008) and EPA (1995).
4.3.1 Choosing a location
Refer to Figure 3 for a complete workflow describing the process of choosing an appropriate
location for the climate station. It is assumed here that a clearing (a relatively open area) is
available at the site or near it that could be used for installing the climate station.
13
TEAM Climate Monitoring Protocol 3.0
The climate equipment itself requires an area of 60-65 m2, where the tower and sensors will be
installed. However an area of this size is not enough to sit the station appropriately. As described
in the section above, different sensors need to comply with specific distance requirements to
nearest obstacles such as trees, houses and roads (WMO 2008, EPA 1995). Following the
guidelines described above, the first step consists in determining whether the clearing is large
enough to house the station. This will depend on the location of the clearing and what is around
it.
4.3.1.1 Ensure the clearing has the right characteristics.
Following the guidelines above, make sure the clearing is on level ground (not on sloping
ground), not located in a valley or hollow, not located in a swamp or in low areas that hold water
after rain. If the clearing is near a road, make sure it is at least 30 m from it.
4.3.1.2 Measure the height of the tallest obstacle next to the clearing.
Using measuring tape (or a rangefinder) and a clinometer estimate the height of the tallest object
you can see next to the clearing, for example the tallest tree (see http://www.edb.upstlse.fr/equipe1/chave/tree-height-protocol.pdf for a suitable protocol). If the width of the clearing
is not at least 4 times the height of this obstacle then the clearing is too small. Unless this
obstacle can be removed or the clearing expanded, a new clearing needs to be located. If no other
clearings are available then go to section 4.5 (Level 4 siting).
4.3.1.3 Tentative locate the base tower
Position yourself in the approximate center of the clearing, locate the tallest object of height H
(Figure 4A) and:
a) Mark your location. This is the tentative location for the base tower.
b) Measure the distance from this location to the tallest obstacle
c) If the distance is larger than or equal to 4 times the height of the obstacle (4H in
Figure 4A), then proceed to 4.3.1.4, otherwise,
d) Go back to the tentative location and move away from the obstacle until you are
at least 4H meters away from the obstacle.
e) Mark this as your new tentative location for the climate station.
4.3.1.4 Locate the next tallest obstacle
From the tentative location you are, now locate the next tallest obstacle in the clearing with
height T (Figure 4B). Go through steps b) to e) as required until your location is 4T meters away
from the obstacle (Figure 4B,C). Ensure that you are still at least 4H meters away from the first
obstacle.
4.3.1.5 Repeat this process iteratively until you have no more obstacles (Figure 4 D, E), always
insuring that you are keeping appropriate distances to all obstacles. Mark the final
location; this will be the location of the base tower.
14
TEAM Climate Monitoring Protocol 3.0
Figure 3. Workflow describing the main steps for siting the climate station (Level 2).
15
TEAM Climate Monitoring Protocol 3.0
Figure 4. Diagram describing siting process. A. Initial location is at least 4H units away from the tallest
obstacle in the clearing of height H. B. The next obstacle of height T should be at least 4T units away from the
station; it is not (within the second dashed circle). Therefore the station needs to be moved west. C. New
location of the station is now at least 4T units away from obstacle of height T (and still 4H units away from
obstacle of height H). D. Now the potential location is within 4C units away from house of height C and needs
to be moved north. E. New location is suitable and complies with distance requirements from all obstacles.
16
TEAM Climate Monitoring Protocol 3.0
4.3.2 Siting the Radiation Sensor
There are two possibilities for locating the radiation sensor based on the local conditions and
structures present at the site:
A suitable location for the radiation sensor is within reach of the climate station (within
100 m of it), such that it can be connected to the same data logger as the other sensors
(see below).
A suitable location for the radiation sensor CANNOT be located within 100 m of the
climate station. A new location will need to be found for the radiation sensor. The sensor
will require its own data logger and power source separate from the main climate station
(see Level 3 Siting).
•
•
4.3.2.1 Finding a suitable location within the vicinity of the climate station
In many cases although the clearing for the climate station is not appropriate to sit the solar
radiation sensor, there might be a structure within the immediate vicinity of the climate station
(roof top, pole, water tower) where the radiation sensor can be installed, fulfilling its siting
requirements (no obstacles above 5 degrees from the horizon, Table 2). If this is the case, the
radiation sensor can be mounted at this location and connected to the data logger with a cable up
to a 100 m long. Since the sensor produces voltage signals that are very small (mV), the
resistance encountered by the signal in longer cables might compromise its integrity. Use the
following guidelines when siting the radiation sensor:
•
•
•
•
•
Make sure the location for the radiation sensor meets the required siting guidelines
(Table 2). Mount it properly making sure it is leveled (see section 5.5.2).
If the radiation sensor is mounted on a pole, make sure the structure is solid and stable
in the wind. If the structure sways too much in the wind, the reading will be an invalid.
The radiation sensor might be mounted on a rooftop, but highly reflective or aluminum
rooftops should be avoided, since the sensor will pick up radiation reflected from the
structure (WMO 2008).
The cable from the sensor to the data logger needs to be ordered with the sensor. Do not
add additional cable to the sensor, since this might compromise the quality of the
reading.
Secure the cable connecting the sensor to the data logger adequately. If the cable is left
hanging in the air it might be vulnerable to the wind or become a bird perching site.
Strap the cable to the structure all the way down to the floor, and from there bury it
underground to the base of the climate station where the data logger is. It is a good idea
to lay down "” PVC pipe 10-20 cm below the ground and pass the cable through the
PVC rather than bury it unprotected underground.
17
TEAM Climate Monitoring Protocol 3.0
4.4 Level 3 Siting
If the radiation sensor cannot be located within the vicinity of the main climate station, a separate
location that fulfills the siting requirements of the sensor will need to be found. The radiation
sensor will be connected to a dedicated data logger and operate independently from the rest of
the climate station. Autonomous 1-2 channel data loggers that are battery powered are relatively
cheap and rugged enough for field conditions (see Appendix A.1). The following guidelines
outline the process of siting the radiation sensor:
•
•
Find a suitable location with an almost complete view of the sky (no obstacles above 5
degrees from the horizon). This location could be a large clearing, the top of an open
ridge or mountain, on top of an existing tower/antenna, etc.
The location should be relatively easy to reach. Technical personnel will need to visit the
site at least every two weeks to clean and maintain the pyranometer (see section 6.3.4).
4.5 Level 4 Siting
In many sites it might be difficult to find a clearing that complies with the requirements for Level
1 (siting requirements for all three sensors are met) or Level 2 (siting requirements for
precipitation and temperature are met). In such cases, it is suggested that the station is located in
a clearing that is the closest possible match to a Level 2 clearing (see section 4.3) and that the
site conditions are carefully documented and monitored annually (see section 4.7.1 below). In
particular, watch for the following:
•
•
•
•
Make sure the Temperature/RH sensor is as far as possible from surrounding vegetation
to minimize microclimatic conditions that could affect the readings.
Ensure that the precipitation gauge has a clear view of the sky and is as far as possible
from surrounding obstacles to avoid water ‘bouncing in’ from other sources, thus
contaminating the readings.
Locate the radiation sensor following the guidelines for Level 2 (within 100 m of the
climate station) or Level 3 (separate location with a dedicated data logger). If neither of
these is feasible, install the radiation sensors as high as possible in the current climate
base and document carefully the site conditions (see section 4.7.1).
Always document carefully the site conditions following the guidelines in section 4.7.1
below and monitor site conditions annually.
4.6 Ordering the Equipment
Once an adequate siting strategy has been reached, the appropriate equipment can be ordered
depending on whether all sensors will be on the same climate tower base (Level 1 siting), all
sensors will be connected to the same data logger but the radiation sensor will be located within
100 m of the climate station (Level 2 siting), or whether the radiation sensor will be placed in a
different location with a dedicated data logger and power source (Levels 3 siting). The
equipment requirements of Level 4 siting are the same of Level 2 or 3 (depending on whether the
solar radiation sensor can be located within 100 m of the main station or in a separate location).
18
TEAM Climate Monitoring Protocol 3.0
A standardized list of equipment and whether it should be acquired as part of Level 1, 2, or 3
siting is shown in Appendix A.1. Once all the equipment has been received it should be
registered by the Site Manager in the TEAM portal using the Site Management Tool (under
MyTEAM area: http://www.teamnetwork.org/en/network_members).
4.7 Climate Station Pre-installation Preparations
Once a suitable location for the climate station has been found, preparations need to be made to
the terrain before the infrastructure and the sensors are installed. These guidelines apply to the
main climate station (Level 1,2 & 4) as well as to a separate mini-station for the radiation sensor
if needed (Level 3).
Clear the terrain: Clear a small core area (60-65 m2-Level 1,2; 25-30 m2 – Level 3) were the
climate station with all its instrumentation will be installed. This area could be circular or
rectangular, but most importantly, it needs to be devoid of all vegetation, with a very short layer
of grass or whichever the natural substrate is in the area; no rock, asphalt or cement.
Install a fence: It is highly recommended to install an open fence (or paling) around the
periphery of the core area (WMO 2008). This will keep animals and intruders out and protect the
integrity of the core area. In areas were elephants are present, the fence might have to be taller
and stronger.
4.7.1 Site Metadata Protocol
A detailed description of the location of the climate station should be compiled as part of the
regular metadata. We outline here a protocol to standardize the way this information is collected:
Equipment/supplies needed:
• Digital Camera with wide angle lens (30-35 mm)
• Laser Range finder
• Clinometer
• Climate Station Site Metadata form (Appendix A.2)
• GPS
1. Estimate the spatial location: Using an approved network GPS unit (e.g. Garmin
60Csx) take a GPS reading at the exact point where the station will be located using at
least 300 measurement points (decimal degrees, WGS42). Name the waypoint using the
following convention:
CL-Site Code-Station Number
For example the main climate station at Nam Kading would be named CL-NAK-1.
Transfer the GPX file from the Garmin to a computer and upload the data to the TEAM
portal (see Sampling Unit Placement Protocol:
http://www.teamnetwork.org/en/protocols)
19
TEAM Climate Monitoring Protocol 3.0
2. Take pictures: This information is crucial to get accurate information about the site
where the station is located. Repeat this process every year to document changes in the
physical characteristics of the site.
• Mount a camera with a wide angle lens on a tripod, 1.5 m above the ground in the
exact location where the station will be located. Level the camera so it is completely
horizontal and not angled.
• Take a picture facing north.
• Rotate the camera 30 degrees to the East and take another picture.
• Keep rotating the camera 30 degrees and taking pictures each time, until back facing
north.
• Upload these photos to the TEAM portal as part of the climate metadata. See Section
6.1.4 on where to upload the photos and the Site Metadata Form.
3. Characterize heights and distances to objects: These data can be used to construct a
height and distance profile of the site where the climate station is located. These
measurements should be repeated every year to track changes in the physical
characteristics of the site.
•
•
•
•
•
•
Position yourself in the exact location where the station will be (is) placed and facing
north.
Measure the distance to the nearest object (e.g. tree, house using the laser range finder
and record this value the Site Metadata Form.
Measure the angle in degrees to the top of the object using the clinometer. Record the
value in the Site Metadata Form.
Rotate 5 degrees to the East and repeat the above three steps.
Keep rotating 5 degrees to the East until you are back facing north
See Section 6.1.4 on where to upload the Site Metadata Form.
5 ASSEMBLY OF THE CLIMATE STATION
This section describes the whole process of setting up the climate station from the moment the
equipment is received to a full test run of the climate station with all its sensors. The process is
outlined in general with the main steps; for details refer to the instruction manuals accompanying
the base tower, data logger and sensors.
20
TEAM Climate Monitoring Protocol 3.0
5.1 Testing all the instrumentation upon receipt
As soon as the equipment is received, the data logger and sensors should be tested before final
assembly of the climate station. This testing can happen indoors and the data logger will need to
be connected to a computer to examine the data. This section describes this process to ensure
everything is working correctly. Figure 5 shows a simplified wiring diagram of the climate
station to illustrate the main components and connections between them.
5.1.1 Connect and setup the data logger
Figure 6 shows the main components of the data logger. The left side of the panel contains all the
sensor connections and the power OUT connectors (for some sensors), while the right side
houses the power IN connector, the communications bus (RS-232) and an expansion slot for the
memory card adaptor. You will need a 12 V DC battery to power the data logger (e.g. a car
battery). Follow these steps to setup the data logger:
1. Connect the data logger to the computer: Using the RS-232-USB cable connect the
data logger to a USB port in the computer (make sure the cable is connected to the RS232 port in the data logger – not the CS I/O port).
2. Install the memory card adaptor to the data logger: The memory card module is a
flattened box labeled CFM100. Plug it into the peripheral port of the data logger and
fasten the outside screw to secure it.
3. Insert a memory card into the CFM100: Unfasten the screw on the right hand side of
the CFM100 to open the door to the memory card compartment. Insert the special
memory card provided in the slot. Close the door to the compartment and tighten the
screw.
4. Install the PC200W Campbell Software in your computer: This software is included
in a CD that came with the data logger and allows you to set the clock of the data logger
and upload the standard TEAM data collection program.
5. Open the PC200W software: The data logger should now be on and waiting for
instructions on what to do. Launch PC200W Campbell Software. Your screen will look
like Figure 7.
6. Connect the Data Logger to a Battery: Any battery that is 12 V DC can be used (e.g. a
car battery). Run two cables coming from the positive and negative poles of the battery
and connect them to the POWER IN12V and G notches in the data logger. The CR1000
is protected against reverse polarity so it does not matter which cable goes where.
21
TEAM Climate Monitoring Protocol 3.0
Figure 5. Main wiring diagram of the climate station showing the connections between main components.
22
TEAM Climate Monitoring Protocol 3.0
Figure 6. Main components of the CR1000 data logger.
Figure 7. Main screen of PC200W software.
23
TEAM Climate Monitoring Protocol 3.0
7. Establish communication with the data logger: Select CR1000 on the left and hit the
Connect button on the upper left corner. Once the two are connected you will see the
time clicking on the bottom right corner of the main PC200W window.
8. Clock Synchronization: This is crucial to ensure that all climate data are properly time
stamped.
IF YOU FORGET THIS STEP THE DATA WILL HAVE NO VALUE!
To perform the clock synchronization hit the Set Clock button in the clocks area in the
main window of PC200W (Figure 8). MAKE SURE THAT THE CORRECT LOCAL
DATE AND TIME show in the Data Logger Field. In locations with Daylight Savings
Time (DST) ensure that the standard time is shown (not the DST time).
Figure 8. Main PC200W window with set clock button highlighted.
5.1.2 Upload the data collection program
We have created a standardized data collection program that tells the data logger which sensors
are connected where, how often the data is collected, and how it is reported. The program
expects a maximum of five sensors1 :two temperature/RH sensors, two solar radiation sensors,
and one precipitation sensor. Table 3 shows how different variables from each sensor are
reported (plus the voltage of the battery and the tachometer reading from the radiation shield).
The standard collection program can be downloaded from the TEAM portal
(www.teamnetwork.org) in the MyTEAM area. Follow the link to the Technical Files in the
“Projects and Technical Files” box in the MyTEAM area. The programs are standardized for
1
If the station is sited as Level 1, 2 or 4. If the radiation sensor is on its own, the number of
sensors expected is 3. A separate script is available for the dedicated data logger with the solar
radiation sensor.
24
TEAM Climate Monitoring Protocol 3.0
each TEAM Site and are required for use. Any changes will be done by the Network Office
which will also notify TEAM Sites to update their data logger programs
To Upload the Standard Data Collection Program, hit the Send Program button on the Data
logger Program region of the main window. You will get a warning screen, advising you that any
program already in the data logger will be erased; say YES. Navigate to the local directory where
the program is located and hit OPEN. The program should take a few seconds to compile and
load into the data logger. Now the data logger is ready to collect data. Data will be written to the
memory card directly for easy retrieval.
Variable (units)
Temperature (°C)
Relative Humidity (%)
Collected every
5 sec
5 min
Reported every
5 min
5 min
Rainfall (mm)
Total Radiation (W/m2)
Battery Voltage (V)
Date/Time stamp
Continuously
5 sec
5 sec
5 min
5 min
5 min
5 min
5 min
Fan speed shield (RPM)
5 sec
5 min
What is reported
Average, Standard Deviation
Value at the end of sampling
interval
Total
Average, Standard Deviation
Minimum
Value at the end of sampling
interval
Average RPM during 5 min
period
Table 3. Collection frequency, reporting frequency and what is reported in the standard data collection
program.
5.1.3 Connect all the sensors
Before connecting all the sensors, turn off the data logger by disconnecting it from the battery.
Wiring diagrams for each sensor are available with the program (see also Appendix A.6. for the
standard TEAM Climate Station wiring diagram).
Attach the sensor cables to the appropriate terminals: Use the small screwdriver that comes
with the data logger to securely attach the cables to the terminals by loosening the screw in each
terminal, inserting the cable in the slot above, and then tightening the screw so the cable makes
good contact with the terminal. The temperature/RH and solar radiation sensors should be
connected to differential analog terminals (e.g. 1H/1L), while the precipitation sensor is
connected to a pulse terminal (e.g. P1). The ground cables can all be connected to the same
terminal for a given sensor. Additionally, the Temperature/RH sensor requires power from the
data logger (12V terminal).
Sensor location: The sensors can remain indoors for the test, but if possible, locate the radiation
sensor outside to get a natural reading.
Rain Gauge: Take the cover off the tipping rain gauge (TB4) and make sure the tipping
mechanism is loose (it is usually secured with a rubber band for shipping). You will be adding
some water to the rain gauge so replace the cover and put the gauge inside another bucket or
above a collection tray to avoid water spillage.
25
TEAM Climate Monitoring Protocol 3.0
Collection of test data: Once the sensors are all connected, turn the data logger back on and
wait for about 1-2 hours for data collection. Slowly add 1/3 of a liter of water (about 10 mm) to
the rain gauge over a 5-10 minute period.
5.1.4 Extract the data from the data logger
Examine the data collected to ensure the sensors and data logger are working properly. Select the
Collect Data tab in the main PC200W window and press the Change Table’s Output File
button to specify the name of the file and directory where the data will be written. Finally, press
the Collect button on the upper left corner of the tab to write the data to the file (Figure 9).
Figure 9. Collect Data tab in the main PC200W window.
Examine the data: Open the file in a text editor or Excel and examine the values. The values for
the duplicate Temperature/RH and solar radiation sensors should show as “NA”, but the rest of
the values should show reasonable figures for the sensors.
5.1.5 Set up a dedicated data logger for the radiation sensor (Level 3)
TO BE WRITTEN.
5.2 Installing the base tower
This section describes briefly the installation and proper grounding of the base tower (UT10) that
will house all the equipment for the climate station. More detailed instructions can be found in
the manual of the base tower (http://www.campbellsci.com/documents/manuals/ut10.pdf).
26
TEAM Climate Monitoring Protocol 3.0
5.2.1 Base Installation
The tower is based on top of a concrete foundation that must be installed at the site. A square
hole of 61 cm on the side and 61 cm deep must be dug out and a concrete foundation built out of
a 5 x 10 x 61 cm lumber square (inside dimensions). The square and 4 stakes centered around
each side will provide the base for the concrete foundation. The anchor bolts and base of the
tower are assembled, the hole is filled with concrete and the anchor bolts are driven in with the
tilt base. Wood strips should support the base so it does not sit on top of the wet concrete. Once
the concrete hardens, the wood strips are removed and the base is leveled and tightened with the
attached nuts (see more details in page 2-1 of the UT10 manual).
5.2.2 Tower Installation
After the tilt base is installed the rest of the tower can be assembled and positioned. First install
the mast on the top most section. Then slide the three tower legs into the sleeves of the base.
Level the tower by adjusting the leveling bolts (see more details in page 2-2 of the UT10
manual).
5.2.3 Grounding
PROPER GROUNDING IS CRITICAL TO PROTECT THE INTEGRITY OF ALL THE
EQUIPMENT against lighting strikes. First drive the ground rod next to the base of the tower
using a sledgehammer. Then attach one end of the ground cable (4 AWG wire) to the rod and
then route the cable and attach to the tower leg using the clamp. Route the green (12 AWG ) wire
upwards to where the instrument enclosure will be installed (see more details in page 2-3 of the
UT10 manual). See sections 5.6 for details on grounding the enclosure and the data logger.
5.3 Installing the Data Logger and Battery
The data logger (CR1000) should be installed in a weather resistant enclosure that is attached to
the side of the tower (ENC 14/16). First install the data logger into the enclosure and then attach
the enclosure to the tower. The data logger should be mounted low on the enclosure and secured
to the backplate with 4 screws. This should leave plenty of the space below the data logger for
the incoming cables from the sensors, power cables and the ground cable. The enclosure can be
mounted to the side of the tower by using the mounting brackets attached. Mount the enclosure
at about eye level to facilitate access to it (see more detailed instructions in page 3-1 of the UT10
manual).
The battery should NOT be installed inside the enclosure; lead-based batteries will leak small
amounts of hydrogen gas when charged, creating a potentially dangerous fire hazard in the
absence of appropriate ventilation. To protect it from the elements, the battery should be placed
in a separate plastic/metal container with slits/holes to allow airflow (a plastic car battery
enclosure can be purchased locally). The battery and its enclosure can be mounted on the side of
the tower or sitting on the ground and appropriately secured (e.g. chained).
5.4 Installing the Solar Panel
The solar panel should be installed in a way to maximize exposure to sunlight and ensure the
station can run on solar power during the day.
27
TEAM Climate Monitoring Protocol 3.0
Install the charge regulator: Before mounting the solar panel to the tower, install the power
regulator (Morningstar Sun Keeper 6) to the back of the solar panel. This ensures that the current
coming from the panel is regulated and the current from the battery does not drain to the panel.
WHEN INSTALLING THE REGULATOR MAKE SURE THE PANEL IS COVERED
OR FACING DOWN TO AVOID EXPERIENCING ELECTRIC SHOCK. Follow the
instructions that come with the power regulator for details on the cabling and proper mounting of
the regulator.
Direction and height: If the climate station is in the southern hemisphere, the solar panel
should be facing north; for stations in the northern hemisphere the solar panel should be facing
south. The panel can be installed at any height; 1.6-2.0 m makes it easier for maintenance and
cleaning. The panel does not come with a mount for the tower so a single arm side mount should
be purchased locally for this purpose (see Appendix A.1). The panel can also be installed in a
pole by itself or close to the ground as long as the facing direction and angle guidelines are
strictly followed (see below).
Angle: To maximize the capture of direct solar radiation, angle the solar panel with respect to
the ground using the guidelines in Table 4 (only values relevant to tropical locations shown).
Latitude (degrees)
(N or S)
0-10
11-20
21-23.4
Angle (degrees)
10
Latitude + 5
Latitude + 10
Table 4. Suggested tilt angle to maximize incident solar radiation year round (modified from Landau 2001).
Use a clinometer to ensure the correct tilt angle. For example, it the station is located 15 degrees
north of the equator, the solar panel should be facing south and angled at 20 degrees from the
horizontal.
Connections: Route the cable coming from the solar panel through the regulator along the tower
securing it with plastic ties and into the enclosure. An 8 Amp fuse needs to be installed in the
positive cable at less than 50 cm from the connection to the battery. Connect the cables into
positive and negative terminals of the battery (watch the polarity ; + with +, ! with !). Two
separate cables then go from each of the battery terminals to the data logger. You might consider
using a splitter and connect the cables coming from the solar panel into the splitter instead.
5.5 Installing the sensors
There are two main steps involved in the installation of the sensors: first, the sensor should be
adequately positioned on a mounting bracket and attached to the tower, and then the cable from
the sensor should be connected to the data logger. Below, we describe the main steps to mount
each sensor. Refer to the documentation enclosed with each sensor for more detailed
instructions.
28
TEAM Climate Monitoring Protocol 3.0
5.5.1 Vaisala HMP45C Temperature/RH sensor
Two HMP45C are housed inside a MetOne Aspirated Radiation Shield. (076B). Follow these
steps to mount the shield and the sensors inside it.
Quick description of the radiation shield: The shield consists of two main components: 1) a
large umbrella-like roof that contains the fan and 2) a lower tube that is attached through four
clamps to the upper portion and houses the sensors. The fan at the top draws air from the bottom
of the tube at high speed which is funneled through the sides of an inner tube containing the
sensors. This air cools down the walls of the shield, minimizing the effects of direct solar
radiation on air temperature, which can be important on days with high solar radiation and little
or no wind. The bottom part of the shield (tube) can be easily detached to install/inspect the
sensors.
Connecting the sensor cables: The shield is designed to connect the sensor cables directly into
a wiring box on the top of the tube (the J-Box in the instructions of the shield). Unscrew the top
of the cabling box to expose the connectors. The cabling box contains room for 10 cables (there
are 12 slots but only 10 are wired), which is enough to connect two Vaisala Temperature/RH
sensors. Follow the diagram in Figure 10 to connect the sensor cables to the shield cabling box.
Figure 10. Cabling diagram showing 1) how to connect the cables coming from the Vaisala sensors to the
cabling box inside the aspirated radiation shield; ground cables can be combined into one slot (e.g. black &
white into slot 3) and 2) cabling the whole system into the CR 1000 data logger.
29
TEAM Climate Monitoring Protocol 3.0
Replace the top cover of the cabling box: Once the sensors are connected to the cabling box
replace the top of the box ensuring the sensor terminal cables feed out of the rubberized wedge
located on one side of the cabling box cover. Make sure that the sensor terminal cables are not
tensed inside the box, and tighten the screws of the cover to secure it firmly.
Positioning the sensors inside the shield: With the sensor cables secured, slide the sensor into
one of the large plastic retaining brackets and push to the bottom of the tube until it cannot go
any further (remove the small retaining brackets to create more space). Coil the sensor cable into
2-3 loops and secure at a couple of places, so it does not interfere with the fan once the shield is
assembled. Repeat the same process with the other sensor and position the sensors so they don’t
touch the walls of the tube directly (they can touch each other).
Mount the shield on a cross arm: The top of the shield can be mounted at the end of a sensor
cross arm (CM202) and at a height of 2 m from the ground. Slide the shield into the cross arm
and tighten the Phillips screws so it does not slide.
Assemble the rest of the shield: Position the shield tube on the base of the roof and secure with
the four clamps. Connect the power cable (4 pin connector coming off the side of the box) and
the sensor cable (10 pin connector next to the tube). Route these cables along the cross arm and
down to the enclosure. Wrap wire (or plastic straps) around the cables so they are secure to the
cross-arm and the tower.
Connect the terminals from the sensor cable to the CR1000: There should be 10 individually
colored cables at the end of the sensor master cable. Remove the U-shaped pre-wire connectors if
there are any at the end of the cables. Using a cable cutter, strip about 1 cm of the plastic shield
to expose the bare cable. Using the diagram in Figure 10 connect the cables to correspondent
connectors in the data logger.
Connect the power and tachometer cables to the data logger: Following the same process
connect the power cable (which carries the tachometer signal) in the appropriate slots in the data
logger (make sure the power cable goes into the SW-12 V slot)(see Figure 11).
30
TEAM Climate Monitoring Protocol 3.0
Figure 11. Diagram showing the correct way to connect the power cable terminals to the data logger.
5.5.2 Licor200X Solar radiation sensor
It is recommended to install two pyranometers for redundancy and to account for seasonal
changes in solar path. If the pyranometer is not at the very top of the base tower, the base tower
could shade it during some periods of the year depending on the geographical location of the
field station. For example, in stations located north of the equator the sun path moves southwards
between the summer solstice (June 21) and the winter solstice (December 21) and then back
northwards until the next summer solstice (June 21). If the pyranometer is facing south then the
tower may cast a shade on it between the summer solstice and the fall equinox (September 23)
and then again between the spring equinox (March 21) and the summer solstice (see
http://astro.unl.edu/naap/motion3/animations/sunmotions.swf for a nice simulation of this). A
similar situation can arise for tropical locations south of the equator. To avoid this problem it is
better to have two pyranometers, one facing north and one facing south and then the appropriate
reading can be post-processed depending on the time of the year (not in the original data!). Even
if the pyranometer is not shaded (e.g. at the top of a structure), it is always better to have two in
case one gets dirty, or malfunctions.
Mounting the sensor: Attach a cross-arm stand to the end of the cross arm to provide a leveled
surface for the sensor (Figure 12). The height of the sensor is not as critical as the orientation
(either facing north or south). Mount the sensor on the leveling base (LI2003S) to ensure it is
adequately leveled. The base has a bubble level and adjustment screws to level the sensor
accurately.
Secure and connect the cables: Once the sensor is mounted and leveled, route and secure the
cable along the cross arm and then along the tower and into the enclosure. Finally, connect the
ends of the cables to the appropriate terminals as shown in the wiring diagram that comes with
the data collection program. REMOVE THE RED CAP AFTER INSTALLING THE
PYRANOMETER (save for future storage/shipping).
Figure 12. Diagram showing the mounting configuration for the LI200X pyranometer (adapted from
Campbell 2008).
31
TEAM Climate Monitoring Protocol 3.0
Pyranometer at an alternate location: Follow the same steps for pyranometers that will be
installed at an alternate location within 100 m of the weather station (Level 2) or at a completely
different location with a dedicated data logger (Level 3). In such cases the cross arm will be
attached to a different structure depending on the location chosen. If the pyranometer is installed
within 100 m of the climate station on top of a tall structure, secure the cable connecting the
sensor to the data logger adequately. If the cable is left hanging in the air it might be vulnerable
to the wind or become a bird perching site. Strap the cable to the structure all the way down to
the floor, and from there, bury it underground to the base of the climate station where the data
logger is. It is a good idea to lay down "” PVC pipe 10-20 cm below the ground and pass the
cable through the PVC rather than bury it unprotected.
5.5.3 Rain Gauge (TB4)
The rain gage should be installed at least 6 m away from the climate tower and 30-60 cm above
the ground on a leveling base on top of a pole.
Mounting Pole: There are several commercial options available for poles but a simple and cheap
solution is to buy a steel pipe 4.8 cm wide and 142 cm long driven into a concrete foundation in
the ground 70 cm deep. Dig a hole 70 cm deep by 15-20 cm wide, place the pole in the center of
the hole, fill with concrete and level with a plumb. Cover the top of the pole to avoid water
sipping into it.
Installing the rain gauge: The rain gage can be mounted on top of the pole using a special
mounting bracket (CM240). To install the rain gage remove the cover and lift upward to expose
the base, tipping mechanism and bubble level. Adjust the nuts on the CM240 bracket to level the
base precisely. Remove the rubber band securing the tipping mechanism to ensure it works freely
(IF THIS IS NOT DONE NO DATA WILL BE COLLECTED). Two pieces of flexible
tubing can be attached to the drainage plugs underneath the gauge. Cover the end of the tubes
with plastic mesh or other protection to ensure ants and other insects do not enter the rain gauge.
Routing the cables: To avoid damage to the cable it is best to bury it underground to the base of
the climate station where the data logger is. It is better to lay down "” PVC pipe 10-20 cm
below the ground and pass the cable through the PVC rather than bury it unprotected. Route the
cables through the enclosure and connect to the data logger following the wiring diagram
enclosed that comes with the data collection program.
Manual rain gauge: Install the extra manual rain gauge within the vicinity of the climate station
(at least 6 m away from it). This rain gage can be used as a backup and to check periodically for
the accuracy of extreme rainfall events (> 50 mm/hour) (see section 6.2 below).
32
TEAM Climate Monitoring Protocol 3.0
5.6 Finishing steps
5.6.1 Secure the weather resistant enclosure
Once all the sensors and power sources are connected together, it is important to seal and secure
the enclosure so the data logger, battery and connectors are in a stable environment and protected
against the elements, insects and other threats that can compromise the integrity of the
equipment.
Ground the data logger: Connect the green cable (12 AWG) coming from the bottom of the
enclosure to the ground lug terminal in the data logger (below the Power In terminals).
Ground the enclosure: Connect the green cable coming from the ground rod to the ground lug
in the bottom of the enclosure.
Stabilize cable connections: The ends of the cables coming from the sensors or power sources
should be securely attached to their terminals, to maintain no tension over the connections in the
terminals. Bundle cables together with wire ties and fix the attached wire tie tabs to the side of
the box to hook cables and relieve tension to the terminals.
Seal up the enclosure: Use the enclosed putty to completely seal the bottom entrance of the
enclosure. Affix the humidity indicator to the inside of the box and leave a couple of silica gel
packs to absorb the moisture. It is recommended also to drop in two large pillows of Zorbit (a
substance that regulates humidity inside the box). For security reasons it is also a good idea to
attach a padlock to the enclosure lock.
Organize and tide up the cables: Walk around the tower and make sure no cables are dangling
or loose. Secure any hanging cables with plastic ties.
5.7 Test run the station
It is a good idea to run the station for a week to make sure everything is working as expected.
Data from the first two weeks should be uploaded to the TEAM Data Portal as soon as possible,
to make sure the station is running without any problems. Turn on/connect the battery to the data
logger, close the door and lock it.
Getting the data out: after a few days go back to the station and extract the memory card by
pressing first the button in front of the memory card adapter. As soon as it turns green, open the
door of the adapter and push the button to eject the memory card. Do not be concerned about
loosing any data when removing the card; the data logger will keep collecting data, which will be
stored in its internal memory.
Read the data into the computer: You will need Campbell’s PC200W software to extract the
binary data from the memory card and convert it to a text file. Insert the card in a memory card
reader and open the PC200W software.
Create local storage directory: Establish a local directory to store Climate Measurement Files.
33
TEAM Climate Monitoring Protocol 3.0
Convert the file from the card into a readable format:
• From the PC200W tools menu, select Card Convert. This will open up the Card
Convert Window.
• Select the Card Drive and the Output directory.
• Press the Start Conversion to generate the text file. All Climate Measurement files
should be stored in this directory in the future.
Visualizing the data: The data can be examined with any graphing program (including Excel).
Make sure that the values coming from the different sensors are reasonable and within the
bounds expected for the location of the climate station. Send the file to the TEAM Technical
Director for evaluation.
See Data Retrieval (Section 6.1) for more detailed information on retrieving data from the data
logger.
6 RUNNING THE CLIMATE STATION
Once all the checks have been made, the station can be left running autonomously. Occasionally,
during extreme rainfall events >50 mm/hour) it is a good idea to check the measurements of the
tipping bucket against a manual rain gauge (see below).
To ensure minimum disruption in the data stream, the station should be visited at least every two
weeks to collect data. During this time, some minimum maintenance and checking should be
done (described below in maintenance section).
6.1 Data Retrieval
Retrieving the data often is essential to detect any data anomalies and problems with the sensors.
There are several ways to retrieve data from the station, but here we only describe one option:
manually through removal of the memory card. We envision having wireless options for data
retrieval in the near future, either through radio, cell phone, or satellite uplink.
6.1.1
Retrieving the Data Manually from the Field
Take a memory card: take a blank memory card to replace the one that will be retrieved.
Take out and replace the memory card: After opening the enclosure, extract the memory card
by pressing first the button in front of the memory card adapter on the right side of the data
logger. As soon as it turns green, open the door of the adapter and push the button to eject the
memory card. Do not be concerned about loosing any data when removing the card; the data
logger will keep collecting data, which will be stored in its internal memory. Put in the new
memory card and close the door of the adapter.
34
TEAM Climate Monitoring Protocol 3.0
6.1.2 Retrieving the Data from a dedicated data logger (Level 3).
TO BE COMPLETED.
6.1.3 Extract the Climate Measurement Data File from the Memory Card
The following steps describe the process to extract the Climate Measurement Data file
Open the PC200W software.
Create local storage directory: Establish a local directory to store Climate Measurement Files.
Convert the file from the card into a readable format:
• From the PC200W tools menu, select Card Convert. This will open up the Card
Convert Window.
• Select the Card Drive and the Output directory.
• Press the Start Conversion to generate the text file. All Climate Measurement files
should be stored here in the future.
The data are now ready for upload. Go to Section 6.1.4.
6.1.4 Upload the data to the TEAM portal:
The Climate Measurement Data File will be uploaded to the TEAM Network portal. A fully,
dynamic data management system for all Climate Protocol data and forms is being developed.
The interim solution is the following:
Step 1. Go the www.teamnetwork.org and log into the portal.
Step 2. Go to the MyTEAM area and select “Projects”.
Step 3. Every TEAM Site implementing the 3.0 version of the Climate Protocol will have a
project titled: “TEAM-Site-Name Climate Repository” (e.g. Nam Kading Climate Repository).
Click on this project.
Step 4. Each project contains an Instructions tab, a File Upload tab and Site Personnel tab. All
Climate forms and most importantly the Climate Measurement Data File produced in Section
6.1.3 are to be uploaded here. NOTE: Please read the Instructions tab as it defines how to name
your files and forms.
6.2 Checking rainfall measurements against the manual rain gauge
Automatic tipping buckets, like the one used in this protocol (TB4) can misread the amount of
rainfall during extreme rainfall events (> 50 mm/hour) (e.g. Nystuen 1999). Thus, it is a good
idea to check rainfall measurements after these events with a manual precipitation bucket (e.g. a
US weather type). We suggest the following guidelines to ensure this information can be
captured in a standardized way.
35
TEAM Climate Monitoring Protocol 3.0
6.2.1 Measure and record the event
After the event has passed, measure the rainfall using the enclosed dipstick and write it down
together with the approximate beginning and end time in the Heavy Rainfall Events section of
the Sensor Calibration Form (Appendix A.4).
6.2.2 Submit the data
At the end of the month, submit the data in the Extreme rainfall events form as part of the regular
data submission process . See Section 6.1.4 on where to upload the Sensor Calibration Form.
6.3 Regular Maintenance
Maintenance is key to the proper functioning of the climate station. This section describes in
detail maintenance protocols for the different components of the climate station (core area, base
tower, sensors, radiation shield, data logger, power sources). Table 5 contains a summary of all
maintenance activities and their suggested frequency. All maintenance information will be
recorded on the Climate Maintenance Log Appendix A.3. See Section 6.1.4 for instructions on
how to upload the Climate Maintenance Log to the TEAM Network portal. All maintenance
activities need to be scheduled in advance in the TEAM online Sampling Scheduler before the
start of each data collection year.
6.3.1 Core area maintenance
The surface on the core area around the weather station should be covered with short grass or the
natural substrate at the site. This area should be regularly maintained at least every month
(preferably every two weeks) by keeping the grass short (or natural substrate) and free of debris.
If there is a fence surrounding the climate station, it should also be regularly checked for possible
breaches and general integrity. Replace any sections of the fence if they are damaged or start
showing signs of deterioration.
6.3.2 Tower maintenance
The tower structure should be carefully inspected every month. If a non-aluminum tower is used,
look for signs of deterioration such as growing rusting spots on the poles, and in joints were two
structures meet. As soon as rust is noticed, clean and sand the spot and surrounding area to
remove the rust and apply antirust paint.
Many animals and plants will attempt to colonize the tower. Every time the station is visited,
remove any noticeable debris and structures (e.g. wasp/bee nests, bird nests, termite mounds, etc)
present on the tower. Also remove any lianas or climbers that are starting to colonize from the
base of the tower. Follow ant lines (or termite trails) that are climbing the tower to detect where
they are going (to a sensor, a nest, the enclosure, etc) and destroy them.
36
TEAM Climate Monitoring Protocol 3.0
6.3.3 Enclosure Maintenance
Check the integrity of the enclosure at least monthly (preferably every two weeks). First check
the outside and make sure the enclosure is solid and there are no obvious breaches or rusting
spots developing on the external surface. If any are detected, treat immediately by sanding the
area and applying antirust paint. Look for ant or termite lines going into the enclosure and
destroy them.
Open the enclosure and check the humidity indicator. Replace the silica gel or Zorb-it™ packets
if the middle circle (labeled 40) is pink. If there are ants or other insects inside the box, there is a
breach most likely through the bottom pipe. Carefully check the pipe at the bottom of the
enclosure and make sure the putty is correctly placed to seal the entrance. Remove any debris,
insects, or structures found inside the enclosure.
Inspect the cables and terminals in the data logger and battery to make sure the connections are
not comprised. Look for rusting and salt deposits on the terminals; if any are detected, remove
the cable from the terminal, clean it with sand paper and reconnect. Check the external surface of
the cables to make sure there are no breaks or exposed wires. Repair any cables with exposed or
damaged sections by wrapping the section of the cable with vinyl/electrical tape.
6.3.4 Sensor maintenance
All the sensors used in this protocol are designed to work unattended, but some minimum
maintenance is necessary to ensure they are working correctly.
Temperature/RH sensor (Vaisala HMP45C):Once a month, remove the sensors from the
aspirated radiation shield and check for debris or deposits on the black screen at the end of the
sensor. There is no need to disconnect any cables from the data logger or the cabling box in the
aspirated radiation shield. Just remove the bottom portion of the shield and pull out the sensor
from the tube to inspect it. Refer to the manual of the sensor for other maintenance guidelines,
especially if the station is close to the ocean (salt deposits can form more quickly).
Aspirated radiation shield (MetOne): Every two weeks (or every time the station is visited)
inspect the radiation shield to make sure no animals have colonized the structure (wasps love the
shade provided by the shield). Clean the surface of the main ‘umbrella’ and the tube with a
slightly damped cloth to remove dust and dirt and keep the efficiency of the shield as high as
possible. Check that the fan is working by placing your hand (or an inexpensive portable flow
monitor, e.g. Kestrel® 1000 Pocket Wind Meter-Forestry Suppliers) at the bottom of the shield.
Slight suction should be experimented (if a flow monitor is available it should read about 5 mph
or greater - # 8 km per hour). The data logger is programmed to record the speed of the fan and
write it to the data file, so if there is any problem with the fan it should be apparent in the data
immediately. Replacement fans can be ordered from MetOne (make sure you order the fan with
the tachometer cable – part # 3558)
37
TEAM Climate Monitoring Protocol 3.0
Precipitation gauge (TB4): Inspect the precipitation gauge every time the station is visited.
Remove any debris from the collection funnel or debris screen. Every two weeks, remove the
cover of the gauge to make sure no insects or other animals are present inside. Carefully check
that the tipping bucket mechanism is moving freely (DO NOT tip it because a rainfall event will
be recorded in the data logger). Inspect the siphoning tubes attached to the bottom of the gauge
and make sure they are clear and free from debris (otherwise water will back up into the gauge).
Check the bubble level to ensure the gauge is leveled. If needed, correct the level by adjusting
the nuts on the mounting brackets.
Solar radiation (LI 200X): Every month, check the level of the pyranometers and adjust if
necessary. Remove any debris on the sensor head by using a soft brush. If the debris is
substantial (e.g. a bird dropping) note it in the maintenance log (Appendix A.3), and carefully
clean the surface of the sensor with a humid cloth (do not use chemical cleaners). Inspect the
drain hole next to the sensor and ensure it is open and free of debris.
6.3.5
Power systems maintenance
Solar panel: Clean the surface of the solar panel every month by removing any debris, bird
droppings, dust, etc. This will keep the panel working at the maximum efficiency possible. Using
a voltmeter, measure the voltage differential coming out of the panel; not the regulator (at
maximum efficiency - full sun, this should be about 17.9 V).
Battery: Every month check the battery to ensure it is working properly. Check that all the cable
connections are tight and clean (no salt deposits or rust). When extracting data from the data
logger examine the battery voltage minimum logs for any warning signs. Normal minimum
voltages should be between 11-13 V. If the voltage of the rechargeable battery dips below 10.5 V
this can cause irreversible damage to the battery. If this is the case, immediately replace the
battery.
38
TEAM Climate Monitoring Protocol 3.0
System/Sensor
Climate station core
area/fence
Tower base
Instrument Enclosure
Temperature/RH
sensor
Aspirated radiation
shield
Precipitation gauge
Solar Radiation sensor
Solar Panel
Battery
Activity
Remove debris, general maintenance
Frequency
Monthly
General inspection, rust control,
removal of debris, nests, etc
External/Internal integrity
Check internal humidity
Replace silica or Zorb-it™ packets
Clean debris and deposits
Biweekly
Clean exterior surface, check fan,
inspect fan speed logs every time data
is downloaded
Clean debris from collection funnel
Clean/remove debris from inside
Make sure tipping bucket is working
Check level
Check level, remove debris, inspect
drain hole
Clean surface, check voltage
Check cable connections
Inspect voltage logs
Biweekly
Monthly
Biweekly
Monthly
Every time station is visited
Biweekly
Monthly
Opportunistically, Monthly
Monthly
Every time data is
downloaded
Table 5. Summary of maintenance activities for the equipment in the climate station.
6.4 Sensor Calibration
The sensors need to be calibrated periodically to ensure that the measurements are consistent
through time. Having duplicate sensors facilitates this process and ensures there is always a
backup in case one of the sensors fails. While a sensor is out for calibration, a replacement
sensor needs to be installed in its place (just the head for the Temperature/RH sensor). A
summary of the calibration schedule can be found in Table 6. Sensor calibration will be recorded
in the Sensor Calibration Form Appendix A.4. See Section 6.1.4 on where and how to upload
the Sensor Calibration Form. For each sensor calibrated also please complete the Sensor
Calibration Metadata Form (Appendix A.5). This form keeps track of vendors, costs and
calibration certificates for each of the sensors used. All sensor calibration events will be
scheduled automatically in the TEAM online Sampling Scheduler before the start of each data
collection year.
39
TEAM Climate Monitoring Protocol 3.0
6.4.1 Temperature/RH sensor (Vaisala HMP45C)
The sensor head should be recalibrated every two years (the manufacturer recommends every
year, but keeping duplicate sensors calibrated annually is expensive). However, the first time this
is done, one sensor would need to be operational for two years while the duplicate is sent out for
calibration at the end of the first year. Afterwards, each sensor will be sent out for calibration at
the end of its second year of operation in an alternate schedule to keep two sensors operational at
all times (see Figure 13).
To replace the sensor head follow these steps (you will need to fill out the Sensor Calibration
Form Appendix A4):
Detach the sensor housing of the radiation shield from the top portion of the shield by loosing
the four clamps that retain the housing to the rest of the shield. Do not disconnect the sensor
cable or power cable coming from the shield.
Remove the sensor head: Unhook one of the temperature sensors and pull it out of the housing
without disconnecting the cables from the sensor to the cabling box. Once the sensor is out, pull
out the sensor head at the end. Write down the Serial Number of the sensor head in the
Sensor Calibration Form (Appendix A.4).
Replace the sensor head: Write down the serial number of the replacement sensor head in the
Sensor Calibration Form (Appendix A.4). Insert the replacement head into the probe (there is
only one way to do it).
Put back everything in place: Put the probe back in the radiation shield housing making sure
that the two sensor heads are not touching each other. Clamp back the sensor housing tube into
the fan housing section of the shield.
Send the sensor head out for calibration: Complete a Sensor Calibration Metadata Form
(Appendix A.5) for each sensor that is sent out for calibration. Obtain an RMA number from the
closest regional Campbell Scientific office and mail the sensor head out. When the sensor comes
back, fill the rest of the Sensor Calibration Metadata Form and keep the sensor as a duplicate.
Repeat the process above a year later when the other sensor in the pair will need to be
recalibrated.
Submit the information to the TEAM portal: Every time a sensor is sent out for calibration,
submit the information on the Sensor Calibration Form to the TEAM portal.
40
TEAM Climate Monitoring Protocol 3.0
Figure 13. Diagram illustrating operation and calibration schedules for Temperature/RH sensors (also
applies to the radiation sensors). Sensors are sent out for calibration at the end of their second year of
operation except for the first year, when sensor 2 is sent out (to get sensors out of sync and allow alternation).
During year 2 and afterwards there are always 2 sensors operational and one is out for calibration (and can
be used as a spare when it returns).
6.4.2 Precipitation gauge (TB4)
The TB4 requires very little maintenance and should work well as long as the tipping mechanism
is not disturbed. However, the precipitation gage should be calibrated annually to ensure accurate
rainfall measurements. Record the results in the Sensor Calibration Form. The manufacturer
recommends the following process:
•
•
•
•
•
Remove the cover from the gauge by loosening the screws on the sides.
Check the bubble level to ensure the gauge is perfectly leveled. If not, adjust the nuts on
the mounting bracket to level the unit.
Slowly pour through 314 cc of water through the inner funnel over a 15-minute period
(this is equivalent to 10 mm of rain). Have a second person count the number of tips as
the water is poured.
The gauge should have tipped 39 times. Fill in the time, date and number of tips in the
Sensor Calibration form.
Submit the information to the TEAM portal: Every time the tipping gauge is
calibrated submit the information on the Sensor Calibration Form to the TEAM portal.
See section 6.1.4 for instructions on uploading the Sensor Calibration Form.
If the gauge did not tip 39 times, send it back to the manufacturer for a recalibration. Replace the
gauge with a duplicate until it is returned.
•
Heavy rainfall events: as described above in section 6.2, check extreme rainfall events
(>50 mm/hour) against a manual precipitation gauge. Record the results in the Sensor
Calibration Form and submit with the next data upload. See section 6.1.4 for instructions
on uploading the Sensor Calibration Form.
41
TEAM Climate Monitoring Protocol 3.0
6.4.3 Solar radiation (LI 200X)
The Licor LI 200X should be sent out for calibration every 2 years. As with the temperature
sensor, however, send out for calibration one of the duplicates at the end of the first year of
operation to keep two sensors always operating in alternate schedules (see section 6.4.1 and
Figure 13).
Follow these steps to replace the solar radiation sensor (you will need to fill in the Sensor
Calibration Form).
Disconnect the pyranometer from the data logger: Open the enclosure to get access to the
data logger and disconnect the four cables coming from the pyranometer into the data logger
(usually one into 3H (or 4H), one into 3L (or 3H) and two grounds).
Remove the pyranometer from the leveling base: Using the thin hex key (that comes with the
pyranometer), free the pyranometer from the leveling base. Write down the Serial Number
(below the Model label on one side) and the date on the Sensor Calibration Form.
Install the replacement: Locate the replacement pyranometer in its housing making sure that
the cable is routed through the slot on one side. Secure the pyranometer by tightening the hex
screw on the side of the base (using the thin hex key). REMOVE THE PLASTIC COVER
PROTECTING THE SENSOR (otherwise the data will be useless!).
Connect the pyranometer to the data logger: Route and secure the cable through the leveling
arm and base until it reaches the enclosure. Route through the enclosure making sure there is
enough slack to connect to the data logger. Connect the cables to the terminals where the
replaced-to-be pyranometer used to be (use the cabling diagram for your site to match the color
cables and terminals). Secure the cables inside the enclosure using a grommet and leaving
enough slack so they are not tense.
Check the Leveling Base: Make sure the new pyranometer is leveled by checking the bubble in
the leveling base. Adjust if necessary using the protruding screws on the leveling base.
Record the information and submit to the TEAM portal: Write down the serial number of the
new sensor and the date and time it was installed on the Sensor Calibration Form. Submit the
information to the TEAM portal as soon as technically feasible. See section 6.1.4 for
instructions on uploading the Sensor Calibration Form.
Sensor
Temperature/RH Vaisala
HMP45C
Precipitation (TB4)
Calibration process
Sent to manufacturer for calibration.
Fill in information on the Sensor Calibration Form
Submit information to the TEAM portal
Level and pour 314 cc of water. Gauge should tip 39
times. If not send out for calibration
Fill in information on the Sensor Calibration Form
Frequency
Every two
years1
Yearly
42
TEAM Climate Monitoring Protocol 3.0
Submit information to the TEAM portal
Solar Radiation (LI 200X) Sent to manufacturer for calibration.
Fill in information on the Sensor Calibration Form
Submit information to the TEAM portal
Every two
years1
Table 6. Summary of calibration process and schedule for the sensors used in the TEAM Climate Protocol.
1
Schedule for the first year of operation is slightly different; see section 6.4.1 for details.
7 REFERENCES CITED
Andelman, S. J., & Willig, M. R. 2004. Networks by design: a revolution in ecology. Science,
305(5690): 1565.
Campbell Scientific. 2008. LI200X Pyranometer. Instruction Manual.
http://www.campbellsci.com/documents/manuals/li200x.pdf
Clark, D. A. (2002). "Are Tropical Forests an Important Carbon Sink? Reanalysis of the LongTerm Plot Data." Ecological Applications12(1): 3-7.
Clark, D. A. and D. B. Clark (1994). "Climate-induced annual variation in canopy tree growth in
a Costa Rican tropical rain forest." Journal of Ecology82: 865-872.
Enquist, C. A. F. (2002). "Predicted regional impacts of climate change on the geographical
distribution and diversity of tropical forests in Costa Rica." Journal of Biogeography29: 519-534.
EPA. 1995. Quality Assurance Handbook for Air Polution Measurement Systems.
Metereological Measurements. Vol. 4. US Environmental Protection Agency.
IPCC (2007). Intergovermental Panel on Climate Change, Fourth Assessment Report (AR4).
Kenneth J. F., Wright, J.S., Supardi, N., Rahman Kassim, A. R., Davies, S.J. 2007. Decelerating
growth in tropical forest trees. Ecology Letters 10(1): 1-9.
Landau, C. R., 2001. Optimum orientation of solar panels.
http://www.macslab.com/optsolar.html.)
Malhi, Y. and Wright, J. 2004. Spatial patterns and recent trends in the climate of tropical forest
regions. Phil. Trans. R. Soc. (B), 359: 311-329.
Malhi, Y., Timmons Roberts, J., Betts, R. A., Killeen, T.J., Lee, W. and Nobre, C.A. 2008.
Climate change, deforestation and the fate of the Amazon. Science, 319: 169-172.
43
TEAM Climate Monitoring Protocol 3.0
NRC 1999. Adequacy of Climate Observing Systems. Panel on climate observing systems status.
Climate Research Committee, National Research Council, National Academies Press.
Nystuen, J.A. 1999. Relative performance of automatic rain gauges under differental rainfall
conditions. Journal of Atmospheric and Oceanic Technology, 16(8):1025-1043,
Phillips, O., Y. Malhi, et al. 1998. Changes in the Carbon Balance of Tropical Forests: Evidence
from Long-Term Plots. Science 282: 439-442.
Root, T. L. and S. H. Schneider.1995. Ecology and Climate: Research Strategies and
Implications. Science 269.
WMO. 2003. Guidelines on climate observation networks and systems. WMO/TD 1185.
http://www.wmo.int/pages/prog/wcp/wcdmp/documents/WCDMP-52_000.pdf
WMO. 2008. Guide to Meteorological Instruments and Methods of Observation. 8. World
Metereological Organization.
Wright, J. 2005. Tropical Forests in a changing environment. Trends in Ecology and Evolution,
20(10): 553-560.
8 GLOSSARY
Air Temperature. Refers to the surface air temperature without the influence of direct solar
radiation. Also defined as the temperature reading by a thermometer placed in a shaded
shelter 1-2 m above the ground.
Aspirated Radiation Shield. (see Radiation Shield)
AWG. American Wire Gauge, is a standard to measure wire diameter for round, electrical,
solid, conducting wire. The lowest the AWG, the thickest the wire. For more information and
a table of physical and electrical properties of wires of different gauges see
http://en.wikipedia.org/wiki/American_wire_gauge .
Battery. A rechargeable battery is an essential component of the climate station that allows it
to work during cloudy conditions and at night. We recommend using a 12 VDC 100 Amp-h
sealed battery to provide enough charge for the system, in particular the aspirated radiation
shield (consumes 250 mA or 6 Amp-h in a 24 h period). The battery should be enclosed in a
enclosure that allows some flow of air (and avoid H buildup) but sturdy enough to protect it
from the elements (rain, heat).
44
TEAM Climate Monitoring Protocol 3.0
Calibration. A process to adjust measurements from a sensor to a universally defined
standard of measurement. For example, a thermometer can be calibrated by measuring the
boiling point of distilled water at 0 m above sea level and re-setting this value to 100 °C.
Each sensor follows specific calibration procedures at defined intervals of time to minimize
measurement bias.
Charge regulator. A device that maintains a load voltage nearly constant over a range of
variations of input voltage and current. A charge regulator is installed between the solar
panel and the battery to charge it in full without overcharge in varying conditions while
preventing reverse current during the night (from the battery to the solar panel).
Climate Protocol Maintenance Logs. Field forms to verify and collect information about
the physical status of a climate station. This includes condition of the climate base and its
surrounding area, the data logger and enclosure, the sensors and the power sources of the
climate station. Climate logs should be filled every 2-4 weeks.
Climate Station. The climate station is defined here as the set of sensors, data logger, power
supplies and physical base (tower/tripod) that is assembled to monitor climatological
variables continuously at a fixed point in space.
Data Logger. Computer that receives signals (electrical, pulse, etc) from the sensors and
transforms them into measurements with units (°C, mm, etc) over an integrated period of
time. The datalogger can also regulate the function of some sensors or instruments by
providing or cutting power to them as applicable.
Data Logger Program/Script. Compiled script or computer program that instructs the data
logger where each sensor is connected, the frequency of data collection (e.g. every 5 sec), the
interval of measurement report (e.g. 5 min), and what to do with the different variables for
each interval (e.g. calculate an average, total, minimum, standard deviation, etc). TEAM uses
a standardized script to ensure data collection is uniform across climate stations in the
network.
Data Upload. Process of transferring information (from a data logger, Excel sheet, a
maintenance log, etc) to the TEAM portal through a predefined process (e.g. DeskTEAM).
The data received is checked for basic consistency before being incorporated into the TEAM
database.
Enclosure. Special box that houses the data logger and other sensitive components of the
climate station.
Grounding. Process to protect the climate tower from lightning and/or the accumulation of
static electricity. The base tower is protected with a rod that routes potential lightning strikes
to the ground through a 4 AWG cable (copper cable 5.19 mm diameter). The data logger and
enclosure are also grounded to this same cable to discharge them from static electricity
through a 12 AWG cable (copper cable 2.05 mm diameter).
45
TEAM Climate Monitoring Protocol 3.0
Memory Card. Device to store climate data collected by the data logger (usually a 32-64
MB Compact Flash card). The data logger partitions the memory card in a special way to
maximize the amount of data stored.
Metadata. Data about other data. In general, metadata is structured or standardized using a
scheme to capture it and make it interchangeable and easily readable. Climate metadata
includes details about the sensors (e.g. type, make, model, calibration, etc.), the data logger
(model, firmware version, etc.), the climate station (latitude, longitude, start date,
maintenance information records). TEAM uses the XXX metadata standards.
PC200W Software. Software provided by Campbell Scientific to program a data logger,
extract data from it and visualize it. TEAM uses PC200W to initially setup the time in the
data logger, load the TEAM climate data collection script and extract data from the data
logger or a memory card.
Precipitation. Quantitative measurement of rainfall during a specified time interval. Rainfall
is usually measured in linear units (e.g. mm/time) to standardize for capture area; volume of
water (cm3) / area of capture (cm2) per unit time " 10. TEAM uses a tipping bucket that
sends a pulse signal to the data logger for every 0.2 mm of rain captured.
Pyranometer. Instrument to measure the heating power of radiation, in particular of
radiation coming from the sun (300-2800 nm). The pyranometer measures solar radiation
flux density (watts/m2) from a field of view of 180 degrees. Solar radiation measurements
usually vary as a function of sun position, season, cloud cover, atmospheric composition and
any other physical/chemical variables that filter irradiance.
Radiation Shield. Device that reflects solar radiation to shield it from a sensor (usually a
temperature sensor). TEAM uses an aspirated radiation shield (MetOne) that actively isolates
the sensor chamber wall from external direct solar radiation by driving air from the bottom of
the shield through a fan. Passive radiation shields do not actively isolate the sensor chamber
but instead rely on a series of interconnected hollow plates that shield the air heated by the
external radiation.
Relative Humidity. Variable that measures the ratio of the actual vapor pressure in the air
with respect to the saturation vapor pressure. The relative humidity is expressed as a percent.
Sampling Unit. The sampling unit is defined as the smallest indivisible unit of the total
population selected for sampling. The two major types of sampling units used in TEAM are
points and areas. The sampling unit for the TEAM Climate Protocol is a point.
Sensor. Sensors are the instruments that make the actual measurements of given climatic
variables. Suitable sensors accurately translate environmental change into measurable
electrical properties by outputting a voltage, changing resistance, outputting pulses, or
changing states.
46
TEAM Climate Monitoring Protocol 3.0
Sensor Calibration Form. Field form to keep track of sensor calibration information such as
date when sensor was sent for calibration, serial numbers of sensor in calibration and
replacement sensors, etc. All information from the Sensor Calibration Form needs to be
uploaded to the TEAM portal where it will be stored as downloadable metadata.
Site Metadata Field Form. Field form to collect information on the physical characteristics
of the site where the climate station is installed such as distance to main obstacles, substrate,
slope, sky profile, etc. All information from the Site Metadata Field Form needs to be
uploaded to the TEAM portal where it will be stored as downloadable metadata.
Siting process. This is the process that describes the specific rules needed to deploy a
climate station as a function of physical characteristics of the site, height and distance from
obstacles, specific sensor requirements, etc. The siting process is decribed in detail in section
4 of the TEAM Climate Protocol.
Solar Panel. A device that captures solar energy and transforms it into electrical energy. In
the context of the TEAM Climate Protocol, this energy is used to power the data logger,
sensors and radiation shield. The solar panel also charges the battery so that it can power the
station at night or during cloudy days. We recommend the use of a 85W-2.2 Amp solar panel
to fulfill the power requirements of the climate station.
Solar Radiation. Is the amount of energy in the form of electromagnetic waves coming from
the sun. Radiation from the sun spans a wide range of frequencies from the Ultra violet (100400 nm) passing through the visible light (400-700 nm) and the infrared or heat (700 – 106
nm).
Tipping Bucket. Device to estimate rainfall automatically without human intervention. A
tipping bucket collects rain through a funnel that fills one side of a bucket that is pivoted in
the middle. As one side of the bucket fills with water the weight drives it down releasing the
water and causing the bucket to tip to other side, where the process starts again. Each tip is
recorded by the data logger as a pulse signal and is equivalent to a fixed amount of rain
(usually 0.1-0.2 mm).
Tower (Base tower). Refers to a structure that houses the sensors, the enclosure, the solar
panel and the battery. TEAM uses a 3 m aluminum tower (UT-10, Campbell Scientific) with
a lightning rod and ground cable.
Core Area. Defined as the area (25-30 m2) where the climate station (tower, sensors and
tipping buckets) is contained. The core area should be regularly maintained and fenced for
security and to avoid intrusion of animals.
47
9 APPENDIX A.1. MAIN EQUIPMENT LIST
(Continues into next page)
Category
BASE
DATA LOGGER
/MEMORY
SENSORS
ACCESSORIES
POWER
Equipment
Description
3 m aluminum
base tower
Automated Data
Logger
CompactFlash
Module
64 MB Memory
cards
SanDisk USB
reader/writer
HOBO Data
Logger
Data Shuttle for
Hobo
Auto Precipitation
Gage
Manual
Precipitation
Gauge
Temperature/ RH
sensor
Solar Radiation
Sensor -12 ft
cable
Solar Radiation
Sensor -300 ft
cable
Leveling Base for
TB4-L
Leveling Base for
Licor
Aspirated
radiation shield
Weather-resistant
enclosure
Wind Screen
Number
Supplier
Model ID
UT-10
Level 1
&4
Yes
Level
2
Yes
Level
3
Yes
1
2
Campbell
Scientific
Campbell
Scientific
Campbell
Scientific
SanDisk
CR1000
Yes
Yes
Yes
CFM 1000
Yes
Yes
Yes
CFMC253M
Yes
Yes
Yes
1
SanDIsk
Imagemate
Yes
Yes
Yes
1
Onset
H21-002
No
No
Yes
1
Onset
U-DT-1
No
No
Yes
1
Campbell
Scientific
Forestry
Suppliers
TB4
Yes
Yes
Yes
89018
Yes
Yes
Yes
2
Viasala
HMP-45C
Yes
Yes
Yes
2
Licor
LI-200X
Yes
No
Yes
2
Licor
LI-200X
No
Yes
No
1
Campbell
Scientific
Campbell
Scientific
Met One
CM-240
Yes
Yes
Yes
LI2003S
Yes
Yes
Yes
076-B5
Yes
Yes
Yes
Campbell
Scientific
Campbell
Scientific
Zorbit
Campbell
Scientific
Campbell
Scientific
Universal
Power
Group
ENC-12/14
Yes
Yes
Yes
260-953
Yes
Yes
Yes
Zorbit Packets
Sensor Cross arm
5
3
CM202
Yes
Yes
Yes
Yes
Yes
Yes
Right angle
mounting kit
12 V battery - 100
Ahr
3
CM220
Yes
Yes
Yes
UB121000
Yes
Yes
Yes
1
1
1
2
1
1
1
1
TEAM Climate Monitoring Protocol 3.0
Category
OTHER (site
metadata)
Equipment
Description
12V Charging
regulator
85 W Solar Panel
Laser Rangefinder
Number
Supplier
Model ID
SK-6
Level 1
&4
Yes
Level
2
Yes
Level
3
Yes
1
1
1
Morning
Start
Yingli
Nikon
YL-85
550
Yes
Yes
Yes
Yes
Yes
Yes
Clinometer
1
Suunto
PM5
Yes
Yes
Yes
49
10 APPENDIX A.2. SITE METADATA FIELD FORM
TEAM Climate Monitoring Protocol 3.0
51
TEAM Climate Monitoring Protocol 3.0
52
TEAM Climate Monitoring Protocol 3.0
11 APPENDIX A.3. CLIMATE PROTOCOL MAINTENANCE LOG
53
TEAM Climate Monitoring Protocol 3.0
54
TEAM Climate Monitoring Protocol 3.0
55
TEAM Climate Monitoring Protocol 3.0
12 APPENDIX A.4. SENSOR CALIBRATION FORM
56
TEAM Climate Monitoring Protocol 3.0
57
TEAM Climate Monitoring Protocol 3.0
13 APPENDIX A.5. SENSOR CALIBRATION METADATA FORM
58
TEAM Climate Monitoring Protocol 3.0
Name of Person recording this information
Climate Monitoring Protocol
Sensor Calibration Metadata
Form
v. 1.0
LAST NAME
FIRST NAME
Climate Station ID
CL
Site Code
Point
Please complete one of these forms for EACH sensor being calibrated. Complete
the first half of the form when sending the sensor out for calibration and then
complete the bottom half when the sensor has been received. Attach the calibration
certificate provided by the vendor performing the calibration. Store this information
in the TEAM portal and keep a copy for the site's records.
SENSOR SENT OUT FOR CALIBRATION
Sensor Model:
Sensor Type:
Serial Number:
Date sent:
YYYY
MM
DD
YYYY
MM
DD
Vendor performing calibration:
Address:
Country:
Phone Number:
Estimated cost:
Notes:
CALIBRATED SENSOR RECEIVED
Sensor Model:
Sensor Type:
Serial Number:
Date received:
Calibration certificate #:
Sensor Replaced?
Yes
Real cost:
No
Notes:
59
TEAM Climate Monitoring Protocol 3.0
14 APPENDIX A.6. WIRING DIAGRAMS
60
TEAM Climate Monitoring Protocol 3.0
(Shield cabling diagram shown in next page)
61
TEAM Climate Monitoring Protocol 3.0
SHIELD CABLING DIAGRAM
62