1
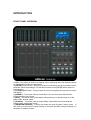
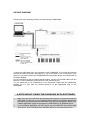
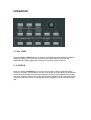
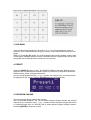
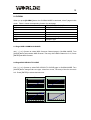
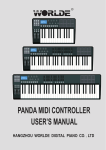
PANDA200
MIDI Controller
Owner’s Manual
1.0 Version
Contents
FEATURES .....................................................................................................................................3
INTRODUCTION............................................................................................................................4
FRONT PANEL OVERVIEW .................................................................................................4
REAR PANEL OVERVIEW....................................................................................................6
HOOKUP DIAGRAM..............................................................................................................7
OPERATION ...................................................................................................................................8
1. FULL LEVEL.......................................................................................................................8
2. 16 LEVELS...........................................................................................................................8
3. PAD BANK ..........................................................................................................................9
4. PRESET................................................................................................................................9
5. PROGRAM CHANGE .........................................................................................................9
6. EDIT ...................................................................................................................................10
6.1 PAD EDIT................................................................................................................10
6.2 CONTROL EDIT .................................................................................................... 11
7. TRANSPORT CONTROL................................................................................................. 11
8. GLOBAL ............................................................................................................................12
8.1 Page1-MIDI COMMON CHANNEL.....................................................................12
8.2 Page2-PAD VELOCITY CURVE .........................................................................12
8.3 Page3-MUTE..........................................................................................................13
8.4 Page4 Reset...........................................................................................................13
8.5 Page5-SAVE GLOBAL..........................................................................................13
8.6 Page6-Pad note output type ................................................................................13
8.7 Page7-Transport type.........................................................................................13
TROUBLESHOOTING ................................................................................................................15
TECHNICAL SPECIFICATIONS ................................................................................................17
FEATURES
l
l
l
l
l
l
l
16 trigger pads with velocity.
5xAssignable Dials.
8xAssignable Slider, each slider can be edit by user.
26xAssignable Buttons
Function buttons, providing functions like, EDIT, GLOBAL, LEVELS, PRESET, PAD
GROUP, and etc.
1xMIDI OUT.(1XMIDI IN)pplied by USB and DC 9V.
Compatible with WinXP/Vista/Win7 and Mac OSX. Drive free and hot-plug supported.
INTRODUCTION
FRONT PANEL OVERVIEW
1. LCD – The display is used for navigating menus, displaying data, and affecting change
on PANDA200’s options and parameters.
2. [VALUE] (Push to Enter) –This dial is used for incrementing and decrementing Presets,
parameter values and settings. This dial also functions as an [ENTER] button when it is
pressed down.
3. [<] AND [>] BUTTONS – These buttons are used for navigating through fields of menus
and options.
4. [PRESET] – This button calls up Preset Mode. You can select and recall different
Preset programs in this mode.
5. [EDIT] – This button calls up Edit Mode, which allows you to edit the behavior of the
pads, knobs, buttons, faders
6. [GLOBAL] – This button calls up Global Mode, where MIDI reset commands and
global system preferences are set.
7. [PROGRAM CHANGE] – Pressing this button will enter Program Change mode. In
this mode, you can send a Program Change or Program with Bank Change message to a
hardware or software module.
8. [FULL LEVEL]. When [FULL LEVEL] is activated, the pads always play back at a
maximum velocity (127),no matter how hard or soft you hit them.
9.[16 LEVEL]. When [16 LEVEL] is activated, you can use the 16 pads to change a
selected sound’s velocity in 16 steps.
10. [CONTROL BANK]. The PANDA200 features 2 independent banks of continuous
controllers. Effectively, this allows you to control up to 78 independent parameters with the
knob, faders and buttons on the PANDA200. The [CONTROL BANK] button is used to
switch among the 2 banks.
11. PAD BANK buttons. These 3 buttons switch among pad banks A, B, C. Each bank can
address a unique set of 16 sounds giving you access of up to 48 different sounds you can
trigger with the pads.The currently selected pad bank will be indicated on the LCD display.
12 . 16 PRESSURE AND VELOCITY SENSITIVE PADS. The pads can be used to trigger
drum hits to our software or hardware module. The pads are pressure and velocity
sensitive, which makes them very responsive and intuitive to play.
13. 5 ASSIGNABLE KNOBS–Each 360-degree knob can be used to send continuous
control data to a desktop audio workstation. These knobs should be endless and can send
MIDI note messages.
14. 26 ASSIGNABLE BUTTONS. These buttons can be used as MIDI CC switches.
15.8 ASSIGNABLE SLIDERS-Each slider can be used to send continuous control data to
a desktop audio workstation or external MIDI device.
REAR PANEL OVERVIEW
1. DC POWER ADAPTER INPUT –Plug in a 9V–1A DC power adapter if you do not wish
to power the PANDA200 through the USB connection.
2. USB CONNECTION – Plug a standard USB cable into this outlet and into the USB port
of your computer. The computer’s USB port will provide power to the PANDA200. This
connection is used to send and receive MIDI data to and from your computer and may
also be used to send MIDI data from your computer to a device attached to the MIDI OUT
port of the PANDA200.
3. MIDI OUT – Use a five-pin MIDI cable to connect the MIDI OUT of the PANDA200 to
the MIDI IN of an external device.
4. MIDI IN – Use a five-pin MIDI cable to connect the MIDI OUT of an external MIDI device
to the MIDI IN of the PANDA200.
5. Pedal A –can be used as MIDI CC switches.
6. Pedal B –can be used as MIDI CC continues.
HOOKUP DIAGRAM
Please refer to the following scenario for connecting the PANDA200.
1.Connect a USB cable from your computer to the PANDA200. The unit will be powered
through the USB connection. Alternatively, if you do not wish to use a computer in your
setup or if you wish to power the PANDA200 externally, please plug in the included 9V-1A
DC power adapter.
2.If you would like to use an external sound module, connect a 5-pin MIDI cable from the
MIDI OUT of the PANDA200 to the MIDI IN of the external device.
3.If you would like to use Footswitches or an Expression Pedal with the PANDA200,
connect the 1/4" jack from the selected pedal in to the appropriate plug on the
PANDA200.
A NOTE ABOUT USING THE PANDA200 WITH SOFTWARE
1.
2.
Make sure that the PANDA200 and all external devices are connected and that the
USB cable is connected to your computer before opening any software applications
with which you intend to use the PANDA200. If the unit is not plugged in before, your
software application might not recognize the PANDA200 as an available device.
In your software application, you will need to set the PANDA200 as a default MIDI
input device. This is usually done in the MIDI section of the Preferences menu.
OPERATION
1. FULL LEVEL
When the [FULL LEVEL] button is activated, the PANDA200 pads always play back at
maximum velocity (127). This way, no matter how hard or soft you hit a pad, the
PANDA200 will always trigger the sound at its maximum velocity (volume).
2. 16 LEVELS
When you press [16 LEVELS], you can use the 16 pads to change a selected pad’s
velocity in 16 steps. This allows you to have more control over the velocity of the desired
sound. When this button is pressed the last pad that was hit gets mapped to all 16 pads.
The pads output the same note number and pressure controller as the initial pad, but the
velocity is fixed at the values in the diagram below, regardless of how hard you hit each
pad.
3. PAD BANK
These 3 buttons switch between pad banks A, B, C. You can store different sounds in
each one of the 3 different banks, giving you access of up to 48 different sounds you can
trigger.
When you Press [A], [B], or [C]. The LCD will display the current Pad bank, and the note
of each pad is changed. When you edit the Pad data, Enter the global setting and choose
save global. All the settings will be saved to the current Pad.
4. PRESET
When the [PRESET] button is valid,the PRESET MODE be activated. different preset
programs can be selected and recalled. A preset is a collection of information about how
different sliders, knobs, and pads will behave.
you can change presets with the [ < ] or [ > ] button, the number of the current preset will
be displayed on the screen, Pressing [ENTER] loads the selected Preset.
5. PROGRAM CHANGE
You can use this button to change the program.
*SET PROGRAM CHANGE: You can set which Program Change Number the pad will
transmit when it is pressed. Use [ < ] or [ > ] button to select Program Change field. While
in ProgramChange field, use [VALUE] dial to select desired Program Change Number.
Pressing [ENTER] to confirm the value.
*SET BANK M: Use [ < ] or [ > ] button to select Bank M field. While in Bank M field, use
[VALUE] dial to select desired value, Pressing [ENTER] to confirm the value.
*SET BANK L: Use [ < ] or [ > ] button to select ‘Bank L’ field. While in Bank L field, use
[VALUE] dial to select desired value, Pressing [ENTER] to confirm the value.
6. EDIT
When you press[EDIT] button,The LCD display‘CTLdata1’ the EDIT MODE be activated.
in this mode, you can change the parameters of the pads, knobs and sliders. The EDIT
MODE allows you to fully customize and optimize your controller for the best desired
performance.
The different parameters that you can edit are organized under two different pages on the
display and are described below. Depending on which event type you select on Page 1,
you will be given different parameters which you can edit on Page 2,
To select the controller you wish to edit, just move any slider, knob or hit a pad – This will
prompt the screen to display the properties of that particular controller. You can select the
desired controller with the [VALUE] dail. Pressing [ENTER] will confirm the value.(In edit
mode,There is no message can be sent).
6.1 PAD EDIT
The pads can either be set to transmit Note information,
Press the pad that you would like to edit, Use [ < ] or [ > ] button to select Note field, The
LCD display ‘Pad_note’, turn the [VALUE] dial to select ‘NOTE’. Press [ENTER] to
confirm the ‘Note’..
6.2 CONTROL EDIT
The knobs and sliders can be set to transmit special value of the Control .
*SET CONTROL VALUE: Use [ < ] or [ > ] button to select Control VALUE field,The LCD
display ‘CTLdata2, While in Control VALUE field, use [VALUE] dial to select desired
Controller VALUE.
7. TRANSPORT CONTROL
There are 6 buttons used for transport control, [|<<],[<<],[>>],[O],[stop],[play].It is common
to set the 6 buttons as Sequencer remote control buttons, it needs to be working with
sequencer software.
12
8. GLOBAL
When you press[GLOBAL] button,the GLOBAL MODE be activated, it has 7 pages in this
mode,Table 1 shows corresponding function for each page.
Page 1
MIDI COMMON CHANNEL
Page2
PAD VELOCITY CURVE
Page 3
MUTE
Page 4
Reset
Page5
SAVE GLOBAL
Page6
Pad Note output type
Page7
Transport type
Table 1
8.1 Page1-MIDI COMMON CHANNEL
use [ > ] or [< ]button to select MIDI Common Channel page in GLOBAL MODE. Turn
[VALUE] dial to select desire MIDI Channel. The array of the MIDI Channel is 0~15, Press
[ENTER] set MIDI Channel.
8.2 Page2-PAD VELOCITY CURVE
Use [ > ] or [< ]button to select PAD VELOCITY CURVE page in GLOBAL MODE. Turn
[VALUE] dial to change Pad curve type. it has four curves, The array of the four curves is
0~3. Press [ENTER] to select desired curve.
PCD2
PCD1
140
140
120
120
100
100
80
80
60
60
40
40
20
20
0
0
1
2
3
4
5
6
7
8
9
1
10
2
3
4
P C D3
5
6
7
8
9
8
9
PCD4
14 0
140
120
100
80
60
40
20
0
12 0
10 0
80
60
40
20
0
1
2
3
4
5
6
7
8
9
1
2
3
4
5
6
7
13
8.3 Page3-MUTE
In MUTE ON mode, any message cannot be send. Press [ENTER] to switch the MUTE
mode.
8.4 Page4 Reset
Reset the all the controller, include the pads, knobs, buttons and sliders..
8.5 Page5-SAVE GLOBAL
Use [ > ] or [< ]button to select SAVE GLOBAL page in GLOBAL MODE. You will see
‘SAVE_ALL’ displayed on the screen. Press [ENTER] to save all the global settings.
8.6 Page6-Pad note output type
In Note_TP1 mode, when striking the pad, the NOTE OFF message be send immediately
after the NOTE ON message is sent. In Note_TP2 mode, The NOTE ON message is sent
when the user strikes the pad, the Note off message is sent when the finger comes off the
pad. Press [ENTER] to switch the mode.
8.7 Page7-Transport
type
It has two type about the transport button,the MMC type and the control message
type.The MMC type match the applications or device that only respond to MIDI machine
control message,The control message type match the applications or device that respond
to MIDI control message.
14
Question: Does the PANDA200 have internal sounds?
Answer: No. The PANDA200 is a MIDI-controller, which means that it does not
contain any sounds inside but is instead used to control external sound devices,
such as hardware and software synthesizers, sequencers and drum machines.
Question: Do I need to use a power adapter if I am using the PANDA 100 with a
computer?
Answer: No. The PANDA200 will draw power directly from the USB port. However, if your
USB port does not supply enough power or if you are using a USB hub, it may be
necessary to use a power adapter.
Question: What software applications is the PANDA200 compatible with?
Answer: The PANDA200 is compatible with any software or hardware device which
supports the MIDI protocol. Please consult your specific hardware or software device’s
documentation for instructions on enabling the PANDA200 as a MIDI input device.
Question: Can I use the PANDA200 as a MIDI interface for other MIDI devices?
Answer: Yes. The PANDA200 functions as a MIDI interface which can send and receive
from other MIDI devices connected to it.
Question: Can I control multiple devices with the PANDA200?
Answer: Yes. The PANDA200 can transmit information on 16 MIDI channels
Question: Can I send Program Change messages to my software or hardware devices?
Answer: Yes. You can send program change messages in Program Change mode. In
addition, pads and buttons may also be assigned to transmit program change messages.
Question: Are the pads on the PANDA200 velocity and pressure sensitive?
Answer: Yes. The PANDA200 sports real MPC velocity and pressure sensitive pads. This
allows you to be extremely expressive with your programming and performance.
Question: What type of pads is used on the PANDA200?
Answer: The PANDA200 features the same pads as the MPC2500.
Question: Are the knobs on the PANDA200 endless?
Answer: The knobs on the PANDA200 are endless pots. This allows you to limit the
range of the knobs, as well as use them as increment/decrement controls. Please note
that your software application must be able to receive and recognize NRPNs for
Increment/decrement functions to work.
Question: I see 5 knobs, 8 faders, 26 buttons, and 16 pads. Is that all I get?
Answer: No. The PANDA200 features multiple banks of controllers and pads, which can
be accessed with the [PAD BANK] and [CONTROL BANK] buttons. This allows you to
access significantly more parameters than the amount of physical controllers. There are 3
control banks, which effectively give you 117 (3x39) controllers. There are also 4 different
pad banks which give you a total of 64 (4x16) pads.
15
TROUBLESHOOTING
PROBLEM
CAUSE
The display dose not
light up.
No power.
PANDA200 not properly
connected.
No sound from target
device.
PANDA200 connected
after software application
has started.
Problem is caused by use
of a USB hub.
Software application not
set to receive MIDI data
from the PANDA200.
Notes sustain
continuously.
Footswitch works in
reverse.
Transport control does
not work.
PANDA200’S MIDI
channel not the same as
application’s incoming
MIDI channel.
Footswitch was plugged
in after the PANDA200
was powered on.
Stuck notes due to
incomplete MIDI data.
Footswitch was plugged
in after power was turned
on.
Software does not
support MMC messages,
MIDI START/STOP or the
MIDI CC mode.
SOLUTION
Please make sure that the
PANDA 100 is connected to your
computer and that the computer
is powered on.
If using a power adapter, please
make sure that the adapter is
plugged into a live power outlet.
Check your computer’s USB
connection to confirm that the
PANDA200 is recognized. If
necessory, replug the
connection and restart your
computer.
If controlling an external
hardware module, make sure that
the PANDA 100’s MIDI OUT is
connected to the device’s MIDI IN
port.
Restart the software application
with the controller plugged in.
Unplug the PANDA200 from the
USB hub and connect directly to
your computer.
Ensure that the PANDA200 or
“USB” MIDI device is listed as an
active MIDI source in your
application. Usually, the MIDI
settings can be accessed
through the application’s
Preferences menu.
Make sure that the PANDA200 is
sending MIDI information on the
channel that the target device
expects.
Turn the unit’s power off, wait a
moment and then turn it on
again.
Turn the unit’s power off, wait a
moment and then turn it on
again.
With the footswitch plugged in,
turn the unit’s power off, wait a
moment, and turn it on again.
Edit the transport control to send
MIDI messages instead. Make
sure that the Transport mode on
the PANDA200 matches the
16
I am only hearing one
sound when I hit
different pads.
16 Level function is
engaged.
The pads always play
at maximum
velocity(127).
Full Level feature is
engaged.
receive mode of your software.
When engaged, the 16 Level
function will map the last hit pad
to all 16 pads. Deactivate 16
Level to return to normal
operation.
When engaged, the Full Level
function will cause all the pads to
output maximum velocity, no
matter how hard they are hit.
Turn off Full Level to return to
normal operation.
17
TECHNICAL SPECIFICATIONS
GENERAL
Display
Dimensions(WxDxH)
Weight
Power
custom LCD w/backlight
330mmx300mmx50mm
1.8kg
~100mA, 5V DC via USB
~1A,9V DC via external adaptor
MIDI output channels over USB
MIDI output channels from 5-pin MIDI
Drum pads
Drum pad banks
Faders
360 degree knobs
Switches
Accessories
INPUTS/OUTPUTS
MIDI inputs
MIDI outputs
USB
DC IN
16
16
16(velocity and pressure sensitive)
3
8
6
396
USB cable, CD-ROM disc
5-pin DINx1
5-pin DINx1
Slave connectorx1(MIDI over USB)
6V DC, 1A
Sales Head Office:
Hangzhou Worlde Digital Piano Co., Ltd
Hangzhou Worlde Music Electronic Co.,Ltd
Add:5 Houshan Rd, Wuchang Industrial Park, Yuhang District, Hangzhou,
310023,P.R.China
Tel:0086 571 88730848
Fax:0086 571 88730748
Website:www.worlde.com.cn
Email:[email protected]