1
32MD311B/32MD301B
26MD311B/26MD301B
22MD311B
19MD311B/19MD301B
LCD TV/DVD
Thank you for choosing
Gradas
aide
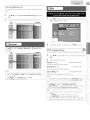
Need help fast?
Read your Owner's Manual
first for
quick tips that make using your
Magnavox
product
more enjoyable.
If you have read your instructions
and still need assistance,
www.magnavox.comlsupport
or call
Manuel
with
Magnavoz.
number)
regorgent
Lea primero el Manual del Propietario,
en donde encontrar6 consejos que
destin6es _ simphfier
le ayudar_n
de votre produit Magnavox.
pas _ r_soudre
votre probt_me,
vous pouvez
acceder
asistencia en linea en
lsupport
www.magnavox.comlsupport
produit
y tenga
_ avoir
votre
o Ilame
pottle
de main
al tel_fono
1-866-341-3738
a mano
(y n_mero
/ serial nombre)
ITI DOLBY
DIGITAL
NODEL NUNBER
Magnavox.
Si despu6s de leerlo a(m necesita ayuda,
consulte nuestro servtcio de
ou formez le
1-866-341-3738
(et model
a disfrutar plenamente
de su producto
notre aide en tigne _ I'adresse
www.magnavox.com
Veillez
ayuda
inmediata?
Toutefois, si vous ne parvenez
your product
I Serial
du Propri_talre
d'astuces
l'utihsation
1-866-341-3738
while
Necesita
rapide?
you may access our online help at
(and Model
pot escoger
votreconfiance,
Magnavox
1
SERIAL NUNBER
el producto
de model
/ serial)
2
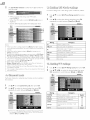
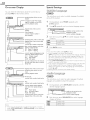
Registering your model with MAGNAVOX makes you eligible for all of the valuable benefits listed below, so don't miss out. Complete and
return your Product Registration Card at once, or register online at www.magnavox.comlsupport
to ensure:
Know these
safety
symbols
A
This "bolt of lightning" indicates uninsulated material
within your unit may cause an electrical shock. For the
safety of everyone in your household, please do not
remove
product
covering.
_IL
The "exclamation
calls
attention literature
to features
for
which
you should point"
read the
enclosed
closely
prevent operating and maintenance problems.
CAUTION:
TOaEDUCE
THE
_SK
OFELECTalC
SHOC_
DONOT
_NOVE
COVEa
(OaBACK)
NOUSEa.SEaVlC_LE
PAaTS
INS
DEaEFEa
SEaVlClNG
TOqUALIFIED
SEaVlCE
_aSONNEL
WARNING:
with
To reduce the
risk of fire
liquids, such as vases, should
CAUTION:
To prevent
Wall
Mount
shock, match
should
wide blade of plug to wide
les choc 61ectriques,
Bracket
shock, this apparatus
not be exposed
to rain or moisture
and objects
filled
not be placed on this apparatus.
electric
ATTENTION:
Pour 6viter
pousser jusqu'au fond.
or electric
to
introduire
slot, fully insert.
la lame la plus large de la fiche dans la borne
Kit
Funai not liable for these
or injury noted below.
Recommended Wall Mount Bracket Kit:
Brand:
Model #: 32MD311B/32MD301B
26MD311B/26MD301B
22MD311B/19MD311B/19MD301B
SANUS
San25b
SAN21 }b
Sanl0B
correspondante
types
of accidents
Installthe Wall Mount Bracket on a sturdy vert cal wall,
If nstalled onto
a celng
Mount
may fall which could
Bracket
or slanted wall, the]V
spec fled len_h, If screws too
and Wall
result n a severe njur}4
Do not use screws that ale longer or shorter
<for 32 inches, 26 inches only>
de la prise et
than their
long are used this may cause
mechan cal or electrical damage nsde the ]V set, If screws
too short are used this may cause the]V
set to fall,
Do not &s_Lenthe screws by excessve
damage the
an injury
Recommended
Screw
dimension
32MD311B/32MD301B
when
purchased:
M4x0.787"
+ Washer
26MD311B/26MD301B
22MD311B/19MD311B/19MD301B
Wall Mount
the mounting
For detailed nformation
ret%r to theWall
Mount
Funai is not
responsible
0.078"(l2_mm)
M4x0.629"
(I 6ram)
M4x0.47Z'
(12ram)
Bracket Kt (sold
of the IV on the wall.
on nstalling the wall mount,
Instruct on Book.
for any damage
to the
product
or in/ur 7 to yourself or others if you elect to ns_Lallthe
IV Wall Mount Bracket or mount the ]V onto the
Bracket
Ihe
Wall
on your
Mount
own.
Bracket
must be installed
force: this may
or cause the product
For sat%ty reasons use 2 people to mount
(2_0ram)
Wall
b7 experts.
Mounting
Do not mount
electrical
to fall, leading to
the [V onto a
Bracket
the TV onto
while your TV s plumed
When
Ihe recommended
separately)
allows
product
the Wall Mounting
n or turned
Bracket
on. It may result in an
shock in/ur)4
installing
the unit on the wall, allow
Top:
Left and right
Bottom:
side:
this
much space.
11.8
nches (}0cm)
5.9
nches (15cm)
3.9 nches
(10cm)
IMPORTANT
SAFETY
Read before
INSTRUCTIONS
operating
equipment
1,
Read theseinstructions,
_.
Keep these
3,
4,
Heed al warnings,
Follow a nstructions,
S.
Do not use this apparatus nea_-wate_
excessve
6.
F.
Clean only wth a dry coth.
Do not beck any of the vent at op opep n£s,
Instal n acco/dapce with the manufactulor's instruct ons,
which could ultimately overtul-n the p_x_duct,
&
Do not nstsll near any heat sources such as radiators
I6. TilrJStability A t_,evisons must comply wth recommended
nstructions,
international goba saf_,ty stand /ds for tt
and stabilty properties of its cabinet design,
• Do not comp_x_mise these design standards by applying
• Also, do not endanger yourself, or children, by placing
electronic equipment/toys
on the top of the cabinet Such
heat
terns could unsuspecting y fall f_-om the top of the set and
regi£ers, stoves, or other appal-atus (inc ud ng amplifiers)
9.
cause product
that produce heat,
Do not det_,at the safl,ty purpose of the polarized or
g_x_ur,ding type pug.A
polarized pug/,as
I7.
blades arid th/d ground ng prong, The wde blade or thtd
prong arc, prey ded for your satct}4When the prey ded
I8.
Power Lines
I9.
dW_y from power lines,
Outdoor Antenna Grounding
An outdoor
rels scerner,t of the obsolete
grounded
out et,
Protect the power cold from being walked on or pinched
Only use alSschments/accessodes
manu_actu reds
tus.When
No, 701984,
specified by the
provides
ing of the leadn
15,
to avoid inju_-y from tip ove_
serv ce personne.
informatiof
wth
ground ng of the mast and supporting
20.
wire to an antenna d scharge unit, sze of
Iocat on of antennad
Object
and Liquid Entry
Care, shoud
that objects do not fJI ar, d quds
Serv cing s
respect to proper
structul e, ground
scharge unt,
cor, nection to grounding electrodes, and requ mments for
the ground n£ e ectrode, See Figure below,
Unp ug this appa/stus during ghtning storms or when unused for long per ods of time,
Refl, r all serv cing to qualified
system s
so as to prey de some p_otection against votage
surges and built up state charges,
Section 810 of the Nat onal Electric Code, ANSI/NFP/\
a cart s used, use taut on when movn£ the
cart/@pa_ _tus combination
14,
If an outside antenna
is connected to the recevec be sule the antenn
ground ng connectors,
13,
antenna should be located
pug does not fit into your outlet, copsult an electric at, for
particularly at plugs, convenience receptacles, and the point
where they exit from the ppa_atus,
11,
damage and/or personal mjur)4
Wall or Ceiling Mounting The appliance should be
mounted to a wall or ceiling only as recommended by the
manufdcture_
two blades wth
one wider than the othet_ A g_ound ng type pug has two
I0,
pull force to the f'_ont, or top, of the cabinet
21.
enc osure through open ngs,
Battery Usage CAUTION
[o
requ red when the apparatus has been damaged n any way,
leakage that may result n body
such as power supply cord or plug is damaged, qud
or dam48e to the unit:
has
be taken so
am not sped
into the
prevent battery
it,jury, p_sperty
damage,
been sped or objects have faen into apparatus, the appara
tus has been exposed to rain o_- moisture, does not operate
• InsMI a batteries correctly, with + and - aligned as
marked on the unt,
norma y, or has been dropped.
• Do not mix batteries (old and new or cadson and
Damage Requiring
Service
The appliance shou d be
serv ted by qua ified service personnel
a ka ine, e,tc,).
when:
• Remove batteries when the unit is not used for a long
time,
A. The power supply cord or the pug has been damaged;
B. Obiects hdve fden, or liquid has been spilled nto the
@p ante;
¢-, The app snce has been exposed to rain
D, lhe appli nce does not appear to operate normally
exhibits
marked change in perfo_-mance;
E, lhe
Note
83_040
appliance has been dropped, or the enclosure damaged,
to the
of the
be connected
or
CATV
NEC
system
that provides
to the _roundin8
installer
:This
_uidelines
system
reminder
for proper
of the building,
s prey ded to call the
_round
C/_]'V
n£ and, in particular,
as close to the
point
of cable
system
nstaller's
spec ties that the
entry
as practical.
attent
on to Art
cable 8round
shall
cie
4
FCC
WARNING
This apparatus may generate or use radio frequency energy. Changes or modifications to this apparatus may cause harmful
unless the modifications are expressly approved in the manual. The user could lose the authority to operate this apparatus
unauthorized
change or modification
RADIO-TV
interference
if an
is made.
INTERFERENCE
This apparatus has been tested and found to comply with the limits for a Class B digital device, pursuant to Part 15 of the FCC Rules.
These limits are designed to provide reasonable protection
against harmful interference
in a residential installation. This apparatus
generates, uses, and can radiate radio frequency energy and, if not installed and used in accordance with the instructions, may cause
harmful interference
to radio communications.
However, there is no guarantee that interference will not occur in a particular installation.
If this apparatus does cause harmful interference
to radio or television reception, which can be determined by turning the apparatus off
and on, the user is encouraged to try to correct the interference
by one or more of the following measures:
1) Reorient or relocate the receiving antenna.
2) Increase the separation between the apparatus and receiver.
3) Connect the apparatus into an outlet on a circuit different from that to which the receiver is connected.
4) Consult the dealer or an experienced radio/TV technician for help.
DECLARATION
Trade
OF
Name:
Model:
CONFORMITY
HAGNAVOX
31ND311 B/3/HD301
B
26HD311B/26HD301
22HD311 B/I9HD311
B
B/I9ND301B
Responsible
Telephone
This Class B digital apparatus complies with Canadian
CAUTION:
Danger
of explosion
WARNING
:
Batteries
Disconnect
the
mains
This apparatus
Make
sure
not
not
be placed
the
prevent
unit
injury,
on the
on it. A falling
LASER
This
plug to shut off when
should
To
place
climbing
if battery
that
is classified
Use
as a CLASS
of controls
those
INPORTANT
protection
Reverse
specified
copying,
technology
in use.The
mains
such as a bookcase
around
this
be securely
even
with
the
same or equivalent
plug shall remain
or rack
type.
heat such as sunshine, fire or the like.
readily
unless proper
operable.
ventilation
is provided.
apparatus.
attached
of being tilted
or
only
to excessive
to the wall in accordance
by a child
and an adult
with
leaning,
the instructions.
pulling,
standing
or
death.
American
viewing
for
ABOUT
performance
of
apparatus
or attempt
employs
a
to service
this
of procedures
radiation
other
CLASSE
1 PRODUIT
LASER
PRODUCTCON LASER CLASR 1
CLASS 1 LASER PRODUCT
I
than
exposure.
this
disposal
Pediatrics
than
of discs are prohibited.
intellectual
property
This
rights
item
of Rovi
Mercury,
please dispose according
with
of
information,
contact:
a ]amp
contains
or recycling
or
discourages
two
and lending
and other
incorporates
copy
Corporation.
are prohibited.
set
the
younger
This
cover
in hazardous
by U.S. patents
ectronics.com
Academy
children
public
is protected
products,
www.mygreene
the
or performance
may result
broadcasting,
For
PRODUCT.
remove
II
herein
and disassembly
Like all LCD
Federal
laws.
NOTE
Replace
be exposed
Canada BETS.7/NTMR.7
INFORMATION
that
engineering
1 LASER
should
or adjustments
COPYRIGHT
Unauthorized
The
injury
not
ReceivingApparatus,
U.SA.
SAFETY
apparatus
CAUTION:
•
must
is capable
can cause serious
or
or more
I 866 341 3738
replaced.
shall not
installation
(10cm)
this apparatus
laser. Only a qualified service person
apparatus,
due to possible
eye injury.
X
find trouble
in a built-in
furniture
unit
installed)
FUNAI CORPORATION,
Inc,
19900 Van Ness Avenue. Torrance. CA 90501
StandardTelevision
is incorrectly
pack or battery
to leave a space of 4 inches
WARNING:
Do
(baEery
I¢ES-003.
Party:
Address:
Number:
years
to
all Local,
State
and
www.eiae.org
television
of age.
RECYCLING
• This unt's p cl<agi% materials dre recycabe and
can be reused. Pease d spose of any materals n
accordance wth your ocal recycling regulations.
• Batteries should never be thrown away or
ncinerated but disposed of n accordance with yourocal r%ulations concerning them ca wastes.
• For ploduct recyc ng nformation, please vist
www.magndvox.com
F s
_\,
WHEN
CARRYINGTHIS
UNIT
k
'_
• At least 2 people are required when
carry,ng ths unt.
,
I
• Make sure to hold the upper and bottom
,
flames of the unt firmly as illustrated.
{
TO AVOID
THE
HAZARDS
OF
L,
ELECTRICAL
SHOCK
AND
FIRE
"
//
7
• Do not handle the AC power cord wth wet hands.
• Do not pull on theAC power cord when disconnecting
AC outlet Grasp t by the plug.
• Do not put your fingers or objects nto the unt.
t fi-om an
LOCATION
AND
HANDLING
• Do not insta the ur, t it, drect sun ght or n d place subjoct to dust
or strong v brat on.
• Avoid a pace with drast c tempe/ature changes.
• Insta the unt in a horzonta
and stabe position. Do not pace
anyth ng d rectly on top or bottom of the unt. Depend ng on your
externa dev ces. nose or disturbance of the p}cture and/or sound
may be gene/ated fthe unt s paced too cose to them. In ths case,
please ensure enough space botween the external devices and the
unt.
• Depending on the env ronment, the temperature of th s unit may
noease slightly.Th}s s not a malfunction.
• Be sure to unplug the AC power cold fi-om the AC outlot before
movng or carry ng the unt.
DEW
CONDENSATION
WARNING
• Dew condensation may form inside the unt n the to lowing
con@t ons. If so, do not use ths unit at least for a f_,w hours unt
nside gets dry.
The unit is moved fi-om a cod pace to a warm pace.
Under condt}ons of h}gh humidity.
After heat ng a cold I_om,
its
Congratulations on your purchase! As you enjoy your new product, please
keep these safety tips in mind:
THE ISSUE
• [he t-ome ti_ealerenle a nr<-entexper ence s a growh'g rend and large
flat panel displays are popular purchases However, flal panel displays
are not always suppored on the proper stonds or inslalled accord ng to the
manufacturer'srecommendalions
• Flat panel displays that are inappropriately s tuated on dressers,bookcases,
shelves,desks, speakers, chestsor carts may fall over and cause injury
THIS MANUFACTURER CARES!
• Tt'e consumer electron cs induslry is committed to r,,aking home enterta nn"ent
enjoyable and safe
TUNE INTO SAFETY
• One sze does NOT f all Follow the r_anufacturer'secommer_dations
for the safe rTstallotionar'd useof your flat panel display
• Carefully read ar,d ur,derstar,d all er,closed instructionsfor orooer useof
this product
• Don't allow children to clmb on or play with furnitJre and telev sion sets
• Don't place flat panel displays on turn tare that can easily be used as steps,
such as a chest of drawers
• Rememberthai children can become excited while watching a program,
especially on a "larger tha_"life" flal panel display Care should be iaken to
place or install _hedisplay wf'e_e it cannol be pushed, pulled over,
or knocked dowr"
• Care should be taken to routeall cords and cables cant'eared to the flat
panel display so that they cannot be pulled or grabbed by curious children
WALL MOUNTING: IF YOU DECIDE
TOWALLMOUNT
YOURFLATPANELDISPLAY,
ALWAYS:
• Use a mountthat has been recommended by he display _anufacturer
and/or Ised by an ndepe_'dent laboratory (suchas UI, CSA, Erl)
• Follovvall inslructionssupplied by the display and wall mount manufacturers
• If you have any doubts abou your ability 1osately install your flal panel
d splay, contact your retailer about professonal installaton
• Make sure that the wall where you are mounting the display s appropriate
Some wall mountsare not designed to be mounted to walls with steel
studs or old cnder block construction If you are unsure, contact a
professional nstaller
• A '_qnimumof _o people are requi ed for ins_allaton Flal panel displays
can be heavy
www.CE.org/safety
6
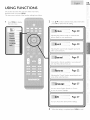
INTRODUCTION
Trademark
Information
HiElmr
Contents
HDMI, the HDMI Logo, and High Definit on Mult media InteHsce are
trademarks or i e£istered trademad<s of HDIVll Lcens n£ LLC in the
United States and other countres,
Important Safety In_ructions
Child Saf_,ty
INTRODUCTION
lrddemark
Featul es
Informat on
6
/
Supplied Accessories
Symbos Used n ths Manual
Attaching the Base
blounting the Ur'it on Your Fum ture
Tilt Stand <22MD311 B//9MD311 B/19MD30I B only>
Insta n£ the Batter es
Control Panel
li_,rmina s
Remote Control Function
8
8
8
9
9
9
I0
I0
12
I1"1 DOLBY
DIGITAL]
lanufJctured
under I cense from Dolby Laborator es, Dolby and the
doubled
symbol am trademad<s of Doby L_boratories.
is a trademark
of DVD Format/Logo
Lcens n£ Corporat
on,
PREPARATION
Antenna Connection
Connection to Cable Receiver or Sate te Box
13
14
Plug In the AC Power Cord
Intal Setup
14
15
WATCHING
TV
Sleep [imer
Switching Each Input Mode
Freeze Node
Channel Select on
16
16
16
16
IV Screen Disp sy Mode
Sound Functions
TV Scroen Information
17
17
18
USING FUNCTIONS
Picture
Sound
Channel
Featul es
10
lO
2I
22
Langua£e
DVD
27
27
Lan£ua£e Code List
OPERATING
19
DVD
Play be Neda
Unp ayab e Neda
Playback
Dsc Menu
Resume P ayback
Paused and Step by step Playback
Fast Fotwa/d / Fast Reverse
Slow Fotwald / Slow Reverse
Zoom
Search Funct ons
Repeat Playback
Repeat AB Playback
Random Playback
Pl_grammed Playback
On screen Display
Specia Settings
CONNECTING
30
30
31
31
31
31
3I
32
32
32
33
33
33
33
34
34
DEVICES
Extem I Device Connect on
Cabe Management
<32b1D]11 B/32b1D]01 B/26MDS11B/26MD301B
36
ony>
39
USEFULTIPS
lroub eshoot n£ Gude
FAQ
40
42
INFORMATION
Glossary
Maintenance
43
43
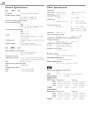
General Spec ficat}ons
Other Specifications
44
44
Limited Wan-anty
47
© 2011 Fun} Electric Co., Ltd.
All ri£hts reserved, No part of this manual ms}, be reproduced, copied,
transmitted, d ssem nsted, trJ, sa-bed, downloaded or stored in any
stord£e medium, n an}/form or for ny purpose without the express prior
wdtt_,n consent of Fun, Furthermore, any unauthorized commerc al
distribution of this manua or any my sion hereto isstdctly proh}bitd,
Informat on in this document s subject to change wthout notice, Funai
reserves the right to change the content herein without the ob gation to
hotly any person or organ zat on of such ch nges.
FUNAI with the _'_ desgn s a regstered trademark of Funai Eectrc
Co., Ltd, and may not be used }n an}/ws/without
the express written
consent of Funa. All other trademarks used heren reman the exclus ve
property of ther respective owners, Nothing conta ned in this manual
shoud be construed as £rar,t ng, by mplicat or, or otherw se, any cense
or right to use an}/of the trademarks displayed helen, Msuse o_ ny
trademarks or any other content n ths manua is stricty prohibted,
Funa sha ag£ressively enfol_e ts ntellectual propelty
ri£hts to the
fuest extent of the aw,
NAGNAVOX
is a regstered trademark of Philips Electronics North
Americd CoqDoration and s used by Funa} Electro Co, Ltd, and Funai
Corpo/at on, Inc, under license fi-om Phps E ectronics North Amer ca,
Features
TV
: ::
i i! i! i!ii!ii!ii!ii!ii!ii!ii!ii!ii!ii!ii!ii!ii!ii!ii!ii!ii!ii!ii!ii!ii
¸
: DVD
ii
DTV/TV/CATV
You cars use your remote contro to select channels whch are
broadcast in digM format and copvent or'al analog format.Also,
cable subscribers can access their cableTV channels.
Information
Display (A[SC
only)
Y_u cdn disp ay the ttle, contents and other information
current DTV plogram on theTV screen.
of the
Autoprogram
This unit automat ca y scans ar,d memol-zes char,he s awl abe in
you1- area, e} m nat ng d fficut setup procedures.
Child
Lock
This featul e allows you to block ch dmn's access to inappropr ate
programs.
Closed Caption
Decoder
Built in closed caption decodel- disp ays text f_r cosed cdpt on
supported programs.
bITS / SAP Tuner
Audo can be selected fl_m the remote
contro.
Auto standby
If there s no operation for 20 minutes, the ur, t wil
standby mode automat col y,
::iiiil
!i:i!
abe on
:!:i_ii
go sic
Parental Lock
Bock the viewing of a DVD video unsuitab e f_r ch Idron.
Resume Playback
Lets you resume playbdck fi-om the pont
stopped,
at which playbdck wds
Indication
DRC (dynamic
range control)
You can control the range of sound volume.
playback
Subtitles
in a Desired
Language
You can seect a desired language fol d sp dyir, g subtit e, fthat
anguage s ava abe on a DVD-v dec,
Various Adjustment
for Picture and Sound
Customizes mase quaty sutabe f_r your room and sets your
sound pl eft.fence.
fun-Link
via HDMI
Link (HDbql Cable not Included)
fun Lnk aows your other HDPII link dev ces to be contro
the HDIHI cable connected to yourTV.
ed by
Selecting a Camera Angle
You can seect the des m.d camera ange, f a DVD costa ns
sequences reco/ded f_-om diff,.rent angles.
Zoom
Aows
Black
Virtual
you to en aloe the size of picture mage.
Level Adjustment
Surround
Search
chapter search/ttle
search/track
seal_h/time
search
Marker
i
?T
The pdl-t or, the dsc desigr, ated by user can be caled bdck,
Input
S-Video
DVD Menus in a Desired
Language
You can disp ay DVD menus n a desiled language, fava
a DVD-v dec,
During
PLL Frequency
Synthesized
Tuning
Pl_vides fl_,e and easy channel selector, and ets you tune
direct y to any channel usng the number and decimal point "."
buttons on the remote contro.
ComponentVideo
pictures, fast
standby mode offer a specific
Choices
for On-screen
Language
Select your on screen language:
Eng sh, Span sh or French.
Stereo Sound Function
HDMI
Still/Fast/Slow/Step
Playback
Various playback modes ale available nclud ng st
forwald/i everse, slow moron and step fi-ames,
Bit Rate
Auto Standby
If there is no nput signl and no operation for I5 minutes, the
unit will go into standby mode automatica ly,
Sleep Timer
You can set the unit to go nto
amount oft me.
Dolby Digital Sound
Enjoy Doby Dgitl
mult <har, ne surround sound whet, you
cor.nect the unit to your Do}by Digital decode1:
Repeat
chapter/ttle/track/a/AB
Input
Input
AV Input
Digital
Audio
Output
In stop
<32MD311B/32MD301 B/26MD311B/26MD301B
only>
HDMI_DVI
Input
When using HDM{ I Input, you can enjoy this unit as d PC
mor, itor f you1- PC has a DVI output term nal,
AnalogAudio
output
<22MD311B/19MD311B/19MD301B
Headphone
Audio
Output
Random
Playback for audio CD
This unt can shuffle the o_de_-of tracks to pay them back n
randomly.
only>
HDMI-DVI
Input
If your vdeo device has DVI output jack, use dn HDI41 DVI
conversion cabe to connect the unit,
PC Input
mode
Program
Playback for audio CD
You cars program the o/do_- of tracks to play them back n
des gnated o/de_:
During
playback
Choices
for Audio Language and Stereo Sound Function
Select your desired anguages or stereo sound _unctior, whe.r,
diff.,rent options are dvailable on your dsc,
ii,iiii!
4
8
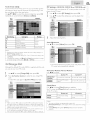
Supplied Accessories
Owner's
Manual
Quick
Start Guide
Registration
card
Attaching
the Base
You must
the
attach
unit. Be sure the
direction.At
base to the
unt
and rear
of the
front
least 2 people
are requ red for these
Spread a thick and soft cloth over a table
2
damage the screen.
Insert 2 hod<s underthe
bottom
arrow
Screws
packed
Model
32MD311
with
this
Quantity
3
19MD301
Drve
_
by |
cord
between
the base and the unrt.
Ph IIps head screws
at the bottom
}
sum notto
,i)), then move the
nto the threaded
B
19MD}11B
_t.lake
M4 x ZO
26M D}01 B
22MD311
steps.
as shown at step Z
....
main unit
to put the AC power
4
top
proper
stops and the screw holes
ae aligned, Make sure not
Size
g
B
onto
the
base in the d rection as
shown by arrow (2) until ¢
unit:
31M D}01 B
26ND311
of the
into base holes (shown
TV base and screws
(NF801UD)
Batteries
(AAA, 1.SV x 2)
base match
1
Place the main unit face down
Remote Control
to have it as a table
M4 x 12_
holes
of the base
untl they ae tight
B
"[o _,mow
Noe
be base f_om hs
in/:
• Unscmwthe Phllps hc_d screws n st_,p 3,
A_L_,rthe saews am removed, mow, the base in the opposite direction
as shown by anow in st_'lD2,then pu}}the base up toward the rear of
the unrL Be tariffs not to @x)p the base when you mmow' it,
ISal<e sure the component code on your universa remote control
is set to our brand, Ref_,rto the manua accompanying your
remote contro 1or more de,tails.
We do not guarantee 100% interoperabil ty with all universal
remote controls,
Symbols Used in this Manual
The following
manual,
s the
Description
descr ption
refers
: D gital]V
operat
: Analog/Cable
• If neither symbo
for the
symbols
used n ths
to:
on
TV operation
appears, the operat on is app cabe to both,
:Playback of DVD video
:Playback ofaud o CD
• Ifnethersymbo appearsunder the funct on heading,operation s
appl cableto both,
Mounting
Screw
(not
•
the Unit
onYour
this unit on 7our furniture
supplied)
Recommended
n the
2 holes
Furniture
tightl 7 using wood
at the
back of the
screw d mension :0,20I
ofthe
base as shown.
x 0.788 aches(5,1 x 20 ram)
screw
rear
screws
Installing the Batteries
Install the
indicated
batteries
(AAA,
inside battery
I .SV x 2) matching
compartment
of the
the
polar t7
remote
control.
/
holes
unit
Tilt Stand <22MD311B/19MD311B/19MD301B
only>
You can adjust the
the
angle of the
stand to change
unit (2.5 ° to 10°).
!i¸¸¸¸2!
,_2
:,
£f£
J
()
i
71¸
ii,iii£!
U
7_
10
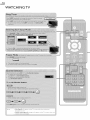
Control
MD311B
Panel
1 VOLUME
+/_,_ p.17
Press to adjust the volume or move right (+)/left
through the main menu items.
series
2 MENU
_,_ p.19
3 CHANNEL
+/_,* p.16
Press to select channels or move up (+)/down
through the main menu items.
8
9 10
11
(-)
4 i___(eject)
ll,_ p.31
5 •
(stop)
ll,_ p.31
6 I_ (play)
,,,_p.31
(-)
7 (b POWER
_,_ p.15
Press to turn the unit on and go into standby mode.
Jo completely turn offthe unit. you must unplug the AC
power cord.
2
3
4
5
6
8 DVD indicator
Lights up orange when a disc s nserted.
7
8
9
10
9 STAND
BY indicator
Lights up red when the unt goes into standby mode.
10
POWER ON indicator
Lights up green when power is on.
11
Infrared
sensor window
Receives infi aped rays transmtted
control.
1
MD301B
2
3
4
5
6
from the remote
7
Terminals
series
k]#"
14
13
8910
11
12
16
3
4
5
6
7
8
9
10
P,[.WJ i,'Y"
3
4
5
6
7
21
12 HDMI 2 Input jack
,,,,_ p.14, 36
Side<32MD311B/32MD301B/26MD311B/26MD301B>
Panel
13 S-Video/CompositeVideo/Audio
(L/R) Input jacks
forVtDEO
_,_ p.37, 38
Rear Panel
14 Disc loading slot
15 AC power cord
16
/
:iiiiil
!i_:i!
_,_ p.31
_,_ p.14
16 Cable management
17 ComponentVideo
and Audio
_,_ p.39
(L/R) Input jacks
_,_ p.14, 37
21
18 AnalogAudio
(L!R) Output
jacks
_,_ p.39
19 AnaJogAudio
(L!R) Input jacks for HDMI
1
Input jack
ll,i. p.36, 39
Audo cable connect on from a DVI devce.
When you connect your PC that has a DVI terminal.
use a stereo toni plug conversion cable as well.
(For HDiVll 1 Input jack only)
17
20
DigitalAudio
21 Antenna
18
Output
jack
_,_ p.38
Input jack
_,_ p.13
22 HDMI 1 (HDMI-DVt) Input jack
ll,_ p.14, 36, 39
HDNI connection for HDNI or DVI devce.
When you connect your PC that has a DVI terminal.
you can enjoy this unt as a PC montor:
16
<22MD311
Side
12
13
B/19MD311
B/19MD301
HDMI 2 Input jack
S-Video / Composite
Video/Audio
for VIDEO
14
38
Panel
15 Antenna
16
i1,_ p.14, 36
(L/R) Input jacks
_,_ p.37,
Headphone Audio Output jack
Headphone connect on for personal listen ng.
Rear
17
B>
Panel
Input jack
_,_ p.13
Disc loading slot
_,_ p.31
17 AC power
cord
18
Input jack
PC (VGA)
i_,_ p.14
19 HDMI 1 (HDMI-DVI)
20
ComponentVideo
21
DigitalAudio
i1,_ p.39
Input jack
and Audio
,,,,_
p.14, 36
(L!R) Input jacks
,,,_ p.14, 37
22 AnalogAudio
Output
jack
_,_ p.38
(L!R) Input jack for PC connection
_,_ p.39
M ni plug audio cable connect on from PC.
23 AnalogAudio
(L!R) Input jacks for HDMI
Input jack
_,_ p.36
Audo cable connect on from a DVI devce.
(For HDiVlt 1 input jack only)
1
i i:ii¸
12
Remote Control
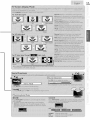
Function
6
1
2
3
4
5
6
7
MENU
,,_ p.19
7 AITl_l'(cursor)
,,,_
p.15
8
OK
,,_ p.15
9
BACK
,,,i-
10
,,,_
p.16
CH
PREV
Press to return
to the
previously
viewed
11 VOL +/12
p.18
channel
,,,_
p.17
Number
buttons
,,_ p.16
• Press to select channels
• (dot)
• Press to shift the
8
9
subchannel
• Press to select chaptel:
from
title
the
(DVD)
main channel
or track
(CD)
erectly,
+10 button
• Press to select
1
13
FREEZE
14
EJECT__
10 or Ngher
number
of chapters.
,,,,_
p.16
1
• Press to pause
screen image
,,,,_
p.31
Press to eject
the @so,
15 DISC MENU
,,,_
p.31
Press to cflspby
16
the
menu
on a cflsc,
TITLE
,,,,_
p.31
Press to ct_splay the title
menu
(DVD)
17 FORMAT
1 (5 (power)
,,,m.p.15
Press to turn
the
3o completely
power
unit on and go into standby
turn
offthe
unit, you must
mode
unplug the AC
cord
19
REV
_NIIiFWD
_ress
TO
3
SOURCE
,,,m. p.16
forward
4
SAP/AUDIO
i,iW. p.17
PLAY I1_
aunng
mrougn
artracKs
audio
language
or
Slow
(DVD)
Dress
mode
(DVD)
diSC playbaCK
s DacKwaro
the
,Jb p.32
or- foBN8 _a cnaDTers. IlTJes (DVL_
diSC
STOP
(CD),
MODE
H,,,_
p.7
• Press to arrange
randomly
•
the
playing
• Press to change
played
the
level (DVD)
camera
bad< flora
Press to search chaptelltJtle
Press to set the marken
•
Press to repeat
playback
repeatedly
Press to magnify
•
Press to select the
the
part
sequence
(CD)
ttie
(DVD)tlack
desgnated
of p cture
(2x
,,,_
p.31
Tne
alsc
DIBVDaCK
•
TO
pont
_ne
alsc
or time
disc
A and B
,,_
p,31
DIavDaCl
MUTE
,,i-
p.17
21
CH
,,i-
p.16
22
CLEAR
+/-
,,,_ p.32, 33
• Press to clear the
numbers
• Press to cancel the
and 4x : DVD)
on a disc (DVD)
%{OD
20
• Press to remove
(CD),
dyapter
subtitles
vrtual
angle (DVD)
(DVD),track
or between
•
and the
angle to see the
d fferent
•
•
(CD)
or playback
(CD)
Press to set the black
surround
on or off,
beng
order
pause
or sound
_'dSS
S
DIavDaCK
.D D.31
CD/of
tc
p.31
F@v@rse
and searcn BaCKWard or
PAUSEII
Press to select the
screen
a diSC
begin Ine
_ress to s
•
for therV
,J_
fol_zVard
SKIP I_I_IiSKIPI_IIH
language
mode
_]OVV
!:he pause mode
_ress tc
audio
I1_
DegIF
,,,_p.16
• Press to select the
ava@ble
,,,_
p.18, 34
SLEEP
audio
ratio
18 INFO
2
• Press to select the
,_,_p.17
Press to select aspect
entered
pont
A for AB
the track
number
ncorrectl}4
repeat
n program
nput
PREPARATION
S
VHF/UHF
i_¸
analog
or
DTV antenna
Before
you connect:
Be sure your
before
antenna
pluming
or other
in the AC
power
device
is connected
r-
property
cord.
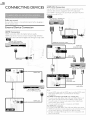
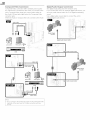
Antenna Connection
Connect
the
antenna
input
Rt coaxial
cable on your
non/e
iiiiiiiiiiiiiiigi!i:(;3iiiiiiiiiiiiil;i_iiii
_
outle_ to _nc
jack of this unit.
_][f2 jj
_i_
HF/UHF
analog
_)rTVantenna
®
®
®
@
@
®
®
cable TV signal
®
RF coaxial cable
:Y}
i}iiiill
Dnce
conne_lons
are con pleted, turn
nl_la seTup, Channel
]/en/onze
cable TV
signal
all available
sea
on the
18 is necessary
_nannels
unit and be?_ln
for the
unit to
Jn Tour area, [Initial
Setup]
_P p.15
Not(,
If you have any quest on about the DTV's antenna, vsit
www, antennsweb.or£ for further information,
Dependin£ on your antenna system, you may need different types
of combiners (mixers) or separators (spfitters) for HD IV signal
the minimum RF bandpass or, these dev ces s 2,000b1Hz or 2GHz.
For your safety nd to dvod dama£e to this unt, pease unpu£ the
RF coax al cable fl_m the antenna input jack before movin£ the
unit,
If you did use an antenna to recew ana osYV, it shoud aso
work for DTV reception, Outdoor or attc ar,tennas wi be more
eff_,ctive thar, a set told or insde antenna,
lb switch your _eception source easily betweer, ar,tenna and cable,
nstall an antenr, a se ect@:
If you are not rocev n£ a si£na from your cable service, contact the
(-abe prov de_
q'i
!i!ili_
14
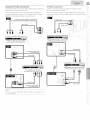
Connection to Cable Receiver or
Satellite Box
Use an HDbql
or ComponentVideo
cables to connect
HDNI
or the ComponentVideo
Input jacks of the
HDFql
or the ComponentV_deo
output
receiver
/ satelhte
If you connect
connect
(red/blue/g_een)
the
and _udio
cables
unit to the
cable
box.
to the
Analog
lacks of the
HDMI cable
unit's ComponentVideo
Au@o
jacks for the Corn
cables to the Analog
)onentV_deo
connector
Input jacks.
Au@o
L/R Input
jacks
component
(red/blue/greenl
and video
audio cables
canes
@e®
cable
receiver/
satellite
box
:
_
You can also connect
box other than the
or CompositeVdeo
HDNI
output
cable receiver
or satellite
or the ComponentVideo
output
might have different
including PPV
this unit to the
output
jacks
jack (u,ml, p.37, 38) because they
jacks.
Requ red cables and connecting
methods
of the
cable receiver/
satellite box, or the ava lability channel for the dear QAFq may
dffer depend
ng on the cable/satellite
prov der or IocalYV
broadcas_Ler:
For more nformation,
please contact
or local IV broadcaste_
e an HDNI cable with the HDNI
your cable/satellite
ogo (a certified
High Speed HDNI cabe is recommended
compat b tY.
Plug In theAC
Hake
sure that
outlet
afte_ aJl the
(iau
provider
HDbll
cable).
for the better
Power Cord
the AC power
necessary
cord
must
connections
be plugged
to an AC
are made.
o/
Do not connect the A¢- power cold to a power
supply outs de
the nd catr'd votage ofths unit (AC 120V).
Connect ng the AC power cord to a power suppy outs de of this
range md 7 re,sut in fire or eectr ca shocks.
• Each time you pug n the AC power cord, no operations
b4oe
pe_#ermed for a f_'w seconds.This is r_ot a mal@nct OnL
wll
be
lS_
!ii!_}!!!
4
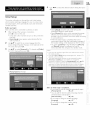
Use _1/1_ to select the desired location setting, then press
OK,
Initial Setup
7his section
which
wili guide you through
ndudes
selecting
and autoprogram,
v ewabJe
Before
After
unt
is connected
•
[initial Setup] menu
unt is turned on.
Use A/V
choices
Use
a few moments
[Retail]
to turn
on the
score, the
unit will
be set up with
the
energy
effic ency for home setting and t can be adjusted
through
a choice of picture and sound quality accord
unit for the
to your
appears
(Engl sh / Espa_ol/Franca
&/T
Select
predefined
setting for retail d splays.
Select [Home], the unit s set to maxmze
automat
tally
to select the on screen language
screen, then
CAiV
or cable.
connections,
on the unit,
It may take
first time.
for
menu
scans and memorizes
to antenna
making all the necessary
•
iV
3
tally
setting
on screen
you begin:
press _ to turn
2
automat
unit's nital
for your
channels.
Make sure the
1
which
the
a language
after the
from
s) on the right
When the
memorized
the
the
sde of the
to select [Antenna]
forTV
press OK.
channels
nitial setup is completed,the
lowest
channel with the confirmation
message
Iocat on sett ng will be d splayed
on the IV
of
screen.
You must set [Home]
in step 4. Otherwise,
[Picture]
and [Sound]
settings you adjusted will not be
memorized
after the unt goes into standby mode.
press OK.
channels, then
ng
preference,
or [Cable]
No_e
If you are, not receiv ng a signal flsm your cable serv ce, contact
the Cabe prov de_:
If you Dess (_ or MENU durng autoplsgram, ths setup of TV
channels will be canceled,
The it, it al autoprogl
rq function can be executed foJ- ether
[Antenna] or [Cable] ony once, When you change the
connect on (Antenna/Cabe),
set [Autoprogram]
agan. ,,_*p.21
If them is no signa input fi-om the antenna terminal and no
operat on for several seconds after you turn on the unit, he pful
hints appeal-s. Follow the instruct ons isted on theTV
• [Autoprogram]
screen.
will begn,
After
an initial
setup
is completed...
• If you want to scan the
[Autoprogram]
•
You can add the
unmemorized
[Add
channels automatically
n,=, p.21
desired
to change
,,_
[Location]
channels
p.22
to another
[Language]
• If you want
and analog
3'i
by autoprogram.
Channels]
• If you want
cable
again,
language.
n,=, p.27
to change
the
location
n,_ p.26
setting.
!i!ili_
16
WATCHING
TV
•
[No Signal] w appear on the lV screen after the subchanne
broadca£ s ovr,_:
•
[Audio only program] message w
receive ony sound sgna+
appear or_ theTV
screen, wher_ you
18
TV Screen Information
You can d splaythe
nformation
in the
digital
mode,
for the current
program
1
currentl
such as the
the
offthe
guides
7 selected
audio
channel
mode
detailed
air channel
on the
broadcast
or other
TV screen,
ng nformat
such as program
on
ttle
and
are displayed,
Press INFO,
4
-5
-9
-10
1
programttle
2
program
(lhe
guide
program
information
3
broadcast
4
channel
5
audio
to broadcasting
of 4 lines.)
staton
number
language
(/iIgC)/audo
mode
[SwitchingAudio
Mode]
6
effective
lines and scan mode
7
TV
scanning
,,_
(N]SC)
p.17
format
8
program's
9
CC (not
10
2
guide added
is d splayed to a max mum
chid
Press INFO
image aspect
avalable
ratio
if closed capt on is set to [Off])
lock ratng
or BACK
to hde the
nformat
on.
Note
When the prozram zude corls sts of more than 4 nes, use •/•
to scl_ to the next/previous
Ines,
[No description
provided.] is displayed when the program gude
is not provided.
While the program £ude is d splayed, the closed caption function
is interrupted,
In exte<na input mode, the follow ng screen is disp ayed;
e.g.) When an externa devce is connected toV deo Input jack,
The informat on d splay will automatica
y disappear n I m nute,
!ii_i!!!
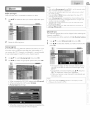
USING FUNCTIONS
!flail}!
Ihis
section
describes
d splayed when
Ihe
1
main
menu
Press MENU
the
the
overview
of the
main
menu
you press MENU,
consists
of the
function
setting
terns
below.
Use &/T
to display
to select a desired
press OK to determine
main menu.
menu and an _tem, then
the setting.
Page 20
Adjusting
picture
the
p cture
quality
mode,
as your
or customize
the
preference.
Page 20
Adjusting
other
the
sound
sound
mode,
equalizer
and some
functions.
Page 21
Scann ng the channels
see what the antenna
available n your
levels are.
_atures
Page 22
Adjusting the Closed Caption,
some other useful funct ons.
ngua ge_
You can choose
3
area and
parental
guide
and
Page 27
English, Spanish, or French
as your
on screen
language.
When
the setting
s completed,
press MENU
to exit.
2O
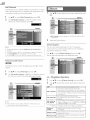
Before
you begin:
You must
set [Home]
Otherwise,
after the
1
n [Location].
the settings
unit goes nto
Use i/•
OK.
,,B p.26
you adjusted
standby
win not
be memorized
mode,
to select the item you want to adjust,then press
$ [AutoVolume
Leveling] wil ony disp ay for 32MD311B,
3lMD30I
B, 26MD311B and ldMD301B,
2
Adjustthe
f0Nowing
terns.
Smart Sound
Use
i/•
to select the
desired
[Standard],
[Movie],
([Personal],
setting, then
[Music],
press OK.
and [News])
Equalizer
Adjust tonal quality for each frequenc 7.
2
Adjustthe
Smart
Use
foNowing
Use _1/1_ to select the specific frequency and use i/•
adjust the level,then press OK.
items.
Picture
i/•
Auto
to select the
([Personal],
des red sett ng, then
[Standard],
[Sports],
[Movie],
press OK.
Ths
and [Game])
Votume
function
the iV
Use
Brightness, Contrast,
Color Temperature
You can only adjust the
[Personal]
Use
in [Smart
i/•
use _1/1_
Color,
foNowing
a constant
als and the
to select the
loudness
d fferential
between
programs.
desired
opt on, then
press OK,
Tint, Sharpness,
opt ons when
you set to
Picture],
to select the
des red sett ng, then
to adjust the
sett ng.
Cursor
press OK.
fhen
-IV Speakers
Select the
_
Cursor
•
amplifier
Brightness
to decredse brightness
to ncredse brightness
an HDMI
Contrast
to decrease contrast
to ncrease contrast
volume
to dec_c,ase coot
to nclease coot
Color
Leveling
keeps
commerc
i/•
to
intr'nsit x
nterlsty
Tint
to add red
to add green
Sharpness
to soften
to sharpen
Color
Temperature
to add warm colors
to add coo colors
audio
output
s HDMI
the
up can be changed
i/•
operations
ths
unit's
opt on, then
iiiil
by
such as
remote
is set to [On].
desired
or not, If your
ble and connected
sound
by usng
Control]
to select the
unit's speakers,
on compat
cable to this unt, some
Make sure [fun-Link
Use
from
link funct
control.
p.26
press OK,
On
The sound will be output
flsm the unt's speakers,
Off
[he sound will not be output fi-om the unit's
speakers,
Ext. Amp
You can contro audo output fi_m your
connected HDPII nk devices by usir, g this unt's
remote contro,
b_oe
We do not guarantee
HDPll nk complant
Before
set [Home]
Otherwise,
n [Location].
the settings/ou
unit goes nto
,,B p.26
adjusted
standby
win not
be memorized
mode.
other brands of
Primary MTS
You can set the
(NISC
1
ty wth
you begin:
You must
after the
I00% interoperab
devices.
Use i/v
OK,
to select the _tem you want to adjus_L,
then press
Ths
sett ng s not
mode
Use
output
mode
as a default
for the
sound
mode
only),
interlocked
when
by press ng SAP/AUDIO.
i/•
to select the
desired
you change the
[Sound
Functions]
opt on, then
output
iiiil
press OK,
Stereo
Outputs
stereo audio,
Mono
Outputs
mono aud o.
SAP
Outputs
second aud o program,
p.17
Noo
After sett ng [Autoprogram],
using CH +/- on the remote control
skps unavailable pFogFams automat ca }4
If you arc, not receiv ng a sgnal flsrn youF cable serv ce, contact
the Cabe prov dens
If you pl c,ss _ ol- MENU duFng autoplsgram, the setup of TV
channels w} be car, ce ed,
Before you begin:
Make sure the unt is connected to antenna or cable.
1
Use A/T
OK.
Even f [Autoprogram]
s completed, the channe} st,ICing wi be
oat fthe AC power coFd s unplugged before, the unt goes nto
standby mode by press n£ _,
to select the item you want to adjus%then press
The PIN code wll be mqumd
[Child Loci<], ,,,,Bp.23
once you set a PIN code n the
If you want to change your PIN code, foow
[Change PIN], u,,,_p.25
Autoprogram
the
nstruction
of
Channel List
The channels
channels
Those
2
selected
here can be skipped
when
selecting
the
using CH + / -.
channels
can stll be selected
with
1
Use Air
to select [Channel
2
Use
to select the channel
the
List],then
Number
buttons,
press OK.
Adjust the following terns.
&/V
you want to remove,
then
press OK,
Autoprogram
If you switch
move
the
wires
(e.g. between
unit to a d fferent
you restore
the
DIV
to use Autoprogram
antenna
and CA[V)
area after the
channels
you deleted,
to pedorm
nitial
Use
A/V
to select [Autoprogram],then
2
Use
Air
to select an appropriate
f
t is recommended
a new channel
1
or f you
sett ng, or
search.
press OK.
option, then
press OK.
{ 'i
• The
channel
You will
d splay for the
removed
not be able to select the
channel
channel
darkens.
again usng
l
C H + I -.
• lo reactivate a removed
channel, use A/V
OK.The
registered
channels are highlighted.
• When
removed
• When
connected
• When
connected
• [Autoprogram]
toVHF/UHF
antenna, select [Antenna].
to C/XTV, select
will
[Cable].
begin.
you remove
a main
channel,
and press
ts subchannels
are
as well.
• The d,ar, nel with the [DTV] indicated on the dspdy
Otherw se the channe is NTSC,
s ATSC,
!/!!
_iiiiii
3'i
!i!ili_
:!:'ii
FI}I
• When the scanning and memorzing
are completed,the
lowest memorized
channel will be displayed.
22
Add Channels
This function
lets you add the offthe
Cable channels
to reception
&/T
that
were
conditions
air along NISC
not
added
by the
at the
intal
setting.
I
Use
2
Use the
Number
to select [Add
channel
you want to add, then
buttons
due
1
Channels],then
to enter
or analog
autoprogram
Use i/•
OK,
to select the item you want to adjus%then press
press OK.
the number
of the
Caption
press OK.
$ [PC Settings ] wil
19MD301 B,
2.
Adjust
Closed
the following
If setup completes successfully, [Added to the channel list,] is
d splayed.
• If external nput s used, it is not possibe to re£ ster the chdnnel
Notednd [Unavailable] wll be d splayed on theTV screen.
By usn£ CH +/-, you can select the memor zed channe s on)4
moves
tems.
closed
captioning
and news. Closed
descriptions
Use
or
Caption
You can yew
•
only display for 22P1D311 B, 19biD311B
&IT
displaxed
to select
See the following
(CC)
caption
forTV
programs,
refers to text
of dialog
or
on screen.
[Closed
Caption],
description
for setting
then
press OK,
each item,
A
B
C
Antenna Confirmation
7his function
channel.
1
Use
__
Use the
&IT
for whch
lets you check the d gital signal strength
to select [Antenna],then
Number
buttons
press OK,
or CH +/-
you want to checkthe
of each
dgtal
to select the channel
sgnal
strength.
1
Use
i/•
to select [Caption
_-
Use
&/•
to select the desh'ed closed
Service],
then press OK.
caption,
then
press
OK,
Off
Seect f you do not want caption service.
CC-1
and T-1
The primary capt on and t_,xt
capt onn_ or t_,xt s displayed
as the prosram's dia}o£ (up to
IV screen, where _tdoes not
o+the p cture),
CC-3
and T-3
Serve as the prefi'rred data channe s.
[he capt on n£ or text s often a secondary
langua£e,
CC-2, CC-4,
T-2 and T-4
• If the channe
s set to ansl%q channe
or
No e
cannot
confirm
the antenna
condt
on,
extema
input,
you
• There
Paint-on
mode
services,The
n the same langudse
4 Ines of scnpt on the
obstruct mlownt parts
Rarely availab e and brosdcasturs use them ony in
speca conditions, such as when [CC-1] and [CC-3]
or [T-l] and [T-3] dre not avdilab e,
are 3 dspiay
modes
D splays nput
immediately,
accordngto
programs:
chdracters on theTV
screen
Pop-on
mode
Once chaJ_ctc,rs are stored in memory, they are
dsplayed a at once,
Roll-up
mode
D splays the characters cont nuously by scro
(max, 4 lines),
ng
23
No_i_
Closed caption wll
connect on.
lo show the closed capt on on your l V screen, broadcast
must contain the closed capt on data,
In addition to the basic closed caption, D]V has its own closed
caption called d gital capt on servce, Use ths menu to change
the sect ngs for d gital capt on servce.
1
Use A/•
OK,
2
Use A/•
to select the desred dgtaJ caption service, then
press OK,
not be displayed when you am using an HDMI
Not aTV programs and commercia s hdve the cosed capt on or
all types of the closed caption,
Capt ons nd texts may not exact y match the [V vote.
Chang ng channels mdy delay the closed caption for a f_,w seconds.
to select [Digital Caption Service], then press
AdNst ng or mutn£
a few seconds.
the voume mdy deay the cosed caption for
Abbrev ations, symbols and other grammar cal shortcuts mdy be
used in older to keep pace with the on.sa een act on.Th s s not
a malfunct on.
The capt on or text characters w not be displayed whe
main menu ol- functions d splay is shown.
Off
Select if you do not want digtal caption
service,
¢S-1 to ¢S-6
Select one of these before changing any
other item n [Closed Caption] menu.
Choose [CS-1] under normal drcumstances,
the
If back box appears on theTV screen, ths means that the cosed
capt on is set to the text mode, Io cleal- the box, seect [CC-1],
[CC-2], [CC-3], [CC-4] or [Off].
If the unt rece yes poor quaty telev sion signa s,the capt ons may
conta n emors, ol-there might be no capt ons at a. Some puss ble
causes of poor quality sgnals are:
Automob e ign tion noise
Electric motor no_se
Note
[Digital Caption Service] that you can switch diff_,rs dependir_g
the broadcast descr pt on,
signal
on
W_,ak signal reception
Multiplex signa leception (ghosts or screen flutter)
Data dropout and Pixelation (fol- DTV ony)
The unt 1eta ns the closed caption sett ng if the power MIs.
When the unt race yes special effects playback sgnal (e.g. Sealzh,
Sow and Sill) fi_om aVCR's vdeo output channe (oh3 or ch4),
the unit may not d splay the correct caption or text.
You can change the capt on style such as font, color or size, etc,
1
Use
A/T
2
Use A/•
to select [Caption
to select [User
Style], then
Setting],
press OK,
Child
then press OK,
Use
4
Use A/•
&/•
to select [On],
then
press OK,
to select an _tem, then
ths
press OK. Then
programs
funct
ratings for
whch
exceed
on, you can block
for children
use
i}iiiill
lock reads the
to the
3
:Y}
Child Lock
programs,
then
the
level you set, Wth
cecta
and any channels
rating
n programs
or external
nput
denies
_:!!il}i
access
nappropriate
modes
can be
nv sible.
A/T
to select the
Picture
desired
setting
and press OK.
C:
display
1
Use A/•
to select [Child Lock], then press OK,
$
i
Edge
(Edge
Color
and
EdgeType)
Font
Color
Font
(Font Style,
Transparency)
Background
(Background
Transparency)
•
Revew
the
Color
your
upper
Font
all selections
and Background
setting
rght
Size,
choce
corner
show
the
Font
Opacity
made
of the
and
below
d splayed
d fferences
Opacity
or
or
by looking
setting
box
in
(not
• Cosed captiorw,g for't style, sze,
coot and opacty can be changed,
Font
Opacity
Background
Background
Edge
19ND311Bor
'
!i!ili_
Font: Size
Font Color
_r22ND311B,
selected).
Font Style
Font
$ [PC Settings] willonlydisplay
19ND301B,
Color
Background
Opacity
Background color dnd opacty of the
dispayed cdpton can be switched.
Edge Color
Edge coot
Edge Type
caption Cdn be switched.
ar,d type of the d splayed
24
2
Use the Number buttons to enter the 4di£t number for
your PiN code.
US Movie
1
• When
you have not
enter 0.0, 0.0.
set up your
• When
is correct,
the
PiN code
PiN code.
[Child
Lock]
menu
2
is
following
description
for setting
is the
ratng
system
created
by NPAA.
Use &/•
OK.
to select [US Movie Ratings Loci<I, then press
Use
to se+ect the desired
&/T
repeated+yto
displayed.
• See the
rat ngs lock
switch
between
rating, then
[View]
press OK
and [Block].
each item.
A
B
C
D
Rating
X
Nee
When you select a i-at ng and set it to [Block], the higher ratings
will be b ocked automatica yShe lower rat ngs wl be ava abe for
NC-I
yew ng.
When you set the highest rating to [View], a rat ngs turn to
[View] automat ca }4
[o block any in pproprate
programs, set you1-mrs in [US Movie
Ratings Loci<I, [US TV Ratings Lock] and [Region Ratings Locl<].
R
The chd loci< sel¢ ng wi be/+,rained after a power Mlure or after
the power is i emoved re1- onger than I0 seconds (except the PIN
code reverts to 0000). [Child Lock] +,,,_,p.23
Iftheratngisbockrd.@wl
ppear
[Region Ratings Lock] w be avaiabe when the unt receives a
d £ital broadcast using the new latng system.
For the Unted States, the unt malt down oad the Region Ratings
Lock [_b e. if requ red.
The Canad an rating systems on ths unit am based on CEA 766 A
and CRIC poc 7,
7
Part£ular
1
2
channels
or external
input
modes
can be invsibie
No one undel- I7 admitted
Restricted; under 17 requ res accompany ng
parent or adult gualdian
PG-I
3
Unsu tab e +or children under 13
PG
P_mntal gu dance suggested
G
General aud ence
NR
No ratng
1
Use
&/•
to select [USTV
_-
Use
&/•
/ _1/1_ to select the
OK
ths
Category
Nature aud ence only
repeatedl}/to
switch
Ratings
Lock],
desred
between
then
press OK.
rating, then
[View]
press
and [Block].
in
funct on.
Use
&/•
to select [Channel
Use
&/•
to select the des red rating, then
repeatedly
to switch
between
Loci<I, then
[View]
press OK.
press OK
and [Block].
Rating
Category
TV-MA
Nature aud ence only
TV-14
Unsutabe
TV-PG
Parental gu dance suggested
TV-G
General aud ence
TV-Y7
Appropriate
+or childmr_ under 14
$ These may diff_,r depend ng on what product you purchased,
For examp e, 22ND311 B, I9ND311 B or 19ND301B w be
d splayed [PC] and [DVD] nstead.
Appropriate
_
for all ch dren 7 and
oldelTV-Y
higher
_ _+
for all ch dren
lower
25
To set the
As foKIV
sub rati%s
the
sub ratings
PC Settings
NA,T_14,T_PG,
to blod< specific
sub ratJ%s, follow
Use
A/Y/_1/1_
repeatedly
orTV
the
elements
set the
of programmi%.
Fb set
step beJow.
to select the
to switch
Y7, you can further
between
desired
[View]
rat ng, then
<22MD311 B, 19MD311B and 19MD301B only>
Ths funct on lets you adjust the PC screen position, dock and
phase during PC nput.
1
Use A/T
to select [PC Settings], then press OK,
2
Use A/T
to select the setqng you want to adjust, then
press OK
and [Block],
press OK,
Auto Adj
ii • _i
ii !_iiii}
Sub Rating
Category
FV
Far_tasy V olence
V
Voence
S
Sexual Situat on
L
Coalso
D
Su££estive Diao£
Rating
3
Adjustthe
f011owi%
ii?!
T_NA
T_I 4
T_PG
Auto Adjustment
Use A/V to select [Adjust],then
T_I
4SV-PG
horizontal/vertical
PC screen
the default
you can set your
PiN code
own
(0000)
s supplied
wth
the
A/T
to select [Change
Number
buttons
PIN], then
press OK,
to enter the
new 4dgit
PIN
code,
•
Enter
PIN code
and phase
of the
Position,Vertical
Position
_1/1_ to adjust.
Cursor
Press the
dock
adjusted.
PiN code.
Use
Use
position,
are automatically
unt,
Horizontal
1
2
press OK.
Ldngua£e
• The
Although
terns.
T_Y7
again in [Confirm
PIN.]
entry
fieJd,
•
Cursor
Horizontal
Position
to move PC soT,en lea_
Vertical
to rnove PC soT,erl
Position
down
1_
to move PC screen rght
to move PC screen up
iiii:i
Clock,
Use
the
Phase
_1/1_ to adjust
[Clock]
PC screen and [Phase]
of the
setting
setting
_i}iiii
to stablize
to improve
the
:?i
clarty
PC screen.
Cursor
•
Cursor
Clock
to decrease sr,ttir,£
to increase
Phase
vaue
vaue
1_
sett r_£
26
fun-Link
This funct on allows
between
our brand
unt
Device
(HDMI CEC)
connecting
you to operate the linked functions
dev ces with a fun Link feature and this
through
an HDMI
[hs
funct
List
on lets you see the product
of connected
A/Y
to select the
screen, then
Use A/Y
to select [fun-Link
number
or name
cable.
Use
1
model
dev ces.
(HDHI
CEC)],then
desired
HDNI
device
listed
on theTV
press OK,
press
OK,
Energy Saving Mode
2
Use A/V
to select the des red selt ng, then
]
Adjustthe
following
press OK,
You can set whether
fun-Link
Control
Set the fun
Link [On]
The following
or [Off].
additional
the
power
consumption
s saved or not,
items.
settings
will
be grayed
desired
sett ng, then
out when
1
Use
•/v
to select [Energy
2
Use
•/•
to select the desred
Saving Model,then
mode,
then
press OK,
press OK.
you
set to [Off],
Use
•/•
to select the
press OK,
Note
• '%u must set [Home]
On
O_f
that s compatible with the fun Lrq< funct or_,
/ Seects if you have connected an externa device
Disab es all fun Lnk
1
Auto
Device
Use
to turn
offby
interlock
ng fiom
ths
powen
•/•
to select the
desired
Your connected
sett ng, then
press OK.
Off
Your connected fun Link device stays on even if
the unit goes into standby mode.
TV
sent from
when the unit goes nto
standby
On
1
Use
•/•
to select [Location],
then
2
Use
•/•
to select the desled
Iocat on, then
Retail
will turn
your
Location
fun Link device turns off
automatically
mode,
This unt
on detected
connected
fun
when
the
power
on sgnal
is
•/•
to select the
desired
sett ng, then
press OK.
press OK,
The unt wil be set up with predefined sr,tt}n£s
for I c'ta I disp _ys. In ths sett ng, you can set the
backli£ht bri£hte_:
The unit is set to maximize the energy eff'ciency
Link devce.
Home
Use
after
You must set [Home] n ths setting. Otherwise, [Picture] and
[Sound] sett ngs you adjusted will not be memor zed after you
turn offthe unit,
On
Auto
,,i- p.26
Off
You can set your devce
unt's
it, [location].
Otherw se, the sett ngs you adjusted will r_ot be memorzed
the unit goes into standby mode.
press OK.
On
Ths unit turns on automat ca y when you turn on
your- connected fun Link dev re,
Off
Ths unt stays the standby mode even f you turn
on your connected fun Link device.
for home setting and t car, be adjusted through a
choice of picture and sound quaty according to
your pmf_,mnce,
27
Current
This funct
used.
1
Software Info
on shows what
Use A/Y
vers on of the
to select [Current
software
Software
currently
Info], then
press
OK.
2
Confirm
the version
of the
software
currentJy
Use _l/l_to
select a des red sell ng and an _tem, then
OK to determine
the setting.
used,
press
}
_i i_'ii!!!
2
Use A/,
to select [English], [Espa6ol] or [Francais],then
press OK,
When
the settng
s completed,
press MENU
to exit,
DVD Language Setting
You car_ change the desired
1
Use
A/V
language when
to select the item
playir_£ back the disc.
you want to adjus_t, then
press
C_
OK.
2
Adjustthe
AUDIO
Select the
terns.
Select the
ORiGiNAL)
language.
'1, *2
(Default:
des red subtitle
MENU
Select the
(Default:
des red audo
SUBTITLE
DISC
following
'1, *2
'1
(Default:
des red language
OFF)
language.
n DVD
ENGLISH)
menu.
No_e
Lan£uage setting for Audio and Subt tie are not ava lable with
some discs.
Use MODE to selec± subtitles available on the DVD,
Use SAP/AUDIO
t_ select audio available on the DVD,
If the DVD's defJult settings for audio and subtitle are the same
language, the subtitles md7 not show unless you turn them on.
28
DVD Audio
Setting
Parental
Choose tile appropriate
audio settings for your- equipment,
affects during the playback of DVD,
1
Use
&/T
to selectthe
desired
item, then
It only
Setting
Parental setXing prevents your- childrep from viewir_g inapproprble
malerials, (password protecled.)
Playback will s_op if the rulings
exceed the levels you set.
press OK.
1
Use the
your
2
buttons
then
to enter the
4dgt
password
for
press OK.
Adjust the following items.
DRC (dynamic range control)
This funct
n the
t
Number
password,
on is available
Dolby
Digtal
ON
(Default:
only on the
dscs whch
DOWN
SAMPLING
This funct
on is available
recorded
n 96kHz.
OFF
the Number
password.
format.
soft and oud
2
Use
&IT
(Default:
ON)
ng ofa
dsc
3
Use
&IV
Set to [BITSTREAM]
Digtal
PCM
(Default:
when
this unt
current
password
[PARENTAL
to select the desired
PARENTAL
4dgit
(4737)
LEVEL],then
to play
press
is connected
to a Dolby
MI parental ocks dm canoe ed.
8 [ADULT]
All ratir_gs (ddut/general/childmr
played back.
I [KID
SAFE]
To change
4
the
PCN, (2 channe)
0 can be
Ony DVD nter, ded forger, era use and
ch dren can be payed back.
Ony DVD ntended
back.
for chil@-en can be played
password
At step 2_,use &/T
then
5
[G]
to select [PASSWORD
CHANGE]
press OK.
Use the
password.
I ¢-onw, rtb the, Dolby D gital nto
press OK,
ALL
BITSTREAN)
decode_:
_em, then
LEVEL
n£ the or £r_a sound,
• When paying back a 96 kHz disc wth the copyl-ght protection
or when [Virtua! Surround] s setto [1] or [2],the sound w be
No down
e
samp ed at 48 kHz even if the [DOWN
SAMPLING]
is set
to [OFF], [Virtual Surround], u,_ p.35
DIGITAL
default
to selectthe
7 [NC-17]-2
DOLBY
alread}4, use
to enter the
OK.
only on d gital outputt
I W_utputt
buttons
• You cannot use the
bad< a DVD.
_____
I Compress the rdn£e between
I No _,ffects (orig}nal sound),
OFF
• If you have set password
ON)
are recorded
Number
buttons
to enter the
new 4dgt
29
Language Code List
Others
You can chan_e tl_e other
functions,
Language
1
2
Use A/T
to selectthe
Adjustthe
following
desired
item, then
Code
A-B
press OK,
items,
ICON
STILL
NODE
Set the p cture
quality
in the
still mode.
If you select [AUTO],
t automatically
selects the best
resolution
sett ng ([FRAME]
or [FIELD])
based on the date
characteristics
of the
pictures.
Macedonian
5957
4747
4752
Malagasy
Malay
5953
5965
Albanian
Amhadc
Arabic
Armenian
Assamese
6563
4759
4764
5471
4765
Malayalalq
Mahese
Maod
Ma athi
Moldavian
5958
5966
5955
5964
5961
Aymara
Azerbaijan_
BashkiBasque
477I
4772
4847
5167
Mongolian
Nauru
Nepali
Norwegian
5960
6047
6051
6061
Bengali;Bangla
Bhutani
4860
5072
Occitan
6149
Bihad
Bislama
Breton
Bulganan
Bu-mese
485
4855
4864
4853
597I
Od/a
Oromo(Akm)
Panjabi
Pashto;Pushlo
Persian
6164
6159
6247
6265
5247
4851
Polish [POLl
Portuguese
[POR]
Quechua
Rhaeto-Romance
6258
6266
6367
6459
6461
6467
AUTO
POWER
Set to [ON]
goes nto
Reset
OFF
fthere
standby
to
the
tb' _
bestdb
zod.
be
hgh/defined.
(Default:
s no operation
ON)
for 20 m nutes, the
unt
mode.
Default
Setting
You can reset all the setdn£s except
on-screen menu lan_uaae.
1
mode w
for the parental setting
and
t
to select [YES],then
press OK,
•Hote
When you want to canoe the int al zadon, select [NO], then press
OK.
>
O-R
<
i
z
;i
5759
4947
Chinese
[C} I]
Corsican
Croatian
Czech [CZE]
7254
4961
5464
4965
Romanian
[RUM]
Russian [RUS]
Samoan
6559
Danish [DAN]
Dutch
[DU]]
English [ENG]
Esperanlo
Estonian
5047
6058
5160
5161
5166
Sangho
Sanskrit
Scots Gaelic
Serbian
Serbo-Cr oatian
6553
6547
5350
6564
6554
Faroese
5261
Sesotho
Setswana
6566
6660
Fiji
Finnish
French
Fdsian
Galidan
5256
5255
5264
5271
5358
5hona
Sindhi
Singhalese
Sisw£
Slovak
6560
6550
6555
6565
6557
Geo/glan
Get nan [GER]
Greek
[GR_
Greenlandic
5747
505I
5158
5758
Slovenian
Somali
Spanish [SPA]
Sundanese
6558
6561
5165
6567
Guarani
Gujarati
Hasa
5360
5367
5447
Swahili
Swedish
6569
6568
Hebrew
Hindi
Hungadan
5569
5455
5467
Tagalog
Ta]ik
Tal nil
Tatar
Icelandic
[CE]
Indonesian
5565
5560
Telugu
Thai
6651
6654
InteNingua
Interlingue
Inupiak
Irsh [IRI]
Italian [ITA]
]apar_ese [jPN]
Javanese
Kannada
Kashmhq
Kazakh
5547
5551
5557
537
5566
5647
5669
5760
5765
5757
Tibetan
Tigdrva
Tonga
Tsonga
Turkish EIUR]
Turkmen
Twi
4861
6655
666"1
6665
6664
6657
6669
Ukrainian
Urdu
6757
6764
iN
Kinyarwanda
Kirghiz
Kirundi
Ko/ean
[KOR]
Kurdish
6469
5771
6460
576I
5767
Uzbek
Vietnamese
Volapuk
Welsh
Wolo
6772
6855
6861
4971
6961
i
L-N
Laothian
Latin
Latvian;L_ttish
586I
5847
5868
Xhosa
Yiddish
Yoruba
Zulu
7054
5655
7161
7267
Lingala
5860
[FN]
[FRE]
[tUN]
I-K
Use A/V
[NOR]
<
Cambodian
Catalan
F-H
I_stillmodow
T/_o p<tu_q_
t FRAME
FIELD
i,£!
4748
C-E
(Default:AUTO)
ii!ttl
_
5866
an_an
Afar
Afdkaans
(Default: ON)
Set to [ON] to show the angle con when multiple camera
angles are available durng DVD playback.
Code
Litb
Abkhazian
Byelorussian
ANGLE
Language
S
[SWE]
i
•
T
6658
6653
6647
6666
_iiili
U-Z
:x:!
•
!iiii i
iiii i i
lO
3O
OPERATING
DVD
Unplayable Media
Playable Media
HediaType
Logo
Recorded
Signal
Media
Size
DVD-VIDEO
NEVER play back the following discs. Otherwise,
may result!
3 inches (8 cm) dsc
DVD RAN
DVD audio
CDi
Photo CD
Vdeo CD
malfunction
DVD with region codes other than I orALL
DTSCD
O
Rw
DVD-RW
DVD RON for personal computers
CDRON for personal computers
[he discs with labels, scratches, stains, blem shes, etc.
HD DVD
di£ita vdeo
[NPEG2)
DVD
BJu ray Disc
DVD or CD contains NPS/jPEG F_les
KODAK Picture CD
O
On the
DVD-R
following
Super
audo
disc, the sound
MAY
NOT
be heard.
CD
5 inches
(12 cm)
Any other
CD-DA
DIGITAL
indications
(video reco/d
n£)
format cannot be pdyed back, Ony the fina zed vdeo format
dscs can be played back,
Some discs cannot be payed bad< because of ncompatibe
AUDIO
CD-RW
rotor8 ng cond t ons, character st cs of the mco/der or specia
properties of dscs,
Only tl,e sour, d recorded on the norma CD dyer carl be
de vemd.The sour, d recorded or, tf,e hi£h der,sty super audio
di£tal audo
DIGITAL
compatibility
Onfindlzed discs cdnnot be pQ,ed bdck,
For DVD RW/R, discs recorded in theVR
AUDIO
OIGITA_
discs without
CD syer cannot be de vered,
Do not use a single CD adaptor
S nches (I2 cm} dsc,
AUDIO
CD-R
wl, el, makes 3 ir,ches (8 crn) to
You can pay back dscs wth the mad<s sted in [Playable Media],
If you use non-stand ldized discs, this unt may not pay them back
or the sound and video quaty wll be comprom sed,
If the reco/ded portion of the dsc s too sma [less than 2,17
nches (55 mm) across), it may not pay back properly,
This unt
region
has been desgned
I, DVD
for region
cannot
must
I n order
Look
region
for the
symbols
play back the
The number
DVD
on the
unit with
the
most
This unt
uses N[SC,
PAL color
Unted
with
or
unt.You
for other
DVD.
@
If these
you cannot
refers to region
of the
region
be played
world,
back
code,
color
color
can only
systems
system
throughout
is NISC
the
(which
s used
States and Canada).
so DVD
system.You
systems.
DVD,
same region
n different
in the
NISC
globe
common
primarily
n the
on your
DVD
regions
unit,
for a specfic
is recorded
[he
in ths
inside the
labeled
world.
that are labeled
symbols
are not on your
A DVD
DVD
forALL
to play back on the
play back DVD
regions,
to play back
be labeled
you play back must
cannot
play back DVD
be recorded
recorded
in
2!!!
Disc Menu
S
!iiii:!
Some dscs conta n disc menus whch
Playback
Before
you begin:
[b display the DVD
Turn on the amplifierand any other equ pment which is
connected
included)
descr be the contents
disc or allow you to customze
dsc playback, or title menu
Ists the trtles ava lable on the DVD.
to ths unrt. Make sure the external
are set to the correct
1
Press _ to turn
2
insert a disc with
A/T/_I/I_
audio receiver
(not
channel
[b
menu, press DISC
MENU
of the
i:[i
which
and use
to select an item, then press OK (or PLAY I1_),
display the top
&/T/_I/I_
menu,
press TITLE
to select an item, then
:!:LI
and use
press OK
(or PLAY I_).
il
on the unit,
label facing forward.
<32MD311B/32MD301B>
Resume Playback
Press STOP
on the IV
•
durng
playback,
Press PLAY I_. Playback
playback
Resume
message
will appear
ii
•
screen.
will resume
flom
the
pont
at whch
{i_i
}
was stopped.
<26MD311B/26MD301B/22MD311B/19MD311B/19MD301B>
•
lo cancel i_sume, press STOP • or,e more time, 4nthe stop mode.
On some discs,STOP • wll not work whle the resume messd£e
appeal-s, Pese
•
}:}:
•
In case the
sure the
forward.
3
Jhe
[V
•
4
was recorded
unit switches
mode
to the
and detects
on both
resume f_,ature, Playback will star,t at the beginn n£ the next tme
you nsert the dsc,
sdes,
make
sde you want to play back s facng
DVD
mode
the type
Pleas PLAY I_ if the
Jhe
•
DVD
label of the
unt
when
the
unit was in
does
automatcally,
press PLAY I_
again,
5
•
If playback
go nto
[AUTO
6
•
to stop playback
remains
standby
POWER
stopped
mode
temporar
OFF]
I}4
for 20 m nutes, the
automatically
and sound
will be muted,
one frame
II
in the
pause
mode,the
disc
at a time.
cent nue playback, press PLAY I_.
I b4otc!
unt
will
when
• Set [STILL MODE] to [FIELD] in the [OTHERS]
n the pduse mode ar,e blurred. ,,_ p.29
menu f pictures
is set to [ON].
Press EJECT A to elect the
dsc.
Fast Forward / Fast Reverse
Nee
[ O ] may appear at the top
be paused
you press PAUSE
goes forward
[b
Press STOP
will
mode.
Each tree
not start
Playback
Press PAUSE II during playback.
• Playback
not go to the DVD
unit starts playback.
If playback
Paused and Step-by-step
of disc.
does
waft urftil the message d sappears.
The resume nformation w be kept even when the unit goes
nto standby mode. However, ejecting the dsc wi cancel the
r £ht on theTV
sol e,en when the
operat on is proh bred by the dsc or ths unit.
Some DVD may star,t p ayback fl_m title 2 or 3 due to specific
programs.
Dur, ng the p ayback of a 2 layered disc, p ctures mdy stop for" a
moment.Th s happens whe the tat ayer is being switched to the
_nd laxer,Th s s not a ma function,
When you cannot i emove the disc, you mdy try ether follow n£
operat ons,
Press and hold EJECT A on the unt for more than 5 seconds,
Unpug the AC power cord and pug it in again, then press
EJECT _,
It will take about 10 seconds to eject the disc, while that the unt
will not respond to any key commands.
Press FWD
select the
_
or REV _
desired
forward
repeatedly
or reverse
To cont nue playback, press PLAY I_.
durng
playback
to
speed.
!i!ili_
:!:L
i
32
Slow Forward / Slow Reverse
Press FWD
mode
_
or REV _1_ repeatedly
to select the des red forward
Tb continue
playback,
during
the paused
or reverse
speed.
press PLAY I_.
•
Set [STILL MODE] to [FIELD] in the [OTHERS] menu f pictul-es
in the slow p ayback mode re b un-ed. _,_ p.29
• Sow fotsuard/s ow reverse speed vanes with d sc.Approx mate
Note
speed s 1(1/16x), 2(I/8x) and 3(I/2×).
The sound will be muted durng ths function.
Using SKIP I_1_1/1_1_1
During
playback, press SKIP III_I/I_IH
des red chapter, tide or track
current
wll
chapter/track
I (CH)
Zoom
repeatedly
untl a
be selected.
current
(TR)
title
I (TT)
or
[SKIPI_1
The zoom function allows you to enlarge the vdeo mage and
to pan through the enlarged mage,
1
During
2
playback,
[
.... ] appears.
•
The pcture
Press OK
press MODE
repeatedly
2
[SKIPHH]
Playback will start
track
automat
[SKIPI_1
cally from
the
[SKIPHH]
chapter; title
Noe
untl
• SKIP 1_141/1_!_1al-e riot available when playback
becomes
repeatedly
twice
or
you selected.
s stopped.
as large.
to change the zoom
factor; [2x]
or
[4x].
3
Once
a desred
the zoomed
4
[o
zoom
p cture
exit zoom.
repeatedly
factor
s set, use A/T/</I_
to slide
across the TV screen.
repeat steps
until [OFF]
1 to 2 above
and press OK
1
appears.
During
[
No_e
• The gray box wth
You can select the
from.
an }nner blue box that shows durng zoomed
psyback s the postion guide nd cotes the posit on of the zoomed
image wthin the overall mate.
Post on guide stays or, theTV screen until you press OK.
Press OK or, e more time to recal the postion guide when
d sappesrs.
•
•
Zoom function does not work while the dsc menu is disp ayed.
4x zoom s not avai b}e on some dscs.
•
Zoom function
s also dvalable during pause mode.
desh'ed time
playback, press MODE
]/[
&IT
the
dsc
repeatedly
is played
back
until
] appears.
2
Use
3
Press the Number
repeatedly
lapse within
4
whch
until [
buttons
] appears.
to select ,/our desired
tree
60 seconds.
Playback will start
automat
rally flora
the time
you selected.
• When there is no need to enter a number, [0] ppesrs
automatca y. For exampe, [0:0 : _
ppesrs in the time search
menu if the tota time of the rite or track s less than I0 m nutes.
• Press CLEAR to erase the incol-rect nput at step 3.
• Time search can only be pe_#ormed durn£
unit has kept the resume informat or,.
It cannot be pe_fformed in the stop mode.
Search Functions
You can select chapters,
1
During
[
pbyback,
]/[
2
Press the
title
[o
until [
Number
buttons
withn
are more
than
entering
Playback will start
track
on the
_epeatedly
dsc.
Press the
or track.
until
you selected.
the
title
search, use
] appears.
to select your
desired
chapter;
60 seconds.
play back a sngle
OK after
3
to perform
repeatedly
or track
there
or tracks
] appears.
• If you want
A/T
titles
press MODE
the
d git chapte_s title
10 chapters,
titles
chapter; title
automatically
from
or track
or tracks,
or trod<
when
press
number:
the chapter, title or
Number
buttons
to select your
p ayback or when the
des red chapter; ttle
33
Repeat Playback
Repeat
function
s available
only during
During
playback, press MODE
S
!fill:!
(x
z3_
playback.
Ths
1
!ii!_}!!!
Random Playback
repeatedly
until [
function
playback
]
shuffles
in the
the
play ng order
oftrad<s
instead
of
sequence.
appears.
2
Press A/T
to changethe
repeat
mode.
1
In stop
menu
OFF
2
mode,
press MODE
repeatedly
until [RANDOM]
appears.
Press PLAY _
to start
random
pByback.
CHAPTER
T TLE
OFF
TRACK
ALL
3
Press BACK
to exit
Programmed
Playback
}_!!ii
Repeat A-B Playback
You can repeat
1
Durng
[
playback
between
You may determine
A and B on a dsc.
playback, press MODE
repeatedly
1
rn stop
menu
until
] appears.
2
2
Press OK at your desired
startng
3
Press OK at your des red endng
pont
Use
mode,
•
Point B should
• Within
a few
be in the
same ttie
(B).
as point
A.
A/T
• Repeat
begin to play
[o
cancel _epeat AB
until [
repeatedly
appears.
1i\4ot¢
•
•
•
will
untl
track, then
onal tracks
mat
be on other
next/previous
play back.
[PROGRAM]
press OK
to
this step untl
screens.
3
Press PLAY _
Use
A/T
pages.
you have selected
all the tracks
program.
can be ordered.
• If8 or more tracks were in a program,
SKIP 11141/1_1 to see all the tracks.
] appears.
Press OK so [OFF]
to select a desired
• Up to 99 tracks
playback, press MODE
tracks
repeatedly
you wish to play back in the
back repeatedly.
4
press MODE
to go on to the
or track
will
n which
store.
(A)
seconds, the sect on AB
order
appears.
• Addit
pont
the
to start
programmed
use
playback.
Noe
Repeat sr,tting (except [ALL]) will be cleared whet, moving to
another tite or chsptel; t_ ok,
Durn£ programmed playback, repeat settir, g w be eff_,ct vo for
Press CLEAR to erase the last track n the program f you make
an erFoK
the tracks in the program.
Repeat playback or repeat A B p ayback rnay r,ot ava abe with
some discs.
press OK at step 2.
While
program is beng pdy_d back, STOP • works s follows:
Pmssi% STOP • once:The trdck w}ll be n the resume st ndby
mode. Next time you press PLAY _, the playb d< will resume
fi_m the point where t s stopped n the programmed playback
• Repeat A-B p syback does not function during other repeat mode.
• [o cancel pointA, press CLEAR at step 2 n
[Repeat A-B Playback].
• Stopping playback wil cancel repeat A_B playback.
1o erase all programmed
tracks at once, seect
[ALL CLEAR] dnd
Pressi% STOP • twce: Resume mode w be car,celed. Next
time you press PLAY _, playback wi restart fix_m the first track
in the or gina olxJe_:However, your programmed playb ck can
be restarted when you b}ow the above steps. (Your programs
ale. st stored unt etherthe
dsc s gected orthe unit goes nto
standby mode.)
On some discs, STOP • will not work while the resume message
appears, Pease wat until the message d sappears.
1o repeat the currant track in the plx_%arr,, foow the £eps I ar,d
2 n [Repeat Playback] ar,d select [TRACK]. _,_- p.33
]o repeat the entre progr4m, follow the steps I dnd 2 in [Repeat
Playback] and seect [ALL]. ,,_- p.33
Lject n£ the dsc or the unit goes into standby mode wl erase the
program.
You cannot use the Number
durng
programmed
buttons to select another track
p ayback Use SKIP I_11/1_!_1 to seect other
tracks in the iDro%am.
You cannot combine random p dyback with programmed
p ayback
You cannot alter programmed order during psyb ok.
You can start programmed p ayback only while n [PROGRAM]
menu,
;ili}!
34
On-screen
Display
You can check the
pressing
INFO
informat
on the
Special Settings
on about
remote
the
current
dsc
b7
control.
ins unt allows you to select a subttie language (f available)
during DVD playback.
1
Durng
playback, press MODE
[
2
Use
repeatedly
until
desired
language
] appears.
A/•
repeatedly
until your
appears.
subtitles can be varied on the
CH (Chapter):
current chapter
total chapters
number
displayed number
current subtitles language
/
3
Each time
you press
•/•,
the
subttle
language
changes
as follows.
remaining time of the current
elapsed time of the current
title
title
TT (Title):
current title number/total
titles
I ENG
I SPA
'er number, appears only when
Press BACK
playing a 2-layered disc
L0 : Layer 0 is playing
L1 : Layer 1 is playing
--
current
when
_"
:
A_-B
Title
being
appears
setting
only
repeat
and
for
video
the
data
amount
currently
time
current
the manul along with the dsc.)
• When [NOTAVAILABLE]
appears on theTV
subt tie s recorded on the scene.
•
read
remaining
track
•/•
severa times, the disc may not have that language. However,
some discs alow you to chnge subtitle anguages setting n the
disc menu. (Operat or1 vares depending or, the dsc, so refer to
repeat
indication
elapsed
• [o cancel the subtit e, select [OFF] at step 2.
• If your anguage is not shown after press r'g
is active
repeat
: A-B
rate
of audio
--
setting
repeat
C : Chapter
_-T
bit
repeat
the
of the
time
current
of the
playback
track
If you choose
screen, it means no
anguage that has 3lettepanguage
code, the code
wil be displayed every time you change the subtte language
setting. If you choose any other languages, [---] will be d splayed
instead. ,_gl-p.29
• Eject ng the dsc wil cancel your subtte setting.
current
status
TR (Track):
current track number/total
tracks
This unt
ALL:
current track number/total
allows
languages
you to select
are available)
durng
an audo
DVD
language
(f multiple
playback.
tracks
current repeat setting appears
only when the repeat setting is
active
_-T
_-A
to exit
Noe
1
Durng
playback,
press SAP/AUDIO
desired
language
appears.
repeatedly
until the
: Track repeat
: AII tracks repeat
A_-B : A-B repeat
--
remaining time of the entire disc
elapsed time of the entire disc
2
Each time
changes
ENG
SPA
FRE
you press SAP/AUDIO.
as follows.
the
audo
language
35
No_e
• Some
discs
wllonly
allow
you
tochange
the
udio
setting
fix)m
the
disc
menu,
Ref_,r
tothe
manual
accompanying
the
discs
for
de_iB,
•
If your I nguage is not shown after pressing SAP/AUDIO
several
times, the disc may not have that language,
However, some discs allow you to change multiple audio lan<qua£es
setting in the disc menu, (Ope/stion varies depend n£ on the disc,
so refer to the manul aon£ with the disc,)
• When [NOTAVAILABLE]
appears on the]V
audio language is not available,
STEREO
L-ch
R-ch
(;
b_ote
• Vrtual
surround
cannot be changed when the sound mode s set
to either [L-ch]
or [R-ch],
screen, it means
You can enjoy
virtual
surround
on your
2_channel
stereo
system.
1
Some DVD
may contain
s multaneously
angle if [ _
to [OFF]
1
have been
fi_om vat ous angles.You
] appears
on the screen.
in [OTHERS]
Durng
scenes which
pByback,
menu,
[ _
press MODE
shot
can change the
If [ANGLE
] will
not
camera
ICON]
until [ D
Use
&/V
repeatedly
until your desired
camera
2
repeatedly
Press •/V
to select the sound
1
Natura
2
Emphas zed eff_'ct,
OFF
]
appears.
2
playback, press MODE
until [
]
level.
is set
appean ,,mi, p.29
repeatedly
During
appears.
eff_,ct,
No eff_,cts (orginal
3
Press BACK
Ths
feature
sound),
to exit,
angle
appears.
]
/_
l
angles can be varied on the
disptayed
3
Press BACK
number
to exit
allows
you to assgn
a specfic
point
on a dsc to
be called back laten
Adjust
the
black level to make the dark
areas of the ]V
picture
To set a marker
brighter:
Durng
1
2
Durng
playbacl<, press MODE
repeatedly
until [ _
[
]
2
Use
•/T
Press &/,
3
Use
_1/1_ to select an available
4
When
to adjustthe
blad< level.
the playback
• Marker
Press BACK
be kept even fthe unit goes nto
standby mode.
1
2
to the
you to select
a sound
mode
durng
CD
playback.
During
playback,
desired
sound
press SAP/AUDIO
mode
as follows.
repeatedly
untl
appears.
Each time you press SAP/AUDIO,
changes
marker
_eaches the
search menu
marker
pont
wthn
appears.
60 seconds.
at which
you want to
press OK.
the
sound
mode
the
to exit,
marker
later
Repeat steps I 2_ n [To set a marker].
Use
_1/1_ to select
marken
Press OK at the desired
the specific
2
untl
c_
the des_ed
allows
until
s now set.
Press BACK
To return
• The sett n£ wi
repeatedly
to exit
Note
This unt
repeatedly
set a marker,
5
1
press MODE
] appears,
appears.
t°OFF
3
playback,
]/[
pont
which
marker
you set.
to restart
playback
fiom
O
i
i
36
CONNECTING
DEVICES
HDMI-DVI
Connection
Use an HDMI
DVI convers
external
dev ces equipped
video
(Use HDkll
I input
Input jack on rear
Before
AC power
wth
the
DVI output
jack only and Audo
unit to
jack.
L/R below
HDHI
1
of IV.)
cable receiver or satellite box
with the DVI output jack
you connect:
Be sure other
the
on cable to connect
device
s connected
properl
7 before
plu&_ing
n
cord,
External Device Connection
HDMI
Connection
HDVII
connect
HDM]
(High-Definition P/ultimeda nteflace) transports
d gital video
on offers the
highest
and multi-channel
p cture
qualt)4
high definition
d gital audio through
a single cable.
_][f2 jj
Blu-ray/DVD
recorder
withtheHDMIoutputlack
4
HDMI
DVI
conversion
cable
audio
cables
_}ix
!:i....
_d,ii
cable
receiver
with
HDMI
the
or satellite
box
DVI output
jack
cable
conversion
HDMbDVI cable
!
audio cables
Blu-ray/DVD
with the HDMI
recorder
output jack
No,,
Use an HDNI cable with the HDNI Io£o (a certified HDMI
Hish Speed HDHll cabe is recommended for the better
compat b ty.
:or HDMI connection
(use HDIVil 1 or 2 Input jack)
HDMI cable
cable),
The unit accepts 480i, 480p, 720p, 1080i and 1080p 24/60 Hz of
video s£nals, ar,d 32kHz, 44.1kHz and 481<Hz of audio %1n Is.
This unt accepts 8,1 channel audio si£na (Doby D £}tal) and 2
channel audio s£nl (LPCbl).
This unt ccepts or, y s£nals in compl ance with EIA861,
:or HDMI-DVI
connection
The unit accepts 480i, 480p, 720p, 1080i and I080p vdeo sisnals,
HDPll DVI connect on mquH es sepa/_te audio connections as we
and the audio signals are converted from digit I to analog,
DVI does not dispay 480i ma£e whch s not in comp once with
EIA/CEA 861/861 B,
ComponentVideo
ComponentV
vdeo
devices
If you connect
connect
Analog
connected
to the
on offers
to the
better
Audio
picture
quoit/for
unit,
S Video
connection
dev ces connected
unit's ComponentVideo
cabJes to the Analog
jacks for the ComponentV
i_i!!ii
S
S-Video Connection
Connection
deo connect
deo connector
Input jacks,
Audo
L/R Input
If you connect
cables to the
oGers good
to the
to the
Audo
p cture
qualty
for video
!ii}i,!
unit.
unit's S Video
L/R jacks right
Input jadq connect
below
the
Composite
audo
Video
connector:
jacks,
_]IF_jj
component
video
cables
(red/blue/green)
S-Video
cable
Blu-ray/DVD recorder with
the component video output lacks
1
I
|
component video cables
(red/blue/green)
I
Blu-ray/DVD recorder with
the component
video output jacks
• The unt dccepts 480 /480p/
this connc, ction.
720p and I080
ofvdeo
sgnals for
!i!ili_
38
Composite
Composte
for video
devices
unit's Composite
the
Audio
connected
L/R input
jacks,
When
Audio
_C
connection
offers
to the
V_deo input
connector
the
Digital Audio
Video Connection
V_deo
vlaeo
standard
unit. if you connect
jack, connect
jacks nght
p_cture
below
the
qua ity
to the
audio cables to
Composite
Video
(for digtal
if you connect
can enjoy
Output
broadcasting
then
only connect
to the Audio
multPchannel
audio
ons only)
d gital audo
dev ce, you
like 5.1ch d gital broadcast
ng
sound.
external
coax al cable to connect
d gital audo
the
unt
to
devices.
Cable
Dolby
a_caaer
Digital
IL
algltal
camcoraer
funct
this unit to an external
Use a d gital audo
s monaural,
Connection
and DVD
audio
coaxial
cable
vlaeo game
VCR
1
video cable
Dolby Digital
decoder
carncorder
J
video game
cable
_:T;,
_
|
vcR
39
AnalogAudio
<32MD311
Output
i;ii!il
Connection
B/32MD301B/26MD311B/26MD301B
(for both
analog and digital
If you connect
can enjoy
ths
stereo
Use audio
only>
[_:l
! HoM,-ov,
.........,.....b,e
i_
broadcasting)
unit to an external
(?_channel)
analog audio
_m
dev ce, you
HDMbDVI conversion
cable should be with
audio.
cables to connect
the
unit to external
analog audio
ferdte
devices.
core.
ud,oci
..........
'es
d....b,e
stereo
system
personal computer
N
stereo
system
VGA cableT
$
7he
following
video
s gnals can be displayed:
_fre_
VGA
SVGA
XGA
WXGA
audio
x
@
480
800
x
600
1,024
x
768
1,280
x
768
1,360
x
768
60Hz
cables
Other
formats
or nonstandard
s gnals will not
be displayed
correctly.
PC Connection
If you connect
640
this unt
to your
PC, you can use this unit as a
PC mon tot:
For 32MD311B,
the
32MD301B,
unit can be connected
Use an HDVll
requires
connect
with
and 26MD301B,
DVI convers on cable for this connect
s_Lereo min plug convers
For 22MD311
equ pped
26MD311B
to your PC that has a DVI terminal.
B, 19MD311
B and 19MD301
a PC input
jack. Use anVGA
on and it requ res stereo
on and it
on cable as well.
toni
well.
B, those
unit s
cable for this
plug audio
cable as
Cable
Management
<32MD311B/32MD301B/26MD311
Keep the cables through
personal
HDMFDVI
computer
conversion
cable
ths
B/26MD301B
holder
to avod
tangling
only>
them.
2E
{
4O
USEFULTIPS
Troubleshooting
If the
unit does
check the
not
Guide
perform
followin_
chart
properly
when
operated
and all connections
once
as nstructed
before
n this
callin_
for
manual,
service.
Nakesurethe,ACpowercordispluggedn,
Md<e sure that the AC outer supp es the proper votage, pug another
the AC outlet to ensure that AC outlet operates normally,
No power
If a power
Control
button's
do not work.
fJure
electrical app ante into
occurs, unpu£ the AC power cord for I minute to aow the unit to reset itseE
Press ony one button at a tree, Do NOT press more than one button at the same tree,
Ensure that no buttons on the remote are depressed and move fl-eely.
Check whether
con-ect )4
Power s ON but no screen ma£e,
the cor, nection of the antenna, cable rece vet or sate te box s connected
Check whether II the cabes to the unit are connected to the correct output jack of your device
ke Blu_ray/DVD recorder
Mke sure that the selected nput mode is connected to the working input iack,
Check f your computer s NOT in sleep mode when the input mode of ths unit is in PC mode.
l_p any key on the keyboard to wake up your computer
Check fthe
power s on.
Check fthe correct nput mode is selected,
Check whether all the cabes to the unit are connected to the correct output jack of your devce
ke Blu ray/DVD recorder
Vew otherTV channe s,The problem mght be limited to the broadcast n£ star or, or weald s£nal
stren_h.
Unpu£ the AC power cord and war for about I minute, then plug the AC power cord and turn
on the unit agan,
Check whether the connection of the antenna, cable rece vet or sate te box s connected
correct _4
p cture or sound
Make sure that the selc,cted nput mode is connected to the working input jack,
Check fyour computer s NOT in sleep mode when the input mode ofths unit is in PC mode.
]_p any key or, the keyboard to wd<e up your computer
blake sure that the sound s not muted. Press MUTE so that the voume bar ar,d current voume
eve w
No
appear on the IV
street,,
blake sure that the voume
vo ume,
is NO[
Vew otherTV
stren_h.
Adjust [Color]
color
Adjusted [Picture] or [Sound]
sett ngs are not efft, ctive every tree
the unit is turned on.
channeB,The
to adjust the desired
problem mght be limited to the broadcasting
station or weal< signal
in the main menu.
You must set [Home] n [Location]. ,,,. p,26
Otherwise, the settings you adiusted wll not be memorized
Electrica nte_%rence flora
Adjust
Sound okay, picture poor
set to [0] or [Mute], If so, use VOL +/-
[Contrast]
Vew otherTV
stren£th.
nd
after the unit goes into standby mode.
nearby appliances may affect p cture qualit_
[Brightness]
in the main menu.
char, he s,The problem mght be limited to the broadcast n£ star on or weal< s£nal
For the best picture qua} ty, watch "High Definition" wide screen programs.
If the HD content is not ava abe, watch "Standard Definition" programs nstead,
Vew otherTV channe s,The problem mght be limited to the broadcast n£ star on or weal< s£nal
stren_h.
Check fthe audo cable s connected n con-ect y,
P cture okay, sound poor
You see a distorted
dn unusual sound,
p cture or hear
You may be getting nte_ff_,rence fi-om e ectrical app ances, automob
ghts,
Try movn£ the unit to another
Electrica
oration
es, motorcycles
or fluorescent
to see fthis is the cause of the probem,
nte_%rence fl-om nearby appliances may ffect
p cture qualit)4
Ghosts, nes or streaks in p cture
Vew otherTV
stren_h,
You see "noise" or "trash" on the
screen,
When the cap bilit es of the unit exceed the capabilit es of the dgtal broadcastin S, the si£na wi
be increased to match the capabilit es of the d splay of the unit, This may cause noise or trash,
Diff.,rent
screen
View otherTV
p xe at on,
color marks on theTV
You switch to a diff.,rent nput
the voume changes.
and
channe s,The problem mght be limited to the broadcast n£ star on or weal< s£nal
channe s,The problem mght be limited to the broadcast n£ star on, mssn£ data or
Ths unit wll memor ze the voume eve fi-om the last time you adjusted it,
If the voume of the sound fl-om another devce s h£her or lower, then the oudness
wi
change.
41
!71!!!
()
!717
You switch to a dif%rc, nt nput and
i
thescree,s_' chdnges.
the displ y irndge d .......
the entile screen,
t ......
Th,s
untw,I.....,zothev,ow,ng
mode
_,om
theasttimoy
.....dthopart,cu_,
,nput
rood
.... i_i_
For
_MO3.B
_NO311B
and
I_NO30I
Bmake
su,
ethat
_Ho_izoo<al
Position_
and
ii!7
[Vertical Position] in [PC Settings] are set con-ect y if you are using ths unit as a PC monitor:
?s
If you are watch}ngTV or using the Composite Video, ComponentVideo
press FORMAT repeated y to switch val-ous screen modes.
or HDNI
with 480 Input,
Capt ......
d splayed
hite
i i box, NO cdptOrl is displayed n
the Closed Cdption supported
]
program,
Inte,fft, rence fi-om budng ....
eather condt ons may ......
captionir,£ to be i....... pete.
Bi-oadcast n£ ststion may shorten the program to insert advert sement,
The closed caption decode1- cannot i-ead the nformation of the shortened program,
No capt on is disp ayed when
};;;i paying back a disc or a cassette
tdpe contd nir,£ capti ....
The dsc or cassette tape may be egay
during copylr_£,
]}
rock be× s dspdyed
screen.
{
}}
Cornpetey
back/whto
on therV
The text mode is se ected for capt on. Select [CC-1],
distorted pcture or
pitt .....
th DVD.
P cture f'-e..............
p dybdck
copied, or the capt on sgna might not have been read
tdriy durng
[CC-2],
[CC-3],
[CC-4]
or [Off],
blal<e sure the dsc is compat ble wth the unt,
Check the disc for finger prints/scratches
and cean with a soft coth wpin£ fl-om center to edge,
t
Clean the dsc,
Ensure the disc is correctl 7 inserted.
Check fthe
!j
Di.........
iiiiiiiiiiiiiiiiiii
t be played,
disc s detect ve by tryng
another disc.
i;
_i}iiii
Cancel the pdrenta loci< or chnge the control eve.
Insert a correct disc that pays on this unt.
Hdnde a disc wth
SUfffdCe,
lO completely
Operations
:!_!il}i
specia cam so that t does not have fingerpr nts, scratches, or dusts on its
reset the unit, unplug the AC power cord from the power outlet for 5-I0
may not be perm tied by the dsc. Refer to the
seconds.
nstructions of the dsc,
The angle cannot be switched for DVD which do not contain multiple ang es, In some cases
mult p e angles are only recorded for specific scenes.
Check the [PARENTAL]
i !ii_!{i
!}ili!_!
setting.
Enter the default password
(4737), then your forgotten
password will be c eal-ed.
O
42
FAQ
Check the antenna or cable connect on to the man unt,
Check the batteries of the remote
contro,
Check if there s an obstacle between the
nfrared ser, sor window
and the remote cor,trol,
I'_,skth
. e sgpal output use [IR Signal Check] ,,_ p.43
If okay, then possible infi-ared sensor trouble
My remote control does not work,
What should I do_
•
Aim the remote control d rectl7 at the infrared sensor window
Reduce the distar, ce to the unt.
on the fi-ont of the unit,
Re insert the batteres with their polartes (+/
signs) as nd cared.
When thel-e s an inflated equipped device such as PC near ths unit, t may interrupt
control signa of this unit.
the remote
Move the nfrared equipped device away flom ths unit, change the angle of the infi-ared sensor or
turn offthe infi-al-ed commun cat on funct on.
unit_
Make sul-e [Autoprogram]
has been completed. ,,_ p.21
Autoprogram
must be completed when you set up the unt
where previous y un va be char, ne s are broadcast.
The selected channel may not be broadcasting.
When [Autoprogram]
s inten-upted
nd not competed,
sure to complete the Autoprogram.
,,gl- p.21
Why can I not watch some RF
signal TV programs,
for the first time or move t to a Iocat on
some channels w
not be received. Make
The selected channel cannot be vewed by the [Child Lock] sett n£. ,,_ p.23
The unt requ res some knd of antenna input.An ndool-antenna
(VHF/UHF),
an extema antenna
(VHF/UHF)
or an RF coaxia cable fl-om your wall cab e/sate te box needs to be plugged nto the
unt.
Cr) Connectors are connected to their corresponding
When
I enter a channel number, it
Many digta channe s have atemate channe numbers.The unit changes the numbers automat cal y to
the ones s}gnifying the broadcast n£ station channel numbe_These bs}c numbers used fol- previous
anaog bro dcasts. (e.g., input oh#30 auto changes to ch#6.1)
changes automatically,
•
can I set the Clock ._
I cannot change the [Child Loci<]
setting because my PIN code no
longer works,
Handle a dsc with spec al Care so that it does not have fingerprints, scratches or dusts on its surtace.
Captions that are delayed a fi, w seconds behind the actua d} og are common for live broadcasts.
Most caption ng production compan es can disp ay a diaog to maximum of 220 words per m nute. If
a diaog exceeds tha£ rate. se ect ve edit ng s used to insure that the capt ons remain upto date wth
the currentTV screen d alog.
Why are captions not displayed
entirely_ Or, captions are delayed
behind the dialog,
How
colored jacks on the unit.
•
is no clock tuner on on ths unit.
If a Power f4ure occurs for longer that, I0 seconds the child ock sett ng s reta ned, but the PIN code
is set to the detour code"0000". [Child Loci<] ,,_ p.23
43
!ii_i!!!
INFORMATION
()
!z!
Maintenance
Glossary
ATSC
o0
Acronym that star,ds for Adv nced-b, evision Systems Committee
the name of the digital bl_adcasting standards,
dnd
=
Wpe
=o
the front
unit with
Aspect
Ratio
Never
The width ofaTV screen relat w to its he ght, Convent ona TVs are 4:3
(in other words, theTV scleen s almost squ re); widescreerl modes
are 16:9 (the TV screen is almost twice as wide as its height),
CEC
(Consumer
Electronics
near the
d scolorat
• o
This aows you to operate the nked funct orls between our bl_rld
dev ces with CEC fl, ature and this UrltWe do not guarsrltee 100%
interoperability with other brands of CEC compliant dev ces.
W
the
exter or surfaces
of the
or alcohol,
Do not
spray
nsect ride
unt, Such chem caJs may cause damage
on to the exposed
=
=o
pe the
and other
a soft cloth.
use a solvent
liquid
Control)
*
panel
i
and
surfaces.
*
panel of the
panel, disconnect
unit with
the AC
a soft cloth.
power
Before
cleaning
cord.
ComponentVideo
This is a vdeo signa format that conveys each of 3 print pa colols
of ight (red, bue and green) through dfferent sgnal nes.Th s Ilows
the vewers to exper encep ctule colors as origina as it s,There am
several signa formats, ncludingY/Pb/Pr
andY/Cb/G:
Dolby
Handle the discs so that fingerpr
to the surS_aces of the dscs.
nts and dust do not
adhere
Digital
[he system deve oped by Dolby Labo/atoJes to compass
sound. It off_'rs £ereo sound (2ch) or mult -ct,annel audo.
H DMI
(High-Definition
Multimedia
dgtal
Interface)
Always
store the
disc n ts protective
case when
it s not
Interface that supports all uncompressed, dgita audio/vdeo
fol-mats
inc ud}ng sr,t top box, Bu rdy/DVD reco/der or digita telev sion, over
a sng}e cable,
used,
H DTV
Do not use a hard cloth snce this will mar the dsc.
Wpe
the dsc in a straight line form center to edge.
(High Definition
Ultirnat_, digtd
quality.
Tb dean
TV)
format that produces
high reso ution and hgh p cture
Never
Do
NTSC
Acronym that st4nds for National lL@vision Systems Committee
the name of nalog broadcasti% standa/ds,
Offthe ai_-N]SC signals arc, no longer being sent by adler
bl_adcasting stations in the USA,
PIN
A stored 4digit
Region
number that allows access to parental control f_,atures.
Should
with
a c rcular
i
motion,
or abrasive
cleaning
agents,
:
your
unt
become
inoperat
ve, do not try to correct
the problem
yourseEThere
are no user serviceable
parts
nside. Call our toll fl'ee customer
support
line found on the
cover of this manual
to locate
an authorzed
servce
i
center
Code
Regions asset ate dscs and payers wth particul r areas of the word,
This unt wi only play back dscs that have compat hie r%ion codes.
You can find the r%on code of your unt by ooking or, the rear pnel,
Some dscs am compat ble wth more than one r%ion (or all r%ions).
SAP (Secondary
Audio
Program)
Second dud o channel de vered sepdrately fl_m man-dud o channel,
This audo channel s used as an alternate n bilingua bl_adcast ng,
SDTV
wipe
not use detergent
-
and
code
off, use a soft cloth,
(Standard
Definition
If the
unt
whle
referr
Guide]
to the NTSC p cture qualit}4
S-Video
OF_,rs higher quality images by deliver ng each signa, coot (c) and
luminance (y) ndependent y of each other through a singe cabe,
not pelform
properly
ng to the relevant
n ths
manual, the
sections
when
t s operated,
and to [Troubleshooting
laser optical
pickup
unit may be
d,ct
Consu,t
you,
dealer
an
Author
gerv,co
ed
Center
nspect
D
TV)
StdndaJd digitd format that is smar
stll does
If the
on and clean ng of the
:.
remote
digital camera
laser opt cal pckup
unt.
.
control
is not working
( ncluding
to see Kit s sending
a cellular
properly,
phone
out an nfrared
With
a digital
(including
with
you can use a
bGitn
camera)
signal.
camera
built-in
cell phone
cameras):
Pont the D gital Camera towards the remote
control inflared
diode at the front of the
remote
control.
Press any button
on the
remote
control
and look through
the
d spla}4 If the
infrared
through
the camera,
sending
out
camera
pulsar ng light appears
the remote
an IR signal.
control
s
44
General Specifications
Other
TV
Specifications
Terminals
Antenna
TV format
Closed
Caption
/_l SC/NTSC
bqIV
§15,12_2/FCC
(d gital CC)
coverage
Terrestrial
Audio
system
Input
Input
Composite
§I 5,119 / FCC (analog
Channel
standard
CC)
2-I
system
Channel
Input
access
(analogW+l
IV pp (75 O)
Pb/Cb
700mV
pp
Pr/Cr
700mV
p.p (750)
frequenc 7 synthesized
tuning
Analog Audio
PC Input
500 mV Fins
only>
D-Sub I5 pn x I (RGB)
blini jck _3,5mm x I (dud o)
Audio
Output
I/8
Remote
inches x I(3,5mm)
control
Dgt_l encoded rlfi-arod light systom
20 Hz to 20 kHz (sample
rate: 48 kHz)
20 Hz to 44 kHz (sample
_ate: 96 kHz)
20 Hz to 20 kHz
CD
(75 O)
only>
Output
response
ratio
500 mV pp
RCA jack (L/R) x 2
vdeo, DVD RW/R,
CD, CDRW/R
(75[3)
x 2
<22MD311B/19MD311B/19MD301B
Headphone
sound)
p.p (750)
(coaxial)
RCA jack x I
compatibility)
CD
Total
Y
<32MD311B/32MD301B/26MD311B/26MD301B
Direct access keyboard,
Programmable
scan, and up/down
DVD
audo
Signal-to-noise
286mV
Output
_,W+84),
DVD
(linear
IV pp (75 O)
C
HDPI119pn
Digital Audio
system
DVD
Y
RCA jacl< x 3
HDMI
14-69
3, A-W,
W+fl _'W+94
A 5-A
1,5A
Frequency
Hini DIN 4 pn jacl< x I
2-13
UHF
(playback
(75 O)
(NTSC)
CATV
Discs
I V pp
Video Input
14-51
each channel has e.g,)
2.14,2.9, 3.14,3.9, etc.
VHF
Channel
Input
RCA jack x I
2-13
UHF
Analog
(F type)
S-Video Input
Component
Tuning
S00mV rms
(ATSC)
VHF
Terrestrial
75 O unbalanced
RCA jack (L/R) x 6
Video
(ATSC/NTSC)
DTV
VHF/UHF/CA]V
(SIN
ratio)
Operating
temperature
41 °F (5 °C) to I04°F (40°C)
Power requirements
I20V- AC +/
I0%,60Hz +/
0.5%
90 dB {JEITA)
distortion
factor
DVD
I KHz 0.007%
(jEIfA)
CD
I KHz 0.007%
(jEllA)
Power
consumption
(maximum)
I50W
LCD
Audio
32ir, ches
[32MD311
measured dagor_ally)
10W, 8 O x 2
B]
Dimensions
<without base>
<with bose>
Width
30,0nches
(760.0mm)
30,0nches
(760,0mm)
Height
20,5 nches
(519,3 mm)
22.2 nches
(563,0mm)
9,4inches
(238,0mm)
Depth
Weight
4,5 nches (114,0mm)
20,29 bs,
[32MD301
(9,201<£)
21,39 bs,
(9,70 k£)
B]
Dimensions
Weight
(31,5 nc/'es
Output
<without
base>
<with base>
Width
30,Onches
(760.0mm)
30,Onches
(760,0mm)
Height
20,5 nches
(519.3mm)
22.2 nches
(563,0mm)
Depth
5,I nches
(127,5mm)
9,4inches
(238.0mm)
20,51 bs,
(9,30k£)
21,61 bs,
(9,80k£)
iiiiiiiiiiiiiiiiiiiiill
!ii{{{{{;i;ili{{{{{{{;i;@iiiiiiiiiiiiiiiiilililililililililililiii
45
!ill!!!!
Power consumption (maximum)
135W
LCD
Audio
26 incl_es
Output
10W, 80
x 2
[26MD311B]
Dimensions
<Mthout
base>
<with base>
Width
75,9 nches
(656,0mm)
25,9 nches
(656,0mm)
Height
17,/riches
(448,0mm)
19.2nches
(487.0mm)
Depth
Weight
8,4 nches (138,0mm)
16.0I Ibs.
[26MD301
(7.26kg)
9,4 nches (238.0mm)
17.11 bs.
(7.76kg)
B]
Dimensions
<withoutbase>
<with base>
Width
25,9 nches
(656,0mm)
25.9 nches
(686,0mm)
Height
17,7nches
(448,0mm)
19.2nches
(487,0mm)
Depth
8.9 nches
(148.0mm)
9.4 nches
(238.0mm)
c¸}
Weight
16.0I bs.
(726 kg)
17.11 bs.
(7,76 kg)
[22MD311B]
Power
consumption
(maximum)
?0w
LCD
Audio
z_
1W, 160 x 2
<withoutbase>
S
<with base>
()
z
Width
21,3 nches
(539,0mm)
21,3 nches
(539,0mm)
Height
14,4riches
{364.0mm)
I5,8qches
(400,0mm)
Depth
Weight
Z_
(21,6 r,ches measured dagonally)
Output
Dimensions
Power
%
Z2inches
8,3 nches
10.8I bs.
consumption
(132.5mm)
(4,90 kg)
8,3 nches
11.69 bs,
(210.0mm)
(5,30 kg)
ii!!t
i
!ii_!!!i
?
(maximum)
U}
87w
LCD
Audio
19(riches
Output
(18/_ riches medsured dagonally)
IW, 16 O x 2
[19MD311B]
Dimensions
<without base>
<with base>
Width
I8,8 riches
(471,5mm)
I8,8 nd,es
(477,5mm)
Height
I35
(330.4mm)
14,8nches
{365.8mm)
Depth
nehes
5,0 nches (125,0mm)
Weight
9.26 bs.
(420 kg)
8,3 nches
9.93 bs.
(210,0mm)
(4,50 kg)
[19MD301
B]
Dimensions
<with base>
IIZ
I8,8 nches
(477.5mm)
I8,8 nches
Height
I3,I
(330,4mm)
I4,8 nches (365.8mm)
Depth
Weight
<withoutbase>
Width
nches
5,4 nches
9,15 bs,
{134.7 ram)
(4,15 kg)
8,3 riches
9,7I bs,
(47"7,5mm)
(ZI0,0 ram)
(4,40 kg)
Designs
notice
and specifications
and wthout
If there
language
are sub/ect
our legal obligat
is a discrepancy
will be English.
between
to change without
on,
languages, the
default
46
47
WARRANTY
COVERAGE:
This warranty
below.
obligation
or
is limited to the terms as set forth
a part
that
mission,
or
or
(e)
warranty
WHO
IS
This
product
person
and
IS"
COVERED:
warranty
receiving
("Warranty
is issued
the
workmanship
product
as
Period")
sales
receipt
from
an
the
on
from
an Authorized
showing
the
authorized
to
as a gift
based
the
product
retailer
original
purchaser
against
date
defects
and
is considered
The
the
such
This
original
purchase
This
IS
occurs
Warranty
Period.
repair
the
charges
ment
of customer
date
proof.
used
date
parts
against
of the
and
replaced
if a defect
claim
the
in material
is received
company
using
any
item
your
will
new
or
or
or
of the
tent
for
due
to
for
replacement
becomes
and
a ninety
Replacement
product
requirements
are
becomes
your
property.
When
can
met.
only
are
days
or
part
a refund
limited
be
sent
to
follow
or
COVERED
This Limited Warranty
company
is not
data,
or other
within
the
ered
data
•
mishandled
that
outside
of the
viewing
appearance
repair
product,
warranty
liable
for
any
damage
information
or
does
not
abuse,
misuse,
neglect,
(b)
damage
caused
company
approved
other
to
stored
additional
AND
or loss
on
any
product
LIHI-
of any
media
or
or reinstallation
covered
under
apply
(a) to
damage
misapplication,
by service
Authorized
This warranty
Printed n China
items
or
other
for
use,
i i';i!!!
not
being
(/')_
or
available
transit
accidents
or
when
il;i!!i
operate
in any
designed,
repair
of products
product
Product
country
but
not
in shipment
can be
provided.
Failure
to
by these
commercial
limited
operate
per
than
the
approved
damaged
for
or adaptation
other
manufactured,
used
lost
modification
to
and
or
rental
country
and/or
enable
for
which
authorized,
or
pro-
contained
part
not
cov-
of programs,
this
Limited
gives
or
Service
you specific
caused
i_;;!!!
purposes).
verification
receipt
Manual.
iiiiiill
!:i!_!ii
at:
SUMER, WITH THE ISSUING COMPANY
NOT LIABLE FOR
ANY INCIDENTAL
OR CONSEQUENTIAL
DAMAGES FOR
BREACH OF ANY EXPRESS OR IMPLIED WARRANTY
ON
THIS PRODUCT.
EXCEPT TO THE EXTENT PROHIBITED BY
APPLICABLE LAW, ANY IMPLIED WARRANTY
OF MERCHANTABILITY
OR FITNESS FOR A PARTICULAR PURPOSE
ON THIS PRODUCT IS LIMITED IN DURATION
TO THE
OF THIS WARRANTY.
Some states do not allow the exclusions
or limitation
by anyone
Location,
legal
(c)
rights.
product,
other
than
to a product
You may
have
of inciden-
tal or consequential damages, or allow limitations on how long an
implied warranty lasts, so the above limitations or exclusions may
not apply to you.
by accident,
non-supplied
performed
other
rights
which
vary from
state/province
211
i_ii_i
_
purposes
REPAIR OR REPLACEMENT AS PROVIDED UNDER THIS
WARRANTY
IS THE EXCLUSIVE REMEDY FOR THE CON-
DURATION
i
modifications.
institutional
no signature
Owner's
to
1-866-341-3738
applies only to new company manufac-
by this warranty.
Recovery
or other
information
is not
to
or
con-
company.
Warranty.
This
images
stationary
cosmetic
unauthorized
of the
voltage
retained
fixed
or
product.
of improper
to improper
shipments
requires
it was
A
adjust-
product.
product
requirements
- EXCLUSIONS
1211
"AS
installation
because
product
tear,
control
product,
and
damage,
TO OBTAIN
ASSISTANCE...
Contact the Customer
Care Center
tured products
that can be identified by the trademark,
trade
name, or logo affixed to it. This Limited Warranty
does not apply
to any hardware
product or any software, even if packaged or
sold with the product, as manufacturers,
suppliers, or publishers
may provide a separate warranty for their own products
packaged with the bundled product.
grams,
sold
delay.
WHAT
IS NOT
TATIONS:
The
and
the
systems
from
periods,
wear
within
of the
product,
connections
resulting
extended
(including
•
warranty
all
i
product.
lightning
from
the
warranty.
if all
defaced,
IS" without
product
replacement
surge,
Damage
it to
is
line
A
•
and
part
maintenance,
•
the
is
property
_ii!iiii!i
per-
or
"AS
cover:
setup
the
source
•
whichever
or
on
or claims
for products
data or lost
software.
the
for
as refurbished
day
Failure
(3)
or
controls
normal
not
not
defective
Damage
for lost
property.
identified
(90)
most
or
from
(90)
a product
company
sold
or
warranty
warranty,
When
company
this
workmanship
ninety
product's
you.
item
becomes
in
for
cause
returning
under
and
repair
markings
(1)
•
return
installation
and/or
or
power
either
inventory,
company
removed
sold
refurbished
does
to
for
repair
supply,
screen
product.
provided
original
coverage
carries
result
parts
in materials
product
renewed
Product
the
equivalent
in current
of the
written
has been
consumables
by including
of antenna/signal
within
refurbished
functionally
price
or
product
Any
least
product
purchase
portion
exchanged,
can
is at
original
defects
longer
Note:
charge,
replacement
remaining
given,
option,
no
products
provides
a valid
its
at
original
Replacement
covered
At
to the
the
charges
repair
parts,
or (2) exchange
the product
with
a product
or which
has been
manufactured
from
new,
or ser-
comparable
refund
products
and
product
replacement
that is new
viceable
new
or
Warranty
Labor
installation
covers
workmanship
Limited
Shipping
•
COVERED:
warranty
kind
without
number
retailers.
•
•
WHAT
modified
serial
accessories
of any
by some
been
if any
the
purchase
Dealer.
name
or
in materials
of original
has
(d)
product,
to state/province,