1
User's Guide
SureThing CD/DVD
Labeler
© 2014 MicroVsion Development, Inc. All rights reserved.
Contents
Chapter 1
1 Welcome to SureThing CD/DVD Labeler
Chapter 2
1 Contact Us
1 Get Answers to Your Questions
1 Buy Now
2 Ordering Labels
Chapter 3
2 What's New for Version 6?
2 New Features List
3 Useful Tips for Existing Users
Chapter 4
4 A Guided Tour to SureThing
5 The Design Window
6 Toolbars
7 The Command Panel
8 The SmartDesign Variation Bar
9 The Design Bar
Chapter 5
9 Quick Start
9 Create a Project
11 Use SmartDesigns to Design Your Label
12 Editing the Text
12 Add Pictures or Clipart
13 Moving and Resizing Objects
13 Importing Song Titles
15 Printing
Chapter 6
16 About SureThing Projects
16 Label types
17 Label templates
18 Designs and Design sets
Chapter 7
2
18 Mastering SureThing
Contents
19 Managing Projects
19
Create a Project
21
Open a Project
21
Save a Project
22
Managing Project Options
22 Printing
23
Printing a Label
23
Printing to a Direct-to-Disc Printer
24
Printing to LightScribe Drives
25
Calibrating Your Printer
26
Paper Feeding Tips
27 Working with Text
27
Adding a Text Frame
28
Editing a Text Frame
28
Circular Text
29
Text effects
29
Insert special fields
30
Find and replace text
30
Blending Text
31 Working with Objects
31
Creating an Object
32
Select, Move, Resize or Rotate an Object
33
Aligning Objects
34
Setting Shades and Transparency
35
Setting Shadows and Borders
37 Working with Backgrounds
37
Selecting a Background
38
Change the Size & Position
40
Background Properties
40
Change the Layout Type
40
Clear the Background
41 Working with Pictures and Clipart
41
Browsing for Pictures or Clipart
41
Using the Picture Tool
42
Blending Images
43
Browsing for CD/DVD Symbols
43
Adding a Transparent Background
3
Contents
44 Working with Playlists
Chapter 8
44
Importing from a CD
45
Import a Playlist from a File
46
Using the Playlist Manager
47
Edit the Active Playlist
47
Selecting Contents Fields
Configuring Music Players and Disc Burners
48
49 Advanced topics
49 Scanning images and backgrounds
49
About scanning your images
50
Choosing the TWAIN source
50
Scan images
50
Scan an image as a background
51 Custom Templates
51
About Custom Label Templates
51
Creating a Custom Template
53
Adding Multiple Blocks
53
Using Custom Templates
54
Using Page Setup
54 Touchup and Effects for Photos
Chapter 9
55
Crop an image
55
Rotate an image
55
Correct Red Eye
Apply Special Effects
56
57 LightScribe
58 LightScribe label modes
58 LightScribe print times
59 Using LightScribe media
59 Create a LightScribe project in SureThing
60 Generic LightScribe printing
4
Welcome to SureThing CD/DVD
Labeler
1
Welcome to SureThing CD/DVD Labeler! With SureThing, you can design eye-catching disc labels, DVD
inserts, jewel case inserts and more in just a few minutes!
SureThing includes a variety of unique features that allow you to quickly produce professional-looking
designs. With features such as SmartDesigns, design sets, text effects and others, you can concentrate
on the creativity of your designs instead of the mechanics involved in creating them.
To get up to speed quickly, we recommend taking a look at the following sections:
A Guided Tour of SureThing
Quick Start
About SureThing Projects
Thank you for choosing SureThing CD/DVD Labeler. We are confident you will find it to be both powerful
and a pleasure to use!
Enjoy!
Please review the following ways you can contact us to get the answers you need. We're here to help.
In this section, you will learn about:
Getting Answers
Buy Now
Ordering Labels
Get Answers to Your Questions
On the Help menu in the main window, you can click one of the following commands to get assistance and
help with your questions:
Click Help > SureThing Announcements to find out the latest news about SureThing CD/DVD Labeler.
Click Help > Order Labels to buy labels to print.
Click Help > SureThing on the Web > Technical Support to display a web page at SureThing.com
that lists all the support options available, such as free technical support for registered users, customer
service for non-technical questions, and more.
Click Help > SureThing on the Web > Software Updates to check the availability of an upgrade to
the software.
Click Help > SureThing on the Web > Support Forum to connect to forums where you can contact
other users of SureThing.
Click Help > SureThing on the Web > Home Page to display the SureThing.com home page.
Buy Now
<%STORE-NAME%>
Thank you for your interest in SureThing CD/DVD Labeler! You can easily contact us to order SureThing
CD/DVD Labeler and Label Refill Packs either via the World Wide Web or by phone. Here’s how:
Ordering online
For secure online ordering go to our web site at <%WEBSITE%> You’ll also find a wealth of information
Chapter 1 Welcome to SureThing CD/DVD Labeler
1
Contact Us
2
about the entire SureThing family products and accessories.
If you would like to email inquires, address them to: sales@<%EMAIL%>
Ordering by phone
To contact us by phone or fax, please select the most convenient option:
(800) 998-4555 Toll Free (U.S. Orders Only)
(760) 438-7781 Voice
(760) 438-7406 Fax
Ordering Labels
SureThing manufactures and sells a variety of premium labels and media case inserts designed for optimal
performance using SureThing CD/DVD Labeler. Please visit us on the web to learn more and conveniently
order supplies delivered directly to your home or office.
SureThing Labels
SureThing Version 6 offers everything that the earlier versions included and much more. As much as
possible, all user's requests have been implemented. The User Interface has been overhauled and
improved, without sacrificing familiarity and intuitive ease of use. Everything works better!
In this section, you will learn about:
New Features
Useful Tips for Existing Users
New Features List
Important
The following features are available in SureThing CD/DVD Labeler Deluxe. Not all of these features are
available in other versions of SureThing CD/DVD Labeler. Check Help > About to confirm which version
of SureThing you are running.
New improved drop-shadows! Create true soft drop shadows, not just offset text. Options include angle,
distance, blur, and opacity.
SVG image support. SVG is the new open standard for vector art. Size your art without losing
resolution!
New improved image engine. Speed is the key word here. High resolution images will no longer slow
you down.
New Design Cloud feature. Share, browse, and download designs from our in-program interface!
PDF export. By popular demand, PDF export is now built right in to the print dialog.
Improved interface. Shades, colors, blends, borders, and transparency options are all available right from
the control strip. The most commonly used tools and options are now available on the right hand side.
It's like having all your tools right where you need them, all the time.
New SureThing Navigator! Consider this the new headquarters of all things SureThing. Not only does
this provide one-click options for creating new files, opening old ones, and managing your own templates,
but it also keeps you notified of new updates and new downloadable content.
2
Chapter 2 Contact Us
What's New for Version 6?
3
Useful Tips for Existing Users
More than just a pretty face lift, SureThing Version 6 hosts a number of new features and improved user
interfaces. Everything just works better. To help you feel at home as quickly as possible, here are a few
tips to get you going:
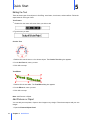
New Rotation Handle
The rotation handle has been moved to the right side of the object. This allows you to easily grab and
rotate the object even at very small sizes. You now click and drag the round white circle to the right of
the object to rotate it.
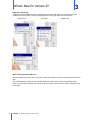
New Control Strip
In version 6 we have made some changes to the control strip along the top. Now our shadows, shades,
blends and borders are easily accessible, instead of being buried in tabbed properties dialogs. The color
menus have also been changed from simple pull-down menus, to a large display of the entire color palette.
The "S" button will open the new Drop Shadow dialog. There is also a new button to the right of the shade
color option for opening the new Shades dialog for setting two color blends. Finally there are new pull-down
menus for setting Border style, thickness and color.
Color Palette
Drop Shadow Options
Chapter 3 What's New for Version 6?
Shade/Blend Options
Border Options
3
3
What's New for Version 6?
Right side control strip
In addition to being available from the left panels and inside the Tools menu on the control strip, we've
created menus for the most commonly used Object tools on the right hand side of the screen:
Picture Tools
Text Tools
Shape Tools
Where's the Import from CD Icon?
We've moved the Import from CD icon from the control strip along the top to the new right-hand side control
strip.
The SureThing main window has been carefully designed to help you be productive and design labels
easily. Once you become familiar with where things are located, you'll find all the useful commands a click
or two away.
4
Chapter 3 What's New for Version 6?
A Guided Tour to SureThing
4
Next: The Design Window
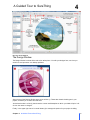
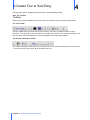
The Design Window
The Design Window is where all the real action takes place. You edit your designs here, much as you
would in a word processor or a desktop publisher.
Along the top of the Design Window are a series of tabs (1). These tabs show the label types in your
project, and allow you to select and edit them.
Just below the tabs is a link (2) that shows the current media/template on which your label will print. Leftclick on the name to change it.
Finally, in the upper right corner is a small button (3) to manage the options for your project including
Chapter 4 A Guided Tour to SureThing
5
A Guided Tour to SureThing
4
setting playlist options, adding/removing label types, and coordinating designs.
Next: The Toolbars
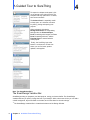
Toolbars
There are two toolbars available along the top of the main window, and one along the right-hand side.
The Text Toolbar
The Text Toolbar helps you format text quickly and easily. Use it as you would a toolbar in a word
processor. From left to right, you can set the font, the point size, the text color, the text transparency, the
font style (bold, italic and underline), the horizontal alignment and finally drop shadows.
The Shades and Borders Toolbar
The shades and borders toolbar allows you to quickly set a color, blend and opacity value for your shades.
You can also quickly set a border style, thickness and color.
6
Chapter 4 A Guided Tour to SureThing
A Guided Tour to SureThing
4
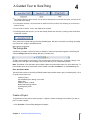
The Quick Select Toolbar
The Quick Select toolbar gives you quick
access to common utility functions. Here
you'll find buttons to zoom in or out on the
design or to fit the design to the window, and
a list of tools used to create new objects in
your designs. A button allows you to import
song titles directly from a disc or player.
Finally a set of alignment buttons for
centering, or aligning multiple objects to each
other.
Click the compass directly above the toolbar
to open the new SureThing Navigator.
Next: The Command Panel
The Command Panel
The Command Panel is positioned on the left side of the Design Window and places the most useful
design commands a click away from your designs. The panel consists of a number of sub-panels which are
like specialized menus that remain open while you work on your design.
Chapter 4 A Guided Tour to SureThing
7
A Guided Tour to SureThing
4
To expand or collapse a sub-panel, click
on the arrows to the right of its title. The
sub-panel will stay open until it is closed,
even across sessions.
The Actions Panel is especially useful
to keep open, as it includes a shortcut
for printing, saving and opening new
projects.
Other sub-panels include the
Backgrounds Panel for manipulating
backgrounds, the Pictures/Clipart
Panel for working with images, the Text
Panel for working with text, and the
Playlists Panel to set and edit the
active playlist.
Finally, the SureThing logo at the
bottom is a shortcut to our web site
where you can find news, product
updates, and supplies.
Next: The SmartDesign Bars
The SmartDesign Variation Bar
SmartDesigns help you jumpstart your label projects, saving you time and effort. The SmartDesign
Variation Bar lets you quickly change the look of your designs. With a few mouse clicks you can add a
colorful background, layout text fields on the label, and choose fonts for the entire design.
1. The SmartDesign Variation Bar is located at the bottom of the Design Window.
8
Chapter 4 A Guided Tour to SureThing
A Guided Tour to SureThing
4
2. The Variation Bar has three controls, one to select a background, one for the text layout, and one for the
fonts used on the design.
3. To change the selection, click the arrows on either end of the controls. This will step you to the next or
previous choice.
4. To see a list of choices, click in the middle of the controls.
5. For Backgrounds and Layouts, you can also visually browse the choices by clicking on the small folder
inside their controls.
Once you've found a good starting point using SmartDesigns, feel free to customize your design by adding
your own photos, images, and additional text.
Next: Design Set Controls
The Design Bar
Sometimes you'll want to print more than one design for a label and print them together. In SureThing we
call these Design Sets and the Design Bar lets you create them.
To add a second design to your project, click the plus sign to the left of the bar. To remove a design, click
the trash can to the right. Click the page icons to move directly to its corresponding design.
Note: This feature is not intended to print multiple copies of the same label, there is a much easier way. To
print multiple copies of the same label, enter a number in the No. of Labels box on the Print dialog box.
Next: Quick Start Guide
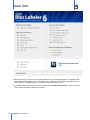
The Quick Start section of SureThing CD/DVD Labeler Help provides steps to get you started quickly. Click
on a topic title to learn more.
Create a Project
Use SmartDesigns to Design Your Label
Editing Text
Adding Pictures or Clipart
Moving and Resizing Objects
Importing Song Titles
Printing
Create a Project
To get started you first need to create a project. A project contains the designs for the labels you wish to
print. To create a project:
1. Click File>New. The SureThing Navigator will appear:
Chapter 4 A Guided Tour to SureThing
9
Quick Start
5
2. Each project may contain one or more types of labels that you can design together, for example a disc
label and jewel case inserts. Click on the project that includes the type of labels you would like to print.
Your project will be created and you will be taken to the label design screen.
3. If you don't see the type of label you want to create, click the More Label Choices... option. The New
Project dialog will appear showing more options:
10
Chapter 5 Quick Start
Quick Start
5
4. Select the type of media from the left column, the manufacturer for the labels you intend to use from the
center column, and the type of labels for the selected media from the right column. The Template
preview should look similar to the labels you intend to use.
5. Click OK once you have made your selections. Your project will be created and you will be taken to the
label design screen.
Next: Use SmartDesigns to Design Your Label
Use SmartDesigns to Design Your Label
SmartDesigns help you jumpstart your label projects, saving you time and effort. With a few mouse clicks
you can add a colorful background, layout text fields on the label, and choose fonts for the entire design.
1. The SmartDesign Variation Bar is located at the bottom of the design window.
2. The Variation bar has three controls, one to select a background, one for the text layout, and one for the
fonts used on the design.
3. To change the selection, click on the arrows on either end of one of controls. This will step you to the
next or previous choice.
4. To see a list of choices, click in the middle of one of the controls.
5. For Backgrounds and Layouts, you can also visually browse the choices by clicking on the small folder
inside their controls.
Tip: Use SmartDesigns to jump start your projects. Once you've found a good starting point, feel free to
customize it by adding your own photos, images, and additional text.
Next: Editing the Text
Chapter 5 Quick Start
11
Quick Start
5
Editing the Text
There are three types of text objects in SureThing: text frames, circular text, and text effects. Follow the
steps below for each type of text.
Text Frames
1. Double-click the center of the text frame you wish to edit.
2. Type the text you want.
Circular Text
1. Double-click over the text on a circular text object. The Circular Text dialog box appears.
2. On the Set Text tab, enter your text.
3. Click OK to accept.
Text Effects
1. Double-click the text effect. The Text Effect dialog box appears.
2. On the Effect tab, enter your text.
3. Click OK to accept.
Next: Add Pictures or Clipart
Add Pictures or Clipart
You can add your own photos, clipart or other images to any design. Follow these steps to add your own
images.
1. Open the Pictures/Clipart Panel.
12
Chapter 5 Quick Start
Quick Start
5
2. Choose Pictures.
3. A browse window will open. Navigate to the folder containing the images you wish to use.
4. Double-click on the image or select the image and click OK.
Next: Moving and Resizing Objects
Moving and Resizing Objects
All objects placed on your designs, whether they are text frames or pictures, text effects or rectangles, can
be moved and resized the same way.
1. Click on the object to select it. A border with white handles will appear.
2. To move the object, click in the center of the object and drag it to its desired location.
3. To resize the object, grab one of the handles on the sides and corners and drag it away from the center
to make it larger or towards the center to make it smaller.
4. For objects that can be rotated, you can grab the round rotation handle to the right of the object.
Note: Circular text behaves slightly differently. Generally, it sizes and positions with relation to the center
of the disc. The center point will stay at the center of the label, while the text moves in and out from the
center.
Next: Importing Song Titles
Importing Song Titles
SureThing will read the song titles off many of your music CDs, including commercial audio CDs, CDs
burned with CD-Text, CDs burned using a popular music program such as iTunes or Windows Media
Player, and MP3 CDs.
1. Insert the disc with the song titles you wish to label in your drive.
Chapter 5 Quick Start
13
Quick Start
5
2. Click on the Import Playlist from CD button on the right-hand tool bar.
3. The Import Playlist from CD dialog will be displayed:
4. It will immediately start searching the CD for the song titles. If you have more than one CD/DVD drive
check to be sure it is searching the drive where you inserted the disc.
5. The playlist for the CD will be displayed. Many times there will be more than one choice because
SureThing checks different sources for the playlist. When you see one you like, click OK.
Tip: If you are labeling a data disc and would like to include a file listing, you can use this same technique.
You can also import a playlist directly
from a media player such as iTunes, or
Windows Media Player.
1. Click on the Import Playlist from
Player button. It's located right below the
Import Playlist from a CD button on the
right-hand tool bar.
14
Chapter 5 Quick Start
Quick Start
5
2. The Import Playlist from Player or
Burner dialog appears. Choose the
program by setting the Select Player or
Burner pulldown menu.
3. Select your playlist and click OK.
Next: Printing
Printing
When your design is ready, it's time to print. The easiest way to start printing is to click on the Print
Design command in the Actions Panel. The print dialog is then displayed.
SureThing Print Dialog
Begin by specifying the number of labels you wish to print. SureThing will automatically sequence them
from page to page. You can select the first label to print by clicking on the sample page on the right side.
The first blue colored label will be the first to print.
Under Label Template, you can see the type of media on which your designs will print. If you need to
change this for whatever reason, for example you purchased a different brand of labels, click on the button
just to the right.
Load your printer with enough labels to print your entire job. You can find out precisely the number of
sheets required by looking just below the sample.
Chapter 5 Quick Start
15
Quick Start
5
Click Print when everything is ready.
To create a PDF file click the "PDF..." button.
See also:
Printing to a Direct-to-Disc Printer
Printing to a LightScribe Device
Next: Back to Quick Start
A SureThing Project, in its simplest form, is the file used to save your label design. To learn more about
SureThing Projects read on...it's not too technical in nature. If not, don't worry. SureThing will take care of
all the details for you.
A SureThing project is a collection of label designs that are saved together in a single file. These designs
can be for a single label type, a CD/DVD label for example, or for different types of labels such as a CD/
DVD label and a jewel case insert. The New Project dialog offers pre-configured projects for the most
common labeling tasks.
So what are the elements that make up a project?
Label Types
Label Templates
Designs and Design Sets
A project can also contain multiple designs for each label type. For example, you may want to create
labels for a 2-disc music CD. Each CD needs to be labeled uniquely so you can easily identify them. When
you have multiple designs in a project, we refer to that as a "Design Set".
Label types
A Label Type tells SureThing what you are labeling. Your current design can contain several label types.
Examples of label types include:
CD label
Jewel case insert
DVD case insert
A project can have one or more label types in it. The New Project dialog box allows you to select from a
number of pre-configured projects. The label types available for your project are shown as tabs along the
top of the Design Window. Clicking on a tab selects it for editing and printing.
16
Chapter 5 Quick Start
About SureThing Projects
6
You can easily add or remove label types from your project.
Click the Project Options button in the upper right corner of the design area and select the Project
Label Types command. .
Label templates
Label templates are used when SureThing prints. A label template describes how the labels are positioned
on a sheet of paper, such as labels you buy from a store or from SureThing, Avery, or Memorex. A label
sheet has one or more label types on it. For example, SureThing CD/DVD label sheets include two CD/
DVD labels and four jewel case spine labels. The label template tells SureThing how to precisely print each
label on the sheet.
The important thing for you to know about label templates is that you have to tell SureThing which one you
want to use. It's easy, and SureThing will remember your choice for use in the future. To select a label
template, click the link just below the tabs at the top of the design area:
Chapter 6 About SureThing Projects
17
About SureThing Projects
6
Note: Some label templates do not necessarily define labels on a sheet of paper, but are used in the same
way. For example, direct-to-disc printers and LightScribe drives print on discs, rather than paper. For these
devices, the templates include the necessary specifications to print directly to the disc.
Designs and Design sets
A "design" is the text and graphics you want to print for a single label. Each project can contain one or
more designs for each label type in the project. These designs are represented by pages on the Design
Bar, found just below the Design Window. These are called "design sets".
Use design sets when each design needs to be labeled uniquely, so you can easily identify them. For
example, you might want to create labels for a two-disc music album or a multiple disc collection of
photos.
To add a design to your project, click the plus sign to the left of the bar. To remove a design, click the trash
can to the right. Click the page icons to edit its corresponding design.
Note: This feature is not intended to allow you to print multiple copies of the same label. To print multiple
copies of the same label, you can enter a number in the No. of Labels box on the Print dialog box.
Typically once you're up and running using the Quick Start guide, most things you need to do will come
pretty naturally. Use this section to tap the full power of SureThing and use it to its fullest.
In this section, you will learn about:
Managing Projects
Printing
Working with Text
Working with Objects
Working with Backgrounds
Working with Pictures and Clipart
Working with Playlists
18
Chapter 6 About SureThing Projects
Mastering SureThing
7
Managing Projects
Projects are all the designs used for a particular purpose that can be saved together in a single file.
In this section, you will learn about:
Creating a Project
Opening a Project
Saving a Project
Managing Project Options
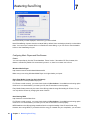
Create a Project
To get started you first need to create a project. A project contains the designs for the labels you wish to
print. To create a project:
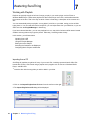
1. Click File>New. The SureThing Navigator will appear:
Chapter 7 Mastering SureThing
19
Mastering SureThing
7
2. Each project may contain one or more types of labels that you can design together, for example a disc
label and jewel case inserts. Click on the project that includes the type of labels you would like to print.
Your project will be created and you will be taken to the label design screen.
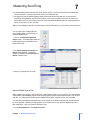
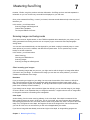
3. If you don't see the type of label you want to create, click the More Label Choices... option. The New
Project dialog will appear showing more options:
20
Chapter 7 Mastering SureThing
Mastering SureThing
7
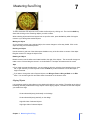
4. Select the type of media from the left column, the manufacturer for the labels you intend to use from the
center column, and the type of labels for the selected media from the right column. The Template
preview should look similar to the labels you intend to use.
5. Click OK once you have made your selections. Your project will be created and you will be taken to the
label design screen.
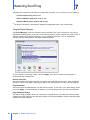
Open a Project
Click File > Open.
1. On the Open dialog box, select the .std or .stt, file that you want. When you select a file, you can see
the contents of the file in Preview.
Notes
.std documents contain project documents.
.stt documents contain user template documents.
Save a Project
1. Click File > Save or Save As.
2. On the Save As dialog box, enter a name for the document that stores your project.
Tip: All your documents are saved in the My SureThing Projects folder (inside the current user's "My
Documents" folder) unless you specify a different directory. We recommend you keep all of your projects
in the same folder.
Notes
.std documents contain project documents.
.stt documents contain user template documents.
Chapter 7 Mastering SureThing
21
Mastering SureThing
7
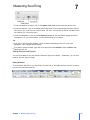
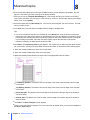
Managing Project Options
There are a number of options you can change for your project. The Project Options menu lets you set the
individual project properties.
Show Playlist Contents
This toggles the Contents field on or off for the current design. The contents field is typically used for a
description of the contents for the disc you are labeling. For music CDs, SureThing can often automatically
fill the contents field with the song titles from your CD (click here to learn more).
Set Playlist Contents
When importing song titles into your label, there is a variety of information you can include for each song,
such as title, artist, playtime, genre and more. Click here to set the information you want to include on this
label.
Display Playlist Fields / Display Playlist Data
This toggles the view between the playlist's data (ex: Title, Artist, song titles, etc...) and the playlist field
names. (ex: {Title}, {Artist}, {Track: Title}, etc...)
Project Label Types
You can add or remove various types of labels from your project. Check label types you want to include,
uncheck those that you want to exclude. Note that the label types must be compatible to be in the same
project. For example, jewel case inserts can be included in the same project as disc labels, but not with
audio tapes.
Printing
Ultimately, printing a label is what SureThing is designed to do. You can print to a paper label, a variety of
disc case inserts, or directly on discs with special printers and disc drives.
In this section, you will learn about:
Printing a Label
Printing to a Direct-to-Disc Printer
Printing to LightScribe drives
Calibrating Your Printer
22
Chapter 7 Mastering SureThing
Mastering SureThing
7
Paper Feeding Tips
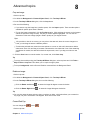
Printing a Label
Printing is easy. To start printing click on the Print Design command in the Actions Panel. The print
dialog is then displayed.
SureThing Print Dialog
Begin by specifying the number of labels you wish to print. SureThing will automatically sequence them
from page to page. You can select the first label to print by clicking on the sample page on the right side.
The first blue colored label will be the first to print.
Under Label Template, you can see the type of media on which your designs will print. If you need to
change this for whatever reason, for example you purchased a different brand of labels, click on the button
just to the right.
Load your printer with enough labels to print your entire job. You can find out precisely the number of
sheets required by looking just below the sample.
Click Print when everything is ready.
Printing to a Direct-to-Disc Printer
You can print directly to disc with many of the new inkjet printers available. To print any disc label design
on your direct-to-disc printer:
1. Click File > Print to bring up the Print Dialog..
2. Click on the dropdown below the Print Using icon.
Chapter 7 Mastering SureThing
23
Mastering SureThing
7
3. Select CD/DVD Printer. Note that you must have a CD/DVD printer installed for this option to be
available.
4. Select the direct-to-disc printer from the Printers list. Note that if you only have one direct-to-disc
printer, it will automatically be selected.
5. Check the Disc Type (the Label Template list changes to Disc Type when printing directly to discs) to
be sure you will be printing using the correct template.
6. Follow the instructions for your printer to load disc(s) into your printer.
7. Click Print when everything is ready.
Note: SureThing is pre-configured to work with most popular direct-to-disc printers. It is possible that you
may have an updated printer driver incompatible with the default settings. If this is the case, SureThing will
ask you to set up your printer manually the first time. Follow the instructions provided with your printer for
this one time setup.
If your printer is not in the list of supported direct-to-disc printers, we want to hear about it. Please contact
us.
Printing to LightScribe Drives
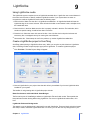
LightScribe Direct Disc Labeling is an exciting disc labeling technology that enables you to burn CD and
DVD labels simply by flipping the discs over and putting them back in the same disc drive that you used to
burn the content for your discs. Using SureThing CD/DVD Labeler in combination LightScribe technology
and specially coated LightScribe discs allows you to produce precise, silkscreen-quality iridescent labels.
With LightScribe, your disc is your label.
Important Note: You must have LightScribe drive and use LightScribe discs to print to LightScribe. You
also must have the LightScribe System Software installed, which is separate from SureThing. You can
obtain the LightScribe software from LightScribe.com.
To print any disc label design to your LightScribe drive:
1. Click File > Print to bring up the Print Dialog..
2. Click on the dropdown below the Print Using icon.
24
Chapter 7 Mastering SureThing
Mastering SureThing
7
3. Select LightScribe. Note that you must have a LightScribe drive installed for this option to be available.
4. If you have more than one drive installed, select the drive you wish to use from the Drives list. Note that if
you only have one LightScribe drive, it will be automatically be selected.
5. Select the Contrast Level. LightScribe provides three different contrast levels for you to choose from
when labeling your discs. The label burn time will increase from Draft to Normal to Best.
6. Insert a LightScribe disc, label side down in the selected drive.
7. Click Print when everything is ready.
Notes: Burning a label with LightScribe is much like recording a CD or DVD, and is much different than
printing to a printer. As with all optical devices, there may be some delays while the drive is identifying the
disc and ensuring it has a LightScribe coating. Depending upon your contrast level, it also takes more time
to burn a label with LightScribe than printing a paper label. Be patient, the results are impressive!
More on LightScribe Labeling
Create a LightScribe Project in SureThing
LightScribe Print Times
LightScribe Label Modes
Using LightScribe Media
Generic LightScribe Printing
Calibrating Your Printer
Because each printer is full of working parts, the precision in each is slightly different (even between
printers of the same model). Thick or glossy paper stock can also affect how paper flows through a printer.
Sometimes this may cause the printed label to line up incorrectly on the paper stock. Calibrating your
printer may help.
To calibrate the printer:
1. Choose the Calibrate Printer command from the File menu. The Calibrate Printer dialog box
appears.
2. Confirm that the correct printer is listed in the Printer field.
3. Press the Print Calibration Sheet button to print on an actual label sheet.
4. Fold the Calibration Sheet according to the printed instructions and enter the values in the Offset
fields.
Chapter 7 Mastering SureThing
25
Mastering SureThing
7
Your printer will now be offset by these values to accommodate for any errors in precision.
Note
Printer calibration may not solve all problems relating to hitting the label squarely on the mark. Because
of the mechanics involved in feeding a sheet of paper through a printer, the paper often passes through
the printer in a slightly different position each time. We recommend that you provide a margin of error
around the edge of any design (called the bleed), which is not critical to the design itself. This allows
your designs to print correctly, even when such shifts in the paper position do occur.
You calibrate a printer. The settings for that printer are remembered. When you change to a printer that
has never been calibrated, you may need to perform these steps again for it.
Calibrations are printed according to the active label template. If you print on an actual label sheet,
guidelines should print to help you see the results immediately
Paper Feeding Tips
Running label sheets and card stock through an inkjet or laser printer is not an exact science. In fact, due
to all the mechanical parts in a printer, it is extremely difficult to hit the sheet in exactly the same spot
twice. Here are a few tips to help you achieve the greatest success.
This End First…
The software tells you which end of the paper to feed into the printer first. Just look at the sample in the
Print Dialog and notice the little red arrows. This helps eliminate guesswork while inserting labels into your
printer.
Remember: You will always feed paper in a portrait orientation into your printer. The red arrows tell you
which end should be fed first.
Printer paper feeding quirks
When a printer grabs a sheet of labels or card stock, the precision that it feeds it through the paper path is
less than desirable. The sheets will shift slightly each pass through the printer, and there is not much you
can do about it.
In most of today’s better printers, this shift is very slight, perhaps a 1/16 or 1/32 of an inch. As a printer
gets older, however, some of the mechanical parts develop a bit more slop and you may notice larger shifts
from sheet to sheet.
The best advice we can provide is to not design anything critical too close to the edge of the label. You can
often bleed backgrounds over the edge of a label to ensure complete coverage, but text or logos too near
the edge may very likely end up either partially or completely off the label. How close is too close?
Experience with your printer will provide the answer.
Printer calibration
A similar problem is that not all printers start at the same offset from the top left edge of the paper. This
means that, without correction, you would never hit the labels on target. Luckily this is something that can
be addressed by the software.
You will need to register the offsets your printer uses by calibrating your printer. You will find the Print
Calibration command on the File Menu.
Label storage tips
To help avoid many of the paper feeding problem described above, store your labels somewhere to
26
Chapter 7 Mastering SureThing
Mastering SureThing
7
minimize physical damage. Find a cool location, and store them flat on a shelf. This will help minimize the
edges from developing a ‘curl’, something printers find difficult to deal with.
Non-printable areas
On some printers, you cannot print to the edge of a sheet of paper. These printers have a margin around the edge
of the sheet that is called the non-printable area. If you have label sheets that have labels positioned within that
area, you cannot print the entire label.
Laser printers with a non-printable area have a 0.25-inch margin on all sides. Inkjet printers with a non-printable
area need more: a 0.25-inch margin on the left and right side and, as a minimum, at least a 0.5-inch margin on
the top and bottom.
If you own a printer with a non-printable area, you cannot do anything about the area. However, you can find a
vendor who can provide labels that accommodate the non-printable area. These types of labels leave enough
room around all sides for most any printer.
Tip
You can get great labels at the following link:
SureThing labels
Working with Text
You can add text and position it anywhere on your design. SureThing has three types of text objects.
Choose the type that best fits your label.
In this section, you will learn about:
Adding a Text Frame
Editing a Text Frame
Circular Text
Text Effects
Insert Special Fields
Find and Replace
Adding a Text Frame
To add a new text frame to your design, do one of the following:
1. Click Create Text Frame on the Text Panel in the Command Bar.
This automatically creates a text frame a the top of your design with sample text in it ready for you to edit.
You just need to change the text and move it to the desired position on the design.
2. Click Tools > Object Tools > Text Frame Tool.
Click in the design where you want the top-left corner of the text frame to be, and hold the mouse down.
Drag the cursor to the approximate size of the text frame. A blank text frame is created.
Enter your own text in the frame.
Chapter 7 Mastering SureThing
27
Mastering SureThing
7
Tip: To show or hide the borders of a text frame, click View > View Options > Show Frame Bounds.
(the borders do not print)
Editing a Text Frame
To edit the text in a text frame, double click anywhere within the frame. The border will change from a
dotted line to a hatched pattern, and there will be a blinking text cursor in the text.
Begin typing just as you would in a word processor. You can change the fonts, color, size, transparency,
shades, blends, shadows and borders using the Toolbars along the top. For more options, right-click and
choose Format>Character. You can change line spacing, tabs, or add bullets and borders with
Format>Paragraph.
As you fill the text frame with text, it is possible to overflow its bounds. When this happens, you will see a
red line at the bottom of the frame, indicating it has more text than it can handle.
You have two choices when this occurs. First, you can re-size the text frame to accommodate the text.
Second, you can reduce the point size of the font to allow the text to fit within the current size.
Double-clicking the hatched border will open the text frame's 'Properties' dialog. Here you can set wrapping
options, margins, columns, growths, sizes, and vertical alignment. All of the options available from
Toolbars are also available here.
Circular Text
1. On the Text Panel in the Command Bar, click Add Circular Text.
2. On the Set Text tab, enter the text you want in the Text box.
3. Click OK.
To Format Circular Text
Use the Toolbars to format the font and size for the text.
Click on the text and drag it towards the center or out towards the edge of the design.
Double-click on the text to edit the circular text properties.
Tips for Circular Text
By default, the circular text is aligned to the top of the label. If you want to change this, select the Align
bottom of text to circle check box.
28
Chapter 7 Mastering SureThing
Mastering SureThing
7
You can change simple circular text by changing the Circle Type to Spiral or Spokes
You can add a Separator to be automatically inserted between individual items, or playlist tracks in the
text.
Text effects
Text effects allow you to apply specials effects to text, such as curved text, slanted text, perspective text,
drop shadows and more. Text effects add spice and pop to your designs.
When you click Add Text Effect in the main window, the Text Effect wizard places a text effect at the
default position in the document which you can then move to the desired location on your design. You can
place a text effect anywhere in the document when you click Tools > Object Tools > Text Effect Tool.
You may be surprised when you first create a text effect that it does not look quite the way you intended.
Text effects can look very different depending on how they are sized, and the initial shape and size of the
text effect is rarely the best choice.
For example, round effects such as a circles or buttons usually look best when they are sized to a square
shape. Similarly, angled text typically looks better when shaped as a rectangle. It all depends on the effect
you are trying to achieve.
To Format a Text Effect
Use the Toolbars to format the font. For some text effects, you can also change the point size. For most,
however, the effect fits within the bounding rectangle, so you change the size by resizing the object.
Double-click on the text to edit the circular text properties.
Tips for Text Effects
When using the Text Effect Dialog, click the Preview button if the Preview window does not show your
selections as you make them.
If the text is tall and skinny, shorten the effect or make it wider. If the text is short and fat, make it taller
or less wide.
For round effects, try using the different thicknesses to achieve the desired result. For example, if the
text in the circle is too big, try using Circle Thinner.
Try setting the Variation setting in the Properties dialog box. For circles, try Stretch and, for many
rectangular effects, try Perspective.
Use the Samples tab to get quick formatting ideas.
Insert special fields
There are a number of special fields that you can insert into the text in your designs that can automatically
be updated without changing the design. To insert a special field:
Chapter 7 Mastering SureThing
29
Mastering SureThing
7
1. Click Tools > Insert Field.
2. On any of the tabs, select a field.
On the User Info tab, select fields that allow you to place information that automatically updates with
your personal information, such as your company name or address. Your personal information is
entered in Tools > Program Options.
On the Merge Fields tab, you can insert fields with data from an external merge file. First select the
merge file. For spreadsheets or databases, such as Excel or Access, be sure to set the type of file
first. Once the file has been selected, select fields you wish to include in your design.
On the Special Fields tab, select fields for general usage, such as serial numbers, date, and so
forth. If the Field Settings button is available for the field that you select, click the button and enter
additional settings.
3. Click the Insert button. The field is added to the document.
4. Select the field in the document and move it to the position you want. You can switch back to your
design and change the cursor position at any time. You do not have to close the dialog box.
Tips
You can also double-click a text frame and insert a field inside it.
When using merge fields, to see the actual data from the merge file in the document, click View > View
Options > Set Merge Record.
If you want to see the field codes in the document, click View > View Options > Show Field Codes.
Find and replace text
1. Click Edit > Replace.
2. Enter the text you want to search for in the Search for box.
3. Enter the text you want to replace the previous text with in the Replace with box.
4. Click Replace.
Tip: Advanced users can click the Character or Paragraph buttons to search for specific character and/
or paragraph formatting. For example, if you check Italic, the software only searches for italicized text. If
you select left alignment, the software only searches for paragraphs that are aligned left. Click the Clear
button to clear any existing formatting search criteria.
Blending Text
You can blend text with whatever is behind it, most typically a colorful background. This produces very cool
and dramatic effects and allows the text to pick up the characteristics of the background itself.
30
Chapter 7 Mastering SureThing
Mastering SureThing
Text w ith no transparency
7
Sam e text w ith 60% transparency
Both look great, but note how the text on right blends into the background and picks up the background
colors as it goes. This has the advantage of working with many more backgrounds and adapting to each. A
number of the SmartDesigns use this technique, or a variation of it. Check them out for example
techniques.
To set the transparency on text, allowing it to blend with objects behind it:.
1. Select the text object.
2. Use the Transparency Control on the Text Toolbar above the Design Window. 100% represents full
opacity for the image, while 0% represents full transparency. Everything in between represents a gradual
level of blend with the objects behind the selected image.
Working with Objects
A SureThing design is a collection of objects to be printed on a label. There are text objects (text frames,
circular text and text effects), picture objects (photos and clipart) and graphic objects (lines, rectangles and
circles).
Regardless of an object's type, you work with them in a very similar fashion. This section covers many of
the common functions you can perform and the different types of objects. In later sections, specific types
of objects will be covered.
In this section, you will learn about:
Creating an Object
Select, Move, Resize or Rotate an Object
Aligning Objects
Setting Shades and Transparency
Setting Shadows and Borders
Creating an Object
There are a number of ways to create specific objects as you will learn later, but there is one place you can
go to create any object. The Object Toolbar below the main Design Window contains tools to create any
object supported by SureThing.
Chapter 7 Mastering SureThing
31
Mastering SureThing
7
1. Select the type of object
you wish to add to your
design.
2. The cursor will change to
that type of tool.
3. Click in the design and drag
the cursor to the desired
size and position for the
object. Don't worry about
being exact, both size and
position are easily changed
later.
Select, Move, Resize or Rotate an Object
Most objects are selected, moved, resized and rotated in exactly the same way.
Select an Object
To select an object you click on it with the mouse. The object will be drawn selected, with a set of handles
surrounding the object.
32
Chapter 7 Mastering SureThing
Mastering SureThing
7
To select more than one object at a time, select the first object by clicking on it. Then hold the Shift key
down while clicking on the remaining objects you wish to select.
When selecting objects which are layered one on top of the other, press the Ctrl key while clicking the
mouse to cycle through the stacked objects.
Moving an Object
As you move the mouse over a selected object, the mouse changes to a four-way handle. Click on the
object and drag it to the desired position.
Resizing an Object
Use the mouse to grab one of the white square handles on any of the four sides or corners of the object.
Drag the mouse in to change the object's size.
Rotating an Object
Move the mouse over the white round rotate handle to the right of the objects. The mouse will change to a
rotate cursor. Click and drag the mouse in a circular fashion. The object will rotate around its center.
Tips
If you need more precise placement, you can nudge an object by selecting it and pressing the up, down,
left, or right arrow keys on the keyboard. Press the Shift key at the same time to move the object in
larger increments.
If you want to change the order of layered objects, use Bring to Front or Bring to Back on the Edit
menu. You can also right-click and select these commands on the shortcut menu.
Aligning Objects
It is sometimes useful to align objects on the design with relation to one another. The toolbar to the right of
the Design Window provides tools to align objects. When aligning objects, remember to first select objects
you would like to align.
Center selected object(s) horizontally on the design.
Center selected object(s) vertically on the design.
Align left sides of selected objects.
Align right sides of selected objects.
Chapter 7 Mastering SureThing
33
Mastering SureThing
7
Align tops of selected objects.
Align bottoms of selected objects.
Align the center points of selected objects horizontally
Align the center points of selected objects vertically
Setting Shades and Transparency
Any object can have a background shade or color to help set it apart on the design. Additionally, you can
set the shade to be opaque, transparent, or anywhere in between. This can produce very cool and dramatic
results, as well as help text become readable on many different backgrounds.
The text frame at the bottom of this label had a white background set to 40% transparency. It lets any color
of the background bleed through and still allow readable text.
The shade color, options, and transparency can be set from the Object Toolbar above the Design Window.
34
Chapter 7 Mastering SureThing
Mastering SureThing
7
1. To set the shade for the object, click on the Shade Color dropdown and select the desired color.
2. To set blend options, click on the Shade Options dropdown. Choose a blend type and colors to blend
from and to. (ex: if you select an "across" blend, the "from" color will start on the left, and blend until it
becomes the "to" color on the right.)
3. To set the transparency, click on the Transparency dropdown. Use the slide to change the level of
transparency. As you move the slider, you will see the results in your design.
Tip
If you set a color and nothing happens, check the objects transparency level. If it is set to be
transparent, color changes won't be visible.
If you want to remove a shade, right click on the object and select Shades. Check the None radio
button and click OK.
Setting Shadows and Borders
You can set shadows on any text objects to help them pop-out of a design. Additionally, you can set a
border on any text object or image.
Setting Shadows
To set a shadow, left-click on your Text Frame, Circular Text, or Text Effect and then click the "S" button
from the control strip along the top.
Chapter 7 Mastering SureThing
35
Mastering SureThing
7
Use the sliders to adjust the shadow's opacity, blur, distance, and angle. Click the color swatch to change
the shadow's color. Note that the shade of the shadow's color will be affected by the Opacity value.
Setting Borders
To set a border, left-click on an object and then set the border pull down menus from the control strip along
the top.
36
Chapter 7 Mastering SureThing
Mastering SureThing
7
Use the "Border/Line Type" pull down menu to set the type or style of the border. Set the thickness of the
border using the "Border/Line Thickness" pull down. Finally, you can set the color by clicking on the color
swatch.
Working with Backgrounds
Backgrounds are images automatically fit to cover the entire area of a label. You can use backgrounds to
dramatically affect the look and mood of your designs. SureThing comes equipped with many backgrounds,
or you can choose one of your own images.
In this section, you will learn about:
Selecting a Background
Change the Size & Position
Background Properties
Changing the Layout Type
Clearing the Background
Selecting a Background
The Select Background control on the SmartDesign Variation Bar allows you to easily change the
background used for your label. To change the background, you can:
Scroll through each available SureThing background by clicking the arrows at either end of the
control.
To display a list of SureThing backgrounds, click in the middle of the Select Background control.
Click the small folder icon
on the Select Background control to visually browse the backgrounds.
Tips
You can also choose SureThing Backgrounds from the Backgrounds Panel in the Command Panel
to visually browse available backgrounds.
If you want to select your own image to use as a background, choose Backgrounds from the
Chapter 7 Mastering SureThing
37
Mastering SureThing
7
Backgrounds Panel in the Command Panel, or click the Picture Tools icon on the right-side toolbar
strip and choose the option Select Background. You can then select a folder on your computer where
your images are kept.
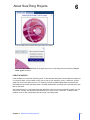
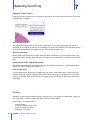
Change the Size & Position
SureThing automatically fits background images to the size of the label. There are times, especially for
photos and other non-square images intended to be used as disc labels, when you need to adjust the
background for optimal results. Click Size & Position on the Backgrounds Panel to make these
adjustments.
When you click on Size & Position, white handles will be placed around the sides and in the center of the
Design Window.
These handles will be used for sizing the background. Since the background is still intended to cover the
entire label, it may be helpful to think of sizing as zooming in or out on the background. To zoom in, drag
one of the handles away from the center of the label. To zoom out, drag one of the handles towards the
center.
As you move the mouse over the image, you will see the cursor turns into a hand.
38
Chapter 7 Mastering SureThing
Mastering SureThing
7
When the hand is present, you can click and drag anywhere on the image. As you move the hand, you will
see the background move around on the label. Move the background around until the portions you want to
print on your label are in the desired position.
In the illustrations above, you can see how we have taken a rectangular image and made it fit a circular
disc label. You can see we zoomed in on the image, and adjusted it so that the face in the photo was not
cut out by the center hole of the disc.
Chapter 7 Mastering SureThing
39
Mastering SureThing
7
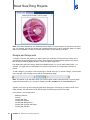
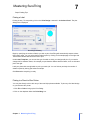
Background Properties
Background properties allow you to control how the backgrounds are displayed in your designs.
How the background is automatically fit to your design is one of most important properties for a
background. If you want the full image to completely fit within the label, regardless of its shape, choose Fit
to Design (with or without bleed).
If you want the original aspect ratio of the image preserved, choose Fit to Design with Original Aspect
Ratio. This will fit the image perfectly in one direction (either vertically or horizontally, which ever is smaller)
and center the background in the other direction. This means the image may get clipped in one direction,
but it will not be distorted. This is the setting we recommend when photos are used.
To set background properties:
1. Click Background > Properties.
2. On the Background Properties dialog box, make adjustments as necessary, depending on the type of
image you are using. For example, try changing the Brightness Control.
3. Click Apply to see how the changes affect your background.
Background Tips
If you wish to restore the default settings, click Reset to Defaults.
If you want to change the background color, click Backgrounds > Clear Background Image. You can
then select Background > Set Background Color and set the options you want.
The center hole can cause problems with disc labels. Use Size & Position to ensure the important parts
of your image are visible.
Change the Layout Type
When adding custom backgrounds SureThing analyzes your image to determine if it is predominantly light,
dark or a mixture of the two. An appropriate SmartDesign Layout will then be chosen to make the text
readable. It is not a perfect science. If you find the text difficult to read, you can change the Layout Type
manually as follows:
1. Click Backgrounds > Layout Type.
2. Select one of the options on the menu to make changes to the background in the current design.
Clear the Background
Do one of the following:
Click Backgrounds > Clear Background Image. This removes the background from the document. All
other objects remain.
In the main window, select No Background on the Select background picture bar.
40
Chapter 7 Mastering SureThing
Mastering SureThing
7
Working with Pictures and Clipart
Pictures and clipart are a great way to personalize your designs. Whether it is a photo, album art,
company logo or a DVD symbol, a picture paints a thousand words. SureThing provides the tools to easily
add and manipulate images in your designs.
In this section, you will learn about:
Browsing for Pictures and Clipart
Using the Picture Tool
Blending Images
Browsing for CD/DVD Symbols
Adding a Transparent Background
Browsing for Pictures or Clipart
1. On the Pictures/Clipart panel in the main window, click Pictures to choose your own image, or
SureThing Clipart & Symbols to choose one of the clipart images included with the program.
2. On the Picture dialog box, browse for the image that you want, select it and click OK. The image is
added to the current design.
Tips
On the Picture dialog box, you can also double-click the image to add it to the design.
If you want to show or hide the pictures in the design, click View > View Options > Show Pictures.
Using the Picture Tool
1. Click Tools > Object Tools > Picture Tool.
2. Do one of the following:
Click a point in the document where you want the picture.
Drag the cursor to the approximate size of the picture.
3. In the New Picture dialog box, select the image file you wish to insert. By default the image maintains
its aspect ratio. (Double-click on the image and uncheck the "Maintain Aspect Ratio" checkbox to
stretch the image out of proportion.)
Chapter 7 Mastering SureThing
41
Mastering SureThing
7
Blending Images
SureThing allows you to blend with other images or text to make smooth transitions and create very
special effects.
The im age w ith no transparency
Sam e im age w ith 40% transparency
Note how the photo on the left blocks out the background completely. The image on the right allows the
cactus, hills and sky to flow through the image producing a dramatic effect. Use your own creativity to
produce cool effects that make your labels memorable.
To set the transparency on an image, allowing it to blend with objects behind it:
1. Select the image.
2. Set Transparency Control on the Object Toolbar above the Design Window
100% represents full opacity for the image, while 0% represents full transparency. Everything in
between represents a gradual level of blend with the objects behind the selected image.
42
Chapter 7 Mastering SureThing
Mastering SureThing
7
Browsing for CD/DVD Symbols
1. On the Pictures/Clipart panel in the main window, click Browse for CD/DVD Symbols.
2. On the Symbols dialog box, select the symbol you want and click OK. The symbol is added to your
design.
Tips
On the Symbols dialog box, you can also double-click the symbol to add it to the design.
You can find White symbols by clicking the White folder. These usually appear better against a dark
background.
Adding a Transparent Background
The Transparent Tool is available when you select an image, such as BMP, TIF, GIF, PNG, or JPG. This is
typically used for logos and other types of images that are often prepared on a white background. All
bitmaps are rectangular and any white pixels affect what is printed. When you place such an image on a
colored background, you see the white square in addition to the actual image.
Select the tool, and click a color within the image. This color then becomes the transparent color.
1. Select the image.
2. Click Tools > Object Tools > Transparent Tool, or click the Picture Tools button on the right side
toolbar and select Transparency Tool.
3. Click a color in the image to set the transparent color. In the following example, click the white area in
the image. Now the image displays and prints only the actual image, and not the extra white space.
Tip:
The color you make transparent doesn't have to be white. Usually the transparent color is the color
outside the edges of the image.
Note:
The transparency tool uses somewhat older technology that is still useful for some images. GIF files, for
example, use this same technique. A better way to achieve transparent backgrounds is to use a graphic
format that allows "alpha-blending", such as 32-bit PNG files. You will need to prepare these images first
in a graphic editing program such as Photoshop or Paint Shop Pro, but you will gain more natural
transitions from the image to the background. For best quality transparent images, we recommend using
32-bit PNG files.
When using 32-bit PNG files, the Transparency Tool is not needed. SureThing will automatically apply
the transparency to the image.
Chapter 7 Mastering SureThing
43
Mastering SureThing
7
Working with Playlists
Playlists are typically thought of as lists of songs you play in your music player such as iTunes or
Windows Media Player. These same playlists are often used to burn music CDs, and therefore describe
the contents of the disc. That is the way we think of them in SureThing: a description of the contents of a
disc.
You can automatically add your playlist, or song titles if you'd like, to your label, saving you lots of effort
typing them in. You can read them from a burned CD, you can import them from your hard drive, or you can
select one from the Playlist Manager in SureThing.
If you have a burned data disc, you can use playlists for it too. Just think of volume and file names instead
of album and song titles and you get the picture. Either way, SureThing makes it easy.
In this section, you will learn about:
Importing from a CD
Importing from a file
Using the Playlist Manager
Editing the Active Playlist
Selecting the Contents to be Displayed
Configuring Music Players and Burners
Importing from a CD
SureThing will read the song titles off many of your music CDs, including commercial audio CDs, CDs
burned with CD-Text, CDs burned using a popular music program such as iTunes or Windows Media
Player, and MP3 CDs.
1. Insert the disc with the song titles you wish to label in your drive.
2. Click on the Import Playlist from CD button from the tool bar on the right.
3. The Import Playlist from CD dialog will be displayed:
44
Chapter 7 Mastering SureThing
Mastering SureThing
7
4. It will immediately start searching the CD for the song titles. If you have more than one CD/DVD drive
check to be sure it is searching the drive where you inserted the disc.
5. The playlist for the CD will be displayed. Many times there will be more than one choice because
SureThing checks different sources for the playlist. It will check your CD for CD-Text, the internet for
album titles, and your music players such as iTunes and Windows Media Player for matching playlists.
When you see one you like, click OK.
Tip: If you are labeling a data disc and would like to include a file listing, you can use this same technique.
You can also import a playlist directly
from a media player such as iTunes, or
Windows Media Player.
1. Click on the Import Playlist from
Player button. It's located right below the
Import Playlist from a CD button on the
right-hand tool bar.
2. The Import Playlist from Player or
Burner dialog appears. Choose the
program by setting the Select Player or
Burner pulldown menu.
3. Select your playlist and click OK.
Import a Playlist from a File
Many popular music players, such as Winamp, save playlists to files on your computer. The most popular
is the industry standard M3U playlist format. SureThing also supports other playlist formats, such as PLS
and WPL. As other playlist formats become available and popular, support for them may be added.
You can also import playlist information from music players or CD burning software that includes support
for music playlists. Currently SureThing allows you to import from iTunes, Windows Media Player v9 or
later, RealPlayer, and your system's CDPlayer.ini file.
1. On the Playlists Panel, click Import from File.
Chapter 7 Mastering SureThing
45
Mastering SureThing
7
2. Browse your computer to find where your playlist files are stored. You can select one of the following:
ITunes exported song .xml or .txt
Generic M3U/PLS playlist file .m3u or .pls
Windows Media Player playlist .m3u or .wpl
3. The playlist information is automatically added to the appropriate fields in the current design.
Using the Playlist Manager
The Playlist Manager is like the command center for playlists. This is the one place you can come to
manage and create playlists. Also keep in mind that every time you import a playlist from a CD or a file, it
adds the playlist to the Playlist manager so it can be reused at a later time. You can add playlists
manually, edit the saved playlists, and delete unwanted playlists.
To use a playlist in your design, select it and click Apply. There are two sections for the playlist, a
document list and a database list.
Document Playlists
This list shows the active playlist used by your project and saved with your document. There are special
playlists to create a new audio or data playlist, and set the current playlist to none (or General Purpose).
Playlist Database
This list shows all the saved playlists you have used in the past. To use one in your current design, select
it and click Apply. It will automatically be added to your current design and to your Document Playlists.
Playlist Manager Buttons
The buttons along the bottom allow you to import from a playlist file from your hard drive, read the playlist
contents from a CD, add the current Document Playlist to the Playlist Database, Edit the selected playlist,
or delete the selected playlist.
46
Chapter 7 Mastering SureThing
Mastering SureThing
7
Edit the Active Playlist
There are times you may need to edit the playlist being used by your design. This may be to correct
mistakes from imported playlists, or just to make them more readable in your design (like shortening titles)
.
Important
You should import the CD contents whenever possible to save time creating your playlists. Then you can
edit any information you wish.
1. In the Playlists Panel, click Edit Active Playlist.
2. The Edit Active Playlist dialog box displays different tabs, depending on if your label is for an audio/
music CD or a digital data CD.
If your label is for an audio, or music, CD, the tabs are General, Tracks and Database.
If your label is for a digital data CD, the tabs are General, File List and Files.
3. Enter the information you want.
Tips
Click the
button to copy the current playlist to the Windows Clipboard.
Click the
button to paste the current playlist from the Windows Clipboard.
Click the
button to retrieve playlist information stored on the CD or search for this information online.
Selecting Contents Fields
When using SmartDesigns, there is a special field where the contents of a disc are displayed. By default,
this includes the track number and track title for each song. You can easily add other fields to be displayed
such as track artist, playtime, genre, and other information.
To change the contents fields, click on the Project Options menu in the Design Window:
Select Set Playlist Contents to bring up its dialog.
Chapter 7 Mastering SureThing
47
Mastering SureThing
7
Check the fields you want displayed, uncheck any you want omitted.
Not all SmartDesign Layouts show the contents field by default. Some are designs primarily to show album
titles. You can turn the contents field on or off within this same dialog, or you can set it to use the default
built-in to the SmartDesign Layout.
Configuring Music Players and Disc Burners
iTunes
You can import directly from the iTunes database. iTunes Version 7 also writes CD Text; however, this
feature is turned off by default. We recommend you turn it on, there is no reason not to do so.
Windows Media Player
http://www.microsoft.com/windows/windowsmedia/
Make sure you are using Windows Media Player 9 or higher before you import.
Roxio Easy Media Creator (by Sonic Solutions)
http://www.roxio.com/en/products/cdrpc.jhtml
For CD text to work correctly, you must check the box for Disc At Once. It is available as a burning option.
If this box is not checked when you create your CD, the CD text does not work properly.
Easy Media Creator enters only the name of the ID3 tag under the song title heading for CD text. So you
can only edit the CD text by changing the name of the file.
Nero Burning ROM
http://www.nero.com/en/index2.htm
For CD text to work correctly, you must check the box for Disc At Once. It is available as a burning option.
If this box is not checked when you create your CD, the CD text does not work properly.
NERO defaults to the ID3 tag being transferred into the song title heading of the CD text for that song.
However, when using NERO, if you double-click the song you inserted into your compilation, you can enter
48
Chapter 7 Mastering SureThing
Mastering SureThing
7
the artist, CD title, song title, producer and other information. SureThing can then read and separate the
information so you can choose how you would like it displayed on your CD cover.
Once you've mastered SureThing, or even if you haven't, there are several advanced topics that may be of
interest to you.
In this section, you will learn about:
Scanning Images and Backgrounds
Custom label Templates
Touchup and Effects for Photos
Scanning images and backgrounds
If you have a scanner, digital camera, or other TWAIN compatible device attached to your printer, you can
easily get artwork from existing sources such as company logos, commercial CDs and photographs
among others.
You can even scan artwork directly as a background for your labels, making it extremely easy to create
exact replicas of your music, software, and data CDs and jewel cases. This is a perfect way to make
backup or archives collections.
In this section, you will learn about:
About Scanning
Choosing the TWAIN Source
Scanning Images
Scanning an Image as a Background
About scanning your images
If you are inserting images that are your own, you might need to edit the image in an image editor before
you insert it into your design. To ensure that the image you use does not cause problems, you should
consider a few attributes of the image.
Resolution
If you are scanning an image into your design, be sure to set the resolution of the scanner to 200 dpi or
less. This will keep the file size of the image down while still providing excellent image quality, which
matches most printers' highest print settings. (A 720 dpi printer does not print at 720 screen resolution, it
prints closer to 200 dpi screen resolution.)
If you already have an image, with a resolution higher than 200 dpi, you can use that image in your design,
of course. While it is not imperative that you change the resolution, it might be wise to use an image editor
to change the resolution to something more manageable.
Color depth
Another setting, found on most scanning software, is the color depth. Color depth is measured in bits.
Many newer scanners can scan in 30 bit color. This is nice to have, but most computer video cards won't
use anything beyond 24 bit color, and most printers cannot do any better than 16 bit color (which still looks
really nice). The higher the color depth, the larger the file size of the image will be. We recommend that
you scan at 16 bit color, we are sure that you will not be disappointed by the results.
If you have an image that was already scanned at a higher color depth, an image editing program can
Chapter 7 Mastering SureThing
49
Advanced topics
8
reduce the color depth of the image which you can then save as another file name (so as to keep the
original in all it is glory)
Print size
Much like using a Xerox machine, the print size can be changed when scanning an image as well. Most
scanning software will allow you to blow up or reduce the size of the final print by percent. We recommend
using 100%. The reason behind this is the final file size of the image.
Final print size can be altered on an image that already exists as well, using an image-editing program.
Some editing programs deal in inches and centimeters and some deal in pixels or dots. Just remember,
DPI is dots per inch (or pixels per inch). If you have an image that is 5 inches by 5 inches at 200 dpi, it will
be 1000 pixels by 1000 pixels. The math being 5 inches X 200 dots per inch = 1000 dots
If your image program makes you re-size in pixels, keep the final count down to no more than 1000 by
1000.
Final file size
An image that is 5 inches by 5 inches is scanned at 100% print size at 200 dpi and 16 bit color depth will
result in a file size of roughly 3 megabytes. This is somewhat large but definitely manageable by the
software. If you were to scan at 150% the size would increase to roughly 6.5 megabytes (don't ask about
the math). This, while still somewhat manageable, is probably overkill for printing to most inkjet printers.
Next: Choosing the TWAIN source
Choosing the TWAIN source
Many people have more than one TWAIN compatible device attached to their computer. For example you
may have a scanner and a digital camera, both of which can be used to acquire images.
In such cases, another menu item will appear on the File menu called Scan Images > Select TWAIN
Source. You can select the device you wish to use from the list.
Next: Scanning Images
Scan images
Note
If you have more than one TWAIN compatible device, you must select the one you wish to use.
How?
Before you attempt to scan an image, be sure your TWAIN compatible device is attached to your printer,
and is turned on.
1. Click File > Scan Images > Acquire Image.
2. Your TWAIN compatible software leads you through the process of acquiring the image.
3. After the process is complete, the image is placed on the design. Move and resize it to the position that
you want.
Next: Scan an image as a background
Scan an image as a background
Scanning an image as a background is much like scanning a normal image, except that the image is
placed and sized to fit on the background layer automatically. Before you attempt to scan an image, be
50
Chapter 8 Advanced topics
Advanced topics
8
sure your TWAIN compatible device is attached to your printer, and is turned on. Then follow these steps:
1. Click File > Scan Images > Acquire Image as Background.
2. Your TWAIN compatible software leads you through the process of acquiring the image.
3. Using your TWAIN compatible software, closely crop the image to the desired size. For example, if you
are scanning a CD, crop the image to the bounding box that encompasses the circle. This makes the
automatic background sizing in SureThing work properly.
4. Choose Background Properties to adjust how the image is stretched to fit the CD.
Next Topic: Custom Templates
Custom Templates
SureThing comes with label templates for most popular brands of labels. If you want to use a generic brand
of labels not supported directly, or you want to create designs for an entirely different type of label, you can
do it here.
In this section, you will learn about:
About Custom Templates
Creating a Custom Template
Adding Multiple Blocks
Using Custom Templates
Using Page Setup
About Custom Label Templates
The Template Creation Wizard lets you create customized layouts for label sheets not found within the
software. If you want to use the software’s great features for other types of labels you use often, such as
address labels, your own custom template can fill that need. And when you're done, you can save the
template and use it any time to create a new label!
During the creation process, you can start from scratch or use a similar label supported by the software’s
SmartDesigns and modify it for your needs. As you complete each screen, click Next to continue; click
Back to make changes to previous screens.
Templates that you create and save appear when you click File > New. In the Choose a media type list,
you click - Templates to see User Templates in the Choose a manufacturer list. The Choose a Label
Type list displays a list of the templates you created. You can select one of your templates and click OK.
Next: Creating a Custom Template
Creating a Custom Template
1. Click File > Template Creation Wizard.
2. Click Next. The Page Layout screen appears. This screen lets you set the page layout to the
dimensions and orientation of the sheet you plan to use, such as a sheet of address labels.
3. Select the page size of the entire sheet from the drop-down list or enter the Width and Height of the
sheet.
4. Click the Portrait or Landscape option that matches the sheet printing orientation.
5. Click Next. The Template Properties screen appears. This screen lets you specify the label’s
template properties, which includes its shape and size, as described below.
Chapter 8 Advanced topics
51
Advanced topics
8
6. Enter a short descriptive name for the type of label for which you are designing the template. This will
appear in the Label Type Tabs at the top of the Design Window.
7. Select an item in the Template SmartDesign list. Look through the list to see if there is an existing
type close to the labels you are trying to create. If there is, choose it. This will help creating new designs
easier. If not, choose (Other).
8. Select the shape from the label Shape list. Your choices are rectangular, the most common, and oval,
which includes circular.
9. In the Size area, enter the width in the Horz. field and height in the Vert. field.
Tip
You can set a bleed for the label you are defining. In the Bleed area, enter the amount of horizontal
bleed in the Horz. field and the amount of vertical bleed in the Vert. field. Bleed is the amount of space
horizontally and vertically outside the bounds of the label into which the software will print. This allows
for full coverage of the label, even when the printer slightly misses the label due to mechanical
problems. Generally, the bleed amount should be small.
10.Click Next. The Layout Properties screen appears. This screen lets you define how the labels are laid
out on the sheet, including how many labels are across and down on the sheet and their starting points.
11. Enter the number of labels there are across on the sheet.
12. Enter the number of labels down there are on the sheet.
13. Make the following measurements and enter them in the appropriate boxes as follows.
Left Starting Position. The distance from the left edge of the sheet to the left edge of the first label
on the sheet.
Top Starting Position. The distance from the top edge of the sheet to the top edge of the first label
on the sheet.
Horizontal Span. The distance from the left edge of the first label to the right edge of the last label
across the sheet.
Vertical Span. The distance from the top edge of the first label to the bottom edge of the last label
down the sheet.
14.Click Next. The Save Template screen appears.
15.Enter a name and save the template. This is the name that will appear when you access the template in
the New or Open dialogs.
52
Chapter 8 Advanced topics
Advanced topics
8
Next: Adding Multiple Blocks
Adding Multiple Blocks
labels on a sheet usually repeat in a symmetrical fashion. For example, there are a number of rows of
labels, with each row having the same number of labels (or columns if you would prefer). Additionally, the
distance between each column is the same and the distance between each row is the same.
Occasionally, you find sheets that do not exhibit this pattern. If not you must create multiple blocks. Quite
simply, additional blocks are needed when there is more than one group of labels that exhibit the pattern of
rows and columns described above. A block can be a small as a single label (1 row x 1 column) or as large
as your sheet.
Important
One important thing to remember about blocks is all labels in each block must share the same physical
dimensions. If you have labels of different sizes on a sheet, you must create new templates for each
size.
1. On the Label Layout Properties screen of the Template Creation Wizard, enter the dimensions of
the first label type.
2. Click the Create button. This creates the first block.
3. Enter the starting position of the block.
4. Click the Create button. This creates the second block.
5. Continue to create blocks as needed. When you are finished using this screen, click Next.
Tip
To remove a block, click the Delete button.
Next: Using Custom Templates
Using Custom Templates
When you are finished with the Create Template Wizard you will be given the option of creating a new
project using the new template right away. Later, you will use the New Project command to use Custom
Templates.
1. Click File > New.
2. In the Choose a media type list, select - Templates.
Tip
If you do not see the Choose a media type list, click the Select Label button on the New Project
dialog box.
3. In the Choose a manufacturer list, select Custom Templates.
4. In the Choose a Label Type list, select the template that you want.
Tip
If you need to edit an existing template, or are creating a template with a combination of different size
labels use Page Setup.
Next: Page Setup
Chapter 8 Advanced topics
53
Advanced topics
8
Using Page Setup
Sometimes you won't get your Custom Template right on the first try. When you need to edit a Custom
Template, use File > Page Setup. The Page Setup dialog is displayed:
The fields in the Page Setup dialog correspond to the fields in the Template Creation Wizard. Make the
changes and click OK.
Tips
Use the Name field to save the template under a new name if you want to keep a copy of the old one.
Use Page Setup to base new templates from one of the pre-configured templates that ship with
SureThing. This can be especially useful when you are making a new template for an off-brand of labels.
Touchup and Effects for Photos
When you are using photos as pictures, clipart, or even backgrounds, you can create great effects with
Touchup and Effects. In fact, you can do it with most images, including the backgrounds that are shipped
with SureThing.
You can apply special effects to your photos like colorize, sepia, emboss and others, or eliminate red-eye,
enhance the exposure, or rotate and crop. This is the command center for editing your images.
In this section, you will learn about:
Crop an Image
Rotate an Image
Correct Red-Eye
Apply Special Effects
54
Chapter 8 Advanced topics
8
Advanced topics
Crop an image
1. Select a picture.
2. On either the Background or Pictures/Clipart Panel, click Touchup & Effects.
3. On the Touchup & Effects dialog box, click the Crop button.
4. Do one of the following:
If you want to crop the image into a perfect square, click the Square option. There are other options
available for specific photo sizes if desired.
To crop the image unrestrained, click the Freeform option. Click and drag the mouse on the image to
outline the part of the image to keep. The part you outline appears highlighted. You can see the
dimensions of the area change (height x width in pixels) as you drag the mouse.
Tips
If the position or size is not correct, you can point to the area and, when the cursor changes to a
hand, you can drag the area to a different position.
To resize the selected area, move the mouse pointer to a corner or side until it becomes a doublesided arrow. Then click and drag to increase or decrease the size. Note that if one of the restraining
checkboxes is marked, the area will maintain its aspect ratio, even if you drag one side to a new
place.
5. Click the Save button to see the results. Or, to start over, click Clear Crop.
Tip
To crop a picture without using the Touchup & Effects dialog box, select a picture and click Tools >
Object Tools > Crop Tool. This allows you to crop the image in place.
To crop a background, use the Size and Position command from the Background Panel.
Rotate an image
1. Select a picture.
2. On either the Background or Pictures/Clipart Panel, click Touchup & Effects.
3. On the Touchup & Effects dialog box, do one of the following:
Click the Rotate Left button
Click the Rotate Right button
to rotate the image 90 degrees counter clockwise.
to rotate the image 90 degrees clockwise.
Tip
You can also rotate pictures and text when you select an object, which also allows you to rotate it to
any angle, not just in increments of 90 degrees. Click here to learn more.
Correct Red Eye
You can change this
to this
.
1. Select a picture.
Chapter 8 Advanced topics
55
8
Advanced topics
2. On either the Background or Pictures/Clipart Panel, click Touchup & Effects.
3. On the Touchup & Effects dialog box, click the Red Eye button
.
4. In the Red Eye Size list, select the option that is closest to the size of the red area, or pupil, on the
photo. The mouse pointer becomes a circle indicating the size of the area for correction.
Tips
You may need to click the Zoom button to find the best size fit.
If you want to compare the original with the adjusted image, you can click the History of Changes
button. You can select the original from the list or the picture with the name of the effect from the list.
5. To apply the settings to the background or picture, click OK.
Tips
If the circle is much larger than the red area, the result may look like this.
Or, if the circle is smaller than the red area, you may get this.
To fix this, click Original on the History of Changes button.
Apply Special Effects
1. On either the Background or Pictures/Clipart Panel, click Touchup & Effects.
2. On the Touchup & Effects dialog box, do one of the following:
To add effects, such as Colorize, Emboss, Mosaic, and more, click the Effects button.
To add touchups to pictures, such as Exposure, Brightness, Contrast, or Sharpness, click the
Touchup button.
3. On the right side of the dialog box, click the left and right arrows to see more settings or variations, if
available.
4. Select the settings.
5. Click the Apply button to see what the effects and settings look like in the Preview box. This does not
affect your image in the document.
Tips
If you want to compare the original with the adjusted image, after you click the Apply button, you can
click the History of Changes button. You can select the original from the list or the picture with the
name of the effect from the list.
SureThing tracks the touchups and effects you apply, so you can undo any of them or redo ones you
undid. Just click the left arrow to undo the most recent adjustment. Or, click the right arrow to redo an
56
Chapter 8 Advanced topics
Advanced topics
8
adjustment. Or click the middle of the Undo/Redo bar and select the change you want to return to.
6. To apply the settings to the background or picture, click the OK button.
Tips
To remove the touchups and effects from a background immediately after you click the OK button, click
Edit > Undo Edit Background.
Once you save the design, the history of touchups and special effects you applied is lost. To restore a
previous change, you must start again with the original picture. Fortunately, SureThing always saves the
modified picture in the design file so your original picture remains unchanged.
LightScribe Direct Disc Labeling is an exciting disc labeling technology that enables you to burn CD and
DVD labels simply by flipping the discs over and putting them back in the same disc drive that you used to
burn the content for your discs. Using SureThing CD/DVD Labeler in combination LightScribe technology
and specially coated LightScribe discs allows you to produce precise, silkscreen-quality iridescent labels.
With LightScribe, your disc is your label.
Important Note: You must have LightScribe drive and use LightScribe discs to print to LightScribe. You
also must have the LightScribe System Software installed, which is separate from SureThing. You can
obtain the LightScribe software from LightScribe.com.
To print any disc label design to your LightScribe drive:
1. Click File > Print to bring up the Print Dialog..
2. Click on the dropdown below the Print Using icon.
3. Select LightScribe. Note that you must have a LightScribe drive installed for this option to be available.
4. If you have more than one drive installed, select the drive you wish to use from the Drives list. Note that if
you only have one LightScribe drive, it will be automatically be selected.
5. Select the Contrast Level. LightScribe provides three different contrast levels for you to choose from
when labeling your discs. The label burn time will increase from Draft to Normal to Best.
6. Insert a LightScribe disc, label side down in the selected drive.
7. Click Print when everything is ready.
Notes: Burning a label with LightScribe is much like recording a CD or DVD, and is much different than
printing to a printer. As with all optical devices, there may be some delays while the drive is identifying the
disc and ensuring it has a LightScribe coating. Depending upon your contrast level, it also takes more time
to burn a label with LightScribe than printing a paper label. Be patient, the results are impressive!
Chapter 8 Advanced topics
57
LightScribe
9
More on LightScribe Labeling
Create a LightScribe Project in SureThing
LightScribe Print Times
LightScribe Label Modes
Using LightScribe Media
Generic LightScribe Printing
LightScribe label modes
LightScribe provides three different label modes to choose from depending upon how much information and
creative expression you want for each disc label. The label burn, or print, time will vary depending upon
which label mode you select.
The LightScribe label modes are:
Title. A simple title that allows you to identify a disc. Use for routine or utility discs.
Content. More complete information about the contents of a disc. Use when you have several discs with
the same title but different contents.
Full. A creative label of words and graphics that uses most of the space on the label. Use for important
or keepsake discs.
Each successive mode expands the area on the disc that you can print. This smaller the print area, the
faster the disc is printed.
In SureThing, you select the LightScribe label mode by choosing one of the SmartDesign layouts in the
Select Layout Style list in the main window. The first two layouts are special layouts that correspond to
the Title and Contents modes. They are named Simple Title and Simple Contents. These layouts
conform to the LightScribe label modes. You can select these labels when you click Simple Title or
Simple Contents in the Select Layout Style list in the main window.
If you want to use a background on your label, keep in mind that if your background covers the entire face
of the label, it is a Full mode label, thereby extending the time it takes LightScribe to complete the label.
SureThing has provided special backgrounds that conform to the LightScribe label modes. When you click
Backgrounds > Select Backgrounds, look for the Standard Backgrounds > LightScribe folder. In this
folder, you can find subfolders with optimized backgrounds for the Title, Content and Full modes.
LightScribe print times
The time to print a label using LightScribe varies with the amount of information contained on the label, the
placement of the information on the label, the contrast level selected, the LightScribe disc used and the
drive.
The LightScribe system burns the image in concentric, circular rings from the inside diameter to the outer
diameter of the label surface. Rings that contain no image data are “skipped”. A simple, circular title, such
as a Title mode label or the Simple Title layout in SureThing, is accomplished most quickly. This is
because the information is limited to circular rings close to the inside diameter.
The density of the rings is adjusted according to the item that you select in the Quality list on the Print
dialog box. Higher contrast is achieved through more densely packed rings.
The LightScribe disc itself and the drive compatibilities also influence the label print time.
58
Chapter 9 LightScribe
LightScribe
9
Using LightScribe media
The LightScribe system requires the use of LightScribe-enabled discs. LightScribe uses control features in
the center hub of the disc to identify media as LightScribe media. If your system does not seem to
recognize the media as LightScribe media, take the following steps.
1. Check the disc. Make sure the disc is a LightScribe-enabled disc. All LightScribe Media will have the
LightScribe logo in the center hub area. There will also be visible control features inside, and adjacent to,
the coated label area.
2. Check the disc in the drive. Make sure the disc is properly oriented in the drive. The label side, which
contains a special coating, should be face down in the drive.
3. Clean the hub. Clean the center hub area of the disc. Use a lint-free cloth to wipe the hub area and
remove any dirt or smudges that may be covering the control features.
4. Use another disc. If these steps do not fix the problem, try another LightScribe-enabled disc.
Create a LightScribe project in SureThing
SureThing makes printing to LightScribe drives easy. While you can print any disc label to a LightScribe
drive, SureThing includes a special project type just for LightScribe. To create a LightScribe project:
1. Click File>New. The New Project dialog will appear:
2. Choose LightScribe for your project. Note that this will only be available if you have a LightScribe drive
installed on your system.
The benefits of using starting with a LightScribe project include:
Better Performance with Label Mode SmartDesigns
The first two layouts in SmartDesigns adhere to LightScribe's Title and Label modes. These provide the
best performance when burning labels using LightScribe. For more on LightScribe's label modes, click
here.
LightScribe Enhanced Backgrounds
The artwork to use as backgrounds is designed for use with LightScribe. These are black and white images
with sharp contrast, tailored for LightScribe's laser. Of course, you can also use any background on your
Chapter 9 LightScribe
59
LightScribe
9
system. Line art and photos usually work very well.
Ready-to-Burn
When you start with a LightScribe project, you won't have to mess with settings in the Print Dialog. Just
design and print.
Generic LightScribe printing
You may have purchased LightScribe-enabled discs that are not fully supported by your LightScribe
system. This could occur if you purchased discs that contain features not supported when you originally
purchased your system.
In such cases, you will generally have two choices. The first, and usually best, choice is to update your
LightScribe software. When you attempt to use such a LightScribe disc, the Hewlett-Packard Lightscribe
Host Software prompts you that an update may be available. For optimal labeling, this is the recommended
action.
The second choice is to continue printing using Generic properties for the disc. Generic properties work
with all LightScribe discs, but do ignore any special properties the disc itself may provide. Therefore, the
results may not be optimal.
There may be times when using Generic properties are the best choice, especially when you don’t have the
time to run the update. We recommend that you run the update as soon as possible so that you can enjoy
the results your LightScribe discs will provide.
60
Chapter 9 LightScribe
© © 2014 MicroVsion Development, Inc. All rights
reserved..
All rights reserved.
Product and company names mentioned in this
manual may be trademarks or registered
trademarks of their respective companies.
Mention of third-party products is for
informational purposes only and constitutes
neither an endorsement nor a recommendation.
The author assumes no responsibility w ith
regard to the performance or use of these
products. All understandings, agreements, or
w arranties, if any, take place directly betw een
the vendors and the prospective users. Every
effort has been made to ensure that the
information in this manual is accurate. The author
is not responsible for printing or clerical errors.
The product described in this manual
incorporates copyright protection technology that
is protected by
method claims of certain U.S. patents and other
intellectual property rights.
This user manual w as created w ith Help &
Manual.
Index
Index
adding transparent backgrounds to
Crop 55
Effects 56
placing 41
Red-Eye 55
Rotate 55
scanning 49, 50
working with 41
A
Advanced Topics
Alpha-blending
using 42
49
art
scanning
49, 50
automatic updates
using 29
Custom Templates
About 51
Blocks 53
Creating 51
Editing 54
Intro 51
Using 53
B
Backgrounds 54
adding 37
adding transparency 43
changing 38, 40
clearing 40
Crop 55
editing 38
editing properties of 40
Effects 56
formatting 40
moving 38
Red-Eye 55
removing 40
Rotate 55
scanning 49, 50
selecting 37
working with 37
burners
configuring for playlists
buying
software
19
21
direct-to-disc printers
printing 23
disc labels
creating
19
discs
printing on
48
23
documents
creating 19
printing 23, 26
saving 21
Easy CD Creator
configuring for playlists
25
circles
aligning 33
moving 32
Effects 56
ellipses
aligning 33
moving 32
F
28
Clipart 41, 54
adding 41
62
designs
creating
opening
E
CD/DVD symbols
adding 43
circular text
adding
design sets
using 18
1
C
calibrating
printers
D
features
new
fields
2
48
43
fields
adding
Index
Index
29
files
creating playlists
N
45
Nero
configuring for playlists
H
hard drive
creating playlists
help
getting
9
O
1
Images 41
adding 41
adding transparent backgrounds to
blending 42
Crop 55
Effects 56
placing 41
Red-Eye 55
Rotate 55
scanning 49, 50
working with 41
iTunes
configuring for playlists
48
L
labels
creating 19
printing 23
templates 17
Lightscribe
printing
2
New Project
45
objects
aligning 33
blending 42
moving 32
I
layouts
changing
new
features
48
ordering
software
1
P
Page Setup 54
Pictures 41, 54
adding 41
adding transparent backgrounds to
blending 42
Crop 55
Effects 56
placing 41
Red-Eye 55
Rotate 55
scanning 49, 50
working with 41
players
configuring for playlists
43
48
Playlist Manager
using 46
40
24, 57, 58, 59, 60
lines
aligning 33
moving 32
M
music players
configuring for playlists
43
48
playlists
clicking buttons 46
configuring players 48
configuring software 48
creating 45, 46
editing 47
importing 45
using 44
printing
calibration 25
direct-to-disc 23
projects
9
63
Index
Index
projects 9
creating 19
opening 21
printing 23, 26
saving 21
purchasing
SureThing
T
technical support
getting 1
Q
Template Creation Wizard
About 51
Blocks 53
Creating 51
Intro 51
questions
getting answers
templates
labels
Quick Start
1
1
9, 11
text
aligning 33
blending 42
finding 30
replacing 30
working with 27
R
rectangles
aligning 33
moving 32
text frames
drawing
Red-Eye 55
rounded rectangles
moving 32
scanning
backgrounds 49, 50
images 49, 50
transitions
smoothing
squares
aligning 33
moving 32
64
support
getting
1
SureThing
buying
1
symbols
adding
43
42
U
11
Special Effects 56
special fields
adding 29
54
transparent backgrounds
adding 43
search
finding 30
replacing 30
software
configuring for playlists
creating playlists 45
27
Touchup and Effects
Crop 55
Effects 56
Red-Eye 55
Rotate 55
S
SmartDesigns
using 19
51, 53, 54
17
Use SmartDesigns
11
48
V
variables
using
29
W
welcome, to the software 1
what's new 2
Windows Media Player
configuring for playlists 48
words
finding
30