1
The Triangular Wave Deposit Control System will give many
years of service if sized and installed properly. Please read
all instructions carefully before assembling the system.
Introduction . . .
The Triangular Wave System is a technologically advanced method for the
treatment of hard water and its effect on fluid based applications.The system
is non-invasive and non-chemical by design and is suitable for all applications
requiring hard water treatment.
Operating Principals . . .
The signal from the Triangular Wave System circuitry flows to a solenoid
coil wound around the pipe treating and conditioning the fluid going through it.
The signal in the coil develops the modulated electrical field that immediately
conditions the water.The field penetrates the piping to its center, acting on the
passing water and the dissolved minerals and particles in the water.The
conditioning effects on the water are long lasting and last down stream.
Installation: Controller
The Triangular Wave System is easy to install. A 85 to 265 vac electrical outlet
is needed (unless other current source was requested prior to purchase) near
the unit installation.The most desirable place to install the unit is immediately
after the water meter, before any plumbing line tee, or before each piece of
vital processing equipment, so that the entire plumbing system is treated for
deposits. The unit may be installed outdoors at a wellhead for example, provided a separate weatherproof housing such as NEMA enclosure is used.
Because the unit is a solid state device, it may be mounted in any position
necessary.
Control Unit Screw Mounting
For screw mounting on a flat wooden surface or other surface, use the 4 No.
6 steel self-tapping screws provided.Alternate screw mounting to a drilled
channel or plate can be done with No. 6, No. 8 or No.10 machine screws and
appropriate nuts or hardware.
Select a location that is near the pipe area and/ or equipment to be treated,
and a location that affords the equipment protection from environmental extremes.
The unit is provided with a line cord.The cord should remain unplugged until
the installation is complete and the case is closed.
A standard installation will not require access to the main control circuit board,
because all connections are available in the wiring terminal. The control circuit is
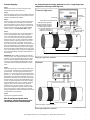
accessed by removing the front panel of the TWT unit. (Refer to Figure 1 following
page). The AC line fuses (3 AG 0.3 amp) are located on the main control
printed circuit board.
Completed System Installation Must Reflect:
A. Solenoid coil correctly field wrapped or factory wrapped Reaction
Chamber /Copper Pipe Signal Enhancer Installed
B. Visual placement of controller for periodic visual inspection of LEDs
All wires must be securely fastened and/or taped to connections
All associated wiring/conduit / line cords must be fastened with plastic wire
ties and out of harms way
IMPORTANT NOTES: Bypassing and/or eliminating water softeners
Water Softeners - Water softeners often leave deposits inside a water system;
therefore, if a softener is in use, you may want to allow the Deposit Control
System to remove the deposits before the softener is switched off. In that
case, leave the softener and the Deposit Control System on together for
about 1 month.
Remember, install the Triangular Wave system downstream of the water
softener, if you plan to run them together.
1. Wrap the coil with electrician’s tape or cloth tape (duct tape) to help
maintain a tight coil and protect the coil from being disturbed.
2. Guide both wires back to the Triangular Wave Unit and leave about
4 to 6 inches of extra wire . Strip enough insulation off the ends of the
wires to install into the barrier terminals.
3. Close the wiring trough.
4. Plug the line cord into a 120 vac outlet.
5. Green LED ( Power On ) will light.
6. Yellow LED ( Coil Energized ) will light.
7. Push and hold the “Push to Test” button to test the alarm circuit.
8. Yellow LED ( Coil Energized ) will go out.
9. Red LED ( System Fault ) will light.
10. Alarm Relay will activate.
11. Audio Alarm will sound.
The audio sounded during this test is the signal solenoid coil.The
conditioning signal varies from very low to very high frequencies.
12. Release the “Push to Test” button.
An additional test should be made to check the alarm circuit for an open
or disconnected coil.
13 To test the cir cuit,disconnect one solenoid lead.
14. Yellow LED (Coil Energized) will go out.
15. Red LED (System Fault) will light.
16. Alarm relay will activate.
17. Audio will sound beep...beep...beep.
18. Reconnect the solenoid wire and your installation is complete.
The unit is in service.
TWT Deposit Control Unit
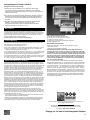
The controller is supplied with a wiring kit and a strain relief connector for the solenoid coil wires. This strain relief will provide a water resistant seal for the two coil
wires. You should rotate the compression ring counter clockwise to release pressure
on the seal. Feed the two wires through the provided holes and tighten the compression ring. Connect the two wires to the coil terminals in the controller housing as
illustrated.
The Model TWT-5C8-402 to the TWT-5C8-410 are provided with an alarm
relay, which may be used for external alarms. The relay contacts are rated 5
amps @ 120 vac. The contacts are isolated from the control circuit and are
single pole double throw. If an external alarm is desired it may be connected
to Barrier terminals.
TWT® Solenoid Wrap & Reaction Chamber Guidelines
The guidelines provided herein are unique and proprietary to the TWT
patented microprocessor controller, solenoid wrap and reaction chamber.
The microprocessor controller, solenoid wrapped reaction chamber are
engineered and designed to operate as a matched system. TWT Inc.
will not accept any responsibility for the products/systems and/or their
operation...
• If any modifications are performed on the units...
• If the system is not installed as recommended by Triangular Wave
Technologies, Inc.
• If any modification and/or changes of the guidelines and/or installation
procedures are made without prior consultation with Triangular Wave
Technologies, Inc.
• Any deviations may cause damage to the system, and will not provide
the proper conditioning and treatment indented.
TWT Patented Deposit Control System:
The basic component in the TWT systems is the deposit controller. It is
comprised of a microprocessor, solenoid coil wrap and/or a reaction chamber. The microprocessor is a patented controller that functions like a small
computer to relay a continuous electrical po wer supply to the solenoid coil
and/or reaction chamber. The reaction chamber is plumbed into the main
water in-take line and/or just b e fore each piece of vital p r o c e s s i n g
equipment, and provides a factory-wrapped wire coil forming a solenoid.
The solenoid conveys the triangular wave signal at the appropriate
power level (as allowed by the model chosen) to the water passing through
the chamber. This signal constantly changes the polarity, frequency, and
amplitude of the current entering the water.
TWT Reaction Chamber:
The pipe material MUST provide a magnetic window for the TWT treatment
system to be able to introduce the magnetic energy necessary through the
pipe material and into the fluid within.The purpose of the reaction chamber
is to provide a means to introduce the magnetic field to colloids/ material
within the pipe. The solenoid coil configuration MUST match the TWT controller which will drive it.TWT Controllers which are intended to drive larger
pipes will be satisfactory to drive smaller pipes, the opposite is not true
(refer to tube & pipe application guidelines on TWT web site).
The following illustrations & guidelines for the solenoid wrapping of the
intended pipes are wound with Teflon type E#18 awg wire.This wire is
stranded copper with electrical insulation.The solenoid coil is formed by
laying the wire, one turn touching the next.The winding MUST be one continuous spiral. The winding should not cross over any turns, this would
cause the cross over turns to cancel each other and reduce the energy
transfer of the solenoid.
2