1
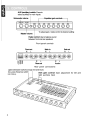
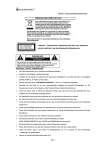
.pyleaudio.com
P
780P
7 BAND PARAMETRIC
EQUA~I~EIR
Contents
1 . FEATURES ............................................................................................. 1
2. PRECAUTIONS •••••••••••••••••••••••••••••••••••••••••••••••••••••••••••••••••••••••••••••••••••••• 2
Installation .................................................................................................................................................................., 2
:I. <:ONTROL.S ............................................................................................... 3
4. OPERATIONS •••••••••••••••••••••••••••••••••••••••••••••••••••••••••••••••••••••••••••••••••••••••••••• 4
Setting system volume ...................................................................................................................................... 4
Adjusting the controls ........................................................................................................................................, 4
Setting the low-pass frequency ................................................................................................................... 5
Connecting an MP3 player or video unit ............................................................................................. 5
Care and maintenance ...................................................................................................................................., 5
5. INSTALLATION AND WIRING ...................................................................... 6
What is included in the box ............................................................................................................................ 6
Before starting .......................................................................................................................................................... 6
Tools and additional components ............................................................................................................., 7
Mounting diagram ................................................................................................................................................ 7
Wiring diagram ....................................................................................................................................................... 8
6. TROUBLESHOOTING ................................................................................. 9
The unit does not work; no lights ............................................................................................................... 9
Sou nd is distorted ................................................................................................................................................., 9
No sound coming from the unit ................................................................................................................... 9
7. GLOSSARY ...............................................................................................110
8. SPECIFICATIONS ....................................................................................... 11
This Equalizer is a 7-band stereo equalier/crossover specifically created
for the mobile environment. This Equalizer provides powerful features in a
compact size:
•
Seven equalization bands (50Hz, 125Hz,320Hz, 750Hz, 2.2KHz, 6kHz, and 16 kHz),
each frequency adjustable from -12 to + 12dB (-15 to + 15dB for subwoofer frequencies)
•
Subwoofer output uses a built-in 18dB per octave electronic crossover fixed at
60Hz or 120Hz.
•
Three stereo RCA outputs to drive front, rear, and subwoofer audio amplifiers
•
An auxiliary stereo RCA input for use with portable devices, such as an MP3
player or DVD player
•
Separate controls for master volume, subwoofer volume (sub level), front/rear
fader, and selection of main or auxiliary inputs
•
Extended frequency response from 20 Hz to 30 kHz with exceptional 100 dB
signal-to-noise performance
•
Dual light selectable ( orange red and blue)
•
Gold-plated RCA connectors to ensure the best audio signal output
•
ISO mounting holes and removable trim ring for custom installation
1
•
Do not operate this product in ways other than those described in this manual.
•
Do not disassemble or modify this unit.
•
Do not pour liquid or poke foreign objects into the unit. Water and humidity may
damage internal circuitry.
•
If the unit becomes wet, turn off all power and ask your authorized dealer to
clean or service the unit.
Failure to observe these precautions may damage your car, the monitor, or the video
source, and may void the warranty.
Installation
Installation of mobile audio and video components requires experience with a variety of
mechanical and electrical procedures. Although this manual provides general installation and operation instructions, it does not show the exact installation methods for your
particular vehicle.
If you do not have the required knowledge and experience to successfully complete the
installation, consult an authorized dealer about professional installation options
2
3. CONTROLS
AUX (auxiliary) switch: Press to
select auxiliary or main inputs
Subwoofer volume
SUB EVEL
Equalizer gain controls
VOLUME
00000000000
Master volume
To adjust gain, rotate control to desired setti ng
Fader control: Use to balance sound
between front and rear speakers
Frontpanelconuo~
Sub out
R
L
Main in
R
L
Front out
R
L
R
L
Rear out
R L
Auxin
Rear panel connections
Light selectable switch(orange red and blue)
low-pass freqency switch
AUX gain control: Gain adjustment for left and
C60/120Hz)
right auxiliary input
3
4. OPERATIONS
Setting system volume
1. Turn the master volume and subwoofer level controls to their minimum settings.
2. Turn the source unit on and increase the volume until you hear distortion.
3. Reduce the volume to just below the distortion point (approximately 80% of full
volume).
This is the maximum usable musical signal for the source unit. Turning the volume
beyond this point increases noise and distortion without increasing the musical
signal.
Note
Once you set the source unit volume, do not change it, Always use the
volume control on the Equalizer as the master(main) volume control,
The Equalizer has better electronics, a higher sound to noise
ratio, and is more linear than the volume settings on any source
unit available.
Adjusting the controls
This Equalizer provides a graphic adjustment band for each of seven frequency ranges:
sub, low, mid, mid-high and high frequency. You can adjust the center of each frequency
band to fine tune the acoustical response to your vehicle's interior.
1. Set all frequencies to the center position. The small dot on the control knob should
be set at 12 o'clock.
2. Play your favorite music track and adjust the individual controls to suit your taste.
Avoid extreme settings, which can distort musical peaks.
3. Increase or decrease the equalizer gain controls to suit your taste.
4. If your system includes a subwoofer, slowly increase the subwoofer level until you
hear a solid bass.
5. If your system includes rear speakers, adjust the fader control to add rear sound.
Set it so most of the music comes from the front and only fills the rear.
4
Setting the low-pass frequency
Set the low pass frequency switch on the top of the Equalizer to either 60Hz or
90 Hz depending on the subwoofer and subwoofer amplifier requirements.
Connecting an MP3 player or video unit
1. Plug the MP3 player or video unit into the auxiliary RCA input on the back of the
Equalizer unit.
2. Make sure the auxiliary button on the front of the unit is out, ready to receive input
from the main RCA input (not the auxiliary RCA input).
3. Turn the master volume to a normal listening level.
4. Press the play button on the auxiliary source.
5. Push in the AUX button to change to the auxiliary source.
6. Using a small flathead screwdriver, adjust the AUX gain controls located on the top
of the unit so that the volume of the auxiliary source matches the volume of the
main source.
Care and maintenance
Cleaning the cabinet
Use a soft, dry cloth to gently wipe dust and dirt from the unit.
Do not use benzene, thinner, car cleaner, or'ether cleaners. These substances may
damage the unit or cause the paint to peel.
Servicing the equalizer/crossover unit
In the event that trouble arises, never open the case or disassemble the unit. The
internal parts are not serviceable by the user. Opening any components will void the
warranty.
WARNING!
Changes or modifications to this product that are not approved
by the manufacturer will void the warranty and will violate FCC
approval.
5
Read these instructions and the following precautions carefully.
What is included in the box
In addition to this manual, the box contains:
•
7-band graphic equalizer
• Warranty card
•
2 mounting brackets
• User manu
•
8 Phillips-head screws
Before starting
Mounting precautions
This Equlizer can be mounted next to the source unit or under the dash using the
mounting brackets. The front panel controls should be easily accessible from the
driver's seat. In addition:
•
This unit requires additional mobile audio components for proper operation.
•
Always use great care when attaching anything to a vehicle! Check clearances in
front of, behind, and on both sides of the planned installation before drilling any
holes or installing any screws.
Wiring precautions
Disconnect the ground (-) terminal on the vehicle's battery.
WARNING!
To prevent short circuits during installation, always discon-
nect the vehicle's negative (-) battery lead before making any
connections.
•
This unit is exclusively for vehicles with a negative ground, 12V battery system.
•
A good chassis ground connection is critical to minimize resistance and avoid noise
problems. Use the shortest wire possible and securely connect it to the car chassis
and the source unit ground.
•
When routing RCA cables, keep the cables away from the power cables and output
speaker wires.
•
If you are using a source unit without a remote turn-on lead, the this unit can be
turned on with a switched accessory lead. This accessory power source is located
in the factory harness at the back of the radio. This lead turns on and off with the
ignition key.
•
Do not open the case. There are no user-serviceable parts inside. If you require
assistance, consult your dealer or an authorized dealer service center.
6
Tools and additional components
You will need:
•
A Phillips-head screwdriver when mounting the unit in the vehicle.
•
A small flat-head screwdriver to adjust the AUX gain controls if you connect an
MP3 player or video source.
•
High-quality RCA input and output cables.
Extra cable can cause signal loss and act as an antenna for noise. Use only highquality RCA cables that are no longer than necessary to make a direct connection
with the source unit and amplifiers.
Mounting diagram
7
Wiring diagram
@
Sou rce unit
Remote tum-on
~
Chassis ground
(bare metal)
L.!::==::::1 Front out
Ma'in in
R L
R
R L
Aearout
,
~
Front ~rear amp
Subourt
RL
L
R L
Auxin
- g~.
Sub
-
.. '~
~
~
8
6. Troubleshooting
The unit does not work; no lights
The power wires may not be connected. Check the power and ground wiring, then
retest.
Sound is distorted
• The source unit volume may be set too high. Reduce the source unit volume.
•
•
Equalizer gain controls are set too high. Turn the equalizer controls to the center
position and listen for distortion again. If the problem still occurs, see your authorized dealer.
Speakers may be damaged. Consult your authorized dealer.
No sound coming from the unit
•
The wrong input is selected. Press the AUX switch to turn the main inputs on.
•
No remote-on. Using a voltmeter, check for + 12V from the remote-on source.
9
Crossover. A device that limits the range of frequencies sent to a speaker or amplifier.
Equalization: the process of boosting or cutting sound signal frequencies to improve
the quality of the sound. The term comes from the filters used to add back high
frequencies at the receiving end of analog transmissions over wires.
Equalization band: the frequency range impacted by a specific filter.
dB: decibel, a measurement of the relative difference in power or intensity between
two acoustic signals
Gain control: gain is the amount of amplification (voltage, current or power) of an
audio signal expressed in dB
Graphic equalizer. a multi-band variable equalizer that uses mechanical controls to
adjust amplitude.
Hz: Abbreviation for Hertz, a unit of frequency equal to one cycle per second.
Octave: the musical principle of dividing sound frequencies into the eight notes of the
musical scale.
OEM: Original Equipment Manufacturer
RCA input/output: port through which sound travels in and out of the system; "RCA"
refers to the type of connector, which was originally manufactured by Radio Corporation
of America.
Slope: how fast the sound changes rated in dBs. The higher the dB number, the faster
the frequency drops off.
10
8. Specifications
Note
The technical data and the design of the equipment may change
without prior notice for the sake of technical improvements.
Graphic center frequencies: SOHz, 12SHz, 320Hz, 7S0Hz,2.2KHz,6KHz, 16KHz
Dual light selectable:
orange red and blue
Boost/cut:
12dB
SIN ratio:
100dB
Frequency response:
10Hz-SOkHz +1-1 dB
Maximum output voltage:
7V
THD:
O.OOS%
Input sensitivity:
SOmV - 3V
Head room:
20dB
Input impedance:
20kOhms
Output impedance:
2kOhms
Stereo separation:
82dB/1 kHz
Operating voltage:
11V-1SV negative ground
Size:
7" wide by 4 1/8" deep by 1" high
11
PRECAUTIONS FOR SAFETY
,
•
.Make sure to read the" manuanor safety precautions before installing unit or accessories.
.00 not install unit in location where it may obstruct or cause injury to driver or passengers .
.00 not install unit where it may be exposed to high temperatures,moisture,dust or any
foreign matter which will damage unit and cause it to malfunction .
.00 not watch TV/Monitor while driving.
MEMO