1
GPS105
Operating Manual
&
Quick Start
Guide
GPS Transceiver
with an
Integrated
UHF Radio
To bring outstanding wireless communication products
to people's lives throughout the world.
WARNINGS & NOTIFICATIONS
When using the GPS105 in a motor vehicle it is the user's responsibility to
ensure operating the GPS105 does not detract from the safe operation of the
vehicle.
For safety reasons it is not recommended that a driver change any settings
while in motion. Please come to a complete stop or have a passenger make
changes if necessary.
The latitude, longitude, and altitude indications on the display are based on
WGS-84 Datum, and the altitude indication may not appear depending on the
signal conditions from GPS satellites.
The compass heading (directional pointer) shown on the display is referenced
to the GPS105's last forward movement.
When viewing the compass heading the GPS105 must be facing in the
direction of the last forward movement in order to read the compass heading
correctly.
GPS signal reception can be affected by the location of satellites, tall
buildings, tunnels, bridges, etc. If the GPS105 is not receiving a signal, you
will need to change your location until a signal is received.
The Global Positioning System is operated and maintained by the US
Government. The US Government is completely responsible for the accuracy of
the Global Positioning System.
The US Government reserves the right to make changes to the Global
Positioning System in accordance with the Department of Defence civil GPS
user policy and the Federal Radio navigation plan. These changes along with
poor satellite geometry could cause inaccurate readings.
i
Quick Start
Guide
The Quick Start Guide pages are designed to allow you to install and operate your GPS105 as quickly as possible,
however it does not attempt to explain any of the advanced features of the GPS105 unit.
INSTALLING YOUR GPS105
Please consider the following before installing.
The GPS105 is designed to fit into a standard car stereo (DIN) fitting.
You may also use the supplied bracket & fasteners to mount the GPS105 in other locations.
The GPS105 uses a UHF antenna and a GPS internal antenna.
For a UHF antenna (not supplied) please follow the manufacturers instructions for installation.
It is recommended that the UHF and GPS antenna are mounted separately.
! If placing the GPS internal antenna on the dashboard or the rear parcel shelf then ensure the UHF antenna is
fitted towards the opposite end of the vehicle or fitted centre of the roof top.
!
!
The GPS105 runs on positive 13.8V DC, negative earth.
The positive wire is fused at 2 Amps.
With some vehicles, the window tint may prevent the GPS Internal Antenna from
acquiring a signal. In such a case, an optional External GPS antenna may be used.
ii
2
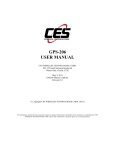
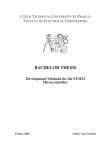
CONNECTING YOUR GPS105
EXTERNAL SPEAKER JACK
BACK PANEL
GPS ANTENNA CONNECTOR
UHF ANTENNA CONNECTOR
DC POWER CORD
Microphone Socket
i. Remove fuse from fuse holder along power lead.
ii. Connect 13.8V supply to the power lead making sure positive is applied to the red wire and
ground to the black wire.
iii. Connect the UHF Antenna with PL259 fitting (not included).
iv. Connect the GPS Internal Antenna.
v. Make sure the Power Switch knob is OFF (see Controls page 4).
vi. Re-insert the fuse into the fuse holder.
vii. Connect microphone plug to microphone socket.
An optional External Speaker may be connected via the External Speaker Jack. When the
external speaker is connected the internal speaker is automatically disconnected.
The connecting wire must use a 3.5mm miniature plug.
iii
3
TEST FOR A GPS SIGNAL
i. Turn the GPS105 ON.
ii. The Welcome display will appear.
SEARCHING FOR
INSTANT
iii. After 3 seconds the initial display will switch to the UHF-CB display.
iv. At the top of the display the unit will indicate it is searching for satellite information.
Make sure the GPS antenna has an unobstructed view of the sky.
For the initial power up it may take up to 15 minutes to secure satellite information.
When satellite data has been retrieved 'SEARCHING FOR SATELLITE' will disappear and
'GPS' will show at the top of the display.
If the unit continues to indicate searching for satellite beyond 15 minutes try holding
the GPS Internal Antenna outside of the vehicle. If satellite data is then retrieved and
'GPS' appears then the vehicle windscreen may have a tint which interferes with the
GPS signal. An optional External GPS Antenna may be fitted.
In this case an external GPS Antenna may be used in place of the internal antenna.
v. Turn OFF the unit and replace the GPS antenna if required and repeat steps i to iv.
vi. Secure all fittings.
iv
SETTING USER NAME
4
You may personalize your GPS105 by setting a User name which will appear at the top of the display. The User name
also forms part of your call ID when communicating to radios using similar technology (GPS105 or GPS205) on
channel 22 or 23.
To set your Username:
i.
Press & hold
ii. Press
iii. Press
MENU
to bring up the menu list.
and scroll down until USER NAME is highlighted.
ENT
.
iv. Enter Name:
v.
Press
or
to select desired character.
Press
or
to move to previous or next character.
Press
ENT
to confirm.
!
!
Username cannot include blank spaces.
The user name may be up to 12 characters long.
v
SEND POSITION ON
5
The SEND POSITION function enables the GPS105 to transmit your User name and position on channels 22 and 23.
The factory setting for this feature is OFF.
Current regulations permit enabling the SEND POSITION function to operate on Channels
22 and 23 only. The SEND POSITION will be OFF from the factory.
To turn SEND POSITION ON:
i. Press & hold MENU to bring up the menu list.
ii. Scroll
to highlight SENDPOSITION.
iii. Press ENT .
iv.
v.
Press
Press
ENT
to select ON.
to confirm setting.
End of
Quick Start
Guide
vi
CONTENTS
Warnings & Notifications...................................................................................................................................................i
Quick Start Guide.............................................................................................................................................................ii
Installing Your GPS105..................................................................................................................................ii
Connecting Your GPS105..............................................................................................................................iii
Test For A GPS Signal.....................................................................................................................................iv
Setting User Name..........................................................................................................................................v
Send Position ON..........................................................................................................................................vi
Contents..........................................................................................................................................................................1
Introduction....................................................................................................................................................................3
Features...........................................................................................................................................................................3
Controls...........................................................................................................................................................................4
Indicators........................................................................................................................................................................5
Included With Your GPS105.............................................................................................................................................6
UHF-CB Operation...........................................................................................................................................................7
Setting The Squelch.......................................................................................................................................7
Selecting A Channel.......................................................................................................................................8
To Transmit And Receive................................................................................................................................8
To Operate In Duplex Mode (Repeaters)........................................................................................................9
Scanning with Priority Channel....................................................................................................................10
Scanning - Scan Memory..............................................................................................................................10
Reply Delay..................................................................................................................................................10
Instant Channel..........................................................................................................................................11
CTCSS (Continuous Tone Coded Squelch System)......................................................................................11
BCLO (Busy Channel Lock Out) Feature......................................................................................................11
Key Beep ON/OFF.........................................................................................................................................12
Roger Beep..................................................................................................................................................12
1
CONTENTS
GPS Operation...........................................................................................................................................................13
Speed Warning............................................................................................................................................13
Early Warning Safety Alerts...........................................................................................................................14
Warning Volume..........................................................................................................................................14
Caller Display...............................................................................................................................................15
CALLER ID Memories...................................................................................................................15
To Store The Caller Into MY POI.....................................................................................................15
Mark Location.............................................................................................................................................16
Quick Access Locations.................................................................................................................16
MY POI Locations..........................................................................................................................17
Edit/Delete MY POI.......................................................................................................................18
Add Or Delete Safety Alert..............................................................................................................19
Navigation...................................................................................................................................................20
Navigate To Quick Access...............................................................................................................21
Navigate To CALLER.....................................................................................................................21
Navigate To MY POI.......................................................................................................................22
Navigate To STATE/CITY.................................................................................................................23
TRIP Computer............................................................................................................................................24
To Reset TRIP Computer..............................................................................................................................24
My Position..................................................................................................................................................25
LCD Contrast...............................................................................................................................................25
UHF Channels & Frequencies....................................................................................................................................26
CTCSS Tone List.........................................................................................................................................................26
Troubleshooting........................................................................................................................................................27
Warranty....................................................................................................................................................................28
2
INTRODUCTION
The Uniden GPS105 is designed to provide you with years of trouble free service. It's rugged components and
materials are capable of withstanding harsh environments.
We are certain that you will enjoy your GPS105. Please read this operating Manual carefully to ensure you gain the
optimum performance of the unit.
FEATURES
! Backlit LCD Display
! Key Beep ON/OFF
GPS FUNCTIONS
!
!
!
!
!
!
!
!
Navigation to pre-programmed Australian and New Zealand cities and suburbs
Mark and delete up to 500 of your own locations
Fixed Speed Camera Warning
Red Light Camera Warning
Black Spot Warning
My Position Display
20 Caller ID Memories*
Trip Computer
UHF-CB
!
!
!
!
!
!
!
!
!
Transmit & Receive on 40 UHF channels
Duplex capability
Scan with Priority CH Watch
Scan Memory ON/OFF
Roger Beep ON/OFF
BCLO (Busy Channel Lock Out) Function
Send, Receive and Navigate your Position with GPS CALLER ID*
38 Built in CTCSS (Continuous Tone Coded Squelch System) Codes
Selectable INSTANT Channel
* To benefit from these features, transmission needs to be with another compatible Uniden GPS product
(GPS105 or GPS205) on channel 22 or 23.
3
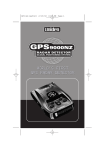
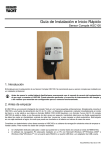
CONTROLS
GPS105
1
7
1.
3
2
8
10
4
5
9
LCD Display
2.
SCAN
3.
NAVI
/MEM - Scan Key/Memory Key
- Navigation Key
4.
VOL/SQ - Centre Knob (Power-VOLUME): Turns the Power ON/OFF and adjusts the Volume.
Outer Ring (SQUELCH): Adjusts the Squelch
5.
PTT - Push to Talk(PTT) switch
6.
Channel Instant - Instant Channel switch
7.
Speaker
8.
DISP
/MENU/
- Display key/ Menu key/ Back to previous Display key
9.
ENT
/MARK/
- Enter key/ Mark key/ Move to next Display key
10. SCROLL -
up,
down,
left,
right keys or
4
6
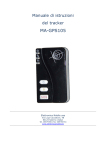
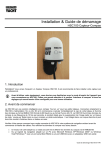
INDICATORS
12 13
11
14
15
16
17
18
20
19
UHF-CB Display
11 GPS - GPS status icon
16 MEMORY icon
12 USER NAME - An example (MICHAEL) is shown
17 CTCSS icon
13 BUSY - Receive icon
18 SCAN icon
14 INSTANT - Channel Instant icon
19 CTCSS Channel indicator
15 DUPLEX icon
20 Channel indicator
5
INCLUDED WITH YOUR GPS105
5
GPS10
al
ng Manu
Operati &
Quick StaGurtide
sceiver
GPS Tran
with an
Integrated
io
UHF Rad
GPS105 Owners Manual
Microphone
Microphone Hanger Screws
and washers
Mounting Bracket, Knobs,
Rubber washer, Washer Stars
and Screws.
DC Power Cord with fuse
GPS Internal Antenna
If any of these items are missing from the box, contact your dealer immediately.
6
UHF CB - OPERATION
All UHF-CB functions are only available when in UHF-CB mode.
SETTING THE SQUELCH
1. To turn the unit ON, rotate VOL knob clockwise. Adjust volume to a comfortable level.
2. Think of the Squelch control as a gate. If you turn SQUELCH
fully clockwise it raises the "Squelch Gate" so
that no signals get through.
3. If you turn the SQUELCH fully counter clockwise, it lowers the
"Squelch Gate" so that everything gets through - noise,
weak signals and strong signals.
4. To set the "Squelch Gate" to the desired level, turn SQUELCH
counter clockwise until you hear noise. Then turn the SQUELCH
clockwise just until the noise stops. Now only strong and medium
signals get through.
7
UHF CB - OPERATION
SELECTING A CHANNEL
The GPS 105 uses the 40 UHF-CB Channels. For your reference a list of the available channels and corresponding
frequencies is printed on page 26.
To select a desired channel in UHF-CB Mode:
1. Press
or
2. Press and hold
momentarily to step up or down a channel.
or
to rapidly step up or down channels.
TO TRANSMIT AND RECEIVE
1. Before you transmit, listen for activity on the selected channel.
2. When the channel is clear, press and hold the PTT to transmit.
‘TX’ will flash on the LCD.
3. Hold the microphone approximately 5 cm in front of your mouth.
Speak in a clear, normal conversational voice.
4. When you have finished speaking, release the PTT and listen for a response. 'TX' then disappears on the LCD.
While receiving, the 'BUSY' icon will flash on the display.
Transmit will not occur if: The unit detects that the channel is busy when using the
CTCSS function with BCLO (page11).
8
UHF CB - OPERATION
TO OPERATE IN DUPLEX MODE (REPEATERS)
The Duplex function enables you to access local repeater stations. You can only activate Duplex from CH01-CH08.
UHF CB Repeaters are used to retransmit or relay your signal.
Repeaters will extend the range of your radio and overcome the shielding effect caused by solid obstructions.
Contact a retailer for a list of repeaters available in your area.
Operation with the aid of a Repeater
To turn DUPLEX ON/OFF:
1. Select the channel of the repeater in your area (CH01 - CH08).
2. Press & hold
3. Scroll
4. Press
5. Press
MENU
.
to highlight DUPLEX.
ENT
.
or
to select ON or OFF as desired.
6. Press ENT to confirm selection.
'DUPLEX' will appear when a duplex channel is used only if duplex is turned ON.
If DUPLEX is selected from the MENU options when the channel is not from
CH01 - CH08, an error tone sounds.
9
UHF CB - OPERATION
SCANNING with PRIORITY CHANNEL
The scan function scans channels that are in the scan memory and stops at an active channel. Whichever channel
you have selected when SCAN begins becomes the Priority Channel. SCAN will check the priority channel every 1.5
seconds.
To initiate scanning:
1. Press
SCAN
momentarily to begin scanning. The SCAN icon flashes on the display.
2. Press PTT, INSTANT or any function key to cancel SCAN.
If SCAN is cancelled while stopped on a busy channel that channel will be the exit channel.
If SCAN is cancelled while scanning then the unit will exit to the priority channel which is the current channel when
SCAN is turned ON.
SCANNING - SCAN MEMORY
You can only scan channels which are currently in the scan memory. By default all channels are active in the scan
memory.
To add or remove channels from the scan memory:
1. Select a channel using scroll
2. Press and hold
MEM
or
.
.
REPLY DELAY
While scanning, the GPS105 stops at a busy channel and receives a transmission.
When the received signal is over, the unit will wait for 3 seconds for the return of the signal, otherwise the radio
resumes scanning.
10
UHF CB - OPERATION
INSTANT CHANNEL
The Instant Channel feature enables a chosen channel to be called at the press of a button. Only one channel at a
time is designated as the Instant Channel.
To register or change the Instant channel:
1. Select a channel using scroll
or
.
2. Press and hold the Instant Channel button. 'INSTANT' will appear on the UHF-CB display for the channel
selected.
To use Instant Channel:
Press the Instant Channel button momentarily when in the UHF-CB mode to instantly change to the Instant channel
and that channel will be automatically called.
CTCSS (Continuous Tone Coded Squelch System)
CTCSS is a feature that allows a group to talk to each other without hearing other users on the same channel.
To activate CTCSS on a current channel:
1. Press & hold
2. Scroll
MENU
.
to highlight CTCSS.
3. Press ENT .
The CTCSS Tone will appear for the current channel.
4. USE
5. Press
or
ENT
to select desired CTCSS tone.
to confirm.
Channels 5 and 35 are used as emergency channels. CTCSS will not operate on these
channels.
BCLO (Busy Channel Lock Out) Feature
The BCLO feature functions automatically when using a channel with CTCSS ON. If attempting to transmit on a
channel with CTCSS ON and that channel is busy the BCLO feature will prevent transmission until the channel
becomes clear.
11
UHF CB - OPERATION
KEY BEEP ON/OFF
Your radio emits a beep each time one of the keys (except for the PTT button) is pressed.
To turn Key Beep ON/OFF:
1. Press & hold
2. Scroll
3. Press
to highlight KEY BEEP.
.
ENT
4. Press
5. Press
.
MENU
or
to select ON or OFF.
to confirm.
ENT
ROGER BEEP
Roger Beep is a BEEP that is sent to notify the end of transmission.
Roger Beep can be heard through the speaker when Key Beep is on. Roger Beep is transmitted even if Key Beep is
turned off. However, Roger Beep will not be heard from the speaker.
To turn Roger Beep ON/OFF:
1. Press & hold
2. Scroll
3. Press
.
to highlight ROGERBEEP.
ENT
4. Press
5. Press
MENU
.
or
ENT
to select ON or OFF.
to confirm.
12
GPS OPERATION
The GPS antenna must have an unobstructed view of the sky for the GPS105 to retrieve satellite data which is used for
the GPS features described on pages 13 to 25.
Current regulations permit the SEND POSITION to operate on Channels 22 and 23 only.
To comply with current regulations, Uniden recommends not to transmit data more than
10 times within an hour on channels 22 and 23.
SPEED WARNING
OPERATION FLOW
Press & hold
SPEEDWARNING
MENU
ENT
ENT
If the current speed that the GPS105 is moving at exceeds the SPEEDWARNING alert setting then a warning tone will
sound and this POP UP Speed Alert will show. The current speed will be indicated. The display remains until the
moving speed falls below the Alert Setting.
Press
DISP
to cancel the alert.
To set a moving speed warning limit:
1. Press & hold
2. Scroll
3. Press
to bring up the menu list.
to highlight SPEEDWARNING.
ENT
4. Press
5. Press
MENU
.
to adjust speed warning to desired level.
ENT
to confirm.
13
EARLY WARNING SAFETY ALERTS
The GPS105 has a preprogrammed memory that will alert you of Fixed Speed Camera, Red Light Camera or Black
Spot. These displays automatically pop up and an alert tone sounds when approaching within 400m and 160m of the
alert location.
Press DISP to cancel the alert.
FIXED SPEED CAMERA
RED LIGHT CAMERA
BLACK SPOT
160m
400m
Camera
WARNING VOLUME
OPERATION FLOW
Press & hold
WARNING VOL
MENU
ENT
ENT
To set the volume for the safety alerts (FIXED CAMERA, RED CAMERA, BLACK SPOT & SPEED WARNING) with this
function:
1. Press & hold
2. Scroll
3. Press
to bring up menu list.
to highlight WARNING VOL.
ENT
4. Press
5. Press
MENU
.
to adjust volume setting (8 levels:0-7, 0 is OFF).
ENT
to confirm.
14
CALLER DISPLAY
The caller display information received from another radio using similar technology
on channels 22 and 23 will POP UP at the end of a received transmission.
GPS
The information includes :
! Callers USER NAME.
! Distance to where call was transmitted from.
! Estimated time of arrival from your location to position of caller calculated at your
average moving speed.
For compass heading & distances to appear the
GPS105 requires a moving direction. If '?'
appears on the display please move forward to obtain
direction.
GPS
CALLER ID Memories
The GPS105 automatically stores CALLER ID data. It will store up to 20 sets of the
user name, last received GPS position and the day / month are stored.
Once 20 Callers are stored the oldest data is dropped from the list when new callers are added.
?
___m
A caller's user name is stored in the caller list only once. If the caller calls again their
information is updated, not repeated.
The POP UP CALLER will remain for 10 seconds and then return to the previous display.
If you wish to keep the POP UP CALLER DISPLAY on the screen for longer then within the 10 second period press
To navigate to CALLER see page 21.
ENT
.
To Store the Caller into MY POI
If you wish to store the caller's information as a MY POI (my point of interest to navigate back to in future) then:
While the POP UP CALLER DISPLAY shows:
1. Press
2. Press
ENT
two times within 1 second.
to select YES.
3. Press ENT to confirm.
To navigate to MY POI see page22.
If you save the information from a caller already stored in MY POI then the information is
updated and not repeated.
15
MARK LOCATION
Mark Location is used to store in memory a location, which may be used in future as a point to navigate back to, or
safety alert location.
QUICK ACCESS LOCATIONS
The quick access locations are to mark your HOME, OFFICE, HOTEL, AIRPORT or BOATRAMP locations. You may
mark the location with the current GPS coordinates or adjust the coordinates to suit.
OPERATION FLOW
Example
PRESS & HOLD
HOME
MRK
Example
ENT
°
ENT
°
1. Move the GPS105 to the location you wish to mark, or have the desired
coordinates at hand.
2. Press and hold
MRK
.
3. Scroll
to highlight desired quick access name.
4. Press ENT .
The quick access display appears with the quick access name and the current GPS coordinates:
If no GPS is available the last GPS position appears.
5. You may change the longitude & latitude values by pressing
to change the value.
6. Press
ENT
to move the cursor and pressing
to confirm.
! The longitude and latitude coordinates must be valid coordinates in the South
Pacific Area.
! The coordinates are displayed in WGS-84 data format.
16
MY POI LOCATIONS
You may mark up to 500 locations into MY POI (My Point Of Interest). Each location may be personalised with a
name.
OPERATION FLOW
PRESSPRESS
& HOLD
MRK&
HOLD
MY POI
Example
Choose
name/
coordinates
0001_____
ENT
ADD
ENT
ENT
1. Move the GPS105 to the location you wish to mark as MY POI, or have the desired coordinates at hand.
2. Press and hold
MRK
3. Scroll
to highlight MY POI.
4. Press
ENT
.
5. Scroll
6. Press
to bring up the mark location list.
to highlight ADD.
ENT
.
7. MY POI display appears with the next available memory number and the current coordinates.
You can move the cursor by pressing
pressing
or
.
or
and can adjust the name and coordinate readings by
CAMP
8. When satisfied with the name and coordinates press
ENT
to confirm.
! If the name already exists or the coordinates are invalid an error message
will appear.
! The longitude and latitude coordinates must be valid coordinates in the
South Pacific Area.
! Coordinates are displayed in WGS84 data format.
17
EDIT/DELETE MY POI
OPERATION FLOW
PRESS & HOLD
PRESS
MRK &
HOLD
MY POI
Example
2. Scroll
3. Press
MRK
ENT
BOB_______
ENT
to bring up Mark Location List.
to highlight MY POI.
ENT
.
4. Scroll
5. Press
ENT
Example
AAAAAAAAAAAAAA
1. Press and hold
EDIT
ENT
to highlight EDIT or DELETE.
ENT
.
6. The EDIT or DELETE MY POI name list appears in Alpha-numeric order.
To find a name you may scroll
. To shortcut to the capital letter of the name press
the capital letter on the right of the display. Then scroll
to the desired letter. Press
to the name list.
7. Press
ENT
to highlight
to move back
to confirm name selection.
8. If you have chosen EDIT you may use the
buttons to edit the name and the coordinates.
If you have chosen DELETE the delete confirmation display appears. Press
to select delete YES or NO.
9. When satisfied with the edit or ready to delete, press
ENT
to confirm.
If a key is not pressed within 60 seconds Edit/Delete MY POI is cancelled.
18
ADD or DELETE SAFETY ALERT
You can store into memory new safety alert (Fixed Speed Camera, Red Light Camera or Black Spot) locations.
If the GPS105 is within 400m of a stored Safety Alert or OPTION location then you can delete this from memory.
The OPTION feature is currently unavailable but may in future be pre-programmed with
points of interest.
OPERATION FLOW
Example
Example
PRESSPRESS
& HOLD
MRK&
HOLD
RED CAMERA
ADD
ENT
Example
°
ENT
ENT
°
1. Move the GPS105 to an alert location you wish to add or delete.
2. Press and hold
3. Scroll
4. Press
to bring up Mark Location List.
to highlight SPEED CAMERA or RED CAMERA or BLACK SPOT or OPTION.
ENT
.
5. Scroll
6. Press
MRK
to highlight ADD or DELETE.
ENT
.
7. When ADD is selected your current GPS location is displayed. You may edit the coordinates using the scroll
buttons.
When DELETE is selected press
8. When ready, press
ENT
or
to select delete YES or NO.
to confirm.
If a key is not pressed within 60 seconds Add or Delete Safety Alert is cancelled.
19
NAVIGATION
The navigation feature allows you to select a desired stored location point to navigate to. The location point can be a
pre-installed state, city or suburb, quick access location, MY POI or CALLER from the caller list.
When navigating to a location point the navigation or NAVI Display alternates as follows:
5 Seconds Later
SUZAN
GPS
N
E
W
S
SUZAN
GPS
5 Seconds Later
DISTANCE
N
E
W
S
TIME TO GO
14.7km
16hr22min
If PTT is pressed the UHF-CB Display will appear. When transmission is complete the display will return to NAVI
Display after 5 secs.
When approaching within 160m and 20m of the set destination the NAVI ARRIVE Tone will sound.
The compass heading (directional pointer) is referenced to the GPS105's last
forward movement.
When viewing the compass heading the GPS105 must be facing in the
direction of the last forward movement in order to read the compass heading
correctly.
20
Navigate to Quick Access
OPERATION FLOW
Example
PRESS
OFFICE
NAVI
1. Press
NAVI
ENT
.
2. Scroll
to highlight desired Quick Access Name.
3. Press
ENT
Press
to switch between UHF-CB, NAVI & TRIP COMPUTER displays.
DISP
. NAVI display appears.
To Cancel Navigation press
NAVI
then press
ENT
.
Navigate to CALLER
OPERATION FLOW
Example
PRESS
CALLER
NAVI
1. Press
NAVI
.
2. Scroll
3. Press
to highlight CALLER.
ENT
4. Scroll
5. Press
Press
DISP
SUZAN
ENT
.
to desired caller.
ENT
. NAVI display appears.
to switch between UHF-CB, NAVI & TRIP COMPUTER displays.
To Cancel Navigation press
NAVI
then press
ENT
.
21
ENT
Navigate to MY POI
OPERATION FLOW
PRESS
Example
MY POI
NAVI
1. Press
NAVI
.
2. Scroll
3. Press
PARK
ENT
to highlight MY POI.
ENT
4. Scroll
.
to find a desired name.
To shortcut to the capital letter of the name:
Press
to highlight the capital letter on the right of the display.
Scroll
to the desired letter.
Press
to move back to the name list.
5. Press
Press
DISP
ENT
. NAVI display appears.
to switch between UHF-CB, NAVI & TRIP COMPUTER displays.
To Cancel Navigation press
NAVI
then press
ENT
.
22
ENT
Navigate to STATE/CITY
OPERATION FLOW
Example
PRESS
STATE/CITY
NAVI
NSW
ENT
Example
ACACIA PK
ENT
1. Press
NAVI
2. Scroll
ENT
.
to highlight STATE/CITY.
3. Press ENT .
The list of Australian States and NZ appears.
4. Scroll
5. Press
to desired state.
ENT
. The City/Suburb list appears.
6. Scroll
to desired City or suburb.
To shortcut to the capital letter of the name:
Press
to highlight the capital letter on the right of the display.
Scroll
to the desired letter.
Press
to move back to the name list.
7.
Press
Press
DISP
ENT
. NAVI display appears.
to switch between UHF-CB, NAVI & TRIP COMPUTER displays.
To Cancel Navigation press
NAVI
then press
ENT
.
23
TRIP COMPUTER
The GPS105 can indicate COMPASS heading and the present speed, average speed, maximum speed and the distance
travelled through the TRIP COMPUTER.
Press
DISP
to switch between UHF-CB, NAVI (if navigating) & TRIP COMPUTER displays.
The TRIP displays alternate automatically as follows:
After 5 sec
TRIP
GPS
SPEED
N
E
W
S
TRIP
GPS
k
N
h
AVG SPD
72h
k
W
SPEED, AVG SPD DISPLAY
DIRECTION
SPEED
E
S
TRIP
GPS
k
N
E
k
W
S
MAX SPD
h
SPEED, MAX SPD DISPLAY
DIRECTION
After 5 sec
After 5 sec
OPERATION FLOW
TRIP RESET
MENU
1. Press & hold
2. Scroll
3. Press
ENT
to bring up menu list.
to highlight TRIP RESET.
ENT
4. Press
5. Press
MENU
ENT
.
or
ENT
to select YES.
to confirm.
24
DIST
k
h
99999km
SPEED, DIST DISPLAY
DIRECTION
TO RESET TRIP COMPUTER
Press & hold
SPEED
h
MY POSITION
OPERATION FLOW
Press & hold
MENU
MY POSITION
ENT
Your current GPS coordinates can be viewed with this
selection.
1. Press & hold MENU to bring up the menu list.
MY POSITION appears as the first highlighted selection.
2. Press ENT to confirm selection.
My Position display appears with your current GPS coordinates.
3. Press
ENT
or
DISP
to exit.
coordinates are displayed in WGS84 format.
LCD CONTRAST
OPERATION FLOW
Press & hold
LCD CONTRAST
MENU
1. Press & hold
2. Scroll
3. Press
ENT
to bring up the menu list.
to highlight LCD CONTRAST.
ENT
4. Press
5. Press
MENU
ENT
.
to adjust contrast level (8 levels 0-7).
ENT
to confirm.
25
UHF CHANNELS
& FREQUENCIES
UHF
CHANNELS
& FREQUENCIES
Simplex Mode
Duplex Mode
CH
Transmit / Receive
Transmit
No. Frequency (MHz) Frequency (MHz)
476.425
476.450
476.475
476.500
476.525
476.550
476.575
476.600
476.625
476.650
476.675
476.700
476.725
476.750
476.775
476.800
476.825
476.850
476.875
476.900
1
2
3
4
5
6
7
8
9
10
11
12
13
14
15
16
17
18
19
20
477.175 CH31
477.200 CH32
477.225 CH33
477.250 CH34
477.275 CH35
477.300 CH36
477.325 CH37
477.350 CH38
CH
No.
Simplex Mode
Transmit / Receive
Frequency (MHz)
476.925
476.950
476.975
477.000
477.025
477.050
477.075
477.100
477.125
477.150
477.175
477.200
477.225
477.250
477.275
477.300
477.325
477.350
477.375
477.400
21
22
23
24
25
26
27
28
29
30
31
32
33
34
35
36
37
38
39
40
Channels 05 and 35 are Emergency Channels and Channel 11 is a Calling
Channel. Channels 22 and 23 are used for telemetry and telecommand
applications, voice communications are not permitted on these channels.
CTCSS TONE LIST
Code No.
00("oF")
01
02
03
04
05
06
07
08
09
10
11
12
Freq. (Hz)
OFF
67.0
71.9
74.4
77.0
79.7
82.5
85.4
88.5
91.5
94.8
97.4
100.0
Code No.
Freq. (Hz)
Code No.
Freq. (Hz)
13
14
15
16
17
18
19
20
21
22
23
24
25
103.5
107.2
110.9
114.8
118.8
123.0
127.3
131.8
136.5
141.3
146.2
151.4
156.7
26
27
28
29
30
31
32
33
34
35
36
37
38
162.2
167.9
173.8
179.9
186.2
192.8
203.5
210.7
218.1
225.7
233.6
241.8
250.3
26
TROUBLESHOOTING
If your GPS105 does not perform to your expectations, try the suggestions listed below.
Unit does not operate.
! Check the 2 Amp fuse in the power lead.
No GPS Detection.
! Make sure the GPS antenna has an
Cannot send or
receive Caller ID.
! Make sure you are communicating with a
unobstructed view of the sky.
compatible unit on channels 22 or 23.
! Check that SEND POSITION is set to ON
(Quick Start Guide step 5).
Does not operate in
Duplex mode.
! Make sure you select channels 1-8 for
Duplex operation.
! Check that you are within range of a local
repeater station.
27
WARRANTY
UNIDEN GPS105 UHF CB RADIO WITH GPS
Limited One Year Warranty
Please keep your sales docket as it provides evidence of warranty.
Warrantor: Uniden Australia Pty Limited ABN 58 001 865 498
Uniden New Zealand Limited
Warranty only available in original country of purchase
Elements of Warranty: Uniden warrants to the original retail owner for the duration of this warranty, its GPS105
UHF CB Transceiver Radio with GPS (hereinafter referred to as the Product) to be free from defects in materials and
craftsmanship with only the limitations or exclusions set out below.
Warranty Duration: This warranty to the original retail owner only, shall terminate and be of no further effect ONE
(1) Year after the date of original retail sale. This warranty will be deemed invalid if the Product is; (A) Damaged or
not maintained as reasonable and necessary, (B) Modified, altered or used as part of any conversion kits,
subassemblies, or any configurations not sold by Uniden, (C) Improperly installed, (D) Repaired by someone other
than an authorised Uniden Repair Agent for a defect or malfunction covered by this warranty, (E) Used in conjunction
with any equipment or parts or as part of a system not manufactured by Uniden, (F) Installed, programmed or
serviced by anyone other than an authorised Uniden Repair Agent, or (G) Where the Serial Number label of the
product has been removed or damaged beyond recognition.
Parts Covered: This warranty covers for 1 year, the UHF CB Transceiver. Accessories: Internal GPS Antenna,
microphone etc is covered for 90 days.
Statement of Remedy: In the event that the product does not conform to this warranty at any time while this
warranty is in effect, the warrantor at its discretion, will repair the defect or replace the product and return it to you
without charge for parts and service. This warranty does not cover provide for the reimbursement or payment of
incidental or consequential damages.
THIS GUARANTEE IS IN ADDITION TO AND DOES NOT IN ANY WAY AFFECT YOUR RIGHTS UNDER THE CONSUMER
GUARANTEE ACT.
Procedure for Obtaining Performance or Warranty: In the event that the Product does not conform to this
warranty, the Product should be shipped or delivered, freight prepaid, with evidence of original purchase, (eg. a copy
of the sales docket), to the warrantor at:
UNIDEN AUSTRALIA PTY LIMITED
Service Division
345 Princes Highway,
Rockdale, NSW 2216
Fax (02) 9599 3278
www.uniden.com.au
UNIDEN NEW ZEALAND LIMITED
Service Division
150 Harris Road,
East Tamaki, Auckland
Fax (09) 274 4253
www.uniden.co.nz
Customers in other states should ship or deliver the Product freight pre-paid to the nearest Uniden Authorised Repair
Centre. (Contact Uniden for the Warranty Agent nearest you.)
28
FOR PURCHASING A UNIDEN PRODUCT
THANK YOU
© 2004
Uniden Australia Pty Limited
Uniden New Zealand Limited
Printed in China
UTZZ01926ZZ