1
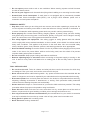
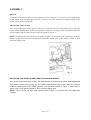
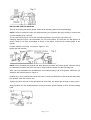
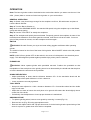
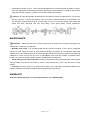
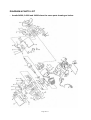
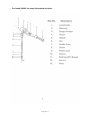
BENCH GRINDER
USER’S MANUAL
WARNING:
Read carefully and understand all ASSEMBLY AND OPERATION
INSTRUCTIONS before operating. Failure to follow the safety rules and
other basic safety precautions may result in serious personal injury.
Item#s 24288,24289,24290
Thank you very much for choosing a Wel-Bilt™ product. For future reference, please complete
the owner’s record below:
Model: _______________
Purchase Date: _______________
Save the receipt, warranty and these instructions. It is important that you read the entire manual
to become familiar with this product before you begin using it.
This air tank is designed for certain applications only. The distributor cannot be responsible for
issues arising from modification. We strongly recommend this item not be modified and/or used
for any application other than that for which it was designed. If you have any questions relative to
a particular application, DO NOT use this product until you have first contacted the distributor to
determine if it can or should be performed on the product.
For technical questions please call 1-800-222-5381.
INTENDED USE
This bench grinder is designed for general metal grinding and sharpening.
TECHNICAL SPECIFICATIONS
Item#
Description
Voltage/
Frequency
Power
Rated Running
Speed
Wheel Size
24288
6in. bench grinder
with work lamp
120V / 60Hz
1/2 HP
3560 RPM
6in. x 13/16in. x
1/2in.
24289
6in. bench grinder
120V / 60Hz
1/2 HP
3560 RPM
6in. x 13/16in. x
1/2in
24290
8in. bench grinder
120V / 60Hz
1/2 HP
3560RPM
8in. x 13/16in. x
5/8in.
GENERAL SAFETY RULES
WARNING! Read and understand all instructions. Failure to follow all instructions listed
below may result in electric shock, fire and/or serious injury.
WARNING! The warnings, cautions, and instructions discussed in this instruction
manual cannot cover all possible conditions or situations that could occur. It must be
understood by the operator that common sense and caution are factors which cannot be
built into this product, but must be supplied by the operator.
SAVE THESE INSTRUCTIONS
WORK AREA
• Keep work area clean, free of clutter and well lit. Cluttered and dark work areas can cause
accidents.
• Do not use your tool where there is a risk of causing a fire or an explosion; e.g. in the
presence of flammable liquids, gasses, or dust. Power tools create sparks, which may ignite the dust
or fumes.
Page 2 of 13
• Keep children and bystanders away while operating a power tool. Distractions can cause you
to lose control, so visitors should remain at a safe distance from the work area.
• Be aware of all power lines, electrical circuits, water pipes and other mechanical haz-ards in
your work area, particularly those hazards below the work surface hidden from the operator's view
that may be unintentionally contacted and may cause personal harm or property damage.
• Be alert of your surroundings. Using power tools in confined work areas may put you
dangerously close to cutting tools and rotating parts.
ELECTRICAL SAFETY
WARNING! Always check to ensure the power supply corresponds to the voltage on the plate.
• Do not abuse the cord. Never carry a portable tool by its power cord, or yank tool or extension
cords from the receptacle. Keep power and extension cords away from heat, oil, sharp edges or
moving parts. Replace damaged cords immediately. Damaged cords may cause a fire and increase
the risk of electric shock.
• Grounded tools must be plugged into an outlet properly installed and grounded in accor-dance
with all codes and ordinances. Never remove the grounding prong or modify the plug in any way. Do
not use any adapter plugs. Check with a qualified electrician if you are in doubt as to whether the
outlet is properly grounded.
•
Double insulated tools are equipped with a polarized plug (one blade is wider than the other).
This plug will fit in a polarized outlet only one way. If the plug does not fit fully in the outlet, reverse
the plug. If it still doesn't fit, contact a qualified electrician to install a polar-ized outlet. Do not change
the plug in any way.
•
Avoid body contact with grounded surfaces such as pipes, radiators, ranges, and refrig-erators.
There is an increase risk of electric shock if your body is grounded.
•
When operating a power tool outside, use an outdoor extension cord marked “W-A” or “W.”
These cords are rated for outdoor use and reduce the risk of electric shock.
•
Extension Cord Use:
A.
Use only 'Listed' extension cords. If used outdoors, they must be marked “For Outdoor Use.”
Those cords having 3-prong grounding type plugs and mating receptacles are to be used with
grounded tools.
B.
Replace damaged or worn cords immediately.
C.
Check the name plate rating of your tool. Use of improper size or gauge of extension cord may
cause unsafe or inefficient operation of your tool. Be sure your extension cord is rated to allow
sufficient current flow to the motor. For the proper wire gauge for your tool, see chart.
CHART FOR MINIMUM WIRE SIZE OF EXTENSION CORD:
If in doubt, use larger cord. Be sure to check voltage requirements of the tool to your incoming
power source.
Page 3 of 13
•
Do not expose power tools to rain or wet conditions. Water entering a power tool will increase
the risk of electric shock.
•
Do not let your fingers touch the terminals of plug when installing to or removing from the outlet.
•
Ground fault circuit interrupters. If work area is not equipped with a permanently installed
Ground Fault Circuit Interrupter outlet (GFCI), use a plug-in GFCI between power tool or
extension cord and power receptacle.
PERSONAL SAFETY
•
Stay alert, watch what you are doing and use common sense when operating a power tool. Do
not use a power tool while you are tired or under the influence of drugs, alcohol or medication. A
moment of inattention while operating power tools may result in serious personal injury.
•
Dress properly. Do not wear loose clothing, dangling objects, or jewelry. Keep your hair, clothing
and gloves away from moving parts. Loose clothes, jewelry or long hair can be caught in moving
parts. Air vents often cover moving parts and should be avoided.
•
Use safety apparel and equipment. Use safety goggles or safety glasses with side shields
which comply with current national standards, or when needed, a face shield. Use a dust mask in
dusty work conditions. This applies to all persons in the work area. Also use non-skid safety
shoes, hardhat, gloves, dust collection systems, and hearing protection when appropriate.
•
Avoid accidental starting. Ensure the switch is in the off position before plugging tool into power
outlet. In the event of a power failure, while a tool is being used, turn the switch off to prevent
surprise starting when power is restored.
•
Do not overreach. Keep proper footing and balance at all times.
•
Remove adjusting keys or wrenches before connecting to the power supply or turning on the
tool. A wrench or key that is left attached to a rotating part of the tool may result in personal
injury.
TOOL USE AND CARE
•
Do not force the tool. Tools do a better and safer job when used in the manner for which they
are designed. Plan your work, and use the correct tool for the job.
•
Never use a tool with a malfunctioning switch. Any power tool that cannot be controlled with the
switch is dangerous and must be repaired by an authorized service representative before using.
•
Disconnect power from tool and place the switch in the locked or off position before servicing,
adjusting, installing accessories or attachments, or storing. Such preventive safety measures
reduce the risk of starting the power tool accidentally.
•
Secure work with clamps or a vise instead of your hand to hold work when practical. This safety
precaution allows for proper tool operation using both hands.
•
Store idle tools. When tools are not is use, store them in a dry, secure place out of the reach of
children. Inspect tools for good working condition prior to storage and before re-use.
•
Use only accessories that are recommended by the manufacturer for your model. Accessories
that may be suitable for one tool may create a risk of injury when used on another tool.
•
Keep guards in place and in working order.
•
Never leave tool running unattended.
Page 4 of 13
UNPACKING
When unpacking the Bench Grinder, please check if any parts are missing or broken, please call the
distributor. Carefully remove the grinder and related hardware from the carton and examine it
thoroughly to insure it has not been damaged. This carton should contain the following items:
Description
Bench Grinder
Qty
. . . . . . . . . . . .. . . 1
Eye Shields . . . . . . . . . . . . . . . . . .2
Tool Rests . . . . . . . . . . . . . . . . . . 2
Spark Guards . . . . . . . . . . . . . . . . 2
Manual . . . . . . . . . . . . . . . . . . . . ..1
Short bolts . . . . . . . . . . . . . . . . . . .4
Bolts . . . . . . . . . . . . . . . . . . . . . . . 2
Long bolts . . . . . . . . . . . . . . . . . . .2
Mounting Rods . . . . . . . . . . . . . . .2
Washers . . . . . . . . . . . . . . . . . … .2
Brackets . . . . . . . . . . . . . . . . …. . 2
Large Washers . . . . . . . . . . . . . . .6
Work lamp (only for #24288) . . . .. 1
Page 5 of 13
ASSEMBLY
SWITCH
The switch is located on the front of the grinder near the bottom. To turn the tool ON, depress the
rocker switch at the top near the word ON. To turn the tool OFF, depress the bottom portion of the
rocker switch near the word OFF.
INSTALLING TOOL RESTS
Turn off and unplug the bench grinder. Remove the tool rests from the top portion of the poly-foam
carton liner and install them to the wheel guards as shown in the figure. Use the bolts and washers
from the plastic bag to secure them in place as shown in Figure 1.
NOTE: There is a left and a right tool rest. Refer to Figure 1 to ensure that you install them correctly.
When in actual use, the tool rests should be adjusted to within 1/4in. of the grinding wheel or other
accessory being used.
INSTALLING THE SPARK GUARDS AND EYE SHIELD BRACKETS
Turn off and unplug the bench grinder. The spark guards are packed in the plastic bag shipped with
your grinder. Select from the bag, the two spark guards and the two smaller bolts and washers.
Install the spark guards to the wheel guards of your grinder as shown in Figure 2. Adjust them to
within 1/16in. of the grinding wheel or other accessory being used.
NOTE: There is a left and right spark guard. Refer to Figure 2 to ensure, that you install them
correctly.
Page 6 of 13
INSTALLING THE EYE SHIELDS
Turn off and unplug the bench grinder. Remove all remaining parts from the plastic bag.
NOTE: There is a left and a right eye shield mounting rod. Examine the figure closely to ensure that
you are installing them correctly.
The one pictured in Figure 3 is for the right wheel guard as you face the front of the tool.
Carefully examine Figure 3 and assemble one rod, one bracket, one bolt and one flat washer as
shown. When it has been assembled as shown in the figure, install it to the wheel guard of the
grinder.
Position it with the arm high, as shown in Figure 4. and
tighten the bolt securely.
NOTE: The eye shields are identical and will fit properly on either side of the grinder. However it may
be necessary to loosen the center hex nut in order to slip the shield over the mounting rod.
After you have assembled and installed each eye shield mounting rod to the grinder, attach the eye
shields to the rods as shown in Figure 5.
Install them in such a way that the three hex nuts on each eye shield are on the back side away from
the operator when the tool is in use.
Tighten the center hex nut so that the shield can be moved, but will be tight enough to stay in place.
Always position the eye shields between your eyes and the grinding wheel or other accessory being
used.
Page 7 of 13
OPERATION
Note: The bench grinder needs to be bolted to the work surface before you start to use the tool. Use
2/5in. (10mm) bolts or screws to fix the bench grinder on your work surface.
GENERAL OPERATION
Step 1: Obtain a tray that is large enough for the workpiece to fit into, fill it with water and place it
near the Bench Grinder.
Step 2: Turn the Bench Grinder on.
Step 3: Once the GRINDING WHEEL has reached full speed, bring the workpiece up to the Wheel,
gently and without jarring.
Step 4: Use the TOOL REST to steady the workpiece.
Step 5: The workpiece will quickly become heated. Frequently quench the workpiece in water. If the
metal becomes heated so much that it gets blue-colored, it will be too soft to be useful. You must
grind off the part that is colored, cool the workpiece and start again..
SWITCH
WARNING! Be safe! Protect your eyes and wear safety goggles at all times while operating
grinder.
The switch is located on the front of the base of this grinder. Move ON/OFF switch to the ON position
to activate.
NOTE: ALWAYS turn grinder OFF via the switch in the event of a disruption in the electrical power
supply. This will safeguard operator against possible injury when power is restored.
EYESHIELDS
WARNING! Never operate grinder with eyeshields removed. Position the eyeshields so that
manipulation of the work piece to the grinding stone is not obstructed by the shield and that the piece
of work is between the stone and the eyeshields.
SPARK DEFLECTORS
•
Adjust periodically to insure that the distance between O.D. of the stone/wire wheel and the
bottom edge of the spark deflector is 1/16in. clearance.
•
Insure screws are securely tightened.
TOOL RESTS
•
Keep tool rests adjusted to 1/16in. clearance between O.D. of stone/wire wheel and the inside
edge of tool rests.
•
Adjust the tool rests to insure the work piece to be ground will contact the wheel slightly above
centre line of the shaft.
•
Periodically check adjustment to insure proper clearance is maintained.
GRINDING STONE
•
To replace grinding wheel, remove outer guard by removing 3 screws (Fig 5 A)
•
Remove hex nut (Fig. 5B) using appropriate wrench.
•
Remove and replace stone with a proper size stone of choice insuring that the speed rating of the
stone is equal to or greater than the machine nameplate.
Page 8 of 13
•
Assemble as shown in Fig. 5. The nut should be tightened to a recommended 55 in/pds of torque.
Note the orientation of the flanged washers whereby the large diameter of washer should bear
against the wheel. Under no condition should the washers be reversed.
Caution: The grinding wheels must always be checked for cracks of imperfections. This is done
with the “ring test.” Tap the wheel gently near the outer rim with the handle of a screwdriver; you
should hear a clear bell-like ringing. If a dull thud occurs do not use the wheel! This means the
wheel has been damaged and will, most likely, come apart during normal operations.
MAINTENANCE
WARNING!
Make sure this tool is disconnected from its power source before attempting any
maintenance, cleaning, or inspection.
•
Maintain your tools. It is recommended that the general condition of any tool be examined
before it is used. Keep your tools in good repair by adopting a program of conscientious repair and
maintenance in accordance with the recommended procedures found in this manual. If any abnormal
vibrations or noise occurs, turn the tool off immediately and have the problem corrected before
further use. Have necessary repairs made by qualified service personnel.
•
Keep cutting tools sharp and clean. Properly maintained cutting tools with sharp cutting edges
are less likely to bind and are easier to control. Keep handles dry, clean, and free from oil and
grease.
•
Cleaning. Use only soap and a damp cloth to clean your tools. Many household cleaners are
harmful to plastics and other insulation. Never let liquid get inside a tool.
WARRANTY
One-year limited warranty. For warranty questions, call 1-800-222-5381
Page 9 of 13
DIAGRAM & PARTS LIST
•
Item#s 24288, 24289 and 24290 share the same parts drawing as below:
Page 10of 13
Page 11of 13
•
For Item# 24288, the lamp illustration is below:
Page 12of 13
Distributed by:
Northern Tool + Equipment Co., Inc.
Burnsville, Minnesota 55306-6936
NorthernTool.com
Made in China
Page 13of 13