1
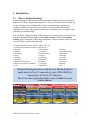
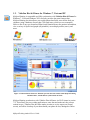
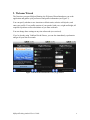
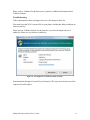
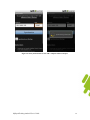
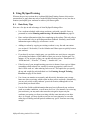
MySportTraining® for Android User’s Guide December 2010 This document applies to MySportTraining® 1.3 and newer for Android Copyright © 2010, VidaOne, Inc. All rights reserved. Table of Contents 1. Introduction ................................................................................................................. 3 1.1. What is MySportTraining? ................................................................................. 3 1.2. VidaOne Diet & Fitness for Windows 7, Vista and XP ..................................... 4 1.3. Technical Support ............................................................................................... 5 2. Welcome Wizard ........................................................................................................ 6 3. Views .......................................................................................................................... 7 3.1. Today .................................................................................................................. 7 3.2. Journal ................................................................................................................. 8 3.3. Calendar .............................................................................................................. 9 3.4. Charts ................................................................................................................ 10 4. Entering Workouts .................................................................................................... 13 4.1. GPS Recording.................................................................................................. 13 4.2. Adding Workouts .............................................................................................. 15 4.3. Editing a Workout ............................................................................................. 22 4.4. Deleting a Workout ........................................................................................... 22 4.5. Copying a Workout ........................................................................................... 22 4.6. Adding your Own Activities ............................................................................. 22 4.7. Planning and Entering a Workout Schedule ..................................................... 24 5. Entering Health Data................................................................................................. 25 6. Settings...................................................................................................................... 26 6.1. Profile ................................................................................................................ 26 6.2. Workouts ........................................................................................................... 26 6.3. Display .............................................................................................................. 26 7. Features ..................................................................................................................... 28 7.1. Activity Filter .................................................................................................... 28 7.2. Personal Best ..................................................................................................... 29 7.3. Training Zones .................................................................................................. 30 7.4. Workout Gear.................................................................................................... 31 7.5. Search Notes ..................................................................................................... 32 7.6. Data Backup ...................................................................................................... 32 7.7. Data Restore ...................................................................................................... 32 7.8. Data Purge ......................................................................................................... 33 7.9. Synchronization ................................................................................................ 34 8. Using MySportTraining ............................................................................................ 37 8.1. Data Entry Tips ................................................................................................. 37 8.2. Reviewing Your Performance........................................................................... 38 MySportTraining®, MyPersonalDiet® and VidaOne Diet & Fitness® are registered trademarks of VidaOne®, Inc. MySportTraining Android User’s Guide 2 1. Introduction 1.1. What is MySportTraining? MySportTraining® is the premier Android application designed to help you track and improve your fitness. Simple and inexpensive, it allows you to keep a detailed daily log of your workouts and your health, and to review your performance and physical condition, whether to keep track of the activities you’re passionate about and are committed to, to track your progress toward a race or a distance goal, or simply to keep yourself in great fitness shape. You will find in MySportTraining all the features you are looking for to track all of your workouts. MySportTraining supports both cardio-vascular (aerobic) and strength training types of workouts, such as those listed below, and you can also create your own activities if they’re not already supported. Weight lifting (free weight, machine, cables, balls, etc) Cycling (road, mountain, stationary, intervals, etc.) Running Stair machine Walking Treadmill Swimming Elliptical stairs Soccer Stepper Triathlon Gymnastics Stretching Basketball Skating (ice and in-line) Football Skiing (cross-country, downhill) Volleyball Golf Martial arts Surfing Horseback riding Equestrian Shooting Fencing Kayaking Canoeing Rowing Etc. MySportTraining has been voted the best Health & Fitness application for five (5) consecutive years (2004-2008) by Smartphone & Pocket PC Magazine. This is the same application that is now available for your Android phone. MySportTraining Android User’s Guide 3 1.2. VidaOne Diet & Fitness for Windows 7, Vista and XP MySportTraining is compatible and fully synchronizes with VidaOne Diet & Fitness for Windows 7, Vista and Windows XP. It not only provides the same features than MySportTraining, but also allows you to add custom data fields, enter all the food you consume (using a database of more than 7500 food items, which you can customize), follow a diet of any type, download Polar® and Garmin® heart rate monitor information, view a variety of reports and graphs (all printable), use multiple profiles (users), and more. Figure 1: VidaOne Diet & Fitness for Windows provides the same features than MySportTraining and much more, and the data is synchronized via Wi-Fi. MySportTraining synchronizes with VidaOne Diet & Fitness via Wi-Fi (more in section 7.5). This allows you to use either application to enter data and make sure they always remain in sync. VidaOne Diet & Fitness makes it easier to review report (on a larger screen), and offers a backup of your data should your phone be lost, damaged or stolen. MySportTraining Android User’s Guide 4 If you’re using a Mac, the synchronization works when you run VidaOne Diet & Fitness in emulation on Mac OS X using Desktop Parallels® or VMware Fusion™. Figure 2: MySportTraining for Android synchronizes with VidaOne Diet & Fitness for Windows. More information about VidaOne Diet & Fitness, including various user’s guide such, are available at www.VidaOne.com/vodf_win.htm. 1.3. Technical Support You can obtain more information about our products, updates, etc. by visiting our Frequently-Asked Questions (FAQ) page at: http://www.VidaOne.com/faqs.htm. If you have a question, want to provide some feedback, or want to report a bug, please send us an email at [email protected]. You can also contact us by mail at the following address: VidaOne, Inc. 5900 Southwest Pkwy Bldg 2, Suite 210 Austin, TX 78735 MySportTraining Android User’s Guide 5 2. Welcome Wizard The first time you open MySportTraining, the Welcome Wizard introduces you to the application and gathers your preferences and profile information (see Figure 3). You can specify whether to use American or Metric units, calories or kilojoules, and enter your profile. Your profile consists of your gender, birth year, weight and height, all required to perform various calculations as you enter workouts. You can change these settings at any time afterwards (see section 6). If you’re already using VidaOne Diet & Fitness, you can also immediately synchronize and get all your data in seconds. Figure 3: The Welcome Wizard makes it easy to get started. MySportTraining Android User’s Guide 6 3. Views MySportTraining is based on views that present your data in a different manner. There are four views, all explained in the following sections: Today, Journal, Calendar and Charts. Various tools are available via the Today’s menu. 3.1. Today Select Today to add workouts and health records: Touch the GPS icon to start recording an outdoor workout (see section 4.1). Touch the Workout icon to add any workout (see section 4.2) Touch the Most Recent icon to see a list of the workout you’ve done in the past 6 months. Touch the Health icon to add a health record (see section 5). Touch the Sync icon to synchronize with VidaOne Diet & Fitness (see section 7.5 for details). Press MENU to access the settings (section 6) and various utilities: Activity filter (section 7.1) Personal best (section 7.2) Training zones (section 7.3) Workout gear (section 7.4) Purge data (section 7.5) Figure 4: The Today view makes it easy to add a new workout. MySportTraining Android User’s Guide 7 3.2. Journal The Journal view shows all the workouts and health data for a given day You can scroll the list if required. You can use the left and right arrows at the top of the screen to switch to other days with data, or touch the date to pick a specific date. Press MENU to add a workout or health record for that day, as many as you need. Touch-and-hold a workout entry in the journal to display a popup menu to edit, copy or delete a workout. Touch-and-hold a health record entry to edit or delete it. Figure 5: The Journal view, showing a cardio workout (5K Run) and a strength workout (Bodylastics Circuit Training). MySportTraining Android User’s Guide 8 3.3. Calendar The Calendar allows you to quickly identify on which days you trained (see Figure 6). Some call it their training-at-a-glance, because you can immediately see how much (or little) you’ve worked in the past weeks. Use the left and right arrows at the top of the screen to switch months, or touch the date to pick a specific date. Each day you exercised is shown with the exercise’s icon and the duration of the workout. You can also select to display the workout duration when available (see section 6.2). Each day is optionally drawn using a color related to the workout training zone or the exertion. Touch a day to open the Journal for that day. Figure 6: The Calendar view, with the effort coloring option on (left) and off (right). MySportTraining Android User’s Guide 9 3.4. Charts The Chart view allows you to see various reports and graphs about your workouts and health records, over any period of time. Charts are particularly useful because they provide a snapshot of your performance and condition, allowing you to appreciate your efforts, but also to make changes in your daily routines if needed. There are many charts to choose from (see examples in Figure 7): Report, which displays the workouts for the selected period Duration, based on the Duration workout field. Distance, based on the Distance workout field (for cardio workouts only). Ascent, based on the Ascent workout field (for cardio workouts only) Volume (blue) and Intensity (red) Training heart rate, based on the Average Heart Rate workout field. Weight lifted (for strength workouts only). Calories (or Kilojoules) to display energy intake (orange) and expenditure (blue), based on the Calories/kJ workout and health fields and your Basal Metabolic Rate. Body weight, based on the Weight health field. Body fat, based on the Body Fat health field. Sleep hours, based on the Hours health field Blood pressure, based on the Blood Pressure health field. Resting heart rate, based on the Resting Heart Rate health field. There are several pre-defined periods to choose from: Today This week This month This year Last week Last month Last year Past 7 days Past 30 days Past 30 days (weeks) Past 3 months Past 6 months Past 12 months Other, to choose any period (see Figure 8) MySportTraining Android User’s Guide 10 Figure 7: Some of the charts that are available. The dotted line shows the average. You can also customize the appearance of the graphs to display lines instead of bars (see section 6.2) MySportTraining Android User’s Guide 11 Figure 8: The Other screen lets you choose any period to chart. MySportTraining Android User’s Guide 12 4. Entering Workouts There are multiple ways to enter workouts: 4.1. By recording “live” a route while exercising outdoor using your phone’s GPS capabilities (section 4.1) By choosing an activity and entering a workout (section 4.2) By copying an existing workout (section 4.5). GPS Recording One of the most exciting features of MySportTraining is the GPS recording of your outdoor workouts. It automatically records the duration and distance of a workout, and you can review these values, your pace, even the course completed so far on a map, at any time during the workout. To start a GPS recording, tap Today and then tap the GPS button to show the GPS Recording screen. You will then see the message “Awaiting position…” (see Figure 9). This message is displayed until your Android phone can precisely pinpoint your current location. Under a clear sky, this may only take a few seconds, but it may take longer (minutes) under different conditions (cloudy sky, in a forest, surrounded by buildings, etc.) The GPS icon in the top bar will blink until the position is known. Figure 9: When recording a workout, it may take a few moments for your current position to be accurately determined. MySportTraining Android User’s Guide 13 One the location is acquired, the live recording begins as soon as you start moving, and pauses when you stop. That means you can put your Android phone back in your pocket or backpack and go. You can disable this “Auto-stop” feature via the GPS Recording’s settings, via MENU > Settings > Auto-start. The Settings screen also allows you to keep the screen on, set the distance and speed units, and choose how to display GPS coordinates. During the recording, you can track your laps by tapping the Lap button or view your current location on a map by tapping the Show Map button. When looking at a map, press MENU > View to selects different views (street, satellite). Figure 10: The GPS Recording screen lets you record live your outdoor workouts. Tap the Map button to see your actual route on Google Maps. When you’re done working out, tap Stop and Done. You will be prompted to choose an activity, and then enter more information about the workout (see section 4.3 for details). You can also review the full route on Google Maps. Auto-Lapping In addition to adding laps by touching the Lap button, you can have laps automatically recorded by distance (e.g. every mile, 5 km, etc) or by position (when looping). In the GPS Recording screen, press MENU > Laps to show the Laps Recording screen: MySportTraining Android User’s Guide 14 Select Manual so that laps are added only when you touch the Lap button in the GPS Recording screen. Select Position for laps to be automatically added when you pass nearby a specific location. To set the location, go to that location and touch the button Set Lap Position to Here. Tracking laps using this method is useful because you can see if the final laps took longer, possibly indicating that you started too strong and grasped to finish the last laps. Select Distance for laps to be to automatically added after you’ve passed the specified distance mark (in miles or km depending on your units of choice). This option is useful to determine if the last segments of a course took you longer that at the beginning, indicating that you possible started too strong and struggled toward the end. Recording Tips The GPS recording will go on until you stop it, even if your screen dims and turns off. The following will help maintain its battery life: Make sure the Keep Screen On option is not selected (via MENU > Settings) Turn Wi-Fi off Make sure your Android is fully charged before working out. Files Location The recorded routes are stored in GPBX files (which are compact binary files) are stored on your Android phone’s SD card, in the Tracks directory. If there’s no SD card, the files are stored in /data/data/com.vidaone.mst/files directory. If you are using VidaOne Diet & Fitness on your PC, those files will be synchronized and viewable on your PC. Garmin Device Also if you are using VidaOne Diet & Fitness on your PC and download records from a supported Garmin device, workouts and routes will synchronize with your Android phone. You then have two ways of recording outdoor workouts: a GPS device or your Android phone; either way, you can see them on your PC and your Android phone. 4.2. Adding Workouts A workout can be added using different ways: In the Today screen, touch Add Workout or Most Recent to select from a list of the most recent workouts you’ve entered (the list is initially empty). In the Journal, select MENU > Add Workout Cardio and strength training have different fields, but data entry is done the same way. MySportTraining Android User’s Guide 15 These buttons allow you to display various input fields: Summary (shown) Location (strength) or route (cardio) Exercises (strength) or intervals (cardio) Heart rate monitoring Gears Custom fields (requires VidaOne Diet & Fitness for Windows) Note Figure 11: Entering workout data (strength at left, cardio at right). Make sure to select an activity (a workout cannot be saved without one). Enter the date and time. Enter the duration. The energy (Calories or Kilojoules) and fat fields are automatically updated based on the duration you enter and exertion you choose, but you can also edit them. Enter your perceived exertion, overall rating, and energy level. Changing the exertion may change the Calories and Fat fields. Choose the type of workout, if desired, among Time-based, Distance-based, HRbased, Warm-Up, Cool-down. Strength workout only: touch the Exercises button to see a list of exercises (or enter some). See section Entering Strength Training Exercises on page 20 for more information about entering exercises. Touch-and-hold an exercise entry to display a popup menu to move the exercise in the list, edit or delete it. Strength workout only: choose the Location button and select Location to see a list of locations. The list is initially empty; press MENU to add your own locations. Touch-and-hold existing entries to edit or delete them. Back to the workout location screen, you can also enter the duration (in minutes) of any warm-up and cool-down periods. MySportTraining Android User’s Guide 16 Cardio workout only: choose the Route button to enter route information: course, distance, pace, ascent, weather, temperature, wind and humidity. select Course to see a list of courses. The list is initially empty; press MENU to add your own courses. Cardio workout only: choose the Intervals button to see a list of intervals (or enter some). See section Entering Cardio Training Intervals for more information about entering intervals. Touch the Laps button to switch to laps instead of intervals. Choose the Heart Rate Monitor button to enter the average, maximum, minimum training heart rates, the target zone, and the time spent (in percentage) in the target zone. Choose the Gear button to select up to four (4) gears that you used for the workout. Those gears will automatically be updated by duration or distance (depending on how they are set up). Refer to section 7.4 for more details about gear tracking. If you also use VidaOne Diet & Fitness for Windows and have defined custom fields, choose the Custom Fields button to enter values for up to four (4) custom fields. Choose the Notes button to enter a note about the workout. MySportTraining Android User’s Guide 17 Entering Cardio Training Intervals You can enter interval training with cardio workouts Select a cardio workout and choose the Intervals button . If you selected a past workout that had laps, touch Intervals to enter intervals (you will be prompted to delete existing laps, if any). Touch Add Interval to display the Edit an Interval screen (see Figure 12). Touch Select Interval to display a screen with a list of intervals. Touch an entry to select it. Using the keyboard, press a letter to find the next interval starting with that letter. Touch-and-hold an entry to show a popup menu to edit or delete it. Press MENU to add an interval (name and note). Enter the number of sets Enter the duration i.e. the working period of the interval, and the maximum heart rate. Enter the recovery period, along the recovery heart rate. If the recovery period also varies from one set to another, use the Note field to enter more information if desired. Select the Rate of Perceived Exertion (RPE). Figure 12: Entering an interval MySportTraining Android User’s Guide 18 Entering Laps You can manually enter and edit laps with cardio workouts: Select a cardio workout and choose the Laps button . If you selected a past workout that had intervals, touch Laps to enter laps (you will be prompted to delete existing intervals, if any). Touch Add Lap to display the Edit a Lap screen and enter a lap duration, along the average heart rate and a note. Touch-and-hold a lap entry to edit or delete it. Figure 13: Entering a lap. MySportTraining Android User’s Guide 19 Entering Strength Training Exercises You can enter detailed exercises for strength workouts: Select a strength activity, select the Exercises button and tap Select Exercise to choose an exercise. MySportTraining comes with popular exercises, but press MENU to add your own. When adding your own exercises, you can enter its name, units (lb or kg), the maximum weight (more on this later) and the muscle groups worked by that exercise (this will be useful when using the muscle chart, below) In the Choose an Exercise screen, touch All to see all exercises, Custom to see only your own exercises, or Muscle Chart to display the front body chart (press Muscle Chart again to see the back muscle chart). Tap a muscle group on the right and you will see a list of all exercises for that group, including your own exercises which you specified the selected muscle group for. Figure 14: The muscle chart can be used to see a list of exercises for a particular muscle group. Enter the number of sets. To enter identical sets, leave Show each set unchecked. The enter the number of sets (up to 250), the repetitions and weight per set. To enter different sets, select Show each set. This is ideal if you vary the number of repetitions or weight for a given exercise. Enter the number of sets (up to 5), and the different sets (reps and weight). MySportTraining Android User’s Guide 20 Press MENU to scratch an exercise (a useful method for indicating that you did not complete that exercise but want to keep it in the list nonetheless), chart or list previous sets of that exercise (to see your progression). Figure 15: Editing an exercise sets. In this case, different sets are entered for the exercise. Enter the units. It is best to use the same unit when entering other instances of that exercise. If the weight varies from one set to another, use to Note field to enter more information if desired. Enter the rest period in seconds. You can choose “None!” when you switch from that exercise to another without taking a pause. Select the Rate of Perceived Exertion (RPE), which is based on the standard Borg CR10 scale. Select the equipment you used among free weight, weight machine, aerobic step, ball, band, cable, medicine ball, roller, ropes, or other. Enter an optional note if needed. MySportTraining Android User’s Guide 21 4.3. Editing a Workout You can edit a workout by tapping on it in the Journal view. 4.4. Deleting a Workout Deleting a workout permanently erases the workout data. To delete a workout, touch-andhold it in the Journal and select Delete Workout. 4.5. Copying a Workout To add an exercise similar to one you’ve completed, go in the Journal, touch-and-hold the past workout and select Copy Workout. You will be prompted for the date of the new workout (today will be shown). Touch Set to copy the past workout into a new workout. All exercises or intervals will be copied as well. 4.6. Adding your Own Activities MySportTraining comes with one strength training activity (“strength training”) and a variety of cardio activities (“aerobics”, “road cycling”, etc.). Not only can you edit those activities, you can also create your own, for the following reasons: Add an activity not listed, with a specific icon and color. Customize the calorie consumption. Add a type of workout for a given activity. For example “Lower Body” instead of “Strength training”, or “Interval Training” instead of “Road cycling”. Doing so helps you identify which type of workout you did (in the calendar and charts), and it makes data entry easier. When you add a workout, MySportTraining looks at the last workout of the same activity and adds all the exercises/intervals you were entered. So if you create a Upper Body and Lower Body activities, and enter workouts with specific exercises for each of them, every time you add a workout, get the exercises for that activity i.e. you do not have to re-enter them every time. Find more about this in section 4.7. Add Custom Activities When adding a workout you must first choose an activity from the Choose an Activity screen. Press MENU to add your own (see Figure 16). Enter a name e.g. Lower body Choose between Strength and Cardio. Strength allows you to enter exercises, Cardio allows you to enter route and laps/intervals. Enter the amount of calories you burn in 30 minutes at a sustained intensity (which is hard breathing where you cannot talk much, but not exhausting). MySportTraining will then be able to precisely calculate the calories you burnt when you enter a workout for that activity, based on the duration and exertion (light, moderate, sustained, strenuous, exhausting). Select an icon and its color. MySportTraining Android User’s Guide 22 Figure 16: Adding a custom activity lets you specify the exact calories you burn. Since you can create as many activities as you need, you can easily enter new workouts that have a different focus. Edit Custom Activities To edit your own activities, add a workout to display the activity list., then tap-and-hold on an activity to delete it. Your activities are listed in bold (see Figure 16). MySportTraining Android User’s Guide 23 4.7. Planning and Entering a Workout Schedule You can combine multiple features of MySportTraining (explained in the previous sections) to plan a schedule consisting of a variety of workouts. Say for instance you want to plan three workouts per week, each one with a specific focus: Monday: upper body (chest, back, arms and shoulders) Wednesday: lower body (legs) Friday: stationary bicycle Here’s how to proceed to plan such a workout schedule: On Monday, add a workout by creating a strength training activity called Upper Body (see page 22) and add the exercises to it). If you choose to skip a specific exercise for this workout only, scratch it (see section Entering Strength Training Exercises on page) so that the exercise remains in the list. On Wednesday, create another strength training workout, this time called Lower Body, also with its own exercises. Similarly, add a workout of that activity. On Friday, add a Bicycling workout. The following Monday, add an Upper Body workout. All the exercises from the previous Upper Body workout will automatically be carried over (including any changes you made), so that you do not have to re-enter them all again. On Wednesday, enter a Lower Body workout and again, all exercises from the previous Lower Body workout will be copied. Edit them as you execute them. Finally, on Friday, enter the Bicycling workout. Intervals (if any), will be copied from the previous Bicycling workout. Over time, you will have a list of custom activities (with their exercises) to choose from , making it very easy to track your workouts. MySportTraining Android User’s Guide 24 5. Entering Health Data A health record can be added using different ways: In the Today screen, touch Health Record. In the Journal, select MENU > Add Health Record. You can enter the following information for each health record: Date and time. Weight, either in lb or kg (based on the selected measurement unit setting). Body fat percentage. Mood. Sleep quality of it and time Resting heart beat rate (beats per minute), taken at rest e.g. when waking up. Blood pressure, taken at rest e.g. when waking up. Body measurements. If you use VidaOne Diet & Fitness for Windows and have defined custom fields, you can assign values for up to four (4) custom fields. A note. It is best to enter this information on a daily basis to provide accurate graphs (described in section 3.4). At a minimum, you should enter your resting heart rate and weight on a weekly basis, in order to review your performance over time. MySportTraining Android User’s Guide 25 6. Settings MySportTraining has various settings to personalize how the data is presented. From the Today screen, press MENU > Settings. The Settings screen shows the version currently installed (e.g. “1.3”). If you are using a trial version, “Trial” is displayed next to the version number. 6.1. Profile Choose Profile to edit the following information: 6.2. Units, either American or Metric Energy units, either calories or kilojoules. Gender Birth year Weight Height Workouts Select to enter workout duration (h:mm:ss) or not (h:mm) When entering a workout, chose to find the past instance of the same workout and copy that workout’s exercises or intervals in the new workout. When selected, this makes it very easy to follow a routine. 6.3. Display Choose a theme among the various themes listed (see Figure 17) Select the first day of the week among Saturday, Sunday (default) and Monday. Select Detailed Journal to display all workout and health information for each record in the Journal. If not selected, only a summary of each record is shown. Choose to draw calendar days using colors matching the workout’s efforts. Select to display a weekly summary at the end of each week in the calendar. Select to display the workout distance in the Calendar instead of the workout duration, when available. For multi-workout days, select to display the daily total duration, instead of the longest workout. MySportTraining Android User’s Guide 26 Figure 17: You can select different color themes! MySportTraining Android User’s Guide 27 7. Features Several utilities are available from the Today screen. 7.1. Activity Filter You can choose to display a subset of the activities you practice by applying a filter. Filtered activities are hidden from the Journal, Calendar and Charts. This is useful if for instance, you are a cyclist and record both your Road cycling and Mountain biking workouts, and need to review only your road cycling workouts. You can unselect all activities but Road cycling to see only your road cycling workouts in the Journal, Calendar and Charts. Choose Today > Fitness Tools > Activity Filter to show the Filter Activity screen is shown (see Figure 18). The activities shown with a checkmark are displayed, the others are filtered (hidden). By default, all activities are visible and shown with a checkmark. To filter (hide) an activity, tap on it to remove the checkmark. Tap on it again to show the checkmark. To select all activities, press MENU > Select All. To unselect them, press MENU > Clear All. Once you’ve selected the activities to show and those to hide, press BACK. If you regularly need to review the same subset of activities, you can create a custom filter. Select the activities you want to see, then press MENU > Save as My Filter. You can then re-apply your filter at any time via MENU > Select My Filter. Figure 18: The Filter Activity screen. MySportTraining Android User’s Guide 28 7.2. Personal Best You can see a list of your ‘personal best’ workouts i.e. those whose rating is set to Personal Best by choosing Today > Fitness Tools > Personal Best (see Figure 19). All workouts (regardless of their date) whose rating is Personal Best will be listed. Figure 19: The Personal Best workouts. MySportTraining Android User’s Guide 29 7.3. Training Zones Training zones are essential for heart-based monitoring training. MySportTraining helps you identifying your training zone if you use a heart rate monitor: Choose Today > Fitness Tools > Training Zones. The Training Zones window is shown (see Figure 20). Enter your maximum heart rate. The default is set to 220 minus your age, provided you entered your birth year in the profile. Note that this formula is just an estimate, and your actual maximum heart rate may vary by as much as +/- 20. The training zones are automatically calculated and each training zone is defined as a range expressed as a percentage (%) of your maximum heart rate (HR). The exact calculation is detailed on the next page in Table 1. To show the heart rate ranges in percentage, select Show values as %. If your heart rate monitor only allows you to enter your target zone's minimum and maximum as multiples of 5, select Use 5-beat increments option to round up values as multiples of 5. Figure 20: The Training Zones window with the effort coloring option. Zone 5 4 3 2 1 Minimum 92.5 85 75 65 60 Maximum 100 92.5 85 75 65 Intensity Exhausting Strenuous Sustained Moderate Effortless Description Anaerobic Lactate threshold training Aerobic Endurance Recovery Table 1: Default training zones. MySportTraining Android User’s Guide 30 7.4. Workout Gear You can track the gear you use for your workouts, either by distance or duration. This is very helpful regarding their maintenance and replacement. For example, you can track the following: Running shoes (by distance), to determine when to replace them; Bicycle and equipment, such as chain, tires, wheels (by distance), to maintain them as needed; Heart rate monitors and other electronic devices (by duration), to determine when to replace their battery To add, edit or delete gear, choose Today > Fitness Tools > Workout Gear (see Figure 21). Press MENU to create a gear, or touch-and-hold a gear to edit or delete it. When editing a workout, tap on the Gear button to select all the gear you used in a workout, and MySportTraining will automatically update their usage. Figure 21: The Workout Gear screen. MySportTraining Android User’s Guide 31 7.5. Search Notes You can search for a word in the notes you’ve entered in workouts and health records. From the Today screen and press MENU> Search Notes. Enter a word in the search edit box at the top of the screen, and touch the Search button. Workout and health records whose notes contain the word will be displayed. Touch an entry to review or edit it. 7.6. Data Backup The data are stored in the internal memory for improved performance. To make a backup on the storage card (e.g. micro SD card), choose Today > Menu > Data > Backup. Those backup files can only be restored in MySportTraining for Android and are not compatible with over version of MySportTraining (BlackBerry, etc) nor VidaOne Diet & Fitness. 7.7. Data Restore To restore the data saved from a previous backup, choose Today > Menu > Data > Restore. Select a file and confirm that you want to restore the data. You can only restore data using a backup file done with MySportTraining for Android. Backup files from other versions of MySportTraining (e.g. for BlackBerry) or from VidaOne Diet & Fitness are not compatible. MySportTraining Android User’s Guide 32 7.8. Data Purge To reduce and save storage space, you can delete past workout and health data that you no longer need. Purging data erases information that cannot be recovered from MySportTraining. The data that is erased is workout and health information. Custom names such as activity names, exercises, intervals, etc. are not erased. If you are using VidaOne Diet & Fitness for Windows, records that are purged will also be deleted from your PC after synchronizing. To purge data, choose Today > MENU > Data > Purge Data. Choose how many months of data you want to keep. For instance, Figure 22 shows that the past 6 months of data will be saved, and all data older than 6 months will be erased. Then touch the Purge Data button. Figure 22: The Purge Data screen. MySportTraining Android User’s Guide 33 7.9. Synchronization MySportTraining fully synchronizes with VidaOne Diet & Fitness for Windows (www.vidaone.com/vodf3_win.htm) via Wi-Fi, allowing you to use your PC and your Android phone to track your health and fitness, and make (precious!) backup of the MySportTraining data. The synchronization also works when using VidaOne Diet & Fitness under Parallels Desktop® and VMware Fusion™ on Mac OS X. PDF documents that explain how to setup each emulator are available at the web address above. To synchronize, open VidaOne Diet & Fitness, select the Profile toolbar and click Android. This opens the iPhone and iPod Touch Synchronization window (Figure 23), which shows your computer address and port, in this figure, 192.168.0.193 and 25007 respectively. Several addresses might be listed. You might have to try them all to find out which works. Keep this option selected as it significantly speeds up subsequent synchronization operations. To force a synchronization from scratch, unselect it. Figure 23: VidaOne NetSync synchronizes data with your Android phone. In MySportTraining, go to the Today screen and touch Synchronize. The Synchronization screen is shown (see Figure 25). Enter the computer address and port values as is (as shown in Figure 23) and tap Synchronize. Select Synchronize on startup to synchronize every time you open MySportTraining. This option helps to make this process automatic. VidaOne Diet & Fitness maintains partnerships i.e. synchronization information with each Android phone. This allows the synchronization to be very fast. If you experience synchronization issue, unselect Use Existing partnership in VidaOne Diet & Fitness to force a clean synchronization from scratch. MySportTraining Android User’s Guide 34 Please refer to VidaOne Diet & Fitness user’s guide for additional information about VidaOne NetSync. Troubleshooting If the synchronization does not happen, here are a few things to check for. First make sure that Wi-Fi is turned ON on your phone, and that the address and port are entered correctly. When you run VidaOne NetSync for the first time, your firewall might ask you to unblock it. Make sure you choose to unblock it. Figure 24: You might have to unblock VidaOne NetSync. Synchronization through a Virtual Private Network (VPN) may not work because of the corporate firewall in place. MySportTraining Android User’s Guide 35 Figure 25: The Synchronization screen with a computer address and port. MySportTraining Android User’s Guide 36 8. Using MySportTraining Whereas the previous sections have explained MySportTraining features, this section presents how to apply them not only to make MySportTraining easier to use, but also to monitor (and adjust) your workouts to achieve your fitness goals. 8.1. Data Entry Tips Here are a few tips to take advantage of what MySportTraining offers: Use a workout schedule with various workouts, each with a specific focus, as presented in section Planning and Entering a Workout Schedule on page 24. Enter workout information right after completing each workout. This only takes a few seconds and is key to providing maximum feedback. Similarly, enter health information upon waking up, at least once a week. Adding a workout by copying an existing workout is very fast and convenient (see section 4.5 for details). Use the Calendar and Chart report to quickly locate a past workout. If you heavily are into a single sport, you can define new activities to categorize your training and obtain a rich feedback of how you exercise for that sport. For instance, if you are into cycling, you can add activities such as: “Road intervals”, “MTB intervals”, “50-miler”, “Century”, “Aerobic ride”, etc. If the first set of your strength training exercises is shorter (fewer reps) or lighter (something called reduced sets, usually for warm-up purposes), make sure to check ‘Show each set’ when entering each exercise. This option lets you specify the rep and weight for each individual set. See Entering Strength Training Exercises on page 20 for details. Use a heart rate monitor to accurately and objectively determine your average heart rate when exercising, which results in more precise workouts. Alternatively, you may rely solely on the workouts’ perceived exertion, although this is less precise than your actual effort. Use the Note fields to add information that may have influenced your workout (such as weather conditions, overall stress level, etc.) For instance, by reviewing your workouts, you may notice that stress has a negative impact on your workouts, preventing you from exercising with the same intensity as on other days. As a result, you may decide to exercise at a lower intensity or even take some days off during stressful periods without any “guilt” from not exercising enough. MySportTraining Android User’s Guide 37 8.2. Reviewing Your Performance The Journal provides you with the right workout information. Regularly review your past workouts – especially those for when you felt very strong – and identify the conditions that led to better results. For instance, if you find out that your best workouts were achieved when waking up with a low heart rate, you may want to back off when you wake up with an elevated one. Take a look at the Month view to assess how consistent you have been regarding your training (consistency is key in any fitness program). If there are long periods of inactivity, you might want to try to find out how you could include one or two workouts to maintain your fitness. Use the report view to determine whether you’ve reached your goals (number of workouts, total duration, etc.) for a given period of time by looking at the totals line at the bottom of the list. This is very useful for comparing your actual training against a long term training plan. Frequently review the graphs to obtain precise feedback: The Duration, Distance and Weight lifted graphs show you the volume of your workouts (i.e., how much you exercise). With the Report view, it’s also the easiest way to measure your progress towards long term goals. For instance, if you set a personal goal of exercising at least 20 hours per month, MySportTraining’s duration chart will allow you to accurately track your monthly progress by showing your how much time you spent exercising. You will be able to make corrections by adding more workouts if need be, or simply maintain the same volume if you are well on your way to reaching your objective. Either way, the charts will tell you where you stand with respect to your goal(s). The pace and training heart rate charts are excellent tools for helping you to identify your overall fitness (the heart rate graph can be substituted by the intensity and exertion chart). For instance, for a given course and average heart rate (or exertion), your pace will likely increase over several weeks as your fitness improves (you will be able to cover more distance in less time for the same effort). Similarly, for a given course and pace, your heart rate will likely decrease over time, given your body’s improved ability to sustain a certain level of effort. The resting heart rate is also a useful graph for identifying which past workouts put stress on your body. For instance, if you increase the volume of your workouts over a few weeks (i.e., exercising several hours more than usual), and the chart shows a gradual elevation of your resting heart rate, you may have become overtrained. It could be best to reduce volume and intensity for the next days in order to recuperate. MySportTraining Android User’s Guide 38 For those carefully tracking their weight, use the calorie burning and intake, body weight, and body fat charts to track your progress. For example, if you are new to exercising, your weight and body fat will decrease as a result of burning fat (your body uses fat among other nutriments for “fuel” when exercising). If one of your goals is to achieve a specific weight or to maintain one, the charts will instantly let you know how you are progressing, allowing you to make sure your weight is not “going off the chart” (literally!) Thank you for using MySportTraining! The VidaOne team MySportTraining Android User’s Guide 39