1
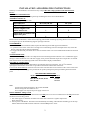
INSTALLATION AND OPERATING INSTRUCTIONS
Warranty is void if the Brewer is connected to any voltage other than voltage specified on the data label of the
Brewer.
UNPACKING AND INSPECTION
Carefully unpack the Brewer by cutting the straps and lifting the sleeve carton off the Brewer.
ASSEMBLY AND SET-UP
The Brewer is shipped complete with:
DESCRIPTION
BC1,120,240,301
BC2,302
4
4
1
2
1
2
Adjustable legs
Carriers complete with
Faucets and Covers
Funnels with wire baskets and
sample filter pack
Remove carriers from Brewer, one has the four (4) legs packed inside. Install legs by tilting Brewer on it's back and
screwing the legs into the threaded leg support openings on bottom.
WATER HOOK UP
The National Sanitation Foundation (NSF) requires the following for the NSF approved installation:
1. A quick disconnect water connection or enough extra coiled tubing (at least 2x the depth of the unit) so that the
Brewer can be moved for cleaning underneath.
2. An approved flow-back prevention device such as a double check valve to be installed between Brewer and water
supply.
WATER CONNECTION
The Brewer comes equipped with a 3/8 compression water inlet fitting located in the back. Use a 3/8 diameter copper
tubing to connect the Brewer to a cold water supply, water pressure should be 20 psi min. to 80 psi max. An external
shut-off valve and a water filtering system with a charcoal filter is highly recommended.
ELECTRICAL CONNECTIONS
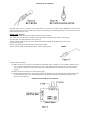
A terminal block inside the base compartment is provided for electrical connections. Two (2) 3 /l6" diameter
openings for field conduit connections are provided in the bottom and the back of the base.
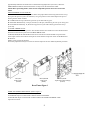
To access the Terminal Block, loosen the 2 screws on the side of the base cover and remove the 1 lower screw at the
base of the rear panel. Dis -engage base panel from rear panel by lifting base panel up and lifting back towards rear
panel.
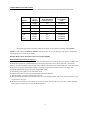
RECOMMENDED WIRING SIZES
Model No.
Single (1) Phase
BC1, BC120, BC240, BC301
BC2, BC302
12 AWG
10 AWG
Note:
1. Neutral (N) and Ground Wires to be 14 AWG minimum.
2. Field wiring must be suitable for 75° C.
3. Use Copper wire only for all power supply connections.
INITIAL PRIMING - Filling of Tank
The BC Brewers are shipped with the Thermostat in the OFF position. Do not turn Thermostat to the ON position until
the Brewer has been fully primed.
1. Turn water supply on and check for leaks at the water inlet connections. Tighten compression
fitting if necessary.
2. Turn on power to the Brewer. The Brewer will automatically start filling. After 6 minutes the filling cycle will stop
and the thermostat should be turned clockwise to the full ON position. Allow
2