1
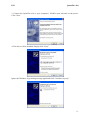
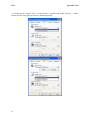
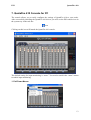
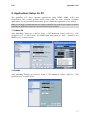
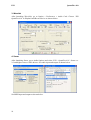
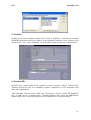
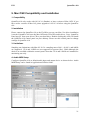
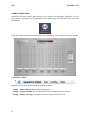
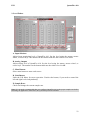
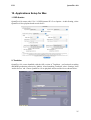
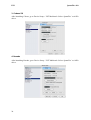
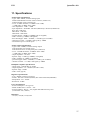
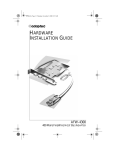
ESI
QuataFire 610
INDEX
1. Introduction ......................................................................................................................2
2. What’s in the Box .............................................................................................................3
3. Key Features .....................................................................................................................3
4. Description of QuataFire 610 ..........................................................................................4
1 Front Panel.....................................................................................................................4
2. Rear Panel.....................................................................................................................5
5. Preparing for Installation ................................................................................................7
6. PC Installation ..................................................................................................................9
7. QuataFire 610 Console for PC ......................................................................................13
1. Pull Down Menus .......................................................................................................13
2. Level Faders................................................................................................................15
8. Applications Setup for PC .............................................................................................17
1. Cubase SX ..................................................................................................................17
2. Nuendo........................................................................................................................17
3. Wavelab ......................................................................................................................18
4. Sonar ...........................................................................................................................18
5. Tracktion.....................................................................................................................19
6. Tassman ESI ...............................................................................................................19
9. Mac OSX Compatibility and Installation ....................................................................21
1. Compatibility ..............................................................................................................21
2. Installation ..................................................................................................................21
3. Limitations..................................................................................................................21
4. Audio MIDI Setup ......................................................................................................21
5. Mac Control Panel ......................................................................................................22
10. Applications Setup for Mac .........................................................................................25
1. DSP-Quattro ...............................................................................................................25
2. Tracktion.....................................................................................................................25
3. Cubase SX ..................................................................................................................26
4. Nuendo........................................................................................................................26
11. Specifications ................................................................................................................27
END USER WARRANTY.................................................................................................28
v5 Nov. 2004
1
ESI
QuataFire 610
1. Introduction
Welcome!
Thank you for choosing the ESI QuataFire 610. QuataFire 610 is an ultra-compact,
professional, mobile recording interface for laptops and desktops. The high resolution 24bit 96/192kHz 6-in 10-out multi-channel audio interface and 32 channel MIDI interface
uses a high bandwidth IEEE1394 (FireWire) bus connection.
QuataFire 610 features low-noise microphone preamps, Neutrik combo input connectors
with phantom power and gain control and RCA line inputs providing you a professional
quality audio “front-end” for your DAW. 8 line level analog outputs allow you to connect
to a mixer, surround matrix, or directly to powered monitors. A separate headphone output
allows you to monitor your signals directly, S/PDIF digital I/O lets you record directly to
and from a CD, MiniDisc or DAT and 32 MIDI channels provide you with ample MIDI
connectivity. QuataFire 610 offers all these features in a rugged, compact package that can
travel with you anywhere.
Even if you are an experienced professional, please take some time to read through this user
manual and familiarize yourself with the QuataFire 610’s features and operation. You may
also want to refer to your audio software’s documentation to better understand how the
QuataFire 610’s features are integrated with the program. Your experience and enjoyment
of your QuataFire 610 will be greatly enhanced by a good working knowledge of your
audio software.
2
ESI
QuataFire 610
2. What’s in the Box
Your QuataFire 610 package contains the following:
·
·
·
·
·
·
QuataFire 610 FireWire audio interface
2 FireWire cables (6-pin to 6-pin, 4-pin to 6-pin)
24 volt DC Power supply and cable
User manual
Driver CD
Tracktion and UAT software bundle CD
3. Key Features
·
·
·
·
·
·
·
·
·
·
·
·
*
FireWire bus powered
4 analog inputs with 24-bit 96kHz support
8 analog outputs with 24-bit 192kHz support *
Dual Mic/Line preamps with gain control
+48V phantom power for condenser microphones
Direct instrument input for guitars (Hi-Z)
24-bit 96kHz S/PDIF coaxial digital I/O
32 channel MIDI I/O
Headphone out with level control and direct input monitoring
Mac Core Audio compatible *
WDM, MME, ASIO, and DirectSound support
Ultimate Audio Tools software package with the full version of Tracktion
sample rates of 176.4 and 192 kHz are not supported with Macintosh computers at
present (Nov, 2004).
3
ESI
QuataFire 610
4. Description of QuataFire 610
1 Front Panel
(1) Power Switch and Power LED:
a. Green:
Green PWR LED indicates that QuataFire 610 is functioning
normally.
b. Red and blinking:
Red and blinking LED indicates:
· QuataFire 610 is initializing
· QuataFire 610 is detecting external clock source when
S/PDIF input is connected to another device.
c. Green and blinking:
Green and blinking LED indicates QuataFire 610 is in
abnormal status. Please click “Factory Default” in the control
panel to initialize the hardware.
(2) Channel 1/2 input connectors:
Balanced XLR/TRS universal (combo) connectors.
(3) Channel 1/2 gain controls:
Control input level of each microphone or line input (for both XLS and TRS).
(4) +48V phantom power switch:
Supply 48V DC phantom power to input channels 1/2 simultaneously by pressing the
button.
(5) LINE/MIC selection switch:
Pressed:
Depressed:
4
Input 1/2 used for microphone signals
Input 1/2 used for line level signals
ESI
QuataFire 610
Button selects the option for both input channels 1/2 simultaneously.
(6) Peak Indicator LED:
Lights up when some of the analog input channels 1/2/3/4 are clipping.
(7) Hi-Z:
Direct instrument input switch. When the button is pressed, you can use analog input 2 as
electric guitar or bass input. Only unbalanced TRS phone jack connection is available for
this setting.
(8) MIDI signal LEDs
(9) Headphone connector and level control:
Monitor all input sources and wave output 1/2 through the headphone output. Output level
can be adjusted with the control knob.
2. Rear Panel
(1) 2 MIDI input and 2 MIDI output connectors
(2) S/PDIF coaxial input and output connectors
(3) Analog outputs 1-8:
RCA connectors for output 1-4. 1/4" stereo jack connectors for output 5-8.
(4) Analog inputs 3/4:
RCA connectors.
5
ESI
QuataFire 610
(5) External power supply connector:
Connect to the included 24V DC adapter when you use QuataFire 610 with 4 pin FireWire
cable.
(6) FireWire connector:
Connect the FireWire to the computer.
6
ESI
QuataFire 610
5. Preparing for Installation
System Requirements
QuataFire 610 does not depend on CPU resources but your computer specifications are
important to make full use of QuataFire 610’s professional digital audio/MIDI features.
IMPORTANT: Since power is supplied through the FireWire cable, it is highly recommended that
you use at least a 300W power supply. If you use the QuataFire 610 with a laptop, we recommend
that you use the included external power supply.
Minimum system requirements for PC
·
·
·
·
·
Intel Pentium III 500MHz CPU or equivalent AMD CPU
256MB of RAM
Direct X 8.1 or higher
Microsoft Windows®XP SP1 (Service Pack 1 must be installed)
One available FireWire (IEEE1394) port
Minimum system requirements for Mac
·
·
·
·
Macintosh with G4 or better processor
256MB of RAM
Mac OS 10.3.6 or higher
One available FireWire (IEEE1394) port
IMPORTANT: It has come to our attention that some FireWire chipsets on PCI FireWire cards and
in laptop computers have compatibility problems with several FireWire audio interfaces including
the QuataFire 610 under Windows XP. Please refer to the list below with tested compatible
FireWire interface cards. Note that this does not mean that all non-listed FireWire controllers are
incompatible with audio interfaces like QuataFire 610, however compatibility in that case has not
been tested by us. Note that Macintosh systems do not have this problem.
Compatible FireWire PCI card list
Adaptec
BusLink
Pinnacle Link
Syba
Belkin
RATOC
I-Will
Digital Research
SIIG
FireConnect 4300, AUA-3121
PCIFW
Linx PCI, 1394 DV
SD-FW323-3I
F5U501
PCIFU2
eLink 1394
DRFIREWIRE
NN-400012, NN-2633
Generally we recommend FireWire controllers with Agere / Lucent chipsets. Some other FireWire
chipsets have problems with streaming audio devices and should not be used with QuataFire 610 or
similar audio devices.
7
ESI
QuataFire 610
If you have a laptop with 4-pin FireWire connectors, please use the included 4-pin to 6-pin
FireWire cable. In this case, you must use the external power supply, because 4-pin
FireWire ports cannot supply power.
6-pin FireWire connector
8
4-pin FireWire connector
ESI
QuataFire 610
6. PC Installation
Before driver installation, please locate your original Windows CD, as you may need it
during installation. If you have a motherboard with a new chipset, please install the recent
patches provided by your motherboard or chipset manufacturers.
CAUTION: Do not connect and power on the QuataFire 610, before the setup program prompts
you to do so.
1. Insert the QuataFire 610 driver CD in the CD-ROM drive. We recommend you to copy
the QuataFire 610 driver folder to your hard drive. Do not move or delete any of these files,
not even after the installation. Run “setup.exe” from this folder.
2. Click “Next” and follow the instructions on the screen.
9
ESI
QuataFire 610
You may receive a warning saying “The software has not passed Windows Logo testing to
verify its compatibility with Windows XP.” Please ignore this message and click “Continue
Anyway.” The drivers have been tested and verified by ESI and are safe to use.
10
ESI
QuataFire 610
3. Connect the QuataFire 610 to your computer’s FireWire port and turn on the power.
Click ‘Next’.
4. The driver will be installed. Simply click “Next.”
Ignore the Windows Logo testing message again and click “Continue Anyway.”
11
ESI
QuataFire 610
5. Checking your system. Go to: Control Panel > Sounds and Audio Devices > Audio.
Please check if your audio devices are installed properly.
12
ESI
QuataFire 610
7. QuataFire 610 Console for PC
The console allows you to easily configure the settings of QuataFire 610 to your needs.
After successfully installing the QuataFire 610 drivers you will see the ESI console icon in
the system tray of the task bar.
icon
Clicking on this icon will launch the QuataFire 610 console.
The default setting for input monitoring is “mute.” You need to unclick the “mute” button
to enable input monitoring.
1. Pull Down Menus
13
ESI
QuataFire 610
1. File – Close Window
This will close the QuataFire 610 console window but it will not shut down the console.
You can always relaunch the console by clicking on the
icon.
2. File - Exit
Shuts down the QuataFire 610 console.
3. Config – Mouse Wheel
Mouse Wheel controls mouse wheel adjustment. When you use the mouse wheel to adjust
the volume level, the adjustment step is set to ±1dB as default.
4. Config – Latency
Determines the latency setting for the QuataFire 610 driver. You must configure latency to
your needs and your system performance. Higher latency for multi-track recording software
using multiple tracks. Process time is longer, but better stability. Lower latency for software
synthesizers, mastering software or multi-track software using only a few tracks. Separate
control of ASIO and WDM latency.
5. Config – Factory Default
Returns all QuataFire 610 configuration settings to factory default.
6. Config - Always On Top
Sets the QuataFire 610 console to appear always over other windows. If this is not selected,
the active windows of other applications will be shown over the QuataFire 610 console.
7. Sampling Rate
Configure the sample rate manually.
8. About
Check current soft and hardware information.
14
ESI
QuataFire 610
2. Level Faders
1. Input Monitor
Adjust input monitoring level of QuataFire 610. Set the level using the mouse, mouse
wheel, or cursor keys. The number on the bottom indicates the relative level in dB.
2. Analog Output
Adjust output level of QuataFire 610. Set the level using the mouse, mouse wheel, or cursor
keys. The number on the bottom indicates the relative level in dB.
3.
Link Button
Links the L/R faders for stereo operation. Unselect the button, if you need to control the left
and right levels independantly.
4.
Mute Button
Select mute button to mute each source.
5. Sample Rate and Latency
Check and change the current value of sample rate and latency.
15
ESI
QuataFire 610
When you synchronize the sample rate from an external digital device connected to the S/PDIF
input, the sample rate must be in the “44.1~ 96kHz” range.
· Please do not connect any S/PDIF input cable when you are not using the digital input because
QuataFire 610 will be automatically synchronized with the external digital signal.
· When a cable is connected to the S/PDIF input, the LED blinks and turns to red while detecting
the external clock.
· After removing the cable, you must reset the sample rate.
·
16
ESI
QuataFire 610
8. Applications Setup for PC
The QuataFire 610 driver supports applications using WDM, MME, ASIO and
DirectSound. This section provides quick setup guide for some common recording
applications. For more detailed information, please consult the application’s user manual.
Note: It is strongly recommended that you configure QuataFire 610 to the proper sample rate before
launching the application. Otherwise, the system may become unstable.
1. Cubase SX
After launching Cubase, go to Device Setup > VST Multitrack. Select ‘ASIO 2.0 – ESI
QuataFire 610’ as ASIO driver. Set MIDI input and output as ‘ESI – QuataFire 610
MIDI1(or 2)’ as shown below.
2. Nuendo
After launching Nuendo, go to Device Setup > VST Multitrack. Select ‘ASIO 2.0 – ESI
QuataFire 610’ as ASIO driver.
17
ESI
QuataFire 610
3. Wavelab
After launching WaveLab, go to Option > Preferences > Audio Card. Choose ‘ESI
QuataFire 610’ as Playback and Record device as shown below.
4. Sonar
After launching Sonar, go to Audio Options and select ‘ESI – QuataFire 610’. Sonar ver.
2.2 and higher can use ASIO drivers. Set audio input and output as shown below.
Set MIDI input and output as shown below.
18
ESI
QuataFire 610
5. Tracktion
QuataFire 610 comes bundled with the full version of Tracktion - professional recording
and MIDI production software by Mackie. After launching Tracktion, select ‘Settings’ then
‘audio devices’ tab. Choose QuataFire 610 as playback and record device as shown below.
6. Tassman ESI
QuataFire 610 comes bundled with Applied Acoustics Systems (AAS)’s Tassman ESI.
Tassman ESI can be used as a standalone software synthesizer or VST instrument with
other audio applications.
After launching Tassman, select ‘Edit’ then ‘Preferences’. Choose ‘ASIO ESI QuataFire
610’ as audio device as shown below. Tassman supports both ASIO and MME/Direct
Sound format. Also, select ESI QuataFire 610 as MIDI device, also shown below.
19
ESI
QuataFire 610
Note: QuataFire 610 driver CD includes Ultimate Audio Tools (UAT) bundle software. They are
located in ‘ESI’ folder of the driver CD. Only applications listed in the QuataFire 610 box work
with QuataFire 610. Other applications are for other ESI products sharing the same universal ESI
driver CD.
20
ESI
QuataFire 610
9. Mac OSX Compatibility and Installation
1. Compatibility
QuataFire 610 only works with OS 10.3.6 (Panther) or later versions of Mac OSX. If you
have earlier versions of Mac OS, please upgrade to OS 10.3.6 before using the QuataFire
610.
2. Installation
Please connect the QuataFire 610 to the FireWire port on your Mac. No driver installation
is needed. QuataFire 610 uses the Mac OSX native FireWire audio driver. Copy ‘QuataFire
Panel app.sit’ from your driver CD to your hard drive. Double clicking this icon will install
the QuataFire 610 control panel on your desktop. Please use this control panel to change
settings of QuataFire 610.
3. Limitations
Sampling rate limitations with Mac OS 10.3.6: sampling rates of 44.1, 48, 88.2, and 96kHz
are supported. 176.4 and 192kHz are not supported at present (Nov. 2004) although the
choices are available within the control panel. Note that 176.4 and 192kHz are intended for
monitoring use only.
4. Audio MIDI Setup
Configure QuataFire 610 as default audio input and output device as shown below. Audio
MIDI Setup can be found in Applications\Utilities folder.
21
ESI
QuataFire 610
5. Mac Control Panel
QuataFire 610 Mac control panel allows you to control and configure QuataFire 610 for
your needs. You should see the QuataFire 610 control panel icon (shown below) after the
installation.
Click this icon to launch the control panel when QuataFire 610 is connected to your system.
1. Pull Down Menu
QuataFire 610 control panel includes a pull down menu:
·
·
·
Config > Mouse Wheel: Mouse wheel adjustment.
Config > Factory Default: Resets all QuataFire 610 configurations to default.
Config > Always On Top: Configures console to appear always on top.
22
ESI
QuataFire 610
2. Level Faders
·
A. Input Monitor:
Adjust input monitoring level of QuataFire 610. Set the level using the mouse, mouse
wheel, or cursor keys. The number on the bottom indicates the relative level in dB.
·
B. Analog Output:
Adjust output level of QuataFire 610. Set the level using the mouse, mouse wheel, or
cursor keys. The number on the bottom indicates the relative level in dB.
·
C. Mute Button:
Select mute button to mute each source.
·
D. Link Button:
Links the L/R faders for stereo operation. Unselect the button, if you need to control the
left and right levels independently.
·
E. Sample Rate:
Check and change the current sample rate.
Note: It is strongly recommended that you configure QuataFire 610 to the proper sample rate before
launching the application. Otherwise, the system may become unstable.
23
ESI
QuataFire 610
When you synchronize the sample rate from an external digital device connected to the S/PDIF
input, the sample rate must be in the “44.1~ 96kHz” range.
· Please do not connect any S/PDIF input cable when you are not using the digital input because
QuataFire 610 will be automatically synchronized with the external digital signal.
· When a cable is connected to the S/PDIF input, the LED blinks and turns to red while detecting
the external clock.
· After removing the cable, you must reset the sample rate.
·
Note: Sampling rate limitations with Mac OS 10.3.6: sampling rates of 44.1, 48, 88.2, and 96kHz
are supported. 176.4 and 192kHz are not supported at present (Nov. 2004) although the choices are
available within the control panel. Note that 176.4 and 192kHz are intended for monitoring use
only.
24
ESI
QuataFire 610
10. Applications Setup for Mac
1. DSP-Quattro
QuataFire 610 comes with i3 S.r.l.’s DSP-Quattro SE. Go to Option > Audio Setting, select
QuataFire 610 as playback and record device.
2. Tracktion
QuataFire 610 comes bundled with the full version of Tracktion - professional recording
and MIDI production software by Mackie. After launching Tracktion, select ‘Settings’ then
‘audio devices’ tab. Choose QuataFire 610 as playback and record device as shown below.
25
ESI
QuataFire 610
3. Cubase SX
After launching Cubase, go to Device Setup > VST Multitrack. Select ‘QuataFire’ as ASIO
driver.
4. Nuendo
After launching Nuendo, go to Device Setup > VST Multitrack. Select ‘QuataFire’ as ASIO
driver.
26
ESI
QuataFire 610
11. Specifications
Analog Inputs Specifications
- Type : 24bit / 96kHz, 4 channel analog inputs
2 balanced XLR/TRS universal combo connector (channel 1/2)
2 unbalanced RCA jacks (channel 3/4)
- Level: -10.0dBv Nominal (-17.5dBFS / Gain +0dB)
+ 7.5dBv Max ( 0 dBFS / Gain +0dB)
- Gain Adjustment : +0dB ~ +40dB
- Input Impedance : XLR/TRS : 10k Ohm (Balanced), 8.2k Ohm (Unbalanced)
RCA Jack : 10K Ohm
MIC Mode : 1.5K Ohm
HI-Z Mode : 140K Ohm
- Dynamic Range : 100dB (@ -60dBFS with A-weighted)
- THD : 0.001% (@ -3dBFS, A-Weighted)
- Pass band Ripple : 20Hz ~ 20.0KHz, +/- 0.01dB (@ fs=44.1KHz)
- Channel Cross talk : <-100 dB, 1 kHz signal @ -3dBFS
- 48V Phantom power on XLR inputs
Analog Outputs Specifications
- Type : 24bit / 192kHz, 8 Channel analog outputs
4 unbalanced RCA jack (CH1/2/3/4)
2 unbalanced stereo 1/4" TRS phone jack (CH5/6/7/8)
- Level : -10.0dBv Nominal (-17.5dBFS / Gain +0dB)
+ 7.5dBv Max ( 0 dBFS / Gain +0dB)
- output impedance : 150 ohm
- dynamic range : 112dB (@ -60dBFS, A-weighted)
- THD : 0.0008% (@ -3dBFS, A-weighted)
- pass band ripple : 20Hz ~ 20.0KHz, +/- 0.2dB (@ fs=44.1KHz)
- channel crosstalk : <-111 dB, 1 kHz signal @ -3dBFS
Headphone Amplifier Specifications
- output power : 100mW Max @ 32ohm
- output impedance : 32 ~ 600 ohm (internal 16 ohm)
- dynamic range : 105dB
- THD : 0.005 (typical)
Digital I/O Specifications
- Type : SPDI/F coaxial I/O connector
- Format : IEC-958 Consumer(S/PDIF), IEC-958 Professional(AES/EBU)
- Sample Rate : 44.1 - 96kHz
- Resolution : 24 Bits
Power Specifications
- Power consumption : 7W (typical)
- IEEE1394 Bus Power : DC 8V ~ 30V
- External Adaptor : DC 8V ~ 30V, higher than IEEE1394 bus power
(recommend : 24V, 500mA)
Dimension
- 144 (W) x 100 (D) x 44 (H) mm
27
ESI
QuataFire 610
END USER WARRANTY
Trademarks
ESI and QuataFire 610 are trademarks of Ego Systems Inc. Windows is a trademark of Microsoft Corporation. Apple, Mac,
Macintosh are trademarks of Apple computer, inc. Other product and brand names are trademarks or registered trademarks
of their respective companies.
End User Warranty
Ego Systems, Inc. warrants this product, under normal use, to be free of defects in materials and workmanship for a period
of One(1) year from date of purchase, so long as: the product is owned by the original purchaser, with proof of purchase from
an authorized ESI dealer. This warranty explicitly excludes power supplies and included cables which may become defective
as a result of normal wear and tear.
In the event that ESI receives, from an original purchaser and within the warranty coverage period, written notice of defects
in materials or workmanship, ESI will either replace the product, repair the product, or refund the purchase at its option. To
obtain warranty service, the original purchaser or his authorized dealer must fill the support contact form at http://www.esipro.com. In the event repair is required, shipment to and from ESI and possible handling charges shall be borne by the
purchaser. ESI will not accept returns without prepaid shipments. In the event that repair is required, a Return Authorization
number must be obtained from ESI. After this number is obtained, the unit should be shipped back to ESI in a protective
package with a description of the problem and the Return Authorization clearly written on the package. All such returns must
be shipped to Ego Systems, Inc. headquarters in Seoul, Korea (or US Office).
In the event that ESI determines that the product requires repair because of user misuse or regular wear, it will assess a fair
repair or replacement fee. The customer will have the option to pay this fee and have the unit repaired and returned, or not
pay this fee and have the unit returned and un-repaired.
The remedy for breach of this warranty shall not include any other damages. ESI will not be liable for consequential, special,
indirect, or similar damages or claims including loss of profit or any other commercial damage, even if its agents have been
advised of the possibility of such damages, and in no event will ESI’s liability for any damages to the purchaser or any other
person exceed the price paid for the product., regardless of any form of the claim. ESI specifically disclaims all other
warranties, expressed or implied. Specifically, ESI makes no warranty that the product is fit for any particular purpose.
The FCC and CE Regulation Warning
This device complies with Part 15 of the FCC Rules. Operation is subject to the following two conditions : (1) this device may
not cause harmful interference, and (2) this device must accept any interference received, including interference that may
cause undesired operation. Caution : Any changes or modifications in construction of this device with are not expressly
approved by the party responsible for compliance, could void the user's authority to operate equipment.
NOTE : This equipment has been tested and found to comply with the limits for a Class A digital device, pursuant to Part 15
of the FCC Rules. These limits are designed to provide reasonable protection against harmful interference when the
equipment is operated in a commercial environment. This equipment generates, uses, and can radiate radio frequency
energy and, if not installed and used in accordance with the instruction manual, may cause harmful interference to radio
communications. Operation of this equipment in a residential area is likely to cause harmful interference in which case the
user will be required to correct the interference at his own expense. If necessary, consult an experienced radio/television
technician for additional suggestions.
Correspondence
For technical support inquiries, contact your nearest dealer or EGO SYSTEMS directly at:
Ego Systems Inc.
6-9, Yongmoon-dong, Yongsan-gu
Seoul, KOREA, 140-832
www.esi-pro.com
Technical Support:
Online Support Community:
North and South America (English)
Germany (German)
UK & International (English)
Sales:
International
USA
Germany
·
·
www.esiforum.com
[email protected]
[email protected]
[email protected]
[email protected]
[email protected]
[email protected]
All features and specifications subject to change without notice.
Parts of this manual are continually being updated. Please check our web site www.esi-pro.com
occasionally for the most recent update information.
28