1
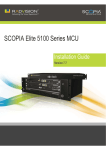
SCOPIA XT1000
Installation Guide
Version 2.0
© 2000-2010 RADVISION Ltd. All intellectual property rights in this publication are owned by RADVISION Ltd and are
protected by United States copyright laws, other applicable copyright laws and international treaty provisions.
RADVISION Ltd retains all rights not expressly granted.
This publication is RADVISION confidential. No part of this publication may be reproduced in any form whatsoever or used
to make any derivative work without prior written approval by RADVISION Ltd.
No representation of warranties for fitness for any purpose other than what is specifically mentioned in this guide is made
either by RADVISION Ltd or its agents.
RADVISION Ltd reserves the right to revise this publication and make changes without obligation to notify any person of
such revisions or changes. RADVISION Ltd may make improvements or changes in the product(s) and/or the program(s)
described in this documentation at any time.
If there is any software on removable media described in this publication, it is furnished under a license agreement
included with the product as a separate document. If you are unable to locate a copy, please contact RADVISION Ltd and
a copy will be provided to you.
Unless otherwise indicated, RADVISION registered trademarks are registered in the United States and other territories.
All registered trademarks recognized.
For further information contact RADVISION or your local distributor or reseller.
Installation Guide for SCOPIA XT1000 Version 2.0, September 2010
http://www.radvision.com
RADVISION | Installation Guide for SCOPIA XT1000 Version 2.0
Chapter '' | 2
Table of Contents
1
Architecture Considerations
About the SCOPIA XT1000 Series .......................................................................... 1
SCOPIA XT1000 Series as Endpoints ....................................................................... 1
SCOPIA XT1000 Series as Embedded MCUs............................................................... 2
Embedded MCUs and SCOPIA XT Desktop ................................................................ 4
Firewall/NAT Support ....................................................................................... 4
ISDN Connectivity ............................................................................................ 5
Implementing External Control............................................................................ 5
2
Hardware Setup
Safety Regulations ........................................................................................... 7
Prerequisites.................................................................................................. 7
Room Setup ............................................................................................. 7
Inspecting the Product ................................................................................ 8
Setting Up the System ...................................................................................... 9
Installing the Codec Unit.............................................................................. 9
Vertical Mounting................................................................................. 9
Horizontal Mounting ............................................................................. 9
Connecting the System................................................................................ 9
GLAN/LAN Hardware Setup ........................................................................ 11
Connecting the Audio System ...................................................................... 14
Connecting the Microphone Array Pod ...................................................... 14
Connecting an External Microphone System ............................................... 15
Connecting an Analog Audio Equipment.................................................... 15
RADVISION | Installation Guide for SCOPIA XT1000 Version 2.0
Table of Contents| i
Connecting the Video System ...................................................................... 17
Connecting the Main Camera ................................................................. 17
Connecting an Optional Camera ............................................................. 18
Using Optional Cameras with the XT1000 Remote Control Unit ........................ 20
Using a DVD or Blu-ray Player ................................................................ 21
Connecting an Analog Video Equipment .................................................... 21
Connecting a Computer ....................................................................... 23
Installing the Batteries of the Remote Control Unit ............................................ 23
RADVISION | Installation Guide for SCOPIA XT1000 Version 2.0
Table of Contents| ii
1
Architecture Considerations
About the SCOPIA XT1000 Series
The SCOPIA XT1000 Series incorporates the latest state-of-the-art video technology for room
conferencing, including support for dual stream 1080p video, high quality data sharing, high
quality full band audio and a high capacity embedded MCU.
Among its key features, SCOPIA XT1000 delivers support for two full High Definition (HD) 1080p
video streams as standard. It includes a PTZ (Pan-Tilt-Zoom) camera with 10x optical zoom for
viewing details, and wide-angle capability for capturing an entire group. The second video stream
can be used with an additional 1080p camera for visual coverage or with a PC for data sharing.
SCOPIA XT1000 supports high-resolution PC data sharing at 30fps, thus allowing presentations and
video clips to be shared with no quality loss.
The multipoint technology embedded in SCOPIA XT1000 provides the ability of hosting High
Definition (HD), Continuous Presence (CP) meetings with up to four or nine participants.
SCOPIA XT1000 provides full band audio encoding to ensure high-clarity audio transmission with
no loss of quality. Beam forming technology is used in the 3-way Microphone Pod to put the focus
on the speaker while isolating background noise. The ability to daisy-chain a second microphone
provides unparalleled large room coverage.
SCOPIA XT1000 Series as Endpoints
Figure 1-1 illustrates a topology in which the XT1000/XT1200 act as endpoints (or terminals):
• The MCU (e.g. SCOPIA Elite MCU) performs media processing for all connected terminals
(XT1000/XT1200, compatible 3rd party, SCOPIA VC240) regardless of their location and can
handle multiple conferences simultaneously. SCOPIA Elite MCU incorporates multi-party
1080p, 720p and H.264 Scalable Video Coding (SVC).
• SCOPIA VC240 integrates advanced video conferencing into a Samsung high resolution 24-inch
multimedia LCD monitor.
The XT1000 features the XT1000 Standard Camera. The XT1200 features a Sony Camera. Both
cameras are high end devices with state-of-the-art optics and full HD (1080p) support.
The Sony Camera provides better quality on average videocommunication condition and is
recommended when:
RADVISION | Installation Guide for SCOPIA XT1000 Version 2.0
'Architecture Considerations' | 1
• High motion 720p60 capture is required. The Standard Camera does not support 60fps
capture.
• There are very low light conditions. In general, the Sony Camera captures better image in low
light conditions.
Figure 1-1 SCOPIA XT1000 Series as Endpoints
SCOPIA XT1000 Series as Embedded MCUs
The MCU capability is embedded in the SCOPIA XT1000 and can be activated by registering the
Codec Unit serial number and product key in the XT1000 web registration page reserved to SCOPIA
XT1000 purchasers. See http://www.radvision.com/XT1000.
The SCOPIA XT1000 HD Room System has the capability of deploying two levels of MCUs:
• SCOPIA XT1004 - Basic MCU level with up to 4 participants (1 Local and 3 Remote). Each
participant receives up to 720p and can send up to 448p.
• SCOPIA XT1009/XT1209 - Advanced MCU level with up to 9 Participants (1 Local and 8
Remote). Each participant receives up to 720p and can send up to 488p depending on the
selected CP layout. Only the Active Speaker can send up to 448p. SCOPIA XT1009 features the
XT1000 Standard Camera, while SCOPIA XT1209 features a Sony Camera.
RADVISION | Installation Guide for SCOPIA XT1000 Version 2.0
'Architecture Considerations' | 2
Figure 1-2 SCOPIA XT1009/XT1209
The figure illustrates how the embedded MCU performs media processing for connected terminals
regardless of their location and handle multiple conferences simultaneously.
We recommend enabling the High Bandwidth Option (12Mbps) when using the embedded MCU. If
the High Bandwidth option is not enabled, the MCU will send out a lower resolution according to
the standard 4Mbps total bandwidth.
The embedded MCU can host Standard Definition (SD) and HD endpoints simultaneously. The
presence of SD endpoints does not affect the quality received by HD endpoints. SD endpoints will
receive SD video streams and HD endpoints will receive HD video streams. In the same way 4:3
and 16:9 video formats are included in the best possible way into the CP mosaic.
RADVISION | Installation Guide for SCOPIA XT1000 Version 2.0
'Architecture Considerations' | 3
Embedded MCUs and SCOPIA XT Desktop
Built on the SCOPIA XT1000 HD room system with its high capacity embedded MCU, the SCOPIA XT
Desktop solution combines HD room system capabilities, embedded multi-party conferencing,
desktop conferencing and firewall traversal. The SCOPIA XT Desktop option is delivered on a CD
for installation on a separate server.
The solution enables remote users to easily connect to a meeting, relying only on the SCOPIA
XT1000 and its embedded MCU with no extra hardware to acquire, deploy and configure. A single
SCOPIA XT Desktop Server is deployed with a single XT1000 endpoint, utilizing the endpoint’s
embedded MCU. The Desktop Server will connect to one specific XT1000 endpoint and will be tied
to its hardware address.
The typical use case would be: a meeting is scheduled in a conference room with SCOPIA XT1000
and another site. A remote sales person wants to participate to the meeting. The remote user
opens his/her web browser, points it to SCOPIA XT1000 and connects to the meeting.
Firewall/NAT Support
SCOPIA XT1000 fully supports firewall and NAT traversal using one of these methods:
• Local Configuration of Firewall/NAT public address. When the system is installed in a NAT
environment, you can configure the NAT public IP address in the Codec Unit in several ways:
Manual setting, Automatic Discovery using HTTP, or Automatic Discovery using STUN. Once
configured, this Firewall/NAT public IP address is then used for all signalling configurations.
This approach works well in simple Firewall/NAT deployments, typically used by home or
small business routers, but requires further support to open ports on the Firewall/NAT server.
Consult your network administrator.
• H.460. H.460 is a H.323 extension to support firewall and NAT traversal. It is more robust than
the auto discovery approach and will traverse more complex network configurations. This
approach requires a Traversal Server, such as RADVISION Pathfinder, to be installed in the
network.
Third-party ITU compliant servers are also supported.
The Codec Unit does not implement a built-in H.460 server. A separate server is required as
the Codec Unit supports only the client side of H.460.
A further solution for firewall issues can be implemented using the LAN 10/100 port option. When
enabling the LAN port, the user will be allowed to connect the two adapters to different IP
networks: for example, LAN connected to the public network and GLAN to a private network.
Note:
When SCOPIA XT1000 is deployed in managed complex network scenarios and is registered to a
gatekeeper, the gatekeeper management policies will apply to both interfaces. Consult your
network administrator for any routing problem that may arise.
RADVISION | Installation Guide for SCOPIA XT1000 Version 2.0
'Architecture Considerations' | 4
ISDN Connectivity
The SCOPIA XT1000 Series supports ISDN connectivity, allowing calls from endpoints to be routed
to the relevant conference using the SCOPIA BRI (Basic Rate Interface) and PRI (Primary Rate
Interface) gateways.
RADVISION has implemented a special pairing mechanism between the gateway and the endpoint
so that ISDN dialing is very simple. After pairing the systems, the participants place ISDN calls by
dialing the remote party ISDN number. The system automatically and transparently takes care of
setting the bit rate and call routing through the ISDN gateway.
A single gateway can serve multiple endpoints. For example, an organization needs to enable 5
endpoints with ISDN connectivity. Assuming the requested ISDN connectivity speed is 256bps, use
only one ISDN PRI gateway as it can support 5 concurrent calls of 256bps each.
With the gateway approach less communication lines are needed. As all gateways do not connect
at the same time and not all calls are ISDN, many more endpoints can share the same ISDN
connection and gateway.
Implementing External Control
The SCOPIA XT1000 has a feature-rich API. Using this API, integrators can implement AMX and
Creston applications to control the Codec Unit. The API is implemented as text commands over
the Ethernet interface. Contact RADVISION customer support for a copy of the API
documentations.
For the current release API support is available by using IP protocol over the Ethernet connection,
and not via the RS-232 serial port.
RADVISION | Installation Guide for SCOPIA XT1000 Version 2.0
'Architecture Considerations' | 5
RADVISION | Installation Guide for SCOPIA XT1000 Version 2.0
'Architecture Considerations' | 6
2
Hardware Setup
Safety Regulations
For detailed safety information consult the SCOPIA XT1000 Safety Instructions leaflet enclosed in
the delivery package.
Prerequisites
Room Setup
Set up the conference room to enjoy the virtual meeting.
SCOPIA XT1000 can receive the Infra-Red (IR) command of the Remote Control Unit via:
1. The Codec Unit IR receiver
2. The IR receiver of the XT1000 Standard Camera or the Sony Camera. In this case the Remote
Control Unit sends the command to the Codec Unit using the VISCA connection. The position
of the Codec Unit in the conference room is not important for receiving the signal from the
Remote Control Unit. But it is important to connect the main camera correctly to the Codec
Unit via the VISCA Cross cable.
Place the Codec Unit anywhere within 5 meter reach of the camera cables. Leave enough space
for air circulation and for connecting cables easily.
Place the camera(s) in a position to ensure eye contact between local and remote participants.
Recommended position is either directly below or directly above the monitors, in central position,
at a distance which enables capture of the entire table.
Place the Microphone Pod at the center of the table. To help with echo cancellation, we
recommend to position the Microphone Pod as far as possible from loudspeakers and other noise
sources (e.g.:computer fans).
RADVISION | Installation Guide for SCOPIA XT1000 Version 2.0
'Hardware Setup' | 7
Figure 2-1 Suggested Room Setup
Avoid white walls as they can introduce an effect-like backlight: a white wall increases the
illumination behind the person. Avoid glass walls, as well as patterns and textures on the walls as
they may cause disturbances to visual effects.We recommend to have plain walls of neutral color.
Also, in order to avoid reverberations, we recommend to use heavy curtains of neutral color and
carpets.
The conference room should be air-conditioned and kept at a cool temperature to avoid the
Codec Unit switching on its fan.
The conference room should be well and uniformly lit, avoiding a mixture of natural and artificial
light. Light should come from the top of the conference table, the front and the rear (for depth
of field). If only ceiling light is available, it should contribute to maintain a pleasant environment
and generate as less heat as possible.
The IR sensors of the Codec Unit and the camera might not receive the infrared rays under sunlight
or near inverter fluorescent lamps.
Inspecting the Product
Inspect the contents of the package for shipping damages.
For a list of package contents see the invoice shipped with your order.
Report any damage or missing items to your distributor or reseller.
Keep the package and its contents for inspection resulting from loss or damage claim.
RADVISION | Installation Guide for SCOPIA XT1000 Version 2.0
'Hardware Setup' | 8
Setting Up the SCOPIA XT1000
Installing the Codec Unit
Vertical Mounting
The Codec Unit can operate in vertical (or horizontal) position.
Procedure
Step 1
Step 2
Remove the cover on the left side of the Codec Unit and insert it into its base.
Using a flat-blade screwdriver fully turn the connecting screw on the base until it is completely
secured.
Figure 2-2 Codec Unit Vertical Mounting
Step 3
With the codec in vertical position we recommend to use the support fairlead to avoid cable
weight issues.
Horizontal Mounting
The XT1000 Codec Unit can operate in horizontal (or vertical) position.
Place the XT1000 Codec Unit on a horizontal surface which stands firmly on its base.
The surface must be dry and free of dust, oil and other residues.
Connecting the System
Figure 2-3 shows possible connections to the Codec Unit.
Note:
CAUTION: Make sure all units are switched off whenever connecting or disconnecting devices.
RADVISION | Installation Guide for SCOPIA XT1000 Version 2.0
'Hardware Setup' | 9
Note:
If cascade cameras are used, RADVISION recommends connecting two cameras of the same type to
the Codec Unit: two XT1000 Standard Cameras or two Sony Cameras.
Note:
RADVISION has certified the XT1000 Standard Camera and the Sony Camera for usage with SCOPIA
XT1000. RADVISION has not certified other cameras and cannot guarantee their compatibility with
the XT1000 Codec Unit. Integrators whishing to use other 3rd party cameras can do this at their own
risk. However, it is recommended to contact RADVISION customer support prior to usage to verify
any known issues.
Figure 2-3 Connecting the Codec Unit to Peripherals
Procedure
Step 1
Step 2
Step 3
Verify the contents of the delivery you received (see Inspecting the Product page 8).
Step 4
Connect the XT1000 Digital Microphone Array Pod (see Connecting the Microphone Array Pod
page 14).
Step 5
Connect the HD video cable to the HD1 monitor output.
Plan system setup in the selected location (see Room Setup page 7).
Connect the main camera. If required, connect a second optional camera. (See Connecting the
Video System page 17.)
RADVISION | Installation Guide for SCOPIA XT1000 Version 2.0
'Hardware Setup' | 10
Step 6
Connect the LAN or GLAN input to the network .
Note:
From software version 2.0.7B only the GLAN input is enabled. You need to purchase a
licence to use the LAN input.
Step 7
Connect additional audio or video equipments to the available inputs/outputs (see Connecting the
Audio System page 14 or Connecting the Video System page 17).
Step 8
Step 9
Step 10
Connect the power supply of the Codec Unit.
Step 11
Power the monitor on.
Press the Power button at the back of the XT1000 Codec Unit. The LED on the front of the XT1000
Codec Unit indicates system status:
•
LED on: System is on and normally operating.
•
LED flashing: System power is on, but the system is in standby mode.
•
LED off: System power is either off or not connected.
Wait for the main graphical user interface (GUI) to appear. To configure the system, see the
SCOPIA XT1000 Administrator Guide. To use the system, see the SCOPIA XT1000 User Guide.
GLAN/LAN Hardware Setup
The LAN and GLAN ports can be used simultaneously, connecting each to different networks (for
example: private and public network).
LAN connection is not available by default. Contact RADVISION to acquire a license to activate the
connection. Enabling LAN will require a system restart.
These are the setup possibilities:
• In case you need to connect the Codec Unit to one network (private or public), we recommend
to connect the network to the GLAN connection and configure only GLAN in the Codec Unit
GUI.
Figure 2-4 Single Network Connection
• In case you need to connect the Codec Unit to a private network and a public network and
you have one router interfacing the Codec Unit in the private network, we recommend to
connect the private network to the GLAN connection, and the public network to the LAN
connection.
RADVISION | Installation Guide for SCOPIA XT1000 Version 2.0
'Hardware Setup' | 11
Figure 2-5 LAN and GLAN Connection - Single Router
• In case you need to connect the Codec Unit to a private network and a public network,and
there are multiple routers in both networks, we recommend to connect the private network
to the GLAN connection, and the public network to the LAN connection.
Note:
All the addresses belonging to IANA private internets (local networks) and listed below will
be routed as private network addresses (i.e. 192.168.xxx.yyy):
• 10.0.0.0 - 10.255.255.255
• 172.16.0.0 - 172.31.255.255
• 192.168.0.0 - 192.168.255.255
RADVISION | Installation Guide for SCOPIA XT1000 Version 2.0
'Hardware Setup' | 12
Figure 2-6 LAN and GLAN Connection - Multiple Router
• We do not recommend a connection where traffic is split between two I/O ports. This type of
connection causes overcharge of memory usage and routing operations inside the Codec Unit.
Figure 2-7 Not Recommended
RADVISION | Installation Guide for SCOPIA XT1000 Version 2.0
'Hardware Setup' | 13
Connecting the Audio System
Connecting the Microphone Array Pod
The Microphone Pod performance varies with room characteristics, background noise levels, and
loudness and position of speakers.
When used in typical settings, the Microphone Pod can cover a radius of 2 meters (about 6.5 feet).
For optimal results:
• Place the Microphone Pod at the center of the table.
• In a larger conference room, connect 2 Microphone Pods. Distribute them evenly on the table.
Figure 2-8 Microphone Setup
Procedure
Step 1
Connect the Microphone Pod output
to the rear panel of the XT1000 Codec Unit.
Figure 2-9 Microphone Pod
Step 2
(Optional) Connect the second Microphone Pod output
RADVISION | Installation Guide for SCOPIA XT1000 Version 2.0
to the first Microphone Pod input
.
'Hardware Setup' | 14
Figure 2-10 Connecting the Microphone Pods to the Codec Unit
Note:
Use 2 Microphone Pods maximum.
Note:
In the current version release, the XT1000 Codec Unit does not encode/decode stereo
signals.
Connecting an External Microphone System
When the two-pod configuration does not suffice to cover the room, use an external microphone
system.
You need to acquire audio mixers from third-parties (e.g. Clear One). An audio mixer can connect
multiple microphones, mix them, cancel the echo and generate a single audio stream that feeds
into the S/PDIF IN jack of the XT1000 Codec Unit.
Make sure the microphone mixer provides a digital (S/PDIF) output that can connect to the XT1000
Codec Unit.
SCOPIA XT1000 supports echo cancellation on the external audio interface.
When working with an external microphone system that does not contain echo cancellation,
enable the echo cancellation feature in the SCOPIA XT1000 GUI.
Make sure to disable echo cancellation when working with an external mixer that handles echo
cancellation externally.
Connecting an Analog Audio Equipment
SCOPIA XT1000 features digital inputs and outputs.
If your room configuration requires analog audio inputs or outputs, use an analog-to-digital (or
vice-versa) audio converter.
RADVISION | Installation Guide for SCOPIA XT1000 Version 2.0
'Hardware Setup' | 15
RADVISION has tested and certified the use of bi-directional AU-D9 from CYP (UK) Ltd. The same
audio converter is also called DCT-9 and is available in the RADVISION price list.
For detailed information on the audio converter, see the DCT-9 Operation Manual on the
company’s site.
As an example of analog to digital conversion: you need to connect your PC to the Codec Unit so
that the remote terminal hears the audio of the movie clip you’re just showing.
Connect your PC to DCT-9 analog L/R input. Then connect DCT-9 COAX output to the S/PDIF input
of the Codec Unit. Make sure to set DCT-9 INPUT SELECT to L/R.
Figure 2-11 Stereo to S/PDIF Cabling
As an example of digital to analog conversion: the Codec Unit sends the audio it receives to a DVD.
Connect the Codec Unit S/PDIF output to the DCT-9 coaxial input. Then connect the DCT-9 analog
L/R output to the DVD input. Make sure to set DCT-9 INPUT SELECT to COAX.
RADVISION | Installation Guide for SCOPIA XT1000 Version 2.0
'Hardware Setup' | 16
Figure 2-12 S/PDIF to Stereo Cabling
Connecting the Video System
Connecting the Standard Camera
Use the XT1000 Remote Control Unit of the Codec Unit to control the Standard Camera.
Note:
The XT1000 Standard Camera is a high-end device with state-of-the art optics and full HD (1080p)
support. Use the Sony Camera if you work with high-motion 720p60 capture.
Note:
CAUTION: Remove the camera stabilizing cartons before applying power to the camera.
Connect the Standard Camera.
RADVISION | Installation Guide for SCOPIA XT1000 Version 2.0
'Hardware Setup' | 17
Figure 2-13 Connecting the Standard Camera
Connecting an Optional Camera
The optional camera kit contains a camera, remote control, and power supply. The kit does not
contain cables since the optional camera location and distance from the Codec Unit varies
significantly across installations.
Use the Sony Camera when high motion 720p60 capture is required. This camera also supports up
to 40x digital zoom.
There are two ways of controlling the optional camera:
• Using the remote control provided in the optional camera kit.
• Using the XT1000 Remote Control Unit. In this case, you must connect a VISCA Cross cable
between the Standard Camera VISCA OUT and the optional camera VISCA IN. The cable will
transfer commands from the Codec Unit to the cameras. (See Using Optional Cameras with
the XT1000 Remote Control Unit page 20).
Note:
CAUTION: Remove the camera stabilizing cartons before applying power to the camera.
RADVISION | Installation Guide for SCOPIA XT1000 Version 2.0
'Hardware Setup' | 18
Procedure
Step 1
Connect the optional Standard Camera to the HDMI2 input of the Codec Unit. In this configuration,
it is possible to send HDMI1 or HDNMI2 as main stream video. As a second stream video it is
possible to send the signal present on the DVI input (usually a PC presentation). You can control
both cameras (HDMI1 and HDMI2) by using the XT1000 Remote Control Unit.
Figure 2-14 Connecting the Optional Standard Camera
Step 2
(Optional) Connect the optional camera to the Codec Unit’s DVI input (instead of connecting a
PC). In this configuration, it is possible to transmit simultaneously two streams coming from two
different cameras. You can control only the HDMI1 camera with the XT1000 Remote Control Unit.
To control the DVI camera, use the camera’s own remote controller.
Note:
Step 3
Do not connect the VISCA Cross cable in that configuration.
(Only if using the XT1000 Remote Control Unit to control the camera.) Connect the VISCA Cross
cable between the Standard Camera and the optional camera.
RADVISION | Installation Guide for SCOPIA XT1000 Version 2.0
'Hardware Setup' | 19
Using Optional Cameras with the XT1000 Remote Control Unit
To control the optional camera with the XT1000 Remote Control Unit, you will need to connect a
VISCA Cross cable between the 2 cameras.
VISCA Control is a standard protocol to control PTZ Cameras. Through the VISCA interface, the
Codec Unit sends commands that change the camera capture resolution, PTZ properties and
more. For example, when changing the camera position using the XT1000 Remote Control Unit,
the IR signals are intercepted by the Codec Unit IR receiver and camera IR receiver and
transmitted to the camera through the VISCA interface.
You may buy a VISCA Cross cable from a third party or make you own cable if you’re planning to
position the optional camera far away from the Codec Unit.
When the Codec Unit is hidden and the Codec Unit IR receiver cannot work properly, the IR signal
coming from the XT1000 Remote Controller is received from the IR sensor of the main camera (not
the optional camera) and the commands are sent, as electrical signals, to the VISCA OUT
connector.
Note:
You must connect a VISCA Cross cable between the main camera and the optional camera.
Note:
RADVISION recommends connecting cameras of the same type to the Codec Unit. If you connect
different types of cameras as main and optional cameras, the similarity of functions is not ensured,
and RADVISION does not assume any responsibility for the malfunctioning.
Procedure
Step 1
Make the VISCA Cross cable.
•
The VISCA Cross cable is an 8-pin mini-DIN male to 8-pin mini-DIN male cable.
Figure 2-15 8-Pin Mini-DIN Connector
RADVISION | Installation Guide for SCOPIA XT1000 Version 2.0
'Hardware Setup' | 20
Figure 2-16 Pinout Diagram
•
Step 2
The cable’s maximal length is 15m (50ft.).
Connect the cable as explained in Connecting an Optional Camera page 18.
Using a DVD or Blu-ray Player
You may connect a DVD or Blu-ray player to the HDMI1 or HDMI2 inputs of the Codec Unit.
When connecting a DVD player, be aware that according to the HDCP Licensee, you cannot use or
transmit a digitally protected content.
If the Codec Unit detects this type of content, the
HDMI input is selected.
Grey Lock logo will appear whenever the
Connecting an Analog Video Equipment
The Codec Unit features digital inputs and outputs.
If the room configuration requires analog video inputs or outputs, use an external
analog-to-digital (or vice-versa) video converter.
RADVISION has tested and certified two video converters from Gefen:
• GTV-COMPSVID-2-HDMIS, Composite/S-Video to HDMI Scaler
• GTV-HDMI-2-COMPSVIDS, HDMI to Composite/S-Video Scaler
See the company’s site for documentation.
For example, you might need to connect an analog camera to the Codec Unit.
Connect the analog camera to HD CAM1 or HD CAM2 using the Composite/S-Video to HDMI Scaler.
RADVISION | Installation Guide for SCOPIA XT1000 Version 2.0
'Hardware Setup' | 21
Figure 2-17 Connecting an Analog Camera
As another example, you might need to connect an external recording device (e.g.: a DVD) to the
Codec Unit.
Connect the DVD to HD1 of the Codec Unit using the HDMI to Composite/S-Video Scaler. Connect
the monitor to HD2.
Figure 2-18 Connecting a DVD
RADVISION | Installation Guide for SCOPIA XT1000 Version 2.0
'Hardware Setup' | 22
Connecting a Computer
To share data during a call, connect a computer to the DVI-I IN socket of the Codec Unit.
Procedure
Step 1
(For computers and laptops with a DVI out connector) Connect the DVI cable to the DVI-I socket
of the Codec Unit and connect the other end of the cable to the computer.
Step 2
(For computers with VGA out only) Use the DVI to VGA adapter:
1. Connect the DVI-VGA adapter to the DVI-IN socket of the Codec Unit.
2. Connect a VGA cable to the adapter. This cable does not ship with the system.
3. Connect the VGA cable to the PC/Laptop VGA out socket.
Step 3
Connect the computer audio to the Codec Unit.
•
Since audio input is not included in the DVI-I port connection to the Codec Unit, establish a
separate audio connection from the computer’s audio output port into the S/PDIF audio
input port of the Codec Unit.
•
If the computer does not support digital audio, you may need an external converter (see
Connecting an Analog Audio Equipment page 15).
Installing the Batteries of the Remote Control Unit
Procedure
Step 1
Step 2
Step 3
Slide the battery compartment cover open.
Put the battery in, making sure the battery’s positive side faces up.
Slide the battery compartment cover back until you hear a click.
When the Remote Control Unit's battery power is low, an icon appears on the GUI letting you know
that you should replace the battery:
•
Half-charged Battery
•
Low Battery
Note:
When the Low Battery icon appears on the display, we recommend to change batteries
immediately, to ensure proper functioning of the system.
For battery disposal information refer to the Safety Instructions leaflet.
RADVISION | Installation Guide for SCOPIA XT1000 Version 2.0
'Hardware Setup' | 23
RADVISION | Installation Guide for SCOPIA XT1000 Version 2.0
'Hardware Setup' | 24
www.radvision.com
About RADVISION
RADVISION (NASDAQ: RVSN) is the industry’s leading provider of market-proven products and technologies for
unified visual communications over IP and 3G networks. With its complete set of standards based video networking
infrastructure and developer toolkits for voice, video, data and wireless communications, RADVISION is driving the
unified communications evolution by combining the power of video, voice, data and wireless – for high definition
video conferencing systems, innovative converged mobile services, and highly scalable video-enabled desktop
platforms on IP, 3G and emerging next generation networks. For more information about RADVISION, visit
www.radvision.com
USA/Americas
T +1 201 689 6300
F +1 201 689 6301
[email protected]
EMEA
T +44 20 3178 8685
F +44 20 3178 5717
[email protected]
APAC
T +852 3472 4388
F +852 2801 4071
[email protected]
This document is not part of a contract of license as may be expressly agreed RADVISION is registered
trademarks of RADVISION, Ltd. All trademarks recognized. All rights reserved © 2010 RADVISION, Ltd.