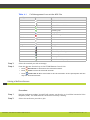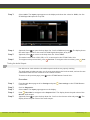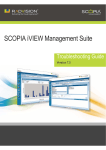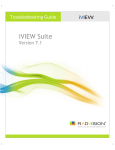
1
SCOPIA XT1000
User Guide
Version 2.0
© 2000-2010 RADVISION Ltd. All intellectual property rights in this publication are owned by RADVISION Ltd and are
protected by United States copyright laws, other applicable copyright laws and international treaty provisions.
RADVISION Ltd retains all rights not expressly granted.
This publication is RADVISION confidential. No part of this publication may be reproduced in any form whatsoever or used
to make any derivative work without prior written approval by RADVISION Ltd.
No representation of warranties for fitness for any purpose other than what is specifically mentioned in this guide is made
either by RADVISION Ltd or its agents.
RADVISION Ltd reserves the right to revise this publication and make changes without obligation to notify any person of
such revisions or changes. RADVISION Ltd may make improvements or changes in the product(s) and/or the program(s)
described in this documentation at any time.
If there is any software on removable media described in this publication, it is furnished under a license agreement
included with the product as a separate document. If you are unable to locate a copy, please contact RADVISION Ltd and
a copy will be provided to you.
Unless otherwise indicated, RADVISION registered trademarks are registered in the United States and other territories.
All registered trademarks recognized.
For further information contact RADVISION or your local distributor or reseller.
User Guide for SCOPIA XT1000 Version 2.0, September 2010
http://www.radvision.com
RADVISION | User Guide for SCOPIA XT1000 Version 2.0
Chapter '' | 2
Table of Contents
1
Getting Started
System Installation and Product Activation.............................................................. 1
Accessing the Main Menu Page............................................................................. 1
Using the Quick Setup Wizard ............................................................................. 2
Setting the Country and Language .................................................................. 3
Adjusting the Image Size.............................................................................. 3
Setting Date and Time................................................................................. 4
Setting the Codec Unit Display Name............................................................... 5
Network Settings ....................................................................................... 6
Setting the Language Interface............................................................................ 7
Activating the Screen Saver................................................................................ 7
Entering Alphanumeric Characters........................................................................ 7
Pairing a Remote Control Unit with a Codec Unit ...................................................... 8
2
Making Calls
Making a Video Call.......................................................................................... 9
Dialing a New Number................................................................................. 9
Redialing the Number ............................................................................... 10
Dialing from the Phonebook ........................................................................ 11
Making an ISDN Call........................................................................................ 11
Making an Audio-only Call ................................................................................ 12
Answering Calls............................................................................................. 12
Answering a Video Call .............................................................................. 12
Using Automatic Answering......................................................................... 13
RADVISION | User Guide for SCOPIA XT1000 Version 2.0
Table of Contents| i
Ending a Call ................................................................................................ 13
Ending a Video Call .................................................................................. 13
Ending an Audio-only Call........................................................................... 13
Confirming Call Disconnection ..................................................................... 14
3
Managing Calls
Managing the Video ........................................................................................ 15
Controlling the Camera ............................................................................. 15
Using the Camera............................................................................... 15
Setting Camera Presets........................................................................ 16
Retrieving Camera Presets .................................................................... 16
Configuring the Monitor ............................................................................. 17
Setting the Monitor Resolution ............................................................... 17
Changing One Monitor Layout ................................................................ 17
Changing Dual Monitor Layouts............................................................... 19
Sharing Contents during a Call ..................................................................... 20
Setting the Computer Display ................................................................ 20
Showing Contents from your Computer .................................................... 21
Setting Privacy ........................................................................................ 22
Setting Privacy during a Call.................................................................. 22
Setting Privacy at System Startup ........................................................... 22
Monitoring the Audio ...................................................................................... 22
Adjusting the System Volume ...................................................................... 22
Adjusting the Ringing Volume ...................................................................... 23
Muting/Unmuting the Microphone Array Pod .................................................... 23
Blocking Incoming Calls ............................................................................. 24
Using the Do Not Disturb Feature ............................................................ 24
Setting the Do Not Disturb Feature at System Startup ................................... 24
Securing Your Calls......................................................................................... 24
Managing the Phonebook ................................................................................. 25
Adding a Contact to the Phonebook............................................................... 25
Modifying a Contact in the Phonebook............................................................ 25
Deleting a Contact from the Phonebook.......................................................... 26
RADVISION | User Guide for SCOPIA XT1000 Version 2.0
Table of Contents| ii
4
Making Multiconference Calls
Initiating a Multiconference .............................................................................. 27
Changing the Video Layout ............................................................................... 29
Setting Multiconference Date and Time................................................................ 30
Managing the Multiconference - MCU Site ............................................................. 31
Joining a Multiconference ................................................................................ 32
Managing the Mulitconference - Terminal Site ........................................................ 33
Ending a Multiconference................................................................................. 34
5
Troubleshooting
Using the Diagnostics Feature............................................................................ 35
Verifying the Software Version ..................................................................... 35
Testing the Audio..................................................................................... 35
Testing the Audio Inputs....................................................................... 35
Testing the Audio Outputs..................................................................... 36
Testing Audio Streaming....................................................................... 37
Testing the Tones ............................................................................... 37
Restoring Default Settings ................................................................................ 37
Getting Help ................................................................................................ 38
RADVISION | User Guide for SCOPIA XT1000 Version 2.0
Table of Contents| iii
1
Getting Started
System Installation and Product Activation
For installation and product activation of the SCOPIA XT1000, consult the documentation enclosed
in the delivery package:
• SCOPIA XT1000 Quick Setup Guide
• SCOPIA XT1000 Safety Instructions leaflet
The Quick Setup section covered in the Quick Setup Guide explains the minimal required setting
necessary to enjoy a proper working of the system.
Your system administrator may have customized certain features described in this guide to suit
the environment of your company. Please ask your service administrator for details on your
system’s customization.
Once you have completed the installation, you are ready to use the system’s Graphical User
Interface (GUI).
Accessing the Main Menu Page
The Main Menu page displays the buttons that you must select to activate the features and
capabilities of the SCOPIA XT1000.
Procedure
Step 1
Step 2
Step 3
Step 4
Turn on the TV monitors.
Make sure the XT1000 Remote Control Unit has batteries installed.
Verify that the LED on the front panel of the XT1000 Codec Unit is blinking.
Turn on the XT1000 Codec Unit by pressing the
button on the XT1000 Remote Control Unit or
the Power button on the back of the XT1000 Codec Unit.
RADVISION | User Guide for SCOPIA XT1000 Version 2.0
'Getting Started' | 1
Step 5
The RADVISION welcome screen appears on the monitors, followed by the Main Menu page.
Figure 1-1 Main Menu Page
Note:
Step 6
All the pages are partitioned into areas: system area (top bar); action area (right bar);
local info area and function keys area (bottom bar corresponding to colored buttons on
the XT1000 Remote Control Unit).
Using the arrow keys of the XT1000 Remote Control Unit, select the action to perform in the
rightmost section of the page (e.g. Make your call or Settings).
According to the selected action, the content of the function key bar changes dynamically in color
and presents further options. In this way, you can access all major system functions by simply
pressing the arrows and color keys of the XT1000 Remote Control Unit.
For example, scroll to Settings. The function keys allow you to choose among
settings,
User settings, and
Quick setup.
Administrator
Using the Quick Setup Wizard
A quick setup wizard will assist you in this first approach to the system.
The quick setup will show more pages, allowing you to set some useful parameters for basic
system management. Your system administrator might already have set these parameters for you.
You might also use the quick setup wizard after:
• Restoring default settings
• Re-installing software
RADVISION | User Guide for SCOPIA XT1000 Version 2.0
'Getting Started' | 2
Setting the Country and Language
You can change the country and language setting of your terminal by accessing the relevant screen
in the Quick Setup.
Procedure
Step 1
Step 2
Step 3
On the Main Menu page, scroll to Settings.
Step 4
Press
Press
Quick setup on the XT1000 Remote Control Unit.
Use the arrow keys to select the Country and preferred Language.
Close to save the new settings.
Adjusting the Image Size
If the display appears cropped on your monitor, you may need to adjust the image size the system
sends you.
Some HD monitors can crop the XT1000 Codec Unit output. If the borders of the graphical pages
are not fully visible, use Quick setup to make the graphic page fully visible.
Procedure
Step 1
Step 2
Step 3
On the Main Menu page, scroll to Settings.
Press
Quick setup on the XT1000 Remote Control Unit.
Navigate to Page 2/6 for graphic resizing.
RADVISION | User Guide for SCOPIA XT1000 Version 2.0
'Getting Started' | 3
Step 4
If all the sides of the orange frame are visible on your monitor, select
Yes, otherwise select
No. Press
. The first slider is highlighted in orange. Use the right and left arrow keys to
move the slider until the Top orange frame is fully visible on your monitor and press
Move to
a different slider with the up and down arrow keys. Repeat the procedure for the Left, Bottom,
and Right side.
Step 5
Press
Close to save the new settings.
Setting Date and Time
Procedure
Step 1
Step 2
On the Main Menu page, scroll to Settings.
Press
Quick setup on the XT1000 Remote Control Unit.
RADVISION | User Guide for SCOPIA XT1000 Version 2.0
'Getting Started' | 4
Step 3
Navigate to Page 4/6 for date and time setting.
Step 4
Use the up and down arrow keys to navigate to the Day field. Press on the XT1000 Remote
Control Unit to delete the date. Enter today’s date. Use the up and down arrow keys to move to
the next field. Repeat the procedure for the Month, Year, Hour, and Minutes.
Step 5
Step 6
(Recommended) To synchronize the system with the network time, set Internet Time to Yes.
Step 7
Step 8
(Optional) Set the Enable daylight time field to Yes.
Step 9
Press
(Recommended) Select the relevant time zone from the drop-down list. The Day, Month, Year,
Hour, and Minutes will show the new time zone.
Set the Start (dd/mm) and Stop (dd/mm) fields to indicate when daylight saving times start and
end.
Close to save the new settings.
Setting the Codec Unit Display Name
Procedure
Step 1
Step 2
Step 3
On the Main Menu page, scroll to Settings.
Press
Quick setup on the XT1000 Remote Control Unit.
Navigate to Page 5/6.
RADVISION | User Guide for SCOPIA XT1000 Version 2.0
'Getting Started' | 5
Step 4
The System Name field displays the name of this Codec Unit as displayed in a video conference,
(e.g.: Hong Kong, or 9th Floor Conf Rm, , or NY Office). Use the XT1000 Remote Control Unit
keypad to type the name. Spaces used in the name will be automatically converted to “_”.
Step 5
Press
Next.
Network Settings
Procedure
Step 1
Step 2
Step 3
Step 4
On the Main Menu page, scroll to Settings.
Step 5
Press
Press
Quick setup on the XT1000 Remote Control Unit.
Navigate to Page 6/6.
Enter your network settings. For questions about this information, consult your system
administrator.
Finish to save the new settings.
RADVISION | User Guide for SCOPIA XT1000 Version 2.0
'Getting Started' | 6
Setting the Language Interface
You may set the language interface in the Quick Setup Wizard or from the Main Menu page.
Procedure
Step 1
Step 2
In the Main Menu page, select Settings, then press
Step 3
Press
User settings.
The General page appears. Use the arrow keys to select the required language interface from the
drop-down list.
Save to save the new setting.
Activating the Screen Saver
Press
Note:
on the XT1000 Remote Control Unit and press
Shutdown no.
The screen saver automatically starts after the period of time set in User settings > User
preferences > General.
Entering Alphanumeric Characters
Use the XT1000 Remote Control Unit keypad or the virtual keyboard to type letters and digits.
Procedure
Step 1
Step 2
Position the cursor in the input field.
Step 3
When using the keypad of the XT1000 Remote Control Unit, press the relevant key to enter the
required letter or digit.
Step 4
When using the virtual keyboard, move the cursor over the required letter or digit and press
Press to delete the last entered character. Press
to close the virtual keyboard.
Press
on the XT1000 Remote Control Unit to change the input mode in the input field. The
available modes are: abc1 (letters, then digit); 1abc (digit, then letters); 123 (digits only); virtual
keyboard.
RADVISION | User Guide for SCOPIA XT1000 Version 2.0
.
'Getting Started' | 7
Pairing a XT1000 Remote Control Unit with a Codec Unit
You can use the Remote Control Unit to control one or more systems in a same room, thus avoiding
interferences with other Remote Control Units. To do so, enter the same code in your Remote
Control Unit and in your system software. All Remote Control Units are supplied with a default
code (01).
Procedure
Step 1
Step 2
On the Main Menu page, scroll to Settings.
Step 3
Using the arrow keys, scroll to Remote control code and type a two-digit code in the field. The
allowed range of code is between 01 and 99.
Step 4
Step 5
Step 6
Step 7
Press
Press
User settings. The General page appears on the display.
Save.
Simultaneously press
and
. The
button becomes red.
Using the keypad, type the two-digit code you just entered in the Remote control code field.
Press
Finish.
RADVISION | User Guide for SCOPIA XT1000 Version 2.0
'Getting Started' | 8
2
Making Calls
Making a Video Call
Dialing a New Number
Before calling, take necessary measures to optimize your virtual meeting:
• Verify that all you need is ready: addresses or numbers to call, lighting, XT1000 Digital
Microphone Array Pods.
• Connect and test the required peripherals (additional HD camera, DVD player or recorder,
PC/laptop). Make sure all units are switched off whenever connecting or disconnecting
devices.
• Use natural gestures as in a real meeting.
• Try to fill the screen as much as possible with persons, not backgrounds.
• Place the XT1000 Digital Microphone Array Pod on the table in front of people.
• Use 2 XT1000 Digital Microphone Array Pods in case of large conference tables.
• Do not place papers or other objects in front of the XT1000 Digital Microphone Array Pod.
• Do not rustle papers or tap on the conference table or the XT1000 Digital Microphone Array
Pod.
• Mute the XT1000 Digital Microphone Array Pod before moving it.
• Speak in a normal voice.
RADVISION | User Guide for SCOPIA XT1000 Version 2.0
'Making Calls' | 9
Procedure
Step 1
In the Main Menu page, select Make your call. You can also press either
the XT1000 Remote Control Unit
Step 2
The Direct call page appears. Enter the contact number using the XT1000 Remote Control Unit or
the virtual keyboard. You may also insert the name of the contact you wish to call, if it exists in
your phonebook.
Note:
or
Direct call on
For information on how to open the virtual keyboard, see Entering Alphanumeric
Characters page 7.
Step 3
Step 4
Select Basic options. Use the arrow keys to select the contact’s call protocol.
Step 5
To call, press
(Optional) To change the contact’s communication settings, select Advanced options. Under Rate
(K) select the maximum bandwidth to use for this call. By default, the system will use the
maximum available bandwidth. In the Call type dropdown menu, select the type of call:
Audio-Video or Audio.
or
.
Redialing the Number
Procedure
Step 1
Step 2
In the Main Menu page, scroll to Make your call.
Press
Recall on the XT1000 Remote Control Unit. The Recall list will appear, showing the list
of the last dialed, received, and missed calls. Icons appear next to a contact number or name.
Icon
Indicates
Received call
Dialed call
Missed call
Note:
Step 3
Step 4
The system allows you to store up to 25 recent calls.
Select the relevant call using the arrow keys.
Press
or
Call to place the call.
RADVISION | User Guide for SCOPIA XT1000 Version 2.0
'Making Calls' | 10
Dialing from the Phonebook
Use the phonebook to dial terminals that are frequently called.
Procedure
Step 1
Press
on the XT1000 Remote Control Unit. Or select Make your call in the Main Menu page,
and press
Contacts.
Step 2
Step 3
The Contacts page appears on the display. Select the contact you wish to dial.
Press
or
Call.
Making an ISDN Call
Your system administrator must enable the ISDN call feature in your terminal.
Procedure
Step 1
Select the ISDN number from the Recall list or from the phonebook. Or dial the ISDN number in
the Direct call page and select the ISDN Call profile.
Figure 2-1 Direct Call Dialing
Step 2
Press
Call to place your call.
RADVISION | User Guide for SCOPIA XT1000 Version 2.0
'Making Calls' | 11
Making an Audio-only Call
You may also use the SCOPIA XT1000 to place audio-only calls.
Procedure
Step 1
Step 2
Step 3
Step 4
In the Main Menu page, select Make your call. (Or press
Step 5
Step 6
Select Audio in the drop-down list.
or
Direct call.)
The Direct call page appears on the display.
Select Advanced options.
Enter the contact number using the XT1000 Remote Control Unit or the virtual keyboard. You may
also use the Recent calls list, or insert the name of the contact you wish to call if it exists in your
phonebook.
To call, press
or
Call on the XT1000 Remote Control Unit.
Answering Calls
Answering a Video Call
Note:
You can set the system to let you answer the call automatically or manually. See Using Automatic
Answering page 13.
When receiving a call, the SCOPIA XT1000 reacts with a ringing sound and a message on the screen
with the calling number/name.
If you set your system to automatic answering, the terminal will answer after the predefined
number of rings.
In automatic or manual answering, during the ringing, you may answer by pressing
Remote Control Unit. To reject the call, press
Reject.
on the
If you set your system to manual answering, you can either accept or reject the incoming call:
• To accept the call, press Accept on the XT1000 Remote Control Unit.
• To reject the call, press Reject on the XT1000 Remote Control Unit.
• To reject the call and set the system to automatically reject all further incoming calls without
asking any more, press
RADVISION | User Guide for SCOPIA XT1000 Version 2.0
Do not disturb.
'Making Calls' | 12
Using Automatic Answering
You can enable/disable automatic answering to an incoming call. You may select among a number
of settings: Always, Never, Never if a call is active. You can also set the number of alert rings
the system will sound until you answer the call.
Procedure
Step 1
Step 2
Step 3
Step 4
Step 5
Navigate to Settings.
Press
User settings.
Select Call-Answer Mode.
Select Automatic answer.
Open the drop-down list and select the required setting:
• Always: this setting enables automatic answer to an incoming call. The system will not
prompt you to accept a call if the display shows the Home page.
• Never: this setting disables automatic answer to an incoming call. The system will alsways
prompt you to accept a call.
• Never if a call is active: this setting disables automatic answer during an ongoing call.
Step 6
Step 7
Step 8
(Optional) Navigate to the After Num. Rings field.
(Optional) Move the slider until the requested value appears on the display.
At each step, press the relevant function key of the remote control to save and undo the settings,
or return to the previous screen.
Ending a Call
Ending a Video Call
To end an ongoing call:
• Press
on the XT1000 Remote Control Unit, or
• Select the
button, then press
Disconnect call on the XT1000 Remote Control Unit.
If you have set your system to Confirm disconnection, a message will appear on your display.
Press
Yes to confirm that you want to end the call.
Ending an Audio-only Call
To disconnect a terminal in an audio-only call, press
on the XT1000 Remote Control Unit.
If you have set your system to Confirm disconnection, a message will appear on your display.
Press Yes to confirm that you want to end the call.
RADVISION | User Guide for SCOPIA XT1000 Version 2.0
'Making Calls' | 13
Confirming Call Disconnection
Set the system to request a confirmation upon call disconnection.
Procedure
Step 1
Step 2
Step 3
Step 4
Press
User settings.
Select Call-Answer Mode.
Select Confirm disconnection.
Select Yes.
RADVISION | User Guide for SCOPIA XT1000 Version 2.0
'Making Calls' | 14
3
Managing Calls
Managing the Video
Controlling the Camera
Using the Camera
You can control the local video camera zoom and panning functions and also those of the remote
camera. To select between the remote and local camera, press
or
.
You can control the remote camera when the connection with the remote terminal is established
and the remote camera is configured to be remotely managed.
You can use the arrow keys to move the camera when the graphic menu is hidden.When the menu
is visible, you can move the camera by using menu commands: scroll to Cameras using the arrow
keys, and select
Move camera. Move the selected camera to the preferred position. Zoom in
or out as desired. You can always zoom in or out without selecting Move camera. Select
Stop
moving camera. To switch to another camera, press
.
RADVISION | User Guide for SCOPIA XT1000 Version 2.0
'Managing Calls' | 15
Procedure
Step 1
Step 2
Step 3
Step 4
While in a call, press
to hide the graphics in the Main Menu page.
Use the arrow keys to move the selected camera to the preferred position.
Press
+ or - to zoom in or out.
To switch to another camera, press
. Press
or
to bring back the graphics.
Note:
You can control the second camera either with its stand-alone remote control or the
XT1000 Remote Control Unit. For this option connect a cascade control cable between the
first and second camera. Ask your system administrator for the availability of such a
cable.
Note:
If you connect a camera to the DVI-I input, the system will manage it as PC content.
Setting Camera Presets
Use camera presets to save camera positions (up to a maximum of 99 positions) at your local
terminal. This feature allows you to select quickly a preferred camera frame of a location or a
video source. You can create these presets before or during a call.
Procedure
Step 1
Step 2
Move the camera as described in Using the Camera page 15 and set to the desired position.
Press
on the XT1000 Remote Control Unit, and enter a two-digit number (from 01 to 99) for
the current display setting.
Note:
Upon completion of the preset, the display notifies you of the stored position.
Retrieving Camera Presets
Use this feature to move the camera to a stored preset.
Procedure
Step 1
Step 2
Press
on the XT1000 Remote Control Unit.
Enter the memory location number corresponding to the desired preset.
RADVISION | User Guide for SCOPIA XT1000 Version 2.0
'Managing Calls' | 16
Configuring the Monitor
Note:
You can return to the Default Auto settings at any time by holding down simultaneously
and
.
Setting the Monitor Resolution
The rear panel of the XT1000 Codec Unit features 2 HDMI input for connecting a main and auxiliary
screen. For cabling, see the cabling diagram in the Quick Setup Guide.
Your system administrator must configure the system for correct video resolution.
Changing One Monitor Layout
You can connect one monitor to the HD1 output of the XT1000 Codec Unit. Depending on the
configuration, the system is capable of automatically recognizing the presence of one monitor.
When you’re not in a call, you’ll see the local camera image on the display.
Once in a call, and depending on the system configuration, you may see the remote image in
full-screen format, and the local image in a smaller, overlapping window. This is called a Picture
In Picture (PIP) view. PIP default position is bottom left on the screen.
Figure 3-1 PIP View, Remote and Local Images
To switch the contents of the windows while staying in PIP view, press
on the XT1000 Remote
Control Unit: you’ll see the local image in full-screen format, and the remote image in a smaller,
overlapping window.
To see the local and remote image side by side and at the same size, press
PaP (Picture and Picture) or Dual Emulation view.
RADVISION | User Guide for SCOPIA XT1000 Version 2.0
. This is called a
'Managing Calls' | 17
Figure 3-2 PaP View, Remote and Local Images
To see only the remote view, press
.
To scroll between PIP, PaP, and remote only view, press
repeatedly.
If the remote terminal shares a presentation, you’ll see it in full-screen format, with the remote
image in a smaller, overlapping window.
Figure 3-3 Presentation with Overlapped Remote View (PIP)
Press
repeatedly to change the contents of the windows, choosing to see the presentation,
remote video, or local video in full-screen format.
Press
repeatedly to change between 3 viewing options: presentation with overlapped remote
view (PIP), presentation and remote view (PaP), and presentation only full screen.
Figure 3-4 Presentation and Remote View (PaP)
RADVISION | User Guide for SCOPIA XT1000 Version 2.0
'Managing Calls' | 18
Changing Dual Monitor Layouts
You can connect one monitor (main) to the HD1 output of the XT1000 Codec Unit, and the second
(auxiliary) monitor to the HD2 output. Depending on the configuration, the system is capable of
automatically recognizing the presence of two monitors.
When you’re not in a call, you’ll see the GUI and the local camera image on the main monitor,
and the local image on the auxiliary monitor.
Once in a call, you’ll see the GUI and the local camera image on the main monitor and the remote
image on the auxiliary monitor. The GUI disappears after a few seconds.
Figure 3-5 Two Monitor Configuration
If the remote terminal shares a presentation with you, you’ll see it in full screen on the main
monitor. You’ll also see the local image in a smaller overlapping window. This is called a PIP view.
On the auxiliary monitor you’ll see the full-screen remote image.
Figure 3-6 Presentation and PIP View
To switch the contents of the windows in the main monitor while staying in PIP view, press
the XT1000 Remote Control Unit: you’ll see the local image in full-screen format, and the
presentation in a smaller, overlapping window.
on
To see the local and remote image side by side and at the same size on the main monitor, press
. This is called a PaP (Picture and Picture) or Dual Emulation view.
RADVISION | User Guide for SCOPIA XT1000 Version 2.0
'Managing Calls' | 19
Figure 3-7 Presentation and PaP View
To see only the presentation on the main monitor, press
.
To scroll between PIP, PaP, and full screen view on the main monitor, press
Note:
repeatedly.
You will hear the audio at the monitor connected to the HD1 output of the XT1000 Codec Unit. If
you do not hear the audio, perform the local tone test described in Testing the Tones page 37. To
reset the XT1000 Codec Unit to automatic monitor configuration, press
and then 0 on the XT1000
Remote Control Unit.
Sharing Contents during a Call
Setting the Computer Display
Configure the computer display to one of the supported picture resolutions and refresh
frequencies.
Procedure
Step 1
Step 2
Step 3
Right-click on your computer desktop. The Display Properties page appears.
Select Settings.
Select one of the relevant resolution and refresh frequencies.
RADVISION | User Guide for SCOPIA XT1000 Version 2.0
'Managing Calls' | 20
Table 3-1
Note:
Resolution and Refresh Frequencies
DVI-I
Resolution
Refresh Frequency (Hz)
VGA
640 x 480
60, 72, 75, 85
SVGA
800 x 600
56, 60, 72, 75, 85
XGA
1024 x 768
60, 70, 72, 75, 85
WXGA
1280 x 768
60, 75
SXGA
1280 x 1024
60, 67, 70, 72, 75, 76, 85
WSGA
1440 x 900
60
UXGA
1600 x 1200
60
WUXGA
1920 x 1200
60
If you connect a camera to the DVI-I input, the system will manage it as PC content.
Showing Contents from your Computer
Once a call has been established, you can show the contents of your computer to the remote
terminal.
Before showing contents, proceed as follows:
• Configure your computer to the resolution and refresh rates supported by the system. See
Setting the Computer Display page 20 for detailed information.
• Connect your computer to the DVI-I input of the Codec Unit. See the Quick Setup Guide for
installation instructions.
• Check that the remote terminal supports Presentation mode. Otherwise, once the call has
been established, the system will send automatically the computer content instead of the live
camera video.
Procedure
Step 1
Step 2
Step 3
In the Main Menu page select Make your call.
Press
to start the presentation.
Note:
If you are not in a call, the presentation starts only on your computer. If you are in a call,
the system will automatically enter Presentation mode and send the live camera video
and your presentation to the remote terminal.
To end the presentation, press the
RADVISION | User Guide for SCOPIA XT1000 Version 2.0
key.
'Managing Calls' | 21
Setting Privacy
Setting Privacy during a Call
While in a call, you can block video transmission from your local terminal.
• Press
on the XT1000 Remote Control Unit.
• The system will send a pre-defined image to the remote terminal. The
icon appears on your
display, indicating that the remote terminal no longer receives video from your local terminal.
You can also set up the feature for activation at system startup.
Setting Privacy at System Startup
You can block video transmission from your local terminal at system startup.
Procedure
Step 1
Step 2
Step 3
Step 4
Press
User settings.
Select Call-Answer Mode.
Select Video Privacy.
Select Yes.
Monitoring the Audio
Adjusting the System Volume
Press
+ or - on the XT1000 Remote Control Unit to adjust the sound you hear at your site.
You can also adjust the sound from the Main Menu page.
Procedure
Step 1
Step 2
Step 3
Step 4
Step 5
Press
User settings.
Select Call-Answer Mode.
Select Volume.
Use the down arrow key to scroll to the Volume setting.
Use the left and right arrow keys to move the slider until the requested value appears on the
screen.
RADVISION | User Guide for SCOPIA XT1000 Version 2.0
'Managing Calls' | 22
Adjusting the Ringing Volume
Set the ringing tone of the incoming call to a comfortable hearing level.
Press
+ or - on the XT1000 Remote Control Unit to adjust the sound you are hear when receiving
a call from the Main Menu page.
Procedure
Step 1
Step 2
Step 3
Step 4
Step 5
Press
User settings.
Select Call-Answer Mode.
Select Ringing Volume.
Use the down arrow key to navigate to the Ringing Volume setting.
Use the left and right arrow keys to move the slider until the requested value appears on the
screen.
Muting/Unmuting the XT1000 Digital Microphone Array Pod
Use the Mute function if you want to prevent the remote site from hearing you.
Procedure
Step 1
Press
The
on the XT1000 Remote Control Unit to mute the XT1000 Digital Microphone Array Pod.
icon appears on the display.
Or press the Mute button on the XT1000 Digital Microphone Array Pod.
Step 2
Press
again to unmute the XT1000 Digital Microphone Array Pod. Or press again the Mute button
on the XT1000 Digital Microphone Array Pod
Note:
if the
icon appears on your display, the XT1000 Digital Microphone Array Pod of the
remote site is muted. Mute is also the starting mode for all conferences.
RADVISION | User Guide for SCOPIA XT1000 Version 2.0
'Managing Calls' | 23
Blocking Incoming Calls
Using the Do Not Disturb Feature
Use the Do Not Disturb feature if you do not want to answer incoming calls.
Procedure
Step 1
Step 2
In the Main Menu page, select Options.
Press
Do not disturb. The system will not answer incoming calls and will sound a busy tone
when the remote terminal calls.
The
icon appears in the system information area of the display.
To activate the feature at system startup, see Setting the Do Not Disturb Feature at System
Startup page 24.
Setting the Do Not Disturb Feature at System Startup
Set the Do Not Disturb feature at system startup if you do not want to receive notifications for
incoming calls.
Procedure
Step 1
Step 2
Step 3
Step 4
Press
User settings.
Select Call-Answer Mode.
Select Do Not Disturb.
Select Yes.
Securing Your Calls
The system can manage secure videoconference sessions via encrypted connections, in both
point-to-point and multipoint sessions. The multipoint videoconference supports up to three
remote encrypted participants.
If your system administrator enabled encryption in your system, an icon showing a padlock
appears on your display. The padlock icon means:
•
•
•
The call is unencrypted.
The call is encrypted.
The call is encrypted only during transmission.
RADVISION | User Guide for SCOPIA XT1000 Version 2.0
'Managing Calls' | 24
Managing the Phonebook
Adding a Contact to the Phonebook
Create a new entry or add a contact from the Recents calls list.
Procedure
Step 1
Step 2
Step 3
Open the Contacts list.
Press
Edit.
The Add contact page appears on the display.
Figure 3-8 Add Contact Page
Step 4
Step 5
Enter the contact Last Name, First Name and Company Name.
Step 6
Press
Enter terminal data (one contact may be associated to many terminals) : name, number (or alias),
call type (H.323, SIP).
Save.
Modifying a Contact in the Phonebook
Procedure
Step 1
Step 2
Step 3
Select the contact.
Press
Modify contact and modify the contact’s information.
Press
Save to save the modified contact.
RADVISION | User Guide for SCOPIA XT1000 Version 2.0
'Managing Calls' | 25
Deleting a Contact from the Phonebook
Procedure
Step 1
Step 2
Step 3
Select the contact.
Press
Delete contact.
Press
Yes to confirm.
RADVISION | User Guide for SCOPIA XT1000 Version 2.0
'Managing Calls' | 26
4
Making Multiconference Calls
Initiating a Multiconference
To host a conference with more than two participants, you must purchase a system providing the
optional MCU (Multi Conference Unit) license. Depending on your licence, you may manage from
4 to 9 participants.
In addition, it is possible to integrate an external MCU that provides additional capabilities.
Consult your system administrator to enjoy the MCU capabilities, as well as to get more details
about the dial plan.
Set up the system’s components as explained in Managing Calls page 15.
Procedure
Step 1
Step 2
Call the first participant as explained in Making a Video Call page 9.
Step 3
Step 4
Repeat steps according to the number of participants allowed in your system.
Call the other participants by pressing
or adding a site.
on the XT1000 Remote Control Unit, answering a call,
Press
Manage conference to enter the menu allowing to manage the Multiconference (see
Managing the Multiconference - MCU Site page 31).
RADVISION | User Guide for SCOPIA XT1000 Version 2.0
'Making Multiconference Calls' | 27
Step 5
(Optional) While in Multiconference, you may set up the Video Layout. Scroll to the Conference
button and press
Video layout or select the Settings button (see Changing the Video Layout
page 29). Press
Default layout to return the default Multiconference layout.
Figure 4-1 Multiconference Screen
Step 6
(Optional) While in Multiconference, you may set up the Multiconference schedule (see Setting
Multiconference Date and Time page 30).
RADVISION | User Guide for SCOPIA XT1000 Version 2.0
'Making Multiconference Calls' | 28
Changing the Video Layout
When using the embedded MCU, the available video layouts are: full screen, Continuous Presence
(CP) 2, CP3, CP4, CP7, CP8, and CP9.
Figure 4-2 Video Layouts
The embedded MCU sends the same video layout to all the participants.
By default, the embedded MCU chooses the best video layout based on the number of participants
in the call. You can change the video layout from the embedded MCU. The change will affect all
participants in the call.
RADVISION | User Guide for SCOPIA XT1000 Version 2.0
'Making Multiconference Calls' | 29
Procedure
Step 1
Step 2
While in Multiconference, select the Conference button, then select Settings.
The Display page appears on the display. Use the arrow keys to change the Video layout setting.
Figure 4-3 Changing the Video Layout
Step 3
Press
Save to save the selected layout. Press
layout.
Note:
Undo to return to the default Multiconference
You can also dynamically change a Conference layout: select the Conference button,
press
Video layout on the Remote Control Unit or
Default layout to return to the
default Multiconference layout.
Setting Multiconference Date and Time
Procedure
Step 1
Step 2
While in Multiconference, select the Conference button. Then select Settings.
Press
Next label.
RADVISION | User Guide for SCOPIA XT1000 Version 2.0
'Making Multiconference Calls' | 30
Step 3
The Scheduling page appears on the display. Use the arrow keys to set a time for ending the
Multiconference.
Figure 4-4 Setting Date and Time
Step 4
Press
to return to the previous page.
Managing the Multiconference - MCU Site
As a chair, you can control terminals participating in the Multiconference.
Procedure
Step 1
Step 2
Once in Multiconference, scroll to the Conference button.
Press
Manage conference on the XT1000 Remote Control Unit. The Conference page appears
on the display allowing you to manage the Multiconference.
Figure 4-5 Managing the Conference
Various icons describe the MCU, terminal, and call status:
RADVISION | User Guide for SCOPIA XT1000 Version 2.0
'Making Multiconference Calls' | 31
Table 4-1
Call Management Icons at the MCU Site
Icon Type
Icon
Audio
Indicates
MCU muted the audio
Audio On
Audio Off due to failed connection
Call
MCU
Incoming call
Outgoing call
Lost incoming call
MCU Control
Chair
On floor
On air
Encryption
Encrypted communication
Video
Video On
Video error
Video Off (audio only)
Previous speaker
Active speaker
Send video to all participants
Step 3
Step 4
Select the terminal you wish to manage.
Press the relevant function key on the XT1000 Remote Control Unit:
•
Press
Disconnect to disconnect the selected terminal.
•
Press
Mute to mute the selected terminal
•
Press
Send video to all to send video to all the terminals. All the participants will see
only the selected terminal.
Joining a Multiconference
Procedure
Step 1
Dial the conference number. Your MCU will connect you directly, or via a Video Interactive Voice
Response (VIVR). The VIVR shows all conferences currently runnning.
Step 2
Select the conference you wish to join.
RADVISION | User Guide for SCOPIA XT1000 Version 2.0
'Making Multiconference Calls' | 32
Managing the Mulitconference - Terminal Site
Procedure
Step 1
While in Multiconference, select the Options button. Then press
Manage conference.
Figure 4-6 Conference GUI
Step 2
The Conference page appears on the display. Press the relevant function key on the Remote
Control Unit:
•
Press
End chair control to request the chair.
•
Press
Send on air to broadcast the video of a terminal. All the participants will see only
the video of the selected terminal.
•
Press
Close conference to end the Multiconference.
Figure 4-7 Managing the Conference
RADVISION | User Guide for SCOPIA XT1000 Version 2.0
'Making Multiconference Calls' | 33
Ending a Multiconference
Press
. Or, select the Disconnect button in the Multiconference Main Menu page.
If you are at the MCU site, you can disconnect one terminal or all terminals participating to the
conference. Select the terminal(s) in the Conference page and press
Disconnect.
If you are at the terminal site, disconnect as in a normal call.
RADVISION | User Guide for SCOPIA XT1000 Version 2.0
'Making Multiconference Calls' | 34
5
Troubleshooting
Using the Diagnostics Feature
Verifying the Software Version
Use this feature to find information about the version of the software modules.
You may also press
in the Main Menu page to have have quick access to system information.
Procedure
Step 1
From the Main Menu page scroll to Settings and press
Control Unit.
Step 2
Step 3
Scroll to Diagnostics. (You may also select Diagnostics and enter the Software version page.)
User settings on the XT1000 Remote
Select Software version. The display shows software information.
Testing the Audio
Testing the Audio Inputs
Use this test to check whether the audio input interfaces are properly working.
To return to the previous page, press
on the XT1000 Remote Control Unit.
Procedure
Step 1
From the Main Menu page scroll to Settings and press
Control Unit.
Step 2
Scroll to Diagnostics.
RADVISION | User Guide for SCOPIA XT1000 Version 2.0
User settings on the XT1000 Remote
'Troubleshooting' | 35
Step 3
Select Audio. The Inputs page appears on the display and shows the values for POD1, the first
XT1000 Digital Microphone Array Pod.
Step 4
(Optional) Press
to open the drop-down list. Scroll to POD2 and press
. The display shows
the audio input values for the second XT1000 Digital Microphone Array Pod.
Step 5
(Optional) Press
to return to the drop-down list. Select SPDIF.
This mode is used when a DVD, DVR, or PC is connected to the XT1000 Codec Unit.
Step 6
To navigate to the previous label, press
Previous. To navigate to the next label, press
Next.
Testing the Audio Outputs
Use this test to check whether the audio output interfaces are properly working.
The Audio page includes two tests, one for tone generation at the local terminal, and one for tone
transmission from the local terminal to the remote terminal.
To return to the previous page, press
on the XT1000 Remote Control Unit.
Procedure
Step 1
From the Main Menu page scroll to Settings and press
Control Unit.
Step 2
Step 3
Step 4
Scroll to Diagnostics.
Step 5
(Optional) Press
to open the drop-down list. Scroll to the relevant value and press
display shows the peak value of the audio output.
User settings on the XT1000 Remote
Select Audio. The Inputs page appears on the display.
Press
Next label to navigate to the Outputs label. The display shows the peak value of the
Monitor audio output.
RADVISION | User Guide for SCOPIA XT1000 Version 2.0
. The
'Troubleshooting' | 36
Testing Audio Streaming
Use this test to check whether the streaming interface is properly working.
Procedure
Step 1
From the Main Menu scroll to Settings and press
Unit.
Step 2
Step 3
Step 4
Scroll to Diagnostics.
Step 5
(Optional) Press
to open the drop-down list. Scroll to the relevant value and press
display shows the values for the streaming interface.
User settings on the XT1000 Remote Control
Select Audio. The Inputs page appears on the display.
Press
Next label to navigate to the Streams page. The display shows the stream values for
transmission.
. The
Testing the Tones
Use this test to check tone generation at the local terminal and tone transmission from the local
terminal to the remote terminal.
Procedure
Step 1
From the Main Menu page scroll to Settings and press
Control Unit.
Step 2
Step 3
Step 4
Step 5
Scroll to Diagnostics.
Note:
If the local tone’s amplitude is modulated, and the level is not constant but increases and
decreases, the HDMI monitor is incompatible or not set properly. Contact your system administrator
to get proper settings.
User Settings on the XT1000 Remote
Select Audio. The Inputs page appears on the display.
Press
Next label to navigate to the Tests page.
Activate the tests.
Restoring Default Settings
You may restore default values of user settings at any time.
All "Load default value" operations cause system restart.
RADVISION | User Guide for SCOPIA XT1000 Version 2.0
'Troubleshooting' | 37
Procedure
Step 1
From the Main Menu page scroll to Settings and press
enter the User Settings page.
Step 2
Step 3
Select Load default values.
on the XT1000 Remote Control Unit to
Select Yes to confirm.
Getting Help
For help during a call, press on the XT1000 Remote Control Unit. The call status and diagnostics
will appear on the display. Press
again and system information will appear on the display.
For context-sensitive help on the selected item or current menu, press and hold
seconds.
for a few
Before contacting your system administrator for further help, write down the Serial Number that
identifies your video conferencing system. The number is printed on a label affixed at the rear of
the XT1000 Codec Unit. The Serial Number starts with AE followed by 9 digits, space, 4 digits,
space, 1 digit, space, 6 digits.
To find the Software Version (XX.YY.ZZ) and User Code (AA:BB:CC) of your system, press
page displays the required information.
RADVISION | User Guide for SCOPIA XT1000 Version 2.0
. The
'Troubleshooting' | 38
www.radvision.com
About RADVISION
RADVISION (NASDAQ: RVSN) is the industry’s leading provider of market-proven products and technologies for
unified visual communications over IP and 3G networks. With its complete set of standards based video networking
infrastructure and developer toolkits for voice, video, data and wireless communications, RADVISION is driving the
unified communications evolution by combining the power of video, voice, data and wireless – for high definition
video conferencing systems, innovative converged mobile services, and highly scalable video-enabled desktop
platforms on IP, 3G and emerging next generation networks. For more information about RADVISION, visit
www.radvision.com
USA/Americas
T +1 201 689 6300
F +1 201 689 6301
[email protected]
EMEA
T +44 20 3178 8685
F +44 20 3178 5717
[email protected]
APAC
T +852 3472 4388
F +852 2801 4071
[email protected]
This document is not part of a contract of license as may be expressly agreed RADVISION is registered
trademarks of RADVISION, Ltd. All trademarks recognized. All rights reserved © 2010 RADVISION, Ltd.