1
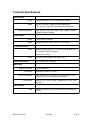
MasonIP
Network Video Player
User Guide
TABLE OF CONTENTS
Welcome........................................... 1
Getting Help
System Requirements..................... 2
Whatʼs in the Box.............................2
Overview of Operation.................... 3
Flexible Input and Output Formats
The Ultimate DVD Player
Multiple Sources
The Library ............................................ 4
About Servers and Networks.......... 5
Recommendations & Tools
Network Security
About Network Speed
Organizing Your Data on the Server(s)
What Mason ʻseesʼ
Compatible Files & Extensions
Special Files
Setting Up the Mason.......................8
Mounting the Mason
Batteries
The Connections................................... 8
Power
Connect Your Network
Connect Your Monitor & Audio
Initial Power On
Setting the IP Address of the Mason... 10
The Web Configuration System.... 11
Main Settings Page............................. 13
Access Control
Video Outputs Setting
Audio Output Settings
Network Settings
Screen Saver
Parental Controls
Power On with Remote Behavior
Filtering & Sorting
Zoom Presets
Servers Settings Page......................... 17
More About Mount Points
Reset Page.......................................... 19
The Remote Control....................... 20
Special & Multipurpose Buttons.......... 21
Page up - Page Down
Reserved Buttons................................22
Appendix.........................................23
Using USB Drives............................... 23
Firmware Updates............................... 24
External Remote Connection.............. 26
Technical Specifications...................... 27
WELCOME
Thank you for purchasing the MasonIP network video decoder/player. Whether
you plan to use the Mason for proofing your DVD authoring, checking your HD
encoding, or as the hub of your home video playback system, we are confident
that you will love its high quality, flexibility and robust design.
This User Guide will take you through the installation, configuration and use of
your MasonIP. Please take a few minutes to read through it before you begin setting up your Mason.
Getting Help
If you need help with the setup or operation of your Mason, Wired offers a variety
of support options.
• Start with our online FAQ database Mason Knowledge-base on our
•
•
website at www.wiredinc.com. Youʼll find a wealth of detailed information
there.
We also offer unlimited technical support via e-mail at:
[email protected].
For warranty repairs or other non-technical questions, contact customer
service at [email protected].
Mason User Guide
Jan 2008
1 of 27
SYSTEM REQUIREMENTS
To use the Mason, you will need:
• A 100/1000base-T Ethernet network connection
• A computer with a web browser (for configuration)
• A TV or monitor with an available composite, s-video, component or DVI
•
video input (HDMI inputs can be used with an optional adapter.)
A computer or computers configured as a server to share the video files
you want to play. (The Mason can access files on NFS, SMB or HTTP
servers.)
The Mason can also play files from a locally connected USB drive. See
ʻUsing USB Drivesʼ later in this guide for details.
WHATʼS IN THE BOX
In the box you should find the following items (if anything is missing contact
Wired at: [email protected].)
• MasonIP unit
• Remote control and batteries
• Power cord
• this User Guide
Itʼs a good idea to save the box and the protective foam in case you
need to transport the Mason in the future.
Mason User Guide
Jan 2008
2 of 27
OVERVIEW OF OPERATION
Simply put, the MasonIP is a hardware device which connects to a TV or monitor
and allows you to play digital video files that are stored on your server(s) over an
Ethernet network. It uses a handheld remote control to navigate its on-screen
menus and control selection and playback of your files.
The Mason is ideally suited for proofing the quality of video encoding in MPEG
formats, as well as testing the functionality of authored DVDs.
Flexible Input and Output Formats
The Mason features a powerful video processor that enables it to decode and
display a wide range of video formats. From the smallest MPEG-1 file to highdatarate HD files in the latest H.264 format, Mason can play them with ease. But
thatʼs just half the story. Masonʼs processor also handles output scaling. This is
especially useful with high-definition monitors, as you can operate at the monitorʼs optimum resolution and let Masonʼs high-quality scaler take care of the rest.
No matter what the format or bitrate your source video, or what type of monitor
youʼre using, the Mason will make it look its best.
The Ultimate DVD Player
For playing or proofing authored DVD projects, the Mason gives unprecedented
flexibility and convenience. You simply put your VIDEO_TS folders on your
server and the Mason plays them just as if they were already written to a DVD.
This can save huge amounts of time in the authoring process, because you donʼt
have to burn a disc every time you want to check something.
Multiple Sources
The Mason can instantly access data located on up to eight different servers or
mount-points. Each can be easily configured with the Masonʼs web-configuration
page, and all playable items are displayed on the easy-to-navigate menus. You
can even give your servers ʻfriendlyʼ names, so they are easier to navigate.
Mason User Guide
Jan 2008
3 of 27
The Library
The contents of all your configured servers are displayed on your TV in a unified
listing called the ʻLibraryʼ. The Library shows each server, as well as any connected USB drives.
Each configured
server is listed in
the Library.
Servers that are offline are still listed,
but their names are
ʻdimmedʼ
Masonʼs internal
storage, with video
test patterns.
You use the up and down arrow buttons on the remote control to move up and
down in the list, the right arrow or enter button to move down ʻintoʼ your folders,
and the left arrow button to back ʻupʼ in the hierarchy of your files. If you have a
video file or DVD highlighted, pressing ʻenterʼ will start playback.
Mason User Guide
Jan 2008
4 of 27
ABOUT SERVERS AND NETWORKS
The Mason plays files that are stored on your server(s). It is beyond the scope of
this guide to cover all the details of choosing and configuring a file server and
network, but here are some things to consider:
The Mason can connect to three types of file servers:
• NFS - common on UNIX/Linux systems
• HTTP - standard web servers
• SMB - the Windows standard for file sharing
Recommendations & Tools
You can access up to eight servers or mount points, and they can be of mixed
types. Which type to use depends on a number of factors, but your computer
type is probably the most significant.
NFS........................
If your server computer is a Macintosh or a Linux
machine, NFS is probably your best choice. It is very
efficient, so gives excellent performance even with
many users connected. NFS serving is built-in to both
Linux and Mac operating systems. You can also configure a Windows machine for NFS sharing, but it requires installation of ʻServices for UNIX for Windowsʼ
which is available from Microsoftʼs website.
For Macs, there is a very handy tool called NFS Manager which greatly simplifies the configuration of NFS
sharing. It costs about $20. You can find it at
www.bresink.com/osx/NFSManager.html.
For Linux systems, see the documentation for your
system for information on enabling and configuring
NFS shares.
SMB .......................
For most Windows machines SMB will be the easiest option. Itʼs built in to Windows and all you have to
do is select a drive or folder and tell Windows to
share it. Macs also support SMB serving, but as already mentioned, NFS is a better choice.
HTTP......................
If you already store your data on an HTTP server, it
can be utilized by the Mason. Mac, Windows, and
Linux machines are all capable of running HTTP
servers. Apache is the most common HTTP server
application, and it is the one we recommend. However, other types will work also.
Check the Mason Knowledge-base at www.wiredinc.com for useful tips
and more details on network configuration.
Mason User Guide
Jan 2008
5 of 27
Network Security
Even on an internal network, it is a good idea to configure your server to require
authentication, to avoid any unauthorized access to your data. On a network that
is accessible to the ʻoutside worldʼ it is absolutely essential. The Mason supports
authentication on all three types of servers.
About Network Speed
The Mason has a 100Base-T Ethernet port. This is more than fast enough to
handle even the highest bitrate files that Mason can play (50 mbps). However, for
best performance youʼll want your server and your network switches to be gigabit
speed. That will prevent the Mason from monopolizing your network, and allow
multiple users and/or Masons to access the server without speed bottlenecks.
Normally, the Mason is used to play files that are located on your local network. It
can be configured to access servers that are ʻoutsideʼ, but in most cases they will
not be fast enough to support video playback. For example, you could set the
Mason to read files from a public website that has video files. But unless you
have an extremely fast internet connection, or the files are very low bitrate, this is
not likely to work very well. But it doesnʼt hurt anything to try it.
Organizing Your Data on the Server(s)
You can arrange your files on your servers any way that is convenient for you.
The Mason can easily navigate any file hierarchy. But there are a few things to
keep in mind:
• Authored DVD projects must contain a folder named VIDEO_TS which
•
•
in turn contains the authored project files (VOBs, BUPs, etc.) The usual
method is to make a folder which has the desired name (i.e. ʻClient Test
Projectʼ) then put the VIDEO_TS folder within that folder.
Individual video files should have appropriate file extensions (.mpv,
.mpg, .ts, avi, .m4v, etc.) This helps insure that the Mason can properly
interpret them.
If you have more than a few hundred items, it speeds and simplifies
navigation to store them in sub-folders.
Mason User Guide
Jan 2008
6 of 27
What Mason ʻseesʼ
When you browse the Library, Mason only displays servers, folders and items it
can play. Folders which contain a VIDEO_TS folder will be shown as DVDs, and
any other playable files will be shown with a movie icon. No other files will be
shown in the listing; incompatible files will just be ignored.
This is a folder which contains a VIDEO_TS folder
This is a playable video file
This is a standard folder
(which may or may not
contain other items.)
Compatible Files & Extensions
Mason recognizes the following file types/extensions for playback:
• .avc
• .mpg
• .avi
• .mpv
• .m2v
• .ts
• .m4v
• .vc1
• .mp4
• .vob
• .mpeg
• .wmv
• .mp3
• VIDEO_TS
• .mpa
Special Files
In addition to the above file formats, the Mason recognizes one special file type:
• MasonIP_Image - a special file containing Mason firmware updates. If
this file is found on a mounted server or drive, you will be prompted to
install the update.
Mason User Guide
Jan 2008
7 of 27
SETTING UP THE MASON
There are three parts to setting up the Mason:
• Connect the Mason to power, network and your TV
• Configure the Masonʼs network address
• Use a web browser to configure your servers
The next few pages cover these items in detail.
Mounting the Mason
The Mason is a standard 1U rack-mount device, which can either be mounted in
a standard equipment rack, or simply placed on a horizontal surface.
As shipped from our factory, the Mason has self-adhesive rubber feet on its bottom to prevent scratching any surface you may set it on.
1. If you will be mounting the Mason in a rack, you may need to peel off
the rubber feet (depending on the clearance below the Mason).
The Mason has vents on its left and right side panels. Be sure these
vents are not blocked when you put the Mason in place.
Batteries
2. If the batteries are not already in the remote control, install them now.
The Connections
All the connections to the Mason are made on its rear panel.
Analog
Video Outputs
Audio Outputs
DVI digital
Power input
Ethernet port video output
and
and USB
Switch
External IR
ports
sensor input
Power
3. Connect the included power cord to the rear of the Mason, and plug it
into a standard 110 volt electrical outlet.
Connect Your Network
4. Connect your Ethernet network to the jack on the rear of the Mason.
Mason User Guide
Jan 2008
8 of 27
Connect Your Monitor & Audio
5. Connect your TV monitor(s) to the desired output(s).
You can connect more than one video output if you like, but depending
on the resolution you select some will not be active.
If your monitor has a
HDMI input, you can
connect it to the DVI
output of the Mason
using an HDMI-toDVI adapter
(not included).
6. Connect the desired audio output(s) to your sound system/amplifier. All
audio outputs are active at all times, so you can connect them to different devices as needed.
Initial Power On
7. Turn on your TV monitor, then turn on the Masonʼs power switch (on the
rear panel.) After a few moments you should see the main Mason menu
on your TV. If you donʼt see anything, make check to be sure your TV
is set to the correct input. The Mason is configured at the factory with
these video settings:
Analog video.........
480i (NTSC)
Digital Video.........
480P
If your monitor cannot operate at the default resolution, you can cycle
through a variety of SD and HD output resolutions by pressing the ʻTV
Modeʼ button on the remote control. Each time you press the button
the Mason will change to a different mode. Continue until you find one
that works on your monitor.
Mason User Guide
Jan 2008
9 of 27
Setting the IP Address of the Mason
At the factory, the Mason is set to these network settings:
Net Discovery.......
Manual
IP address.............
192.168.1.10
Mask.......................
255.255.255.0
Gateway................
192.168.1.1
DNS.......................
not set
Most likely you will need to change these settings to something appropriate for
your network.
8. With the remote control pointed towards the front of the Mason, press
the ʻSetupʼ button. The Network Settings window will be displayed.
Choose Manual or DHCP
Use the arrow keys on the remote
to move from field to field, and the
number keys to enter values.
9. Use the arrow keys on the remote to select Manual or DHCP for network discovery.
Manual...................
Continue by entering the appropriate values in all the
fields, using the remote to move from field to field,
and the number keys to enter the values. Press the
ʻSELECTʼ button on the remote when youʼre done.
DHCP.....................
The IP Address should set itself (this may take a few
seconds). Make note of the address, as youʼll need it
later, then press the ʻSELECTʼ button to save your
setting and close the settings window.
Mason User Guide
Jan 2008
10 of 27
THE WEB CONFIGURATION SYSTEM
With the exception of initially setting the IP address, all of Masonʼs settings are
made using its web-based configuration pages. To access the configuration
pages, you simply enter the IP address of your Mason into the address field of
your favorite web browser on your computer.
You can always find the current address of your Mason by pressing the ʻsetupʼ
button on the remote control.
Current address
of the Mason
If you were unable to set the IP address in the earlier steps because
your monitor could not display the default resolution, you will need to
connect to the configuration page using the default address of
192.168.1.10. If the rest of your network is not using 192... addresses,
you will need to temporarily connect your computerʼs Ethernet directly
to the Masonʼs Ethernet port, using a standard Ethernet cable. This
should allow it to communicate with the Configuration page so you can
set the resolution.
1. On your computer, enter the Masonʼs IP address in your browser and
press ʻenterʼ.
2. A browser authentication window will appear. Enter the user name and
password and press ʻreturnʼ or click the OK button in your browser.
We ship the Mason with the user name set to ʻadminʼ, and the password ʻadminʼ. If you have reset the Mason to the factory defaults, then
there there will be no user name or password set.
Mason User Guide
Jan 2008
11 of 27
The main configuration page will open. It should look something like this:
Notice that the MasonIP configuration pages are divided into four sections -
• Main - which is used to change operational settings
• Servers - where you set up access to your server(s)
• Help - online help for each setting
• Reset - allows you to reset your Mason back to factory settings
Each section is accessible by clicking on its tab near the top of the page.
Just below the section tabs, youʼll see the firmware version and electronic serial
number of your Mason.
Keep reading for details of each section and their settings.
Mason User Guide
Jan 2008
12 of 27
Main Settings Page
To save any changes to the Masonʼs settings, click the ʻSave Changesʼ
button at the bottom of the configuration page. Changes are applied as
soon as you save them.
Access Control
This section is used to specify the user name and password which is required to
enter the Mason IP Configuration pages.
If you set an access password and then later forget it, you will not be
able to access the configuration pages. To regain access you would
need to do a complete restore of the Mason by downloading the latest
firmware updater from the Wired website.
Video Outputs Setting
These settings determine the resolution and format of the Masonʼs video output.
Resolution.............
Normally you would select the highest resolution that
your TV/monitor supports. Choose the desired resolution from the pop-up menu.
Screen Shape .......
Specifies whether you have a widescreen or standard
shape TV, and whether to use Pan & Scan or Letterboxing when fitting a wide movie on a standard TV.
Digital Video.........
Specifies the video format for the digital input of your
TV. If you are connecting to a HDMI input, be sure to
select HDMI.
Some newer TVs with DVI inputs also require this setting; choose the setting that gives the best results.
Mason User Guide
Jan 2008
13 of 27
Overscan...............
On some monitors (CRT & others), part of the image
is usually obscured by the frame. Selecting 'overscan'
will cause the Mason to slightly shrink everything so it
will fit better on the screen.
Picture Controls...
The Mason allows you to use the remote control to
adjust the color, contrast and brightness of the image.
You can disable these adjustments if you prefer.
Audio Output Settings
This group of settings controls the audio output format and optionally allows the
volume to be controlled with the remote.
Digital Outputs.....
Specifies what data is sent out of the digital audio
ports (SP/DIF, TOSLINK and AES/EBU). Choose
pass-through if you are using an external decoder
(typically a receiver with built-in Dolby and DTS).
Volume Control.....
The Mason's remote can be used to adjust the output
sound level, or you can choose to disable this feature
(recommended if you are using an external decoder.)
Network Settings
This section specifies the network address of the Mason IP itself. If you change
the network settings and then click the 'Save' button, you will be disconnected
from the web configuration pages. You will need to enter the Masonʼs new address into your browser to continue.
Changing these is the same as changing the Network Settings using
the remote control.
Addressing...........
Choose Manual or DHCP. If you choose DHCP, you
donʼt need to complete the other fields.
Mason User Guide
Jan 2008
14 of 27
Screen Saver
To help prevent burn-in on your TV, the Mason has a built-in screen saver function. You can specify how long it should wait before activating, and whether you
want it to display a moving Wired logo, or simply blank the screen.
Activate after.........
Choose how many minutes before the screen saver
starts
Type .......................
Choose ʻLogoʼ to display a dark-gray Wired logo, or
ʻBlank screenʼ. (on Energy Star monitors, choose
ʻblank screenʼ to allow the monitor to sleep).
The screen saver will not activate during video or DVD playback, only
while the Mason is displaying its menus.
Parental Controls
Some DVDs utilize a system to limit access to material that might be objectionable to certain viewers. You can enable this feature by entering a restriction level
and access code. Then when you play a DVD with such restrictions, you will be
asked to enter the code using the remote control before playback will proceed.
Parental Level.......
Choose the desired control level
Access Code........
Enter the desired four-digit access code
Confirm Code .......
Reenter the code to confirm it
Mason User Guide
Jan 2008
15 of 27
Power On with Remote Behavior
You can specify what happens when you turn the Mason off and on using the
remote control.
Resume .................
The Mason will remember where you left off and
start up again in the same place. This works
whether you were watching a movie or browsing
the library.
Show Library ........
Choose this option to have the Mason display the
main level of the Library directory when you turn
it on. In this mode, the Mason will attempt to remount any configured servers when powering on.
If you turn the Mason on/off with the back panel power switch, it always
starts at the main level of the Library.
Filtering & Sorting
This is a useful feature that causes Mason to ignore 'a' and 'the' at the beginning
of file names. (i.e. a movie called 'The Greatest Movie Ever' would be listed with
movies beginning with 'G', and not grouped with everything starting with 'The'.)
Zoom Presets
The Mason has four zoom levels which can be selected in rotation using the
'zoom' button on the remote control. You can specify the zoom percentages for
three of the four settings.
Mason User Guide
Jan 2008
16 of 27
Servers Settings Page
This page allows you to specify up to eight servers and/or mount points which
contain your media files. Mason can connect to Unix/Linux (NFS), Windows
(SMB) and HTTP servers.
Each of the eight possible servers has the same settings.
Address.................
The IP address of the desired server
Type .......................
Choose NFS, SMB or HTTP to match your server
Mount Point ..........
specify the mount-point path to the server.
User Name............
User name for the server (not needed for servers with
guest access enabled.)
Password..............
Password for the server (not needed for servers with
guest access enabled.)
Alias.......................
The Mason allows you to specify a 'friendly' name for
each server. This name will be used when navigating
and selecting items on the Mason. (i.e. instead of
seeing the name of a server as
nfs://192.168.1.77/mnt/dvdstorage, you could give it
the alias name 'DVDs' and Mason will always refer to
it by that name.)
The Servers appear in the main Library view in the order they are entered on the Configuration page. If you want them to show up in a different order, just reenter them in the desired order.
Mason User Guide
Jan 2008
17 of 27
More About Mount Points
Itʼs important to note that the ʻServerʼ entries donʼt all have to refer to different
physical servers. You can enter a single server multiple times, specifying different
sub-paths in the Mount Point field.
For example, if your directory structure looks like this -
this is the NFS share
You can specify the
mount point path to a
subfolder instead.
The mount point would typically be entered like this:
When viewed in the Mason Library, the corresponding Server entry would contain
the single folder named ʻDVDsʼ, and you would navigate into that folder to find
the additional folders.
But the Mason also accepts mount point paths that point to lower levels of the
shared item. You simply add the desired path to the end of the mount point path,
like this for example:
That would cause the Library to show only the contents of the folder ʻNewʼ. Any
items ʻoutsideʼ that folder in the hierarchy would not be accessible.
For more information on network configuration see the online Mason
Knowledge-base on our website at www.wiredinc.com.
Mason User Guide
Jan 2008
18 of 27
Reset Page
This page is used to reset the Mason to factory default settings.
Reset Mason.........
All your settings will be erased. The video resolution
will revert to 480p for digital and 480i for analog, and
the network settings will revert to 192.168.1.10. You
would then need to use the remote control to set the
IP address of the Mason before you can resume using the Web Configuration pages.
Cancel....................
Goes back to the Main page without resetting the
Mason
Mason User Guide
Jan 2008
19 of 27
THE REMOTE CONTROL
The Masonʼs remote control is used to navigate the Library and control the playback of your video. It includes all the typical functions of a DVD player remote
control, along with a few special functions.
The most-used buttons are the navigation keys group, which includes the fourway arrows and ʻEnterʼ key along with the ʻMenuʼ and ʻReturnʼ function, and the
standard playback buttons. In addition, the ʻA-Bʼ and ʻRepeatʼ buttons can be
used to play a specific portion of your video or group of videos in rotation.
These buttons are
used to navigate
standard DVD
menus.
Repeat Buttons
A-B lets you specify a
portion of a video to
repeat. The Repeat button allows you to
choose to repeat the
current file, folder, chapter, or title, depending
on the current item.
These buttons control
the playback of your
video, and the selection of audio tracks
and subtitles (where
applicable.)
Some functions may be inactive for certain types of files. For example,
fast-reverse is not available for file playback.
Mason User Guide
Jan 2008
20 of 27
Special & Multipurpose Buttons
Some of the buttons on the remote have special functions.
Eject Button
Stops playback of
DVD (overrides any
UOPs that may be
set).
Power Button
Depending on your
settings, this button
either suspends/
resumes the Masonʼs
operation, or rescans
and remounts all
available servers and
drives.
Select Button
Confirms settings in
on-screen windows.
Setup Button
If picture controls are
active, this cycles
through the available
adjustments, which
can then be changed
with the arrow buttons. When viewing
the Library, it displays
the Network Settings.
Volume Buttons
Adjusts the output
volume (if enabled).
When viewing the Library, they double as
Page Up and Page
Down buttons in the
listing.
Repeat Button
Enables repeat playback of current file,
folder, chapter, or title,
depending on the current item.
Zoom Button
Cycles through the
four possible zoom
settings (which are
configured using the
web configuration
page.)
Mason User Guide
Jan 2008
21 of 27
Page up - Page Down
The Volume ʻ+ʼ and ʻ-ʼ buttons are used to control the Masonʼs output volume, if
you have enabled that feature on the Configuration page. But these buttons also
double as ʻPage Upʼ and ʻPage Downʼ buttons when you are viewing the Library
listing. They let you jump through long listings very quickly.
Reserved Buttons
Some of the buttons on the remote are reserved for future use, and are currently
inactive. They are indicated here.
Mason User Guide
Jan 2008
22 of 27
APPENDIX
Using USB Drives
The Mason is primarily designed to play files located on network servers, but it
can also play files from locally connected USB drives. This is ideal for situations
where you need a ʻstandaloneʼ player.
You can connect external USB hard drives or flash drives to the Masonʼs USB
ports.
The drive must be formatted in Windows format (MS-DOS/FAT32). If you are using a Mac, you can check the format by connecting it to your Mac, selecting the
USB driveʼs icon and choosing ʻGet Infoʼ from the File menu. If it is not in MSDOS format, use the Apple Disk Utility tool to reformat it.
We recommend using USB drives which have their own power supplies, rather than drives which draw their power from the USB port.
Mason User Guide
Jan 2008
23 of 27
Firmware Updates
The Mason has internal software/firmware that controls its operation and functionality. This firmware can be updated ʻin the fieldʼ.
If Wired releases new firmware for the Mason, or if you want to completely reset
the Mason to its original factory state, follow these steps to update the firmware.
1. First, download the appropriate firmware from the Wired website:
www.wiredinc.com/category/support/firmware/. There will always be two
variations of each firmware version MasonIP_Image - This variation will update your Masonʼs firmware, but
leave all your settings intact. This is the one you would normally use.
MasonIP_Image.complete - This variation will also update the firmware, but will completely reset your settings, including any access
password you may have set. Use this one if you need to go back to
factory-fresh settings.
2. Copy the downloaded file to a Windows-formatted USB flash drive.
3. The firmware file must be named exactly this way: MasonIP_Image
If you downloaded the ʻcompleteʼ firmware file, change its name to ʻMasonIP_Imageʼ
4. Plug the USB flash drive into one of the USB ports on the rear of the
Mason.
Mason User Guide
Jan 2008
24 of 27
After a few moments, the Mason will recognize the firmware file and this
window will pop-up, showing the version of the new firmware.
5. To proceed with the firmware update, use the arrow buttons on the remote to choose ʻYesʼ and then press the ʻEnterʼ button. (to cancel without updating, choose ʻNoʼ instead.)
The firmware update will begin, and the progress will be shown in the
window. It typically takes about two minutes for the update to complete.
Do not turn off the Mason or unplug the USB flash drive while the firmware is being updated; interrupting the update could cause your Mason
to malfunction.
6. When the update is finished, you will be prompted to restart the Mason
by switching the power off and back on again.
Mason User Guide
Jan 2008
25 of 27
External Remote Connection
The Masonʼs remote control sensor is located on the front panel.
IR Sensor window
If your Mason is located in an enclosed space it may not be able to properly pick
up the signals. We offer an optional external IR sensor which plugs into the ʻIR
Remote INʼ jack on the rear panel, and can be placed in an accessible location.
Contact Wired at [email protected] for more information.
You can also use a variety of standard IR extender/repeater systems.
Mason User Guide
Jan 2008
26 of 27
Technical Specifications
Video Outputs
Analog
composite via BNC, s-video, component via 3-BNCs
Digital
DVI (DVI connector, supports DVI and HDMI timing)
SDI - optional - supports SD and HD with embedded audio
Available resolutions
480i (NTSC), 576i (PAL), 480p, 576p, 720p60, 720p50,
1080i60, 1080i50, 1080p60
Audio Outputs
Analog
Digital
stereo line level via RCA
AES/EBU via XLR, SP/DIF via RCA, Toslink optical
Compatible Formats
Video
MPEG-1, MPEG-2, AVC, VC-1, H.264, DIVX, Windows Media, VOB files, VIDEO-TS folders
Bitrate up to 50 mbps
Audio
Power Requirements
PCM, AAC, Dolby Digital, DTS, MPEG, MP3
AC - 100-130 volts - .25 amps
Networking
Network connection
Addressing
Ethernet 100base-T
manually set (static IP) or DHCP
Server Compatibility
Can access up to eight servers or mount-points on NFS,
SMB or HTTP servers. Supports authentication.
Configuration
Built-in HTTP server allows configuration via any web
browser.
Local Storage
USB
Mason User Guide
Support USB flash drives or hard drives (MS-DOS/FAT32
format)
Jan 2008
27 of 27