1
Compaq DECprint Supervisor (DCPS)
for OpenVMS
System Manager’s Guide
Order Number: AA–PSVEF–TE
June 2001
This manual describes how system maintainers (system managers, data
center operators, and application programmers) with system privileges
can create DECprint Supervisor print queues to provide printing services
for the users of PostScript printers, customize the DECprint Supervisor
printing system, and test the printing system. This manual also describes
common problems with PostScript printing and how to solve them.
Revision/Update Information:
This guide supersedes AA–PSVEE–TE.
Operating System & Versions:
OpenVMS Alpha, Version 6.2, 7.2-1, or 7.3
OpenVMS VAX, Version 5.5-2, 7.2, or 7.3
Software Version:
Compaq DECprint Supervisor (DCPS) for
OpenVMS, Version 2.0
Compaq Computer Corporation
Houston, Texas
© 2001 Compaq Computer Corporation
Compaq, VAX, VMS and the Compaq logo Registered in U.S. Patent and Trademark Office.
DECnet and OpenVMS are trademarks of Compaq Information Technologies Group, L.P. in the
United States and other countries.
Microsoft and Windows are trademarks of Microsoft Corporation in the United States and other
countries.
All other product names mentioned herein may be trademarks or registered trademarks of their
respective companies.
Confidential computer software. Valid license from Compaq required for possession, use, or
copying. Consistent with FAR 12.211 and 12.212, Commercial Computer Software, Computer
Software Documentation, and Technical Data for Commercial Items are licensed to the U.S.
Government under vendor’s standard commercial license.
Compaq shall not be liable for technical or editorial errors or omissions contained herein. The
information in this document is provided "as is" without warranty of any kind and is subject
to change without notice. The warranties for Compaq products are set forth in the express
limited warranty statements accompanying such products. Nothing herein should be construed
as constituting an additional warranty.
The DECprint Supervisor documentation set is available on CD-ROM.
This document was prepared using DECdocument, Version 3.3-1b.
Contents
Preface . . . . . . . . . . . . . . . . . . . . . . . . . . . . . . . . . . . . . . . . . . . . . . . . . . . . .
xiii
1 DECprint Supervisor Overview
.
.
.
.
.
1–1
1–3
1–4
1–5
1–6
2.1
Non-PrintServer Printers . . . . . . . . . . . . . . . . . . . . . . . . . . . . . . .
2.1.1
Directly-Connected Serial Printers . . . . . . . . . . . . . . . . . . . . .
2.1.2
Networked Printers . . . . . . . . . . . . . . . . . . . . . . . . . . . . . . . .
2.1.2.1
Raw TCP/IP Printers . . . . . . . . . . . . . . . . . . . . . . . . . . . .
2.1.2.2
LAT Printers . . . . . . . . . . . . . . . . . . . . . . . . . . . . . . . . . .
2.1.2.2.1
Configuring the Printer for LAT Access . . . . . . . . . . .
2.1.2.2.2
Setting DECserver LAT Port Characteristics . . . . . . .
2.1.2.2.3
Editing the LAT Configuration File . . . . . . . . . . . . . .
2.1.2.2.4
Setting the Communications Speed . . . . . . . . . . . . . .
2.1.2.3
AppleTalk Printers . . . . . . . . . . . . . . . . . . . . . . . . . . . . . .
2.1.3
General Information . . . . . . . . . . . . . . . . . . . . . . . . . . . . . . . .
2.1.3.1
Supported Printers . . . . . . . . . . . . . . . . . . . . . . . . . . . . . .
2.1.3.2
Setting the printer timeout . . . . . . . . . . . . . . . . . . . . . . .
2.1.3.3
Changing the Printer Password . . . . . . . . . . . . . . . . . . . .
2.1.3.4
Setting the Printer Name . . . . . . . . . . . . . . . . . . . . . . . .
2.2
DIGITAL PrintServer Printers . . . . . . . . . . . . . . . . . . . . . . . . . . .
2.2.1
Defining PrintServer TCP/IP Network Nodes . . . . . . . . . . . .
2.2.2
Defining PrintServer DECnet Network Nodes . . . . . . . . . . . .
2.2.3
Deleting the PrintServer Client Startup File . . . . . . . . . . . . .
2–1
2–2
2–3
2–3
2–4
2–4
2–5
2–7
2–8
2–9
2–9
2–9
2–9
2–10
2–10
2–11
2–11
2–11
2–12
1.1
1.2
1.2.1
1.2.2
1.2.3
Purpose of the DECprint Supervisor Software .
DECprint Supervisor Software Components . .
The Print Symbiont . . . . . . . . . . . . . . . . . .
Device Control Libraries . . . . . . . . . . . . . .
Translators . . . . . . . . . . . . . . . . . . . . . . . . .
.
.
.
.
.
.
.
.
.
.
.
.
.
.
.
.
.
.
.
.
.
.
.
.
.
.
.
.
.
.
.
.
.
.
.
.
.
.
.
.
.
.
.
.
.
.
.
.
.
.
.
.
.
.
.
.
.
.
.
.
.
.
.
.
.
2 Setting Up Printers
iii
3 Creating and Modifying Print Queues
3.1
3.2
3.3
3.3.1
3.3.2
3.3.2.1
3.3.2.2
3.3.2.3
3.3.2.4
3.3.2.5
3.3.3
3.3.4
3.3.5
3.3.6
3.3.7
3.3.8
3.4
3.4.1
3.4.1.1
3.4.1.2
3.4.2
3.4.3
3.4.4
3.4.5
3.4.6
3.5
3.6
3.7
iv
If You Are Installing the Software for the First Time . . . . . . . . .
If You Are Upgrading From DECprint Printing Services Software
(CPS) . . . . . . . . . . . . . . . . . . . . . . . . . . . . . . . . . . . . . . . . . . . . . .
Setting Up Execution Queues . . . . . . . . . . . . . . . . . . . . . . . . . . .
Supplying the Name of the Execution Queue (P1) . . . . . . . . .
Supplying the Printer Device Name (P2) . . . . . . . . . . . . . . . .
If Your Printer Is On a TCP/IP Network and Uses Raw
TCP/IP Sockets . . . . . . . . . . . . . . . . . . . . . . . . . . . . . . . .
If Your Printer Is On a LAT Network or Directly
Connected . . . . . . . . . . . . . . . . . . . . . . . . . . . . . . . . . . . .
If Your PrintServer Printer Is Part of a TCP/IP Network
.............................................
If Your PrintServer Printer Is Part of a DECnet Network
.............................................
If Your Printer Is Part of an AppleTalk Network . . . . . . .
Supplying the Library Logical Name (P3) . . . . . . . . . . . . . . .
Assigning Default PRINT Command Parameters to the
Queue (P4) . . . . . . . . . . . . . . . . . . . . . . . . . . . . . . . . . . . . . . .
Supplying Default Queue Attributes (P5) . . . . . . . . . . . . . . . .
Setting the Speed for Serial Printers (P6) . . . . . . . . . . . . . . .
Supplying SET DEVICE Qualifiers to the Queue (P7) . . . . . .
Enabling SET VERIFY When Initializing the Queue (P8) . . .
Customizing Execution Queue Behavior . . . . . . . . . . . . . . . . . . .
Running DCPS as a Multistreamed Process . . . . . . . . . . . . .
Managing Print Queues When Running
Multistreamed . . . . . . . . . . . . . . . . . . . . . . . . . . . . . . . . .
Changing the DCPS Environment When Running
Multistreamed . . . . . . . . . . . . . . . . . . . . . . . . . . . . . . . .
Interrupting Busy Printers When a Job Starts . . . . . . . . . . .
Suppressing PostScript Synchronization When a Job
Starts . . . . . . . . . . . . . . . . . . . . . . . . . . . . . . . . . . . . . . . . . . .
Purging the Symbiont Process’s Working Set . . . . . . . . . . . . .
Suppressing the OPCOM Message ‘‘User Name Not Found’’
................................................
Using Old ANSI Translator Page Size for A4 Landscape . . .
Setting Up Generic Queues . . . . . . . . . . . . . . . . . . . . . . . . . . . . .
Activating Changes to the Queue Definitions . . . . . . . . . . . . . . . .
Testing the Printing System . . . . . . . . . . . . . . . . . . . . . . . . . . . . .
3–1
3–1
3–2
3–3
3–3
3–4
3–5
3–6
3–6
3–6
3–7
3–7
3–8
3–9
3–9
3–10
3–10
3–10
3–11
3–11
3–12
3–12
3–13
3–13
3–13
3–14
3–15
3–16
4 Providing Automatic Data Type Detection
4.1
4.2
4.2.1
4.2.2
4.2.3
How DCPS Automatically Detects Data Type . . . . . . .
Specifying Automatic Data Type Detection . . . . . . . . .
Linking File Extensions with Data Types . . . . . . .
Specifying Default Data Types for the System and
Queues . . . . . . . . . . . . . . . . . . . . . . . . . . . . . . . . . .
How Users Control Data Type Detection . . . . . . . .
........
........
........
4–1
4–1
4–2
........
........
4–3
4–4
5 Manipulating Print Jobs and Print Queues
5.1
5.2
5.3
5.4
5.4.1
5.4.2
5.4.3
5.5
5.6
5.7
5.8
5.9
5.10
5.11
5.12
5.13
Displaying Print Job Status . . . . . . . . . . . . . . . . . . . . . . . . . .
Deleting a Print Job . . . . . . . . . . . . . . . . . . . . . . . . . . . . . . . .
Releasing a Print Job in the Holding State . . . . . . . . . . . . . .
Requeuing Print Jobs . . . . . . . . . . . . . . . . . . . . . . . . . . . . . . .
Requeuing Pending Print Jobs . . . . . . . . . . . . . . . . . . . . .
Requeuing the Currently Printing Job to Another Queue
Requeuing Current and Future Print Jobs in a Queue . .
Modifying the Attributes of a Print Job . . . . . . . . . . . . . . . . .
Displaying a Queue . . . . . . . . . . . . . . . . . . . . . . . . . . . . . . . .
Pausing a Queue . . . . . . . . . . . . . . . . . . . . . . . . . . . . . . . . . .
Starting a Queue . . . . . . . . . . . . . . . . . . . . . . . . . . . . . . . . . .
Modifying the Attributes of a Queue . . . . . . . . . . . . . . . . . . .
Preventing Users from Printing to a Queue . . . . . . . . . . . . . .
Deleting a Queue . . . . . . . . . . . . . . . . . . . . . . . . . . . . . . . . . .
Responding to a Stalled Queue . . . . . . . . . . . . . . . . . . . . . . .
Stopping and Starting the Queue Manager . . . . . . . . . . . . . .
.
.
.
.
.
.
.
.
.
.
.
.
.
.
.
.
.
.
.
.
.
.
.
.
.
.
.
.
.
.
.
.
.
.
.
.
.
.
.
.
.
.
.
.
.
.
.
.
5–1
5–2
5–3
5–3
5–3
5–4
5–4
5–4
5–5
5–5
5–6
5–7
5–7
5–7
5–8
5–9
What Are Separation Pages? . . . . . . . . . . . . . . . . . . . . . . . . . . . .
Enabling Job Separation Pages . . . . . . . . . . . . . . . . . . . . . . . . . .
Error Messages on the Trailer Page . . . . . . . . . . . . . . . . . . . .
Suppressing Job Trailer Pages . . . . . . . . . . . . . . . . . . . . . . . .
Specifying a Special Input Tray for Job Burst and Flag Pages
................................................
Enabling File Separation Pages . . . . . . . . . . . . . . . . . . . . . . . . . .
Adding a System Message to Separator Pages . . . . . . . . . . . . . . .
Requesting Job Log Pages . . . . . . . . . . . . . . . . . . . . . . . . . . . . . .
The File Error Page . . . . . . . . . . . . . . . . . . . . . . . . . . . . . . . . . . .
6–1
6–2
6–3
6–4
6 Specifying Separation, Log, and Error Pages
6.1
6.2
6.2.1
6.2.2
6.2.3
6.3
6.4
6.5
6.6
6–4
6–4
6–6
6–6
6–7
v
7 Creating Setup Modules and Device Control Libraries
7.1
7.2
7.2.1
7.2.2
7.3
7.4
7.4.1
7.4.2
7.4.3
7.4.4
7.5
7.6
7.7
7.8
7.9
7.10
7.11
7.12
What Is a Setup Module? . . . . . . . . . . . . . . . . . . . . . . . . . . . . . . .
Locating Setup Modules . . . . . . . . . . . . . . . . . . . . . . . . . . . . . . . .
Locating Custom Setup Modules . . . . . . . . . . . . . . . . . . . . . .
Displaying the Contents of a Setup Module . . . . . . . . . . . . . .
Creating Custom Setup Modules . . . . . . . . . . . . . . . . . . . . . . . . .
Creating Device Control Libraries . . . . . . . . . . . . . . . . . . . . . . . .
Putting Setup Modules in Libraries . . . . . . . . . . . . . . . . . . . .
Specifying a Library Search List . . . . . . . . . . . . . . . . . . . . . .
Device Control Libraries Must Exist for Queue to Start . . . .
Preserving Custom Setup Modules During Upgrades . . . . . .
Including Setup Modules in Print Job . . . . . . . . . . . . . . . . . . . . .
Persistently Loading PostScript Resources . . . . . . . . . . . . . . . . .
Changing the Default Character Set for PCL and Proprinter
Print Jobs . . . . . . . . . . . . . . . . . . . . . . . . . . . . . . . . . . . . . . . . . .
Specifying Printer Resolution with Setup Module . . . . . . . . . . . .
Modifying DECimage Parameters with Setup Modules . . . . . . . .
Providing Access to Font Cartridge Emulation . . . . . . . . . . . . . .
Device Control Library Cache Feature . . . . . . . . . . . . . . . . . . . . .
Printing on Unrecognized Printers . . . . . . . . . . . . . . . . . . . . . . . .
7–1
7–1
7–2
7–2
7–3
7–3
7–4
7–5
7–7
7–7
7–7
7–8
7–9
7–11
7–11
7–13
7–14
7–15
8 Creating and Maintaining Form Definitions
8.1
8.2
8.3
8.4
8.5
8.6
Associating Setup Modules with Forms . .
Associating a Form with a Print Queue . .
Creating Form Definitions for ANSI Files
Displaying Forms and Their Attributes . .
Deleting a Form . . . . . . . . . . . . . . . . . . . .
Using the Default ANSI Form Definition .
.
.
.
.
.
.
.
.
.
.
.
.
.
.
.
.
.
.
.
.
.
.
.
.
.
.
.
.
.
.
.
.
.
.
.
.
.
.
.
.
.
.
.
.
.
.
.
.
.
.
.
.
.
.
.
.
.
.
.
.
.
.
.
.
.
.
.
.
.
.
.
.
.
.
.
.
.
.
.
.
.
.
.
.
.
.
.
.
.
.
.
.
.
.
.
.
.
.
.
.
.
.
.
.
.
.
.
.
8–1
8–2
8–3
8–4
8–4
8–5
Accounting Information Supplied by the DECprint Supervisor
Software . . . . . . . . . . . . . . . . . . . . . . . . . . . . . . . . . . . . . . . . . .
Accounting Information Supplied by the Job Controller . . . . . .
Accounting Fields Left Blank by the Job Controller . . . . . .
Accounting Fields Filled with Zeros by the Job Controller .
Compatibility with Mechanical Page Counters . . . . . . . . . . . . .
.
.
.
.
.
.
.
.
.
.
9–1
9–2
9–3
9–3
9–4
9 Charging Users for Printer Resources
9.1
9.2
9.2.1
9.2.2
9.3
vi
10 Printer-Specific Information
10.1
Apple LaserWriter Plus Printer . . . . . . . . . . . . . . . . . . . . . . . . .
10.1.1
LPS$PERSISTENT_RESOURCES Not Supported . . . . . . . .
10.2
Compaq Laser Printer LN16 and GENICOM microLaser 170 . .
10.2.1
Printer Configuration Setting . . . . . . . . . . . . . . . . . . . . . . .
10.2.2
LAT and AppleTalk Configuration . . . . . . . . . . . . . . . . . . . .
10.3
Compaq Laser Printer LN32 and LNM40; GENICOM LN21,
LN28 and LNM40; GENICOM microLaser 210, 280, 320 and
401 . . . . . . . . . . . . . . . . . . . . . . . . . . . . . . . . . . . . . . . . . . . . . . .
10.3.1
Printer and Network Firmware Versions . . . . . . . . . . . . . . .
10.3.2
Printer Configuration Settings . . . . . . . . . . . . . . . . . . . . . . .
10.3.2.1
Language-Sensing Mode . . . . . . . . . . . . . . . . . . . . . . . .
10.3.2.2
Printer Setting May Cause Stalled Queues . . . . . . . . . .
10.3.3
LAT and AppleTalk Configuration . . . . . . . . . . . . . . . . . . . .
10.3.4
Queue Aborts When Using TCPware . . . . . . . . . . . . . . . . . .
10.4
DIGITAL Colorwriter LSR 2000 Printer . . . . . . . . . . . . . . . . . .
10.4.1
NIC Does Not Work with Raw TCP/IP . . . . . . . . . . . . . . . . .
10.5
DIGITAL DECcolorwriter 1000 Printer . . . . . . . . . . . . . . . . . . .
10.5.1
Printer-Specific Setup Files . . . . . . . . . . . . . . . . . . . . . . . . .
10.6
DIGITAL DEClaser 3500 Printer . . . . . . . . . . . . . . . . . . . . . . . .
10.6.1
Job Remains in Starting State . . . . . . . . . . . . . . . . . . . . . . .
10.6.2
Interaction Between Communication Protocol and Native
PCL Support . . . . . . . . . . . . . . . . . . . . . . . . . . . . . . . . . . . .
10.6.3
NIC Does Not Work with Raw TCP/IP . . . . . . . . . . . . . . . . .
10.7
DIGITAL DEClaser 5100 Printer . . . . . . . . . . . . . . . . . . . . . . . .
10.7.1
Native PCL Is Unavailable with EtherTalk Protocol on NIC
...............................................
10.7.2
NIC Does Not Work with Raw TCP/IP . . . . . . . . . . . . . . . . .
10.7.3
Downloading and Deleting Fonts . . . . . . . . . . . . . . . . . . . . .
10.7.4
Error Page Feature . . . . . . . . . . . . . . . . . . . . . . . . . . . . . . .
10.8
DIGITAL Laser Printer LN15+ . . . . . . . . . . . . . . . . . . . . . . . . .
10.8.1
Printer Configuration Settings . . . . . . . . . . . . . . . . . . . . . . .
10.9
DIGITAL Laser Printer LN17+ps . . . . . . . . . . . . . . . . . . . . . . .
10.9.1
Job Remains in Starting State . . . . . . . . . . . . . . . . . . . . . . .
10.9.2
Incorrect Sheet Count . . . . . . . . . . . . . . . . . . . . . . . . . . . . .
10.9.3
Downloading and Deleting Fonts . . . . . . . . . . . . . . . . . . . . .
10.9.4
Colored Separator Pages and Tray Switching . . . . . . . . . . .
10.10 DIGITAL Laser Printer LN20 . . . . . . . . . . . . . . . . . . . . . . . . . .
10.10.1
Incorrect Sheet Count . . . . . . . . . . . . . . . . . . . . . . . . . . . . .
10.11 DIGITAL Laser Printer LN40 . . . . . . . . . . . . . . . . . . . . . . . . . .
10.11.1
Incorrect Sheet Count . . . . . . . . . . . . . . . . . . . . . . . . . . . . .
10.11.2
First Job May Be Offset Incorrectly . . . . . . . . . . . . . . . . . . .
.
.
.
.
.
10–1
10–1
10–1
10–1
10–2
.
.
.
.
.
.
.
.
.
.
.
.
.
10–2
10–3
10–3
10–3
10–3
10–3
10–4
10–4
10–4
10–4
10–4
10–5
10–5
.
.
.
10–6
10–6
10–6
.
.
.
.
.
.
.
.
.
.
.
.
.
.
.
.
10–6
10–6
10–7
10–7
10–7
10–7
10–8
10–8
10–9
10–9
10–9
10–9
10–9
10–9
10–9
10–10
vii
10.12 Compaq and DIGITAL Laser Printer LNC02 . . . . . . . . . . . . . . . .
10.12.1
Minimum Firmware Version . . . . . . . . . . . . . . . . . . . . . . . . .
10.12.2
Incorrect Sheet Count . . . . . . . . . . . . . . . . . . . . . . . . . . . . . .
10.13 DIGITAL PrintServer 17 Printer . . . . . . . . . . . . . . . . . . . . . . . . .
10.13.1
Colored Separator Pages and Tray Switching . . . . . . . . . . . .
10.14 HP LaserJet IIID Printer . . . . . . . . . . . . . . . . . . . . . . . . . . . . . . .
10.14.1
Job Remains in Starting State . . . . . . . . . . . . . . . . . . . . . . . .
10.14.2
Incorrect Sheet Count on Duplex Jobs . . . . . . . . . . . . . . . . . .
10.15 HP LaserJet IIISi Printer . . . . . . . . . . . . . . . . . . . . . . . . . . . . . .
10.15.1
Incorrect Sheet Count on Native PCL Jobs . . . . . . . . . . . . . .
10.15.2
Incorrect Sheet Count on Duplex Jobs . . . . . . . . . . . . . . . . . .
10.16 HP LaserJet 4SiMX Printer . . . . . . . . . . . . . . . . . . . . . . . . . . . . .
10.16.1
Incorrect Sheet Count on Duplex Jobs . . . . . . . . . . . . . . . . . .
10.17 HP LaserJet 5M Printer . . . . . . . . . . . . . . . . . . . . . . . . . . . . . . .
10.17.1
Problems Selecting an Input Tray . . . . . . . . . . . . . . . . . . . . .
10.17.2
Incorrect Sheet Count on Duplex Jobs . . . . . . . . . . . . . . . . . .
10.18 HP LaserJet 5SiMX Printer . . . . . . . . . . . . . . . . . . . . . . . . . . . . .
10.18.1
Job Trailer Pages Print in Next Bin . . . . . . . . . . . . . . . . . . . .
10.18.2
Tray Is Not Available Due to Lack of Memory for Loaded
Paper . . . . . . . . . . . . . . . . . . . . . . . . . . . . . . . . . . . . . . . . . .
10.18.3
Duplex Not Supported Due to Lack of Memory for Loaded
Paper . . . . . . . . . . . . . . . . . . . . . . . . . . . . . . . . . . . . . . . . . .
10.18.4
Incorrect Sheet Count on Duplex Jobs . . . . . . . . . . . . . . . . . .
10.19 HP LaserJet 4000, 4050 and 5000 . . . . . . . . . . . . . . . . . . . . . . . .
10.19.1
Minimum Firmware Version . . . . . . . . . . . . . . . . . . . . . . . . .
10.20 HP LaserJet 8000, 8100 and 8150 . . . . . . . . . . . . . . . . . . . . . . . .
10.20.1
Optional Mailbox . . . . . . . . . . . . . . . . . . . . . . . . . . . . . . . . . .
10.20.2
Problems Starting Queues . . . . . . . . . . . . . . . . . . . . . . . . . . .
10.20.3
Minimum Firmware Version . . . . . . . . . . . . . . . . . . . . . . . . .
10.21 HP XL300 Printer . . . . . . . . . . . . . . . . . . . . . . . . . . . . . . . . . . . .
10.21.1
Communication Problem . . . . . . . . . . . . . . . . . . . . . . . . . . . .
10.22 Lexmark Optra Rt+ Printer . . . . . . . . . . . . . . . . . . . . . . . . . . . . .
10.22.1
Tray Linking and INPUT_TRAY . . . . . . . . . . . . . . . . . . . . . .
10.23 Lexmark Optra S . . . . . . . . . . . . . . . . . . . . . . . . . . . . . . . . . . . . .
10.23.1
Problems Starting Queues . . . . . . . . . . . . . . . . . . . . . . . . . . .
10.24 Tektronix Phaser . . . . . . . . . . . . . . . . . . . . . . . . . . . . . . . . . . . . .
10.24.1
Printer Configuration Settings . . . . . . . . . . . . . . . . . . . . . . . .
viii
10–10
10–10
10–10
10–10
10–10
10–11
10–11
10–11
10–11
10–11
10–11
10–12
10–12
10–12
10–12
10–12
10–12
10–12
10–12
10–12
10–13
10–13
10–13
10–13
10–13
10–13
10–13
10–14
10–14
10–14
10–14
10–14
10–14
10–14
10–14
11 Troubleshooting Procedures
11.1
What to Do if a Serial Printer Is Not Printing . . . . . . . . . . . . .
11.1.1
What to Do if a Locally-Connected Serial Printer Will Not
Start Printing . . . . . . . . . . . . . . . . . . . . . . . . . . . . . . . . . .
11.1.2
What to Do if a Locally-Connected Serial Printer Has
Stopped Printing . . . . . . . . . . . . . . . . . . . . . . . . . . . . . . . .
11.1.3
What to Do if a LAT Printer Is Not Printing . . . . . . . . . . .
11.1.3.1
How to Determine Which Host Controls the Printer . .
11.1.3.2
How to Troubleshoot Printer Communications
Problems . . . . . . . . . . . . . . . . . . . . . . . . . . . . . . . . . . .
11.1.3.3
Common LAT Error Messages . . . . . . . . . . . . . . . . . . .
11.1.4
How to Eliminate Excess Login Dialog on Serial Printers .
11.2
What to Do if a PrintServer Printer Is Not Printing . . . . . . . .
11.3
What to Do if Printing Is Slower than Expected . . . . . . . . . . .
11.4
What to Do if Layup Definition Files Are Not Found . . . . . . . .
11.5
What to Do if Files Are Printed with Unexpected Results . . . .
11.5.1
What to Do if Default Queue Parameters Are Not
Effective . . . . . . . . . . . . . . . . . . . . . . . . . . . . . . . . . . . . . . .
11.5.2
What to Do if a File Data Type Is Not Recognized . . . . . . .
..
11–1
..
11–2
..
..
..
11–5
11–7
11–7
.
.
.
.
.
.
.
.
.
.
.
.
.
.
11–11
11–11
11–13
11–14
11–15
11–16
11–16
..
..
11–16
11–17
Overview of Management Commands . . . . . . . . . . . . . . . . . . . . .
Use of SET PRINTER with DCPS . . . . . . . . . . . . . . . . . . . . . . .
A–1
A–3
A Printing System Management Commands
A.1
A.2
B Logical Names used by DCPS
C Downloading and Deleting Fonts
D DECprint Supervisor (DCPS) and DECprint Printing Services
Software (CPS)
D.1
D.2
D.3
D.4
D.5
D.6
D.7
D.8
D.9
DCPS/CPS Coexistence . . . . . . . . . . . . . . . . .
Printer Support . . . . . . . . . . . . . . . . . . . . . . .
DCPS$ Prefix . . . . . . . . . . . . . . . . . . . . . . . . .
Startup File Converter . . . . . . . . . . . . . . . . . .
Eliminating Generic Queues . . . . . . . . . . . . .
Page Scaling . . . . . . . . . . . . . . . . . . . . . . . . .
Layup for PS Level 2 Printers & Layup Fixes
Layup Options on PRINT Command Line . . .
Page Sizes . . . . . . . . . . . . . . . . . . . . . . . . . . .
.
.
.
.
.
.
.
.
.
.
.
.
.
.
.
.
.
.
.
.
.
.
.
.
.
.
.
.
.
.
.
.
.
.
.
.
.
.
.
.
.
.
.
.
.
.
.
.
.
.
.
.
.
.
.
.
.
.
.
.
.
.
.
.
.
.
.
.
.
.
.
.
.
.
.
.
.
.
.
.
.
.
.
.
.
.
.
.
.
.
.
.
.
.
.
.
.
.
.
.
.
.
.
.
.
.
.
.
.
.
.
.
.
.
.
.
.
.
.
.
.
.
.
.
.
.
.
.
.
.
.
.
.
.
.
D–1
D–1
D–1
D–2
D–3
D–3
D–3
D–3
D–4
ix
D.10
D.11
D.12
D.13
D.14
D.15
D.16
D.17
D.18
D.19
D.20
D.21
D.22
Selecting Separator Pages from Alternate Tray
Stopping Unreachable PrintServer . . . . . . . . . .
Overwriting First Line . . . . . . . . . . . . . . . . . . .
Stall Timeouts . . . . . . . . . . . . . . . . . . . . . . . . .
Requeuing a Job . . . . . . . . . . . . . . . . . . . . . . . .
Reading Stream Files . . . . . . . . . . . . . . . . . . . .
Copies Start on New Sheets . . . . . . . . . . . . . . .
Generic Queues Restarted . . . . . . . . . . . . . . . .
Proprinter Translator . . . . . . . . . . . . . . . . . . . .
DCPS and PATHWORKS Libraries . . . . . . . . .
Printing with Macintosh & PC Files . . . . . . . .
Improved Color Function for Colormate PS . . .
Printing Security Messages . . . . . . . . . . . . . . .
.
.
.
.
.
.
.
.
.
.
.
.
.
.
.
.
.
.
.
.
.
.
.
.
.
.
.
.
.
.
.
.
.
.
.
.
.
.
.
.
.
.
.
.
.
.
.
.
.
.
.
.
.
.
.
.
.
.
.
.
.
.
.
.
.
.
.
.
.
.
.
.
.
.
.
.
.
.
.
.
.
.
.
.
.
.
.
.
.
.
.
.
.
.
.
.
.
.
.
.
.
.
.
.
.
.
.
.
.
.
.
.
.
.
.
.
.
.
.
.
.
.
.
.
.
.
.
.
.
.
.
.
.
.
.
.
.
.
.
.
.
.
.
.
.
.
.
.
.
.
.
.
.
.
.
.
.
.
.
.
.
.
.
.
.
.
.
.
.
.
.
.
.
.
.
.
.
.
.
.
.
.
D–4
D–8
D–8
D–9
D–9
D–9
D–9
D–9
D–9
D–10
D–10
D–10
D–10
...
3–2
E Ordering Additional Documentation
Index
Examples
3–1
3–2
3–3
7–1
8–1
Creation of an Execution Queue Entry for a PrintServer
Printer . . . . . . . . . . . . . . . . . . . . . . . . . . . . . . . . . . . . . .
Creation of an Execution Queue Entry for a Serial
Printer . . . . . . . . . . . . . . . . . . . . . . . . . . . . . . . . . . . . . . .
Setting Up a Generic Queue . . . . . . . . . . . . . . . . . . . . . .
Search List for Device Control Libraries . . . . . . . . . . . . .
Sample Form Definition, CONFIDENTIAL . . . . . . . . . . .
.
.
.
.
.
.
.
.
.
.
.
.
3–3
3–14
7–5
8–1
DECprint Supervisor Software Components . . . . . . . . . . . . .
A Job Burst Page . . . . . . . . . . . . . . . . . . . . . . . . . . . . . . . . . .
A File Flag Page . . . . . . . . . . . . . . . . . . . . . . . . . . . . . . . . . .
1–4
6–2
6–5
Figures
1–1
6–1
6–2
x
Tables
2–1
2–2
3–1
3–2
3–3
5–1
7–1
7–2
7–3
7–4
8–1
10–1
10–2
10–3
A–1
A–2
B–1
D–1
DECserver Port Characteristics . . . . . . . . . . . . . . . . . . . . .
Printer-Required DECserver Port Characteristics . . . . . . .
Raw TCP/IP Port Numbers . . . . . . . . . . . . . . . . . . . . . . . .
Parameter Values for Generic Queues . . . . . . . . . . . . . . . .
IVP Files with Different Data Types . . . . . . . . . . . . . . . . .
Commands to Display Queues . . . . . . . . . . . . . . . . . . . . . .
Printer Resolution Setup Modules . . . . . . . . . . . . . . . . . . .
Enabling and Disabling DECimage . . . . . . . . . . . . . . . . . .
DECimage Setup Modules—Combined Parameters . . . . . .
DECimage Setup Modules—Individual Parameters . . . . . .
DEFINE/FORM Qualifiers for ANSI Files . . . . . . . . . . . . .
Valid LN21, LN28, LN32, LNM40, mL210, mL280, mL320
and mL401 Language Sensing Configurations . . . . . . . . . .
LN15 Configuration Settings . . . . . . . . . . . . . . . . . . . . . . .
Tektronix Phaser Configuration Settings . . . . . . . . . . . . . .
Printing System Management Commands . . . . . . . . . . . . .
SET PRINTER Qualifier Equivalents for DECprint
Supervisor Queues . . . . . . . . . . . . . . . . . . . . . . . . . . . . . . .
DCPS Logical Names . . . . . . . . . . . . . . . . . . . . . . . . . . . . .
Tray Number Values . . . . . . . . . . . . . . . . . . . . . . . . . . . . .
.
.
.
.
.
.
.
.
.
.
.
.
.
.
.
.
.
.
.
.
.
.
2–6
2–6
3–5
3–14
3–16
5–5
7–11
7–12
7–12
7–13
8–3
.
.
.
.
.
.
.
.
10–3
10–8
10–14
A–1
..
..
..
A–4
B–2
D–4
xi
Preface
Intended Audience
This manual is for OpenVMS system managers and data center operators.
Using this guide, you can create and modify print queues, maintain the print
jobs and print queues, and set up printing environments to meet the needs of
the printing system users.
This guide is also intended for advanced users and applications programmers
who customize the printing system using form definitions, setup modules, and
layup definition files. The DECprint Supervisor for OpenVMS User’s Guide
describes how users access the features of the printing system.
Be sure to read the DECprint Supervisor for OpenVMS Software Installation
Guide if you have not installed the DECprint Supervisor software.
Associated Documents
For information about additional PostScript printing documentation and how
to order documentation, refer to the Ordering Additional Documentation
appendix in this manual.
Conventions
The following conventions are used throughout this document:
Convention
Meaning
UPPERCASE
Uppercase characters indicate DCL commands, qualifiers, and
parameters.
italics
Italic characters in command examples indicate that you are to
substitute a word or value of your choice.
xiii
xiv
Convention
Meaning
bold
Bold characters are PostScript operators or error message prefix
strings. Bold in examples shows the characters that you should
enter as part of the procedure.
[]
Brackets indicate that the enclosed item is optional.
Ctrl/x
This symbol indicates a control key sequence. Press the key labeled
Ctrl while you simultaneously press another key, represented by x.
Return
This symbol indicates that you should press the Return key.
1
DECprint Supervisor Overview
1.1 Purpose of the DECprint Supervisor Software
The DECprint Supervisor software allows people to use and manage networked
PostScript printers. For example, it allows users to:
•
Print customized documents, print two-sided, and select input trays.
•
Modify printed documents without changing the files that are printed,
which saves paper and allows the production of custom printed documents.
•
Print different types of files on the PostScript printers.
•
Access printers from the OpenVMS VAX and Alpha operating systems and
from personal computers (PCs) and Macintosh systems.
The system manager makes the printing system easier to use by providing:
•
Default queue attributes, so users do not have to specify certain
parameters, such as duplex printing
•
Setup modules, which are stored in device control libraries and are used to
modify the printing environment for print jobs
•
Form definitions, specifying sets of print attributes and including setup
modules to make them all easier for users to access
•
Layup definition files, which you can create to customize the way print jobs
are printed on the media
Note
Starting with DCPS V2.0, the need for DCPS-OPEN and DCPS-PLUS
licenses has been eliminated. The right to use all features of DCPS is
now included with the OpenVMS operating system license.
DECprint Supervisor Overview 1–1
DCPS also provides the following features:
•
Document Formatting
Change the size of pages as they are printed to fit the physical size of
media, using the following command:
$ PRINT/PARAMETERS=(PAGE_SIZE=n,SHEET_SIZE=m) file-spec
Specify page layup handling as the file is printed, using the following
command:
$ PRINT/PARAMETERS=(LAYUP=option=value)
Save paper, using one of the following commands:
$ PRINT/PARAMETERS=(PAGE_LIMIT="n,m")
$ PRINT/PARAMETERS=(NUMBER_UP=n)
Print multiple uncollated copies of each sheet via the SHEET_COUNT
parameter.
Use device control modules for all data types via the /SETUP qualifier.
ANSI modules may include control sequences. PCL modules may
include binary font data.
•
Data Type Translation
DCPS lets users print additional file data types, including:
PCL 4 (Printer Control Language) files generated for printing on
Hewlett-Packard LaserJet IID devices
Proprinter files generated for printing on IBM Proprinter XL24 devices
ReGIS graphics files (monochrome output only)
TEKTRONIX files, generated for printing on TEKTRONIX 4010/4014
devices
ASCII text files, to be printed with line numbers, page headers, and
alternating groups of gray and white bars
DIGITAL Document Interchange Format (DDIF) bitonal image files
•
Automatic Data Type Detection
Users do not need to specify the data type of the print file, in most cases.
DCPS recognizes files of the supported data types and automatically
translates them to PostScript before printing.
1–2 DECprint Supervisor Overview
DCPS can print files that contain both text (ANSI, PCL, or Proprinter
data) and PostScript data. For example, users can print electronic mail
messages that contain PostScript files. The user submits the print job
without specifying any data type. The DECprint Supervisor software
begins printing the file as text and automatically recognizes the change to
PostScript, printing the file properly.
See Chapter 4 for information about customizing the printing system to
recognize and print the files generated by users at your site.
1.2 DECprint Supervisor Software Components
The DECprint Supervisor software includes the following components:
•
A print symbiont, which processes print requests from OpenVMS print
queues assigned to the printer
•
Queue management services, as described in Chapter 5
•
Data type translators to translate non-PostScript files for printing on
PostScript devices
•
A device control library for setup modules that affect the printing of files,
as described in Chapter 7
The DECprint Supervisor symbiont is used in place of the OpenVMS print
symbiont, PRTSMB. The software is distributed as executable image files, text,
and help files.
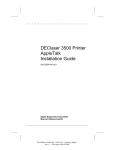
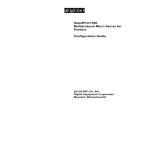
Figure 1–1 illustrates the process by which print jobs are produced on an
OpenVMS system and delivered to the printer.
DECprint Supervisor Overview 1–3
Figure 1–1 DECprint Supervisor Software Components
The software components of a DECprint Supervisor printing system are
described in the following sections.
1.2.1 The Print Symbiont
Users send jobs to the printer using the DCL PRINT command or using
an application program that generates the OpenVMS system service call
SYS$SNDJBC. The print symbiont manages the print jobs. The DECprint
Supervisor software performs the following operations:
•
Maintains resources
•
Sends control data to the printer
•
Sends the data file to the printer
1–4 DECprint Supervisor Overview
•
Monitors printer progress
•
Reports printer status
•
Handles exceptions
For example, suppose a user issues the following PRINT command:
$ PRINT/QUEUE=POST3/NOTIFY THORNTON.TXT
The PRINT command line is translated to system service calls, which are sent
to the job controller. The calls are converted to job controller data structures,
which are then passed to the symbiont for processing. The symbiont sends
the processed arguments and file data to the printer and notifies the user by
displaying messages about the status of the print job.
See the DECprint Supervisor for OpenVMS User’s Guide for information about
the PRINT command and its qualifiers.
1.2.2 Device Control Libraries
A device control library is an OpenVMS text library that contains setup
modules. The symbiont uses modules from the device control library to
implement the various PRINT parameters. The DECprint Supervisor software
extracts the appropriate module, depending on the qualifier that either appears
on the PRINT command line or is associated with a print queue, and inserts
the module into the data stream.
The device control library also contains modules that the symbiont does not
automatically use. Some of these modules contain PostScript procedures, for
example, to include an error handler in a print job or to extend the findfont
procedure to recognize alternate character encodings. These are described in
the DECprint Supervisor for OpenVMS User’s Guide.
You can create setup modules to be used on your own systems. When you
create setup modules, you must store them in a device control library other
than the DCPS$DEVCTL library. Create a device control library as described
in Chapter 7 and add your library to the device control library search list
defined in DCPS$STARTUP.COM.
When you create a site-specific device control library for your custom setup
modules, the contents of your library are retained from one version of the
DECprint Supervisor software to the next. The standard device control library,
DCPS$DEVCTL, is overwritten when you upgrade from one version of the
software to the next.
DECprint Supervisor Overview 1–5
1.2.3 Translators
When a print job submits a print file that is not PostScript (or PCL, if your
printer has a native PCL interpreter), the symbiont invokes a translator to
translate the user’s input file into PostScript. (Refer to Chapter 4 for more
information about customizing the printing system for certain types of files.)
DECprint Supervisor software can detect the file data type automatically. You
need not specify the data type on the PRINT command line. Translation to
PostScript for successful printing is automatic. It is not necessary to maintain
generic print queues for default data types.
The system manager can associate a default data type with a generic print
queue, allowing users to print files by specifying the generic queue name. See
Chapter 3 for more information.
If DCPS incorrectly identifies the data type of a file, you can identify the data
type on the command line:
$ PRINT MYFILE.MEM /PARAMETERS=DATA_TYPE=ANSI
$ PRINT MYFILE.POST /PARAMETERS=DATA_TYPE=POSTSCRIPT
1–6 DECprint Supervisor Overview
2
Setting Up Printers
If you are installing DECprint Supervisor for the first time, or installing new
printers, read this chapter. You may also find this chapter useful if you are
changing the setup of an existing printer. The following sections describe how
to set up your printers to work with DECprint Supervisor software.
Non-PrintServer printers
Section 2.1
DIGITAL PrintServer printers
Section 2.2
Note
If you are changing the setup of a printer for which a DECprint
Supervisor queue already exists, you must first stop the associated
queue using the STOP/QUEUE/NEXT or STOP/QUEUE/RESET command.
2.1 Non-PrintServer Printers
You can connect PostScript printers other than DIGITAL PrintServer printers
to your OpenVMS system in a number of ways:
•
If your printer contains a network interface card (NIC) that supports
the bi-directional raw TCP/IP, LAT, or AppleTalk protocol, you can
communicate with your printer via the network.
•
If your printer uses a serial connection, you can connect the printer directly
to your OpenVMS system, or connect it to a print server or terminal server
and communicate with it via the network.
•
If your printer uses a bi-directional Centronics parallel connection, you can
connect it to a print server or terminal server and communicate with it via
the network.
Setting Up Printers 2–1
If your printer is connected via the network, multiple systems can access it.
The devices that can be used with DECprint Supervisor software are listed in
the Software Product Description (SPD).
Note
DCPS requires that the entire communication path between your
OpenVMS system and your printer be bi-directional. For a networked
printer, this communication path includes the connection between
the printer and the network device as well as the connection between
the network device and your OpenVMS system. LAT and AppleTalk
network devices, and serial interfaces, usually provide bi-directional
communication. Raw TCP/IP network devices, and parallel ports
on a printer, terminal server, or print server, may not satisfy this
requirement. The DCPS software will not work with a connection that
does not allow status messages and other information to be sent from
the printer to your OpenVMS system.
CSA0 (printer port 0 on VAXstation II and VAXstation II/GPX systems)
is not a supported interface for serial printers.
DEClaser printers may require an H8571–E adapter if you are using
a DECconnect serial cable. Refer to your printer installation guide for
more information.
2.1.1 Directly-Connected Serial Printers
For your printer and OpenVMS system to be able to communicate, you must
set the baud rate of your printer and system’s serial interfaces to the same
values. Also, your printer should be set for eight-bit characters with no parity.
Note
When choosing a baud rate other than the default of 9600 baud,
consider the following limitations:
•
OpenVMS drivers do not support baud rates of 3600 and 7200
baud.
•
DMZ32 serial interfaces, Revision E or lower, require a speed of
4800 baud or less.
•
If you select an improper speed, the printer may not operate or may
stop unexpectedly.
2–2 Setting Up Printers
Refer to your printer’s hardware installation guide for information on
configuring its serial interface. After you have made the necessary changes,
turn the printer off and back on. Then manually print a test page and verify
that the reported settings are as desired.
Set the baud rate of your OpenVMS system’s serial interface by specifying
a value for P6 when setting up the corresponding DCPS print queue, as
described in Section 3.3.6.
2.1.2 Networked Printers
Your printer may contain a network interface card (NIC) or may be accessable
to the network via a print server of a terminal server.
Printers can be configured as network printers if:
•
The printer is connected to a NIC, print server, or terminal server.
•
Every host system using the printer is running DECprint Supervisor
software. If any host system accesses the printer by any other means, the
printer system may fail.
Network printing has the following implications:
•
The printer may be used from multiple systems.
•
There is no centralized accounting for the printer. Each system maintains
separate accounting information for the printing performed by that system.
•
Multiple systems running DECprint Supervisor software contend for the
same printer.
•
There is no centralized print queue for the printer, which means:
The SHOW QUEUE command does not display the queues located on
other nodes in the network.
The system does not provide print job scheduling or load balancing
among printers or nodes in the network.
2.1.2.1 Raw TCP/IP Printers
Raw TCP/IP is a network protocol that utilizes the TCP/IP protocol directly
without any additional interpretation of the TCP data stream. It is supported
by many printer Network Interface Cards (NICs), print servers, and terminal
servers.
Setting Up Printers 2–3
There are other printer protocols that layer upon TCP/IP, including CPAP
(Common Printer Access Protocol), LPD, and Telnet. DCPS uses CPAP to
communicate with DIGITAL PrintServer printers.
Note
DCPS does not support the Telnet or LPD protocols.
To communicate with your printer using raw TCP/IP, the NIC, print server,
or terminal server that you use to connect your printer to the network must
provide a raw TCP/IP port. Further, this raw TCP/IP port must support bidirectional communication between the printer and your OpenVMS system.
DCPS does not work with unidirectional ports, such as those found on the
NICs for the DEClaser 3500 and 5100 printers, the RapidPrint 200, and
Hewlett-Packard JetDirect cards that interface with the printer via its XIO
(versus MIO) slot.
Before you can communicate with your printer via TCP/IP, you must define
an IP address for it. You may also assign a name to the address. Refer to
the printer documentation for information on setting the printer’s IP address.
Refer to Compaq TCP/IP Services for OpenVMS, Process Software MultiNet
for OpenVMS, or Process Software TCPware documentation for information on
configuring your OpenVMS system’s TCP/IP environment. If your printer is
connected through a print server or terminal server, you must configure the IP
address of the server. You also need to configure the connection between the
printer and the server (for example, you may need to perform actions similar to
those described in Section 2.1.2.2.2 for LAT printers). Refer to documentation
for your terminal server or printer server for information on configuring its
network and printer interfaces.
2.1.2.2 LAT Printers
2.1.2.2.1 Configuring the Printer for LAT Access To configure serial printers
as network printers through a LAT connection to the Ethernet, change the
following:
1. If you are using a serial printer connected via a terminal server,
set the necessary port and server characteristics for the printer (see
Section 2.1.2.2.2 for DECserver devices).
2. Make the necessary changes to SYS$STARTUP:LAT$SYSTARTUP.COM
(see Section 2.1.2.2.3).
3. Set the communications speed (see Section 2.1.2.2.4).
2–4 Setting Up Printers
You can also change the printer password and printer name. These changes
are optional and explained in Section 2.1.3.3 and Section 2.1.3.4.
2.1.2.2.2 Setting DECserver LAT Port Characteristics
Note
The process for configuring non-DECserver LAT devices is not described
here, but many LAT devices use the same commands used by a
DECserver device. Refer to the online help or other documentation
for your NIC, terminal server, or print server for more information.
To change DECserver port characteristics, you need privileged status on the
DECserver device. Once you have privileged status, use the DEFINE PORT
and SET PORT commands.
The DEFINE command changes the port’s characteristics in the server’s
permanent database. These changes do not take effect until the next login for
the port.
SET commands take effect immediately, but only alter the port’s characteristics
for the current session. For example, to change the INPUT SPEED and
OUTPUT SPEED values on PORT_6 to 19200 baud (on a DECserver 200),
issue the following commands from the console server manager:
LOCAL> SET PRIVILEGED
PASSWORD> password
LOCAL> SET PORT 6 SPEED 19200
LOCAL> DEFINE PORT 6 SPEED 19200
Note
DECprint Supervisor supplies a sample command file for this
purpose, if using LAT. This command file sets the characteristics
for a DECserver with the Terminal Server Manager (TSM) software,
and records data in the TSM database. (TSM is a software product
available separately from Compaq.) The command file is:
SYS$COMMON:[SYSHLP.EXAMPLES.DCPS]DCPS$CONFIG-PRINTER-PORT.COM
This command file provides examples of characteristics for
DECserver 100, DECserver 200, and DECserver 500 devices.
For information about the commands and procedures for your DECserver
device, refer to your DECserver management guide.
Setting Up Printers 2–5
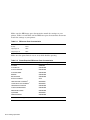
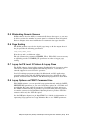
Make sure the DECserver port characteristics match the settings on your
printer. Table 2–1 and Table 2–2 list DECserver port characteristics that must
match the settings on your printer.
Table 2–1 DECserver Port Characteristics
Character size
8
Parity
None
Input speed
9600
Output speed
9600
Make sure the queue limit is not set to 0, which disables queuing.
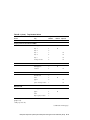
Table 2–2 Printer-Required DECserver Port Characteristics
Characteristic
Default Settings
ACCESS
REMOTE
AUTOBAUD
DISABLED
AUTOCONNECT
DISABLED
AUTOPROMPT
DISABLED
BREAK
DISABLED
BROADCAST
DISABLED
FLOW CONTROL
XON
INPUT FLOW CONTROL1
ENABLED
1
OUTPUT FLOW CONTROL
ENABLED
INACTIVITY LOGOUT
DISABLED
LOSS NOTIFICATION
DISABLED
MESSAGE CODES
DISABLED
QUEUING
ENABLED
VERIFICATION
DISABLED
1 Characteristic
2–6 Setting Up Printers
not supported by the DECserver 500 server.
Note
On many versions of DECserver devices, QUEUING is not a
port characteristic, but is a server characteristic whose default is
ENABLED.
2.1.2.2.3 Editing the LAT Configuration File The LAT configuration
file (SYS$STARTUP:LAT$SYSTARTUP.COM) defines host node service
characteristics. Before you start the print queues, make sure the LAT driver is
running and ports are available.
Note
Commands referenced in this section are LATCP commands. For
more information on LATCP commands, refer to the OpenVMS System
Management Utilities Reference Manual.
1. Edit LAT$SYSTARTUP.COM and add the following command to create an
applications port on the host node (service node) that will support your
printer:
$ CREATE PORT LTAd:/NOLOG/APPLICATION
In this command format, you supply the number of the applications port
for d, which must be a unique number from 1-9999.
Note
LTA devices are not always dedicated to printers; they may be shared
with other devices. Connections to the LTA device from the other
devices are established dynamically among the lowest available ports.
If you assign a higher port number to the printer, you can help secure
the port for the printer and prevent interference from connections to
other devices.
2. In LAT$SYSTARTUP.COM, add the following command to associate the
applications port with a remote port on a server:
$ SET PORT LTAd:/NODE=server_name/PORT=port_name/QUEUE/APPLICATION
Setting Up Printers 2–7
In the command format, you supply the following values:
LTAd:
Name of the application port
server_name
Name assigned to the LAT device
port_name
LAT device’s port name
The following example associates application port LTA9000: with port
PORT_7 on a remote DECserver 200 named LN03RDS:
$ SET PORT LTA9000:/NODE=LN03RDS/PORT=PORT_7/QUEUE/APPLICATION
If the LAT device is dedicated to printing services, you can define the LAT
connection for the printer in the DCPS$STARTUP.COM file. This makes it
easier for you to solve configuration problems because all the information
is in one file. However, if the LAT device also supports devices other than
printers, you should define the port in the LAT$SYSTARTUP.COM file.
3. To make a successful LAT connection, you must make sure the following
lists of groups have at least one LAT group in common:
•
On the LAT port, authorized groups and current groups
•
On the service node, enabled groups
If you did not set up these groups correctly, you receive the following error
message when a print job is submitted:
%DCPS-E-LRJACCESSDENIED, Access denied
You can use LATCP commands to include the necessary LAT group
designations. For additional information, refer to the OpenVMS System
Management Utilities Reference Manual.
Note
This information is not required for the DECserver 90L device.
2.1.2.2.4 Setting the Communications Speed Make sure the serial printer
communications speed is set to the default (9600 baud). If you want the printer
to run at a different baud rate, use the following procedure.
If the printer is on a DECserver device, use the following steps:
1. Set the printer to the appropriate baud rate (see your printer hardware
installation guide).
2. Set the DECserver communications speed (see your terminal server
installation guide).
2–8 Setting Up Printers
3. Power on the printer. Wait for the printer to eject the power-up test
page, and then check the test page to ensure that the desired settings are
indicated on the test page.
2.1.2.3 AppleTalk Printers
If you use your printer in an AppleTalk network, the address of the printer in
the AppleTalk network is normally the printer’s PostScript printername. If two
or more printers have the same printername and are on the same zone of the
AppleTalk network, the actual node names for these printers will be depend on
the order in which the printers are powered up. Printers of the same product
type will have the same printername until it is explicity changed. Therefore, it
is necessary to change a printer’s printername to ensure the printer is uniquely
and consistently identified on the network. Use the tools provided with your
printer, and/or your PC or Macintosh to change the name of your printer.
2.1.3 General Information
2.1.3.1 Supported Printers
You can use DCPS with many PostScript printers. Consult the SPD for the list
of supported by the DECprint Supervisor software. You may also be able to
use DCPS in an unsupported fashion with printers not listed in the SPD (see
Section 7.12).
Before installing a printer, perform the following:
•
Install a PostScript option if your printer requires one.
•
Install at least the minimum amount of memory for PostScript printing.
Printing legal size paper or printing duplex requires more memory than
the base configuration. Consult your printer manual for your minimum
requirements.
2.1.3.2 Setting the printer timeout
The printer may abort a print job if it does not receive data for a specified
period of time. Compaq recommends that you change the timeout value to zero
(0), which means no timeout.
You may be able to set the timeout value through the front panel, as
documented in the operator’s guide for your printer.
You can also change the printer timeout value with the setdefaulttimeouts
PostScript operator. Modify the standard file
SYS$COMMON:[SYSHLP.EXAMPLES.DCPS]LPS$SET_TIMEOUT.PS to
change the timeout value to 0. Print the file using the DATA_TYPE=POSTSCRIPT
parameter to change the timeout value in the printer’s nonvolatile memory to
0, thus preventing timeout conditions on the printer.
Setting Up Printers 2–9
To submit the file for printing as a PostScript job, use the following command:
$ PRINT/QUEUE=queuename/PARAMETER=(DATA_TYPE=POSTSCRIPT) LPS$SET_TIMEOUT.PS
When the print job is processed, a page is printed to indicate that the timeout
was successfully changed.
2.1.3.3 Changing the Printer Password
PostScript printers have passwords that restrict access to certain functions.
You can change the password for your printer from the default value. For serial
printers, submit a print job that includes the current password as well as the
new password. Refer to the PostScript Printers Programmer’s Supplement for
information about changing your printer’s password.
The default password for ScriptPrinters is (LN03R), with the parentheses
required. The default password for DEClaser printers is 0 (the number zero),
without parentheses. If you change the printer password from the default,
print jobs may take longer to print, because the printer password is required to
persistently load PostScript prologues for ANSI files and separation pages.
2.1.3.4 Setting the Printer Name
Some system messages include the printer name. If you have not set a unique
printer name, these messages contain the default printer name. The default
printer name for a ScriptPrinter printer is LN03R. The default printer name
for a DEClaser printer is DEClaser. For example, on a DEClaser printer where
the name has not been changed, the following message reflects the default
printer name:
%DCPS-I-TRAYSUBST, Output will be delivered to the only tray on DEClaser
If you change the DEClaser printer name to SNUFFY, the same error message
reflects the unique new printer name:
%DCPS-I-TRAYSUBST, Output will be delivered to the only tray on SNUFFY
For non-PrintServer printers, the printer name is stored in the printer’s
nonvolatile memory. To set the printer name, edit a copy of the file
LPS$SET_PRINTER_NAME.PS found in
SYS$COMMON:[SYSHLP.EXAMPLES.DCPS] to include the desired name and
password. Select a printer name of 31 characters or less.
Then submit the file for printing as a PostScript job:
$ PRINT/QUEUE=queuename /PARAMETER=(DATA_TYPE=POSTSCRIPT) LPS$SET_PRINTER_NAME.PS
Edit and submit a copy of LPS$SET_PRINTER_NAME.PS for each printer
that requires a unique name.
2–10 Setting Up Printers
2.2 DIGITAL PrintServer Printers
DIGITAL PrintServer printers are network printers. They require the
OpenVMS DECnet, Compaq TCP/IP for OpenVMS, Process Software MultiNet
for OpenVMS or Process Software TCPware for OpenVMS software to be
running on the OpenVMS systems where the DECprint Supervisor software is
running.
Note
Make sure that PrintServer Software is running on the PrintServer
printer before starting DECprint Supervisor.
The following procedures allow users to access PrintServer printers on TCP/IP
and DECnet networks.
2.2.1 Defining PrintServer TCP/IP Network Nodes
Before you can communicate with your DIGITAL PrintServer printer via
TCP/IP, you must assign an IP address to it. You may also associate a name
with the address.
Refer to the PrintServer documentation for information on setting the
printer’s IP address. Refer to Compaq TCP/IP Services for OpenVMS, Process
Software MultiNet for OpenVMS or Process Software TCPware for OpenVMS
documentation for information on configuring your OpenVMS system’s TCP/IP
environment.
2.2.2 Defining PrintServer DECnet Network Nodes
Before you can communicate with your DIGITAL PrintServer printer via
DECnet, you must assign a DECnet address to it. You may also associate a
name with the address.
Refer to the PrintServer documentation for information on setting the printer’s
DECnet address.
To associate a DECnet node name name with the printer’s DECnet address,
use the NCP command if you are running DECnet Phase IV software, or the
DECNET_REGISTER command if you are running DECnet-Plus (formerly
DECnet/OSI) software. Refer to the OpenVMS DECnet documentation for
more information about node names and these commands.
Setting Up Printers 2–11
2.2.3 Deleting the PrintServer Client Startup File
An existing LPS$STARTUP.COM file, if any, is no longer used and is
not compatible with DECprint Supervisor. Delete this file after you edit
DCPS$STARTUP.COM. To delete this file, follow this procedure:
Note
Delete all generic queues before deleting the execution queue.
1. Stop existing print queues with the STOP/QUEUE/RESET command.
2. Delete existing PrintServer print queues.
3. Add new print queues to DCPS$STARTUP.COM for PrintServer printers.
4. If you have any customized definitions in the LPS$STARTUP.COM file,
copy the changes into SYS$STARTUP:DCPS$STARTUP.COM.
5. Edit SYS$MANAGER:SYSTARTUP_VMS.COM, removing the reference to
SYS$MANAGER:LPS$STARTUP.COM.
6. Delete LPS$STARTUP.COM. You can delete this and other files that are no
longer needed for PrintServer printing using the following command file:
SYS$COMMON:[SYSHLP.EXAMPLES.DCPS]DCPS$DELETE-LPSCLIENT.COM
2–12 Setting Up Printers
3
Creating and Modifying Print Queues
This chapter explains how to start up the printing system and test the printer.
Note
Make sure the system queue manager is running before creating
queues.
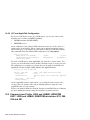
3.1 If You Are Installing the Software for the First Time
If this is a new installation, you can use the startup template file to help you
set up your queues. Copy the printer startup template file as follows:
$ COPY SYS$COMMON:[SYS$STARTUP]DCPS$STARTUP.TEMPLATE SYS$COMMON:[SYS$STARTUP]DCPS$STARTUP.COM
3.2 If You Are Upgrading From DECprint Printing Services
Software (CPS)
If you are upgrading from CPS to DCPS, convert your CPS$STARTUP.COM
file as follows:
1. Enter the following command:
$ @SYS$STARTUP:CPS_TO_DCPS_STARTUP.COM
2. Answer the questions displayed on your screen. For example:
Enter filename of CPS startup file to be converted;
Default filename is SYS$SYSROOT:[SYS$STARTUP]CPS$STARTUP.COM
[default]:
disk$manager:[cps_conversion]cps$startup.com
Enter filename of DCPS startup file to be created;
Default filename is SYS$SYSROOT:[SYS$STARTUP]DCPS$STARTUP.COM
[default]:
Creating and Modifying Print Queues 3–1
disk$manager:[cps_conversion]dcps$startup.com
Please read or run DIFFERENCES on the output file,
DISK$MANAGER:[CPS_CONVERSION]DCPS$STARTUP.COM,
to be sure the new file meets your needs.
The procedure creates a startup file that DECprint Supervisor recognizes,
but does not change your existing queue definitions. If you need to add new
queues, see Section 3.3
DCPS has an automatic data type detection feature. Therefore, you no longer
need to specify the data type as a queue default or in the PRINT command.
If you defined generic queues for default data types, edit
DCPS$STARTUP.COM and remove them.
3.3 Setting Up Execution Queues
You must create an execution queue for each PostScript printer. Execution
queues schedule jobs for processing and deliver the print jobs to a printer. An
execution queue is associated with a particular printer.
When you create an execution queue, you supply information about the queue,
including its name and default parameters. Example 3–1 shows creation of
an execution queue for a PrintServer printer. Example 3–2 shows creation
of an execution queue for a serial printer. These commands are placed in
DCPS$STARTUP.COM.
Note
Configure your system so that required software is started before you
start your execution queues. For example, for a networked printer,
ensure that the corresponding TCP/IP, LAT, DECnet, AppleTalk, or
PrintServer Supporting Host software is started first.
Also, if you invoke DCPS$EXECUTION_QUEUE.COM directly, and
neglect to add the same command to DCPS$STARTUP.COM, some
DCPS queues may not work after your OpenVMS system reboots.
Example 3–1 Creation of an Execution Queue Entry for a PrintServer Printer
(continued on next page)
3–2 Creating and Modifying Print Queues
Example 3–1 (Cont.) Creation of an Execution Queue Entry for a PrintServer Printer
$ @SYS$STARTUP:DCPS$EXECUTION_QUEUE LPS20$BULL09 ! P1 - Execution queue name
"DECNET/BULL09" - ! P2 - Device name (PrintServer DECnet node name)
DCPS_LIB ! P3 - Logical name for your library search list
"SIDES=2" ! P4 - Defines a default queue parameter
"" ! P5 - Value to override/add to default qualifiers
"" ! P6 - Communication speed
"" ! P7 - Set device qualifier
""
! P8 - Verify on/off
Example 3–2 Creation of an Execution Queue Entry for a Serial Printer
$ @SYS$STARTUP:DCPS$EXECUTION_QUEUE 2UP ! P1 - Execution queue name
"SERIAL/TTB4" - ! P2 - Device name
DCPS_LIB ! P3 - Logical name for your library search list
"NUMBER_UP=2" - ! P4 - Defines a default queue parameter
"/DEFAULT=(FLAG,FORM=MYFORM,NOFEED)" ! P5 - Value to override or add to default qualifiers
"" ! P6 - Communication speed
"/SPOOL=(2UP,DISK1$:)" ! P7 - Set device qualifier
""
! P8 - Verify on/off
The following sections describe each item of information you need to supply to
DCPS$EXECUTION_QUEUE.COM.
3.3.1 Supplying the Name of the Execution Queue (P1)
An execution queue name can have 1-31 characters, including uppercase and
lowercase alphabetical characters, digits, the dollar sign ($), and the underscore
character (_). The queue name must include at least one alphabetical character
and cannot have intervening spaces.
3.3.2 Supplying the Printer Device Name (P2)
The printer device name specifies the interconnect and device used to access
the printer, and the VMScluster member node on which it resides.
Specify the device name in the following format:
node::"interconnect/interconnect_specific_device_address"
Creating and Modifying Print Queues 3–3
where:
•
node is the name of the VMScluster member on which the queue executes.
If the OpenVMS system is not a member of a cluster, then node:: can be
omitted.
•
interconnect specifies the interconnect type. You can specify one of the
following:
•
For . . .
Specify . . .
Printers that connect through raw TCP/IP sockets
IP_RAWTCP
Printers that connect directly or through LAT
SERIAL
PrintServer printers using CPAP protocol and DECnet
DECNET
PrintServer printers using CPAP protocol and TCP/IP
IP_CPAP
Printers that connect through EtherTalk and LocalTalk protocols
APPLETALK
interconnect_specific_device_address is the actual address of the printer.
The following sections have specific instructions:
For Printer using this interconnect . . .
See . . .
IP_RAWTCP
Section 3.3.2.1
Serial
Section 3.3.2.2
IP_CPAP
Section 3.3.2.3
DECnet
Section 3.3.2.4
AppleTalk
Section 3.3.2.5
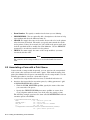
3.3.2.1 If Your Printer Is On a TCP/IP Network and Uses Raw TCP/IP Sockets
Enter the device information in the following format:
"IP_RAWTCP/address:port"
where:
address is the IP address of your NIC, print server, or terminal server in either
a named or numeric format.
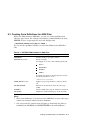
port is the number of the raw TCP port for your network device. Check the
documentation for your NIC, print server, or terminal server to determine what
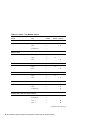
number to use. Table 3–1 shows the port numbers for some commonly-used
devices.
3–4 Creating and Modifying Print Queues
Table 3–1 Raw TCP/IP Port Numbers
20nn
2501
3001
6869
9100
DECserver terminal servers, where ‘‘nn’’ is the physical port number
DIGITAL LN17ps and DIGITAL Laser Printer LN17+ps
Emulex NICs
DIGITAL Laser Printer LN15 and LN15+
DIGITAL RapidPrint 500 print server
DIGITAL Laser Printer LN20, LN40 and LNC02
Compaq Laser Printer LN16, LN32 and LNM40
GENICOM LN and microLaser printers
GENICOM RapidPrint MPS100 print server
Hewlett-Packard LaserJet printers
Lexmark Optra printers
Tektronix Phaser printers
Xerox DocuPrint N printers
Hewlett-Packard JetDirect, XCD, and Lexmark NICs
For example, a raw TCP/IP printer could be specified by either of the following:
"IP_RAWTCP/ln17ps.my.org:2501"
"IP_RAWTCP/8.9.10.11:2501"
Note
If you specify the wrong port number for the printer, DCPS is unable to
communicate with the printer. However, because the symptoms are no
different than if the printer were busy, offline, etc., you do not receive
any indication that the port number is illegal.
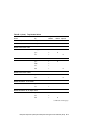
3.3.2.2 If Your Printer Is On a LAT Network or Directly Connected
Use the following format for serial printers:
If Your Serial Printer is On . . .
Use This
Format . . .
A local serial line
‘‘SERIAL/Txyn’’
x is the printer type code, y is the
controller name, and n is the host system
unit number.
A LAT port
‘‘SERIAL/LTAn’’
n is the host system unit number.
Where . . .
Note
The SET TERMINAL and SET DEVICE commands translate the
name of the printer for serial printers. To prevent the commands
Creating and Modifying Print Queues 3–5
from translating the printer name, prefix the printer name with an
underscore (_).
3.3.2.3 If Your PrintServer Printer Is Part of a TCP/IP Network
Enter the device information in the following format:
"IP_CPAP/address"
where address is the IP address of your DIGITAL PrintServer printer in either
a named or numeric format.
For example, a PrintServer TCP/IP node could be specified by either of the
following:
"IP_CPAP/garmnd.dsg.dec.com"
"IP_CPAP/16.128.144.11"
3.3.2.4 If Your PrintServer Printer Is Part of a DECnet Network
Enter the device information in the following format:
"DECNET/nodename"
where nodename is the DECnet node name of your DIGITAL PrintServer
printer.
For example, a PrintServer DECnet node could be specified by:
"DECNET/GARMND"
3.3.2.5 If Your Printer Is Part of an AppleTalk Network
You can include printers in your printing system that are connected to an
AppleTalk network. To make an AppleTalk printer a network sharable device,
the PATHWORKS AppleTalk for VMS software component must be running on
the same node that is running the DCPS queue.
The configuration of this type of network is described in the PATHWORKS for
VMS (Macintosh) Introduction to the AppleTalk Network System manual.
Enter the device information in the following format:
"APPLETALK/printername@zone@type"
where:
•
printername is the AppleTalk node name assigned to the printer. This is
the PostScript printer name. This value is required.
3–6 Creating and Modifying Print Queues
•
zone is the zone that includes the printer. This value is optional. The
default is the AppleTalk zone for the network segment of the OpenVMS
system on which the print queue is running.
•
type describes the printer’s accessibility. This value is optional. Generally,
the type is LaserWriter.
When only printername is required, the information provided for P2 would be
just "APPLETALK/printername".
For example, an AppleTalk printer could be specified by any of the following:
"APPLETALK/Paul’s Printer"
"APPLETALK/Paul’s Printer@MRO"
"APPLETALK/Paul’s Printer@MRO@LaserWriter"
3.3.3 Supplying the Library Logical Name (P3)
The name of the standard device control library is DCPS$DEVCTL. This is the
default library name if this parameter is blank. Refer to Chapter 7 for more
information about creating device control libraries and defining the device
control library logical name.
3.3.4 Assigning Default PRINT Command Parameters to the Queue (P4)
You can specify default PRINT command parameters to associate with the
queue. Any PRINT parameter can be associated by default with a queue.
Default PRINT parameters are used when the print job prints on the specified
queue, unless the user specifies different parameter values in the PRINT
command line. The parameter values specified in the PRINT command line
override the default queue parameters.
Place quotes around default PRINT parameters, as shown in the following
example:
$ @SYS$STARTUP:DCPS$EXECUTION_QUEUE 2UP ! P1 - Execution queue name
"SERIAL/TTB4" - ! P2 - Device name
DCPS_LIB ! P3 - Logical name for your library search list
"NUMBER_UP=2"
! P4 - Defines a default queue parameter
How DECprint Supervisor Prioritizes PRINT Parameters
Parameters set by the /PARAMETERS qualifier of the PRINT command
override any defaults set for the queue. DECprint Supervisor uses default
values for parameters, from highest to lowest priority, as follows:
1. Parameters specified in the PRINT command
2. Queue defaults specified for the generic queue
Creating and Modifying Print Queues 3–7
3. Queue defaults specified for the execution queue
4. Defaults built into the DCPS software:
DATA_TYPE=AUTOMATIC
INPUT_TRAY=printer-specific1
LAYUP_DEFINITION=no default layup definition
MESSAGES=NOMESSAGES
NUMBER_UP=0
OUTPUT_TRAY=printer-specific1
PAGE_LIMIT=no limit
PAGE_ORIENTATION=PORTRAIT
PAGE_SIZE=(same as SHEET_SIZE)
SHEET_COUNT=1
SHEET_SIZE=printer-specific1
SIDES=printer-specific1
TAB=NOTAB
Some parameter values are controlled by the printer hardware and can be
set through means other than the DECprint Supervisor software. DIGITAL
PrintServer printers are affected by the PrintServer Software. Other printers
are controlled through the printer control panel or switches.
3.3.5 Supplying Default Queue Attributes (P5)
You can supply a value to override or add to the default queue attributes. Do
not use the INITIALIZE/QUEUE command to set these qualifiers. Enter them
into the queue definition instead.
By default, the printer startup command procedure creates print queues with
the following INITIALIZE/QUEUE qualifier settings:
•
/SEPARATE=(BURST,TRAILER,NORESET)
The /SEPARATE qualifier is used to specify job separation pages. The
default setting specifies:
Job burst pages.
Job trailer pages.
No reset module is sent between print jobs (NORESET). This setting is
included for compatibility with sites upgrading from PrintServer client
software.
•
1
/FORM_MOUNTED=DCPS$DEFAULT
These settings depend on the setting of the printer’s PostScript interpreter.
3–8 Creating and Modifying Print Queues
This qualifier allows you to include a default form definition assumed
to be mounted on the printer. The default form for ANSI jobs
only is DCPS$DEFAULT. If you include a form definition with the
/FORM_MOUNTED qualifier, specify the same form definition in the
/DEFAULT qualifier as well.
•
/DEFAULT=(NOFEED)
The /DEFAULT qualifier specifies default PRINT qualifiers. The standard
queue definition specifies a default setting of NOFEED on print jobs.
You can modify this command line to include any PRINT qualifiers. For
example, you can include your own form to be applied to print jobs when a
form definition is required:
/DEFAULT=(FORM=MYFORM,NOFEED)
If you specify the /DEFAULT qualifier, be sure to include the FORM
and NOFEED keywords. If they are not included, the values revert to
the OpenVMS defaults, which are not compatible with the DECprint
Supervisor software.
Note
If you include more than one qualifier in the queue definition, enclose
the values in quotation marks.
3.3.6 Setting the Speed for Serial Printers (P6)
You can set the communications speed for serial printers attached directly to
your OpenVMS system. If this parameter is blank, the default is 9600 baud.
To change the speed, replace the null string (‘‘’’) with a value, such as ‘‘19200’’.
For printers that utilize network connections, this parameter is ignored.
3.3.7 Supplying SET DEVICE Qualifiers to the Queue (P7)
You can specify the SET DEVICE command qualifiers for this queue. For
example, to enable error logging, include the following string:
"/ERROR_LOGGING"
Now, all error messages reported by the printer are recorded in the error
log file, SYS$ERRORLOG:ERRLOG.SYS. You can read this file using the
ANALYZE/ERROR command.
This parameter is valid for serial printers only.
Creating and Modifying Print Queues 3–9
3.3.8 Enabling SET VERIFY When Initializing the Queue (P8)
You can specify the setting of the SET VERIFY command for the
DCPS$EXECUTION_QUEUE.COM command procedure. The default setting
is NOVERIFY, to save log file space and console log space. If P8 contains
1, then SET VERIFY is enabled, which is useful for diagnosing problems in
the printer startup file. (Refer to the OpenVMS DCL Dictionary for more
information about the SET [NO]VERIFY command.)
3.4 Customizing Execution Queue Behavior
You can alter the behavior of DCPS print symbionts and their corresponding
execution queues in a number of ways, several of which are described in this
section. Other options are listed in Appendix B, along with general guidelines
for making the changes. Some customizations apply to all DCPS queues while
others apply only to queues that you specify.
3.4.1 Running DCPS as a Multistreamed Process
A DCPS symbiont is capable of running as a multistreamed process. As a
multistreamed symbiont process, one DCPS process can run more than one
DCPS execution queue. A new DCPS process is not started every time a DCPS
print queue is started, but only when all current processes are supporting a
specified maximum number of queues (‘‘streams’’). The number of queues that
a DCPS symbiont process will support is determined by the value of the logical
DCPS$MAX_STREAMS when the process is started.
DCPS can be configured to support up to 32 execution queues per DCPS
symbiont process. The logical DCPS$MAX_STREAMS is used to specify the
number of queues per DCPS symbiont process. To define this logical, specify
the following command in your DCPS$STARTUP.COM file (a template is
provided in DCPS$STARTUP.TEMPLATE) and substitute the number of
queues per process to use. If this logical is not defined, a DCPS process will
support only one (1) execution queue.
$ DEFINE/SYSTEM/EXECUTIVE DCPS$MAX_STREAMS max-number
Execute your DCPS$STARTUP.COM file to enable this logical and start your
queues with DCPS as a multistreamed process.
A DCPS process terminates only when all queues associated with the process
are stopped.
3–10 Creating and Modifying Print Queues
3.4.1.1 Managing Print Queues When Running Multistreamed
The OpenVMS Queue Manager controls when a symbiont process is created
and terminated. Generally a new DCPS symbiont process is created when
there are no free streams in all existing DCPS symbiont processes. As
previously stated, the number of streams (queues) that a DCPS process
supports is determined by the value of the logical DCPS$MAX_STREAMS
when a new process is started. A symbiont process terminates when all the
queues supported by that process are stopped.
The set of print queues that a DCPS symbiont process supports is determined
by the order in which queues are started, and by any subsequent stopping
(STOP/QUEUE/RESET or STOP/QUEUE/NEXT) and starting (START/QUEUE) of queues.
DCPS defines a logical which identifies the process ID for a queue (Section 5.8).
You can use these logicals to determine the process that supports a queue and
the set of queues that are supported by the same process.
Although not likely, a problem observed with one queue could be the result of
a problem that exists with another queue, because both queues are supported
by the same process. It may not be sufficient to examine the state of one job on
one queue to identify a problem. You may need to look at the state of the first
job on all the queues supported by that DCPS process.
A DCPS queue should not be stopped by stopping the DCPS process that
supports that queue. Stopping a DCPS symbiont process with STOP/ID will
stop all of the queues supported by that process.
3.4.1.2 Changing the DCPS Environment When Running Multistreamed
With a single-streamed DCPS symbiont process, changes to DCPS logicals and
other aspects of the DCPS environment may not take effect until after you
have issued a STOP/RESET and then a START command for the associated queue,
depending on what you are trying to change.
To change the behavior for a single DCPS queue that is associated with a
multistreamed process, you may need to stop all the DCPS queues associated
with that symbiont process and then restart them before the change will
take effect. This is because some aspects of the environment are determined
only when the DCPS symbiont process starts (rather than when a DCPS queue
starts), and the symbiont process does not stop until all of its associated queues
are stopped.
Creating and Modifying Print Queues 3–11
3.4.2 Interrupting Busy Printers When a Job Starts
DCPS normally waits for a raw TCP/IP, LAT, or serial printer to be idle
before sending a new job to it. This is especially important in a networked
environment where a printer connected through a DECserver device or other
network terminal server can be shared among DCPS queues, LATSYM queues,
Windows and UNIX hosts, etc.
Prior to version V1.2, DCPS used an aggressive synchronization sequence to
gain control of a printer’s PostScript interpreter. This scheme worked well
in an all-DCPS environment, but in a multi-host environment it sometimes
caused print jobs from other systems to terminate prematurely.
If you rely on DCPS’s earlier behavior to abort errant PostScript jobs on
one queue by starting a job on another queue, you can define the following
system-wide logical to restore the more aggressive behavior:
$ DEFINE/SYSTEM/EXECUTIVE DCPS$queuename_INTERRUPT_WHEN_BUSY 1
3.4.3 Suppressing PostScript Synchronization When a Job Starts
DCPS begins a job on a raw TCP/IP, LAT, or serial printer by synchronizing
with its PostScript interpreter to ensure that the interpreter is ready to accept
commands. However, some PostScript printers are not always in a state
where they can recognize the synchronization control characters. In particular,
some printers that support additional printer languages like HP PCL do not
correctly respond to this sequence under certain circumstances. For example,
the DEClaser 3500, when in PS/PCL sensing mode, inadvertently switches to
PCL mode when DCPS sends a Ctrl/T character to its serial port. The printer,
then out of the PostScript mode, does not respond, and the print job gets stuck
in the ‘‘starting’’ state.
You can define a logical to cause the DCPS symbiont to avoid using its usual
synchronization sequence for printers that use a raw TCP/IP, LAT, or serial
connection. The logical has no effect when using printers connected via other
means. Refer to Chapter 10 for printer-specific recommendations.
To disable the synchronization sequence for a print queue, use the following
command:
$ DEFINE/SYSTEM/EXECUTIVE DCPS$queuename_NO_SYNC 1
The absence of the synchronization step is not generally a problem for most
modern serially-connected printers because such printers use flow control to
hold off data when the interpreter is not ready to accept data. However, the
printer is more vulnerable to printing ‘‘garbage’’ or losing jobs if communication
parameters, such as baud rate and stop bits, are not set correctly. Depending
3–12 Creating and Modifying Print Queues
on the configuration, it’s also possible to loose print jobs if the printer data
cable is disconnected or the printer is powered off.
3.4.4 Purging the Symbiont Process’s Working Set
The DCPS symbiont purges its working set after it has been idle for a period of
time in order to conserve system resources. The time delay is intended to help
prevent the system from thrashing by keeping the program in physical memory
while more work is apt to arrive.
By default, DCPS waits ten (10) minutes after becoming idle before purging its
working set. You can increase this value, if desired, by defining a system-wide
logical:
$ DEFINE/SYSTEM/EXECUTIVE DCPS$PURGE_TIME "0 hh:mm:ss.00"
where hh:mm:ss.00 is an OpenVMS delta-time value specifying the desired
time delay. If the value is less than the default of ten seconds, the default is
used.
3.4.5 Suppressing the OPCOM Message ‘‘User Name Not Found’’
When DCPS is executing in a cluster environment where the UAF files are
different between cluster members, an OPCOM message is displayed and the
job prints normally:
%%%%%%%%%%% OPCOM 1-MAR-2001 18:43:55.87 %%%%%%%%%%%
Message from user SYSTEM on LITERA
Queue SHARIE: %DCPS-W-USERNOTFOUND, user name FOO not found,
no log files created
-RMS-E-RNF, record not found
Because the username cannot be found, the symbiont cannot perform the
MESSAGES=KEEP or MESSAGES=PRINT parameter request.
To keep this OPCOM message from being displayed for every job:
$ DEFINE/SYSTEM/EXECUTIVE DCPS$queuename_IGNORE_UNKNOWN_USER 1
3.4.6 Using Old ANSI Translator Page Size for A4 Landscape
All versions of the ANSI translator prior to DCPS V1.1A had a problem
printing 66 lines of text in landscape mode on A4 paper. Certain printers
have slightly smaller than average print areas when using A4 paper, which
resulted in the 66th line being lost or clipped when using print parameters of
PAGE_SIZE=A4,PAGE_ORIENTATION=LANDSCAPE.
The ANSI translator now correctly prints 66 lines of text in landscape mode
on A4 paper. The fix involved changing the vertical spacing of the font used
(SGR 15) and correcting the maximum printable area for A4 paper.
Creating and Modifying Print Queues 3–13
If you use preprinted forms that depend on the old translator’s behavior, you
can retain the old behavior by defining a DCPS logical:
$ DEFINE/SYSTEM/EXECUTIVE DCPS$queuename_OLD_ANSI_PAGE_SIZES 1
3.5 Setting Up Generic Queues
Generic queues are not associated with a specific printer; rather, they point
to the execution queues. Generic queues can be associated with more than
one execution queue and can distribute print jobs among queues, or they can
be used to associate specific DECprint Supervisor functions with a print job.
Generic queues are optional.
Example 3–3 shows how to set up a generic queue for printing with a layup
definition file. This generic queue feeds print jobs to either of two ScriptPrinter
execution queues.
Example 3–3 Setting Up a Generic Queue
$ @SYS$STARTUP:DCPS$GENERIC_QUEUE DRAFT_DOCS ! P1 - Generic queue name
"LN03R_TTB4,LN03R_TTB7" - ! P2 - Execution queue names
"LAYUP=LPS$SINGLEHOLES" ! P3 - Default queue parameters
"" ! P4 - Default queue qualifiers
""
! P5 - Verify on/off
Table 3–2 Parameter Values for Generic Queues
Parameter
Value
P1 (required)
Name of the generic queue.
In Example 3–3, DRAFT_DOCS is the generic queue to which users
will send print jobs.
P2 (required)
Name of the execution queue(s) to which the generic queue can send
jobs. You must supply at least one execution queue name for each
generic queue definition.
In Example 3–3, the generic queue will send print jobs to two
execution queues: LN03R_TTB4 and LN03R_TTB7.
P3 (optional)
Default PRINT parameters.
In Example 3–3, LAYUP=LPS$SINGLEHOLES provides a default
layup definition file for the generic queue.
(continued on next page)
3–14 Creating and Modifying Print Queues
Table 3–2 (Cont.) Parameter Values for Generic Queues
Parameter
Value
P4 (optional)
Explicit INITIALIZE/QUEUE qualifiers.
P5 (optional)
Setting of the SET VERIFY command. The default is SET
NOVERIFY.
3.6 Activating Changes to the Queue Definitions
When you create or modify the DCPS$STARTUP.COM file, you must activate
the changes for the DECprint Supervisor to use the new queue definitions.
You can wait until you stop and restart the system, or you can execute the
DCPS$STARTUP.COM file, as follows:
1. Stop the print queues that you modified. If any of the modified queues are
running on a multistreamed symbiont, stop all other queues that are using
that same symbiont (see Section 3.4.1.2). To stop the queues, enter the
following command for each print queue:
$ STOP/QUEUE/NEXT queuename
2. Edit the system startup file SYS$MANAGER:SYSTARTUP_VMS.COM to
include a command that invokes DCPS$STARTUP.COM.
Look for the following command in the system startup file:
$ @SYS$STARTUP:DCPS$STARTUP
If this command is not in the system startup file, add it to the file. Use the
following guidelines:
•
If you are using a printer with TCP/IP, add the new line after TCP/IP
is started.
•
If you are using a printer with LAT, add the new line after LAT is
started.
•
If you are using a printer with AppleTalk, add the new line after
AppleTalk is started.
•
If you are using a PrintServer printer with DECnet, add the new line
after the command to invoke STARTNET.COM. PrintServer Software
must be running on the PrintServer host system before you start the
queues.
Creating and Modifying Print Queues 3–15
•
If the system startup file includes a command to start
LPS$STARTUP.COM, replace it with the command to start
DCPS$STARTUP.COM.
•
If you are upgrading from DECprint Printing Services (CPS), delete the
command to start CPS$STARTUP.COM from the system startup file.
3. Execute the printer startup command file:
$ @SYS$STARTUP:DCPS$STARTUP.COM
If the queues are on a VMScluster system, you should execute the command
above from all nodes in the cluster.
The print queues are started by the printer startup command file. See
Section 3.7 for information on testing your new queue definitions.
3.7 Testing the Printing System
Note
Execution of the IVP (@SYS$TEST:DCPS$IVP) does not cause anything to
print.
You can test the printing system by printing the IVP files from
SYS$COMMON:[SYSTEST.DCPS]. The IVP files represent the different
data types that DCPS supports. The IVP files are listed in Table 3–3.
Table 3–3 IVP Files with Different Data Types
File Name
File Type
DCPS$IVP_ANSI.DAT
ASCII files
DCPS$IVP_LIST.DAT
Simple ASCII
DCPS$IVP_PCL.DAT
PCL Level 4 files
DCPS$IVP_POST.DAT
PostScript files
DCPS$IVP_PROPRINTER.DAT
Proprinter files
DCPS$IVP_REGIS.DAT
ReGIS files
DCPS$IVP_TEK4014.DAT
Tektronix 4010/4014 files
DCPS can automatically detect the file’s data type. You do not have to specify
the data type on the command line. For example, you can enter the following
PRINT command:
3–16 Creating and Modifying Print Queues
$ PRINT/QUEUE=queuename/NOTIFY DCPS$IVP_data-type.DAT
If the print queue is linked to a specific data type, or you are testing the LIST
data type, specify the data type of the file.
For example, to print DCPS$IVP_POST.DAT, use the following PRINT
command:
$ PRINT/QUEUE=queuename /PARAMETERS=DATA_TYPE=POSTSCRIPT/NOTIFY SYS$COMMON:[SYSTEST.DCPS]DCPS$IVP_POST.DAT
Creating and Modifying Print Queues 3–17
4
Providing Automatic Data Type Detection
DECprint Supervisor software can determine the data type of the file to be
printed. This chapter explains how you can customize your printing system to
print the types of files that users need to print.
4.1 How DCPS Automatically Detects Data Type
If a user does not specify the data type and the print queue has no default data
type, DCPS examines each file in the print job. DCPS attempts to determine
the data type of the file from instructions in the file, or from the file name
extension.
If DECprint Supervisor software cannot determine the file data type by any of
these methods, the file is printed as a text file. Text files are handled as ANSI
files unless another default text file data type (PCL or Proprinter) has been
defined by the system manager for the queue or for the system.
When files are treated as text files in this way, the DECprint Supervisor
software can detect PostScript data after the text, so a file that starts with text
followed by PostScript is printed properly.
The process of determining the file data type is repeated for each file in a print
job, so a single print job can contain different types of files.
4.2 Specifying Automatic Data Type Detection
You can control how the DECprint Supervisor software determines the data
type of files as they are printed. You can:
•
Link file extensions with data types. You can edit the default file extension
data file to add or modify the standard list of file extensions and the data
types to which they are associated. See Section 4.2.1.
•
Specify the default data type to use when DCPS cannot determine the file’s
data type in any other way. You can specify a system wide default and a
queue-specific default text data type. See Section 4.2.2.
Providing Automatic Data Type Detection 4–1
If necessary, you can create generic queues that have default data types, so
that every file sent to the queue is assumed to be that data type. Only the
user’s PRINT parameters can override the queue default data type.
4.2.1 Linking File Extensions with Data Types
The DECprint Supervisor software uses a data file to link file extensions to
data types. Use the following procedure to create a local data file of your
system’s file extensions and the associated data types.
1. If your system does not have a customized data file, use the sample file
supplied with your software. Copy the file, and change the file’s extension,
as shown in the following command:
$ COPY
_From: SYS$LIBRARY:DCPS$FILE_EXTENSION_DATA_TYPE.DAT_DEFAULT
_To: SYS$COMMON:[SYSLIB]DCPS$FILE_EXTENSION_DATA_TYPE.DAT
If the .DAT file is not in variable or stream format, DCPS cannot read
it when the queues are started. OPCOM will report the error, and the
symbiont process may be terminated. You should save the .DAT file in
the appropriate format, and then restart the printing system using the
DCPS$STARTUP.COM file.
2. Edit the file. The file has the default file extension and data types listed.
For example:
POSTSCRIPT:
EPS
EPSF
POST
PS
;
The example shows that files with extensions of .EPS, .EPSF, .POST, and
.PS are linked to the PostScript data type.
Add extensions that are specific to your site, or modify any that have a
different local meaning.
You can specify any valid DATA_TYPE value, except AUTOMATIC. Do not
abbreviate the data type names. The valid data type names are:
ANSI
ASCII
DDIF
LIST
PCL
4–2 Providing Automatic Data Type Detection
POSTSCRIPT
PROPRINTER
REGIS
TEK4014
4.2.2 Specifying Default Data Types for the System and Queues
You can specify a system wide default text data type and queue-specific default
text data types. If DCPS software cannot determine the data type, the file is
processed as the default data type you specify.
The factory default data type is ANSI. If users regularly print PCL or
Proprinter text files instead of ANSI files, you should change the default
from ANSI to PCL or Proprinter.
Define one or both of the following logical names:
•
DCPS$DEFAULT_TRANSLATOR specifies the system wide default text
data type.
To define a system wide default text data type, use the following command:
$ DEFINE/SYSTEM/EXECUTIVE DCPS$DEFAULT_TRANSLATOR text_data_type
•
DCPS$queuename_DEFAULT_TRANSLATOR specifies the queue-specific
default data type.
To define a queue-specific default text data type, use the following
command:
$ DEFINE/SYSTEM/EXECUTIVE DCPS$queuename_DEFAULT_TRANSLATOR text-data-type
Valid values for the text-data-type are:
•
ANSI (the default)
•
PCL
•
PROPRINTER
Do not abbreviate the data type name.
If the system wide data type differs from the queue-specific data type, the
queue-specific data type takes precedence.
The queue-specific logical name is useful when a queue is used by
PATHWORKS clients. Text files printed from PCs may be PCL or Proprinter
files. The following example specifies the PCL data type for the queue named
PATHWORKS:
$ DEFINE/SYSTEM/EXECUTIVE DCPS$PATHWORKS_DEFAULT_TRANSLATOR PCL
Providing Automatic Data Type Detection 4–3
The DECprint Supervisor software attempts to determine the file data type
for each file sent to the PATHWORKS queue. If a file data type cannot be
determined, the file is processed as a PCL file. If the file contains PCL text
followed by PostScript, it is printed properly.
4.2.3 How Users Control Data Type Detection
Users control the way print jobs are processed for automatic data type
detection by specifying:
•
The data type with the /PARAMETERS=DATA_TYPE qualifier in the
PRINT command.
This qualifier overrides the automatic data type detection process; only
the presence of DDIF file tags can prevent the file from being processed
using the translator associated with the specified data type. If the file
contains DDIF tags and is explicitly specified as another data type, the file
is not printed. The following error message is displayed, and the DECprint
Supervisor software continues with the next file in the print job (if any):
INVDDIFDATA, Invalid DDIF data, flushing to end of file
•
Automatic data type detection with the following PRINT parameter:
/PARAMETERS=DATA_TYPE=AUTOMATIC[=text-data-type]
Users can specify the /PARAMETERS=DATA_TYPE=AUTOMATIC
qualifier to specify automatic data type detection (for example, if the
print queue has a default data type).
If the user includes the default text data type (text-data-type) in the
DATA_TYPE=AUTOMATIC parameter, the DECprint Supervisor software
assumes the specified data type if the data type of a print file cannot be
determined.
The text-data-type value is optional; the default is ANSI. Users should
include this value to specify another text data type, such as PCL or
Proprinter.
The DECprint Supervisor software can print a file that starts with the
default text data type followed by PostScript data. If a user needs to print
a file that begins with PCL text followed by PostScript data, the user can
explicitly set the default text data type to be PCL using the following
PRINT command:
$ PRINT/QUEUE=PS20$A10 PIC.MSG/PARAMETERS=(DATA_TYPE=AUTOMATIC=PCL)
4–4 Providing Automatic Data Type Detection
This feature is useful for printing files generated by electronic messaging
systems. For example, you can print a PostScript file that was sent to you
from someone using the messaging system, if the resulting file contains a
text message header followed by PostScript data.
Providing Automatic Data Type Detection 4–5
5
Manipulating Print Jobs and Print Queues
This chapter describes the commands for maintaining and controlling print
jobs, print queues, and the queue manager.
Some of the commands described in this chapter require privileges.
5.1 Displaying Print Job Status
You can use the SHOW ENTRY command to display the status of a print job.
You do not need privileges to use this command to display your own print jobs,
but privileges are required to display another user’s print jobs.
The SHOW ENTRY command lists all your print jobs. To display the status
of another user’s print job, you must supply the job number with the SHOW
ENTRY command or specify the user using the /USER qualifier. You can
display the job numbers for all print jobs in a designated queue using the
SHOW QUEUE/ALL command, as follows:
$ SHOW QUEUE/ALL PS40$A12
Printer queue PS40$A12, busy, on LEVEL::PS40, mounted form DCPS$DEFAULT
(stock=DEFAULT)
Entry Jobname
----- ------304
MEMO
Username
-------MSMITH
Blocks Status
------ -----5 Printing
You can use the SHOW ENTRY/FULL command to display information about a
specific print job. For example:
Manipulating Print Jobs and Print Queues 5–1
$ SHOW ENTRY 304/FULL
Entry Jobname
Username
Blocks Status
----- ------------------- -----304 MEMO
MSMITH
5 Printing
On busy printer queue PS40$A12
Submitted 14-MAR-2001 10:41
/FORM=DCPS$DEFAULT (stock=DEFAULT) /NOTIFY
/PRIORITY=100
File: _$1$DUA10:[MSMITH]MEMO.TXT;1 (printing)
Note
Print job status may be shown as ‘‘Printing’’ when the file has not yet
actually started printing on the printer.
5.2 Deleting a Print Job
You can delete a print job using the DELETE/ENTRY command. You can
delete you own print job without privileges. However, you must have privileges
to delete another user’s print jobs.
The DELETE/ENTRY command accepts the print job number as an argument.
For example:
$ DELETE/ENTRY=569
This command deletes print job 569. The system sends messages indicating
the successful print job deletion.
The print job is terminated in a method that depends on the status of the print
job when you issue the DELETE/ENTRY command.
If you issue DELETE/ENTRY . . .
DCPS software . . .
when the print job is printing,
may take several seconds to stop the print job.
The printer prints data in its buffers, plus any
required job trailer pages and job log pages.
During this time, a SHOW QUEUE command
displays the job’s status as Aborting.
before a connection is established
with a network printer,
prints no pages.
after the connection is established,
prints the job trailer page with a message
indicating the fact that you deleted the print
job.
5–2 Manipulating Print Jobs and Print Queues
If you issue DELETE/ENTRY . . .
DCPS software . . .
before the job burst or job flag pages
are printed,
may not print the job burst or job flag page.
However, job trailer and job log pages are
printed if the queue is set up to print them.
5.3 Releasing a Print Job in the Holding State
When a print job is in the Holding state, you must release it for it to print.
The user can put a job in the Holding state using the PRINT/AFTER or
PRINT/HOLD command. The user or system operator can put a print job in
the Holding state using the SET ENTRY/HOLD command.
Use the SET ENTRY/RELEASE command to release the print job to be
printed. You must specify the job number in the SET ENTRY command. This
command does not require privileges if you are releasing a print job that you
submitted. Privileges are required to release another user’s print jobs.
For example:
$ SET ENTRY/RELEASE 569
In this example, print job 569 was in the Holding state and was released for
printing.
5.4 Requeuing Print Jobs
You can change the print queue for one or more print jobs, as described in the
following sections.
5.4.1 Requeuing Pending Print Jobs
You can requeue a print job that has not started printing using the SET
ENTRY/REQUEUE command. Without privileges, you can requeue your jobs.
With privileges, you can requeue any print job that has not started printing.
You must supply the job entry number with the SET ENTRY command. The
/REQUEUE qualifier requires the name of the new print queue. For example:
$ SET ENTRY/REQUEUE=POSTSCRIPT$DUPLEX 596
This command changes the print queue for job 596. The print job is sent to the
POSTSCRIPT$DUPLEX queue.
Manipulating Print Jobs and Print Queues 5–3
5.4.2 Requeuing the Currently Printing Job to Another Queue
When a printer problem prevents completion of the printing job, you can
requeue the print job to another printer. Use the STOP/QUEUE/REQUEUE
command to send the print job to another print queue. You supply both the old
queue name and the new queue name for this command. For example:
$ STOP/QUEUE/REQUEUE=POSTSCRIPT$DUPLEX POSTSCRIPT$SIMPLEX
In this example, the print job that is currently printing on the queue
POSTSCRIPT$SIMPLEX is stopped and requeued to POSTSCRIPT$DUPLEX.
The POSTSCRIPT$SIMPLEX queue is not stopped and continues with printing
the next job in the queue.
5.4.3 Requeuing Current and Future Print Jobs in a Queue
The ASSIGN/MERGE command allows you to specify that all print jobs in
a certain queue, and those submitted later for that queue, are to be sent
to another queue. The ASSIGN/MERGE command requires privileges. You
must supply the old queue name and the new queue name. Use the following
procedure:
1. Use the STOP/QUEUE/NEXT command to stop the malfunctioning print
queue after the current print job has finished.
2. Use the STOP/QUEUE/REQUEUE command to requeue the currently
printing job to the new queue.
3. Use the ASSIGN/MERGE command to cause all pending and future print
jobs to be requeued. For example:
$ STOP/QUEUE/NEXT PRINTER$NOTABLE
$ STOP/QUEUE/REQUEUE=PRINTER$ABLE PRINTER$NOTABLE
$ ASSIGN/MERGE PRINTER$ABLE PRINTER$NOTABLE
5.5 Modifying the Attributes of a Print Job
The SET ENTRY command allows a user to modify the attributes of a pending
print job. You cannot modify a print job that has begun printing. If you have
privileges, you can modify the attributes of print jobs submitted by other users.
The SET ENTRY command requires that you specify the job number and
allows you to specify one or more PRINT command qualifiers, which are listed
in Appendix A. For example:
$ SET ENTRY 596/PARAMETERS=PAGE_ORIENTATION=LANDSCAPE
5–4 Manipulating Print Jobs and Print Queues
This example changes a print job from portrait orientation to landscape
orientation. If the original PRINT job contained any PRINT parameters, you
must specify them all again when you modify any print parameters with the
SET ENTRY/PARAMETERS command. If you do not respecify the PRINT
parameters, the print job will be printed using the default parameter values
for those not included in the SET ENTRY command.
5.6 Displaying a Queue
You can display a print queue, including its status, its attributes and the print
jobs in the queue, using the SHOW QUEUE command. This command does
not require privileges, unless you wish to view queue security information or
view print jobs belonging to other users.
To display a specific queue, supply the queue name. To display all of the
queues, omit the queue name from the SHOW QUEUE command. Use the
commands in Table 5–1 to display information about queues.
Table 5–1 Commands to Display Queues
To list:
Enter:
The name and description of every print
and batch queue
SHOW QUEUE
The names of all the print queues
SHOW QUEUE/DEVICE=PRINTER
All the jobs in all the queues
SHOW QUEUE/ALL
All the jobs in the specified queue
SHOW QUEUE/ALL queue-name
The attributes of all the queues
SHOW QUEUE/FULL
The attributes of a certain queue
SHOW QUEUE/FULL queue-name
5.7 Pausing a Queue
Use the STOP/QUEUE command to pause a queue. You must have privileges
and supply the queue name to the STOP/QUEUE command.
You can pause the queue after the current print job has completed by using the
STOP/QUEUE/NEXT command. This allows the current job to complete before
pausing the queue. For example:
$ STOP/QUEUE/NEXT PS$A4
This command pauses the queue PS$A4 after the current job has completed
printing.
Manipulating Print Jobs and Print Queues 5–5
If it is necessary to pause the queue without waiting for the current job to
complete, use the STOP/QUEUE/RESET command. For example:
$ STOP/QUEUE/RESET PS$A4
This command pauses the queue PS$A4 and printing stops immediately.
Note
When communications problems arise with a serial or raw
TCP/IP interconnect, the symbiont will keep listening for up to 4
minutes before disconnecting from the printer. Therefore, under
some conditions, the device is not released immediately after a
STOP/QUEUE/RESET command is issued.
See Appendix A for more STOP/QUEUE qualifiers.
5.8 Starting a Queue
Use the START/QUEUE command to restart a print queue that has been
paused with the STOP/QUEUE command. If you make changes to a
print queue in DCPS$STARTUP.COM, restart the queue by executing the
DCPS$STARTUP.COM file, as described in Section 3.6.
For example, to restart print queue PS40$A15, use the following command:
$ START/QUEUE PS40$A15
If you interrupt a printing job when you stop the queue, the print job restarts
when you restart the queue.
The logical name, DCPS$queuename_PID, is defined by the symbiont when
it starts executing. This allows the system manager to determine which
symbiont is assigned to a given queue, and is especially useful when using
multi-streamed symbionts. See Section 3.4.1.
Note
When a DCPS queue is started, the symbiont does not immediately
attempt to make a connection to the printer, to minimize the possibility
that the queue will not start. This is particularly important while
starting queues at system boot time, to avoid introducing delays or
errors into the boot process. It is not until DCPS starts processing a
5–6 Manipulating Print Jobs and Print Queues
job from a queue that DCPS determines the state of the printer and its
associated interconnect.
5.9 Modifying the Attributes of a Queue
You can temporarily modify the attributes of a print queue with the SET
QUEUE command. When the printing system is restarted, the queue
attributes you set with the SET QUEUE command are lost. To permanently
modify print queue attributes, edit the DCPS$STARTUP.COM file.
The qualifiers to the SET QUEUE command are listed in Appendix A. Note
that some print queue attributes cannot be set using the SET QUEUE
command.
The following command limits the print jobs for the PS$DRAFT queue to those
of 1000 blocks or less.
$ SET QUEUE PS$DRAFT/BLOCK_LIMIT=1000
The SET QUEUE command requires privileges; you must supply the queue
name and the appropriate qualifiers.
5.10 Preventing Users from Printing to a Queue
Use the SET QUEUE/CLOSE command to close a queue and prevent users
from submitting print jobs to the queue. This command requires privileges and
you must supply the queue name. For example:
$ SET QUEUE/CLOSE PS$A4
After you enter this command, the PS$A4 queue is closed and users cannot
submit print jobs to the queue. The print jobs that are currently in the queue
are completed. You can open the print queue using the following command:
$ SET QUEUE/OPEN PS$A4
5.11 Deleting a Queue
You can delete a print queue using the DELETE/QUEUE command. This
command requires privileges. Follow these steps to delete a DECprint
Supervisor queue:
1. Make sure that there are no generic queues running that are associated
with the queue that you are deleting, by displaying the queue using the
SHOW QUEUE/FULL command. If there are generic queues associated
with the queue, delete the generic queues first.
Manipulating Print Jobs and Print Queues 5–7
2. Pause the queue using the STOP/QUEUE/NEXT command. Wait for the
printing to stop on the printer before you delete the queue.
3. Requeue all the print jobs in the queue and future print jobs for the queue
using the ASSIGN/MERGE command (see Section 5.4.3).
4. Delete the queue with the DELETE/QUEUE command. Enter the queue
name as an argument to this command. For example, the following
command deletes the queue PS$A4 and any print jobs that were pending
in that queue.
$ DELETE/QUEUE PS$A4
Remember to modify the DCPS$STARTUP.COM file to delete the queue
permanently. Otherwise, when the printing system is restarted, the print
queue you deleted will come back.
5.12 Responding to a Stalled Queue
Printers are reported as Stalled when the DECprint Supervisor does not
receive information from the printer within a specified amount of time. When
the stalled timeout value is exceeded, the following message is displayed:
PRINTERSTALLED, Printer printer-name is stalled
You can alter the stalled printer timeout value be defining a logical:
$ DEFINE/SYSTEM/EXECUTIVE DCPS$queuename_STALL_TIME "0 hh:mm:ss.00"
where hh:mm:ss.00 is an OpenVMS delta-time value specifying the desired
time delay.
The default stalled timeout value is four minutes. Compaq recommends that
you do not change this timeout value.
When you receive a message that the printer is stalled, you must determine if
action is required. If the stalled message came from a networked printer (for
example, a PrintServer printer), the stalled message probably indicates that a
long time has passed between network communications and therefore you can
safely ignore the stalled messages.
But if the stalled message follows other printer-related messages, they may
indicate another reason for the long delay. The printer might be out of paper,
or it might have a paper jam. Therefore, when a print queue is stalled,
you should check your OPCOM messages to see if a printer condition was
previously reported. Refer to Chapter 11 for more information.
5–8 Manipulating Print Jobs and Print Queues
DCPS may also temporarily define a system-wide logical giving some indication
of why the queue is stalled. To examine this logical, execute the following
command on the system where the execution queue is running. If the queue is
on a VMScluster, be sure to use the appropriate cluster member.
$ SHOW LOGICAL DCPS$queuename_STALLED
5.13 Stopping and Starting the Queue Manager
To stop and start all the queuing activity on the system, stop and start the
queue manager. System shutdown and startup procedures perform these
operations automatically. The commands to stop and start the queue manager
require privileges.
You can stop the queue manager using the following command:
$ STOP/QUEUE/MANAGER/CLUSTER
When you are ready to start the queue manager, enter the following command:
$ START/QUEUE/MANAGER
Manipulating Print Jobs and Print Queues 5–9
6
Specifying Separation, Log, and Error
Pages
6.1 What Are Separation Pages?
Separation pages are sheets that show where a user’s print job or each file in a
print job begins and ends. Separation pages include:
•
Burst pages - printed at the beginning of a print job or file.
•
Flag pages - printed at the beginning of a print job or file.
•
Trailer pages - printed at the end of a print job or file.
A job flag page looks like a job burst page without the border around the page.
A job trailer page looks like a job flag page with the message ‘‘END OF JOB’’
printed at the top and with additional information listed for the job (for
example, when it finished, which PRINT qualifiers and parameters were used,
and how many pages were printed). File separation pages are differentiated
from each other in an analagous fashion, and from job separation pages by the
presence of file-specific information (for example, the file specification, file size,
and modification time).
You can enable separation pages for print jobs and each file in a print job. The
following sections show you how.
Specifying Separation, Log, and Error Pages 6–1
6.2 Enabling Job Separation Pages
Job separation pages keep print jobs separate. Figure 6–1 shows one type of
job separation page; a job burst page.
Figure 6–1 A Job Burst Page
This is the value of the PSM$ANNOUNCE system logical.
Note: this is text from the job’s /NOTE qualifier
DAN::SYSTEM
JOB 713
EXAMPLE
Owner UIC:
Account:
[SYSTEM]
SYSTEM
Priority:
Submit queue:
Submitted:
Printer queue:
Printer device:
Started:
100
DANS_PRINTER
30−MAY−1997 22:54
DANS_PRINTER
"IP_RawTCP/ln17ps.my.org:2501"
30−MAY−1997 22:58
Digital Equipment Corporation
OpenVMS VAX V6.1
LN17ps Dan’s Printer
DECprint Supervisor V1.4
You enable and disable job separation pages by editing the DCPS$STARTUP.COM
file; the user cannot override these settings.
Enter the /SEPARATE qualifier to parameter 5 in the execution queue entry in
DCPS$STARTUP.COM, as shown here:
6–2 Specifying Separation, Log, and Error Pages
@sys$startup:dcps$execution_queue DCPS_TTB4 ! P1
"SERIAL/TTB4" ! P2
DCPS_LIB ! P3
"" ! P4
"/SEPARATE=(BURST,NOFLAG,TRAILER)"
! P5
-
Execution queue name
Device name
Logical name for /LIBRARY
Default queue parameters
- Default queue qualifiers
Notes:
•
Job burst pages do not imply job flag pages for DCPS, as is true for some
other OpenVMS print symbionts.
•
You can use the SET QUEUE command to temporarily specify job
separation pages. For example:
$ SET QUEUE/SEPARATE=(BURST,NOFLAG,TRAILER) queuename
•
Job separation pages are not affected by parameters set with the
PRINT/PARAMETERS command or by the PostScript file being printed.
The pages use the default PostScript context of the printer, not the context
of the user’s job.
•
Even if you disable separation pages, DCPS prints a job trailer page if an
error occurs in the print job. The job trailer page contains messages about
the errors in a print job.
6.2.1 Error Messages on the Trailer Page
If the print job contains errors, the trailer page includes messages that can
help the user determine what went wrong with the print job. Following are
examples of these messages:
28-MAR-2001 11:03 %DCPS-I-TRAYSUBST, Output will be delivered to the
only tray on printer-name
28-MAR-2001 11:03 %DCPS-W-INVACC, invalidaccess: Attempt to access
restricted object or capability - offending command is get
These types of messages are also displayed on the user’s terminal if /NOTIFY
was specified in the PRINT command for the print job.
The following types of messages are not printed on the job trailer page:
•
Start and end messages
•
Hardware printer error messages, such as ‘‘out of paper’’
•
Messages related to communications
•
Messages that the software uses to manage resources in the printer
Specifying Separation, Log, and Error Pages 6–3
6.2.2 Suppressing Job Trailer Pages
DCPS normally prints a job trailer page if errors occur during the job, even
if /SEPARATE=TRAILER is not specified for the queue, as mentioned in sections
Section 6.2 and Section 6.2.1. This behavior may be undesireable when
printing on expensive media, especially if the reported errors are unimportant.
To prevent DCPS from printing job trailers, even when errors occur for the job,
define the following system-wide logical:
$ DEFINE/SYSTEM/EXECUTIVE DCPS$queuename_SUPPRESS_JOBTRAILER 1
Note
Running DCPS this way makes it much more difficult to diagnose real
problems when they arise. If you are getting nuisance error messages,
Compaq recommends that you resolve the underlying problem rather
than suppressing the messages.
6.2.3 Specifying a Special Input Tray for Job Burst and Flag Pages
When users print jobs on expensive or special media, it may be desirable to
print job burst and flag pages from a special input tray. This technique is also
useful for specifying a different color paper for separating print jobs.
You may specify a special input tray for job flag pages and job burst pages.
Define a logical name using the following command:
$ DEFINE/SYSTEM/EXECUTIVE DCPS$queuename_SEPARATOR_TRAY n
In this command, queuename is the name of the execution queue and n is the
PostScript input tray number. The tray numbers are specific to your printer
model and may be listed in your printer owner’s manual.
6.3 Enabling File Separation Pages
File separation pages separate the files in the print job. Figure 6–2 shows an
example of a file flag page.
6–4 Specifying Separation, Log, and Error Pages
Figure 6–2 A File Flag Page
This is the value of the PSM$ANNOUNCE system logical.
Note: this is text from the job’s /NOTE qualifier
DAN::SYSTEM
JOB 713
EXAMPLE.PS;2
File:
_DAN$DKA0:[SYS0.SYSMGR]EXAMPLE.PS;2
Last Modified: 15−APR−1995 14:02
Owner UIC:
[SYSTEM]
Length:
Longest record:
Priority:
Submit queue:
Submitted:
Printer queue:
Printer device:
1 block
40 bytes
100
DANS_PRINTER
30−MAY−1997 22:54
DANS_PRINTER
"IP_RawTCP/ln17ps.my.org:2501"
Digital Equipment Corporation
OpenVMS VAX V6.1
LN17ps Dan’s Printer
DECprint Supervisor V1.4
To enable default file separation pages, do the following:
•
For an execution queue, specify /DEFAULT=(file-separation-page) in
parameter p5.
•
For a generic queue, specify the /DEFAULT=(file-separation-page) in
parameter p4.
Users can override the default file flag, burst, and trailer attributes for a queue
by specifying the /[NO]FLAG, /[NO]BURST, and /[NO]TRAILER qualifiers in
the PRINT command.
Specifying Separation, Log, and Error Pages 6–5
In the following example, each file in the job will be preceded by a file flag page
and followed by a file trailer page:
$ PRINT/FLAG=ALL/TRAILER=ALL FILE1.PS,FILE2.PS,FILE3.PS
Note
If the PAGE_LIMIT parameter is used in the PRINT command, or if
the print job is terminated, the file flag page and file trailer page may
not be printed.
6.4 Adding a System Message to Separator Pages
You can add a system message to the top of job and file burst, flag, and trailer
pages for all jobs printed on your system. The following example shows you
how:
$ DEFINE/SYSTEM/EXECUTIVE PSM$ANNOUNCE "Computer Services Group"
The example shows that the logical name PSM$ANNOUNCE is now ‘‘Computer
Services Group’’.
Note
The PSM$ANNOUNCE logical is used by other print symbionts (for
example, LATSYM) as well as by the DCPS symbiont. Your definition
of PSM$ANNOUNCE will also affect these other symbionts.
6.5 Requesting Job Log Pages
A job log page is an optional sheet with information about the print job and
any messages that occurred during the print job. Use the MESSAGES=PRINT
parameter in the PRINT command to print a job log page. When printed, the
job log page precedes the job trailer page. If you are not printing job trailer
pages, the job log page is the last page of a job.
6–6 Specifying Separation, Log, and Error Pages
6.6 The File Error Page
If the software cannot access the print file when the print job starts printing,
a file error page is printed and the software continues with the next file in the
print job (if any).
The file error page contains the following information:
•
File log page banner
•
Client node name and user’s name
•
Job number
•
File identification (file name, extension, and version only)
•
File specification (full file specification)
•
The messages area
Specifying Separation, Log, and Error Pages 6–7
7
Creating Setup Modules and Device
Control Libraries
7.1 What Is a Setup Module?
A setup module is a file containing instructions that modify the appearance of
a print job or redefine the instructions in the print job.
You can include a setup module in a print job with the PRINT command’s
/SETUP qualifier. The following example uses a setup module that specifies
600 dots-per-inch (DPI) resolution:
$ PRINT/QUEUE=LPS32$2SIDES/SETUP=RES_600X600 IMAGE.PS
You can also implicitly include setup modules in a print job through the use of
a form (see Chapter 8).
7.2 Locating Setup Modules
DECprint Supervisor ships with various setup modules, which are located in
the following device control library:
SYS$LIBRARY:DCPS$DEVCTL.TLB
To list the setup modules, use the following command:
$ LIBRARY/LIST SYS$LIBRARY:DCPS$DEVCTL.TLB
The list of setup modules displays, similar to the following:
Creating Setup Modules and Device Control Libraries 7–1
DCW1000_DISPLAY
DCW1000_ENHANCED
DCW1000_HIGHRES
LPS$$APPLE360_INITPSDEVICE
LPS$$APPLE360_SETINPUTTRAY
RES_1200X1200
RES_1200X600
Note
Do not modify any of the setup modules or the device control library.
Some setup modules are created only for certain printers. Those setup modules
have the printer name as part of their file name. For instance, the setup
module DL3500_RET_DARK is intended for the DEClaser 3500 printer.
Note
Do not change the contents of the standard supplied device control
library.
7.2.1 Locating Custom Setup Modules
Custom setup modules go in special device control libraries, which are required
to be .TLB (text library) files located in SYS$LIBRARY. The following command
lists all of the text libraries in SYS$LIBRARY. To determine what subset of
these are special device control libraries used with DCPS, correlate the .TLB
file names with the libraries and library search lists associated with the
/LIBRARY qualifier for your system’s DCPS print queues.
$ DIRECTORY SYS$LIBRARY:*.TLB
7.2.2 Displaying the Contents of a Setup Module
To see the instructions that a setup module contains, do the following:
1. Extract the setup module from the device control library. The following
example extracts the setup module DI_ON from DCPS$DEVCTL.TLB and
renames it MYSETUP.TXT in the user’s directory:
$ LIBRARY/EXTRACT=(DI_ON)/OUT=MYSETUP SYS$LIBRARY:DCPS$DEVCTL.TLB
2. Type or edit the setup module to display its contents:
$ TYPE MYSETUP.TXT
7–2 Creating Setup Modules and Device Control Libraries
The setup module DI_ON enables DECimage, and contains the following
instructions:
%!
% ~~~~~~~~~~ DI_on ~~~~~~~~~~
statusdict begin false setDECimage end
systemdict /languagelevel known {languagelevel} {1} ifelse
2 ge {currentpagedevice /Install get exec} if
statusdict begin true setDECimage end
% ~~~~~~~~~~~~~~~~~~~~~~~~~~~
Note
Some setup modules contain escape sequences or graphics, which
cannot be displayed when you type the file. For such modules, you may
wish to use the DUMP/RECORD command on the extracted file.
7.3 Creating Custom Setup Modules
You can create setup modules that affect print jobs with different data types.
Some setup modules manipulate ANSI print jobs, while others affect PostScript
jobs. You can create setup modules for any data type you support.
Notes:
•
If your PCL or Proprinter setup module needs carriage-control characters
after each line, manually supply them when you create the setup module
file. (PCL and Proprinter setup modules do not end line with carriagecontrol characters because the setup modules may contain binary data, like
fonts and raster graphics.)
•
ANSI setup modules cause a page eject in the printer before the data file,
if the setup module causes anything to be printed.
7.4 Creating Device Control Libraries
To make the setup module accessible to users, you must create a device control
library and put the module in the library. Create a different library for setup
modules of each data type. Do not include setup modules of different data
types in the same library. You can create a library for ANSI, PCL, Proprinter,
or PostScript files.
Creating Setup Modules and Device Control Libraries 7–3
Note
Do not put your custom setup modules in the standard DCPS$DEVCTL
library. Custom setup modules in DCPS$DEVCTL will be deleted if
you upgrade DECprint Supervisor software.
To create a library for setup modules, use the following command format:
$ LIBRARY/CREATE/TEXT SYS$COMMON:[SYSLIB]library-name.TLB
You supply the library-name, the name you give to the library.
The following command creates a new PostScript device control library, PS1,
for your customized PostScript setup modules:
$ LIBRARY/CREATE/TEXT SYS$COMMON:[SYSLIB]PS1.TLB
For more information, refer to the OpenVMS Command Definition, Librarian
and Message Utilities Manual.
7.4.1 Putting Setup Modules in Libraries
To insert a setup module into a device control library, use the following
command format:
$ LIBRARY/INSERT SYS$LIBRARY:library-name.TLB module-name
In the command line, you supply the following information:
library-name
The name of the library
module-name
The name of the setup module
The following command puts the PostScript setup module, CONFIDENTIAL.PS,
into your PostScript device control library, PS1.TLB, and names the setup
module CONFIDENTIAL:
$ LIBRARY/INSERT SYS$LIBRARY:PS1.TLB CONFIDENTIAL.PS
The following command puts the ANSI setup module, A4_PAGE.TXT, into
your ANSI device control library, ANSI1.TLB, and names the setup module
A4_PAGE:
$ LIBRARY/INSERT SYS$LIBRARY:ANSI1.TLB A4_PAGE.TXT
7–4 Creating Setup Modules and Device Control Libraries
7.4.2 Specifying a Library Search List
If you have several device control libraries, you need to set up a search list
of the libraries in SYS$STARTUP:DCPS$STARTUP.COM. The search list
specifies which device control libraries to search, and the priority of the
libraries.
Example 7–1 shows a search list of device control libraries.
Example 7–1 Search List for Device Control Libraries
$ DEFINE/SYSTEM/EXECUTIVE/NOLOG DCPS_LIB DCPS$DEVCTL,"PS1/DATA_TYPE=POSTSCRIPT","ANSI1/DATA_TYPE=ANSI",PS2
In Example 7–1, the software does the following:
1. Looks in the standard device control library DCPS$DEVCTL for required
setup modules and for any setup modules that have been specified with
/SETUP or /FORM.
2. Looks in the PostScript library PS1 for any specified setup modules not
found in the standard device control library. (PostScript setup modules
can be used with any type of file, so the PostScript device control library is
always included in the search for a setup module.)
3. If the print job is ANSI, looks in the library called ANSI1.
4. If the print job is a data type other than ANSI, skips the ANSI1 library
and looks for it in the PostScript library PS2.
To define your library logical name and search list, perform the following steps:
1. Edit DCPS$STARTUP.COM and add the following command line:
Creating Setup Modules and Device Control Libraries 7–5
Command Line
Example
$ DEFINE/SYSTEM/EXECUTIVE/NOLOG logical-name search-list
$ DEFINE/SYSTEM/EXECUTIVE/NOLOG DCPS_LIB DCPS$DEVCTL,"PS1/DATA_TYPE=POSTSCRIPT","ANSI1/DATA_TYPE=ANSI",PS2
In the command line, you supply the following information:
logical-name: Use a logical name that expands to a list of library names.
Make sure the logical name also appears in the execution queue definition
(parameter p3). search-list: Add the list of libraries to be searched. Use
the following guidelines as you add libraries:
•
Place the standard device control library, DCPS$DEVCTL, first in the
list for most efficient printing.
If you do not include DCPS$DEVCTL in the library search list, the
symbiont stops and returns the following error message:
REQMODNOTFOUND, Required device control module module-name not found
•
Make sure all the library names are in SYS$LIBRARY.
•
Make sure all the library names have the file extenstion .TLB.
•
For each library that includes the /DATA_TYPE qualifier, enclose the
library name and the qualifier in quotation marks. If you do not use
the /DATA_TYPE qualifier, you do not need to enclose the library name
in quotation marks. The default data type for a library is PostScript.
•
If an ANSI module and a PostScript module perform the same function
and have the same name, determine which one you want as the default
for ANSI jobs.
If you want ANSI jobs to default to PostScript, place the PostScript
device control library before the ANSI library. If you want ANSI jobs
to default to ANSI, place the ANSI library in front of the PostScript
library.
2. Stop and restart the execution queue to include your new library. (If you
add a setup module to an existing library, you do not have to reinitialize
the queue.)
7–6 Creating Setup Modules and Device Control Libraries
7.4.3 Device Control Libraries Must Exist for Queue to Start
All device control libraries specified for a queue must exist for the queue
to start. For example, if a queue is defined with the following logical, the
libraries SYS$LIBRARY:DCPS$DEVCTL.TLB, SYS$LIBRARY:ANSI.TLB and
SYS$LIBRARY:PS.TLB must all exist as text libraries:
$ DEFINE/SYSTEM/EXECUTIVE DCPS_LIB DCPS$DEVCTL, "ANSI/DATA_TYPE=ANSI", "PS/DATA_TYPE=POSTSCRIPT"
7.4.4 Preserving Custom Setup Modules During Upgrades
When you install DECprint Supervisor software, it creates a new version of the
standard device control library (DCPS$DEVCTL.TLB). If you purged old files
during the software installation, early copies of the device control library are
deleted. (Refer to the DECprint Supervisor for OpenVMS Software Installation
Guide for more information.)
When you add custom setup modules, create a new library and refer to it in
the library search list. This preserves your custom setup modules when you
upgrade your software.
Upgrading from DECprint Printing Services or PrintServer Client Software
DECprint Printing Services software and PrintServer Client software have
their own device control libraries (CPS$DEVCTL.TLB and LPS$DEVCTL.TLB).
When you upgrade to DECprint Supervisor, the CPS$ and LPS$ device control
libraries are no longer used. If you have custom setup modules in either of
those libaries, insert the modules into a new library and specify the library in
the device control library search list.
7.5 Including Setup Modules in Print Job
You can specify setup modules using the /SETUP qualifier in the PRINT
command.
To include an ANSI setup module in a print job using the /SETUP qualifier,
use the following command format:
$ PRINT/QUEUE=queue-name/SETUP=your-module-name print-file.TXT
If you enter the command wrong, the error is not detected until the file prints.
To enable the software to detect the error immediately, you can include the
setup module in a form. See Chapter 8 for instructions.
Creating Setup Modules and Device Control Libraries 7–7
If users access a setup module frequently, you can associate the setup module
with a queue, so that all print jobs submitted to that queue are printed with
the setup module automatically. See Chapter 8 for instructions.
7.6 Persistently Loading PostScript Resources
Note
This feature applies only to desktop printers; PrintServer printers are
loaded with persistent resources using the PrintServer software.
Downloading PostScript code with every print job can adversely affect printing
performance. To resolve this problem, you can load a module that permanently
resides in the printer.
The module LPS$PERSISTENT_RESOURCES loads persistently to desktop
printers. To create a persistent PostScript module, follow these steps:
1. Create a new device control library for site-specific PostScript setup
modules, using the following command:
$ LIBRARY/CREATE/TEXT SYS$COMMON:[SYSLIB]library-name.TLB
2. Edit the SYS$STARTUP:DCPS$STARTUP.COM file to include the new
device control library in the search list. Use the following command in the
DCPS startup file:
$ DEFINE/SYSTEM/EXECUTIVE/NOLOG DCPS_LIB DCPS$DEVCTL, "library-name/DATA=POST"
3. In the execution queue definition for each PostScript printer to which you
want to load the setup module, ensure that the logical name DCPS_LIB is
entered in parameter 3 as the device control search list logical name.
4. Save the DCPS$STARTUP.COM file.
5. Stop the queues for the printers affected by the change, using the
STOP/QUEUE/RESET command for each queue.
6. Execute the new DCPS$STARTUP.COM file.
7. Test each print queue by sending two print jobs to the printer. The setup
module is loaded with the first print job sent to the printer. The setting
should be effective for the second print job, as well.
7–8 Creating Setup Modules and Device Control Libraries
CAUTION
Problems can occur from the misuse of the persistent setup feature.
Keep the following in mind when using this feature:
•
Only PostScript setup modules can be persistently loaded. Other
data types cannot be persistently loaded.
•
A setup module can exceed the printer’s virtual memory. Different
models of printers have different capacities. For example, a setup
module can overwhelm a printer with too many fonts.
•
A shared network printer can be used from several nodes in the
network. Make sure the same setup module is loaded from all the
nodes that access the printer to ensure consistent print results. If
you required different setup modules load the setup module with
each print job, using either the /SETUP or /FORM qualifier.
•
Improper PostScript coding in a persistently loaded setup module
can cause unexpected results that are difficult to analyze. Also,
because the code remains in the printer until the printer is turned
off, users from different systems may have print jobs fail with
unexpected results, but would not be able to determine the cause of
the problem.
7.7 Changing the Default Character Set for PCL and
Proprinter Print Jobs
The default character set for PCL files is Roman-8. The default character set
for Proprinter files is code page 437, character set 1. To change the default
character set, use the following procedure:
1. Create one device control library for PCL setup modules, one for Proprinter
modules, and another library for PostScript modules. Use the following
commands:
$ LIBRARY/CREATE/TEXT SYS$COMMON:[SYSLIB]PCL_LIB
$ LIBRARY/CREATE/TEXT SYS$COMMON:[SYSLIB]PRO_LIB
$ LIBRARY/CREATE/TEXT SYS$COMMON:[SYSLIB]PS_LIB
Creating Setup Modules and Device Control Libraries 7–9
2. Edit DCPS$STARTUP.COM to include these libraries, as follows:
DEFINE/SYSTEM/EXECUTIVE/NOLOG DCPS_LIB DCPS$DEVCTL,
"PCL_LIB/DATA=PCL",
"PRO_LIB/DATA=PRO",
PS_LIB)
The PostScript device control library (PS_LIB) must be last in the search
list.
3. Create the following setup modules:
•
The DEF_CHAR_SET.PCL file selects the PC-8 Danish/Norwegian
character set:
<ESC>!‘1P<ESC>(11U<ESC>!‘0P
Replace <ESC> with the escape character (decimal 27).
•
The DEF_CHAR_SET.PRO file selects code page 850:
<ESC>‘<ETX><NUL><CR>R<ETX>
Replace <ESC> with the escape character (decimal 27).
Replace <ETX> with the etx character (decimal 3).
Replace <NUL> with the null character (decimal 0).
Replace <CR> with the carriage return character (decimal 13).
•
The DEF_CHAR_SET.PS PostScript file is used for printing files that
are neither PCL nor Proprinter.
4. Put these modules in the appropriate device control libraries, using the
LIBRARY command as shown in the following example:
$ LIBRARY/INSERT/TEXT
SYS$COMMON:[SYSLIB]PCL_LIB DEF_CHAR_SET.PCL
$ LIBRARY/INSERT/TEXT
SYS$COMMON:[SYSLIB]PRO_LIB DEF_CHAR_SET.PRO
$ LIBRARY/INSERT/TEXT
SYS$COMMON:[SYSLIB]PS_LIB DEF_CHAR_SET.PS
5. Create a form definition that includes DEF_CHAR_SET as the setup
module. You can associate this form with your printer execution queue as
follows:
$ DEFINE/FORM DEF_CHAR_SET form_number /SETUP=DEF_CHAR_SET/STOCK=DEFAULT
7–10 Creating Setup Modules and Device Control Libraries
To make this change to the queue permanent, specify this form in the
execution queue definition in the DCPS$STARTUP.COM file.
7.8 Specifying Printer Resolution with Setup Module
These setup modules allow you to manipulate the resolution of PostScript
Level 2 printers.
Table 7–1 Printer Resolution Setup Modules
Setup Module
Description
RES_300X300
300 dpi horizontal and vertical
RES_600X300
600 dpi horizontal and 300 dpi vertical
RES_600X600
600 dpi horizontal and vertical - default
RES_1200X600
1200 dpi horizontal and 600 dpi vertical
RES_1200X1200
1200 dpi horizontal and vertical
Note
Not all resolutions are supported by all printers. To have the printer
notify you if it cannot print at a specified resolution, add the /NOTIFY
switch to the PRINT command. If the printer cannot print at the
requested resolution, it prints at a lower resolution.
7.9 Modifying DECimage Parameters with Setup Modules
There following setup modules invoke DECimage or modify the DECimage
parameters. They are grouped into the following categories:
Enabling and Disabling DECimage
These setup modules leave all current parameters intact, and turn DECimage
on or off. It is not necessary to use these modules if you use other DECimage
setup modules. The DECimage setup modules automatically invoke DECimage
for the current print job.
Creating Setup Modules and Device Control Libraries 7–11
Table 7–2 Enabling and Disabling DECimage
Setup Module
Description
DI_ON
Turns DECimage ON
DI_OFF
Turns DECimage OFF
Combined Parameters
These setup modules adjust two DECimage parameters simultaneously.
Table 7–3 DECimage Setup Modules—Combined Parameters
Setup Module
Description
DI_HICONTRAST
Punch0 = 0.2, Punch1 = 0.8
DI_LOCONTRAST
Punch0 = -.1, Punch1 = 1.1
DI_BRIGHTER
Punch0 = -.2, Punch1 = 0.8
DI_DARKER
Punch0 = 0.2, Punch1 = 1.2
DI_NORMAL
Punch0 = 0, Punch1 = 1
Individual Parameters
When you specify one of these setup modules, all other parameters remain at
the default value or the value most recently modified by another setup module.
The setup modules have no order dependency, so they may appear in any order
on the print command line.
7–12 Creating Setup Modules and Device Control Libraries
Table 7–4 DECimage Setup Modules—Individual Parameters
Setup Module
Description
DI_PUNCH0_0
Punch0 = 0
DI_PUNCH0_0P1
Punch0 = 0.1
DI_PUNCH0_0P2
Punch0 = 0.2
DI_PUNCH0_M0P1
Punch0 = -.1
DI_PUNCH0_M0P2
Punch0 = -.2
DI_PUNCH1_1
Punch1 = 1
DI_PUNCH1_0P8
Punch1 = 0.8
DI_PUNCH1_0P9
Punch1 = 0.9
DI_PUNCH1_1P1
Punch1 = 1.1
DI_PUNCH1_1P2
Punch1 = 1.2
DI_SHARP_0P5
Sharpness = 0.5
DI_SHARP_1
Sharpness = 1.0
DI_SHARP_1P5
Sharpness = 1.5
DI_SHARP_2
Sharpness = 2.0
DI_SHARP_2P5
Sharpness = 2.5
DECimage Setup Module Example
The following example adds sharpening and shifts the gray levels:
$ PRINT/NOTIFY/QUEUE=queue/SETUP=(DI_SHARP_2,DI_DARKER) file
7.10 Providing Access to Font Cartridge Emulation
The DECprint Supervisor software can emulate physical font cartridges. Use
the FONTS_USED parameter with the PRINT command to specify one or more
soft font modules from the device control library SYS$LIBRARY:CPS$ANSI_
FONTS.TLB.
This feature, which is available for ANSI files only, supports documents that
require font cartridges to print on DIGITAL ANSI printers. Just as with these
printers, the document must contain escape sequences that select the desired
fonts.
Creating Setup Modules and Device Control Libraries 7–13
Note
DECprint Supervisor software does not include any soft font modules.
You may obtain soft font kits from Compaq separately.
You can associate one or more default soft font modules with a print queue, so
that users do not have to specify this parameter on the PRINT command line.
For example, to establish CGTRIUM24_ISO1 as the default soft font module
for the queue, include the following line in DCPS$STARTUP.COM:
FONTS_USED=CGTRIUM24_ISO1
(Add the line to p4 in the execution queue definition or as p3 in the generic
queue definition.)
You can combine soft font modules for user convenience, at the expense of
disk space and loading time. For example, if users need to load all three DEC
Multinational CG Times soft font modules together, create a new module using
the following sequence of commands:
$ LIBRARY SYS$LIBRARY:CPS$ANSI_FONTS.TLB/EXTRACT=CGTIMES8-10-12_MCS
$ LIBRARY SYS$LIBRARY:CPS$ANSI_FONTS.TLB/EXTRACT=CGTIMES14-18_MCS
$ LIBRARY SYS$LIBRARY:CPS$ANSI_FONTS.TLB/EXTRACT=CGTIMES24_MCS
$ COPY CGTIMES8-10-12_MCS.TXT,CGTIMES14-18_MCS.TXT,CGTIMES24_MCS.TXT ALLCGTIMES_MCS.TXT
$ LIBRARY/INSERT SYS$LIBRARY:CPS$ANSI_FONTS.TLB ALLCGTIMES_MCS.TXT
Users can specify the new module with the print parameter
FONTS_USED=ALLCGTIMES_MCS.
7.11 Device Control Library Cache Feature
DCPS includes a device control library caching feature that optimizes the
retrieval of certain commonly-used PostScript device control modules.
The caching feature causes modules with names beginning with LPS$$ to
be read only the first time they are requested. Those modules reside in the
symbiont’s cache. Jobs that follow can quickly access those modules until you
reset the queue or restart the system. This minimizes access to the primary
device control library, saves CPU time, reduces disk activity.
The device control library caching feature is disabled by default. To enable the
device control library caching feature for a specific queue, enter the following
command before you start a print queue:
7–14 Creating Setup Modules and Device Control Libraries
$ DEFINE/SYSTEM/EXECUTIVE DCPS$queuename_DEVCTL_CACHE 1
Caching device control library modules can decrease the total CPU time
consumed by the symbiont by as much as 17 percent. I/O activity on the part
of the symbiont is also reduced by as much as 50 percent.
You can define the system logical DCPS$DEVCTL_CACHE (with no queue
name specified) to specify that device control library caching is enabled for all
DCPS print execution queues on that system.
7.12 Printing on Unrecognized Printers
The DCPS software automatically obtains a printer’s product name before
printing jobs. It uses the product name to select and download device control
modules that are specific to the particular printer.
If you use the DCPS software with a printer whose product name it does not
recognize, the product name defaults to ‘‘UNRECOGNIZED’’ and the supervisor
downloads device control modules associated with that name. Although this
configuration is unsupported, the modules associated with the unrecognized
printer may be sufficient to permit simple printing with that device.
A system manager can also modify the corresponding device control modules as
needed without affecting the characteristics of any of the supported printers.
By following the comments contained within the LPS$$UNRECOGNIZED
modules, along with some knowledge of PostScript and the specifics of the
printer, and examination of device control modules for similarly programmed
printers (if any), the system manager may be able to get tray and sheet size
selection working for the printer.
Note
Your use of an unrecognized printer with DCPS, and any use or
modification of the LPS$$UNRECOGNIZED device control modules,
is without support or assistance from Compaq Computer Corporation.
Further, Compaq makes no commitment to maintain the same contents
of or interface to these modules for different versions of DCPS.
Device control modules are located in the following device control library:
SYS$COMMON:[SYSLIB]DCPS$DEVCTL.TLB
Creating Setup Modules and Device Control Libraries 7–15
The device control modules associated with an unrecognized printer are:
LPS$$UNRECOGNIZED_INITPSDEVICE
LPS$$UNRECOGNIZED_SETCONTEXT
LPS$$UNRECOGNIZED_SETINPUTTRAY
LPS$$UNRECOGNIZED_SETOUTPUTTRAY
If you modify these modules for a certain printer, you should always place the
modified modules in a site-specific device control library (see Section 7.4).
7–16 Creating Setup Modules and Device Control Libraries
8
Creating and Maintaining Form Definitions
You can create form definitions, which users can include in their PRINT
command to modify the appearance of a file. A form definition can specify
several attributes for a print job, including the type of paper stock on which
it is to be printed; the width, length, and margins associated with the paper;
whether long text lines are to be truncated or wrapped onto another line; and
setup modules to be implicitly sent to the printer.
When users specify an unknown form name in their PRINT command,
DECprint Supervisor informs them immediately. In contrast, if they specify an
unknown setup module in their PRINT command, DECprint Supervisor does
not inform them of the problem until it starts printing the job and needs to
access the setup module.
The commands for creating, maintaining, and deleting forms require that you
have operator privileges.
8.1 Associating Setup Modules with Forms
To associate a setup module with a form, use the DEFINE/FORM command
with the /SETUP qualifier.
Example 8–1 defines a form called CONFIDENTIAL that uses a setup module
called PRIVATE.
Example 8–1 Sample Form Definition, CONFIDENTIAL
$ DEFINE/FORM CONFIDENTIAL 101/DESCRIPTION="prints the word CONFIDENTIAL on each page"/STOCK=DEFAULT/SETUP=PRIVATE
When you define a form, you supply the following qualifiers and information:
•
Form Name: You select the name for the form you are defining. The name
can consist of up to 31 characters and must contain at least one alphabetic
character.
Creating and Maintaining Form Definitions 8–1
•
Form Number: You specify a number for the form you are defining.
•
/DESCRIPTION: You can optionally add a description to the form to help
users understand what the different forms do.
•
/STOCK: You supply the name of the media that needs to be in the printer
when this form is invoked. The media you specify must match the media
in the printer. If they do not match, the job is held in the queue until users
load the specified media or modify the form definition. Use the DEFAULT
parameter to use whatever media is in the printer.
•
/SETUP: You must supply the name of the setup module(s) you want
associated with the form.
Note
The existence of the setup module(s) is not checked until the form is
used.
8.2 Associating a Form with a Print Queue
If users invoke a setup module frequently, you can associate the setup module
with a form, then associate the form with a queue. This method ensures that
print jobs submitted to the queue automatically use the setup module. Use the
following procedure to associate a form with a queue:
1. Associate the setup module with the form, as described in Section 8.1.
2. Associate the form with the execution queue, by editing parameter 5 (p5)
in DCPS$STARTUP.COM as follows:
•
With the /FORM_MOUNTED qualifier, specify the name of the form
you want tied to the queue.
•
Specify the /DEFAULT=FORM=form-name qualifier to ensure that
every job prints with the form, even if the user does specify a form.
The following example associates the form called CONFIDENTIAL with an
execution queue called XLR8:
$ @SYS$STARTUP:EXECUTION_QUEUE.COM XLR8!P1 - Execution queue name
"DECNET/XLR8" !P2 - Device name
DCPS_LIB !P3 - Logical name for /LIBRARY
"" !P4 - Not used
"/FORM_MOUNTED=CONFIDENTIAL/DEFAULT=(FORM=CONFIDENTIAL,NOFEED)"
!P5 - Queue default qualifiers
8–2 Creating and Maintaining Form Definitions
8.3 Creating Form Definitions for ANSI Files
When you define forms for ANSI files, you can use various qualifiers that
affect the page layout. For example, the following command defines the form
CENTER to have a top margin of 6 and a left margin of 10:
$ DEFINE/FORM /MARGIN=(TOP=6,LEFT=10) CENTER 3
You can use the qualifiers in Table 8–1 with form defintions for ANSI files
only:
Table 8–1 DEFINE/FORM Qualifiers for ANSI Files
This Qualifier . . .
Does the Following . . .
/LENGTH=n
Sets the length of each page, in lines.
/MARGIN=keyword=n
Sets the margins.
You supply one or more of the following keywords:
TOP=n
BOTTOM=m
RIGHT=y
LEFT=z
To supply more than one margin keyword, enclose
the list in parentheses, as in:
/MARGIN=(TOP=n,BOTTOM=m)
/PAGE_SETUP=module
Applies a page setup module to each page in the
job.
/[NO]TRUNCATE
Truncates long lines that do not fit in the page
width.
/WIDTH=n
Sets the width of the page in columns or characters.
/[NO]WRAP
Wraps lines wider than the page to the next line.
Notes:
•
These form definitions are useful only with ANSI files, because other types
of files have internal controls for these attributes.
•
You can prevent the software from wrapping or truncating long lines by
including both /NOWRAP and /NOTRUNCATE in the form definition.
Creating and Maintaining Form Definitions 8–3
8.4 Displaying Forms and Their Attributes
You can display the forms that already exist on your system with the following
command:
$ SHOW QUEUE/FORM
The form definitions display as follows:
Form name
--------A4_12 (stock=PLAIN_PAPER)
A4_LPT_GRAY (stock=PLAIN_PAPER)
A4_LPT_PLAIN (stock=PLAIN_PAPER)
BOOT_CHART (stock=DEFAULT)
BSS$LANDSCAPE (stock=DEFAULT)
BSS$PORTRAIT (stock=DEFAULT)
Number
-----1129
1118
1119
37
3301
3302
Description
----------A4 12-Pitch with margins
A4 DP line printer with gray bars
A4 Plain DP line printer format
BOOT_CHART
BSS Specific Landscape
BSS Specific Portrait
You can display the attributes of a form using the SHOW QUEUE/FORM/FULL
command. For example, this command displays the attributes of
DCPS$DEFAULT:
$ SHOW QUEUE/FORM/FULL DCPS$DEFAULT
Form name
Number Description
-------------- ----------DCPS$DEFAULT (stock=DEFAULT)
1115 DCPS default
/LENGTH=66 /STOCK=DEFAULT /TRUNCATE /WIDTH=80
8.5 Deleting a Form
Use the DELETE/FORM command to delete a form definition from the system’s
form table. The format of this command is as follows:
$ DELETE/FORM form-name
In the command line, you supply form-name, which is the name assigned to
the form you are using.
Before you use the DELETE/FORM command, execute the SHOW
QUEUE/FULL/ALL command. References to a form can exist as an attribute
of an active print queue or as a qualifier to a print request. If you try to delete
a form that has outstanding references, you are notified of the condition, and
the form is not deleted. (Refer to Appendix A.)
8–4 Creating and Maintaining Form Definitions
8.6 Using the Default ANSI Form Definition
If users omit a form definition in their PRINT command, but supply one of
the following qualifiers, DECprint Supervisor links the default form definition
DCPS$DEFAULT with the ANSI file.
/HEADER
/SPACE
/PARAMETERS=[NO]TAB
Creating and Maintaining Form Definitions 8–5
9
Charging Users for Printer Resources
This chapter describes the accounting information that is supplied to the
OpenVMS accounting files by the DECprint Supervisor software.
The OpenVMS Accounting Utility reads information about the use of system
resources from the file SYS$MANAGER:ACCOUNTING.DAT. The DECprint
Supervisor software records information in this file about printer usage. For
information about the OpenVMS Accounting Utility, see the OpenVMS System
Manager’s Reference Manual.
9.1 Accounting Information Supplied by the DECprint
Supervisor Software
The print symbiont supplies the following information in the accounting file for
each print job:
•
Pages printed This is the actual number of sheets printed. When you are using the
NUMBER_UP parameter to print multiple pages on a sheet, this field
records the number of sheets of paper printed, not the number of logical
pages printed. The number of sheets printed includes the separation (flag,
trailer, and burst) pages. When the print job is deleted by the user or
system operator, this information reflects the number of pages printed
before the job was terminated.
•
Gets from source This is the number of RMS ‘‘gets’’ from all files in the print job (records
read).
•
QIO puts
This is the number of QIO ‘‘writes’’ to the printer per job.
Charging Users for Printer Resources 9–1
When a print job has been completed successfully, the print symbiont sends
a request to the job controller to insert certain accounting data fields into
the accounting log file. For successful jobs and jobs terminated by the
DELETE/ENTRY command, the accounting file also includes the following
message:
%SYSTEM-S-NORMAL, normal successful completion
If the print job terminates abnormally, the information the print symbiont
supplies in the accounting log may be incomplete. To filter out such jobs, count
only the jobs that receive the successful completion status message. Any of the
following may cause the job to terminate abnormally:
•
STOP/QUEUE/RESET command
•
Symbiont crash
•
Printer crash
•
Network connection lost
9.2 Accounting Information Supplied by the Job Controller
The job controller supplies the following information in the accounting file for
print jobs:
•
Username
User name of the user who submitted the print job.
•
Account
Account name of the user who submitted the print job.
•
UIC (user identification code)
UIC of the user who submitted the print job.
•
Process ID
Process ID of the user who submitted the print job.
•
Start Time
The time the print job reached the top of the device queue (not necessarily
the time that the print job actually began to print).
•
Finish Time
The time the job finished printing.
•
Elapsed Time
9–2 Charging Users for Printer Resources
The wall-clock time it took for the job to print (finish time minus start
time).
•
Priority
Queue priority of the print job.
•
Final Status Code
Exit status of the print job. The status code for success is 00040001.
•
Queue Entry
Queue entry number. This is the print job number. In this example, 222 is
the job number:
$ PRINT/QUEUE=LN03R$SCRIPT4/NOTIFY TEST.MEM
Job TEST (queue LN03R$SCRIPT4, entry 222) started on queue SCRIPT4
•
Queue Name
Name of the print device queue.
•
Queue Job
Print job name, as printed on the job flag page.
•
Final Status Text = F$MESSAGE
The text for the Final Status code. The text for completion of a normal job
is:
%JBC-S-NORMAL, Normal successful completion
9.2.1 Accounting Fields Left Blank by the Job Controller
The job controller fills the following fields with blanks in the accounting file for
print jobs:
•
Owner ID
•
Terminal Name
•
Remote Node Name
•
Remote ID
9.2.2 Accounting Fields Filled with Zeros by the Job Controller
The job controller fills the following fields with zeros in the accounting file for
print jobs:
•
Privilege <31–00>
•
Privilege <63–32>
Charging Users for Printer Resources 9–3
9.3 Compatibility with Mechanical Page Counters
The PrintServer printers have mechanical page counters.
The mechanical page counter is different from the counter accessible through
the PostScript pagecount operator.
•
The mechanical page counter counts all the sheets printed since the print
engine was built.
•
The PostScript page counter counts the number of sheets printed by the
controller.
Under normal use, the totals of both counters increase at a similar rate, but
there can be a significant difference between them. Print engine test pages,
initiated with the test button on the printer, are recorded on the mechanical
counter but not on the PostScript counter. Also, replacing components can
affect the counters. For example, replacing the nonvolatile memory of the
controller resets the PostScript counter, but it does not affect the mechanical
counter.
Because the counters record different events, they should be used for different
purposes:
•
Use the PostScript counter to determine the number of sheets printed
within a PostScript program.
•
Use the mechanical counter to track print engine use.
9–4 Charging Users for Printer Resources
10
Printer-Specific Information
This chapter provides management information about using DCPS with
specific printers. Printer-specific information that might be of interest to
general users is in the DECprint Supervisor for OpenVMS User’s Guide rather
than in this manual. The DECprint Supervisor for OpenVMS Release Notes
may also contain additional printer-specific information.
Check the documentation for your printer, network interface card, print server,
or terminal server to determine the correct TCP port number to use. The TCP
port number may also be listed in Table 3–1.
10.1 Apple LaserWriter Plus Printer
10.1.1 LPS$PERSISTENT_RESOURCES Not Supported
The DCPS feature to load the module LPS$PERSISTENT_RESOURCES
outside the PostScript server loop for desktop printers is not supported for the
LaserWriter Plus.
10.2 Compaq Laser Printer LN16 and GENICOM microLaser
170
10.2.1 Printer Configuration Setting
DCPS requires the printer’s PERSONALITY be set to POSTSCRIPT. If the
PERSONALITY is set to AUTO or PCL, DCPS jobs will remain in a Starting
state and never print. This setting is in the printer console’s CONFIG menu.
Setting the PERSONALITY to POSTSCRIPT will still allow PCL jobs coming
from Windows PCs to print correctly.
Printer-Specific Information 10–1
10.2.2 LAT and AppleTalk Configuration
To create a LAT device for use by a DCPS queue, you can use either of the
following sets of values for LATCP qualifiers:
•
/NODE=nodename /PORT=PORT_1
•
/SERVICE=service
where nodename is the printer’s NIC nodename and service is the name of a
valid service on the printer. These values can be obtained from the printer
NIC’s status page or by logging in to the NIC via Telnet or LAT. For example,
this command shows the printer NIC’s nodename to be PRQ_00001F:
Local_4> show server
NET16 Version V1.0/1(990126)
Hardware Addr: 00-50-27-00-00-1f
Ident String: NET16
Uptime:
Name/Nodenum:
23:17:07
PRQ_00001F/ 0
To create a DCPS queue using AppleTalk, you must use a service name. You
can use one of the default services, modify a default service or create your own.
The following is an example of a service that can be used by both LAT and
AppleTalk. In this example, DCPS_LN16 is the AppleTalk name.
Local_4> list service dcps_ln16
Service: DCPS_LN16
Rating: N/A
Characteristics:
Ident: DCPS Compaq Laser Printer LN16
Ports: 1
Queueing Binary Rtel Connections AppleTalk
Lat
SOJ: <none>
EOJ: <none>
Enabled Groups: 0
Create AppleTalk services with caution, as creating the same service name
on more than one printer will result in multiple printers using the same
AppleTalk name on your network.
Refer to the printer’s Ethernet Network Interface Card (NIC) Reference Manual
for more information about setting characteristics of printer services.
10.3 Compaq Laser Printer LN32 and LNM40; GENICOM
LN21, LN28 and LNM40; GENICOM microLaser 210, 280,
320 and 401
10–2 Printer-Specific Information
10.3.1 Printer and Network Firmware Versions
Firmware versions are listed on the printed Summary Sheet and on the
printer’s internal Web page. Printer firmware is listed as Product Version and
network firmware is listed as Network Version.
10.3.2 Printer Configuration Settings
10.3.2.1 Language-Sensing Mode
DCPS can print to these printers when the printer is in PostScript mode
or automatic language-sensing mode. Make sure the INTERPRETER and
FORMAT settings are set as described in Table 10–1. These values are set in
the INTERFACE menu on the printer’s console.
Table 10–1 Valid LN21, LN28, LN32, LNM40, mL210, mL280, mL320 and
mL401 Language Sensing Configurations
Printer Settings
Printer Mode
Interpreter
Format
PostScript/PCL sensing
Auto Switch
Raw
PostScript
PostScript
Normal
10.3.2.2 Printer Setting May Cause Stalled Queues
The factory default value for the printer’s Delayed Output Close setting may
cause DCPS queues to stall. The default value is OFF and is intended to
improve performance by controlling how quickly the printer ends one job and
starts another. However, if you also print from environments other than DCPS,
this value may cause DCPS queues to stall. Therefore, if you also print from
multiple environments, set the value to ON. If you print only from DCPS, you
may leave the value of Delayed Output Close at OFF.
The setting for Delayed Output Close is found on the printer’s console as
DELAY OUT CLOSE in the NETWORK section of the INTERFACE menu. 3
10.3.3 LAT and AppleTalk Configuration
Please see Section 10.2.2 for information about configuring LAT and AppleTalk
queues.
3
This setting does not appear on LN32 and LNM40 printers with firmware earlier
than version 3.03.
Printer-Specific Information 10–3
10.3.4 Queue Aborts When Using TCPware
When using TCPware with these printers, it is possible to receive numerous
userdata messages on the screen and have the queue fail with an OPCOM
message similar to the following:
%%%%%%%%%%% OPCOM 21-APR-1999 15:09:53.22 %%%%%%%%%%%
Message from user SYSTEM on ZIPPY
Queue LN32_RAW: %DCPS-F-EXQUOTA, process quota exceeded
This problem occurs when running TCPware V5.3-3 and network firmware
V1.0/4 (990323). To avoid this problem, the system manager should perform
one of the following steps:
•
Issue the following TCPware commands:
$ NETCU STOP /TCP
$ NETCU START /TCP /NOPATH_MTU_DISCOVERY
•
Upgrade TCPware to a version later than V5.3-3
•
Apply TCPware patch kit DRIVERS_V533P020
•
Upgrade the printer’s network firmware
10.4 DIGITAL Colorwriter LSR 2000 Printer
10.4.1 NIC Does Not Work with Raw TCP/IP
DCPS cannot communicate with the Colorwriter LSR 2000 NIC via a raw
TCP/IP connection because the NIC does not support raw TCP/IP
communication.
AppleTalk is the only network protocol that DCPS can use to communicate
with the Colorwriter LSR 2000 printer.
10.5 DIGITAL DECcolorwriter 1000 Printer
10.5.1 Printer-Specific Setup Files
You can use the files listed in the table below to alter the persistent state of the
printer, affecting all subsequent jobs that the printer receives from your system
and from other systems in the network until the printer is turned off and back
on. The files are located in the SYS$COMMON:[SYSHLP.EXAMPLES.DCPS]
directory.
10–4 Printer-Specific Information
Setup File
Description
DCW1000_CONFIG.PS
Sets the printer timeouts
DCW1000_DEVPARAM.PS
Changes configuration of the serial port
DCW1000_STARTPG.PS
Enables the start page
DCW1000_NOSTRTPG.PS
Disables the start page
DCW1000_PRNTCNFG.PS
Enables a software-selected information page
DCW1000_PSCRIPT.PS
Changes the port to PostScript and default on all
ports
Notes:
•
When you send the DCW1000_DEVPARAM.PS file to the printer, the
communications settings change and the queue hangs. You must
STOP/RESET the queue and change the corresponding settings on the
DECserver or other LAT device to which the printer is connected. Also, be
sure that the printer is running in PostScript mode.
•
By default, the DIP switches on the back of the printer are in the down
position, indicating that the serial interface can be adjusted and that no
color correction is set. The factory default is 9600 baud, 8 bits, and no
parity. See the DECcolorwriter 1000 documentation for further information
on how setup files and DIP switches interact.
•
To check the current configuration of the printer, toggle DIP switch 4 from
down to up, then to down (with the other three DIP switches in the down
position). The printer prints a configuration page. Make sure that the
printer is running in PostScript mode.
10.6 DIGITAL DEClaser 3500 Printer
10.6.1 Job Remains in Starting State
When using DCPS with the DEClaser 3500 printer with the optional serial
port, the job may remain in a starting state. If this is the case, you must
choose one of the following options:
1. Lock the printer to PostScript mode. (On the front panel: Serial, Printer
Type = STD PostScript). Do not use the DCPS$queuename_NO_SYNC
logical. In this mode, native PCL is not available because the printer does
not respond to PJL sequences. You should use the workaround described in
Section 10.7.1 to force use of the PCL 4 translator.
Printer-Specific Information 10–5
2. Set the serial port language sensing mode to Automatic. (On the
front panel: Serial, Printer Type = PS/PCL Sensing), and define the
DCPS$queuename_NO_SYNC logical. In this mode, the printer responds to
PJL sequences and switches to native PCL 5 or PostScript as indicated by
the datastream.
10.6.2 Interaction Between Communication Protocol and Native PCL
Support
The optional network card supports switching to native PCL; however, the
protocol must be set to autosensing.
10.6.3 NIC Does Not Work with Raw TCP/IP
DCPS cannot communicate with the printer via a raw TCP/IP connection
because the NIC does not support bidirectional TCP/IP communication.
As an alternative, you can connect the printer to a print server (for example,
the Rapidprint 500) or a terminal server, or use a LAT connection instead.
10.7 DIGITAL DEClaser 5100 Printer
10.7.1 Native PCL Is Unavailable with EtherTalk Protocol on NIC
Because of a problem with the Network Interface Card (NIC), DCPS cannot
switch the printer into native PCL when using the EtherTalk protocol. Users
will see the error:
%DCPS-W-UNDEF, undefined: Name not known - offending command is <1B>
%DCPS-E-FLUSHING, Rest of Job (to EOJ) will be ignored
A partial workaround is possible by specifying a default print job parameter of
PAGE_LIMIT=999999 for the queue when you create it in DCPS$STARTUP.COM.
This parameter forces any PCL files to be printed through the PCL translator.
Remember, though, that the PCL translator is PCL 4 rather than PCL 5.
10.7.2 NIC Does Not Work with Raw TCP/IP
DCPS cannot communicate with the printer via a raw TCP/IP connection
because the NIC does not support bidirectional TCP/IP communication.
As an alternative, you can connect the printer to a print server (for example,
the Rapidprint 500) or a terminal server, or use a LAT connection instead.
10–6 Printer-Specific Information
10.7.3 Downloading and Deleting Fonts
You may download or delete fonts from the DEClaser 5100 printer’s optional
hard drive using the FONT_DOWNLOADER.COM procedure described in
Appendix C.
10.7.4 Error Page Feature
The DEClaser 5100 printer has a feature that ejects the current sheet and then
prints a PostScript Error information sheet when a PostScript interpreter error
occurs. While this feature provides a powerful means for analyzing PostScript
problems, it is not recommended for everyday use with the DCPS software for
the following reasons:
•
PostScript error pages are printed when a user enters DELETE/ENTRY to
abort a print job.
•
PostScript error pages are printed after a not ready condition is cleared
(paper supplied, jam corrected, etc.) if a job was submitted on the serial
port while the printer was not ready to print.
You should disable the feature called ‘‘Print Errors’’ through the DEClaser
5100 front panel before starting print queues with DCPS. Enable the feature
only when you are interested in analyzing PostScript problems.
If a job fails to print because of a ‘‘Limitcheck’’ error, also see if ‘‘page protection
required’’ is part of the error message. Presence of this error means the job
failed because of a banding failure.
10.8 DIGITAL Laser Printer LN15+
The DIGITAL Laser Printer LN15+ is an upgrade to the DIGITAL Laser
Printer LN15. References in the DCPS documentation to the DIGITAL Laser
Printer LN15 also apply to the DIGITAL Laser Printer LN15+.
10.8.1 Printer Configuration Settings
DCPS requires certain LN15 printer characteristics to be set. If these values,
described in Table 10–2, are not set, DCPS jobs will remain in a Starting state
and never print.
Printer-Specific Information 10–7
Table 10–2 LN15 Configuration Settings
Setting
Value
Where Set
Documentation
PERSONALITY
PS
Printer console
CONFIG menu
LN15 User Manual
NPAP MODE
OFF
Printer console
PARALLEL menu
LN15 User Manual
PORT 1 BITRONICS
ENABLED
Ethernet card
management
RapidPrint 600 Print
Server Installation
Guide
10.9 DIGITAL Laser Printer LN17+ps
The DIGITAL Laser Printer LN17+ps is an upgrade to the DIGITAL LN17ps
printer. References in the DCPS documentation to the DIGITAL LN17ps
printer also apply to the DIGITAL Laser Printer LN17+ps.
10.9.1 Job Remains in Starting State
If you use a raw TCP/IP or LAT-connected LN17ps printer with DCPS, the
associated DCPS print job may remain in a Starting state.
You must either set the Ethernet port to use the PostScript language and
disable automatic language sensing, or define a DCPS$queuename_NO_SYNC
system logical for the associated queue.
•
If all the print jobs that the printer receives from its Ethernet port come
from DCPS, including PCL jobs that use the printer’s native PCL 5e
interpreter, do the following:
Set the printer’s Ethernet port System Language to PostScript and turn off
Language Sensing. You change these settings from the interface menu on
the printer console, as described in the LN17ps User Guide.
•
If any of the print jobs that the printer receives from its Ethernet port do
not contain PostScript data (for example, they contain PCL or ASCII data)
and DCPS is not the source of such data, do the following:
Enable Language Sensing on the the printer’s Ethernet port. Define a
DCPS$queuename_NO_SYNC system logical for the associated queue as
described in Section 3.4.3.
10–8 Printer-Specific Information
10.9.2 Incorrect Sheet Count
The sheet count reported on the job trailer page and in the OpenVMS
accounting file may be several sheets too few due to a limitation with the
LN17ps printer. There is no known workaround.
10.9.3 Downloading and Deleting Fonts
You may download or delete fonts from the LN17ps printer’s optional
hard drive using the FONT_DOWNLOADER.COM procedure described in
Appendix C.
10.9.4 Colored Separator Pages and Tray Switching
The LN17ps can switch between input trays when a specified tray becomes
empty. By default, tray switching is disabled. If you currently specify colored
separator pages by using the DCPS$queuename_SEPARATOR_PAGE logical,
you may want to ensure that tray switching is disabled.
You disable tray switching from the printer console, under the PostScript
menu. See the LN17ps User Guide for more information.
Use one of the following PostScript tray numbers as the value of the
DCPS$queuename_SEPARATOR_PAGE logical:
0
1
2
3
Main tray
Front tray
Lower 1 tray
Lower 2 tray
10.10 DIGITAL Laser Printer LN20
10.10.1 Incorrect Sheet Count
The sheet count reported on the job trailer page and in the OpenVMS
accounting file is incorrect due to a limitation with the LN20 printer. There
is no known workaround. The LN20 has, however, an accounting feature that
can be used to track printer utilization.
10.11 DIGITAL Laser Printer LN40
10.11.1 Incorrect Sheet Count
The sheet count reported on the job trailer page and in the OpenVMS
accounting file is incorrect due to a limitation with the LN40 printers. There
is no known workaround. The LN40 has, however, an accounting feature that
can be used to track printer utilization.
Printer-Specific Information 10–9
10.11.2 First Job May Be Offset Incorrectly
The first DCPS job to print to the LN40 after the printer is powered on may
jog incorrectly. This occurs only if the LN40 is configured with OFFSET
STACKING set to ON and COLLATION set to OFF.
10.12 Compaq and DIGITAL Laser Printer LNC02
10.12.1 Minimum Firmware Version
To use the LNC02 with the Raw TCP/IP protocol from DCPS, the printer must
be running a minimum firmware version of System Release 1.1.1, Revision 3.11.
This firmware version number is displayed on the printer’s startup page.
10.12.2 Incorrect Sheet Count
The sheet count reported on the job trailer page and in the OpenVMS
accounting file is incorrect due to a limitation with the LNC02 printer. There
is no known workaround. The LNC02 has, however, an accounting feature that
can be used to track printer utilization.
10.13 DIGITAL PrintServer 17 Printer
10.13.1 Colored Separator Pages and Tray Switching
PrintServer Software, Version 5.0, adds input tray failover to the PrintServer
17 series printers. This feature allows the printer to automatically switch
to another input tray containing the same size media when the current tray
becomes empty. This feature is enabled by default.
If you currently use colored flag pages, you may want to disable this feature.
To disable input tray failover, perform the following steps:
1. Edit LPS$SUPPORT:LPSDEFAULTS.<printer name>
2. Search for the /TraySwitch parameter:
/TraySwitch true % Controls input tray failover.
% false = disable
% true = enable
3. Change the value of the TraySwitch parameter from ‘‘true’’ to ‘‘false’’.
PostScript is case sensitive; the only valid values are ‘‘true’’ or ‘‘false’’.
/TraySwitch false % Controls input tray failover.
% false = disable
% true = enable
10–10 Printer-Specific Information
4. Enable the changes by issuing the reconfigure command from the remote
console facility.
$ MCR LPS$CONSOLE <printer name>
LPS> PRIV
Password: <password>
LPS> RECONFIG
LPS> EXIT
Refer to the DEC PrintServer Supporting Host Software for OpenVMS
Management Guide for additional information.
10.14 HP LaserJet IIID Printer
10.14.1 Job Remains in Starting State
The DCPS$queuename_NO_SYNC logical can be used to solve reported
problems printing to HP LaserJet IIID printers with HP-supplied PostScript
Level 2 cartridges. Those cartridges have a known problem where they corrupt
status messages they send to a host. This can cause jobs to get stuck in the
‘‘starting’’ state when DCPS tries to use its synchronization sequence. See
Section 3.4.3 for more information.
10.14.2 Incorrect Sheet Count on Duplex Jobs
The HP LaserJet IIID and several other HP LaserJet printers do not internally
count physical sheets but instead count pages imaged. Therefore the ‘‘Sheets
printed’’ data of the trailer page will reflect the number of images processed.
For example, a six-page print job with burst and trailer pages enabled and
/PARAMETERS=(SIDES=2) specified will show ‘‘Sheets printed’’ as eight when
only five sheets are printed.
10.15 HP LaserJet IIISi Printer
10.15.1 Incorrect Sheet Count on Native PCL Jobs
The HP LaserJet IIISi printer does not keep track of the sheet count while
printing native PCL files. The sheet count reported at the end of the job, both
on the trailer page and to the OpenVMS accounting system, includes only those
sheets printed in PostScript mode, such as the job separation pages. There is
no known workaround for this problem.
10.15.2 Incorrect Sheet Count on Duplex Jobs
The HP LaserJet IIISi printer exhibits the same behavior with sheet count as
mentioned in Section 10.14.2.
Printer-Specific Information 10–11
10.16 HP LaserJet 4SiMX Printer
10.16.1 Incorrect Sheet Count on Duplex Jobs
The HP LaserJet 4SiMX printer exhibits the same behavior with sheet count
as mentioned in Section 10.14.2.
10.17 HP LaserJet 5M Printer
10.17.1 Problems Selecting an Input Tray
DCPS may ignore explicit INPUT_TRAY parameter values for the HP LaserJet
5M printer, instead utilizing paper from another input tray. DCPS may also
report that TRAY_1 is not available, even though the tray is a standard tray,
when tray 1 is empty.
Both classes of problems are related to the printer attempting to select an
alternate input tray if the desired tray is empty or otherwise not satisfactory.
To avoid these problems, use the HP 5M console to specify that tray 1 is a
‘‘cassette’’ and to lock out all but one of the available input trays. Refer to the
printer’s user manual for more information.
10.17.2 Incorrect Sheet Count on Duplex Jobs
The HP LaserJet 5M printer exhibits the same behavior with sheet count as
mentioned in Section 10.14.2.
10.18 HP LaserJet 5SiMX Printer
10.18.1 Job Trailer Pages Print in Next Bin
If the network manager has placed the mailbox bins into ‘‘job separator mode’’
using the administration software supplied with the printer, the DCPS job log
and trailer pages print in the next bin, separated from the rest of the job.
10.18.2 Tray Is Not Available Due to Lack of Memory for Loaded Paper
If an input tray is loaded with a paper size that cannot be printed with the
current memory configuration, DCPS reports the tray as not available. (Refer
to the HP5SiMX users’s guide for memory requirements.)
10.18.3 Duplex Not Supported Due to Lack of Memory for Loaded
Paper
If an input tray is loaded with a paper size which cannot be printed in duplex
mode with the current memory configuration, DCPS reports that duplex is not
supported. (Refer to the HP5SiMX users’s guide for memory requirements.)
10–12 Printer-Specific Information
10.18.4 Incorrect Sheet Count on Duplex Jobs
The HP LaserJet 5SiMX printer exhibits the same behavior with sheet count
as mentioned in Section 10.14.2.
10.19 HP LaserJet 4000, 4050 and 5000
10.19.1 Minimum Firmware Version
To use an HP LaserJet 4000 or 5000 printer from DCPS, the printer must
be running a minimum firmware version of 19980714 MB3.68. To use an
HP LaserJet 4050 printer, it is recommended that the printer be running
a minimum firmware version of 19991030 MB6.30. This firmware version
number is displayed as Firmware Datecode on the printer’s configuration page.
If your printer is running an older version of firmware, contact HP and request
the proper version. The new firmware will be sent on a SIMM to be installed
in your printer.
10.20 HP LaserJet 8000, 8100 and 8150
10.20.1 Optional Mailbox
DCPS numbers the optional mailbox bins on the HP LaserJet 8000 printer
from 1-5, 1-7 or 1-8, depending on the particular option installed. This is
consistent with the numbers molded into the plastic beside the bins. The
printer’s console, in contrast, refers to these same bins as numbers two
through nine. Refer to the HP LaserJet User Guide for your printer model for
more information about the numbering and purpose of trays with different
options and configurations.
10.20.2 Problems Starting Queues
Some models in this series may not allow DCPS jobs to start. To resolve
this, either set the printer to PostScript mode or suppress DCPS’s PostScript
synchronization. See the DECprint Supervisor for OpenVMS Release Notes or
the OpenVMS System Manager’s Reference Manual for more information.
10.20.3 Minimum Firmware Version
To use a HP LaserJet 8000 printer from DCPS, the printer must be running
a minimum firmware version of 19980610 MB4.28. This firmware version
number is displayed as Firmware Datecode on the printer’s configuration page.
If your printer is running an older version of firmware, contact HP and request
the proper version. The new firmware will be sent on a SIMM to be installed
in your printer.
Printer-Specific Information 10–13
10.21 HP XL300 Printer
10.21.1 Communication Problem
If a file printed to the XL300 printer contains multiple userdata messages
that are returned in quick succession, some messages may be lost, and
others returned incorrectly. Also, occasionally, messages that the DECprint
Supervisor wants returned to it will get garbled. This will result in spurious
messages to the user’s terminal (if /NOTIFY is set). Otherwise, the job prints
correctly.
10.22 Lexmark Optra Rt+ Printer
10.22.1 Tray Linking and INPUT_TRAY
If tray linking is enabled by the printer console, the linked trays cannot be
selected individually using the INPUT_TRAY parameter. Specifying any linked
tray in the INPUT_TRAY parameter causes the printer to select among the
linked trays in accordance with its own algorithm.
10.23 Lexmark Optra S
10.23.1 Problems Starting Queues
Some models in this series may not allow DCPS jobs to start. To resolve
this, either set the printer to PostScript mode or suppress DCPS’s PostScript
synchronization. See the DECprint Supervisor for OpenVMS Release Notes or
the OpenVMS System Manager’s Reference Manual for more information.
10.24 Tektronix Phaser
10.24.1 Printer Configuration Settings
You must change the following AppSocket settings when using Phaser printers
with DCPS:
Table 10–3 Tektronix Phaser Configuration Settings
AppSocket Setting
Value
Interpreter
PostScript
Filtering
Interpreter-Based
10–14 Printer-Specific Information
11
Troubleshooting Procedures
This chapter contains troubleshooting procedures for diagnosing error
conditions on the printer system.
When a printer problem occurs, information may be displayed on the user’s
terminal if the /NOTIFY qualifier is included on the PRINT command line.
This information may indicate the cause of the failure.
Check the job trailer page from the print job, which shows some of the
messages that result from printing. Problems with the print files are indicated
on a file error page (see Section 6.6).
When a printing system problem occurs, examine the console output or
the OPERATOR.LOG file for operator communication manager (OPCOM)
messages. If your terminal is not running OPCOM, use REPLY/ENABLE to
enable PRINTER and CENTRAL messages. Restart the symbiont, and reprint
the job. Then you can read the relevant messages. This procedure requires
OPER privileges. Printer messages are listed in the DECprint Supervisor for
OpenVMS User’s Guide.
11.1 What to Do if a Serial Printer Is Not Printing
When you examine the OPCOM messages, look for a message from the printer
indicating NOTREADY. This message indicates that the printer is unable to
acknowledge any queries from the system. Check for the following:
•
Faulty communication line or cable
•
Incorrect port baud rate setting
•
Incorrect switch settings or front panel settings
•
Excessive line noise resulting in lost response from the printer
•
No power to the printer
•
Faulty connector or incorrect type of connector
•
Incorrect bits/character, incorrect parity, or both
Troubleshooting Procedures 11–1
11.1.1 What to Do if a Locally-Connected Serial Printer Will Not Start
Printing
The steps in this section apply to any serial printer on a local line.
Step 1: Print a test page
Manually print a test page on your printer, following instructions in your
owner’s manual.
If able to print a test page, go on to step 2 to check the printer hardware and
software configurations. If the printer does not produce a test page, check the
printer hardware.
•
Is the power on?
•
Is the printer on line?
•
What is the status of the print engine?
Step 2: Check the printer hardware and software configurations
The configuration settings on the printer and in the software associated with
the printer must be the same. To verify that the settings match, check a
printed summary sheet or the printer console or switches to verify that the
settings are consistent for the following settings:
•
Paper size
•
Communication: 9600 baud (or appropriate baud rate)
•
Eight bits, no parity (required)
•
Flow control
Refer to the printer owner’s manual for information on how to change these
settings.
Check the terminal device characteristics of a directly-connected serial printer
by issuing the following command on the node of the device:
$ SHOW TERMINAL device-name[:]
The variable device-name is the device name in the printer startup file in
parameter p2 of the execution queue definition.
Check for the following characteristics:
•
Eight bits
•
Parity: None
•
Input speed: 9600 baud
11–2 Troubleshooting Procedures
•
Output speed: 9600 baud
The summary sheet and the terminal settings should be the same.
If your printer interface runs at a different speed, make sure you set the same
configuration switch settings and device characteristics.
If the printer is connected directly to the host, check the baud rate setting in
the printer startup command file. If you did not enter a baud rate in parameter
p6 of the execution queue definition, the startup procedure sets the printer
speed at 9600 baud. Refer to the SET TERMINAL command in the OpenVMS
DCL Dictionary for information on changing the system’s interpretation of the
device characteristics.
If your printer is connected by a LAT device to a local area Ethernet, see
Section 11.1.3.
If the settings agree and the job still does not print, go to step 3.
Step 3: Check communications software
Test the operation of the communications equipment by attempting to send
data directly to the device. To perform this procedure, make sure the queue is
paused (see Section 5.7).
The device must not be spooled to accomplish this procedure. If the device is
spooled, enter the following command:
$ SET DEVICE LTAnnnn:/NOSPOOL
To test the communications setup, issue the SET HOST/DTE command to the
printer. Use the commands in the following examples:
$ SET HOST/DTE LTA9092:
Connection established, type ^\ to exit
Ctrl/T
%%[ status: idle ]%%
After you press Ctrl/T, you should receive a message in the form of
%%[Status: description]%%. If you receive this message, the connection to the
printer is established and working.
If no message of this type is displayed, enter the commands in the following
example:
^\
$ COPY TT: LTA9092:
showpage
Ctrl/Z
$
Troubleshooting Procedures 11–3
The test is successful if a page of paper is ejected from the printer. If no paper
is ejected, there is a faulty connection with the printer. In this case, check the
communications cables. Then try the commands in the first example again.
If the COPY command succeeds, but the SET HOST command fails, check the
communications cables inbound from the printer to the host node for a faulty
connection.
Step 4: Check DCPS$STARTUP.COM
Make sure that the DCPS$STARTUP.COM file reflects your print queue needs
and that the changes are appropriate for your printer. To check the printer
execution queue characteristics, enter the following command, inserting the
name of the printer execution queue:
$ SHOW QUEUE/FULL exec-queue-name
For example, the characteristics for the printer execution queue TXA1_LN03R
on host EDEN are as follows:
$ SHOW QUEUE/FULL TXA1_LN03R
Printer queue TXA1_LN03R, on EDEN::TXA1:
/BASE_PRIORITY=4 /FORM=DCPS$DEFAULT /LIBRARY=DCPS_LIB /OWNER=[SYSTEM]
/PROCESSOR=DCPS$SMB /PROTECTION=(S:E,O:D,G:R,W:W) /SCHEDULE=(NOSIZE)
/SEPARATE=(BURST,TRAILER)
$
Specifically, check the following:
•
Make sure that /PROCESSOR=DCPS$SMB.
•
Check that /FORM=DCPS$DEFAULT, or matches the changes you made
to DCPS$STARTUP.COM. Ensure that the printer is capable of printing
according to the form definition.
•
Make sure that the /LIBRARY qualifier value is the same as parameter p3
in DCPS$STARTUP.COM and if it is a logical name, that the logical name
has been defined.
If the queue characteristics do not match those defined in DCPS$STARTUP.COM,
stop the printer execution queue.
Next, execute the DCPS$STARTUP.COM file, as follows:
$ @SYS$STARTUP:DCPS$STARTUP
Recheck the execution queue characteristics. If the characteristics are correct
and the job still does not print, go to step 5.
11–4 Troubleshooting Procedures
Step 5: Check queue logical defaulting
Use the following command to check the values of queue default parameters in
the DCPS$STARTUP.COM file, in p4 of the execution queue definition, and in
parameter p3 of the generic queue definition.
$ SHOW LOGICAL DCPS$queuename_PARAMETER
Step 6: Check the queue configurations
The values provided in DCPS$STARTUP.COM are not validated, but simply
passed as parameters to the appropriate OpenVMS commands and utilities.
Therefore, the OpenVMS commands and utilities detect and report any errors
directly. Refer to the OpenVMS System Messages: Companion Guide for Help
Message Users for an explanation of error messages issued by the following
DCL commands:
•
INITIALIZE/QUEUE
•
SET TERMINAL
•
SET DEVICE
Note
To debug DCL command procedures and record the information in a
file, you can use the following commands:
$ SET HOST 0/LOG
$ SET VERIFY
Alternatively, you can set parameter p8 in the execution queue
definition in DCPS$STARTUP.COM to 1 for automatic recording.
11.1.2 What to Do if a Locally-Connected Serial Printer Has Stopped
Printing
When your printer stops printing, follow these steps:
•
If your printer fails consistently, follow the steps in Section 11.1.1.
•
If your printer fails occasionally, follow the steps in this section.
After checking all messages, including the notification messages from the
PRINT command, the console output, and the OPCOM log, go to step 1 if the
cause of the problem is not apparent.
Troubleshooting Procedures 11–5
Step 1: Print the IVP data sheets
Print the following Installation Verification Procedure (IVP) files from
SYS$COMMON:[SYSTEST.DCPS]:
DCPS$IVP_ANSI.DAT
DCPS$IVP_POST.DAT
DCPS$IVP_REGIS.DAT
DCPS$IVP_TEK4014.DAT
DCPS$IVP_PCL.DAT
DCPS$IVP_PROPRINTER.DAT
Remember to use the appropriate DATA_TYPE parameter value, indicated in
the file name following the underscore, for each of the files. For example, to
print DCPS$IVP_REGIS.DAT, use the following PRINT command:
$ PRINT/QUEUE=queue-name/PARAMETERS=(DATA_TYPE=REGIS)/NOTIFY SYS$COMMON:[SYSTEST.DCPS]DCPS$IVP_REGIS.DAT
If the files are not printed, go to step 2 to check the files for user error.
If any of the IVP files are not printed, check to see if the translator execution
files exist, using the following command:
$ DIR SYS$SHARE:TRN$*.*
Directory SYS$COMMON:[SYSLIB]
TRN$ANSI_PS.EXE;
TRN$DDIF_PS.EXE;
TRN$TEK4014_PS.EXE; TRN$PCL_PS.EXE;
TRN$REGIS_PS.EXE;
TRN$PROPRINTER_PS.EXE;
Total of 6 files.
If the correct files are present, go to step 2.
If any files are missing, reinstall the DECprint Supervisor software.
Step 2: Check files for user error
If a particular file fails to print, examine the trailer page from the print job
for messages that indicate the cause of the failure. For an explanation of, and
recovery procedures for the error messages, see the DECprint Supervisor for
OpenVMS User’s Guide.
If the file is a PostScript file, an error exists in either the PostScript file or in
the application that generated the PostScript file. If the application is supplied
by Compaq, submit a Software Performance Report (SPR).
If the file is other than a PostScript file, an error exists in the translation
process. If the translator is supplied by Compaq, submit a Software
Performance Report.
11–6 Troubleshooting Procedures
Sometimes, when the serial communication cable between the printer and the
host is disconnected and later reconnected, the active print job displays the
status Printing when nothing is happening at the printer. Power-cycle the
printer, then resubmit the lost print job.
Note
When reconnecting the printer to the host, turn off and then turn
on the printer. Turning the printer off and on ensures proper
synchronization between the print symbiont and the printer.
11.1.3 What to Do if a LAT Printer Is Not Printing
A network environment allows several separately managed systems to access
the same printer. Therefore, when the printer is not printing, you must
determine which node has control of the printer.
The remaining sections discuss the following steps in troubleshooting the
printer in a network environment:
1. Determining the node that controls the printer:
•
Determine the printing node
•
Determine the LAT node and port name
•
Check the port and system server names
•
Determine the host controlling the printer
2. Troubleshooting the printer:
•
Check port characteristics
•
Follow procedures in Section 11.1.1
3. Other troubleshooting hints:
•
NOTREADY status
•
Common error messages and their probable causes
11.1.3.1 How to Determine Which Host Controls the Printer
A network printer may fail to print if another node is accessing the printer, or
if the printer has stopped printing. Perform the following steps to determine
which host has control of the printer.
Troubleshooting Procedures 11–7
Step 1: Determine your printing node
To determine which node runs your printer, issue the following command,
inserting the name of the print queue you use:
$ SHOW QUEUE/FULL queue-name
From the first line of the following sample display, you determine that
FIERY is the node that runs your printer and LTA546 is the application
port associated with the print queue:
Printer queue LN03R3, on FIERY::LTA546, mounted form DCPS$DEFAULT
(stock=DEFAULT)
/BASE_PRIORITY=4 /FORM=DCPS$DEFAULT (stock=DEFAULT)
/NOENABLE_GENERIC /LIBRARY=DCPS_LIB lowercase /OWNER=[SYSTEM]
/PROCESSOR=DCPS$SMB /PROTECTION=(S:E,O:D,G:R,W:W) /SCHEDULE=(NOSIZE)
/SEPARATE=(BURST,TRAILER)
$
Perform steps 2 and 3 on the node (FIERY) that runs the printer.
Step 2: Determine LAT node and port name to which the printer is connected
Look in the LAT startup file SYS$STARTUP:LAT$SYSTARTUP.COM. The SET
PORT command associates the application port (LTAd) with a specific port
(/PORT=port_name) on the server (/SERVER=server_name).
CREATE PORT LTA546: /NOLOG /APPLICATION
! LN03R3
SET PORT LTA546: /APPLICATION /QUEUE /NODE=TAS204 /PORT=PORT_7
Note
The port must be set with queuing enabled (/QUEUE) and as an
application port (/APPLICATION).
Make sure that SYSTARTUP_VMS.COM invokes LAT$STARTUP.COM.
Step 3: Check port and server system names
Ensure that port and server system settings are the same as those in the
SYS$STARTUP:LAT$SYSTARTUP.COM. Use the LATCP SHOW PORT
command to look at the application port (LTAd) as follows:
$ RUN SYS$SYSTEM:LATCP
LCP>SHOW PORT lta546
Local Port Name = LTA546: application
11–8 Troubleshooting Procedures
Specified Remote Node Name = TAS204
Specified Remote Port Name = PORT_7
Actual Remote Node Name = TAS204
Actual Remote Port Name = PORT_7
Link Name = LAT$LINK
Step 4: Determine which host controls the printer
You can determine which host controls the printer by logging in to a terminal
that is connected directly to a DECserver or by connecting to a LAT device over
the network. If you have direct access to the DECserver port, go directly to
step 4B.
Step 4A: Connect to the LAT device
Use either the Network Control Program (NCP) or Terminal Server Manager
(TSM) to connect to the DECserver device over the network.
To use NCP, issue the following commands:
•
To determine the type of service circuit, for example UNA–0 or QNA–0, use
the following commands:
$ MCR NCP
NCP> SHOW KNOWN CIRCUITS
•
To determine the 48-bit Ethernet address (for example, 08–00–2B–05–C7–
05), use the following commands:
$ MCR LATCP
LCP> SHOW NODE server-name
For example, to get the Ethernet address for TAS200PSSA, enter the
following command:
LCP> SHOW NODE TAS200PSSA
Node Name: TAS200PSSA
Node State: Reachable
Node Ident: LN03R V2.0 DECServer 200
Incoming Connections:
Enabled
Circuit Timer (msec):
Multicast Timer (msec):
Service Groups:
Service Name
BURNET
LAT Protocol Version: 5.1
Address: 08-00-2B-05-C7-05
80
30
15, 31-32 99
Status
Available
Rating
0
Identification
In this example, the Ethernet address 08-00-2B-05-C7-05 is displayed.
Troubleshooting Procedures 11–9
You can use the service circuit name and the Ethernet address to make a
connection to the LAT node using the following command:
$ MCR NCP
NCP> CONNECT VIA service-circuit PHYSICAL ADDRESS nn-nn-nn-nn-nn-nn
After entering the NCP CONNECT command, press Return until you get the
pound sign (#) prompt. At this prompt type the password (ACCESS) to get the
Local> prompt:
#
username: username
Local>
Step 4B: At the LAT console port
After making your connection and logging in to the LAT console, enter the
following commands:
Local> SET PRIVILEGED
Password>
Local> SHOW SESSIONS PORT_7
The default password is SYSTEM.
The following example shows a SHOW SESSIONS PORT command on a
DECserver 200 that tells you that a remote system HAILEY controls port 7.
Local> SHOW SESSIONS PORT 7
Port 7: (Remote)
Connected
-Session 1: Hailey
Connected
Current Session 1
Pasthru
If your system runs the TSM software, issue the following commands:
$ RUN SYS$SYSTEM:TSM$MAIN
TSM> USE SERVER tas204
TSM> SET PRIVILEGED
Password>
TSM> SHOW SESSIONS PORT_7
Note
To run the TSM program, you need read access to the TSM
management directory file and OPER privileges. For more information,
refer to the Guide to Terminal Server Manager.
11–10 Troubleshooting Procedures
11.1.3.2 How to Troubleshoot Printer Communications Problems
After determining which system controls the printer port, follow these steps.
Step 1: Check port characteristics
Compare the LAT port characteristics with those listed in the DECprint
Supervisor for OpenVMS Software Installation Guide. To view the port
characteristics, issue the SHOW PORT command at the Local> prompt or
the TSM> prompt.
Step 2: Use procedures in Section 11.1.1
Follow the steps in the appropriate section:
•
For a new printer, Section 11.1.1
•
For a printer that has stopped printing, Section 11.1.2
If you follow these procedures and the printer is not printing, go to step 3.
Step 3: Regain control of the LAT port
You may need to disconnect a symbiont process that controls the port connected
to the printer. For example, an unsupported version of the symbiont software
might not disconnect after it gains control of the port. Disconnect the symbiont
process with the following command:
Local> SET PRIVILEGED
Password>
Local> LOGOUT PORT port_number
You need privileged status on the LAT node to execute this command.
11.1.3.3 Common LAT Error Messages
The following list contains common error messages received in a network
environment. The error message prefix is DCPS$. The severity level is not
indicated. The messages are arranged alphabetically by ident-string. (Refer to
the DECprint Supervisor for OpenVMS User’s Guide for an explanation of the
error message format.)
DCPS$_CONAPPLICATION, Connection request is not to a LAT applications
port
Explanation: This message usually occurs when a LAT port is not
reserved as an applications port, and another device is connected to
the port that is requested by the printer. The LAT configuration file
LAT$SYSTARTUP.COM should contain a line similar to the following with
the /APPLICATION parameter.
SET PORT LTAnnn:/NODE=server-name/PORT=port-name/QUEUE/APPLICATION
To avoid this problem, specify a higher port number for the printer.
Troubleshooting Procedures 11–11
DCPS$_CONTERMINATED, Connection abnormally terminated
Explanation: This message occurs when communication to the LAT node
is interrupted. This results in a stopped queue. Check the following:
•
Power is supplied to the LAT device.
•
Printer port is not logged off.
•
All connections from LAT device to the Ethernet cable are working.
DCPS$_CONTIMEOUT, Connection timed out, server not available, or
incorrect server name specified
Explanation: This message occurs when the server name is not
recognized. This problem may indicate the collision of user terminal
space and the printer port.
Verify that the server name connected to the printer port is correct.
Compare the server name specified in the LAT configuration file
LAT$SYSTARTUP.COM with the server name on the LAT device.
LAT$SYSTARTUP.COM should contain a line similar to the following:
SET PORT LTAxxx:/NODE=server_name/PORT=port_name/QUEUE/APPLICATION
Use the SHOW PORT command to find the server name associated with
the printer port:
Local> SHOW PORT port-name
DCPS$_LRJACCESSDENIED, Access denied
Explanation: This message usually occurs when the group code specified
in LAT$SYSTARTUP.COM does not match one of the groups on the LAT
device connected to the printer. Thus, the printer software does not have
access to the LAT port. The LAT configuration file LAT$SYSTARTUP.COM
should contain a line similar to the following:
SET NODE/GROUP=group-list/ENABLE
Compare groups, /GROUP=group-list, set in LAT$SYSTARTUP.COM with
those set on the LAT device (SHOW PORT command).
DCPS$_LRJDELETED, Queue entry deleted by server
Explanation: This message occurs when someone manually terminates
the connection to the LAT device.
DCPS$_LRJILLEGAL, Illegal request parameter
Explanation: This message indicates that an internal LAT error has
occurred. Submit a Software Performance Report.
11–12 Troubleshooting Procedures
DCPS$_LRJINUSE, Port or service in use
Explanation: This message usually occurs on a LAT port when port-name
is not set with the queuing parameter (/QUEUE) enabled or when the
queue limit is too small. On the LAT device, enter the following command:
SET PORT port-name QUEUE ENABLE
DCPS$_LRJNAMEUNKNOWN, Port Name is unknown
Explanation: This message occurs when the port name specified in
the LAT configuration file LAT$SYSTARTUP.COM is not known on the
server. Compare the port name specified in the LAT configuration file
LAT$SYSTARTUP.COM with the printer port name associated with
the server. LAT$SYSTARTUP.COM should contain a line similar to the
following:
SET PORT LTAnnn:/NODE=server-name/PORT=port-name/QUEUE/APPLICATION
Find the name of the printer port associated with the server, by issuing the
following command:
Local> SHOW PORT port-number
DCPS$_LRJNOTOFFERED, Service is not offered on the requested port
Explanation: This message usually occurs when the access mode is not
set to REMOTE on the LAT port. Use the SET and DEFINE commands as
follows to set the access mode for the port:
Local> SET PORT port-number ACCESS REMOTE
Local> DEFINE PORT port-number ACCESS REMOTE
Note
For more information, refer to the DECprint Supervisor for OpenVMS
User’s Guide or to the troubleshooting guide for your LAT device.
11.1.4 How to Eliminate Excess Login Dialog on Serial Printers
Serial printers transmit unsolicited data to the host system when power-up
initialization occurs. The OpenVMS operating system normally interprets
unsolicited data from a terminal device as a login request. The printer
software startup file sets the SECURE_SERVER terminal characteristic for all
printer terminal devices on the host system. SECURE_SERVER prevents the
OpenVMS host and the printer from engaging in a potentially endless login
dialog.
Troubleshooting Procedures 11–13
To eliminate login dialog, set terminal characteristics for terminal devices by
using the following procedures in this order:
1. SYSGEN AUTOCONFIGURE
2. SYSTARTUP_VMS
3. DCPS$EXECUTION_QUEUE.COM
AUTOCONFIGURE uses SYSGEN parameters to set default terminal
characteristics for all terminal devices on the system. Your system will not
encounter the login dialog problem if SECURE_SERVER is set with SYSGEN.
The SYSGEN parameter that accomplishes this is TTY_DEFCHAR2. Refer
to the OpenVMS Upgrade and Installation Manual for information on setting
SYSGEN parameters.
The system startup procedure may also set terminal characteristics. Since this
command file executes prior to the printer startup file, your system will be less
vulnerable to the login dialog problem if SECURE_SERVER is set for printer
terminal devices within the SYSTARTUP_VMS file.
DCPS$EXECUTION_QUEUE.COM (the printer execution queue command file)
sets the SECURE_SERVER terminal characteristic for printer terminal devices
by default. This file is provided in the software kit.
If your printer is configured on a LAT device in a local area Ethernet, set
the LAT port and the terminal server characteristics for the printer to
minimize login dialog. Refer to the DECprint Supervisor for OpenVMS
Software Installation Guide for LAT port characteristics.
11.2 What to Do if a PrintServer Printer Is Not Printing
The following troubleshooting procedures can help you diagnose error
conditions that can occur during installation of DECprint Supervisor software
for PrintServer printers.
If the printer is not printing, check the OPCOM messages. If the cause of
the failure is not immediately apparent, check the queue characteristics, as
follows:
1. Execute the following instruction, inserting the name of the PrintServer
device queue:
$ SHOW QUEUE queue-name/FULL
11–14 Troubleshooting Procedures
For example, the queue characteristics for the PrintServer device queue
LPS40$FANG on node VIPER are as follows:
$ SHOW QUEUE LPS40$FANG/FULL
Printer queue LPS40$FANG, on VIPER::FANG, mounted form DCPS$$FORM
(stock=DEFAULT)
/BASE_PRIORITY=4 /FORM=DCPS$DEFAULT /LIBRARY=DCPS_LIB /OWNER=[SYSTEM]
/PROCESSOR=DCPS$SMB /PROTECTION=(S:E,O:D,G:R,W:W) /SCHEDULE=(NOSIZE)
/SEPARATE=(FLAG,TRAILER)
$
2. If the queue characteristics do not match those recorded in
DCPS$STARTUP.COM, delete the device queue and all generic queues that
point to it. Then execute the DCPS$STARTUP.COM file. DCPS$STARTUP
is located in SYS$STARTUP:. For example:
$
$
$
$
$
$
$
STOP/RESET/QUEUE generic-queue-1
STOP/RESET/QUEUE other-generic-queues
STOP/RESET/QUEUE pserver-name
DELETE/QUEUE generic-queue-1
DELETE/QUEUE other-generic-queues
DELETE/QUEUE pserver-name
@SYS$STARTUP:DCPS$STARTUP
Recheck the queue characteristics. If they are correct and the job still
does not print, refer to the DEC PrintServer Supporting Host Software for
OpenVMS Management Guide for further information.
11.3 What to Do if Printing Is Slower than Expected
Slower printing speeds can result from:
•
Printing of complex ANSI jobs from applications
•
Printing of complex PostScript jobs
•
Occurrence of ANSI translator prologue mismatch
•
Changing the printer password from the default (refer to the DECprint
Supervisor for OpenVMS Software Installation Guide).
Complex ANSI jobs include those that use many downloaded fonts on a page.
These jobs always take longer to print.
For serial printers, a 30-second delay before the printing of ANSI jobs indicates
an ANSI prologue mismatch between the ANSI translator and the print job.
On a serial printer, power cycle the printer (turn it off and then on) to load the
appropriate prologue. The first ANSI print job is delayed by the loading of the
prologue, but subsequent ANSI print jobs are printed more efficiently.
Troubleshooting Procedures 11–15
If your printer is connected to multiple nodes running different versions of
the printing system, power cycling the printer may not eliminate the 30second delay. The node that connects to the printer first persistently loads its
prologue. The other nodes must load the prologue with every print job. To
eliminate the delay in this case, every node should run the same version of the
DECprint Supervisor software.
11.4 What to Do if Layup Definition Files Are Not Found
DECprint Supervisor software places the following sample layup definition files
in [SYSHLP.EXAMPLES.DCPS]:
LPS$HOLES.LUP
LPS$SINGLEHOLES.LUP
LPS$DOUBLEHOLES.LUP
LPS$NUP.LUP
COLOR-PRINTER-FULL-PAGE.LUP
PROPRINTER-FULL-PAGE.LUP
Make sure that the layup directory logical name, DCPS$LAYUP, points to
SYS$SYSDEVICE:[SYSHLP.EXAMPLES.DCPS] or to the directory that
contains the .LUP sample files on all nodes in the cluster.
11.5 What to Do if Files Are Printed with Unexpected Results
The DECprint Supervisor software attempts to print every file in every print
job even if there are problems in the specification of print parameters and print
job attributes. Print queues with erroneous default parameters can still print
files, but all the print parameters are not effective and messages are generated
indicating the problem, as described in Section 11.5.1.
In cases where the file is printed using the wrong data type translator, the
file data type has not been correctly determined by the DECprint Supervisor
software. The methods for solving problems with automatic data type detection
are described in Section 11.5.2.
11.5.1 What to Do if Default Queue Parameters Are Not Effective
If you enter a parameter in DCPS$STARTUP.COM incorrectly, print jobs sent
to that print queue are printed, but the invalid parameter and the parameters
following it are not applied to the print job.
If an invalid print parameter is included in the queue definition, the printing
system generates an error message that is displayed on your screen and
printed on the job trailer page for every print job sent to the associated queue.
The parameters that are not processed take the default settings.
11–16 Troubleshooting Procedures
In the following example, there is an extra L in the argument to the second
parameter, PAGE_ORIENTATION. Therefore, the printing system ignores
the second parameter, NUMBER_UP=2. Only the first parameter, SHEET_
SIZE=B, is processed.
@sys$startup:dcps$generic_queue ! Landscape queue
DCPS$WIDE$PRINT ! P1 - Generic queue name
TEK4014_TTB4 ! P2 - /GENERIC = execution queues
"SHEET_SIZE=B,PAGE_ORIENTATION=LLANDSCAPE,NUMBER_UP=2"
! P3 - Default queue parameter
! P3 - Default queue parameter
For every print job for this queue, an error message similar to the following
is displayed on the screen and printed on the job trailer page in the message
section:
10-MAR-2001 15:21 %DCPS-E-PARSYNERR, Syntax error in the /PARAMETERS
qualifier at or near PAGE_ORIENTATION=LLANDSCAPE
11.5.2 What to Do if a File Data Type Is Not Recognized
If the DECprint Supervisor software fails to determine the data type of a
print file correctly, the user can explicitly specify the DATA_TYPE parameter.
If necessary, you can set up a generic queue for specific data types. All
files printed to this queue will have the specified data type, unless the user
explicitly specifies another data type using the DATA_TYPE parameter. Users
can also specify the DATA_TYPE=AUTOMATIC parameter to explicitly specify
automatic data type detection.
The automatic data type feature examines the following to determine the data
type of the file:
1. The value of the DATA_TYPE parameter in the PRINT command
2. The queue default data type specified in the DCPS$STARTUP.COM file
3. OpenVMS file tags (for example, DDIF stored_semantics tags)
4. The contents of the file
5. The file extension
If the DECprint Supervisor software cannot determine the file data type from
these steps, the default text data type is used. If no default text data type
has been defined by the user or the system manager (see Section 4.2.2), the
file is processed as ANSI. When the default text data type is used, the text
can precede PostScript; the file is printed properly. However, the file may not
be printed properly if any more text follows the PostScript data. In this case,
it may be necessary to edit the file and print the text and PostScript data as
separate files.
Troubleshooting Procedures 11–17
In general, though, users should not be encouraged to modify the contents
of their files or the file extensions so that the data type can be determined.
Instead, the application that generates the file may be examined and modified
if necessary; or you can provide site-specific file extension files, default text
data types, or generic queues with explicit default data types.
11–18 Troubleshooting Procedures
A
Printing System Management Commands
You use standard OpenVMS DCL commands to manage the DECprint
Supervisor queues, jobs, and related system resources.
Note
Remember that the management commands only affect the system on
which they are issued. A network printer can serve other systems as
well, with each system having its own set of queues, jobs, forms, etc.
A.1 Overview of Management Commands
Table A–1 lists the commands used to manage print queues, print jobs, and
related system resouces. More information for these commands can be found
in the OpenVMS DCL Dictionary.
Table A–1 Printing System Management Commands
Command
Function
ASSIGN /MERGE
Removes jobs from one queue and puts them
in another existing queue.
ASSIGN /QUEUE
Assigns a logical queue to an execution
queue.
DEASSIGN /QUEUE
Deassigns a logical queue and stops the
logical queue.
DEFINE /CHARACTERISTIC
Defines a queue characteristic name and
number.
DEFINE /FORM
Defines a printer form name, number, and
attributes.
(continued on next page)
Printing System Management Commands A–1
Table A–1 (Cont.) Printing System Management Commands
Command
Function
DELETE /CHARACTERISTIC
Deletes the definition of a queue characteristic.
DELETE /ENTRY
Deletes one or more job entries from a queue.
DELETE /FORM
Deletes the definition of a form.
DELETE /QUEUE
Deletes a queue.
INITIALIZE /QUEUE
Not recommended for use with the DECprint
Supervisor software.
SET ENTRY
Changes or deletes attributes of a job that is
in the queue but not currently executing.
SET QUEUE
Changes the status and attributes of a queue.
SET QUEUE /ENTRY
This command has been superseded by the
SET ENTRY command, which performs
identical functions. Compaq recommends
that you use the SET ENTRY command.
SET QUEUE /RETAIN
Retains print jobs upon completion or
termination due to an error.
SHOW ENTRY
Display information about print jobs.
SHOW QUEUE
Displays information about queues and jobs.
SHOW QUEUE /CHARACTERISTICS
Displays information about queue characteristic names and numbers available on a
queue.
SHOW QUEUE /FORM
Displays the names and numbers of the
forms defined for your system.
START /QUEUE
Starts or restarts a queue.
START /QUEUE /MANAGER
Starts the system job queue manager and
opens the queue file.
STOP /QUEUE
Pauses an execution queue.
STOP /QUEUE /ABORT
Stops the executing print job, but does not
stop the queue.
STOP /QUEUE /MANAGER
Stops the system job queue manager and
closes the job queue file.
STOP /QUEUE /NEXT
Stops the queue after the current job has
finished printing.
(continued on next page)
A–2 Printing System Management Commands
Table A–1 (Cont.) Printing System Management Commands
Command
Function
STOP /QUEUE /REQUEUE
Stops the executing print job and requeues it
to the specified queue, but does not stop the
queue.
STOP /QUEUE /RESET
Stops a queue immediately and returns
control to the system.
A.2 Use of SET PRINTER with DCPS
Because PostScript printers are controlled by the DECprint Supervisor
software, the DCL SET PRINTER command has no meaning in a DECprint
Supervisor environment. Print job characteristics for the DECprint Supervisor
are set and displayed by other means.
Print job characteristics for DECprint Supervisor are determined by:
1. Parameters embedded in the job data
2. Parameters passed in the /PARAMETERS qualifier of the PRINT command
3. DEFINE /FORM qualifiers
4. For PrintServer printers, default parameters which are in the PrintServer
configuration database
5. The default queue parameters, which are defined in the DCPS$STARTUP.COM
file
Items 1, 2, and 3 in this list are controlled by the PostScript interpreter or the
data syntax translator, depending on the type of job being processed. Item 4
is controlled by the PrintServer server management interface described in the
DEC PrintServer Supporting Host Software for OpenVMS Management Guide.
Table A–2 shows the SET PRINTER qualifiers and the equivalent control in a
DECprint Supervisor printing system.
Printing System Management Commands A–3
Table A–2 SET PRINTER Qualifier Equivalents for DECprint Supervisor
Queues
SET PRINTER
Qualifier
Equivalent Control
/CR
Insertion of carriage return characters is controlled by the
current data type translator.
/FALLBACK
Translation of DIGITAL multinational characters is controlled by
the current font. If the character does not exist in the specified
font, the font error character prints.
/FF
Mechanical form feeds are controlled by the current data type
translator or the PostScript interpreter.
/LOWERCASE
The DECprint Supervisor printer is considered to be a lowercase
printer. It does not translate lowercase to uppercase.
/PAGE
The number of lines printed on each page is controlled by the
ANSI translator (ANSI files only). This characteristic is available
through DEFINE /FORM.
/PASSALL
Whether the system interprets special characters or forwards
them as 8-bit binary data is controlled by the current data type
translator.
/PRINTALL
Whether the printer interprets special characters or prints their
8-bit binary equivalent is controlled by the current data type
translator.
/TRUNCATE
Truncation of data that exceeds the limitation imposed by the
/WIDTH qualifier is controlled by the form definition or the
current data type translator.
/WIDTH
The number of characters allowed on each line of the currently
installed media is controlled by the form definition, or a
combination of the current data type translator and the current
font.
/WRAP
Generation of a carriage-return/line-feed by the printer when it
reaches the end of a line is controlled by the form definition or
the current data type translator.
A–4 Printing System Management Commands
Note
Not all data type translators implement the preceding functions in
the same manner; refer to a translator’s documentation for specific
information about its behavior.
Printing System Management Commands A–5
B
Logical Names used by DCPS
This appendix provides some information about OpenVMS logical names that
are used by the DECprint Supervisor for OpenVMS software.
Here are some guidelines for using these logical names:
•
Any logical whose name begins with ‘‘DCPS’’ is only used by the DECprint
Supervisor for OpenVMS software. Other logical names (for example,
PSM$ANNOUNCE) may be used by and impact other components of your
OpenVMS system.
•
You should place your desired definitions for these logical names in
DCPS$STARTUP.COM or in something that it invokes. The startup
procedure template has comments about how to define some of these.
•
Changes to some logical names have an immediate effect, while changes
to others take effect only when a queue starts or when a DCPS symbiont
process is first created. The ramifications of this are particularly
significant if you are using multistreamed DCPS symbiont processes (see
Section 3.4.1.2). You should assume that the symbiont reads all logical
names only when it is first created, thus requiring you to first stop all
queues and then retart them before your changes can take effect.
•
You should define the desired logical names in the system table in
executive mode (that is, using DEFINE/SYSTEM/EXECUTIVE).
•
In a VMScluster environment, you should define the desired logical
names on all nodes that utilize the DCPS software. To examine logical
names defined by DCPS, you need to look on the node on which the DCPS
symbiont process is running.
•
Additional logical names may be listed in the DECprint Supervisor for
OpenVMS Release Notes.
Logical Names used by DCPS B–1
Below is a table of the logical names used by DCPS, their acceptable values,
and a brief explanation of what they mean. There are also references to
other sections of this document or other documents where you can find more
information about the logical names.
Note
In the following table, qn is an abbreviation for the queue name.
Table B–1 DCPS Logical Names
Logical Name
Acceptable Values
Meanings and References
Logical names that provide information to DCPS
DCPS$DEFAULT_TRANSLATOR
<set of translators>1
System wide default text data type;
Section 4.2.2
DCPS_LIB2
search list
List of DCPS setup libraries and
their data types; Section 7.4.2
DCPS$DEVCTL_CACHE
1
Enable system wide device control
caching; Section 7.11
DCPS$LAYUP3
search list
Directory where layup files are
stored; DECprint Supervisor for
OpenVMS Software Installation
Guide
DCPS$MAX_STREAMS
0..32
Number of queues per DCPS
symbiont process; Section 3.4.1
DCPS$PURGE_TIME
delta time
Time to wait before purging working
set; Section 3.4.4
DCPS$qn_DEFAULT_
TRANSLATOR
<set of translators>1
Queue specific default text data type;
Section 4.2.2
DCPS$qn_DEVCTL_CACHE
1
Enable queue specific device control
caching; Section 7.11
1
<set of translators> = ANSI, AUTOMATIC, LIST, PCL, POSTSCRIPT, REGIS, TEK4014, etc.
2
Defined with a default value in the DCPS$STARTUP.COM
Defined by DCPS$REQUIRED.COM using information you supplied during the DCPS installation
3
(continued on next page)
B–2 Logical Names used by DCPS
Table B–1 (Cont.) DCPS Logical Names
Logical Name
Acceptable Values
Meanings and References
Logical names that provide information to DCPS
DCPS$qn_DEVICE_NAME4
string
Actual device name associated with
the queue when name is too long for
INITIALIZE/QUEUE/ON qualifier
(and SHOW QUEUE/FULL lists
‘‘DCPS$’’ as the device instead);
Section 3.3.2
DCPS$qn_IGNORE_UNKNOWN_ 1
USER
Disable unknown user error when
username not found in UAF;
Section 3.4.5
DCPS$qn_INTERRUPT_
WHEN_BUSY
1
Disable wait for serial printers to be
‘‘not busy’’; Section 3.4.2
DCPS$qn_NO_SYNC
1
Disable usual synchronization on
printers other than PrintServer
printers; Section 3.4.3
DCPS$qn_OLD_ANSI_PAGE_
SIZES
1
Use old (pre-V1.1a) vertical spacing
for A4 size in ANSI translator;
Section 3.4.6
DCPS$qn_PARAMETER4
string
Default queue parameters;
Section 3.3.4
DCPS$qn_SEPARATOR_TRAY
number
Tray number to take job burst and
flag pages from; Section 6.2.3
DCPS$qn_STALL_TIME
delta time
Timeout before declaring a printer
stalled; Section 5.12
DCPS$qn_SUPPRESS_
JOBTRAILER
1
Disable printing of job trailer;
Section 6.2.2
PSM$ANNOUNCE
string
String which prints on separator
pages; Section 6.4
Logical names that return information from DCPS
DCPS$qn_PID
Process ID of DCPS symbiont
controlling the queue; Section 5.8
DCPS$qn_STALLED
Reason for queue being stalled;
Section 5.12
4
Defined by DCPS$EXECUTION_QUEUE.COM
Logical Names used by DCPS B–3
C
Downloading and Deleting Fonts
You may be able to use the SYS$COMMON:[SYSHLP.EXAMPLES.DCPS]FONT_
DOWNLOADER.COM command procedure to list, download, and delete fonts
on the optional hard drive on a printer. The procedure is known to work with
the DEClaser 5100 and LN17ps printers, and may work with other printers as
well.
To use the procedure, invoke it and follow the prompts that it gives you.
Downloading and Deleting Fonts C–1
D
DECprint Supervisor (DCPS) and DECprint
Printing Services Software (CPS)
This appendix explains the differences between the DECprint Supervisor
software and the DECprint Printing Services software, and their ability to
coexist. ‘‘DCPS’’ refers to the DECprint Supervisor for OpenVMS product;
‘‘CPS’’ refers to the DECprint Printing Services product.
D.1 DCPS/CPS Coexistence
DCPS software can coexist on the same system with CPS Version 4.0 or
Version 4.1 software. The installation of DCPS software does not delete or
modify components of CPS software. You may continue to run both products
on the same system, or you may migrate the existing queue structure from the
CPS product to the DCPS product.
D.2 Printer Support
D.3 DCPS$ Prefix
All file names, logical names, and messages for the DCPS product start with
the DCPS$ prefix. This ensures that you can continue to use CPS software to
drive some queues, and add the DCPS software to drive others. The default
OpenVMS form is DCPS$DEFAULT.
Certain files, however, are considered system resources, and are shared
between the DCPS and CPS products, and possibly other products. These
shared resources are:
DECprint Supervisor (DCPS) and DECprint Printing Services Software (CPS) D–1
•
CPS$ANSI_FONTS.TLB
This is the library containing downloadable fonts that emulate LN03 or
DEClaser font cartridges.
•
Data type translators
The DCPS product installs its translators using the same directory and file
name structure that the CPS product used.
Secondary messages (those generated by other facilities such as RMS, and
passed along by the DCPS product) retain the code of the facility that
originated the message.
D.4 Startup File Converter
The conversion tool, CPS_TO_DCPS_STARTUP.COM, converts the startup file
for the CPS software so that it uses the names from the DCPS product. This
tool is described in Section 3.2.
The following table lists the CPS_Name and the corresponding DCPS_Name
conversions.
CPS_Name
DCPS_Name
CPS$STARTUP
DCPS$STARTUP
CPS$EXECUTION_QUEUE
DCPS$EXECUTION_QUEUE
CPS$REQUIRED
DCPS$REQUIRED
CPS$GENERIC
DCPS$GENERIC
CPS_LIB
DCPS_LIB
CPS$DEVCTL
DCPS$DEVCTL
LPS$queuename_PARAMETER
DCPS$queuename_PARAMETER
CPS$queuename_STALL_TIME
DCPS$queuename_STALL_TIME
LPS$LAYUP
DCPS$LAYUP
DECprint Printing Services
DECprint Supervisor
The conversion tool does not change queue names or the structure of the
queues.
D–2 DECprint Supervisor (DCPS) and DECprint Printing Services Software (CPS)
D.5 Eliminating Generic Queues
DCPS software has the ability to automatically detect data types, so you may
be able to reduce the number of generic queues or eliminate them altogether.
Refer to Chapter 4 for more information on automatic data type detection.
D.6 Page Scaling
The DCPS product can scale the logical page image to fit the output sheet if
the job provides the following parameters:
PAGE_SIZE=p,SHEET_SIZE=s
Note that p and s are different values.
The job assumes the parameter NUMBER_UP=1. With CPS, it was necessary
to explicitly provide a NUMBER_UP parameter in order to trigger page
scaling.
D.7 Layup for PS Level 2 Printers & Layup Fixes
The DCPS software layup facility supports PostScript Level 2 operators when
connected to printers that implement PostScript Level 2. It also fixes or
extends support for several Level 1 operators.
Level 1 PostScript programs produced by Macintosh and PC applications
generally print better with the DCPS product than they did with the CPS
product. Problems with CorelDraw and Macintosh programs have been fixed.
D.8 Layup Options on PRINT Command Line
With DCPS software, you can provide layup options directly with the LAYUP_
DEFINITIONS parameter, or you can record those options in a .LUP file and
provide that file name with the parameter. Providing the layup options on
the PRINT command makes it possible to pass them with jobs to be printed
on another system via the Distributed Queuing Services product. CPS V4.1
software offers only the .LUP file option.
See the DECprint Supervisor for OpenVMS User’s Guide for information on
expressing layup options in a layup definition file or as a PRINT parameter.
DECprint Supervisor (DCPS) and DECprint Printing Services Software (CPS) D–3
D.9 Page Sizes
In the CPS V4.1 product, the following page sizes did not exist or were not
correctly interpreted. The DCPS product defines and interprets these correctly.
A6
C
D
7x9
7_envelope
10x14
11x14
PostCard
D.10 Selecting Separator Pages from Alternate Tray
To select job separator pages from an alternate tray using the DCPS software,
define the following system logical:
$ DEFINE /EXECUTIVE_MODE /SYSTEM DCPS$queuename_SEPARATOR_TRAY number
Note that number is a valid tray number for the printer served by that queue,
and is printer-specific. Refer to your printer documentation to obtain the
correct value.
The following are the values for Compaq and DIGITAL printers:
Table D–1 Tray Number Values
Printer
Tray
Tray
Number
upper
0
lower
1
multipurpose
3
Default
Optional
Compaq Laser Printer LN16
♦
♦
♦
(continued on next page)
D–4 DECprint Supervisor (DCPS) and DECprint Printing Services Software (CPS)
Table D–1 (Cont.) Tray Number Values
Printer
Tray
Tray
Number
Default
Optional
Compaq Laser Printer LN32 and LNM40
multipurpose
0
tray 1
1
tray 2
2
tray 3
3
tray 4
4
tray 5
5
envelope feeder
6
multipurpose
0
cassette1
1
manual feed
0
lower
1
upper2
2
power envelope feeder
3
multipurpose
0
upper
1
lower
2
high capacity feeder3
3
♦
♦
♦
♦
♦
DEClaser 1150 and 1152
♦
♦
DEClaser 2150 and 2250
♦
♦
♦
DEClaser 3250
1 If
♦
installed, becomes the default
2 Duplex
3 A/A4
only
page sizes only
(continued on next page)
DECprint Supervisor (DCPS) and DECprint Printing Services Software (CPS) D–5
Table D–1 (Cont.) Tray Number Values
Printer
Tray
Tray
Number
upper
0
lower
2
multipurpose
3
multipurpose
0
Default
Optional
DEClaser 3500
♦
♦
DEClaser 5100
upper
1
lower
2
♦
♦
DIGITAL Colorwriter 1000
upper
0
lower
1
♦
♦
DIGITAL Colorwriter LSR 2000 and 2000+
upper
1
lower
2
♦
♦
DIGITAL Laser Printer LN15 and LN15+
upper
0
lower
1
multipurpose
3
♦
♦
♦
DIGITAL LN17ps and Laser Printer LN17+ps
main
0
multipurpose
1
lower 1
2
lower 2
3
♦
♦
♦
(continued on next page)
D–6 DECprint Supervisor (DCPS) and DECprint Printing Services Software (CPS)
Table D–1 (Cont.) Tray Number Values
Printer
Tray
Tray
Number
Default
Optional
DIGITAL LN17ps and Laser Printer LN17+ps
envelope feeder
♦
4
DIGITAL Laser Printer LN20
multipurpose
1
upper
2
lower
5
upper
1
middle
2
lower
3
LCIT
5
upper
1
lower
5
upper
1
lower
2
♦
♦
DIGITAL Laser Printer LN40
♦
♦
DIGITAL Laser Printer LNC02
♦
♦
DIGITAL PrintServer 17 and 17/600
DIGITAL PrintServer 20, 32, 32plus and 40
upper
1
lower
2
LCIT
3
♦
(continued on next page)
DECprint Supervisor (DCPS) and DECprint Printing Services Software (CPS) D–7
Table D–1 (Cont.) Tray Number Values
Printer
Tray
Tray
Number
Default
Optional
GENICOM microLaser 170
see Compaq Laser Printer LN16
GENICOM microLaser 210 and LN21
multipurpose
0
tray 1
1
tray 2
2
tray 3
3
envelope feeder
6
♦
♦
♦
♦
GENICOM microLaser 280 and LN28
multipurpose
0
tray 1
1
tray 2
2
tray 3
3
♦
♦
♦
GENICOM microLaser 320 and 401
see Compaq Laser Printer LN32
D.11 Stopping Unreachable PrintServer
If the operator issues STOP/QUEUE/RESET, and the queue is connected to a
DIGITAL PrintServer printer that is unreachable, the queue stops properly.
This was not always the case with the CPS V4.1 software.
D.12 Overwriting First Line
In the CPS V4.1 product, the top line was overwritten if the record started
with a form feed. This works correctly in the DCPS software.
D–8 DECprint Supervisor (DCPS) and DECprint Printing Services Software (CPS)
D.13 Stall Timeouts
The CPS V4.1 software did not start the stall timer for directly-connected
serial printers. The DCPS software starts the timer.
In the CPS V4.1 product, the default timeout for a stall message was one
minute. This frequently resulted in ‘‘queue stalled’’ messages when the printer
was processing a compute-intensive page (and was not really stalled at all). In
the DCPS product, the stall timeout is four minutes.
D.14 Requeuing a Job
When a network error occurred while connecting to a printer, the CPS V4.1
software would requeue the job with the /HOLD attribute. The DCPS software
requeues it without the /HOLD attribute.
D.15 Reading Stream Files
If a PostScript file has a record attribute of STREAM, STREAM_LF, or
STREAM_CR, it is read in head1 mode. This allows the DCPS software to
print very long stream records that the CPS software cannot print. Files of
this type are sometimes written by PC communications programs.
D.16 Copies Start on New Sheets
When /COPIES=n is requested, and n is more than one, each copy starts on a
new sheet, even when printing with NUMBER_UP or SIDES=2. This was not
the case with PostScript jobs in the CPS V4.1 product.
D.17 Generic Queues Restarted
On shutdown, OpenVMS stops execution queues but not generic queues. As
a result, when the system starts up again, the generic queues begin running
even though they may have the wrong characteristics. When you start up
generic queues in the CPS V4.1 product, you get warning messages saying
that the queues are already running (as of OpenVMS V5.5). When the DCPS
software starts up generic queues, it stops and then restarts those that are
already running.
D.18 Proprinter Translator
The DCPS software contains a new Proprinter-to-PostScript translator
not available in the CPS product. For general information on using the
PROPRINTER data type, see the DECprint Supervisor for OpenVMS User’s
Guide.
DECprint Supervisor (DCPS) and DECprint Printing Services Software (CPS) D–9
D.19 DCPS and PATHWORKS Libraries
PATHWORKS for OpenVMS (Macintosh) creates its own device control library,
MSAP$DEVCTL.TLB, and also puts its modules into the CPS library if there
is one. It does not put them in the DCPS library. To rectify this, define
DCPS_LIB as a search list that points to both the DCPS and PATHWORKS
libraries. An example in DCPS$STARTUP.TEMPLATE shows how to do this.
D.20 Printing with Macintosh & PC Files
The DCPS software contains a new PostScript example file to improve printing
of Macintosh and PC files on DIGITAL PrintServer printers.
D.21 Improved Color Function for Colormate PS
The color transfer function of the Colormate PS has been changed to avoid the
problems of gray scale images that are muddy or brown, and natural images
with poor flesh tones. The Colormate PS now runs prints with a new default
color transfer function to provide better gray scale images and natural flesh
tones. Consequently, you may notice the following changes when you print on
the Colormate PS:
•
Graphic images may not seem as brilliant.
•
Grays will be accurately rendered as gray and not brown.
•
Some pictures may appear to have less yellow and/or more blue in them.
D.22 Printing Security Messages
The DCPS product provides a new example file:
SYS$COMMON:[SYSHLP.EXAMPLES.DCPS]CONFIDENTIAL.PS
This file shows how to redefine the showpage operator to write ‘‘Confidential’’
at the top and bottom of each page as an overlay (that is, after the contents of
the page have been imaged).
D–10 DECprint Supervisor (DCPS) and DECprint Printing Services Software (CPS)
E
Ordering Additional Documentation
This appendix lists Compaq software documents and documentation kits
associated with PostScript printers, and their respective order numbers.
The asterisk (*) in an order number stands for the latest version of the
document or kit.
PrintServer Software
Software Document
Part Number
Digital UNIX
QA-0V9AJ-GZ
HP-UX
QA-0V9AD-GZ
IBM-AIX
QA-0V9AE-GZ
IRIX
QA-0V9AQ-GZ
OpenVMS
QA-0V9AA-GZ
Solaris
QA-0V9AK-GZ
SunOS
QA-0V9AC-GZ
ULTRIX
QA-0V9AB-GZ
Windows
QA-0V9AH-GZ
Note
PrintServer Software is being retired in 2001. This documentation may
no longer be available.
PostScript Programming Documentation
•
PrintServer Printers PostScript Level 2 Programmer’s Supplement
(order number: EK–PRTPL–PS)
•
PostScript Printers Programmer’s Supplement
(order number: AA–HL84*–TE)
Ordering Additional Documentation E–1
DECprint Supervisor Software for OpenVMS
The following is the DECprint Supervisor Software for OpenVMS documentation.
Complete documentation kit (order number: QA–09NAA–GZ)
•
DECprint Supervisor for OpenVMS Software Installation Guide
•
DECprint Supervisor for OpenVMS System Manager’s Guide
•
DECprint Supervisor for OpenVMS User’s Guide
DIGITAL ANSI-Compliant Level 3 Printing Protocol
The following is the DIGITAL ANSI-Compliant Level 3 Printing Protocol
documentation.
Documentation kit (order number: QA–YNCA*–GZ)
•
DIGITAL ANSI-Compliant Printing Protocol Level 3 Programming
Reference Manual
•
DIGITAL ANSI-Compliant Printing Protocol Level 3 Programming
Supplement
E–2 Ordering Additional Documentation
Index
A
Accounting fields
filled with zeros by job controller, 9–3
left blank by job controller, 9–3
supplied by DECprint Supervisor, 9–1
supplied by job controller, 9–2
Accounting utility, 9–1
Automatic data type detection
overview, 1–2
solving problems with, 11–17
specifying a default text data type for,
4–3
B
Baud rate limitations, 2–8
Bi-directional communication
requirement for, 2–2
Burst page, 6–1
C
Changing the character set for PCL and
Proprinter files, 7–9
Character sets, changing for PCL and
Proprinter files, 7–9
Commands
See Print queue commands
DELETE/ENTRY, 5–2
SET ENTRY, 5–4
SHOW ENTRY, 5–1
SHOW QUEUE, 5–1, 5–5
START/QUEUE, 5–6
Commands (cont’d)
START/QUEUE/MANAGER, 5–9
STOP/QUEUE/MANAGER, 5–9
Conventions, xiii
Converting queues from DECprint Printing
Services, 3–1
CPAP
Also see TCP/IP
definition of, 3–4
specifying network address, 3–6
CPS, D–1
Custom setup modules, 7–7
D
Data type detection, 1–2
DCPS$DEFAULT form, 8–5
DCPS$STARTUP.COM
creating, 3–1
specifying the device name in, 3–5
DEClaser font emulation, 7–13
DECnet
specifying PrintServer network address,
3–6
DECprint Printing Services, converting from,
3–1
DECprint Printing Services software, D–1
DECprint Supervisor
features, 1–1
DECprint Supervisor software overview, 1–3
Default form, 8–5
Default queue
parameters, 3–7
syntax errors handling, 11–16
syntax for, 3–7
Index–1
Default queue (cont’d)
qualifiers, 3–8
Default text data type, 4–3
Defining
print queue qualifiers, 3–8
DELETE/ENTRY command, 5–2
DELETE/FORM command, 8–4
Deleting
forms, 8–4
print jobs, 5–2
Device control library, 1–5, 7–1
Device name, specifying in
DCPS$STARTUP.COM, 3–5
Displaying
print job status, 5–1
queues, 5–5
Documentation
Compaq/DIGITAL PostScript printers,
E–1
E
Error messages
for LAT connected printers, 11–11
Error page, 6–7
Ethernet use, serial printers, 2–3
Execution queues, 3–2
specifying printer device name in, 3–5
F
File burst page
specifying, 6–4
File error page, 6–7
File flag page
specifying, 6–4
File separation pages
specifying, 6–4
File trailer page
specifying, 6–4
Flag page, 6–1
Font cartridge emulation, 7–13
Fonts
downloading and deleting, C–1
Index–2
/FORM qualifier
with DELETE, 8–4
with SET/QUEUE, 8–2
with START/QUEUE, 8–2
Forms
associating with queues, 8–2
default, 8–5
deleting, 8–4
G
Generic queues, 3–14
defining, 3–14
H
Hardware requirements
other printers, 2–2
I
IP_CPAP
See CPAP
IP_RAWTCP
See Raw TCP/IP
J
Job burst page
specifying, 6–2
Job flag page
specifying, 6–2
Job log page
description of, 6–6
specifying, 6–6
Job not printing, 11–14
Job trailer page
specifying, 6–2
L
LAT
port characteristics required for printing,
2–5
terminal server, 2–4
LAT protocol file, editing the, 2–7
LAT startup file, 2–4
Library search list for setup modules, 7–5
Login dialog, reducing for serial printers,
11–13
Log page, 6–1
LPD, not supported, 3–4
LPS$$UNRECOGNIZED, 7–15
M
Messages
network error, 11–11
Modifying
DCPS symbiont behavior, 3–10
execution queue behavior, 3–10
print job attributes, 5–4
queues, 3–15
Multistreamed symbiont process
changing DCPS environment with, 3–11
running DCPS as, 3–10
N
Network printers
troubleshooting, 11–7
O
OPCOM messages, 11–1
Other printers
hardware requirements, 2–2
P
Page counters, mechanical, 9–4
PCL files
changing character set for, 7–9
Persistent resources, loading, 7–8
Port characteristics, 2–5
Postinstallation requirements
for PrintServer printers, 2–11
PRINT command, 1–4
/BURST qualifier, 6–6
/FLAG qualifier, 6–6
MESSAGES parameter, 6–6
PRINT command (cont’d)
/TRAILER qualifier, 6–6
Printer documentation, E–1
Printer name, setting, 2–10
Printers
troubleshooting newly installed, 11–2
Printers, serial use on Ethernet, 2–3
Printer-specific information, 10–1
Printer startup file
defining execution queues in, 3–2
defining generic queues in, 3–14
Printing system management commands,
A–1
Print job attributes, changing, 5–4
Print jobs
characteristics, A–3
deleting, 5–2
holding, 5–3
printer state is unknown, 5–6
releasing, 5–3
Print queues
commands, A–1
customizing execution queue behavior,
3–10
displaying, 5–5
execution, 3–2
generic, 3–14
interrupting busy printers when job
starts, 3–12
parameters
default, 3–7
syntax, 3–7
syntax errors, 11–16
qualifiers, 3–8
running DCPS as a multistreamed
process, 3–10
running multistreamed, 3–11
stalled, 5–8
starting, 5–6
suppressing PostScript synchronization
when a job starts, 3–12
suppressing the OPCOM message ‘‘User
Name Not Found’’, 3–13
testing the printing system, 3–16
types of, 3–1
Index–3
PrintServer printers
postinstallation requirements, 2–11
specifying DECnet network address, 3–6
specifying TCP/IP network address, 3–6
troubleshooting procedures for, 11–14
Print symbiont
device control library for, 1–5
Proprinter files
changing character set for, 7–9
PSM$ANNOUNCE, 6–6
Q
Qualifiers, print queue, 3–8
Queue
See Print queue
Queue logical names, 11–5
Queue manager
starting, 5–9
stopping, 5–9
Queue parameters
default, 3–7
defaulting order of, 3–7
redefining, 3–7
syntax for, 3–7
Queue structure
of execution queues, defining, 3–2
of generic queues, defining, 3–14
R
Raw TCP/IP
Also see TCP/IP
definition of, 3–4
specifying network address, 3–4
specifying TCP port number, 3–4
Requirements
for PrintServer printers on TCP/IP, 2–11
Resources
persistently loading, 7–8
Index–4
S
Search list for device control libraries, 7–5
Separation pages
adding system message to, 6–6
definition of, 6–1
enabling for file, 6–4
enabling for job, 6–2
Serial printers
eliminating login dialog on, 11–13
Serial printers, on Ethernet, 2–3
SET ENTRY/HOLD command, 5–3
SET ENTRY/RELEASE command, 5–3
SET ENTRY command, 5–4
SET PRINTER, A–3
Setup modules, 7–7
customized, 7–7
SHOW ENTRY command, 5–1
SHOW QUEUE command, 5–1, 5–5
Stalled print queue, 5–8
START/QUEUE/MANAGER command, 5–9
START/QUEUE command, 5–6
Starting
print queues, 5–6
queue manager, 5–9
Startup file, creating, 3–1
STOP/QUEUE/MANAGER command, 5–9
Stopping
queue manager, 5–9
Supported printers
using, 2–9
Symbiont, 1–4
System startup file, editing the, 3–15
T
TCP/IP
Also see CPAP
Also see Raw TCP/IP
requirements, 2–11
Telnet, not supported, 3–4
Text data type default, 4–3
Third-party printers
unsupported, 7–15
Trailer page, 6–1
Translators, 1–6
Troubleshooting procedures
for a printer in a network environment,
11–7
for incorrectly translated files, 11–17
for jobs not printing, 11–1
for newly installed printers, 11–2
for PrintServer printers, 11–14
for queue default parameters, 11–16
for slow printing, 11–15
for stopped printers, 11–5
when jobs are not printing, 11–14
when layup definition files are not found,
11–16
U
Unrecognized printers, 7–15
Unsupported printers, 7–15
Index–5