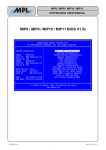
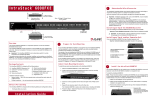
1
EPaC 205-01A Book Page 1 Wednesday, October 15, 1997 3:40 PM
Asanté
EtherPaC 2000+ Series
Plug-and-Play ISA Ethernet Adapter
Installation Guide
EPaC 205-01A Book Page 2 Wednesday, October 15, 1997 3:40 PM
Copyright Notice
Copyright 1996 by Asanté Technologies, Inc.
All rights reserved. No part of this manual, or any associated artwork, software, product design
or design concept, may be copied, reproduced or stored, in whole or in part, in any form or by
any means mechanical, electronic, optical, photocopying, recording or otherwise, including
translation to another language or format, without the express written consent of Asanté
Technologies, Inc.
Printed in Taiwan.
Trademarks
Asanté Technologies and EtherPaC are trademarks of Asanté Technologies, Inc. Microsoft, Windows, Windows 95 and Windows NT are registered trademarks of Microsoft Corporation. Ethernet is a registered trademark of the Xerox Corporation. All brand names and products are
trademarks or registered trademarks of their respective holders.
FCC Information
This device complies with part 15 of the FCC Rules. Operation is subject to the following two
conditions: (1) this device may not cause harmful interference and (2) this device must accept
any interference received, including interference that may cause undesired operation.
Operation of this equipment in a residential area is likely to cause interference, in which case,
the user, at his or her own risk and expense, will be required to correct the interference.
Declaration of Conformity
Asanté Technologies, Inc. declares that the EtherPaC 2000+ Adapter conforms with the following standards, in accordance with the provisions of the EC Directive 89/336/EEC: EN
55022:1994, EN50082-1:1992, IEC 801-2, IEC 801-3, IEC801-4:1988.
Asanté Warranty
Asanté Technologies, Inc. warrants that this product will be free from defects in title, materials
and manufacturing workmanship. If the product is found to be defective, then, as your sole
remedy and as the manufacturer’s only obligation, Asanté Technologies, Inc. will repair or
replace the product.
This warranty is exclusive and is limited to the EtherPaC 2000+ Series ISA Ethernet Adapter
Card.This warranty shall not apply to products that have been subjected to abuse, misuse,
abnormal electrical or environmental conditions, or any condition other than what can be considered normal use.
Warranty Disclaimers
Asanté Technologies, Inc. makes no other warranties, express, implied or otherwise, regarding
the EtherPaC 2000+ Series ISA Ethernet Adapter Card, and specifically disclaims any warranty
for merchantability or fitness for a particular purpose.
The exclusion of implied warranties is not permitted in some states and the exclusions specified herein may not apply to you. This warranty provides you with specific legal rights. There
may be other rights that you have which vary from state to state.
Limitation of Liability
The liability of Asanté Technologies, Inc. arising from this warranty and sale shall be limited to a
refund of the purchase price. In no event shall Asanté Technologies, Inc. be liable for costs of
procurement of substitute products or services, or for any lost profits, or for any consequential,
incidental, direct or indirect damages, however caused and on any theory of liability, arising
from this warranty and sale. These limitations shall apply notwithstanding any failure of essential purpose of any limited remedy.
EPaC 205-01A Book Page i Wednesday, October 15, 1997 3:40 PM
Table of Contents
Introduction . . . . . . . . . . . . . . . . . . . . . . . . . . . . . . . . . . 1-1
Features . . . . . . . . . . . . . . . . . . . . . . . . . . . . . . . . . . . . . . . . . . . . .1-2
Package Contents . . . . . . . . . . . . . . . . . . . . . . . . . . . . . . . . . . . . .1-2
Installing the Adapter . . . . . . . . . . . . . . . . . . . . . . . . . . 2-1
Optional AUI Connector . . . . . . . . . . . . . . . . . . . . . . . . . . . . . . . .2-2
Configuring the Adapter . . . . . . . . . . . . . . . . . . . . . . . . . . . . . . . .2-2
Testing the Adapter . . . . . . . . . . . . . . . . . . . . . . . . . . . . . . . . . . . .2-3
LED Indicators . . . . . . . . . . . . . . . . . . . . . . . . . . . . . . . . . . . . . . . .2-5
Installing Network Drivers . . . . . . . . . . . . . . . . . . . . . . 3-1
Network Operating Systems Supported . . . . . . . . . . . . . . . . . . . .3-1
Installing Network Specific Drivers . . . . . . . . . . . . . . . . . . . . . . .3-2
Remote Boot ROM . . . . . . . . . . . . . . . . . . . . . . . . . . . . . 4-1
Booting Your PC From a Server . . . . . . . . . . . . . . . . . . . . . . . . . .4-1
Installing the Boot ROM . . . . . . . . . . . . . . . . . . . . . . . . . . . . . . . .4-1
Enable Boot ROM Function . . . . . . . . . . . . . . . . . . . . . . . . . . . . . .4-2
Setting the Boot ROM Address . . . . . . . . . . . . . . . . . . . . . . . . . . .4-2
Preparing the Network Server and PC . . . . . . . . . . . . . . . . . . . . .4-2
i
EPaC 205-01A Book Page ii Wednesday, October 15, 1997 3:40 PM
Jumper Configuration . . . . . . . . . . . . . . . . . . . . . . . . . . A-1
Specifications . . . . . . . . . . . . . . . . . . . . . . . . . . . . . . . . . B-1
EtherPaC 2000+ Adapter Specifications . . . . . . . . . . . . . . . . . . . B-1
ii
EPaC 205-01A Book Page 1 Wednesday, October 15, 1997 3:40 PM
1
Introduction
The Asanté EtherPaC 2000+ adapter is a Plug-and-Play Ethernet adapter that
connects a personal computer with an Industry-Standard Architecture (ISA)
bus to an Ethernet network.
Plug-and-Play technology provides automatic configuration of new devices
without user intervention.
The EtherPaC 2000+ adapter has two fixed connectors: RJ-45 and BNC. An
optional AUI connector is also available.The adapter can be set to operate in
one of three modes:
❏
Plug-and-Play
❏
Jumperless
❏
Jumper
The adapter operates in either 8- or 16-bit slots, and is designed to comply
with the IEEE 802.3 Ethernet standard.
Hassle-free installation is achieved by conforming to Plug-and-Play ISA specifications. For compatibility with older, non-Plug-and-Play systems, use the
configuration software program to configure the adapter instead of setting
jumpers.
The adapter can work with software drivers for Novell NE2000 adapters,
including NetWare ODI, Microsoft Windows 95, Windows NT, LAN Manager,
Windows for Workgroups,TCP/IP, etc.
Page 1-1
EPaC 205-01A Book Page 2 Wednesday, October 15, 1997 3:40 PM
Introduction
Features
❏
❏
❏
❏
❏
❏
❏
❏
❏
❏
❏
❏
Operates in Plug-and-Play, Jumperless, or Jumper mode
Support for 8- and 16-bit expansion slots
Provides UTP/BNC/AUI ports to comply with IEEE 802.3
10BASE-2, 10BASE-5 and 10BASE-T standard
Fully compatible with Novell’s NE2000 Ethernet adapter
Provides drivers for popular Network Operating Systems
including Novell’s NetWare, Microsoft Windows 95, Windows NT, LAN Manager, Windows for Workgroups, and
FTP PC/TCP
On-board 16KB RAM for higher performance
On-board Boot ROM socket for diskless workstations
Conforms to Plug-and-Play ISA specifications
Full duplex design to double the performance to
20Mbps
Auto-setup of IRQ and I/O address even with non-Plugand-Play systems
Media type auto detection
Provides diagnostic software and LEDs to indicate network activity
Package Contents
Please make sure that you have the following items in this package:
❏
❏
❏
❏
❏
Page 1-2
EtherPaC 2000+ Ethernet adapter
This installation guide
One driver diskette
One T-connector
One registration card
EPaC 205-01A Book Page 1 Wednesday, October 15, 1997 3:40 PM
2
Installing the Adapter
Using the EtherPaC 2000+ Ethernet adapter to set up your PC network,
install the adapter in the computer.
Note: You do not need to set any jumpers or switches on the adapter
unless it is necessary to assign specific IRQ and I/O addresses.
1
2
3
Turn the power off and remove the computer cover.
Align the adapter’s edge connector with an expansion slot.
Push the adapter down into the slot until the adapter locks into
place, as illustrated in Figure 2-1.
Figure 2-1
Inserting the adapter in an expansion slot
4
5
Replace the computer cover.
6
Power on the computer.
Attach the network cable.The adapter provides two connectors
for connecting to an Ethernet network: RJ-45 or BNC. (An
optional AUI connector is also available.)
Page 2-1
EPaC 205-01A Book Page 2 Wednesday, October 15, 1997 3:40 PM
Installing the Adapter
Optional AUI Connector
An optional AUI connector is available from Asanté (see back cover).The JP3
connector on the adapter is used to attach a cable to a bracket with the AUI
connection.
To install the AUI connector cable:
1
Hook up the cable to the connector marked JP3: AUI.
Important: Make sure the red line on the cable is aligned
with the pin 1 (lower left) location.
2
Secure the bracket to the computer.
Configuring the Adapter
The EtherPaC 2000+ adapter provides three methods for configuration (setting IRQ and I/O base addresses): Plug-and-Play mode, Jumperless mode, and
Jumper mode.
Plug-and-Play mode (default mode)
When using the adapter in a Plug-and-Play-compliant system, no software or
jumper-setting configuration is needed.The Plug-and-Play system automatically configures the adapter.
To set the adapter into Plug-and-Play mode:
❏
Remove the jumper on jumper-pair 8 of JP1 (default setting)
Jumperless mode
When using the adapter in Jumperless mode in a non-Plug-and-Play-compliant system, you can configure the adapter by software configuration with
the SETUP.EXE program. (Refer to the README.EXE program for details on
using the SETUP program to configure the adapter.)
Page 2-2
EPaC 205-01A Book Page 3 Wednesday, October 15, 1997 3:40 PM
EtherPaC 2000+ Installation Guide
To set the adapter into Jumperless mode:
❏
❏
Remove the jumper on jumper-pair 8 of JP1 (default setting)
Use the SETUP.EXE program to set to Jumperless mode
Jumper mode
When using the adapter in Jumper mode, you can configure the adapter
with jumper settings JP1 and JP2. (See Appendix A for a description of
jumper settings.)
To set the adapter into Jumper mode:
❏
Place the jumper on jumper-pair 8 of JP1
Full Duplex mode
The adapter supports full duplex mode, which transmits and receives data
simultaneously. Full duplex mode is set by using the SETUP.EXE program.
Refer to the README.EXE program for details on using the SETUP.EXE program.
Important: If the adapter is set to full duplex mode, the hub
it is connected to should be a switching hub that
supports full duplex mode.
Testing the Adapter
The SETUP.EXE program provides diagnostic software for testing the EtherPaC 2000+ adapter.The diagnostic program checks the adapter then reports
the results. It can help you to isolate any problem on the adapter and figure
out whether the problem is caused by the adapter or the cable.The diagnostic program can be used at any time.
Important: Make sure the drivers are not loaded into memory before running the diagnostic program. If you
are using Windows 95, restart the computer in
the MS-DOS mode to prevent Windows 95 from
loading drivers.
Page 2-3
EPaC 205-01A Book Page 4 Wednesday, October 15, 1997 3:40 PM
Installing the Adapter
To run the diagnostic program:
1
2
3
Insert the Driver Diskette into drive A.
Type the following at the DOS prompt:
A:SETUP
Press return.
A screen appears displaying the main menu.
4
Select DIAGNOSTICS, then press return.
The sub-menu appears, displaying two options:
❏
❏
5
Diagnostics on Board — tests your LAN card and network connection
Diagnostics on Network —tests the LAN card on the
network to see if the adapter can receive and send
data to the network accurately
Select Diagnostics on Board or Diagnostics on Network,
then press return.
The program runs a number of tests.The names of the tests and
their results are displayed on the screen. Verify the results to
make sure that all tests passed.
Press F1 or the space bar at any time for detailed information on
the tests.
Note: If a test fails, check for conflicts with IRQ and I/O
address parameters. If a conflict is discovered, change
to a parameter that is not being used by other devices.
6
7
Page 2-4
Press ESC to end the test.
Select Exit, then press return to return to DOS.
EPaC 205-01A Book Page 5 Wednesday, October 15, 1997 3:40 PM
EtherPaC 2000+ Installation Guide
LED Indicators
Figure 2-2 shows the two LEDs that indicate Link and Activity status for
installation verification and diagnostic purposes.
Link LED
Figure 2-2
Activity LED
LED Indicators
Activity LED
The amber Activity LED indicates the activity (transmit and receive data) status of the EtherPaC 2000+ controller board.This LED should blink when
data packets are being transmitted or received from the cable.
State
Description
Blinking
• Data packets being transmitted or received
Off
• Power off
On
• Power on
• Data packets not being transmitted or received
Link LED
The green Link LED indicates whether the twisted-pair link is connected. If
link integrity is not detected, there is a link failure and the Link LED will be
off.The transmit and receive functions of the jack also will be disabled.
State
Description
On
• Link integrity is detected
Off
•
•
•
•
No twisted-pair cable is connected
No power source to hub
Twisted-pair cable is faulty
A non-10BASE-T device connected at the other end of the twistedpair cable
Page 2-5
EPaC 205-01A Book Page 6 Wednesday, October 15, 1997 3:40 PM
EPaC 205-01A Book Page 1 Wednesday, October 15, 1997 3:40 PM
3
Installing Network Drivers
Network Operating Systems Supported
After installing, configuring and testing the adapter, you are ready to install
network drivers and work with your network operating system.
The following network operating systems are supported:
❏
❏
❏
❏
Novell NetWare
Microsoft Windows 95
Microsoft Windows for
Workgroups
Microsoft Windows NT
❏
❏
❏
❏
Microsoft LAN Manager
SCO UNIX
Other NDIS-and ODI-compliant operating systems
TCP/IP
This chapter describes driver installation in the following environments:
❏
❏
❏
Novell NetWare Client
Microsoft Windows 95
Microsoft Windows NT 4.0 Workstation
Generally, the adapter will support a network operating system (NOS) that
works with NDIS and ODI drivers. Because of the variety of environments in
which the adapter may be installed and used, and the frequency of revisions
in those environments, the instructions for driver installation are given as
READ ME files on the driver disk supplied in your adapter package.
Review the READ ME files by running README.EXE from the DOS prompt.
For complete installation details, see the READ ME file in the subdirectory
appropriate to your network operating system.
Page 3-1
EPaC 205-01A Book Page 2 Wednesday, October 15, 1997 3:40 PM
Installing Network Drivers
Installing Network Specific Drivers
Novell NetWare Client
To install a NetWare DOS ODI driver automatically, run the INSTODI autoinstallation program on the Driver Diskette. Performing this procedure
installs all necessary NetWare DOS ODI client software, modifies the CONFIG.SYS file, and configures the adapter automatically.
1
Insert the EtherPaC 2000+ Driver Diskette into the computer’s
floppy drive A, then change to drive A.
2
3
Type the following at the DOS prompt:
4
5
6
Press any key to continue.
7
When the installation is complete, remove the Driver Diskette
and reboot the system.
8
Run STARTNET.BAT from the C:\NWNET directory to logon to a
NetWare server as a NetWare DOS ODI client.
INSTODI
Press return.
The main display appears.
Press 1 to select VLM or 2 to select NETX ODI Environment.
If you are using a non-Plug-and-Play system, you may be
prompted to activate the adapter. Press Y to activate the adapter.
The appropriate files will be copied to the default C:\NWNET
directory.
Microsoft Windows 95
This section explains how to install the driver to use your adapter with Windows 95.The instructions require that you have previously installed the Windows 95 software on the computer without installing a network adapter or
driver.
Page 3-2
EPaC 205-01A Book Page 3 Wednesday, October 15, 1997 3:40 PM
EtherPaC 2000+ Installation Guide
Note: The EtherPaC 2000+ adapter is a Plug-and-Play module with
Windows 95; no separate driver installation is needed. After inserting
the adapter into your computer, Windows 95 will automatically detect
and install the Novell NE2000 driver for use with the adapter.
The Windows 95 installation disks or CD is needed to complete
this installation.
1
2
Install the adapter into an expansion slot.
Power on the computer, then start Windows 95.
When Windows 95 starts, a “New Hardware Found” window
appears.
Note: If the “New Hardware Found” window does not
appear, you need to configure the adapter using the Add
New Hardware wizard in the Windows 95 Control Panel.
3
Select Windows default driver, then click OK.
Note: If you have not installed a network adapter on the
computer before, Windows 95 may prompt you to enter the
computer name and workgroup name.
4
Click Yes to restart the computer.
Microsoft Windows NT Workstation 4.0
This section explains how to install the drivers to use your adapter with
Windows NT Workstation 4.0.The instructions require that you have previously installed Windows NT 4.0 on your computer without installing a network adapter or driver.
1
Install the adapter into your computer, then power on the computer.
2
3
Start Windows NT 4.0, then click the Start button.
Open the Settings menu and select Control Panel.
Page 3-3
EPaC 205-01A Book Page 4 Wednesday, October 15, 1997 3:40 PM
Installing Network Drivers
4
5
Double-click the Network icon.
If you have previously installed a network adapter on the
computer:
❏
Click Adapters in the Network window
❏
Click Add
If you have not installed a network adapter on the computer:
❏
❏
❏
❏
Click Yes in the Network Configuration dialog box
Select Wired to the Network in the Network Setup
Wizard window
Click Next to continue
Click the Select from list button
6
Click the Have Disk button in the Select Network Adapter
window.
The Insert Disk window appears.
7
8
9
Insert the Driver Disk into floppy drive A.
10
Select EtherPaC 2000+ Ethernet Adapter, then click OK.
If installing the adapter for the first time, follow the Windows NT
instructions to install the appropriate protocols and network services.
11
Click Skip in the Input Ethernet ID window if only one adapter
is installed.The Ethernet Adapter Bus Location window appears.
12
13
Select ISA bus type, then click OK.
Page 3-4
Type the following at the prompt:
A:\WINNT40
Click OK.
The Select OEM Option window appears.
Click Close in the Network window, then click Yes to restart.
EPaC 205-01A Book Page 1 Wednesday, October 15, 1997 3:40 PM
4
Remote Boot ROM
Booting Your PC From a Server
You may want to boot up your PC from a remote server on the network, or
you may have a PC without a boot diskette or a disk drive and need to boot
up from a remote server. To boot the PC from a server, you need to:
❏
❏
❏
❏
Install the Remote Boot ROM on the EtherPaC 2000+
adapter
Install Novell NetWare software on the network
Prepare the PC
Prepare the server
Boot ROM allows you to load the PC operating system over the network.
Installing the Boot ROM
You install the Boot ROM in the ROM socket of the EtherPaC 2000+ adapter.
Note: If the EtherPaC 2000+ adapter is installed in the PC and connected to the network, turn off the PC, then disconnect and
remove the adapter.
1
Take the Boot ROM out of its protective packaging and check all
pins on the ROM to make sure none are bent.
2
3
Locate the socket for the Boot ROM on the adapter.
Align the Boot ROM’s notch and pins with the socket’s notch and
pins.
Page 4-1
EPaC 205-01A Book Page 2 Wednesday, October 15, 1997 3:40 PM
Remote Boot ROM
4
Gently press the ROM into the socket (see Figure 4-1). Be careful
not to bend the pins.
Boot ROM socket
Figure 4-1
5
Boot ROM socket on the adapter
Install the EtherPaC 2000+ adapter in the PC, then turn on the
PC.
Enable Boot ROM Function
To use the Remote Boot function, you also need to enable the Boot ROM
function in the SETUP.EXE program. Run the setup program from the driver
diskette, select Manual Setup Configuration and enable the Boot ROM
function.
Setting the Boot ROM Address
The Boot ROM address can be setup by running the SETUP.EXE program and
selecting the Boot ROM parameter. If using Jumper mode, you need to
setup the Boot ROM address using jumpers on JP2.
Preparing the Network Server and PC
The procedure for preparing the server and the PC to use a Boot ROM is
dependent upon the Boot ROM product and the network operating system
you are using. Please refer to the user documentation that came with your
Boot ROM for instructions on preparing the network server and PC. Also
see the README.EXE program for detailed instructions on setting up the
network software.
Page 4-2
EPaC 205-01A Book Page 1 Wednesday, October 15, 1997 3:40 PM
A
Jumper Configuration
The EtherPaC 2000+ Adapter can be configured by either jumper settings or
software. Please refer to the following illustrations and tables for a detailed
description of the jumper settings.
Important: You only need to set the jumper when the card is
in Jumper mode.
Hardware jumper setting
JP1
JP2
JP3
AUI Port
Figure A-1
EtherPaC 2000+ Adapter
IRQ
JPR
1
JP1:
BROM ADDRESS
JP2
JP1
I/O
8
8 OPEN : Jumperless/Plug-and-Play mode
CLOSE : Jumper mode
Figure A-2
JP1 and JP2 diagram
Page A-1
EPaC 205-01A Book Page 2 Wednesday, October 15, 1997 3:40 PM
Jumper Configuration
JP1 : 1-4 (I/O ADDRESS)
JP1 : 5-7 (IRQ)
1
2
3
4
I/O
5
6
7
IRQ
0
0
0
0
300H
0
0
0
2(9)
0
0
0
1
320H
0
0
1
3
0
0
1
0
340H
0
1
0
4
0
0
1
1
360H
0
1
1
5
1
0
0
0
380H
1
0
0
10
1
0
0
1
3A0H
1
0
1
11
1
0
1
0
3C0H
1
1
0
12
1
0
1
1
3E0H
1
1
1
15
0
1
0
0
200H
0
1
0
1
220H
0
1
1
0
240H
0
1
1
1
260H
1
1
0
0
280H
1
1
0
1
2A0H
1
1
1
0
2C0H
1
1
1
1
2E0H
JP2 : BROM ADDRESS
Page A-2
1
2
3
4
5
BROM BASE SIZE
0
0
0
0
0
DISABLE NONE
0
1
0
0
0
C0000H,32K
0
1
0
0
1
C8000H,32K
0
1
0
1
0
D0000H,32K
0
1
0
1
1
D8000H,32K
0
1
1
0
0
C0000H,64K
0
1
1
0
1
D0000H,64K
1
0
0
0
0
C0000H,16K
1
0
0
0
1
C4000H,16K
1
0
0
1
0
C8000H,16K
1
0
0
1
1
CC000H,16K
1
0
1
0
0
D0000H,16K
1
0
1
0
1
D4000H,16K
1
0
1
1
0
D8000H,16K
1
0
1
1
1
DC000H,16K
EPaC 205-01A Book Page 1 Wednesday, October 15, 1997 3:40 PM
B
Specifications
EtherPaC 2000+ Adapter Specifications
Bus Characteristics
❏
Works in 8- or 16-bit Industry Standard Architecture
(ISA) bus
Standards
❏
IEEE 802.3 10BASE-T, 10BASE-2 and 10BASE-5
Compatibility
❏
Novell NE2000 compatible
❏
Plug-and-Play ISA specifications
LED Indicators
❏
Link integrity (green)
❏
Activity (red)
Connector/Cable
❏
RJ-45 port: Unshielded twisted-pair wire 22AWG–
26AWG for RJ-45 jack (24AWG recommended); maximum length is 100 meters
❏
BNC port: IEEE 802.3 10BASE-2 Thin Ethernet supported
by BNC T-connector to RG-58 A/U coaxial bus cable
Page B-1
EPaC 205-01A Book Page 2 Wednesday, October 15, 1997 3:40 PM
Specifications
❏
AUI port (optional): IEEE 802.3 10BASE-5 Thick Ethernet
supported by AUI (DB15) connector
Environment
❏
Temperature: Operating 0º C to 50º C; Storage –20º C to
+70º C
❏
Humidity: Operating 10% to 90% (non-condensing)
Software Configuration
❏
I/O address: 200H, 220H, 240H, 260H, 280H, 2A0H,
2C0H, 2E0H, 300H, 320H, 340H, and 360H
❏
Interrupt line: IRQ2 (IRQ9), IRQ3, IRQ4, IRQ5, IRQ10,
IRQ11, IRQ12, and IRQ15
❏
Boot ROM address: C0000H, C4000H, C8000H,
CC000H, D0000H, D4000H, D8000H, DC0000H
Emissions
❏
❏
Page B-2
FCC part 15 Class A
CE
EPaC 205-01A Book Page 3 Wednesday, October 15, 1997 3:40 PM
Technical Support
Contacting Technical Support
To contact Asanté Technical Support:
Telephone
(800) 622-7464
(408) 435-0706
Fax
(408) 432-6018
Fax-Back
(800) 741-8607
(408) 954-8607
Bulletin Board Service (BBS)
(408) 432-1416
ARA BBS (guest log-in)
(408) 894-0765
AppleLink Mail/BBS
ASANTE
FTP Archive
ftp.asante.com
Internet Mail
[email protected]
World Wide Web Site
http://www.asante.com
Technical Support Hours
6:00 a.m. to 6:00 p.m. Pacific Time USA, Monday - Friday.
EPaC 205-01A Book Page 4 Wednesday, October 15, 1997 3:40 PM
ASANTÉ TECHNOLOGIES, INC., 821 FOX LANE, SAN JOSE, CA 95131
PHONE: 408.435.8388, 800.662.9686 • FAX: 408.432.7511, APPLELINK: ASANTE.SALES, e-mail address: [email protected]
©1996 Asanté Technologies Inc., Asanté is a trademark of Asanté Technologies, Inc. All brand names and products are trademarks
or registered trademarks of their respective holders. Part Number 06-00205-02 Rev. A
EPaC 205-01A Book Page 1 Wednesday, October 15, 1997 3:40 PM
DRAFT
Courier-Bold @ 10.0 pt 3-2, 3-5
Courier-Bold @ 9.0 pt 2-4
Garamond-Bold @ 10.0 pt 2-4, 3-2, 3-4–3-5
Garamond-BoldItalic @ 10.0 pt 2-3, 3-3
Garamond-Book @ 10.0 pt 1, i, 1-1–B-2
Garamond-Book @ 18.0 pt A-1, B-1
Garamond-Book @ 5.0 pt 4
Garamond-Book @ 6.0 pt 4
Garamond-Book @ 8.0 pt 4
Garamond-Book @ 9.0 pt 2-1, 2-5, 4-2–A-1
Garamond-Light @ 10.0 pt 2-1
Times-Roman @ 12.0 pt 3, A-2, 1–2
Univers @ 10.0 pt 4–2-5, 3-1–3-5, 4-1–B-2, 1–2
Univers @ 7.0 pt 2-5, 4-2
Univers-Bold @ 10.0 pt i–2-5, 3-1–3-5, 4-1–B-2, 1–2
Univers-Bold @ 12.0 pt i
Univers-Bold @ 13.0 pt 1-2, 2-2–2-3, 2-5, 3-1–3-2, 4-1–4-2, B-1
Univers-Bold @ 14.0 pt 2-1–2-2, 2-4, 3-2–3-5, 4-1–4-2
Univers-Bold @ 18.0 pt 1–3, 1-1–2-5, 3-1–3-5, 4-1–2
Univers-Bold @ 20.0 pt i, 1-1, 2-1, 3-1, 4-1, A-1, B-1
Univers-Bold @ 24.0 pt 1, 3
Univers-Bold @ 48.0 pt 1-1, 2-1, 3-1, 4-1, A-1, B-1
Univers-Bold @ 6.0 pt A-2
Univers-Bold @ 7.0 pt 2-5
Univers-Bold @ 9.0 pt 3–4
Univers-CondensedBold @ 10.0 pt 4
Univers-CondensedBold @ 18.0 pt 3–4
Univers-CondensedBold @ 9.0 pt 3
ZapfDingbats @ 10.0 pt 1-1–1-2, 2-2–2-4, 3-1, 3-3–3-4, 4-1, A-1,
Page -1
EPaC 205-01A Book Page 2 Wednesday, October 15, 1997 3:40 PM
DRAFT
B-1–B-2
Page -2