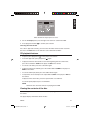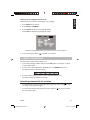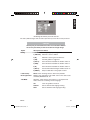
1
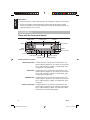
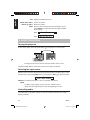
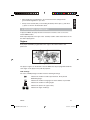
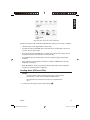
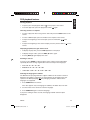
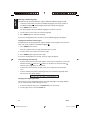
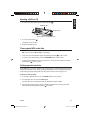
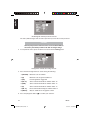
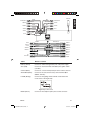
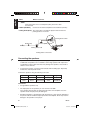
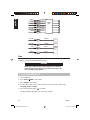
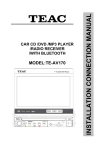
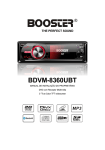
English
Owner’s Manual
VB475
1 DIN DVD/CD/AMFM RECEIVER
VB475
VB475OwnersManual.indd 1
1
1/27/2007 9:34:13 PM
English
Thank you for purchasing this Clarion product.
•
Please read this owner’s manual in its entirety before operating this equipment.
•
After reading this manual, keep it handy, such as in your glove compartment.
•
Save your sales receipt. The warranty at the end of this manual and your sales
receipt are essential for warranty service.
FCC Approval
The Clarion VB475 has been tested and found to comply within the limits of a Class B
digital device, pursuant of Part 15 of the FCC rules. These limitations are designed to
provide reasonable protection against harmful interference in a residential installation.
This equipment generates and uses radio frequency energy and if not installed and
used in accordance with the instructions, may cause harmful interference to radio
communications.
There is no guarantee that interference will not occur in a particular installation. If
this equipment does cause harmful interference to a radio or television reception,
turn off the equipment and contact a local Clarion Dealer for assistance. Changes or
modifications to this product not approved by the manufacturer will void the warranty
and violate FCC Approval.
Contents
FCC Approval .......................................................................................................... 2
1. FEATURES.............................................................................................................. 4
Features .................................................................................................................. 4
2. PRECAUTIONS ....................................................................................................... 4
3. CONTROLS............................................................................................................. 6
Player with the front panel closed ........................................................................... 6
Player with the front panel open .............................................................................. 8
Remote control ........................................................................................................ 8
4. BASIC OPERATIONS ........................................................................................... 10
Turning the player on ............................................................................................. 10
Selecting the input source ..................................................................................... 10
Controlling audio ................................................................................................... 10
Turning the player off ............................................................................................. 11
Setting the time ..................................................................................................... 12
Protecting the player from theft ............................................................................. 12
Care and maintenance .......................................................................................... 13
Changing the battery in the remote control ........................................................... 14
2
VB475OwnersManual.indd 2
VB475
1/27/2007 9:34:20 PM
VB475
VB475OwnersManual.indd 3
English
5. DVD/CD/MP3 OPERATIONS ............................................................................... 15
Regions ................................................................................................................. 15
About DVDs ........................................................................................................... 16
About video CDs, VCDs and MP3 files ................................................................. 16
Loading discs (DVDs and CDs) ............................................................................. 17
DVD playback features .......................................................................................... 19
CD playback features ............................................................................................ 21
Viewing the contents of the disc ............................................................................ 21
Repeating chapters and tracks.............................................................................. 22
Ejecting a DVD or CD ............................................................................................ 23
Playing back MP3 audio files ................................................................................ 23
Setting parental controls ....................................................................................... 23
6. RADIO OPERATIONS.......................................................................................... 25
Searching automatically for a station .................................................................... 25
Searching manually for a station ........................................................................... 26
Presetting frequencies .......................................................................................... 26
Scanning stored stations ....................................................................................... 26
7. AUX-IN OPERATIONS .......................................................................................... 26
Selecting the AUX-IN input source ........................................................................ 26
AUX-IN Playback features ..................................................................................... 26
8. INSTALLATION AND WIRING .............................................................................. 27
Precautions ........................................................................................................... 27
Requirements ........................................................................................................ 27
Options .................................................................................................................. 28
Accessories and hardware .................................................................................... 28
Installing the player ............................................................................................... 28
Cable connections ................................................................................................. 30
Connecting the speakers....................................................................................... 32
Outlet power amplifier connection ......................................................................... 33
Fuse ...................................................................................................................... 34
9. DVD PREFERENCES ........................................................................................... 34
Language options.................................................................................................. 35
Video options ........................................................................................................ 35
Rating options ....................................................................................................... 36
10. TROUBLESHOOTING ......................................................................................... 38
Restoring factory defaults...................................................................................... 38
11. GLOSSARY ......................................................................................................... 39
12. SPECIFICATIONS ............................................................................................... 40
3
1/27/2007 9:34:20 PM
English
1. FEATURES
Features
•
Removable front panel with protective
case for theft prevention.
•
Dolby 4.2 channel sound effects
(manufactured under license from Dolby
Laboratories. “Dolby” and the doubleD symbol are trademarks of Dolby
Laboratories.)
Manufactured under license
from Dolby Laboratories.
“Dolby” and the double-D symbol are
trademarks of Dolby Laboratories.
•
Types of supported discs: DVD-5, DVD-9, DVD-10, DVD-18, SVCD, DVCD, VCD,
CD, MP3, MPEG4, etc.
•
TV standards supported: NTSC, PAL or Auto
•
Image aspect ratio: 4:3 or 16:9
•
Audio output: 4.2CH
•
Audio input: Stereo
•
Disc playback functions: multiple angles, multiple dubbed languages, fast forward,
fast backward, broken point auto memory
•
AM/FM radio capabilities: stores 18 FM and 12 AM broadcasting stations; tunes
automatically and manually
2. PRECAUTIONS
Disc handling
•
To keep a disc clean, do not touch the play side (non-label side).
•
Do not scratch or bend discs.
•
Do not attach sticky notes to or put tape on a disc.
•
Do not attempt to play back a deformed disc.
•
Keep discs away from direct sunlight and heat, such as dashboards and vehicle
heaters; and from dirty, dusty and damp areas, such as vehicle seats.
•
Store discs in a protective disc case.
•
Before playback, wipe the disc outwards from the center with a clean cloth.
Operating
•
Do not operate this product in ways other than those described in this manual.
Failure to follow instructions may void the warranty.
•
Do not make selections through the front panel or the remote while operating the
4
VB475OwnersManual.indd 4
VB475
1/27/2007 9:34:21 PM
English
vehicle. You may cause an accident. Find a place to pull over and stop before you
configure the player.
•
Keep the volume lower than you might if listening at home to ensure safe driving.
•
Do not use the player with the ignition off, which could drain the vehicle’s battery.
•
Parking in direct sunlight for several hours raises the temperature in the vehicle.
If the internal temperature is extremely high (over 50 degrees Celsius), start the
vehicle and let the interior cool down before you use the player.
•
Before leaving the vehicle, eject the DVD disc and store it separately, away from
direct sunlight. Heat and humidity can damage DVD discs causing them not to play.
•
Do not operate the player using a voltage higher than DC 12V.
General
•
Do not pour liquid into the player or poke foreign objects, such as coins, into the
DVD drive slot. Water, humidity, and foreign objects may damage internal circuitry.
•
Do not place screwdrivers or other metal objects near the player or disc.
•
If the player becomes wet, turn off all power and ask your authorized Clarion Dealer
to clean or service the unit.
•
Do not drop the player. You may cause permanent damage.
•
If the vehicle’s battery dies or you disconnect the player from battery power, the
contents of the player’s memory will be lost and all options will return to their factory
defaults.
•
The player uses a Class 1 Laser and will emit a visible or invisible hazardous laser
beam. Avoid looking directly at this beam.
Installation
Installation of mobile audio and video components requires experience with a variety
of mechanical and electrical procedures. Although this manual provides general
installation and operation instructions, it does not show the exact installation methods
for your particular vehicle.
If you do not have the required knowledge, experience, and/or tools to successfully
complete the installation, consult an authorized Clarion Dealer about professional
installation options.
•
Video playback requires the installation of a separate monitor, such as Clarion’s
OHM series monitors. The monitor must support both NTSC and PAL TV standards.
•
Do not install a video monitor where the driver can be distracted by it. Such
placement may cause a traffic accident and violate local regulations.
•
The vehicle must have a 12V battery with negative grounding. Before installing it in
a recreational vehicle, truck or bus, check the battery voltage.
•
For optimal performance and operation, mount the player horizontally. Avoid
mounting the player in a tilted position in excess of 15 degrees.
VB475
VB475OwnersManual.indd 5
5
1/27/2007 9:34:21 PM
English
Maintenance
•
When washing the vehicle, keep the player dry, including the speaker and any discs.
•
Do not disassemble or modify this player. You may damage the player, void the
warranty, and suffer electric shock. All warranty service should be performed by an
authorized Clarion service center.
3. CONTROLS
Player with the front panel closed
Audio knob
LCD screen
Arrows
Open
Power/mute
DISP
(Display)
BAND
SRC (source)
2/UP
Forward and reverse
1/DN (down) 3/ZOOM
Play/Pause
6/RPT (repeat)
4/SCN (scan) 5/RDM (random)
Quick reference to controls
1/DN (down) button In radio mode, press to select the preset button 1. The
station frequency displays on the LCD. Press and hold to
store a radio frequency at button 1. In MP3 mode, press
to page down a list of MP3 files.
2/UP button In radio mode, press to select the preset button 2. The
station frequency displays on the LCD. Press and hold to
store a radio frequency at button 2. In MP3 mode, press
to page up a list of MP3 files.
3/ZOOM button In radio mode, press to select the preset button 3. The
station frequency displays on the LCD. Press and hold to
store a radio frequency at button 3. In DVD mode, press
to zoom in.
4/SCN (scan) button In radio mode, press to select the preset button 4. The
station frequency displays on the LCD. Press and hold to
store a radio frequency at button 4. In DVD, CD or MP3
modes, press to fast forward playback.
6
VB475OwnersManual.indd 6
VB475
1/27/2007 9:34:21 PM
English
5/RDM (random) button In radio mode, press to select the preset button 5. The
station frequency displays on the LCD. Press and hold
to store a radio frequency at button 5. In DVD, CD or
MP3 modes, press to play back chapters, tracks or files
randomly.
6/RPT (repeat) button In radio mode, press to select the preset button 6 The
station frequency displays on the LCD. Press and hold to
store a radio frequency at button 6. In DVD, CD or MP3
modes, press to alternate among repeat options.
BAND button (B) In radio mode, press to select among three FM and two
AM bands. Press and hold, then press the Forward ( )
and reverse ( ) buttons to enter manual station
search.
Arrow buttons Press to make selections during playback setup.
Display button (D) Press to display the clock. Press and hold to access
system setup.
Forward ( ) and reverse Press and hold to fast forward and reverse through
( ) buttons chapters, tracks, files or frequencies.
Press once to skip to the next or previous chapter, track,
file or frequency.
Press repeatedly to move forward or back at the
following speeds. Each time you press the speed
changes:
<
> 1x > 2x > 4x > 8x > 20x > normal playback >
LCD screen The small Liquid Crystal Display (LCD) used to display
the time, radio frequency, disc, and MP3 information.
Open button Press to open the front panel.
Play/pause button ( ) In DVD, CD or MP3 modes, press this button to play or
pause the disc.
Power/mute button ( ) In standby, press to turn the power on. When the power
is on, press to mute the volume. Press and hold for two
seconds to turn the power off.
SRC (source) button ( ) Press to alternate among input sources: Radio, DVD. etc.
Audio knob Rotate to the right to increase the volume and to the left
to decrease the volume.
VB475
VB475OwnersManual.indd 7
7
1/27/2007 9:34:22 PM
English
Player with the front panel open
DVD/CD slot
Eject button
Front panel open
Remote control
Source Mute
Display
Menu
Arrows
Play/pause
Volume decrease
Power
Return
Setup
Stop/Band
Next
Volume increase
Previous
Fast forward
Fast reverse
Slow
Go to
Title
Scan
Audio
Subtitle
Folder down
Folder up
Repeat
Random
Zoom
Angle
PAL/NTSC
Clear
Quick reference to controls
8
VB475OwnersManual.indd 8
VB475
1/27/2007 9:34:24 PM
English
Angle Changes the scene angle while playing back a DVD that
includes multiple scene angles.
Arrows Selects options on the DVD menu and values on OnScreen Display (OSD) menus.
Audio DVD: Changes the language during playback.
VCD/CD: Changes audio channel (left, right, stereo).
Clear DVD: Erases incorrect input. Works in DVD mode only.
Display (DISP) Displays playback information.
Fast forward ( ) Speeds playback forward at 2x, 4x, 8x, 16x and 32x
speeds.
Fast reverse ( ) Fast reverses playback at 2x, 4x, 8x, 16x and 32x speeds.
Folder (DOWN and Selects the folder when using the OSD menus.
UP)
Go to Starts playback at the selected chapter, track or time.
Menu DVD: Displays the main menu.
VCD: Turns playback control (PBC) on and off.
Mute Disables and enables sound.
Next ( ) Skips to the next chapter (DVD) or the next track (CD).
PAL/NTSC (P/N) Selects the video format in which the disc was recorded.
NTSC is used in the United States. PAL is used in Europe
and elsewhere. Check the disc packaging to determine
which you need.
Play/pause ( ) In DVD, CD or MP3 modes, starts and pauses the disc.
Power ( ) Turns the player on and off.
Previous ( ) Skips to the previous chapter (DVD) or track (CD).
Random (RDM) Plays back chapters or tracks in random order.
Repeat (RPT) In DVD, CD or MP3 modes, alternates among repeat
options.
Return In VCD mode with playback control (PBC) on, goes to the
beginning of the current track. Works only in VCD mode.
Scan (SCN) In DVD/VCD modes, plays back 10 seconds of every track.
Setup Accesses the setup menu used to modify player options.
Slow In DVD mode, plays back in slow motion.
Source (SRC) Alternates among input sources: Radio, DVD, etc.
Stop/Band ( BAND) In radio mode, selects among three FM and two AM bands.
In DVD, CD and MP3 modes, stops play back.
Subtitle Turns pre-recorded subtitles on and off.
VB475
VB475OwnersManual.indd 9
9
1/27/2007 9:34:24 PM
English
Title Displays the DVD’s title menu.
Volume down (VOL-) Lowers the volume.
Volume up (VOL+) Raises the volume.
Zoom Zooms in when viewing a movie or photograph. As you
press ZOOM, the player alternates among the available
zoom settings:
<
DVD: > off > 1x > 2x > 3x > 4x >
<
VCD: > off > 1x > 2x > 3x >
4. BASIC OPERATIONS
Turning the player on
To turn on the power, press the power button ( ) on the player or on the remote.
Power button
Locating the power button on both the player and the remote control
The player briefly displays, “Welcome!” and turns the radio on by default.
Selecting the input source
With the power turned on (either by pressing the power button or loading a disc), select
the input source by pressing SRC (source) on the player or SRC ( ) to alternate among:
<
> Radio > DVD > AUX-IN >
AUX-IN is an auxiliary input device, such as a portable audio device.
NOTE
If a DVD or CD is playing, you eject the disc, and then insert it
again, the player begins play back from the beginning of the disc.
Controlling audio
The audio knob on the player controls not only the volume but also the bass, treble,
balance and fader.
10
VB475OwnersManual.indd 10
VB475
1/27/2007 9:34:25 PM
English
Configuring audio options
1. Press the AUDIO button to select audio mode.
The audio button works to adjust the volume.
2. Press the same button again and again to alternate among all audio options:
<
> Volume > Bass > Treble > Balance >
Fader > Loud > Sound effect >
3. Stop on the attribute you want to control.
Option
Volume
Knob direction Description
Left
Reduces volume.
Right
Increases volume.
Left
Reduces bass or treble.
Right
Boosts bass or treble.
Balance
Left to right
Fader
Left to right
Loud
Left
Adjusts the volume proportion from the left
to the right.
Adjusts the volume proportion from the
front to the rear.
Turns off Loud.
Bass and treble
Right
Sound
effect
control
Left to right
Turns on Loud, giving an extra volume
boost. When on, turning the volume knob
to the right increases the volume more
quickly than it would otherwise.
Selects one of the following sound effects,
which you can set based on the type of
music you listen to:
<
NORMAL
>
POP
> FLAT >
>
CLASSIC > JAZZ > ROCK >
NOTE
After five seconds of inactivity, the player exits audio setup mode.
Muting the sound
To mute sound, briefly press Power/mute ( ). To enable sound, briefly press Power/
mute again.
Turning the player off
When you’re finished, either press the power button on the remote or press and hold
the power button on the player for two seconds.
VB475
VB475OwnersManual.indd 11
11
1/27/2007 9:34:26 PM
English
The player briefly displays, “Bye Bye!” and enters its “standby” state. The player never
turns off completely. If the clock display is enabled (the default), the player displays the
current time prefaced by “AM” or “PM.”
Setting the time
In standby, you can set the time on the clock.
1. If the player is on, press the power button ( ) to turn it off (go into standby mode).
2. Press and hold the D button on the player.
The system displays the current time setting.
3. To switch between setting the hours and minutes, press the button again.
3. Press the next button (
)to increase the hours or minutes.
4. Press the previous button ( ) to decrease the hours or minutes.
NOTE
After five seconds of inactivity, the player exits time setup mode.
Protecting the player from theft
To discourage theft, detach the front panel, store it in the protective case provided, and
take it with you.
Removing the front panel
1. Press the open button ( ) in the upper left corner of the player to open the front
panel.
Open button
Left side of the player
CAUTION
Do not grip the front panel buttons or use force to remove and
install the front panel.
2. Holding the right side of the front panel, push the panel to the left to release the
right pivot hinge.
12
VB475OwnersManual.indd 12
VB475
1/27/2007 9:34:27 PM
English
Right pivot hinge
Direction to disconnect the front panel
3. Pull the panel out to release and remove it from the left pivot hinge.
The left pivot hinge
is in the lower left
Corner of the chassis
Direction to remove the front panel
CAUTION
Do not subject the front panel to excessive shocks.
Do not expose the front panel to direct sunlight or high temperatures.
Replacing the front panel
1. Line up the front panel with the opening on the player.
2. Pressing on both left and right edges, snap the panel into place.
Care and maintenance
Cleaning the player
•
Use a clean, soft, dry cloth to gently wipe dust and dirt from the player.
•
Do not use benzene, thinner, vehicle cleaner, or other cleaners. These substances
may damage the system or cause the paint to peel.
•
The surface of the LCD screen can be easily scratched. Do not rub it with anything
abrasive.
Servicing the player
In the event that trouble arises, never open the player case, disassemble it or attempt
to repair it yourself. The internal parts are not serviceable by the user. Opening any
components will void the warranty. All warranty service should be performed by an
authorized Clarion service center.
VB475
VB475OwnersManual.indd 13
13
1/27/2007 9:34:28 PM
English
CAUTION!
Changes or modifications to this product not approved by
the manufacturer will void the warranty and will violate FCC
approval.
Cleaning the remote control
Use only a clean, soft, damp cloth to clean the remote control. Do not use lighter fluid,
methanol alcohol or other solvents.
Cleaning discs
Before playing a disc, wipe it outwards from the center with a clean, soft cloth.
Changing the battery in the remote control
The remote control uses one CR2025 (3V) lithium battery.
1. Slide the tray out on the back of the remote control.
Replacing the remote control battery
2. Remove the used battery.
3. Insert the charged battery with the plus (+) and minus (-) poles pointing in the
direction shown.
Battery precautions
•
Keep batteries out of the reach of children. If swallowed, immediately consult a
doctor.
•
If you won’t be using the remote control for a month or longer, remove the battery.
•
Do not recharge A battery.
•
Do not attempt to disassemble a battery.
•
Do not handle batteries with metallic tools.
•
Do not store batteries with metallic materials.
•
If a battery leaks, wipe the remote control completely clean and install a new
battery.
14
VB475OwnersManual.indd 14
VB475
1/27/2007 9:34:29 PM
When disposing of used batteries, do not incinerate them. Comply with all
governmental regulations in your area.
•
Always check carefully that you are loading the battery with its plus (+) and minus
(-) poles as shown in the illustration above.
English
•
5. DVD/CD/MP3 OPERATIONS
To play back DVDs, the player must be connected to a monitor, such as one of the
Clarion OHM monitors.
Audio output depends on the type of disc. Carefully read the audio characteristics of the
disc before playing back.
Regions
Each player and DVD is programmed for the region of the world in which it was
purchased.
Region map
The player’s region is on the bottom of the unit. DVDs must be pre-programmed with the
same region as the player or they will not play back.
DVD markings
The icons on DVD packages and discs have the following meanings:
Indicates the number of audio output channels, which provide
dubbed languages.
Indicates the number of languages for which subtitles are provided.
Indicates the number of viewing angles.
,
VB475
VB475OwnersManual.indd 15
Indicates the picture size (aspect ratio).
Indicates the region number(s).
15
1/27/2007 9:34:29 PM
English
About DVDs
The contents of a DVD are organized into titles and chapters. A single work, such as a
movie, corresponds to a single title. Each scene corresponds to a chapter.
Chapter structure on a DVD
On karaoke discs, each song corresponds to a title.
Some discs are organized differently. How you access the titles depends on how the
disc was recorded:
Playing back some DVD-video discs may not be possible for a variety of reasons.
•
With DVD-R discs, only recordings made in the video format (video mode) can be
played back.
•
With DVD-RW discs, recordings made in the Video Recording format (VR mode)
cannot be played back.
•
Even when DVD-R and DVD-RW recordings have been made using a playable
format (video mode), playback may not be possible due to disc characteristics,
scratches or dirt on the disc.
•
Dirt and condensation on the lens inside the player may prevent playback.
•
Although you may playback discs recorded using the correct format on a PC, the
recording software, environmental settings and other factors may inhibit playback.
With some DVD discs, you may not be able to use all player functions. For example,
discs that feature Playback Control (PBC) provide a playback menu and do not allow
the use the number buttons on the remote to directly enter chapter and track numbers.
About video CDs, VCDs and MP3 files
Video CDs and VCDs discs are organized into tracks with each track corresponding to
one song. Some discs also feature an index to the tracks.
16
VB475OwnersManual.indd 16
VB475
1/27/2007 9:34:30 PM
English
Track structure on a music CD or video CD
Read the precautions with all CD-R and CD-RW discs before you use them. In addition:
•
CD-Extra discs can be played back as music CDs.
•
Playback of CD-R and CD-RW discs, other than those recorded with a music CD
recorder, may not be possible.
•
Even those CD-R and CD-RW discs recorded using a music CD recorder may not
play back due to disc characteristics or dirt on the disc.
•
As with DVDs, dirt and condensation on the lens inside the player may prevent
playback.
•
Titles and other text information recorded on a CD-R or CD-RW disc cannot be
displayed on the player.
•
With CD-RW discs, the time to play back will be longer than the time required to
play back a conventional CD or CD-R disc.
Loading discs (DVDs and CDs)
NOTES
To view a DVD or video CD, the player must be connected to an
LCD monitor, such as one of the Clarion OHM monitors.
The player does not need to be turned on to load and unload
discs.
1. To release the front panel, press the open button ( ).
VB475
VB475OwnersManual.indd 17
17
1/27/2007 9:34:31 PM
English
Open button
Left side of the front panel
2. If the slot already contains a DVD or CD, press the eject button ( ) to remove the
disc.
DVD/CD slot
Eject button
Player with the front panel open
The player ejects the disc and automatically returns to radio mode.
NOTE
Do not insert 3-inch (8 cm) discs. The player supports only 5-inch
(12 cm) discs, which have the same physical dimensions as most
commercial audio CDs and computer software CD-ROMs.
3. Insert your DVD or CD.
CD and player
This action turns the power on and selects the DVD player as the input source.
4. Close the front panel.
The player receives the disc, automatically turns the player power on, and briefly
displays, “Loading...” and begins to play back the DVD. It takes a short time to begin
playing back the DVD or video CD.
Audio output depends on the type of DVD or CD. Consult the disc jacket for more
information.
5. When you’re finished, open the front panel and press the eject button ( ) to remove
the disc.
18
VB475OwnersManual.indd 18
VB475
1/27/2007 9:34:31 PM
English
DVD playback features
Pausing playback
•
To pause, press the play/pause button ( ) on the player or the remote.
•
To resume play back, press the play/pause button ( ) again.
Choosing sections or chapters
•
To select a play time when using a CD or video CD, press the GOTO button on the
remote.
•
To select a DVD chapter, press the number of the chapter on the remote.
•
To skip to the beginning of the next chapter, press the next button ( ) on the
remote.
•
To skip to the beginning of the current chapter, press the previous button ( ) on the
remote.
Displaying playtime, disc type and the clock
•
To display the play time, press the DISP (D) button on the player.
•
To display the type of disc, press the DISP (D) button again.
•
Pressing DISP (D) again displays the clock.
Zooming in and out
To zoom in, press ZOOM on either the player or the remote. Pressing this button
repeatedly alternates among magnification values based upon the image type:
•
Video CD: 1x > 2x > 3x > off
•
DVD/MPG4: 1x > 2x > 3x > 4x > off
•
JPEG: 4/3x > 3/2x > 2x > 3x > 1/2x > 3/4x > off
Selecting the language for subtitles
The DVD must be pre-programmed to support subtitles for this feature to work. To
determine the number of languages for which subtitles are provided, look for this
symbol on the DVD packaging: . The packaging should also indicate which
languages are supported.
1. Press SUBTITLE on the remote.
If the disc supports only one language for subtitles, this button does not work.
2. Use the arrows on the remote to select the language.
3. Press SUBTITLE again to select the language.
If you press nothing for three seconds, the language subtitle selection option
disappears.
VB475
VB475OwnersManual.indd 19
19
1/27/2007 9:34:32 PM
English
Selecting a dubbed language
The DVD must be pre-programmed to support additional dubbed languages (audio
channels). To determine the number of dubbed languages, look for this symbol on
the DVD packaging:
. The packaging should also indicate the languages.
1. Press AUDIO on the remote.
The player displays the list of dubbed languages from which to choose.
2. Use the arrows on the remote to select the language.
3. Press AUDIO again to select the language.
If you press nothing within three seconds, the list of dubbed languages disappears.
Playing back different camera angles
The DVD must be pre-programmed to support multiple camera angles for this feature to
work. Look for this symbol on the DVD packaging: .
1. Press ANGLE on the remote.
If the disc supports only one angle, this button does not work.
2. Use the arrows on the remote to select the angle.
3. Press ANGLE again to play back the angle.
If you press nothing within five seconds, the list of angles disappears.
Fast forwarding and reversing
•
To fast forward and reverse through chapters, tracks, files or frequencies, press and
hold the forward ( ) and reverse ( ) buttons on the player or the fast forward ( )
and fast reverse ( ) buttons on the remote.
•
To skip to the next or previous chapter, track, file or frequency, press the button
once.
•
To move forward or back at the following speed, press the button repeatedly. Each
time you press the speed changes:
<
> 1x > 2x > 4x > 8x > 20x > normal playback >
Changing the image aspect ratio
The aspect ratio is the relationship between the width and height of the image. Options
are 4:3, which provides normal viewing and 16:9.
1. To enter the SETUP menu, press the SETUP button on the remote.
2. Use the right arrow to select the Video tab.
20
VB475OwnersManual.indd 20
VB475
1/27/2007 9:34:34 PM
English
Video tab with TV shape option set to 4:3
3. For the TV shape option, press the right or left arrows to select 4:3 or 16:9.
4. Press play/pause button ( ) to confirm your selection.
Choosing the video format
For a disc to play back correctly, you must select the video format used to record the
disc. Press the P/N button on the remote to select either PAL or NTSC.
CD playback features
•
To pause, press play/pause ( ) on the player or the remote.
•
To resume play back, press play/pause ( ) again.
•
To play back the first 10 seconds of each track beginning with the current track,
press the scan button: 4/SCN on the player or SCN on the remote.
•
To cancel scan mode, press the scan button again.
•
To play back all tracts randomly, press the random button: 5/RDM on the player or
RDM on the remote.
•
To cancel random play back, press the random button again.
•
To repeat the current track press the repeat button: 6/RPT on the player or RPT on
the remote.
To play back the current disc, press the repeat button a second time.
To cancel repeat playback, press it a third time.
NOTE
Other functions work the same as for playing back a DVD.
Viewing the contents of the disc
To view the type of disc and the current track that is playing, press the DISP button on
the remote.
The player displays information about the disc:
VB475
VB475OwnersManual.indd 21
21
1/27/2007 9:34:34 PM
English
Example of the information displayed for a VCD
Example of the information displayed for a DVD
Example of the information displayed for an MPEG disc
•
Use the arrow keys on the remote to move up and down in the list. Use the number
keys on the remote to select a different chapter or track.
•
To change to another mode, press the RETURN button on the remote.
•
To clear the message on the screen, press DISP again.
Repeating chapters and tracks
To repeat the current DVD chapter, CD track or MP3 selection, press 6/RPT on the
player or RPT on the remote. Playback alternates among repeat options, which vary
depending on the type of disc:
•
A single press of the repeat button selects DVD repeat options: Repeat Chapter >
Repeat Title > Off.
•
A second press of the repeat button selects SVCD, MP3, CD, and VCD repeat
options: Repeat single > Repeat all > Off.
•
A third press of the repeat button cancels repeat playback.
CAUTION:
If you’re playing back a video CD and playback control (PBC) is
on, don’t use the repeat playback function. Follow the instructions on the disc packaging.
22
VB475OwnersManual.indd 22
VB475
1/27/2007 9:34:35 PM
English
Ejecting a DVD or CD
1. To release the front panel, press the open button ( ).
DVD/CD slot
Eject button
Player with the front panel open
2. Press the eject button ( ).
The player ejects the disc.
3. Remove the DVD or CD.
Playing back MP3 audio files
•
To move from folder to folder, press the FOLDER down and up buttons (DOWN and
UP on the remote or DN and UP on the player).
•
To access the selected folder, press the play/pause button ( ) on the remote.
•
To return to the parent folder, press the RETURN button on the remote.
•
To play back the MP3 title, use the arrow keys to select the title and press the play/
pause button ( ) on the remote.
Setting parental controls
Some DVDs let you restrict children from viewing violent or adult material. This works by
setting the allowable movie rating. Assuming the DVD has been pre-programmed with a
movie rating, the player plays back only discs that conform to the rating you set.
Parental control for video
1. To enter the SETUP menu, press the SETUP button on the remote.
2. Use the right arrow to select the Rating tab.
The first time you set parental control, the default password is 3308.
3. Type the default password or the four-number password you set in the password
field and press the play/pause button ( ) to confirm.
VB475
VB475OwnersManual.indd 23
23
1/27/2007 9:34:35 PM
English
The Rating tab with the password selected
The lock symbol changes from closed to open when you enter the correct password.
CAUTION
Record your password and store it in a secure location. Without
the correct password you will not be able to change ratings
4
To set parental control, press the down arrow and select the Rating option.
Rating menu with Kid Safe rating selected
5. Press the left and right arrows to select among the following:
1 (KID SAF)
Material is safe for children.
2 (G)
Material is safe for general audiences.
3 (PG)
Parental guidance suggested.
4 (PG 13)
Some material unsuitable for children under 13.
5 (PGR)
Some material unsuitable for children under 17.
6 (R)
Some material unsuitable for children under 17.
7 (NC 17)
Not recommended viewing for children under 17.
8 (ADULT)
Only for adults due to the graphic content.
6. Press the play/pause button ( ) to confirm your selection.
24
VB475OwnersManual.indd 24
VB475
1/27/2007 9:34:36 PM
English
Filtering out foul language from the audio
TVG mode mutes sentences containing off-color language.
1. Press SETUP on the remote.
2. Select Rating > TVG Mode.
3. Select Tolerant for minimal foul language muting.
Select Strict for maximum foul language muting.
Example showing TVG mode off for audio, but one for closed captions
4. Press the play/pause button ( ) to confirm your selection.
6. RADIO OPERATIONS
This procedure assumes that the power is on.
1. If you’ve been playing a DVD or CD, press the SRC button on the player or remote
to select Radio mode.
2. To select one of three FM and two AM bands, press the BAND button. Keep
pressing this button to alternate among:
<
> FM 1 > FM 2 > FM 3 > AM 1 > AM 2 >
3. To select a preset station, press one of the numbered buttons (1-6).
The station frequency displays on the LCD.
Searching automatically for a station
•
To automatically search forward through radio frequencies, press next ( ). To stop
at a station, press this button again.
•
To search back through radio frequencies, press previous ( ). To stop at a station,
press the button again.
VB475
VB475OwnersManual.indd 25
25
1/27/2007 9:34:36 PM
English
Searching manually for a station
To manually move up through the radio frequencies, press and hold the BAND button.
Presetting frequencies
•
To preset the current frequency, hold one of the numbered buttons for two seconds.
•
To display the current frequency, press the DISP (D) button on the player. To display
the clock, press this button again.
Scanning stored stations
•
To scan the stored stations for the current band and play back each station for five
seconds, press the down arrow ( ).
•
To scan the current band and auto store the available stations, press and hold the
down arrow ( ) for more than two seconds.
7. AUX-IN OPERATIONS
Before operating an external auxiliary source:
•
Make sure that the output from the external audio source is properly connected to
the AUX-IN.
•
Make sure the external audio source is turned on.
•
Change the source to AUX-IN by pressing SRC ( ) on the player or SRC on the
remote. The player plays back an external audio source through the auxiliary input.
Selecting the AUX-IN input source
With the power turned on (either by pressing the power button or loading a disc), press
SRC (source) on the player or on the remote until AUX-IN displays on the LCD.
AUX-IN Playback features
•
To pause, press play/pause ( ) on the player or the remote.
•
To resume play back, press play/pause ( ) again.
•
To play back the first 10 seconds of each track beginning with the current track,
press the scan button: 4/SCN on the player or SCN on the remote.
•
To cancel scan mode, press the scan button again.
•
To play back all tracts randomly, press the random button: 5/RDM on the player or
RDM on the remote.
•
To cancel random play back, press the random button again.
26
VB475OwnersManual.indd 26
VB475
1/27/2007 9:34:37 PM
To repeat the current track press the repeat button: 6/RPT on the player or RPT on
the remote.
To play back the current disc, press the repeat button a second time.
To cancel repeat playback, press it a third time.
English
•
NOTE
Other functions work the same as for playing back a DVD.
8. INSTALLATION AND WIRING
Installation of mobile audio and video components requires experience with a variety
of mechanical and electrical procedures. Although this manual provides general
installation and operation instructions, it does not show the exact installation methods
for your particular vehicle.
If you do not have the required knowledge, experience, and/or tools to successfully
complete the installation, consult an authorized Clarion Dealer about professional
installation options.
Precautions
•
Carefully read the procedure and the installation specifications before installing
the player. Connect all components according to the diagrams provided. Incorrect
connection may damage the player.
•
If installation requires you to drill holes or make other modifications to the vehicle,
consult an authorized Clarion Dealer for help.
•
Install the player where it will not get in the way of the driver or injure a passenger in
the event of an emergency stop.
•
Overheating will damage the semiconductor laser (used to play back discs). Do not
install the player near a heat source, such as a heater outlet.
•
Make all connections before you connect the player to the power supply.
•
Insulate any exposed cables to prevent them from causing a short circuit with the
vehicle bracket.
•
Pack all cables to avoid power supply terminals touching other metal vehicle parts.
•
Before making the final installation, temporarily connect the wiring, turn the power
on, make sure the player works correctly and that nothing else in the vehicle has
ceased to work.
Requirements
•
The player requires a 12V negative (-) grounded voltage power supply.
•
Use only the parts included with the player. Using unauthorized parts can cause the
system to malfunction.
VB475
VB475OwnersManual.indd 27
27
1/27/2007 9:34:37 PM
English
Options
To connect any auxiliary device to the player, refer to the manual supplied by the
manufacturer of the auxiliary unit.
Accessories and hardware
The following components come with the player:
Qty Item
Picture
Qty Item
1
Mounting
bracket
1
Storage box for
front panel
1
Nut M5
1
Power
connector
1
Assembly bar
1
Remote control
1
Screw (B15
x 16)
1
Trim ring
1
Bolt
1
Battery
2
Keys
Picture
Installing the player
If the vehicle has a two-inch high slot in the dashboard for a DVD player, you may
directly install the player in the dashboard.
1. To avoid shorts in the electrical system, disconnect the vehicle’s battery.
2. Connect the mounting bolt on the back of the player using a crescent wrench.
3. Check all the electrical connections based on the wiring diagram.
4. Insert the power connector into the player’s power receptacle on the back of the
player.
28
VB475OwnersManual.indd 28
VB475
1/27/2007 9:34:38 PM
English
Location on vehicle
Assembly bar
Screw
Dashboard face
Power connector
Nut
Bolt
Connections identified
5. Use the nut to mount one side of the assembly bar with the bolt.
6. Insert the player into the mounting bracket and push it in until it clicks in place.
Front of the player showing how to install the mounting bracket
The front edge of the bracket lines up with the front of the player.
VB475
VB475OwnersManual.indd 29
29
1/27/2007 9:34:39 PM
English
7. Use the screw (B15x16) to attach the other side of the assembly bar to the vehicle
body.
8. Attach the trim ring to the front of the player.
Cable connections
•
Refer to the owner’s manual for the power amplifier and for other units before you
make connections.
•
Secure wiring with cable clamps or adhesive tape. To protect the wiring, wrap
adhesive tape around the wires where they lie against metal vehicle parts.
•
Route and secure all wiring so that it cannot touch any moving parts, such as the
gear shift, handbrake and seat rails. Do not route wiring in places that get hot, such
as near the heater outlet. If the insulation of the wiring melts or gets torn, it could
short circuit to the vehicle body.
•
Don’t pass the yellow lead through a hole with a grommet into the engine
compartment to connect to the battery. This will damage the lead insulation and
cause a very dangerous short.
•
Do not shorten any leads. If you do, the protection circuit may fail to work when it
should.
•
Never feed power to other equipment by cutting the insulation of the player’s power
supply lead to tap into the lead. The current capacity of the lead will be exceeded
causing overheating.
•
When replacing the fuse, use only a fuse with the same rating (10A).
30
VB475OwnersManual.indd 30
VB475
1/27/2007 9:34:39 PM
ANTENNA
RED
SURROUND-R
RED
WHITE
SUB.W1
FRONT-R
WHITE
RED
FRONT-L
SUB.W2
YELLOW
English
WHITE
SURROUND-L
WHITE
VIDEO2
AUX-L
YELLOW
VIDEO1
RED
AUX-R
MUTE
BROWN
WHITE/BLACK
BLUE
WHITE
PRK SW
ILLUMI
GROUND
BATTERY
ORANGE
GRAY/BLACK
BLACK
GRAY
YELLOW
GREEN
RED
ANT.CONT
FRONT L+
FRONT RFRONT R+
VIOLET
VIOLET/BLACK
ACC
FRONT L-
1A
GREEN/BLACK
WHITE
BLUE/WHITE
REAR RREAR R+
REAR LREAR L+
P.CONT
Cable
Where to connect
Battery (Yellow)
Connect to vehicle storage battery: DC 12V power supply.
ACC (Red)
Connect to electric terminal controlled by the ignition switch
(12V DC).
Ground (Black)
Connect to a clean and exposed part of the vehicle’s chassis.
ANT.CONT (White)
Connect to the auto-antenna relay control terminal (Max
300mA, 12V DC).
ILLUMI (Orange)
Connect to the lighting switch terminal used to detect the
on/off status of the night lamp.
Night lamp connections
MUTE (Brown)
VB475
VB475OwnersManual.indd 31
Connect to the telephone (TEL) mute control connector.
31
1/27/2007 9:34:39 PM
English
Cable
Where to connect
NOTE
If the vehicle does not use a telephone (TEL), leave this cable
unconnected.
P.CONT (Blu/WHT)
Connect to the external amplifier control terminal (12V DC).
Parking brake (Blue) This connection is used by the player to detect when the
parking brake is on and off.
Parking brake switch
Brake lamp
Ground (GND)
Battery
Parking brake cord
Parking brake connections
Connecting the speakers
•
Speakers connected to this player must be high-power types with a minimum rating
of 30W and an impedance of 4 to 8 Ohms. Connecting speakers with output and
/or impedance values other than these may damage the speakers, cause them to
smoke or even catch fire.
•
To avoid short-circuits, cover disconnected leads with insulating tape. Especially
insulate the unused speaker leads.
Connect the speakers using the following color code:
Speaker
Left +
Left -
Right +
Right -
Front
White
White/black
Gray
Gray/black
Rear
Green
Green/black
Violet
Violet/black
Precautions
•
Use groundless speakers only.
•
The input power of the speakers you use must be over 40W.
Your speakers must be able to support the full power of the amplifier, if not, the
speakers and/or the player may be damaged.
•
Speaker impedance is 4W. Speakers with greater than or less than 4W impedance
may not be able to handle the output power from the amplifier, which may result in
damage to the speakers or the player.
32
VB475OwnersManual.indd 32
VB475
1/27/2007 9:34:40 PM
Do not use a three-cable speaker system and do not connect the speakers to the
vehicle’s body. The player uses BTL circuitry, which requires that each speaker be
connected using insulated cables.
•
Install the speaker cables and power amplifiers approximately 12 inches (30cm)
away from the antenna and any antenna extended parts.
English
•
Correct speaker wiring
Left +
Left -
Right +
Right -
White
White/black
Gray
Gray/black
Left and right wiring diagram
Incorrect speaker wiring
Left +
Left Right +
Right -
Left +
Left -
Left +
Left -
Right +
Right +
Right -
Right Wiring examples
Outlet power amplifier connection
CAUTION
Connect the amplifier carefully using the following diagram.
Incorrectly connecting the amplifier may impact the quality of
the audio and could damage the speakers.
•
When the player is on, it outputs a control signal through the blue and white lead.
Connect this lead to an external power amp’s system remote control or to the
vehicle’s auto-antenna relay control terminal (max. 300mA 12 VCD). If the vehicle
features a glass antenna, connect to the antenna booster power supply terminal.
•
When using an external power amp, do not connect the blue and white lead to the
amp’s power terminal. Likewise, do not connect the blue and white lead to the power
terminal of the auto-antenna. This connection could cause excessive current drain
and the player to malfunction.
VB475
VB475OwnersManual.indd 33
33
1/27/2007 9:34:40 PM
English
WHITE
SURROUND-L
RED
FRONT-R
WHITE
FRONT-L
YELLOW
VIDEO2
YELLOW
VIDEO1
RED
POWER
AMP
AUX-R
YELLOW
VIDEO1
YELLOW
VIDEO2
RED
AUX-R
WHITE
AUX-L
MONITOR
MONITOR
EXTERNAL
AUDIO
DEVICE
Fuse
If the fuse requires replacing, use only a 10A fuse. If the fuse malfunctions after
installing it, consult an authorized Clarion Dealer.
WARNING
Replacing a 10A fuse with a high-capacity fuse or directly
connecting the player without a fuse will easily cause a fire
and or damage the equipment.
9. DVD PREFERENCES
1. Insert a DVD disc.
2. Press STOP ( BAND) on the remote.
3. Press SETUP on the remote.
4. Use the right and left arrows on the remote to select one of three options tabs:
Language, Video or Rating.
5. Press the play/pause button ( ) to confirm.
The player displays the options for the tab you selected.
34
VB475OwnersManual.indd 34
VB475
1/27/2007 9:34:41 PM
English
Language options
Language setup tab
Option
Description and Values
OSD Menu
Selects the language for the on-screen display menus.
English, Chinese, French, Spanish
Subtitle
Selects the language for subtitles.
English, Chinese, French, Spanish
Auto
Off
Audio
Turns subtitles off.
Selects the audible language for the DVD audio track.
English, Chinese, French, Spanish
DVD Menu
Selects the language for the DVD menus.
English, Chinese, French, Spanish
Video options
Video tab with TV shape option set to 4:3
VB475
VB475OwnersManual.indd 35
35
1/27/2007 9:34:41 PM
English
Option
Description and Values
TV shape
Selects the aspect ratio (relationship of the image width to height).
TV system
Video Mode
Priority Content
4:3
Normal aspect ratio.
16:9
Full width aspect ratio.
Selects the TV standard.
PAL
For Europe and Asia.
NTSC
For the United States.
Controls how video images display.
FILL
Stretches the image so it fits the entire screen.
This may distort the image slightly.
Original
Displays without distortion, but the image does
not fill the entire screen.
H FIT
Extends the left and right sides of the image.
W FIT
Expands the image horizontally so that it fits the
entire screen. The expansion ratio increases
towards the right and left edges of the screen.
Lets you define what type of DVDs you listen to most frequently.
DVD-Audio, DVD-Video
PictureCD View
JPEG Internal
Configures how to view a CD that contains digital photographs.
Original
Displays the photo at its original size.
Fit to screen
Enlarges each photo to fit the screen.
When viewing photographs, this option determines how long the
photograph displays.
5 seconds, 10 seconds, 15 seconds
Rating options
To change this page requires a password. The default password is 3308. Type four
numbers in the password field and press play/pause button ( ) to confirm the
password.
36
VB475OwnersManual.indd 36
VB475
1/27/2007 9:34:41 PM
English
The Rating tab with the password selected
The lock symbol changes from closed to open when you enter the correct password.
CAUTION:
Record your password and store it in a secure location. Without
the correct password you will not be able to change ratings
Option
Description and Values
Rating
Restricts movie viewing to appropriate ages.
1 (KID SAF)
Material is safe for children.
2 (G)
Material is safe for general audiences.
3 (PG)
Parental guidance suggested.
4 (PG 13)
Some material unsuitable for children under 13.
5 (PGR)
Some material unsuitable for children under 17.
6 (R)
Some material unsuitable for children under 17.
7 (NC 17)
Not recommended viewing for children under 17.
8 (ADULT)
Only for adults due to the graphic content.
Load Factory
Reset returns all rating values to their factory defaults.
DivX registration
Displays your registration code. “DivX” refers to the audio codec
created by DivXNetworks, Inc.
TVG Mode
Simulates, using software, the function of a set-top box that
mutes sentences containing off-color language.
VB475
VB475OwnersManual.indd 37
Off
Turns TV guidance mode off.
Tolerant
Selects minimal foul language muting.
Strict
Selects maximum foul language muting.
37
1/27/2007 9:34:42 PM
English
10. TROUBLESHOOTING
No sound from the speakers
•
Sound may be muted. Press MUTE to restore the sound.
•
The player may be fast forwarding, fast reversing, searching or displaying a single
frame.
•
Confirm that the cables are connected correctly.
There is no vehicle-installed phone and the telephone muting cable is connected to
the high level.
No picture on the monitor
•
Make sure the cables are connected correctly.
•
Check to make sure that the parking brake is connected correctly.
•
Make sure you are operating the monitor correctly. Turn the monitor off and back on,
and select the video source.
The disc will not play
•
Make sure a disc is loaded with the right side up. The side with the label on it should
be up.
•
Make sure the disc is not damaged or warped.
•
Try another disc that you know works.
•
If the disc is wet, remove it and let the player dry for about an hour before trying
again.
Restoring factory defaults
If the system is locked, insert a the end of a paper clip into the hole to press the RESET
button.
Reset button
Player with the front panel removed
NOTE
Reset returns all option settings to their factory defaults.
38
VB475OwnersManual.indd 38
VB475
1/27/2007 9:34:42 PM
English
11. GLOSSARY
CD: Compact Disc.
CD-R/RW: CD Read/Read and Write.
CODEC: Short for Compression/Decompression Module, it applies to audio data.
Dolby Digital: The marketing name for the audio compression technologies developed
by Dolby Laboratories.
DVD: Digital VideoDisc or Digital Versatile Disc.
DVD-R: DVD Read only.
DVD-RW: DVD Read and Write.
IR: Infrared.
MP3: MPEG Audio Layer-3, a standard for sound compression without sacrificing
quality.
NTSC: National TV Standards Committee, the group that developed the video formats
used in the United States.
OSD: On-Screen Display.
PAL: The primarily European standard for displaying analog television signals.
PBC: PlayBack Controls.
SRC: Source.
TVG: TVGuardian® is a registered trademark of Principle Solutions, Inc.
VCD: Video CD, the standard for storing video on a CD.
Viewing angle: Pre-recorded alternative angles for individual scenes.
VB475
VB475OwnersManual.indd 39
39
1/27/2007 9:34:42 PM
English
12. SPECIFICATIONS
Power
Supply power voltage
Audio
S/N Ratio
Dynamic Range
Output power
Load Impedance
THD
Usable Sensitivity (S/N: 30dB)
Frequency Response:
S/N Ratio
Antenna Impedance
Usable Sensitivity(S/N: 20dB)
S/N Ratio
Antenna Impedance
Frequency Response
Input Impedance
S/N Ratio
Standard Input Level
Max Input Level:
Region number:
S/N ratio
Dynamic Range
Distortion
Video
Audio
Number of channels
FM Radio
AM Radio
AUX-IN
DVD Player
Output level
12V DC
(10.5~16V DC allowable)
MAX Current: 10A
80dB
80dB
25 W x 4
4
0.1%
20 dBu
60 Hz ~ 14 kHz
55dB
75
36dBu
43dB
75
20 ~ 20,000Hz
47K
70dB
200mV
2V
1
90dB(1KHZ)
90dB(1kHZ)
0.05%(1kHZ)
1.0V /75 ( 0.2V) P-P
2.0V(1KHZ .0dB) 0.2V
4.2 CH
NOTE
For the sake of technical improvements, this technical data and
the design of the equipment may change without prior notice.
40
VB475OwnersManual.indd 40
VB475
1/27/2007 9:34:42 PM
English
VB475
VB475OwnersManual.indd 41
41
1/27/2007 9:34:42 PM
English
42
VB475OwnersManual.indd 42
VB475
1/27/2007 9:34:44 PM
English
VB475
VB475OwnersManual.indd 43
43
1/27/2007 9:34:44 PM
English
Clarion Corporation of America
All Rights Reserved. Copyright © 2007: Clarion Corp. of America
Printed in China
44
VB475OwnersManual.indd 44
VB475
1/27/2007 9:34:44 PM