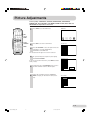
1
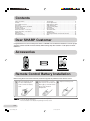
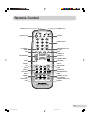
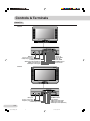
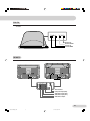
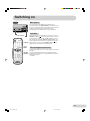
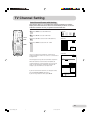
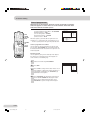
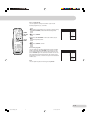
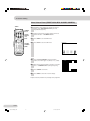
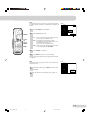
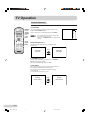
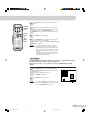
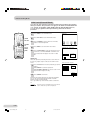
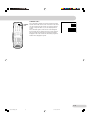
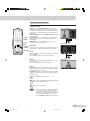
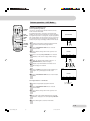
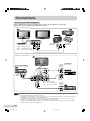
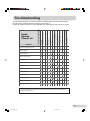
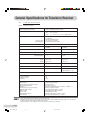
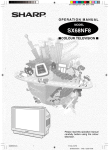
COLOUR TELEVISION
MODEL
SX66NF8
SX76NF8
OPERATION MANUAL
ON TIMER
ON TIMER
(SX66NF8)
(SX76NF8)
Please read this operation manual
carefully before using the colour
television.
SX66/76NF8(Front)
1
02.10.22, 4:16 PM
Safety Precautions
This equipment complies with the requirements of Directives 89/336/EEC and 73/23/EEC as amended by 93/68/EEC.
To prevent fire or electrical shock,
do not use the TV set in an
excessively damp place.
Never remove the back of the
cabinet, as there is high voltage in
the TV set.
Please call for service.
Position the TV set out of direct
sunlight and away from heat, as
high temperatures can damage
the cabinet, CRT, or other
electronic parts.
Unplug the power cord from the
wall outlet immediately if the TV
set begins to make unusual noises
or give off smoke or an odd smell,
then call your dealer for service.
Do not cover the ventilation holes
at the back of the TV set, this can
cause fire or other serious
problems. Leave an adequate
open space behind the TV set for
good ventilation.
Always disconnect your television
from the mains and the aerial
cable during thunderstorms.
Even if your television is switched
off, it can still be damaged by
lightning striking the mains and/or
aerial cable.
Do not install this equipment in a
confined space such as a
bookcase or a built-in cabinet.
To prevent fire, never place any
type of candle or naked flames on
the top or near the TV set.
Television equipment and cart
combination should be moved
with care. Quick stops, excessive
force and uneven surfaces may
cause the equipment and cart
combination to overturn.
Wall or shelf mounting should
follow the manufacturer’s
instructions, and should use a
mounting kit approved by the
manufacturer.
To prevent electrical shock, do not
subject the AC power cord to
damage by bending or twisting it, or
by placing heavy items on top of it
and do not place the AC power cord
under the TV set. If the AC power
cord becomes damaged, unplug it
from the wall outlet immediately and
call your dealer for service.
Do place the TV set onto an even
stand, table or track which size is
bigger than the TV set.
If the TV set is put onto a smaller
size or uneven stand, table or track
may cause the TV cabinet distort. Do
not put or insert anything between
TV set and the stand, table or track.
Do not place this television
equipment on an unstable cart,
stand or table. The television
equipment may fall, causing
serious injury to a child or an
adult, and serious damage to the
equipment.
Use only with a cart or stand
recommended by the
manufacturer, or sold with the
television equipment.
The picture tube of your TV has a
special coating. Do not knock or rub
on the tube face with sharp or hard
surfaces, otherwise you will damage
the coating.
To prevent damaging the surface of
the television screen, remove finger
prints only with a soft cloth dampened
with glass cleaner. Do not use any
abrasive cleaners.
Do not use thinner, benzene or other
strong chemical cleaners.
E1
SX66/76NF8(01-)new
1
02.10.22, 4:02 PM
Contents
Safety Precautions .............................................................
Contents .............................................................................
Dear SHARP Customer .....................................................
Accessories ........................................................................
Remote Control Battery Installation ...................................
Remote Control ..................................................................
Controls & Terminals ..........................................................
Aerial Connections - TV set only - ......................................
Aerial Connections - VCR and TV - ....................................
Switching on .......................................................................
Menu Structures .................................................................
TV Channel Setting ............................................................
1
2
2
2
2
3
4
6
6
7
8
9
TV Operation ....................................................................
Picture Adjustments .........................................................
Wide Mode Fast Menu .....................................................
Audio Adjustments ...........................................................
Features Setting Mode .....................................................
VCR Mode ........................................................................
Other Features .................................................................
TELETEXT Mode .............................................................
Connections .....................................................................
Troubleshooting ................................................................
General Specifications for Television Receiver ................
Index ................................................................................
16
17
19
21
24
29
30
32
36
37
38
39
Dear SHARP Customer
Congratulations! You are now the proud owner of a SHARP Colour Television Receiver. To ensure proper
operation, please read this manual carefully. After reading, keep this manual in a safe place for future
reference.
Accessories
COLOUR TELEVISION
MODEL
SX66NF8
SX76NF8
OPERATION MANUAL
ON TIMER
ON TIMER
(SX66NF8)
(SX76NF8)
Please read this operation manual
carefully before using the colour
television.
Remote control
R-6 (“AA”Size) dry batteries
Operation manual
Remote Control Battery Installation
Before using the TV set for the first time, install the supplied dry batteries in the remote control.
1
With your thumb nail, pull up
the slit as indicated by the
arrow to remove the battery
2
Insert two batteries 1.5 V (R-6,
“AA” size). Be sure to match the
3
battery ±/— terminals with the
±/— marks inside the
cover.
compartment.
• Remove batteries if weak or if the unit is not in use for long periods.
• Do not mix old and new batteries.
• Incorrect installation of the batteries may damage the remote control.
E2
SX66/76NF8(01-)new
2
02.10.22, 4:03 PM
Replace the battery cover.
Remote Control
POWER (VCR)
STAND-BY (TV)
CHANNEL CALL
TV/VIDEO
NUMBER buttons
FLASH BACK
GREEN
RED
SINGLE/DOUBLE entry
YELLOW
BLUE
CHANNEL UP
VOLUME DOWN
VOLUME UP
CHANNEL DOWN
MENU
REVEAL
LIST
STORE
CANCEL
HALF PAGE
RESET
REWIND
PLAY
PAUSE/STILL
STOP
WIDE MODE
CLOCK
SOUND MODE
HOLD
SOUND MUTE
TEXT/MIX/PICTURE
INDEX
CHANNEL UP (VCR)
FAST FOWARD
CHANNEL DOWN (VCR)
RECORD
E3
SX66/76NF8(01-)new
3
02.10.22, 4:03 PM
Controls & Terminals
FRONT TV
SX66NF8
ON TIMER
ON TIMER
Main power
Remote control sensor
Headphone jack (3.5mm / 16~600 ohms)
S-VIDEO input terminal
VIDEO input terminal (PAL/NTSC)
AUDIO input terminal (left)
AUDIO input terminal (right)
Channel UP
Channel DOWN
Volume UP
Volume DOWN
ON TIMER indicator
Power indicator
SX76NF8
ON TIMER
ON TIMER
Main power
Remote control sensor
Headphone jack (3.5mm / 16~600 ohms)
S-VIDEO input terminal
ON TIMER indicator
Power indicator
AUDIO input terminal (right)
AUDIO input terminal (left)
VIDEO input terminal (PAL/NTSC)
E4
SX66/76NF8(01-)new
4
02.10.22, 4:03 PM
TOP TV
SX76NF8
Channel UP
Channel DOWN
Volume UP
Volume DOWN
REAR TV
SX66NF8/SX76NF8
OUT
VIDEO
L
AV-1 IN
AV-2 IN
OUT
COMPONENT
Y
R
AV-1 IN
AV-2 IN
VIDEO
PB
(CB)
L
AUDIO
COMPONENT
Y
PB
(CB)
AUDIO
PR
(CR)
R
OUT
AV-1 IN
AV-2 IN
COMPONENT
VIDEO
Y
L
PB
(CB)
AUDIO
R
PR
(CR)
(MONO)
PR
(CR)
Aerial terminal
Component Input (AV-2)
Audio/Video Input (AV-2)
Audio/Video Input (AV-1)
Audio/Video Output
E5
SX66/76NF8(01-)new
5
02.10.22, 4:03 PM
Aerial Connections - TV set only To enjoy a clearer picture, we recommend that you use an outdoor antenna. The following is a brief
explanation of the types antenna connections:
(1) 75-OHM COAXIAL CABLE:
Connect the cable from the antenna to a standard DIN45325 plug
(IEC 169-2) and plug directly into the antenna socket on the rear of
the TV set.
(2) 300-OHM RIBBON CABLE:
Connect the cable from the antenna to a balun (Balanced Transformer)
and plug directly into the antenna socket on the rear of the TV set.
TV
Standard DIN45325 plug (IEC169-2)
75-ohm coaxial cable (round cable) (not supplied)
OUT
AV-1 IN
AV-2 IN
COMPONENT
Y
VIDEO
PB
(CB)
L
AUDIO
PR
(CR)
R
300-ohm twin-lead
flat feeder
(not supplied)
75-ohm impedance
converter
(not supplied)
Antenna in
Aerial Connections - VCR and TV You can also connect the TV set to the tuner on a VCR using the connection shown below.
VCR
TV
OUT
VIDEO
L
AV-1 IN
AV-2 IN
COMPONENT
Y
PB
(CB)
AUDIO
R
PR
(CR)
To antenna in
terminal
To RF out
terminal
Antenna in
• Remove the power cord from the electrical outlet before connecting the antenna to the rear of the TV set.
• When using the RF terminal connection, set the TV to channel zero to make initial adjustments for the VCR.
• Turn off the power on the TV set and the VCR being connected before making the above connections.
Be sure the cord plugs are fully inserted in the connection terminals.
• See the operation manual of your VCR for connection details.
E6
SX66/76NF8(01-)new
6
02.10.22, 4:03 PM
Switching on
Main power
TV Set
This TV memorizes the Mode last used when it was
switched off. When the MAIN POWER is pressed to turn on
the set, the Power indicator will light and the set will resume
in either the Stand-by mode or Programme mode,
depending upon its condition when it was switched off.
Main power
Stand-by
Power indicator
When the TV is in Stand-by mode, to turn on the TV press
STAND-BY button (
TV) on the remote control, or one of
,
CH
). The TV
the four buttons on the TV (
will change from Stand-by mode to Programme mode, the
Power indicator will turn green from red and an image will
TV)
STAND-BY appear on the screen. Press STAND-BY button (
again and the TV will return to Stand-by mode.
CH UP/
DOWN
VOLUME
UP/DOWN
Blue background off timer
If weak signal conditions in TV or VCR mode, the screen will
turn blue.
The blue background off-timer is then engaged, unless a
good signal is received, the set will automatically switch to
Stand-by mode after
15 minutes.
E7
SX66/76NF8(01-)new
7
02.10.24, 10:40 AM
Menu Structures
This TV set has a MAIN menu with four basic menus, which permit access to
the different functions of the TV.
These menus are as indicated below.
MENU
By pressing MENU :
Main menu
Button
Menu
Functions / Options
RED
PICTURE
ADJUSTMENTS
CONTRAST
COLOUR
BRIGHTNESS
SHARPNESS
NORMALISE
TINT CONTROL
ECO MODE
COMB FILTER
NTSC HUE
ROTATION
GREEN
AUDIO
ADJUSTMENTS
LOUDSPEAKERS
HEADPHONES
VOLUME
BASS
TREBLE
BALANCE
NORMALISE
LOUDSPEAKERS (MODE)
EFFECTS
SOUND IDENT.
DYNAMIC BASS.
A.V.C
VOLUME
BASS
TREBLE
BALANCE
NORMALISE
HEADPHONES (MODE)
SOUND IDENT.
YELLOW
OTHER
FUNCTIONS
LANGUAGE
ON TIMER: TIME / SWITCH ON
OFF TIMER: OFF / 120 Min. / 90 Min. / 60 Min. / 30 Min.
DEMO
CHILD LOCK: LOCK ALL / LOCK PROGRAMME / CLEAR LOCK
BLUE
INSTALL
AND TUNE
CHANNEL: CH (Aerial) / CC (Cable)
SEARCH (Frequency Tuning)
FINE TUNE
MODE: TV / VCR / SKIP
EDIT: Edit this program / Go to sorting mode / Delete this program/
Exit this menu
AUTO-TUNE
E8
SX66/76NF8(01-)new
8
02.10.22, 4:03 PM
TV Channel Setting
Auto Channel Preset with Sorting
This function frees you of troublesome channel presetting procedures.
Simply follow the instructions below to automatically store all on-air and
cable real channels into the programme channel memories.
MAIN menu
1
Press MENU to see the MAIN menu.
2
Press BLUE to see the TUNE menu.
3
Press CH UP to select AUTO-TUNE (blue box).
1.
2.
BLUE
CH UP
BLUE
3.
TUNE menu
Pr 06
CH21
CHANNEL
4
4.
SEARCH
Press MENU to start the AUTO -TUNE.
F-TUNE
MENU
MODE
Press MENU button
to Auto-tune
WARNING! All
pretuned channels
will be lost
EDIT
AUTO-TUNE
SEARCHING
The TV set searches for frequencies, memorises the
channels found them from Pr-01 of the TV, to a maximum of
99 programmes.
Pr 01
30 %
This tuning process may take several minutes to perform.
When the automatic search has been completed, the
“Stored programmes” menu will appear on screen. In this
menu, you can change the order of the channels and
change or give the channels a four letter name.
If you wish to rename the channels, or change the order;
refer to Stored programmes on page 10.
If you wish to go out of the menu, press BLUE.
Searching,
please wait.
Stored programmes:
Pr 01
Pr 02
Pr 03
Pr 04
Pr 05
Pr 06
Pr 07
Pr 08
Pr 09
Pr 10
(red)
-------------------------------
Edit this program
(green)
Go to sorting mode
(yellow)
Delete this program
(blue)
CH21
CH31
CH41
CH51
CH61
––––
––––
––––
––––
––––
Exit this menu
E9
SX66/76NF8(01-)new
9
02.10.22, 4:03 PM
TV Channel Setting
Stored programmes
When the TV has finished the automatic search, the Stored programmes
menu will appear on screen with a list of the channels which have been
memorized with the available options:
a) Select programme to be edited CH UP/DOWN
b) Edit this program RED
c) Go to sorting mode GREEN
d) Delete this program YELLOW
e) Exit this menu BLUE
RED
GREEN
YELLOW
BLUE
VOLUME
UP
CH UP/
DOWN
With these options, you will be able to organise the real
channels (CH **) memorized in the TV programmes (Pr 01
… Pr 99.Pr 00) and put them into your own preferred order.
Stored programmes:
Pr 01
Pr 02
Pr 03
Pr 04
Pr 05
Pr 06
Pr 07
Pr 08
Pr 09
Pr 10
(red)
-------------------------------
CH21
CH31
CH41
CH51
CH61
––––
––––
––––
––––
––––
-------------------------------
Edit this program
(green)
Go to sorting mode
(yellow)
Delete this program
(blue)
CH21
CH31
CH41
CH51
CH61
––––
––––
––––
––––
––––
Exit this menu
Select a programme to be edited
Use this option to select a programme from the list. Each
time you press CH UP/DOWN, the memorized channel will
be viewed and will remain selected on the list by means of a
white background.
Edit this program
Use this option for giving a name made up of four digits to
the channels or for changing the one which appears on
some channels, in the following way:
1
1.
Select the channel using CH UP/DOWN.
Stored programmes:
2
Press RED.
3
Press CH UP to change the first letter. Letters A to Z
of the alphabet, a blank space and the numbers 0 to
9 will appear sequentially. Press CH DOWN to go
backwards in the sequence.
4
Press VOLUME UP for changing the position of the
cursor and CH UP/DOWN for changing the letters.
When you have finished the fourth letter, press
VOLUME UP to quit the Change of Name option.
2.
s
3.
4.
E 10
SX66/76NF8(01-)new
10
02.10.22, 4:03 PM
Pr 01
Pr 02
Pr 03
Pr 04
Pr 05
Pr 06
Pr 07
Pr 08
Pr 09
Pr 10
Press the MENU
button to exit.
Go to sorting mode
Use this option for sorting the channels (CH) into the
desired programme (Pr), as follows:
1
1.
Select the programme (Pr) you wish to change using
CH UP/DOWN (marked with white background).
Stored programmes:
Pr 01
Pr 02
Pr 03
Pr 04
Pr 05
Pr 06
Pr 07
Pr 08
Pr 09
Pr 10
GREEN
YELLOW
2
2.
Press GREEN .
BLUE
CH21
CH31
CH41
CH51
CH61
––––
––––
––––
––––
––––
-------------------------------
Insert the marked
programme in the
position you wish.
3
Press CH UP/DOWN to move the channel (CH) to
the required position.
4
Press GREEN to finish.
3.
CH UP/
DOWN
4.
Press green button to
finish.
Delete this program
Use this option for cancelling programmes which are badly
tuned or repeated. When YELLOW is pressed, the TV will
ask for confirmation that you wish to cancel, and you must
press YELLOW again. The channels that follow it on the list
will automatically rearrange themselves by moving up one
programme (Pr) place, to restore the space of the cancelled
channel (CH).
Stored programmes:
Pr 01
Pr 02
Pr 03
Pr 04
Pr 05
Pr 06
Pr 07
Pr 08
Pr 09
Pr 10
CH21
CH31
CH41
CH51
CH61
––––
––––
––––
––––
––––
-------------------------------
WARNING!
This programme
will be erased.
Press yellow button
again to confirm.
or press any other
button to cancel.
Exit
Use this option to quit the menu by pressing BLUE.
E 11
SX66/76NF8(01-)new
11
02.10.22, 4:03 PM
TV Channel Setting
Manual Channel Preset (PRESET USING REAL CHANNEL NUMBERS)
GREEN
1
Depending on the programme channel you want to
preset, press SINGLE/DOUBLE entry to select
single/double digit entry.
2
Select the programme channel number you want to
preset with the 0 ~ 9 NUMBER buttons.
3
Press MENU to see the MAIN menu.
4
Press BLUE to see the TUNE menu.
1.
NUMBER
buttons
SINGLE/
DOUBLE
entry
BLUE
VOLUME
UP/DOWN
2.
3.
4.
MAIN menu
MENU
BLUE
5
5.
Press Volume UP/DOWN to select (with white
letters) the Channel type: CH (Aerial) or CC (Cable).
TUNE menu
CHANNEL
CH
CC
Pr 06
CH21
SEARCH
6
6.
Enter the real channel number you want to store with
the 0 ~ 9 NUMBER buttons (two digit entry only).
F-TUNE
MODE
EDIT
7
Press GREEN to memorize.
8
Press MENU to clear the on-screen display.
7.
AUTO-TUNE
MEMORIZE
GREEN
8.
Repeat the above procedure for presetting other programme.
E 12
SX66/76NF8(01-)new
12
02.10.22, 4:03 PM
Manual Channel Preset (PRESET USING BY CHANNEL NUMBER)
RED
1
Depending on the programme channel you want to
preset, press SINGLE/DOUBLE entry to select
single/double digit entry.
2
Select the programme channel number you want to
preset with the 0 ~ 9 NUMBER buttons.
3
Press MENU to see the MAIN menu.
4
Press BLUE to see the TUNE menu.
1.
NUMBER
buttons
SINGLE/
DOUBLE
entry
GREEN
BLUE
2.
3.
CH DOWN
4.
VOLUME
UP/DOWN
MAIN menu
MENU
BLUE
5
5.
Press Volume UP/DOWN to select (with white
letters) the Channel type: CH (Aerial) or CC (Cable).
TUNE menu
CHANNEL
CH
CC
Pr 06
CH21
SEARCH
To select channel “5A”, press 5 and then press
RED.
F-TUNE
MODE
6
6.
Press CH DOWN to select SEARCH.
EDIT
AUTO-TUNE
SEARCH
CHANNEL
7
7.
Press Volume UP/DOWN to start preset.
The tuning sequence will stop when a signal is
detected, if the signal is not the required channel
press Volume UP/DOWN to continue.
Pr 06
CH21
SEARCH
F-TUNE
MODE
EDIT
8
8.
AUTO-TUNE
MEMORIZE
Press GREEN to memorize.
GREEN
9
9.
Press MENU to clear the on-screen display.
Repeat the above procedure for presetting other programme
channels.
E 13
SX66/76NF8(01-42)
13
02.10.25, 10:50 AM
TV Channel Setting
After preset has been performed
The following features are available for preset channels:
MAIN menu
Fine tuning
GREEN
When a preset programme channel is not exactly tuned, you
can fine tune the channel in this mode.
NUMBER
buttons
BLUE
1
1.
Select the programme channel number you want to
tune using the 0 ~ 9 NUMBER buttons
TUNE menu
CHANNEL
CH
CC
Pr 06
CH21
SEARCH
BLUE
2
2.
F-TUNE
Press MENU to see the MAIN menu.
MODE
CH DOWN
EDIT
3
Press BLUE to see the TUNE menu.
4
Press CH DOWN twice to select F-TUNE (blue box).
5
Press and hold the Volume UP/DOWN, until the best
tuning position is found, for the best picture and
sound.
3.
AUTO-TUNE
VOLUME
UP/DOWN
4.
MENU
5.
After Fine tuning the programme number will turn
from green to yellow.
F-TUNE (Fine tune) menu
CHANNEL
6
6.
Pr 06
CH21
SEARCH
Press GREEN to memorize.
F-TUNE
MODE
7
7.
Press MENU to clear the on-screen display.
EDIT
AUTO-TUNE
Repeat the above procedure for other programme channels
as required.
E 14
SX66/76NF8(01-)new
14
02.10.22, 4:03 PM
MEMORIZE
GREEN
Mode
This feature allows you to select TV, VCR, SKIP. First follow
the above steps 1, 2, and 3. The TUNE menu will appear on
screen.
MODE
Pr 06
CH21
CHANNEL
SEARCH
F-TUNE
1
1.
Press CH DOWN to select MODE.
MODE
TV
VCR
SKIP
EDIT
GREEN
2
2.
AUTO-TUNE
Press Volume UP to select:
MEMORIZE
GREEN
TV:
If the TV signal is weak the image can move.
In this case set the MODE to TV.
VCR: The upper part of the picture may be
distorted when receiving signal from a VCR
via RF terminal on the TV set.
In this case, set the MODE to VCR.
SKIP: Allows you to skip channels you do not want
to view when using CH UP/DOWN.
Volume
UP
CH UP/
DOWN
MENU
3
Press GREEN to memorize.
4
Press MENU to clear the on-screen display.
3.
4.
Repeat the above procedure for other programme channels
as required.
EDIT
EDIT
This feature allows you to give a name to the channels and
change the name.
CHANNEL
SEARCH
F-TUNE
1
1.
Select EDIT and then press MENU. The EDIT menu
will appear.
MODE
EDIT
AUTO-TUNE
2
2.
Press the MENU
button to enter
the EDIT and
SORTING menu.
For the details on the procedure, refer to page 10.
E 15
SX66/76NF8(01-)new
15
02.10.22, 4:03 PM
TV Operation
Channel Selection
CH UP/DOWN
NUMBER
buttons
Select the programme channel number you want to see,
using the CH UP/DOWN buttons .
SINGLE/
DOUBLE
entry
You can clear the on-screen display by pressing MENU.
FLASH
BACK
CH UP/
DOWN
MENU
Pr 01
Pr 02
Pr 03
Pr 04
Pr 05
Pr 06
Pr 07
Pr 08
Pr 09
Pr 10
The channels that are in SKIP mode cannot be
seen when using this method.
Use the 0 ~ 9 NUMBER buttons to display these
channels.
SINGLE/DOUBLE entry
This button selects between one or two digit channel
number entry.
Pr *
Single digit
entry mode
Pr * *
Press
Double digit
entry mode
0~9 NUMBER buttons
You can select channels by pressing the 0 ~ 9 NUMBER
buttons on the remote control.
For single and double digit entry see above.
FLASH BACK
Press this button to switch the currently viewed channel to
the previously viewed channel, and vice versa.
This function is only available in programme channel
selection mode.
I.e. not when AV terminals are in use.
Pr 01
Previously
viewed channel
Pr 12
Press
Currently
viewed channel
E 16
SX66/76NF8(01-)new
16
02.10.22, 4:03 PM
Picture Adjustments
Picture quality: CONTRAST, COLOUR, BRIGHTNESS, SHARPNESS,
NORMALISE, TINT CONTROL, ECO MODE, COMB FILTER, NTSC HUE and
ROTATION are adjustable in this menu.
1
Press MENU to see the MAIN menu.
MAIN menu
RED
CH UP/
DOWN
RED
Volume
UP/DOWN
2
PICTURE menu
Press RED to see the PICTURE menu.
CONTRAST
MENU
3
COLOUR
Press CH UP/DOWN to select an option from the list:
CONTRAST, COLOUR, BRIGHTNESS,
SHARPNESS or NORMALISE.
The selected item will appear on screen in a blue box.
4
For your desired picture, adjust the picture quality
with Volume UP/DOWN.
If you wish to normalize video levels, press MENU to default
factory settings.
BRIGHTNESS
SHARPNESS
NORMALISE
NORMALISE menu
CONTRAST
COLOUR
BRIGHTNESS
5
6
Continuously press CH UP/DOWN arrows to access
the TINT CONTROL and ECO MODE options.
Select TINT CONTROL and press Volume UP/
DOWN, to adjust your desired skin colour (blue or
red).
SHARPNESS
NORMALISE
Press the MENU
button to
normalise ...
TINT CONTROL
TINT
CONTROL
ECO MODE
COMB
FILTER
NTSC HUE
ROTATION
E 17
SX66/76NF8(01-)new
17
02.10.22, 4:03 PM
Picture Adjustments
7
7.
Select ECO MODE “ON” to reduce contrast in areas
of the picture that are excessively white.
ECO MODE
TINT
CONTROL
ECO MODE
ON
COMB
FILTER
NTSC HUE
ROTATION
MENU
8
8.
Select COMB FILTER “ON” to reduce colour
interference in picture with fine details and the
picture gets sharper.
COMB FILTER
TINT
CONTROL
ECO MODE
COMB
FILTER
NTSC HUE
ROTATION
9
9.
Select NTSC HUE to adjust the skin colour (Green or
Red) during NTSC signal reception through the
external connectors.
NTSC HUE
TINT
CONTROL
ECO MODE
COMB
FILTER
NTSC HUE
ROTATION
10
10.
If the picture is tilted, select ROTATION to adjust the
picture tilt.
ROTATION
TINT
CONTROL
ECO MODE
11
11.
Press MENU to close the menu.
COMB
FILTER
NTSC HUE
ROTATION
E 18
SX66/76NF8(01-)new
18
02.10.22, 4:04 PM
ON
Wide Mode Fast Menu
With this menu you can select the width of the picture:
AUTO, PANORAMA, FULL, NORMAL, ZOOM 14:9 or
CINEMA, by pressing WIDE MODE.
AUTO
Each time you press WIDE MODE, the width of the picture
changes as indicated:
EXIT
AUTO * ➔ PANORAMA ➔ FULL ➔ NORMAL ➔ ZOOM 14:9 ➔ CINEMA
RED
When you select PANORAMA, ZOOM 14:9 or CINEMA, 4
options appear on the screen.
BLUE
PANORAMA
GREEN
YELLOW
BLUE
V-SCROLL: Press RED to see the Vertical SCROLL menu.
V-SIZE: Press GREEN to see the Vertical SIZE menu.
NORMAL: Press YELLOW to normalize the Vertical
SCROLL and SIZE.
WIDE
MODE
EXIT: Press BLUE to quit the menu.
Volume
UP/DOWN
V-SCROLL menu: Press Volume UP/DOWN to adjust the
Vertical SCROLL (UP/DOWN).
V-SCROLL
RED
V-SIZE menu: Press Volume UP/DOWN to adjust the
Vertical SIZE (LARGE/SMALL).
V-SIZE
NORMAL.
EXIT
GREEN YELLOW BLUE
V-SCROLL menu
PANORAMA
* AUTO mode (VPS code): The VPS signal is sent
by some broadcasting stations with information of
the original size.
When the TV is in AUTO mode and receives the
VPS signal, it changes the size automatically as
indicated below:
V-SCROLL
DOWN
UP
EXIT
BLUE
When the TV is receiving VPS code 16:9 the TV
selects CINEMA automatically.
When the TV is receiving VPS code 14:9 the TV
selects ZOOM 14:9 automatically.
When the TV is receiving VPS code 4:3 the TV
selects PANORAMA automatically.
When the TV does NOT receive VPS code the TV
selects PANORAMA automatically.
V-SIZE menu
PANORAMA
V-SIZE
SMALL
LARGE
EXIT
BLUE
E 19
SX66/76NF8(01-)new
19
02.10.22, 4:04 PM
Wide Mode Fast Menu
Wide Mode (Special detail information)
Special detail information about PANORAMA, FULL, NORMAL, ZOOM 14:9 and CINEMA (16:9) .
PANORAMA
4:3
16 : 9
The Panorama Mode adapts the broadcast picture to 16:9
format without changing the centre of view. This is
especially useful for programmes like the News when the
speaker in the centre of the picture needs to be seen
clearly.
FULL
With Full Mode you adapt the picture 16:9 format while
also stretching the centre of view. This is an advantage,
for example, when watching sports games where there is
no real fixed centre of the picture.
NORMAL
You can watch 4:3 programmes in 4:3 format by switching
to Normal Mode function.
ZOOM 14:9
Adapts the 14:9 broadcast cinema movies to the 14:9
Mode.
CINEMA (16:9)
Adapts the 16:9 broadcast cinema movies to the 16:9
Mode, thereby getting rid of the black borders.
E 20
SX66/76NF8(01-)new
20
02.10.22, 4:04 PM
Audio Adjustments
Loudspeakers Sound Volume
Use Volume UP/DOWN to increase/decrease the volume
level. The volume indicator will appear on the screen.
To adjust the headphones volume, see the
SOUND menu on page 22.
MUTE
Volume
UP/DOWN
SOUND MUTE
Press the button to mute the sound. “MUTE” appears on the
screen. Press the button again to turn the sound back on.
SOUND
MODE
SOUND
MUTE
SOUND MODE
Press the button to change the sound mode for the
speakers. The sound mode will appear on the screen.
STEREO
Depending on the sound transmission the sound
reproduction can be chosen as indicated below:
When the TV set is receiving a STEREO programme, the
TV selects STEREO automatically, and you can change:
STEREO MONO
When the TV is receiving a BILINGUAL programme, the
TV selects DUAL CHANNEL A automatically, and you
can change:
DUAL CHANNEL A DUAL CHANNEL B
DUAL CHANNEL A B MONO
MONO
When the TV is receiving a MONO (NICAM) programme,
the TV set selects MONO NICAM automatically, and you
can change:
MONO NICAM MONO (FM)
When the TV is receiving a MONO (FM) programme, the
TV set selects MONO automatically but the sound mode
cannot be changed.
See the Sound Setting Mode (page 22) to
change the sound mode for the headphones.
External source: When you are watching the TV set
through the AV-1, AV-2 or AV-3 terminals, the Sound mode
button is not operative.
E 21
SX66/76NF8(01-)new
21
02.10.22, 4:04 PM
Audio Adjustments
Sound Setting Mode
Sound quality (VOLUME, BASS, TREBLE, BALANCE, NORMALISE, SOUND
MODE and SPATIAL EXPANDER) are adjustable in this menu.
RED
1
Press MENU to see the MAIN menu.
2
Press GREEN to see the SOUND menu.
MAIN menu
GREEN
GREEN
CH UP/
DOWN
3
Press RED to select LOUDSPEAKERS or press
GREEN to select HEADPHONES.
SOUND menu
VOLUME
LOUDSPEAKERS
BASS
Volume
UP/DOWN
4
SOUND
MODE
TREBLE
Press CH UP/DOWN to select an option from the list:
VOLUME, BASS, TREBLE, BALANCE or
NORMALISE.
The selected option will appear in white letters on a
blue background.
MENU
BALANCE
NORMALISE
LOUDSPEAKERS
RED
5
HEADPHONES
GREEN
Adjust the sound quality according to your
preferences with Volume UP/DOWN.
Select NORMALISE and press MENU to normalise audio
levels to default factory settings.
NORMALISE
VOLUME
LOUDSPEAKERS
BASS
6
Press CH DOWN to see more options:
SPEAKERS (Mode), HEADPHONES (Mode),
EFFECTS, SOUND IDENT., and DYNAMIC BASS.
TREBLE
BALANCE
NORMALISE
7
Press CH UP/DOWN to select: LOUDSPEAKERS or
HEADPHONES.
Press Volume UP/DOWN to change the sound
mode, as indicated on page 21, in the section Sound
mode.
SOUND mode
LOUDSPEAKERS
HEADPHONES
EFFECTS
SOUND
IDENT.
8
9
Select EFFECTS* and press Volume UP/DOWN to
activate or deactivate the SPATIAL EXPANDER
effect.
Select SOUND IDENT.** to activate (ON) or
deactivate (OFF) the automatic identification of audio
system of the current programme.
10
Select DYNAMIC BASS.*** and select the desired
mode from OFF, MEDIUM, and STRONG.
11
Select A.V.C**** and select the desired mode from
Short, Middle or Long.
12
Press MENU to close the menu.
E 22
SX66/76NF8(01-)new
22
02.10.22, 4:04 PM
Press the
MENU button
to normalise...
DYNAMIC
BASS.
A.V.C
STEREO
* EFFECTS
SPATIAL EXPANDER: The spatial expander effect depends on whether the feed is MONO or
STEREO.
If the source feed is MONO, it produces a “Pseudo Stereo” effect.
If the source feed is STEREO, it produces a spatial expander effect, expanding the
stereophonic image.
BYPASS: The BYPASS effect deactivates the SPATIAL EXPANDER.
The SPATIAL EXPANDER effect does not work with headphones.
** SOUND IDENT.
SOUND IDENT. ON: TV automatically identifies the sintonized audio system MONO FM,
STEREO NICAM or DUAL NICAM SIGNAL.
SOUND IDENT. OFF: Disqualifies the automatic identification of the audio system and forces
the sound into MONO FM.
This mode can be convenient when the level of the signal received is extremely weak. This
function is independent for every programme.
*** DYNAMIC BASS. system extends the frequency range of loudspeakers to create different
bass effects.
**** A.V.C (Automatic Volume Correction)
Different sound sources, fairly often do not have the same volume level, for example the
changing from movie to the advertisements.
The Automatic Volume Correction (A.V.C) solves this problem and equalizes the volume
levels.
You can select A.V.C from four different time levels; Short, Middle and Long.
E 23
SX66/76NF8(01-42)
23
02.10.25, 10:50 AM
Features Setting Mode
In this mode you can set LANGUAGE, ON-TIMER, OFF-TIMER, CHILD LOCK and view the all functions
implemented in your TV set demonstration .
LANGUAGE
You can select the desired language for the TV screen.
GREEN
FEATURES menu - LANGUAGE
1
Press MENU to see the MAIN menu.
2
Press YELLOW to see the FEATURES menu.
1.
LANGUAGE
NUMBER
buttons
2.
3.
3
Press CH UP/DOWN to select an option from the list:
LANGUAGE, ON TIMER, OFF TIMER, DEMO or
CHILD LOCK.
The selected item will appear on screen in white
letters on a blue background.
4.
4
Press Volume UP to select the desired language in
the white letters.
5.
Press MENU to close the menu.
YELLOW
Volume
UP
CH UP/
DOWN
MENU
5
ON TIMER
ENGLISH
DEUTSCH
FRANÇAIS
ITALIANO
ESPAÑOL
OFF TIMER
DEMO
ON TIMER
The ON-TIMER is used to automatically switch on the TV set during the day.
MAIN menu
1
Press MENU to see the MAIN menu.
2.
2
Press YELLOW to see the FEATURES menu.
3.
Press CH UP/DOWN to select an option from the list:
ON TIMER, OFF TIMER, CHILD LOCK, DEMO.
The selected item will appear on screen in white
letters on a blue background.
1.
3
YELLOW
FEATURES menu - ON TIMER
LANGUAGE
4
4.
Press Volume UP to select the TIME (current time) in
white letters.
ON TIMER
TIME
08:30
SWITCH ON **:**
OFF TIMER
DEMO
5
5.
To programme the current TIME: In order to be able
to run this function, it is essential to adjust the
current time.
Automatic TIME adjustment: If you are receiving a
channel with Teletext, the TIME is automatically
synchronized with the Teletext clock.
*Important: If a signal via satellite is being
received, or if correct time cannot be obtained,
the time will have to be adjusted manually.
Manual TIME adjustment: To adjust the time
manually, this should be done with the 0 ~ 9
NUMBER buttons.
E 24
SX66/76NF8(01-)new
24
02.10.22, 4:04 PM
CANCEL
GREEN
RED
6
Press Volume UP to select: SWITCH ON in white
letters.
7
Adjusting the SWITCH ON Time. Once the current
TIME has been adjusted, the SWITCH ON Time can
be set with the 0 ~ 9 NUMBER buttons.
GREEN is used to cancel the SWITCH ON function.
8
Press MENU to close the menu.
9
Press STAND-BY on the remote control to put the
TV into switch on Stand-by Mode.
LED indicator on the TV set lights up RED during ON
TIMER is activated.
6.
STAND-BY
7.
NUMBER
buttons
GREEN
Volume
UP
CH UP/
DOWN
8.
9.
MENU
As a safety precaution, in the case of nobody
being home when the television switches on
automatically, the television will disconnect itself
after 120 minutes; if it is to continue to run, any
button on the remote control functions should be
pressed.
In the event of a power cut, disconnection from
the plug or television switch, all the data on the
ON TIMER will be cancelled.
OFF TIMER
The OFF TIMER automatically switches the TV set to Stand-by Mode after a
predetermined period, (30, 60, 90 or 120 minutes).
First follow the steps 1 to 3 (page 24) to see the FEATURES menu-ON
TIMER.
1
1.
Press Volume UP to select OFF TIMER and then
press CH UP/DOWN to select the desired period in
white letters.
Select OFF to deactivate off-timer.
Press GREEN to memorize.
FEATURES menu - OFF TIMER
LANGUAGE
ON TIMER
OFF TIMER
DEMO
2
2.
0FF
120 Min.
90 Min.
60 Min.
30 Min.
Press MENU to close the menu.
MEMORIZE
The OFF TIMER data will be cancelled if you turn
off the TV by STAND-BY on the remote control or
with the MAIN POWER on the TV set.
GREEN
E 25
SX66/76NF8(01-)new
25
02.10.22, 4:04 PM
Features Setting Mode
Child Lock (Channel Block)
You can lock a TV channel to prevent unsupervised TV viewing by following
these procedures; the protection can apply to the television itself LOCK ALL
or to specific programmes LOCK PROG.. With the CHILD LOCK function,
you can also programme a time period during which the TV will be
protected.
Press MENU to see the MAIN menu.
2
Press YELLOW to see the FEATURES menu.
3
Press CH DOWN to select CHILD LOCK in white
letters on a blue background.
4
Press MENU to see the CHILD LOCK menu.
5
Press CH UP/DOWN to select an option from the list:
LOCK ALL, LOCK PROGRAMME or CLEAR LOCK
The selected item will appear on screen in a blue
box.
2.
GREEN
MAIN menu
1
1.
YELLOW
3.
VOLUME
UP
CH UP/
DOWN
MENU
YELLOW
4.
5.
FEATURES menu - CHILD LOCK
CHILD LOCK
Press the MENU
button to enter
the CHILD LOCK
menu.
➜
LOCK ALL
Select this option for protecting the access to the whole TV.
If necessary, repeat steps 1 to 4 to see the CHILD LOCK
menu.
1.
1
Press Volume UP to select the protection type (white
letters):
Select NONE: To cancel the protection.
Select ALWAYS LOCKED: The access to the TV will
be protected throughout the day.
CHILD LOCK menu - LOCK ALL
LOCK ALL
NONE
ALWAYS LOCKED
LOCK PROG.
CLEAR LOCK
MEMORIZE
2.
2
Press GREEN to memorize.
GREEN
From this time forward, whenever the protection conditions
are met, the screen will be blocked and the “LOCKED
MODE” message will be displayed.
Press any number key on the remote control to unlock the
TV.
Since the “key” for unlocking the TV is the remote
control, make sure you do not misplace it.
E 26
SX66/76NF8(01-)new
26
02.10.22, 4:04 PM
LOCK PROGRAMME
Select this option to protect the access to separate
programmes.
GREEN
1
Press MENU to see the MAIN menu.
2
Select the programme channel number you want to
protect using the 0 ~ 9 NUMBER buttons or CH UP/
DOWN.
3.
3
Repeat steps 1 to 4 (page 26) to see the CHILD
LOCK menu.
4.
Press CH DOWN to select LOCK PROG. (blue
background).
1.
2.
NUMBER
buttons
VOLUME
UP
CH UP/
DOWN
MENU
LOCK PROGRAMME menu
LOCK ALL
4
5
5.
Press Volume UP to select the protection type (white
letters):
LOCK PROG.
NONE
ALWAYS LOCKED
CLEAR LOCK
MEMORIZE
GREEN
Select NONE: To cancel the protection from the
selected programme.
Select ALWAYS LOCKED: To protect the access
from the selected programme throughout the day.
6
6.
Press GREEN to memorize.
From this time forward, whenever the protection
conditions are met, the screen will be blocked and
the “LOCKED MODE” message will be displayed.
Press any NUMBER buttons to unlock the TV.
Since the “key” for unlocking the TV is the remote
control, make sure you do not misplace it.
E 27
SX66/76NF8(01-)new
27
02.10.22, 4:04 PM
Features Setting Mode
CLEAR LOCK
This option enables you to erase all the adjustments made
to the CHILD-LOCK function.
If necessary repeat steps 1 to 4 (page 26) to see the
CHILD LOCK menu.
CLEAR LOCK menu
LOCK ALL
LOCK PROG.
1
Press CH UP/DOWN to select CLEAR LOCK.
2
Press MENU to confirm that you want to initialize the
CHILD LOCK system.
3
Press MENU to clear the on-screen display.
4
Use the CLEAR LOCK to cancel any previously set
CHILD LOCK programmes to avoid malfunction
when a new program is set.
1.
CH UP/
DOWN
YELLOW
MENU
2.
3.
4.
CLEAR LOCK
Press the menu
button to clear
the child lock
system.
Demo
The demonstration function allows you to see all the menus implemented in
this TV set.
1
1.
FEATURES menu - DEMO
Press MENU to see the MAIN menu.
LANGUAGE
2
2.
Press YELLOW to see the FEATURES menu.
ON TIMER
OFF TIMER
DEMO
3
Press CH DOWN to select DEMO.
4
Press MENU to begin the demonstration.
3.
➜
4.
5
5.
Press any button on remote control to exit this
function when you wish.
E 28
SX66/76NF8(01-)new
28
02.10.22, 4:04 PM
Press the MENU
button to start
the DEMO.
VCR Mode
SHARP VCR can be operated using the TV remote control.
POWER (VCR)
Press this button to turn your VCR on.
POWER
(VCR)
CH UP/DOWN (VCR)
These buttons are used for changing channels and setting
the timer.
PLAY
Press this button to start playback.
REWIND
PLAY
FAST
FORWARD
CH UP/
DOWN
RECORD
STOP
PAUSE/
STILL
RECORD
Press this button to start recording. If the video cassette is
protected against recording, it will be ejected.
STOP
Press this button to stop playback or recording.
FAST FORWARD and REWIND
Both these buttons have the following function:
PAUSE/STILL
Press to temporarily stop the tape during playback or
recording mode.
Press again to release pause.
Fast forwarding and Rewinding
1
To move through the cassette faster, press STOP to
stop and then press FAST FOWARD or REWIND to
fast forward or rewind the cassette.
2
Press STOP to stop fast forward or rewind.
1.
2.
Picture Search
1
During playback, press FAST FOWARD for forward
picture search, or REWIND for reverse search.
2
Press PLAY to resume normal playback.
1.
2.
For further details, please refer to operation manual of your
VCR.
E 29
SX66/76NF8(01-)new
29
02.10.22, 4:04 PM
Other Features
TV/VIDEO
With this button you can select either source of input for the
TV.
1
1.
TV/VIDEO
2
2.
RED
GREEN
When TV/VIDEO is first pressed, the TV/Video menu
appears and TV mode changes to VIDEO mode. The
screen is displayed in the last VIDEO mode.
Press the corresponding COLOUR to select one of
the input sources, as indicated in the diagram.
If you press any COLOUR during VIDEO mode, the
TV/Video menu will appear again.
YELLOW
AV-1
AV-1
RED
BLUE
AV-2
COMPO
NENT
BLUE: AV-3 S AV-3 (S-VIDEO)
The selected input will appear on the screen.
CLOCK
3
3.
Press TV/VIDEO again, and you will exit the menu
and VIDEO mode will change back to TV mode.
CLOCK
Press the button to display the current time on the screen.
That this function operates only if the station you
are tuned to broadcasts a teletext signal.
Headphone jack
The headphone jack is located behind the door.
How to open the door: Lift the projection at the lower right
of the door with your finger in the direction of the arrow.
1
Press MENU to see the MAIN menu.
2
Press GREEN to see the SOUND menu.
3
Press GREEN to select HEADPHONE VOLUME.
4
Adjust the headphone volume with Volume UP/
DOWN.
1.
2.
3.
4.
Caution:
To protect your ears, reduce the volume of
headphones before connecting them.
5
Make sure that you insert the headphone plug all the
way.
6
Press MENU to close the menu.
5.
6.
The SPATIAL EXPANDER effect cannot be
adjusted for the headphones.
E 30
SX66/76NF8(01-)new
30
02.10.22, 4:04 PM
AV-3
S AV-3
GREEN YELLOW BLUE
Each time the corresponding COLOUR is
pressed, AV-3/S AV-3 (S-VIDEO) change as
indicated below.
Volume
UP/DOWN
MENU
TV/Video menu
Behind the door
CHANNEL CALL
CHANNEL
CALL
Press the button to display the current programme number
and the sound mode on the screen. The name if it has been
set, the remaining time for off-timer, the real-timer and the
on-timer, if they have been set, are also displayed on the
screen.
Press the button again to make the on-screen disappear.
If the channel you are viewing has been set to be skipped
with the channel skip function, the programme number is
displayed in red. If the channel was fine-tuned, programme
number will be displayed in yellow.
BBC1:
01
STEREO
OFF TIMER
: 120Min.
TIME
: 10:30
ON TIMER
: 18:00
E 31
SX66/76NF8(01-)new
31
02.10.22, 4:04 PM
TELETEXT Mode
What is Teletext?
RED
NUMBER
buttons
GREEN
BLUE
YELLOW
Teletext is an information service, organized like a magazine, which is
provided by some television stations in addition to regular television
broadcasting. Your television receives special Teletext signals broadcast by
a TV station, processes the information and displays it graphically on the
screen. News, weather and sports information, stock exchange prices,
programme previews and closed captioning for the deaf are among the
many services available through Teletext.
Teletext information is organized much like a magazine: according to pages
and sub-pages. The basic unit of displayed information is the page. A subpage is one of a series of pages.
Teletext reception is controlled by using the remote control. Refer to the
appropriate button descriptions for operation of the Teletext functions.
CH UP/
DOWN
Teletext features
TEXT/MIX/
PICTURE
Depending on the TV programme, the Teletext
pages are transmitted using different systems.
Your SHARP TV is adjusted to receive 2 Teletext
systems, namely FLOF and LIST, which are
automatically identified by the receiver.
The user can easily identify them by the manner
in which they appear on the screen.
To switch ON and switch OFF the Teletext
Select a TV channel which is broadcasting the
Teletext programme you would like to watch.
2
Press TEXT/MIX/PICTURE twice to select the
Teletext Mode.
Teletext information will appear on the screen.
2.
TELETEXT
NEWS
SPORTS
RED
GREEN YELLOW BLUE
3
Press TEXT/MIX/PICTURE twice to go out from
Teletext Mode.
Page Selection
Fast Page Selection
Select the appropriate programme channel.
Press TEXT/MIX/PICTURE twice to select the Teletext
Mode.
To recall a page number displayed in the coloured brackets,
simply press the corresponding COLOUR .
0~9 NUMBER buttons
Enter a desired page number with 0 ~ 9 NUMBER butttons.
(To select P.100: press 1, 0, 0).
Page selector
You can sequentially select page numbers by pressing CH
UP/DOWN.
E 32
SX66/76NF8(01-)new
32
WEATHER
TELETEXT
100
3.
MOVIE
LIST
1
1.
FLOF
02.10.22, 4:04 PM
RED
200
300
400
GREEN YELLOW BLUE
Other Teletext features
TEXT/MIX/PICTURE
CANCEL
REVEAL
CLOCK
TV Mode: Press TEXT/MIX/PICTURE to select SPLIT
SCREEN Mode (Picture & Teletext). This feature allows the
user to watch a Teletext page on the right hand side of the
screen while on the left hand side is shown the normal TV
programme.
SPLIT SCREEN Mode: Press TEXT/MIX/PICTURE to select
the Teletext Mode.
Teletext Mode: Press the button again to superimpose a
Teletext broadcast onto the current TV programme screen
(mixed Mode).
MIXED Mode: Press the button again to return to the
normal TV screen (current program).
SPLIT SCREEN Mode
TELETEXT Mode
HOLD
HALF PAGE
TEXT/MIX/
PICTURE
Each time you press the button, the upper/lower half of the
Teletext page is magnified and displayed on the screen.
HALF PAGE
HOLD
Any Teletext page or subpage can be held on the screen by
pressing HOLD.
Press the button again to cancel the HOLD Mode.
REVEAL
MIXED Mode
Press this button to reveal hidden information such as the
answer to a quiz.
Press the button again to hide the information.
CLOCK
TV Mode: When the TV signal with TEXT data is received,
by pressing this button the real time information will appear
on the top left area of the screen.
Teletext Mode: When a selected Teletext page has hidden
subpages or timed pages, these pages can be seen by the
following manner:
1
Press CLOCK. Screen will show
2
Enter 4 digits corresponding to the subpage desired.
E.g. 0021 for subpage number 21.
3
Wait until the page appears.
1.
2.
3.
“= = = = ”
You can use this button together with CANCEL .
This means that you can view the main TV
picture until the subpage has been found. The on
screen icon at the top left side of the screen will
change when the subpage has been found.
Press TEXT/MIX/PICTURE to view the subpage.
E 33
SX66/76NF8(01-)new
33
02.10.22, 4:04 PM
TELETEXT Mode
CANCEL
With this button Teletext information is cancelled and TV
picture is restored. Indication is shown on screen.
In this position, the TV programme cannot be changed,
being in Teletext/Cancelled mode. When a change takes
place in the Teletext information, the upper time of the
cancelled page or some other indication of special pages is
shown on screen. To uncancel, press TEXT/MIX/PICTURE
and the whole Teletext is shown.
This button can be used together with CLOCK
while awaiting subpages.
If you are in SPLIT SCREEN mode (Picture &
Teletext) CANCEL is not available.
MENU
LIST
CLOCK
TEXT/MIX/
PICTURE
INDEX
RESET
CANCEL
LIST
Pressing this button you force the Teletext to LIST Mode. It
means that row 24 (bottom row of Teletext) will not have
transmitter information, only the pages that you have
previously stored in the memory.
More information on Teletext Page memory List (page 35).
Pressing LIST again we go out from LIST Mode and system
is going to be identified again (FLOF).
INDEX
Press INDEX to return back to index page.
RESET
Press RESET to return back to index page and go out from
Teletext mode.
SPLIT SCREEN (LIST mode)
This feature allows the user to watch a Teletext page (in
LIST Mode) on the right hand side of the screen while on
the left hand side is shown the normal TV programme.
To activate this mode, press any colour when you are
watching a TV programme with Teletext information and the
display page will be page memorized in LIST mode (see
LIST Mode).
To exit from SPLIT SCREEN (LIST Mode) press MENU.
If there is not TXT transmission, a black box
appears.
When using SPLIT SCREEN (LIST Mode) only the following
TEXT buttons are active:
■ Colour
■ REVEAL
■ 0~ 9 NUMBER buttons ■ CLOCK (Timed pages)
■ Half PAGE
■ STORE
■ HOLD
■ TEXT/MIX/PICTURE (TEXT off)
Pressing any other button allows to return on normal TV
Mode resetting the SPLIT SCREEN (LIST Mode) feature.
E 34
SX66/76NF8(01-)new
34
02.10.22, 4:04 PM
100 200 300 400
Teletext operation - LIST Mode Teletext Page memory List
NUMBER
buttons
BLUE
YELLOW
GREEN
RED
How to Operate Page Memory
Your TV has 40 Teletext page number memories for fast
recall of Teletext information.
In programme positions 1 through 9, four Teletext page
numbers can be stored in each position; a total of 36 pages.
In programme positions 10 through 99, only one programme
with 4 page numbers can be stored. If you try to store more
than 4 page numbers in a programme position between 10
and 99, the previously stored page numbers will be erased.
P 100
(FLOF TELETEXT)
News
Sports
Movie
Weather
LIST
TEXT/MIX
/PICTURE
STORE
1
Select the programme channel number into which
you want to store Teletext page numbers.
2
Press TEXT/MIX/PICTURE twice to select the
Teletext mode.
3
Press LIST to change from FLOF system to LIST
mode.
4
Press a corresponding COLOUR to the coloured
brackets on the screen for page number storage.
1.
2.
3.
4.
P 300
TELETEXT
100
200
425
400
YELLOW
5
Enter the Teletext page number using the 0 ~ 9
NUMBER buttons (enter three digits).
6
Repeat steps 4 and 5 until the numbers for the
desired pages are entered.
7
Press STORE to memorize the page numbers you
require. The symbol appears on the screen.
8
Press TEXT/MIX/PICTURE twice to exit the Teletext
Mode.
5.
6.
7.
8.
P 425
TELETEXT
100
200
425
400
Fast Page Selection - LIST Mode -
1
Select the appropriate programme channel.
2
Press TEXT/MIX/PICTURE twice to select the
Teletext Mode.
3
Press LIST to change from FLOF system to LIST
Mode.
4
To recall a page number displayed in the coloured
brackets, simply press the corresponding COLOUR.
1.
2.
3.
4.
.
5.
5
If you want to store,
press SYMBOL
Press LIST again to return to FLOF Mode.
E 35
SX66/76NF8(01-)new
35
02.10.22, 4:04 PM
Connections
Connecting to video equipment
Enjoy playback from a video disc player, VCR or other video equipment by connecting
them to this TV set using the Audio/Video in terminals.
Example use of front terminals
TV
VCR
(SX66NF8)
Camcorder
Video Game
ON TIMER
ON TIMER
(SX66NF8)
(SX76NF8)
AV-3 IN
Behind the door
To Audio/Video
out terminals
To S-Video
out terminals
Yellow: To video input jack
White: To audio input (L) jack
Red:
To audio input (R) jack
Example use of rear terminals
TV
For Playback
OUT
VIDEO
L
AV-1 IN
AV-2 IN
COMPONENT
Y
PB
(CB)
AUDIO
R
For Recording and Editing
PR
(CR)
To Audio/
Video out
terminals
(SX76NF8)
VCR
DVD Player
To Audio/
Video in
terminals
OUT
AV-1 IN
AV-2 IN
COMPONENT
VIDEO
Y
L
PB
(CB)
AUDIO
R
To
Component
terminals
(MONO)
PR
(CR)
Green: To Y input jack
Blue: To PB (C B) input jack
Red: To PR (CR) input jack
To Audio/
Video out
terminals
VCR
• Turn off the power on the TV set and the VCR being connected before making the above connections. Be sure the cord
plugs are fully inserted in the connection terminals.
• For playback of monaural audio, connect the external source to the audio input left terminal on the front or rear of the TV
set (MONO) to hear the same sound from both speakers.
• The audiovisual cords required to connect the TV set with video equipment may differ from those shown in the above
diagram. See the operation manual of your video equipment for connection details.
• The above recording and editing connections are for intended solely for personal use and not for the illegal copying of
audiovisual material protected by copyright laws.
E 36
SX66/76NF8(01-)new
36
02.10.22, 4:05 PM
Troubleshooting
Increase the volume.
Check if the Brightness or Contrast setting in the picture
setting mode might be all the way to the minus side
Try fine tuning to correct.
Check batteries in the remote control.
Adjust COLOUR control.
Turn OFF using the Main POWER switch,
then turn ON again after a minute.
Check for local interference.
If outside antenna is used, check for
broken wires.
Antenna not connected to terminal at the
back of the TV set.
Main POWER switch of TV not ON.
TV not plugged in. Outlet power OFF.
Problems
Try a new channel to check for possible
station trouble.
Quick
Service
Check List
Possible Causes/Remedies
The following problems do not always indicate a hardware failure. Therefore, please use the
troubleshooting guide below before calling for repair service.
If, after following the guide none of the remedies work, unplug the TV set and call for service.
Remote control does not work.
Bars on screen
Picture distorted.
Picture rolls vertically.
No colour
Poor reception on some channels
Picture weak.
Picture lines or streaks
Picture ghosting
Picture blurred.
Sound OK, picture poor.
Picture OK, sound poor.
No picture or sound
This unit is equipped with a microprocessor. Its performance could be adversely affected by
external electrical noise or interference. If this should happen, unplug the unit and plug it in
again after a few minutes.
E 37
SX66/76NF8(01-)new
37
02.10.22, 4:05 PM
General Specifications for Television Receiver
Item :
IC Solid State Colour TV Receiver
Models: SX66NF8, SX76NF8
Receiving Broadcast Standard
CCIR TV Standard system PAL- B/G
Receiving Channel
VHF :
UHF :
CATV:
Receiving System
Sound:
Colour System:
Field Frequency:
Power Source
AU0 - AU12, NZ1 - NZ11
E 21 - E 69 Ch
S 1 - S 20 Ch, S 21 - S 41 Ch (Hyperband)
FM MONO
A2 STEREO
DIGITAL STEREO NICAM
PAL (NTSC by AV inputs)
50 Hz (50/60 Hz by AV inputs)
220V-240V AC 50Hz
SX66NF8
SX76NF8
Power Consumption at 240V AC 50Hz
140 W max.
140 W max.
Power Consumption at (Stand-by)
3 W max.
3 W max.
Audio Output:Internal speaker: Left/Right:(RMS)
Sub Woofer (RMS)
5+5W
—
5+5W
10 W
Dimensions (Approx.)
786.0 m/m.
520.0 m/m.
490.0 m/m.
880.0 m/m.
566.0 m/m.
545.0 m/m.
Viewing Area (diagonal measurement)
66 cm (28")
76 cm (32")
Weight (Approx.)
41 Kg
54 Kg
Speaker
6x12 cm
Antenna Input Impedance
VHF/UHF 75 ohm Unbalanced
Accessories & etc.
a) User Instruction
b) Remote Control
c) Battery
Yes
Yes
2 pcs.
Other Features list
● Comb Filter
● 100 Channel Programming System
● Cable and Hyperband
● Teletext
● OSD System (On Screen Display)
● WHITE TEMP Control
● TINT Control
● ECO mode
● Wide Mode Function
● A2 STEREO
●
●
●
●
●
●
●
●
●
●
width:
height:
depth:
2 pcs.
5x11 cm
Sub Woofer Box
2 pcs.
1 pc.
Digital Stereo NICAM
ON-OFF Timer
Child Lock System
Audio/Video Input Terminal x 3 (Front x 1, REAR x 2)
NTSC Playback AV Input
S-Video Input Terminal x 1 (Front)
Blue Back Noise Mute Function
Headphone Terminal
Audio/Video Output terminal x 1 (Rear)
Component input terminal x 1 (Rear)
• Design and specifications are subject to change without notice.
• Receiving system: These receiving systems, encompassing all currently available technology, include those with planned
broadcast, videotape and laserdisc hardware and software.
• Reception channels: Some examples of the main receivable channels are shown above.
E 38
SX66/76NF8(01-)new
38
02.10.22, 4:05 PM
Index
A
N
Accessories ......................................................................... 2
After preset has been performed ..................................... 14
Antenna Connections ......................................................... 6
Audio Adjustments ............................................................ 21
Auto Channel Preset ........................................................... 9
A.V.C ............................................................................ 22, 23
NTSC HUE ........................................................................ 18
B
P
Balance .............................................................................. 22
Bass ................................................................................... 22
Bilingual ............................................................................. 21
Blue background off-timer .................................................. 7
Brightness ......................................................................... 17
Picture Adjustments .......................................................... 17
C
Clock .................................................................................. 30
Colour ................................................................................ 17
Comb filter ......................................................................... 18
Contrast ............................................................................. 17
Controls & Terminals .......................................................... 4
Current time ...................................................................... 24
Channel Selection ............................................................. 16
Child Lock (Channel Block) .............................................. 26
O
OFF-Timer ......................................................................... 25
ON-Timer ........................................................................... 24
Other Features .................................................................. 30
R
REAR TV ............................................................................. 5
Remote control .................................................................... 3
Remote Control Battery Installation .................................. 2
ROTATION ......................................................................... 18
S
Delete (Programme) ......................................................... 11
Demonstration ................................................................... 28
Safety Precaution ............................................................... 1
Sharpness ......................................................................... 17
SKIP ................................................................................... 15
Sorting (Programme) ........................................................ 11
Sound Mute ....................................................................... 21
Sound Setting Mode ......................................................... 22
Specifications .................................................................... 38
Stand-by .............................................................................. 7
Stereo ................................................................................ 21
Switching on ........................................................................ 7
E
T
ECO mode ......................................................................... 18
Edit (Programme) .............................................................. 10
Teletext ..............................................................................
Tint control ........................................................................
Treble .................................................................................
Troubleshooting .................................................................
TV/VIDEO ..........................................................................
D
F
Features Setting Mode ..................................................... 24
Fine tuning ........................................................................ 14
FLOF (Teletext) ................................................................. 32
FRONT TV ........................................................................... 4
32
17
22
37
30
V
Volume (Headphones) ...................................................... 22
Volume (Loudspeakers) .............................................. 21, 22
H
W
Headphone jack ............................................................ 4, 30
Wide mode ........................................................................ 19
L
LANGUAGE ....................................................................... 24
LIST (Teletext) ....................................................... 32, 34, 35
M
Main power .......................................................................... 7
Manual Channel Preset .............................................. 12, 13
Menu Structures .................................................................. 8
Mono .................................................................................. 21
E 39
SX66/76NF8(01-)new
39
02.10.22, 4:05 PM
MEMO
SX66/76NF8(01-)new
40
02.10.22, 4:05 PM
WARRANTY
Consumer Electronic Products
Congratulations on Your Purchase!
This Sharp product is warranted against faults in materials and manufacture for a period of twelve (12)*
months from the date of original purchase.
If service is required during the warranty period, please contact your nearest Sharp Approved Service
Centre. These repairs would be carried out at no charge to the owner, subject to the conditions specified
herein.
The owner is responsible for any transportation and insurance costs if the product has to be returned for
repair.
This warranty does not extend to accessories or defects or injuries caused by or resulting from causes not
attributable to faulty parts or the manufacture of the product, including but not limited to, defect or injury
caused by or resulting from misuse, abuse, neglect, accidental damage, improper voltage, liquid spillage,
vermin infestation, software, or any alterations made to the product which are not authorised by Sharp.
Please retain your sales documentation, as this should be produced to validate a warranty claim.
This warranty is in addition to and in no way limits, varies or excludes any express and implied rights and
remedies under any relevant legislation in the country of sale.
IMPORTANT
DO NOT RETURN THIS PAGE TO SHARP
For your reference, please enter the particulars of your purchase below and retain, with your purchase
documentation.
Model No.
Serial No.
Date of Purchase
Retailer
FOR LOCATION ENQUIRIES WITHIN
AUSTRALIA
REGARDING YOUR
LOCAL
SHARP APPROVED SERVICE CENTRE
LOOK ON THE WEB AT
www.sharp.net.au
OR CALL SHARP
1 300 135 022
SHARP CORPORATION OF AUSTRALIA PTY. LIMITED
A.B.N. 40 003 039 405
1 Huntingwood Drive Blacktown NSW 2148
IMPORTANT NOTICE: This warranty applies only to products sold in Australia
SHARP CORPORATION
Printed in Malaysia
TINS-A380WJZZ 2
02P10-MSK
SX66/76NF8(01-)new
42
02.10.24, 10:40 AM