1
Earth Ground Installation
Important! The satellite surge protection components cannot properly function unless an efficient pathway to earth
ground is provided. The ground path must be as direct as possible, without sharp bends and must not exceed 30 ohms
resistance (when measured with an earth ground resistance test device). A resistance reading of 0–10 ohms is considered excellent, 11–20 ohms is acceptable and 21–30 is considered marginal. All electrical components throughout the
irrigation system should be grounded in a manner which provides the same ground potential.
The following instructions depict one of several acceptable earth grounding methods. Due to variables in soil composition and terrain, the method shown may not be suitable for your installation site. Contact your local Toro distributor for
assistance and availability of the required earth ground resistance test instrument. Recommended ground testers are:
AEMC Instruments, model 3710 clamp-on tester, or Biddle Megger, model 250260 (or equivalent).
Procedure
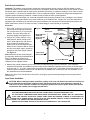
1. Drive a 5/8" (16mm) by 8' (2.5m) copper-clad steel rod into well-moistened
soil not more than 12' (3.7m) from the
satellite. The top of the ground rod
should be slightly below grade level.
2. Using a 5/8" (16mm) clamp or “Cad
weld” fastener, attach a length of #6
(6mm2) solid copper wire near the top
of the ground rod. Avoiding sharp
bends, route the wire through the foundation into the controller cabinet. Secure
the wire to the large copper ground lug
provided on the power supply chassis.
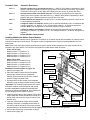
See Figure 2.
Note: Make sure the soil surrounding the
ground rod(s) remains well moistened at all
times. The addition of some form of
irrigation may be required if the satellite is
installed in a non-irrigated location.
Figure 2
850-00
Valve Cover
Ground Wire To
Additional
Ground Rod(s)
(Optional)
Chassis
Ground Lug
#6 (6mm2) Solid
Copper Ground Wire
WARNING
HIGH
VOLTAGE
115V
Copper-Clad
Ground Rod
12' (3.7m) Maximum
3. Measure the ground resistance per the instructions provided with the ground test instrument. If the resistance
exceeds the acceptable limit, additional ground rod(s) can be installed at a distance equal to twice the buried depth
of the first rod; i.e., 16' (4.9m). Interconnect the ground rods using #6 (6mm2) solid copper wire and test again. If the
measured ground resistance continues to read above the acceptable limit, contact your local Toro distributor for further assistance and recommendations.
Note: A Toro Valve Cover, P/N 850-00, works well for covering the ground rod and providing access to the ground wire
connection(s).
Input Power Installation
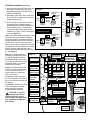
CAUTION: When installing multiple controllers, polarity of the Line and Neutral connections must be properly maintained throughout the irrigation system. Reversed polarity may cause damaging potentials to
exist at one or more controller locations. An equipment ground wire from the power source must also be
connected to the satellite power supply terminal block.
WARNING
AC POWER WIRING MUST BE INSTALLED AND CONNECTED BY QUALIFIED PERSONNEL ONLY.
ALL ELECTRICAL COMPONENTS AND INSTALLATION PROCEDURES MUST COMPLY WITH ALL APPLICABLE
LOCAL AND NATIONAL ELECTRICAL CODES. SOME CODES MAY REQUIRE A MEANS OF DISCONNECTION
FROM THE AC POWER SOURCE, INSTALLED IN THE FIXED WIRING, HAVING A CONTACT SEPARATION OF AT
LEAST 0.120" (3MM) IN THE LINE AND NEUTRAL POLES.
ENSURE THE AC POWER SOURCE IS OFF PRIOR TO CONNECTING TO THE CONTROLLER.
2