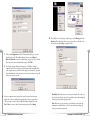
1
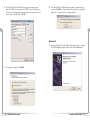
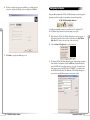
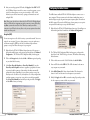
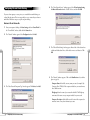
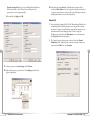
Page
Table of Contents
l.
Introduction
2
ll. Contacting Technical Support
3
lll. Installing the Adapter Hardware
4
lV. Installing the Adapter Software
6
V.
Windows 98 SE
6
Windows ME
9
Windows 2000
11
Configuring the Adapter
15
Encryption
16
Vl. Configuring the AdHoc Feature
17
Vll. Configuring File and Printer Sharing
18
Vlll.Troubleshooting
25
lX. Notices
27
X. Warranty
30
Proprietary Notice and Disclaimer
Unless otherwise noted, this document and the information herein disclosed are proprietary to Actiontec Electronics, Inc the manufacturer. Any
person or entity to whom this document is furnished or who otherwise has possession thereof, by acceptance agrees that it will not be copied or
reproduced in whole or in part, nor used in any manner except to meet the purposes for which it was delivered.
The information in this document is subject to change without notice and should not be construed as a commitment by Actiontec the
manufacturer. Although Actiontec the manufacturer will make every effort to inform users of substantive errors, Actiontec the manufacturer disclaims
all liability for any loss or damage resulting from the use of this document or any hardware or software described herein, including without
limitation contingent, special or incidental liability.
Note: PC is a trademark of IBM Corporation. Windows 98 SE, Windows Millennium Edition, Windows Me, and Windows 2000 are trademarks
of Microsoft Inc. All other brand or product names and logos used in this manual are trademarks or registered trademarks of their respective
holders.
0530-0261-000
Table of Contents
1
l
Introduction
Thank you for purchasing the Actiontec PCI 802.11b Wireless Adapter. This Wireless
Adapter is easy to use and easy to setup. If you’re tired of dealing with all those messy
wires just to connect a laptop to your home network, then take your networking to the
next level with the Actiontec PCI 802.11b Wireless Adapter. You’ll be able to share files,
printers, and even your high-speed Internet access, wirelessly!
Contacting Technical Support
Actiontec Electronics prides itself on making high-quality, durable, high-performance
products. If you need assistance, the Actiontec Technical Support Department is
available 6 am to 11pm Mon - Sun (Central Time), to provide professional support.
Package Contents
Make sure the following items are included in this package:
PCI 802.11b Wireless Adapter
Actiontec PCI 802.11b Wireless Adapter Installation CD-ROM
User’s Manual and Quick Start Installation Guide
Minimum System Requirements
Actiontec Electronics, Inc.
760 N. Mary Avenue
Sunnyvale, CA 94085
Phone: 1-719-884-8300 E-mail: [email protected]
One Pentium-class computer, running at 200 Mhz or higher (preferably 300
Mhz or higher)
Microsoft Windows 98 Second Edition (SE), Microsoft Millennium Edition
(Me), or Microsoft 2000 installed
2
Introduction
Contacting Technical Support
3
ll
Installing the Adapter Hardware
1. Switch off the computer and all connected peripheral devices.
2. Unplug the computer power cord from the wall outlet.
lll
3. Remove the computer’s cover. Refer to the documentation that came with your
computer for instructions.
CAUTION: Always discharge static electricity before handling the adapter. You can
discharge static electricity by touching a grounded metal structure, or by using a
commercially available grounding strap.
Also, ensure you are installing the adapter in a PCI slot, rather than an ISA slot. PCI
slots are usually smaller and light-colored or white, while ISA slots are larger and darkcolored or black. If you are not familiar with computers and computer hardware, or
cannot tell the difference between a PCI slot and ISA slot, refer to the documentation
that came with your computer. You will severely damage your computer if you install
the adapter in the wrong slot.
Note: The position of the expansion slots in your computer may differ from the
illustrations shown in this manual, which show the slots in a vertical position.
Regardless of the position of the expansion slots, the installation steps remain the
same. Please refer to the documentation that came with your computer for more
information about the expansion slot configuration of your computer.
5. Insert the PCI 802.11b Wireless Adapter into an available PCI expansion slot
(with adapter’s black antenna protruding out of the back of your computer), then
press on the top edge of the adapter straight down until the adapter’s connectors
seat firmly in the PCI slot. Secure the adapter’s faceplate with the screw you
removed in Step 4, as shown in the following diagram. Make sure the antenna is
not bent or otherwise damaged.
4. Remove the screw securing the expansion slot cover behind one of the computer’s
available PCI expansion slots. Lift the expansion slot cover out as shown in the
figure below.
6. Put the cover back on the computer and secure it.
7. Make sure all power switches are in the OFF position, then reconnect the power
cables to the computer and its peripherals.
4
Installing the Adapter Hardware
Installing the Adapter Hardware
5
lll
Installing the Adapter Software
3. Insert the Actiontec PCI 802.11b Wireless Adapter Installation CD into your
CD-ROM drive. Select CD-ROM Drive, then click Next.
Windows 98 SE
1. After you install the PCI 802.11b Wireless Adapter, turn on your computer. The
“Add New Hardware Wizard” window appears. Click Next.
lV
lV
4. Windows locates the “AEIWLNIC.inf”driver file. Click Next to install the driver
software.
2. In the next window, select Search for the best driver for your device, then
click Next.
6
Installing the Adapter Software
Installing the Adapter Software
7
5. The “Actiontec PCI 802.11b Wireless Adapter Properties” window appears.
(Note: The “SSID” must be the same as the “ESSID” on your home gateway or
access point. See the documentation that came with your home gateway or access
point for more information.) Click OK to complete the installation process.
7. To activate the PCI 802.11b Wireless Adapter’s software, you must restart your
computer. Click OK in the “System Settings Change” window to restart. If this
window does not appear, restart your computer manually.
lV
lV
Windows Me
1. After you install the PCI 802.11b Wireless Adapter and turn on your computer,
Windows displays an “Add New Hardware Wizard” window. Insert the Actiontec
PCI 802.11b Wireless Adapter Installation CD in the CD-ROM drive, click
Automatic search for a better driver (Recommended), then click Next.
6. The installation is complete. Click Finish .
8
Left Installing the Adapter Software
Installing the Adapter Software
9
2. The “Actiontec PCI 802.11b Wireless Adapter Properties” window appears.
(Note: The “SSID” must be the same as the “ESSID” on your home gateway or
access point. See the documentation that came with your home gateway or access
point to access its “ESSID” value.) Click OK.
4. To activate the PCI 802.11b Wireless Adapter’s software, you must restart your
computer. Click OK in the “System Settings Change” window to restart. If this
window does not appear, restart your computer manually.
lV
lV
Windows 2000
1. After you install the PCI 802.11b Wireless Adapter and turn on your computer,
the “Add New Hardware Wizard” window appears. Click the Next button.
3. The installation is complete. Click Finish.
10
Installing the Adapter Software
Installing the Adapter Software
11
2. In the next window, select Search for the best driver for your device, then
click Next.
4. Windows locates the “AEIWLNIC.inf” driver file. Click Next to install the
driver software.
lV
lV
3. Insert the Actiontec PCI 802.11b Wireless Adapter Installation CD into your
CD-ROM drive. Select CD-ROM Drive, then click Next.
12
Installing the Adapter Software
5. The “Wireless LAN Configuration Utility” window appears. (Note: The “SSID”
must be the same as the “ESSID” on your home gateway or access point. See the
documentation that came with your home gateway or access point for more
information) Click Next to continue the installation process.
Installing the Adapter Software
13
6. If you have configured any encryption capabilities in your home gateway or
access point, complete the following screen accordingly, then click Next.
Configuring the Adapter
After you install the software for the PCI 802.11b Wireless Adapter, a status icon appears in
the system tray on the lower right side of your desktop, as shown in the figure below.
PCI 802.11b Wireless Adapter Status Icon
You will not be automatically connected to a network, however. To configure the PCI
802.11b Wireless Adapter and connect to a home gateway or access point:
lV
1. Right-click on the PCI 802.11b Wireless Adapter Status icon. A list appears, as
shown in the figure below. There should be a black dot next to Turn Wireless
Radio On. If not, click on the text to turn on the wireless radio.
2. Select the Advanced Configuration... option from the list.
7. Click Finish to complete the installation process.
3. The “Actiontec PCI 802.11b Wireless Adapter Properties” window will appear, as shown
below. Under the “Configuration” tab, check the SSID value. This value should be the
same as the ESSID value of your home gateway or access point. For example, if your
home gateway or access point’s ESSID value is “ACTIONTEC,” enter the same value
into the SSID field of this window. The default value, “ANY,” will cause the adapter to
try to connect to any available home gateway or access point it can find.
14
Installing the Adapter Software
Configuring the Adapter
15
V
4. After you enter the appropriate SSID value, click Apply and then OK. The PCI
802.11b Wireless Adapter is now able to connect to your home gateway or access
point. If your home gateway or access point is connected to a DSL or cable
modem, test your wireless connection by opening your Internet browser and
surfing the Web.
Note: There are two colored bars on either side of the PCI 802.11b Wireless Adapter
Status icon. When the bars are green, your wireless connection is strong. When they
are yellow, your wireless connection is fair. When they are red, your wireless
connection is poor. When the bars are yellow or red, you may experience slower than
normal connection speeds.
Configuring the AdHoc Feature
The AdHoc feature enables the PCI 802.11b Wireless Adapter to connect to two or
more computers. The most common use for this feature is multi-player games, in
which each player can play the game from separate computer against one another via
the AdHoc network. If you use the AdHoc feature, a home gateway or access point is
not required. Follow these steps to set up the AdHoc feature:
1. Right click on the PCI 802.11b Wireless Adapter Status icon. A list will appear as
shown in the figure below. From the list, select Advanced Configuration....
Encryption (WEP)
V
You can use encryption to add a level of security to your wireless network. You are not
required to use encryption. If you use a home gateway or access point, make sure to
use the same encryption (WEP) keys for both your wireless adapter and home
gateway or access point. Follow these steps to set up encryption:
1. Right-click on the PCI 802.11b Wireless Adapter Status icon. A list appears, as
shown in the middle picture on the previous page.From the list, select Advanced
Configuration.... The “Wireless LAN Configuration Utility” window appears.
2. Click on the Encryption tab, then select 64 bit or 128 bit encryption, depending
on your desired level of security.
3. Select Create Keys with Passphrase or Create Keys Manually. If you select
Create Keys with a Passphrase and enter a passphrase (a passphrase is the same
as a password, with the same type of functionality), the utility automatically
generates the four keys. Remember, if you use a home gateway or access point,
these keys need to be added to it. If you already have a set of keys configured into
your home gateway or access point, or you prefer to create the keys manually,
select Create Keys Manually and enter the keys in the given fields. Click Apply
and then OK to activate your settings.
16
Configuring the Adapter
Vl
2. The “Wireless LAN Configuration Utility” window appears, as shown in the
figure below. In the “Profile” field, type in a name. This will save all the settings
under that name.
3. Click on the down arrow in the “Mode” field and select 802.11 AdHoc.
4. Enter an SSID value in the SSID field. The SSID value must be the same on
every computer on your network.
5. In the AdHoc Channel field, select a channel number. This value must be
between 1 and 11, and the same for each computer on your network.
6. Finally, click Apply and then OK to activate the settings. Repeat this procedure
for each computer you want to include on your network.
Configuring the AdHoc Feature
17
Configuring File and Printer Sharing
4. The “Select Network Service” window appears. Select File and printer sharing
for Microsoft Networks from the “Models” list box, and then click OK.
If you use a home gateway or access point, you can establish a network allowing you
to share files and printers. This is an easy method to set up a network in your home or
small office. Follow these steps to set up file and print sharing:
Windows 98 SE and Windows Me
1. From your computer’s desktop, click Start, Settings, and then Control Panel. In
the “Control Panel” window, double-click the Network icon.
2. The “Network” window appears. Select Configuration, then click Add.
5. The “File and Print Sharing” window appears. Ensure both of the selections have
a check mark beside them. If not, click in the box next to each selection. Click
OK.
Vll
6. The “Network” window reappears. Click on the Identification tab (see the first
figure on page 20).
3. The “Select Network Component Type” window appears. Click Service, then Add.
Computer Name: In this field, enter any name you want (for example, My
Computer, John, CPU654). Each computer included on your network must
have a different name.
Workgroup: Enter the name of your network in this field. The Workgroup
name must be the same on every computer included on your network.
Computer Description: In this field, enter the location of the computer, the
main user’s name, or any other information you want.
18
Configuring File and Printer Sharing
Configuring File and Printer Sharing
19
Vll
10. The “File Share Screen Properties” window appears. Select Sharing, then click
Shared As. This will enable other users on your network to see the file or drive
selected. Select an Access Type, as explained below.
Vll
Vll
7. Click on the Configuration tab. In the “Primary Network Logon:” text box,
located just above the “File and Print Sharing” button, ensure Client for
Microsoft Networks is selected (see the first figure on page 18). If not, click the
down arrow and select it from the list that appears. Click OK.
8. The “System Settings Change” windows appears. Click Yes to restart the
computer. If you do not see this screen, restart your computer manually. After
your computer restarts, you will be asked to supply a user name and a password.
Enter the information in the respective text boxes and write it down, since you’ll
need it to access your network.
9. After your computer restarts and you have entered a password and user name,
enable a file or drive for sharing by locating the file or drive you want to share.
(The easiest way to do this is by using Windows Explorer.) Right-click on the
File or Drive you want to share. From the list that appears, select Sharing.
20
Configuring File and Printer Sharing
Read Only: Allows other users on your network to view the file or drive you
select, but not modify it in any way. You can further restrict their priviliges by
entering a password in the appropriate field.
Full: Allows users on your network to read, modify, move, and delete any
information in the shared drive or file. You can restrict their privileges by
entering a user name and password.
Configuring File and Printer Sharing
21
Depends on Password: Allows you to have both Read Only and Full Access
files on the shared file or drive. The level of access will depend on the
passwords you enter in the appropriate field.
When you finish, click Apply, then OK.
13.Enable sharing by selecting Share As. A default name for the printer will be
created in the Share Name text box. Set a password for the printer at this time if
you want to restrict printer use on the network. Set the default printer settings by
modifying information on the other tabs of this window.
Windows 2000
1. After you install and configure the PCI 802.11b Wireless Adapter, Windows 2000
automatically enables file and print sharing for your computer. The only items
that need to be changed are your Workgroup settings. All the computers on your
network must have the same Workgroup name. To check or change the
Workgroup name, right-click on the My Computer icon on your desktop and
select Properties from the list that appears.
2. The “System Properties” window appears, as shown below. Select Network
Identification. If the “Workgroup” name is the same as the other computers on
your network, click OK. If not, select Properties.
Vll
Vll
11. To share your printer, select Start, Settings, and then Printers.
12. Right-click on the printer you want to share. Select Sharing from the list that
appears as shown below.
22
Configuring File and Printer Sharing
Configuring File and Printer Sharing
23
3. The “Identification Changes” window appears. In the Computer Name: text
box, enter a name for your computer. This computer name must be different
from all other computer names on the network. In the Workgroup text box,
enter the network name. This network name must be the same for every
computer on your network. Click OK to return to the “Network Properties”
window, then click OK again to restart your computer.
Troubleshooting
You are experiencing slow or erratic network performance.
The antenna may not be receiving a strong signal. Keep the area around the
antenna clear from materials that could block radio transmission, such as metal
objects, electronic devices, and cordless telephones.
Changing the direction of the antenna may strengthen the wireless signal.
Move your computer a few inches to receive a stronger signal. If this doesn’t
work, you may have to move your computer closer to the home gateway or
access point.
Check your home gateway or access point to ensure that it is operating
correctly. Make sure that there are no loose connections or cabling problems,
and that the home gateway’s or access point’s antenna is working properly. You
may have to consult the documentation that came with your home gateway or
access point to check its operation.
Vll
You cannot connect to your home gateway or access point.
Make sure that the “SSID” value of the PCI 802.11b Wireless Adapter is the
same as the “ESSID” value of your home gateway or access point. See page 8
(Windows 98 SE), page 10 (Windows Me), or page 13 (Windows 2000) for
more information.
Make sure that the encryption settings of the PCI 802.11b Wireless Adapter
match the encryption settings of your home gateway or access point. See page
16 for more information. You may have to consult the documentation that
came with your home gateway or access point to get information concerning
the unit’s encryption capabilities.
There is no network connection when the computer becomes active again after
being in sleep mode
Restart the computer to restore the connections.
Installation program does not finish. The driver fails to load.
There may be a resource conflict on your computer. Use the Device Manager
to resolve resource conflicts. To access the Device Manager, select System from
the Control Panel, and then select Device Manager.
24
Configuring File and Printer Sharing
Troubelshootingr
25
Vlll
The PCI 802.11b Wireless Adapter installs as an unknown device.
The Windows Add Hardware Wizard was unable to locate the PCI 802.11b
Wireless Adapter drivers. You may have had no CD or the wrong CD inserted
in the CD-ROM drive, or the Installation CD may not have been ready when
the wizard looked for the drivers. To solve this problem, remove the PCI
802.11b Wireless Adapter from your computer and repeat the installation
procedure. Make sure that you insert the Installation CD when the procedure
indicates, and that you wait for it to come up to speed in the drive.
Notices
FCC Regulations
The following statements are provided in accordance with the Federal
Communications Commission (FCC) regulations. Please read these statements
carefully before installing your modem.
FCC Part 68 Requirements
This equipment complies with Part 68 of the FCC Rules. On the bottom of the
modem is a label that contains, among other information, the FCC Registration
Number and Ringer Equivalence Number (REN) for this equipment. If requested,
this information must be given to the telephone company.
The REN is used to determine the maximum number of devices connected to your
telephone line that will ring in response to an incoming call. In most, but not all,
areas, the total REN of devices connected to a line should not exceed five (5). To find
out the total permitted in your area, contact your local telephone company.
If your telephone equipment causes harm to the telephone network, the telephone
company can discontinue your service temporarily. If possible, the company will
notify you in advance. But if advance notice is not practical, you will be notified as
soon as possible. You will be informed of your right to file a complaint with the FCC.
Vlll
Your telephone company can make changes in its facilities, equipment, operations, or
procedures that could affect the operation of your equipment. If so, you will be
notified in advance so you can make the changes needed to maintain uninterrupted
service.
If you experience trouble with this equipment, please contact the manufacturer at the
address given in this manual. The telephone company may ask that you disconnect
this equipment from the network until the problem has been corrected or until you
are sure that the equipment is not malfunctioning.
This equipment may not be used on public coin service provided by the telephone
company. Connection to party lines is subject to state tariffs.
26
Troubleshooting
Notices
27
lX
X
Canadian Department Of Communications (CDOC)
Requirements for End Users:
Note: The Canadian Department of Communications label identifies certified
equipment. This certification means the equipment meets certain telecommunications
network requirements. The Department does not guarantee the equipment will
operate to the user’s satisfaction.
Before installing this equipment, users should ensure that connection to the line is
allowed by the local telecommunications company. The equipment must also be
installed using an acceptable method of connection. In some cases, the company’s
inside wiring associated with a single line individual service may be extended by
means of a telephone extension cord. Compliance with the above conditions may not
prevent degradation of service in certain situations.
Repairs to certified equipment should be made by an authorized Canadian
maintenance facility designated by the supplier. Any repairs or alterations made by the
user to this equipment, or equipment malfunctions, may give the telecommunications
company cause to request the user to disconnect the equipment.
Users should ensure for their own protection that the electrical ground connections of
the power utility, telephone lines, and internal metallic water pipe system, if present,
are connected together. This precaution may be particularly important in rural areas.
CAUTION: Users should not attempt to make such connections themselves, but
should contact the appropriate electrical inspection authority, or electrician, as
appropriate.
- Connect the equipment into an outlet on a circuit different from that to which
the receiver is connected.
- Consult the dealer or an experienced radio or television technician for help.
Modifications
The FCC requires the user to be notified that any changes or modifications made to this
device that are not expressly approved by Actiontec Electronics, Inc may void the user’s
authority to operate the equipment.
Declaration of conformity for products marked with the FCC logo – United States only
This device complies with Part 15 of the FCC Rules. Operation is subject to the
following two conditions: (1) This device may not cause harmful interference, and
(2) This device must accept any interference received, including interference that may
cause undesired operation.
"IMPORTANT NOTE: To comply with FCC RF exposure compliance requirements
the antenna used for this transmitter must be installed to provide a separation distance
of at least 20 cm from all persons and must not be co-located or operating in
conjunction with any other antenna or transmitter."
For questions regarding your product, or the FCC declaration, contact:
Actiontec Electronics, Inc
lX
760 North Mary Ave,
Sunnyvale, CA 94086
Regulatory Compliance Notices Class B Equipment
This equipment has been tested and found to comply with the limits for a Class B
digital device, pursuant to Part 15 of the FCC Rules. These limits are designed to
provide reasonable protection against harmful interference in a residential installation.
This equipment generates, uses, and can radiate radio frequency energy and, if not
installed and used in accordance with the instructions, may cause harmful interference
to radio communications. However, there is no guarantee that interference will not
occur in a particular installation. If this equipment does cause harmful interference to
radio or television reception, which can be determined by turning the equipment off
and on, the user is encouraged to try to correct the interference by one or more of the
following measures:
United States
Tel: (408) 752-7700
Fax: (408) 541-9005
- Reorient or relocate the receiving antenna.
- Increase the separation between the equipment and receiver.
28
Notices
Notices
29
Warranty
Actiontec Electronics, Inc., Limited Warranty
Hardware: Actiontec Electronics, Inc., warrants to the end user (“Customer”) that this
hardware product will be free from defects in workmanship and materials, under normal
use and service, for twelve (12) months from the date of purchase from Actiontec
Electronics or its authorized reseller.
Actiontec Electronics’ sole obligation under this express warranty shall be, at Actiontec’s
option and expense, to repair the defective product or part, deliver to Customer an
equivalent product or part to replace the defective item, or if neither of the two
foregoing options is reasonably available, Actiontec Electronics may, in its sole discretion,
refund to Customer the purchase price paid for the defective product. All products that
are replaced will become the property of Actiontec Electronics, Inc., Replacement
products may be new or reconditioned. Actiontec Electronics warrants any replaced or
repaired product or part for ninety (90) days from shipment, or the remainder of the
initial warranty period, whichever is longer.
X
Software: Actiontec Electronics warrants to Customer that each software program
licensed from it will perform in substantial conformance to its program specifications,
for a period of ninety (90) days from the date of purchase from Actiontec Electronics
or its authorized reseller. Actiontec Electronics warrants the media containing software
against failure during the warranty period. The only updates that will be provided are
at the sole discretion of Actiontec Electronics and will only be available for download
at the Actiontec Web site, www.actiontec.com. Actiontec Electronics’ sole obligation
under this express warranty shall be, at Actiontec Electronics’ option and expense, to
refund the purchase price paid by Customer for any defective software product, or to
replace any defective media with software which substantially conforms to applicable
Actiontec Electronics published specifications. Customer assumes responsibility for the
selection of the appropriate applications program and associated reference materials.
Actiontec Electronics makes no warranty or representation that its software products
will meet Customer’s requirements or work in combination with any hardware or
applications software products provided by third parties, that the operation of the
software products will be uninterrupted or error free, or that all defects in the software
products will be corrected. For any third-party products listed in the Actiontec
Electronics software product documentation or specifications as being compatible,
Actiontec Electronics will make reasonable efforts to provide compatibility, except
where the noncompatibility is caused by a “bug” or defect in the third party’s product
or from use of the software product not in accordance with Actiontec Electronics
published specifications or User Guide.
THIS ACTIONTEC ELECTRONICS PRODUCT MAY INCLUDE OR BE
BUNDLED WITH THIRD-PARTY SOFTWARE, THE USE OF WHICH IS
30
Warranty
GOVERNED BY A SEPARATE END-USER LICENSE AGREEMENT. THIS
ACTIONTEC ELECTRONICS WARRANTY DOES NOT APPLY TO SUCH
THIRD-PARTY SOFTWARE. FOR THE APPLICABLE WARRANTY, PLEASE
REFER TO THE END-USER LICENSE AGREMENT GOVERNING THE USE
OF SUCH SOFTWARE.
Obtaining Warranty Service: Customer may contact Actiontec Electronics Technical
Support Center within the applicable warranty period to obtain warranty service
authorization. Dated proof of purchase from Actiontec Electronics or its authorized
reseller may be required. Products returned to Actiontec Electronics must be preauthorized by Actiontec Electronics with a Return Merchandise Authorization (RMA)
number marked on the outside of the package, and sent prepaid and packaged
appropriately for safe shipment, and it is recommended that they be insured or sent by
a method that provides for tracking of the package. The repaired or replaced item will
be shipped to Customer, at Actiontec Electronics’ expense, not later than thirty (30)
days after Actiontec Electronics receives the defective product. Return the product to:
In the United States:
Actiontec Electronics, Inc
760 North Mary Avenue
Sunnyvale, CA 94085
Actiontec Electronics shall not be responsible for any software, firmware, information,
or memory data ,or Customer information contained in, stored on, or integrated with
any products returned to Actiontec Electronics for repair, whether under warranty or
not.
WARRANTIES EXCLUSIVE: IF AN ACTIONTEC ELECTRONICS’
PRODUCT DOES NOT OPERATE AS WARRANTED ABOVE, CUSTOMER’S
SOLE REMEDY FOR BREACH OF THAT WARRANTY SHALL BE REPAIR,
REPLACEMENT, OR REFUND OF THE PURCHASE PRICE PAID, AT
ACTIONTEC ELECTRONICS’ OPTION. TO THE FULL EXTENT ALLOWED
BY LAW, THE FOREGOING WARRANTIES AND REMEDIES ARE
EXCLUSIVE AND IN LIEU OF ALL OTHER WARRANTIES, TERMS OR
CONDITIONS, EXPRESS OR IMPLIED, EITHER IN FACT OR BY
OPERATION OF LAW, STATUTORY OR OTHERWISE, INCLUDING
WARRANTIES, TERMS OR CONDITIONS OF MERCHANTABILITY,
FITNESS FOR A PARTICULAR PURPOSE, SATISFACTORY QUALITY,
CORRESPONDENCE WITH DESCRIPTION, AND NON-INFRINGEMENT,
ALL OF WHICH ARE EXPRESSLY DISCLAIMED. ACTIONTEC
ELECTRONICS NEITHER ASSUMES NOR AUTHORIZES ANY OTHER
PERSON TO ASSUME FOR IT ANY OTHER LIABILITY IN CONNECTION
WITH THE SALE, INSTALLATION, MAINTENANCE OR USE OF ITS
PRODUCTS.
Warranty
31
X
ACTIONTEC ELECTRONCS SHALL NOT BE LIABLE UNDER THIS
WARRANTY IF ITS TESTING AND EXAMINATION DISCLOSE THAT THE
ALLEGED DEFECT OR MALFUNTION IN THE PRODUCT DOES NOT
EXIST OR WAS CAUSED BY CUSTOMER’S OR ANY THIRD PERSON’S
MISUSE, NEGLECT, IMPROPER INSTALLATION OR TESTING,
UNAUTHORIZED ATTEMPT TO OPEN, REPAIR OR MODIFY THE
PRODUCT, OR ANY OTHER CAUSE BEYOND THE RANGE OF THE
INTENDED USE, OR BY ACCIDENT, FIRE, LIGHTNING, OTHER
HAZARDS, OR ACTS OF GOD.
LIMITATION OF LIABILITY: TO THE FULL EXTENT ALLOWED BY LAW,
ACTIONTEC ELECTRONICS ALSO EXCLUDES FOR ITSELF AND ITS
SUPPLIERS ANY LIABILITY, WHETHER BASED IN CONTRACT OR TORT
(INCLUDING NEGLIGENCE), FOR INCIDENTAL, CONSEQUENTIAL,
INDIRECT, SPECIAL, OR PUNITIVE DAMAGES OF ANY KIND, OR FOR
LOSS OF REVENUE OR PROFITS, LOSS OF BUSINESS, LOSS OF
INFORMATION OR DATA, OR OTHER FINANCIAL LOSS ARISING OUT
OF OR IN CONNECTION WITH THE SALE, INSTALLATION,
MAINTENANCE, USE, PERFORMANCE, FAILURE, OR INTERRUPTION
OF ITS PRODUCT, EVEN IF ACTIONTEC ELECTRONICS OR ITS
AUTHORIZED RESELLER HAS BEEN ADVISED OF THE POSSIBILITY OF
SUCH DAMAGES, AND LIMITS ITS LIABILITY TO REPAIR, REPLACE,OR
REFUND THE PURCHASE PRICE PAID, AT ACTIONTEC ELECTRONICS’
OPTION. THIS DISCLAIMER OF LIABILITY FOR DAMAGES WILL NOT
BE AFFECTED IF ANY REMEDY PROVIDED HEREIN SHALL FAIL OF ITS
ESSENTIAL PURPOSE.
X
Disclaimer: Some countries, states, or provinces do not allow the exclusion or limitation
of implied warranties or the limitation of incidental or consequential damages for
certain products supplied to consumers, or the limitation of liability for personal injury,
so the above limitations and exclusions may be limited in their application to you. When
the implied warranties are not allowed to be excluded in their entirety, they will be
limited to the duration of the applicable written warranty. This warranty gives you
specific legal rights which may vary depending on local law.
Dispute Resolution: The customer may contact the Director of Technical Support in
the event the Customer is not satisfied with Actiontec Electronics response to the
complaint. In the event that the Customer is still not satisfied with the response of the
Director of Technical Support, the Customer is instructed to contact the Director of
Marketing. In the event that the Customer is still not satisfied with the response of the
Director of Marketing, the Customer is instructed to contact the Chief Financial
Officer and/or President.
Governing Law: This Limited Warranty shall be governed by the laws of the State of
California, U.S.A,. excluding its conflicts of laws and principles, and excluding the
United Nations Convention on Contracts for the International Sale of Goods.
32
Warranty