1
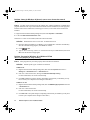
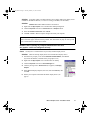
eng_inst.print.book Page 1 Tuesday, February 17, 1998 4:39 PM
Matrox Graphics Architecture
ENGLISH
Matrox Productiva G100 • Matrox Millennium II • Matrox Mystique 220
• Installation Guide •
10526-101-0300
1998.02.20
in_inst.trademarks.fm Page 32 Monday, February 16, 1998 11:42 AM
Copyright © 1998 Matrox Graphics Inc. • (English) All rights reserved. • (Français) Tous droits réservés. • (Deutsch)
Alle Rechte vorbehalten. • (Italiano) Tutti i diritti riservati. • (Español) Reservados todos los derechos.
Trademarks • Marques déposées • Warenzeichen
• Marchi registrati • Marcas registradas
Matrox Electronic Systems Ltd..................................... Matrox®, Matrox Mystique®
Matrox Graphics Inc. .................................................... CenterWINDOW™, DeskNav™, Matrox G100™,
Matrox HD Benchmark™, Matrox m3D™,
Matrox Media XL-MPEG™, Matrox Millennium™,
Matrox Millennium II™, Matrox Mystique 220™,
Matrox PC-VCR Remote™, Matrox Productiva™,
Matrox Quick Connect™, Matrox Rainbow Runner™,
Matrox Rainbow Runner Studio™,
Matrox Rainbow Runner TV™, MaxVIEW™, MGA™,
MGA Control Panel™, MGA Desktop Navigator™,
MGA DynaView™, MGA Impression™,
MGA Impression Plus™, MGA Millennium™,
MGA PowerDesk™, MGA PowerDoc™, MGA QuickDesk™,
ModeSWITCH™, PanEND™, PanHOME™, PanLOCK™,
PixelTOUCH™, QCDP™, QuickAccess™, ResSwitch™
Adobe Systems Inc. ..................................................... Acrobat®, Adobe®
Autodesk Inc................................................................. 3D Studio®, AutoCAD®
Bentley Systems Inc..................................................... MicroStation™
CompuServe Inc. ......................................................... CompuServe®
Eastman Kodak Company............................................ Kodak Precision™
Intel Corporation........................................................... Intel®, MMX™, Pentium®
International Business Machines Corporation ............. IBM®, OS/2®, PowerPC®, VGA®
Microsoft Corporation................................................... ActiveMovie™, ActiveX™, Direct3D™, DirectDraw™,
DirectVideo™, DirectX™, Microsoft®, MS-DOS®, Windows®,
Windows 95™, Windows for Workgroups™, Windows NT™
Ulead Systems, Inc. ..................................................... Ulead®
U.S. Environmental Protection Agency ........................ Energy Star™
VDOnet Corporation Limited ........................................ VDOnet®, VDOPhone™
• (English) All other nationally and internationally recognized trademarks and tradenames are hereby
acknowledged. • (Français) Toutes les autres marques et tous les autres noms déposés reconnus nationalement ou
internationalement sont également reconnus par les présentes. • (Deutsch) Alle sonstigen national und international
bekannten Warenzeichen und Produktnamen werden hiermit anerkannt. • (Italiano) Eventuali altri nomi di prodotto
menzionati in questo manuale sono dei proprietà di rispettivi produttori. • (Español) Por medio del presente se
reconocen todas las demás marcas y nombres comerciales reconocidos a nivel nacional e internacional.
na_inst.compliance.fm Page 1 Monday, February 16, 1998 6:05 PM
USA
American user’s information – FCC Compliance Statement
Warning Changes or modifications to this unit not expressly approved by the party responsible for compliance
could void the user’s authority to operate this equipment. To meet FCC requirements, shielded cables must be used
to connect the monitor and other peripherals to the card.
Remark for G+/PRO, MIL2 and MY220 series This equipment has been tested and found to comply with the
limits for a Class B digital device, pursuant to part 15 of the FCC Rules. These limits are designed to provide
reasonable protection against harmful interference in a residential installation. This equipment generates, uses and
can radiate radio frequency energy and, if not installed and used in accordance with the instructions, may cause
harmful interference to radio communications. However, there is no guarantee that interference will not occur in a
particular installation. If this equipment does cause harmful interference to radio or television reception, which can
be determined by turning the equipment off and on, the user is encouraged to try to correct the interference by one
or more of the following measures:
• Reorient or relocate the receiving antenna.
• Increase the separation between the equipment and receiver.
• Connect the equipment into an outlet on a circuit different from that to which the receiver is connected.
• Consult the dealer or an experienced radio/TV technician for help.
CANADA
(English) Canadian user’s information –
Industry Canada Compliance Statement
Remark for G+/PRO, MIL2 and MY220 series This digital apparatus does not exceed the Class B limits for radio
noise emission from digital apparatus set out in the Radio Interference Regulation of Industry Canada.
(Français) Informations destinées aux utilisateurs Canadiens –
Conformité avec les exigences du ministère de l’Industrie Canada
Avis relatif à la série G+/PRO, MIL2 et MY220 Le présent appareil numérique n’émet aucun bruit
radioélectrique dépassant les limites applicables aux appareils numériques de Classe B prescrites dans le
Règlement sur le brouillage radioélectrique édicté par Industrie Canada.
eng_inst.print.book Page 2 Tuesday, February 17, 1998 4:39 PM
Contents
Using this guide
3
Overview
4
Hardware installation
5
Software installation
7
Software setup – Windows 95
8
Monitor setup.......................................................................................................................... 8
Display setup .......................................................................................................................... 8
Software overview .................................................................................................................. 9
Software setup – Windows NT 4.0
10
Monitor setup........................................................................................................................ 10
Display setup ........................................................................................................................ 10
Software overview ................................................................................................................ 11
Troubleshooting
12
Display information
19
Index
21
2
Matrox Graphics Card – Installation Guide
eng_inst.print.book Page 3 Tuesday, February 17, 1998 4:39 PM
Using this guide
This guide assumes you’re familiar with basic functions like click, right-click and double-click, and
that you’re familiar with the basics of the operating system you’re using. Also, we use the following
conventions:
Bold for text that appears on-screen, subheadings and labels.
Italics for file names, paths, publication titles, and new terms.
Bold Italic for emphasis.
Keyboard keys in square brackets, with a plus sign separating keys that you press simultaneously.
For example: press [Ctrl]+[Alt]+[Del] to restart your computer.
Arrows (“”) to separate ordered directions. For example, “click OK Close OK” is the same
as “click OK, then click Close, then click OK”.
When viewing online, green for cross-references and underlined green for links to Web pages.
Click green text to jump to what is being referenced. (To jump to Web pages, your system first
needs to have full Internet access.)
More information
We provide additional documentation in Help files, readme files, and Adobe Acrobat PDF (Portable
Document Format) files. To view or print PDF files, use the Acrobat Reader program, which you can
install from the “Matrox Installation” CD-ROM. This guide is available on the CD-ROM as a PDF
file (doc\inst_en.pdf). The online version of this guide has additional information, including the
following sections: “Hardware information”, “Customer support”, “Warranty” and “Software license
agreement”.
For context-sensitive Help where available, click the “
” icon in the title bar, then click the item
you want help on. Right-click a Help topic for a pop-up menu that lets you print or copy it.
Matrox Graphics Card – Installation Guide
3
eng_inst.print.book Page 4 Tuesday, February 17, 1998 4:39 PM
Overview
Thank you for purchasing a Matrox graphics card. Your Matrox Productiva G100, Millennium II or
Mystique 220 card is a high-performance graphics card that plugs into an expansion slot inside your
personal computer. Matrox’s 64-bit graphics engine gives you superior performance with Windows,
digital video and 3D graphics. To further accelerate 3D programs, your Matrox card uses bus
mastering and has hardware-accelerated features, including texture mapping, Gouraud shading and
Z-buffering. Depending on the model of your Matrox card, it supports display resolutions up to
1800 × 1440 and 1920 × 1200.
Your Matrox graphics card is 100% VGA compatible and supports all VESA standards: VBE 2.0
(Super VGA modes), DPMS (energy saving), and DDC-2B (Plug-and-Play monitor).
Also, depending on the model of your Matrox card, you can upgrade it with more RAM or
multimedia hardware add-ons. For more information on available upgrades, see the Matrox Web site
(www.matrox.com/mga).
Software supplied
MGA PowerDesk for Windows 95: MGA display drivers; DirectDraw, DirectVideo and
Direct3D support; Settings, Monitor, Color, Hot Keys and Information property sheets; MGA
Desktop Navigator and MGA QuickDesk programs; online documentation
MGA PowerDesk for Windows NT 4.0: MGA display drivers; DirectDraw and OpenGL
support; Settings, Monitor, Information, Performance and PowerDesk property sheets; MGA
Desktop Navigator and MGA QuickDesk programs; online documentation
Microsoft DirectX 5
Adobe Acrobat Reader for Windows
Online documentation
Various third-party software
Installation overview
1
Install the hardware – see “Hardware installation”, page 5.
2
Install the software – see “Software installation”, page 7.
4
Matrox Graphics Card – Installation Guide
eng_inst.fm Page 5 Wednesday, February 18, 1998 10:26 AM
Hardware installation
WARNING – Static electricity can severely damage electronic parts. Take these precautions:
1
Before touching any electronic parts, drain the static electricity from your body. You can do
this by touching the metal frame of your computer.
Don’t remove a card from the anti-static container it was shipped in until you’re ready to
install it. When you remove a card from your computer, place it back in its container.
When handling a card, hold it by its edges, and avoid touching its circuitry.
Switch to the standard VGA display driver
If you’re running Windows 95 on your computer, this step is not necessary. If you’re using
another operating system (for example, Windows NT 4.0), see its documentation for how to
switch to VGA mode.
2
Open your computer and remove your existing graphics card
Turn off your computer and all peripherals such as the monitor or printer. Open the computer and
remove your existing graphics card. (If you have a display adapter built into your computer’s
motherboard, it should automatically disable itself after your Matrox card is installed.)
3
Choose an expansion slot
Most computers have different types of
expansion slots. Choose an AGP or PCI slot,
depending on the type of Matrox graphics card
you have. Your system manual should identify
the location of each type of expansion slot in
your computer.
(Back of
computer)
AGP slot
PCI slot
ISA slot
WARNING: Inserting your Matrox card into the wrong slot could damage your card, your
computer, or both.
If you have an AGP card, don’t insert the plastic tab next to the connector pins into the slot.
Matrox Graphics Card – Installation Guide
5
eng_inst.print.book Page 6 Tuesday, February 17, 1998 4:39 PM
4
Insert your Matrox card
Remove the cover for the slot you intend to use.
Save the screw for the mounting bracket.
Position your Matrox card over the expansion
slot you’ve chosen. Push the card in firmly and
evenly until it’s fully seated in the slot. Replace
the screw to secure the bracket of your Matrox
card to the computer frame.
5
Bracket screw
Graphics
card
Expansion
slot
Motherboard
Connect the monitor
Simply plug your monitor cable into the monitor connector on
your Matrox card. Make sure the other end of the monitor cable is
properly connected to your monitor. See your monitor manual for
more information.
6
Restart your computer
7
Install the software
If you’re using Windows 95, it detects new hardware when you restart. If Matrox display drivers
haven’t been previously installed, Windows 95 reports finding a PCI adapter (even if you have an
AGP card).
If you see the New Hardware Found dialog box, click “Do not install a driver”, then OK.*
If you see the Update Device Driver Wizard dialog box, click Next, then Finish.
At this point, Windows is using a display driver that doesn’t fully support your Matrox graphics
card. To install Matrox display drivers and other software, see “Software installation”, page 7.
If you’re using Windows NT 4.0, see “Software installation”, page 7.
* If you prefer, you can select “Driver from disk provided by hardware manufacturer” to install the Matrox display
drivers from the root folder of the “Matrox Installation” CD-ROM.
6
Matrox Graphics Card – Installation Guide
eng_inst.print.book Page 7 Tuesday, February 17, 1998 4:39 PM
Software installation
This section describes how to install Matrox software for Windows 95 and Windows NT 4.0.
1
Insert the “Matrox Installation” CD-ROM in your CD-ROM drive – the mgasetup program
automatically starts. This setup program works with Windows 95 and Windows NT 4.0, and
detects which operating system you’re using.
2
Select the language you want to use, then click Next.
3
To see notes on the contents of the CD-ROM, click View ReadMe. To continue, click Next.
4
If this is a first-time installation, the setup program lists drivers that are not installed.
To begin the software installation, click Install.
5
Choose an installation type:
To install the complete MGA PowerDesk
(recommended), click Typical.
To customize the PowerDesk installation, click
Custom.
If you click Custom, the setup program prompts you
for a destination folder and what PowerDesk options
you want to install.
After you choose, the setup program automatically
installs Matrox software and drivers. After this is
done, leave the CD-ROM in your CD-ROM drive,
then click OK to restart your computer and for all changes to take effect.
6
After you restart your computer, the CD-ROM setup program starts again. The main menu lists
other software you can install from the CD-ROM. To install, select an item, click Install, then
follow the on-screen instructions. After the installation of an item is finished, you can return to
the main menu to install another. Click Exit when you’re done.
If this is a first-time installation, your display is using a 640 × 480 resolution with 256 colors –
supported by most monitors. To adjust software monitor settings:
for Windows 95, see “Software setup – Windows 95”, page 8.
for Windows NT 4.0, see “Software setup – Windows NT 4.0”, page 10.
Matrox Graphics Card – Installation Guide
7
eng_inst.print.book Page 8 Tuesday, February 17, 1998 4:39 PM
Software setup – Windows 95
To access PowerDesk programs and online documentation, click
MGA PowerDesk.
Programs Monitor setup
To check your monitor settings
1
Right-click the Windows desktop background, then click the Properties menu item Monitor tab.
2
If you have a Plug-and-Play monitor:
Make sure the Windows 95 Monitor button is selected. If this button
is selected, the MGA display driver automatically uses the correct
settings for your monitor.
If you don’t have a Plug-and-Play monitor:
If the monitor type listed under the Windows 95 Monitor button is
incorrect or shows Unknown Monitor, you should select a monitor.
To select a monitor, click the MGA Monitor button, select your monitor by name in the list below
this button, then click OK. If your monitor doesn’t appear in the list, you can try the Windows 95
method of monitor selection. For more information on monitor selection, see the MGA
PowerDesk online guide.
Note: Many Plug-and-Play monitors do not automatically report if they’re capable of
1152 × 864, or 1600 × 1200 and higher display resolutions. To use these resolutions, or higher
refresh rates than those reported by the monitor, you can use the MGA monitor selection method.
WARNING: If incorrect software monitor settings are applied, some monitors can be
permanently damaged. For more information, see your monitor manual.
Display setup
After checking your monitor’s software settings, you can change your display resolution, color
palette and other MGA PowerDesk settings. To access MGA display property sheets, right-click the
Windows desktop background, then click the Properties menu item. To change your display
resolution or color palette, click the Settings tab. For more information on changing your display
settings, see the MGA PowerDesk online guide.
8
Matrox Graphics Card – Installation Guide
eng_inst.print.book Page 9 Tuesday, February 17, 1998 4:39 PM
Software overview
MGA PowerDesk for Windows 95 includes
MGA display driver with:
DirectDraw, DirectVideo and Direct3D support for direct access to Matrox hardware.
Plug-and-Play (DDC-2B) and Energy Star (DPMS) support.
Settings property sheet to change your display settings. Use this sheet to access MGA
PowerDesk features such as:
Desktop mode buttons to set up a proportional, horizontal or vertical virtual desktop.
Display schemes to easily switch to a pre-defined display setting.
Performance property sheet to change MGA display driver performance settings.
Utilities property sheet to configure MGA PowerDesk options.
Monitor property sheet to inform the MGA display driver of your monitor’s capabilities. You can
use this sheet instead of the Windows 95 method of monitor selection.
Color property sheet to change your display’s color balance.
Hot Key property sheet to define keyboard shortcuts for:
CenterWINDOW to center your view area on the active window.
MaxVIEW to resize the active program window to the size of your current display area.
PanEND to move your display area to the right or bottom of your virtual desktop.
PanHOME to move your display area to the left or top of your virtual desktop.
PanLOCK to enable or disable panning.
PixelTOUCH to magnify part of your desktop area.
Information property sheet for information on your display hardware and software.
MGA Desktop Navigator program to quickly move the view area of your desktop and for quick
access to the PixelTOUCH zoom, PanLOCK and CenterWINDOW features.
MGA QuickDesk menu to quickly switch to a saved display scheme, to save and restore the
position of your desktop icons, to open the Windows Display Properties dialog box, or to start
MGA Desktop Navigator. To see this menu, click the monitor icon on the Windows 95 taskbar.
MGA Diagnostic program to identify some possible display-related problems.
Matrox Graphics Card – Installation Guide
9
eng_inst.print.book Page 10 Tuesday, February 17, 1998 4:39 PM
Software setup – Windows NT 4.0
To access PowerDesk programs and online documentation, click
MGA NT PowerDesk.
Programs Monitor setup
To check your monitor settings
1
Right-click the Windows desktop background, then click the MGA Display Properties menu item
Monitor tab.
2
If you have a Plug-and-Play monitor:
Make sure the Plug-and-Play (DDC) monitor button is selected. If so,
the MGA display driver automatically uses the correct settings for your monitor. If not, click this
button, then click Apply.
If you don’t have a Plug-and-Play monitor:
See if the Default monitor (60 Hz) button is selected. If so, use the
MGA monitor selection method. For more information on MGA monitor selection, see MGA
PowerDesk online guide.
Note: Many Plug-and-Play monitors do not automatically report if they’re capable of 1152 × 864
or 1600 × 1200 and higher display resolutions. To use these resolutions, or higher refresh rates
than those reported by the monitor, you can use the MGA monitor selection method.
WARNING: If incorrect software monitor settings are applied, some monitors can be
permanently damaged. For more information, see your monitor manual.
Display setup
After checking your monitor’s software settings, you can change your display resolution, color
palette and other MGA PowerDesk settings. To access MGA display property sheets, right-click the
Windows desktop background, then click the MGA Display Properties menu item. To change your
display resolution or color palette, click the Settings tab. For more information on changing your
display settings, see the MGA PowerDesk online guide.
10
Matrox Graphics Card – Installation Guide
eng_inst.print.book Page 11 Tuesday, February 17, 1998 4:39 PM
Software overview
MGA PowerDesk for Windows NT 4.0 includes
MGA display driver with:
Multi-display support to use up to 4 monitors at a time (one monitor for each Matrox card –
of the same type – in your computer)
Accelerated DirectDraw and OpenGL support for direct access to Matrox hardware.
Plug-and-Play (DDC-2B) monitor support.
Settings property sheet to change your display settings. This sheet provides access to MGA
PowerDesk features such as:
Desktop mode buttons to set up a proportional, horizontal or vertical virtual desktop.
Display schemes to easily switch to a pre-defined display setting.
Monitor property sheet to inform the MGA display driver of your monitor’s capabilities.
Information property sheet to display hardware and software version numbers and capabilities.
Performance property sheet to configure advanced driver performance settings.
PowerDesk property sheet with settings for:
PixelTOUCH to zoom in and pan on your view area.
CenterWINDOW to center opened windows in your view area.
MaxVIEW to maximize windows in your view area instead of your desktop.
CenterPOPUP to have new windows pop up in the center of your current view area.
MGA Desktop Navigator (DeskNav) program to quickly change the view area of your desktop and
give you quick access to the PixelTOUCH zoom and CenterWINDOW features. Access DeskNav
through
Programs MGA NT PowerDesk.
MGA QuickDesk program to quickly switch between your saved display schemes, open the MGA
Display Properties dialog box or launch MGA Desktop Navigator. This program appears as a
monitor icon on the Windows NT taskbar.
Matrox Graphics Card – Installation Guide
11
eng_inst.print.book Page 12 Tuesday, February 17, 1998 4:39 PM
Troubleshooting
This section contains solutions to problems you may encounter with your Matrox graphics card.
Problem: Computer doesn’t boot after Matrox card is installed
Cause There may be another graphics adapter in your computer. (For MGA multi-display mode
in Windows NT, all other graphics cards in your computer must also be Matrox cards of the same
type – Productiva G100, Millennium, Millennium II or Mystique 220.)
Solution
If another graphics card is plugged into an expansion slot, remove it.
Solution
If a graphics adapter is built-in to your computer’s motherboard, your system may
have not automatically disabled it when you inserted your Matrox card. Check your system
manual for instructions on how to disable your computer’s built-in graphics adapter.
Problem: Wrong color balance, screen image off-center, or no picture at all
Cause Your monitor’s video controls may be improperly set.
Solution
Adjust your monitor’s controls (brightness, contrast and so on). For more
information, see your monitor manual.
Cause The monitor connections may have been inserted improperly.
Solution
Make sure the monitor’s power cable is firmly in place.
Solution
Make sure the 15-pin connector to your Matrox graphics card
is firmly in place.
Solution
If your monitor uses a 15-pin connector, make sure the
connection to the monitor is firmly in place.
15-pin connector
Solution
If your monitor uses BNC input, make sure the Red, Green, Blue, Horizontal Sync
(HSYNC – white or gray wire), and Vertical Sync (VSYNC – black wire) connections are firmly
in place and plugged into the correct input.
Cause If your monitor uses BNC input, one or more
connection settings may be incorrect.
Solution
Set each of your monitor’s RGB input
and sync switches (if available) to 75 ohms, with the
sync set to “external”. These controls are usually
switches on the back of your monitor.
12
Matrox Graphics Card – Installation Guide
Bayonet Nut Connect (BNC)
eng_inst.print.book Page 13 Tuesday, February 17, 1998 4:39 PM
Problem: After the startup screen, or after display settings are changed,
the screen image is garbled or unusable
(rolling screen images, overlapping screen images or a blank screen)
Cause The MGA display driver may be trying to use settings your monitor doesn’t support. This
can happen if a monitor was never selected in the software and the display resolution was changed to
one your monitor doesn’t support, or if the monitor connected to your computer was changed without
it being changed in the software.
WARNING: If incorrect software monitor settings are applied, some monitors can be
permanently damaged. For more information, see your monitor manual.
Solution
Windows 95:
1
Press [Ctrl]+[Alt]+[Del] twice to restart your computer.
2
When you see “Starting Windows 95...”, press [F5] to enter “safe mode”.
3
Right-click the Windows desktop background, then click the Properties menu item Settings tab.
4
Move the Display area slider down to its lowest settings, then click OK.
5
Restart your computer normally.
6
Select a monitor with the Monitor property sheet, then you can adjust your display settings.
For more information, see the MGA PowerDesk online guide.
Solution
Windows NT 4.0:
1
Press [Ctrl]+[Alt]+[Del] [Tab] [Tab] [Enter] [] (down arrow) [Enter] to restart
your computer.
2
From the startup menu, choose Windows NT 4.0 “VGA mode”.
After startup, MGA software prompts you that MGA display drivers are not active; click OK
to continue.
3
Right-click the Windows desktop background, then click the MGA Display Properties menu
item Settings tab.
Windows may prompt you that the display settings are incorrect for the current mode; click
OK to continue.
4
Move the Display area slider down to its lowest settings, then click OK.
5
Restart your computer normally.
6
Select a monitor with the Monitor property sheet, then you can adjust your display settings.
For more information, see the MGA PowerDesk online guide.
Matrox Graphics Card – Installation Guide
13
eng_inst.print.book Page 14 Tuesday, February 17, 1998 4:39 PM
Problem: After game for Windows 95 starts, monitor doesn’t display properly
(rolling screen images, overlapping screen images or a blank screen)
Cause If your game uses a low-resolution (640 × 480 and below), full-screen display mode, your
monitor may not support the refresh rate the MGA driver is using.
Solution
1
If the game is still running in full-screen mode, press [Ctrl]+[Alt]+[Del] once for the Close
Program dialog box, and then click the End Task button.
2
Right-click the Windows desktop background, then click the Properties menu item Monitor
tab MGA Monitor button.
3
From the MGA monitor list, select the monitor model you’re using. If your monitor model
does not appear in the list, select a monitor that runs at 60 Hz at 640 × 480 (for example,
Standard Monitor Types Vesa 1024X768 @60Hz). For more information on MGA monitor
selection, see the MGA PowerDesk online guide.
4
Click OK to apply your selection and close the dialog box.
Problem: 3D program for Windows 95 or Windows NT 4.0
doesn’t start or stops running
(program uses bus mastering)
Cause Your computer or program may not work well with bus mastering.
Solution
Disable bus mastering.
(If you want to continue using bus mastering, see the other solutions.)
Windows 95:
1
Right-click the Windows desktop background, then click the Properties menu item Settings tab PowerDesk button Performance tab.
2
Clear the Use Bus Mastering check box.
3
Click OK OK Yes to accept the changes and restart your computer.
Windows NT 4.0:
14
1
Right-click the Windows desktop background, then click the MGA Display Properties menu
item Performance tab.
2
Clear the Use Bus Mastering (OpenGL) check box.
3
Click OK Yes to accept the changes and restart your computer.
Matrox Graphics Card – Installation Guide
eng_inst.print.book Page 15 Tuesday, February 17, 1998 4:39 PM
Cause (PCI graphics cards only) Your Matrox card may be in a “slave” expansion slot on a
computer that makes a distinction between bus mastering and slave slots.
Solution
Change slots. Shut down your computer, disconnect it from the power supply,
remove your Matrox card and then insert it into a different PCI expansion slot. For instructions
on how to safely install your Matrox card, see “Hardware installation”, page 5.
Cause Your computer may have not given an interrupt request (IRQ) to your Matrox graphics card
or may have given one used by another device in your computer. This may be because your
computer’s “Plug-and-Play” feature is turned off.
To check the display adapter’s IRQ (Windows 95):
1
Right-click the My Computer icon on the Windows desktop background, then click the Properties
menu item Device Manager tab.
2
Click the plus sign to the left of the Display adapters. An “X”
through an icon means the hardware has been disabled. A
circled exclamation point through the icon means the
hardware has a problem.
3
Double-click the name of your Matrox display adapter to open a properties dialog box. The type
of problem is displayed in the General tab Device Status area. Check also the Resource tab Resource Settings list for an Interrupt Request.
Solution
Change settings in your computer’s CMOS setup utility.
If your computer has the options of enabling Plug-and-Play detection, or assigning an IRQ to a
VGA adapter, make sure they’re enabled. If your computer doesn’t have these options, you may
be able to manually assign an IRQ to your graphics card using the CMOS setup utility.
For more information on your computer’s CMOS setup utility, see your system manual or contact
your system manufacturer.
Solution Windows 95 (PCI graphics cards only): You may have to manually assign an IRQ
to your Matrox card with the irqset program in the C:\Program Files\Matrox MGA PowerDesk
folder. For instructions on how to use irqset, see
Programs MGA PowerDesk readme.
Cause Your computer’s other BIOS settings may be incorrect.
Solution
Reset your computer’s BIOS settings to the factory defaults using the CMOS setup
utility. The factory defaults are usually the “safest” settings. Check your system manual for more
information.
Matrox Graphics Card – Installation Guide
15
eng_inst.print.book Page 16 Tuesday, February 17, 1998 4:39 PM
Problem: Game for Windows 95 doesn’t start or runs slower than normal
(program uses Microsoft DirectX interface)
Cause An older version of DirectX may be installed. The “Matrox Installation” CD-ROM setup
program installs DirectX as part of the MGA PowerDesk software installation, but some programs
install an older version of DirectX (overwriting your version). To see what version of DirectX is
installed:
1
Right-click the Windows desktop background, then click Properties Information.
2
Look at the Microsoft DirectX Version label.
If DirectX 5.0 or later is not installed, follow the instructions below.
Solution
Install DirectX version 5.0 or later. To install DirectX 5.0:
1
Insert the “Matrox Installation” CD-ROM in your CD-ROM drive. Windows automatically
starts the CD-ROM setup program; click Cancel to continue.
2
Click
3
Type “d:\directx5\dxsetup”, where “d:\” is the drive letter of your CD-ROM drive; then click
OK to start the DirectX setup program.
Run.
Problem: Program for Windows 95 or Windows NT 4.0
doesn’t run properly or stops running
Cause Some programs may not work properly with some MGA acceleration.
Solution
Disable specific types of software acceleration.
Windows 95:
1
Right-click the Windows desktop background, then click the Properties menu item Settings tab PowerDesk button Performance tab.
2
Clear one or more check boxes, starting with Use Device Bitmaps Caching.
For more information, see context-sensitive Help.
3
Click OK Close to accept the changes. (Depending on the feature you disabled, you may
have to restart your computer for the changes to take effect.)
Windows NT 4.0:
16
1
Right-click the Windows desktop background, then click MGA Display Properties menu item
Performance tab.
2
Clear one or more check boxes.
For more information, see context-sensitive Help.
3
Click OK Yes to accept the changes. (Depending on the feature you disabled, you may have
to restart your computer for the changes to take effect.)
Matrox Graphics Card – Installation Guide
eng_inst.print.book Page 17 Tuesday, February 17, 1998 4:39 PM
Solution
If possible, update your Matrox display driver. Matrox makes new display drivers
available on the Matrox Web site (www.matrox.com/mga) and BBS (514-685-6008).
Solution
Windows 95: Disable Matrox hardware acceleration.
1
Right-click the My Computer icon on the Windows desktop background.
2
Click the Properties menu item Performance tab Graphics button.
3
Move the Hardware acceleration slider to None.
4
Click OK Close Yes to accept the changes and restart your computer.
Note: If you identify a program that doesn’t work well with MGA acceleration, please contact
Matrox technical support and describe the problem. This information may help us come up with
a fix or work-around in a future driver release.
Problem: After restarting my computer, Windows 95 warns that
the graphics card is not configured correctly
Cause You may have a conflict because of previously installed display drivers.
Solution
Delete all existing display drivers and reinstall MGA display drivers.
1
If Windows 95 prompts you to start the Add New Hardware Wizard, click Cancel.
(If you start the Wizard, it will not detect your graphics card.)
2
Right-click the My Computer icon on the Windows 95 desktop.
3
Click the Properties menu item Device Manager tab.
4
Click the plus sign next to Other devices (if it appears) and Display
adapters.
5
Delete all listed display adapters (click each, then click Remove), then
click OK.
6
Restart your computer and reinstall the MGA display drivers (see
page 6).
Matrox Graphics Card – Installation Guide
17
eng_inst.print.book Page 18 Tuesday, February 17, 1998 4:39 PM
Problem: Screen image defects appear in Windows 95 or Windows NT 4.0
(example: mouse pointer not drawn properly)
Cause Some programs may not work properly with some MGA acceleration.
Solution
Disable specific types of software acceleration.
Windows 95:
1
Right-click the Windows desktop background, then click the Properties menu item Settings tab PowerDesk button Performance tab.
2
Clear one or more check boxes, starting with Use Device Bitmaps Caching.
For more information, see context-sensitive Help.
3
Click OK Close to accept the changes. (Depending on the feature you disabled, you may
have to restart your computer for the changes to take effect.)
Windows NT 4.0:
1
Right-click the Windows desktop background, then click MGA Display Properties menu item
Performance tab.
2
Clear one or more check boxes.
For more information, see context-sensitive Help.
3
Click OK Yes to accept the changes. (Depending on the feature you disabled, you may have
to restart your computer for the changes to take effect.)
Solution
If possible, update your Matrox display driver. Matrox makes new display drivers
available on the Matrox Web site (www.matrox.com/mga) and BBS (514-685-6008).
Solution
Windows 95: Disable Matrox hardware acceleration.
1
Right-click the My Computer icon on the Windows desktop background.
2
Click the Properties menu item Performance tab Graphics button.
3
Move the Hardware acceleration slider to None.
4
Click OK Close Yes to accept the changes and restart your computer.
Cause
Windows 95: There may be a conflict between resources in your system.
Solution
18
1
Right-click the My Computer icon on the Windows desktop background, then click the
Properties menu item Device Manager tab.
2
Click the plus sign next to Other devices (if it appears) and Display adapters.
3
Delete any display adapter other than the one for your Matrox graphics card.
4
Restart your computer.
Matrox Graphics Card – Installation Guide
eng_inst.print.book Page 19 Tuesday, February 17, 1998 4:39 PM
Display information
Refresh rates
Horizontal refresh rate (kHz)
Vertical refresh rate (Hz)
Display
resolution*
Mystique 220
Productiva
G100
Millennium II
Mystique 220
Productiva
G100
Millennium II
640 × 480
31–102
31–102
31–102
60–200
60–200
60–200
800 × 600
31–114
38–114
38–114
60–200
60–200
60–200
1024 × 768
48–113
48–113
48–113
60–140
60–140
60–140
1152 × 864
54–110
54–110
54–110
60–120
60–120
60–120
1280 × 1024
64–107
64–107
64–107
60–100
60–100
60–100
1600 × 1200
75–100
75–106
75–113
60–80
60–85
60–90
1920 × 1080
68–84
68–88
70–94
60–72
60–75
60–80
1920 × 1200
75–81
75–91
75–95
60–65
60–70
60–76
1800 × 1440
89
89–97
89–104
60
60–65
60–70
* Maximum refresh rates are attainable when using 8- or 16-bit color palettes.
Maximums may not be attainable at the highest display resolutions with a 24- or 32-bit color palette.
Maximum display resolutions – Matrox Productiva G100 & Mystique 220
Graphics memory
Color palette
Maximum display area
Maximum 3D display area *
256 colors (8-bit)
1920 × 1080
—
32/64 K colors (15/16-bit)
1152 × 864
800 × 600
16.8 M colors (24-bit)
800 × 600
—
16.8 M colors (32-bit)
800 × 600
—
2 MB †
256 colors (8-bit)
1800 × 1440 / 1920 × 1200
—
32/64 K colors (15/16-bit)
1920 × 1080
1152 × 864
16.8 M colors (24-bit)
1280 × 1024
—
16.8 M colors (32-bit)
1152 × 864
800 × 600
256 colors (8-bit)
1800 × 1440 / 1920 × 1200
—
32/64 K colors (15/16-bit)
1800 × 1440 / 1920 × 1200
1920 × 1080
16.8 M colors (24-bit)
1920 × 1080
(G100: 1600 × 1200)
—
16.8 M colors (32-bit)
1280 × 1024
1152 × 864
4 MB
8 MB
* Double-buffering, without Z-buffering.
† Mystique 220 only.
Matrox Graphics Card – Installation Guide
19
eng_inst.softinfo.fm Page 20 Tuesday, February 17, 1998 4:59 PM
Maximum display resolutions – Matrox Millennium II
Graphics memory
Color palette
Maximum display area
Maximum 3D display area*
256 colors (8-bit)
1800 × 1440 / 1920 × 1200
—
32/64 K colors (15/16-bit)
1920 × 1080
1152 × 864
16.8 M colors (24-bit)
1280 × 1024
—
16.8 M colors (32-bit)
1152 × 864
800 × 600
256 colors (8-bit)
1800 × 1440 / 1920 × 1200
—
32/64 K colors (15/16-bit)
1800 × 1440 / 1920 × 1200
1920 × 1080
16.8 M colors (24-bit)
1920 × 1080
—
16.8 M colors (32-bit)
1280 × 1024
1152 × 864
256 colors (8-bit)
1800 × 1440 / 1920 × 1200
—
4 MB
8 MB
32/64 K colors (15/16-bit)
1800 × 1440 / 1920 × 1200 1800 × 1440 / 1920 × 1200
12 MB
16.8 M colors (24-bit)
1920 × 1080
—
16.8 M colors (32-bit)
1280 × 1024
1280 × 1024
256 colors (8-bit)
1800 × 1440 / 1920 × 1200
—
32/64 K colors (15/16-bit)
1800 × 1440 / 1920 × 1200 1800 × 1440 / 1920 × 1200
16 MB
16.8 M colors (24-bit)
1920 × 1080
—
16.8 M colors (32-bit)
1280 × 1024
1280 × 1024
* Double-buffering, without Z-buffering.
Supported VESA modes
In the table below, VESA modes supported by your Matrox graphics card are indicated by a VESA
mode number. Many Super VGA DOS programs use VESA modes.
Display resolution
16 colors
256 colors
32 K colors
64 K colors
16.8 M colors
640 × 400
—
100
—
—
—
640 × 480
—
101
110
111
112
800 × 600
102
103
113
114
115
1024 × 768
—
105
116
117
118
1280 × 1024
—
107
119
11A
—
1600 × 1200
—
11C
11D
11E
—
20
Matrox Graphics Card – Installation Guide
eng_inst.print.book Page 21 Tuesday, February 17, 1998 4:39 PM
Index
0-9
3D
4, 14
A
acceleration, MGA
Adobe Acrobat
AGP
16, 18
3
I
W
installation
Matrox card 5–6
Windows 95/NT/ 4.0
warning
IRQ settings
7
15
M
5
12
monitor connector
B
BIOS settings
15
12
BNC monitor connection
bus mastering
4, 14
monitor settings 12
Windows 95 8, 13, 14
Windows NT 4.0 10, 13
3, 6, 7
P
5, 15
PDF 3
PCI
8, 10
DirectX 16
Plug-and-Play
DDC
8, 10
display
drivers 9, 11
information 19–20
S
document conventions
software setup
Windows 95 8, 13, 14
Windows NT 4.0 10, 13
software installation
3
17
Super VGA
E
expansion slots
Windows NT 4.0
display settings 10
MGA software 11
monitor settings 10, 13
3
online documentation
D
driver conflict
Windows 95
display settings 8
MGA software 9
monitor settings 8, 13, 14
O
C
CD-ROM, Matrox
5, 8, 10, 13
5, 6, 12, 15
7
20
T
H
troubleshooting
hardware
acceleration 4, 16, 18
information 9, 11
installation 5–6
V
12–18
VESA 4
DDC monitor
modes (table)
VGA
8, 10
20
5
Matrox Graphics Card – Installation Guide
21
eng_inst.print.book Page 22 Tuesday, February 17, 1998 4:39 PM
22
Matrox Graphics Card – Installation Guide