1
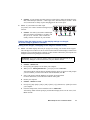
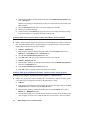
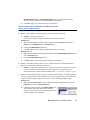
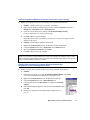
Matrox Graphics Architecture
ENGLISH
Millennium II / Mystique 220
• Installation Guide •
10526-101-0200
1997.08.01
Trademarks
Matrox® and Matrox Mystique® are registered trademarks of Matrox
Electronic Systems Ltd.
Matrox Rainbow Runner™, Matrox Rainbow Runner Studio™, Matrox
Rainbow Runner TV™, Matrox PC-VCR Remote™, Matrox HD Benchmark™,
Matrox Quick Connect™, Matrox Millennium™, Matrox Millennium II™,
Matrox Mystique 220™, Matrox Media XL-MPEG™, MGA™,
MGA Millennium™, MGA PowerDoc™, MGA Impression™, MGA Impression Plus™,QCDP™,
MGA DynaView™, PixelTOUCH™, CenterWINDOW™, PanLOCK™, PanHOME™, PanEND™, MaxVIEW™,
ResSwitch™, ModeSWITCH™, MGA Control Panel™, QuickAccess™, MGA PowerDesk™,
MGA Desktop Navigator™, DeskNav™ and MGA QuickDesk™ are trademarks of Matrox Graphics Inc.
Adobe™ and Acrobat™ are trademarks of Adobe Systems Inc.
IBM®, VGA®, and OS/2® are registered trademarks of International Business Machines Corporation.
Intel® and Pentium® are registered trademarks of Intel Corporation; MMX™ is a trademark of Intel
Corporation.
Windows NT™, Windows 95™, Windows for Workgroups™, DirectX™, DirectDraw™, DirectVideo™,
Direct3D™, ActiveX™ and ActiveMovie™ are trademarks of Microsoft Corporation; Microsoft®, Windows® and
MS-DOS® are registered trademarks of Microsoft Corporation.
AutoCAD® and 3D Studio® are registered trademarks of Autodesk Inc.
MicroStation™ is a trademark of Bentley Systems Inc.
CompuServe® is a registered trademark of CompuServe Inc.
Energy Star™ is a trademark of the U.S. Environmental Protection Agency (EPA).
Kodak Precision™is a trademark of Eastman Kodak Company.
Ulead® is a registered trademark of Ulead Systems, Inc.
VDOPhone™ is a trademark of VDOnet Corporation Limited.
VDOnet® is a registered trademark of VDOnet Corporation Limited.
MacOS™ and QuickDraw 3D™ are trademarks of Apple Computer Inc.
All other nationally and internationally recognized trademarks and tradenames are hereby acknowledged.
Disclaimer
THE INFORMATION IN THIS GUIDE IS SUBJECT TO CHANGE AT ANY TIME AND WITHOUT NOTICE.
Matrox Graphics Inc. reserves the right to make changes in specifications at any time and without notice. The
information provided by this document is believed to be accurate and reliable. However, no responsibility is
assumed by Matrox Graphics Inc. for its use; nor for any infringements of patents or other rights of third
parties resulting from its use. No license is granted under any patents or patent rights of Matrox Graphics Inc.
© Copyright Matrox Graphics Inc., 1997. All rights reserved.
2
Matrox Graphics Card – Installation Guide
Contents
Using this guide
4
Overview
5
Hardware installation
6
Software installation
9
MGA PowerDesk for Windows 95
10
Monitor setup.....................................................................................................................10
Display setup .....................................................................................................................10
Software overview .............................................................................................................11
MGA PowerDesk for Windows NT 4.0
12
Monitor setup.....................................................................................................................12
Display setup .....................................................................................................................12
Software overview .............................................................................................................13
Other software
14
Windows 3.1 ......................................................................................................................14
Windows NT 3.51..............................................................................................................15
OS/2 ...................................................................................................................................16
DOS utilities ......................................................................................................................16
AutoCAD & MicroStation for DOS ..................................................................................17
Display information
18
Hardware information
20
Troubleshooting
22
Index
29
Matrox Graphics Card – Installation Guide
3
Using this guide
Document conventions
This guide assumes you’re familiar with basic functions like click, right-click and double-click, and
that you’re familiar with the basics of the operating system you’re using. In addition, we use the
following conventions:
Bold for text that appears on-screen and subheadings.
Italics for file and path names, publication titles, and new terms.
Bold Italic for emphasis.
Green for cross-references.
(When viewing online, click on green text to jump to the page being referenced.)
Keyboard keys in square brackets, with a plus sign separating keys that you press
simultaneously. For example: press [Ctrl]+[Alt]+[Del] to restart your computer.
Arrows (“”) to separate ordered directions.
For example:
Click the Start button Programs folder MGA PowerDesk folder;
is the same as:
1
Click the Start button.
2
Click the Programs folder.
3
Click the MGA Powerdesk folder.
Online documentation
We provide additional documentation in Help files, readme files, and Adobe Acrobat Portable
Document Format (PDF) files. To view or print PDF files, use the Acrobat Reader program, which
you can install from the Matrox Installation CD-ROM.
For context-sensitive Help where available, click the “ ” icon in the title bar, then click the item
you want help on. Right-click a Help topic for a pop-up menu that lets you print or copy it.
4
Matrox Graphics Card – Installation Guide
Overview
Thank you for purchasing a Matrox graphics card. Your Millennium II or Mystique 220 card is a
high-performance graphics card that plugs into an expansion slot inside your personal computer.
Matrox’s 64-bit graphics engine gives you superior performance with Windows, digital video and
3D graphics. To further accelerate 3D programs, your Matrox card has hardware-based texturemapping and uses bus mastering. This card supports display resolutions up to 1800 × 1440 and
1920 × 1200. You can also upgrade your Matrox card with more RAM or multimedia hardware
add-ons.
Your Matrox graphics card is 100% VGA compatible and supports all VESA standards: VBE 2.0
(Super VGA modes), DPMS (energy saving), and DDC-2b (Plug-and-Play monitor).
Software supplied
MGA PowerDesk for Windows 95: MGA display drivers; DirectDraw, DirectVideo and
Direct3D support; Settings, Monitor, Color, Hot Keys and Information property sheets; MGA
Desktop Navigator and MGA QuickDesk programs; online documentation
MGA PowerDesk for Windows NT 4.0: MGA display drivers; DirectDraw and OpenGL
support; Settings, Monitor, Information, Performance and PowerDesk property sheets; MGA
Desktop Navigator and MGA QuickDesk programs; online documentation
MGA AutoCAD and 3D Studio MAX drivers for Windows NT
Fully accelerated drivers for Windows 3.1, Windows NT 3.51, OS/2 Warp 3.0 and 4.0,
AutoCAD for DOS, and MicroStation for DOS
Microsoft DirectX 3 and DirectVideo
Adobe Acrobat Reader for Windows
Online documentation
Various third-party software
Installation overview
1
Install the hardware – see “Hardware installation”, page 6.
2
Install the software –
for Windows 95 and Windows NT 4.0, see “Software installation”, page 9.
for Windows 3.1, Windows NT 3.51, OS/2 Warp 3.0 and 4.0, AutoCAD for DOS, and
MicroStation for DOS, see “Other software”, page 14.
Matrox Graphics Card – Installation Guide
5
Hardware installation
WARNING: Static electricity can severely damage electronic parts. Take these precautions:
1
Before touching any electronic parts, drain the static electricity from your body. You can do
this by touching the internal metal frame of your computer while it’s unplugged.
Don’t remove a card from the anti-static container it’s shipped in until you’re ready to install
it. When you remove a card from your computer, place it back in its container.
Don’t let your clothes touch any electronic parts.
When handling a card, hold it by its edges, and avoid touching its circuitry.
Switch to the standard VGA display driver
If you’re running Windows 95 on your computer, this step is not necessary. If you’re using
another operating system (for example, Windows NT 4.0), see its documentation for how to
switch to VGA mode.
2
Open your computer and remove your existing graphics card
Turn off your computer and all peripherals such as the monitor or printer. Open the computer
and remove your existing graphics card. (If you have a display adapter built into your
computer’s motherboard, it should automatically disable itself after your Matrox card is
installed.)
3
Choose a PCI expansion slot
Most PCI bus computers have a combination of PCI and ISA expansion slots. PCI slots are
usually made with plastic of a contrasting beige color, and are shorter than other slots in your
computer. Your system manual should identify the PCI slots. Plugging your Matrox card into a
non-PCI slot could damage the card, your computer, or both
Back of computer
PCI slot
ISA slot
PCI vs. ISA expansion slots
6
Matrox Graphics Card – Installation Guide
4
Insert your Matrox card
Remove the cover for the slot you intend to use. Save the screw for the mounting bracket.
Position your Matrox card over the PCI expansion slot you’ve chosen. Push the card in firmly
and evenly until it’s fully seated in the slot. Replace the screw to secure the bracket of your
Matrox card to the computer chassis.
Bracket screw
Motherboard
Matrox graphics card
PCI expansion slot
5
Connect the monitor
Simply plug your monitor cable into the monitor connector on your Matrox card. Make sure the
other end of the monitor cable is properly connected to your monitor. See your monitor manual
for more information.
Bracket
Monitor connector (blue)
Rainbow Runner
video connector (black)
Side-view of your Matrox card
Matrox Graphics Card – Installation Guide
7
6
Restart your computer
7
Install the software
If you’re using Windows 95, it reports that it
has detected new hardware when you restart:
a
Click “Driver from disk provided by
hardware manufacturer”, then click OK.
b
When Windows prompts you for the
software driver location, insert the Matrox
Installation CD-ROM in your CD-ROM
drive. Windows automatically starts the
CD-ROM setup program; click Cancel to
continue.
c
Type “d:\” in the text box (where “d” is
the drive letter of your CD-ROM drive), then click OK.
This installs the MGA display drivers for Windows 95, but not the rest of the software
included on the Matrox CD-ROM.
d
To install other software included on the Matrox CD-ROM, see “Software installation”,
page 9.
If you’re using Windows NT 4.0, see “Software installation”, page 9.
If you’re using Windows 3.1, Windows NT 3.51, OS/2 Warp 3.0 or 4.0, AutoCAD for DOS, or
MicroStation for DOS, see “Other software”, page 14.
8
Matrox Graphics Card – Installation Guide
Software installation
This section describes how to install Matrox software for Windows 95 and Windows NT 4.0. For
other operating systems, see “Other software”, page 14.
1
Insert the Matrox Installation CD-ROM in your CD-ROM drive – the mgasetup program
automatically starts. This setup program works with Windows 95 and Windows NT 4.0, and
detects which operating system you’re using.
2
Select the language you want to use, then click Next.
3
To see notes on the contents of the CD-ROM, click View ReadMe. To continue, click Next.
4
If this is a first-time installation, the setup program lists drivers that are not installed.
To begin the software installation, click Install.
5
Choose an installation type:
To install the complete MGA PowerDesk
(recommended), click Typical.
To customize the PowerDesk installation, click
Custom.
If you click Custom, the setup program prompts you
for a destination folder and what PowerDesk options
you want to install.
After you choose, the setup program automatically
installs Matrox software and drivers. After this is
done, leave the Matrox CD-ROM in your CD-ROM
drive, then click OK to restart your computer and for all changes to take effect.
6
After you restart your computer, the CD-ROM setup program starts again. The main menu lists
other software you can install from the Matrox CD-ROM. To install, select an item, click Install,
then follow the on-screen instructions. After the installation of an item is finished, you can
return to the main menu to install another. Click Exit when you’re done.
If this is a first-time installation, your display is using a 640 × 480 resolution with 256 colors –
supported by most monitors. To adjust software monitor settings:
for Windows 95, see “MGA PowerDesk for Windows 95”, page 10.
for Windows NT 4.0, see “MGA PowerDesk for Windows NT 4.0”, page 12.
Matrox Graphics Card – Installation Guide
9
MGA PowerDesk for Windows 95
To access PowerDesk programs and online documentation, click the Start button Programs folder
MGA PowerDesk folder.
Monitor setup
To check your monitor settings:
1
Right-click the Windows desktop background, then click the Properties menu item Monitor tab.
2
If you have a Plug-and-Play monitor:
Make sure the Windows 95 Monitor button is selected. If this button
is selected, the MGA display driver automatically uses the correct
settings for your monitor.
If you don’t have a Plug-and-Play monitor:
If the monitor type listed under the Windows 95 Monitor button is
incorrect or shows Unknown Monitor, you should select a monitor.
To select a monitor, click the MGA Monitor button, select your monitor by name in the list below
this button, then click OK. If your monitor doesn’t appear in the list, you can try the Windows 95
method of monitor selection. For more information on monitor selection, see the MGA
PowerDesk online guide.
Note: Many Plug-and-Play monitors do not automatically report if they’re capable of
1152 × 864, or 1600 × 1200 and higher display resolutions. To use these resolutions, or higher
refresh rates than those reported by the monitor, you can use the MGA monitor selection method.
WARNING: If incorrect software monitor settings are applied, some monitors can be
permanently damaged. For more information, see your monitor manual.
Display setup
After checking your monitor’s software settings, you can change your display resolution, color
palette and other MGA PowerDesk settings. To access MGA display property sheets, right-click the
Windows desktop background, then click the Properties menu item. To change your display
resolution or color palette, click the Settings tab. For more information on changing your display
settings, see the MGA PowerDesk online guide.
10
Matrox Graphics Card – Installation Guide
Software overview
MGA PowerDesk for Windows 95 includes
Fast MGA display driver with:
DirectDraw, DirectVideo and Direct3D support for direct access to Matrox hardware.
Plug-and-Play (DDC-2b) and Energy Star (DPMS) support.
Settings property sheet to change your display settings. Use this sheet to access MGA
PowerDesk features such as:
Desktop mode buttons to set up a proportional, horizontal or vertical virtual desktop.
Display schemes to easily switch to a pre-defined display setting.
Performance property sheet to change MGA display driver performance settings.
Utilities property sheet to configure MGA PowerDesk options.
Monitor property sheet to inform the MGA display driver of your monitor’s capabilities. You
Color property sheet to change your display’s color balance.
Hot Key property sheet to define keyboard shortcuts for:
can use this sheet instead of the Windows 95 method of monitor selection.
CenterWINDOW to center your view area on the active window.
MaxVIEW to resize the active program window to the size of your current display area.
PanEND to move your display area to the right or bottom of your virtual desktop.
PanHOME to move your display area to the left or top of your virtual desktop.
PanLOCK to enable or disable panning.
PixelTOUCH to magnify part of your desktop area.
Information property sheet for information on your display hardware and software.
MGA Desktop Navigator program to quickly move the view area of your desktop and for quick
access to the PixelTOUCH zoom, PanLOCK and CenterWINDOW features.
MGA QuickDesk menu to quickly switch to a saved display scheme, to save and restore the
position of your desktop icons, to open the Windows Display Properties dialog box, or to start
MGA Desktop Navigator. To see this menu, click the monitor icon on the Windows 95 taskbar.
MGA Diagnostic program to identify some possible display-related problems.
Matrox Graphics Card – Installation Guide
11
MGA PowerDesk for Windows NT 4.0
To access PowerDesk programs and online documentation, click the Start button Programs folder
MGA NT PowerDesk folder.
Monitor setup
To check your monitor settings
1
Right-click the Windows desktop background, then click the MGA Display Properties menu
item Monitor tab.
2
If you have a Plug-and-Play monitor:
Make sure the Plug-and-Play (DDC) monitor button is selected. If so,
the MGA display driver automatically uses the correct settings for your monitor. If not, click
this button, then click Apply.
If you don’t have a Plug-and-Play monitor:
See if the Default monitor (60 Hz) button is selected. If so, use the
MGA monitor selection method. For more information on MGA monitor selection, see MGA
PowerDesk online guide.
Note: Many Plug-and-Play monitors do not automatically report if they’re capable of
1152 × 864 or 1600 × 1200 and higher display resolutions. To use these resolutions, or higher
refresh rates than those reported by the monitor, you can use the MGA monitor selection method.
WARNING: If incorrect software monitor settings are applied, some monitors can be
permanently damaged. For more information, see your monitor manual.
Display setup
After checking your monitor’s software settings, you can change your display resolution, color
palette and other MGA PowerDesk settings. To access MGA display property sheets, right-click the
Windows desktop background, then click the MGA Display Properties menu item. To change your
display resolution or color palette, click the Settings tab. For more information on changing your
display settings, see the MGA PowerDesk online guide.
12
Matrox Graphics Card – Installation Guide
Software overview
MGA PowerDesk for Windows NT 4.0 includes
Fast display driver with:
Multi-display support to use up to 4 monitors at a time (one monitor for each Matrox card
– of the same type – in your computer)
Accelerated DirectDraw and OpenGL support for direct access to Matrox hardware.
Plug-and-Play (DDC-2b) monitor support.
Settings property sheet to change your display settings. This sheet provides access to MGA
PowerDesk features such as:
Desktop mode buttons to set up a proportional, horizontal or vertical virtual desktop.
Display schemes to easily switch to a pre-defined display setting.
Monitor property sheet to inform the MGA display driver of your monitor’s capabilities.
Information property sheet to display hardware and software version numbers and capabilities.
Performance property sheet to configure advanced driver performance settings.
PowerDesk property sheet with settings for:
PixelTOUCH to zoom in and pan on your view area.
CenterWINDOW to center opened windows in your view area.
MaxVIEW to maximize windows in your view area instead of your desktop.
CenterPOPUP to have new windows pop up in the center of your current view area.
MGA Desktop Navigator (DeskNav) program to quickly change the view area of your desktop
and give you quick access to the PixelTOUCH zoom and CenterWINDOW features. Access
DeskNav through the Start menu Programs folder MGA NT PowerDesk folder.
MGA QuickDesk program to quickly switch between your saved display schemes, open the MGA
Display Properties dialog box or launch MGA Desktop Navigator. This program appears as a
monitor icon on the Windows NT taskbar.
Matrox Graphics Card – Installation Guide
13
Other software
This section describes how to install Matrox drivers and software for Windows 3.1,
Windows NT 3.51, OS/2 Warp 3.0 and 4.0, AutoCAD for DOS, and MicroStation for DOS.
Windows 3.1
Software installation
1
Restart Windows in VGA mode. For information on how to do this, see Windows
documentation.
2
Insert your Matrox Installation CD-ROM in your CD-ROM drive.
3
In Program Manager, click File Run. Type d:\win31\setup (where “d” is the letter of your
CD-ROM drive), then click OK to begin the setup program.
4
Follow the on-screen instructions. The setup program creates a new program group called MGA
PowerDesk.
5
If this is a first-time installation, and you don’t have a Plug-and-Play monitor, the Monitor
Selection program prompts you to select a monitor from a list. This is to let Matrox drivers know
what settings to use for your monitor. For more information, click Help.
6
Select a display resolution and color palette setting for Windows. (Later, you can change this
setting with the MGA Control Panel program.)
7
Click OK to restart your computer and for changes to take effect.
For more information, double-click Readme.Win in the MGA PowerDesk program group.
Online guide installation
1
If Acrobat Reader 2.1 is not already installed on your computer, install it from the Matrox
CD-ROM. From Program Manager, then click File Run. Type d:\acro21\setup (where “d” is
the letter of your CD-ROM drive), then click OK. Follow the on-screen instructions.
2
From Program Manager, then click File Run. Type d:\win31doc\setup (where “d” is the letter
of your CD-ROM drive), then click OK. This installs PDF files and creates icons for them in the
MGA PowerDesk program group.
DCI Video for Windows 3.1 accelerator
Included with the installation of Matrox software for Windows 3.1 is an MGA Display Control
Interface (DCI) driver. This driver is Microsoft/Intel-compliant and accelerates the playback of
Indeo- and Cinepak-encoded AVI files and MPEG files. You need Microsoft Video for Windows 1.1e
to take advantage of this acceleration. To install Video for Windows 1.1e, start the vfw\setup.exe
14
Matrox Graphics Card – Installation Guide
program on the Matrox CD-ROM. You can enable or disable the DCI driver with the Uninstallation
program.
MGA Uninstallation
The MGA Uninstallation program in the PowerDesk program group lets you disable (and later
re-enable) or remove all or parts of the Matrox software for Windows 3.1. If you’re upgrading from
Windows 3.1 to Windows 95, first uninstall Matrox software for Windows 3.1. For more
information, see the online documentation.
Windows NT 3.51
Driver installation
1
Insert your Matrox Installation CD-ROM in your CD-ROM drive.
2
From Program Manager, double-click Control Panel Display, then click Change Display Type
Change Other.
3
Type d:\winnt35\ (where “d” is the letter of your CD-ROM drive), then click OK.
4
Select a display resolution and color palette supported by your monitor, click Install, then follow
the on-screen instructions.
5
When prompted, restart your computer for changes to take effect.
If your computer doesn’t restart with the display settings you selected, your Matrox graphics card
may not support those settings. Double-click Control Panel Display, then click List All Modes. To
see if your monitor supports a display mode, select one, then click Test. To apply a mode, select one,
then click OK.
To access the MGA PowerDesk features, double-click Control Panel MGA Panel. For more
information, see the online Help. See also the winnt35/readme.nt text file on the Matrox CD-ROM.
Monitor setup
If you have a Plug-and-Play (DDC) monitor, the Matrox display driver automatically uses correct
settings for your monitor. If you don’t have a DDC monitor and a monitor is not selected in Matrox
software, the driver uses default settings. To let the driver know your monitor’s capabilities:
1
Double-click Control Panel MGA Panel, then click the Monitor tab.
2
From the monitor list, select your monitor by name, or select one whose maximum refresh rate
matches your monitor’s, then click Save.
3
Restart your computer for changes to take effect.
Matrox Graphics Card – Installation Guide
15
OS/2
Driver installation
1
Restart your computer in VGA mode:
a
During startup, press [Alt]+[F1] when “OS/2” appears in the top-left corner of your screen.
b
From the on-screen menu, choose to restart in VGA mode.
2
Insert the Matrox Installation CD-ROM in your CD-ROM drive.
3
In Presentation Manager (PM), double-click OS/2 System, then click Drives.
4
Double-click the icon for your CD-ROM drive, then double-click os2 install.cmd.
5
Enable the Primary Display check box, then click OK.
6
Select MATROX MGA Millennium/Mystique Series in the list box, then click OK.
7
Type d:\os2\ (where “d” is the letter of your CD-ROM drive), then click Install.
8
After files are copied to your computer, restart your computer for changes to take effect.
If this is a first-time installation, OS/2 restarts in the default display settings for Matrox drivers
(640 × 480 display area, 256 colors). For information on the Matrox driver for OS/2, see the
os2/readme.os2 text file on the Matrox CD-ROM.
MGA Settings
To open the MGA Settings program, double-click its icon on the PM desktop. Use this program to
change display settings like resolution, color palette, font size, EnDIVE (Enhanced Direct Interface
Video Extensions), a hardware-zoom hot key, and see display information.
Monitor settings
If you have a Plug-and-Play (DDC) monitor, the Matrox display driver automatically use correct
settings for your monitor. If don’t have a DDC monitor and a monitor is not selected in Matrox
software, the driver uses default settings. Use MGA Settings to select a monitor.
DOS utilities
Matrox software utilities for DOS include:
progbios – to reprogram or update the Flash EPROM of your Matrox graphics card.
mgamon – to select a monitor for the CAD and VESA Super VGA programs.
vbetsr and vbesetup – for higher monitor refresh rates while using VESA Super VGA modes.
To install these utilities, start the dosutil\install.exe program on the Matrox CD-ROM. By default,
these programs are installed in the c:\mga\setup directory. For more information on Matrox software
utilities for DOS, see the readme.txt text file installed in this directory.
16
Matrox Graphics Card – Installation Guide
To use vbetsr.com and vbesetup.exe
1
Add lines with the path to vbetsr and vbesetup (in that order) to your autoexec.bat file.
2
If you do not have a Plug-and-Play (DDC) monitor, use the mgamon program to tell Matrox
software for DOS what your monitor capabilities are.
AutoCAD & MicroStation for DOS
AutoCAD for DOS
The MGA DynaView driver for AutoCAD supports AutoCAD 12 and 13 for DOS and 3D Studio.
To install, start the acad\install.exe program on the Matrox Installation CD-ROM. By default, the
install program copies driver files to the c:\mga\acadrv directory on your computer.
For instructions on setting up the driver for AutoShade and 3D Studio, see the Matrox readme.aca
file in the mga\acadrv directory. For more information on the AutoCAD MGA driver and on how to
use the DynaView for DOS features, see the MGA CAD Drivers Guide (see “MGA CAD drivers
online guide”).
MicroStation PC for DOS
To install the MGA driver for MicroStation 5.0 and MicroStation 95 (MicroStation 4.0 isn’t
supported), start the ustat\install.exe program on the Matrox CD-ROM. When prompted by the setup
program, specify the path where your MicroStation software is installed. The setup program copies
files to the drv subdirectory in this path.
For information on the MGA MicroStation driver, see the MGA CAD Drivers Guide. For more
information on the driver, see also the readme.mga file in your MicroStation drv subdirectory.
MGA CAD drivers online guide
The MGA CAD Drivers Guide shows you how to set up and use MGA drivers for AutoCAD and
MicroStation. Matrox provides this guide in five languages as Acrobat Portable Document Format
(PDF) files. Use the Acrobat Reader program to view or print PDF files.
If you already have Acrobat Reader installed, you can use it to open the PDF files on the Matrox
CD-ROM in the cadguide directory. If you want to install the CAD drivers guide and Acrobat Reader
for DOS, start the cadguide\setup.exe program. If you want to install Acrobat Reader for DOS only,
start the cadguide\install.exe program.
Matrox Graphics Card – Installation Guide
17
Display information
Refresh rates
Horizontal refresh rate (KHz)
Vertical refresh rate (Hz)
Display
resolution1
Mystique 220
Millennium II
Mystique 220
Millennium II
640 x 480
31–102
31–102
60–200
60–200
800 x 600
31–114
38–114
60–200
60–200
1024 x 768
48–113
48–113
60–140
60–140
1152 x 864
54–110
54–110
60–120
60–120
1280 x 1024
64–107
64–107
60–100
60–100
1600 x 1200
75–100
75–113
60–80
60–90
1920 x 1080
68–84
70–94
60–72
60–80
1920 x 1200
75–81
75–95
60–65
60–76
1800 x 1440
89
89–104
60
60–70
1. Maximum refresh rates are when using 8- or 16-bit color palettes.
Maximums may not be attainable at the highest display resolutions with a 24- or 32-bit color palette.
Maximum display resolutions – Mystique 220
Color palette
Maximum display area
Maximum 3D display area1
256 colors (8-bit)
1920 x 1080
—
32/64 K colors (15/16-bit)
1152 x 864
800 x 600
16.8 M colors (24-bit)
800 x 600
—
16.8 M colors (32-bit)
800 x 600
—
256 colors (8-bit)
1800 x 1440 / 1920 x 1200
—
32/64 K colors (15/16-bit)
1920 x 1080
1152 x 864
16.8 M colors (24-bit)
1280 x 1024
—
16.8 M colors (32-bit)
1152 x 864
800 x 600
256 colors (8-bit)
1800 x 1440 / 1920 x 1200
—
32/64 K colors (15/16-bit)
1800 x 1440 / 1920 x 1200
1920 x 1080
16.8 M colors (24-bit)
1920 x 1080
—
16.8 M colors (32-bit)
1280 x 1024
1152 x 864
Graphics memory
2 MB
4 MB
8 MB
1. Double-buffering, without z-buffering.
18
Matrox Graphics Card – Installation Guide
Maximum display resolutions – Millennium II
Color palette
Maximum display area
Maximum 3D display area1
256 colors (8-bit)
1800 x 1440 / 1920 x 1200
—
32/64 K colors (15/16-bit)
1920 x 1080
1152 x 864
16.8 M colors (24-bit)
1280 x 1024
—
16.8 M colors (32-bit)
1152 x 864
800 x 600
256 colors (8-bit)
1800 x 1440 / 1920 x 1200
—
32/64 K colors (15/16-bit)
1800 x 1440 / 1920 x 1200
1920 x 1080
16.8 M colors (24-bit)
1920 x 1080
—
16.8 M colors (32-bit)
1280 x 1024
1152 x 864
256 colors (8-bit)
1800 x 1440 / 1920 x 1200
—
32/64 K colors (15/16-bit)
1800 x 1440 / 1920 x 1200
1800 x 1440 / 1920 x 1200
16.8 M colors (24-bit)
1920 x 1080
—
16.8 M colors (32-bit)
1280 x 1024
1280 x 1024
256 colors (8-bit)
1800 x 1440 / 1920 x 1200
—
32/64 K colors (15/16-bit)
1800 x 1440 / 1920 x 1200
1800 x 1440 / 1920 x 1200
16.8 M colors (24-bit)
1920 x 1080
—
16.8 M colors (32-bit)
1280 x 1024
1280 x 1024
Graphics memory
4 MB
8 MB
12 MB
16 MB
1. Double-buffering, without z-buffering.
Supported VESA modes
In the table below, VESA modes supported by your Matrox graphics card are indicated by a VESA
mode number. Many Super VGA DOS programs use VESA modes.
Display resolution
16 colors
256 colors
32 K colors
64 K colors
16.8 M colors
640 x 400
—
100
—
—
—
640 x 480
—
101
110
111
112
800 x 600
102
103
113
114
115
1024 x 768
—
105
116
117
118
1280 x 1024
—
107
119
11A
—
1600 x 1200
—
11C
11D
11E
—
To use higher refresh rates while in VESA display modes, see “DOS utilities”, page 16.
Matrox Graphics Card – Installation Guide
19
Hardware information
Millennium II
MGA-2164W graphics chip, TI 3026 external RAMDAC
Graphics cards –
MIL2P/4 series: 250 MHz RAMDAC, PCI Bus, 4 MB WRAM
MIL2P/8 series: 250 MHz RAMDAC, PCI Bus, 8 MB WRAM
Memory upgrades 1 –
MIL2/MOD4: 4 MB WRAM (for MIL2P/4 and MIL2P/8)
MIL2/MOD8: 8 MB WRAM (for MIL2P/4 and MIL2P/8)
MIL2/MOD12: 12 MB WRAM (for MIL2P/4)
Mystique 220
MGA-1164SG graphics chip, internal RAMDAC
Graphics cards –
MY220P/2 series: 220 MHz RAMDAC, 2 MB SGRAM
MY220P/4 series: 220 MHz RAMDAC, 4 MB SGRAM
MY220P/BIZ2 series: 220 MHz RAMDAC, 2 MB SGRAM
MY220P/BIZ4 series: 220 MHz RAMDAC, 4 MB SGRAM
Memory upgrades 1 –
MYST/MOD2: 2 MB SGRAM (for MY220P/2 and /BIZ2)
MYST/MOD4: 4 MB SGRAM (for MY220P/4 and /BIZ4)
MYST/MOD6: 6 MB SGRAM (for MY220P/2 and /BIZ2)
Technical features – Millennium II & Mystique 220
64-bit VGA-compatible drawing engine
Separate sync monitors only
Supports PCI bus version 2.1 at clock speeds up to 33 MHz
Video specifications – Millennium II & Mystique 220
The video follows the PS/2 standard, with no sync on RGB, and no blanking pedestal. Black or
blank – 0.0 V; White – 0.700 V.
There are five connections to a monitor that uses BNC (Bayonet Nut Connect) connectors –
R, G, B, HSYNC (white or gray wire), and VSYNC (black wire).
1. A Matrox memory upgrade module can’t be used with the Matrox Rainbow Runner Studio add-on card. This is because
they each attach to the same connectors on the Matrox graphics card.
20
Matrox Graphics Card – Installation Guide
Monitor connector pinouts
5
1
10
6
15
11
1
2
3
4
5-8
9
Analog red output
Analog green output
Analog blue output
Not connected
Ground
Not connected
10
11
12
13
14
15
Ground
Not connected
SDA (DDC)
TTL horizontal sync
TTL vertical sync
SCL (DDC)
Rainbow Runner video connector pinouts
8
1
15
9
1-2
3
4
5
Reserved
Y out (luminance)
C out (chroma)
Composite out
6
7
8
9-15
Y in (luminance)
C in (chroma)
Composite in
Ground
VGA feature connector pinouts
1
13
14
25
1-8
9
10
11
12
13-16
17
Pixel data
Pixel clock
Blanking
Horizontal sync
Vertical sync
Ground
External pixel data
enable*
18
19
External sync enable*
External pixel clock
enable*
20
Unused (reserved)
21-24 Ground
25
Unused (reserved)
* When enabled, these signals are active low
Matrox Graphics Card – Installation Guide
21
Troubleshooting
This section contains solutions to problems you may encounter with your Matrox graphics card.
Problem: Computer doesn’t boot after Matrox card is installed
Cause – Some computers may not properly detect the addition or change of an internal PCI
card. On startup, a computer may beep differently from normal to indicate this error.
Solution – Reset your computer’s CMOS. This is usually done through a switch or jumper
on the motherboard of your computer. Check your system manual or contact your computer
vendor for instructions on how to do this.
Cause – There may be another graphics adapter in your computer. (For MGA multi-display
mode in Windows NT, all other graphics cards in your computer must also be Matrox cards of
the same type – Millennium, Millennium II or Mystique 220.)
Solution – If another graphics card is plugged into an expansion slot, remove it.
Solution – If a graphics adapter is built-in to your computer’s motherboard, your system
may have not automatically disabled it when you inserted your Matrox card. Check your
system manual for instructions on how to disable your computer’s built-in graphics adapter.
Problem: Wrong color balance, screen image off-center, or no picture at all
Cause – Your monitor’s video controls may be improperly set.
22
Solution – Adjust your monitor’s controls (brightness, contrast and so on). For more
information, see your monitor manual.
Cause – The monitor connections may have been inserted improperly.
Solution – Make sure the monitor’s power cable is firmly in place.
Solution – Make sure the 15-pin connector (see picture) to your Matrox
graphics card is firmly in place.
Solution – If your monitor uses a 15-pin connector, make sure the
connection to the monitor is firmly in place.
Matrox Graphics Card – Installation Guide
15-pin connector
Solution – If your monitor uses BNC input (see picture below), make sure the Red, Green,
Blue, Horizontal Sync (HSYNC – white or gray wire), and Vertical Sync (VSYNC – black
wire) connections are firmly in place and plugged into the correct input.
Cause – If your monitor uses BNC input
(see picture), one or more connection settings may be
incorrect.
Solution – Set each of your monitor’s RGB input
and sync switches (if available) to 75 ohms, with
the sync set to “external”. These controls are
usually switches on the back of your monitor.
Bayonet Nut Connect (BNC)
Problem: After the startup screen, or after display settings are changed,
the screen image is garbled or unusable
(rolling screen images, overlapping screen images or a blank screen)
Cause – The MGA display driver may be trying to use settings your monitor doesn’t support.
This can happen if a monitor was never selected in the software and the display resolution was
changed to one your monitor doesn’t support, or if the monitor connected to your computer was
changed without it being changed in the software.
WARNING: If incorrect software monitor settings are applied, some monitors can be
permanently damaged. For more information, see your monitor manual.
Solution – Windows 95:
1
Press [Ctrl]+[Alt]+[Del] twice to restart your computer.
2
When you see “Starting Windows 95...”, press [F5] to enter “safe mode”.
After startup, MGA software detects that MGA display drivers are not active and prompts
you as to whether you want to have MGA software disabled; click No.
3
Select your monitor with the Windows 95 monitor selection method.
For more information, see the MGA PowerDesk online guide.
4
Restart your computer.
Solution – Windows NT 4.0:
1
Press [Ctrl]+[Alt]+[Del] [Tab] [Tab] [Enter] [] (down arrow) [Enter] to restart
your computer.
2
From the startup menu, choose a Windows NT 4.0 “VGA mode”.
After startup, MGA software prompts you that MGA display drivers are not active; click
OK to continue.
Matrox Graphics Card – Installation Guide
23
3
Right-click the Windows desktop background, then click the MGA Display Properties menu
item Settings tab.
Windows may prompt you that the display settings are incorrect for the current mode; click
OK to continue.
4
Move the Display area slider down to its lowest setting, then click OK.
5
Restart your computer normally.
6
Select a monitor with the Monitor property sheet, then you can adjust your display settings.
For more information, see the MGA PowerDesk online guide.
Problem: Other device doesn’t work properly after Matrox card is installed
(examples: sound card output distorted, fast modem loses data often)
Cause – Some computers require that software wait for the hardware to be ready to receive new
data. The Matrox display drivers are not normally set to do this because it slows them down
slightly and it’s not necessary for most computers.
Solution – Windows 95:
1
Right-click the Windows desktop background, then click the Properties menu item Settings tab PowerDesk button Performance tab.
2
Clear the Use automatic PCI bus retries check box.
3
Click OK OK Yes to accept the changes and restart your computer.
Solution – Windows NT 4.0:
1
Right-click the Windows NT desktop background, then click the MGA Display Properties
menu item Performance tab.
2
Clear the Use automatic PCI bus retries check box.
3
Click OK Yes to accept the changes and restart your computer.
Problem: After game for Windows 95 starts, monitor doesn’t display properly
(rolling screen images, overlapping screen images or a blank screen)
Cause – If your game uses a low-resolution (640 × 480 and below), full-screen display mode,
your monitor may not support the refresh rate the MGA driver is using.
1
Solution –
If the game is still running in full-screen mode, press [Ctrl]+[Alt]+[Del] once for the Close
Program dialog box, and then click the End Task button.
24
2
Right-click the Windows desktop background, then click the Properties menu item Monitor tab MGA Monitor button.
3
From the MGA monitor list, select the monitor model you’re using. If your monitor model
does not appear in the list, select a monitor that runs at 60 Hz at 640 × 480 (for example,
Matrox Graphics Card – Installation Guide
Standard Monitor Types Vesa 1024X768 @60Hz). For more information on MGA
monitor selection, see online the MGA PowerDesk online guide.
4
Click OK to apply your selection and close the dialog box.
Problem: 3D program for Windows 95 or Windows NT 4.0
doesn’t start or stops running
(program uses bus mastering)
Cause – Your computer or program may not work well with bus mastering.
Solution – Disable bus mastering:
(If you want to continue using bus mastering, see the other solutions.)
Windows 95 –
1
Right-click the Windows desktop background, then click the Properties menu item Settings tab PowerDesk button Performance tab.
2
Clear the Use Bus Mastering check box.
3
Click OK OK Yes to accept the changes and restart your computer.
Windows NT 4.0 –
1
Right-click the Windows desktop background, then click the MGA Display Properties menu
item Performance tab.
2
Clear the Use Bus Mastering check box.
3
Click OK Yes to accept the changes and restart your computer.
Cause – Your Matrox card may be in a “slave” expansion slot on a computer that makes a
distinction between bus mastering and slave slots.
Solution – Change slots. Shut down your computer, disconnect it from the power supply,
remove your Matrox card and then insert it into a different PCI expansion slot. For
instructions on how to safely install your Matrox card, see “Hardware installation”, page 6.
Cause – Your computer may have not given an interrupt request (IRQ) to your Matrox graphics
card or may have given one used by another device in your computer. This may be because your
computer’s “Plug-and-Play” feature is turned off. To check the display adapter’s IRQ:
Windows 95 –
1
Right-click the My Computer icon on the Windows desktop background, then click the
Properties menu item Device Manager tab.
2
Click the plus sign to the left of the Display adapters. An
“X” through an icon means the hardware has been
disabled. A circled exclamation point through the icon
means the hardware has a problem.
Matrox Graphics Card – Installation Guide
25
3
Double-click the name of your Matrox display adapter to open a properties dialog box. The
type of problem is displayed in the General tab Device Status area. Check also the
Resource tab Resource Settings list for an Interrupt Request.
Solution – Change settings in your computer’s CMOS setup utility.
If your computer has the options of enabling Plug-and-Play detection, or assigning an IRQ
to a VGA adapter, make sure they’re enabled. If your computer doesn’t have these options,
you may be able to manually assign an IRQ to your graphics card using the CMOS setup
utility.
For more information on your computer’s CMOS setup utility, see your system manual or
contact your system manufacturer.
Solution – Windows 95: You may have to manually assign an IRQ to your Matrox card
with the irqset program in the C:\Program Files\Matrox MGA PowerDesk folder. For
instructions on how to use irqset, see the Start menu Programs folder MGA PowerDesk
folder Readme file.
Cause – Your computer’s other BIOS settings may be incorrect.
Solution – Reset your computer’s BIOS settings to the factory defaults using the CMOS
setup utility. The factory defaults are usually the “safest” settings. Check your system
manual for more information.
Problem: Game for Windows 95 doesn’t start or runs slower than normal
(program uses Microsoft DirectX interface)
Cause – An older version of DirectX may be installed. The Matrox Installation CD-ROM setup
program installs DirectX as part of the MGA PowerDesk software installation, but some
programs install an older version of DirectX (overwriting your version). To see what version of
DirectX is installed:
1
Right-click the Windows desktop background, then click the Properties menu item Information tab.
2
Look at the Microsoft DirectX Version label.
If DirectX 3.0 or later is not installed, follow the instructions below.
26
Solution – Install DirectX version 3.0 or later. To install DirectX 3.0:
1
Insert the Matrox CD-ROM in your CD-ROM drive. Windows automatically starts the
CD-ROM setup program; click Cancel to continue.
2
Click the Start button Run menu item.
3
Type “d:\directx3\dxsetup”, where “d:\” is the drive letter of your CD-ROM drive; then
click OK to start the DirectX setup program.
Matrox Graphics Card – Installation Guide
Problem: Program for Windows 95 doesn’t run properly or stops running
Cause – Some programs may not work properly with some MGA acceleration.
Solution – Disable specific types of software acceleration:
1
Right-click the Windows desktop background, then click the Properties menu item Settings tab PowerDesk button Performance tab.
2
Clear one or more check boxes, starting with Use Device Bitmaps Caching.
For more information, see context-sensitive Help.
3
Click OK OK to accept the changes.
Depending on the feature you disabled, you may have to restart your computer for the
changes to take effect.
Solution – Disable Matrox hardware acceleration:
1
Right-click the My Computer icon on the Windows desktop background.
2
Click the Properties menu item Performance tab Graphics button.
3
Move the Hardware acceleration slider to None.
4
Click OK OK to restart your computer.
Note: If you identify a program that doesn’t work well with MGA acceleration, please contact
Matrox technical support and describe the problem. This information may help us come up with
a fix or work-around in a future driver release.
Problem: After restarting my computer, Windows 95 warns that
the graphics card is not configured correctly
Cause – You may have a conflict because of previously installed display drivers.
Solution –
1
If Windows 95 prompts you to start the Add New Hardware Wizard, click Cancel.
(If you start the Wizard, it will not detect your graphics card.)
2
Right-click the My Computer icon on the Windows 95 desktop.
3
Click the Properties menu item Device Manager tab.
4
Click the plus sign next to Other devices (if it appears) and Display
adapters.
5
Delete all listed display adapters (click each, then click Remove), then
click OK.
6
Restart your computer and reinstall the MGA display drivers (see
page 8).
Matrox Graphics Card – Installation Guide
27
Problem: Screen image defects appear in Windows 95
(example: mouse pointer not drawn properly)
28
Cause – You may have a conflict because of previously installed display drivers.
Solution –
1
Right-click the My Computer icon on the Windows desktop background, then click the
Properties menu item Device Manager tab.
2
Click the plus sign next to Other devices (if it appears) and Display adapters.
3
Delete any display adapter other than the one for your Matrox graphics card.
4
Restart your computer.
Matrox Graphics Card – Installation Guide
Index
0-9
I
V
3D .................................... 5, 25
installation
Matrox card ..................... 6–8
other software ............... 14–17
Windows 95/NT 4.0 .............. 9
IRQ settings........................... 25
VESA ..................................... 5
DDC monitor .... 10, 12, 15, 16
modes (table) ..................... 19
Super VGA ........................ 16
VGA
connector ........................... 21
driver........................ 6, 14, 16
A
acceleration, MGA ................. 27
Adobe Acrobat .............. 4, 14, 17
B
BIOS settings ......................... 26
BNC monitor connection ........ 23
bus mastering ..................... 5, 25
C
CD-ROM,
Matrox ............. 4, 8, 14, 15, 16
CMOS .................................. 22
D
DDC .................... 10, 12, 15, 16
DirectX ................................. 26
display
drivers .......................... 11, 13
information ................... 18–19
document conventions .............. 4
driver confilct ................... 27, 28
M
monitor connector ......... 7, 21, 22
monitor settings ..................... 22
other software ............... 14–16
Windows 95 ............ 10, 23, 24
Windows NT 4.0 ........... 12, 23
O
online documentation ............... 4
P
PCI
bus ..................... 6, 20, 22, 24
bus mastering ....................... 5
expansion slot ............. 6, 7, 25
PDF ............................. 4, 14, 17
Plug-and-Play ....... 10, 12, 15, 16
warning .................. 6, 10, 12, 23
Windows 3.1 .......................... 14
Windows 95
display settings ................... 10
MGA software ................... 11
monitor settings ....... 10, 23, 24
Windows NT 3.5 .................... 15
Windows NT 4.0
display settings ................... 12
MGA software ................... 13
monitor settings ............. 12, 23
R
E
Rainbow Runner connector . 7, 21
expansion slots .......... 6, 7, 22, 25
S
H
software installation ................. 9
Super VGA ....................... 16, 19
hardware
acceleration .................... 5, 27
information ....... 11, 13, 20–21
installation ....................... 6–8
W
T
technical information .............. 20
troubleshooting ................. 22–28
Matrox Graphics Card – Installation Guide
29