Download Daewoo DHR-8100P User manual
Transcript
DG-M22-12D1P-XA(GB) 2005.12.22 8:9 AM ˘ ` A mac001 1200DPI 100LPI HELP LINE Number ; 0870 100 2525 With queries, please quote the page number, reference number and model number. HDD/DVD Recorder DH-6100P/DHR-8100P User Manual Downloaded From Disc-Player.com Daewoo Manuals DG-M22-12D1P-XA(GB) 2005.12.22 8:4 AM ˘ ` 1 mac001 1200DPI 100LPI Safety Instructions INTRODUCTION Please keep the product’s guarantee sheet and receipt in a safe place. Precautions • Read this booklet carefully. • Make sure the rating of your household electricity supply matches that shown on the back of your product. • Read this page and chapter ‘Setting up your product’ to help you set up and adjust your product correctly. • Do not put the product in a hot or humid place. • Do not open the product. Get a qualified technician to carry out any repairs. • Do not connect the product to the power supply if you have just moved it from a cold environment to a warm room. This can lead to condensation inside the product, which can damage it. Wait for approx. 2 hrs for it to reach room temperature. • Make sure the product is placed at least 10 cm apart from other home appliances or obstacles to ensure sufficient ventilation. • The product should not be exposed to dripping or splashing and no objects filled with liquids, such as vases should be placed on top of the product. • Before a storm and/or lightning, unplug the product from the mains supply and aerial. • Put the product on a steady flat surface. • Only clean the product with a soft, lint-free cloth. Do not use harsh or alcohol- based cleaning agents. For your own Safety • There are no components in this product you can service or repair yourself. • Do not open the case of the product. Only allow a qualified engineer to repair or service your product. • This product is designed to work continuously. Switching it off (stand-by mode) does not disconnect it from the mains. To disconnect it from the mains you have to unplug it. 1 Downloaded From Disc-Player.com Daewoo Manuals DG-M22-12D1P-XA(GB) 2005.12.22 8:4 AM ˘ ` 2 mac001 1200DPI 100LPI Important Safeguards CAUTION RISK OF ELECTRIC SHOCK DO NOT OPEN CAUTION: TO REDUCE THE RISK OF ELECTRIC SHOCK, DO NOT REMOVE COVER (OR BACK). NO USER-SERVICEABLE PARTS INSIDE. REFER SERVICING TO QUALIFIED SERVICE PERSONNEL. The lightning flash with arrowhead symbol, within an equilateral triangle, is intended to alert the user to the presence of uninsulated ‘dangerous voltage‘ within the product’s enclosure that may be of sufficient magnitude to constitute a risk of electric shock. The exclamation point within an equilateral triangle is intended to alert the user to the presence of important operating and servicing instructions in the literature accompanying the appliance. IMPORTANT FOR LASER PRODUCTS LASER This Digital Video Disc Player employs a Laser System. To ensure proper use of this product please read this owner’s manual carefully and retain for future reference. Should the unit require maintenance, contact an authorized service location - see service procedure. Use of control adjustments or the performance of procedures other than those specified may result in hazardous radiation exposure. To prevent direct exposure to the laser beam, do not try to open the enclosure. Visible laser radiation when open and interlocks defeated. DO NOT STARE INTO THE BEAM. DANGER Visible laser radiation when open and interlock failed or defeated. Avoid direct exposure to beam. CLASS 1 LASER PRODUCT WARNING TO REDUCE THE RISK OF FIRE OR CAUTION CAUTION ELECTRIC SHOCK, DO NOT EXPOSE THIS APPLIANCE TO RAIN OR MOISTURE. TO PREVENT ELECTRIC SHOCK, MATCH WIDE BLADE OF PLUG TO WIDE SLOT, FULLY INSERT. Any changes or modification in construction of this device which are not expressly approved by the party responsible for compliance could void the user’s authority to operate the equipment. 2 Downloaded From Disc-Player.com Daewoo Manuals CAUTION Do not open the top cover. There are no user serviceable parts inside the Unit; leave all servicing to qualified service personnel. DG-M22-12D1P-XA(GB) 2005.12.22 8:4 AM ˘ ` 3 mac001 1200DPI 100LPI Important Safeguards 1 READ INSTRUCTIONS All the safety and operating instructions should be read before the unit is operated. 2 RETAIN INSTRUCTIONS The safety and operating instructions should be retained for future reference. 3 HEED WARNINGS All warnings on the unit and in the operating instructions should be adhered to. 4 FOLLOW INSTRUCTIONS All operating and use instructions should be followed. 5 CLEANING Unplug this unit from the wall outlet before cleaning. Do not use liquid cleaners or aerosol cleaners. Use a damp cloth for cleaning. 6 ATTACHMENTS Do not use attachments unless recommended by the unit’s manufacturer as they may cause hazards. 7 WATER AND MOISTURE Do not use this unit near water- for example, near a bath tub, wash bowl, kitchen sink or laundry tub, in a wet basement, or near a swimming pool. 8 ACCESSORIES Do not place this unit on an unstable cart, stand, tripod, bracket, or table. The unit may fall, causing serious injury to a child or adult as well as serious damage to the unit. Use this unit only with a cart, stand , tripod, bracket, or table recommended by the manufacturer. 8A A unit and cart combination should be moved with care. Quick stops, excessive force, and uneven surfaces may cause the product and cart combination to overturn. 9 PORTABLE CART WARNING (symbol provided by RETAC) VENTILATION Slots and openings in the case are provided for ventilation to ensure reliable operation of the unit and to protect it from overheating. These openings must not be blocked or covered. These openings must not be blocked by placing the unit on a bed, sofa, rug, or other similar surface. This unit should never be placed near or over a radiator or heat radiator. This unit should not be placed in a built-in installation such as a bookcase or rack unless proper ventilation is provided or the manufacturer’s instructions have been adhered to. 10 POWER SOURCES This unit should be operated only from the type of power source indicated on the marking label. If you are not sure of the type of power supply to your home, consult your dealer or local power company. For units intended to operate from battery power, or other sources, refer to the operating instructions. 11 POWER-CORD PROTECTION Power-supply cords should be routed so that they are not likely to be walked on or pinched by items placed upon or against them, paying particular attention to cords at plugs, mains sockets, and the point where they exit from the unit. 12 LIGHTNING For added protection for this unit during a lightning storm, or when it is left unattended and unused for long periods of time, unplug it from the wall outlet and disconnect the antenna or cable system. This will prevent damage to the unit due to lightning and power line surges. 13 DISC TRAY Keep your fingers well clear of the disc as it is closing. It may cause serious personal injury. 14 OVERLOADING Do not overload wall outlets of extension cords as this can result in a risk of fire or electric shock. 15 OBJECT AND LIQUID ENTRY Never push objects of any kind into this unit through openings as they may touch dangerous voltage points or ‘short-out’ parts that could result in a fire or electric shock. Never spill liquid of any kind on the unit. 16 BURDEN Do not place a heavy object on or step on the product. The object may fall, causing serious personal injury and serious damage to the 3 Downloaded From Disc-Player.com Daewoo Manuals INTRODUCTION This set has been designed and manufactured to assure personal safety. Improper use can result in electric shock or fire hazard. The safeguards incorporated in this unit will protect you if you observe the following procedures for installation, use and servicing. This unit is fully transistorized and does not contain any parts that can be repaired by the user. DG-M22-12D1P-XA(GB) 2005.12.22 8:4 AM ˘ ` 4 mac001 1200DPI 100LPI Important Safeguards product. 17 DISC Do not use a cracked, deformed or repaired disc. These discs are easily broken and may cause serious personal injury and product malfunction. 18 SERVICING Do not attempt to service this unit yourself as opening or removing covers may expose you to dangerous voltage or other hazards. Refer all servicing to qualified service personnel. 19 DAMAGE REQUIRING SERVICE A. B. C. D. E. F. Unplug this unit from the wall outlet and refer servicing to qualified service personnel under the following conditions. When the power-supply cord or plug is damaged. If liquid has been spilled, or objects have fallen into the unit. If the unit has been exposed to rain or water. If the unit does not operate normally by following the operating instructions. Adjust only those controls that are covered by the operating instructions. Improper adjustment of other controls may result in damage and will often require extensive work by a qualified technician to restore the unit to its normal operation. If the unit has been dropped or the cabinet has been damaged. When the unit exhibits a distinct change in performance-this indicates a need for service. 20 REPLACEMENT PARTS When replacement parts are required, have the service technician verify that the replacements he uses have the same safety characteristics as the original parts. Use of replacements specified by the unit manufacturer can prevent fire, electric shock, or other hazards. 21 SAFETY CHECK Upon completion of any service or repairs to this unit, ask the service technician to perform safety checks recommended by the manufacturer to determine that the unit is in safe operating condition. 22 WALL OR CEILING MOUNTING The product should be mounted to a wall or ceiling only as recommended by the manufacturer. 4 Downloaded From Disc-Player.com Daewoo Manuals 23 HEAT The product should be situated away from heat sources such as radiators, heat registers, stoves, or other products (including amplifiers) that produce heat. 24 To prevent battery electrolyte leakage, which may result in injury and damage to the unit or other objects, observe the following precautions; A. All batteries must be installed with the proper polarity. B. Do not mix new with old or used batteries. C. Only use batteries of the same type and brand. D. Remove the batteries when they are not to be used for a long period time. E. When the batteries have become discharged, they must be disposed of in a safe manner which complies with all applicable laws. 25 WEEE (Waste of electrical and electronic equipment) The meaning of the symbol on the product, its accessory or packaging indicates that this product shall not be treated as household waste. Please, dispose of this equipment at your applicable collection point for the recycling of electrical & electronic equipments waste. In the European Union and Other European countries which there are separate collection systems for used electrical and electronic product. By ensuring the correct disposal of this product, you will help prevent potential hazards to the environment and to human health, which could otherwise be caused by unsuitable waste handling of this product. The recycling of materials will help conserve natural resources. Please do not therefore dispose of your old electrical and electronic equipment with your household waste. For more detailed information about recycling of this product, please contact your local city office, your household waste disposal service or the shop where you purchased the product. DG-M22-12D1P-XA(GB) 2005.12.22 8:4 AM ˘ ` 5 mac001 1200DPI 100LPI Table of Contents Recording Safety Instructions ____________________________1 Important Safeguards _________________________2 Table of Contents ______________________________5 Overview ______________________________________6 Identification of Controls ______________________10 Basic Recording________________________________41 Connections Connecting Antenna/Cable ____________________15 Connecting a TV _______________________________15 Connecting an Amplifier/Receiver _____________16 Connecting Optional Equipment ______________17 Connecting a Digital Camcorder ______________17 Recording to DVD or HDD One Touch Record (OTR) To Pause the Recording Playing under recording 41 41 42 42 Timer Recording _______________________________42 Timer Recording using Manual Set Record Screen Timer Recording using VideoPlus system Canceling a Timer Recording Stopping a Timer Recording in Progress Timer Recording Troubleshooting 42 43 44 44 44 Recording from an External Input _____________45 Dubbing _______________________________________46 Media files Copying ___________________________47 Setup Initial Installation ______________________________18 Setup menu____________________________________19 Setup Menu Overview Menu Navigation INSTALLATION Settings RECORDING OPTIONS Settings LANGUAGE Settings PREFERENCES / Video Settings PREFERENCES / Audio Settings PREFERENCES / Parental Controls PREFERENCES / Auto Settings PREFERENCES / Hard Disk System Information Restore Defaults 19 19 19 22 23 24 25 26 28 29 31 31 On-Screen Display Overview __________________32 Editing HDD Playback and Editing ____________________49 Playing a HDD title Deleting a HDD title Editing a HDD title Sorting a HDD title Dubbing a HDD title to DVD disc 49 49 50 52 52 Disc Manager __________________________________53 Disc Editing in DVD±RW disc Disc Editing in DVD±R, DVD-RW disc Title Editing Advanced Disc Editing 53 55 56 57 Playback Reference DVD Playback _________________________________34 Playing a Picture or Music files _______________36 Time shifting & Saving ________________________39 Troubleshooting _______________________________59 Technical Specifications ________________________61 Time shifting in HDD mode Saving to HDD 39 40 5 Downloaded From Disc-Player.com Daewoo Manuals INTRODUCTION Introduction DG-M22-12D1P-XA(GB) 2005.12.22 8:4 AM ˘ ` 6 mac001 1200DPI 100LPI Overview Overview Which discs you can use Time Shifting The following discs can be used in your HDD/DVD Recorder: : Simultaneous video recording and playback • Pause and resume the live TV broadcast. Issue trick mode commands like fast forward, fast rewind, jump and instant replay • Play a previously recorded program while another program is being simultaneously recorded Program Recording Playback and recording DVD+RW (Digital Versatile Disc + ReWritable) DVD+R (Digital Versatile Disc + Write-Once) DVD-R (DVD-Recordable) / DVD-RW (DVDRewritable): Recording with +VR Format (Dual media support). : Recording from TV tuner or analog AV input • Full support for VideoPlus technologies - simply enter the program code number (published in newspapers or on the internet) to setup timer recording • Manually set up timer recording for a TV program or a recurring TV program These discs can only be played back in other DVD players or recorders if the recording was made in ‘Video mode‘ and the recording was finalised. Personal video copying by external input CD-R (CD recordable) Audio, MP3 files • Analog and DV camcorder tapes • VCR tapes High-speed dubbing • Select program(s) from HDD and copy them to DVD Also copy from DVD to HDD (Available with +VR Format, JPEG, MP3) • Watch a TV program while high-speed dubbing is in progress Simple, easy video editing • Rename programs, Delete programs, Split programs, Segment programs • Identify and keep the desired video and remove the parts you do not need. Playback only DVD Video (Digital Versatile Disc) Audio CD (Compact Disc Digital Audio) CD-RW (CD rewritable) Audio, MP3 files VCD, SVCD Not all recordable CDs may be played by your player. About Symbols About the Symbol ‘ ‘ may appear on the TV screen during operation. This icon means the function explained in this User's Guide is not available on that specific disc. DVD Playback DVD, VCD, SVCD, MPEG file video, MPEG-1 Layer 2, MP3, CD stereo audio, Dolby Digital& DTS digital audio output. Regional code If the region number on your DVD disc does not correspond to the region number of this player, the disc cannot be played. 2 6 Downloaded From Disc-Player.com Daewoo Manuals ALL DG-M22-12D1P-XA(GB) 2005.12.22 8:4 AM ˘ ` 7 mac001 1200DPI 100LPI Overview DVD, DVD+R, DVD+RW? Supporting Disc ±RW / ±R Recording Format ±Disc + VR format Finalize -RW, -R, +R After finalising other DVD playback What is a DVD? All discs can playback Consumer Does not need selection (recording format) Remark : A DVD Recorder that supports ‘dual media’ recording allows DVD+RW format recording (+VR) on either DVD-R, DVD-RW, DVD+R or DVD+RW media. Any editing feature that is available with the +RW logical format is available on any of the media types. This system allows the flexibility for the consumer to use any of the above media formats for recording in the same system. Since the +VR format is DVD-Video compatible, the consumer can take any disk recorded on this platform and should be capable of playing it back on the majority of DVD players on the market. DVD (Digital Versatile Disc) is a storage medium that combines the convenience of the compact disc with the latest digital video technology. DVD video uses modern MPEG2 data compression technology that enables an entire feature film to be stored on a single five inch disc. How good is the resolution of DVD compared with VHS? The razor-sharp digital images have more than 500 lines of resolution at 720 pixels per line. This is more than twice as high as VHS and even better than laser disc quality. DVD picture quality is easily comparable to the digital masters produced in recording studios. What is a DVD+RW? DVD+ReWritable uses ‘phase change‘ media, the same technology on which rewritable CDs are based. A high-performance laser is used to change the reflective properties of the recording layer; this process can be repeated more than a thousand times. What is a DVD+R? Disc-related Terms Title (DVD only) The main film, accompanying feature content, or music album. Each title is assigned a title reference number enabling you to locate it easily. Chapter (DVD only) Sections of a movie or a musical piece that are smaller than titles. A title is composed of one or several chapters. Each chapter is assigned a number to enable you to easily locate the chapter you want. Depending on the disc, chapters may not be labeled. Track (Audio CD only) Sections of a movie or a musical piece on an audio CD. Each track is assigned a number, enabling you to easily locate the track you want. Unlike a DVD+RW disc, a DVD+R (write-once DVD) can only be written to once. If it is not finalised after a recording, further recordings can be added to it. Old recordings can be deleted but they can no longer be overwritten. The deleted recordings (titles) are marked 'deleted title'. Before a DVD+R can be played in a DVD player, it must be finalised in the HDD/DVD Recorder. Once this process is complete, no further recordings can be added. What can I do with my HDD/DVD Recorder? Your HDD/DVD Recorder is a machine for recording and playing back digital video discs with ‘two-way‘ compatibility with the universal DVD video standard. This means: • existing DVD video discs can be played on the recorder. • recordings made on your HDD/DVD Recorder can be played on other DVD video players and DVD-ROM drives. 7 Downloaded From Disc-Player.com Daewoo Manuals INTRODUCTION Dual Media DG-M22-12D1P-XA(GB) 2005.12.22 8:4 AM ˘ ` 8 mac001 1200DPI 100LPI Overview About DVD Recording Notes on Recording • The recording times shown are not exact because the HDD/DVD Recorder uses variable bit-rate video compression. This means that the exact recording time will depend on the material being recorded. • When recording a TV broadcast, if the reception is poor or the picture contains interference, the recording times may be shorter. • Discs recorded at high speeds (equal to or greater than 2X) may not be recognized. • If you record still pictures or audio only, the recording time may be longer. • The displayed times for recording and time remaining may not always add up to the exact length of the disc. • The available recording time may decrease if you heavily edit a disc. • When using a DVD+R disc, you can keep recording until the disc is full, or until you finalise the disc. Before you start a recording session, check the amount of recording time left on the disc. Recording TV Audio Channels The HDD/DVD Recorder can record one or two channel audio. For TV broadcasts, this usually means mono or stereo, but some programs are broadcast in bilingual audio channel. You can record either BIL I, BIL II or both. Restrictions on Video Recording • You cannot record copy-protected video using this HDD/DVD Recorder. Copy-protected video includes DVD-Video discs and some satellite broadcasts. If copy-protected material is encountered during a recording, recording will pause or stop automatically and an error message will be displayed on-screen. • Video that is ‘copy-once only’ can only be recorded using DVD+RW discs with CPRM. Copyright Notice • Audio and video recordings you make using the HDD/DVD Recorder are for your personal use only. You may not sell, lend, or rent them to other people. • This product incorporates copyright protection technology that is protected by method claims 8 Downloaded From Disc-Player.com Daewoo Manuals of certain U.S.patents and other intellectual property rights owned by Macrovision Corporation and other rights owners. Use of this copyright protection technology must be authorized by Macrovision Corporation, and is intended for home and other limited viewing uses only unless otherwise authorized by Macrovision corporation. Reverse engineering or disassembly is prohibited. DG-M22-12D1P-XA(GB) 2005.12.22 8:4 AM ˘ ` 9 mac001 1200DPI 100LPI Overview Caution Do not mix old and new batteries. Never mix different types of batteries (standard, alkaline, etc.). Handling the Unit When shipping the unit The original shipping carton and packing materials come in handy. For maximum protection, re-pack the unit as it was originally packaged at the factory. When setting up the unit The picture and sound of a nearby TV, VCR, or radio may be distorted during playback. In this case, position the unit away from the TV, VCR, or radio, or turn off the unit after removing the disc. To keep the surface clean Do not use volatile liquids, such as insecticide spray, near the unit. Do not leave rubber or plastic products in contact with the unit for a long period of time. They will leave marks on the surface. Cleaning the Unit To clean the cabinet Use a soft, dry cloth. If the surfaces are extremely dirty, use a soft cloth lightly moistened with a mild detergent solution. Do not use strong solvents such as alcohol, benzine, or thinners, as these might damage the surface of the unit. To obtain a clear picture The HDD/DVD Recorder is a high-tech, precision device. If the optical pick-up lens and disc drive parts are dirty or worn, the picture quality will be poor. Regular inspection and maintenance are recommended after every 1,000 hours of use. (This depends on the operating environment.) For details, please contact your nearest dealer. Remote Control Operation Range Point the remote control at the remote sensor and press the buttons. Distance: Within 23 ft (7 m) of the remote sensor. Angle: Within 30° in each direction of the remote sensor. Remote Control Battery Installation Detach the battery cover on the rear of the remote control, and insert two AAA batteries. Make sure the polarities (+ and -) are aligned correctly. Notes on Discs Handling Discs Do not touch the playback side of the disc. Hold the disc by the edges so that fingerprints will not get on the surface. Do not stick paper or tape on the disc. Storing Discs After playing, store the disc in its case. Do not expose the disc to direct sunlight or sources of heat, or leave it in a parked car exposed to direct sunlight, as there may be a considerable temperature increase inside the car, which could distort the disc. Cleaning Discs Fingerprints and dust on the disc can cause poor picture quality and sound distortion. Before playing, clean the disc with a clean cloth. Wipe the disc from the centre outward. Do not use strong solvents such as alcohol, benzine, thinners, commercially available cleaners, or antistatic spray intended for older vinyl Yes No records. Note on HDD • • • • Do not move the recorder immediately after switching it off. Wait at least 2minutes after power-off. If the HDD/DVD Recorder is used improperly or in an unsuitable environment, it is possible that the HDD will fail. Power failure may cause data loss on the HDD. We recommend that you back up your important data to DVD discs in order to protect against accidental loss or possible HDD failure. 9 Downloaded From Disc-Player.com Daewoo Manuals INTRODUCTION Precautions DG-M22-12D1P-XA(GB) 2005.12.22 8:4 AM ˘ ` 10 mac001 1200DPI 100LPI Identification of Controls Front Panel $ ! @ ( ) 1 ! Disc Tray (DVD deck) Insert a disc here. @ Front Panel Display Shows the current status of the HDD/DVD Recorder. # OPEN/CLOSE (DVD) Opens or closes the disc tray. $ PLAY/PAUSE (ENTER) Starts playback of a disc or HDD. Pauses playback or recording temporarily. % STOP Stops playback. ^ PREV/REW Skips to previous chapter. Searches backward. & NEXT/FF Skips to next chapter. Searches forward. * STANDBY/ON Turns the HDD/DVD Recorder on and off. ( REC Starts recording. Press repeatedly to set the recording time. ) SELECT DVD/HDD Toggles control between the DVD mode and the HDD mode. 1 MENU Accesses media browser or return to previous menu. 2 PR+/– (…/†) Scans up or down through memorized channels. Also moves up and down in menus. 10 Downloaded From Disc-Player.com Daewoo Manuals # 2 % ^ * & 3 4 3 AVF Input (VIDEO, L-AUDIO-R) Connects to the audio/video output of an external source (VCR, Camcorder, etc.). 4 S-VIDEO Input Connects to the S-Video output of an external source (VCR, Camcorder, etc.). • HDD capacity is displayed in front panel or Setup-Preferences-Hard Disk. DG-M22-12D1P-XA(GB) 2005.12.22 8:4 AM ˘ ` 11 mac001 1200DPI 100LPI Identification of Controls INTRODUCTION Front Panel Display DVD MODE HDD MODE HDD/DVD Recorder is recording. Disc is loaded HDD Timer Recording is set DVD Timer Recording is set FRONT DISPLAY MESSAGE:Indicates clock,channel,current mode,OTR time,etc. Channel PR23 Recording on HDD TV Channel Input mode 11:15 Indicates a Timer recording on HDD is set. 11:15 Indicates a Timer Recording on HDD is in standby mode. Au-1 AV1 input 11:15 Indicates the HDD is recording. Au-2 AV2 input 0:30 OTR Recording mode Recording on disc 11:15 Indicates a DVD Timer recording is set. Indicates a DVD Timer Recording is in standby mode. 11:15 Indicates the DVD is recording. 0:30 OTR Recording mode RECP Recording Pause mode 11:15 Others SAFE Indicates when the HDD/DVD Recorder is locked. The front panel is locked by pressing and holding the [√] button over 5 seconds on the remote control and is unlocked by pressing any key on the remote control. TV Indicates the HDD/DVD Recorder is in TV mode (set by [TV/DHR] button). I-S Indicates when the HDD/DVD Recorder is outputting the video signal in Interlaced Scan mode. P-S Indicates when the HDD/DVD Recorder is outputting the video signal in Progressive Scan mode. NO No disc or unreadable disc 11 Downloaded From Disc-Player.com Daewoo Manuals DG-M22-12D1P-XA(GB) 2005.12.22 8:4 AM ˘ ` 12 mac001 1200DPI 100LPI Identification of Controls Remote Control - Turns the HDD/DVD Recorder on and off. - Locks the front panel by pressing and holding it over 5 seconds. Opens and closes the disc tray. Selects DVD mode. HDD DV INPUT Selects HDD mode. Not available Switches the HDD/DVD Recorder input to RF (Tuner), AV1, AV2, AVF or SVIDEO. - Selects numbered options in menus. - Selects TV channels. Clears previous setting of timer-recording or file name. Adds the title in Dubbing or Copying menu. Accesses media browser (or title menu) or return to previous menu. Displays or exits the main setup menu. Displays the edit menu for DVD or HDD. Displays information about the currently loaded disc, HDD or TV channel. - œ √…† : Selects menu options. - PR +/– : Selects channels. Confirms menu selections. - Starts playback. - Pauses playback or recording temporarily. Press again to exit Pause mode. Skips to the next or previous chapter/track. Searches backward/forward. Increases or decreases the slow motion speed when playing a DVD or HDD. Stops playback or recording. 12 Downloaded From Disc-Player.com Daewoo Manuals DG-M22-12D1P-XA(GB) 2005.12.22 8:4 AM ˘ ` 13 mac001 1200DPI 100LPI Identification of Controls INTRODUCTION Starts recording. Press repeatedly to set the recording time. For more details, Refer to One Touch Record (OTR) on page 41. DUB Displays the Dubbing or Copy menu. Selects Recording mode. (Approx.) [DVD] HQ (1hr), SP (2hrs), EP (4hrs), SLP (6hrs) DH-6100P [HDD] HQ (16Hrs), SP (33hrs), EP (64hrs), SLP (97hrs) DHR-8100P HQ (32Hrs), SP (66hrs), EP (128hrs), SLP (195hrs) Displays the Timer Recording menu and VideoPlus menu. Selects a subtitle language, if available. Selects an audio language (DVD), audio channel (CD) or audio type (TV). Enlarges the video image. Repeats the current chapter, track, title or the entire disc. Repeats playback between two points (A and B). Searches for a specific title or a chapter. TV/DHR TITLE/PBC Switches between the HDD/DVD Recorder tuner and your TV tuner. Displays a disc’s Title menu, if available. Press and hold for 5 seconds to switch between Progressive Scan and Interlace Scan mode. P.SCAN Progressive Scan Mode • If your TV supports Progressive Scan, you can view high quality video by setting the HDD/DVD Recorder to Progressive Scan mode. If your TV does not support Progressive Scan, do NOT change to Progressive Scan mode. If you do so accidentally, press and hold the [P.SCAN] button for 5 seconds to restore normal viewing. • When video output mode is changed from RGB to Interlace or Progressive (Scart 1) will not be correct colour for Component video. • As component outputs have their own Jacks on the back side, change the TV input into Component input, after connecting the component cables from the HDD/DVD Recorder to the TV. • Changing from Interlace or Progressive to RGB, should be the opposite of above. CONSUMERS SHOULD NOTE THAT NOT ALL HIGH DEFINITION TELEVISION SETS ARE FULLY COMPATIBLE WITH THIS PRODUCT AND MAY CAUSE ARTIFACTS TO BE DISPLAYED IN THE PICTURE. IN THE CASE OF 525 PROGRESSIVE SCAN PICTURE PROBLEMS, IT IS RECOMMENDED THAT THE USER SWITCH THE CONNECTION TO THE 'STANDARD DEFINITION' OUTPUT. IF THERE ARE QUESTIONS REGARDING OUR TV SET COMPATIBILITY 'WITH THIS MODEL 525p DVD PLAYER, PLEASE CONTACT OUR CUSTOMER SERVICE CENTRE. 13 Downloaded From Disc-Player.com Daewoo Manuals DG-M22-12D1P-XA(GB) 2005.12.22 8:4 AM ˘ ` 14 mac001 1200DPI 100LPI Identification of Controls Rear panel ! @ # & $ % * ( ! S-VIDEO OUT Connect to a TV with an S-Video Input. @ AUDIO OUT (L, R) Connect to a TV or other equipment with audio inputs. # COMPONENT VIDEO OUT (Y Pb Pr) Connect to a TV with Component Video (Y Pb Pr) inputs. $ Scart socket 2 Connection of an additional device (satellite receiver, set-top box, video recorder, camcorder, etc.) % ANT IN Connect to your antenna or cable TV outlet. 14 Downloaded From Disc-Player.com Daewoo Manuals ^ ) ^ AC Power Cord Plug into a power outlet. & COAXIAL/OPTICAL (Digital Audio Out) Connect to an amplifier with a coaxial (or optical) digital audio input. * Scart socket 1 Connection of a TV set. Composite-output and RGB-output ( ANT OUT Connect to a TV with an RF input. ) Cooling Fan Caution • Do not touch the inner pins of the jacks on the rear panel. Electrostatic discharge may cause permanent damage to the HDD/DVD Recorder. DG-M22-12D1P-XA(GB) 2005.12.22 8:4 AM ˘ ` 15 mac001 1200DPI 100LPI Connections Connecting a TV Choose one of the following TV connections, depending on the capabilities of your equipment. Rear of TV S-VIDEO INPUT Pr S ANTENNA INPUT COMPONENT/PROGRESSIVE VIDEO INPUT Pb C Y V R Connecting Antenna/Cable 1 Disconnect the antenna/cable from the rear of your TV. 2 Connect this cable to the jack marked ANT IN (FROM ANT.) on the rear panel of the HDD/DVD Recorder. Antenna Antenna Cable TV Wall Jack Flat Wire (300ohm) 300/75ohm Adapter (Not supplied) OR OR Rear of HDD/DVD Recorder RF Connection Connect the ANT OUT (TO TV) jack on the HDD/DVD Recorder to the antenna in jack on your TV using the supplied 75-ohm RF cable (R). This set doesn’t have a modulator output. However it still applies the RF through Output. Scart Connection 1 Plug a scart cable into the scart socket EURO AV1 at the back of the HDD/DVD Recorder and the corresponding scart socket at the back of the TV set. (V) 2 Rear of HDD/DVD Recorder Plug a scart cable into the blue scart socket EURO AV2/DECODER at the back of the HDD/DVD Recorder and the corresponding scart socket at the back of the Decoder. 15 Downloaded From Disc-Player.com Daewoo Manuals CONNECTIONS Caution • Make sure the HDD/DVD Recorder is connected directly to the TV, and the TV is set to the correct video input. • Do not connect the HDD/DVD Recorder’s AUDIO OUT jack to the phone in jack (record deck) of your audio system. • Do not connect the HDD/DVD Recorder via your VCR. The DVD image could be distorted by the copy protection system. If your cable wire is connected to your TV without a converter or descrambler box, unscrew the wire from your TV and attach it to the RF IN (FROM ANT.) jack on the rear panel of the HDD/DVD Recorder. Use the supplied RF cable to connect between the HDD/DVD Recorder’s OUT (TO TV) jack and the antenna input jack on your TV. With this connection, you can receive all midband, superband, and hyperband channels (all cable channels). INTRODUCTION • There are a variety of ways to connect the HDD/DVD Recorder to your TV and other equipment. Use only one of the connections described below. Whichever TV connection you use will work with all input sources. • Please refer to the manuals for your TV, VCR, stereo system, or other devices as necessary to make the best connections. • For better sound reproduction, connect the HDD/DVD Recorder’s AUDIO OUT jacks to the audio in jacks of your amplifier, receiver, stereo, or audio/video equipment. See ‘Connecting an Amplifier/Receiver‘ on page 16. DG-M22-12D1P-XA(GB) 2005.12.22 8:4 AM ˘ ` 16 mac001 1200DPI 100LPI Connections S-Video Connection 1 Connect the S-VIDEO OUT jack on the 1 Connect the HDD/DVD Recorder’s DIGITAL AUDIO OUT jack (Coaxial or Optical) to the corresponding in jack on your amplifier. Use an optional digital coaxial (or optical) audio cable. (X) 2 You will need to activate the HDD/DVD Recorder’s digital output; see ‘Audio’ Settings on page 25. HDD/DVD Recorder to the S-Video in jack on your TV using an S-Video cable (S). 2 Connect the Left and Right AUDIO OUT jacks from the HDD/DVD Recorder to the left/right audio in jacks on your TV using the audio cables. Component Video Connection • If your television is a high-definition or ‘digital ready‘ television, you may take advantage of the HDD/DVD Recorder’s Progressive Scan output for the highest video resolution possible. • If your TV does not accept the Progressive Scan format, the picture will appear scrambled. 1 Connect the COMPONENT VIDEO OUT jacks on the HDD/DVD Recorder to the corresponding in jacks on your TV using a Y Pb Pr cable (C) if the component (Y, Pb, Pr) is available on your TV. 2 Connect the Left and Right AUDIO OUT jacks from the HDD/DVD Recorder to the left/right audio in jacks on your TV using the audio cables. • Be sure to set the HDD/DVD Recorder to Progressive Scan mode by pressing and holding [P.SCAN] for 5 seconds (or changing the ‘Video Output’ in the Setup Menu; see page 24). • Progressive Scan does not work with the RF, Audio/Video or S-Video connections. Connecting an Amplifier/Receiver Digital Multi-Channel Sound? A digital multi-channel connection provides the best sound quality. For this you need a multi-channel audio/video receiver that supports one or more of the audio formats provided by your HDD/DVD Recorder (MPEG 2, Dolby Digital, and DTS). Check the receiver manual and the logos on the front of the receiver. • Due to the DTS Licensing agreement, the digital output will be in DTS digital out when the DTS audio stream is selected. • If the audio format of the digital output does not match the capabilities of your receiver, the receiver will produce a strong, distorted sound or no sound at all. • 5.1 channel digital surround sound via the digital connection can only be obtained if your receiver is equipped with a digital multichannel decoder. • To see the audio format of the current DVD on the on-screen display, press [AUDIO]. The HDD/DVD Recorder does not perform internal (2- channel) decoding of DTS sound tracks. To enjoy DTS multi-channel surround, you must connect the HDD/DVD Recorder to a DTS compatible receiver via one of the HDD/DVD Recorder’s digital audio outputs. Rear of HDD/DVD Recorder Connecting to an amplifier equipped with two channel analog stereo or Dolby Pro Logic ll/Pro Logic Connect the Left and Right AUDIO OUT jacks on the HDD/DVD Recorder to the left and right audio in jacks on your amplifier, receiver, or stereo system, using the supplied audio cables (A). Connecting to an amplifier equipped with two channel digital stereo (PCM) or to an Audio/Video receiver equipped with a multi-channel decoder (Dolby Digital™, MPEG 2, or DTS) 16 Downloaded From Disc-Player.com Daewoo Manuals X A OPTICAL COAXIAL DIGITAL INPUT DIGITAL INPUT L R AUDIO INPUT Amplifier (Receiver) DG-M22-12D1P-XA(GB) 2005.12.22 8:4 AM ˘ ` 17 mac001 1200DPI 100LPI Connections Connecting Optional Equipment CONNECTIONS To receive audio/video signals from other equipment, connect the AVF (Audio/Video Front) jacks on the HDD/DVD Recorder to the audio/video out jacks on your external component, using optional audio/video cables. Jack Panel of Accessory Component (VCR, Analog Camcorder, etc.) Front of HDD/DVD Recorder 17 Downloaded From Disc-Player.com Daewoo Manuals DG-M22-12D1P-XA(GB) 2005.12.22 8:4 AM ˘ ` 18 mac001 1200DPI 100LPI Initial Installation After successfully connecting your HDD/DVD Recorder to your TV and other devices, this chapter will show you how to complete the initial installation. You must follow the initial installation process to set the time, date, channels, and language preferences for the HDD/DVD Recorder. 1 A ‘Welcome‘ message is displayed on the screen. Make sure the RF cable from your antenna or cable TV jack is connected. Press [ENTER] to begin initial installation. 2 Select the desired language for the on-screen menu using […/†]. Press [ENTER] to confirm. 3 Select the desired country using […/†]. Press [ENTER] to confirm. 4 Select the desired disc menu language using […/†]. Press [ENTER] to confirm. 5 Select the desired disc playback audio language using […/†]. Press [ENTER] to confirm. 6 Select the desired disc playback subtitle language using […/†]. Press [ENTER] to confirm. Installation 7 The HDD/DVD Recorder detects channels automatically and stores them in memory. 8 After finishing Auto Channel Search, set the clock. 9 Use [œ/√] to move left/right and use […/†] to change the settings. 10 After setting the clock, press [ENTER] to confirm. If you cancel the process during Initial Installation, you should repeat this procedure. Re-Installation This set is equipped with the multi-tuner for receiving many countries' broadcasting. In order to receive broadcasting of different countries, follow as below. 1 Press [SETUP] and select the 'Restore Defaults' using [œ /√]. Then, RESET the set. (see page 31) 2 Power On, then you see the 'Initial Installation'. 3 Select the country which you want to (see step 3), then repeat the steps 4~10. Installation Installation Instructions: Please select your language to begin auto install procedure: English Spanish French Danish Catalan German Icelandic Instructions: Please select your country of use: UK & Ireland Switzerland Belgium Denmark Finland France Germany Greece Instructions: Setup-Exit Enter-Confirm Setup-Exit Move …† Welcome. Press [Enter] to begin auto channel search. Ensure aerial is connected. Installation Please select disc menu language: Default Installation English Spanish Please select disc audio language: French Default Czech Installation English Danish Spanish Please select disc subtitle language: German French Default Czech English Instructions: Danish Spanish Setup-Exit Move …† Enter-Confirm German French Czech Instructions: Danish Enter-Confirm Setup-Exit Move …† German 18 Downloaded From Disc-Player.com Daewoo Manuals Installation Searching for available TV stations: 2 channels found Please wait... Instructions: Setup-Exit Enter-Confirm Setup-Exit Move …† Set Clock Please set the clock: … Time : 13 : 00 † Date : 02 \ Jan \ 2010 (Sat) Instructions: Enter-Confirm Setup-Exit Move …† DG-M22-12D1P-XA(GB) 2005.12.22 8:4 AM ˘ ` 19 mac001 1200DPI 100LPI Setup menu Setup Menu Overview The HDD/DVD Recorder Setup menu includes six categories, including: Installation, Recording Options, Languages, Preferences, System Info, and Restore Defaults. Press [SETUP] and [œ/√] on the remote control to view the first and second levels of the Setup menu. 4 Press [ENTER]. The ‘Manual Setup’ menu appears. 5 Use […/†] to select ‘Standard‘. Press [ENTER] to move to the second level. 6 Use […/†] to select the desired ‘Standard’ (PAL-BG, PAL-II, PAL-DK, or SECAM-L), then press [ENTER]. Menu Navigation Press [SETUP]. The Setup menu appears. 4 5 Press [ENTER] to move to the third level. Use [œ/√] to select the desired category. While the desired category is selected, press […/†] to move to the second level. Press [SETUP] to exit the Setup menu. INSTALLATION Settings Manual Set To complete the set-up of your HDD/DVD Recorder when the auto set has not stored all of the channels or when you wish to store a new channel. 1 2 3 Press [SETUP]. The Setup menu appears. Use [œ/√] to select ‘Installation‘. While ‘Installation‘ is selected, press [†] to select ‘Manual Set‘. PAL-BG Select The Aerial standard. CH-02 PAL-BG PAL-II Off PR-01 PAL-DK P-01 SECAM-L Enter-Confirm Setup-Exit Move …† Use […/†] to select the desired setting, then press [ENTER] to confirm your selection. Some items require additional steps. Press [SETUP] at any time to return to the previous menu. 6 Standard Reception Auto Search Fine Tune Decoder Store Channel Program Name Instructions: SETUP 1 2 3 Manual Setup This set is equipped with the Multi-Tuner. You can search broadcasting of other countries. If the set can not search the channels, please Re-Install. (see page 18.) 7 Use […/†] to select ‘Reception‘. Press [ENTER] to move to the second level. 8 Use […/†] to select the desired broadcast system (Aerial or Cable), then press [ENTER]. Aerial: If you are using a standard antenna to receive channels. Cable: If you are using basic cable to receive channels. Manual Setup Standard Reception Auto Search Fine Tune Decoder Store Channel Program Name Instructions: PAL-BG Aerial Select The CH-02 Reception. Aerial Off PR-01 Cable P-01 Enter-Confirm Setup-Exit Move …† Installation Manual Set Auto Set Set Clock Adjust Channels Instructions: Enter-Confirm Setup-Exit Move …† 19 Downloaded From Disc-Player.com Daewoo Manuals DG-M22-12D1P-XA(GB) 2005.12.22 8:4 AM ˘ ` 20 mac001 1200DPI 100LPI Setup menu 9 10 Use […/†] to select ‘Auto Search‘. 14 Search the real channel number by pressing [œ/√]. Use […/†] to select ‘Store Channel‘. Press [ENTER] to move to the second level. 15 Use […/†] to select program number to store and press [ENTER] to confirm. Manual Setup Standard Reception Auto Search Fine Tune Decoder Store Channel Program Name Instructions: Manual Setup PAL-BG Aerial CH-02 Standard Reception Auto Search Fine Tune Decoder Store Channel Program Name Instructions: Off PR-01 P-01 Enter-Confirm Setup-Exit Move …† PAL-BG Aerial CH-02 Off PR-01Channel Select To P-01 Store PR-01 Enter-Confirm Setup-Exit Move …† 11 Select ‘Fine Tune’. You can adjust the fine tuning. 16 Use […/†] to select ‘Program Name‘. Press [√] to move to the second level. If your HDD/DVD Recorder is showing no station name or is showing a station name incorrectly, you can correct this. 17 Either select the name from the stored list or you create the station name and enter a 4-digit name. Change the letters with the […/†], move the next letter with the [œ/√]. Manual Setup Standard Reception Auto Search Fine Tune Decoder Store Channel Program Name Instructions: PAL-BG Aerial CH-02 Off PR-01 P-01 Enter-Confirm Setup-Exit Move …† Manual Setup 12 Use […/†] to select ‘Decoder‘. Press [ENTER] to move to the second level. 13 When the program is encoded (and you have a decoder connected to socket EURO AV2), press […/†] to select ‘On’ and press [ENTER] to confirm. Manual Setup Standard Reception Auto Search Fine Tune Decoder Store Channel Program Name Instructions: PAL-BG Aerial CH-02 Off Decoder Select PR-01 State P-01 Off Enter-Confirm Setup-ExitOnMove …† 20 Downloaded From Disc-Player.com Daewoo Manuals Standard Reception Auto Search Fine Tune Decoder Store Channel Program Name Instructions: PAL-BG Aerial CH-02 Off PR-01 Edit Channel P-01 Name P – 0 1 Enter-Confirm Setup-Exit Move …† DG-M22-12D1P-XA(GB) 2005.12.22 8:4 AM ˘ ` 21 mac001 1200DPI 100LPI Setup menu Auto Set The HDD/DVD Recorder has a frequency synthesized tuner capable of receiving channels that include VHF Low E2~S6, VHF High S7~S36, and UHF S37~E69. Set Clock 1 Follow steps 1-2 as shown under ‘Manual Set’. 2 Use […/†] to select ‘Set Clock‘. Preparation: Installation Connect the HDD/DVD Recorder to the desired type of antenna or cable TV system, as shown in ‘Connecting Antenna/Cable‘ on page 15. 1 2 Follow steps 1-2 as shown under ‘Manual Set’. Manual Set Auto Set Set Clock Adjust Channels While ‘Installation‘ is selected, press […/†] to select ‘Auto Set‘. Instructions: Installation Manual Set Auto Set Set Clock Adjust Channels 3 Press [ENTER]. The ‘Set Clock’ menu appears. Set Clock Please set the clock: … Instructions: Time : 13 : 00 Enter-Confirm Setup-Exit Move …† 3 † Date : 02 \ Jan \ 2010 (Sat) Instructions: Press [ENTER] to begin the channel search. The tuner will automatically search for all available channels in your area and place them in the tuner’s memory. Enter-Confirm Setup-Exit Move …† 4 œ /√ (left/right): Moves the cursor to the previous or next column. Installation …/† (up/down): Changes the setting at the current cursor position. Searching for available TV stations: 5 channels found Please wait... Enter the date and time. 5 Press [ENTER] to confirm your setting, then press [SETUP] to exit the Setup menu. Instructions: Setup-Exit After Auto Set is complete, follow the instructions above to make sure that Tuning Band is set correctly. 21 Downloaded From Disc-Player.com Daewoo Manuals SETUP Enter-Confirm Setup-Exit Move …† DG-M22-12D1P-XA(GB) 2005.12.22 8:4 AM ˘ ` 22 mac001 1200DPI 100LPI Setup menu Adjust Channels 1 Follow steps 1-2 as shown under ‘Manual Set’. 2 Use […/†] to select ‘Adjust Channels‘. 2 Press […/†] to select the PR number you want to move to. 3 Press [ENTER]. The selected PR Will be moved to the new PR number. Delete Installation Manual Set Auto Set Set Clock Adjust Channels After tuning TV stations into your HDD/DVD Recorder, you may wish to delete a station. 1 Use […/†] to select 'Delete' and press [ENTER]. Instructions: Enter-Confirm Setup-Exit Move …† RECORDING OPTIONS Settings 3 Press [ENTER]. The Adjust Channels menu appears. Adjust Channels … PR-01 PR-02 PR-03 PR-04 PR-05 PR-06 ------------------- † Select Channel Options Edit Align Delete DVD Record Quality You can set the default DVD recording quality to (Approx. time) : HQ (High Quality - 1 hr/disc), SP (Standard Play - 2 hrs/disc), EP (Extended Play - 4 hrs/disc), or SLP (Super Long Play - 6 hrs/disc). 1 2 3 Press [SETUP]. The Setup menu appears. 4 5 Press [ENTER] to move to the second level. 6 Press [ENTER] to confirm your selection, then press [SETUP] to exit the menu. Instructions: Enter-Confirm Setup-Exit Move …† 4 Use […/†] to select the PR number you want to adjust. Then press [ENTER]. Edit After tuning TV stations into your HDD/DVD Recorder, you may wish to put a name into any channel you want to. 1 2 Use […/†] to select 'Edit' and press [ENTER]. 3 Press [ENTER] to confirm. You can put a name by pressing […/†] and [œ /√]. Align After tuning TV stations into your HDD/DVD Recorder, you may wish to change the order of PR's you have in your set, as your preference. 1 Use […/†] to select 'Align' and press [ENTER]. 22 Downloaded From Disc-Player.com Daewoo Manuals Use [œ/√] to select ‘Recording Options‘. While ‘Recording Options‘ is selected, press [†] to select ‘DVD Record Quality‘. Use […/†] to to select the desired Record Quality (HQ, SP, EP, or SLP). Recording Options DVD Record Quality HDD Record Quality Auto Chapter SP Record Select SP Quality 5 min SLP EP Instructions: SP Enter-Confirm Setup-Exit HQ Move …† DG-M22-12D1P-XA(GB) 2005.12.22 8:4 AM ˘ ` 23 mac001 1200DPI 100LPI Setup menu LANGUAGE Settings HDD Record Quality You can set the default HDD recording quality to (Approx. time) : [DHR-8100P] HQ (High Quality 32hrs), SP (Standard Play - 66hrs), EP (Extended Play - 128hrs), or SLP (Super Long Play - 195hrs). [DH-6100P] HQ (16hrs), SP(33hrs), EP (64hrs), or SLP (97hrs) Follow the same procedure as the 'DVD Record Quality'. Recording Options DVD Record Quality HDD Record Quality Auto Chapter SP SP HDD Select 5Quality min Instructions: Select a language for the HDD/DVD Recorder Setup menu and on-screen displays. 1 2 3 Press [SETUP]. The Setup menu appears. 4 5 6 Press [ENTER] to move to the second level. Use [œ] and [√] to select ‘Languages‘. While ‘Languages‘ is selected, press [†] to select ‘OSD Language‘. Use […/†] to select the desired language. Press [ENTER] to confirm your selection, then press [SETUP] to exit the menu. EP Enter-Confirm Setup-Exit SP Move …† HQ Auto Chapter During recording, chapter markers are added automatically at fixed intervals. You can set this interval to 5 minutes, 10 minutes or 15 minutes. To turn off automatic chapter marking, select ‘Off‘. Follow the same procedure as the ‘DVD Record Quality’. Instructions: OSD Language Menu Language Subtitle Language Audio Language Instructions: English Select OSD Default Language Default English Default Spanish French Enter-Confirm Setup-Exit Czech Move …† Menu/Subtitle/Audio Language Recording Options DVD Record Quality HDD Record Quality Auto Chapter Languages SP Select Auto SP Chapter 5 min Off 5min Select your preferred language for Disc Menus, Subtitles, and Audio soundtracks. Follow the same procedure as the OSD Language. Default : The disc’s default language is selected. 10min Enter-Confirm Setup-Exit 15min Move …† 23 Downloaded From Disc-Player.com Daewoo Manuals SETUP SLP OSD Language DG-M22-12D1P-XA(GB) 2005.12.22 8:4 AM ˘ ` 24 mac001 1200DPI 100LPI Setup menu PREFERENCES / Video Settings 1 2 3 4 Auto : Convert to the appropriate aspect ratio Press [SETUP]. automatically. Use [œ/√] to select ‘Preferences‘. Video Output While ‘Preferences‘ is selected, press [†] to select ‘Video‘. Progressive Scan Video provides the highest picture quality with reduced flickering. Press [ENTER]. The ‘Video‘ submenu is displayed. RGB : If you connect the HDD/DVD Recorder to an analog television using the SCART jacks, set Video Output to ‘RGB’. Interlace or Progressive : If you connect the HDD/DVD Recorder to a digital television (DTV) or Monitor using the COMPONENT jacks, set Video Output to ‘Interlace’ or ‘Progressive’. Preferences Video Audio Parental Controls Auto Settings Hard Disk Follow the same procedure as ‘TV Aspect Ratio’ to change the ‘Video Output’. Instructions: Video Enter-Confirm Setup-Exit Move …† TV Aspect Ratio 1 Use […/†] to select ‘TV Aspect‘ while the TV Aspect Video Output Interlace ‘Video‘ submenu is displayed. 2 3 Progressive Press [ENTER] or [√] to go to the second level. Instructions: RGB Enter-Confirm Setup-Exit Move …† Use […/†] to select the desired ‘TV Aspect’. Video TV Aspect Video Output Auto Select Picture Interlace Format 4:3 LB 4:3 PS 16:9 Instructions: Auto Enter-Confirm Setup-Exit Move …† 4 5 Auto Interlace Select Video Output Press [ENTER] to confirm your selection. Press [SETUP] to exit the menu. 4:3 LB : Select when a standard 4:3 TV is connected. Displays theatrical images with masking bars above and below the picture. 4:3 PS : Select when a standard 4:3 TV is connected. Displays pictures cropped to fill your TV screen. Both sides of the picture are cut off. 16:9 : Select when a 16:9 wide screen TV is connected. 24 Downloaded From Disc-Player.com Daewoo Manuals Caution • Once the Progressive Scan setting is entered, an image will only be visible on a Progressive Scan compatible TV or monitor. Press and hold [P.SCAN] for 5 seconds to return to Interlace Scan mode. DG-M22-12D1P-XA(GB) 2005.12.22 8:4 AM ˘ ` 25 mac001 1200DPI 100LPI Setup menu PREFERENCES / Audio Settings Follow the same procedure as ‘Video’ Settings to select ‘Audio’ Settings. Select when connected to a Dolby Digital or DTS decoder (or an amplifier or other equipment with a Dolby Digital or DTS decoder). Dynamic Range Preferences Video Audio Parental Controls Auto Settings Hard Disk While watching DVD movies, you may wish to compress the dynamic range of the audio output (the difference between the loudest and quietest passages). This allows you to listen to a movie at a lower volume without losing clarity of sound. Set ‘Dynamic Range‘ to Low or High for this effect. Follow the same procedure as ‘Digital Output‘ to set the ‘Dynamic Range’. Instructions: Enter-Confirm Setup-Exit Move …† ‘Audio’ submenu is displayed. Press [ENTER] or [√] to go to the second level. Audio Digital Output Dynamic Range Virtual Surround Use […/†] to select the desired digital output type. Low High Enter-Confirm Setup-Exit Move …† Audio Bitstream Select Digital Off Output Off Off Bitstream LPCM Instructions: Enter-Confirm Setup-Exit Move …† 4 5 Bitstream Off Select Dynamic Off Range Off Instructions: Digital Output Dynamic Range Virtual Surround SETUP Digital Output 1 Use […/†] to select ‘Digital Output‘ while the 2 3 Bitstream Press [ENTER] to confirm your selection. Press [SETUP] to exit the menu. Off Virtual Surround You can enjoy a simulated 3D effect from two speakers by setting Virtual Surround to On. Follow the same procedure as ‘Digital Output‘ to set the ‘Virtual Surround’ option. Audio Digital Output Dynamic Range Virtual Surround Surround No signal will be output from the Digital Audio Out jacks. LPCM Bitstream Off Off Select Virtual Off Instructions: On Enter-Confirm Setup-Exit Move …† Select when connected to a 2 channel digital stereo amplifier. The HDD/DVD Recorder's digital audio signal will be output in the PCM 2ch format when you play a DVD (or HDD) recorded with a Dolby Digital (only for DVD) or MPEG soundtrack. If the DVD is recorded with a DTS sound track then no sound will be heard. 25 Downloaded From Disc-Player.com Daewoo Manuals DG-M22-12D1P-XA(GB) 2005.12.22 8:4 AM ˘ ` 26 mac001 1200DPI 100LPI Setup menu PREFERENCES / Parental Controls The initial password is ‘0000‘. You must enter this password before you can change the Parental Level. Set Parental Level The Parental Controls feature allows you to prevent DVDs from being played based on their ratings or to have certain discs played with alternative scenes. You can set the parental level from ‘Adult’ to ‘Kid safe’. 1 2 3 Press [SETUP]. Use [œ/√] to select ‘Preferences‘. While ‘Preferences‘ is selected, press [†] to select ‘Parental Controls‘. And press [ENTER]. Set the new password to something other than '0000'. 5 After setting the password, press [ENTER] while 'Set Parental Level' is displayed. 6 7 Enter your new password. Use […/†] to select the desired parental level and press [ENTER] to confirm. Off : If you select Unlock, the Lock feature is not active. All discs will play in full. Adult to Kid safe: Some discs contain scenes Preferences not suitable for children. If you set a rating for the HDD/DVD Recorder, all scenes with the same rating or lower will be played. Higher rated scenes will not be played unless an alternative scene is available on the disc. The alternative must have the same rating or a lower one. If no suitable alternative is found, playback will stop. You must enter the 4-digit password or change the rating level in order to play the disc. Video Audio Parental Controls Auto Settings Hard Disk Instructions: Enter-Confirm Setup-Exit Move …† 4 Use […/†] to select ‘Set Parental Level’ and press [ENTER]. The Password Input dialog will appear. Enter a 4-digit password using the [0-9] buttons. If this is the first time you have entered a password, you will be prompted to enter the password again to confirm it. Parental Control Set Parental Level Select Offthe Change Password parental level Parental Country CodeOff AU Set Hdd Parental LockAdultOff NC-17 R Parental Control Set Parental Level Change Password Parental Country Code Set Hdd Parental Lock Instructions: Off Enter-Confirm Setup-Exit Move …† AU Off 8 Press [ENTER] to confirm your rating selection, then press [SETUP] to exit the menu. Instructions: Parental Control Enter-Confirm Setup-Exit Move …† Set Parental Level Adult Change Password Parental Country Code AU Set Hdd Parental Lock Off Change Password Current Code ____ Enter New Code ____ ConfirmPassword Code ____ Enter Password Instructions: Setup-Exit Enter-Confirm Instructions: Setup-Exit Enter-Confirm 26 Downloaded From Disc-Player.com Daewoo Manuals **__ Instructions: Enter-Confirm Setup-Exit Move …† DG-M22-12D1P-XA(GB) 2005.12.22 8:4 AM ˘ ` 27 mac001 1200DPI 100LPI Setup menu Change Password 1 While ‘Preferences‘ is selected, press [†] to Parental Country Code 1 While ‘Preferences‘ is selected, press [†] to select ‘Parental Controls‘. 2 Press [ENTER]. The ‘Parental Controls‘ submenu appears. 3 Use […/†] to select ‘Change Password‘ then press [ENTER]. select ‘Parental Controls‘. Then press [†] to select ‘Parental Country Code‘. Parental Control Set Parental Level Adult Change Password Parental Country Code AU Set Hdd Parental Lock Off Parental Control Set Parental Level Adult Change Password Parental Country Code AU Set Hdd Parental Lock Off Enter-Confirm Setup-Exit Move …† 2 Press [ENTER]. Enter your current 4-digit password then press [ENTER]. 3 Use […/†] to select the desired country and press [ENTER] to confirm. Enter-Confirm Setup-Exit Move …† 4 The ‘Change Password’ submenu appears. Enter your current 4-digit password. Change Password Current Code SETUP Instructions: Instructions: Parental Country Code Please select Country for Parental Setup **** Enter New Code **** Confirm Code **__ Instructions: Setup-Exit Enter-Confirm … Australia † Belgium Denmark Finland France Instructions: Enter-Confirm Setup-Exit Move …† 5 Enter a new 4-digit password. Re-enter the new password to confirm, press [ENTER]. • Master Password : If you forget your password, press 3,3,0,8 on the remote control and then press [ENTER]. • Set the new password to something other than '0000'. 27 Downloaded From Disc-Player.com Daewoo Manuals DG-M22-12D1P-XA(GB) 2005.12.22 8:4 AM ˘ ` 28 mac001 1200DPI 100LPI Setup menu Set Hdd Parental Lock It allows you to prevent from being played the title parental locked in HDD video menu. You can set the HDD parental lock as follow. 1 While ‘Preferences‘ is selected, press [†] to select ‘Parental Controls‘. And press [ENTER]. 2 Use […/†] to select ‘Set Hdd Parental Lock’ and press [ENTER]. The Password Input dialog will appear. Enter a 4-digit password using the [0-9] buttons. If this is the first time you have entered a password, you will be prompted to enter the password again to confirm it. PREFERENCES / Auto Settings 1 While ‘Preferences‘ is selected, press [†] to select ‘Auto Settings‘. 2 Press [ENTER] to display the submenu. Preferences Video Audio Parental Controls Auto Settings Hard Disk Instructions: Enter-Confirm Setup-Exit Move …† Parental Control Set Parental Level Adult Change Password Parental Country Code AU Set Hdd Parental LockSelect Offthe parental lock Off On Instructions: Enter-Confirm Setup-Exit Move …† active. All titles in the HDD will play in full. Auto Clock enables the HDD/DVD Recorder to set the clock automatically whenever it is in Standby mode (plugged in but powered off). Auto Clock is only available for models with the VPS/PDC function. Some broadcasting stations may send the time and date along with the VPS/PDC data. The video will automatically use this time and date during the initial setting up procedure during normal use, and every time you switch the video off at the mains. If you find that this time and date is incorrect you can remove this feature by following the steps below changing it to the OFF mode, you will then have to manually set the time and date, see above. On : If you select On, the Parental Lock feature 1 Use […/†] to select 'Auto Clock Set' and press [ENTER]. 2 Use […/†] to change the 'Auto Clock Set' status, and press [ENTER] to confirm. 3 After setting the password, press [ENTER] while 'Set Hdd Parental Lock' is displayed. 4 5 Enter your new password. Use […/†] to select the desired parental level and press [ENTER] to confirm. Off : If you select Off, the Lock feature is not is active in HDD Edit menu. To playback the title parental locked in HDD video menu, you must enter the 4-digit password. For detailed information, refer to page 50. 6 Auto Clock Set Press [ENTER] to confirm your rating selection, then press [SETUP] to exit the menu. Auto Settings Auto Clock Set VPS/PDC On Select Auto On Clock Status Off On Instructions: Enter-Confirm Setup-Exit Move …† 28 Downloaded From Disc-Player.com Daewoo Manuals DG-M22-12D1P-XA(GB) 2005.12.22 8:4 AM ˘ ` 29 mac001 1200DPI 100LPI Setup menu VPS/PDC Auto Settings Auto Clock Set VPS/PDC On On Select VPS/ PDC Status Off On Instructions: Enter-Confirm Setup-Exit Move …† "VPS/PDC" and "Auto Clock Set" are not provided for some countries. PREFERENCES / Hard Disk 1 While ‘Preferences‘ is selected, press [†] to select ‘Hard Disk‘. 2 Press [ENTER] to display the submenu. Preferences Video Audio Parental Controls Auto Settings Hard Disk Instructions: Enter-Confirm Setup-Exit Move …† the ‘Hard Disk’ submenu is displayed. Press [ENTER] or [√] to go to the second level. HDD Preferences Auto Title Delete Buffering Mode Jump To Internal Reset Hard Disk On Preserve Select Auto 5 Min Delete Off On Model : ST3160022ACE 80GB Instructions: Enter-Confirm Setup-Exit Move …† 2 3 4 SETUP VPS/PDC is a service provided by some stations to enable you to perform timer recordings precisely even if the broadcaster delays the start time of the program slightly. The time you enter is the VPS/PDC time so this must be correct. Not all stations offer VPS/PDC, in which case the player will start at the time you enter and not the actual start time of the programme. If you wish to start recording at a specific time without it being adjusted by the VPS/PDC system in the event of a delay, switch VPS/PDC off otherwise the player will not record. Follow the same procedure as ‘Auto Clock Set’ to set the ‘VPS/PDC’ status. Auto Title Delete 1 Use […/†] to select ‘Auto Title Delete‘ while Use […/†] to select the desired option. Press [ENTER] to confirm your selection. Press [SETUP] to exit the menu. Off With this selection, the HDD/DVD Recorder will stop recording and prompt the user to erase some titles and create more room on the HDD, if the [STOP] is not pressed and the recording takes all the available space on the hard disk drive. On With this selection, the HDD/DVD Recorder overwrites un-protected titles, if the [STOP] is not pressed and the recording takes all the available space on the hard disk drive. Buffer Mode 1 Use […/†] to select ‘Buffering Mode‘ while the ‘Hard Disk’ submenu is displayed. Press [ENTER] or [√] to go to the second level. HDD Preferences Auto Title Delete Buffering Mode Jump To Internal Reset Hard Disk On Preserve Select Buffering 5 Mode Min Preserve Refresh Model : ST3160022ACE 80GB Instructions: Enter-Confirm Setup-Exit Move …† 29 Downloaded From Disc-Player.com Daewoo Manuals DG-M22-12D1P-XA(GB) 2005.12.22 8:4 AM ˘ ` 30 mac001 1200DPI 100LPI Setup menu 2 3 4 Use […/†] to select the desired option. Reset Hard Disk Press [ENTER] to confirm your selection. This feature enables you to erase the entire content of the HDD. Please proceed with caution, as this process is irreversible. Press [SETUP] to exit the menu. Preserve 1 “Preserve” maintains the content of the buffer upon changing the TV channel. Use […/†] to select ‘Reset Hard Disk’ while the ‘Hard Disk’ submenu is displayed. 2 Press [ENTER]. Refresh HDD Preferences Refreshes the buffer upon changing the TV channel. Auto Title Delete Buffering Mode Jump To Internal Reset Hard Disk Jump To Internal This feature enables you to skip to internal which is set in timeshift mode. 1 Model : ST3160022ACE 80GB Use […/†] to select ‘Jump To Internal‘ while the ‘Hard Disk’ submenu is displayed. Press [ENTER] or [√] to go to the second level. HDD Preferences Auto Title Delete Buffering Mode Jump To Internal Reset Hard Disk On Preserve Select Jump 5 Min Internal 30 Sec Instructions: Enter-Confirm Setup-Exit Move …† 3 The Reset menu will appear. Use the […/†] buttons to select ‘Yes‘ or ‘No’ and press [ENTER]. 4 Select ‘Yes‘ to begin Hard Disk Formatting. While hard disk is reformatted, do Not power Off absolutely. 1 Min Model : ST3160022ACE 80GB Instructions: 3 Min Enter-Confirm Setup-Exit Move5…† Min 2 3 4 On Preserve 5 Min Reset Hard Disk All recorded programs will be deleted. Are you Sure? Use […/†] to select the desired option. Yes Press [ENTER] to confirm your selection. No Instructions: Press [SETUP] to exit the menu. Enter-Confirm Setup-Exit Reformat Hard Disk Hard Disk currently Erasing. Please do not power off... 5 30 Downloaded From Disc-Player.com Daewoo Manuals Power is turned off automatically when HDD reset is finished. DG-M22-12D1P-XA(GB) 2005.12.22 8:4 AM ˘ ` 31 mac001 1200DPI 100LPI Setup menu System Information Restore Defaults System Information helps service personnel identify key firmware information about your HDD/DVD Recorder in case service is required. If you wish, you can reset the HDD/DVD Recorder to its original factory settings. 1 2 System Info Press [SETUP]. Use [œ/√] to select ‘Restore Defaults‘. Restore Defaults System Version If you select this function all settings will be removed and the product will be set into initial (factory) mode. System Version Version FD30902DXVL 3.3.0 Micom Software 1.9.5 Enter-Confirm Setup-Exit BDR-B2DX Move Loader …† Version Main Build Instructions: Instructions: SETUP Enter-Confirm Setup-Exit Move …† Instructions: Setup-Exit 3 4 Press [ENTER]. The Initialize menu will appear. Use the […/†] buttons to select ‘Yes‘ and press [ENTER]. Restore Defaults Are you sure you want to restore default settings? Yes No Instructions: Enter-Confirm Setup-Exit • Some options cannot be reset, including Parental Controls, Password, and Country Code. • After Restoring Defaults, the unit is powered off automatically. At this time, if you power on again, the Installation menu appears. You must set the country, language, channel, and clock settings again. 31 Downloaded From Disc-Player.com Daewoo Manuals DG-M22-12D1P-XA(GB) 2005.12.22 8:4 AM ˘ ` 32 mac001 1200DPI 100LPI On-Screen Display Overview The On-Screen Display provides feedback on the status of the HDD/DVD Recorder and/or the currently loaded disc or HDD. To access the OnScreen Display (or OSD), press [DISPLAY]. 3 Use […†] to change the numbers. Press [ENTER] to confirm. Chapter Shows the current chapter number and total number of chapters, and skips to the desired chapter number. Displaying Disc Information 1 Press [DISPLAY] during playback. The on-screen display appears on the TV screen. To display information about the currently loaded disc or HDD: 2 Use […†] to select the ‘Chapter‘ icon on the onscreen display. Press [ENTER] to display a submenu. 3 Use […†] to change the numbers. Press [ENTER] to confirm. On-screen display operation 1 Press [DISPLAY] repeatedly to display/change the information displayed on-screen. 2 To remove the on-screen display, press [DISPLAY] repeatedly until it disappears. See the descriptions below for detailed explanations of the on-screen displays for each media type. Some discs may not provide all the features shown in the on-screen display examples. Temporary Feedback Icons Action prohibited or not available Angle Shows the current angle number and total number of angles, and changes the angle number. 1 Press [DISPLAY] during playback. The on-screen display appears on the TV screen. 2 Use […†] to select the ‘Angle‘ icon on the onscreen display. Press [ENTER] to display a submenu. 3 Use […†] to change the numbers. Press [ENTER] to confirm. Audio Disc Information options for DVD, HDD DVD Title 1 of 3 Chapter 23 of 41 Angle 1 of 1 Audio 2. Eng Subtitle Off Elapsed 01:29:31 Instructions: Enter-Confirm Setup-Exit Move …† HDD Title Chapter Audio Elapsed 1 of 3 23 of 41 2. Eng 01:29:31 Instructions: Enter-Confirm Setup-Exit Move …† Title Shows the current title number and total number of titles, and skips to the desired title number. Shows the current audio soundtrack language, encoding method, and channel number, and changes the setting. 1 Press [DISPLAY] during playback. The on-screen display appears on the TV screen. 2 Use […†] to select the ‘Audio‘ icon on the onscreen display. Press [ENTER] to display a submenu. 3 Use […†] to change the numbers. Press [ENTER] to confirm. Subtitle Shows the current subtitle language, and changes the setting. 1 1 Press [DISPLAY] during playback. The on-screen display appears on the TV screen. Press [DISPLAY] during playback. The on-screen display appears on the TV screen. 2 2 Use […†] to select the ‘Title‘ icon on the onscreen display. Press [ENTER] to display a submenu. Use […†] to select the ‘Subtitle‘ icon on the onscreen display. Press [ENTER] to display a submenu. 3 Use […†] to change the numbers. Press [ENTER] to confirm. 32 Downloaded From Disc-Player.com Daewoo Manuals DG-M22-12D1P-XA(GB) 2005.12.22 8:4 AM ˘ ` 33 mac001 1200DPI 100LPI On-Screen Display Overview Elapsed Shows the elapsed playing time, and skips to the desired time. Changing the TV Audio Channel You can change the TV audio using the [AUDIO] button. Press [AUDIO] repeatedly to change the TV audio, according to the Broadcast audio signal as shown below. 1 Press [DISPLAY] during playback. The on-screen display appears on the TV screen. 2 Use […†] to select the ‘Elapsed’ icon on the onscreen display. Press [ENTER] to search by time. The submenu appears. 3 Use […†] to change the numbers and use [œ √] to move left or right. • BIL Audio Signal 4 Within 7 seconds, press [ENTER] to confirm the start time. Playback starts from the selected time on the disc. • MONO Audio Signal Stereo ➝ Mono ➝ Stereo BIL I ➝ BIL II ➝ (BIL Off) ➝ BIL I Mono The current audio channel is displayed on-screen. • If the sound is poor quality when set to Stereo, you can often improve it by changing to Mono. • When an external input is selected, the audio channel can be switched only to Stereo. Changing TV Channels If no disc is playing, you can change TV channels using the [0-9] or [PR+/–] buttons on the remote control or [PR+/–] buttons on the front panel. 33 Downloaded From Disc-Player.com Daewoo Manuals SETUP For the title recorded without DVD navigation information, such as the one from broadcast or line input, ‘Elapsed’ function does not work. • STEREO Audio Signal DG-M22-12D1P-XA(GB) 2005.12.22 8:4 AM ˘ ` 34 mac001 1200DPI 100LPI DVD Playback Playing a DVD 1 Still Picture and Frame-by-Frame Playback 1 Press [PLAY/PAUSE] during playback. The Press [DVD] to set the remote control to operate the DVD. HDD/DVD Recorder will go into Still mode. DVD Selected Turn the TV on and select the video input source connected to the HDD/DVD Recorder. Actions are now for DVD Audio system: Turn the audio ■ Stop system on and select the input source connected to the HDD/DVD Recorder. 2 Press [OPEN/CLOSE] to open the disc tray. 3 Load your disc in the tray with the playback side down (label side up). 2 Fast Forward/Backward 1 Press [REW (œœ)] or [FF (√√)] during playback. The HDD/DVD Recorder will go into Search mode. 2 4 Press [OPEN/CLOSE] to close the tray. 5 'LOAD' appears on the front panel display, and playback starts automatically. If playback does not start, press [PLAY (√)]. In some cases, the Disc menu may appear instead. Playing a DVD When a DVD+RW or unfinalised DVD+R/-R/-RW is inserted, no title is played automatically but the current TV channel displays on the screen. If you want to play a title on the DVD+R (+RW), you must press [MENU] or [PLAY] to display the disc menu. Select a title to play then press [ENTER]. If a Disc menu is displayed • A Disc menu may be displayed when you load a DVD. Use the [œ √…†] buttons to select the title/chapter you want to view, then press [ENTER] to start playback. Press [TITLE] or [MENU] to return to the Disc menu. • The HDD/DVD Recorder will not play discs with Region codes different from the HDD/DVD Recorder. The Region code for this HDD/DVD Recorder is 2 (two). • Unless stated otherwise, all operations described below use the remote control. Some features may also be available in the Setup menu. • A disc which is recorded by computer at high speeds (greater than or equal to 2x) may not be recognized. • A disc which is recorded with unauthorized movie material may not be played. • A disc which is recorded by another recorder or not recorded correctly may not be recognized or played. 34 Downloaded From Disc-Player.com Daewoo Manuals You can back up or advance the picture frameby-frame by pressing [FF (√√)] repeatedly during Still mode. Press [REW] or [FF] to select the desired speed: √√ X2, √√ X4, √√ X8, √√ X16, √√ X32, √ (forward) or œ, œœ X2, œœ X4, œœ X8, œœ X16, œœ X32 (backward). Slow Motion Press [SLOW+] or [SLOW-] to select the desired speed: 1/2, 1/4, 1/8,1/2, ...(forward), or 1/2, 1/4, 1/8, 1/2, ... (backward). Changing the Audio Language Press [AUDIO] and then press [AUDIO] repeatedly during playback to hear a different audio language or audio track. Subtitles Press [SUBTITLE] and then press [SUBTITLE] repeatedly during playback to select among all available subtitle languages. Zoom The Zoom function allows you to magnify the video image and scroll around the enlarged image. 1 Press [ZOOM] during Play mode to activate the Zoom function. Each press of the [ZOOM] button changes the Zoom level as follows: X1 (normal size) ➝ X2 ➝ X4 ➝ X1 (normal size) 2 Use the [œ √…†] buttons to scroll around the zoomed picture. 3 To resume normal playback, press [ZOOM] repeatedly until the X1 (normal picture) appears. DG-M22-12D1P-XA(GB) 2005.12.22 8:4 AM ˘ ` 35 mac001 1200DPI 100LPI DVD Playback Selecting Titles • The Zoom function may not work on some DVDs (ex. Jpg..) • The Zoom function does not work in PAUSE mode. When a disc has more than one title, you can select among all available titles as follows: 1 Repeat 1 To repeat the currently playing chapter, press [REPEAT]. ‘REPEAT CHAPTER’ appears on the TV screen. Selecting Chapters 2 To repeat the currently playing title, press [REPEAT] twice. ‘REPEAT TITLE’ appears on the TV screen. 3 To repeat the whole disc, press [REPEAT] three times. ‘REPEAT DISC’ appears on the TV screen. 4 1 Press [PREV (§)] or [NEXT (∞)] briefly during playback to select the next or previous chapter. 2 To skip directly to any chapter during playback, press [DISPLAY]. Use […†] to select the Chapter icon, then press [ENTER] to display a submenu. Use […†] to select the desired chapter number and press [ENTER] to confirm. Disc Menus [VCD] Track ➝ Disc ➝ Off ➝ Track ... Many DVDs contain Disc menus that allow you to access special features. To open a Disc menu, press [MENU]. Then use the […†] buttons to highlight your desired selection and press [ENTER]. [CDDA, MP3] Track ➝ All ➝ Off ➝ Track ... A-B You can repeat a scene between two points (A and B): Press [PLAY/PAUSE] play to the start of the desired scene. 2 3 4 5 Press [A-B] to mark the start point. 1 2 the Title menu will appear on the TV screen. Otherwise, the Disc menu may appear. Press [A-B] to mark the end point. The marked scenes are repeated continuously until you stop the repeat by pressing [A-B] button again. the Search menu. T/ 3 œ C 1 To exit the Disc menu, press [STOP] or [HDD]. Title Menus 1 Press [TITLE]. If the current title has a menu, Use [FF], [NEXT] to search the end point. Search 1 Press [SEARCH] to display Press [MENU]. The Disc menu is displayed. 2 The Title menu may contain camera angles, spoken languages and subtitle options, as well as the chapters for the title. … † Use [œ √] to move to Title √ (T) or Chapter (C) and use […†] to set the title or chapter number. 35 Downloaded From Disc-Player.com Daewoo Manuals PLAYBACK [DVD] Chapter ➝ Title ➝ Disc ➝ off ➝ Chapter ... 2 When a title on a disc has more than one chapter, you can select among all available chapters as follows: Each press of the [REPEAT] button changes the repeat mode as follows: 1 Press [DISPLAY] and use […†] to select the Title icon. Press [ENTER] to display a submenu. Use […†] to select the desired title number and press [ENTER] to confirm. DG-M22-12D1P-XA(GB) 2005.12.22 8:4 AM ˘ ` 36 mac001 1200DPI 100LPI Playing a Picture or Music files Audio CD Playback MP3 Playback (HDD Media, DVD) The HDD/DVD Recorder can play audio CDs on CDR/RW, DVD+R/RW, DVD-R/RW. The HDD/DVD Recorder can play MP3 files on a disc such as CD-R/RW, DVD+R/RW, DVD-R/RW, or on HDD Media. 1 2 Insert the disc and close the tray. The CD Music folder tree appears. Use […†] to select a track or a file, then press [ENTER] or [PLAY]. 1 Prior to playing MP3 files on disc, insert disc and close the tray. 2 Press [MENU] to bring up the Media Browser and select the media (HDD Media, DVD) you want to play. 3 Press [ENTER] and select the Music category using […†], then press [ENTER]. 4 The MP3 folder tree appears. Use […†] to select a track or a file, then press [ENTER] or [PLAY]. Playback will stop at the end of the disc. CD Music Item : CD Audio Tr : 3/13 ■ STOP Normal TRACK 1 TRACK 2 TRACK 3 TRACK 4 TRACK 5 TRACK 6 TRACK 7 TRACK 8 TRACK 9 TRACK 10 00:03:45 00:03:46 00:03:47 00:03:48 00:03:49 00:03:50 00:03:51 00:03:52 00:03:53 00:03:54 13 Tracks 1/13 …† Playback will stop at the end of the media. Move-…†œ √ Select-ENTER Back-MENU Exit-SETUP DVD Music 3 While playing an Audio CD, use [FF] or [REW] for 2x speed playback. 4 Use [PLAY/PAUSE] to pause playback while the disc is playing. 5 To stop playback at any time, press [STOP]. Item : MP3 Tr : 10/204 ■ STOP Normal 01 INTRO.MP3 01 SHE’S MINE.MP3 01 --,--- --- --.MP3 01 --,--- --- --.MP3 01 CLOSE YOUR EYES.MP3 01 TIMELESS-S.G..MP3 01 TOO LATE.MP3 01 ROCK WITH YOU.MP3 01 IT’S MY LIFE.MP3 01 --,--- --- --.MP3 216 Items Move-…†œ √ Edit-EDIT Copy-DUB 22/216 …† Exit-SETUP • On the MP3 CD menu, you can display the folders on the disc. Use […†] to select the folder icon on the MP3 CD menu then press [ENTER]. You can also display just the tracks in the folders. Use […†] to select a folder then press [ENTER]. • Press [REPEAT] to repeat a track (file) and press again to repeat the whole media. • If the disc contains JPEG files as well as MP3 files, you can change the Play mode to display JPEG image files by pressing [MENU]. 36 Downloaded From Disc-Player.com Daewoo Manuals DG-M22-12D1P-XA(GB) 2005.12.22 8:4 AM ˘ ` 37 mac001 1200DPI 100LPI Playing a Picture or Music files JPEG Playback (HDD Media, DVD) The HDD/DVD Recorder can play JPEG Picture files on a disc such as CD-R/RW, DVD+R/RW, DVDR/RW, or on HDD Media. 1 Prior to playing Jpeg picture files on disc, insert disc and close the tray. 2 Press [MENU] to bring up the Media Browser and select the media (HDD Media, DVD) you want to play. 3 Press [ENTER] and select the Picture category using […†], then press [ENTER]. 4 The JPEG folder tree appears. If there are folders which contain JPEG files, select the desired folder using […†] and press [ENTER]. 5 6 The full size image will be displayed and a slide show starts automatically with a time interval of 10 seconds. 7 Press [NEXT] or [PREV] to manually skip to the next or previous image. 8 Press [√] (or [œ]) to rotate the image (counter) clockwise. 9 Press [STOP] to exit the slideshow. Select the thumbnail you want to display using […†] and press [ENTER]. DVD Pictures .. / IMG_0248.JPG IMG_0250.JPG IMG_0261.JPG IMG_0268.JPG IMG_0266.JPG IMG_0277.JPG IMG_0282.JPG 24 Items Move-…†œ √ Edit-EDIT 2/24 …† Copy-DUB Exit-SETUP PLAYBACK Item : JPG Pic : 2/143 • If the disc contains MP3 files as well as JPEG files, you can change the Play mode to play MP3 files by pressing [MENU]. • When a CD contains both MP3 files and JPEG files, the default Play mode is JPEG image files. • MP3 files encoded below 32kbps are not supported. 37 Downloaded From Disc-Player.com Daewoo Manuals DG-M22-12D1P-XA(GB) 2005.12.22 8:4 AM ˘ ` 38 mac001 1200DPI 100LPI Playing a Picture or Music files Playing MP3 Files During a Slide Show You can enjoy a slide show while listening to MP3 music files. 1 Prepare the Disc which includes both MP3 and JPEG files. Or copy the files to HDD Media category. 2 Insert the disc. Then press [MENU] to bring up Media browser. 3 Select the media you want to play between HDD Media and DVD, and go to music category. 4 During playback of the MP3 files, press [MENU] to return to the selected media browser. The music playback will not stop. 5 Go to Picture category, and select the image files and press [ENTER] to start the slide show. 6 The MP3 files you selected continue to play during the JPEG slide show. • The HDD/DVD Recorder can playback up to 1000 files per disc. • Press [œ/ √] to move up and down per 10 files in DVD(HDD) Pictures(Music) Browser. Either HDD Videos does. • Customers should note that permission is required in order to download MP3 and music from the Internet. Our company has no right to grant such permission. Permission should always be sought from the copyright owner. 38 Downloaded From Disc-Player.com Daewoo Manuals DG-M22-12D1P-XA(GB) 2005.12.22 8:4 AM ˘ ` 39 mac001 1200DPI 100LPI Time shifting & Saving Time shifting in HDD mode When the HDD/DVD Recorder is turned on or you press the [HDD] button on the remote control or the [DVD/HDD] button on the front panel to move to HDD mode from other menus, the last viewed TV channel will be tuned in and Time shifting starts automatically. Time shifting allows ‘pausing’ the live TV broadcast for up to 60 minutes. At any time, the viewing can resume. Press [PLAY/PAUSE] to pause the broadcast, press [PLAY/PAUSE] again to resume TV viewing. If the system is paused for 60 minutes, it will automatically resume TV viewing. 12 : 34 13 : 34 √ LIVE If you are using the default value of “Setup –> Preferences –> Hard Disk –> Buffer mode –> Refresh”, and change Channels, the Time shifting buffer data will be lost. No message will be provided prior to doing so. However, if you set “Setup –> Preferences –> Hard Disk –> Buffer mode –> Preserve”, and change Channels, the Time shifting buffer data will be maintained. During Time shifting, a Timer recording may come up. As you cannot watch one program in Time shifting and record another channel, the HDD/DVD Recorder will prompt you to confirm if you want to keep the current channel or proceed with Timer recording. If there is no response, this combination assumes Timer recording should be started. The message will appear 5 seconds before the TImer recording is due. Press [STOP] to return to the live broadcast. Navigation in Time Shifting mode You can navigate in Time shifting mode and control the output by using the following remote control keys: Changes the channel Fast Forward. Press to cycle through 2, 4, 8, 16, 32X speeds. Fast Rewind. Press to cycle through 4, 8, 16, 32X speeds. Slow forward/reverse. Press to cycle through 1/2, 1/4 or 1/8 speeds. Jumps back to the 'jump to interval' time is set in the setup menu. Jumps forward to the 'jump to interval' time is set in the setup menu. Refer to page 30. 39 Downloaded From Disc-Player.com Daewoo Manuals PLAYBACK Time shifting is stored in a buffer that contains 60 minutes of recording. After 60 minutes, the buffer will be progressively overwritten. If you need to keep the video contained in this buffer for future usage, you can Save all or part of the buffer. DG-M22-12D1P-XA(GB) 2005.12.22 8:4 AM ˘ ` 40 mac001 1200DPI 100LPI Time shifting & Saving Saving to HDD Save While viewing a program, press [REC]. This will start saving the segment you are watching. You can navigate forward. During the saving operation, by pressing [REC], you will increase the length of the program you are saving by 15 minutes up to a maximum of 10 hours. Press [STOP] to indicate the end of the saving operation. In case of recording a part of Time shifting buffer, the buffer will be empty. You can not change the channel or the source if saving is on-going (the end of the recording segment is either not entered, or in case of a long recording, it has not been reached.) Saving has to be manually stopped first ( by pressing [STOP].) The HDD/DVD Recorder will prompt you to Stop saving first. The segment will be saved on the HDD and then channel or source change will be performed. The saved program will be removed from the Time shifting buffer when it is about to be overwritten by a Live recording. During recording from the Time shifting buffer, [PLAY/PAUSE] dose not work as pause(play) the recording but work as pause(play) the broadcast in the buffer. Indicates recording to the HDD and Rec Speed Indicates Time shifting operation: PLAY, STILL, LIVE, STOP, FF, REW, etc recording Other Operations in TIme shifting saving mode While in Time shifting saving mode, you can use the following keys for other operations: HDD, DVD, MENU, OPEN/CLOSE, SETUP, INPUT, P.SCAN buttons. 40 Downloaded From Disc-Player.com Daewoo Manuals • If the unit is set as “Setup –> Preferences –> Hard Disk –> Auto Title Delete –> On” if the [STOP] is not pressed and the recording takes all the available space on the hard disk drive, the HDD/DVD Recorder will erase unprotected titles to the amount of about 10 hours in HQ mode (approx. 40GB) and keep recording. • If the unit is set as “Setup –> Preferences –> Hard Disk –> Auto Title Delete –> Off” if the [STOP] is not pressed and the recording takes all the available space on the hard disk drive, the HDD/DVD Recorder will stop recording and prompt the user to erase some titles and create more room on the HDD. • If you want to stop recording in Time shifting specific operation (FF, REW, STILL, etc), press [STOP] to return to LIVE mode and then press [STOP] again. DG-M22-12D1P-XA(GB) 2005.12.22 8:4 AM ˘ ` 41 mac001 1200DPI 100LPI Basic Recording Recording to DVD or HDD If you press [DVD] or [HDD], you will be in DVD or HDD mode. You can start recording to DVD or HDD by pressing the [REC] button. (In the case of a DVD, it must be a recordable media in the tray.) 1 Turn on the HDD/DVD Recorder and load a recordable disc . Make sure your TV input is set to view the HDD/DVD Recorder. Select the media to record by pressing [DVD] , [HDD], or [DVD/HDD] on the front panel. 2 Set the desired Recording mode by pressing [REC SPEED] repeatedly. Record Mode Record Mode Dvd record quality now set to : Hdd manual record quality set to : HQ 0Hrs 58Mins HQ 27Hrs 13Mins ■ Stop √ LIVE [INPUT] or [TV/DHR]. You can select which video input you want to record from the following options are available. TV, AV1, AV2, AVF, S-VIDEO Input 4 Press [AUDIO] to select the audio channel to record (Stereo, BIL, or Mono). The table below shows what audio channel will be recorded with different settings and different types of broadcasts. The last column (Monitor Audio) shows what you will hear during recording. For example, if the TV broadcast is in Stereo, then setting the HDD/DVD Recorder to Stereo will record the broadcast in Stereo, and the Monitor Audio will also be in Stereo. Broadcast Audio L Ch R Ch MONO MONO L R MONO MONO BIL I BIL I BIL II BIL II (BIL I) (BIL I) 6 Press [STOP (■)] to stop recording. • The maximum number of DVD titles per disc is 49. If the HDD/DVD Recorder is powered off during DVD recording, the recording will not be saved. • If a DVD+RW or unfinalised DVD±R, DVD-RW disc is inserted in the tray, no title is played automatically after loading is finished. • If you are recording to a blank DVD±R (±RW) disc, it may take up to 7 minutes (it depends on the disc) for post processing after recording. One Touch Record (OTR) 3 Set the desired Recording source by pressing TV Selected Broadcast Audio MONO MONO STEREO STEREO MONO BIL I BIL BIL II (BIL Off) Recording will start. The REC indicator lights on the front panel display. Recording continues until you press [STOP] or the disc is full. To record for a fixed length of time, see One Touch Record. One Touch Recording allows you to add recording time in fixed increments at the touch of a button. 1 Follow steps 1-4 under Recording from TV. 2 Press [REC (●)] repeatedly to set the length of the recording. Recording starts after the first press. Each subsequent press increases the recording time by 15 minutes within the available space (DVD) or 10 hours (HDD). The recording time is displayed on the front panel. Monitor Audio MONO STEREO MONO BIL I BIL II (BIL Off) 41 Downloaded From Disc-Player.com Daewoo Manuals PLAYBACK Available disc (or HDD) space will be displayed by selecting recording mode. 5 Press [REC (●)] once. DG-M22-12D1P-XA(GB) 2005.12.22 8:4 AM ˘ ` 42 mac001 1200DPI 100LPI Timer Recording To Pause the Recording 1 Press [PLAY/PAUSE] to pause the disc during recording. 2 To continue recording in DVD mode, press [PLAY/PAUSE] or [REC (●)]. • To quit One Touch Recording, press and hold [STOP] for 5 seconds. • The HDD/DVD Recorder will automatically power off when One Touch Recording ends. • You cannot record on the HDD and DVD at the same time. • Pressing [PLAY/PAUSE] during HDD recording does not act as record pause but time shifting still. Recording is still under way and other time shifting operation (FF, REW, etc) works properly. Timer Recording using Manual Set Record Screen The Timer Recording function allows you to record up to 8 programs within a period of one month. 1 Insert recordable media such as DVD±R, DVD±RW if you are recording to DVD. 2 Press [TIMER]. The ‘Select Record Method’ menu appears. Select Record Method Please choose your preferred method for scheduling a recording Manual edit timer VideoPlus Timer Recording PR No. Date Start End Mode Instructions: ---- --/-- --:-- --:-- --Enter-Confirm Setup-Exit Move …† ---- --/-- --:-- --:-- ------ --/-- --:-- --:-- ------ --/-- --:-- --:-- ------ --/-- --:-- --:-- ------ --/-- --:-- --:-- ------ --/-- --:-- --:-- ------ --/-- --:-- --:-- --Instructions: Playing under recording 1 Press [MENU] to play DVD or HDD during recording. Then Media Browser appears. 2 In Media Browser, Select and play the media you want to view among HDD and DVD. • You can’t play a DVD disc during DVD recording. • The maximum number of titles that can be recorded on the HDD is 254. • Using the HDD allows you to record a maximum of 10 hours continuously. Enter-Edit Setup-Exit Move …† 3 Select ‘Manual edit timer’ with […/†] and confirm with [ENTER]. • • • • • • • 42 Downloaded From Disc-Player.com Daewoo Manuals The ‘Timer Recording’ menu appears. Use […†] to move to a timer recording slot, and press [ENTER] to modify it. If you did not set the clock on the HDD/DVD Recorder, you must do so before programming a timer recording. Media - Choose desired media (DVD or HDD) using […†]. PR No. – Choose the desired channel, or one of the external inputs from which to record. Date – Choose a date up to 1 month in advance, or select a daily or weekly program. Start Time – Set the recording start time. End Time – Set the recording end time. Mode – Choose a Record mode. HQ, SP, SLP or EP Repeat-Choose frequency of the recording. Once, Daily, Weekly, Weekday. DG-M22-12D1P-XA(GB) 2005.12.22 8:4 AM ˘ ` 43 mac001 1200DPI 100LPI Timer Recording 4 Enter the necessary information for your Timer Recording(s). • œ √ – Moves the cursor left/right. • …† – Changes the setting of the current cursor position. • Press [SETUP] to exit the Timer Record menu. • Press [ENTER] after filling in all the program information. • Press [TIMER] to display the Timer Record List. Edit Timer Media PR No. Date Start End Mode Repeat Delete Instructions: PR-03 02/Jan Sun 13:30 14:30 HQ Once finishes to confirm the recorded program. If two timer recordings are set to record sequentially (one right after the other), the very beginning of the later program may not be recorded. Timer Recording using VideoPlus system Thanks to this programming system, you no longer need to tediously enter the date, programme number, start and end time. All the information needed by the HDD/DVD Recorder for programming is contained in the VideoPlus programming number. This VideoPlus number is found in most TV listings. 1 Insert recordable media such as DVD±R, Enter-Save Setup-Exit 5 Press [ENTER] to save the program. The Timer Record List will appear. DVD±RW if you are recording to DVD. 2 Press [TIMER]. The ‘Select Record Method’ menu appears. Timer Recording PR No. Date Start PR-03 02/01 13:30 ---- --/-- --:----- --/-- --:-- End Mode 14:30 HQ --:-- ----:-- --- must power off the HDD/DVD Recorder to start the Timer Recording. • The Timer indicator lights on the front panel display when the HDD/DVD Recorder is ready for the Timer Recording. • The timer indicator will flash if any of the following conditions occur; - Empty or non-recordable disc is found in the tray when DVD Timer recording starts. - When you go into Media browser, SETUP, Timer Recording menu after Timer Recording setup. - When you record the TV signal after Timer Recording setup. - When you play titles after Timer Recording setup. • The HDD/DVD Recorder will automatically power off when the Timer Recording ends. • There is a short delay when a timer recording Please choose your preferred method for scheduling Manual edit timerVideoPlus VideoPlus Please enter your VideoPlus Code. Instructions: ––––––––– Enter-Confirm Setup-Exit Move …† 3 Select ‘VideoPlus’ with […/†] and confirm with [ENTER]. The ‘VideoPlus’ menu appears. Enter the entire ‘VideoPlus’ number. This number is up to 9 digits long and can be found next to the start time of the TV programme in your TV listings magazine. e.g.: 5-234-89 or 5 234 89 Enter 523489 for the ‘VideoPlus’ number. If you make a mistake, you can clear it with [CLEAR]. 4 Press [ENTER] to confirm. 43 Downloaded From Disc-Player.com Daewoo Manuals RECORDING 6 Press [SETUP] to exit the Timer Record List. 7 Timer indicator will light or start blinking. You Select Record Method 
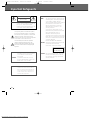
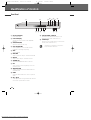
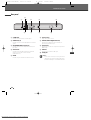
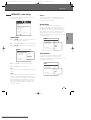
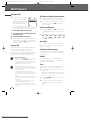
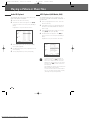
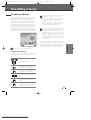
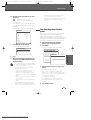
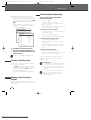
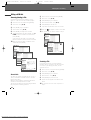
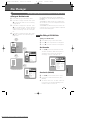
DG-M22-12D1P-XA(GB) 2005.12.22 8:4 AM ˘ ` 44 mac001 1200DPI 100LPI Timer Recording 5 The decoded information appears after confirmation. You can go back at any time to change the information by pressing [ENTER]. Select the appropriate input field using […†]. If required, change the information using […†]. If all the information is correct, press the [ENTER] button. The programming information is stored in a TIMER block. Timer Recording PR No. Date Start PR-03 02/01 13:30 ---- --/-- --:----- Edit --/---:-Timer ---- Media --/-- --:----- --/-- --:-No. --:----- PR--/----- Date --/-- --:----- Start --/-- --:-End Instructions: Mode Enter-Edit Setup-Exit Repeat Delete Instructions: End Mode 14:30 HQ --:-- ----:-- ----:-- ----:-- --PR-03 --:-- ----:--02/Jan --- Sun 13:30 --:-- --14:30 HQ Move …† Once Enter-Save Setup-Exit 6 Press [SETUP] to exit the Timer Record List. 7 Timer indicator will light or start blinking. You must power off the HDD/DVD Recorder to start the Timer Recording. Timer Recording Troubleshooting Even if a Timer Recording is set, the HDD/DVD Recorder will not record if: • No disc is loaded. • A non-recordable disc is loaded. • ‘Lock Disc’ is set to ON in the DISC Settings menu; see page 54. • There are already 49 titles recorded on the disc or 254 titles recorded on the HDD. You cannot enter a Timer Recording if: • A recording (dubbing, copying) or playing titles is already under way. • The start time has already passed. • Eight Timer Recordings have already been set. If two or more Timer Recordings overlap: • The earlier program takes priority. • When the earlier program finishes, the later program starts. • If two programs are set to start at exactly the same time, the program entered first takes priority. Confirmation is not possible when: • The DISC Lock setting is set to ON. • There are already 49 titles recorded on the disc or 254 titles recorded on the HDD. VideoPlus is not available for some countries. Canceling a Timer Recording You can clear a Timer Recording any time before the recording actually starts. • Use […†] to select the program you want to erase on the Timer Recorder List, then press [ENTER] to modify it. Use [œ √] to select 'Delete' then press [ENTER]. Or just press [CLEAR] on the Timer Recorder List. Stopping a Timer Recording in Progress After a Timer Recording has started, you can still cancel the program by pressing and holding [STOP] for 5 seconds. 44 Downloaded From Disc-Player.com Daewoo Manuals If the disc is damaged, the recording may not complete successfully, even if the Check field shows ‘Rec. OK‘. Recording Priority • Timer Recording and OTR (One Touch Record) have the same priority but they have lower priority than manual recording. During manual recording, Timer Recording or OTR will be ignored. The cooling fan continues to work when a Timer recording is set and VPS/PDC is turned ON, because the HDD/DVD Recorder has to get time data from the station. DG-M22-12D1P-XA(GB) 2005.12.22 8:4 AM ˘ ` 45 mac001 1200DPI 100LPI Recording from an External Input Recording from External Components You can record from an external component, such as a camcorder, VCR or Digital Camera, connected to any of the HDD/DVD Recorder’s external inputs. 1 Make sure the component you want to record from is connected properly to the HDD/DVD Recorder; see pages 15~17. 2 Use [PR+/–] or [INPUT] to select the external input to record from. 3 Load a recordable disc if you are recording onto a DVD. And then select HDD or DVD to record. 4 Set the desired Recording mode by pressing [REC SPEED] repeatedly. Available disc (or HDD) space will be displayed by selecting recording mode. 5 Press [REC (●)] once. Recording will start. The REC indicator lights on the front panel display. Recording continues until you press [STOP] or the disc (or HDD) is full. To record for a fixed length of time, see ‘One Touch Record‘ on page 41. 6 Press [STOP (■)] to stop recording. RECORDING • If your source is copy-protected, you will not be able to record it using the HDD/DVD Recorder. See ‘Copyright Notice‘ on page 8 for more details. 45 Downloaded From Disc-Player.com Daewoo Manuals DG-M22-12D1P-XA(GB) 2005.12.22 8:4 AM ˘ ` 46 mac001 1200DPI 100LPI Dubbing Dubbing will copy the selected titles (+VR format) with the same properties (title name, duration, index picture, chapter mark) in HDD Videos to DVD or vice versa. The Media BROWSER can not be activated in the middle of dubbing, that means play, stop, any edits does not work. Dubbing from HDD to DVD 1 Prior to selecting titles for dubbing, you need to HDD to DVD Dubbing Add Start Dubbing 1. Title PR-01 ---2. Title PR-02 ---3. Title PR-03 ---4. Title PR-04 ---5. Title PR-05 ---6. Title PR-06 ---Dub : 0 Titles 7. Title PR-06 ---8. Title PR-06 ---9. Title PR-06 ---10. Title PR-06 ---HDD Space : 99% 13 Titles 1/13 …† Move-…†œ √HDD Select-ENTER Back-MENU Exit-SETUP to DVD Dubbing insert a recordable disc into the tray. Add Start Dubbing The DVD+HDD Combination may take a few moments to format the disc if it is used for the first time, determine compatibility and free recordable space. During this time you will see the Disc Loading logo. Dub : 1 Titles 2 Press [DUB], then 'Media Dubbing' appears. You can see the titles in your HDD browser and will select them to be dubbed to DVD. HDD to DVD Dubbing This will dub 1 title(s) The Time Shift Buffer will stop Continue? Yes No HDD Space : 99% 13 Titles 1/13 …† Move-…†œ √ Select-ENTER Back-MENU Exit-SETUP HDD to DVD Dubbing Completed 3 Select 'HDD to DVD' using […†] and press [ENTER]. 4 Select the title you want to dub using […†] and press [ENTER] to add. Then select more titles using […†] and press [ADD]. Repeating the same process, you can add many titles. You can see charged space you selected in DVD with progress bar in red, also how many titles you selected to be dubbed and free space in DVD. 5 If you select all the titles you want to dub, select ‘Start Dubbing’ using […†]. Press [ENTER] to confirm, then Dubbing will be started. Media Dubbing HDD to DVD DVD to HDD HDD to DVD Dubbing Date : 22/06/05 Time : 11/16 Length : 00:13 Quality : HQ 1. Title PR-01 ---2. Title PR-02 ---3. Title PR-03 ---4. Title PR-04 ---5. Title PR-05 ---6. Title PR-06 ---Dub : 0 Titles 7. Title PR-06 ---Move-…†œ √ Select-ENTER Back-MENU 8. Title Exit-SETUP PR-06 ---9. Title PR-06 ---10. Title PR-06 ---HDD Space : 99% 13 Titles 1/13 …† Move-…†œ √ Select-ENTER Back-MENU Exit-SETUP 46 Downloaded From Disc-Player.com Daewoo Manuals When dubbing process is completed, the tray will be open automatically. DG-M22-12D1P-XA(GB) 2005.12.22 8:4 AM ˘ ` 47 mac001 1200DPI 100LPI Media files Copying Dubbing from DVD to HDD 1 Prior to selecting titles for dubbing, you need to insert a disc to be dubbed into the tray. Press [DUB], then 'Media Dubbing' appears. 2 3 Select 'DVD to HDD'' using […†] and press [ENTER]. 4 Select the title you want to dub using […†] and press [ENTER] to add. Then select more titles using […†] and press [ADD]. Repeating the same process, you can add many titles. 5 If you select all the titles you want to dub, select ‘Start Dubbing’ using […†]. Press [ENTER] to confirm, then Dubbing will be started. Media Dubbing HDD to DVD DVD to HDD Copying and Editing media file (DVD, HDD) Copying will copy the media files (jpg, mp3) in HDD Media to DVD, or vice versa. HDD Media to HDD Media copy (DVD to DVD) is also available. If you want to copy media files on your DVD to HDD, these files will be saved in each category (HDD Pictures, Music) of HDD Media and they cannot be saved in HDD Video. The folders in the HDD media browser can be viewed in any category, but the jpg files in folders can only be viewed in HDD Pictures. Mp3 files in the folder can only be viewed in the same way and either in DVD Media browser. If you want to copy media files in HDD Media to your DVD, Disc recorded with DVD Video format cannot be supported. Media BROWSER can not be activated in the middle of Copying, that means play, stop, any edits do not work. 1 Select the desired media to copy from. Then enter the HDD Media Browser (or DVD Media Browser). DVD to HDD Dubbing Date : 22/06/05 Time : 11/16 Length : 00:13 Quality : HQ 1. Title PR-01 ---2. Title PR-02 ---3. Title PR-03 ---4. Title PR-04 ---Move-…†œ √ Select-ENTER Back-MENU 5. Title Exit-SETUP PR-05 ---DVD6.toTitle HDD Dubbing PR-06 ---Title PR-01 ---Dub : 0 TitlesAdd 7. Title PR-061.---Start8.Dubbing Title PR-02 ---Title PR-062.---Title PR-03 ---9. Title PR-063.---4. Title 10. Title PR-06 ---- PR-04 ---5. Title PR-05 ---DVD Space : 99% 13 Titles 6.1/13 …† ---Title PR-06 DVD to :HDD Dubbing 0 Titles 7. Title PR-06 ---Move-…†œ √ Dub Select-ENTER Back-MENU Exit-SETUP Add 8. Title PR-06 ---Start Dubbing DVD 9. to Title HDD PR-06 Dubbing ---This will dub 1PR-06 title(s) 10. Title ---The Time Shift Buffer will stop DVD Space :Continue? 99% 13 Titles 1/13 …† Yes Select-ENTER Back-MENU Exit-SETUP Dub :Move-…†œ 1 Titles √ No Use […†] to select HDD Pictures or HDD Music (or DVD Pictures or DVD Music), then press [ENTER]. RECORDING DVD Space : 99% 13 Titles Press [MENU] to enter the HDD Media Browser (or DVD Media Browser). HDD Media Browser HDD Pictures HDD Music 55 Pictures Files DVD Browser DVD Pictures DVD Music 1/13 …† 55 Pictures Files to HDD Move-…†œ √ Select-ENTER DVD Back-MENU Exit-SETUP Dubbing Completed 2 If you want to edit a folder including copy, select the folder you want to edit using […†] and press [EDIT]. - Create Folder : Create folder where you want - Delete Folder 47 Downloaded From Disc-Player.com Daewoo Manuals DG-M22-12D1P-XA(GB) 2005.12.22 8:4 AM ˘ ` 48 mac001 1200DPI 100LPI Media files Copying - Copy Folder : Copy folders including all files in the folder. - Rename Folder HDD Music Create Folder Delete Folder Copy Folder Rename Folder DVIX/ 1/ MU/ 02_LIVIN ON PRAYER.MP3 Select the title you want to copy using […†]. Then select 'Edit‘ using […†] and press [ENTER]. HDD Music 6 After selecting the destination to be copied, select 'Copy here' and press [ENTER]. Select 'YES' and press [ENTER] to confirm, the Copy process will be started. Copy Completed Play View Info Edit DVIX/ 1/ MU/ 02_LIVIN ON PRAYER.MP3 HDD Music DVIX/ 1/ 4/4 …† MU/ 02_LIVIN ON PRAYER.MP3 Move-…†œ √ Select-ENTER Back-MENU Exit-SETUP 4572 MB Free - Open : Open the media and folder you want to copy to. - Copy Here : Copy to the media immediately after confirmation message. - Create folder : Create folder in the media you want to copy to. Whole copy process is displayed with a percent unit on the upper right corner. Delete Copy 4Create ItemsFolder 3 Select 'Copy‘ using […†] and press [ENTER]. Or If you press [DISPLAY] button, progress bar per each file (or folder) is displayd on the lower part. just press [DUB]. Using the same procedure as Dubbing, repeat the process; select the titles using […†] and press [ADD], you can add as many titles you want. ‘Media Copy’ will appear. 4 Select 'Done' and press [ENTER] after selecting all the titles you want to copy, and then 'Media Copy - Select Destination' appears. 5 Select the media you want to copy to and press [ENTER]. HDD Media Copy Remove Done Copy : 1 files 7MB DVIX/ 1/ MU/ 02_LIVIN ON PRAYER.MP3 HDD Media Copy - Select Destination Open HDD Copy Here DVD 4 Items 4/4 …† Create Folder Move-…†œ √ Select-ENTER Back-MENU Exit-SETUP Copy : 1 files 296 KB 4572 MB Free 48 Downloaded From Disc-Player.com Daewoo Manuals • DivX copy works only in Divx model. • To format a DVD±RW disc that contains media files (mp3, jpg), press [SETUP] to return to DVD-EE MODE. Press [REC] and then [YES] to confirm, the disc format will be started. • When the copy process is completed the tray will open automatically. • HDD Media (Picture,Music) capacity is limited to 10% of HDD. (Approx. 16GB for 160GB Model, 8GB for 80GB Model) DG-M22-12D1P-XA(GB) 2005.12.22 8:4 AM ˘ ` 49 mac001 1200DPI 100LPI HDD Playback and Editing This section explains various functions of HDD editing. At first, go to ‘HDD Videos’ mode. 1 Press [HDD] to select HDD Or press [PLAY/PAUSE] to play the title. 6 To stop playback at any time, press [STOP]. Then it will return to media browser. 7 To leave the media browser mode, press [SETUP]. mode. HDD Selected Actions are now for HDD √ Live Still Picture and Frame-by-Frame Playback, Fast Forward/Backward, Slow Motion, Zoom, A-B, Search , Selecting Titles 2 Press [MENU] to enter the media browser. Same with ‘DVD Playback’. (Fast rewind : x4, x8, x16, x32) 3 While ‘HDD Videos‘ is selected, press [ENTER] to go to the ‘HDD Videos’ page. Repeat Media Browser HDD Videos HDD Media DVD Multimedia files HDD Videos Date : 22/06/05 Time : 11/16 Length : 00:13 Quality : HQ 1. Title PR-01 ---2. Title PR-02 ---3. Title PR-03 ---4. Title PR-04 ---Move-…† Select-ENTER Back-MENU Exit-SETUP 5. Title PR-05 ---6. Title PR-06 ---7. Title PR-06 ---8. Title PR-06 ---9. Title PR-06 ---10. Title PR-06 ---Free Space : 99% 13 Titles 1/13 …† Playing a HDD title Follow these instructions to play back a scene from the Title List. Select the title to playback using [ENTER]. Then select ‘Play‘ using [… †]. Press [ENTER] to play the title. HDD Videos Play Delete Edit Sort Dubbing 1. Title PR-01 ---2. Title PR-02 ---3. Title PR-03 ---4. Title PR-04 ---5. Title PR-05 ---6. Title PR-06 ---7. Title PR-06 ---8. Title PR-06 ---9. Title PR-06 ---10. Title PR-06 ---Free Space : 99% 13 Titles 1/13 …† Move-…† Select-ENTER Back-MENU Follow these instructions to delete a title from the Title List. 4 5 6 7 Select the title to be erased using [ENTER]. Then select ‘Delete‘ using [… †]. Press [ENTER] to erase the title. Select 'Yes' and press [ENTER] to confirm. HDD Videos Play Delete Edit Sort Dubbing 1. Title PR-01 ---2. Title PR-02 ---3. Title PR-03 ---4. Title PR-04 ---5. Title PR-05 ---6. Title PR-06 ---7. Title PR-06 ---HDD Videos 8. Title PR-06 ----PR-01 ---Play 1. Title ----PR-02 ---Delete 9. Title PR-06 2. Title 10. Title PR-06 Edit 3. Title---PR-03 ---PR-04 ---Free SpaceSort : 99% 13 Titles 4. Title 1/13 …† Dubbing 5. Title PR-05 ---Move-…† Select-ENTER Back-MENU 6. Title PR-06 ---7. Title PR-06 ---8. Title PR-06 ---HDD Videos 9. Title PR-06 ---Play 10. Title PR-06 ---Delete Delete Title Free Space : 99% 13 TitlesAre you1/13 …† Edit sure you want to delete? Sort Move-…† Select-ENTER Back-MENU Dubbing YES NO Free Space : 99% 13 Titles 1/13 …† Move-…† Select-ENTER Back-MENU 49 Downloaded From Disc-Player.com Daewoo Manuals EDITING 4 5 Deleting a HDD title RECORDING Move-…† Select-ENTER Back-MENU Exit-SETUP While playing the HDD, each press of the [REPEAT] button changes the repeat mode as follows: Chapter ➝ Title ➝ Disc ➝ off ➝ Chapter ... DG-M22-12D1P-XA(GB) 2005.12.22 8:4 AM ˘ ` 50 mac001 1200DPI 100LPI HDD Playback and Editing Editing a HDD title Renaming (Labeling) a Title Follow these instructions to rename a title list name,i.e., to edit the title of a recorded program. 4 5 6 7 8 9 Select the title to be labeled using [ENTER]. Select ‘Edit’ using [… †] . Press [ENTER] to go to submenu. Select ‘Name’ using [… †] . Press [ENTER] to change the title name. 4 5 6 7 8 9 10 11 The Keyboard Menu will be displayed. Use [œ √…†] to select a character or function and press [ENTER]. Play Delete Edit Sort Dubbing 1/13 …† Move-…† Select-ENTER Back-MENU Parental Lock This menu will appear only when you set to 'On' in 'Setup - Preferences - Parental Controls - Set Hdd Parental Lock' menu. When you lock a program, the parental password selected in the Setup menu will be used. The user will be asked to Unlock the program before Play or any Edit or Dubbing operation. 50 Downloaded From Disc-Player.com Daewoo Manuals Select ‘Parental Lock’ using [… †] . Press [ENTER] to lock the title. If you enter the password, the title is locked. Lock icon ‘ ’ will appear in front of Title name. To ‘Unlock’ the title, select ‘Unlock’ in step 7. 1. Title PR-01 ---2. Title PR-02 ---3. Title PR-03 ---4. Title PR-04 ---5. Title PR-05 ---6. Title PR-06 ---7. Title PR-06 ---8. Title PR-06 ---9. Title PR-06 ---HDD Videos 10. Title PR-06 ----PR-01 ---Date : 22/06/05 1. Title Free SpaceTime : 99%: 11/16 13 Titles 2. Title 1/13PR-02 …†---Length : 00:13 3. Title PR-03 ---Move-…† Quality Select-ENTER : HQ Back-MENU 4. Title PR-04 ---5. Title PR-05 ---6. Title PR-06 ---7. Title PR-06 ---8. Title PR-06 ---9. Title PR-06 ---10. Title PR-06 ---Free Space : 99% 13 Titles 1/13 …† HDD Videos Free Space : 99% 13 Titles Press [ENTER] to go to submenu. Name Parental Lock Unprotect Video Edit After the new title name is complete, select ‘SAVE’ and press [ENTER]. 1. Title PR-01 ---2. Title PR-02 ---3. Title PR-03 ---4. Title PR-04 ---5. Title PR-05 ---6. Title PR-06 ---HDD Videos 7. Title PR-06 ------- PR-01 ---Name 8. Title PR-06 1. Title Title PR-06 ---- PR-02 ---Parental9.Lock 2. Title 10. Title PR-06 ----PR-03 ---Unprotect 3. Title Free Space Video : 99% Edit 13 Titles 4. Title 1/13PR-04 …†---5. Title PR-05 ---Move-…† Select-ENTER Back-MENU 6. Title PR-06 ---Title PR-06 ---HDD7. Videos 8. Title PR-06 ---Name9. Title PR-06 ---Title PR-01 ---Parental 10. Lock Title PR-06 ---Unprotect CLR SP DEL SAVE Free Space : 99% Titles 1 1/13 Video13 Edit 2 3 4…† 5 6 7 8 9 0 AB C DE F G H I J Move-…† Select-ENTER Back-MENU K LMNO PQ R ST UVWXY Z ( ) . , : ; & ! Select ‘Edit’ using [… †] . HDD Videos CLR : Clear the title name / SP : Space / DEL : Delete a character / SAVE : Save the title name 10 Select the title to be locked using [ENTER]. Move-…† Select-ENTER Back-MENU Protecting a Title If you want to protect a title from accidental recording, editing, or erasing, you can protect the title. Later, if you change your mind, you can unprotect the title. 4 5 6 7 8 9 Select the title to be protected using [ENTER]. 10 To ‘Unprotect’ the title, select ‘Unprotect’ in step 7. Select ‘Edit’ using [… †] . Press [ENTER] to go to submenu. Select ‘Protect’ using [… †] . Press [ENTER] to protect the title. Protect icon will appear at the back of Title name. DG-M22-12D1P-XA(GB) 2005.12.22 8:4 AM ˘ ` 51 mac001 1200DPI 100LPI HDD Playback and Editing HDD Videos Name Parental Lock Protect Video Edit 1. Title PR-01 ---2. Title PR-02 ---3. Title PR-03 ---4. Title PR-04 ---Title PR-05 ---HDD5.Videos Title PR-061.---Date 6. : 22/06/05 Title PR-01 ---Title PR-062.---Time7.: 11/16 Title PR-02 ---8. :Title PR-063.---Length 00:13 Title PR-03 ---9. Title Quality : HQ PR-064.---Title PR-04 ---10. Title PR-06 ---- PR-05 ---5. Title 6. Title PR-06 ---Free Space : 99% 13 Titles 1/13 …† 7. Title PR-06 ---Move-…† Select-ENTER Back-MENU 8. Title PR-06 ---9. Title PR-06 ---10. Title PR-06 ---Free Space : 99% 13 Titles 1/13 …† Move-…† Select-ENTER Back-MENU • Hide Chapter : Use to hide or unhide chapter markers in the title. Depending on whether a chapter is currently hidden or unhidden, one of the following options will be available : Hide : press [ENTER] to hide the current chapter during playback. Unhide : press [ENTER] to unhide the current chapter during playback. Note : You can use this feature to remove commercials during playback by inserting chapter markers at the start and end of a commercial interruption and hiding the chapter created. • Change Index Picture : Use to edit the title index picture. When highlighted by pressing [ENTER], the image on the screen is used as the new title index picture. Editing a Title 4 Select the title to be edited using [ENTER]. 5 Select ‘Edit’ using [… †] . 6 Press [ENTER] to go to submenu. 7 Select ‘Video Edit’ using [… †] . 8 Press [ENTER] to go to HDD Edit menu. 9 The HDD Edit Menu will be displayed. • Split Title : Use to divide the title into two separate titles. When highlighted by pressing [ENTER], the current title is divided into two separate titles at the point where [ENTER] is pressed. HDD Videos Name Parental Lock Unprotect Video Edit 1. Title PR-01 ---2. Title PR-02 ---3. Title PR-03 ---4. Title PR-04 ---5. Title PR-05 ---6. Title PR-06 ---7. Title PR-06 ---HDD8.Edit Title PR-06 ---Title9. Title PR-06 ---1 of 2 10. ChapterTitle PR-061 ---of 11 Edit Chapters Free Space : 99% 13 Titles 1/13 …† • Title : Press [ENTER] and select the title you want to edit using [… †]. Hide Chapter Change Index Picture Split Title • Chapter : Move-…† Select-ENTER Back-MENU Press [ENTER] and select the chapter you want to edit using [… †]. Instructions: Enter-Confirm Setup-Exit Move …† Use to create, delete and edit chapter markers in the title. Use the cursor button to choose one of the following options : Add : when highlighted, creates a new chapter marker at the point in the title where [ENTER] is pressed. Delete : when highlighted and [ENTER] is pressed, deletes the last chapter that was created in the title. Delete all : when highlighted and [ENTER] is pressed, deletes all chapter markers within the title. • • • Please note that any edits made will not be in effect until [MENU] or [STOP] button is pressed. During this time, the HDD/DVD Recorder will update the title with the edits made. Once the update is complete, the edits will be available the next time the title edited is played back. Press [MENU] or [STOP] to exit from editing menu. You can enter into HDD Edit menu directly by pressing [EDIT] button. 51 Downloaded From Disc-Player.com Daewoo Manuals EDITING • Edit Chapters : DG-M22-12D1P-XA(GB) 2005.12.22 8:4 AM ˘ ` 52 mac001 1200DPI 100LPI HDD Playback and Editing Sorting a HDD title Dubbing a HDD title to DVD disc Follow these instructions to sort a title from the Title List by varying the order. Follow these instructions to copy the title(s) selected with the same properties (title name, duration, index picture, Lock, Chapter Mark) information over to DVD. 4 5 6 7 8 Select the title to be sorted using [ENTER]. Then select ‘Sort‘ using [… †]. Press [ENTER] to go to submenu. Select ‘Record Date’ using [… †] . 4 5 6 Select the title to be dubbed using [ENTER]. 7 The ‘HDD to DVD Dubbing’ Menu will be displayed. For more detailed information about ‘HDD to DVD Dubbing’ procedure, go to page 46. Press [ENTER] to sort the list by record date. Record Date : sorts by record date. Alphabetical : sorts by alphabetical order. Delete Order : sorts by record date and displays protected titles at the end. Protected : sorts by protected titles. HDD Videos Play Delete Edit Sort Dubbing 1. Title PR-01 ---2. Title PR-02 ---3. Title PR-03 ---4. Title PR-04 ---5. Title PR-05 ---HDD6.Videos Title PR-06 ---7. Title Record Date PR-061.---Title PR-01 ---8. Title PR-062.---Alphabetical Title PR-02 ---9. Order Title PR-063.---Delete Title PR-03 ---10. Title PR-06 ---- PR-04 ---Protected 4. Title Title…† PR-05 ---Free Space : 99% 13 Titles 5.1/13 6. Title PR-06 ---Move-…† Select-ENTER Back-MENU 7. Title PR-06 ---8. Title PR-06 ---9. Title PR-06 ---10. Title PR-06 ---Free Space : 99% 13 Titles 1/13 …† Move-…† Select-ENTER Back-MENU 52 Downloaded From Disc-Player.com Daewoo Manuals Then select ‘Dubbing‘ using [… †]. Press [ENTER] to go to ‘HDD to DVD Dubbing’ menu. HDD Videos Play Delete Edit Sort Dubbing 1. Title PR-01 ---2. Title PR-02 ---3. Title PR-03 ---4. Title PR-04 ---5. Title PR-05 ---6. Title PR-06 ---Title PR-06 ---HDD7. to DVD Dubbing 8. Title PR-06 ---Date 9. : 22/06/05 Title PR-01 ---Title PR-061.---Time10. : 11/16 2. Title Title PR-06 ---- PR-02 ---Length : 00:13 3. Title PR-03 ---Free Space : 99% 13 :Titles Quality HQ 4.1/13 Title…† PR-04 ---5. Title PR-05 ---Move-…† Select-ENTER Back-MENU 6. Title PR-06 ---Dub : 0 Titles 7. Title PR-06 ---8. Title PR-06 ---9. Title PR-06 ---10. Title PR-06 ---Free Space : 99% 13 Titles 1/13 …† Move-…† Select-ENTER Back-MENU DG-M22-12D1P-XA(GB) 2005.12.22 8:4 AM ˘ ` 53 mac001 1200DPI 100LPI Disc Manager This section explains edit functions for the entire disc and for the titles in the disc. At first, go to ‘Disc Menu’ mode. 1 Press [MENU] to go to ‘Disc Menu’ menu. 2 If you want to display ‘Title Edit’ menu, press [√] in ‘Disc Menu’ menu. Go to ‘Title Editing’ on page 56~57. 3 If you want to display ‘Disc’ top menu, press […] in ‘Disc Menu’ menu. The Disc top Menu shows you disc information, such as disc type, number of recordings, total titles, free space, etc. 4 If you want to display ‘Disc Edit’ menu, press [√] ‘Disc’ top menu. Go to ‘Disc Editing’ on page 53~55. 1 2 3 … † 1. TITLE 02/01/2004 03:24:48 HQ 00:03:21 2. TITLE 02/01/2004 03:24:48 SP 00:01:12 EMPTY TITLE Disc Editing in DVD±RW disc At first, go to ‘Disc Edit’ mode. Press [MENU] then √ For recordable DVD media, such as DVD±R and DVD±RW discs, you can manage the disc using the Disc Menu. The DVD±R Disc Menu allows you to rename your disc or finalise it so it will be compatible with most other DVD players. The DVD±RW Disc Menu allows you to erase, lock, or unlock your disc. You can also make it compatible with most other DVD players. EMPTY MY DVD DVD √ Play Title † Press [Enter] to begin playback of title. NTSC EMPTY Instructions: Enter-Confirm 02/01/2004 √ 06:43:08 Press [√]. ‘Disc Edit’ menu will be displayed. The Disc ‘Information’ Menu shows you disc information, such as disc type, number of recordings, total titles, free space, etc. … Step1] ‘Disc Menu’ menu NTSC Press […]. ‘Disc’ Top menu will be displayed. Disc Information 4 Use [œ/√] to select the ‘Information’ menu. Press [√] then Press […] then Press [MENU] to go to ‘Disc Menu’ menu. DVD Step2] ‘Title Edit’ menu EDIT EDIT † † EDIT † Type DVD+RW Recordings 5 Total Title 00:57:57 Free Space 01:48:48 Finalized Locked No Compatible Yes Instructions: Setup-Exit NTSC DVD Information √ EDITING Step3] ‘Disc’ top menu Press [√] then √ Information Type Recordings Total Title Free Space Finalized Locked Compatible DVD+RW 5 00:57:57 01:48:48 No Yes Instructions: Setup-Exit Erase the disc (DVD±RW) 4 Use [œ/√] to select ‘Erase the disc’ menu. 5 If you want to erase the whole disc, press [ENTER]. Step4] ‘Disc Edit’ menu 6 To confirm, select ‘Yes‘. To cancel, select ‘No‘. If you select ‘Yes‘ and press [ENTER], all the contents of the disc will be lost. 53 Downloaded From Disc-Player.com Daewoo Manuals DG-M22-12D1P-XA(GB) 2005.12.22 8:4 AM ˘ ` 54 mac001 1200DPI 100LPI Disc Manager Make Compatible Erase the disc Press [Enter] if you want to erase the disc. All the disc Erase existing recordings will be cleared. Erase the disc? All recordings will be lost. Yes No 'Make Compatible' for a DVD+RW will automatically create a menu screen for navigating the disc. This menu screen is accessible by pressing [TITLE]. 4 Use [œ/√] to select ‘Make Compatible‘ for DVD+RW. Press [ENTER] as shown on the screen. 5 Select 'Yes' using […] and press [ENTER] to make the disc compatible. 6 7 Press [ENTER] again. Instructions: Enter-Confirm Instructions: Enter-Confirm Move …† DVD±R discs cannot be locked (unlocked) or erased. Press [SETUP] to go to the top disc menu. Lock/Unlock Disc (DVD±RW) If you want to protect a disc from accidental recording, editing, or erasing, you can lock the disc. Later, if you change your mind, you can unlock the disc. 4 5 6 7 Use [œ/√] to select ‘Lock/Unlock Disc’. Press [ENTER] as shown on the screen. You can see the current disc status (Locked or Unlocked). Press [Enter] to make any previous title editing compatible with your DVD player. Make Compatible Lock/Unlock Disc Press [Enter] to lock the disc. This prevents future disc operations or recordings. Instructions: Enter-Confirm You can change the disc status by selecting ‘Yes‘ and pressing [ENTER]. The ‘Changing Disc Status’ bar will appear. This process takes a few seconds. After the process is finished the menu disappears automatically. Make Compatible Lock/Unlock Disc Disc is unlocked. Do you want to lock it? Yes No Lock/Unlock Disc Changing disc lock status. Instructions: PleaseMove wait…† a moment.... Enter-Confirm 54 Downloaded From Disc-Player.com Daewoo Manuals Instructions: Enter-Confirm Make disc compatible with your DVD player. Yes No Make Compatible Finished. This Disc should already be compatible. ok Instructions: Enter-Confirm Move …† Instructions: Enter-Confirm Move …† • ‘Make Compatible’ can take up to 3-4 minutes depending on the type of disc, how much is recorded on the disc, and the number of titles on the disc. • If you do not make your DVD+RW disc compatible, your edits will not be recognized by other DVD players. • It may take over 7 minutes for finalizing the edited disk, you must wait till the set finishes the finalizing operation. DG-M22-12D1P-XA(GB) 2005.12.22 8:4 AM ˘ ` 55 mac001 1200DPI 100LPI Disc Manager Disc Editing in DVD±R, DVD-RW disc Change Disc Name You can rename your disc to any name you choose. The default disc name is ‘MY DVD‘. 4 Use [œ/√] to select ‘Change Disc Name‘. Press [ENTER] as shown on the screen. 5 6 The Keyboard Menu appears. Finalising a DVD±R (or DVD-RW) ‘locks’ its recordings in place so the disc can be played on most standard DVD players or computers equipped with DVD-ROM drives. 4 Use [œ/√] to select ‘Finalise Disc‘ for a DVD±R (or DVD-RW). Press [ENTER] as shown on the screen. 5 Select 'Yes' using […] and press [ENTER] to finalise the disc. 6 7 Press [ENTER] again. Use [œ √…†] to select and press [ENTER] to enter the name of the disc. CLR : Clear the disc name / SP : Space / DEL : Delete a character / SAVE : Save the disc name 7 8 Finalise Press [ENTER] again. To save the name of the disc, select ‘SAVE‘ and press [ENTER]. If ‘Lock Disc’ is set to ‘On’ in the DISC Settings menu, you cannot rename your disc; see page 54. Change Disc Name Press [SETUP] to go to the top disc menu. Once you have finalised a DVD±R (or DVD-RW) disc, you cannot edit or record anything else on that disc. Finalise Disc Finalise Disc Press [Enter] if you want to finalise the disc. No changes can be made afterwards. Continue? Yes No Instructions: Enter-Confirm Instructions: Enter-Confirm Move …† Press [Enter] to change the disc name. Change Disc Name MY DVD CLR SP 1 2 3 4 5 ABC D E Instructions: Enter-Confirm K L M N O U VW X Y : ; & DEL 6 7 F G P Q Z ( SAVE Disc Name 8 9 Change 0 H I Problem. J R S This T disc is locked. It ) . cannot , be renamed. ok Enter-Confirm Move …† Instructions: Enter-Confirm Move …† EDITING 55 Downloaded From Disc-Player.com Daewoo Manuals DG-M22-12D1P-XA(GB) 2005.12.22 8:4 AM ˘ ` 56 mac001 1200DPI 100LPI Disc Manager Title Editing You can manage the titles on your DVD±R/±RW discs using the Title menu. At first, go to ‘Title Edit’ mode. 1 2 Press [MENU] to go to ‘Disc Menu’ menu. 3 Press [√]. ‘Title Edit’ menu will be displayed. Select the desired title you want to manage using […†]. Change Name To change the name of a title: 4 5 6 4 5 7 Select ‘Play Title' using [œ √] . Press [ENTER] to change the title name. The Keyboard Menu will be displayed. Use [œ √…†] to select a character or function and press [ENTER]. CLR : Clear the whole title. / SP : Add a space / DEL : Delete a character / SAVE : Save the title name Play a Title To play a title: Select ‘Change Name’ using [œ √] . After the new title name is complete, select ‘SAVE’ and press [ENTER]. Press [ENTER] to play the title. … √ Change Name Change Name Press [Enter] to change the title name. TITLE CLR SP 1 2 3 4 5 ABC D E K LMN O U VW X Y : ; & Play Title † Press [Enter] to begin playback of title. Instructions: Enter-Confirm EMPTY Instructions: Enter-Confirm Erase a Title 4 Select ‘Erase Title‘ using [œ √]. 5 Press [ENTER] to erase the title. 6 Select 'Yes' and press [ENTER] to confirm. The Erase Title progress bar will be displayed. This may takes several seconds. 7 After erasing is complete, the erased title remains as an empty title. You can erase titles on DVD±RW discs only. Erase Title Erase Title Press [Enter] to erase Erase Title this title. Would you like to Erase the title? Yes Title is being erased. No Instructions: Enter-Confirm Please wait a moment... Instructions: Enter-Confirm Move …† 56 Downloaded From Disc-Player.com Daewoo Manuals DEL 6 7 F G P Q Z ( SAVE 8 9 0 H I J R S T ) . , Enter-Confirm Move …† DG-M22-12D1P-XA(GB) 2005.12.22 8:4 AM ˘ ` 57 mac001 1200DPI 100LPI Disc Manager Advanced Disc Editing Record Option To set DVD±R and DVD±RW recording options: 4 Select ‘Record Options’ using [œ √] and press [ENTER]. 5 Select your preferred record options for each disc type: For DVD±R The last recorded title : Allows you to append your new recording to the end of your last recording, or record it as a new title. Others : Allows you to record your new title until the end of the disc. When you insert a DVD±R or DVD±RW disc already recorded by your HDD/DVD Recorder, you can edit the titles and chapters in a variety of ways. At first, go to ‘DVD Edit’ mode. 1 2 Press [MENU] to go to ‘Disc Menu’ menu. 3 Press [EDIT]. ‘DVD Edit’ menu will be displayed. Select the recorded title you want to edit using […†]. … √ † 2. TITLE 02/01/2004 03:24:48 SP 00:01:12 For DVD±RW The last blank title : Allows you to record your new title until the end of the disc. The last recorded title : Allows you to record over your last recorded title and then stop. Allows you to record over your last recorded title and continue recording until the end of the disc. Allows you to append your new recording to the end of your last recording. (option) Others : Allows you to record over the title and then stop. Allows you to record over the title and continue recording until the end of the disc. Record Options Press [Enter] to select a method for overwriting this title. You can choose Overwrite then stop Overwrite and continue (Append to existing) Instructions: Enter-Confirm Instructions: Enter-Confirm Move …† EMPTY TITLE EMPTY Titles and Chapters When you insert a DVD±R or DVD±RW disc already recorded by your HDD/DVD Recorder, all titles recorded on the disc appear on your screen. If a selected title has chapters, you can skip to the next or previous chapter by pressing [NEXT] or [PREV]. You can also see how many chapters are in a title by pressing [DISPLAY] during playback. Title To select a specific title: DVD Edit Title 1 of 2 Chapter 1 of 11 Select Title … Edit Chapters Hide Chapter 1 of 2 Change Index Picture † Split Title 1 Use […†] to select ‘Title‘. 2 Press [ENTER] to display the submenu. 3 Use […†] to select the desired title number and then press [ENTER]. Instructions: Enter-Confirm Setup-Exit Move …† Chapter As overwriting function may take several minutes to finish and save recording, we recommend to delete the title and record function. To select a specific chapter: 1 Use […†] to select ‘Chapter‘. 2 Press [ENTER] to display the submenu. 3 Use […†] to select the DVD Edit Title 1 of 2 Chapter 1 of 11 Edit Chapters Hide Chapter Select Chapter… Change Index Picture 1 of 11 † Split Title Instructions: Enter-Confirm Setup-Exit Move …† 57 Downloaded From Disc-Player.com Daewoo Manuals EDITING Record Options 1. TITLE 02/01/2004 03:24:48 HQ 00:03:21 DG-M22-12D1P-XA(GB) 2005.12.22 8:4 AM ˘ ` 58 mac001 1200DPI 100LPI Disc Manager desired chapter number and then press [ENTER]. Edit Chapters You can add a chapter marker anywhere in a title during playback. Once the chapter is marked, you can use the chapter search feature as described above. You can add/delete chapter markers or delete all chapter markers in a title. 1 Use […†] to select ‘Edit Chapters‘. 2 Press [ENTER] to display the submenu. 3 Use […†] to select one of the various chapter marker functions (Add, Delete, or Delete All). 4 Title 1 of 2 Chapter 1 of 11 Edit Chapters Hide Chapter Change Index Picture Choose the edit Split Title Delete All Press [ENTER] to display the submenu. 3 Use […†] to select ‘Yes‘ if you prefer to change the picture. 4 2 Press [ENTER] to display the submenu. 3 Use […†] to select 'Yes' if you prefer to split the title. 4 DVD Edit Title 1 of 2 Chapter 1 of 11 Edit Chapters Hide Chapter Change Index Picture Split Title Instructions: Enter-Confirm Setup-Exit Move …† Press [ENTER] at the point where you want to divide the title into two separate titles Split the title in two? Yes No Split Title Splitting title into 2 titles. Instructions: Setup-Exit DVD Edit Title 1 of 2 Chapter 1 of 11 Edit Chapters Hide Chapter Change Index Picture Split Title Instructions: Enter-Confirm Setup-Exit Move …† Each title displayed in the Playlist menu is represented by a thumbnail picture taken from the start of that title or chapter. If you prefer, you can select a different still picture from within the title. 2 Use […†] to select 'Split Title'. Please wait a moment.... Change Index Picture Use […†] to select ‘Change Index Picture‘. 1 Function Instructions:Add Enter-Confirm Setup-Exit Delete Move …† Hide Chapters 1 This feature allows you to split a title into two titles. DVD Edit Press [ENTER] to confirm. This feature allows you to hide or unhide a chapter. After hiding a chapter, the chapter is not deleted but only hidden. If a chapter is hidden then it shows ‘Unhide Chapter‘ and vice versa. Split Title DVD Edit Title 1 of 2 Chapter 1 of 11 Edit Chapters Hide Chapter Change Index Picture Split Title Instructions: Change Picture Enter-ConfirmAreSetup-Exit you sure? Move …† Yes No Press [ENTER] when the preferred picture is on your TV screen. 58 Downloaded From Disc-Player.com Daewoo Manuals • Split Title may take several minutes. • After editing is complete, a DVD-RW,DVD±R disc will not be compatible with other DVD players until you make the disc compatible; see page 54~55. DG-M22-12D1P-XA(GB) 2005.12.22 8:4 AM ˘ ` 59 mac001 1200DPI 100LPI Troubleshooting Check the following guide for the possible cause of a problem before contacting customer support. Symptom No power. Cause Solution The power cord is disconnected. Downloaded From Disc-Player.com Daewoo Manuals REFERENCE 59 EDITING Plug the power cord into the wall outlet securely. The TV is not set to receive HDD/DVD Select the appropriate video input on the No picture. Recorder signal output. TV so the picture from the HDD/DVD Recorder appears on the TV screen. The video cable is not connected Connect the video cable securely. securely. The TV power is turned off. Turn on the TV. The equipment connected with the No sound. Select the correct input mode on the audio audio cable is not set to receive receiver so you can listen to the sound HDD/DVD Recorder signal output. from the HDD/DVD Recorder. The audio cables are not connected Connect the audio cables securely. securely. The power on the equipment Turn on the equipment connected with the connected with the audio cable is audio cable. turned off. The audio cables are damaged. Replace with new ones. Playback picture is poor. The disc is dirty. Clean the disc. HDD/DVD Recorder does No disc is inserted. Insert a disc. (Check that the disc not start playback. indicator on the front panel display is lit.) An unplayable disc is inserted. Insert a playable disc. (Check the disc type, colour system, and regional code.) The disc is placed upside down. Place the disc with the playback side down. Place the disc on the disc tray correctly The disc is not placed within the inside the guide. guide. Clean the disc. The disc is dirty. Cancel the Parental Control function or The Parental Control level is set. change the rating level. You cannot connect via the HDD/DVD Picture from external The video signal from the external Recorder. Connect the component input is distorted. component is copy-protected. directly to your TV. Use the ‘Adjust Channels’ feature to Some channels are skipped The skipped channels were deleted restore channels. over when using [PR+/–]. with the ‘Adjust Channels’ feature. Tighten connections or replace cable. Picture or sound of Antenna or cables are loose. broadcasting channel is Wrong Tuning Band is selected in the Try all ‘Auto Set‘ options; see page 21 for details. weak or missing. HDD/DVD Recorder Setup menu. Turn camcorder on and operate properly. Camcorder image not Camcorder is off. shown. Use [INPUT] to select AV input channel Camcorder image via A/V The HDD/DVD Recorder’s source is (AV or AVF). input to HDD/DVD not set to AV or AVF. Recorder is not shown on TV screen. Can’t play disc recorded The disc was not finalised (or not made Finalise the disc; see page 55. on this HDD/DVD compatible if using a DVD+RW). No solution. Recorder on another DVD Some players will not play even a player. finalised disc. No solution. Discs recorded with copy-once material cannot be played on other players. DG-M22-12D1P-XA(GB) 2005.12.22 8:4 AM ˘ ` 60 mac001 1200DPI 100LPI Troubleshooting Symptom Cannot record or did not record successfully. Timer Recording not possible. Stereo Audio Record and/or Playback not present. Remote control does not work properly. Cause Solution The remaining blank space on the disc is insufficient. The source you are trying to record is copy-protected. When setting the recording channel, the channel is tuned on your TV’s tuner. Clock in HDD/DVD Recorder is not set to correct time. Timer has been programmed incorrectly. TIMER indicator light does not appear after programming timer. TV is not Stereo-compatible. Broadcast program is not in stereo format. HDD/DVD Recorder A/V Out jacks are not connected to TV A/V In jacks. Use another disc. You cannot record the source. Select the channel on the HDD/DVD Recorder’s built-in TV tuner. Set clock to correct time. See ‘Set Clock‘ on page 21. Reprogram Timer. See ‘Timer Recording‘ on page 42~44. Reprogram Timer. No solution. No solution. Make A/V connections. Stereo is available only via A/V output from HDD/DVD Recorder. HDD/DVD Recorder Audio/Video Out is Select AUX or A/V source as TV input. not selected for viewing at the TV. Set TV audio channel mode to Stereo. HDD/DVD Recorder’s TV audio channel is set to BIL or MONO. See ‘Changing the TV Audio Channel‘ on The remote control is not pointed at page 33. the remote sensor of the HDD/DVD Point the remote control at the remote Recorder. sensor of the HDD/DVD Recorder. The remote control is too far from the HDD/DVD Recorder. Operate the remote control within 23 ft There is an obstacle in the path of the (7m). remote control and the HDD/DVD Remove the obstacle. Recorder. The batteries in the remote control are dead. Replace the batteries. RESET : If the set is in malfunctions, press [DVD/HDD] key on the front panel for 5 seconds or unplug the power cord, and then plug it in after 5 seconds. As this set is a Digital Multimedia Product, malfunction may occur. Moisture Condensation Moisture condensation can occur: In locations where moisture condensation may occur: When the HDD/DVD Recorder is moved from a cold place to a warm place. Keep the HDD/DVD Recorder plugged into an AC power outlet with the power on. This will help prevent condensation. Under extremely humid conditions. When condensation has occurred, wait a few hours for the HDD/DVD Recorder to dry before using it. 60 Downloaded From Disc-Player.com Daewoo Manuals DG-M22-12D1P-XA(GB) 2005.12.22 8:4 AM ˘ ` 61 mac001 1200DPI 100LPI Technical Specifications General Power requirements 200–240V~, 50/60 Hz Power consumption 40W Dimensions(approx.) 435 x 55 x 343 mm (w x h x d) Mass (approx.) Net : 4.3kg Gross : 5.6kg Operating temperature 41°F to 95°F (5°C to 35°C) Operating humidity 5% to 90% Signal system PAL Colour Recording Recording formats Recordable discs Recordable time DVD Video Recording, DVDVIDEO DVD±R, DVD±RW [DVD] (Approx.) 1 hour (HQ mode), 2 hours (SP mode), 4 hours (EP mode), 6 hours (SLP mode) [HDD] (Approx.) [DHR-8100P] 32 hours (HQ mode), 66 hours (SP mode), 128 hours (EP mode), 195 hours (SLP mode) [DH-6100P]16 hours (HQ), 33 hours (SP), 64 hours (EP), 97 hours (SLP) Video recording format Sampling frequency Compression format 27MHz MPEG 2 Audio recording format Sampling frequency Compression format 48kHz MPEG1 Layer2 HDD Specifications DVD Specifications Frequency response Video S/N DVD (PCM 48 kHz): 8 Hz to 22 kHz, CD: 8 Hz to 20 kHz More than 60 dB More than 90 dB Less than 0.04% More than 90 dB Over 500 lines (HQ Recording) Inputs Antenna In/Out Video In Audio In U/V-mixed; 75 Ω unbalanced 1.0 Vp-p, unbalanced -8.8 dBm Outputs Video output Video output terminal, 1.0 Vp-p, unbalanced, RGB output (75Ω in load, R : 0.7Vp-p, G : 0.7Vp-p, B : 0.7Vp-p) Audio output Audio output terminal (2 kinds), 2Vrms (DVD) Analog audio output : 2.0Vrms, Digital audio output : coaxial, optical S-Video output 1.0Vp-p, 75Ω unbalanced, Mini DIN 4-pin x 1, C : 0.286Vp-p, 75Ω Component Video output/Progressive Scan (Y) 1.0Vp-p, 75 Ohm, negative sync, RCA jack X 1, (Pb)/(Pr) 0.7Vp-p, 75 ohm , RCA jack X2 Accessories RF cable ...................................................................... 1 Scart cable ................................................................. 1 Blank DVD+RW disc .................................................. 1 Remote control .......................................................... 1 Batteries ..................................................................... 2 Design and specifications are subject to change without notice. Manufactured under license from Dolby Laboratories. ‘Dolby‘, ‘Pro Logic‘ and the doubleD symbol are trademarks of Dolby Laboratories. DTS and DTS Digital Out are registered trademarks of Digital Theater Systems, Inc. 61 Downloaded From Disc-Player.com Daewoo Manuals REFERENCE Capacity 80GB or160GB (1platter) RPM 7200 RPM Start Time 8 sec (15 sec max ) Stop time 12 sec ( 20 sec max ) HDD Recording Capacity (160GB) (Approx.) HQ : 9.5 Mbps, 32Hr, SP : 5.1 Mbps, 66Hr, EP : 2.5 Mbps, 128Hr, SLP : 1.7 Mbps, 195Hr Audio Frequency range 20Hz to 20 KHz Video S/N Over 50 dB Audio S/N Over 65 dB Resolution Over 500 lines (HQ Recording) Audio S/N Harmonic distortion Dynamic range Resolution Downloaded From Disc-Player.com Daewoo Manuals COUNTRY The information provided will be held on computer by the DAEWOO Registration Department of Domestic & General Insurance Co. Limited for the provision of warranty insurance or product related purposes. The information will not be disclosed to third parties, should you prefer not to receive product related details writes to Domestic & General Insurance Co. DAE REG / 295 Limited, on the address overleaf. TODAY DATE OF PURCHASE TEAR OFF HERE AND RETURN MODEL No. KEEP THIS SECTION FOR FUTURE REFERENCE SERIAL No. PRODUCT VALUE DATE OF PURCHASE NAME OF RETAILER SERIAL No. POSTCODE Please keep this with your purchase receipt, which will be required if service is needed on this product during the guarantee period. On the expiry date of the manufacturer’s guarantee you will be sent details of our annual insurance plan but if you have already bought an extended warranty for this product from your retailer please tick box PRODUCT DESCRIPTION MODEL No. PRODUCT DETAILS INITIALS mac001 TOWN NUMBER/HOUSE NAME/STREET SURNAME ` 62 MR MRS MS YOUR 1ST YEAR MANUFACTURER’S GUARANTEE ˘ To register you product for its 12 month guarantee please complete and return the section below. IMPORTANT 2005.12.22 8:4 AM REGISTERING YOUR NEW DAEWOO PRODUCT GUARANTEE REGISTRATION DG-M22-12D1P-XA(GB) 1200DPI 100LPI DAEWOO GUARANTEE CONDITIONS This product is guaranteed for 12 months from the date of original purchase. Any defect that arises due to faulty materials or workmanship will be repaired free of charge during this period by the dealer from whom you purchased the unit. The guarantee is subject to the following provisions. The guarantee does not cover accidental damage, misuse, cabinet parts, knobs or consumable items such as batteries, drive belts or bulbs. The product must be correctly installed and operated in accordance with the instructions contained in the manual. It must be used solely for domestic purposes. For further information regarding your guarantee please see the section at the rear of your user manual. The guarantee will be rendered invalid if the product is resold or has been damaged by inexpert repair. DAEWOO disclaims any liability for incidental or consequential damages. The guarantee is in addition to and does not diminish your statutory or legal rights. In the event of a breakdown please refer to your instruction manual and check all plugs, fuses and electricity supply. In the event of there being no breakdown you will be charged for the repair. AFFIX STAMP HERE DAEWOO GUARANTEE DEPARTMENT Leicester House 17, Leicester Street Bedworth Nuneaton Warwickshire CV12 8JP Downloaded From Disc-Player.com Daewoo Manuals 1200DPI 100LPI mac001 ` 63 ˘ 2005.12.22 8:4 AM DG-M22-12D1P-XA(GB)