1
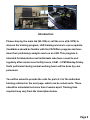
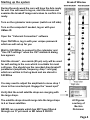
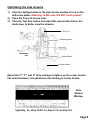
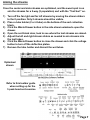
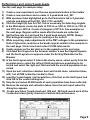
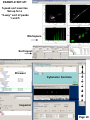
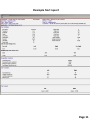
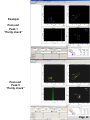
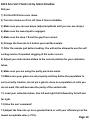
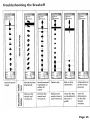
University of Massachusetts Medical School
Flow Cytometry Core Facility
BD FACSAria II Self-Sorting Training Program
Prepared by Marc Barnard
Table of Contents
Page 2
Introduction
Page 3
Training Overview
Page 4
Starting up the system
Page 5
Cleaning and Shutting down the system
Page 6
Optimizing the side streams
Page 7
Aiming the streams and FACSDiva toolbar guide
Page 8
Setting drop delay with Accudrop Beads
Page 9
Performing a sort using 5-peak beads
Page 10
Example set-up of the 5 peak bead sort exercise
Page 11
Example Sort Report
Page 12
Example post-sort “purity checks”
Page 13
Appendix: Example sort setup for a RFP expressing cell line
Page 14
Appendix: Task bullet list with “Clog Fix” by Susanne Pechhold
Page 15
Appendix: FACSAria sort check list by Glenn Paradise
Page 16
Appendix: Troubleshooting the breakoff
Introduction
Please drop by the main lab (S5-322) or call the core at (6-3276) to
discuss the training program. LSR training and use is a pre-requisite.
Candidates should be familiar with the FACSDiva program and have
done their preliminary analysis work on an LSR. This program is
intended for laboratories and individuals who have a need to sort
regularly after normal core facility hours, 8 AM – 5 PM Monday-Friday.
Sorts performed during normal working hours will be done by core
personnel.
You will be asked to provide the cells for parts 2-3 of the individual
training outlined on the next page, which can be actual sorts. These
should be scheduled not more than 2 weeks apart. Training time
required may vary from the description below.
Page 2
FACSAria training program overview:
1) A 2 hour introduction to the FACSAria II with a practice bead sort.
This will include stopping the stream, removing the nozzle, sonicating
and reinserting it, restarting the stream and returning to the original
drop position. This is an “Introduction to fixing a clog”. Please review
the training manual prior to this session. Your lab will just be charged
for the time spent on the Aria at our normal sort rate for all phases of
this program.
2) An actual sort during the work day where you provide the cells and
we guide you through the setup. Post-sort instrument cleaning and
shut-down will be performed.
3) An actual sort during the work day where you provide the cells and
you do all the setup. A core faculty member will be present for
questions and guidance.
4) A 1 hour review of what to do in case of a clog and performing the
auto-delay in case the stream comes back in a different spot. The
function of CST bead settings will also be reviewed.
5) Following this program you should do 1 or 2 independent self sorts
during workday hours when core personnel are available. You will then
be cleared to self sort after hours.
Page 3
Breakoff Window
Starting up the system
During the work week the core will have the Aria ready
for use. You will need to log on, start the stream and
examine the breakoff image and values to confirm it is
ready.
Turn on the cytometer main power (switch on left side)
Turn on the computer if needed, log on with your
UMass ID
Open the “Coherent Connection” software
Open FACSDiva, log in with your unique password
which we will set up for you
Wait for FACSDiva to connect to the cytometer and
“Use CST settings” when the CST mismatch dialog
box appears
Start the stream*, one nozzle (85 µm) only will be used
for self-sorting in the core which is suitable for most
cell types. You should use the recorded drop breakoff
parameters (amplitude, frequency, drop 1 and gap)
which are written in the log book and are stored in
FACSDiva
You may need to adjust the amplitude to move drop 1
close to the recorded spot. Engage the “sweet spot”
Verify that the small satellite drops are merging with
the large drops.
The satellite drops should merge into the large drops
in 6 or fewer satellites.
NEVER run a sample which has NOT been filtered
through our 37 µm mesh or BD tubes # 352235
*
All Figures
courtesy of
Becton
Dickinson
Page 4
Cleaning and Shutting down the system
You must clean the instrument as detailed below at the end of your
sort. Always Filter 10% Bleach and Coulter Clenz before running it on
the Aria. It is good practice to run water or PBS between critical
samples and prior to cleaning for shut-down.
You do NOT need to refill the sheath and empty the waste tanks.
Initial cleaning:
1)
Run Filtered bleach on flow rate 11 (high) for 4 minutes
2)
Run Filtered Coulter Clenz (Blue) on flow rate 11 (high)
for 4 minutes
3)
Run Filtered water on flow rate 11 for 4 minutes
Clean the flow cell
1) Turn off stream
2) Remove nozzle !! DO NOT TOUCH O-RING !! and install the closedloop nozzle (in holder, attached by tubing). Sonicate nozzle.
3) Select Cytometer>Cleaning Modes>Clean Flow Cell
4) When prompted, install a tube containing aprox. 3 mL filtered
distilled water then click OK. The cytometer loads the tube and fills
the flow cell with DI water.
5) Click OK when the completion dialog appears.
Following flow cell cleaning:
1) Export FCS files and experiment if you have not already done so.
2) Close the “Coherent connection” software
3) Close FACSDiva
4) Shut down computer
5) Power off Aria
Page 5
Optimizing the side streams
1)
2)
3)
Click the Voltage button in the side stream window to turn on the
deflection plates !!Warning 12,000 volts! Do NOT touch plates!!
Open the flow cell access door.
Click the Test Sort button and adjust the micrometer dial on the
diode laser to better view the streams.
Flow Cell
Deflection plates
Micrometer
Dial
Waste Drawer
Collection tubes
Adjust the 2nd, 3rd, and 4th drop settings to tighten up the center stream
The stream below is not optimized, note fanning of center stream.
Side
Stream
Window
Typically , 2nd drop 10-20, 3rd drop 5-10, 4th drop 0-5
Page 6
Aiming the streams
Once the center and side streams are optimized, and the sweet spot is on
aim the streams for a 2-way (2 population) sort with the “Test Sort” on.
1)
2)
3)
4)
5)
6)
7)
Turn off the far right and far left streams by moving the stream sliders
to the 0 position. Only 2 streams should be visible.
Place a tube holder (2 or 4 tube) on the bottom of the sort collection
block.
Click the Waste Drawer button in the side stream window to open the
drawer.
Open the sort block door, look to see where the test streams are aimed.
Adjust the left and right stream sliders as needed to aim streams into
the test tubes.
Click the Waste Drawer button to close the drawer and click the voltage
button to turn off the deflection plates.
Remove the tube holder and discard the wet tubes.
Optimized
stream
Refer to this toolbar guide
when setting up for the
5 peak bead sort exercise
Page 7
Setting the drop delay with Accudrop Beads
The Flow Core has made an “Accudrop delay” experiment. Please use this for
setting drop delay. This is only necessary if Drop 1 cannot be brought
back to within 10 (±5) of today’s dated target value listed in the log book.
1)
2)
3)
4)
5)
6)
7)
8)
9)
10)
Open the Accudrop Delay experiment and expand Tube_001
Open the Sort Layout by double-clicking it
Close the sort block door and flow cell access door
Load a tube of Accudrop beads (in the sort room refrigerator)
Adjust the flow rate to achieve a flow rate of 800-1500 (85 µm nozzle)
Click sort in the sort layout
Click cancel in the Confirm dialog (waste drawer stays closed)
Click Auto Delay button in the side stream window
Click Start run in the Auto Delay dialog.
Monitor the auto delay window for progress. A message appears when the
process is completed.
11) Click Exit in the Auto Drop Delay window to close it.
12) Unload the Accudrop tube. Cancel dialog box asking if you would like to
save sort report.
Page 8
Performing a sort using 5-peak beads
See the next page for example setup
1)
2)
3)
4)
5)
6)
7)
8)
9)
10)
11)
12)
13)
14)
15)
Create a new experiment, use the new experiment button in the toolbar
Create a new specimen and re-name it: 5-peak bead sort_001
With specimen tube highlighted go to the Parameters tab in Cytometer
controls and delete all but FSC, SSC, FITC and APC
Click the height (H) box for FSC, this is necessary for detecting singlets
In the Workspace create dot plots of FSC-A vs. SSC-A, FSC-A vs. FSC-H,
and FITC-A vs. APC-A. Create a histogram of FITC-A. See examples on
the next page. Regions will be made after the beads are collected.
Set the flow rate to 2 and load the 5 peak bead sample. NOTE: Always
filter biological samples prior to running on the sorter!!
While acquiring, make adjustments to the PMT voltages in the parameters
field of Cytometer controls so the beads appear similar to the example on
the next page. Click record and collect 10,000 total events
Create regions on the dot plots as in the example on the next page
Click New Sort Layout on the browser toolbar, a new Sort layout appears
and the Sort Layout icon appears under the Sorting Worksheet in the
Browser
In the Sort Layout select 2 tube in the device menu, select purity from the
precision menu, select the left sort field and add one population to be
sorted and select the right sort field and add the second population to be
sorted
Open the sort collection chamber door and install clean collection tubes
with 1 ml of PBS (collection media) in them
Load the 5 peak beads, start acquisition, click Sort on the Sort layout and
click OK in the confirm dialog box
Stop the sort when 20,000 beads of each population have been collected.
Remove the sample and collection tubes. Save the sort report when the
dialog box appears
Create new tubes (5-peak bead sort_002 and _003) and record each of the
2 collection tubes (purity checks) to confirm sort performance
Page 9
EXAMPLE SET-UP:
5-peak sort exercise
Set-up for a
“2-way” sort of peaks
1 and 5
Sort these
populations
Workspace
Sort layout
Browser
Cytometer Controls
Acquisition dashboard
Inspector
Page 10
Example Sort report
Page 11
Example
Post-sort
Peak 1
“Purity check”
Post-sort
Peak 5
“Purity check”
Page 12
Example sort setup for a cell line
Sorting for RFP positive cells
Page 13
Task Bullet List with “Clog Fix” by Susanne Pechhold
● Turn on computer
● Turn on instrument
● Log on to Windows and FACSDiva, start Coherent Connection
● Make a new folder in FACSDiva browser
● Make an Experiment (or duplicate a former experiment without data then cut
and paste into your new folder)
● Make sure the 85 µm nozzle is in, Start stream
● Wash 5 min Filtered 10% Bleach and 5 min Filtered water
● Check stream and drop breakoff, change amplitude to bring drop 1 near
target value.
● Test side streams and adjust drop charge to optimize (no center strean
fanning). Change Drop1 target if necessary.
● Turn on Sweet Spot
● Perform Accudrop drop delay
● Filter all Biological samples or you WILL clog. Use provided 37 µm mesh
squares or BD cell strainer tubes PN 352235 (sterile)
CLOG!!
Okay, so you did everything right and it clogged. It happens. Maybe you ran it
too fast.
● Remove the nozzle and Sonicate it !! DO NOT TOUCH O-RING !!
● Dry with compressed air
● Inspect it under the dissection scope
● Carefully re-insert the nozzle and start stream
● If it still looks bad, partial clog, repeat the steps above
Page 14
FACS Aria Sort Check List by Glenn Paradise
Did you:
1) Put the FACS Aria cover down.
2) Turn the stream on if it is off. Give it time to stabilize.
3) Make sure you can see drops (adjust amplitude until you can see drops).
4) Make sure the sweet spot is engaged.
5) Make sure the drop 1 # and the gap # are correct.
6) Change the flow rate to 2 before you load the sample.
7) Filter the sample just before loading. You will not be allowed to use the self
sorting service if repeated clogging of the sorter occurs.
8) Adjust your side stream sliders to the correct position for your collection
tubes.
9) Make sure you are using the purity precision mode.
10) Make sure your gates are set properly and they define the population to
sort correctly. Caution, do not put a gate to close to a population of cells you
do not want, this will decrease the purity of the sorted cells.
11) Load your collection tubes. Use left and right first followed by far left and
far right.
12) Give the sort command!
13) Adjust the flow rate up to no greater than 6 or until your efficiency is at the
lowest acceptable value (~72%).
Page 14
Page 15