1
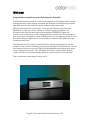
COLORONIX COLORTAINMENT!
CONTROLLER
Page 1—Coloronix Colortainment! Controller V1.0
Welcome 3
Safety Instructions 4-5
Specifications 6
Front and Back Panel 7
Front Panel 7
Back Panel 7
Turning on the Unit 8
The Touchscreen 8
Using Tabs 8
The Home Screen 9
Using the Home Screen 9
The Timetable 10
The Settings Screen 11
Changing Light Settings 11
The Current Time Screen 12
Changing the Day and Time 12
Troubleshooting 13
Other Information 13
Disclaimer 13
Warranty 13
Copyright 13
Page 2—Coloronix Colortainment! Controller V1.0
Welcome
Congratulations and welcome to the Colortainment! Controller.
The Colortainment! Controller is a revolutionary lighting control system which radically
changes the way in which lighting and space are designed and how lighting combines
with video and sound to create immersive entertainment experiences.
Electrify and enhance the mood of your venue with the Colortainment! Controller.
Whether it’s a club, bar, cinema, retailer or landmark lighting installation, the
Colortainment! Controller will maximize the potential of RGBW LED lights and
transforms your space into an ever changing dynamic environment. The character of
your venue can be changed to create ambience and mood throughout the day. You can
also synchronize your lights with sound and video to create amazing effects that your
customers would love.
The Colortainment! Controller is powered by Color Ray technology which is the new
standard in the creation and delivery of immersive entertainment experiences. You will
be amazed by the stunning array of Color Ray lighting effects that change your space
into an entertainment venue. Your LED lights can perform vibrant swirls, dynamic
ripples, colorful bounces and energetic sways all in harmony with sound and video.
This is revolutionary and now you are part of it!
Page 3—Coloronix Colortainment! Controller V1.0
Safety Instructions
CAUTION: To reduce the risk of electric shock, do not remove cover. There are no
user serviceable parts inside. Refer servicing to your installer or a qualified personnel.
Read Instructions
All the safety and operating instructions should be read before appliance is operated.
Retain Instructions
The safety and operating instructions should be retained for future reference.
Heed Warnings
All warnings on the appliance and in the operating instructions should be adhered to.
Follow Instructions
All operating and use instructions should be followed.
Water and Moisture
This appliance must not be used near water.
Ventilation
The appliance should be situated so that its location does not interfere with its ventilation.
For example, the appliance should not be situated on soft furnishings, such as a sofa, that
may block the ventilation of the Colortainment! Controller, or placed in an inadequately
ventilated built-in installation that may impede the airflow to the appliance.
Heat
The appliance should be situated away from heat sources such as radiators, or other
appliances that produce heat. If the Colortainment! Controller is installed in a rack ensure
that adequate space is maintained between the Colortainment! Controller and other items
in the rack. It is suggested that 1U is left between the Colortainment! Controller and units
above and below.
Power Sources
The appliance must only be connected to the power supply indicated on the appliance.
Grounding and Polarization
The appliance must be grounded. When using an extension power supply cable or a power
supply cable other than that supplied with the appliance, it should be 3-core, fitted with the
appropriate molded-on plugs and carry safety approval appropriate to the country of use.
Power Cable Protection
Power supply cables should be routed so that they are not likely to be walked on or pitched
by items placed on or against them, paying particular attention to the cable at the plug and
the point where it exits from the appliance.
Cleaning
The appliance should be cleaned with a soft cloth. No cleaning agents should be used.
Page 4—Coloronix Colortainment! Controller V1.0
Non-use periods
The power cable should be unplugged from the outlet when left unused for a long period of
time.
Foreign objects
Care must be taken so that objects do not fall into the appliance, and that liquids are
not spilled into the enclosure through openings.
Damage requiring Servicing
The appliance must be serviced by a qualified personnel when:
A
The power-supply cable or the plug has been damaged; or
B
Objects have fallen, or liquid has been spilled into the appliance; or
C
The appliance has been exposed to rain; or
D
The appliance does not appear to operate normally, or exhibits a significant
change in performance; or
E
The appliance has been dropped, or the enclosure has been damaged.
Servicing
The user must not attempt to service the appliance beyond that described in the
operating instructions. All other servicing should be referred to qualified service
personnel.
WARNING: To prevent fire or shock hazard, do not expose this equipment to rain
or moisture.
Observe all warnings on the appliance.
To prevent electric shock, do not open the enclosure; there are no user serviceable
parts inside.
To prevent electric shock, do not use this (polarized) power plug with an extension
cable or other outlets unless the blades can be fully inserted to prevent blade
exposure.
Ensure that the voltage indicated on the back panel matches that of the power supply.
Important for UK only:
The wires in this mains lead are colored in accordance with the following code:
Blue: neutral
Brown: live
green/yellow: earth
As the colors of the wires in the mains lead of this apparatus may not correspond with the colored
markings identifying the terminals in your plug, proceed as follows:
The green and yellow wire must be connected to the terminal in the plug, which is marked with the letter
E, or by the earth symbol, or colored green or green and yellow.
The blue wire must be connected to the terminal, which is marked with the letter N or colored black.
The brown wire must be connected to the terminal which is marked with the letter L or colored red.
Page 5—Coloronix Colortainment! Controller V1.0
Specifications
Power
Input Voltage
Input
Output
Physical
Certification and Safety
UI
100-240V AC, 50 – 60Hz,
20W
Composite RCA/Phono
Video
Stereo RCA/Phono
Audio
RS232 – 9 pin serial
Control
RJ45 (for future
Auxiliary Interface
extensions), USB 2.0
Lighting
Single Universe DMX 512
via 5 pin XLR
2U rack mount unit
Form Factor
Rack mount ears or
Mounting Options
Dimensions (Width x Depth removable feet
19 x 14 x 3.5in (483 x
x Height)
356 x 89mm)
Weight
8.82lb (4kg)
Operating Temperature
32° - 122°F (0° - 50°C)
Humidity
8 –90%, non condensing
Ceritifcation
CE, FCC
Environment
Dry Location, IP20
Up to 12 Color Ray Modes Default or installer
customized selection
Scheduler
Weekly by Hour Scheduling
of Color Ray Modes
One touch Override
Instantly override any
timetable with a fixed Color
Ray Mode
Page 6—Coloronix Colortainment! Controller V1.0
Front and Back Panel
Front Panel
Back Panel
Touchscreen
Easy to use Touchscreen interface allows you to navigate through pre-installed ambient
lighting effects, change the daily schedule and alter the light settings.
Ethernet
For network connectivity and connection to other devices.
Video In
Allows LED lighting installation to be synchronized to video content, producing dynamic
lighting effects.
Audio In
Connects LED lighting installation to an audio source for automated dynamic lighting
effects synchronized to music.
RS232
Compatible connection to other devices and systems.
USB
For PC connection and use with PC based Color Ray applications.
DMX
Industry standard interface and connection to LED lighting installations. Single DMX
512 universe supported with 5 pin XLR connector.
Power
100 - 240V AC, 50-60Hz, 20W
Page 7—Coloronix Colortainment! Controller V1.0
Turning on the Unit
Check that the power lead is connected to the Colortainment! Controller and turn on at
the wall socket.
This powers up the your Colortainment! Controller. When start up is complete, the
HOME screen will be displayed.
The Touchscreen
Using Tabs
The Touchscreen allows you to choose from the 12 Color Ray Modes, view and edit the
timetable and adjust the light settings.
There are four screens chosen by
touching the window tab:
•
The HOME screen is used to
preview the 12 bespoke Color
Ray Modes that your installer
has designed and programmed
for you.
•
The TIMETABLE screen allows
you to view the current lighting
schedule on the seven day
timetable chart, and alter it by
hour for each day.
•
The SETTINGS screen allows you to change the brightness and color saturation of the lights,
and the transition time between presets.
•
The CURRENT TIME screen allows you to set the current day and time.
Page 8—Coloronix Colortainment! Controller V1.0
The Home Screen
Although the Colortainment! Controller comes pre-installed with 12 Color Ray Modes, installers will be
able to create 12 new Color Ray Modes to suit your preferences precisely. A Color Ray Mode can
automatically generate a near infinite combination of lighting effects triggered by audio, video and time.
Within each Color Ray Mode there are a set of rules which define how audio, video and light react with
the space to generate mood.
Each mode has a defined base color palette and ambient effect. How audio and video react to those
color palettes can then in turn be customized and layered over the base.
Using the HOME Screen
Touch a Color Ray Mode icon to select it and override the current scheduled effects.
When you touch the icon, it will be highlighted to show your selection and its lighting effects will
immediately be displayed in your room until it is deselected.
To deselect the Color Ray Mode touch the icon again and it will no longer be highlighted.
When no Color Ray Mode is selected, the Colortainment! Controller will return to playing the timetabled
effects.
Page 9—Coloronix Colortainment! Controller V1.0
The Timetable
1.
2.
3. To set the daily schedule, first
select the Color Ray Mode of your
choice, then by touching the
“Schedule Setting Bar”, select the
hour that you want the Color Ray
Mode to be used.
Press again to clear a slot.
To view another day of the week
select the ‘Previous’ button to view
the previous day or select the ‘Next’
button to view the next day.
Touch the ‘back button’ to return to
the TIMETABLE window.
Page 10—Coloronix Colortainment! Controller V1.0
The Settings Screen
The SETTINGS screen allows
you to adjust the brightness,
saturation and transition
speed. These settings
change the overall properties
of the effects
The ‘Brightness slider’
adjusts the intensity of the
lights you have installed.
The ‘Saturation slider’
adjusts the vividness of the
colours.
The ‘Transition slider’ adjusts the speed at which one preset changes to the next
Color Ray Mode at the end of each hour.
The ‘Reset box to default’ button allows you to change the settings back to the original
installed settings.
Changing Light Settings
Touch the SETTINGS tab to display the
settings window
The Brightness, Saturation and
Transition speed can be changed by
adjusting the
corresponding sliders.
Slide the ‘Brightness Slider’ towards
the left to darken the light intensity, and
towards the right to brighten the light
intensity.
Slide the ‘Saturation Slider’ towards
the left to reduce the vividness of the
colours, and towards the right to increase the vividness of the colours.
Slide the ‘Transition Slider’ towards the left to reduce the speed, and towards the
right to increase the speed. You can choose through slow, medium and fast.
Page 11—Coloronix Colortainment! Controller V1.0
The Current Time Screen
The DAY/TIME screen allows you to alter the current day and time.
The time is used by the Colortainment! Controller for the 7-day scheduler and daily
systems check.
The options can be easily navigated through by using the ‘Previous’ and ‘Next’ buttons.
Changing the Day and Time
Touch the CURRENT TIME tab to display the current time window
Use the arrows to adjust the day, hour and minutes display.
Touch the SET button to save the displayed value as the current time.
Selecting another tab without pressing SET will overlook any changes.
Page 12—Coloronix Colortainment! Controller V1.0
Troubleshooting
If you are experiencing difficulties please verify that the Colortainment! Controller has
power and is correctly connected by following the instructions in the Quick Start Guide
or this User Guide. If the Colortainment! Controller still does not operate as expected,
please contact your installer.
Other Information
Disclaimer
All Colortainment! Controller software remains sole property of Coloronix, Inc. and its
suppliers. Any attempt to alter or replicate the contents of the Colortainment!
Controller is prohibited. Any attempt to copy or alter the software will render any
warranties void. Coloronix, Inc. will initiate legal proceedings against anyone attempting
to copy or replicate the software.
Do not open the Colortainment! Controller case, to do so will void your warranty.
For support and advice please contact your installer.
Warranty
The Colortainment! Controller is warrantied against faulty workmanship for 12 months
from the date of purchase. If you have a problem please contact your installer.
Copyright
© 2011 Coloronix, Inc.
Page 13—Coloronix Colortainment! Controller V1.0