1
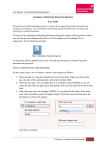
Open Course Timetabler
User Manual
(Version 1.0)
www.openctt.org
Open Course Timetabler (OCTT) is free software licenced under the GNU Public
Licence and is copyright © by Open Course Timetabler 2007. This software is being
developed primarily by Ivan Ćurak and Augustin Juričić.
User Manual Author: Daryl Moon ([email protected])
Open Course Timetabler
User Manual
__________________________________________________________________________________________________________
Table of Contents
1
Getting Started with OCTT .............................................................................. 3
1.1 Install the software ........................................................................................................ 3
1.1.1 Install OCTT .................................................................................................... 3
1.1.2 Install PHP WebTimetable ............................................................................... 3
1.2 Understand the terminology used in OCTT ................................................................. 3
1.2.1 Educational Program ........................................................................................ 3
1.2.2 Class ................................................................................................................ 3
1.2.3 Course.............................................................................................................. 3
1.2.4 Lesson.............................................................................................................. 4
1.2.5 Terms............................................................................................................... 4
1.3 Collect Information ....................................................................................................... 4
1.3.1 Teachers........................................................................................................... 4
1.3.2 Rooms.............................................................................................................. 4
1.3.3 Courses ............................................................................................................ 4
2
Entering Data .................................................................................................... 5
2.1
2.2
2.3
2.4
Input Days and Terms ................................................................................................... 5
Input Teachers............................................................................................................... 8
Input Rooms ................................................................................................................ 10
Input Educational Programs, Classes and Courses.................................................... 11
2.4.1 Educational Program ...................................................................................... 11
2.4.2 Classes ........................................................................................................... 11
2.4.3 Courses .......................................................................................................... 12
2.5 Input Room Restrictions ............................................................................................. 14
3
Building the Timetable.................................................................................... 15
3.1 Time Saving Tips ......................................................................................................... 17
Page 2 of 18
Open Course Timetabler
User Manual
__________________________________________________________________________________________________________
1 Getting Started with OCTT
Before you commence your timetable, there are a few tasks that you need to complete in
preparation. Download and install the software, carefully read the definitions of the terminology
that is used in OCTT – it is likely they will be different from what you currently use. Visit the
OCTT website and read about latest developments and comments/questions in the online forum.
www.openctt.org
1.1 Install the software
1.1.1
Install OCTT
Download and install the Open Course Timetable software from
http://sourceforge.net/projects/openctt.
Download the latest *.msi file (eg
Release_0.7.1_OCTTSetup.msi) and install it (on a Windows 2000/XP/Vista PC).
You also need Microsoft’s .NetFramework 1.1 (or later) from the Microsoft web
site.
1.1.2
Install PHP WebTimetable
While you are at the website you may want to download the PHP web timetable
plug-in: OCTT_Release_0.7.1_PhpWebTimetable.zip This software allows you to
upload your timetable to your website for teachers and students to access. You will
need a web server with the mySQL database and PHP installed on your network to
use this function.
1.2 Understand the terminology used in OCTT
1.2.1
Educational Program
An Educational Program is the highest level in the hierarchy. Examples may include
Year 10 Business Studies, Year 11 Accounting, Year 12 Information Technology or
simply Year 5 for a junior school.
1.2.2
Class
A class in OCTT is a sub-set of an educational program. If there are 40 students in
Year 10 Business Studies, they may be separated into classes as follows: Year 10
Business Group A and Year 10 Business Group B with 20 students in each group.
In junior schools where there is no subject specialties they may simply be defined as
Year 5A, Year 5B, Year 5C and Year 5D.
1.2.3
Course
OCTT uses the term “course” in the same way as many schools use the term
“subject”. A course may be Maths, English, Information Technology, Science, etc.
When you define a course, you specify the actual number of lessons the course will
have each week. If the course is split between two teachers then you must create
two separate courses (eg MathsA and MathsB) so you can timetable the lessons
according to teacher availability.
Page 3 of 18
Open Course Timetabler
User Manual
__________________________________________________________________________________________________________
1.2.4
Lesson
A lesson is a single period of time in which a group of students and a teacher meet in
a classroom. Eg: A Maths lesson for Year 10 Business Studies students in Room 1
with Mr Smith from 9:00 am to 10:00 am. If this group of students has a total of
four (4) hours of Maths each week with this teacher, they will be defined as four (4)
separate lessons. When you create a timetable, you drag and drop each individual
lesson into a vacant place on the timetable grid.
1.2.5
Terms
A term in OCTT is a time period in which a lesson is taught.
Eg 09:00 – 10:00
1.3 Collect Information
The next step is to gather the details of the resources that you will use for your timetable.
This includes all teacher names, room names and courses.
1.3.1
Teachers
Prepare a list of teachers that includes all of the following:
•
•
•
•
•
1.3.2
Title (Mr, Mrs, Miss, Dr etc),
First Name
Last Name
Rank (teacher, senior teacher, Head of Department, Professor etc)
External identifier - If you have a student management system where teachers
are identified by a code or number you can add this into the external identifier
field.
Rooms
Prepare a list of rooms that includes the following:
•
Room number (or names) – try to keep them short as they are used in the
timetable reports and long names may be truncated.
Capacity – how many students can you fit in the room?
External identifier – If you have a student management system where you
identify rooms by another number or code you can add this here.
•
•
1.3.3
Courses
OCTT uses a three level hierarchy to identify courses. The three levels are:
1.
2.
3.
Educational Program
Class
Course (you may refer to this as a subject)
For example:
Educational Program:
Class:
Courses:
Year 12 Business
12 Business Group A
Accounting, IT, Maths, Science
Page 4 of 18
Open Course Timetabler
User Manual
__________________________________________________________________________________________________________
A good way to setup your classes is to select the most complex Educational Program
first and experiment with the structure and naming conventions until you are happy
with the way it works and how the timetable reports look. Complete the timetable
for this one program before you make lots of timetable entries and have to later
change them.
Information you need to collect for courses includes:
•
Educational Program
o name
o external identifier (optional)
o time restrictions - when you cannot schedule classes (optional)
•
Class Name
o Code
o Name
o Year
o external identifier (optional)
o time restrictions - when you cannot schedule classes (optional)
•
Courses (or lessons or subject classes)
o Course Name
o Short Name (used on printed timetables – keep short, consistent and meaningful)
o Lesson Type (optional – may be used to indicate variations like practical, theory,
etc of the course (or subject) )
o Number of lessons per week (eg if you have one hour lessons and need 3 hours
of maths, place 3 here)
o Number of enrolled students (used when placing lessons into rooms)
o Teacher (select from existing list)
o Group & Group Name
o external identifier (optional)
2 Enter Base Data
Now you have collected all your data, start entering your resources in the following order:
1.
2.
3.
4.
Days and Terms (lesson times)
Teachers
Rooms
Courses
2.1 Input Days and Terms
First Add the days your classes will be taught on by selecting “Document” from the main
OCTT Menu and then selecting “Add Day” and ticking the days you will use.
Page 5 of 18
Open Course Timetabler
User Manual
__________________________________________________________________________________________________________
Select “Add day” from the menu and tick the days that you require for classes.
Next, add Terms (lesson times) by selecting “Document” from the main OCTT Menu and
then selecting “Add term”. Set the start and end times (using 24 hour clock).
Page 6 of 18
Open Course Timetabler
User Manual
__________________________________________________________________________________________________________
Select “Add term” and enter the start and end times (in 24 hour format) for each lesson.
Later when you have input some classes and begin to build your timetable, you will see
these Terms (time slots) you have created.
Page 7 of 18
Open Course Timetabler
User Manual
__________________________________________________________________________________________________________
2.2 Input Teachers
To input teachers, select the Teachers TAB in the menu, right click on the school name
and select “Add teacher”.
Enter the title, first name, last name, rank and (optionally) the external identifier for each
teacher.
Page 8 of 18
Open Course Timetabler
User Manual
__________________________________________________________________________________________________________
Time restrictions for teachers can be set by right clicking the teacher name and selecting
define allowed/unallowed timeslots. This prevents a teacher from being scheduled for a
class at that time. This is useful if you have part time teachers that only work mornings
(for example) and you can block out the afternoons to prevent them being timetabled then.
If you have a staff development activity that you require staff to attend then you can also
use this function.
In the example above, the teacher is not available from 9:00 am to 12:00 am on
Wednesday and not available from 12:00 – 13:00 (lunch).
Room restrictions for a teacher can also be set for teachers. (right click on teacher and
select “Restrict Possible Rooms”. It may be more useful to set room restrictions by class
instead of by teacher. It is more likely that a class can only be held in a special type of
room (eg gymnasium, or computer lab).
Page 9 of 18
Open Course Timetabler
User Manual
__________________________________________________________________________________________________________
In the example above, the teacher can only teach in Lab2.
Tip: Create a “dummy” teacher record that can be used for a class where you don’t know
who is teaching the class yet. If you have several new teachers starting but have not
appointed them yet you can setup several – perhaps name them Vacant (English), Vacant
(Maths) etc and just change the name when the teachers are appointed.
2.3 Input Rooms
To input rooms, select the Rooms TAB in the menu, right click on the school name and
select “Add Room”.
Enter the room name, capacity and (optionally) the external identifier. Keep the room
names short so they will fit on the printed timetable.
Tip: Create a “dummy” room that can be used for a class that you don’t know where they
are going to be held yet. Name the room “AAA Not Allocated” (or something similar) so
that it appears at the top of the rooms list. Set the number of students the room can hold to
a large number (eg 200) so you can place several classes in there until you find a
permanent room for them.
Page 10 of 18
Open Course Timetabler
User Manual
__________________________________________________________________________________________________________
2.4 Input Educational Programs, Classes and Courses
As suggested above, start with one Educational Program and enter all the classes and
courses (subjects) for that program before you enter the next program. Try printing
timetables for rooms, teachers and classes and make sure you are happy with the
information shown and the layout (especially use of class names and short names) before
you enter lots of data and have to change it later.
2.4.1
Educational Program
On the Courses TAB, right click on the school name and select “Add new
educational program”.
Enter the name of the new educational program and (optionally) the External ID.
2.4.2
Classes
Once you have created the Educational Program, select it from the menu, right click
and select “Add class”.
Page 11 of 18
Open Course Timetabler
User Manual
__________________________________________________________________________________________________________
Enter the class details.
2.4.3
Courses
Select the Courses TAB from the menu, right click on the Educational Program and
select “Add new course”.
Page 12 of 18
Open Course Timetabler
User Manual
__________________________________________________________________________________________________________
Enter the details you require for the new course.
IMPORTANT NOTE: The course short name is used in the printed timetable.
Create your own set of codes to clearly identify the Educational Program, Class
and Course. For example: the short name 10-BUS-A-IT identifies Year 10,
Business Studies Group A, Information Technology.
Page 13 of 18
Open Course Timetabler
User Manual
__________________________________________________________________________________________________________
The above is a sample of the PDF report for a class. (note the use of the short names
for courses).
The above is a sample of the Web based report. Again the short names for courses
are used.
2.5 Input Room Restrictions
If you have some lessons that can only be held in a specific room or a small group of
rooms then you can enter these restrictions before you start timetabling the classes. Place
the restriction by selecting the course (after you input the courses), right click and select
“Restrict Possible Rooms”. This makes selecting the room much quicker when you start
timetabling as you are only presented with a small list of rooms to choose from (or the
room is automatically selected if you restrict it to only one room).
Page 14 of 18
Open Course Timetabler
User Manual
__________________________________________________________________________________________________________
The course above (Microsoft Excel) has been restricted to Lab1, Lab2 or Lab3.
3 Build the Timetable
If you have an existing timetable (eg from last year) then you may find it helpful to use this as
a starting point when building your new timetable.
Once you have entered the educational programs, classes and courses, you can start building
your timetable by dragging and dropping the lessons into a vacant space in the blank timetable
grid.
Page 15 of 18
Open Course Timetabler
User Manual
__________________________________________________________________________________________________________
The picture above shows the Excel lesson being dragged from the bottom of the screen onto
the timetable grid. Notice the only free space is Friday 11:00 – 12:00.
If a lesson cannot be placed on a blank space it may be because:
•
•
The teacher has another lesson at that time
The teacher has been scheduled as unavailable (unallowed time slot)
After you place the lesson on the timetable, you need to double click the room number and
select an available room.
If a room is not shown in the list it may be because:
•
•
The capacity of the room is less than the number of students enrolled.
Room restrictions are set on that course, allowing it to only be held in a specific
room or group of allowed rooms.
Page 16 of 18
Open Course Timetabler
User Manual
__________________________________________________________________________________________________________
4 Time Saving Tips
4.1 Copying Courses
You can copy courses from one class to another. This can save a time if the courses are
similar. After copying, make any small changes necessary to the new course BEFORE
you start allocating the lessons to time slots.
If you want to change the course after you have moved all the lessons onto the timetable
grid, you will have to move them all back to the bottom of the screen (unallocated). Make
your changes then drag and drop the lessons back on the timetable grid.
To copy a course, right click on the course you want to copy from and select “Copy course
to clipboard”.
Next, select the Class you want to copy the course to and right click and select “Add new
course from clipboard”.
Finally, make any changes to the new course (including changing the short name).
Page 17 of 18
Open Course Timetabler
User Manual
__________________________________________________________________________________________________________
4.2 Copying a Timetable
OCTT stores its timetable data file (only one file) with the extension of .oct. It is a plain
text file that is formatted with XML. The XML formatting looks similar to the HTML
format you see in web pages.
If you wish to copy an entire timetable, for example to make a new timetable for Term 2,
based on Term 1, then simply copy the .oct file and rename it. Make sure the copy has the
extension .oct or OCTT will not be able to open it.
While it is possible to edit the .oct file with a text editor such as notepad, it is very easy to
make a small mistake and OCTT will refuse to load the file and crash the program. If you
must edit the .oct file make sure you make a backup of the file before you start editing it.
If you have any changes, corrections or suggestions to improve this document, please
email the author (Daryl Moon) at [email protected].
Page 18 of 18