1
12. Commissioning The Appliance
WARNING: This appliance is serviced and repaired externally.
External equipment operated at 230volts should not be
serviced or repaired under adverse weather conditions.
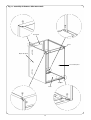
NOTE: The Outdoor Pack is not load bearing, it only provides
weather proofing for the boiler inside.
Ensure that no foreign matter is left in the system as this could
cause damage to the appliance.
12.1 Check that the electrical supply to the appliance is
switched off.
12.2 When commissioning the appliance after initial installation
follow the procedure from 12.3, otherwise remove the burner
first as described in section 14.3.
Benchmark Water Treatment: For optimum performance after
installation, this boiler and its associated central heating
system should be flushed in accordance with the guidelines
given in BS7593:1992 - Treatment of water in domestic hot
water systems. Full instructions are supplied with proprietary
cleansers sold for this purpose. If an inhibitor is to be used
after flushing, it should be used in accordance with the
inhibitor manufacturers instructions.
Suitable flushing agents and inhibitors are available from Betz
Dearborn Tel: 0151 4209563 and Fernox Tel: 01799 550811.
Instructions for use are supplied with these products.
IMPORTANT: Any system cleanser must be flushed from the system
before an inhibitor is added.
12.3 Prepare the heating system
1. After initial installation and checking for leaks, as previously
described, drain down the system sufficiently to add a flushing
agent. After flushing drain the system before filling.
2. Refill the system.
12.4 Check the Burner
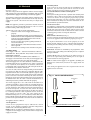
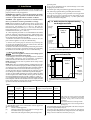
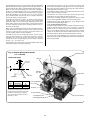
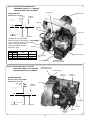
1. Check that the nozzle and electrode settings are correct for
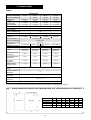
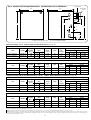
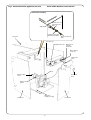
the relevant burner. (See Figs. 28, 29, 30 and 31).
2. Check that the nozzle lies central with the combustion head hole.
3. Check for any visible defects.
12.5 Replace the burner
1. Connect the flexible oil supply hose to the isolating valve and
tighten sufficiently to form a good seal. Where a double pipe
system or a single pipe system with de-aerator is being used fit
the bypass plug, as described in Fig.6, and connect the oil return
flexible hose to the return pipe fitting.
2. With the sponge O-ring gasket around the burner blast tube
insert the burner into the housing tube. Push the burner firmly
forward to compress the gasket and tighten the two locking
screws using a 5mm Allen key.
Note: It is important that a good seal is made between the
burner and the boiler to prevent re-circulation of the flue gases
from the combustion chamber to the burner inlet.
3. Re-connect the electrical lead plug into the control box .
12.6 Check the installation
1. Check that the appliance is correctly wired as described in
Section 10.
2. Check the combustion chamber base insulation board is
positioned correctly in the bottom of the heatexchanger
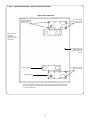
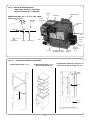
3. Check that all baffles are correctly located and the heat shield is
correctly mounted (Danesmoor utility 20/25, 26/32, Worcester
Bosch 70/90 and 90/110 models only) as shown in Fig.32.
4. Check that the baffle retainer is correctly mounted
(Danesmoor utility 20/25, 26/32, Worcester Bosch 70/90 and
90/110 models only) as shown in Fig.32.
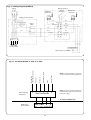
5. Check that the control thermostat and auto reset high limit
thermostat phials are correctly located in the boiler thermostat
pocket positioned in the top front of the boiler as shown in Fig.3.
6. Check that the manual reset limit thermostat is located in the
steel pocket above the electrical box mounting bracket on the
front face of the boiler as shown in Fig.3.
7. Check the frost thermostat phial is positioned within the
boiler cabinet underneath the outdoor electrical control box.
Locate the phial of the frost thermostat in the clip underneath
the outdoor electrical control box
8. Check that all of the air-ways to the burner are clear of any obstruction.
Note: Check the insulation jacket on the rear of the boiler
does not block the air inlet channels below the flue terminal.
There should be at least 10mm clearance between the
bottom of the terminal and the insulation jacket. If there is
not sufficient clearance cut around the insulation jacket
ensuring 10mm clearance.
12.7 Fit a pressure gauge and manifold to the burner pump at the
point indicated in Fig.8 or the pressure gauge port shown in Fig.
31 on the Danesmoor Utility 20/25 and Worcester Bosch 70/90.
12.8 Turn on the electricity to the appliance from within the
property and set the switch to the ‘Run’ mode on the Outdoor
Pack electrical control box (see Fig.11).
12.9 Bleed the burner.
Single Pipe System
Release the fuel bleed port on the manifold and place a suitable
receptacle beneath. Turn on the boiler thermostat and allow the
burner to run through to lockout. Wait two minutes and reset
the burner control box. Repeat the procedure at least three
times or until a steady stream of oil, without air, is exhausted
from the bleed port. Re-lock the bleed port.
Double Pipe System
A double pipe system will automatically vent the air back to the
oil tank. Turn on the boiler thermostat and allow the burner to
run through to lockout. Wait two minutes and reset the burner
control box. Repeat the procedure until the burner fires and runs
in a steady state. This may take several attempts depending on
the oil pipe length and height.
Single pipe suction lift system with de-aerator
A single pipe suction lift system with de-aerator will automatically vent air through the de-aerator by turning on the boiler thermostat and allowing the boiler run to lockout. Wait two minutes
and reset the burner control box. Repeat the procedure until the
burner fires and runs in a steady state.
On long oil pipe runs from the oil tank to the boiler it is recommended that the de-aerator be primed to prevent damage to the
oil pump.
To prime the the de-aerator follow the following procedure:
a) Disconnect the flexible oil inlet hose end nearest the
de-aerator and place in a container of oil.
b) Place an empty container to collect oil from the oil
inlet pipe connection of the de-aerator.
c) Prime the de-aerator and reconnect the de-aerator
to the flexible oil inlet hose.
12.10 Adjust the air shutter and pump pressure to the settings
recommended in Tables 2 to 5. After a pre-ignition period of
approximately 15 seconds the burner should ignite. Flame sensing
is carried out by means of a photocell mounted in the burner body.
Should the boiler fail to establish a normal firing pattern (or should
flame failure occur during running), the absence of a flame is
sensed and the control box is monitored to a safe lockout condition
and the boiler is shut down. The lockout indicator light/reset
button in the burner control box will illuminate indicating that the
burner has gone to lockout. In this instance wait two minutes and
press the lockout reset button to initiate another start sequence.
Repeat the procedure until a flame is established.
Note: Persistent lockout when running indicates a fault and a
Service Engineer should be consulted.
12.11 Run the boiler for approximately 3 minutes and switch off
checking that there is no after-spurting from the nozzle. This can
be detected by oil saturation on the blast tube. If after-spurting
occurs remove the burner from the boiler, unscrew the nozzle, and