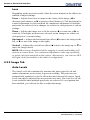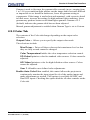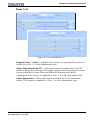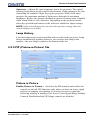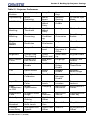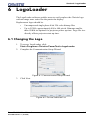
1
Section : Christie PowerTool USER’S MANUAL 020-100035-02 MasterSUITE 5.0 User Manual 020-100448-01 Rev. 1 (03-2010) 1 Section : Christie PowerTool USER’S MANUAL 020-100035-02 MasterSUITE 5.0 User Manual 020-100448-01 Rev. 1 (03-2010) 1 Every effort has been made to ensure the information in this document is accurate and reliable; however, due to constant research, the information in this document is subject to change without notice. COPYRIGHT NOTICE © 2007-2010 Christie Digital Systems USA, Inc. - All rights reserved. This document contains proprietary information of Christie Digital Systems USA, Inc., and may not be reproduced, stored in a retrieval system, transferred to other documents, disclosed to other manufacturers, or used for manufacturing or for any other purpose, in whole or in part, without prior written permission of Christie Digital Systems USA, Inc. Christie Digital Systems USA, Inc., reserves the right to make changes to specifications at any time without notice. The information furnished in this publication was believed to be accurate and reliable. Christie Digital Systems USA, Inc. makes no warranty of any kind with regard to this material, including, but not limited to, implied warranties of fitness for a particular purpose. Christie Digital Systems USA, Inc. shall not be liable for errors contained herein or for incidental or consequential damages in connection with the performance or use of this material. GRAPHIC ILLUSTRATIONS All drawings, including system layout, hardware devices, controls and indicators, screens, and maintenance drawings are provided to enhance understanding of the accompanying text. These graphics are representations only; they are not necessarily drawn to scale and may not represent parts of your specific machine. TRADEMARKS PowerTool and ColorMatcher are trademarks of Christie Digital Systems USA, Inc. All other trademarks used in this manual are the property of their respective owners. SOFTWARE LICENSING AGREEMENT This Software License Agreement (the “Agreement”) is a legal Agreement between the end user, either, an individual or business entity (“Licensee”) and Christie Digital Systems USA, Inc. (“Christie” or “Licensor”) for the software known commercially as PowerTool 2.0 (“Software”). If Licensee does not accept the terms of this Agreement, Licensee shall return the Christie product and the software to the vendor. LICENSE AND RESTRICTIONS Ownership of Software: and its third party suppliers retain title and ownership of all rights, including copyright and all other intellectual property rights, in and to the Software and accompanying written materials (the “Documentation”), and all copies thereof, regardless of form or media. This License is not a sale of any rights in or to the Software or the Documentation or any copy thereof. Licensee acquires no right whatsoever to the Software or the Documentation except the right to use the Software and the Documentation in accordance with the terms of this License. Third Party Licenses: Licensee acknowledges that the Software may utilize software and other materials provided by third parties. Such third parties may enforce the provisions of this License to the extent such third party software and other materials are used by Licensee. Any limitation of liabilities in this License also apply to such third party suppliers and the third party software and other materials provided by them. Such limitation of liabilities, apply to the Software as a whole and are not cumulative. Grant of License: The Licensor grants to Licensee, a non exclusive and non-transferable right to use for personal or internal business purposes, the executable version of the Software and the Documentation, as long as Licensee complies with the terms and conditions of this License. Licensor reserves all rights not expressly granted to Licensee. Copy Restrictions: Licensee may keep one copy of the Software solely for backup or archival purposes. Unauthorized copying or distribution of the Software, including Software which has been modified, merged, or included with other software or of the Documentation is expressly prohibited unless agreed to in writing by Christie. Licensee must reproduce and include the copyright notice on any backup copy of the Software and Documentation. Licensee may not remove any proprietary rights or copyright notice or identification which indicates the ownership by Christie of the Software or the Documentation. Use Restrictions: Licensee shall not (a) modify, adapt, decompile, disassemble reverse engineer, or otherwise attempt to derive the source code for the Software, or create derivative works based on the Software or the Documentation; (b) assign this License or redistribute, encumber, sell, PowerTool 2.0 User Manual 020-100035-02 Rev. 1 (03-2010) i transfer, lease, or grant a sublicense of the Software or the licenses granted herein or otherwise transfer rights to the Software to any person or entity except as and when authorized by the Licensor in writing; (c) directly or indirectly, export or transmit the Software, either alone or bundled with other software, to any country to which such export or transmission is restricted by any applicable laws without the appropriate prior written consent of the applicable government entity or department. Licensee will make reasonable efforts to prevent any unauthorized use of the Software or Documentation by third parties and will advise Licensee's employees of the restrictions upon use restrictions herein. MAINTENANCE AND SUPPORT Term of Maintenance and Support: The Licensor shall provide maintenance and support services related to the Software (“Support Services” for a period of 90 days from the date of receipt of the Software). Support Services are governed by the Licensor’s policies and programs described in materials provided by the Licensor. Any supplemental software code provided to the Licensee as part of the Support Services shall be considered part of the Software and subject to the terms and conditions of this Software License Agreement. WARRANTY AND LIMITATION OF LIABILITY Product Warranties: The Licensor warrants that the Software will perform substantially in accordance with the accompanying written materials for a period of 90 days from the date of receipt of the Software. This warranty is void if the Licensee or any third party changes or modifies the Software. The liability of this Licensor under this section is limited to the correction of any error or malfunction and shall not include liability for loss of data, loss of computer time, any direct damages or any indirect or consequential damages. This warranty only extends to those failures communicated to the Licensor in writing within 90 days of the receipt of the Christie Digital product. The Licensor does not warrant that the Software is free from any minor defects or that it will operate uninterrupted. The Licensor does not make any other warranties, either express or implied, including, but not limited to, implied warranties of merchantability, fitness for a particular purpose, title and non-infringement, with regard to the Software. Some jurisdictions do not allow limitations or duration of an implied warranty, so the above limitation may not apply to you. Licensee’s Remedy: The Licensor’s entire liability and the Licensee’s exclusive remedy shall be repair or replacement of the Software that does not meet the Warranty. Any replacement Software will be warranted for the remainder of the original warranty period or thirty (days), whichever is longer. ii PowerTool 2.0 User Manual 020-100035-02 Rev. 1 (03-2010) Exclusions and Limitation of Liability: In no event shall the Licensor be liable for any loss of data or profits or special, incidental, indirect or consequential damages, (including, without limitation, damages for loss of business profits, business interruption, loss of business information, or any other pecuniary loss) arising out of or in connection with the use of or inability to use the Software, even if the Licensor has been advised of the possibility of such damages. In no event will the Licensor be liable for any damages caused by the Licensee’s failure to meet Licensee’s responsibilities, which responsibilities include without limitation, the provision of properly functioning and compatible hardware, operating systems, or applications software, or arising out of incomplete or inaccurate information provided to the Licensor. In any case, the Licensor’s entire liability under this Agreement shall be limited to CDN$1,000. TERMINATION AND DEFAULT Termination: The Licensor may terminate this Agreement if the Licensee breaches or is in default of any obligation. Should this Agreement be terminated for any reason, the Licensee agrees to immediately cease using the Software and to return to the Licensor all copies of the Software. The Licensee’s obligation under this section shall survive the termination of the Agreement. GENERAL Notices: Unless otherwise set forth in this Agreement, all notices, demands or other communications to the Licensor hereunder shall be in writing (including telecopy) and shall be deemed to have been duly given if delivered during normal business hours by hand, Federal Express, United Parcel Service or other reputable overnight commercial delivery service, by telecopy, confirmation of receipt received, or by mail with return receipt requested, addressed as follows: Christie Digital Systems USA, Inc. c/oChristie Digital Systems Canada, Inc. Legal Department 809 Wellington Street North Kitchener, Ontario N2G 4Y7 Severability: If any provision of this Agreement is held to be invalid, such invalidity shall not affect the other provisions of this Agreement. Waiver: No waiver by the Licensor of any particular default or omission committed by the Licensee shall affect or impair the right of the Licensor in respect of any subsequent default or omission of the same or a different kind. No delay or failure by the Licensor to exercise any rights in connection with PowerTool 2.0 User Manual 020-100035-02 Rev. 1 (03-2010) iii any default or omission committed by the Licensee shall affect or impair the Licensor’s rights in respect of that particular default or omission or any subsequent default or omission of the same or different kind. In any event, time shall continue to be of the essence without the necessity of specific reinstatement. Governing Law: This Agreement shall be governed by and interpreted in accordance with the laws of the Province of Ontario and the federal laws of Canada applicable therein. The Parties hereby will attorn to the nonexclusive jurisdiction of the Courts of the Province of Ontario. iv PowerTool 2.0 User Manual 020-100035-02 Rev. 1 (03-2010) Table of Contents 1.1 Related Documents............................................................................... 1-1 2 Installation and Setup 2.1 Requirements........................................................................................ 2-1 2.1.1 Recommended System................................................................. 2-1 2.1.2 Projector Requirements ............................................................... 2-1 2.1.3 Connection Requirements............................................................ 2-2 Serial Connections: ..................................................................... 2-2 Ethernet Connections: ................................................................ 2-2 Wireless Ethernet Connections: .................................................. 2-3 2.2 Projector Setup ..................................................................................... 2-3 2.2.1 Connect the Projector(s) Serially................................................. 2-3 2.2.2 Configure Projector ID ................................................................ 2-4 2.3 Software Installation............................................................................. 2-4 2.3.1 Installing PowerTool From the MASTERSuite Interface ........... 2-4 2.3.2 Uninstalling PowerTool............................................................... 2-5 3 Working with PowerTool 3.1 Starting the PowerTool Software ......................................................... 3-1 3.2 Working With Configuration Files....................................................... 3-2 3.2.1 Open a Configuration File ........................................................... 3-2 3.2.2 Create a Configuration File ......................................................... 3-2 3.2.3 Add Projectors to the Configuration............................................ 3-3 3.2.4 Save a Configuration File ............................................................ 3-5 3.3 Controlling Projectors .......................................................................... 3-6 3.3.1 Select a Projector and View Settings........................................... 3-6 3.3.2 Change Settings ........................................................................... 3-7 3.4 VirtualRemote ...................................................................................... 3-7 4 PowerTool Interface 4.1 General Function .................................................................................. 4-1 4.2 PowerTool Menu .................................................................................. 4-2 4.3 PowerTool Ribbon................................................................................ 4-2 4.4 Projector Workspace ............................................................................ 4-3 4.5 Projector Control Tabs ......................................................................... 4-4 4.5.1 Control Tab.................................................................................. 4-5 Information .................................................................................. 4-5 Source .......................................................................................... 4-5 Lens ............................................................................................. 4-6 4.5.2 Image Tab .................................................................................... 4-6 Auto Levels ................................................................................. 4-6 PowerTool 2.0 User Manual 020-100035-02 Rev. 1 (03-2010) v Table of Contents Contrast .......................................................................................4-8 4.5.3 Color Tab .....................................................................................4-9 Max Drives/SD Video/HD Video .............................................4-10 Color Temperature ....................................................................4-10 User 1–4 ....................................................................................4-11 4.5.4 Lamp Tab ...................................................................................4-12 Lamp Mode ...............................................................................4-12 Lamp History .............................................................................4-13 4.5.5 PIP (Picture-in-Picture) Tab ......................................................4-13 Picture in Picture .......................................................................4-13 Size and Position .......................................................................4-14 Source ........................................................................................4-14 PIP Image ..................................................................................4-15 4.5.6 Status Tab...................................................................................4-15 4.5.7 Color Matcher ............................................................................4-16 5 Backing Up Projector Settings 5.1 Back Up Projector Channels or Preferences.........................................5-1 5.2 Restore Projector Channels or Preferences...........................................5-1 5.3 Projector Preferences ............................................................................5-2 6 LogoLoader 6.1 Changing the Logo ...............................................................................6-1 6.2 Restoring the Default Christie Logo.....................................................6-2 vi PowerTool 2.0 User Manual 020-100035-02 Rev. 1 (03-2010) Section 1: Introduction 1 Introduction 1.1 Document Conventions The following text formats can be throughout the User Manual: • KEYPAD COMMANDS/PC KEYSTROKES E.G., POWER, ENTER, CHANNEL • Content Reference e.g., Section 5 - Troubleshooting • Document Reference e.g., Using 3D in Mirage • Figure/Table References e.g., Figure 2.1, Table 4.3 • Software Menus/Options e.g., Camera Settings, Screen Definition • On screen Messages e.g., No Signal • OPERATIONAL STATES E.G., POWER, ON, OFF 1.2 Related Documents All information included in this user manual is also included in the on-line help. This manual covers the use of controls in the PowerTool interface. For information about supported functions for specific projector models, see the projector user manual. PowerTool 2.0 User Manual 020-100035-02 Rev. 1 (03-2010) 1-1 Section 2: Installation and Setup 2 Installation and Setup Christie PowerTool is a suite of software tools for working with projectors, which includes: • LogoLoader • VirtualRemote 2.1 Requirements 2.1.1 Recommended System • PC running an Intel or 100% compatible processor • Windows XP SP1 or later • 256 MB of free disk space • 256 MB of RAM (512 MB recommended) • 1 available serial port or an Ethernet connection NOTE: When using a tablet PC use Windows XP Tablet PC Edition 2005 SP2 or later. 2.1.2 Projector Requirements • One or more projectors running version 1.2f or later of the firmware • Each projector must be running version 3.1.2.0 or later of the Xport firmware NOTE: To check firmware versions press Menu on the projector control pad and select 6 Status. Check the version of Software and Ethernet SW respectively. PowerTool 2.0 User Manual 020-100035-02 Rev. 1 (03-2010) 2-1 Section 2: Installation and Setup 2.1.3 Connection Requirements Serial Connections: • 1 serial cable per projector Figure 2-1 Serial Connection Ethernet Connections: • 1 network hub • 1 Ethernet cable to connect the PC to the network hub • 1 Ethernet cable per projector Figure 2-2 Ethernet Connection 2-2 PowerTool 2.0 User Manual 020-100035-02 Rev. 1 (03-2010) Section 2: Installation and Setup Wireless Ethernet Connections: • 1 wireless network hub • 1 wireless-enabled PC • 1 Ethernet cable per projector 192.168.200.2 192.168.200.3 192.168.200.1 192.168.200.4 Figure 2-3 Wireless Ethernet Connection 2.2 Projector Setup Complete projector setup instructions are detailed in the projector user manual. This section focuses on checking or adjusting settings with respect to using the PowerTool software. 2.2.1 Connect the Projector(s) Serially 1. Connect a standard serial cable from the serial port on your computer to the RS-232 In connector on the projector. 2. For multiple projectors, connect the RS-232 Out connector of the previously connected projector to the RS-232 In connector on the next projector with another standard serial cable. 3. Repeat Step 2 for each projector in a daisy chain fashion. 4. For each projector, set the projector’s baud rate to 115,200. From the projector keypad or remote press MENU, 4 CONFIGURATION, 7 COMMUNICATION, 1 BAUDRATE FOR RS232. PowerTool 2.0 User Manual 020-100035-02 Rev. 1 (03-2010) 2-3 Section 2: Installation and Setup 2.2.2 Configure Projector ID Each projector must have a unique identification number. Automatic detection of projectors can fail if projectors have duplicate IDs. The projector’s menu can be accessed either via the keypad on the projector or the remote control. The menus are displayed on the projected screen. All menu options are numbered. Menu items can be selected by using the up and down arrow buttons and then pressing ENTER, or by pressing the option number from the keypad. NOTE: Configuring IDs is required only when the projectors are connected serially. 1. Press the MENU button to access the main menu. Figure 2-4 Projector Keypad 2. Select 4 CONFIGURATION. 3. Select 7 COMMUNICATION. 4. Select 3 PROJECTOR. 5. Specify a unique identification number. 6. Press the MENU button to exit the projector's menu structure. NOTE: If you do not have a remote, use the left and right arrow keys on the projector to select a number. 2.3 Software Installation 2.3.1 Installing PowerTool From the MASTERSuite Interface 2-4 1. From the MASTERSuite interface, click the MASTERSuite button>Client Applications. 2. Click Install PowerTool. 3. Follow the instructions in the installation wizard. PowerTool 2.0 User Manual 020-100035-02 Rev. 1 (03-2010) Section 2: Installation and Setup 2.3.2 Uninstalling PowerTool 1. Click Start Menu>Settings>Control Panel>Add or Remove Programs. 2. Scroll to the PowerTool software and click the remove button to uninstall the program. PowerTool 2.0 User Manual 020-100035-02 Rev. 1 (03-2010) 2-5 Section 3: Working with PowerTool 3 Working with PowerTool PowerTool provides a quick and convenient way to control selected projectors in a multi-projector array. PowerTool runs on PC or Tablet. 3.1 Starting the PowerTool Software 1. To start the software, click Start>Programs>Christie>PowerTool>PowerTool. Startup opens the Load Configuration File dialog. Figure 3-1 Load Configuration File • To create a new configuration file, click New Configuration, add projectors, and save the configuration file. • To open a configuration file when starting the software, select Load Configuration, browse and select the configuration to load. NOTE: PowerTool automatically loads the projectors in the configuration file into the projector workspace. Red (Status Unknown) indicates projectors that are in an error condition, or projectors that are not connected as recorded in the configuration file. PowerTool 2.0 User Manual 020-100035-02 Rev. 1 (03-2010) 3-1 Section 3: Working with PowerTool 3.2 Working With Configuration Files 3.2.1 Open a Configuration File 1. Click the PowerTool button and select Open. Figure 3-2 PowerTool Interface 2. Browse to and select the configuration file to load. NOTE: PowerTool automatically loads the projectors in the configuration file into the projector workspace. Red (Status Unknown) indicates projectors that are in an error condition, or projectors that are not connected as recorded in the configuration file. 3.2.2 Create a Configuration File 1. Click the PowerTool button and select New. Figure 3-3 PowerTool Interface 2. 3-2 Add projectors, and save the configuration file. PowerTool 2.0 User Manual 020-100035-02 Rev. 1 (03-2010) Section 3: Working with PowerTool 3.2.3 Add Projectors to the Configuration 1. To add projectors to the configuration, click Add Devices. Figure 3-4 Add Devices Button 2. In the Device Search dialog, select the connection mode: Figure 3-5 Device Search Dialog • Serial Select this option if the projectors are serially connected. Ensure the COM Port and Baud Rate match the information specified on the projectors. If the values do not match the projector(s) will not be located. • Ethernet Select this option if the projectors are connected via Ethernet. Ensure the Port matches the port specified on the projectors, or check the Search All Ports option. • For PowerTool to detect projectors, they must be plugged into the network. • Only connected projectors that are on the same subnet will be listed, as defined by your subnet mask. PowerTool 2.0 User Manual 020-100035-02 Rev. 1 (03-2010) 3-3 Section 3: Working with PowerTool • Listed projectors that are not responding to Ethernet communication will be noted with a COMM ERROR warning. A COMM Error may indicate: • The wrong port has been specified for the projector(s). • Network traffic may be high. • The projector may not be working properly. NOTE: Auto detection may fail if some of the projectors have duplicate IDs or IP addresses. If no projectors are found, your router and/or firewall may not be configured correctly. If some projectors are found and others are not, you may have problems with one or more of the following: duplicate IDs or IP addresses, incorrect IP addresses, or incorrect firewall configuration. 3. Click Search. PowerTool detects all the projectors that are connected. Figure 3-6 Projectors found NOTE: Projectors flagged with the message “COMM ERROR” have been detected, but are not responding to communication. They cannot be selected for configuration until the communication problem has been resolved. 3-4 4. Click to select the projector(s) and Click a selected projector to deselect it, or click Deselect All to clear your selection. 5. Click Next to add the projectors to the configuration. Projectors are added in the order they are selected. PowerTool 2.0 User Manual 020-100035-02 Rev. 1 (03-2010) Section 3: Working with PowerTool Figure 3-7 Projectors added to the configuration 6. Click the Layout list arrow to see available layouts and select one from the list. The projector icons are automatically arranged according to the layout. Figure 3-8 Projector Layout 7. To rearrange the projectors, click and drag a projector icon to a new position in the layout. 3.2.4 Save a Configuration File To save the configuration file, click the PowerTool button and select Save As. PowerTool 2.0 User Manual 020-100035-02 Rev. 1 (03-2010) 3-5 Section 3: Working with PowerTool 3.3 Controlling Projectors 3.3.1 Select a Projector and View Settings • • To select a projector, click to highlight the projector icon. • Supported functions and options are activated in the PowerTool ribbon and in the projector control tabs. Unsupported functions and options are grayed out. • Displayed values reflect the current settings for the projector. To select multiple projectors, click to highlight additional projector icons. • Selecting multiple projectors disables those controls for which multiple selection does not make sense. For example, on the Control tab, the Projector ID fields are disabled when multiple projectors are selected. • Functions and options that apply to all selected projectors remain active. All other functions and options are grayed out. • A displayed value for a control indicates that all the selected projectors have the same value, else the value is blanked. NOTE: Check boxes have 3 stages: checked (all projectors), unchecked (none of the projectors), and orange background (some of the projectors). Figure 3-9 Projector Screen Selection 3-6 PowerTool 2.0 User Manual 020-100035-02 Rev. 1 (03-2010) Section 3: Working with PowerTool 3.3.2 Change Settings 1. Select the projectors you want to work with. 2. Click the tabs under the projector work space to access projector controls. Functions that apply to all the selected projectors are enabled. 3. Work with the controls to change the settings. Changes are sent to the selected projectors in real time. See 4 PowerTool Interface for information about the individual PowerTool controls. See the projector user manual for details about supported functions for your projector. 3.4 VirtualRemote VirtualRemote functions the same as the projector remote keypad. To access VirtualRemote: 1. Select the projector(s) you want to work with. 2. Click Launch>VirtualRemote in the Control ribbon. 3. Complete the Communication Setup Wizard. Figure 3-10 Communication Setup Wizard 4. Click Next. Figure 3-11 Device Selection List 5. Click to select the projector(s) you want to work with, and click Finish. PowerTool 2.0 User Manual 020-100035-02 Rev. 1 (03-2010) 3-7 Section 3: Working with PowerTool 6. 3-8 Click the buttons on the virtual remote to select functions as you would press the buttons on a real remote keypad. The commands are sent to the selected projectors. PowerTool 2.0 User Manual 020-100035-02 Rev. 1 (03-2010) Section 4: PowerTool Interface 4 PowerTool Interface PowerTool provides access to projector functions vis a visual interface. PowerTool Button Tool Ribbon Projector Workspace Projector Control Tabs Figure 4-1 Interface PowerTool is used with various Christie projectors. 4.1 General Function Functions and options are either active or grayed out. Active – Indicates that the function or option is supported by the selected projector or projectors. Grayed out – Indicates that the function or option is not supported by at least one of the selected projectors. See the projector user manual for projector specific information about supported functions. Functions such as Auto Setup can be used with a single or mutiple selected projectors at once. Functions such as Status apply to only a single projector at a time. PowerTool 2.0 User Manual 020-100035-02 Rev. 1 (03-2010) 4-1 Section 4: PowerTool Interface 4.2 PowerTool Menu The PowerTool menu provides access to Windows standard file management functions. To access the PowerTool menu click the PowerTool button. Figure 4-2 PowerTool Menu 4.3 PowerTool Ribbon The Control tab on the tool ribbon provides quick access to the most commonly used controls. Other options are grouped by function under the tabs at the bottom of the PowerTool window. Figure 4-3 PowerTool Ribbon, Control Tab Power Panel – On/Off turn the selected projectors ON or OFF. When powering ON or OFF, the status lights of the affected projector(s) turn medium green and the ON/OFF buttons for the affected projector(s) are disabled until the cycle is complete. If multiple projectors are selected, but only some of them are on, both buttons are available. Clicking the ON button powers up the selected projectors that are not already on. Channel – Backs up and restores channel settings for the selected projector(s). See 5 Backing Up Projector Settings. Preferences – Backs up and restores projector preferences for the selected projectors. See 5 Backing Up Projector Settings. 4-2 PowerTool 2.0 User Manual 020-100035-02 Rev. 1 (03-2010) Section 4: PowerTool Interface Control Panel Input Signal – Sets the input source for the selected projectors. If multiple projectors are selected, only the sources that are common to all the selected projectors are included in the list. See the projector manual for information about supported input sources. Test pattern – Identifies the test pattern to display during setup or troubleshooting. This option is enabled for supported projectors only. Enable – When checked enables the selected test pattern on the selected projector(s). The test pattern displays instead of the media from the input source. NOTE: If multiple projectors are selected and only some of them are shuttered, the check box remains unchecked. Shutter Open – Opens and Closes the shutter for the selected projector(s). Layout Panel Polling Rate – Sets the rate at which PowerTools sends a status request to all the projectors in the configuration. This setting should only be changed by experienced system administrators. The polling rate for serially connected projectors should not be set lower than 300. Layout – Select the layout of the projectors in the configuration. PowerTool calculates layout options based on the number of projectors in the configuration. The selected layout is reflected in the projector workspace below the tool bar. Add Devices – Opens the Add Devices dialog. Launch – Opens the virtual remote keypad so that you can control the selected projector using the familiar keypad layout. 4.4 Projector Workspace Figure 4-4 Projector Workspace PowerTool 2.0 User Manual 020-100035-02 Rev. 1 (03-2010) 4-3 Section 4: PowerTool Interface The projector workspace displays buttons representing the projectors in the configuration. Each icon displays the projector name and a color-coded status indicator. Red – Status information unknown. Light Green – Projector powered ON. Medium Green – Projector COOLING DOWN. Dark Green – Projector powered OFF. You can hover over a projector button to display more status information. Click and drag a button to move it to a new position in the layout. 4.5 Projector Control Tabs Figure 4-5 Project Control Tabs The tabbed controls give access to projector options grouped by function. See the projector user manual for projector specific information about supported functions and options. 4-4 PowerTool 2.0 User Manual 020-100035-02 Rev. 1 (03-2010) Section 4: PowerTool Interface 4.5.1 Control Tab Figure 4-6 Control Tab Information Projector Name – Identifies the selected projector by name. This is a PowerTool reference only and is not stored on the projector. This field is disabled when multiple projectors are selected. Projector ID – Identifies the selected projector’s ID number. This field is disabled when multiple projectors are selected. Connection – Identifies the selected projector’s IP address/COM port. This field is disabled when multiple projectors are selected. Source Auto Setup: – Optimizes settings for the current source. Auto Setup will override settings you may have adjusted. Table 4.1 outlines the Auto Setup changes. PowerTool will prompt you to confirm that you want to use Auto Setup. You must have an unlocked channel present to use Auto Setup. If multiple projectors are selected, Auto Setup will be run on each selected projector in succession. Failures will be reported. Auto Setup is not available if the selected Input Signal source is inactive Table 4.1 Auto Setup Settings Pixel tracking Pixel phase Size and blanking Vertical stretch Position Input levels PowerTool 2.0 User Manual 020-100035-02 Rev. 1 (03-2010) Contrast Brightness Auto input level (Off) Detail (if video source) Filter Luma delay 4-5 Section 4: PowerTool Interface Lens Depending on the projector model, either the arrow buttons or the sliders are enabled to adjust settings. Focus – Adjusts lens focus to improve the clarity of the image ( to decrease focal distance, or to increase focal distance). Click the button for a small adjustment or click and hold for continuous adjustment. If multiple projectors are selected, focus changes are relative to each projector’s current settings. Zoom – Adjusts the image size to fit the screen ( to zoom out, or to zoom in). If multiple projectors are selected, zoom changes are relative to each projector’s current setting. Horizontal – Adjusts the horizontal lens offset ( to move the image to the left, or to move the image to the right). Vertical – Adjusts the vertical lens offset ( to move the image up, or to move the image down). NOTE: When using a hand-held tablet, tapping a control and holding will activate a context menu. For continuous adjustment, either tap repeatedly, or gently rub back and forth on the control. Alternatively, you can turn OFF the right-click functionality in the tablet’s configuration. 4.5.2 Image Tab Auto Levels The Auto Levels tab continuously monitors the input signal levels and makes adjustments as necessary to prevent crushing. The projector can automatically optimize levels for all but the most unusual of sources. Input levels can only be adjusted for one projector at a time. The Auto Levels tab is not available when multiple projectors are selected. If a test pattern has been enabled, you will not be able to adjust the image. 4-6 PowerTool 2.0 User Manual 020-100035-02 Rev. 1 (03-2010) Section 4: PowerTool Interface Figure 4-7 Auto Levels Enable Auto Levels – Automatically adjusts the Black Levels and Drive Levels for the source specified on the Control tab. Selecting this option disables the Black Levels and Drive Levels controls. Before beginning, check that overall contrast and brightness settings are near 50 and color temperature is properly set up on an internal gray scale test pattern. • Check this option to enable automatic level adjustment. This is only available for BNC sources. • Uncheck this option to disable automatic adjustment and enable the manual settings. Only experienced users should manually adjust Black Levels and Drive Levels. There must be at least two consecutive white pixels present in the image for proper “Auto Input Level” function. Leave this control OFF after use. Auto levels applies to BNC and DVI-A sources only. Black Levels – Red/Green/Blue – Indicates the black levels of each color for the specified source on the selected projector. Experienced users may choose to manually adjust black levels for very unusual sources exhibiting one or more overly high black level (typically caused by a noisy source causing black level spikes). These adjustments, which together serve as a calibration process compensating for differences in sources and cabling, enable an experienced user to perfect the source image input levels and eliminate “overshoot” and “undershoot”. Input Levels – Red/Green/Blue – Input Levels are of limited use with digital signals, but do offer some ability to tweak poorly mastered source materials. PowerTool 2.0 User Manual 020-100035-02 Rev. 1 (03-2010) 4-7 Section 4: PowerTool Interface Contrast Figure 4-8 Contrast Contrast – Increases or decreases the perceived difference between light and dark areas of your image (0-100). For best results, keep close to 50. If contrast is set too high, the light parts of the image lose detail and clarity. If the contrast is set too low, the light areas will not be as bright as they could be and the overall image will be dim. For best results, start with a low value and increase so that whites remain bright, but are not distorted or tinted, and that light areas do not become white (i.e., are “crushed”). If the environment lighting changes, an adjustment of Gamma is recommended (see below). This control is not available when multiple projectors are selected, if a test pattern is running, or if there is a video signal error. Brightness – Increases or decreases the amount of black in the image (0 to 100). For best results, keep close to 50. Start with a high value and decrease so that dark areas do not become black (i.e., are “crushed”). Conversely, high brightness changes black to dark gray, causing washed-out images. This control is not available when multiple projectors are selected, if a test pattern is running, or if there is a video signal error. Gamma Type – Identifies the gamma curve used for gamma adjustments: Standard, 2.22, or custom. Gamma – Determines what gray shades are displayed between minimum input (black) and maximum input (white) for all signals. A good gamma setting helps to optimize blacks and whites, while ensuring smooth transitions for the “in-between” values utilized in other colors. Unlike Brightness and Contrast controls, the overall tone of your images can be lightened or darkened without changing the extremes. All images will be more vibrant, while still showing good detail in dark areas. 4-8 PowerTool 2.0 User Manual 020-100035-02 Rev. 1 (03-2010) Section 4: PowerTool Interface Gamma is used to fine-tune the gamma table currently in use, ranging from 1 to 3. If excess ambient light washes out the image and it becomes difficult or impossible to see details in dark areas, lower the gamma setting to compensate. If the image is washed out and unnatural, with excessive detail in black areas, increase the setting. In high ambient light conditions, lower gamma may produce better results than higher gamma. Gamma of 2.2 (default) indicates the gamma table has not been adjusted. Manual gamma adjustment is enabled when Gamma Type is set to Custom. 4.5.3 Color Tab The contents of the Color tab change depending on the output color selection. Output Color – Allows you to specify the output color mode. The selections include: Max Drives – Drives all three colors at their maximum level so that they are fully on and cannot be changed. Color TemperatureEnables the color temperature selection control. SD VideoOptimizes color for standard video sources. Colors cannot be adjusted. HD VideoOptimizes color for high definition video sources. Colors cannot be adjusted. User 1–4Enables user defined color adjustments. Enable Auto ColorWhen enabled, this control allows the projector to continuously monitor the input signal levels of the analog inputs and make adjustments as needed. This options is available for BNC and Dual DVI inputs. Checking this option disables all other controls on the Color tab. PowerTool 2.0 User Manual 020-100035-02 Rev. 1 (03-2010) 4-9 Section 4: PowerTool Interface Max Drives/SD Video/HD Video Max Drives turns all the colors to their maximum level. Figure 4-9 Color Settings Color Temperature Figure 4-10 Color Temperature Color Temperature Slider – This selection allows you to specify color gamut by selecting an accurate color temperature. Color temperatures are expressed in degrees Kelvin (3200-9300K) and utilize different combinations of the projector’s original native color primaries to produce a “coloration” or cast (reddish or bluish) in images—the higher the temperature, the more reddish the cast; the lower the temperature, the more bluish the cast. This option is available only if you have a source connected and have selected Color Temperature from the Output Color drop-down list. 4-10 PowerTool 2.0 User Manual 020-100035-02 Rev. 1 (03-2010) Section 4: PowerTool Interface User 1–4 Figure 4-11 User-Defined 1–4 Output Color - Color – Identifies the color to be adjusted. This feature is enabled for User 1–4 color adjustments only. Color Adjustment by XY – Select this feature to enable the Color XY sliders to adjust the color specified in the Output Color drop-down. It allows you to define Red, Green, Blue and White by defining their RGB components. This feature is enabled for User 1–4 color adjustments only. Color Saturation – Select this feature to enable the Color Saturation sliders. This feature is enabled for User 1–4 color adjustments only PowerTool 2.0 User Manual 020-100035-02 Rev. 1 (03-2010) 4-11 Section 4: PowerTool Interface 4.5.4 Lamp Tab Figure 4-12 Lamp Lamp Mode Lamp Mode List – Indicates the lamp usage mode that regulates the lamp’s power and light output. Max brightness – The lamp burns as brightly as possible, driven by 100% of the power level rating for the installed lamp. Maximum brightness for any lamp gradually diminishes with age and images become dimmer over time. The lamp’s current output level is reflected in the Intensity control. Intensity – Brightness remains close to the specified level for as long as possible. If you select this option, you must also set the desired intensity level using the Intensity control. The projector will automatically adjust power as needed to maintain this intensity as closely as possible. Power – Power supplied to the lamp will remain at the specified wattage level. If you select this option, you must also set the power level using the Power (W) control. Power (W) – Indicates the lamp power level in watts. The range depends on the projector model. This control is enabled when you select Power from the Lamp Mode drop-down list. Enabled when Lamp Mode is set to Power. Intensity – Indicates the light intensity setting for the lamp. The range is 09999. Note that the intensity value is a correlation only and does not represent a lumens level. This control is enabled when you select Intensity from the Lamp Mode drop-down list. Enabled when Lamp Mode is set to Intensity. 4-12 PowerTool 2.0 User Manual 020-100035-02 Rev. 1 (03-2010) Section 4: PowerTool Interface Aperture – Adjusts the optical aperture inside the projector. The optical aperture inside the projector controls the diameter of the opening to the lens, controlling the amount of light leaving the projector. With a fully open aperture, the maximum amount of light passes through for maximum brightness. Reduce the aperture diameter to increase contrast ratio. Enabled when Lamp Mode is set to Intensity. Depending on the projector model, either the up and down buttons or the slider are enabled to adjust settings. NOTE: If the selected projector can store the aperture setting, then this control displays as a slider. Lamp History Lists the lamps most recently installed and recorded in the projector. Lamp history automatically updates whenever you record a new lamp serial number—the new lamp is added to the bottom of the list. 4.5.5 PIP (Picture-in-Picture) Tab Figure 4-13 PIP Picture in Picture Enable Picture in Picture – •Activates the PIP window and enables the controls on the tab. PIP functions only when you have an active signal and are not running a test pattern. If you have no active signal the following warning is displayed, No Active Video Signal/Image Settings Controls Disabled and the PIP Image controls are disabled. PowerTool 2.0 User Manual 020-100035-02 Rev. 1 (03-2010) 4-13 Section 4: PowerTool Interface Size and Position Position Presets – Allows you to set the position of the PIP window: • Top Left • Top Right • Bottom Left • Bottom Right • Custom H-Position/V-Position – Indicates the horizontal/vertical position of the picture-in-picture window. The range is a number in pixels. This control is enabled when you select the Custom option from the Position Presets list. PIP Size – Indicates the width of the PIP window in pixels. The height of the window is determined using the default aspect ratio of the input image. This control is enabled when you select the Custom option from the Position Presets drop-down list. PIP Border Width – Indicates the width of the border around the PIP window. Source Main and PIP Images SWAP – Switches the images displayed of the main screen with the PIP window. PIP Input Signal – Allows you to specify the source for the PIP window. Two sources on the same decoder can result in a conflict. For best PIP or Seamless Switching results when composite and S-video signals are on the same decoder, use two different signal types. The selections include: • BNC • DVI-I • Composite • S-Video • Option slot #1 • Option slot #2 NOTE: Interlaced sources are not recommended for PIP. Tips for using PIP or Seamless Switching: • 4-14 When using two digital signals or one analog and one digital, each must be <165 MHz. PowerTool 2.0 User Manual 020-100035-02 Rev. 1 (03-2010) Section 4: PowerTool Interface • When using two analog signals, each must be <90MHz. • Avoid using an interlaced source in the PIP window. • Seamless switching may affect image quality in some cases. PIP Image Brightness, contrast, and gamma for the PIP image behave in the same way as brightness, contrast, and gamma for the main image. For details, see Contrast on page 4-8. 4.5.6 Status Tab Figure 4-14 Status Device Information – Identifies the selected projector and the installed firmware, and tracks the operation hours for the lamp and projector. Temperature Readings – Indicates the current operating temperatures for various components in the projector chassis. Refresh Date and Time – Allows you to refresh the status information for the selected projector(s) immediately. The projector’s status light glows orange if the last status update did not complete. PowerTool 2.0 User Manual 020-100035-02 Rev. 1 (03-2010) 4-15 Section 4: PowerTool Interface 4.5.7 Color Matcher Figure 4-15 Color Matcher Color Gamut Graph – Visually identifies the color gamut described by the chart. Color Gamut/Common Gamut – Identifies the color gamut. • For a single selected projector, identifies the color gamut stored at user locations 1 through 4. Values reflect the User location selected. • For multiple selected projectors, calculates the common gamut that can be supported by the selected projectors. If applied, the values will be stored at the selected User location. User 1-4 – Identifies the User location where the color gamut values are stored. Apply – Sends the calculated common gamut values to the selected User location on the selected projectors. This option is available when multiple projectors are selected. Undo – Restores the color gamut values that were in use prior to applying the common gamut. This option is available immediately after applying a common gamut. 4-16 PowerTool 2.0 User Manual 020-100035-02 Rev. 1 (03-2010) Section 5: Backing Up Projector Settings 5 Backing Up Projector Settings 5.1 Back Up Projector Channels or Preferences 1. Select the projectors. 2. On the Control ribbon: 3. • Click Preferences>Backup • Click Channel>Backup Browse to where you want to save the backup files and click OK. Depending on the projector model, files are saved as: • channel_projector ID_MAC address-dd-mm-yyyy-hh-mm.chl • preferences_projector ID_MAC address-dd-mm-yyyy-hh-mm.tpr • channel_projector ID__yyyy_mm_dd_hh_mm.tar • preferences_projector ID__yyyy_mm_dd_hh_mm.tar 5.2 Restore Projector Channels or Preferences Projectors must be powered ON to restore channels and preferences. 1. Select the projectors to restore settings for. 2. On the Control ribbon: 3. • Click Preferences>Restore • Click Channel>Restore Browse to and select the backup file to restore. Depending on the projector model, files are saved as: 4. • channel_projector ID_MAC address-dd-mm-yyyy-hh-mm.chl • preferences_projector ID_MAC address-dd-mm-yyyy-hh-mm.tpr • channel_projector ID__yyyy_mm_dd_hh_mm.tar • preferences_projector ID__yyyy_mm_dd_hh_mm.tar Click Open. PowerTool 2.0 User Manual 020-100035-02 Rev. 1 (03-2010) 5-1 Section 5: Backing Up Projector Settings 5. When restoring channel definitions, PowerTool prompts you to delete existing channels first: • Click Yes to clear existing channels. Only the channels in the restore file will remain after the restore operation. • Click No to keep existing channels. Only the channels that in the restore file are updated. Other channels remain unchanged. NOTE: If no projectors are found, your router and/or firewall may not be configured correctly. If some projectors are found and others are not, you may have problems with one or more of the following: duplicate IDs or IP addresses, incorrect IP addresses, or incorrect firewall configuration. 5.3 Projector Preferences Table 5.1 Projector Preferences Shutter 3D Stereo Select Sync Test Pattern Grey Focus Language Picture Mute 3D Stereo Sync Delay Freeze Image Internal Test Pattern Screen Orientation Onscreen Display Frame Delay Level Detector Select Source Broadcast Keys Picture-inPicture Brightness Uniformity Color Enable Select Input Projector Number Active Projector Edge Blending Lamp Message Enable Source/ Channel Name Password Enable Auto Setup Edge Blend Select Lamp Limit In Menu Fan Sensor Enable Size-Position Presets Select Output Color Lamp Mode Source Memory Lock PIP Border Width Size Warp Select Lamp Power Auto Source Br. Uniformity Select Vertical Stretch 2D Keystone Corners Lamp Intensity Delete Source PIP Horizontal Position Pixel Tracking Warp Prefilter H Lamp Changed Baud Rate PIP Vertical Position Pixel Phase Warp Prefilter V Optical Aperture Baud Rate Secondary PIP Horizontal State Horizontal Position Warp Sharpness LampLOC Module Projector Number Blue Odd Gain 5-2 PowerTool 2.0 User Manual 020-100035-02 Rev. 1 (03-2010) Section 5: Backing Up Projector Settings Table 5.1 Projector Preferences Vertical Position Warp Latency Lamp Size Broadcast Keys Dark Interval Top Blanking Noise Reduction White Boost Network Routing 3D Stereo Sync Mode Left Blanking Motion Filter Color Wheel Delay Keypad Enable Auto Power UP Bottom Blanking Film Mode Threshold 2nd Color Wheel Delay Backlight Slidebar Enable Right Blanking Ten Bit Processing Lamp Conditioni ng Screen Orientation Error Message Enable Plug & Display Modes Output Resolution Lamp Orientation Keystone Menu Font Contrast Output Format Red Black Level 2D Keystone H Offset Lamp Message Enable Brightness DHDM Loop Thru Setting Green Black Level Auto Power Up Keypad Enable Base Gamma Curve DHDM Dual Link Format Blue Black Level Language Output Color Default Color Frame Lock Enable Red Drive Source Dialog Enable 2D Keystone Throw Ratio Tint Splash Select Green Drive Slidebar Enable Numbers Select Image Detail LiteLOC Calibration Blue Drive Error Message Enable Splash Select Input Filter PIP Border Color Auto Input Levels Menu Location Parameter Lockout Copy Comprehensi ve CLR Image Optimization Clamping Menu Shift Horizontal 2D Keystone V Offset Interpolated Color Numbers Select Image Peak Detector Menu Shift Vertical Comprehensive Color Adj Color Space Aspect Ratio Overlay Red Odd Offset Menu Font Gamma Video Standard Edge Blend Black Levels Red Odd Gain Time & Date Warp Select Chroma/ Luma Delay Intelligent Lens System Green Odd Offset XPort IP 2D Keystone H Offset PowerTool 2.0 User Manual 020-100035-02 Rev. 1 (03-2010) 5-3 Section 5: Backing Up Projector Settings Table 5.1 Projector Preferences Video Black Level Lens Calibrate Green Odd Grain Lens Vertical Offset Output Format Zoom Automatic Gain Control Blue Odd Offset Lens Horizontal Offset 2D Keystone Center Fade Time Output Resolution 2D Keystone Zoom General Input/ Output PIP Border Color 5-4 PowerTool 2.0 User Manual 020-100035-02 Rev. 1 (03-2010) Section 6: LogoLoader 6 LogoLoader The LogoLoader software enables users to easily replace the Christie logo with an image more suited for the particular display. Replacement logos should be. • Uncompressed single plane 8-bit 256 color bitmap files • Up to 512Kb, approximately 800 x 600 pixels. Bitmaps smaller than 150Kb are optimal for projector power up time. Logo file size directly affects projector start-up time. 6.1 Changing the Logo 1. To access LogoLoader, click Start>Programs>Christie>PowerTools>LogoLoader. 2. Complete the Communication Setup Wizard. Figure 6-1 Communication Setup Wizard 3. Click Next. Figure 6-2 Device Selection List PowerTool 2.0 User Manual 020-100035-02 Rev. 1 (03-2010) 6-1 Section 6: LogoLoader 4. Click to select the projector(s) you want to work with, and click Finish. The LogoLoader interface shows the selected projectors. Figure 6-3 LogoLoader Interface 5. Click to select the projector(s) for editing. 6. To upload a logo click Browse and select the file to load. If the selected file does not meet the requirements a pop-up screen indicates what is wrong. 7. Specify the position of the logo: 8. 9. • Select an option from the Location drop-down menu. • Specify the X and Y offsets of the image. The range for these fields is a minimum of -2048 and a maximum of 2048. To change the background color click Select from the Background Color section and select a color from the dialog. Click Send. If a logo is loaded when the projector(s) is powered down the image will appear when the projector(s) is powered ON, as long as the projector detects the image. If the projector is already powered ON when a logo is loaded a message appears requesting you to recycle the power. The image will only be displayed once the projector is restarted. 6.2 Restoring the Default Christie Logo 1. 6-2 To restore factory defaults select File> Restore Factory Logo. PowerTool 2.0 User Manual 020-100035-02 Rev. 1 (03-2010) A LogoLoader 6-1 auto levels 4-6, 4-7 auto setup 4-5 P B backup 5-1 black levels 4-7 brightness 4-8 C channels backup 5-1 restore 5-1 color 4-9 gamut 4-16 matcher 4-16 temperature 4-10 COMM error 3-4 connections 2-2 Ethernet 2-2 serial 2-2 wireless 2-3 contrast 4-8 control tab 4-5 G gamma 4-8 I image, adjusting 4-6 input levels 4-7 input signal 4-14 L lamp 4-12, 4-13 lens focus 4-6 horizontal/vertical offset 4-6 offset 4-6 zoom 4-6 logo changing 6-1 restoring 6-2 PowerTool 2.0 User Manual 020-100035-02 Rev. 1 (03-2010) picture in picture (PIP) 4-13, 4-14, 4-15 preferences backup 5-1 restore 5-1 projectors backup preferences 5-2 ID 2-4 requirements 2-1 setting up 2-3 status 4-15 R requirements 2-2 restore 5-1 S selecting projectors 3-6 setting up projectors 2-3 starting PowerTool 3-1 status projector 4-15 temperature 4-15 system requirements 2-1 T temperature status 4-15 V virtualremote 3-7 W wireless 2-3 Index-1-1 Section : Corporate offices USA – Cypress ph: 714-236-8610 Canada – Kitchener ph: 519-744-8005 Worldwide offices United Kingdom ph: +44 118 977 8000 Hungary/Eastern Europe ph: +36 (0) 1 47 48 100 Beijing ph: +86 10 6561 0240 Germany ph: +49 2161 664540 Singapore ph: +65 6877 8737 Korea ph: +82 2 702 1601 France ph: +33 (0) 1 41 21 44 04 Shanghai ph: +86 21 6278 7708 Japan ph: +81 3 3599 7481 For the most current technical documentation, please visit www.christiedigital.com 2-2 PowerTool 2.0 User Manual 020-100035-02 Rev. 1 (03-2010)