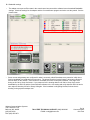
1
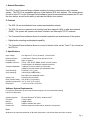
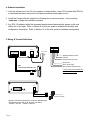
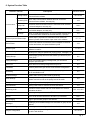
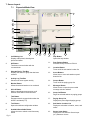
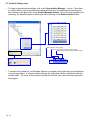
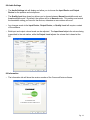
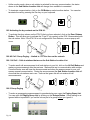
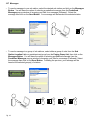
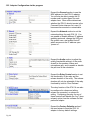
0211
Software for IPW-1A Intercom-Over-IP Adaptor
POWER
i re
2W
s
T
IN0 IN1
NO C NC
LAN
PWR
OPERATION MANUAL
TABLE OF CONTENTS
GENERAL DESCRIPTION
1
FEATURES
2
SPECIFICATIONS
3
SOFTWARE INSTALLATION
4
WIRING & TERMINAL DEFINITIONS
5
SYSTEM FUNCTION TABLE
6
SCREEN LAYOUT
Expanded Mode View
Collapsed Mode View
7
7.1
7.2
SOFTWARE CONFIGURATION WINDOW
General tab
Paging Groups
Paging Messages
Ignore List
Passwords
Scheduling
Archival Settings
Audio Settings
Information
8
8.1
8.2
8.3
8.4
8.5
8.6
8.7
8.8
8.9
PRIOIRTY LEVEL
9
OPERATIONS
Sub station calling in
Answering a call from sub station
Monitoring the sub station
Talking to a sub station
Activating the dry contacts
ALL CALL / GROUP PAGING
All Call
Group Paging
Messages
10
10.1
10.2
10.3
10.4
10.5
10.6
10.6.1
10.6.2
10.7
ICON DESCRIPTIONS
11
HARDWARE CONFIGURATION
Accessing from CommuniCenter
Adaptor Configuration via software
Adaptor Configuration via browser
12
12.1
12.2
12.3
BROADCAST AND DIRECT MODE
Broadcast Mode
Direct Mode
What network administrator needs to know
What functions are available in each mode
Appendix A
A.1
A.2
A.3
A.4
TROUBLESHOOTING
Bandwidth Settings
Appendix B
B.1
Pg. 2
1. General Description
The IPW-1A and CommuniCenter software combine to create a network door entry intercom
system. The IPW-1A is compatible with any of the Aiphone IE/IF door stations. The system allows
for call-in to the PC via the CommuniCenter software, general communication between the PC and
the door station, as well as the ability to activate the electric door release.
2. Features
o The IPW-1A can be distributed over a data communication network.
o The IPW-1A can be connected to an existing local area network (LAN) or wide-area network
(WAN). The system will operate over wired, wireless, and fiber-optic TCP/IP networks.
o The CommuniCenter software allows for standard operation and maintenance of the system.
o Digital audio recording and playback capability.
o The CommuniCenter software allows for control of electric locks via the “Form C” dry contact on
the IPW-1A.
3. Specifications
Input Voltage:
Network Interface:
IP Assignment:
Hardware Protocols:
Use Aiphone PT-1211C (included); 15-24V AC/DC
10/100 Base-T Ethernet (Auto detection) RJ-45
Static or Dynamic
TCP/IP, UDP, DHCP, SNMP, AutoIP, SonicIP, Ipzator
Contact Aiphone for additional supported protocols
Transport Bandwidth: ≈128Kbps per active session (normal mode)
≈64Kbps per active session (low bandwidth mode)
Audio Encoding:
PCM (raw), G.7II ( Law)
Audio Sampling:
16bit at 8kHz (normal mode)
8bit at 8kHz (low bandwidth mode)
Output Level:
Determined by sub station
Relay Contact Rating: 30V AC/DC 1.0A (resistive)
Operating temperature: 32°F to 104°F (0°C to 40°C)
Dimensions:
1-1/2″H x 4-1/4″W x 4-15/16″D
Software System Requirements:
For optimum performance of the CommuniCenter program, we recommend the following
minimum requirements:
Operating System:
Processor:
Memory:
Hard drive:
Sound Card:
®
®
Microsoft Windows XP (SP2), Windows Vista
1 GHz or faster
256MB of RAM
50MB of available disk space
Windows supported sound card (w/ speaker & microphone)
Note:
Windows is the registered trademark of Microsoft Corporation in the United Sates and other countries.
Pg. 3
4. Software Installation
1. Load the software onto the PC to be used as a master station. Insert CD (included with IPW-1A)
or download the latest version from the Aiphone website (www.aiphone.com).
2. Install the CommuniCenter software by following the on-screen prompts, or by executing
“setup.exe” to begin the installation process.
3. Any IPW-1A adaptors within the broadcast domain should automatically appear on the sub
station list on the right. Refer to Section 8 of this user guide for software functionality and
configuration information. Refer to Section 12 of this user guide for hardware configuration.
5. Wiring & Terminal Definitions
T
IN0 IN1
NO C NC
POWER
T
IN0 IN1
PT-1211C
NO C NC
LAN
PWR
*Normally Closed dry contact
*Common
*Normally Open dry contact
Input ground
Input 1 (sensor input)
Input 0 (external call button input)
Note:
Contact rated at 30V AC/DC, 1.0A
* The dry contact can be used for door
release or an alarm output.
PT
SUB
RESET
RS-232
STATUS
SUB
1
2
Audio Only Door
IE Series sub station
Wiring to sub station should be 2-conductor shielded cable.
* Wire distance from IPW-1A to IE series sub station:
22AWG = 387 feet, 18AWG = 980 feet
Pg. 4
6. System Function Table
Feature/Function
Talking to Sub
Description
Reference section
Direct audio communication between the IPW-1A and the
CommuniCenter software
10.2 & 10.4
Monitoring Sub Direct audio communication between the IPW-1A and the
CommuniCenter software, one-way only
Communication
10.3
Group Call
Broadcast audio transmission from the CommuniCenter software
to selected adaptors, one-way only
10.6.2
All Call
Broadcast audio transmission from the CommuniCenter software
to all visible adaptors, one-way only
10.6.1
Message
Direct or broadcast transmission of a pre-recorded message from
the CommuniCenter software to selected station(s) / group(s)
10.7
Contact Input and Sensor Input
Contact input is equivalent to call button from IE series sub
Sensor input will create a sensor input event in the software
Device Reset
Device reset function will cause the IPW-1A adaptor to cease all
function and reboot, as if power had been cycled
12.1
Screen Layout
Describes what each button and window in the CommuniCenter
software is used for
7.1 & 7.2
Software Configuration
Allows you to configure passwords, paging groups, messages, etc
Paging Groups
Create paging groups and select the stations you wish to be part
of the group
8.2
Paging Messages
Set up pre-recorded paging messages that you can send to
groups or specific subs
8.3
Ignore List
Block devices from being recognized from your PC
8.4
Passwords
Create a password to gain access to the software configuration
8.5
Scheduling
Set specific times during the day/week to put the program in and
out of unavailable mode
8.6
Archival Settings
Enable audio archiving and/or data-log archiving
8.7
Audio Settings
Allows you to choose input and output device for the
speaker and mic as well as the quality level of the audio
8.8
Priority Level
Lists priority level for calls (highest to lowest)
Call Placement
Placing a call to the PC from the IE series sub station
Answering a call
Procedure used to answer call from a sub station or to select a
sub station to talk to
Door Release
Activating the dry contacts on the IPW-1A
All Call
Place an all call announcement to all subs in your software
10.6.1
Group Paging
Page to pre-selected groups of sub stations
10.6.2
Messages
Sending a pre-recorded message to a sub station or group of sub
stations
10.7
Hardware Configuration
Accessing hardware configuration from within CommuniCenter
12.1
Adaptor Configuration
Accessing the adaptor settings via the CommuniCenter software
or via the web browser
5, 7, 11
8
9
10.1
10.2, 10.3, 10.4
10.5
12.2 & 12.3
Pg. 5
7. Screen Layout:
7.1
Expanded Mode View
19
1
2
18
3
4
17
5
6
16
7
8
9
1-
Call Waiting List
Displays calls placed, showing time
placed and status
2-
Off Button
Terminates communication with the
connected sub
3-
4-
5-
6-
7-
10
12
13
14
15
10-
Help Button
Opens the help window
11-
Door Release Button
Activates the dry contact on IPW-1A
12-
Location Button
Turns on/off the sub station location list
13-
Arrow Buttons
Allows user to move sub stations up and
down the list
Activity Log Text Box
Shows most recent system activity
14-
Groups Button
Turns on/off the paging group list
Monitor Button
Allows the selected station to be monitored
15-
All Call Button
Makes a broadcast announcement to all
stations visible within CommuniCenter
Messages Button
Allows a user to open the prerecorded
message selection window
16-
Group Call Button
Pages to selected stations or paging groups
17-
Paging Group List
Displays the preconfigured paging groups
18-
Sub Station Location List
Displays a sub station‟s location, name, and
status
19-
Sensor Input Status
Displays an icon when the Sensor Input
(In 1) detects a closure
Selected Device Text Box
Displays the station or group that has been
selected
Talk Button
Engages transmit communication when the
button is activated (PTT)
8-
Tool Button
Opens the software configuration window
9-
Available/Unavailable Button
Allows the user to switch to and from away
status
Pg. 6
11
7.2
Collapsed Mode View
1
2
3
4
5
10
6
11
7
12
8
13
9
14
1-
Minimize, and Terminate buttons
Minimizes or terminates the program
2-
Expand/Collapse Button
Toggles between the expanded and
collapsed versions
3-
Sensor Input Status
Displays an icon when the Sensor Input
(In 1) detects a closure
4-
Call Waiting List
Displays calls placed, showing time
placed and status
5-
Selected Device Text Box
Displays the station or group that has been
selected
6-
Monitor Button
Allows the selected station to be monitored
7-
All Call Button
Makes a broadcast announcement to all
stations visible within CommuniCenter
8-
Talk Button
Engages transmit communication when the
button is activated (PTT)
9-
Tool Button
Opens the software configuration window
10-
Activity Log Text Box
Shows most recent system activity
11-
Off Button
Terminates communication with the
connected sub
12-
Door Release Button
Activates the dry contact on IPW-1A
13-
Available/Unavailable Button
Allows the user to switch to and from away
status
14-
Help Button
Opens the help window
Pg. 7
8. Software Configuration Window
o Open the Software Configuration Window by clicking on the Tool Button. If a password has
been set you will be prompted by the Password Required dialog. By default the password is
not set. When using a password, make sure it is something you will be able to recall or write it
down in secure location.
8.1 General Tab
o Under the General Tab you will have the option of selecting how you receive call notifications.
You can select the following from the drop down box:
“Visual (pop up)” will display the “Incoming Call” pop up
“Audible (.wav file)” will play a preselected .wav file
“Both” will enable both the Visual and Audible notifications
o If you are using the Audible (.wav file) option click on the Select Chime Tone button to select a
suitable file from your PC. For “Normal” bandwidth mode your file must be 16-bit, 8kHz, PCM
(uncompressed), for “Low” bandwidth mode your file must be 8-bit, 8kHz uLaw (compressed).
o When minimized, the program can be hidden from the task bar by clicking on the “Hide when
Minimized” check box. The program will always be visible in the system tray.
Pg. 8
8.2 Paging Groups
o Under the Paging Groups tab you will have the option to create different paging groups. Type
in a group name in the box to the left of the Create Group button. Next click on the Create
Group button. You will now see the name in the Groups list. To delete the group from the
Groups list, select the group and then click the Delete button. The final step is to select which
sub stations you want in your group. Select the group from the Groups list, then in the
Connected Device list, use the check box under the Group column to add the desired sub
stations to your group. Clicking on the Refresh button will update the list with the latest devices
available.
Create and name group
Select sub station(s) via check box
Updates the connected devices list
8.3 Paging Messages
o Under the Paging Messages tab you can create messages from .wav files on your PC. To
enable the user to browse for a file in the Paging Message pop-up window, the „Allow direct
browse for files‟ box must be checked. Otherwise, only the pre-configured messages will be
selectable. Use the Select .wav file… button to browse your PC for a .wav file. Files must
match your Audio Settings. If you‟re setup for “Normal” bandwidth then your file must be 16-bit,
8kHz, PCM (uncompressed), if you‟re in “Low” bandwidth mode then your file must be 8-bit,
8kHz uLaw (compressed). Next, create a Nickname in the space provided, then click on the
Add Nickname button. Your saved messages will be shown in the lower list view window. To
remove a message from the list, select the message and then click on the Remove Nickname
button.
Enables the user to browse for a file in
the Paging Message pop-up window
Type nickname here
List of saved messages
Pg. 9
8.4 Ignore List
o Under the Ignore List tab you will have the option to block specific devices from being
recognized at this PC. To view the list of devices available on the network, check the Enable
Ignore Feature check box. This will display the Connected Devices list. From the list, check
the devices you want to ignore. Devices that are ignored will display a green check mark.
Clicking on the Refresh button will update the list with the latest devices available.
Click check box to enable feature
Click check box to ignore specific devices
Updates connected devices list
8.5 Passwords
o The Passwords tab allows you to create a password to gain access to the Software
Configuration window. You are limited to 16 alpha-numeric characters. Be sure to write it down
or use a password that can be recalled. When configured, you will be prompted with a
Password Required pop up when accessing the software configuration window.
Type password here
Pg. 10
8.6 Scheduling
o The Scheduling tab allows the user to set specific times during the day/week to put the program
in and out of unavailable mode. Select the day of the week and then set the starting time and
ending time. To save, click on the Add current entry button. Use the drop downs to change
the hour (24 hr.), minutes, and seconds for the start/stop time. Each day must be set
independently.
Start time
Stop time
Selected day‟s schedule
8.7 Archival Settings
o The Archival Settings tab allows you to enable or disable the audio archiving and data-log
archiving features. Click on the Audio Archive Enable check box to enable this feature. From
the Select audio archive folder… button you can create your own folder or use the default
folder. Windows Vista users are encouraged to create a specific folder for the archived audio.
When audio archiving is enabled, the system will record both sides of any conversation. This
also includes group paging and all call announcements.
o To enable the event log data, click on the Event Log Archive Enable check box. When event
log archiving is enabled, all activity on the system will be recorded to the archive folder.
Pg. 11
8.7 Archival Settings cont.
o To listen to the archived recordings, click on the Open Archive Manager… button. From there
you will be able to open the individual recording and play it by first selecting the recording and
then clicking on the play button in the Archive Manager window. Once you have listened to the
recording, you have the option of deleting the file by clicking on the Delete selected button.
Station ID# (00 = page / all call)
Hours, minutes, seconds when recording started
Millisecond recording started (to keep file unique)
o To access the log data file, use Windows Explorer to navigate to the folder that you had selected
in the set up process. If using the default settings, the Logs folder will be a sub folder within the
Archive folder. The log is a text document and will list the date, time, and event that occurred in
the program.
Pg. 12
8.8 Audio Settings
o The Audio Settings tab will display and allow you to choose the Input Device and Output
Device for the speaker and microphone.
o The Quality level drop down box allows you to choose between Normal bandwidth mode and
Low bandwidth mode. By default, the system will be in Normal mode. This setting must match
the bandwidth setting you have for the devices, otherwise an error status will occur.
o Any changes made to the Input Device, Output Device, or Quality Level will require a restart
of the software.
o Both input and output volume levels can be adjusted. The Input Level adjusts the volume being
transmitted to the sub station, while the Output Level adjusts the volume that is heard at the
PC.
8.9 Information
o The information tab will show the version number of the CommuniCenter software.
Pg. 13
9. Priority level (highest to lowest)
o
o
o
o
o
o
All Call
Group Call
Broadcast Messages
Direct Messages
Direct Communication
Monitoring
(1 - highest)
(1 - highest)
(1 - highest)
(2 - middle)
(2 - middle)
(3 - lowest)
All call, group call, and broadcast messages have the highest priority level. If a PC is in direct
communication with a sub or is monitoring a sub when a high priority call is placed, the
communication will be interrupted and the sub will receive the call. The unit will revert back to its
previous communication state once the priority call is completed.
10. Operations
10.1 Sub station calling in
o Pressing the call button on the substation will trigger a call tone to be heard at the substation.
Pressing the call button additional times will cause the tone to repeat.
o When the call button on a substation is pressed the CommuniCenter will either display a pop up
visual notification, emit a predetermined sound or both, depending on how it was configured.
o During call in, the Call Waiting List will display the unit calling in, showing status of unit and
time that the call was received.
o During call in, the Sub Station Location List will change the device State from “Available” to
“Calling”.
10.2 Answering a call from a sub station
o To remove the pop up notification, simply click “OK” on the pop-up or press the space bar on
your keyboard. If you receive multiple calls at the same time, you will receive only one pop-up.
Any calls after the pop-up was removed will generate a new pop-up notification.
Pg. 14
o
Answer the calling station by selecting the station and double clicking in either the Sub Station
Location List, or in the Call Waiting List. You can also select the station and then click on
the “Talk” button or press the space bar on your keyboard. Click the OFF button or press Esc
to end the conversation.
o A second method of answering the calling station is to simply press on your space bar or click
on the “Talk” button. Pressing the space bar can always be used instead of clicking on the
“Talk” button. Click the OFF button or press Esc to end the conversation.
10.3 Monitoring the sub station.
o Monitoring a sub station is the lowest priority of communication. Only one CommuniCenter can
monitor a sub station at any given time. If more than one CommuniCenter selects the same
station, it will be the CommuniCenter that has selected last that will be able to monitor. When
monitoring a sub station, no pretone will be heard at that sub station, regardless of configuration.
In addition, the sub station will not change state in the Sub Station List.
o To monitor a sub station select the station by either double-clicking on the unit in the Sub
Station Location List or use the Arrow Buttons to select the station, then click the Monitor
Button. The Monitor Button will turn green indicating that you are monitoring the selected
substation. To stop monitoring, click on the Off Button or select another station.
+
10.4 Talking to a sub station when it has not called in.
o To talk with a sub station, first select the station. This can be done by using the Arrow Buttons,
or by clicking on the sub station in the Sub Station Location List. Then click on the Talk
Button or use the space bar on your keyboard.
o Another method is to monitor (double click on) the sub station in the Sub Station Location List
then click on the Talk Button, or use the space bar on your keyboard.
+
o When talking to a sub station, you must either press the space bar on your keyboard or have the
Talk Button engaged for as long as you are talking (PTT).
Pg. 15
o Unlike monitor mode, when a sub station is selected for two way communication, the status
shown in the Sub Station Location List will change from available to connected.
o To terminate communication, click on the Off Button or select another station. You can also
terminate the call by pressing the Esc key on your keyboard.
10.5 Activating the dry contacts on the IPW-1A.
o To activate the door release on the IPW-1A that you have selected, click on the Door Release
Button. This will allow you to activate the “Form C” dry contact on the IPW-1A associated with
the sub station. Note: If the IPW-1A is not configured for Door Release, an error pop-up will
occur.
10.6 All Call / Group Paging – Limited to 1 PC at a time on the network.
10.6.1 All Call – Calls to stations that are on the Sub Station Location List.
o To make an all call announcement to all sub stations in your list, click on the All Call Button and
make your announcement after the pre-tone. Stations that are in communication with another
CommuniCenter user will hear the announcement and when the announcement is over, will
resume normal communication. During the announcement the Sub Station Location List will
show that the sub stations are in use. Units on the ignore list will not receive all call
announcements.
10.6.2 Group Paging
o To make a group paging announcement to preselected groups, open the Paging Group List.
You can open the Paging Group List by clicking on the Groups Button. Group calling to an
ignored station is possible if you set the sub as part of a group before you ignore it.
Pg. 16
o From the Paging Group List, select the group or groups that you want to page by clicking the
check box next to the desired group.
o Once a group is selected, click on the Group Call button or press the space bar and make your
announcement following the pre-tone. The announcement will be heard at all sub stations within
the selected group(s).
o To make a group paging announcement to manually selected groups, open the Sub Station
Location List. You can open the Sub Station List by clicking on the Location Button.
o From the Sub Station Location List, select the sub stations that you want to page by clicking
the check box next to the desired station.
o Once a group of stations is selected, click on the Group Call button or press the space bar to
make your announcement following the pre-tone. The announcement will be heard at all the
selected sub stations.
Note: Manual group selection can be cleared by pressing the Esc key.
Pg. 17
10.7 Messages
o To send a message to one sub station, select the desired sub station and click on the Messages
Button. You will have the option of selecting a predefined message from the Predefined
Messages pop-up window or browsing your files for a message (if allowed). Select the
message then click on the Send Button. Your message will be heard at the selected station.
o To send a message to a group of sub stations, select either a group of units from the Sub
Station Location List or a predetermined group from the Paging Group List, then click on the
Messages Button. You will have the option of selecting a predefined message from the
Predefined Messages pop-up window or browsing your files for a message (if allowed). Select
the message then click on the Send Button. Following the pre-tone, your message will be
heard at the selected group(s) of stations.
Pg. 18
11. Icon Descriptions
Under Type are icons that indicate what each item is:
Blue square is for a Broadcast Mode intercom
Red circle is for another PC running CommuniCenter
Blue circle with symbol is for Direct Mode intercoms
Note: See page 23 A.2 for Direct Mode configuration.
Under S.I. are icons showing the status of
each Sensor Input:
Sensor Input normal
Sensor Input closure detected
12. Hardware Configuration
12.1 Accessing the hardware configuration from within CommuniCenter
o Right click the desired sub station in the Sub Station Location List. This will give you the
option to reset the IPW-1A, or access the settings via the program or through the browser.
o To reset the unit, click on Reset or press the R key. This will cause the sub station to
temporarily disappear from the Sub Station Location List. At the sub station, you will hear the
unit‟s IP address. Note: if the device is „In Use‟, the reset command will be ignored. Once reset,
the unit will once again appear in the Sub Station Location List.
o To access the settings via the program, click on Settings or press the S key. This will open the
Hardware Configuration Window and allow you to configure the IPW-1A.
o To access the settings via the web browser, click on Launch in browser or type the L key. This
will allow you to access the settings for the IPW-1A via the browser. You will also be able to
assign a password for the adaptor in the browser setting mode.
Pg. 19
12.2 Adaptor Configuration via the program
Expand the General section to see the
MAC address for the IPW-1A adaptor.
You will also be able to assign the ID
number and Location Name for each
adaptor here. Show offline determines
whether the IPW-1A should remain in the
CommuniCenter intercom list, even if it
becomes disconnected or unreachable.
Expand the Network section to set the
network settings for each IPW-1A. You
can enable or disable different IP address
grabbing protocols, change the UDP port
the system uses, and enable SonicIP
which announces the IP address upon
“power on”.
Expand the Audio section to adjust the
quality (bandwidth settings) of the audio
as well as the speaker volume and
microphone gain, and to enable or disable
the pre-tone at the substation.
Expand the Relay Control section to set
the functionality of the relay and the
release duration of the relay. The release
duration will only be selectable if the relay
functionality is set to „Door Release‟.
The relay function of the IPW-1A can also
be configured to release on talking,
release on connected, or release on
calling. Configuring the relay for any of
these functions will disable the “key” (door
release) option from the software for that
particular adaptor.
Expand the Factory Defaults section if
the need arises to reset the IPW-1A
adaptor to factory default settings.
Pg. 20
12.3 Adaptor Configuration via the browser
o
The adaptor settings can also be configured using a web browser. Open the browser and enter the IP address of
the adaptor, or right-click launch in browser from within CommuniCenter. Enter the password (if set) and leave the
User Name blank. In addition to the settings accessible from the CommuniCenter program, the web browser has
expanded options under Network and Security.
Note: If the ID# is left unconfigured, Group Call
and All Call will not function properly.
General Settings
o ID#: Sets the unique ID for the identification of the IPW-1A for the purpose of Group Call and All Call (1 to 2048;
default = "0").
o Location Name: Sets the descriptive name for the IPW-1A. A name should be chosen which is both unique and
applicable to the installed location / application.
o Show Offline: Determines whether the IPW-1A should remain in the CommuniCenter intercom list, even if it
becomes disconnected or unreachable.
Note: A gateway setting is only necessary when
connecting directly to a PC master station
outside of the LAN (utilizing direct-mode; see
Appendix A)
Note: See Page 23 A.2 for configuration
instructions for Direct Master Connection.
Network (Interface) Settings
o IP Address: Used to configure the IP address settings for the IPW-1A. For automatic IP assignment, the following
settings are utilized:
IP Discovery Enabled: (0.0.0.0) -- Factory Default; all protocols enabled.
Disable AutoIP: (0.0.1.0)
Disable BOOTP: (0.0.2.0)
Disable DHCP: (0.0.4.0)
Disable IPZator: (0.0.8.0)
Note: These settings can be used together as a binary bitmask to enable / disable any specific combination of
discovery protocols.
o Subnet mask: Used to assign a Subnet mask when a Static IP is assigned (default = "0.0.0.0", when automatic IP
discovery is used).
o Gateway: Sets the default Gateway IP address when a Static IP is assigned (default = "0.0.0.0", when automatic IP
discovery is used).
o UDP Protocol Port: Assigns the UDP port to be utilized for communication with the PC master station
(default = "1724").
o Enable SonicIP: If set to "Yes", the IPW-1A will verbally announce its IP address over the attached substation
whenever initialized (default = Yes).
Pg. 21
12.3 Adaptor Configuration via the browser (continued)
Note: The Audio Quality setting must match the
Audio Quality setting of every Master which will
communicate with the IPW-1A, otherwise Audio
will not work properly.
Note: The pretone setting has no effect on
Group-Call or All-Call type communication (which
are always preceded by an audible pretone).
Audio Settings
o Audio Quality: Sets the audio quality level for the IPW-1A to either 'Normal' (default) or 'Low Bandwidth'.
o Speaker Level: Sets the IPW-1A's output level, on a scale of 0 to 20 (default = "10"). If the output level at the substation is
too low (or high), increase (or decrease) this setting accordingly.
o Mic Sensitivity: Determines the sensitivity of the IPW-1A's substation input, on a scale of 1 to 16 (default = "7"). If the
microphone sensitivity is too low (or high), increase (or decrease) this setting accordingly..
o Pretone: Determines whether an audible pretone will precede two-way communication with the substation (default = "Off").
Note: The master station 'Key' button will only
be functional if 'Door Release' is selected.
Note: The Door Release Duration field is only
visible if the Relay Function is configured for ‘Door
Release’.
Relay Settings
o Relay Function: Determines the function of the IPW-1A relay output from the following setting options:
o Door Release: Relay will be triggered for the programmed duration by the Master station pressing the 'Key' button (Factory
Default).
o Release on Incoming Audio: When audio is being directly transmitted to the IPW-1A, the relay output will be active
(excludes Broadcast audio).
o Release on Connection: Relay output will be active during any direct audio connection from a Master station (excludes
Broadcast audio).
o Release on Calling: Relay output will be active from the moment the call button is pressed until the Master station
answers.
o Release Duration: Sets the duration for the door release function (1 to 600 sec.; default = "1 sec.").
Note: If Factory Defaults is 'Disabled' and the IPW1A becomes inoperable due to misconfiguration,
the only way to revert the device to Factory Default
settings will be via a direct physical connection to
the IPW-1A's RS-232 serial port.
Note: The Set Password field is only visible if a
password has not yet been assigned.
Security Settings
o Reset Function: Enables or disables the functionality of the IPW-1A's Reset button (Default = 'Enabled').
o Factory Defaults: Allows (or disallows) the IPW-1A to be reset to Factory Default settings (Default = 'Enabled').
o Update Function: Controls the ability to enter the Bootloader mode of the IPW-1A, for the purpose of updating the
firmware (Default = 'Enabled').
o Set Password: Assigns a password to prevent unauthorized access to the IPW-1A web interface, as well as
changing any settings of the IPW-1A from the Master interface (Default is NO PASSWORD).
o Old Password/New Password: When a password is already assigned, these fields are used to change the IPW-1A
password.
Note: The 'Old Password' field must match the currently assigned password for the 'New Password' to be applied.
These fields are not visible if a password has not yet been assigned.
Pg. 22
Appendix A. Understanding Broadcast Mode and Direct Mode Connection
A.1 Broadcast Mode (the default mode)
o
Broadcast Mode allows multiple master PC‟s running CommuniCenter and by default every master can
communicate to any substation. Broadcast Mode is named for its method of communication, UDP broadcasts. An
example single Local Area Network involving a switch and a DHCP server should not require any changes to the
default configuration of the IPW-1A adaptor. When the adaptor powers on it seeks an IP address and when it gets
one, it will begin broadcasting using UDP (default port 1724) to the entire broadcast domain.
o
A broadcast domain is typically every device sharing a common hub or switch but nothing beyond a router or
gateway. If the network involves a Wide Area Network (more than 1 router) one option is to use a bridged Virtual
Private Network so that broadcasts are repeated between networks. IT professionals may be able to provide
additional methods.
A.2 Direct Mode
o
Configuring the IPW-1A in Direct Mode allows the system to function when traversing multiple networks. Direct
Mode allows an intercom to communicate over a WAN or over networks not bridged without additional VPN
equipment. When working in Direct Mode, the intercom will only be able to work with a single designated PC. Over
a WAN, you must set each router to allow UDP traffic on (default) port 1724, and then forward traffic to the
appropriate destination PC running CommuniCenter.
o
Other CommuniCenter PC‟s in the either LAN will not communicate with any intercoms set up in direct mode. If
multiple PC‟s are required to communicate with a intercom over a WAN, then you will need to set up a VPN or other
bridged connection between the networks and use the default Broadcast Mode.
A.3 What does the network administrator need to know?
o
For Broadcast Mode: The adaptors and the computers running CommuniCenter must be in the same broadcast
domain. Use this mode for full functionality, including multiple master PC’s.
o
For Direct Mode: The gateways and firewalls connecting the adaptor(s) and the computer running CommuniCenter
must have a port open (UDP 1724 by default) and if necessary, forwarding rules in place. Use this mode if
extending the broadcast domain is not an option.
o
Transport Bandwidth:
≈128Kbps per active session (normal mode)
≈64Kbps per active session (low bandwidth mode)
A.4 What functions are available in each mode?
Feature
o Multiple PC‟s
o Call in
o Monitor
o Talk
o Relay
o
o
o
All Call
Group Call
Messages
Description
Multiple master PC‟s communicating to each substation
Call in from the substation or to the substation
Listen to the substation
Speak (and listen) to the substation
Relay functions, door release or release on
calling, connecting or incoming audio
Speak one-way to all substations at the same time
Speak one-way to selected substations
Play .wav file to selected substations
Broadcast
Yes
Yes
Yes
Yes
Direct
No, single master only
Yes
Yes
Yes
Yes
Yes
Yes
Yes
Yes
No
No
One station at a time
Pg. 23
B.1 Bandwidth settings
o
o
The adaptor can report an Error state in the event that an intercom and the software have mismatched Bandwidth
settings. Check the settings for the adaptor and the CommuniCenter program and make sure they match. See the
picture below.
Some routers and gateways are configured for what is commonly called „Broadcast storm protection‟ which has a
limit for bandwidth of a broadcast from any source. The primary benefit of such a feature is to prevent a Denial of
Service attack on the network. Once the limit is exceeded, the router will stop the broadcast. This might occur
during an All Call or Group Call event. If you suspect a limit is shutting down the All Call or Group Call, set the
bandwidth for the IPW-1A and the CommuniCenter software to the Low setting and verify that each IPW-1A has its
own unique ID # and try All Call or Group Call again. If the broadcast is still getting blocked, find out what is
blocking it using a packet analyzer tool.
Aiphone Communication Systems
1700 130th Ave. N.E.
Bellevue, WA 98005
(425) 455-0510
FAX (425) 455-0071
TOLL FREE TECHNICAL SUPPORT: (800) 692-0200
E-MAIL: [email protected]
Pg. 24
CommuniCenter
0211Tech